Embed Size (px)
Citation preview

Chapter 9: Diving into Design with PublisherTemplates
Walkthrough ExtrasEasy Web Design, Chapter 9, pages 254-291
Easy Web Design’s Chapter 9 walkthrough shows you how to create a Web site
using Microsoft Publisher's design templates and Web tools.
In these online walkthrough extras, you can:
• Delete objects
• Add and import text
• Use Wizards to format objects
• Format headings with WordArt
• Work with hyperlinks
If you've been working through the walkthrough in Chapter 9, you’ve already
created the site framework, added and customized a navigation bar, inserted
an image and clip art, modified AutoShapes, and replaced text in a couple
small text boxes. The time has come to pay attention to the main content area
of the Web site.
Please note that for these walkthrough extras, we provide the prepared text
for these steps because we believe you can hone your typing skills another time
(if necessary). If you prefer, you can type your own text into your Web site.

You can access each walkthrough extra using the links in this page's left
navigation area. Each extra presents the online steps and a print option so you
can follow along online or refer to a hard copy printout.
You can also print all Chapter 9 walkthrough extras in one document ( doc ::
pdf ).
Deleting ObjectsBefore deleting objects, you should clear your screen of any ruler guides. This
will make identifying objects easier.
To clear all ruler guides, make sure your Web site is open in Publisher and then
follow these steps:
1. Click Ruler Guides on the Arrange menu
2. Click Clear All Ruler Guides.
Next you might want to shrink the page view by using the Zoom drop-down list
on the Standard toolbar. We suggest that you reduce the page down to about
66 or 75 percent.
After you've prepared your view, you're ready to delete. To delete an object,
simply select it and use any standard delete action, such as pressing the
Backspace or Delete key, clicking the Cut button in the Standard toolbar, or
right-clicking and choosing Cut or Delete Object.

tip To select multiple objects at one time for deleting, press CTRL while
you click the objects to be deleted. When you execute the cut or delete
process, all selected objects will be removed.
For this walkthrough, you will delete items on each page so your pages will
appear as shown here.
Deleting template objects on the home page and subpages
First, delete the following objects on the home page (page 1):
• The horizontal rule line above the To Contact Us box
• All three text boxes associated with the To Contact Us area
• The short black vertical rule line to the right of the To Contact Us area
Next, on page 2, clear all the ruler guides and delete all the text boxes except
the calendar and the footer box.
Finally, on page 3, delete all objects in the main area of the page except the
Heading box, the large text box below the Heading box, the placeholder map,
and footer area.

Adding and Importing TextTyping and pasting text are basic skills that you’ve probably already mastered
to some degree, so we won’t cover those procedures here. Importing text
might not be a familiar task, so you can try that method here by adding some
home page text we’ve already prepared for you.
Importing text enables you to quickly add edited and formatted text to a Web
publication. In this section, you’ll import the text from the welcome.doc Word
document that you downloaded from the CreationGuide Web site at the
beginning of Chapter 9.
Here are the steps you should follow to import text into the large text box on
the your walkthrough Web site’s home page:
1. Display page 1 of your Web site if necessary.
2. Select and delete the placeholder text in the large text box on the
home page.
3. Click Text File on the Insert menu.
4. In the Insert Text dialog box, display the contents of the C:\koury
folder, as shown in the following figure.

Importing text from a text file
5. Double-click the welcome.doc file.
The text fills the text box, and then a message box indicates that the
text box is not large enough to contain the text. The message box asks
if you want Publisher to automatically flow your text onto the next
page. You’re going to resize the text box in the , so you don’t need
Publisher to flow the text for you.
6. Click No in the message box, and then save your changes.
Resizing ObjectsResizing objects in Publisher is a simple task of selecting the object you want
to change and then dragging a horizontal, vertical, or corner selection handle.

Dragging a corner selection handle enables you to resize an object both
vertically and horizontally at the same time.
To practice resizing a text box, you’ll resize the text box you filled in the
previous section (Adding and Importing Text) because it contains text in
overflow. You can tell when a text box contains text in overflow because the
Text in Overflow visual aid appears when you select the text box.
To resize the text box, follow these steps:
1. Select the text box on the home page that contains the text you
inserted in the preceding section.
2. Click and drag the middle selection handle on the bottom edge of the
text box down until all the text is viewable (around 850 px).
Adding a Text Box and Inserting Copyright InformationYou might have noticed that Publisher's Web site template doesn’t include any
copyright information. To add a copyright, you add a text box and enter your
information. In this section, you’ll use ruler guides to help you resize the
bottom-of-page navigation bar text box and insert a new text box to hold the
copyright information below the bottom-of-the-page links:
1. Display page 1 of your walkthrough Web site.

2. Position the following ruler guides by dragging ruler guides from the
rulers or configuring the Ruler Guides dialog box as follows:
• Horizontal: 980 px, 988 px, 1016 px
• Vertical: 192 px, 748 px
3. Scroll to the bottom of the home page, select the text box containing
the text navigation buttons, and drag the bottom edge of the text box
to the 980 px ruler guide.
4. To create a new text box, click Text Box on the Insert menu, and then
drag in the document to create a text box below the navigation bar.
After you draw the text box, use the selection handles to resize the new
text box to fill the area between the 988 px and 1016 px horizontal
ruler guides and the 192 px and 748 px vertical ruler guides.
5. With the new text box selected, click Symbol on the Insert menu, click
the copyright symbol in the Symbol dialog box, click Insert, and then
click Close.
6. Press SPACEBAR, type copyright text similar to 2006 Bughouse
Productions. All Rights Reserved., and then click the Center alignment
button on the Formatting toolbar. Your copyright text should look
similar to the copyright text shown in following figure.
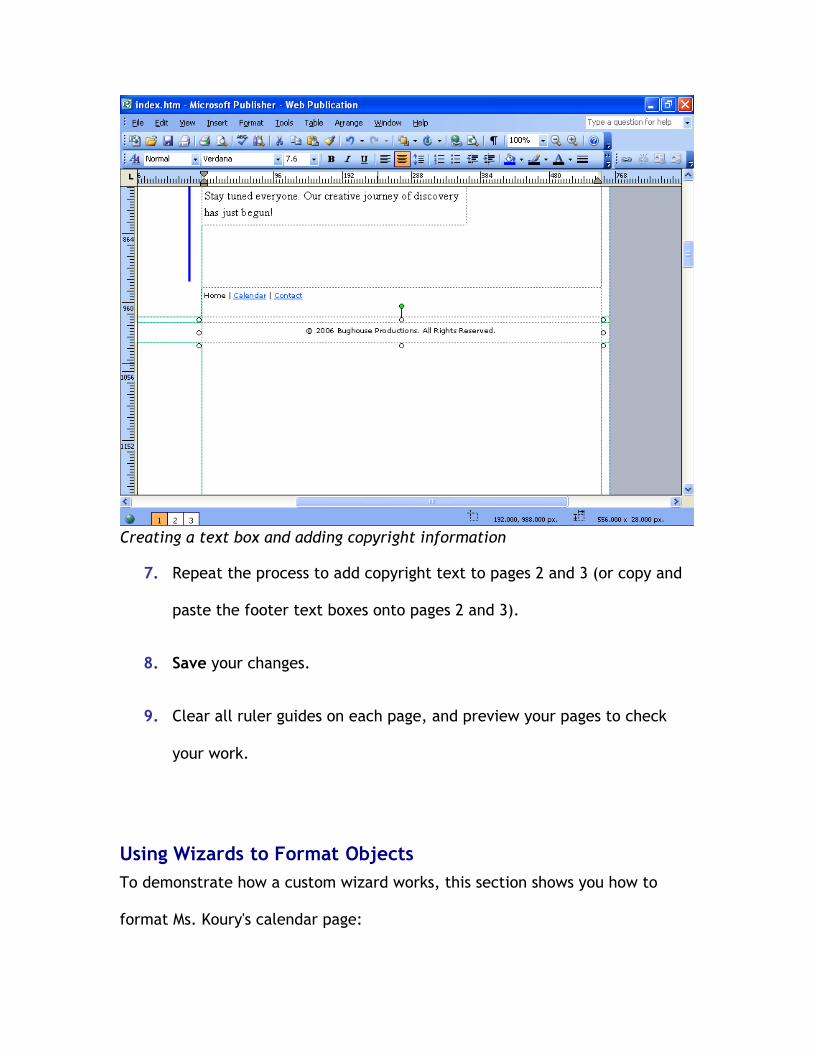
Creating a text box and adding copyright information
7. Repeat the process to add copyright text to pages 2 and 3 (or copy and
paste the footer text boxes onto pages 2 and 3).
8. Save your changes.
9. Clear all ruler guides on each page, and preview your pages to check
your work.
Using Wizards to Format ObjectsTo demonstrate how a custom wizard works, this section shows you how to
format Ms. Koury's calendar page:
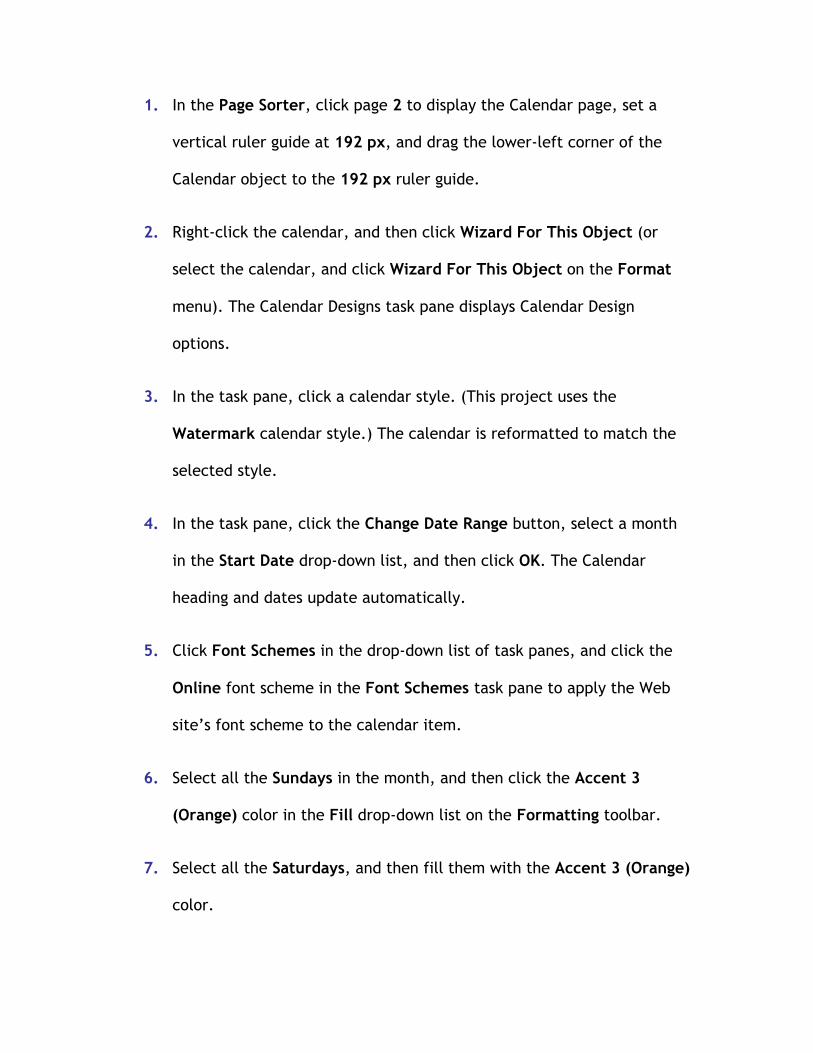
1. In the Page Sorter, click page 2 to display the Calendar page, set a
vertical ruler guide at 192 px, and drag the lower-left corner of the
Calendar object to the 192 px ruler guide.
2. Right-click the calendar, and then click Wizard For This Object (or
select the calendar, and click Wizard For This Object on the Format
menu). The Calendar Designs task pane displays Calendar Design
options.
3. In the task pane, click a calendar style. (This project uses the
Watermark calendar style.) The calendar is reformatted to match the
selected style.
4. In the task pane, click the Change Date Range button, select a month
in the Start Date drop-down list, and then click OK. The Calendar
heading and dates update automatically.
5. Click Font Schemes in the drop-down list of task panes, and click the
Online font scheme in the Font Schemes task pane to apply the Web
site’s font scheme to the calendar item.
6. Select all the Sundays in the month, and then click the Accent 3
(Orange) color in the Fill drop-down list on the Formatting toolbar.
7. Select all the Saturdays, and then fill them with the Accent 3 (Orange)
color.

8. Select two consecutive weekdays of your choice (the 24th and 25th are
selected in the walkthrough sample site), and then fill them with the
Accent 2 (Gold) color.
9. Click any weekday (the 8th is selected in the walkthrough sample site),
click the Font Size drop-down arrow on the Formatting toolbar, and
select 8.
10. Hold down SHIFT and press ENTER, and then type Project Due.
11. Using 8-point text, add No School! to the gold-colored calendar dates.
12. Save your changes. Your calendar should look similar to the calendar
shown in the figure.

Formatting an object by using a wizard
Formatting Page Headings by Using WordArtIn this section, we show you how to use WordArt so you know you have the
capability to create stylized text when you need it. In this walkthrough extra,
you’ll replace the three page headings in Ms. Koury's Web site with WordArt, as
described here:
1. Display the home page of your walkthrough Web site in Publisher.
2. Delete the blue Home text, and add a 192 px horizontal ruler guide.

3. On pages 2 and 3, delete the Calendar and Contact text, and add a 180
px horizontal ruler guide. You’ll use the ruler guides as the baseline for
your WordArt text.
4. Click page 1 in the Page Sorter to return to the home page.
5. Click Picture on the Insert menu, and then click WordArt.
6. In the WordArt Gallery, click the second style in the second row, as
shown in the figure, and then click OK.
Selecting a WordArt style
7. In the Edit WordArt Text dialog box, type Home, select Verdana in the
Font list, select 32 in the Size list, click the Bold button, and then click
OK.
The WordArt object appears as a selected object on the page, and the
WordArt toolbar is visible.
8. Click the Format WordArt button on the WordArt toolbar.
9. In the Fill section, change the color to Accent 1 (Blue), and then click
OK.
10. Position the WordArt text in the top-left corner of the text box, as
shown in the following figure.

Positioning a WordArt object
tip To nudge, or move, selected objects small increments at a time, hold
down ALT and press the arrow keys.
11. Create WordArt text for the Calendar and Contact pages, but format the
text to have a size of 24 instead of 32 and align the headings on the
192 px horizontal ruler guide.
12. Save your work.

Linking to a Page in Your SiteFor this procedure and the following two hyperlink procedures, you’ll link text
that has been added in a gray sidebar. Therefore, in this first procedure, you’ll
create the gray sidebar:
1. Display the home page of your walkthrough Web site.
2. Click Text Box on the Insert menu, and then draw a small box below
the caption you formatted for the discovery clip art (Easy Web Design,
Chapter 9, page xxx). Don’t worry about the size or placement of the
text box—you’ll configure those settings using the Format Text Box
dialog box in the upcoming steps.
3. Click Text Box on the Format menu.
4. In the Fill section on the Colors And Lines tab, click the Color down
arrow, and then click Accent 4 (which is the gray color in the color
scheme row on the color palette).
5. On the Size tab, locate the Size And Rotate section, type 256 in the
Height box, and then type 164 in the Width box. Leave the scale
settings at 100%.
6. On the Layout tab, set the Horizontal position to 576 From: Top Left
Corner and the Vertical position to 496 From: Top Left Corner.

7. On the Text Box tab, type 15 in the Left, Right, Top, and Bottom
boxes. You should now have a gray box on your home page below the
clip art item, as shown in the figure.
Creating a shaded sidebar box
8. Click in the gray box, type The latest newsletter was sent home. Did
you get it?, and then press ENTER.
9. Type This month’s calendar has been updated. See our upcoming
events and deadlines., and then press ENTER.
10. Type Have a question? Send me a message. I am always happy to hear
from you., and then press ENTER.
You are now ready to add links to your sidebar text. First you’ll link the word
calendar in the second paragraph to the Calendar page in Ms. Koury’s site:
11. Double-click the word calendar in the second paragraph, and then click
Hyperlink on the Insert menu (or press Ctrl+K).
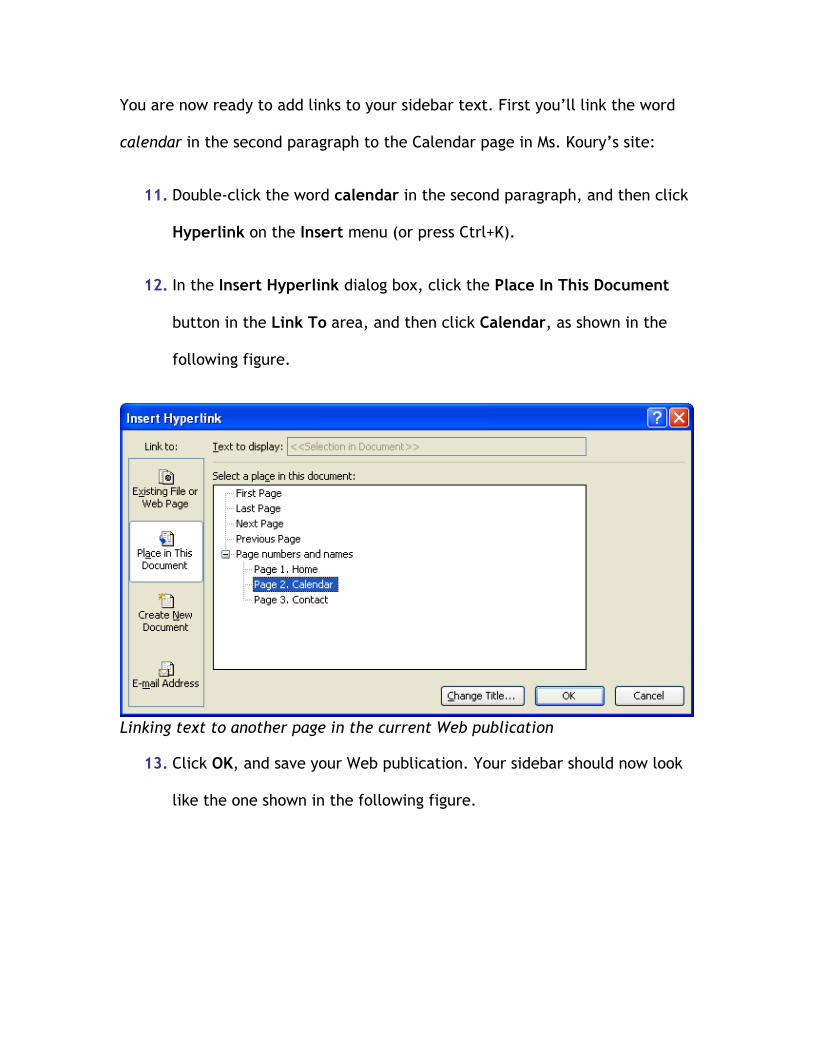
12. In the Insert Hyperlink dialog box, click the Place In This Document
button in the Link To area, and then click Calendar, as shown in the
following figure.
Linking text to another page in the current Web publication
13. Click OK, and save your Web publication. Your sidebar should now look
like the one shown in the following figure.

Viewing a hyperlink in the shaded sidebar
Linking to an Outside Page That Opens in a New WindowBy default, hyperlinks you create in Publisher open the linked page in the same
browser window. If you link to an outside resource, such as the newsletter Ms.
Koury wants to make available to visitors, you might want to have that
resource open in a new browser window. To do this in Publisher, you need to
insert an HTML code fragment. You’ll see what we mean in a moment.
For this procedure, we created a “fake” newsletter from a Publisher print
document by saving it as an .htm file located at
http://www.creationguide.com/koury/newsletter.htm. We didn’t add any
content to the Publisher newsletter template for this exercise, because
newsletter development isn’t the focus of this walkthrough. But we’re all for

helping out whenever we can, so we are pleased to be able to provide you with
a top 10+1 list from a design professional regarding how you can create great
newsletters.
To link to the newsletter and open it in a new window, follow these steps:
1. In the gray sidebar box, click after the word latest, press ENTER, and
then delete the word newsletter. In this procedure, you will place an
HTML code fragment after the word latest that displays the word
newsletter for you.
2. On the Insert menu, click HTML Code Fragment, and then enter the
code shown in the following figure. The red text indicates text that you
would modify if your Web site has a different font family or font size. It
also shows where the address for the linked page should be inserted as
well as the text that should be included on your page.

Creating an HTML code fragment to open a link in a new window
3. Click OK.
4. Your page should now include a transparent box containing the code
fragment. Resize the box to approximately the size of the word
newsletter, and then position the box in the gray sidebar as shown in
the next figure.

Viewing an HTML code fragment box in place
5. To see if your inserted text is positioned correctly, you must view the
page in Web Page Preview mode.
tip You might have to go back and forth between Publisher and Web Page
Preview before you align the linked text to your satisfaction. Remember to
use the nudge technique (hold down ALT and press the arrow keys) to make
small adjustments.
6. After you’re satisfied with the position of your link and you’ve tested
the link to ensure that it works properly, save your changes. The
following figure shows how the newsletter link created by the HTML
code fragment appears in Web Page Preview, with the hyperlink clicked
to open the online newsletter.
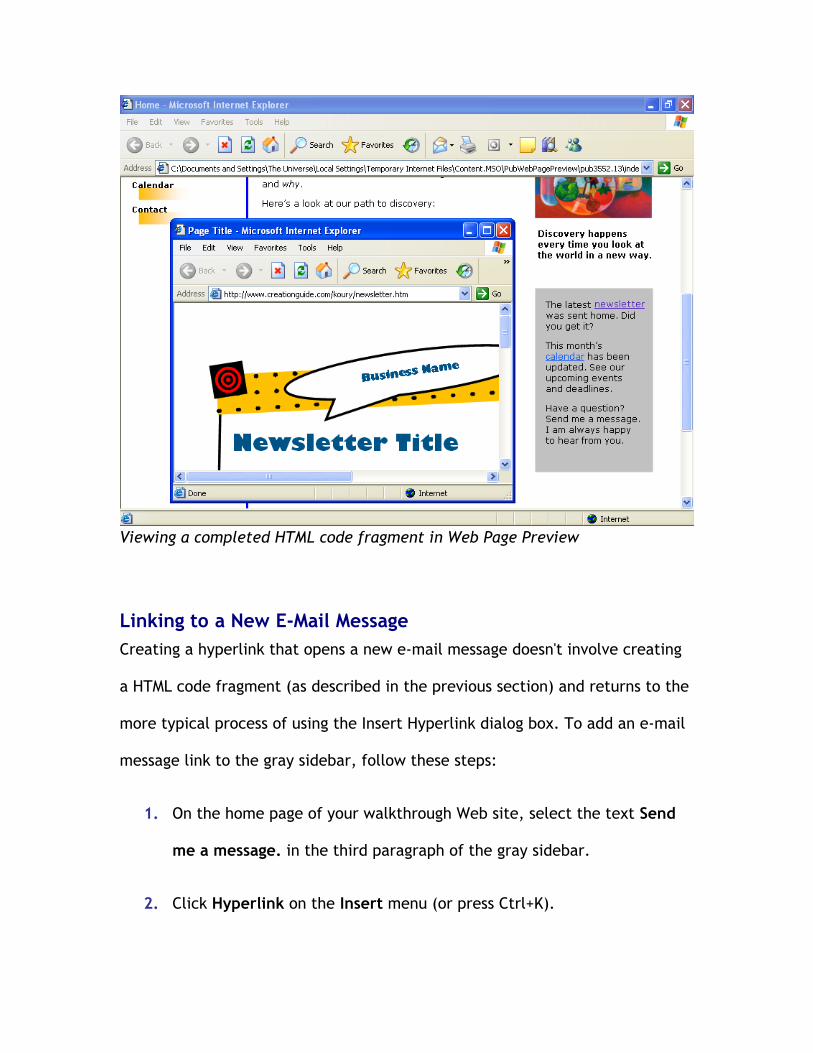
Viewing a completed HTML code fragment in Web Page Preview
Linking to a New E-Mail MessageCreating a hyperlink that opens a new e-mail message doesn't involve creating
a HTML code fragment (as described in the previous section) and returns to the
more typical process of using the Insert Hyperlink dialog box. To add an e-mail
message link to the gray sidebar, follow these steps:
1. On the home page of your walkthrough Web site, select the text Send
me a message. in the third paragraph of the gray sidebar.
2. Click Hyperlink on the Insert menu (or press Ctrl+K).

3. Click the E-mail Address button in the Link To list.
4. Enter your e-mail address in the E-mail Address box. Publisher
automatically adds mailto: in front of your e-mail address, as shown in
this figure.
Configuring an e-mail hyperlink
5. Click OK, and then save your Web publication.
Nice work! Now, return to Easy Web Design to wrap up the walkthrough.


![K o /Wµ o] Z íî ZíW &µv u v o - Koenig Solutions€¦ · BI Publisher Functional Components 3 -4 BI Publisher Layout Templates 3 -6 BI Publisher Multitier Architecture 3 -7 BI](https://img.pdfslide.net/doc/110x75/5e984cc82543f217e5267172/k-o-w-o-z-zw-v-u-v-o-koenig-solutions-bi-publisher-functional.jpg)