Embed Size (px)
Citation preview

Microsoft Official Training Materials for Microsoft Dynamics ™ Your use of this content is subject to your current services agreement
Chapter 9: Profiling Classification
CHAPTER 9: PROFILING AND CLASSIFICATION This chapter contains the following sections:
• Introduction to Profiling and Classification • Profile Questionnaires • Contact Rating • Entering Contact Profiles • Creating Segments Using Profile Information • Updating Profile Questionnaires • Testing and Printing Questionnaires • Exercises
Page 249

Microsoft Official Training Materials for Microsoft Dynamics ™ Your use of this content is subject to your current services agreement
Microsoft Navision Relationship Mangement
Introduction to Profiling and Classification In the Sales & Marketing application area, you can create questionnaires that provide profiles of your contacts. These profiles are visible on the lines of the contact card, giving you a quick overview of information about the contact. You can set up questions on a questionnaire to be answered automatically by the program, using information from Sales & Marketing or other application areas. You can also use the questionnaires and questions as filters to select contacts for segments.
Profile Questionnaires You create your profile questionnaires to provide precisely the information you want to view on the contact card. You can create as many different questionnaires as you like, and then select the questionnaire you want to apply to each contact.
Automatic Classification of Contacts You can have the program automatically classify your contacts according to customer, vendor, and contact information by setting up automatically answered profile questions in the Profile Questionnaires Setup window. After you have set up automatically answered profile questions, if you assign the profile questionnaire containing these questions to a contact, the program will automatically fill in the answers for the contact. Only contacts that are recorded as customers can be assigned a classification based on customer data, and only contacts that are recorded as vendors can be assigned a classification based on vendor data. You can also have the program turn out a classification of your contacts based on a rating system. You simply assign different values (points) to different answers in a profile questionnaire. The program then sums up the points to group your contacts in various categories (for example in ABC customers, High/Low loyalty vendors, Platinum/Gold/Silver prospects, and so on).
Reports You can print test reports and questionnaire handouts. Both reports print the questionnaire questions and answers, but the handout is designed to be viewed by your contacts. You can set filters to determine the information and the questionnaires printed on the reports.
Page 250

Microsoft Official Training Materials for Microsoft Dynamics ™ Your use of this content is subject to your current services agreement
Chapter 9: Profiling Classification
Profile Questionnaires
Setting Up Profile Questionnaires You set up profile questionnaires to include the information you want to enter on your contacts' profiles. Within each questionnaire, you can set up the different questions you intend to ask your contacts. You can also decide to have the program automatically answer some of the questions based on contact, customer, or vendor data (see the following section, “Automatic Classification”). To set up a profile questionnaire, follow this procedure:
1. Click SALES & MARKETING→MARKETING→SETUP→PROFILE→ QUESTIONNAIRE SETUP. The Profile Questionnaire Setup window appears:
2. On the header, either fill in the Profile Questionnaire Code field, or click the AssistButton to the right of the field to see a list of the profile questionnaires and select a profile questionnaire from the list.
3. On the Profile Questionnaire lines, click the first empty line to enter the question.
4. In the Type field, select Question.
5. If more than one answer can apply to a contact, place a check mark in the Multiple Answers field.
Once you have filled in a line in the Profile Questionnaire Setup window with a question, you must then fill in one or more lines with answers to the question. These lines must be right below the line with the question. You fill in the answers in the order that you would want them to appear on a printed questionnaire.
6. In the line below the Question line, which is the Type field, select Answer.
7. A question will normally have at least two possible answers.
Page 251

Microsoft Official Training Materials for Microsoft Dynamics ™ Your use of this content is subject to your current services agreement
Microsoft Navision Relationship Mangement
8. In the Priority field, select the priority level you want to assign to the answer.
9. Repeat steps 4 to 6 to enter all the questions and answers within the profile questionnaire.
Moving Lines Up or Down If you discover that you need to move a line in your questionnaire to a different line, (for example, if you want the answers to a question to appear in a different order or to move a question and its answers to a different place in the questionnaire), you can do this with ease. Select the line to be moved, and click FUNCTION→MOVE UP or FUNCTION→MOVE DOWN. The line is then moved up to the line above or the line below.
Automatic Classification To have the program automatically answer the questions that you have set up in the Profile Questionnaire, follow this procedure:
1. In the Profile Questionnaire Setup window, select the question that you want to be automatically answered, and then click LINE→ QUESTION DETAILS. The Profile Question Details window appears. The fields on the General tab are filled in for you, based on the information you entered in the Profile Questionnaire Setup window, but you can change them if necessary.
3. On the Classification tab, place a check mark in the Auto Contact Classification field.
4. In the Customer Class. Field, Vendor Class. Field, or Contact Class. Field, select the criteria you want the program to use to classify contacts. You can only fill in one of these fields.
Page 252

Microsoft Official Training Materials for Microsoft Dynamics ™ Your use of this content is subject to your current services agreement
Chapter 9: Profiling Classification
5. In the Starting Date and Ending Date fields, set up date formulas for the dates the program uses to start and stop classifying contacts.
6. In the Classification Method field, select the method the program will use to classify the contacts. See the following section, “Classification Method,” for information about the different options.
7. In the No. of Decimals field, enter the number of decimal places you will use when filling in the From Value and To Value fields (in the Profile Questionnaire Setup window) for answers to the question.
8. You only need to fill in the Sorting Method field if you selected Percentage of Value or Percentage of Contacts in the Classification Method field.
9. Close the Profile Question Details window.
10. In the Auto Contact Classification field of the Profile Questionnaire Setup window, fill in the From Value or To Value field appropriately.
Classification Method The Classification Method field determines the method the program will use to classify contacts. There are three options: Defined Value, Percentage of Value, and Percentage of Contacts. Select Defined Value if you want the automatic classification to be based on a defined value of sales, purchases, and so on. For example, you can define answer A to apply only to contacts where your profit is less than 30,000 LCY, answer B to apply to the contacts where your profit is between 30,000 and 149,999 LCY, and answer C to apply to the contacts where your profit is more than 150,000 LCY. Select Percentage of Value if you want the automatic classification to be based on a percentage of sales, purchases, and so on. If you select this option, you can define the way the program will sort the contacts in the Sorting Method field. For example, you can define answer A to apply to the contacts that make up the lowest 30% profit, answer B to the contacts that make up the next 50 %, and answer C to the contacts that account for the top 20% of your profits. Select Percentage of Contacts if you want the automatic classification to be based on a percentage of contacts. For example, you can define answer A to apply to the 20% of your contacts that you have profited most from, answer B to the next 50 %, and answer C to the last 30%.
Page 253

Microsoft Official Training Materials for Microsoft Dynamics ™ Your use of this content is subject to your current services agreement
Microsoft Navision Relationship Mangement
Example: Using Automatic Classification You want to classify your contacts according to average invoice size: Answer Applies to
A Contacts that have an average invoice size over 50,000 LCY
B Contacts that have an average invoice size between 10,000 and 49, 999 LCY
C Contacts that have an average invoice size less than 9,999 LCY To do this, fill in the Profile Questionnaire Setup window like this:
Then fill in the Classification tab in the Profile Question Details window like this:
Page 254

Microsoft Official Training Materials for Microsoft Dynamics ™ Your use of this content is subject to your current services agreement
Chapter 9: Profiling Classification
Contact Rating You can create ratings for your contacts to be displayed on the contact card. You can use a number of existing questions and answers and combine them with new questions and answers to form the basis of your rating. Each answer in the rating is given a number of points and, depending on the range you set up for the categories (From Value and To Value), the rating system will group your contact in the categories you have defined. See, for example, High, Low, or A, B, and C. There are two methods for rating your contacts: You can either use the wizard by clicking SALES & MARKETING→MARKETING→SETUP→PROFILE→QUESTIONNAIRE SETUP, and then click FUNCTIONS→CREATE RATING menu item to open the wizard. Or you can set it up manually.
Creating Contact Ratings: To manually create ratings for your contacts, follow this procedure:
1. Click SALES & MARKETING→MARKETING→SETUP→ PROFILE→QUESTIONNAIRE SETUP.
2. Click the AssistButton in the Profile Questionnaire Code field to see a list of available profile questionnaires.
3. Either select an existing profile questionnaire, or enter a new profile questionnaire by filling in the relevant fields in the window.
4. In the Profile Questionnaire Setup window, click the AssistButton in the Type field, choose Question, and type your question in the Description field.
5. On the next empty line, click the AssistButton in the Type field, choose Answer, and type your answer in the Description field.
6. In the Priority field, click the AssistButton, and select the priority.
7. Insert values in the From Value and To Value fields. Contacts that receive points within the defined range will get the answer.
Page 255

Microsoft Official Training Materials for Microsoft Dynamics ™ Your use of this content is subject to your current services agreement
Microsoft Navision Relationship Mangement
Repeat steps 5 to 7 to enter more answers to be included in the rating question.
8. With the cursor on the question line, click the Line button, and select the Question Details menu item.
9. On the Classification tab in the Profile Question Details window, place a check mark in the Auto Contact Classification field.
10. Click the AssistButton to the right of the Contact Class. Field, and select the Rating option.
11. Fill in the Min. % Questions field (0 is default).
12. Click Answer Points, and enter the points you want to assign to each answer listed in the Answer Points window.
Page 256
Microsoft Official Training Materials for Microsoft Dynamics ™ Your use of this content is subject to your current services agreement
Chapter 9: Profiling Classification
If you want to get an overview of the points you have given each answer, click Points to open the Answer Points List window.
13. Return to the Profile Questionnaire Setup window, and click FUNCTIONS→UPDATE CLASSIFICATION to run an update.
You can now see the result of your rating on the lines in two places: In the Profile Questionnaire Setup window (No. of Contacts field) and on the Contact Card.
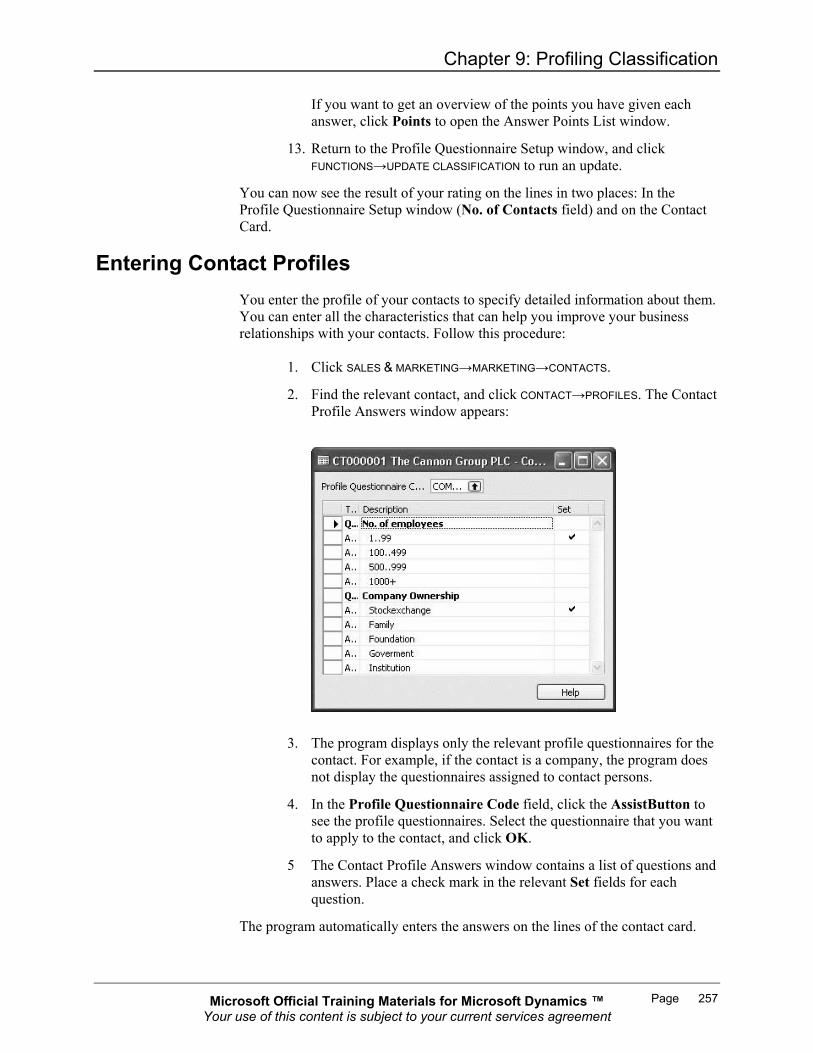
Entering Contact Profiles You enter the profile of your contacts to specify detailed information about them. You can enter all the characteristics that can help you improve your business relationships with your contacts. Follow this procedure:
1. Click SALES & MARKETING→MARKETING→CONTACTS.
2. Find the relevant contact, and click CONTACT→PROFILES. The Contact Profile Answers window appears:
3. The program displays only the relevant profile questionnaires for the contact. For example, if the contact is a company, the program does not display the questionnaires assigned to contact persons.
4. In the Profile Questionnaire Code field, click the AssistButton to see the profile questionnaires. Select the questionnaire that you want to apply to the contact, and click OK.
5 The Contact Profile Answers window contains a list of questions and answers. Place a check mark in the relevant Set fields for each question.
The program automatically enters the answers on the lines of the contact card.
Page 257

Microsoft Official Training Materials for Microsoft Dynamics ™ Your use of this content is subject to your current services agreement
Microsoft Navision Relationship Mangement
Creating Segments Using Profile Information You can use profile information to add contacts to segments for your campaigns. You do this in the third window of the Segment wizard. Follow this procedure:
1. Click SALES & MARKETING→MARKETING→SEGMENTS.
2. Find the segment card for the relevant segment (or press F3 to create a new one).
3. Click FUNCTIONS→SEGMENT→WIZARD. The Segment Wizard window appears.
4. Fill in the fields on the first two pages of the wizard. The third page of the wizard looks like this:
5. In the Profile Questionnaire Code field, select the relevant questionnaire.
Page 258

Microsoft Official Training Materials for Microsoft Dynamics ™ Your use of this content is subject to your current services agreement
Chapter 9: Profiling Classification
6. On the next page of the wizard, select the line that contains the question and answers that you want the program to use as a filter when selecting contacts for the segment.
7. Click Next to fill in the last page of the wizard, or click Finish. Now all the contacts that provided the selected answer on the selected questionnaire will be included in the segment.
Page 259

Microsoft Official Training Materials for Microsoft Dynamics ™ Your use of this content is subject to your current services agreement
Microsoft Navision Relationship Mangement
Test Your Skills – Adding Contacts to a Segment Scenario: You want to add to a segment (SM 10001 - Increase Sale) all your contacts that are companies with more than 1000 employees.
Page 260

Microsoft Official Training Materials for Microsoft Dynamics ™ Your use of this content is subject to your current services agreement
Chapter 9: Profiling Classification
Updating Profile Questionnaires The program does not automatically update the classification of contacts. To have the correct number of contacts recorded for each answer in the Profile Questionnaire Setup window, you must regularly update the contact classification. You do this with the Update Contact Classification batch job. This batch job updates all the answers to the profile questions that are automatically answered by the program, based on customer, vendor, or contact data. If you want to include more information, you can select additional fields to be included in the batch job. To update contact classification, follow this procedure:
1. Click SALES & MARKETING→MARKETING→PERIODIC ACTIVITIES→UPDATE CONTACT CLASSIFICATION.
2. The Update Contact Classification window appears:
3. On the Profile Questionnaire Header tab, fill in the Filter field for Code, Description, and/or Business Relation Code to set filters for the questionnaires to be updated. Click the up-arrow in the lower left-hand corner of the window to see the table with the filters you have set for the batch job.
4. On the Options tab, enter the date of the update. Only information up to and on that date will be included in the update.
5. Click OK to start the batch job. If you do not want to run the batch job now, click Cancel to close the window.
Page 261

Microsoft Official Training Materials for Microsoft Dynamics ™ Your use of this content is subject to your current services agreement
Microsoft Navision Relationship Mangement
Testing and Printing Questionnaires You can print test reports of your profile questionnaires. A test report lists information from each line of the Profile Questionnaire Setup window. You can also print questionnaires to be distributed to your contacts and returned to you.
Printing a Test Report To print a test report, follow this procedure:
1. Click SALES & MARKETING→MARKETING→SETUP→ PROFILE→QUESTIONNAIRE SETUP.
2. In the Profile Questionnaire Setup window, click FUNCTION→TEST REPORT. The Questionnaire - Test window appears:
3. In the Filter field for Code, click the AssistButton and select the questionnaire you want to test (if you leave this field blank, the questions and answers for all your questionnaires will appear on the report).
4. If you want to include more information, you can select additional fields to be included in the report. To do this, in the Field field, press F3, click the AssistButton, and then select the relevant field(s). You can set filters on any of the fields.
5. To print the report, click the Print button. To see the report on screen, click Preview. If you do not want to print the report, click Cancel.
Page 262

Microsoft Official Training Materials for Microsoft Dynamics ™ Your use of this content is subject to your current services agreement
Chapter 9: Profiling Classification
The following picture shows a preview of the report:
Printing the Questionnaire – Handouts Report With the Questionnaire Handouts report, you can print your profile questionnaires and distribute them to your contacts. To print the report, follow this procedure:
1. Click SALES & MARKETING→MARKETING→SETUP→ PROFILE→QUESTIONNAIRE SETUP.
2. In the Profile Questionnaire Setup window, click FUNCTION→PRINT. The Questionnaire – Handouts window appears:
3. On the Profile Questionnaire Header tab in the Filter field for Code, click the AssistButton, and select the questionnaire that you want to print. If you leave this field empty, all your questionnaires will be printed.
Page 263

Microsoft Official Training Materials for Microsoft Dynamics ™ Your use of this content is subject to your current services agreement
Microsoft Navision Relationship Mangement
4. If you want to include more information, you can select additional fields to be included in the report. To do this, in the Field field, press F3, click the AssistButton, and then select the relevant field(s). You can set filters on any of the fields.
5. On the Options tab in the Print Classification Fields field, click to insert a check mark if you want the report also to include the questions that are automatically answered by the program.
6. To print the report, click the Print button. To see the report on screen, click Preview. If you do not want to print the report, click Cancel.
The following picture shows a preview of this report:
Page 264
Microsoft Official Training Materials for Microsoft Dynamics ™ Your use of this content is subject to your current services agreement
Chapter 9: Profiling Classification
Test Your Skills – Setting Up a Questionnaire You want to set up a new questionnaire for contacts that are vendors.
1. Set up the following questions and answers (or make up your own – but make at least one question use automatic classification):
Purchase (LCY) Current Year (use percentage of value) Discount % (defined value)
2. Enter the questionnaire for the contact AR Day Property
Management, and view the questions and answers on the contact card.
3. Update the contact classification, and look at the results in the Profile Questionnaire Setup window.
4. Print a test report for your new questionnaire.
Page 265

Microsoft Official Training Materials for Microsoft Dynamics ™ Your use of this content is subject to your current services agreement
Microsoft Navision Relationship Mangement
Test Your Skills – Rating Your Contacts You want to make a rating of your prospects to make it possible for you to identify the ideal prospects to focus your sales campaign on. You choose to base the rating on four different questions to group your prospects in the following categories: Ideal, Good, Average, Not interesting.
1. Create a new profile questionnaire with the code name IDEAL.
2. Set up the following questions and answers in the questionnaire:
3. Now create the rating of your prospects based on these four questions in order to group them in the categories: Ideal, Good, Average, Not interesting.
Page 266

Microsoft Official Training Materials for Microsoft Dynamics ™ Your use of this content is subject to your current services agreement
Chapter 9: Profiling Classification
Quick Interaction: Lessons Learned Take a moment to write down three Key Points you have learned from this chapter: 1.
2.
3.
Page 267

Microsoft Official Training Materials for Microsoft Dynamics ™ Your use of this content is subject to your current services agreement
Microsoft Navision Relationship Mangement
Page 268