Embed Size (px)
Citation preview
Java Prog. Techniques for Games. Chapter N7. Walking Draft #1 (25th Sept. 06)
1 Andrew Davison © 2006
Chapter N7. Walking Around the Models
This chapter looks at how to populate a scene with 3D models, and 2D images 'pretending' to be 3D. It's also about how to make the scene's background more realistic. The ObjView3D application is shown in Figure 1.
Figure 1. ObjView3D in Action.
The key techniques developed in this chapter are:
• 3D Model Loading
Java 3D has built-in support for loading 3D models converted using the Wavefront OBJ format. I develop a ModelLoader class that simplifies the process, and explain how the loaded model can then be translated, rotated, and/or scaled.
• 2D Ground Cover
The scene is decorated with 2D images which rest on the floor (e.g. the trees in Figure 1) and always stay oriented towards the viewer, giving the impression that they're 3D. This is a cheap alternative to employing real 3D models.
• Keyboard-based Movement
I've been using the Java 3D OrbitBehavior class to change the camera's viewpoint up to now, but ObjView3D uses a KeyBehavior class instead. Key presses move the camera forwards, backwards, left or right, rotate it left or right, and make it float up or down. However, the camera is prevented from descending through the floor.
• A Better Background
I look at three ways of creating a background that contains interesting detail, and looks different when viewed from different places in the scene. The approaches are:
1. A textured-wrapped sphere.
2. A skybox (a Java 3D Box with textures pasted onto each face).
Java Prog. Techniques for Games. Chapter N7. Walking Draft #1 (25th Sept. 06)
2 Andrew Davison © 2006
3. A skybox covered with Terragen-generated textures. This version is built from quads, which gives the programmer more control over how it's positioned. Terragen is a freeware photorealistic landscape renderer (available at http://www.planetside.co.uk/terragen).
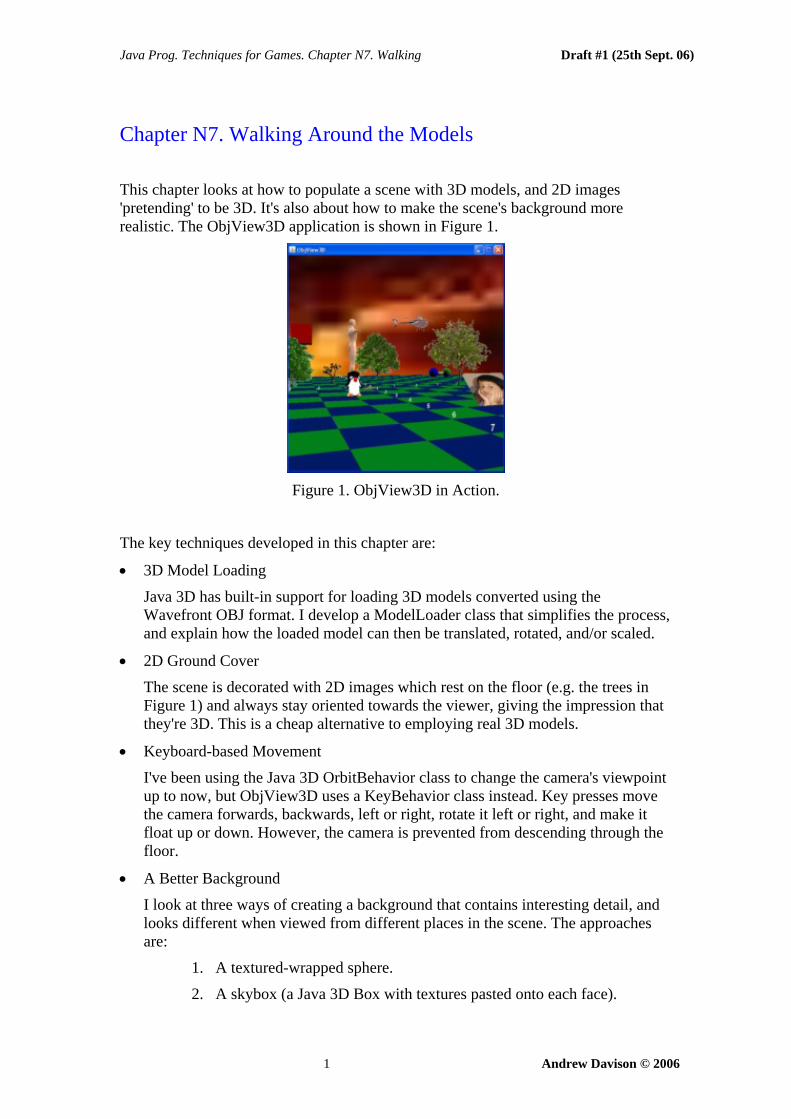
1. Class Diagrams for ObjView3D Figure 2 shows the class diagrams for the ObjView3Dapplication. The class names and public methods are shown.
Figure 2. Class Diagrams for ObjView3D.
ObjView3D is the top-level JFrame for the application, utilizing WrapObjView3D to create the 3D scene inside a JPanel. This includes the lighting and the various background techniques. The skybox constructed from Terragen textures uses the TexPlane class to create its walls, floor, and ceiling.
WrapObjView3D employs ModelLoader to load the OBJ models, and GroundShape for the 2D images.
Key presses are caught by the KeyBehavior class, and translated into changes to the camera's viewpoint.
The checkboard floor is created with the CheckerFloor and ColouredTiles classes, which are unchanged from previous examples, so not described again.
Java Prog. Techniques for Games. Chapter N7. Walking Draft #1 (25th Sept. 06)
3 Andrew Davison © 2006
2. A Spherical Background addBackground() in WrapObjView3D lays a texture over the inside face of a Sphere connected to a Background node: // globals private static final String SKY_DIR = "skyBox/"; // location of sky textures private BranchGroup sceneBG; private void addBackground(String fnm) { Texture2D tex = loadTexture(SKY_DIR + fnm); Sphere sphere = new Sphere(1.0f, Sphere.GENERATE_NORMALS_INWARD | Sphere.GENERATE_TEXTURE_COORDS, 8); Appearance backApp = sphere.getAppearance(); backApp.setTexture( tex ); BranchGroup backBG = new BranchGroup(); backBG.addChild(sphere); Background bg = new Background(); bg.setApplicationBounds(bounds); bg.setGeometry(backBG); sceneBG.addChild(bg); } // end of addBackground() private Texture2D loadTexture(String fn) // load image from file fn as a texture { TextureLoader texLoader = new TextureLoader(fn, null); Texture2D texture = (Texture2D) texLoader.getTexture(); if (texture == null) System.out.println("Cannot load texture from " + fn); else { System.out.println("Loaded texture from " + fn); texture.setEnable(true); } return texture; } // end of loadTexture()
The background shape surrounds the scene, even though the Sphere's radius is set to be 1.0f. The radius isn't utilized when the shape is used as a background.
The Sphere is set to create inward normal vectors, thereby forcing the texture to appear on its inside faces—the ones visible within the scene.
The square of the number of divisions given in the Sphere constructor (8) equals the number of surfaces in the sphere. By reduced the number from 15 (the default) to 8, the cost of generating the sphere is greatly reduced, without noticeably decreasing the texturing quality.

Java Prog. Techniques for Games. Chapter N7. Walking Draft #1 (25th Sept. 06)
4 Andrew Davison © 2006
Figure 1 shows the spherical background in action, and highlights it's main weakness: the distortion of the texture when it's wrapped around the sphere. The problem can be solved by employing a skybox as the background geometry rather than a sphere.
3. A SkyBox Background A skybox is a cube made of six images that surrounds the scene. It's easily implemented by using a Java 3D Box object in the Background node. This is done in addSkyBox(): private void addSkyBox(String fnm) { com.sun.j3d.utils.geometry.Box texCube = new com.sun.j3d.utils.geometry.Box(1.0f, 1.0f, 1.0f, Primitive.GENERATE_TEXTURE_COORDS, new Appearance()); // a default appearance for the Box as a whole Texture2D tex = loadTexture(SKY_DIR + fnm); setFaceTexture(texCube, com.sun.j3d.utils.geometry.Box.FRONT, tex); setFaceTexture(texCube, com.sun.j3d.utils.geometry.Box.LEFT, tex); setFaceTexture(texCube, com.sun.j3d.utils.geometry.Box.RIGHT, tex); setFaceTexture(texCube, com.sun.j3d.utils.geometry.Box.BACK, tex); setFaceTexture(texCube, com.sun.j3d.utils.geometry.Box.TOP, tex); setFaceTexture(texCube, com.sun.j3d.utils.geometry.Box.BOTTOM,tex); BranchGroup backBG = new BranchGroup(); backBG.addChild(texCube); Background bg = new Background(); bg.setApplicationBounds(bounds); bg.setGeometry(backBG); sceneBG.addChild(bg); } // end of addSkyBox()
The references to com.sun.j3d.utils.geometry.Box distinguish the class from the same-named Box class in the Swing package.
Although addSkyBox() pastes the same texture onto every face of the box, it's quiet possible to stick different textures onto them.
The Box uses a default appearance (white) since each face is assigned its own Appearance node in setFaceTexture(). private void setFaceTexture(com.sun.j3d.utils.geometry.Box texCube, int faceID, Texture2D tex) { Appearance app = new Appearance(); // make texture appear on back of face PolygonAttributes pa = new PolygonAttributes(); pa.setCullFace( PolygonAttributes.CULL_FRONT); app.setPolygonAttributes( pa ); if (tex != null)

Java Prog. Techniques for Games. Chapter N7. Walking Draft #1 (25th Sept. 06)
5 Andrew Davison © 2006
app.setTexture(tex); texCube.getShape(faceID).setAppearance(app); } // end of setFaceTexture()
A specific cube face is obtained with Box.getShape() which returns a Shape3D reference whose appearance can be set.
The Appearance node culls its front (outward) face, leaving its inward side to be drawn, which is the one visible to the user. Unfortunately, this means that the image is shown in reverse, but there's no simple way to display an image on a Box face with its front facing inwards.
Figure 3 shows a shot of the scene when addSkyBox() is employed to draw a stars texture.
Figure 3. A Stars-Filled Scene
The individual stars are visible, whereas much of the detail is distorted when the same texture is wrapped over a sphere with addBackground().
4. A SkyBox Built with Quads A drawback with the skybox Background node approach is that the box geometry is always in the background, which makes it difficult to have it interact with other elements in the scene. For example, the floor of the skybox is always 'out of reach' of an object no matter how far it moves downwards.
The approach in this section creates a skybox out of six quads, connected directly to the scene graph without utilizing a Background node. This means the quads are located at specific places in the scene, and so can interact with other scenery objects.
Java Prog. Techniques for Games. Chapter N7. Walking Draft #1 (25th Sept. 06)
6 Andrew Davison © 2006
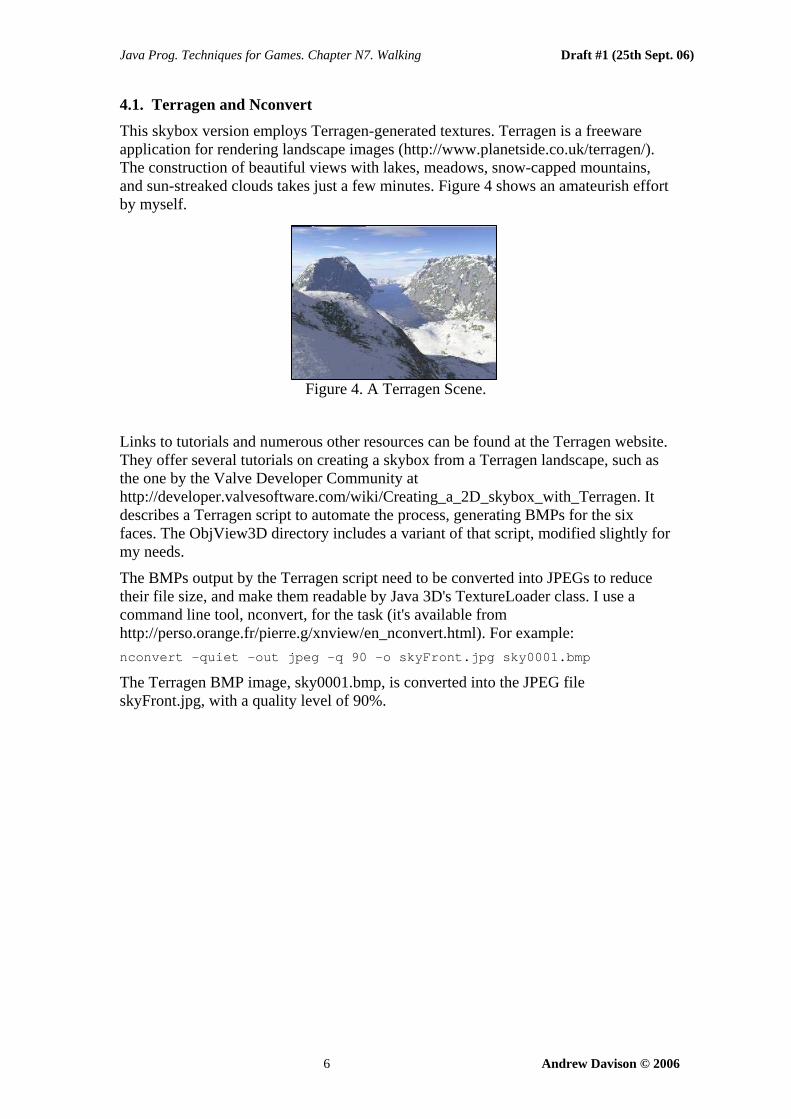
4.1. Terragen and Nconvert This skybox version employs Terragen-generated textures. Terragen is a freeware application for rendering landscape images (http://www.planetside.co.uk/terragen/). The construction of beautiful views with lakes, meadows, snow-capped mountains, and sun-streaked clouds takes just a few minutes. Figure 4 shows an amateurish effort by myself.
Figure 4. A Terragen Scene.
Links to tutorials and numerous other resources can be found at the Terragen website. They offer several tutorials on creating a skybox from a Terragen landscape, such as the one by the Valve Developer Community at http://developer.valvesoftware.com/wiki/Creating_a_2D_skybox_with_Terragen. It describes a Terragen script to automate the process, generating BMPs for the six faces. The ObjView3D directory includes a variant of that script, modified slightly for my needs.
The BMPs output by the Terragen script need to be converted into JPEGs to reduce their file size, and make them readable by Java 3D's TextureLoader class. I use a command line tool, nconvert, for the task (it's available from http://perso.orange.fr/pierre.g/xnview/en_nconvert.html). For example: nconvert -quiet -out jpeg -q 90 -o skyFront.jpg sky0001.bmp
The Terragen BMP image, sky0001.bmp, is converted into the JPEG file skyFront.jpg, with a quality level of 90%.
Java Prog. Techniques for Games. Chapter N7. Walking Draft #1 (25th Sept. 06)
7 Andrew Davison © 2006
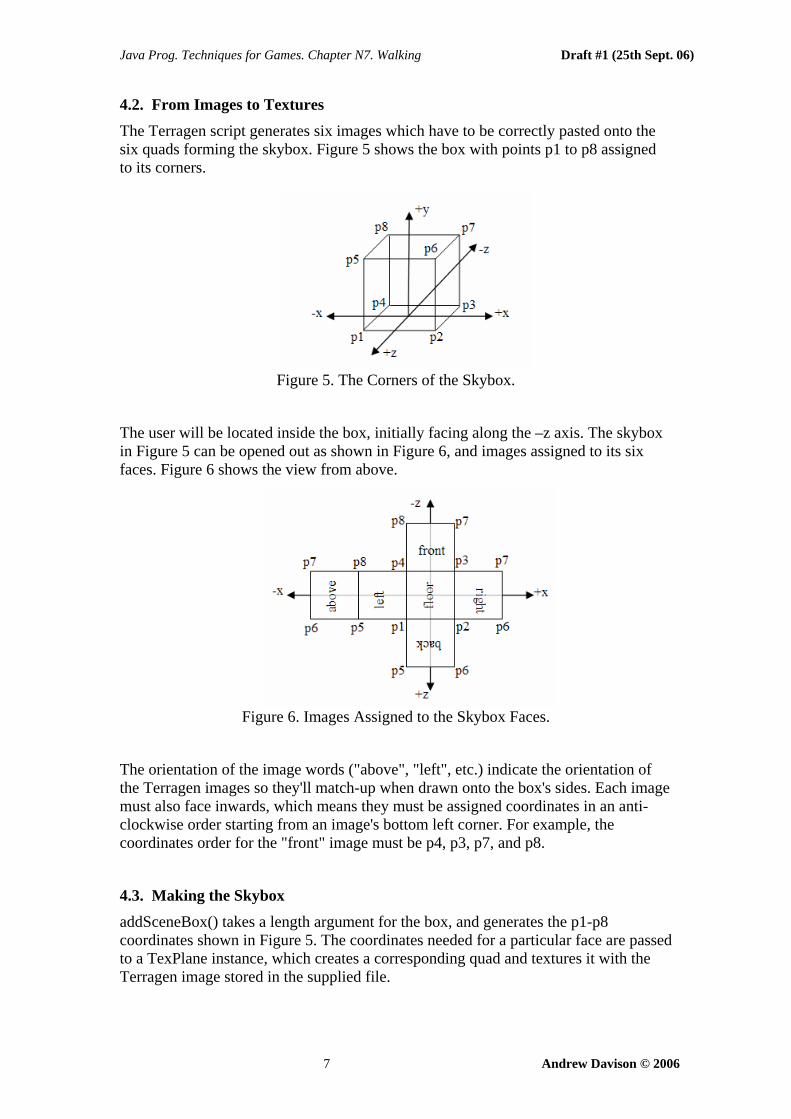
4.2. From Images to Textures The Terragen script generates six images which have to be correctly pasted onto the six quads forming the skybox. Figure 5 shows the box with points p1 to p8 assigned to its corners.
Figure 5. The Corners of the Skybox.
The user will be located inside the box, initially facing along the –z axis. The skybox in Figure 5 can be opened out as shown in Figure 6, and images assigned to its six faces. Figure 6 shows the view from above.
Figure 6. Images Assigned to the Skybox Faces.
The orientation of the image words ("above", "left", etc.) indicate the orientation of the Terragen images so they'll match-up when drawn onto the box's sides. Each image must also face inwards, which means they must be assigned coordinates in an anti-clockwise order starting from an image's bottom left corner. For example, the coordinates order for the "front" image must be p4, p3, p7, and p8.
4.3. Making the Skybox addSceneBox() takes a length argument for the box, and generates the p1-p8 coordinates shown in Figure 5. The coordinates needed for a particular face are passed to a TexPlane instance, which creates a corresponding quad and textures it with the Terragen image stored in the supplied file.
Java Prog. Techniques for Games. Chapter N7. Walking Draft #1 (25th Sept. 06)
8 Andrew Davison © 2006
// global private final static double DY = 0.01; private void addSceneBox(double wallLen) { // the eight corner points /* base starting from front/left then anti-clockwise, at a small offset below the floor, DY */ Point3d p1 = new Point3d(-wallLen/2, -DY, wallLen/2); Point3d p2 = new Point3d(wallLen/2, -DY, wallLen/2); Point3d p3 = new Point3d(wallLen/2, -DY, -wallLen/2); Point3d p4 = new Point3d(-wallLen/2, -DY, -wallLen/2); /* top starting from front/left then anti-clockwise, at height wallLen/4 */ Point3d p5 = new Point3d(-wallLen/2, wallLen/4, wallLen/2); Point3d p6 = new Point3d(wallLen/2, wallLen/4, wallLen/2); Point3d p7 = new Point3d(wallLen/2, wallLen/4, -wallLen/2); Point3d p8 = new Point3d(-wallLen/2, wallLen/4, -wallLen/2); // use the six textures created with Terragen // floor sceneBG.addChild( new TexPlane(p2, p3, p4, p1, SKY_DIR+"floor.jpg")); // front wall sceneBG.addChild( new TexPlane(p4, p3, p7, p8, SKY_DIR+"skyFront.jpg")); // right wall sceneBG.addChild( new TexPlane(p3, p2, p6, p7, SKY_DIR+"skyRight.jpg")); // back wall sceneBG.addChild( new TexPlane(p2, p1, p5, p6, SKY_DIR+"skyBack.jpg")); // left wall sceneBG.addChild( new TexPlane(p1, p4, p8, p5, SKY_DIR+"skyLeft.jpg")); // ceiling sceneBG.addChild( new TexPlane(p5, p8, p7, p6, SKY_DIR+"skyAbove.jpg")); } // end of addSceneBox()
The skybox is positioned a small distance below the floor (DY), so the checkboard floor will remain visible. The height of the box is less than its breadth and width since this reduces the heights of the mountains shown in the wall images.
Java Prog. Techniques for Games. Chapter N7. Walking Draft #1 (25th Sept. 06)
9 Andrew Davison © 2006
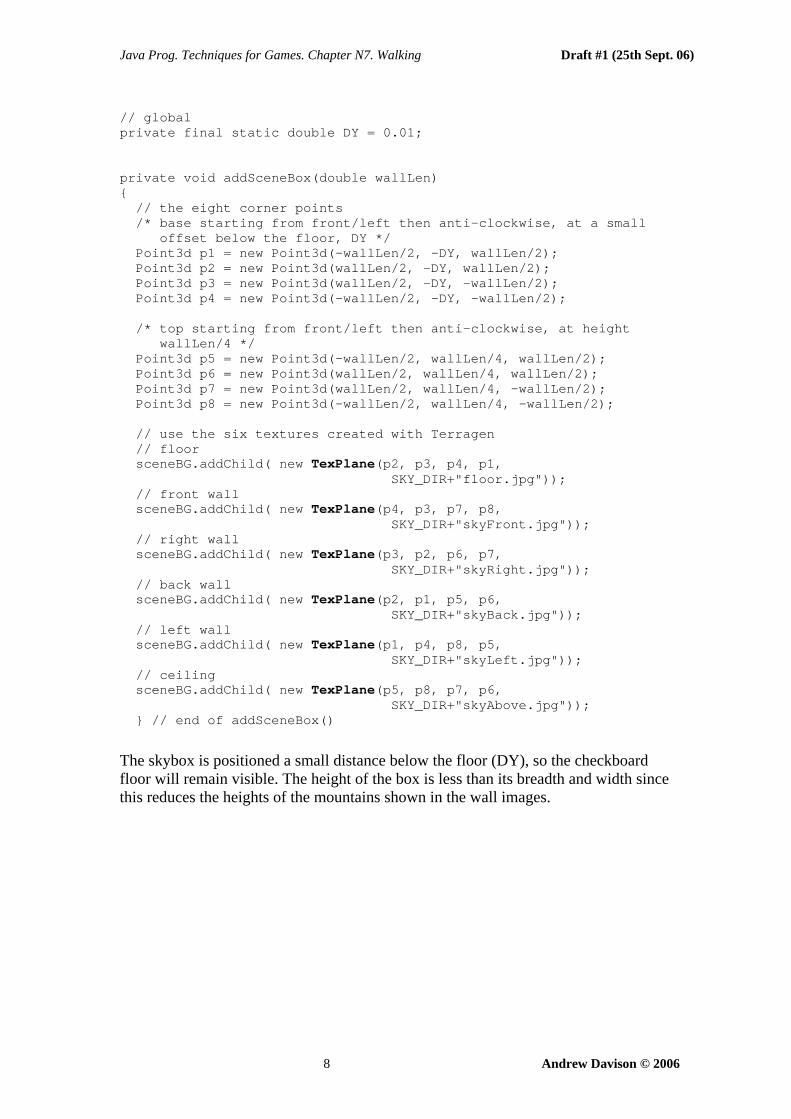
Figure 7 shows a view from inside the scene.
Figure 7. The Scene with a Terragen Skybox.
4.4. Texturing a Plane TexPlane is a subclass of Shape3D which creates a single QuadArray of four vertices with a texture wrapped over it. The texture is applied without any material settings (i.e. no color or lighting effects). // global private static final int NUM_VERTS = 4; public TexPlane(Point3d p1, Point3d p2, Point3d p3, Point3d p4, String texFnm) { createGeometry(p1, p2, p3, p4); Texture2D tex = loadTexture(texFnm); Appearance app = new Appearance(); app.setTexture(tex); // set the texture setAppearance(app); } // end of TexPlane() private void createGeometry(Point3d p1, Point3d p2, Point3d p3, Point3d p4) { QuadArray plane = new QuadArray(NUM_VERTS, GeometryArray.COORDINATES | GeometryArray.TEXTURE_COORDINATE_2 ); // anti-clockwise from bottom left plane.setCoordinate(0, p1); plane.setCoordinate(1, p2); plane.setCoordinate(2, p3); plane.setCoordinate(3, p4); TexCoord2f q = new TexCoord2f(); q.set(0.0f, 0.0f); plane.setTextureCoordinate(0, 0, q); q.set(1.0f, 0.0f); plane.setTextureCoordinate(0, 1, q); q.set(1.0f, 1.0f); plane.setTextureCoordinate(0, 2, q);

Java Prog. Techniques for Games. Chapter N7. Walking Draft #1 (25th Sept. 06)
10 Andrew Davison © 2006
q.set(0.0f, 1.0f); plane.setTextureCoordinate(0, 3, q); setGeometry(plane); } // end of createGeometry()
The texture coordinates are assigned in an anti-clockwise order, starting at the bottom-left of the image. This matches the ordering of the points supplied to the constructor.
loadTexture() is another version of the texture loading method that I've used several times. This time it contains two extra texture operations to improve the skybox effect. private Texture2D loadTexture(String fn) // load image from file fn as a texture { TextureLoader texLoader = new TextureLoader(fn, null); Texture2D texture = (Texture2D) texLoader.getTexture(); if (texture == null) System.out.println("Cannot load texture from " + fn); else { System.out.println("Loaded texture from " + fn); // remove edge texels, so no seams between texture faces texture.setBoundaryModeS(Texture.CLAMP_TO_EDGE); texture.setBoundaryModeT(Texture.CLAMP_TO_EDGE); // smoothing for texture enlargement/shrinking texture.setMinFilter(Texture2D.BASE_LEVEL_LINEAR); texture.setMagFilter(Texture2D.BASE_LEVEL_LINEAR); texture.setEnable(true); } return texture; } // end of loadTexture()
The calls to the setMinFilter() and setMagFilter() smooth the image when several texture coordinates (texels) have to be reduced or enlarged, and perhaps combined, to map onto a screen pixel. Unfortunately, this combination introduces a 'seam' problem at the edge of a texture – a flickering visible line which comes and goes as the viewer moves. This is solved by the two setBoundaryMode method calls since CLAMP_TO_EDGE switches off the combination operation for edge texels.
4.5. The Size of the SkyBox The skybox should be big enough to be located beyond any of the objects inside the scene, but should be positioned inside the BoundingSphere instance for the scene.
Another issue is that the camera should probably be constrained so it can't move through the sides of the skybox. In ObjView3D, the camera can't pass downwards through the floor, but can travel through the walls and ceiling. Modifying the KeyBehavior class to restrict such journeys isn't difficult, as I'll show when I describe the class later.

Java Prog. Techniques for Games. Chapter N7. Walking Draft #1 (25th Sept. 06)
11 Andrew Davison © 2006
5. Loading Models Java 3D supports external model loading through its Loader interface and the Scene class. Java 3D offers two subclasses of Loader aimed at particular file formats: Lw3dLoader handles Lightwave 3D scene files, and ObjectFile processes Wavefront OBJ files. A third subclass, LoaderBase, implements the Loader interface in a generic way to encourage the building of loaders for other 3D formats through subclassing.
The Scene class uses a Loader object to extract details about a model, the most significant being its BranchGroup (usually for the purpose of adding it to the application scene).
There's a wide range of Java 3D loaders for different file formats, written by third party developers, which I discussed in chapter 1 ??. In this chapter – and others – I employ the built-in OBJ loader.
For the artistically-impaired (e.g. yours truly), there are a profusion of Web sites that offer 3D models. A good starting point is the Google directory on 3D models http://directory.google.com/Top/Computers/Software/Graphics/3D/Models/. A site with many free models is 3D Cafe (http://www.3dcafe.com/).
5.1. Loading OBJ Models Java 3D handles a subset of the full OBJ file format (as described at http://www.fileformat.info/format/wavefrontobj/). An OBJ model acceptable to Java 3D must consist of polygonal shapes made from groups of vertices. A polygon's face is defined using vertices, with the optional inclusion of normals and texture coordinates. Faces can be grouped together, and different groups can be assigned materials made from ambient, diffuse and specular colors, and textures. The material information is stored in a separate MTL-formatted file. Java 3D understands a number of built-in color materials, so a shape can employ those rather than a MTL file.
Java 3D doesn't support the free-form geometry parts of the OBJ format, including free-form curves and surfaces, or more advanced forms of OBJ rendering such as interpolation and shadows.
The OBJ features understood by Java 3D are summarized in the documentation for the Java 3D ObjectFile class, where the methods for loading an OBJ file are described.
The OBJ and MTL formats are supported by all the major 3D drawing tools. Two freeware applications that I've used in the past are Blender (http://www.blender.org) and MilkShape3D (http://www.swissquake.ch/chumbalum-soft/).
An advantage of the OBJ and MTL formats is that they're text-based, so the model files can be edited without special tools. This is sometimes useful even when using 3D drawing tools. For example, the OBJ export feature of MilkShape3D produces a MTL file lacking an "illum" line for specifying the lighting type. This is easily fixed by adding: illum 2
to the file. It switches on full lighting (ambient, diffuse, and specular).
Another useful property of Java 3D's support is that each group in a OBJ model is mapped to a Java 3D Shape3D class. The vertex information becomes accessible via

Java Prog. Techniques for Games. Chapter N7. Walking Draft #1 (25th Sept. 06)
12 Andrew Davison © 2006
the shape's Geometry node component, and its material data via Appearance. This makes it quite easy to examine, and modify, a model at run time.
5.2. The OBJ Model Loader The constructor for my ModelLoader class creates an instance of Java 3D's ObjectFile, which is used for loading all the OBJ models. // globals private ObjectFile objFileloader; public ModelLoader() { objFileloader = new ObjectFile(); }
The ObjectFile constructor can take several flag arguments. A particularly useful one is ObjectFile.RESIZE which forces a resize of the model so it's centered at (0,0,0) and its coordinates are all in the range of (-1,-1,-1) to (1,1,1). For example: objFileLoader = new ObjectFile(ObjectFile.RESIZE);
Although it's possible to resize and reposition a model at run time within a Java 3D application, it's better to do these things before the model is exported from the drawing package. This reduces the processing needed at run time.
Requesting a Model The ModelLoader.getModel() method expects a filename, and an optional y-axis distance. The method returns a TransformGroup connected to the model, which moves it by the specified distance, and reduces its size if it's too big. public TransformGroup getModel(String fnm) { return getModel(fnm, 0); } public TransformGroup getModel(String fnm, double yMove) // returns tg --> model { // load the model BranchGroup modelBG = loadModel(fnm); if (modelBG == null) return null; double scaleFactor = getScaling(modelBG); // scale and move the model along the y-axis Transform3D t3d = new Transform3D(); t3d.setScale(scaleFactor); t3d.setTranslation( new Vector3d(0,yMove,0)); TransformGroup tg = new TransformGroup(t3d); tg.addChild(modelBG); return tg; } // end of getModel()
Java Prog. Techniques for Games. Chapter N7. Walking Draft #1 (25th Sept. 06)
13 Andrew Davison © 2006
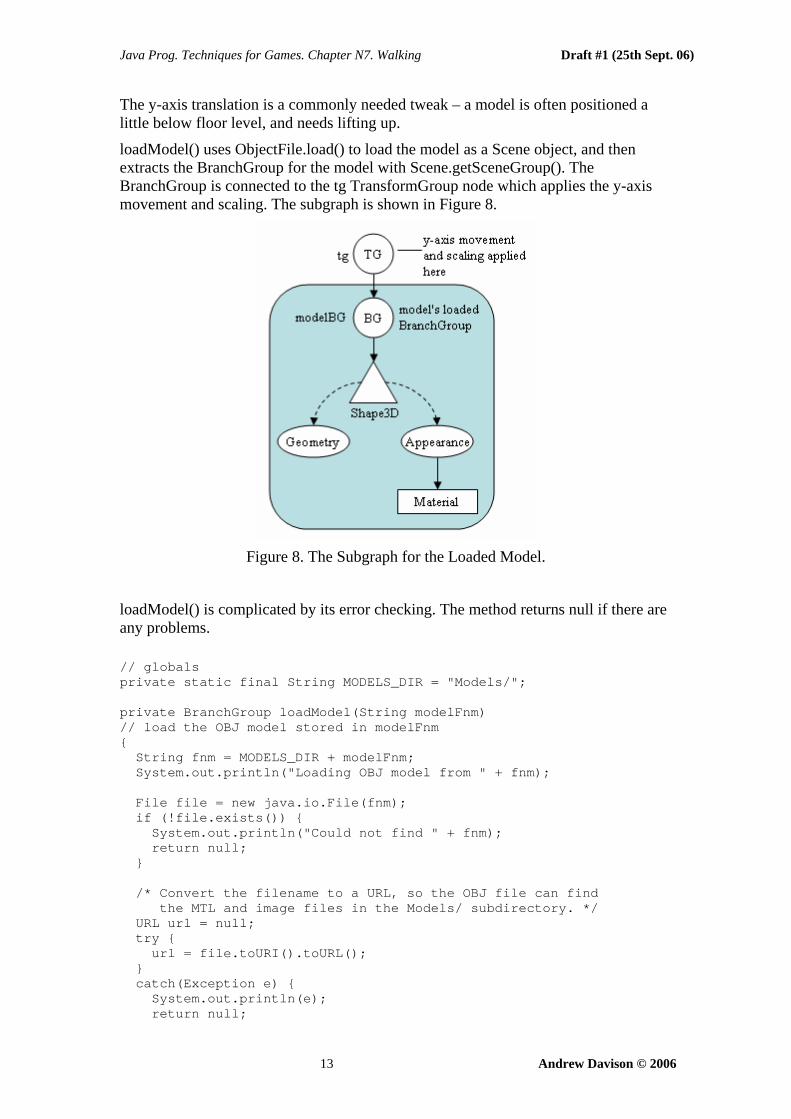
The y-axis translation is a commonly needed tweak – a model is often positioned a little below floor level, and needs lifting up.
loadModel() uses ObjectFile.load() to load the model as a Scene object, and then extracts the BranchGroup for the model with Scene.getSceneGroup(). The BranchGroup is connected to the tg TransformGroup node which applies the y-axis movement and scaling. The subgraph is shown in Figure 8.
Figure 8. The Subgraph for the Loaded Model.
loadModel() is complicated by its error checking. The method returns null if there are any problems. // globals private static final String MODELS_DIR = "Models/"; private BranchGroup loadModel(String modelFnm) // load the OBJ model stored in modelFnm { String fnm = MODELS_DIR + modelFnm; System.out.println("Loading OBJ model from " + fnm); File file = new java.io.File(fnm); if (!file.exists()) { System.out.println("Could not find " + fnm); return null; } /* Convert the filename to a URL, so the OBJ file can find the MTL and image files in the Models/ subdirectory. */ URL url = null; try { url = file.toURI().toURL(); } catch(Exception e) { System.out.println(e); return null;
Java Prog. Techniques for Games. Chapter N7. Walking Draft #1 (25th Sept. 06)
14 Andrew Davison © 2006
} // read in the model from the file Scene scene = null; try { scene = objFileloader.load(url); } catch (FileNotFoundException e) { System.out.println("Could not find " + fnm); return null; } catch (ParsingErrorException e) { System.out.println("Could not parse contents of " + fnm); System.out.println(e); return null; } catch (IncorrectFormatException e) { System.out.println("Incorrect format in " + fnm); System.out.println(e); return null; } // return the model's BranchGroup if(scene != null) return scene.getSceneGroup(); else return null; } // end of loadModel()
The ObjectFile.load() method utilized in loadModel() locates the model file using a URL, which may seem a bit strange since the file is in a local subdirectory, Models/. There's another version of ObjectFile.load() which takes a String argument for the filename, which seems more suitable. However, I found that while it could load the OBJ file, it always failed to find the MTL file associated with the model. The URL version of load() doesn't suffer from this problem.
Scaling the Model A common mistake when loading a large model is to position it so that the camera's viewpoint is inside the model. If the back faces of the its polygons aren't rendered (as is commonly the case) then the user will see nothing.
getScaling() checks the model's bounding box dimensions, and uniformly scales it so its new dimensions don't exceed MAX_SIZE (5) units along any axis. Since the camera starts 9 units away from the center in WrapObjView3D this makes it less likely that a large model will 'disappear'. // global private static final double MAX_SIZE = 5.0; // max size of model along any dimension private double getScaling(BranchGroup modelBG) // check the model's size and scale if too big { double scaleFactor = 1.0; BoundingBox boundBox = new BoundingBox( modelBG.getBounds());
Java Prog. Techniques for Games. Chapter N7. Walking Draft #1 (25th Sept. 06)
15 Andrew Davison © 2006
Point3d lower = new Point3d(); boundBox.getLower(lower); // System.out.println("lower: " + lower); Point3d upper = new Point3d(); boundBox.getUpper(upper); // System.out.println("upper: " + upper); // calculate model scaling double maxDim = getMaxDimension(lower, upper); if (maxDim > MAX_SIZE) { scaleFactor = MAX_SIZE/maxDim; System.out.println("Applying scaling factor: " + scaleFactor); } return scaleFactor; } // end of getScaling()
getMaxDimension() finds the largest side of the bounding box around the model: private double getMaxDimension(Point3d lower, Point3d upper) { double max = 0; if ((upper.x - lower.x) > max) max = upper.x - lower.x; if ((upper.y - lower.y) > max) max = upper.y - lower.y; if ((upper.z - lower.z) > max) max = upper.z - lower.z; return max; } // end of getMaxDimension()
Other Reasons for a Model Disappearing A model may disappear because it is too big, as described above. Other possible reasons are that it's too small, or has been drawn behind or inside another shape. For example, a model rendered beneath the floor in ObjView3D will be hidden from view.
A first step in finding the model is to uncomment the two println()'s in getScaling(). They report the shape's upper and lower bounding box coordinates, which will tell you where the object is located, and its size.
5.3. Positioning a Model The ModelLoader class is used by WrapObjView3D in its addModels() method. Six OBJ models are loaded, then translated, rotated, and scaled in various ways. // global private BranchGroup sceneBG; private void addModels() // in WrapObjView3D {
Java Prog. Techniques for Games. Chapter N7. Walking Draft #1 (25th Sept. 06)
16 Andrew Davison © 2006
ModelLoader ml = new ModelLoader(); Transform3D t3d = new Transform3D(); // a large pink human t3d.setIdentity(); // resets t3d (just to be safe) t3d.setTranslation( new Vector3d(0,0,-7)); // move t3d.setScale(2.5); // enlarge t3d.setRotation( new AxisAngle4d(0,1,0, Math.toRadians(90)) ); // rotate 90 degrees anticlockwise around y-axis TransformGroup tg1 = new TransformGroup(t3d); tg1.addChild( ml.getModel("humanoid.obj", 0.8) ); sceneBG.addChild(tg1); // a penguin t3d.set( new Vector3d(-1,0,2)); // move, and resets t3d t3d.setScale(0.5); // shrink TransformGroup tg2 = new TransformGroup(t3d); tg2.addChild( ml.getModel("penguin.obj") ); sceneBG.addChild(tg2); // a barbell t3d.set( new Vector3d(7,0,-7)); TransformGroup tg3 = new TransformGroup(t3d); tg3.addChild( ml.getModel("barbell.obj", 0.25) ); sceneBG.addChild(tg3); // john's picture t3d.set( new Vector3d(2,0,5)); t3d.setScale( new Vector3d(4,1,0.25)); // stretch along x-axis, shrink along z-axis t3d.setRotation( new AxisAngle4d(1,0,0, Math.toRadians(-45)) ); // rotate 45 degrees anticlockwise around x-axis TransformGroup tg4 = new TransformGroup(t3d); tg4.addChild( ml.getModel("longBox.obj") ); sceneBG.addChild(tg4); // a helicopter t3d.set( new Vector3d(1,2,0)); // up into the air TransformGroup tg5 = new TransformGroup(t3d); tg5.addChild( ml.getModel("heli.obj") ); sceneBG.addChild(tg5); // a colored cube t3d.set( new Vector3d(-3,2,-5)); // up into the air TransformGroup tg6 = new TransformGroup(t3d); tg6.addChild( ml.getModel("colorCube.obj")); sceneBG.addChild(tg6); } // end of addModels()
The six models illustrate different aspects of the OBJ and MTL formats:
• The large pink figure (humanoid.obj) consists of a single unnamed group of vertices, colored with the "flesh" Java3D built-in material.
• The penguin (penguin.obj) utilizes a texture (specified in penguin.mtl and penguin.gif).
• The barbell (barbell.obj) is constructed from three groups of vertices representing the balls and the crossbeam. Colors for the balls are defined inside barbell.mtl.
Java Prog. Techniques for Games. Chapter N7. Walking Draft #1 (25th Sept. 06)
17 Andrew Davison © 2006
• The box model (longBox.obj) is wrapped around with a texture of my son John (specified in longBox.mtl and john.jpg). This example shows how it's possible to create 3D 'poster' shapes.
• The helicopter (heli.obj) is constructed from multiple groups, with a texture assigned to its cockpit (as defined in heli.mtl and metal.gif)
• The colored cube (colorCube.obj) is a simple OBJ model created manually by me. The faces are red or green, with the colors specified in colorCube.mtl.
Each model is positioned using similar code. A Transform3D object (t3d) is initialized with a translation vector, a scale factor, and a rotation. For example, the humanoid's position is defined using:
t3d.setIdentity(); // resets t3d t3d.setTranslation( new Vector3d(0,0,-7)); // move t3d.setScale(2.5); // enlarge t3d.setRotation( new AxisAngle4d(0,1,0, Math.toRadians(90)) ); // rotate 90 degrees anticlockwise around y-axis
The Transform3D.setIdentity() call resets the matrix inside the t3d object.
Scaling is applied uniformily along all the axes. It's also possible to vary the resizing in each dimension by utilizing a vector: t3d.setScale( new Vector3d(4,1,0.25));
The rotation component is easiest to define with an AxisAngle4d object which specifies the rotation (in radians) about a vector given as the first three arguments. The right hand rule determines the rotation direction.
The translation, scaling, and rotation components can be added to the Transform3D object in any order. However, at run time they're executed in the fixed sequence T-S-R (translation, scaling, then rotation). This can be observed by moving the setTranslation() call for the humanoid model to after the setScale() and setRotation() calls – when the code is executed again the model's position will be unchanged (rotated to the right at (0,0,-7)).
It's possible to combine setIdentity() and setTranslation() into a single set() call which takes a Vector3d argument: t3d.set( new Vector3d(0,0,-7));
This fills the Transform3D matrix with the translation, and clears any rotation or scaling settings.
Once the Transform3D has been initialized, it's applied to a new TransformGroup node. The model's TransformGroup is connected to it (via a call to ModelLoader.getModel()), and the whole thing is attached to the scene graph. For example, for the humanoid: TransformGroup tg1 = new TransformGroup(t3d); tg1.addChild( ml.getModel("humanoid.obj", 0.8) ); sceneBG.addChild(tg1);

Java Prog. Techniques for Games. Chapter N7. Walking Draft #1 (25th Sept. 06)
18 Andrew Davison © 2006
6. Ground Cover 3D Models are complex to build, and expensive to render. Often they can be replaced by 2D 'fakes' which appear 3D-like. The trees and cactus in ObjView3D are instances of the GroundShape class which illustrates the idea (see Figure 9).
Figure 9. Cactus and Tree Ground Cover.
A GroundShape object displays a transparent GIF drawn on the front face of a 4-sided QuadArray. The center of the quad's base is at (0, 0, 0), resting on the ground. It has sides of screenSize, and is always oriented towards the viewer (see Figure 10). The orientation is achieved by making GroundShape a subclass of OrientedShape3D, and setting its axis of rotation to be the y-axis.
Figure 10. The Position of the GroundShape Quad.
No matter where the user moves to, the ground shape will face him, giving the impression of 3D solidity. The drawbacks are that the shape always look the same, and the effect breaks down if the user leaves the floor and look down on the ground shape from above.
GroundShape's geometry – a QuadArray of four vertices – is very similar to that used in TexPlane. It also uses a texture to wrap the quad, but with additional transparency attributes so the transparent parts of the GIF won't be rendered. private void createAppearance(String fnm) { Appearance app = new Appearance();
Java Prog. Techniques for Games. Chapter N7. Walking Draft #1 (25th Sept. 06)
19 Andrew Davison © 2006
// blended transparency so texture can be irregular TransparencyAttributes tra = new TransparencyAttributes(); tra.setTransparencyMode( TransparencyAttributes.BLENDED ); app.setTransparencyAttributes( tra ); Texture2D tex = loadTexture(fnm); app.setTexture(tex); // set the texture setAppearance(app); } // end of createAppearance()
loadTexture() is a copy of the same-named method in TexPlane.
6.1. Positioning the Ground Cover WrapObjView3D creates GroundShape instances in addGroundCover(). They're positioned at (0, 0) on the XZ plane by default, so TransformGroups are employed to move them to the required spots. The following code fragment creates a tree, and moves it to (4, 0, 0). Transform3D t3d = new Transform3D(); t3d.set( new Vector3d(4,0,0)); TransformGroup tg1 = new TransformGroup(t3d); tg1.addChild( new GroundShape("tree1.gif", 3) ); sceneBG.addChild(tg1);
The numerical argument to the GroundShape constructor is a scaling factor. By default, each shape uses a screen size of 1.
7. Manipulating the User's Viewpoint
WrapObjView3D calls createUserControls() to carry out two tasks:
• to position the user's initial viewpoint;
• to create a KeyBehavior object which responds to keyboard input by moving the viewpoint.
The createUserControls() method: // info used to position initial viewpoint private final static double Z_START = 9.0; private void createUserControls() { ViewingPlatform vp = su.getViewingPlatform(); // position viewpoint TransformGroup targetTG = vp.getViewPlatformTransform(); Transform3D t3d = new Transform3D(); targetTG.getTransform(t3d); t3d.setTranslation( new Vector3d(0,1,Z_START)); targetTG.setTransform(t3d);
Java Prog. Techniques for Games. Chapter N7. Walking Draft #1 (25th Sept. 06)
20 Andrew Davison © 2006
// set up keyboard controls to move the viewpoint KeyBehavior keyBeh = new KeyBehavior(); keyBeh.setSchedulingBounds(bounds); vp.setViewPlatformBehavior(keyBeh); } // end of createUserControls()
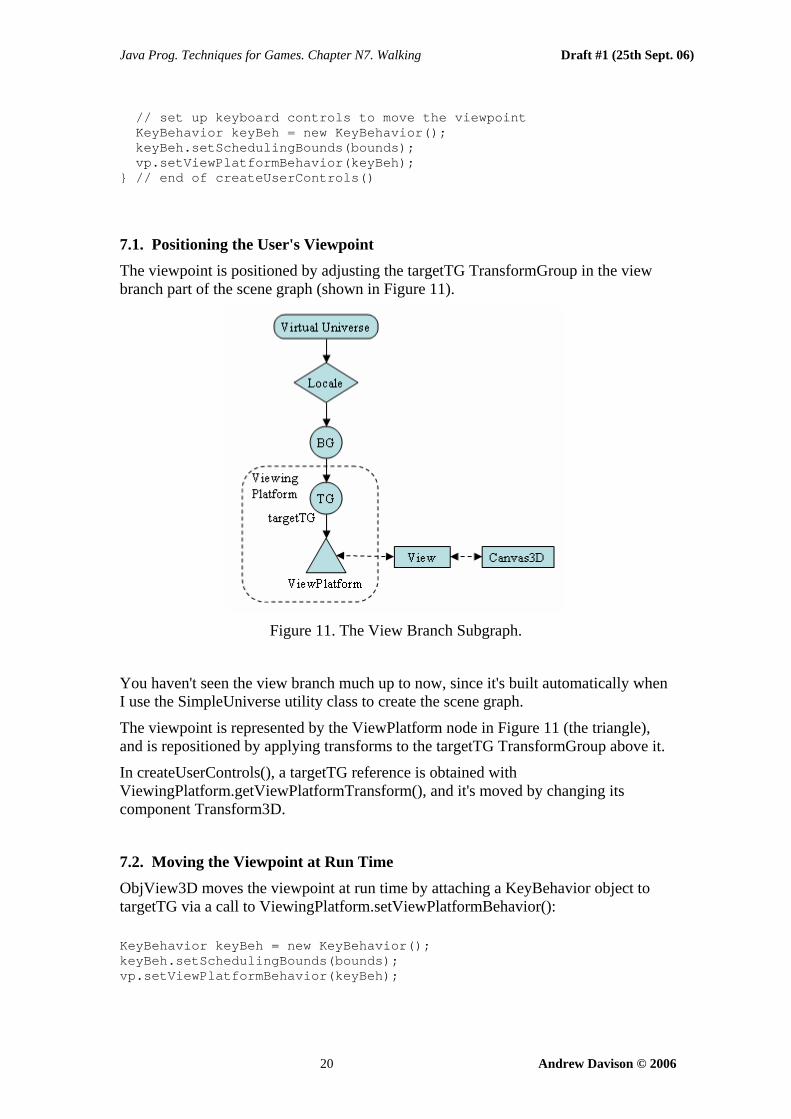
7.1. Positioning the User's Viewpoint The viewpoint is positioned by adjusting the targetTG TransformGroup in the view branch part of the scene graph (shown in Figure 11).
Figure 11. The View Branch Subgraph.
You haven't seen the view branch much up to now, since it's built automatically when I use the SimpleUniverse utility class to create the scene graph.
The viewpoint is represented by the ViewPlatform node in Figure 11 (the triangle), and is repositioned by applying transforms to the targetTG TransformGroup above it.
In createUserControls(), a targetTG reference is obtained with ViewingPlatform.getViewPlatformTransform(), and it's moved by changing its component Transform3D.
7.2. Moving the Viewpoint at Run Time ObjView3D moves the viewpoint at run time by attaching a KeyBehavior object to targetTG via a call to ViewingPlatform.setViewPlatformBehavior(): KeyBehavior keyBeh = new KeyBehavior(); keyBeh.setSchedulingBounds(bounds); vp.setViewPlatformBehavior(keyBeh);
Java Prog. Techniques for Games. Chapter N7. Walking Draft #1 (25th Sept. 06)
21 Andrew Davison © 2006
targetTG is available to methods inside KeyBehavior by having it inherit the Java 3D ViewPlatformBehavior class: public class KeyBehavior extends ViewPlatformBehavior {...}
KeyBehavior responds to arrow key presses, optionally combined with the alt key, which move the viewpoint forwards, back, left, right, up and down, and rotates it around its y-axis. The movement and rotation operations are carried out by manipulating targetTG.
7.3. Setting up the Key Behavior The WakeupCondition for KeyBehavior is an AWT key press, specified in the constructor: WakeupCondition keyPress = new WakeupOnAWTEvent( KeyEvent.KEY_PRESSED );
The key press is registered in initialize(): wakeupOn(keyPress);
processStimulus() checks that the wakeup criterion is an AWT event, and responds to key presses: public void processStimulus(Enumeration criteria) { WakeupCriterion wakeup; AWTEvent[] event; while( criteria.hasMoreElements() ) { wakeup = (WakeupCriterion) criteria.nextElement(); if( wakeup instanceof WakeupOnAWTEvent ) { event = ((WakeupOnAWTEvent)wakeup).getAWTEvent(); for( int i = 0; i < event.length; i++ ) { if( event[i].getID() == KeyEvent.KEY_PRESSED ) processKeyEvent((KeyEvent)event[i]); } } } wakeupOn( keyPress ); // re-register } // end of processStimulus()
All the testing and iteration through the event[] array leads to a call to processKeyEvent(), which reacts to the key press.
7.4. Processing a Key Key processing is divided between two methods based on whether the alt key is being pressed. private void processKeyEvent(KeyEvent eventKey) { int keyCode = eventKey.getKeyCode();

Java Prog. Techniques for Games. Chapter N7. Walking Draft #1 (25th Sept. 06)
22 Andrew Davison © 2006
if(eventKey.isAltDown()) // key + <alt> altMove(keyCode); else standardMove(keyCode); }
Every key has a unique key code constant—they're listed at length in Java's documentation for the KeyEvent class. Checking for modifier keys, such as alt and shift, can be done by testing the KeyEvent object (e.g. with isAltDown() in processKeyEvent()).
standardMove() is a multi-way branch which calls doMove() or rotateY() to carry out a translation or rotation. // globals private static final double ROT_AMT = Math.PI / 36.0; // 5 degrees private static final double MOVE_STEP = 0.2; // hardwired movement vectors private static final Vector3d FWD = new Vector3d(0,0,-MOVE_STEP); private static final Vector3d BACK = new Vector3d(0,0,MOVE_STEP); // key names private int forwardKey = KeyEvent.VK_UP; private int backKey = KeyEvent.VK_DOWN; private int leftKey = KeyEvent.VK_LEFT; private int rightKey = KeyEvent.VK_RIGHT; private void standardMove(int keycode) { if(keycode == forwardKey) doMove(FWD); else if(keycode == backKey) doMove(BACK); else if(keycode == leftKey) rotateY(ROT_AMT); else if(keycode == rightKey) rotateY(-ROT_AMT); } // end of standardMove()
altMove() employs a similar coding structure to move the viewer up or down, left or right. // global movement vectors private static final Vector3d LEFT = new Vector3d(-MOVE_STEP,0,0); private static final Vector3d RIGHT = new Vector3d(MOVE_STEP,0,0); private static final Vector3d UP = new Vector3d(0,MOVE_STEP,0); private static final Vector3d DOWN = new Vector3d(0,-MOVE_STEP,0); private void altMove(int keycode) { if(keycode == forwardKey) { upMoves++; doMove(UP); } else if(keycode == backKey) { if (upMoves > 0) { // don't drop below start height
Java Prog. Techniques for Games. Chapter N7. Walking Draft #1 (25th Sept. 06)
23 Andrew Davison © 2006
upMoves--; doMove(DOWN); } } else if(keycode == leftKey) doMove(LEFT); else if(keycode == rightKey) doMove(RIGHT); } // end of altMove()
altMove() shows how it's possible to constrain camera movement: it stops the camera moving below its starting position by keeping a record of its vertical movement in upMoves.
Rotating rotateY() applies a y-axis rotation to targetTG: // globals for repeated calculations private Transform3D t3d = new Transform3D(); private Transform3D toRot = new Transform3D(); private void rotateY(double radians) { targetTG.getTransform(t3d); // targetTG is the ViewPlatform's TransformGroup toRot.rotY(radians); t3d.mul(toRot); targetTG.setTransform(t3d); } // end of rotateY()
t3d and toRot are globals to avoid the overhead of temporary object creation every time that rotateY() is called.
toRot is initialized with the required rotation, overwriting any previous value. It's then multiplied to targetTG's current rotation, which 'adds' it to the viewpoint's orientation without affecting its translation component.
Translating doMove() works in a similar way to rotateY() but 'adds' a translation to the viewpoint's current position. // globals for repeated calculations private Transform3D t3d = new Transform3D(); private Transform3D toMove = new Transform3D(); private void doMove(Vector3d theMove) { targetTG.getTransform(t3d); toMove.setTranslation(theMove); t3d.mul(toMove); targetTG.setTransform(t3d);

Java Prog. Techniques for Games. Chapter N7. Walking Draft #1 (25th Sept. 06)
24 Andrew Davison © 2006
}
The translation vector is stored in the toMove Transform3D object, then multiplied to the Transform3D instance for targetTG.