Embed Size (px)
Citation preview

CHE 311L
ORGANIC CHEMISTRY LABORATORY
Table of Contents I. Introduction ............................................................................................................................................... 1
II. Safety.......................................................................................................................................................... 2
III. Experimental Reporting .......................................................................................................................... 4
1. Before Coming to Lab ........................................................................................................................ 4
a. The pre-lab protocol ...................................................................................................................... 4
b. A sample protocol.......................................................................................................................... 4
2 During Lab ............................................................................................................................................ 5
a. The experimental procedure (your Lab Notebook) ................................................................. 5
b. The sample procedure .................................................................................................................. 6
c. Helpful hints .................................................................................................................................... 7
3. Your report ........................................................................................................................................... 7
a. What you need to turn in .............................................................................................................. 7
b. Sample calculation format for reports ....................................................................................... 8
IV. Appendix .................................................................................................................................................... 9
1. Data Analysis ....................................................................................................................................... 9
a. Measurements............................................................................................................................... 9
i. Introduction ................................................................................................................................ 9
ii. Instruments with markings not based on powers of 10 .................................................... 9
iii. Digital readouts ..................................................................................................................... 10
iv. Volumetric pipettes............................................................................................................... 10
b. Significant Figures ..................................................................................................................... 10
c. Error .............................................................................................................................................. 10
2. Calculation of theoretical and actual yields ................................................................................. 13
3. Conversion calculations .................................................................................................................. 14
a. mmol to g ..................................................................................................................................... 14
b. theoretical yield .......................................................................................................................... 14
c. volume to mol.............................................................................................................................. 14
d. moles from concentration percentage ................................................................................... 14
i. % solution (w/v) ....................................................................................................................... 14
ii. % solution (v/v) ....................................................................................................................... 15
Introduction - 1
I. INTRODUCTION
The goal of Organic Chemistry 311 L is to provide you with a foundation in general laboratory skills required for practical work in organic chemistry.
This is probably your first laboratory experience that will have a strong relationship to procedures and operations common in the health professions such as pharmacy, biochemistry, medicine, medical technology and nursing. Furthermore, all research in organic chemistry builds on the techniques in this course.
In the experiments you perform this semester, you will utilize the techniques you have learned previously. You will need less guidance and with careful planning you should be able to do almost everything on your own. We have endeavored to design these experiments so that there is a correlation between lecture and lab material.
Introduction - 2
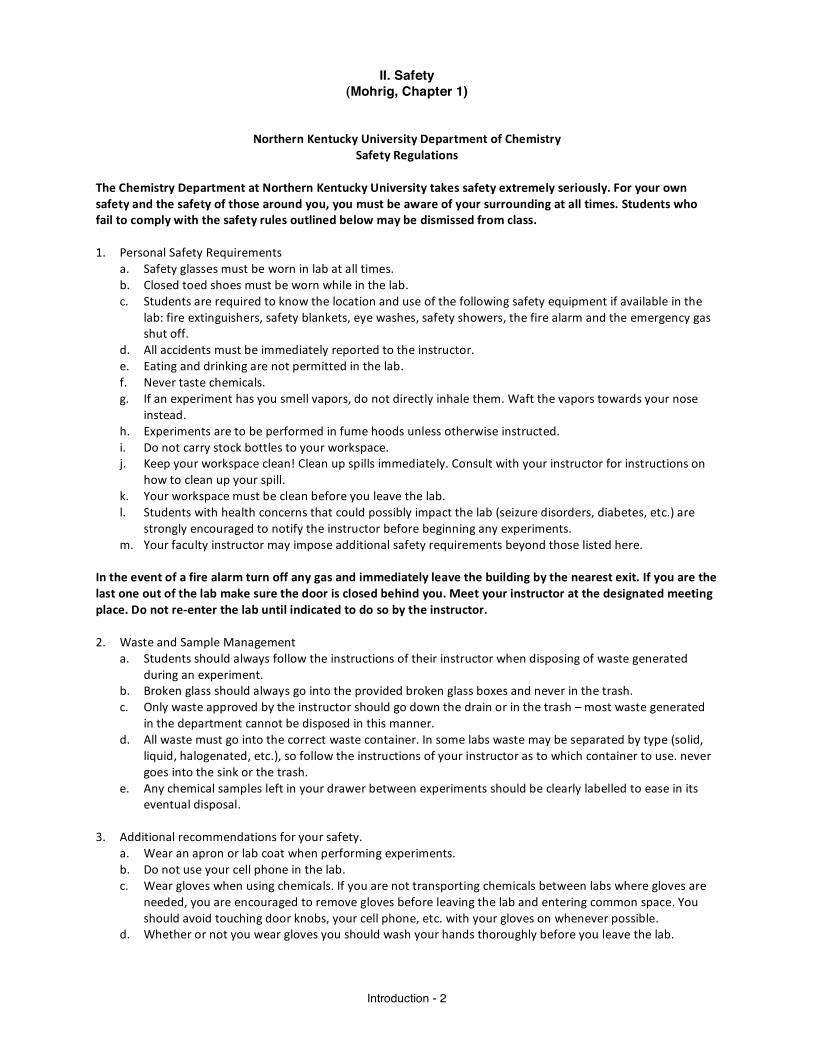
II. Safety (Mohrig, Chapter 1)
Northern Kentucky University Department of Chemistry Safety Regulations
The Chemistry Department at Northern Kentucky University takes safety extremely seriously. For your own safety and the safety of those around you, you must be aware of your surrounding at all times. Students who fail to comply with the safety rules outlined below may be dismissed from class. 1. Personal Safety Requirements
a. Safety glasses must be worn in lab at all times. b. Closed toed shoes must be worn while in the lab. c. Students are required to know the location and use of the following safety equipment if available in the
lab: fire extinguishers, safety blankets, eye washes, safety showers, the fire alarm and the emergency gas shut off.
d. All accidents must be immediately reported to the instructor. e. Eating and drinking are not permitted in the lab. f. Never taste chemicals. g. If an experiment has you smell vapors, do not directly inhale them. Waft the vapors towards your nose
instead. h. Experiments are to be performed in fume hoods unless otherwise instructed. i. Do not carry stock bottles to your workspace. j. Keep your workspace clean! Clean up spills immediately. Consult with your instructor for instructions on
how to clean up your spill. k. Your workspace must be clean before you leave the lab. l. Students with health concerns that could possibly impact the lab (seizure disorders, diabetes, etc.) are
strongly encouraged to notify the instructor before beginning any experiments. m. Your faculty instructor may impose additional safety requirements beyond those listed here.
In the event of a fire alarm turn off any gas and immediately leave the building by the nearest exit. If you are the last one out of the lab make sure the door is closed behind you. Meet your instructor at the designated meeting place. Do not re-‐enter the lab until indicated to do so by the instructor. 2. Waste and Sample Management
a. Students should always follow the instructions of their instructor when disposing of waste generated during an experiment.
b. Broken glass should always go into the provided broken glass boxes and never in the trash. c. Only waste approved by the instructor should go down the drain or in the trash – most waste generated
in the department cannot be disposed in this manner. d. All waste must go into the correct waste container. In some labs waste may be separated by type (solid,
liquid, halogenated, etc.), so follow the instructions of your instructor as to which container to use. never goes into the sink or the trash.
e. Any chemical samples left in your drawer between experiments should be clearly labelled to ease in its eventual disposal.
3. Additional recommendations for your safety.
a. Wear an apron or lab coat when performing experiments. b. Do not use your cell phone in the lab. c. Wear gloves when using chemicals. If you are not transporting chemicals between labs where gloves are
needed, you are encouraged to remove gloves before leaving the lab and entering common space. You should avoid touching door knobs, your cell phone, etc. with your gloves on whenever possible.
d. Whether or not you wear gloves you should wash your hands thoroughly before you leave the lab.
Introduction - 3
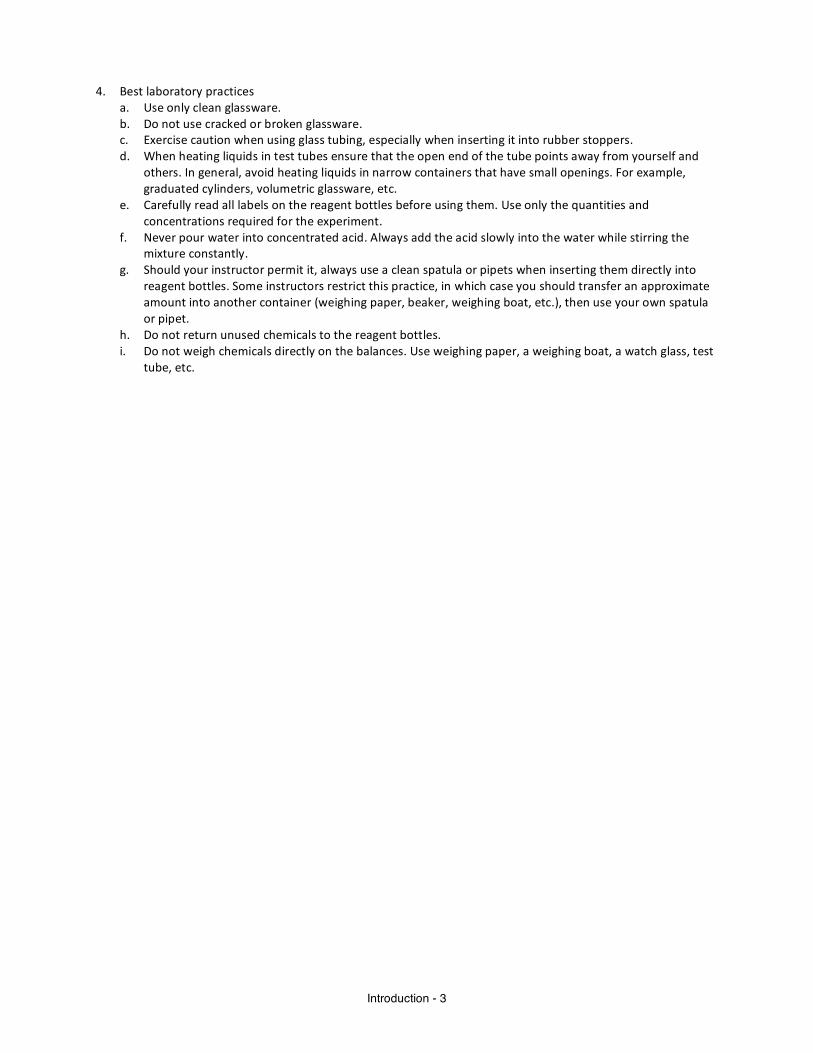
4. Best laboratory practices
a. Use only clean glassware. b. Do not use cracked or broken glassware. c. Exercise caution when using glass tubing, especially when inserting it into rubber stoppers. d. When heating liquids in test tubes ensure that the open end of the tube points away from yourself and
others. In general, avoid heating liquids in narrow containers that have small openings. For example, graduated cylinders, volumetric glassware, etc.
e. Carefully read all labels on the reagent bottles before using them. Use only the quantities and concentrations required for the experiment.
f. Never pour water into concentrated acid. Always add the acid slowly into the water while stirring the mixture constantly.
g. Should your instructor permit it, always use a clean spatula or pipets when inserting them directly into reagent bottles. Some instructors restrict this practice, in which case you should transfer an approximate amount into another container (weighing paper, beaker, weighing boat, etc.), then use your own spatula or pipet.
h. Do not return unused chemicals to the reagent bottles. i. Do not weigh chemicals directly on the balances. Use weighing paper, a weighing boat, a watch glass, test
tube, etc.
Introduction - 4
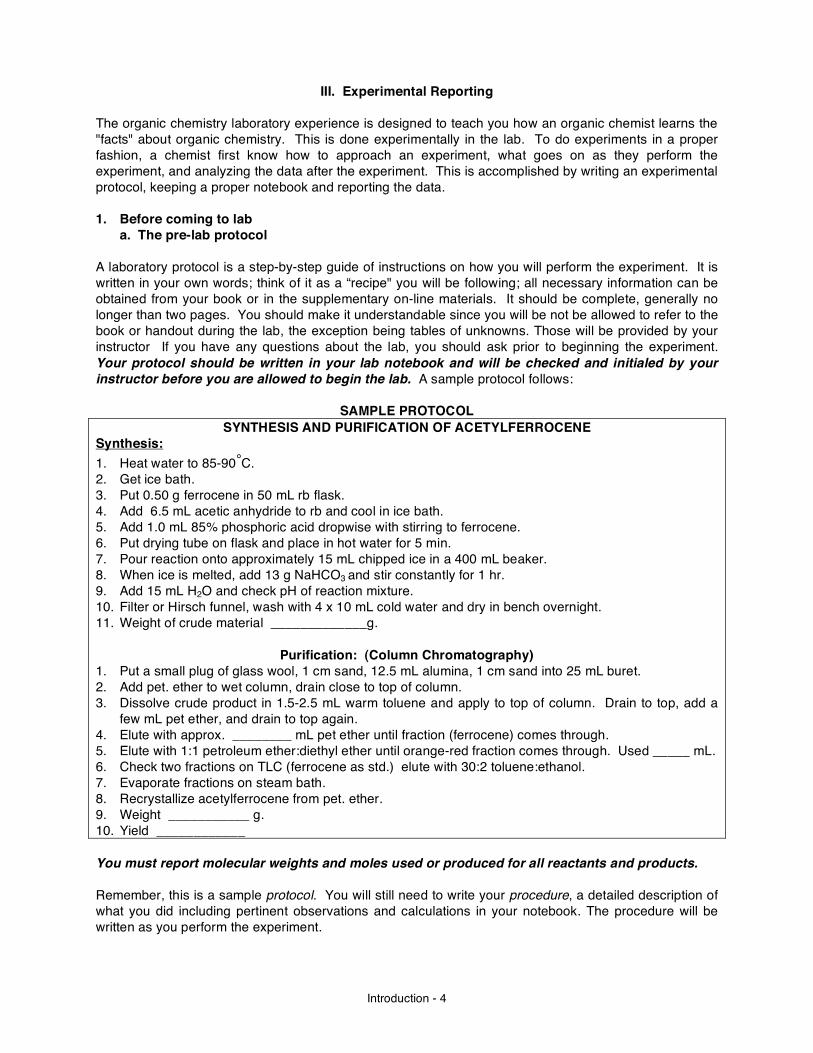
III. Experimental Reporting
The organic chemistry laboratory experience is designed to teach you how an organic chemist learns the "facts" about organic chemistry. This is done experimentally in the lab. To do experiments in a proper fashion, a chemist first know how to approach an experiment, what goes on as they perform the experiment, and analyzing the data after the experiment. This is accomplished by writing an experimental protocol, keeping a proper notebook and reporting the data.
1. Before coming to lab a. The pre-lab protocol A laboratory protocol is a step-by-step guide of instructions on how you will perform the experiment. It is written in your own words; think of it as a “recipe" you will be following; all necessary information can be obtained from your book or in the supplementary on-line materials. It should be complete, generally no longer than two pages. You should make it understandable since you will be not be allowed to refer to the book or handout during the lab, the exception being tables of unknowns. Those will be provided by your instructor If you have any questions about the lab, you should ask prior to beginning the experiment. Your protocol should be written in your lab notebook and will be checked and initialed by your instructor before you are allowed to begin the lab. A sample protocol follows:
SAMPLE PROTOCOL SYNTHESIS AND PURIFICATION OF ACETYLFERROCENE
Synthesis: 1. Heat water to 85-90°C. 2. Get ice bath. 3. Put 0.50 g ferrocene in 50 mL rb flask. 4. Add 6.5 mL acetic anhydride to rb and cool in ice bath. 5. Add 1.0 mL 85% phosphoric acid dropwise with stirring to ferrocene. 6. Put drying tube on flask and place in hot water for 5 min. 7. Pour reaction onto approximately 15 mL chipped ice in a 400 mL beaker. 8. When ice is melted, add 13 g NaHCO3 and stir constantly for 1 hr. 9. Add 15 mL H2O and check pH of reaction mixture. 10. Filter or Hirsch funnel, wash with 4 x 10 mL cold water and dry in bench overnight. 11. Weight of crude material _____________g.
Purification: (Column Chromatography) 1. Put a small plug of glass wool, 1 cm sand, 12.5 mL alumina, 1 cm sand into 25 mL buret. 2. Add pet. ether to wet column, drain close to top of column. 3. Dissolve crude product in 1.5-2.5 mL warm toluene and apply to top of column. Drain to top, add a
few mL pet ether, and drain to top again. 4. Elute with approx. ________ mL pet ether until fraction (ferrocene) comes through. 5. Elute with 1:1 petroleum ether:diethyl ether until orange-red fraction comes through. Used _____ mL. 6. Check two fractions on TLC (ferrocene as std.) elute with 30:2 toluene:ethanol. 7. Evaporate fractions on steam bath. 8. Recrystallize acetylferrocene from pet. ether. 9. Weight ___________ g. 10. Yield ____________
You must report molecular weights and moles used or produced for all reactants and products. Remember, this is a sample protocol. You will still need to write your procedure, a detailed description of what you did including pertinent observations and calculations in your notebook. The procedure will be written as you perform the experiment.
Introduction - 5
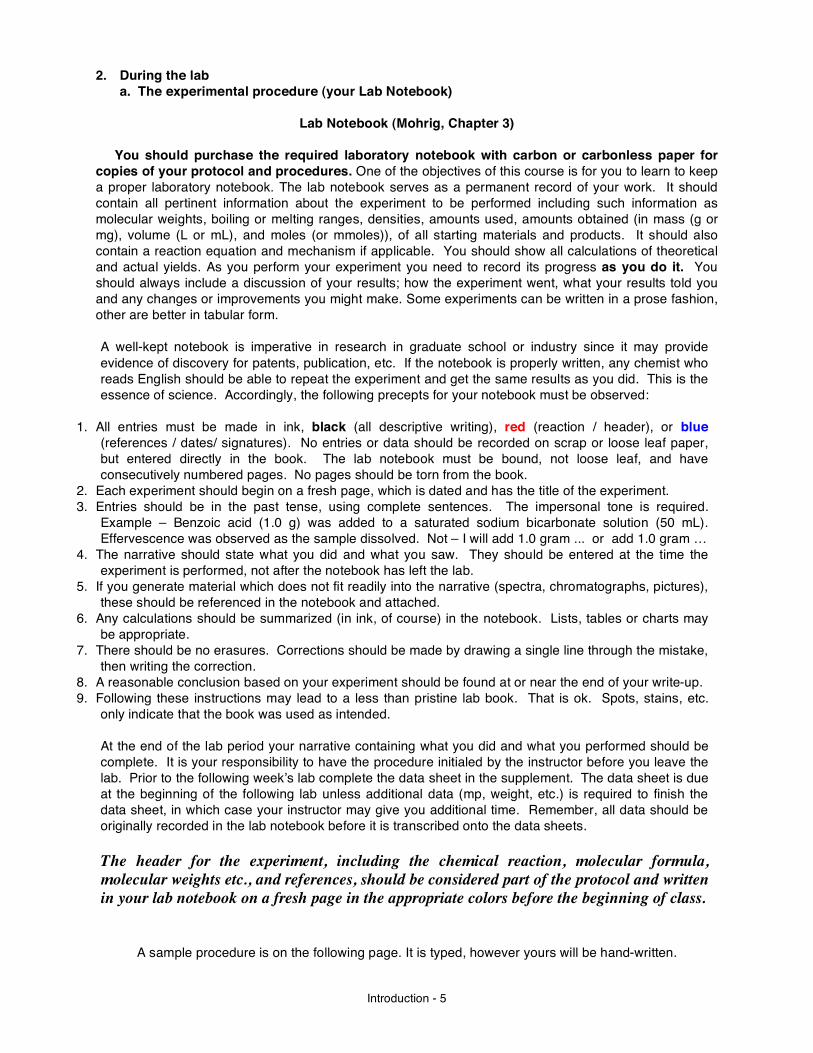
2. During the lab a. The experimental procedure (your Lab Notebook)
Lab Notebook (Mohrig, Chapter 3)
You should purchase the required laboratory notebook with carbon or carbonless paper for copies of your protocol and procedures. One of the objectives of this course is for you to learn to keep a proper laboratory notebook. The lab notebook serves as a permanent record of your work. It should contain all pertinent information about the experiment to be performed including such information as molecular weights, boiling or melting ranges, densities, amounts used, amounts obtained (in mass (g or mg), volume (L or mL), and moles (or mmoles)), of all starting materials and products. It should also contain a reaction equation and mechanism if applicable. You should show all calculations of theoretical and actual yields. As you perform your experiment you need to record its progress as you do it. You should always include a discussion of your results; how the experiment went, what your results told you and any changes or improvements you might make. Some experiments can be written in a prose fashion, other are better in tabular form. A well-kept notebook is imperative in research in graduate school or industry since it may provide evidence of discovery for patents, publication, etc. If the notebook is properly written, any chemist who reads English should be able to repeat the experiment and get the same results as you did. This is the essence of science. Accordingly, the following precepts for your notebook must be observed:
1. All entries must be made in ink, black (all descriptive writing), red (reaction / header), or blue (references / dates/ signatures). No entries or data should be recorded on scrap or loose leaf paper, but entered directly in the book. The lab notebook must be bound, not loose leaf, and have consecutively numbered pages. No pages should be torn from the book.
2. Each experiment should begin on a fresh page, which is dated and has the title of the experiment. 3. Entries should be in the past tense, using complete sentences. The impersonal tone is required.
Example – Benzoic acid (1.0 g) was added to a saturated sodium bicarbonate solution (50 mL). Effervescence was observed as the sample dissolved. Not – I will add 1.0 gram ... or add 1.0 gram …
4. The narrative should state what you did and what you saw. They should be entered at the time the experiment is performed, not after the notebook has left the lab.
5. If you generate material which does not fit readily into the narrative (spectra, chromatographs, pictures), these should be referenced in the notebook and attached.
6. Any calculations should be summarized (in ink, of course) in the notebook. Lists, tables or charts may be appropriate.
7. There should be no erasures. Corrections should be made by drawing a single line through the mistake, then writing the correction.
8. A reasonable conclusion based on your experiment should be found at or near the end of your write-up. 9. Following these instructions may lead to a less than pristine lab book. That is ok. Spots, stains, etc.
only indicate that the book was used as intended. At the end of the lab period your narrative containing what you did and what you performed should be complete. It is your responsibility to have the procedure initialed by the instructor before you leave the lab. Prior to the following weekʼs lab complete the data sheet in the supplement. The data sheet is due at the beginning of the following lab unless additional data (mp, weight, etc.) is required to finish the data sheet, in which case your instructor may give you additional time. Remember, all data should be originally recorded in the lab notebook before it is transcribed onto the data sheets. The header for the experiment, including the chemical reaction, molecular formula, molecular weights etc., and references, should be considered part of the protocol and written in your lab notebook on a fresh page in the appropriate colors before the beginning of class.
A sample procedure is on the following page. It is typed, however yours will be hand-written.

Introduction - 6
Asymmetric 1,4-addition to a chiral oxazolidinone
CH3MgBrCuBr • (CH3)2SN
O
H3CO
CH3 O
N
O
H3CO
CH3 OCH3
C21H21NO3335.4018 g/mol
5.00 g14.9 mmol
KCR - III- 20
C22H25NO3351.4444 g/mol
theo : 14.9 mmol, 5.23gact : 5.04 g, 96 %
as a 9:1 mixture of diastereomers
THF, (CH3)2S0 °C ! rt
3.0 M in Et2O7.50 mL
22.5 mmolAldrich
Ref: Based on Oppolozer, W.; Kingma, A.J.; Ploi, G. Tetrahedron, 1989, 45, 479 - 488.
.
April 1, 1994. Into a clean, dry 250 mL 2-neck round bottomed flask with a magnetic stirbar was placed copper (I) bromide dimethyl sulfide complex (4.58 g, 22 mmol; Aldrich). The flask was fitted with a pressure equalizing addition funnel and topped with a rubber septum. The system was purged with argon and freshly distilled tetrahydrofuran (50 mL) and dimethyl sulfide (20 mL) added. The open neck was then fitted with a rubber septum and the reaction mixture cooled to – 10 °C. The methyl magnesium bromide was then added to the solution via syringe resulting in a yellow slurry which was stirred for 10 minutes. During this time the addition funnel was charged with the acyloxazolidinone in freshly distilled tetrahydrofuran (25 mL). The oxazolidinone was then added to the cuprate solution over 15 minutes changing the reaction color from yellow to green. The reaction was stirred at 0 °C for 30 min and 90 min at room temp. The reaction was quenched by the slow addition of 1 N hydrochloric acid (25 mL) and stirring for 15 min. The phases were separated and the aqueous phase was extracted with ethyl ether (2 X 50 mL). The extracts were combined with the original organic layer and dried over anhyd. magnesium sulfate. The drying agent was filtered and silica gel (5 g) added to the filtrate. The solvents were removed by rotary evaporation under reduced pressure and remaining solids were dried overnight under high vacuum. -KCR. April 2, 1994. The solids was chromatographed on silica gel (150 g) using ethyl acetate : hexanes ( 3 : 7; v/v) as the eluant. Like fractions were combined and concentrated by rotary evaporation to yield 5.04 g of a white solid. -KCR. April 3, 1994. 1H nmr of the solid (KCR - III - 21A) confirms that it is the desired product as a 9:1 ratio of diastereomers. The product has a melting point of 113 – 115 °C. This product will be used in the next reaction without further purification. -KCR.

Introduction - 7
HELPFUL HINTS FOR SURVIVAL IN ORGANIC CHEMISTRY LAB
1) Always take melting points and weights of any intermediates as well as products in a synthesis. 2) Contrary to popular belief, round bottom flasks will not stand upright on a flat bench top. USE A
CORK RING or A BEAKER. 3) Items sitting in an ice bath will not remain upright as the ice melts. CLAMP THEM. 4) Vacuum filtrations need to be clamped. 5) Recrystallization of products is important and required; it increases the purity of the products. 6) Once you have recrystallized a product, you need to vacuum filter it. (Hirsch or Büchner funnel---
REMEMBER?) 7) Always use clean glassware. Do not expect the instructor to perform miracles when your product is
purple and it should be white, because you used dirty glassware. 8) Melting points are ranges. 9) Hot things burn. 10) Sharp things cut. 11) Include a mechanism somewhere in your report-even if it is provided for you.
3. Lab Reports
Lab reports will be due in lab the week following the experiment. The report should be turned in with pages in the following order: 1) Data Sheets and post lab questions: The data portion may seem redundant to you, but consider this
as the report that you would want to turn in to your boss in a professional setting. Do not complete these data sheets during the laboratory period. The data should be first recorded in your lab notebook, then after class, transcribed to the data sheets.
2) Calculations: examples of all calculations relevant to the report (carbon copy pages from your lab notebook).
3) Any spectroscopic data (NMR spectra, TLC plates, etc). 4) Your laboratory procedure (carbon copy pages from your lab notebook). 5) Your pre-lab protocol – signed by your instructor. • All lab reports involving a preparation must contain a reasonable mechanism for the reaction (if any
was conducted for the week), whether it is specifically asked for or not---this is the heart of organic chemistry.
• You are responsible for yourself, therefore you are responsible for listening to announcements. A superior student will be aware!
Samples
For some experiments, you will be asked to turn in a sample of your product. You should have your vial
labeled with the following information: 1) Name; 2) Lab Day; 3) Name or structure of compound; 4) Weight; 5) Melting point.
Note: Copying information from a current or former studentʼs lab report is a violation of the Honor Code.
Introduction - 8
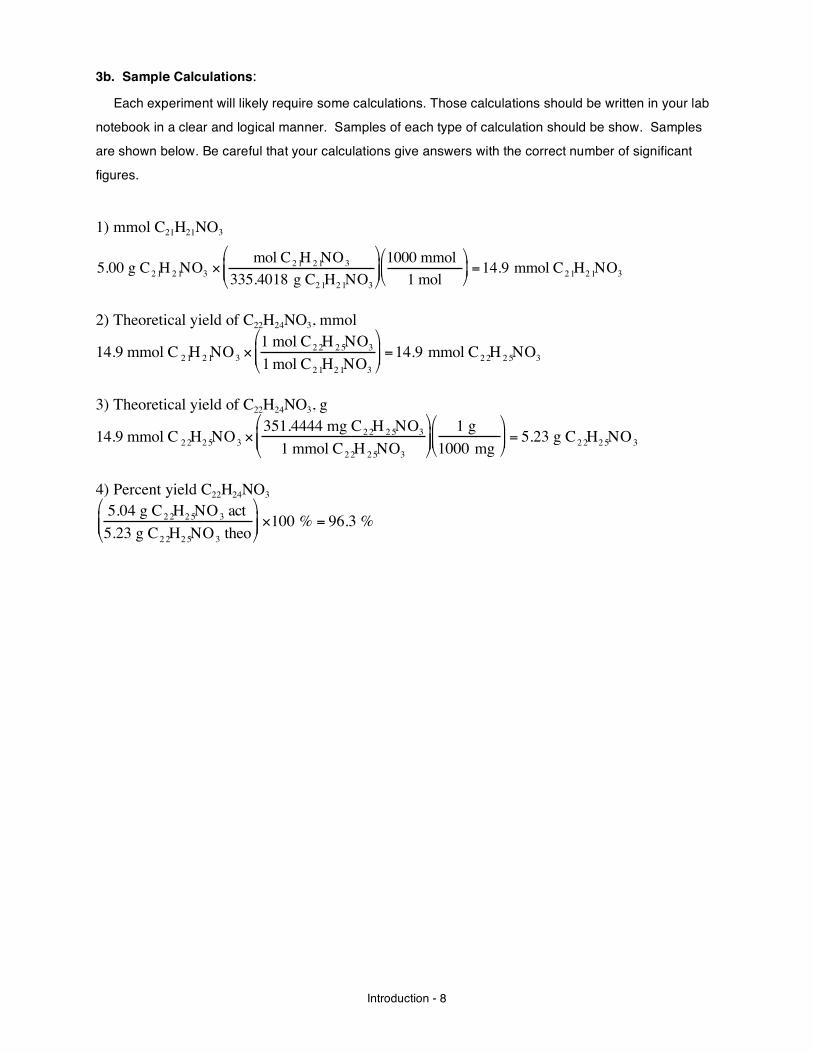
3b. Sample Calculations: Each experiment will likely require some calculations. Those calculations should be written in your lab
notebook in a clear and logical manner. Samples of each type of calculation should be show. Samples
are shown below. Be careful that your calculations give answers with the correct number of significant
figures.
1) mmol C21H21NO3
!
5.00 g C2 1H 2 1NO3 "mol C2 1H 2 1NO3
335.4018 g C2 1H2 1NO3
#
$ % %
&
' ( (
1000 mmol 1 mol
#
$ %
&
' ( =14.9 mmol C2 1H2 1NO3
2) Theoretical yield of C22H24NO3, mmol
!
14.9 mmol C 2 1H 2 1NO3 "1 mol C2 2H 2 5NO3
1 mol C2 1H2 1NO3
#
$ % %
&
' ( ( =14.9 mmol C2 2H 2 5NO3
3) Theoretical yield of C22H24NO3, g
!
14.9 mmol C 2 2H2 5NO3 "351.4444 mg C2 2H 2 5NO3
1 mmol C2 2H 2 5NO3
#
$ % %
&
' ( (
1 g 1000 mg #
$ % %
&
' ( ( = 5.23 g C2 2H2 5NO3
4) Percent yield C22H24NO3
!
5.04 g C2 2H2 5NO3 act5.23 g C2 2H2 5NO3 theo
"
# $ $
%
& ' ' (100 % = 96.3 %

Introduction - 9
IV. Appendix 1. Data Analysis a. Measurements i) Introduction. All measurements of non-exact quantities should reflect in the number recorded the degree of uncertainty in the measurement. For example, consider measuring the length of a pencil with a metric ruler as shown in Figure 1.
It is observed that the length of the pencil lies between 3.3 and 3.4 centimeters (cm). Since the ruler is calibrated to the tenth centimeter position, we are certain that the length is at least 3.3 cm but less than 3.4 cm. We must estimate or interpolate the value between 3.3 and 3.4. It appears to be about 0.6 of the way between. Thus, the length of the pencil would be recorded as 3.36 cm. However, we are not certain about the value 0.06; someone else could just as easily have estimated it to be 0.07 or 0.05. The measurement 3.36 cm has three significant figures and it is the digit to the right that has some uncertainty in it. When the measurement 3.36 cm is recorded, it implies to the reader that the 3.3 is certain and the 0.06 is the first position of doubt. In general, the first position of doubt in any measured value will be at the first decimal place beyond the last decimal place that is calibrated. For example, if a graduated cylinder is calibrated to the units place (every milliliter), then the volume can be recorded to the tenths position. ii) Instruments with markings not based on powers of 10 For instruments, such as thermometers and some rulers which are marked in steps of something other than 10, 1, .1, .01 etc. you will take the markings and separate them into ten equal segments to estimate your last significant figure. For example if the markings are in 2 degree steps you would mentally break these marking into .2 steps. This means you would report the value as 55.0, 55.2, 55.4, etc. and not 55.1, 55.3, 55.5 etc. which would require separating the markings incorrectly into 20 segments.
In the ruler above it is seen that the length of the pencil lies between 6.6 and 6.8 centimeters (cm). Since the ruler is calibrated with two tenth centimeter makings, we are certain that the length is at least 6.6 cm but less than 6.8 cm. So breaking this segment into 10 places each representing 0.02 we would say this length is 6.68 cm.
Introduction - 10
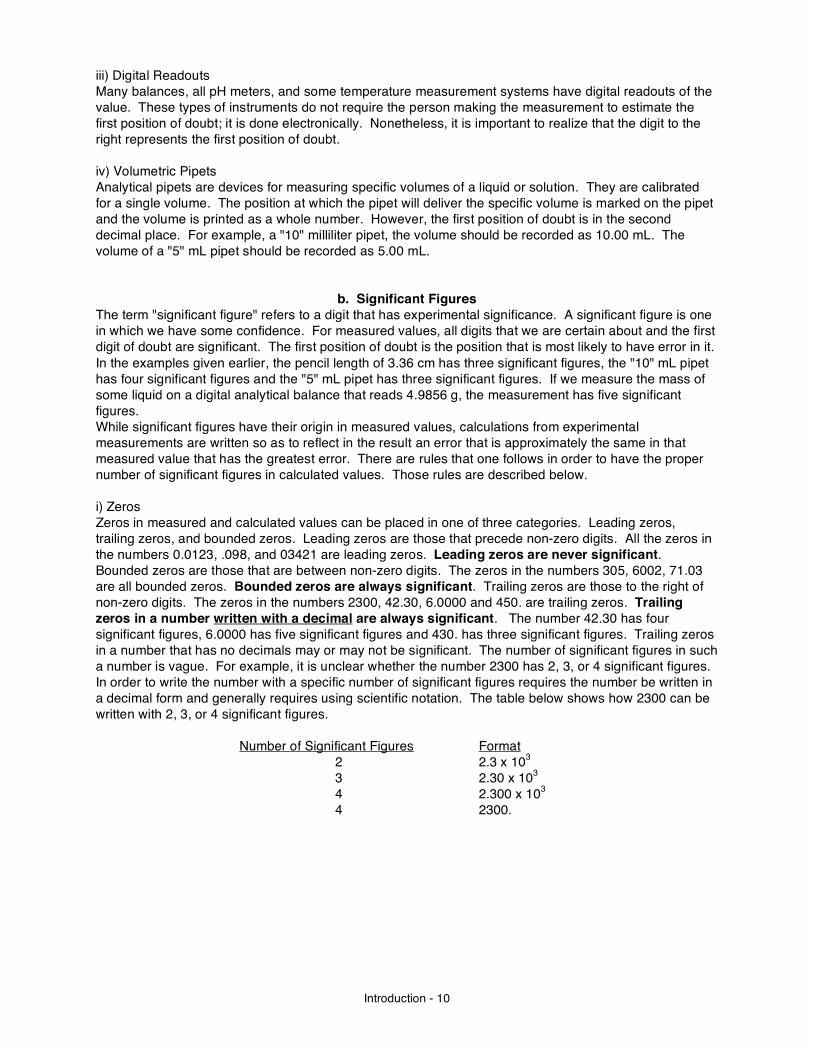
iii) Digital Readouts Many balances, all pH meters, and some temperature measurement systems have digital readouts of the value. These types of instruments do not require the person making the measurement to estimate the first position of doubt; it is done electronically. Nonetheless, it is important to realize that the digit to the right represents the first position of doubt. iv) Volumetric Pipets Analytical pipets are devices for measuring specific volumes of a liquid or solution. They are calibrated for a single volume. The position at which the pipet will deliver the specific volume is marked on the pipet and the volume is printed as a whole number. However, the first position of doubt is in the second decimal place. For example, a "10" milliliter pipet, the volume should be recorded as 10.00 mL. The volume of a "5" mL pipet should be recorded as 5.00 mL.
b. Significant Figures
The term "significant figure" refers to a digit that has experimental significance. A significant figure is one in which we have some confidence. For measured values, all digits that we are certain about and the first digit of doubt are significant. The first position of doubt is the position that is most likely to have error in it. In the examples given earlier, the pencil length of 3.36 cm has three significant figures, the "10" mL pipet has four significant figures and the "5" mL pipet has three significant figures. If we measure the mass of some liquid on a digital analytical balance that reads 4.9856 g, the measurement has five significant figures. While significant figures have their origin in measured values, calculations from experimental measurements are written so as to reflect in the result an error that is approximately the same in that measured value that has the greatest error. There are rules that one follows in order to have the proper number of significant figures in calculated values. Those rules are described below. i) Zeros Zeros in measured and calculated values can be placed in one of three categories. Leading zeros, trailing zeros, and bounded zeros. Leading zeros are those that precede non-zero digits. All the zeros in the numbers 0.0123, .098, and 03421 are leading zeros. Leading zeros are never significant. Bounded zeros are those that are between non-zero digits. The zeros in the numbers 305, 6002, 71.03 are all bounded zeros. Bounded zeros are always significant. Trailing zeros are those to the right of non-zero digits. The zeros in the numbers 2300, 42.30, 6.0000 and 450. are trailing zeros. Trailing zeros in a number written with a decimal are always significant. The number 42.30 has four significant figures, 6.0000 has five significant figures and 430. has three significant figures. Trailing zeros in a number that has no decimals may or may not be significant. The number of significant figures in such a number is vague. For example, it is unclear whether the number 2300 has 2, 3, or 4 significant figures. In order to write the number with a specific number of significant figures requires the number be written in a decimal form and generally requires using scientific notation. The table below shows how 2300 can be written with 2, 3, or 4 significant figures. Number of Significant Figures Format 2 2.3 x 10³ 3 2.30 x 10³ 4 2.300 x 10³ 4 2300.
Introduction - 11
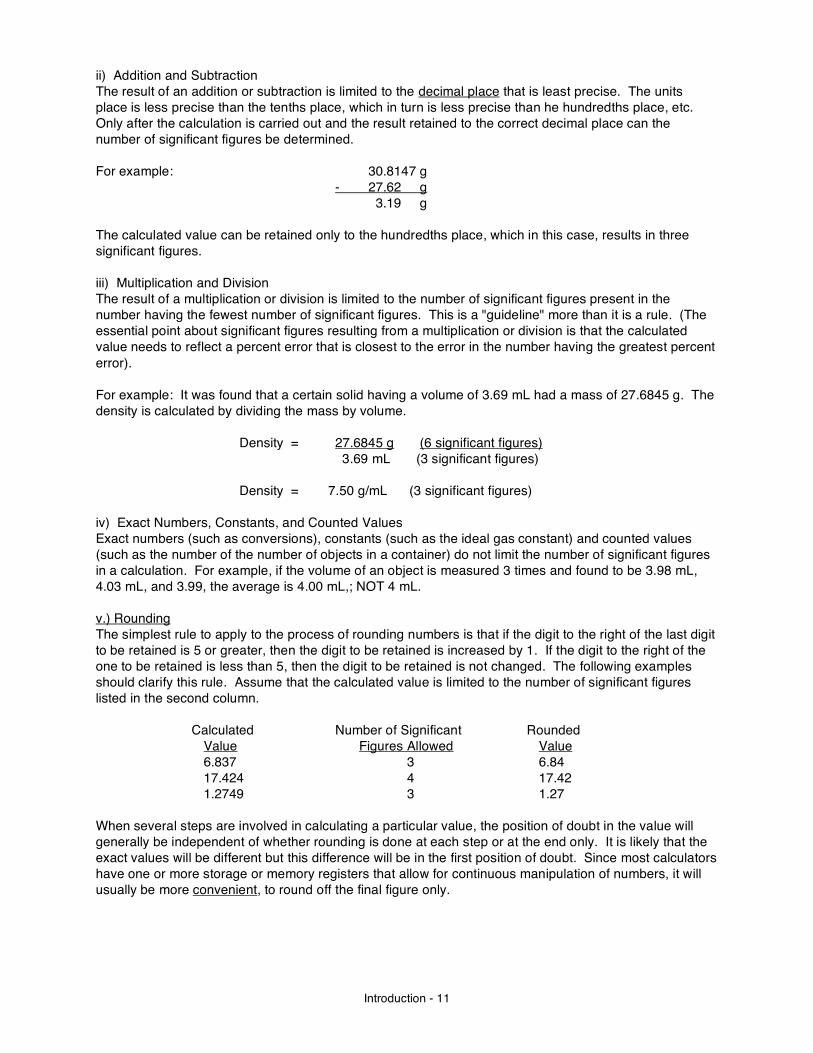
ii) Addition and Subtraction The result of an addition or subtraction is limited to the decimal place that is least precise. The units place is less precise than the tenths place, which in turn is less precise than he hundredths place, etc. Only after the calculation is carried out and the result retained to the correct decimal place can the number of significant figures be determined. For example: 30.8147 g - 27.62 g 3.19 g The calculated value can be retained only to the hundredths place, which in this case, results in three significant figures. iii) Multiplication and Division The result of a multiplication or division is limited to the number of significant figures present in the number having the fewest number of significant figures. This is a "guideline" more than it is a rule. (The essential point about significant figures resulting from a multiplication or division is that the calculated value needs to reflect a percent error that is closest to the error in the number having the greatest percent error). For example: It was found that a certain solid having a volume of 3.69 mL had a mass of 27.6845 g. The density is calculated by dividing the mass by volume. Density = 27.6845 g (6 significant figures) 3.69 mL (3 significant figures) Density = 7.50 g/mL (3 significant figures) iv) Exact Numbers, Constants, and Counted Values Exact numbers (such as conversions), constants (such as the ideal gas constant) and counted values (such as the number of the number of objects in a container) do not limit the number of significant figures in a calculation. For example, if the volume of an object is measured 3 times and found to be 3.98 mL, 4.03 mL, and 3.99, the average is 4.00 mL,; NOT 4 mL. v.) Rounding The simplest rule to apply to the process of rounding numbers is that if the digit to the right of the last digit to be retained is 5 or greater, then the digit to be retained is increased by 1. If the digit to the right of the one to be retained is less than 5, then the digit to be retained is not changed. The following examples should clarify this rule. Assume that the calculated value is limited to the number of significant figures listed in the second column. Calculated Number of Significant Rounded Value Figures Allowed Value 6.837 3 6.84 17.424 4 17.42 1.2749 3 1.27 When several steps are involved in calculating a particular value, the position of doubt in the value will generally be independent of whether rounding is done at each step or at the end only. It is likely that the exact values will be different but this difference will be in the first position of doubt. Since most calculators have one or more storage or memory registers that allow for continuous manipulation of numbers, it will usually be more convenient, to round off the final figure only.
Introduction - 12
c. Error Types of Errors The term "error" refers to any variation that occurs in a quantity that is or can be measured more than once. There are two general classes of errors: experimental and human. Experimental Errors Experimental errors are those that are inherent in the design of the experiment or in the instruments themselves. There are two types of experimental errors; systematic and random. i) Systematic Errors (Determinate) Systematic errors, also called determinate errors, are those that are the same for each measurement with the instrument used. Such errors are often caused by a faulty instrument. Frequently, these errors can be corrected providing that the origin of the error is known. Systematic errors almost always result in the measured value being either too large or too small rather than too small sometimes and too large at other times. In other words, systematic errors are not random. ii) Random Errors (Indeterminate) Random errors, also called indeterminate errors, are those that cannot be avoided or corrected. These errors are inherent in the instruments or in a combination of uncontrolled variables. For example, suppose we are determining the diameter of a cylinder by taking several measurements along its length. Random error would be due primarily to the error in estimating the position of doubt and the variation of the diameter along the length of the cylinder. Random errors result in the measured value being both too large at times and too small at other times. Human Errors Human errors are those due to carelessness on the part of the experimenter. They can appear as either systematic or random. Human error is not to be used as an excuse for poor results. If errors of this sort are suspected, they should be traced to their origin and eliminated. Human errors include blunders such as miscalculations, misreading of a scale, or sloppy laboratory technique.
Introduction - 13
DETERMINATION OF THEORETICAL AND ACTUAL YIELDS
Mohrig, p. 24.
Two of the most important pieces of information that one wants to learn when doing any type of experiment that involves a "synthesis" is how much should I get if the reaction went 100% and how much, "what percentage," did I really obtain.
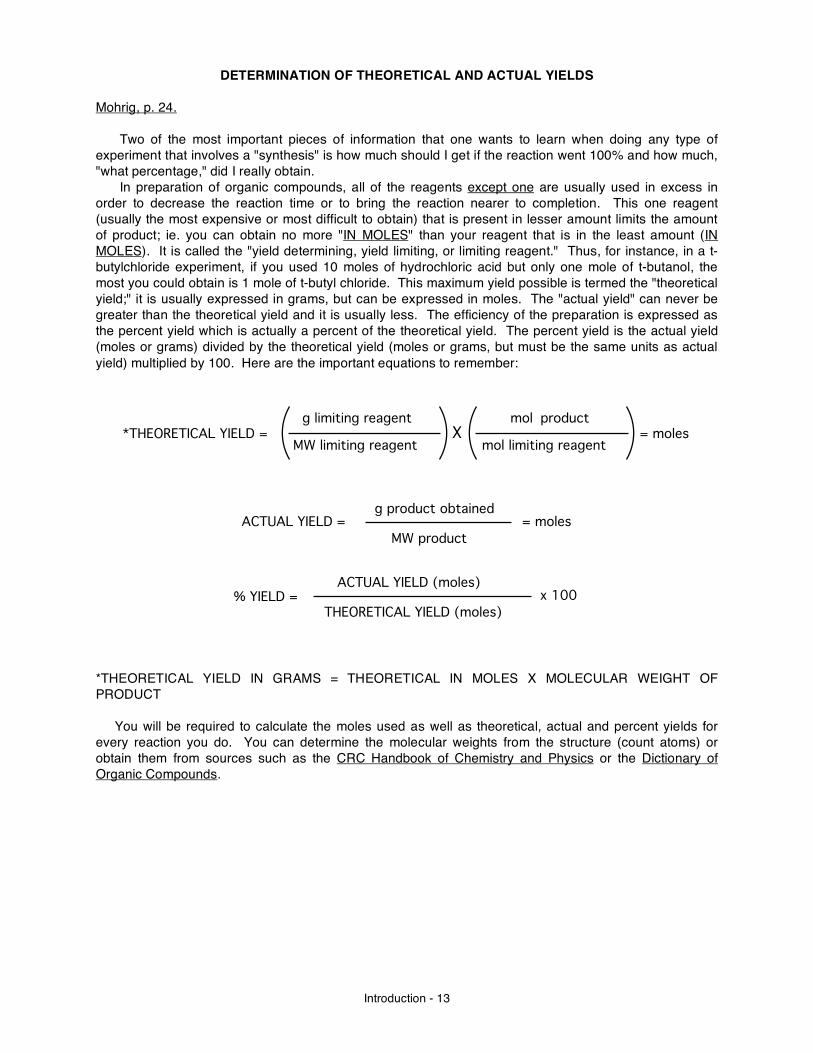
In preparation of organic compounds, all of the reagents except one are usually used in excess in order to decrease the reaction time or to bring the reaction nearer to completion. This one reagent (usually the most expensive or most difficult to obtain) that is present in lesser amount limits the amount of product; ie. you can obtain no more "IN MOLES" than your reagent that is in the least amount (IN MOLES). It is called the "yield determining, yield limiting, or limiting reagent." Thus, for instance, in a t-butylchloride experiment, if you used 10 moles of hydrochloric acid but only one mole of t-butanol, the most you could obtain is 1 mole of t-butyl chloride. This maximum yield possible is termed the "theoretical yield;" it is usually expressed in grams, but can be expressed in moles. The "actual yield" can never be greater than the theoretical yield and it is usually less. The efficiency of the preparation is expressed as the percent yield which is actually a percent of the theoretical yield. The percent yield is the actual yield (moles or grams) divided by the theoretical yield (moles or grams, but must be the same units as actual yield) multiplied by 100. Here are the important equations to remember:
x 100THEORETICAL YIELD (moles)
ACTUAL YIELD (moles)% YIELD =
= molesMW product
g product obtained ACTUAL YIELD =
= molesMW limiting reagent
g limiting reagent*THEORETICAL YIELD = X
mol limiting reagent
mol product
*THEORETICAL YIELD IN GRAMS = THEORETICAL IN MOLES X MOLECULAR WEIGHT OF PRODUCT You will be required to calculate the moles used as well as theoretical, actual and percent yields for every reaction you do. You can determine the molecular weights from the structure (count atoms) or obtain them from sources such as the CRC Handbook of Chemistry and Physics or the Dictionary of Organic Compounds.
Introduction - 14
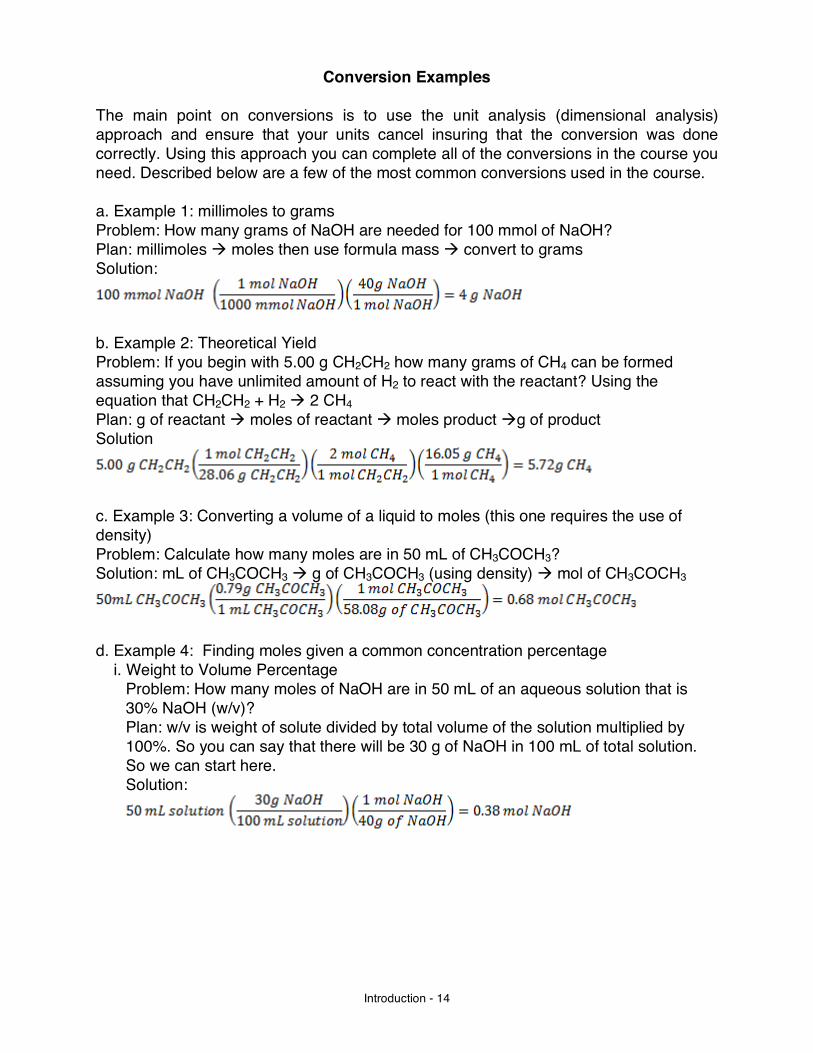
Conversion Examples
The main point on conversions is to use the unit analysis (dimensional analysis) approach and ensure that your units cancel insuring that the conversion was done correctly. Using this approach you can complete all of the conversions in the course you need. Described below are a few of the most common conversions used in the course. a. Example 1: millimoles to grams Problem: How many grams of NaOH are needed for 100 mmol of NaOH? Plan: millimoles à moles then use formula mass à convert to grams Solution:
b. Example 2: Theoretical Yield Problem: If you begin with 5.00 g CH2CH2 how many grams of CH4 can be formed assuming you have unlimited amount of H2 to react with the reactant? Using the equation that CH2CH2 + H2 à 2 CH4 Plan: g of reactant à moles of reactant à moles product àg of product Solution
c. Example 3: Converting a volume of a liquid to moles (this one requires the use of density) Problem: Calculate how many moles are in 50 mL of CH3COCH3? Solution: mL of CH3COCH3 à g of CH3COCH3 (using density) à mol of CH3COCH3
d. Example 4: Finding moles given a common concentration percentage
i. Weight to Volume Percentage Problem: How many moles of NaOH are in 50 mL of an aqueous solution that is 30% NaOH (w/v)? Plan: w/v is weight of solute divided by total volume of the solution multiplied by 100%. So you can say that there will be 30 g of NaOH in 100 mL of total solution. So we can start here. Solution:

Introduction - 15
ii. Volume to Volume Percentage Problem: How many moles of CH3COCH3 are in 50 mL of an aqueous solution that is 30% CH3COCH3 (v/v)? Plan: v/v is volume of solute divided by total volume of the solution multiplied by 100%. So you can say that there will be 30mL of CH3COCH3 in 100 mL of total solution. So we can start here.