Embed Size (px)
Citation preview
ChemBioO
ffice.Com®
Chem & Bio DrawChem & Bio Drawing Standard
®
Chem & Bio Draw 12.0 iUser Guide
ContentsChapter 1Getting Started.........................................1
The Toolbars ...........................................1Periodic Table .........................................2
Chapter 2Basic Drawings .........................................3
Bonds ......................................................3Atom labels .............................................4Rings .......................................................5Arrows and Shapes .................................6
Chapter 3Tutorials..................................................11
Overview...............................................11Tutorial 1: Drawing a Structure ............11Tutorial 2: Using Rings.........................12Tutorial 3: Fischer Projections..............13
Tutorial 4: Perspective Drawings ......... 15Tutorial 5: Stereochemistry .................. 17
Chapter 4Advanced Drawing Techniques............ 19
Clean Up Structure ............................... 19Drawing Reactions................................ 20
Appendix AChemical Interpretation........................ 23
Chemical Intelligence ........................... 23Database Conventions .......................... 23
Appendix BNicknames .............................................. 27
Index ............................................ 29

ii Contents
Chem & Bio Draw 12.0 1User Guide
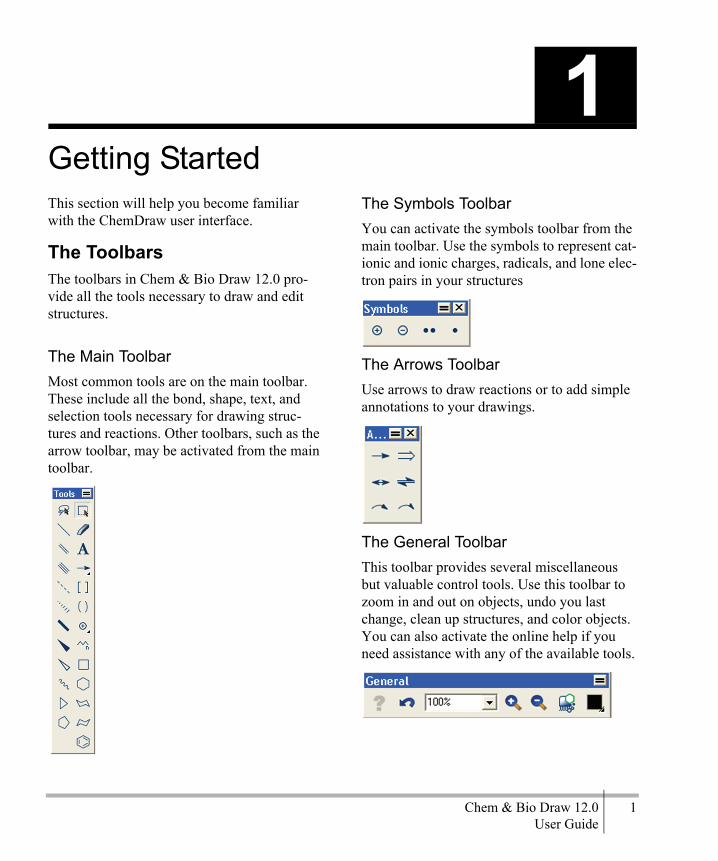
Getting StartedThis section will help you become familiar with the ChemDraw user interface.
The ToolbarsThe toolbars in Chem & Bio Draw 12.0 pro-vide all the tools necessary to draw and edit structures.
The Main ToolbarMost common tools are on the main toolbar. These include all the bond, shape, text, and selection tools necessary for drawing struc-tures and reactions. Other toolbars, such as the arrow toolbar, may be activated from the main toolbar.
The Symbols ToolbarYou can activate the symbols toolbar from the main toolbar. Use the symbols to represent cat-ionic and ionic charges, radicals, and lone elec-tron pairs in your structures.
The Arrows ToolbarUse arrows to draw reactions or to add simple annotations to your drawings.
The General ToolbarThis toolbar provides several miscellaneous but valuable control tools. Use this toolbar to zoom in and out on objects, undo you last change, clean up structures, and color objects. You can also activate the online help if you need assistance with any of the available tools.
1

2 Getting StartedChapter 1
Periodic TableUse the periodic table to insert atoms into structures. Go to View>Show Periodic Table Window.Click a symbol to highlight the atom and acti-vate the Text tool. Drag across the table to highlight each atom.TO ADD AN ATOMSelect it in the periodic table and click an empty space in the document. The atom appears in its chemically neutral form. For example, carbon appears as CH4 and hydrogen appears as H2.TO LABEL AN ATOMClick an existing unlabeled atom.
TO CHANGE THE OXIDATION STATEUsing the symbol for the atom, click the atom in the document window.TO CHANGE TO A DIFFERENT ATOMSelect the new atom in the periodic table and click the atom in the document you want to change.TO EDIT A LABELTo modify the atom label, double-click the atom in the document window.
NOTE: Some element names conflict with ChemDraw 12.0 Hotkeys and may not be inter-preted correctly.

Chem & Bio Draw 12.0 3User Guide
Basic DrawingsChemDraw 12.0 provides a variety of tools for drawing everything from simple chemical structures to complex reactions. In this section, we introduce basic drawing techniques to help you create your first structures. We also explain how to add features such as arrows and shapes to enhance structures and reactions.
BondsThe Main toolbar offers numerous options for drawing bonds. Some of the tools are for draw-ing specific types of bonds while others repre-sent nonspecific bonds for drawing structures for database queries.
Drawing bondsAll bonds that you draw are, by default, con-strained to a fixed length and fixed angle. To draw the first bond of your structure, select the solid bond tool in the Main toolbar and click in the document window. To draw another bond, click either end of the first bond.
Figure 2.1 Adding a bond to an atom
You can draw a bond in any direction. Using a bond tool, click and drag from an existing atom or an empty area in the document window. The bond is drawn in the direction you drag the cursor.
Figure 2.2 Adding a bond by dragging
Bond Types
Double BondsThere are two ways to draw a double bond:
• Draw a bond using the Double bond tool.• Draw a single bond over an existing single
bond.
Wedged BondsWedged bonds are drawn with a fixed orienta-tion in a document window.To draw a wedged bond:
1. Click one of the wedged bond tools.2. Drag from the narrow end of the wedged
bond to the wide end of the wedged bond.
2
4 Basic DrawingsChapter 2
BOND ORIENTATION
• To change the orientation of the wedged bond, click the center of the bond using the wedged bond tool.
NOTE: ChemDraw 12.0 treats hashed wedged bonds with the narrow end in the plane of the screen and the wide end behind the plane.
Editing BondsYou can modify the appearance of chemical bonds by:
• Changing bond types• Changing bond alignment and orientation• Moving Atoms• Layering bonds
Changing Bond TypesChange a bond from one type to another select-ing a bond tool and clicking the center of an existing bond.
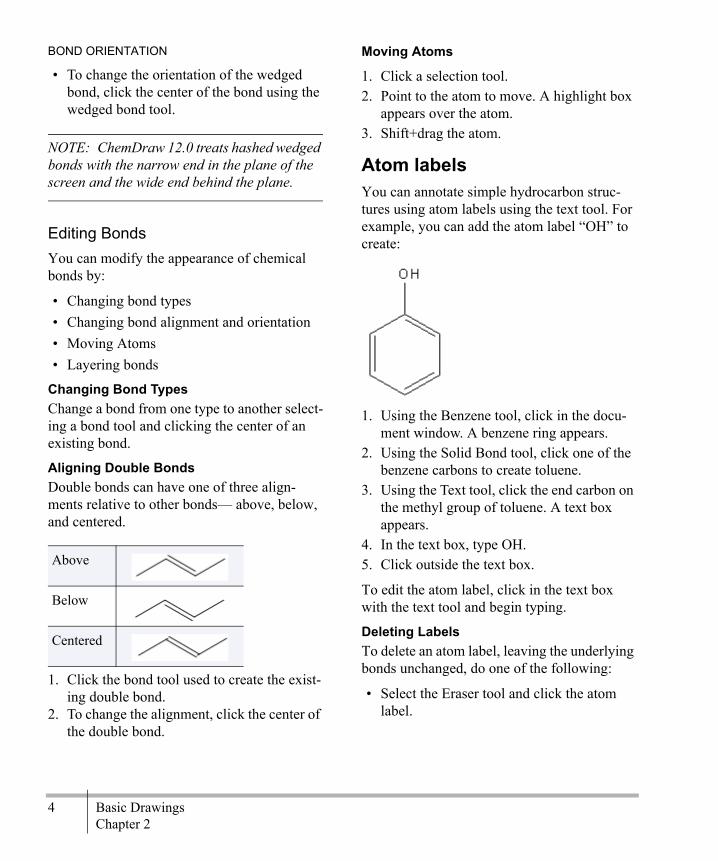
Aligning Double BondsDouble bonds can have one of three align-ments relative to other bonds— above, below, and centered.
1. Click the bond tool used to create the exist-ing double bond.
2. To change the alignment, click the center of the double bond.
Moving Atoms
1. Click a selection tool.2. Point to the atom to move. A highlight box
appears over the atom.3. Shift+drag the atom.
Atom labelsYou can annotate simple hydrocarbon struc-tures using atom labels using the text tool. For example, you can add the atom label “OH” to create:.
1. Using the Benzene tool, click in the docu-ment window. A benzene ring appears.
2. Using the Solid Bond tool, click one of the benzene carbons to create toluene.
3. Using the Text tool, click the end carbon on the methyl group of toluene. A text box appears.
4. In the text box, type OH.5. Click outside the text box.
To edit the atom label, click in the text box with the text tool and begin typing.
Deleting LabelsTo delete an atom label, leaving the underlying bonds unchanged, do one of the following:
• Select the Eraser tool and click the atom label.
Above
Below
Centered
Chem & Bio Draw 12.0 5User Guide
• With a selection, bond, or ring tool selected, point to the atom label and press the space-bar, Backspace, or Delete key.
Using NicknamesUsing Nicknames, you can add short names for functional groups to use as an atom label or part of a label. When you label an atom with a nickname, the expanded structure retains its chemical significance.Commonly used nicknames, such as Me, Et, and Ph are stored in your ChemDraw Items folder. You can edit this list within the GUI (however, you should not attempt to edit this file directly).
Applying NicknamesYou may type a nickname into your structure.To type the nickname:
1. Double click an atom with a bond tool or click an atom with the Text tool.
2. Type the nickname in the text box.
NOTE: Nicknames are tokens and do not flip orientation when applied to the left side of a structure when using Automatic Justification. For example, in the absence of a defined Nick-name, the label “OTHP” appears as “PHTO”. However, since the Nickname “THP” is defined, the label appears as “THPO”.
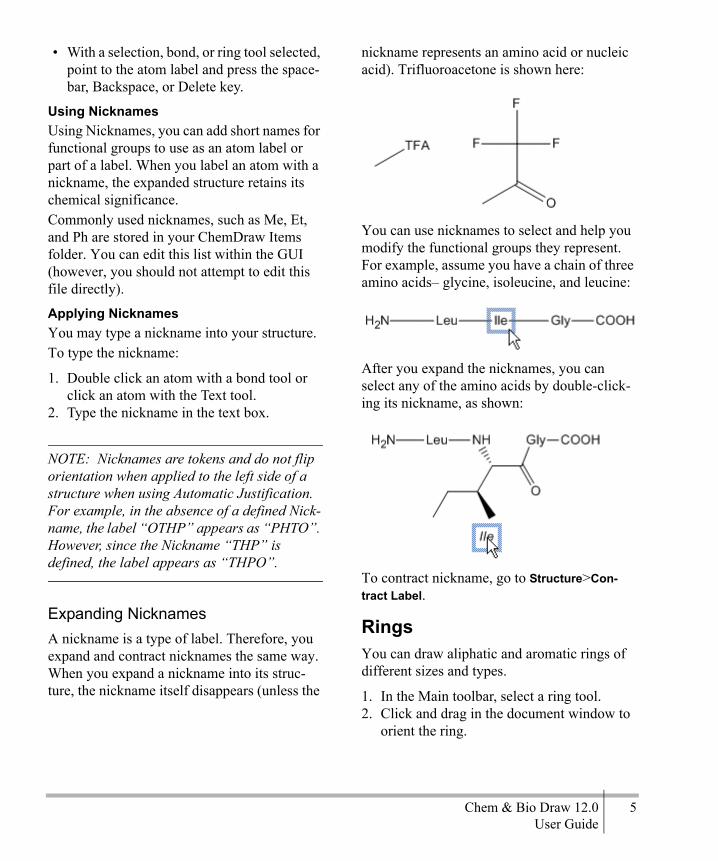
Expanding NicknamesA nickname is a type of label. Therefore, you expand and contract nicknames the same way. When you expand a nickname into its struc-ture, the nickname itself disappears (unless the
nickname represents an amino acid or nucleic acid). Trifluoroacetone is shown here:
You can use nicknames to select and help you modify the functional groups they represent. For example, assume you have a chain of three amino acids– glycine, isoleucine, and leucine:
After you expand the nicknames, you can select any of the amino acids by double-click-ing its nickname, as shown:
To contract nickname, go to Structure>Con-tract Label.
RingsYou can draw aliphatic and aromatic rings of different sizes and types.
1. In the Main toolbar, select a ring tool.2. Click and drag in the document window to
orient the ring.

6 Basic DrawingsChapter 2
If you click an atom or bond with a ring tool in an existing structure, the ring is fused to it.
Aromatic Structures
Delocalized ringsYou can draw a resonance delocalized ring using any ring tool except for the cyclohexane chairs.
1. Click a ring tool.2. Press the Ctrl key and drag or click in the
document window.
Resonance structuresYou can draw benzene in either of its two ori-entations:
To draw, click in the document window with the benzene drawing tool. To draw a different orientation, Shift-click in the drawing window.
Arrows and ShapesUse the tools and tool palettes on the main toolbar to add shapes to your documents (A tool palette is indicated on the main toolbar by an arrow). You can tear off the palettes and place them where you want.Objects, except for daggers and some symbols, can be rotated and scaled.
ArrowsYou can customize arrows not only for length and angle, but for arrowhead width and shape. You can also drag an arrow from its middle to create an arc of any length.
When you mouse-over an arrow with the Lasso, Marquee, or an Arrow tool selected, the application switches to edit mode and adjust-ment handles appear on the arrow.
Figure 2.3 Arrow adjustment handles
Drag the adjustment handles to change the arrow length, angle, or shape. When changing the angle of an arrow, you are restricted to multiples of 15° if the Fixed Angles is selected. Hold down the Alt key to drag to any angle.
The Bracket ToolsThese include brackets [ ] and parentheses ( ).
Paired BracketsPaired brackets can only be placed in a vertical orientation. A rectangle or box defines their position.To draw a paired brackets:
1. Select a paired bracket tool from the Draw-ing Elements palette.
2. Point where you want a corner of the bracket.
3. Drag from one corner of the box diagonally to the opposite corner.
Chem & Bio Draw 12.0 7User Guide
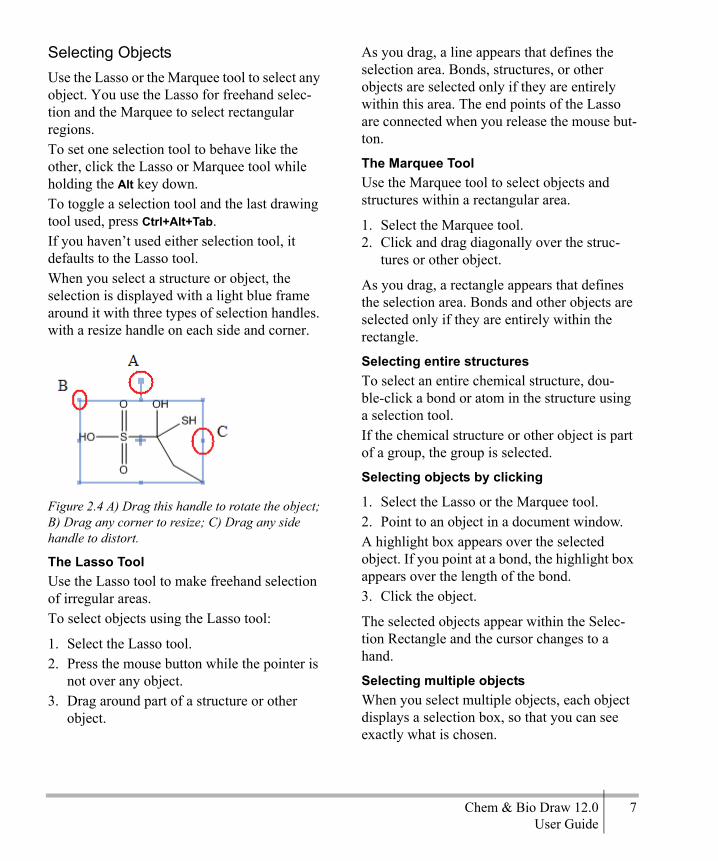
Selecting ObjectsUse the Lasso or the Marquee tool to select any object. You use the Lasso for freehand selec-tion and the Marquee to select rectangular regions.To set one selection tool to behave like the other, click the Lasso or Marquee tool while holding the Alt key down.To toggle a selection tool and the last drawing tool used, press Ctrl+Alt+Tab.If you haven’t used either selection tool, it defaults to the Lasso tool.When you select a structure or object, the selection is displayed with a light blue frame around it with three types of selection handles. with a resize handle on each side and corner.
Figure 2.4 A) Drag this handle to rotate the object; B) Drag any corner to resize; C) Drag any side handle to distort.
The Lasso ToolUse the Lasso tool to make freehand selection of irregular areas.To select objects using the Lasso tool:
1. Select the Lasso tool.2. Press the mouse button while the pointer is
not over any object.3. Drag around part of a structure or other
object.
As you drag, a line appears that defines the selection area. Bonds, structures, or other objects are selected only if they are entirely within this area. The end points of the Lasso are connected when you release the mouse but-ton.
The Marquee ToolUse the Marquee tool to select objects and structures within a rectangular area.
1. Select the Marquee tool.2. Click and drag diagonally over the struc-
tures or other object.
As you drag, a rectangle appears that defines the selection area. Bonds and other objects are selected only if they are entirely within the rectangle.
Selecting entire structuresTo select an entire chemical structure, dou-ble-click a bond or atom in the structure using a selection tool.If the chemical structure or other object is part of a group, the group is selected.
Selecting objects by clicking
1. Select the Lasso or the Marquee tool.2. Point to an object in a document window.A highlight box appears over the selected object. If you point at a bond, the highlight box appears over the length of the bond.3. Click the object.
The selected objects appear within the Selec-tion Rectangle and the cursor changes to a hand.
Selecting multiple objectsWhen you select multiple objects, each object displays a selection box, so that you can see exactly what is chosen.
8 Basic DrawingsChapter 2
To add more objects to the selection, press Shift and select the other objects.To select all objects, go to Edit>Select All.
Deselecting all objectsTo deselect all objects, do one of the follow-ing:
• Click an empty area outside the selection rectangle.
• Press Esc.• Select a different tool.• Select another object without holding down
Shift.
Deselecting one objectTo deselect only one of several selected objects, hold down the Shift key and click the object with a selection tool.
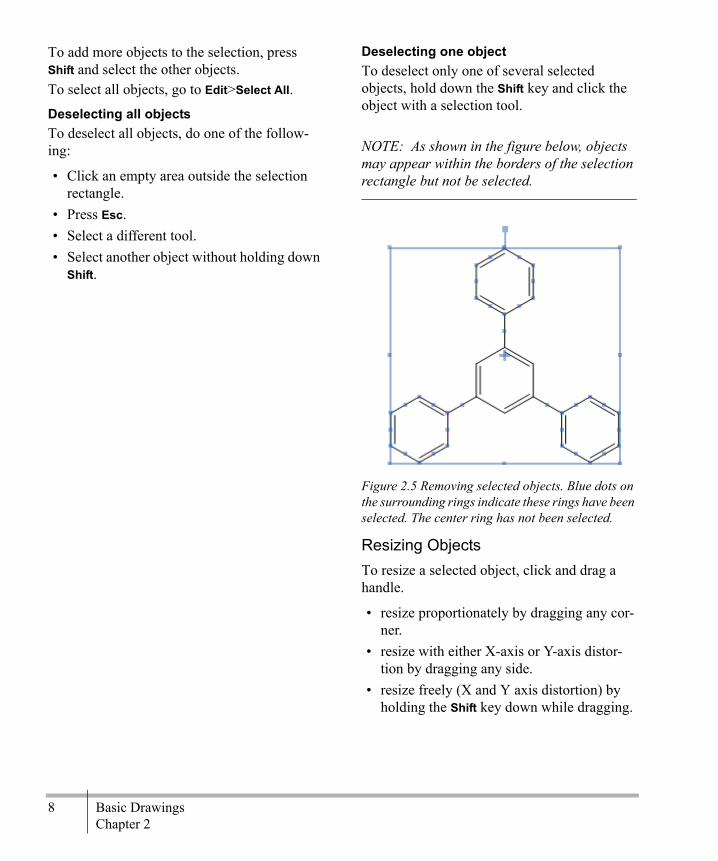
NOTE: As shown in the figure below, objects may appear within the borders of the selection rectangle but not be selected.
Figure 2.5 Removing selected objects. Blue dots on the surrounding rings indicate these rings have been selected. The center ring has not been selected.
Resizing ObjectsTo resize a selected object, click and drag a handle.
• resize proportionately by dragging any cor-ner.
• resize with either X-axis or Y-axis distor-tion by dragging any side.
• resize freely (X and Y axis distortion) by holding the Shift key down while dragging.
Chem & Bio Draw 12.0 9User Guide
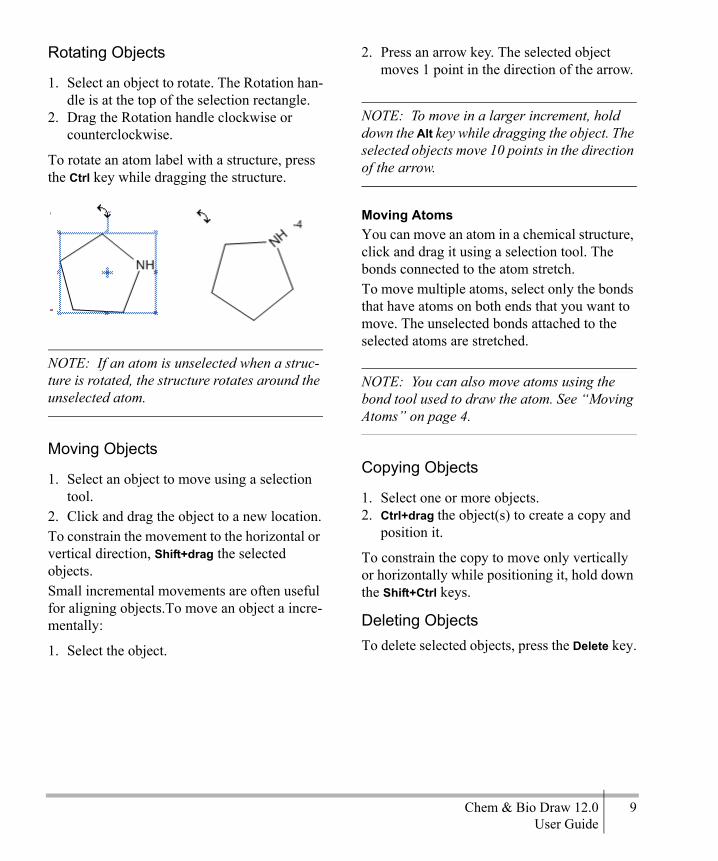
Rotating Objects
1. Select an object to rotate. The Rotation han-dle is at the top of the selection rectangle.
2. Drag the Rotation handle clockwise or counterclockwise.
To rotate an atom label with a structure, press the Ctrl key while dragging the structure.
NOTE: If an atom is unselected when a struc-ture is rotated, the structure rotates around the unselected atom.
Moving Objects
1. Select an object to move using a selection tool.
2. Click and drag the object to a new location.To constrain the movement to the horizontal or vertical direction, Shift+drag the selected objects.Small incremental movements are often useful for aligning objects.To move an object a incre-mentally:
1. Select the object.
2. Press an arrow key. The selected object moves 1 point in the direction of the arrow.
NOTE: To move in a larger increment, hold down the Alt key while dragging the object. The selected objects move 10 points in the direction of the arrow.
Moving AtomsYou can move an atom in a chemical structure, click and drag it using a selection tool. The bonds connected to the atom stretch.To move multiple atoms, select only the bonds that have atoms on both ends that you want to move. The unselected bonds attached to the selected atoms are stretched.
NOTE: You can also move atoms using the bond tool used to draw the atom. See “Moving Atoms” on page 4.
Copying Objects
1. Select one or more objects.2. Ctrl+drag the object(s) to create a copy and
position it.
To constrain the copy to move only vertically or horizontally while positioning it, hold down the Shift+Ctrl keys.
Deleting ObjectsTo delete selected objects, press the Delete key.

10 Basic DrawingsChapter 2
Chem & Bio Draw 12.0 11User Guide
TutorialsOverviewThe tutorials illustrate fundamental drawing techniques. Each tutorial introduces new tech-niques, or variations of techniques learned in previous tutorials. We therefore suggest that you follow the tutorials in order.
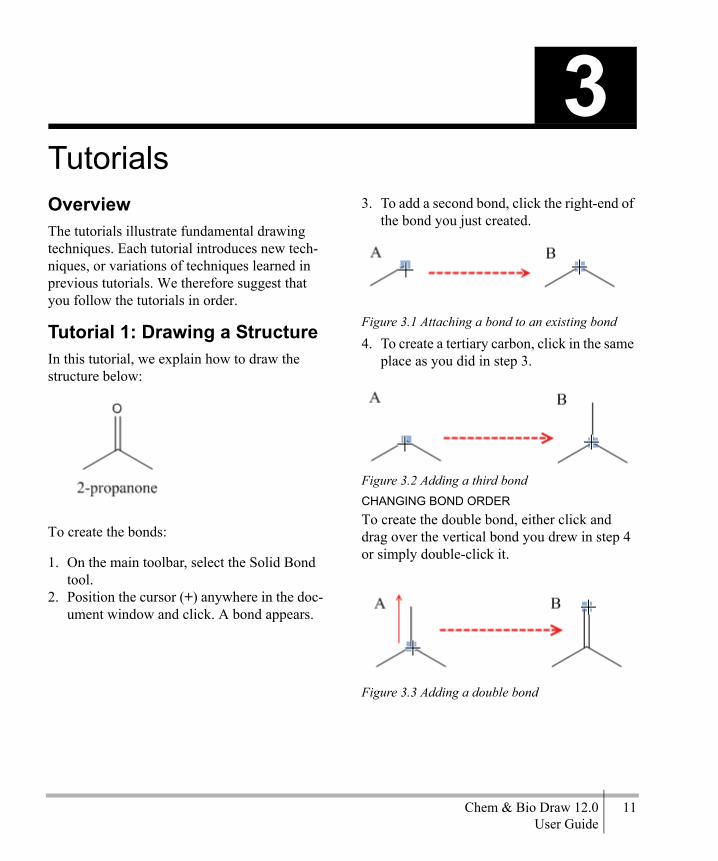
Tutorial 1: Drawing a StructureIn this tutorial, we explain how to draw the structure below:
To create the bonds:
1. On the main toolbar, select the Solid Bond tool.
2. Position the cursor (+) anywhere in the doc-ument window and click. A bond appears.
3. To add a second bond, click the right-end of the bond you just created.
Figure 3.1 Attaching a bond to an existing bond
4. To create a tertiary carbon, click in the same place as you did in step 3.
.
Figure 3.2 Adding a third bondCHANGING BOND ORDERTo create the double bond, either click and drag over the vertical bond you drew in step 4 or simply double-click it.
Figure 3.3 Adding a double bond
3

12 TutorialsChapter 3
ADDING ATOM LABELS
1. Using the Text tool, click the end of the double-bond shown below. A text box appears at the end of the bond.
2. Type an uppercase O in the text box.3. Close the text box by either pressing the
Esc key or choosing another tool.
Tutorial 2: Using RingsIn this tutorial you use rings to create the struc-ture below:
Create the ring system:
1. Click the Benzene tool.2. Shift-click in an empty area of the docu-
ment.
NOTE: Hold down the shift key to change resonance structures when using the cyclopentadiene or benzene tools.
3. Point to the center of the lower right bond in the benzene ring.
4. Click to fuse another ring.
Figure 3.4 Fusing rings
5. In the final structure, there is supposed to be only one double bond in the second ring. To correct the current structure, click one of the double bonds using the Single Bond tool. Do the same for the other double bond.
Figure 3.5 To change the bond order, type ‘1’.
6. To create the double bond in the second ring, click it using the Double Bond tool.
Chem & Bio Draw 12.0 13User Guide
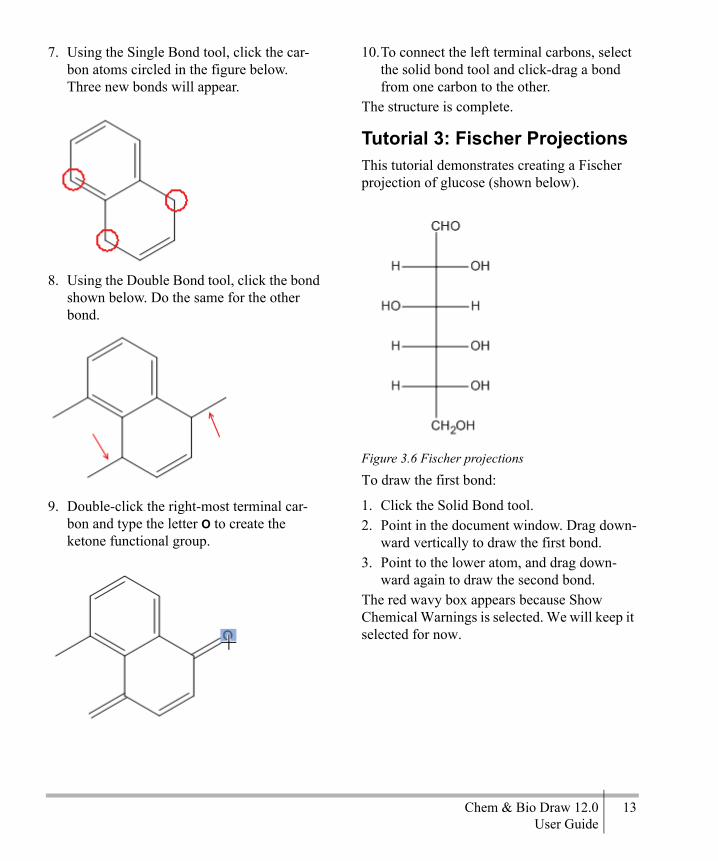
7. Using the Single Bond tool, click the car-bon atoms circled in the figure below. Three new bonds will appear.
8. Using the Double Bond tool, click the bond shown below. Do the same for the other bond.
9. Double-click the right-most terminal car-bon and type the letter O to create the ketone functional group.
10.To connect the left terminal carbons, select the solid bond tool and click-drag a bond from one carbon to the other.
The structure is complete.
Tutorial 3: Fischer ProjectionsThis tutorial demonstrates creating a Fischer projection of glucose (shown below).
Figure 3.6 Fischer projections
To draw the first bond:
1. Click the Solid Bond tool.2. Point in the document window. Drag down-
ward vertically to draw the first bond.3. Point to the lower atom, and drag down-
ward again to draw the second bond.The red wavy box appears because Show Chemical Warnings is selected. We will keep it selected for now.

14 TutorialsChapter 3
4. Repeat step 3 three more times to draw a total of five bonds.
Figure 3.7 Drawing the backbone
NOTE: When you drag the pointer along the length of the bonds, the pointer alternates between an arrow and a cross. The arrow indi-cates you are pointing over the center of a bond, and the cross indicates you are pointing to an atom.
Add horizontal bonds to the second atom in the string of bonds you created:
1. To add a perpendicular bond, point to the uppermost Chemical Warning box and click it.
Note that the red wavy box disappears as soon as you add a bond.2. Click again to add a horizontal bond in the
opposite direction.
3. Repeat steps 1 and 2 with each successive Chemical Warning box until all horizontal bonds are added.
Figure 3.8 Adding horizontal bonds to the backbone
Add labels to the first and last carbon atoms:
1. Select the Text tool.2. Double-click the uppermost carbon atom to
create a text box, and type CHO in upper-case.
3. Double-click the lower-most carbon atom, and type CH2OH in uppercase.
Figure 3.9 Adding atom labels
Add the repeating labels for the hydrogens and hydroxyls:
1. Double-click the atom shown in A below and type H in uppercase.
Chem & Bio Draw 12.0 15User Guide
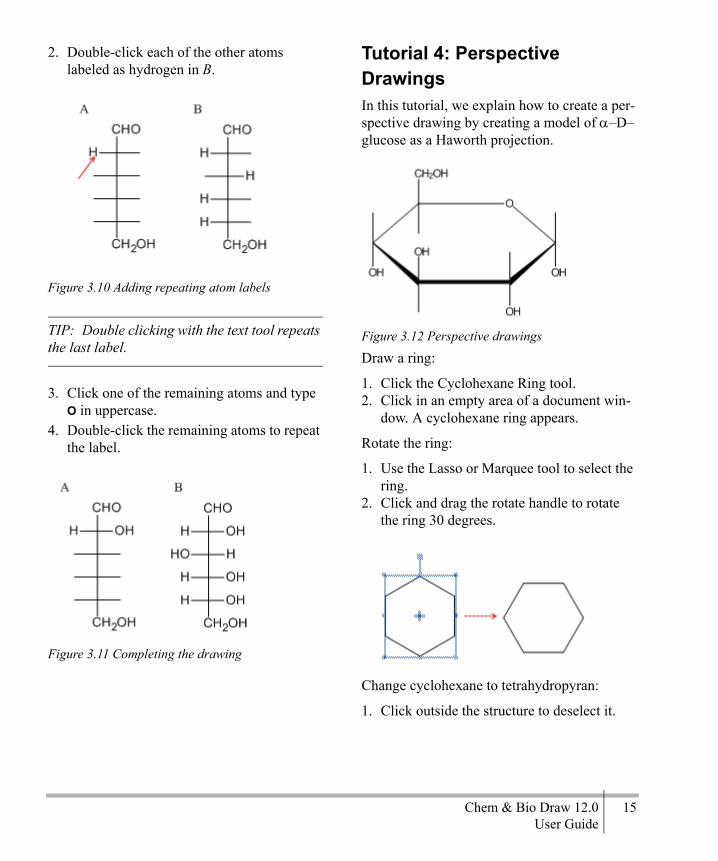
2. Double-click each of the other atoms labeled as hydrogen in B.
Figure 3.10 Adding repeating atom labels
TIP: Double clicking with the text tool repeats the last label.
3. Click one of the remaining atoms and type O in uppercase.
4. Double-click the remaining atoms to repeat the label.
Figure 3.11 Completing the drawing
Tutorial 4: Perspective DrawingsIn this tutorial, we explain how to create a per-spective drawing by creating a model of α–D–glucose as a Haworth projection.
Figure 3.12 Perspective drawings
Draw a ring:
1. Click the Cyclohexane Ring tool.2. Click in an empty area of a document win-
dow. A cyclohexane ring appears.
Rotate the ring:
1. Use the Lasso or Marquee tool to select the ring.
2. Click and drag the rotate handle to rotate the ring 30 degrees.
Change cyclohexane to tetrahydropyran:
1. Click outside the structure to deselect it.

16 TutorialsChapter 3
2. Point to the atom indicated in the figure below, and type the letter O in uppercase.
Figure 3.13 Adding an atom label with a HotKey
Resize horizontally:
1. Go to Edit>Select All (or type Ctrl-A).2. Using a selection tool, click-drag the right
side handle to resize the ring horizontally. Release the mouse button when the ring is stretched about 200%.
Resize the ring:
1. Go to Edit>Select All (or type Ctrl-A).2. Click-Drag the ring a corner adjustment
handle increase the size of the ring to 150%. A dialog box appears, asking you whether you want to scale the drawing and text settings.
3. In the dialog box, click No.
Add vertical bonds:
1. Click the Solid Bond tool.2. Point to the atom shown in the figure below
and drag upward to create a bond.
3. Point to the same atom, and drag downward to create another bond.
4. Repeat this procedure four more times, add-ing the pairs of vertical bonds shown below:
Create OH labels:Point to where you want the label and type O in uppercase. You can also use the Text tool method described in the steps below.
1. Select the Solid Bond tool, point to the atom shown in the figure below and double-click to open a text box.

Chem & Bio Draw 12.0 17User Guide
2. Type OH.
Figure 3.14 Adding the OH labels
3. Move the pointer to the other atoms as shown, and triple-click to repeat the atom label.
TIP: If placing the labels is difficult because of the drawing size, go to View> Magnify.
Add the CH2OH label:
1. Triple-click the upper atom of C5.
2. Press the Enter key to open the atom label text box. Type CH2 before the OH.
Figure 3.15 Adding the CH2OH label
NOTE: When used with a bond tool active, Enter is a Hotkey that opens a text box for the last atom labeled.
Tutorial 5: StereochemistryThis tutorial demonstrates using Stereochemis-try markers and the flip command. As you draw the structure below, you may notice that some of the steps are similar to those needed earlier to draw isobutane.First, we draw the following structure:
Drawing the structureTo draw the structure:
1. Click the Solid Bond tool.
18 TutorialsChapter 3
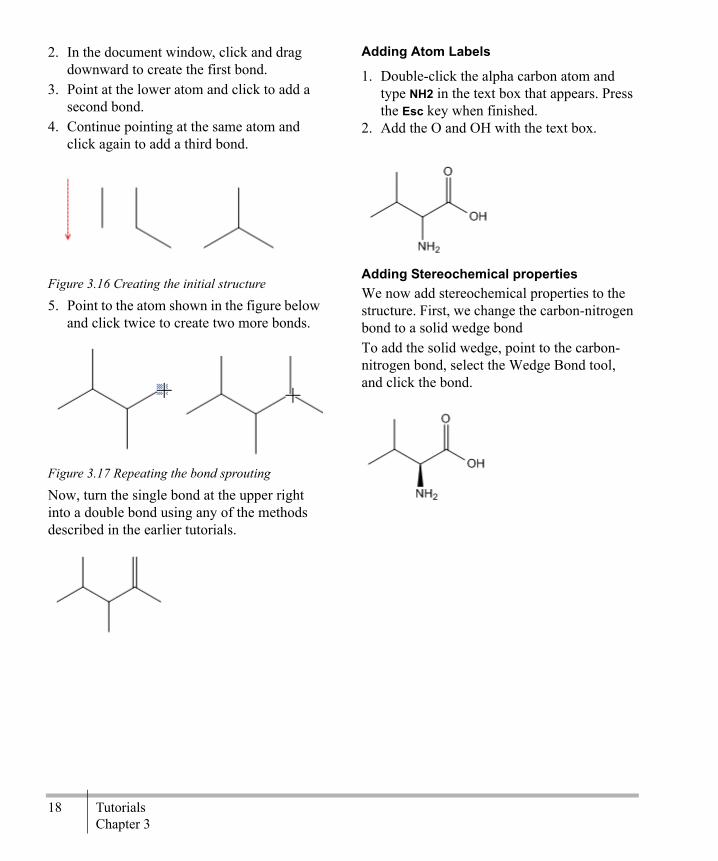
2. In the document window, click and drag downward to create the first bond.
3. Point at the lower atom and click to add a second bond.
4. Continue pointing at the same atom and click again to add a third bond.
Figure 3.16 Creating the initial structure
5. Point to the atom shown in the figure below and click twice to create two more bonds.
Figure 3.17 Repeating the bond sprouting
Now, turn the single bond at the upper right into a double bond using any of the methods described in the earlier tutorials.
Adding Atom Labels
1. Double-click the alpha carbon atom and type NH2 in the text box that appears. Press the Esc key when finished.
2. Add the O and OH with the text box.
Adding Stereochemical propertiesWe now add stereochemical properties to the structure. First, we change the carbon-nitrogen bond to a solid wedge bondTo add the solid wedge, point to the carbon-nitrogen bond, select the Wedge Bond tool, and click the bond.
Chem & Bio Draw 12.0 19User Guide
Advanced Drawing TechniquesThe advanced features in ChemDraw are designed to either help you save time or to per-form functions that simply can’t be accom-plished using the basic tools. For example, you can see your drawing as 3D models or create stereoisomers at the click of your mouse. With the ChemDraw 12.0 advanced drawing fea-tures, you can:• Clean up structures• Create synthesis drawings• Label functional groups with nicknames.
Clean Up StructureYou may find it difficult to draw atoms in the sterically correct position. Use the Clean Up Structure command to redraw the structure so that bond lengths are fixed and atoms are in the correct location. Clean Up Structure does not position molecules relative to other objects. So, some overlap may occur.The Clean Up Structure feature follows these rules:• A ring is redrawn only if all of its bonds are
selected.• Structures are rotated so that as many bonds
as possible are directed at a multiple of 15 degrees.
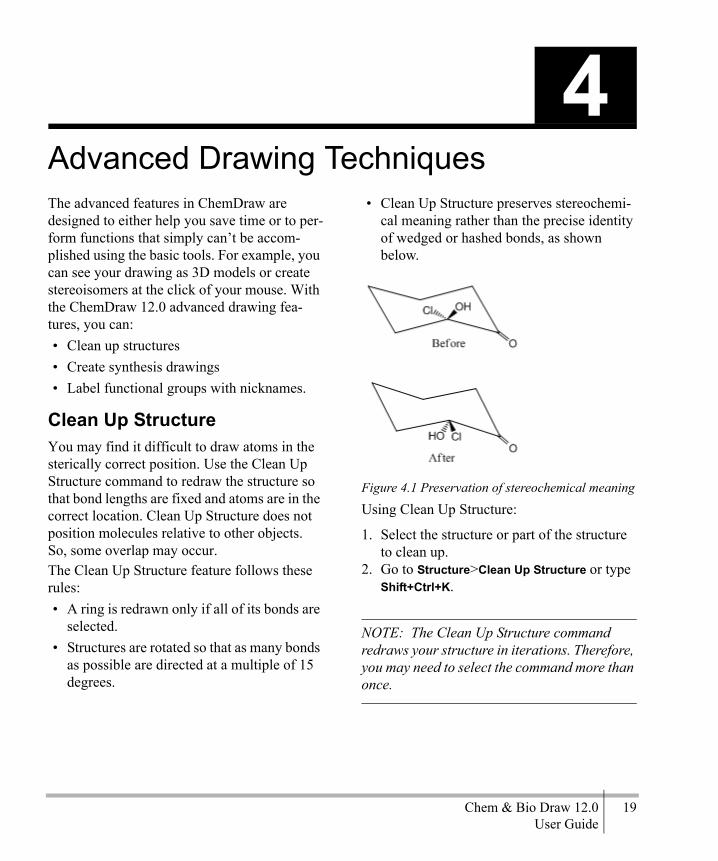
• Clean Up Structure preserves stereochemi-cal meaning rather than the precise identity of wedged or hashed bonds, as shown below.
Figure 4.1 Preservation of stereochemical meaning
Using Clean Up Structure:
1. Select the structure or part of the structure to clean up.
2. Go to Structure>Clean Up Structure or type Shift+Ctrl+K.
NOTE: The Clean Up Structure command redraws your structure in iterations. Therefore, you may need to select the command more than once.
4
20 Advanced Drawing TechniquesChapter 4
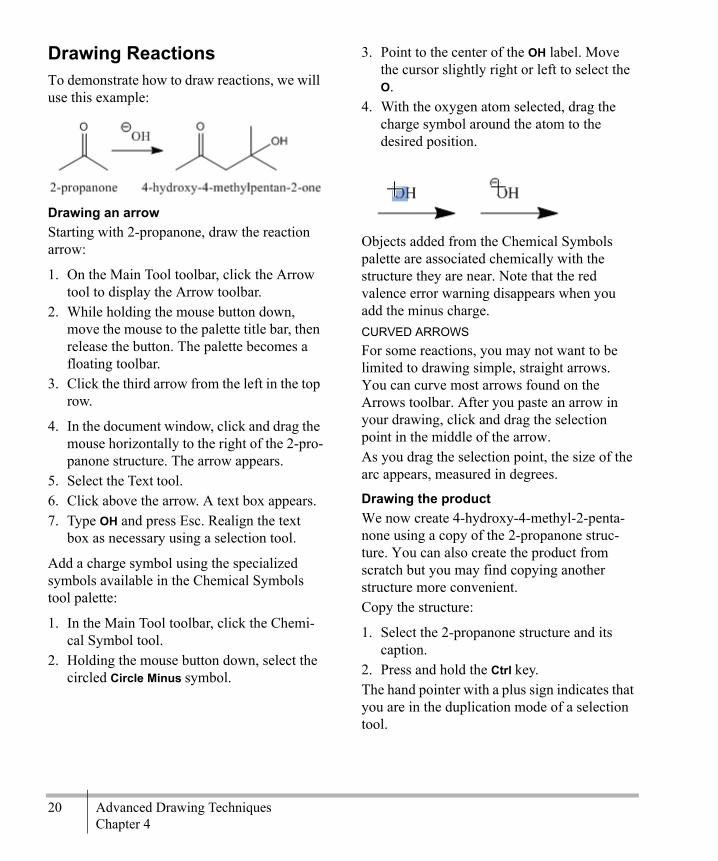
Drawing ReactionsTo demonstrate how to draw reactions, we will use this example:
Drawing an arrowStarting with 2-propanone, draw the reaction arrow:
1. On the Main Tool toolbar, click the Arrow tool to display the Arrow toolbar.
2. While holding the mouse button down, move the mouse to the palette title bar, then release the button. The palette becomes a floating toolbar.
3. Click the third arrow from the left in the top row.
4. In the document window, click and drag the mouse horizontally to the right of the 2-pro-panone structure. The arrow appears.
5. Select the Text tool.6. Click above the arrow. A text box appears.7. Type OH and press Esc. Realign the text
box as necessary using a selection tool.
Add a charge symbol using the specialized symbols available in the Chemical Symbols tool palette:
1. In the Main Tool toolbar, click the Chemi-cal Symbol tool.
2. Holding the mouse button down, select the circled Circle Minus symbol.
3. Point to the center of the OH label. Move the cursor slightly right or left to select the O.
4. With the oxygen atom selected, drag the charge symbol around the atom to the desired position.
Objects added from the Chemical Symbols palette are associated chemically with the structure they are near. Note that the red valence error warning disappears when you add the minus charge.CURVED ARROWSFor some reactions, you may not want to be limited to drawing simple, straight arrows. You can curve most arrows found on the Arrows toolbar. After you paste an arrow in your drawing, click and drag the selection point in the middle of the arrow.As you drag the selection point, the size of the arc appears, measured in degrees.
Drawing the productWe now create 4-hydroxy-4-methyl-2-penta-none using a copy of the 2-propanone struc-ture. You can also create the product from scratch but you may find copying another structure more convenient.Copy the structure:
1. Select the 2-propanone structure and its caption.
2. Press and hold the Ctrl key.The hand pointer with a plus sign indicates that you are in the duplication mode of a selection tool.

Chem & Bio Draw 12.0 21User Guide
3. Drag the selection rectangle to the right and release the mouse button.
Figure 4.2 Duplicating a structure
NOTE: To keep the copy aligned with the orig-inal, hold Shift while dragging.
Modify the duplicate structure:
1. Select the Solid Bond tool.2. Click the far right bond of the copied struc-
ture (Figure A).3. Point to a terminal carbon, shown in A
below.
4. Click the carbon atom until three bonds appear, allowing a pause between each click.
NOTE: If you click too fast, the click is inter-preted either as a double-click, which opens a text box or a triple-click, which duplicates your last atom label.
Figure 4.3 Adding multiple bonds to an atom
5. Point to a terminal carbon atom, shown in Figure A below.
6. Type OH in uppercase.
Figure 4.4 Adding an atom label

22 Advanced Drawing TechniquesChapter 4
Chem & Bio Draw 12.0 23User Guide
Chemical InterpretationChemDraw 12.0 converts lines, characters, and other symbols into chemically meaningful fig-ures as you work. This occurs in the back-ground.This section describes how ChemDraw 12.0 interprets what you draw.
Chemical IntelligenceChemDraw 12.0 was designed as a tool to aid in chemical communication. Most chemists would understand AcOo-C6H4COOH immedi-ately, whether or not they recognized it as aspi-rin. Most computer programs, however, require what is known as a “complete connec-tion table,” in this case, a collection of 21 atoms connected by 5 double bonds and 16 sin-gle bonds in a specific pattern. ChemDraw 12.0 takes what makes sense to a chemist and converts it into what makes sense to another application.This chemical intelligence can be used as a sophisticated “spelling” checker for chemical compounds. For example, if you’re investigat-ing organic acids, a compound with the struc-tural formula CH3COO would probably represent acetic acid. Present the same formula in a paper on transition metal chemistry, and you might be describing a novel methylated cobalt oxide. If you had asked ChemDraw 12.0 to interpret it beforehand, you would have received a message reporting a valence error, and you might have been prompted either to
add a negative charge or to change the capital-ization. ChemDraw 12.0 can offer only suggestions. If you and your audience understand what you are trying to depict, then you can ignore these suggestions.
Database ConventionsMost databases require not only that you draw a structure in a way that makes sense, but that you draw it in the way that the database expects it.
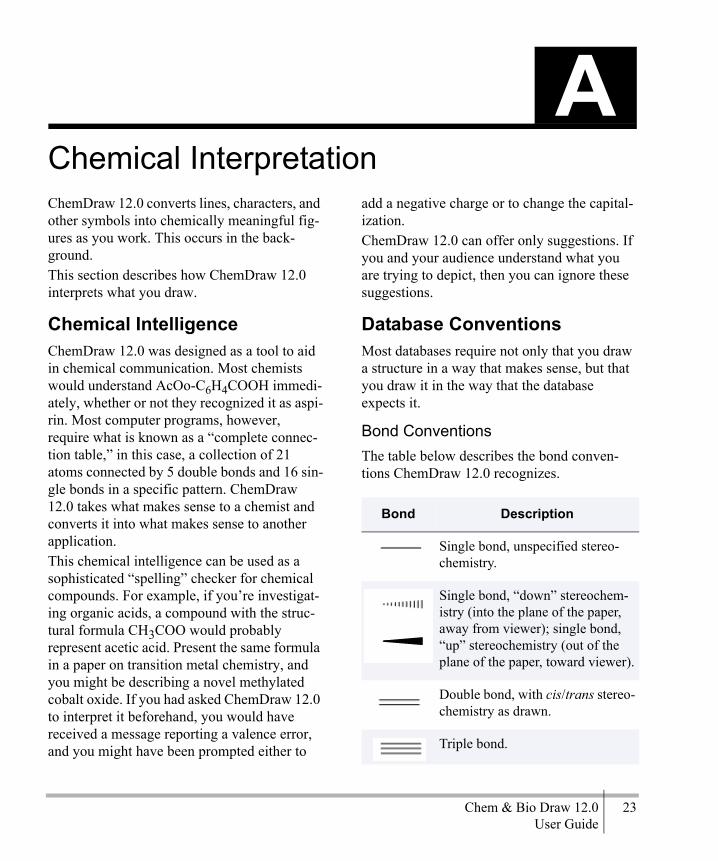
Bond ConventionsThe table below describes the bond conven-tions ChemDraw 12.0 recognizes.
A
Bond Description
Single bond, unspecified stereo-chemistry.
Single bond, “down” stereochem-istry (into the plane of the paper, away from viewer); single bond, “up” stereochemistry (out of the plane of the paper, toward viewer).
Double bond, with cis/trans stereo-chemistry as drawn.
Triple bond.

24 Chemical InterpretationAppendix A
A single bond near a closed circle is recog-nized as aromatic:
Atom LabelsA simple atom label may contain any of the following:
ChemDraw 12.0 analyzes atom labels from left to right, applying standard valence rules to determine which atoms are bonded together. The exception is with an atom label in Auto-matic alignment on the left side of a com-
pound. This type of atom label is displayed in reverse (H3CO instead OCH3) and is parsed from right to left. Standard valences for each atom are defined in the Isotopes Table.By definition, a “simple” atom label has all bonds attached to the first (or last) character. A multi-attached atom label has bonds connected to more than one character, or has all of its bonds attached to a character in the middle of the atom label. Multi-attached atom labels are always parsed from beginning to end, but the beginning might be on the right if the atom label was in Automatic style and on the left side of the original structure:
A single element.
An element and some number of hydrogen atoms.
A nickname.
Repeating units within parentheses.
+*/
A series of any combi-nation of the above.
A multi-attached label that is parsed from left to right.
A multi-attached label that is parsed from right to left.
A bond attached to the open parenthesis of a repeating group is treated as if bonded to the first of those groups.
A bond attached to the close parenthesis or repeat count of a repeating group is treated as if bonded to the last of those groups.
Chem & Bio Draw 12.0 25User Guide
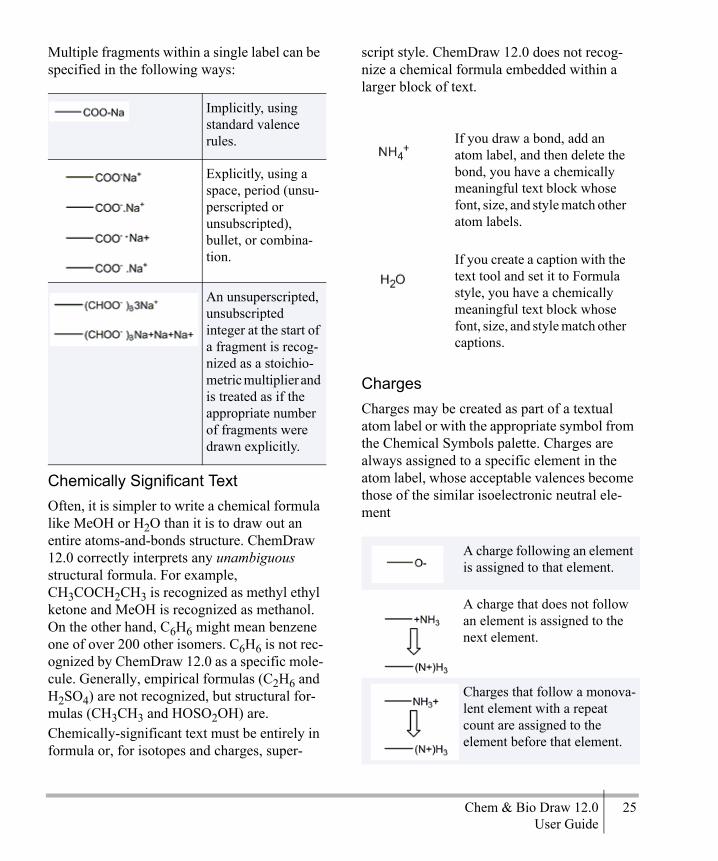
Multiple fragments within a single label can be specified in the following ways:
Chemically Significant TextOften, it is simpler to write a chemical formula like MeOH or H2O than it is to draw out an entire atoms-and-bonds structure. ChemDraw 12.0 correctly interprets any unambiguous structural formula. For example, CH3COCH2CH3 is recognized as methyl ethyl ketone and MeOH is recognized as methanol. On the other hand, C6H6 might mean benzene one of over 200 other isomers. C6H6 is not rec-ognized by ChemDraw 12.0 as a specific mole-cule. Generally, empirical formulas (C2H6 and H2SO4) are not recognized, but structural for-mulas (CH3CH3 and HOSO2OH) are.Chemically-significant text must be entirely in formula or, for isotopes and charges, super-
script style. ChemDraw 12.0 does not recog-nize a chemical formula embedded within a larger block of text.
ChargesCharges may be created as part of a textual atom label or with the appropriate symbol from the Chemical Symbols palette. Charges are always assigned to a specific element in the atom label, whose acceptable valences become those of the similar isoelectronic neutral ele-ment.
Implicitly, using standard valence rules.
Explicitly, using a space, period (unsu-perscripted or unsubscripted), bullet, or combina-tion.
An unsuperscripted, unsubscripted integer at the start of a fragment is recog-nized as a stoichio-metric multiplier and is treated as if the appropriate number of fragments were drawn explicitly.
If you draw a bond, add an atom label, and then delete the bond, you have a chemically meaningful text block whose font, size, and style match other atom labels.
If you create a caption with the text tool and set it to Formula style, you have a chemically meaningful text block whose font, size, and style match other captions.
A charge following an element is assigned to that element.
A charge that does not follow an element is assigned to the next element.
Charges that follow a monova-lent element with a repeat count are assigned to the element before that element.
26 Chemical InterpretationAppendix A
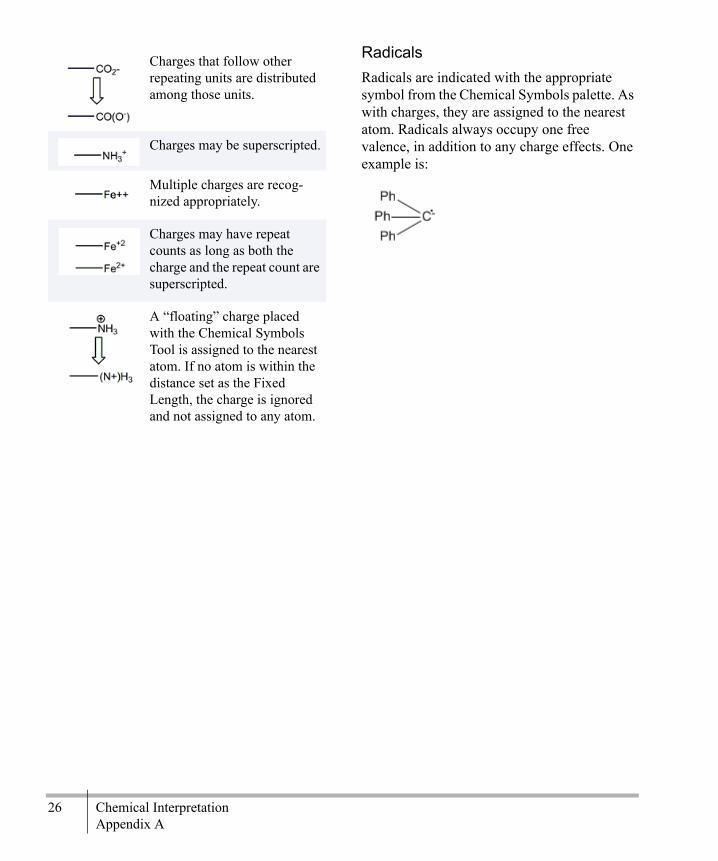
RadicalsRadicals are indicated with the appropriate symbol from the Chemical Symbols palette. As with charges, they are assigned to the nearest atom. Radicals always occupy one free valence, in addition to any charge effects. One example is:
Charges that follow other repeating units are distributed among those units.
Charges may be superscripted.
Multiple charges are recog-nized appropriately.
Charges may have repeat counts as long as both the charge and the repeat count are superscripted.
A “floating” charge placed with the Chemical Symbols Tool is assigned to the nearest atom. If no atom is within the distance set as the Fixed Length, the charge is ignored and not assigned to any atom.

Chem & Bio Draw 12.0 27User Guide
NicknamesNicknames are listed alphabetically by abbre-viation in two tables. Each listing is a link to a page that displays the structure and full name.
A navigation bar at the bottom of the page lets you step through the section or return to the listings.
B
Ac-Me
Ac Bz c-C7H13 cyclopropyl DPIPS i-C4H9
Ad BOM c-C8H15 Cys DPTBS i-C5H11
Ala Bs c-Hx Dan DTBMS i-Pr
Alloc Bt C10H20 DEAE DTBS Ile
Allyl Btm C10H21 DEIPS Et Im
Am Bu Cbz DMIPS Fmoc Leu
Arg Bzh cHx DMPM Gln Lys
Asn Bzl CoA DMPS Glu m-C6H4
Asp BzOM Cy DMTr Gly m-Phenylene
Benzoyl c-C3H5 cyclobutyl DNP His m-Tolyl
Benzyl c-C4H7 cycloheptyl Dnp i-Am MDIPS
Bn c-C5H9 cyclooctyl Dns i-Bu MDPS
Boc c-C6H11 cyclopentyl DNS i-C3H7 Me

28 NicknamesAppendix B
MEM-Xyl
MEM n-Pr Phenyl s-Butyl TBDMS Thr
Mes N3 Pht s-C4H9 TBDPS TIPDS
Met neo-Am Piv s-C5H11 TBMPS TIPS
MMTr neo-C5H11 PMB SEM TBS TMS
MOM Np PMBM Ser TDS Tos
MPM o-C6H4 PNB SES Tf trans-Cinnamyl
Ms o-Phenylene Poc t-Am Tfa Troc
MTM o-Tolyl PPi t-BOC TFA Trp
n-Am p-C6H4 Pr t-Boc Thexyl Trt
n-Bu p-Phenylene Pro t-Bu THF Ts
n-C3H7 p-Tolyl Pv t-Butyl Thf Tyr
n-C4H9 Ph s-Am t-C4H9 THP Val
n-C5H11 Phe s-Bu t-C5H11 Thp Xyl
Chem & Bio Draw 12.0 29User Guide
IndexAadjustment handles 6advanced drawing techniques 19arrows
adjustment handles 6cursor types 6
Arrows Toolbar 1atom labels 24
specification 24atom labels, adding 2atom, changing to a different 2atom, to add an 2atoms
moving 9attachment points 20
Bbenzene ring
changing orientation 6drawing 6
bondschanging type 4editing 4selecting 7types 23
bracketspaired 6
Cchanging bond type 4charges
specifications 25symbols, drawing 25
chemical intelligence 23chemical interpretation 23chemically significant text 25
chemistryof ChemDraw 23
clean up structure 19copying objects 9curved arrows 20cycloalkane rings, converting to delocal-ized rings 6cyclohexane chair ring tool 5cyclohexane ring tool 12, 15cyclopentadiene ring tool 5cyclopentadiene ring, changing orientation 6cyclopentadiene rings, drawing 6cyclopropane ring tool 5
Ddatabase conventions 23database conventions, in structure drawings 23deleting
delete key 9objects 9
delocalized rings, drawing 6deselecting objects 8deselecting one object 8dissociation tool 20double bond
drawing 3orientation 4
drawingarrows 20benzene and cyclopentadiene rings 6charge symbols 25database conventions 23double bonds 3mirror images 19
30 Index
reactions 20resonance delocalized rings 6single bonds 3
drawing a structure tutorial 11duplicating objects 9
Eediting
a label 2bond type 4bonds 4
empirical formulas 25
FFischer projections tutorial 13
GGeneral Toolbar 1getting started tutorial 11
Hhighlight box
selecting 7
Iimported objects, selecting 7
KKekule structures 6
Llabels 2Lasso tool
selecting objects 7
MMain Toolbar 1Main toolbar 1, 3, 5Marquee tool 7mass fragmentation tool 20mirror images, creating 19
movingatoms 4, 9objects 9
NNewman projections tutorial 17nicknames 5, 27
Oobjects
copying 9deleting 9moving 9selecting 7
orientationbenzene ring tool 6cyclopentadiene ring tool 6double bonds 4
oxidation state, changing 2
Ppaired brackets 6palette
single bonds 3periodic table 2perspective drawings tutorial 15positioning
objects 9
Rradicals 26
specification 26reactions 20repeating atom labels 4resizing objects 8resonance delocalized rings, drawing 6resonance structures 6, 12retrosynthesis tool 20rings tutorial 12rotate
command 9
Chem & Bio Draw 12.0 31User Guide
dialog box 9objects 9
rotating objects 9
Sselecting
bonds 7entire structure 7with lasso 7with marquee 7
selecting multiple objects 7selecting objects 7
by clicking 7selection tool
deleting 9deselecting objects 8highlight box 7
single bonds, drawing 3stereochemistry
drawing mirror images 19structure
clean up structure command 19selecting 7
Symbols Toolbar 1
Ttoolbars
arrows 1general 1main 1
symbols 1tools
bold wedge bond 3bond 3cyclohexane chair 5cyclohexane ring 12, 15cyclooctane ring 5cyclopentadiene ring 5cyclopropane ring 5dashed bond 3dissociation 20hashed bond 3hashed wedge bond 3lasso 7Marquee 7mass fragmentation 20retrosynthesis 20
Tutorial 1 (Drawing a Structure) 11Tutorial 2 (Using Rings) 12Tutorial 3 (Fischer projections) 13Tutorial 4 (Perspective Drawings) 15Tutorial 5 (Newman Projections) 17tutorials 11types of bonds 23
Uusing nicknames 5
Wwedged bonds, drawing 3

32 Index


![[CHEM] Chem Nomenclature](https://img.pdfslide.net/doc/110x75/577dabac1a28ab223f8ccaec/chem-chem-nomenclature.jpg)