Embed Size (px)
Citation preview
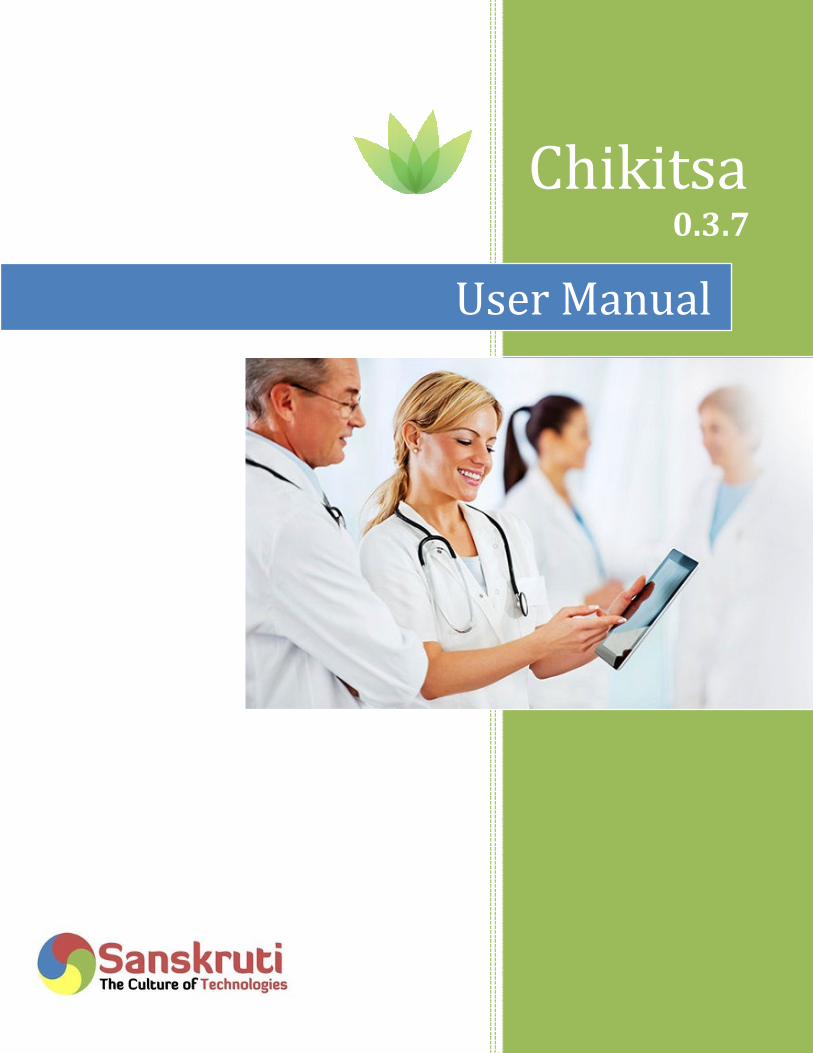
Chikitsa
User Manual
Chikitsa 0.3.7
User Manual
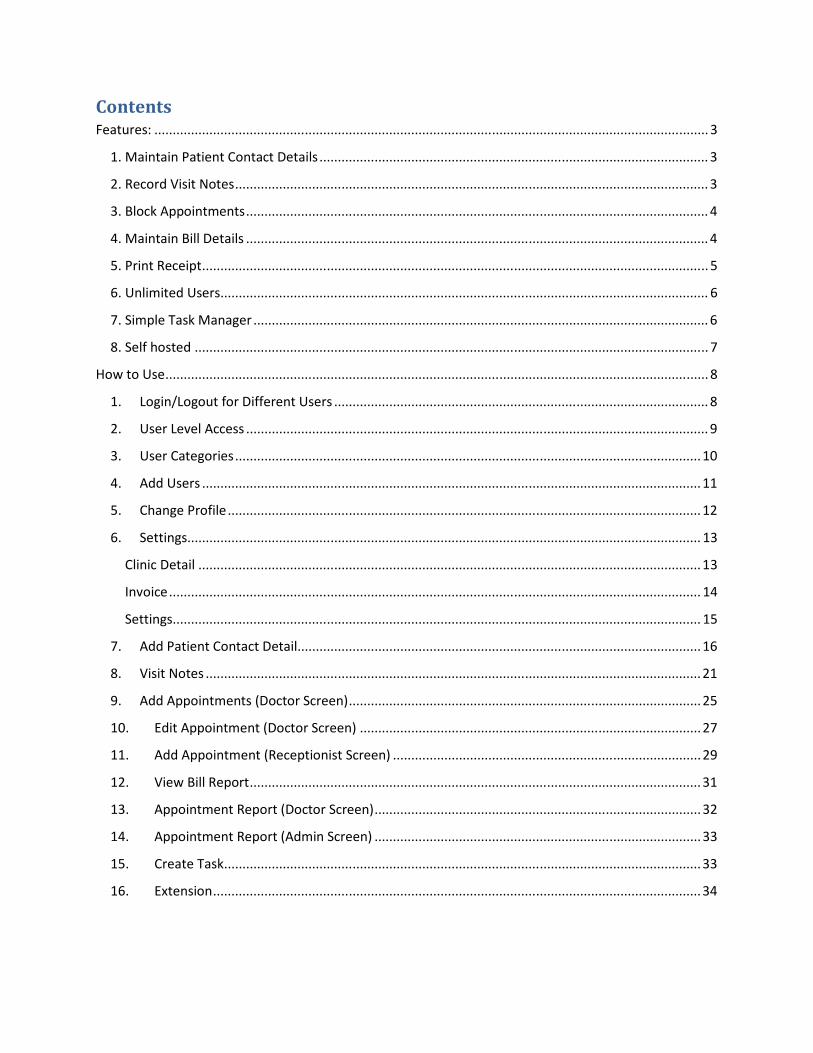
Contents Features: ....................................................................................................................................................... 3
1. Maintain Patient Contact Details .......................................................................................................... 3
2. Record Visit Notes ................................................................................................................................. 3
3. Block Appointments .............................................................................................................................. 4
4. Maintain Bill Details .............................................................................................................................. 4
5. Print Receipt .......................................................................................................................................... 5
6. Unlimited Users ..................................................................................................................................... 6
7. Simple Task Manager ............................................................................................................................ 6
8. Self hosted ............................................................................................................................................ 7
How to Use .................................................................................................................................................... 8
1. Login/Logout for Different Users ...................................................................................................... 8
2. User Level Access .............................................................................................................................. 9
3. User Categories ............................................................................................................................... 10
4. Add Users ........................................................................................................................................ 11
5. Change Profile ................................................................................................................................. 12
6. Settings ............................................................................................................................................ 13
Clinic Detail ......................................................................................................................................... 13
Invoice ................................................................................................................................................. 14
Settings ................................................................................................................................................ 15
7. Add Patient Contact Detail .............................................................................................................. 16
8. Visit Notes ....................................................................................................................................... 21
9. Add Appointments (Doctor Screen) ................................................................................................ 25
10. Edit Appointment (Doctor Screen) ............................................................................................. 27
11. Add Appointment (Receptionist Screen) .................................................................................... 29
12. View Bill Report ........................................................................................................................... 31
13. Appointment Report (Doctor Screen) ......................................................................................... 32
14. Appointment Report (Admin Screen) ......................................................................................... 33
15. Create Task .................................................................................................................................. 33
16. Extension ..................................................................................................................................... 34
Features:
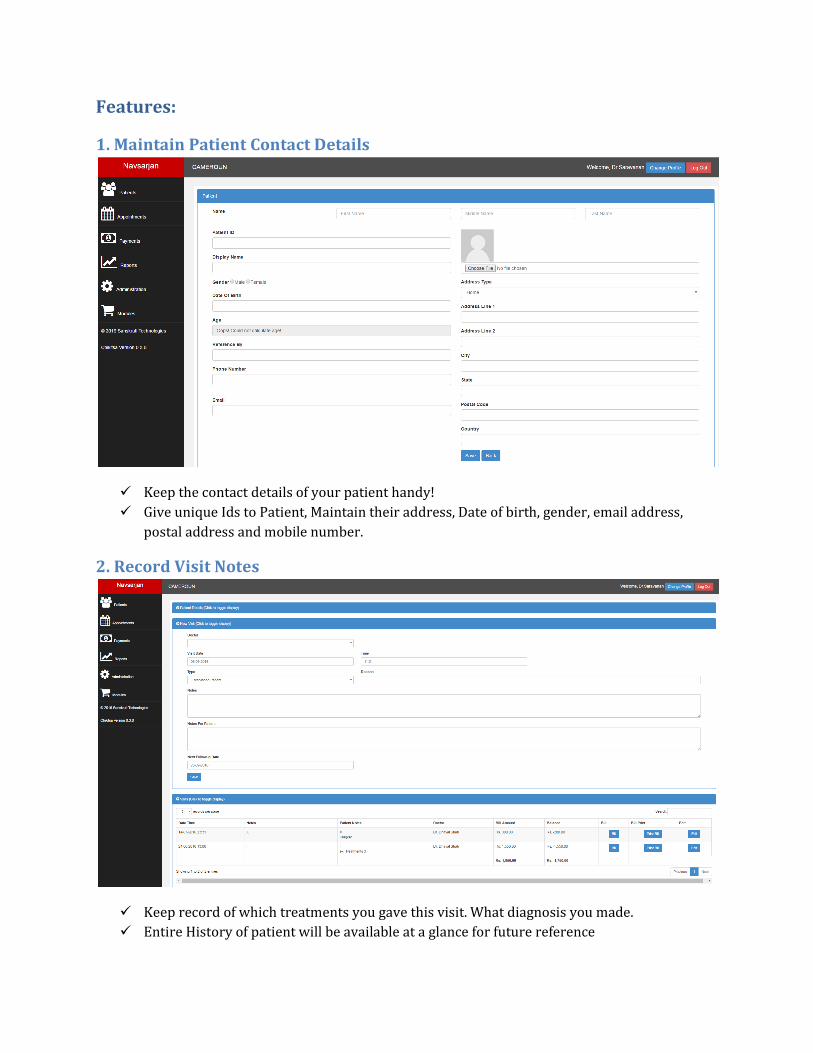
1. Maintain Patient Contact Details
� Keep the contact details of your patient handy!
� Give unique Ids to Patient, Maintain their address, Date of birth, gender, email address,
postal address and mobile number.
2. Record Visit Notes
� Keep record of which treatments you gave this visit. What diagnosis you made.
� Entire History of patient will be available at a glance for future reference
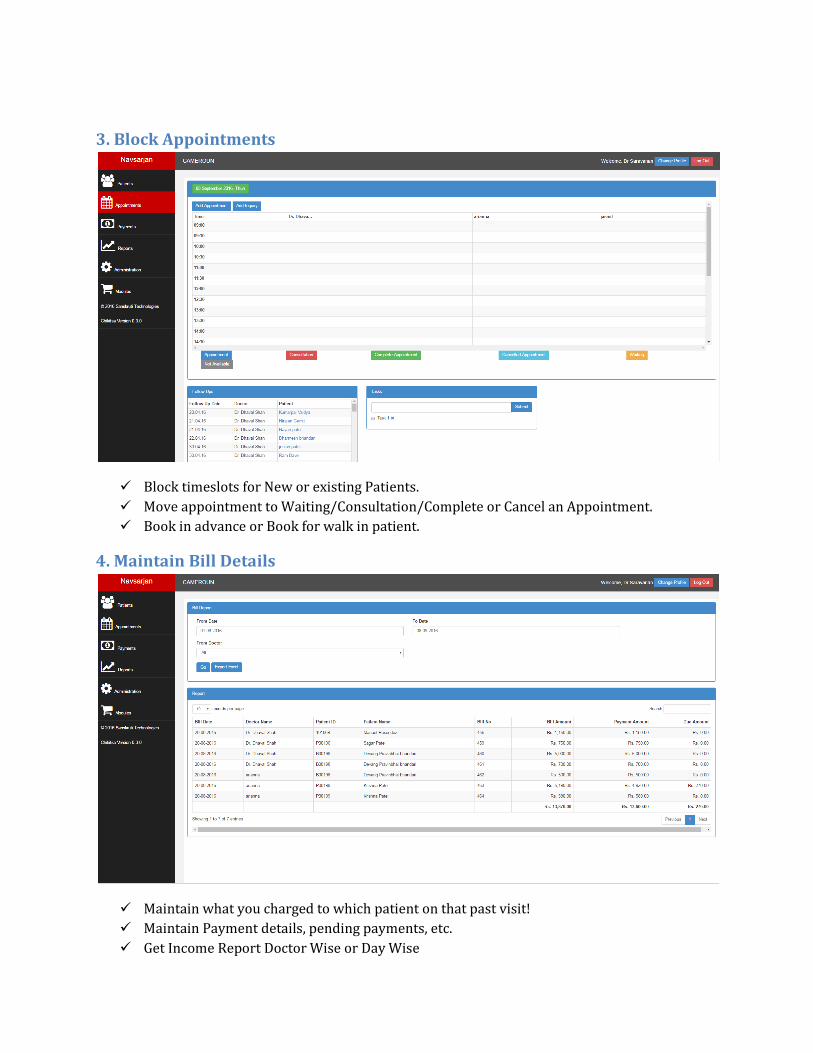
3. Block Appointments
� Block timeslots for New or existing Patients.
� Move appointment to Waiting/Consultation/Complete or Cancel an Appointment.
� Book in advance or Book for walk in patient.
4. Maintain Bill Details
� Maintain what you charged to which patient on that past visit!
� Maintain Payment details, pending payments, etc.
� Get Income Report Doctor Wise or Day Wise
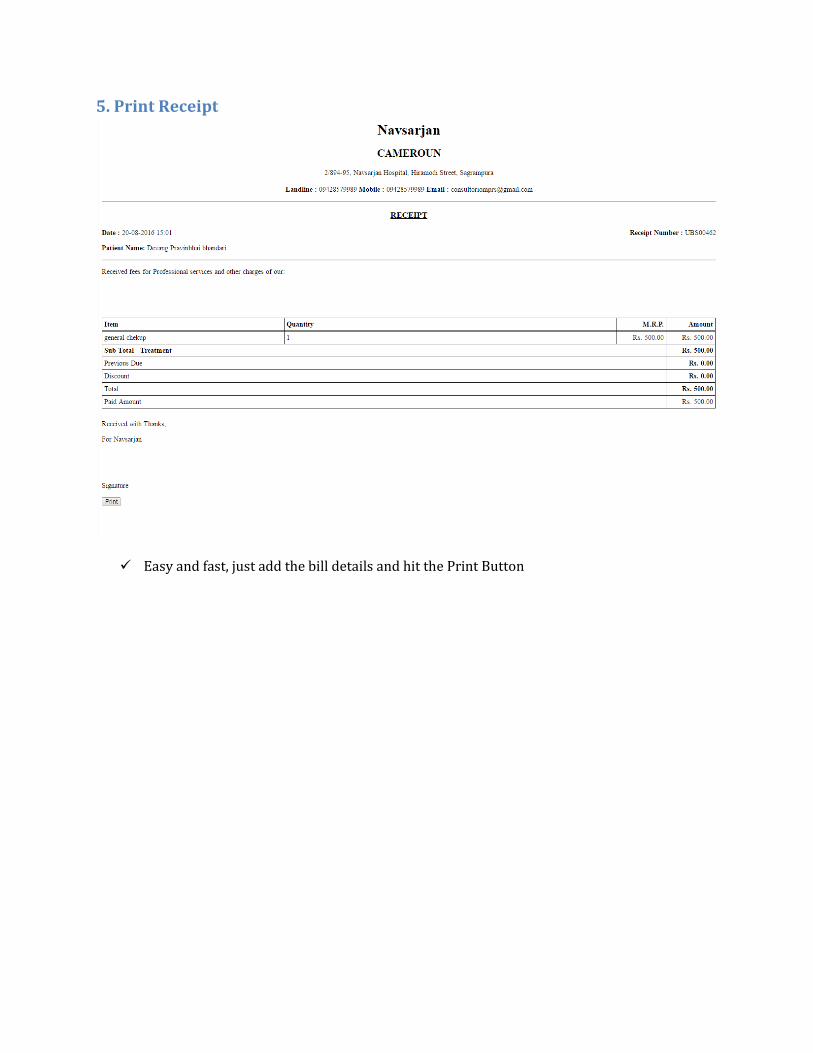
5. Print Receipt
� Easy and fast, just add the bill details and hit the Print Button
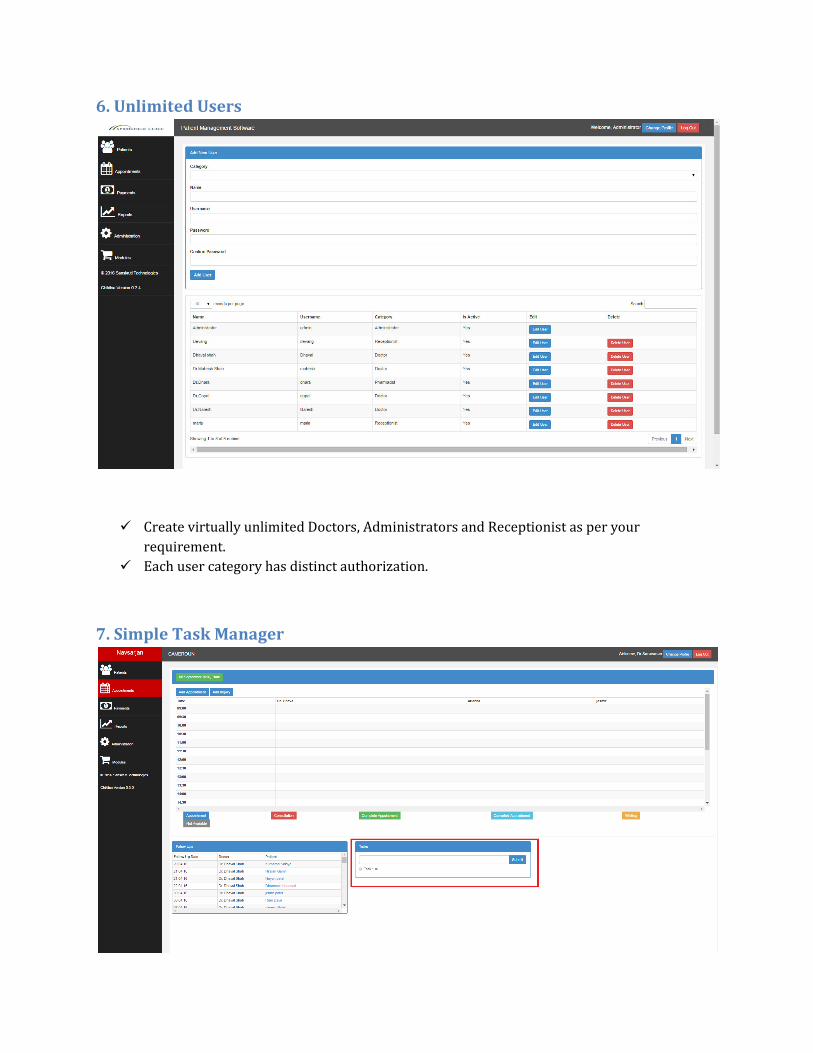
6. Unlimited Users
� Create virtually unlimited Doctors, Administrators and Receptionist as per your
requirement.
� Each user category has distinct authorization.
7. Simple Task Manager
� Simple task manager for each user on his/her dashboard.
8. Self hosted
� Download, install and use. All on your own server.
� No monthly fees – it’s free!
How to Use
1. Login/Logout for Different Users
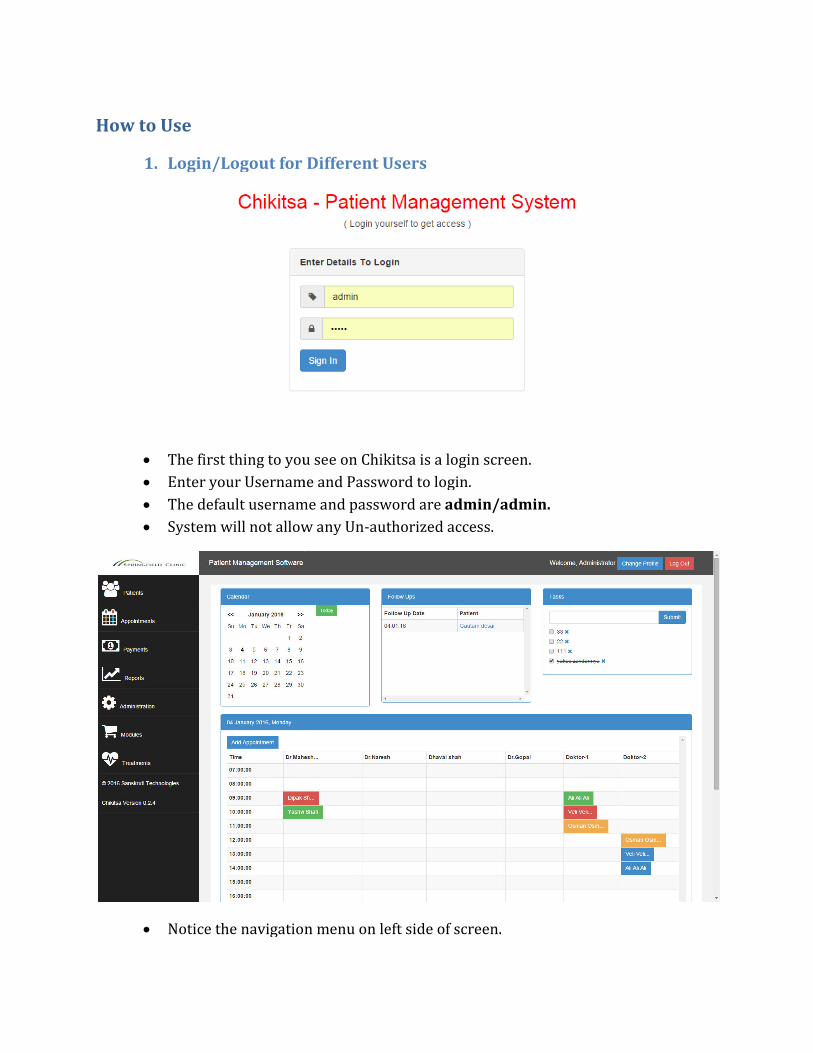
• The first thing to you see on Chikitsa is a login screen.
• Enter your Username and Password to login.
• The default username and password are
• System will not allow any Un
• Notice the navigation menu on left side of screen.
Login/Logout for Different Users
The first thing to you see on Chikitsa is a login screen.
Enter your Username and Password to login.
The default username and password are admin/admin.
System will not allow any Un-authorized access.
Notice the navigation menu on left side of screen.
• The admin will have access to all menus.
• Click on the logout button on right corner to logout.
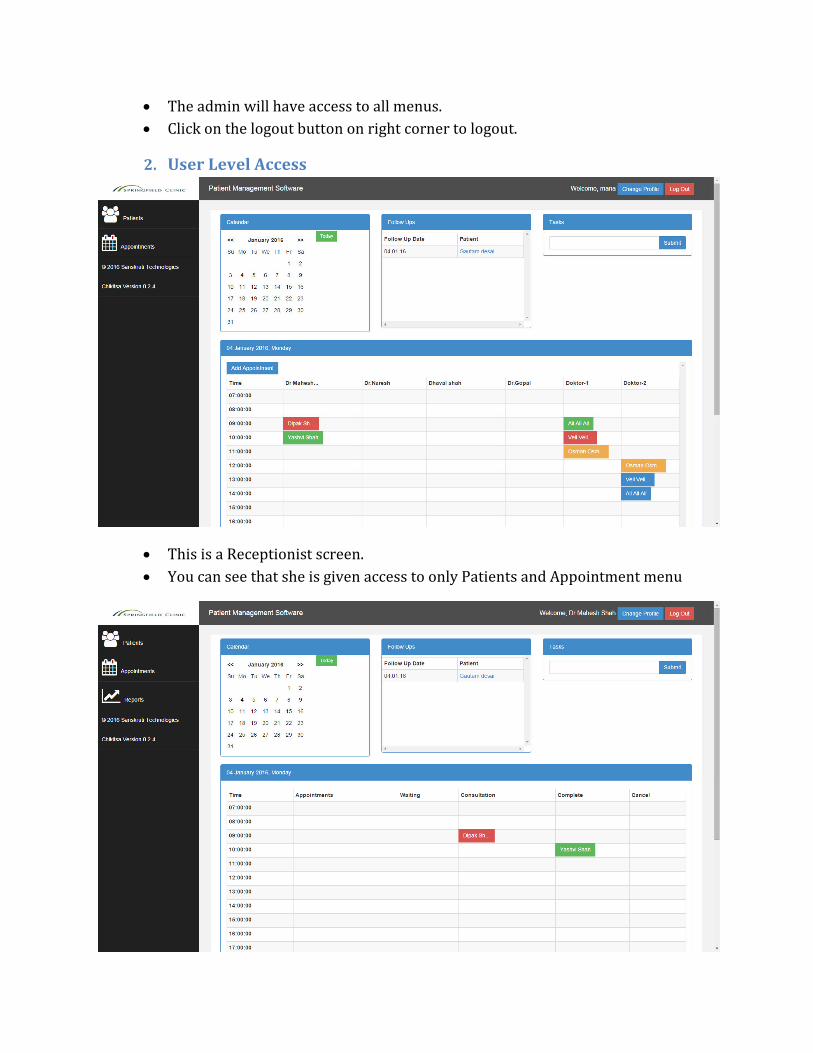
2. User Level Access
• This is a Receptionist screen.
• You can see that she is given access to only Patients and Appointment menu
• This is a Doctor screen.
• Notice the menus of Doctor’s login.
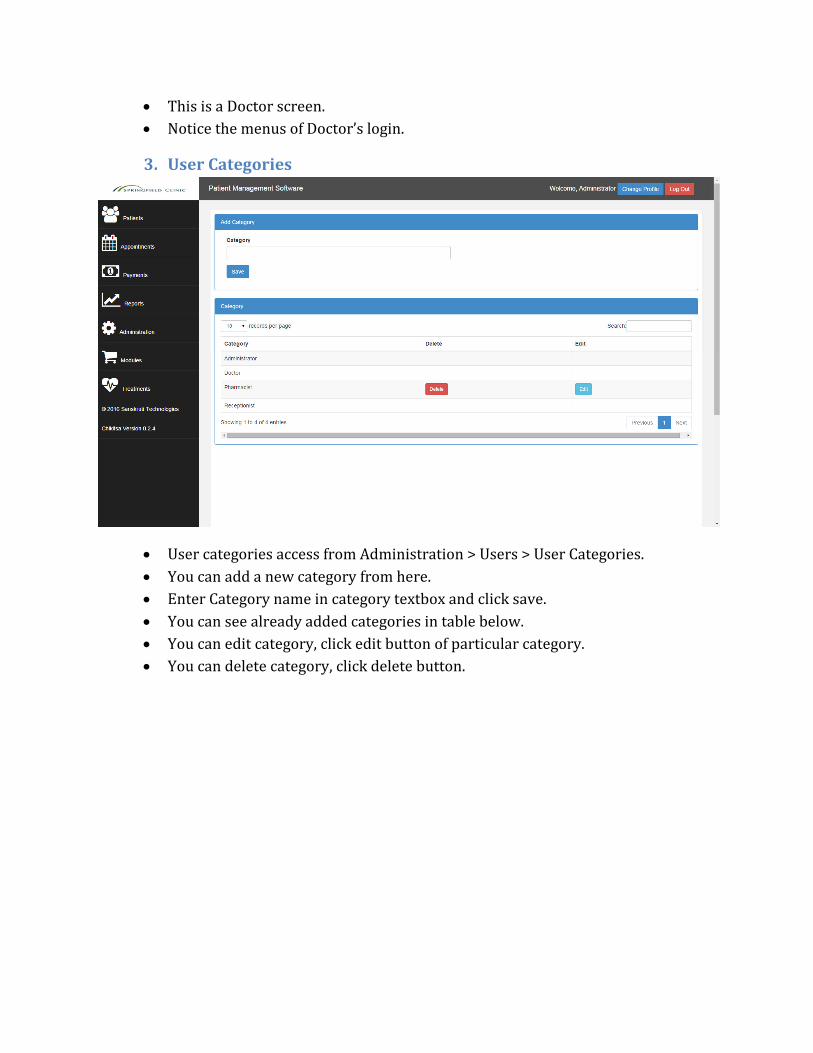
3. User Categories
• User categories access from Administration > Users > User Categories.
• You can add a new category from here.
• Enter Category name in category textbox and click save.
• You can see already added categories in table below.
• You can edit category, click edit button of particular category.
• You can delete category, click delete button.
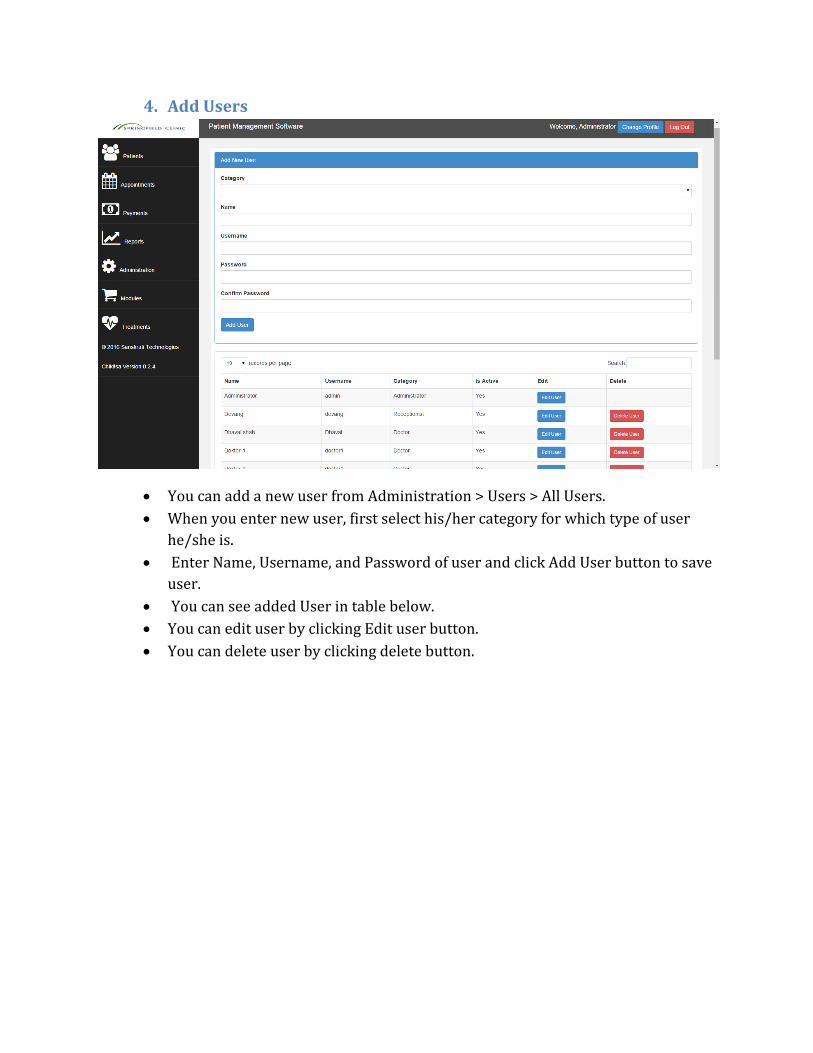
4. Add Users
• You can add a new user from Administration > Users > All Users.
• When you enter new user, first select his/her category for which type of user
he/she is.
• Enter Name, Username, and Password of user and click Add User button to save
user.
• You can see added User in table below.
• You can edit user by clicking Edit user button.
• You can delete user by clicking delete button.
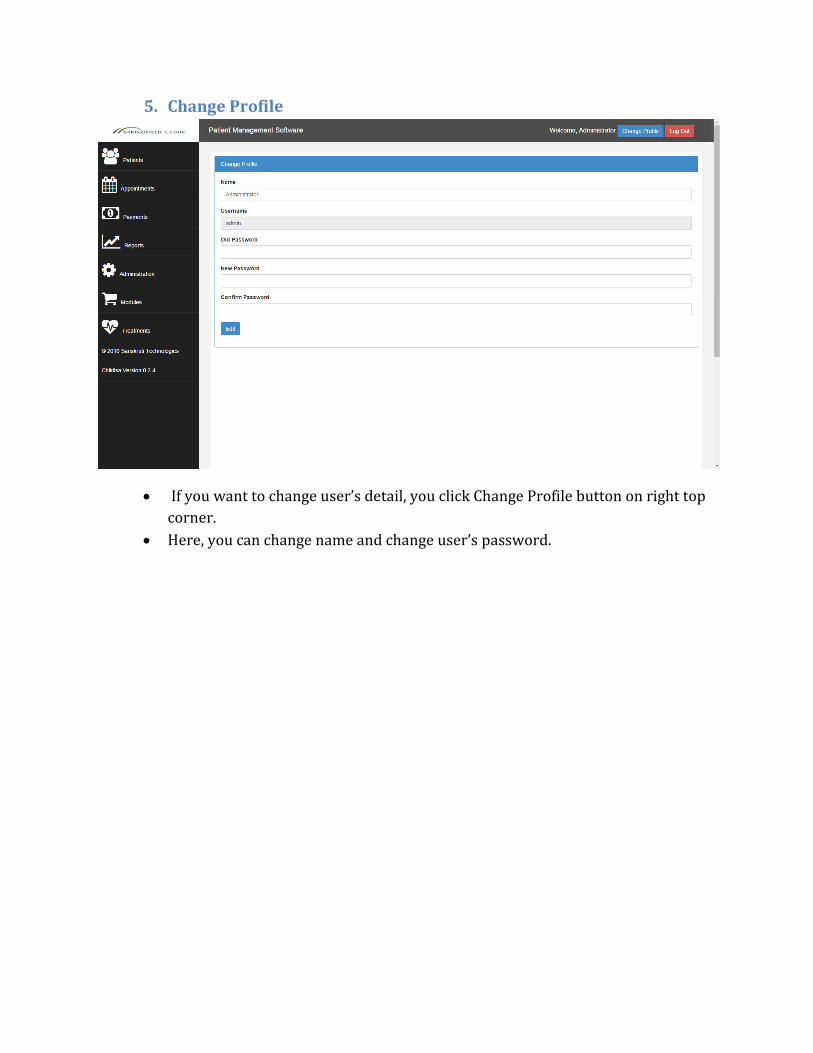
5. Change Profile
• If you want to change user’s detail, you click Change Profile button on right top
corner.
• Here, you can change name and change user’s password.
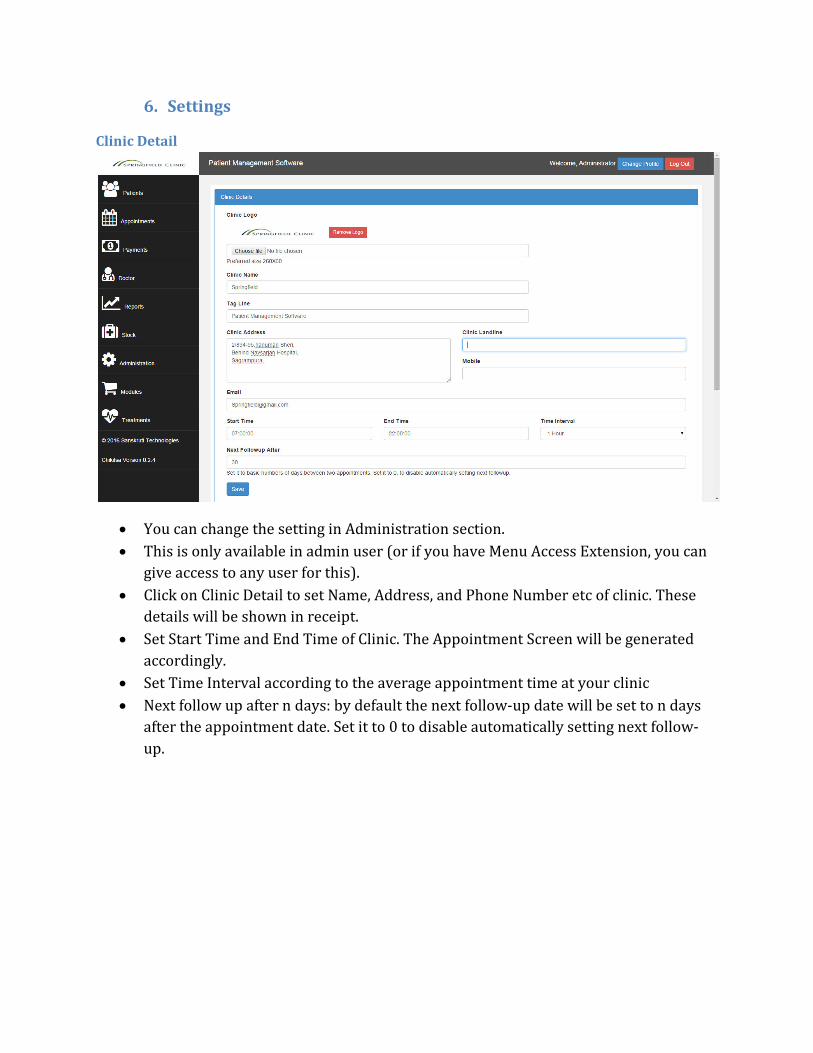
6. Settings
Clinic Detail
• You can change the setting in Administration section.
• This is only available in admin user (or if you have Menu Access Extension, you can
give access to any user for this).
• Click on Clinic Detail to set Name, Address, and Phone Number etc of clinic. These
details will be shown in receipt.
• Set Start Time and End Time of Clinic. The Appointment Screen will be generated
accordingly.
• Set Time Interval according to the average appointment time at your clinic
• Next follow up after n days: by default the next follow-up date will be set to n days
after the appointment date. Set it to 0 to disable automatically setting next follow-
up.
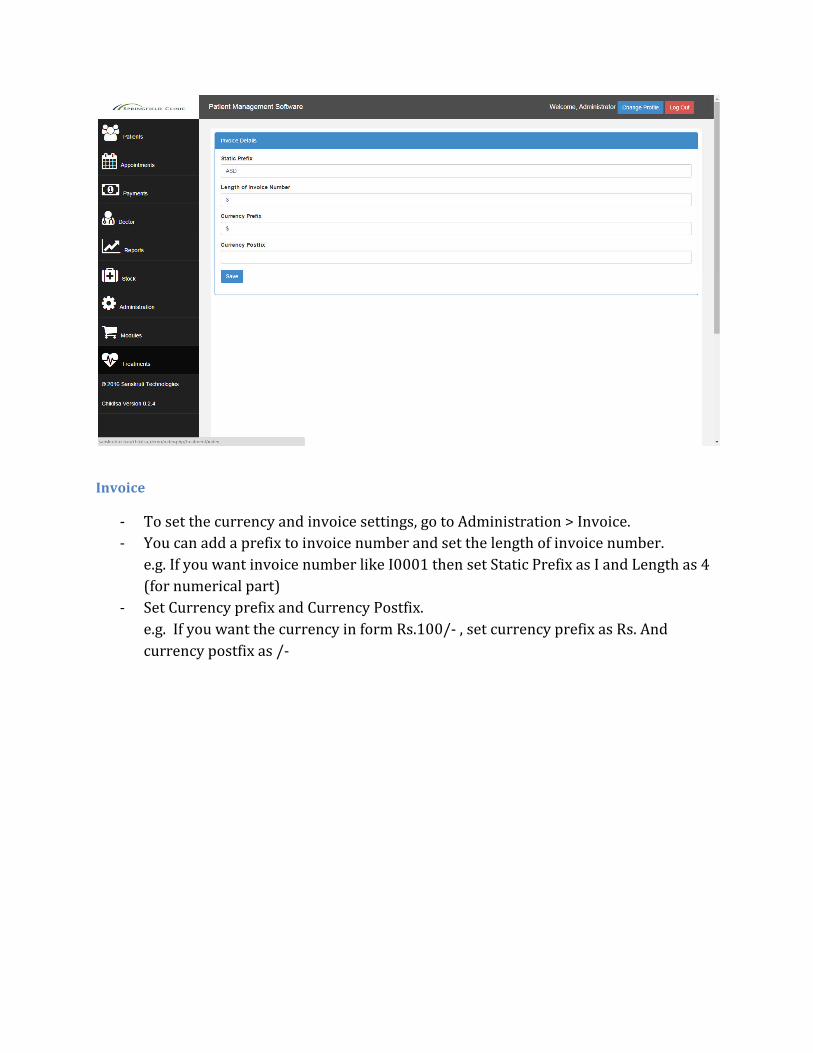
Invoice
- To set the currency and invoice settings, go to Administration > Invoice.
- You can add a prefix to invoice number and set the length of invoice number.
e.g. If you want invoice number like I0001 then set Static Prefix as I and Length as 4
(for numerical part)
- Set Currency prefix and Currency Postfix.
e.g. If you want the currency in form Rs.100/- , set currency prefix as Rs. And
currency postfix as /-
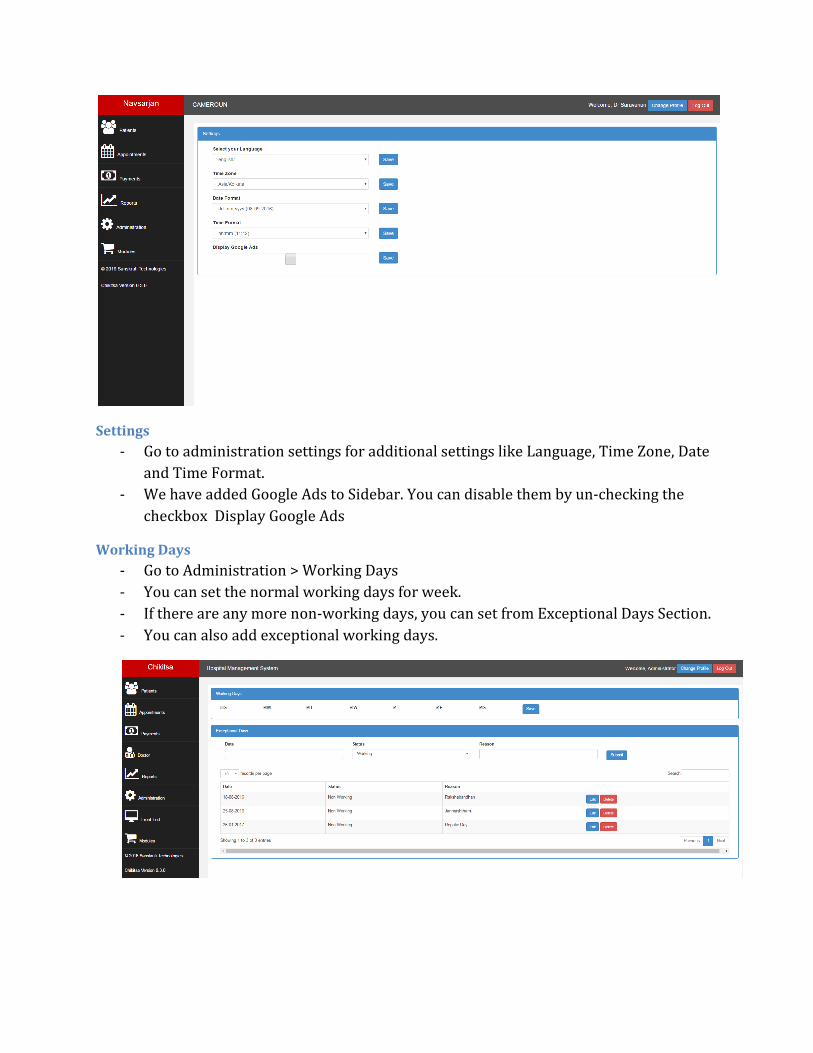
Settings
- Go to administration settings for additional settings like Language, Time Zone, Date
and Time Format.
- We have added Google Ads to Sidebar. You can disable them by un-checking the
checkbox Display Google Ads
Working Days
- Go to Administration > Working Days
- You can set the normal working days for week.
- If there are any more non-working days, you can set from Exceptional Days Section.
- You can also add exceptional working days.
7. Add Patient Contact Detail
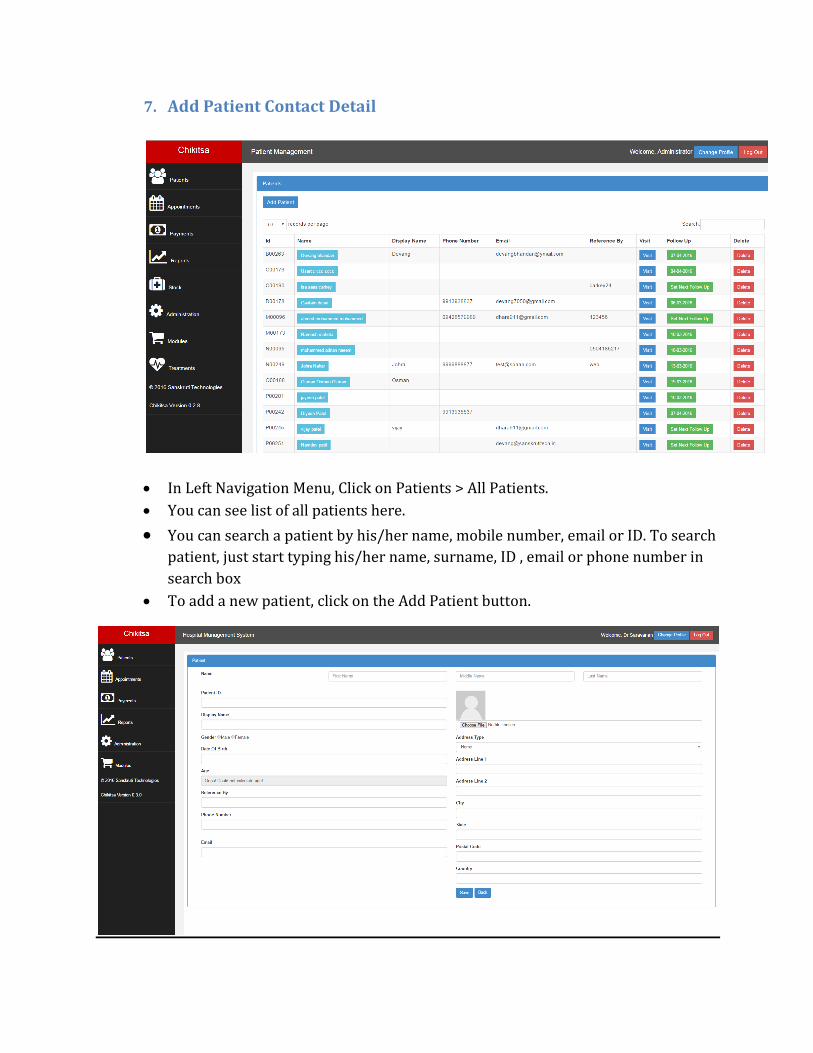
• In Left Navigation Menu, Click on Patients > All Patients.
• You can see list of all patients here.
• You can search a patient by his/her name, mobile number, email or ID. To search
patient, just start typing his/her name, surname, ID , email or phone number in
search box
• To add a new patient, click on the Add Patient button.
• Enter First Name, Middle Name, Last Name and other detail of Patient.
• To save detail Press Save button.
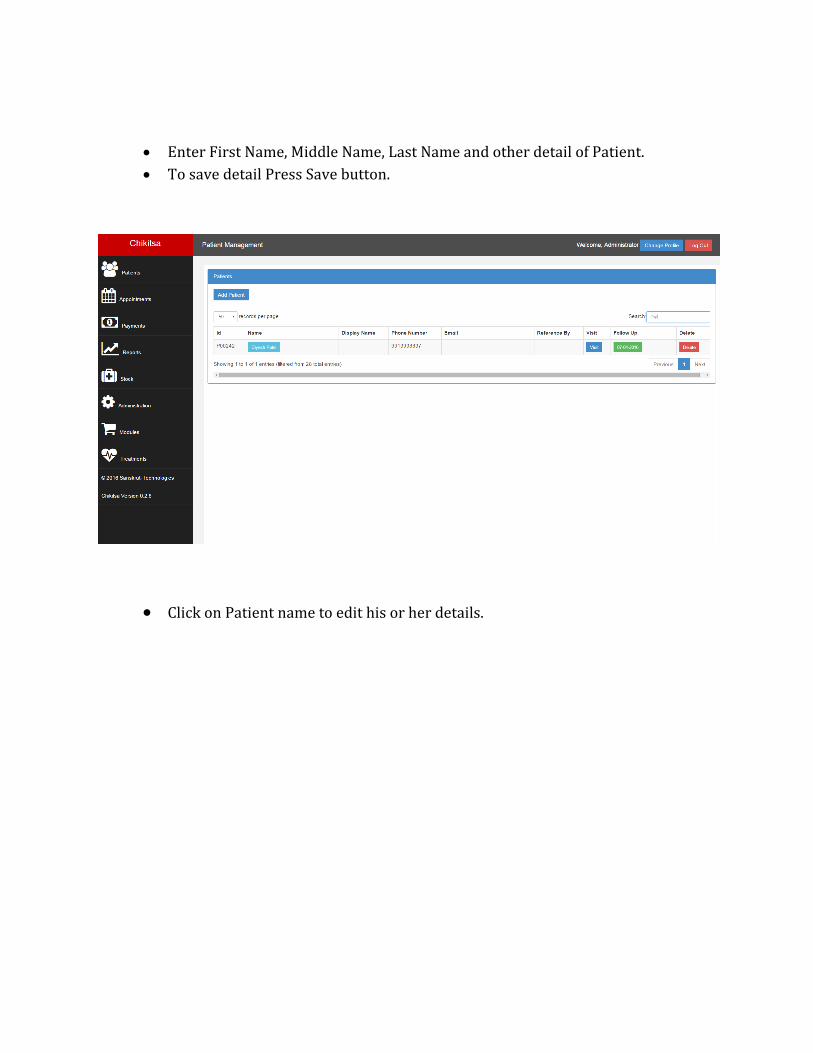
• Click on Patient name to edit his or her details.
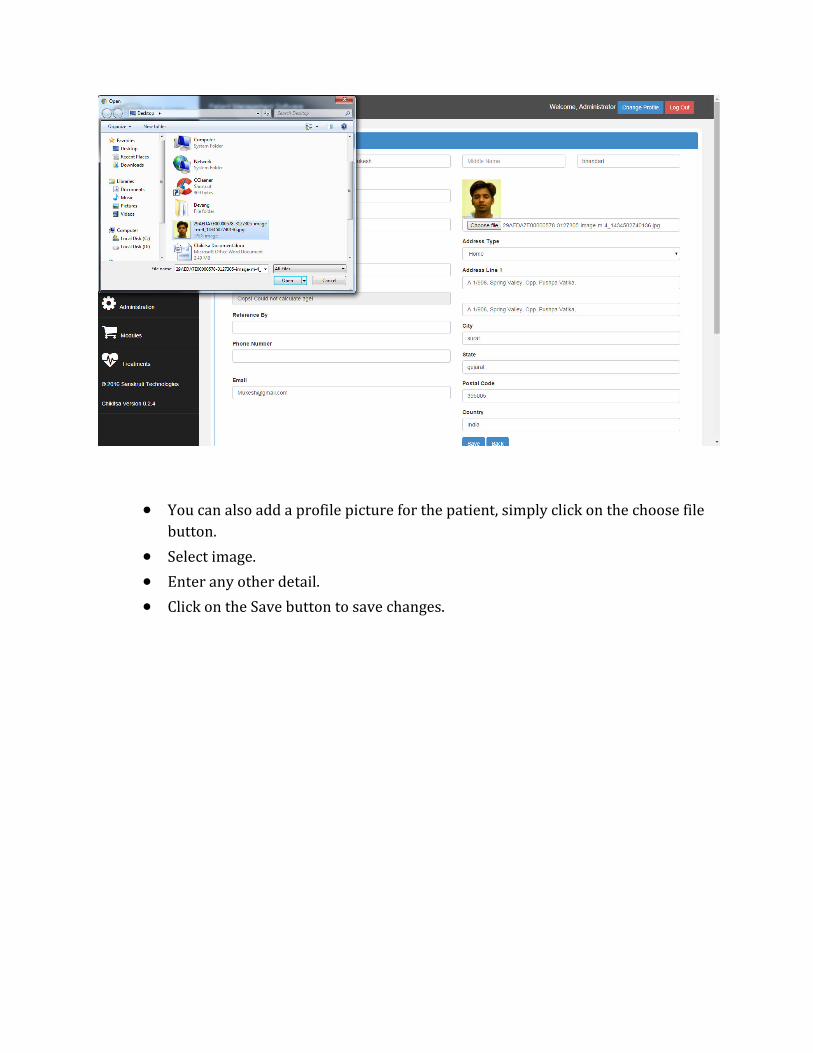
• You can also add a profile picture for the patient, simply click on the choose file
button.
• Select image.
• Enter any other detail.
• Click on the Save button to save changes.
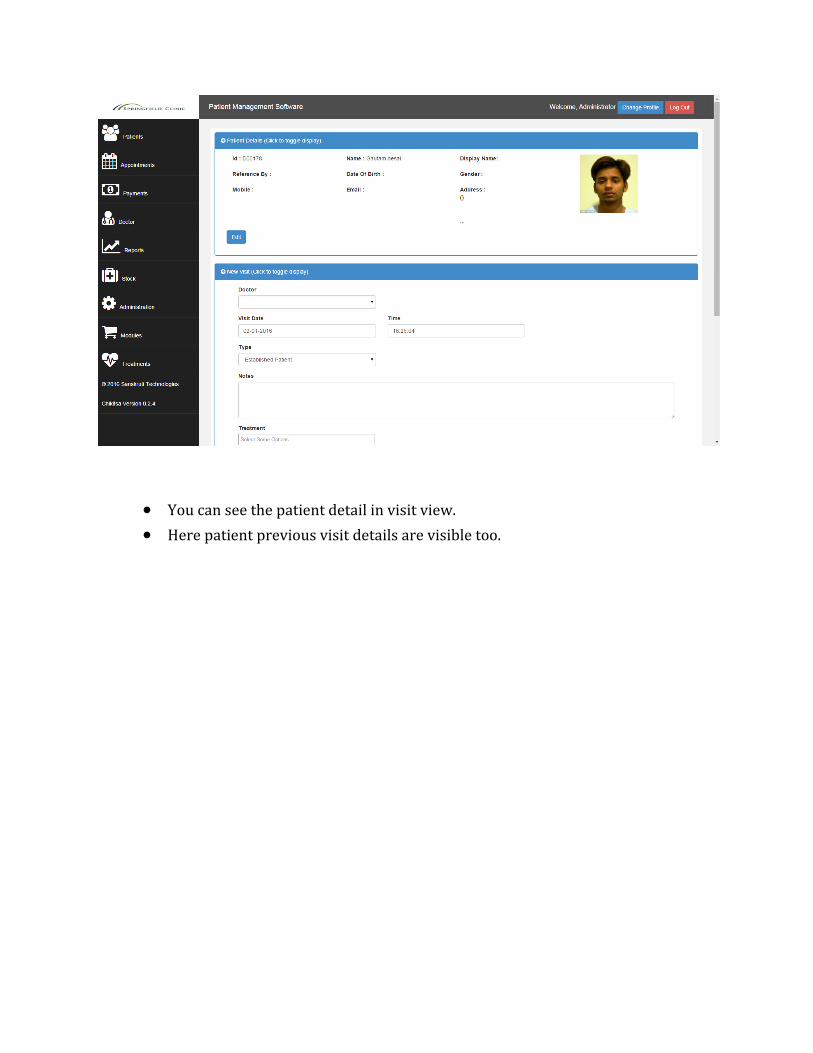
• You can see the patient detail in visit view.
• Here patient previous visit details are visible too.
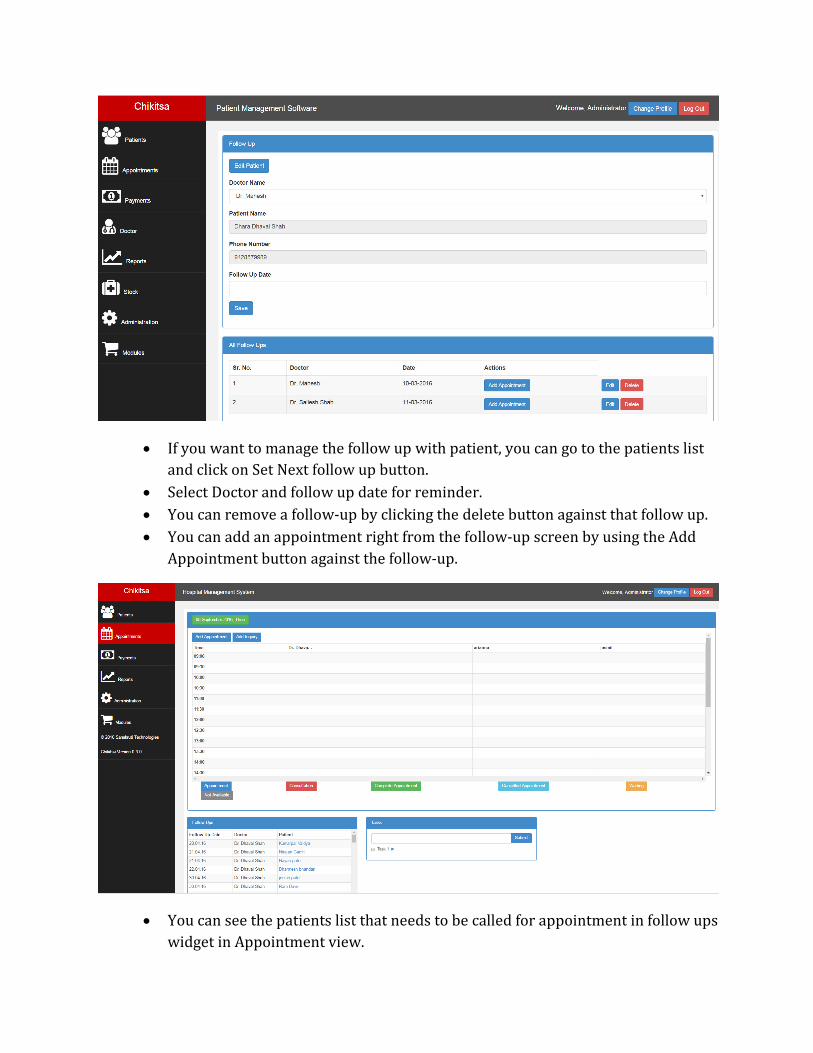
• If you want to manage the follow up with patient, you can go to the patients list
and click on Set Next follow up button.
• Select Doctor and follow up date for reminder.
• You can remove a follow-up by clicking the delete button against that follow up.
• You can add an appointment right from the follow-up screen by using the Add
Appointment button against the follow-up.
• You can see the patients list that needs to be called for appointment in follow ups
widget in Appointment view.
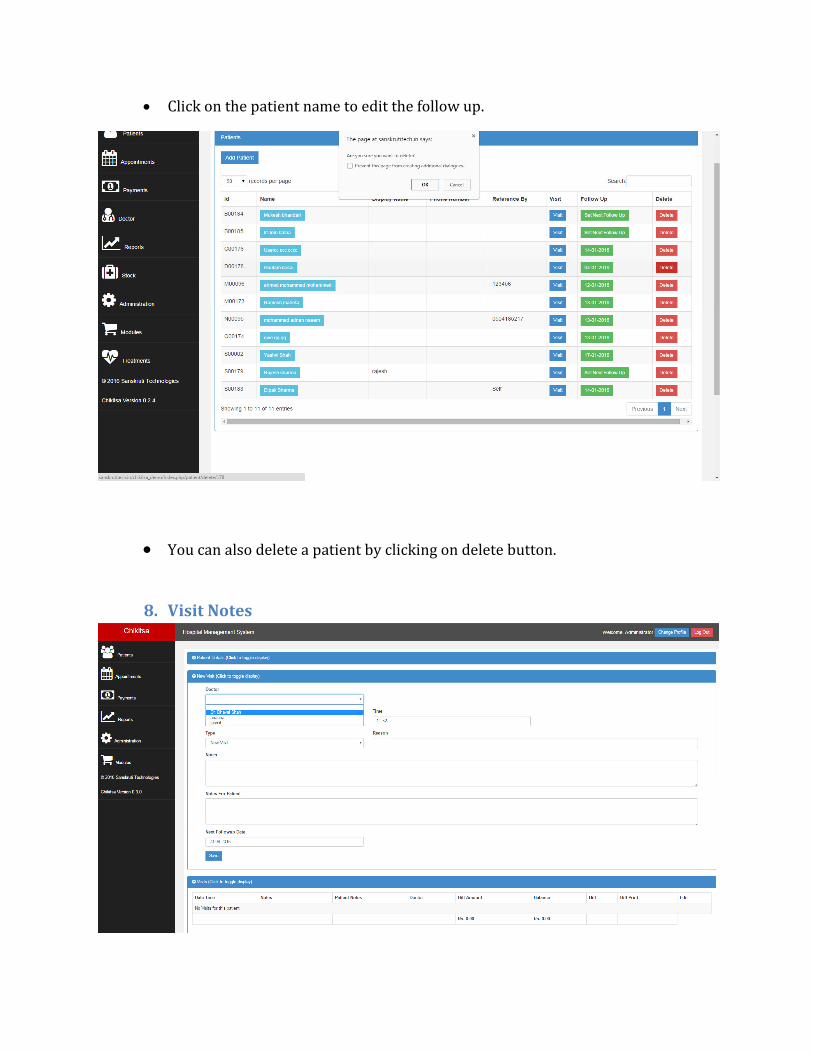
• Click on the patient name to edit the follow up.
• You can also delete a patient by clicking on delete button.
8. Visit Notes
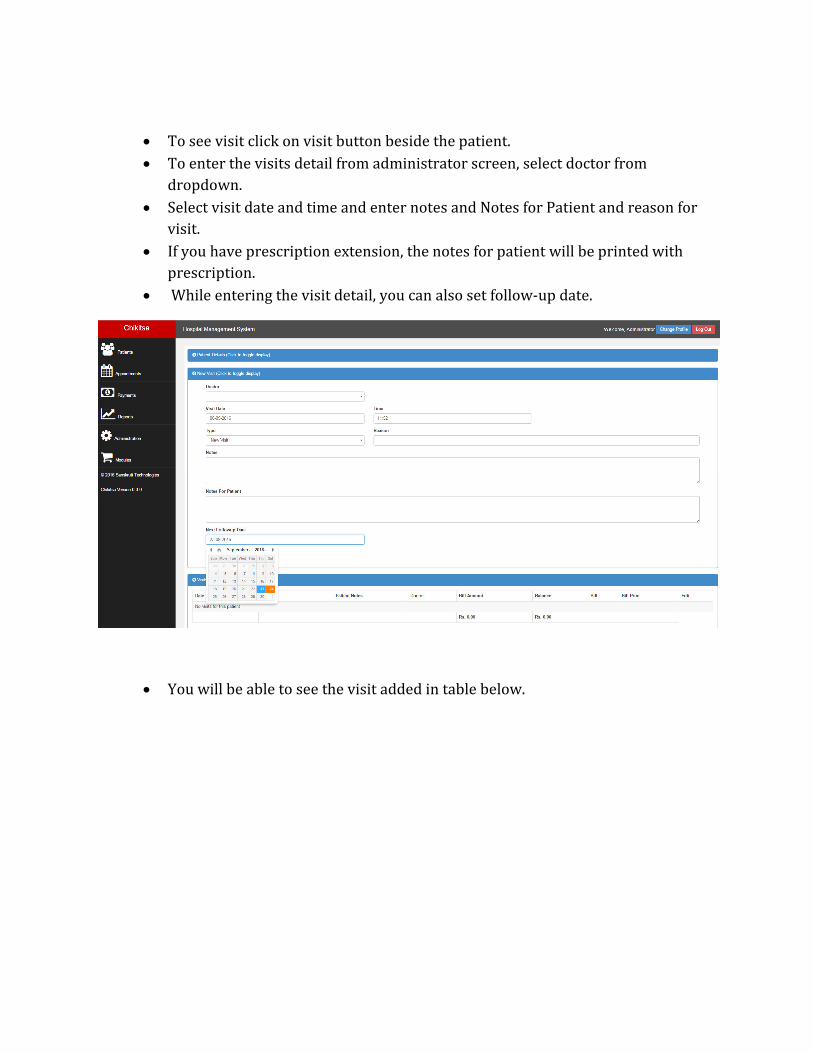
• To see visit click on visit button beside the patient.
• To enter the visits detail from administrator screen, select doctor from
dropdown.
• Select visit date and time and enter notes and Notes for Patient and reason for
visit.
• If you have prescription extension, the notes for patient will be printed with
prescription.
• While entering the visit detail, you can also set follow-up date.
• You will be able to see the visit added in table below.

• To edit visit, click on the edit button beside the visit detail.
• Change the detail you want to change and click edit to save change.
• To enter the bill details, click on the bill button.
• Enter the item and amount.
• You can also delete an already added item.
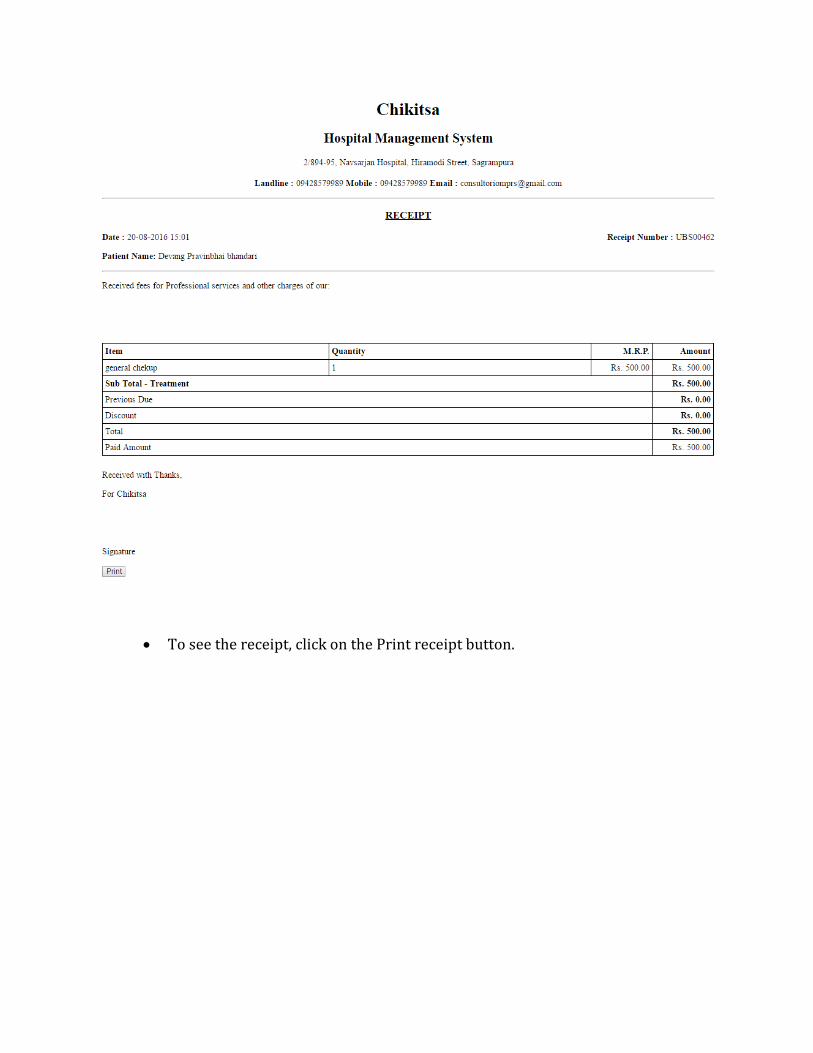
• To see the receipt, click on the Print receipt button.
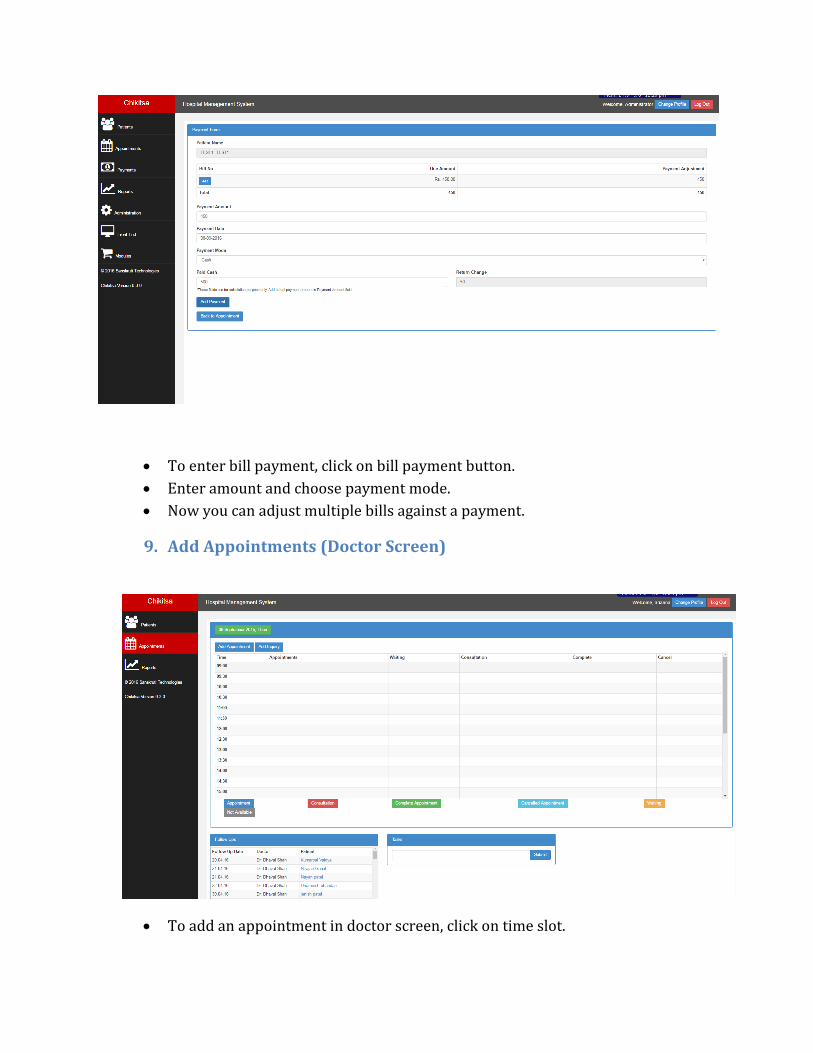
• To enter bill payment, click on bill payment button.
• Enter amount and choose payment mode.
• Now you can adjust multiple bills against a payment.
9. Add Appointments (Doctor Screen)
• To add an appointment in doctor screen, click on time slot.
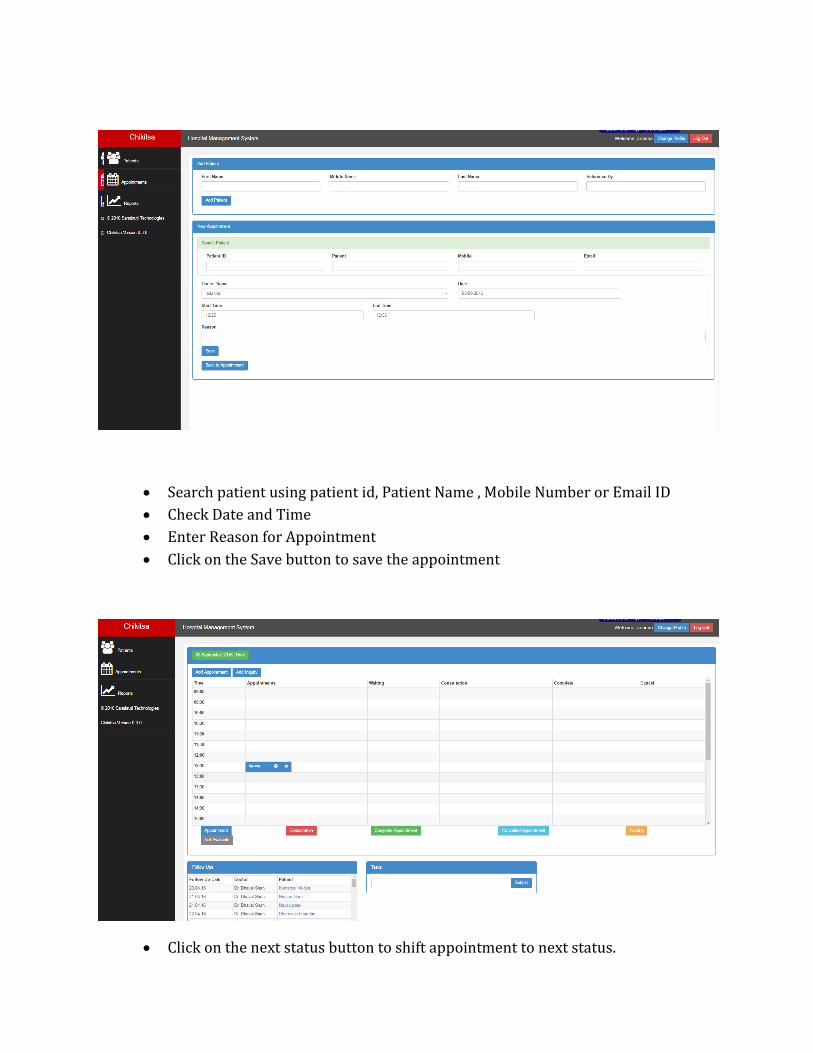
• Search patient using patient id, Patient Name , Mobile Number or Email ID
• Check Date and Time
• Enter Reason for Appointment
• Click on the Save button to save the appointment
• Click on the next status button to shift appointment to next status.
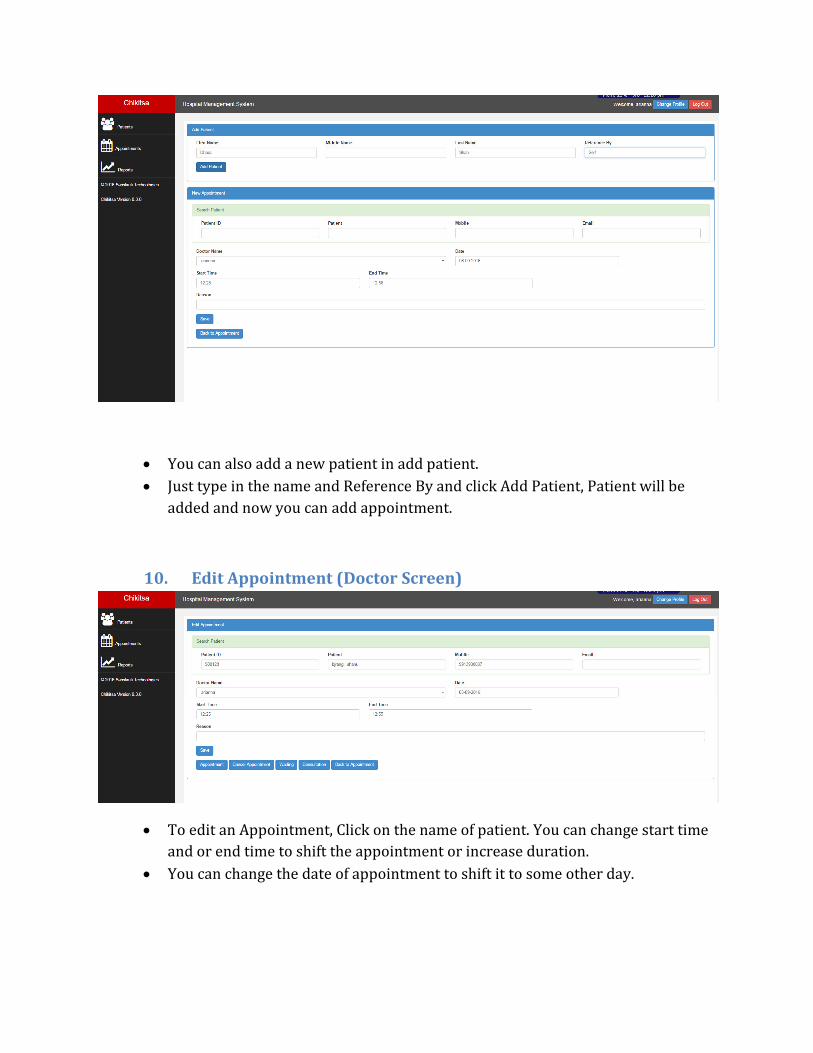
• You can also add a new patient in add patient.
• Just type in the name and Reference By and click Add Patient, Patient will be
added and now you can add appointment.
10. Edit Appointment (Doctor Screen)
• To edit an Appointment, Click on the name of patient. You can change start time
and or end time to shift the appointment or increase duration.
• You can change the date of appointment to shift it to some other day.
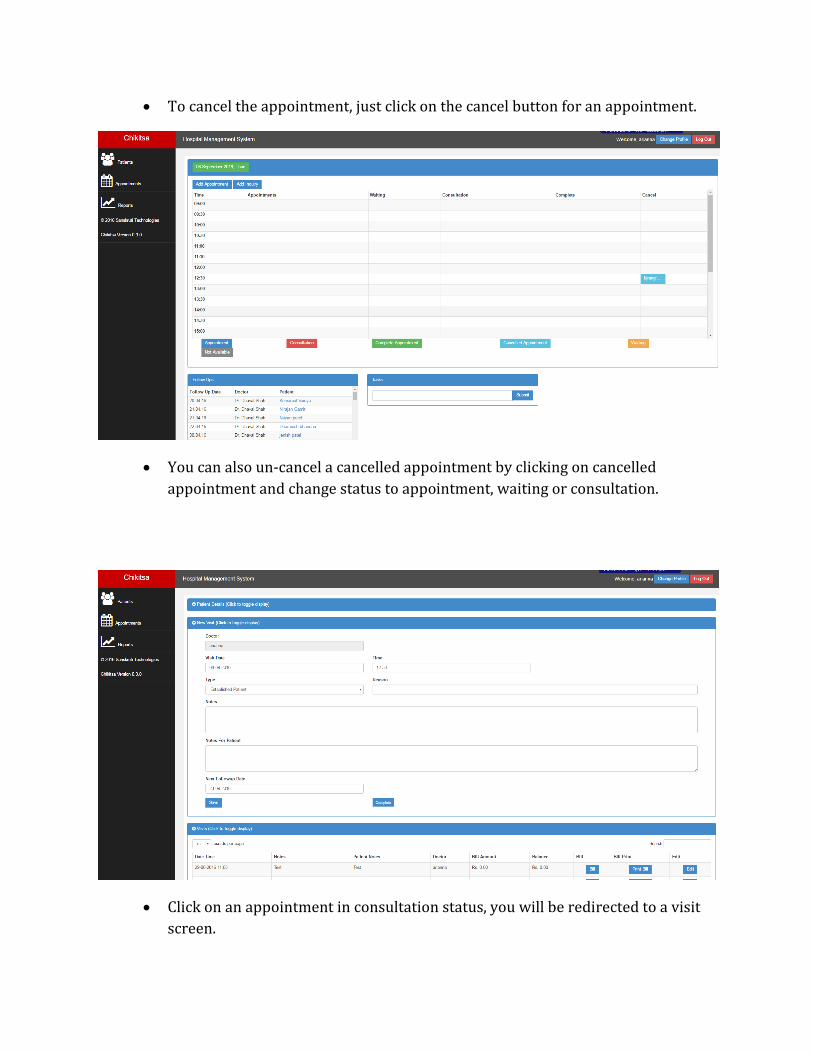
• To cancel the appointment, just click on the cancel button for an appointment.
• You can also un-cancel a cancelled appointment by clicking on cancelled
appointment and change status to appointment, waiting or consultation.
• Click on an appointment in consultation status, you will be redirected to a visit
screen.
• You can see patient detail in visit view.
• You can add notes, notes for patient, reason about this visit.
• You can also see previous visit notes in the table below.
• Click on the complete button to mark the consultation is complete.
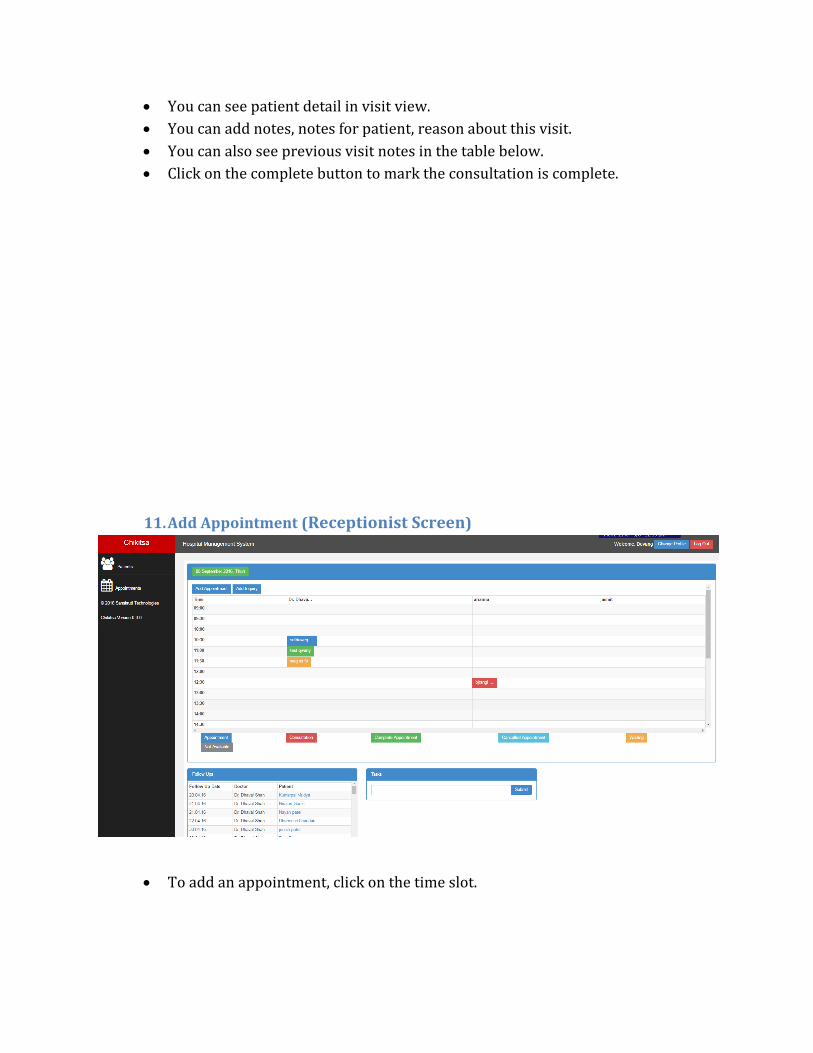
11. Add Appointment (Receptionist Screen)
• To add an appointment, click on the time slot.
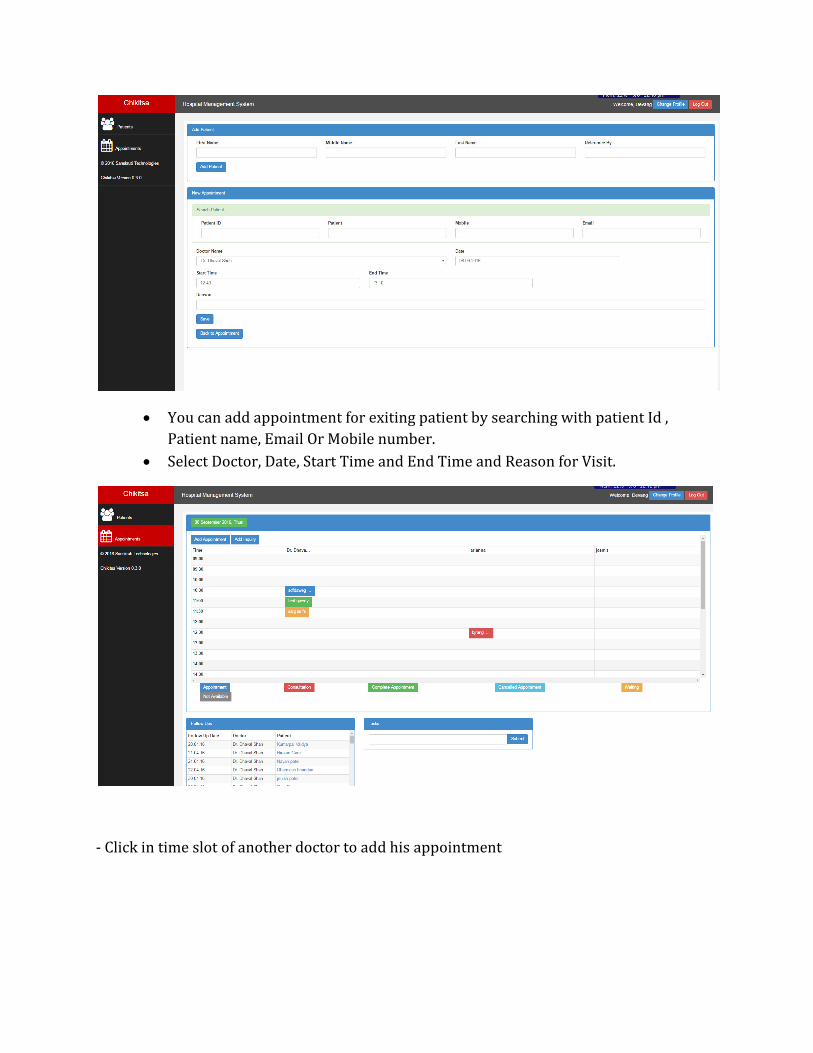
• You can add appointment for exiting patient by searching with patient Id ,
Patient name, Email Or Mobile number.
• Select Doctor, Date, Start Time and End Time and Reason for Visit.
- Click in time slot of another doctor to add his appointment
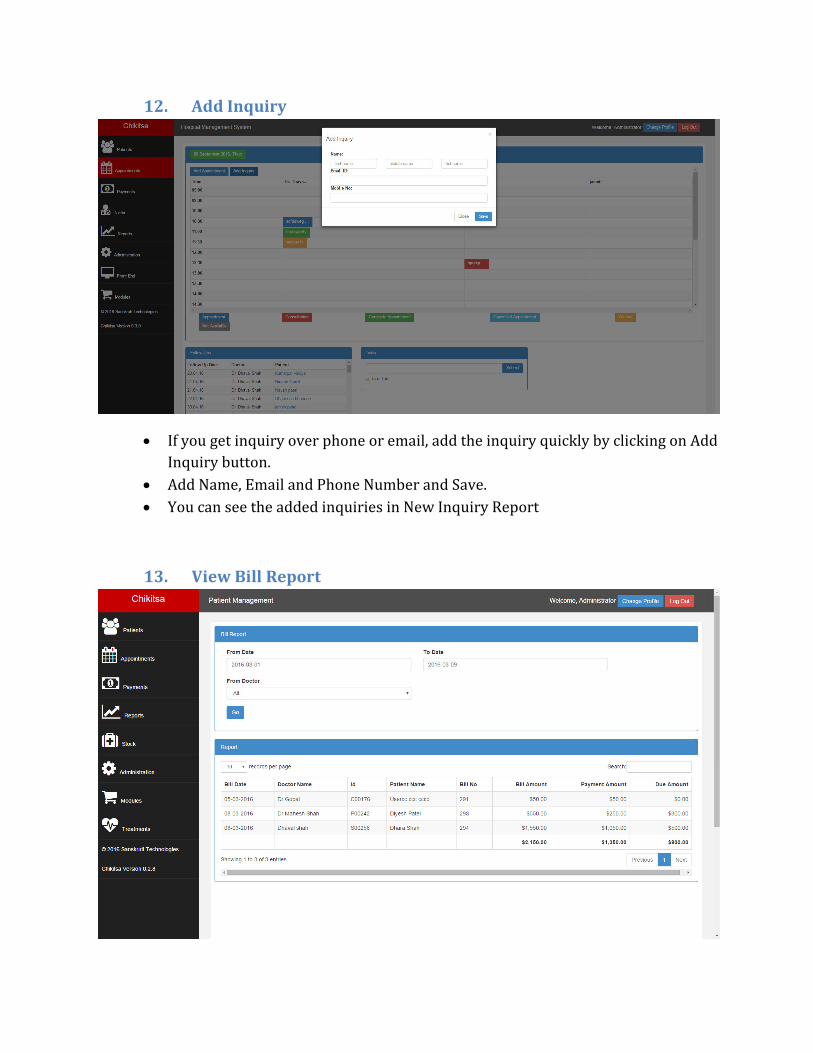
12. Add Inquiry
• If you get inquiry over phone or email, add the inquiry quickly by clicking on Add
Inquiry button.
• Add Name, Email and Phone Number and Save.
• You can see the added inquiries in New Inquiry Report
13. View Bill Report
• To view Bill Detail Report, Go to Report > Bill Detail Report.
• Select the dates and doctor for which you want to report and Click Go button.
• Select All Doctors or Particular doctor to see the report.
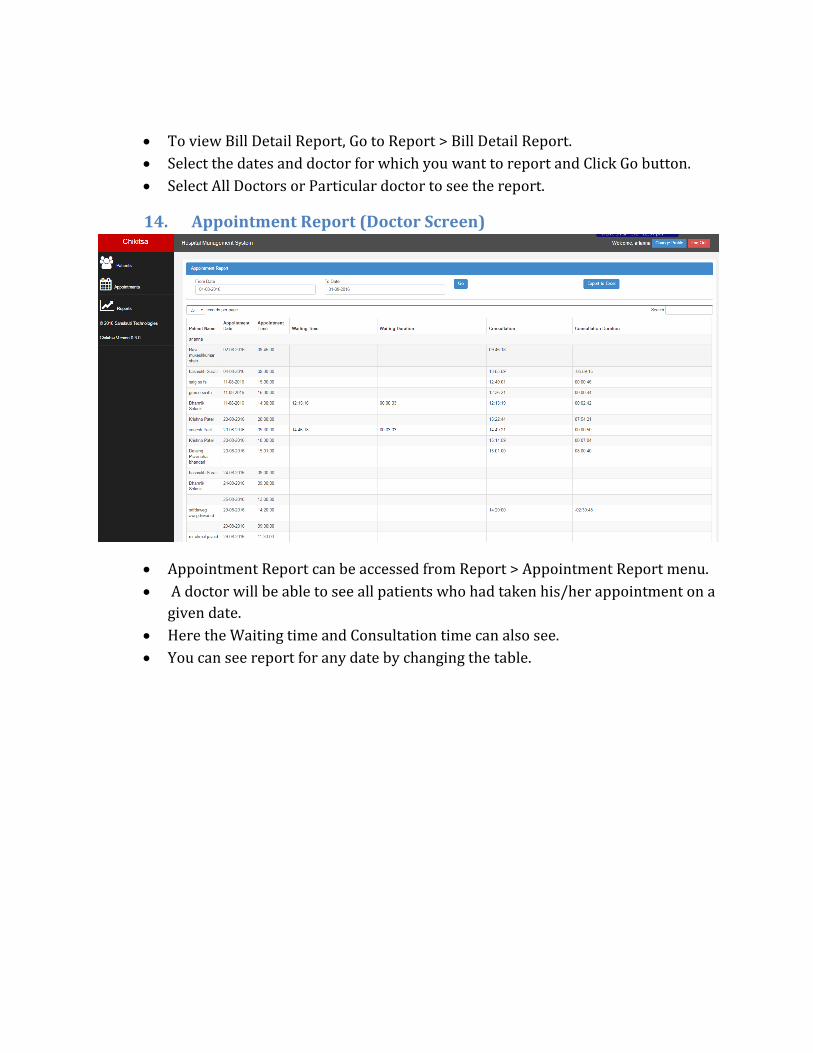
14. Appointment Report (Doctor Screen)
• Appointment Report can be accessed from Report > Appointment Report menu.
• A doctor will be able to see all patients who had taken his/her appointment on a
given date.
• Here the Waiting time and Consultation time can also see.
• You can see report for any date by changing the table.
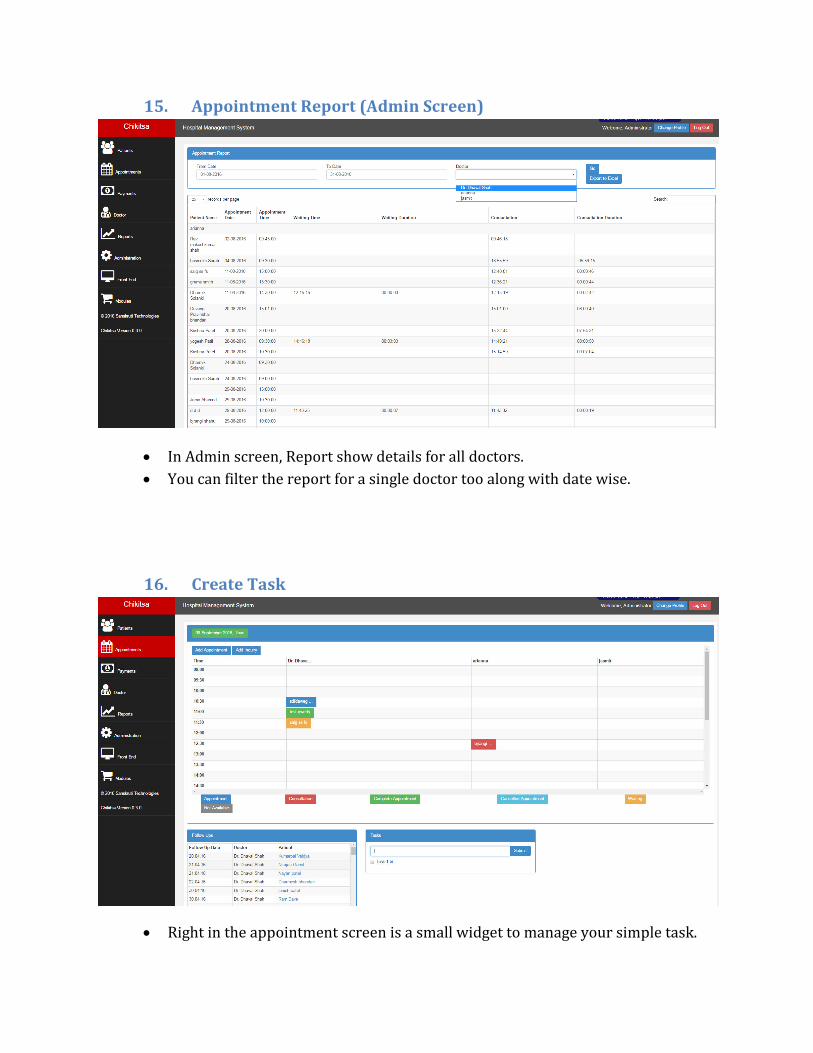
15. Appointment Report (Admin Screen)
• In Admin screen, Report show details for all doctors.
• You can filter the report for a single doctor too along with date wise.
16. Create Task
• Right in the appointment screen is a small widget to manage your simple task.
• Simply write down a reminder to yourself and click submits, a task will be
created for you.
• You can delete a task by clicking the cross beside a task.
• Mark a task as done by checking it.
• You can also uncheck a task to make it active again.
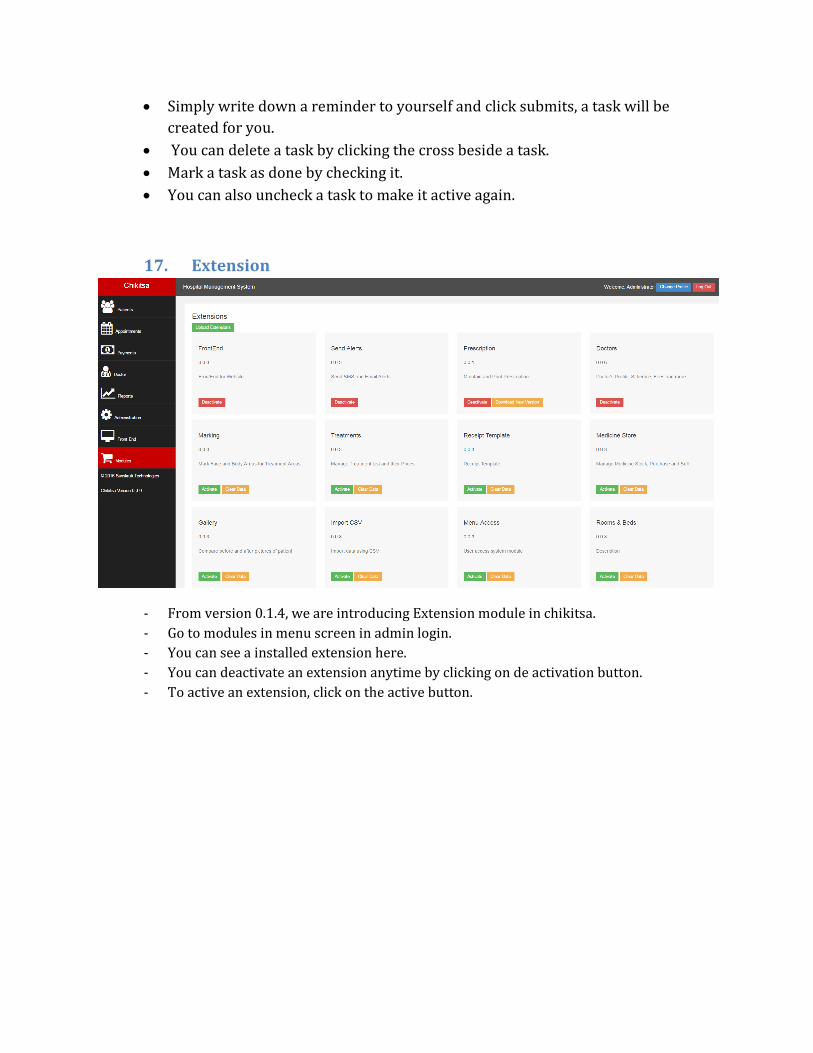
17. Extension
- From version 0.1.4, we are introducing Extension module in chikitsa.
- Go to modules in menu screen in admin login.
- You can see a installed extension here.
- You can deactivate an extension anytime by clicking on de activation button.
- To active an extension, click on the active button.
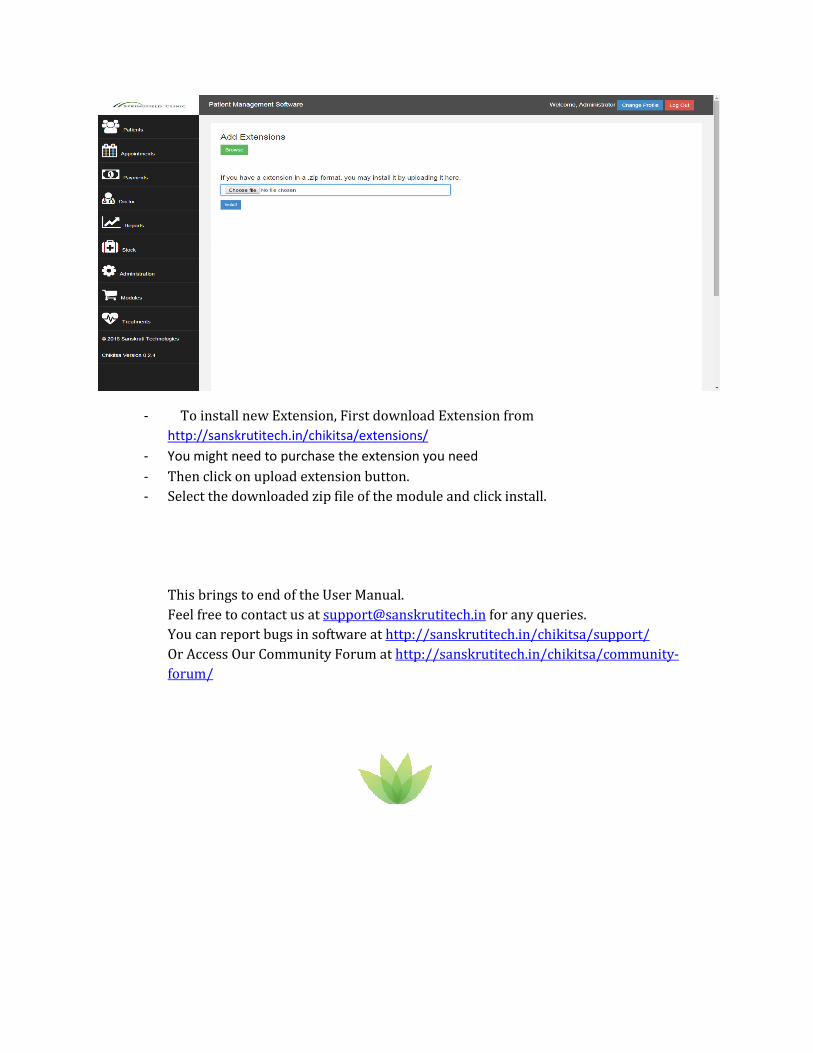
- To install new Extension, First download Extension from
http://sanskrutitech.in/chikitsa/extensions/
- You might need to purchase the extension you need
- Then click on upload extension button.
- Select the downloaded zip file of the module and click install.
This brings to end of the User Manual.
Feel free to contact us at
You can report bugs in software at
Or Access Our Community Forum at
forum/
To install new Extension, First download Extension from
http://sanskrutitech.in/chikitsa/extensions/
You might need to purchase the extension you need
upload extension button.
Select the downloaded zip file of the module and click install.
This brings to end of the User Manual.
Feel free to contact us at [email protected] for any queries.
You can report bugs in software at http://sanskrutitech.in/chikitsa/support/
Or Access Our Community Forum at http://sanskrutitech.in/chikitsa/community
http://sanskrutitech.in/chikitsa/support/
ikitsa/community-