Embed Size (px)
Citation preview
silabs.com | Building a more connected world. Rev. 0.1
CHIP - Connected Home Over IP
This lab procedure walks through the steps to build CHIP Lock-app
project using EFR32 SLWRB4170A. The first part reviews how to
setup the environment using Virtual Machine running Ubuntu 20.04
LTS on Windows 10 machine. The second part shows how to
create Lock-app example and flash on to SLWRB4170A. The final
part introduces how to establish the connection with OTBR and use
Chip-tool to control the device.
*As of 5/11/2021 Project Connected Home over IP is now Matter. Learn more about Matter.
KEY POINTS
Setup CHIP environment on WSL2
Build Lock-app project for BRD4170A
Flash firmware on BRD4170A
Establish communication with OTBR
Use chip-tool to control the device
CHIP – Connected Home Over IP Prerequisites
silabs.com | Building a more connected world. Rev. 9 | 1
1 Prerequisites
For this lab you will need the following:
Software Requirement:
1. Studio 5 with Gecko SDK 3.0.0 or later installed on Windows 10
2. VirtualBox (with Ubuntu 20.04 LTS) installed on Windows 10
VirtualBox: https://www.virtualbox.org/
Ubuntu 20.04.x LTS: https://ubuntu.com/download/desktop
3. Latest Raspberry Pi OS.
For more instructions visit: https://www.raspberrypi.org/documentation/installation/noobs.md
4. Gecko SDK v2.7 downloaded in Linux (Ubuntu) VM
Download from https://github.com/SiliconLabs/sdk_support
5. Tera Term: https://ttssh2.osdn.jp/index.html.en
6. J-Link RTT Viewer: https://www.segger.com/downloads/jlink/
7. SSH Client (Putty or Similar) : https://www.putty.org/
Note: WSL2 or Native Linux or Mac machine can also be used to build this CHIP Project but WSL2 has limitations as
described in section 5.4. To install WSL2 visit: https://docs.microsoft.com/en-us/windows/wsl/install-win10
Hardware Requirements:
1. SLWSTK6000B Wireless Starter Kit main board + BRD4170A for CHIP device
2. SLWSTK6000B Wireless Starter Kit main board + BRD4170A for RCP Device
3. Raspberry Pi 3B+/4 for Open Thread Border Router
4. Two Micro-USB to USB Type-A cables for Kit
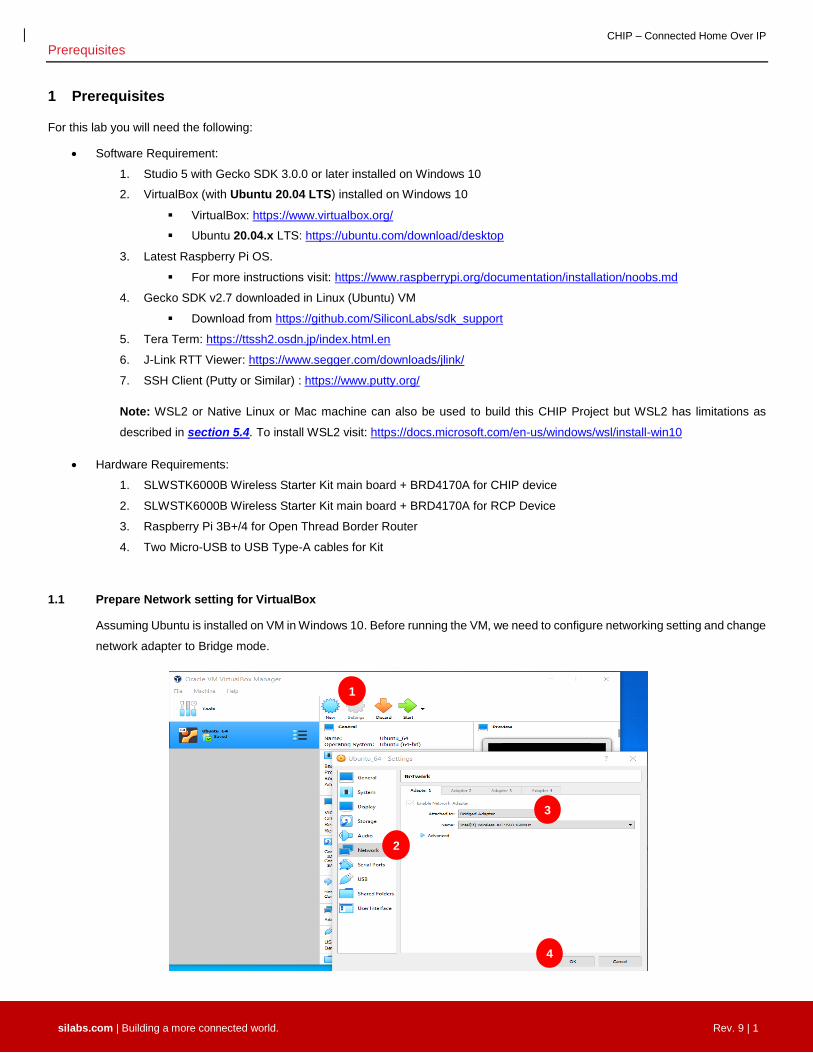
1.1 Prepare Network setting for VirtualBox
Assuming Ubuntu is installed on VM in Windows 10. Before running the VM, we need to configure networking setting and change
network adapter to Bridge mode.
1
2
3
4
CHIP – Connected Home Over IP Prerequisites
silabs.com | Building a more connected world. Rev. 9 | 2
1. Open the VirtualBox and click on ‘Settings’ of your Linux VM.
2. Click on ‘Network’ and Select the ‘Adapter 1’ tab.
3. Make sure ‘Bridge Adapter’ is selected in the ‘Attached to:’ box.
4. Click OK.
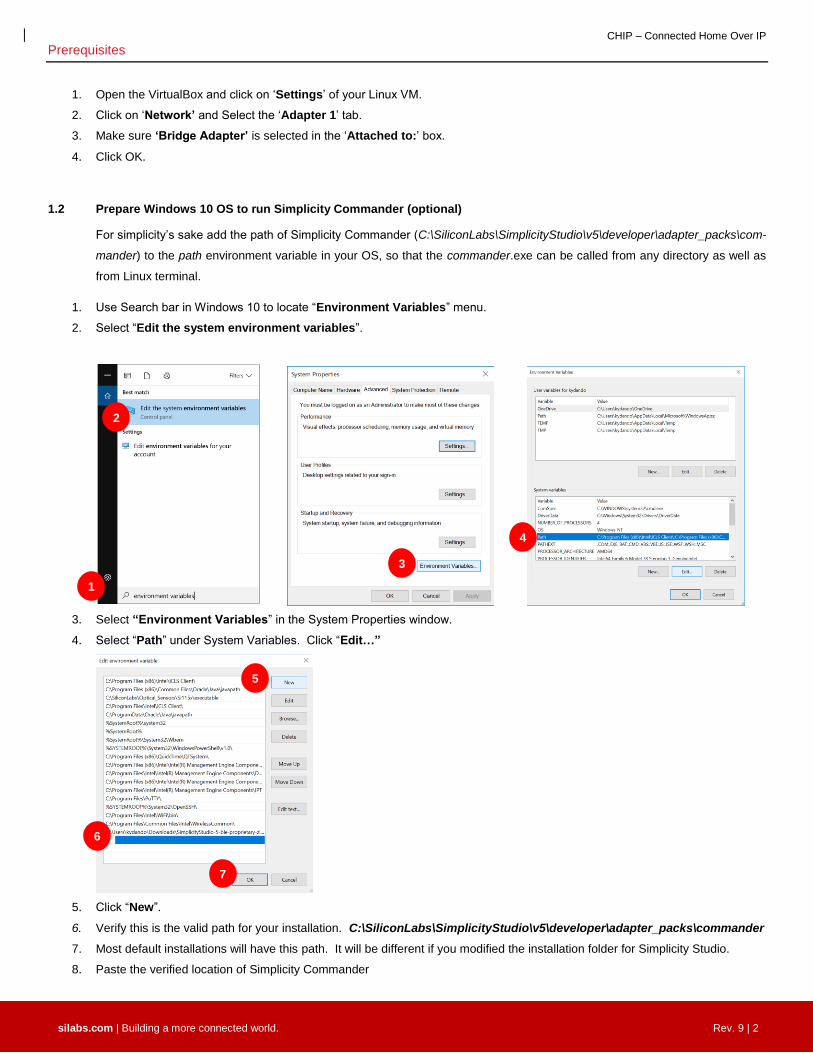
1.2 Prepare Windows 10 OS to run Simplicity Commander (optional)
For simplicity’s sake add the path of Simplicity Commander (C:\SiliconLabs\SimplicityStudio\v5\developer\adapter_packs\com-
mander) to the path environment variable in your OS, so that the commander.exe can be called from any directory as well as
from Linux terminal.
1. Use Search bar in Windows 10 to locate “Environment Variables” menu.
2. Select “Edit the system environment variables”.
3. Select “Environment Variables” in the System Properties window.
4. Select “Path” under System Variables. Click “Edit…”
5. Click “New”.
6. Verify this is the valid path for your installation. C:\SiliconLabs\SimplicityStudio\v5\developer\adapter_packs\commander
7. Most default installations will have this path. It will be different if you modified the installation folder for Simplicity Studio.
8. Paste the verified location of Simplicity Commander
1
2
3
4
5
6
7
CHIP – Connected Home Over IP Prerequisites
silabs.com | Building a more connected world. Rev. 9 | 3
9. Click “OK” to accept addition to path and return to Environment Variables window
10. Under System variables Click “New”
11. Under Variable name enter “PATH_GCCARM”
12. Under Variable value enter “C:\SiliconLabs\SimplicityStudio\v5\developer\toolchains\gnu_arm\7.2_2017q4”
13. Click “OK” to accept new variable.
14. Under System variable Click “New”
15. Under Variable name enter “PATH_SCMD”
16. Under Variable value enter “C:\SiliconLabs\SimplicityStudio\v5\developer\adapter_packs\commander” (VERIFIED IN STEP 5)
17. Click “OK” to accept new variable.
18. Click “OK” 3 times to close the open windows
19. Computer will need to be restarted for new PATH variable to be updated
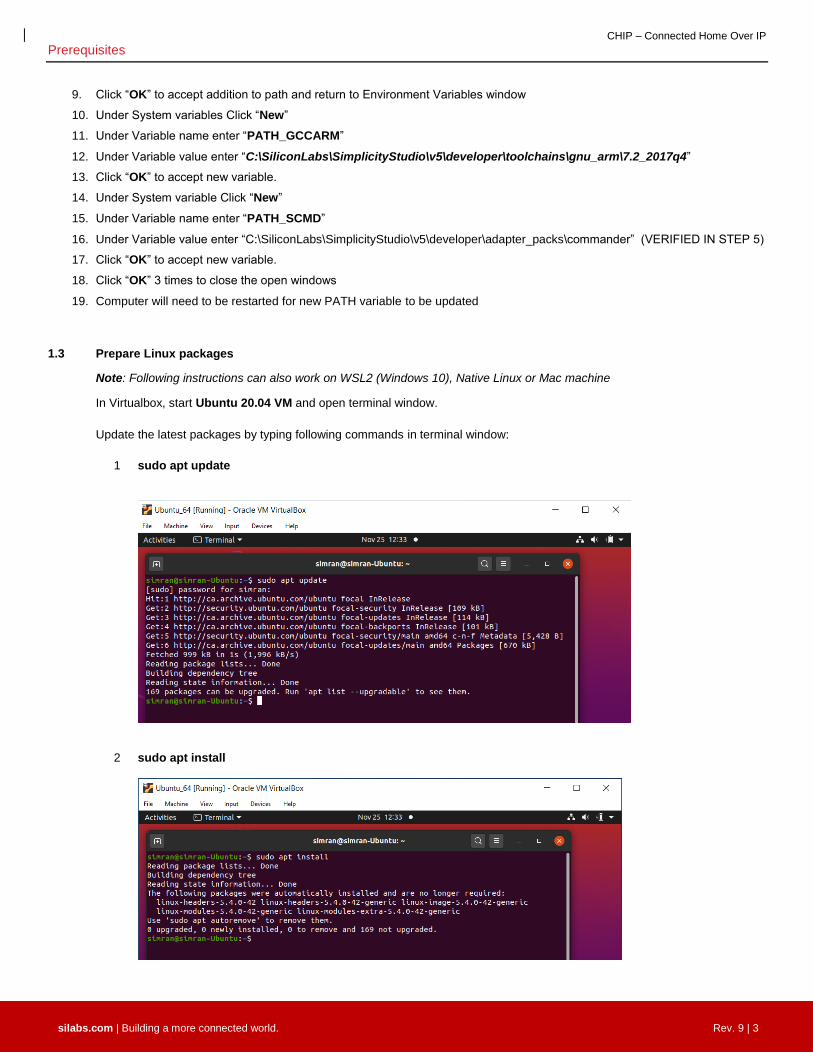
1.3 Prepare Linux packages
Note: Following instructions can also work on WSL2 (Windows 10), Native Linux or Mac machine
In Virtualbox, start Ubuntu 20.04 VM and open terminal window.
Update the latest packages by typing following commands in terminal window:
1 sudo apt update
2 sudo apt install

CHIP – Connected Home Over IP Build Preparation for CHIP
silabs.com | Building a more connected world. Rev. 9 | 4
2 Build Preparation for CHIP
Note: Instructions provided in this section 2 can be used to build Chip project on WSL2 (Windows 10), Native Linux or Mac machine)
2.1 Prerequisites for CHIP project on Linux VM
The following section details how to set up environment for CHIP Project. All the current development on CHIP is available at
https://github.com/project-chip/connectedhomeip
Check out the Code and SDK from GitHub.
1. Open the Linux terminal from start menu.
2. Clone the Gecko SDK 2.7 from https://github.com/SiliconLabs/sdk_support
3. Clone the repository. To check out the CHIP repository:
git clone https://github.com/SiliconLabs/sdk_support.git
ls
CHIP – Connected Home Over IP Build Preparation for CHIP
silabs.com | Building a more connected world. Rev. 9 | 5
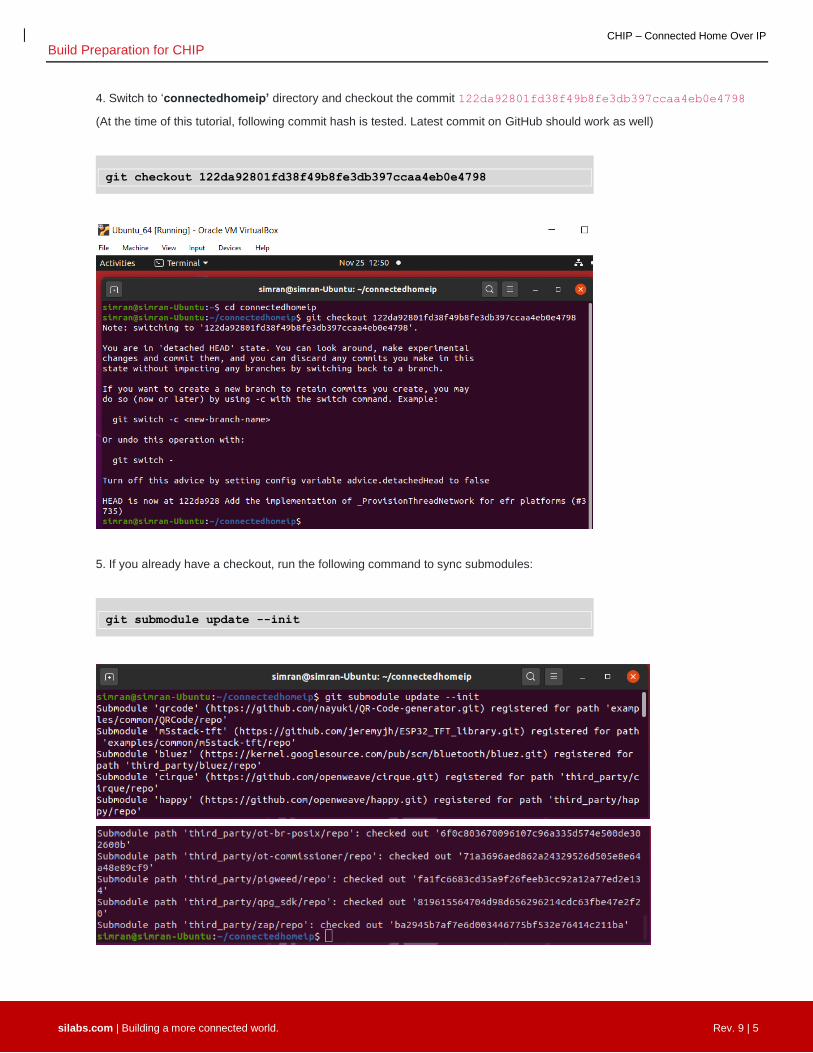
4. Switch to ‘connectedhomeip’ directory and checkout the commit 122da92801fd38f49b8fe3db397ccaa4eb0e4798
(At the time of this tutorial, following commit hash is tested. Latest commit on GitHub should work as well)
5. If you already have a checkout, run the following command to sync submodules:
git checkout 122da92801fd38f49b8fe3db397ccaa4eb0e4798
git submodule update --init
CHIP – Connected Home Over IP Build Preparation for CHIP
silabs.com | Building a more connected world. Rev. 9 | 6
6. Install prerequisites on Linux required to CHIP project.
2.2 Prepare CHIP Environment and build the source and libraries
Build all sources, libraries, and tests for the host platform.
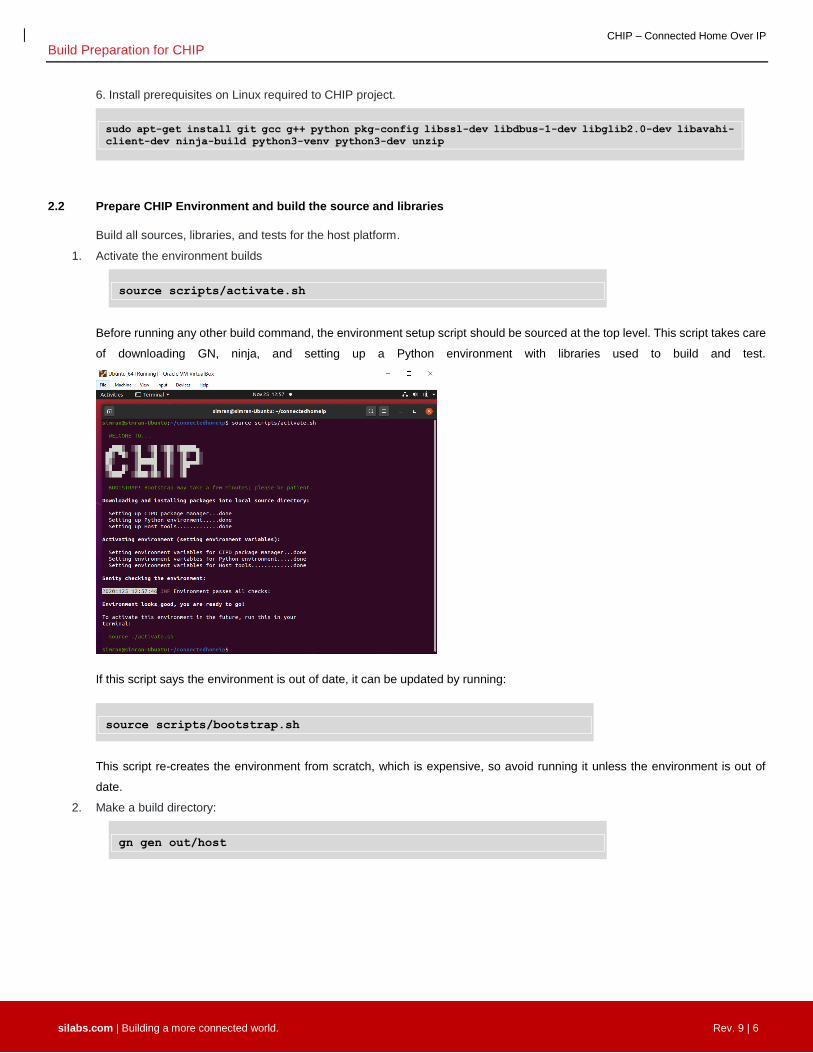
1. Activate the environment builds
Before running any other build command, the environment setup script should be sourced at the top level. This script takes care
of downloading GN, ninja, and setting up a Python environment with libraries used to build and test.
If this script says the environment is out of date, it can be updated by running:
This script re-creates the environment from scratch, which is expensive, so avoid running it unless the environment is out of
date.
2. Make a build directory:
sudo apt-get install git gcc g++ python pkg-config libssl-dev libdbus-1-dev libglib2.0-dev libavahi-
client-dev ninja-build python3-venv python3-dev unzip
source scripts/activate.sh
source scripts/bootstrap.sh
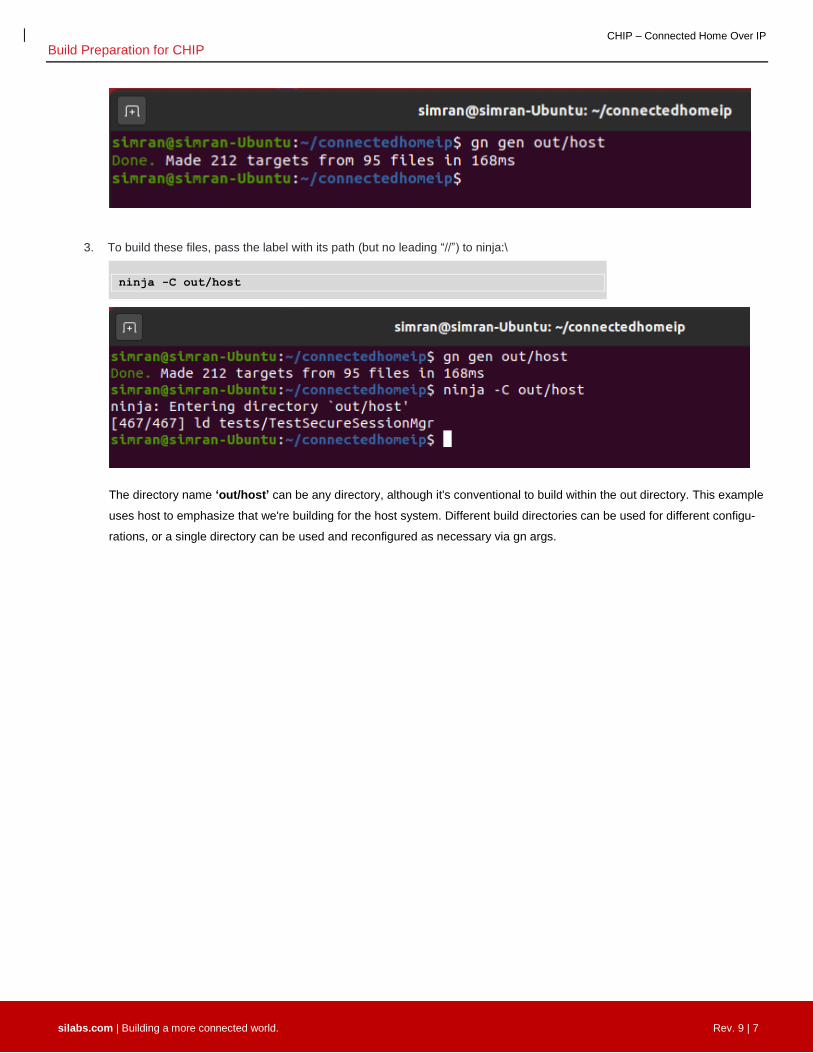
gn gen out/host
CHIP – Connected Home Over IP Build Preparation for CHIP
silabs.com | Building a more connected world. Rev. 9 | 7
3. To build these files, pass the label with its path (but no leading “//”) to ninja:\
The directory name ‘out/host’ can be any directory, although it's conventional to build within the out directory. This example
uses host to emphasize that we're building for the host system. Different build directories can be used for different configu-
rations, or a single directory can be used and reconfigured as necessary via gn args.
ninja -C out/host
CHIP – Connected Home Over IP Creating EFR32 Lock-App
silabs.com | Building a more connected world. Rev. 9 | 8
3 Creating EFR32 Lock-App
Note: Instructions provided in this section 3 can be used to build Chip project on WSL2 (Windows 10), Native Linux or Mac machine)
The EFR32 lock example provides a baseline demonstration of a door lock device, built using CHIP and the Silicon Labs gecko SDK.
The example currently supports Open Thread.
The lock example is intended to serve both to explore the workings of CHIP as well as a template for creating real products based
on the Silicon Labs platform.
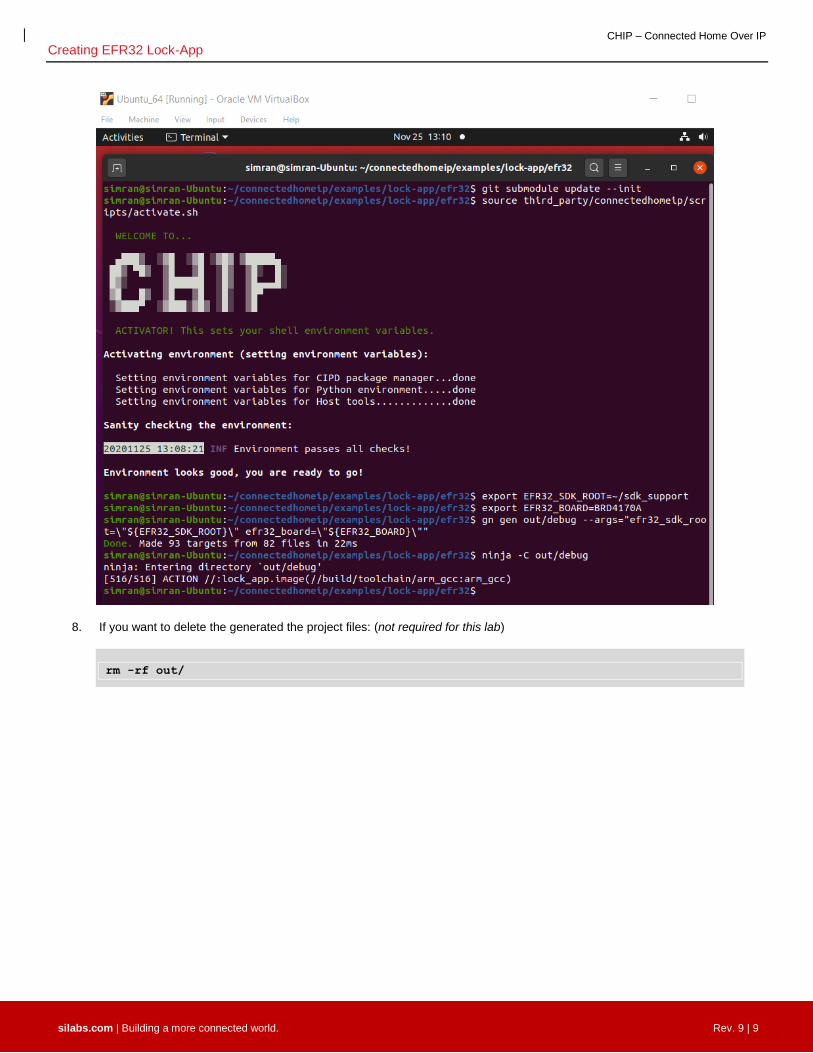
3.1 Building the example
1. Switch to efr32 lock-app folder.
2. Verify all the submodules are updated and synchronized.
3. Make sure to activate the environment. This will load gn and ninja for building further instructions.
4. Setup the Gecko SDK 2.7 path. Refer to section 1.2 for downloading the Gecko SDK 2.7
export EFR32_SDK_ROOT=<path-to-silabs-sdk-v2.7>
5. Set the board number used to build this example project.
6. Now, setup the build directory before compiling the project. with GN, you can setup your own build directories with the settings
you want. This lets you maintain as many different builds in parallel as you need.
7. To build the project, pass the label with its path to ninja
cd ~/connectedhomeip/examples/lock-app/efr32
git submodule update --init
source third_party/connectedhomeip/scripts/activate.sh
export EFR32_SDK_ROOT=~/sdk_support
export EFR32_BOARD=BRD4170A
gn gen out/debug --args="efr32_sdk_root=\"${EFR32_SDK_ROOT}\" efr32_board=\"${EFR32_BOARD}\""
ninja -C out/debug
CHIP – Connected Home Over IP Creating EFR32 Lock-App
silabs.com | Building a more connected world. Rev. 9 | 9
8. If you want to delete the generated the project files: (not required for this lab)
rm -rf out/
CHIP – Connected Home Over IP Creating EFR32 Lock-App
silabs.com | Building a more connected world. Rev. 9 | 10
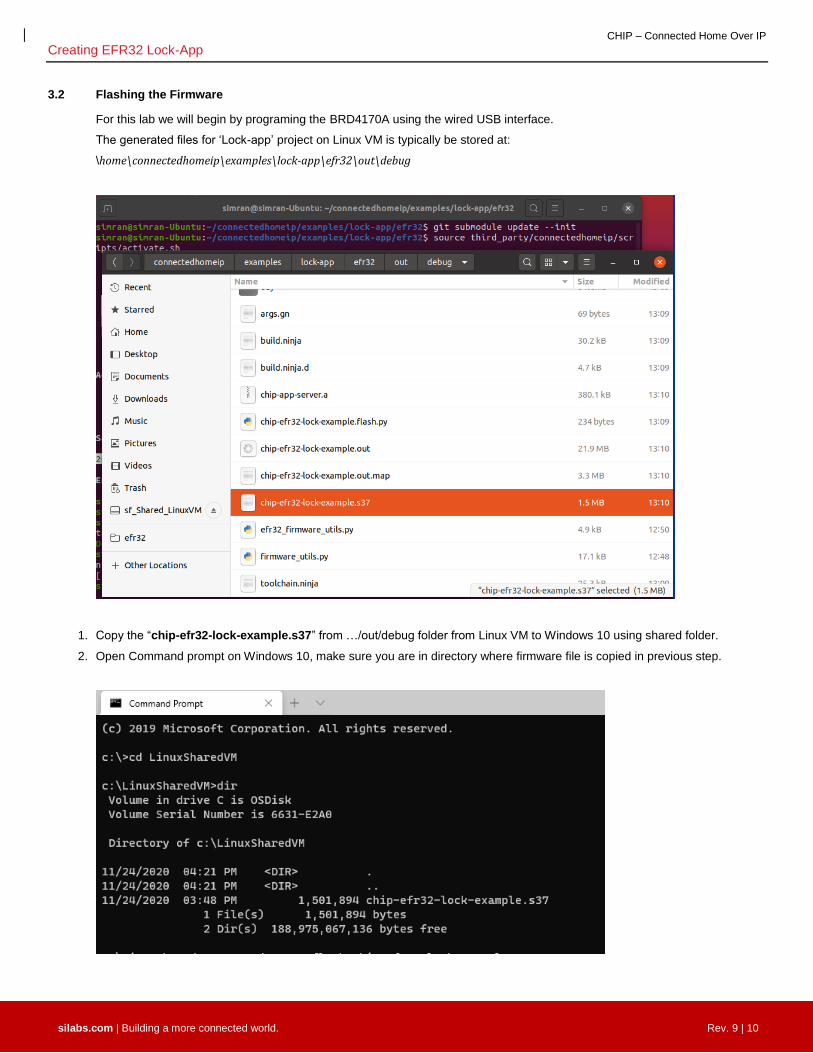
3.2 Flashing the Firmware
For this lab we will begin by programing the BRD4170A using the wired USB interface.
The generated files for ‘Lock-app’ project on Linux VM is typically be stored at:
\home\connectedhomeip\examples\lock-app\efr32\out\debug
1. Copy the “chip-efr32-lock-example.s37” from …/out/debug folder from Linux VM to Windows 10 using shared folder.
2. Open Command prompt on Windows 10, make sure you are in directory where firmware file is copied in previous step.

CHIP – Connected Home Over IP Creating EFR32 Lock-App
silabs.com | Building a more connected world. Rev. 9 | 11
3. Before flashing the application firmware, verify whether the bootloader is flashed. Otherwise the application will not bootup.
4. Type the following command to flash the firmware to the BRD4170A:
Note: You can also manually launch GUI interface of commander.exe file from (C:\SiliconLabs\SimplicityStudio\v5\devel-
oper\adapter_packs\commander) and flash the file to the board
commander.exe flash chip-efr32-lock-example.s37
1
2
CHIP – Connected Home Over IP Preparing OTBR and RCP Device
silabs.com | Building a more connected world. Rev. 9 | 12
4 Preparing OTBR and RCP Device
This section is not covered in this tutorial. So, we will only cover brief setup of RCP and Board Router. For in-depth detail on
setting up Open Thread Boarder Router, you can refer to AN1256: Using the Silicon Labs RCP with the Open Thread Border
Router https://www.silabs.com/documents/public/application-notes/an1256-using-sl-rcp-with-openthread-border-router.pdf
4.1 Preparing RCP Device
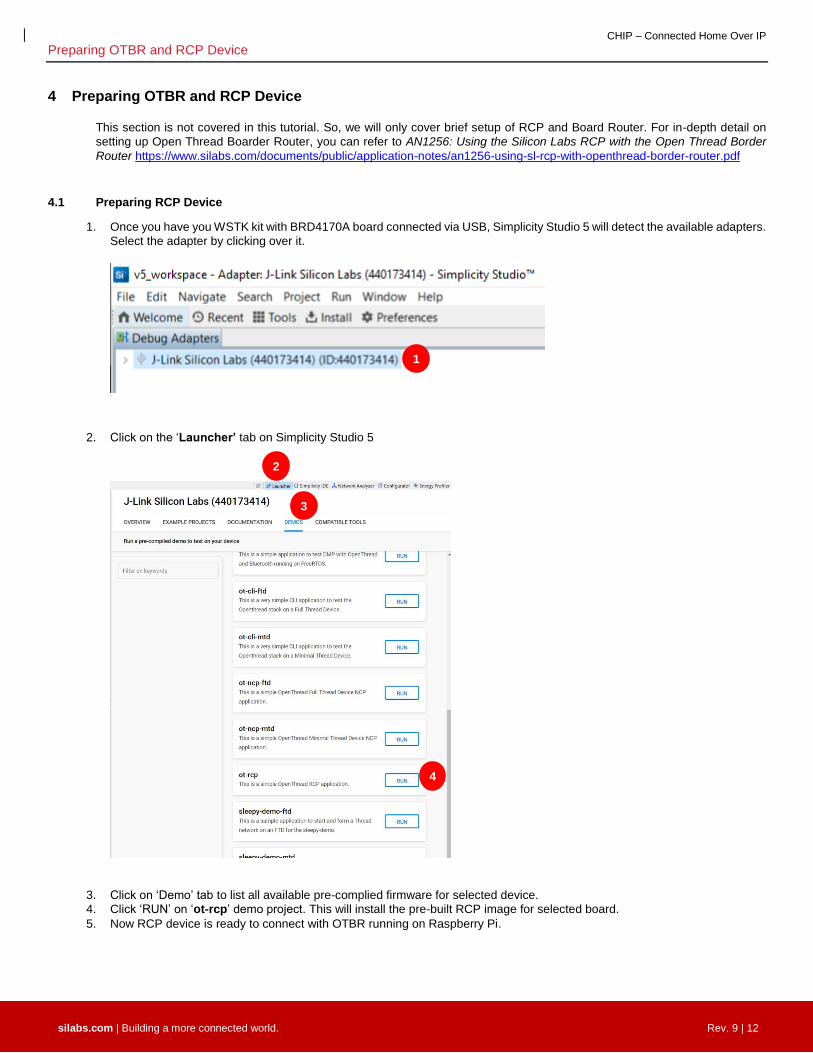
1. Once you have you WSTK kit with BRD4170A board connected via USB, Simplicity Studio 5 will detect the available adapters.
Select the adapter by clicking over it.
2. Click on the ‘Launcher’ tab on Simplicity Studio 5
3. Click on ‘Demo’ tab to list all available pre-complied firmware for selected device.
4. Click ‘RUN’ on ‘ot-rcp’ demo project. This will install the pre-built RCP image for selected board.
5. Now RCP device is ready to connect with OTBR running on Raspberry Pi.
1
2
3
4
CHIP – Connected Home Over IP Preparing OTBR and RCP Device
silabs.com | Building a more connected world. Rev. 9 | 13
4.2 Launching OTBR (Open Thread Boarder Router)
Assuming OTBR is already setup and running on Raspberry pi (refer to section 4 introduction for installing OTBR on Raspberry
Pi). You can use SSH terminal like Putty. Open SSH terminal and login to Raspberry pi.
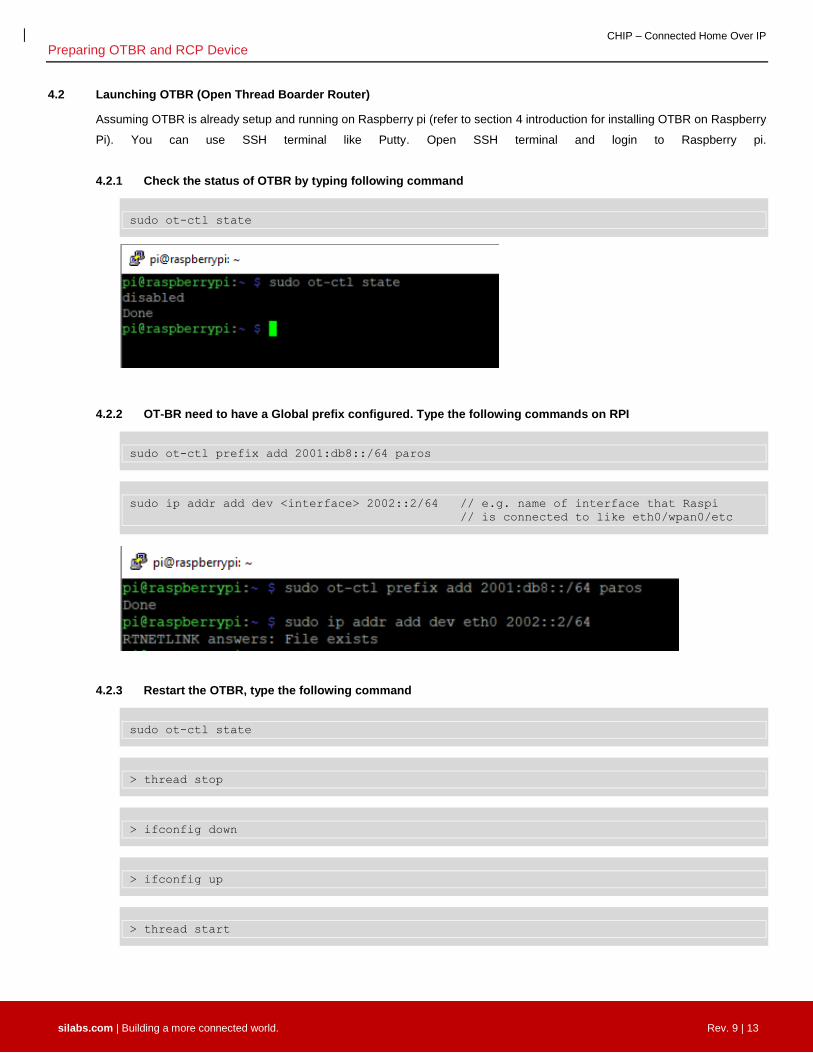
4.2.1 Check the status of OTBR by typing following command
4.2.2 OT-BR need to have a Global prefix configured. Type the following commands on RPI
4.2.3 Restart the OTBR, type the following command
sudo ot-ctl state
sudo ot-ctl prefix add 2001:db8::/64 paros
sudo ip addr add dev <interface> 2002::2/64 // e.g. name of interface that Raspi
// is connected to like eth0/wpan0/etc
sudo ot-ctl state
> thread stop
> ifconfig down
> ifconfig up
> thread start
CHIP – Connected Home Over IP Preparing OTBR and RCP Device
silabs.com | Building a more connected world. Rev. 9 | 14
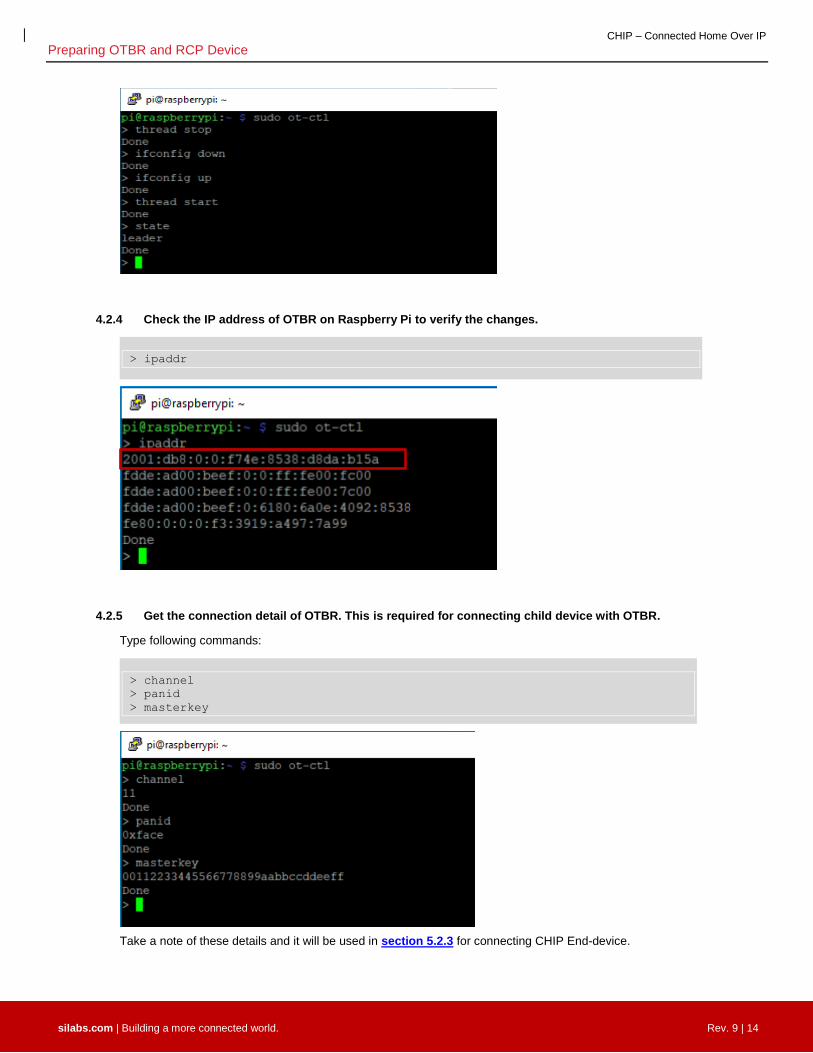
4.2.4 Check the IP address of OTBR on Raspberry Pi to verify the changes.
4.2.5 Get the connection detail of OTBR. This is required for connecting child device with OTBR.
Type following commands:
Take a note of these details and it will be used in section 5.2.3 for connecting CHIP End-device.
> ipaddr
> channel
> panid
> masterkey
CHIP – Connected Home Over IP Running the CHIP End Device Demo
silabs.com | Building a more connected world. Rev. 9 | 15
5 Running the CHIP End Device Demo
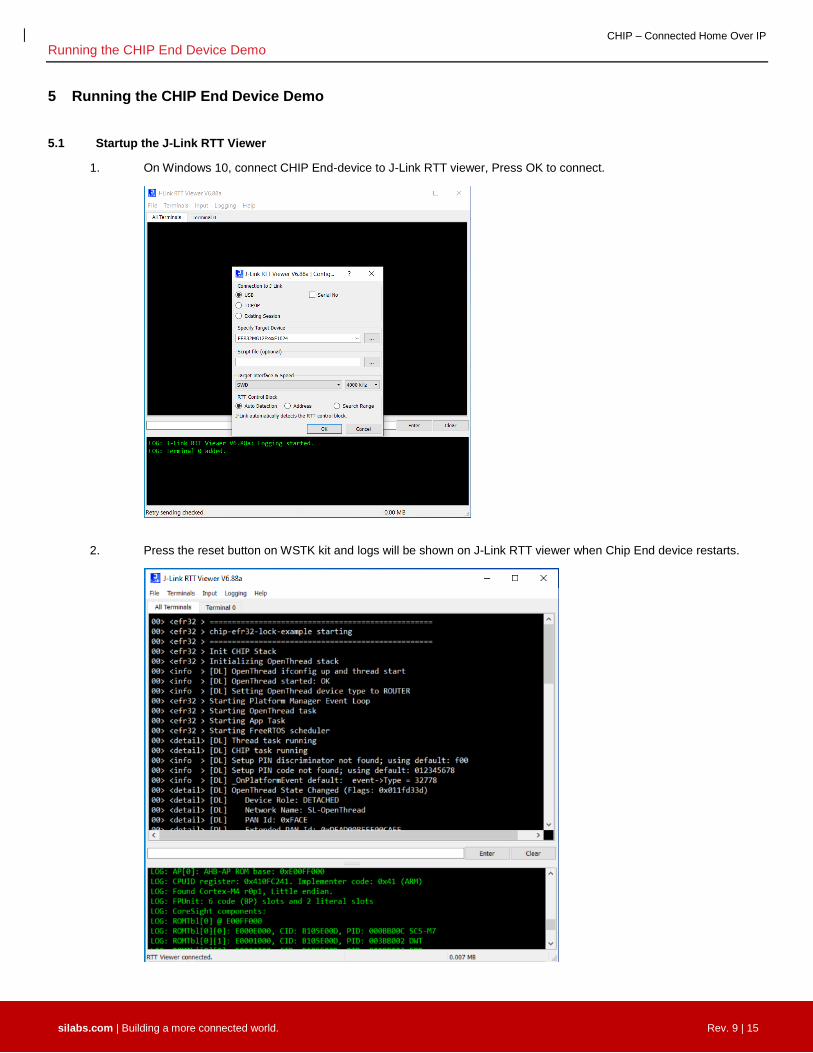
5.1 Startup the J-Link RTT Viewer
1. On Windows 10, connect CHIP End-device to J-Link RTT viewer, Press OK to connect.
2. Press the reset button on WSTK kit and logs will be shown on J-Link RTT viewer when Chip End device restarts.
CHIP – Connected Home Over IP Running the CHIP End Device Demo
silabs.com | Building a more connected world. Rev. 9 | 16
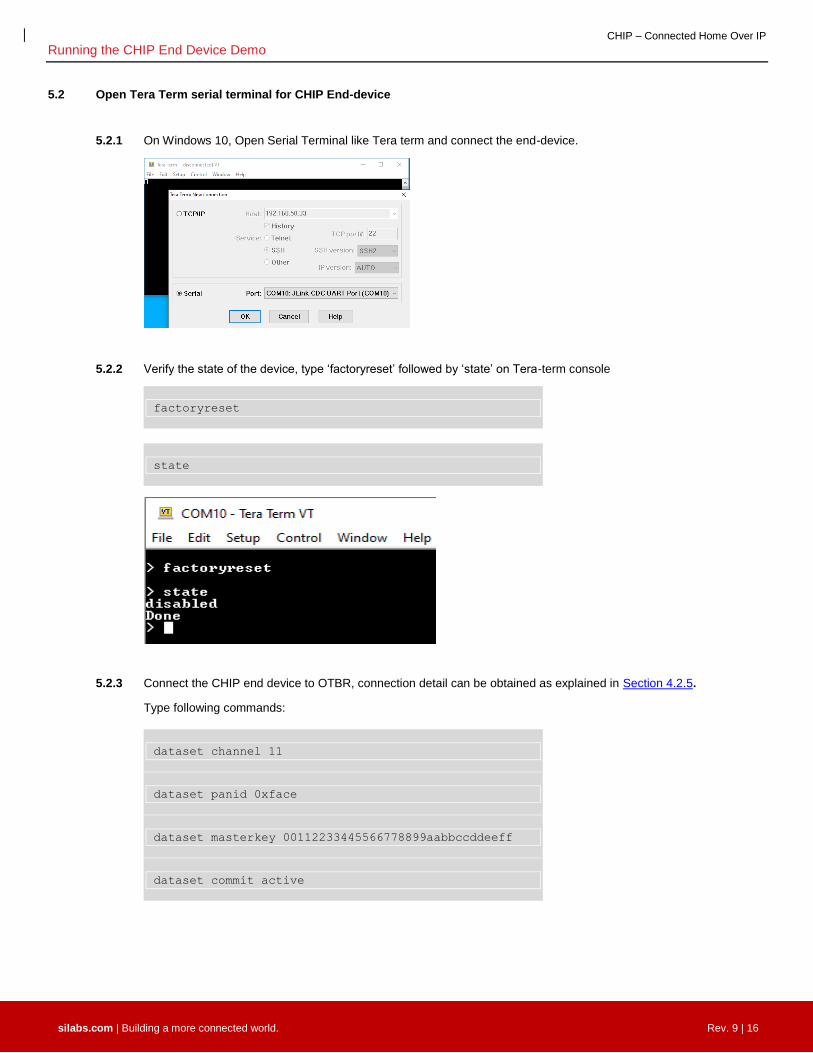
5.2 Open Tera Term serial terminal for CHIP End-device
5.2.1 On Windows 10, Open Serial Terminal like Tera term and connect the end-device.
5.2.2 Verify the state of the device, type ‘factoryreset’ followed by ‘state’ on Tera-term console
5.2.3 Connect the CHIP end device to OTBR, connection detail can be obtained as explained in Section 4.2.5.
Type following commands:
factoryreset
state
dataset channel 11
dataset panid 0xface
dataset masterkey 00112233445566778899aabbccddeeff
dataset commit active
CHIP – Connected Home Over IP Running the CHIP End Device Demo
silabs.com | Building a more connected world. Rev. 9 | 17
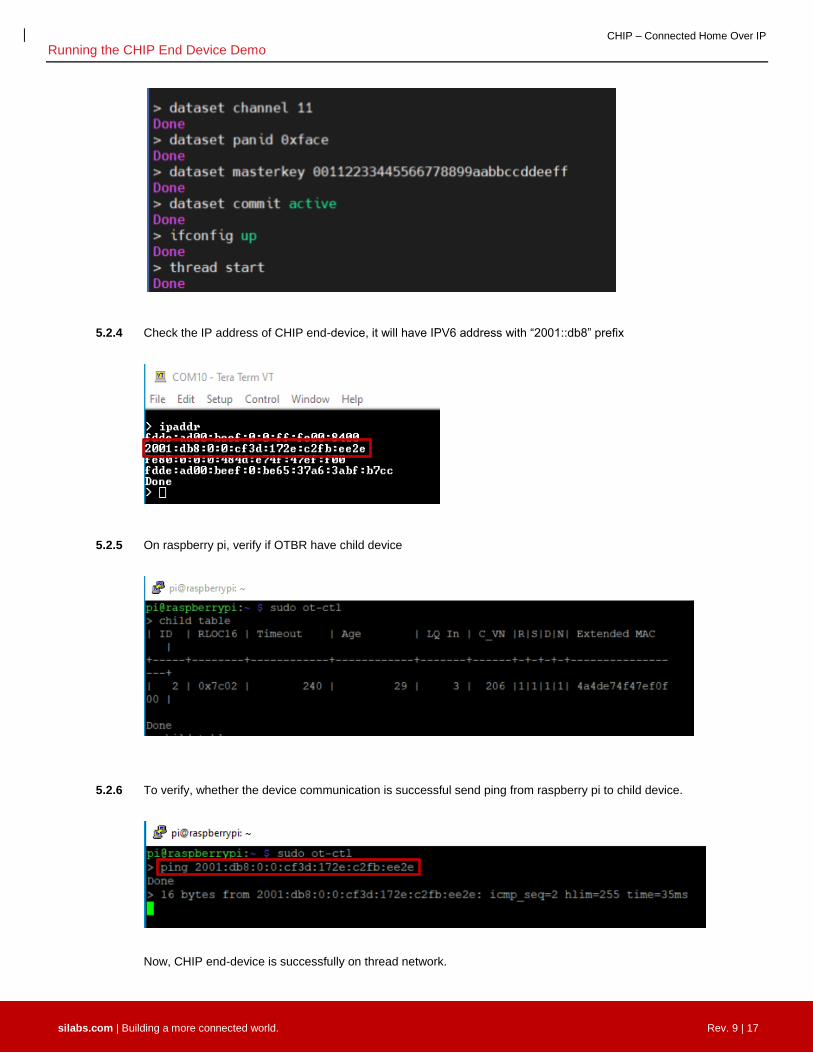
5.2.4 Check the IP address of CHIP end-device, it will have IPV6 address with “2001::db8” prefix
5.2.5 On raspberry pi, verify if OTBR have child device
5.2.6 To verify, whether the device communication is successful send ping from raspberry pi to child device.
Now, CHIP end-device is successfully on thread network.
CHIP – Connected Home Over IP Running the CHIP End Device Demo
silabs.com | Building a more connected world. Rev. 9 | 18
5.3 Building CHIP-TOOL in Linux VM
Note: Instruction provided in this section 5.3 can be used to build Chip-tool on WSL2 (Windows 10), Native Linux or Mac
machine) But WSL2 cannot act as client to send messages using chip-tool
Chip-tool allow to send message over thread network to control CHIP END-DEVICE. Before using chip-tool, we must build binaries just like lock-app example.
On Virtual Machine, open Linux terminal, and switch to chip-tool directory under ‘connectedhomeip’ directory.
Now, generated binaries for chip-tool are under ‘~/examples/chip-tool/out/debug’ folder. Using chip-tool you can now control the lock status with on/off command. But before that we need to add ipv6 route in next step.
5.4 ADD IPV6 Route on Client Device
Client device is used to send messages to Chip End device. Linux VM or native Linux or Mac machine can be used as client
device.
Note: WSL2 does not currently support IPV6 routing and cannot be act as client for sending messages using chip-tool.
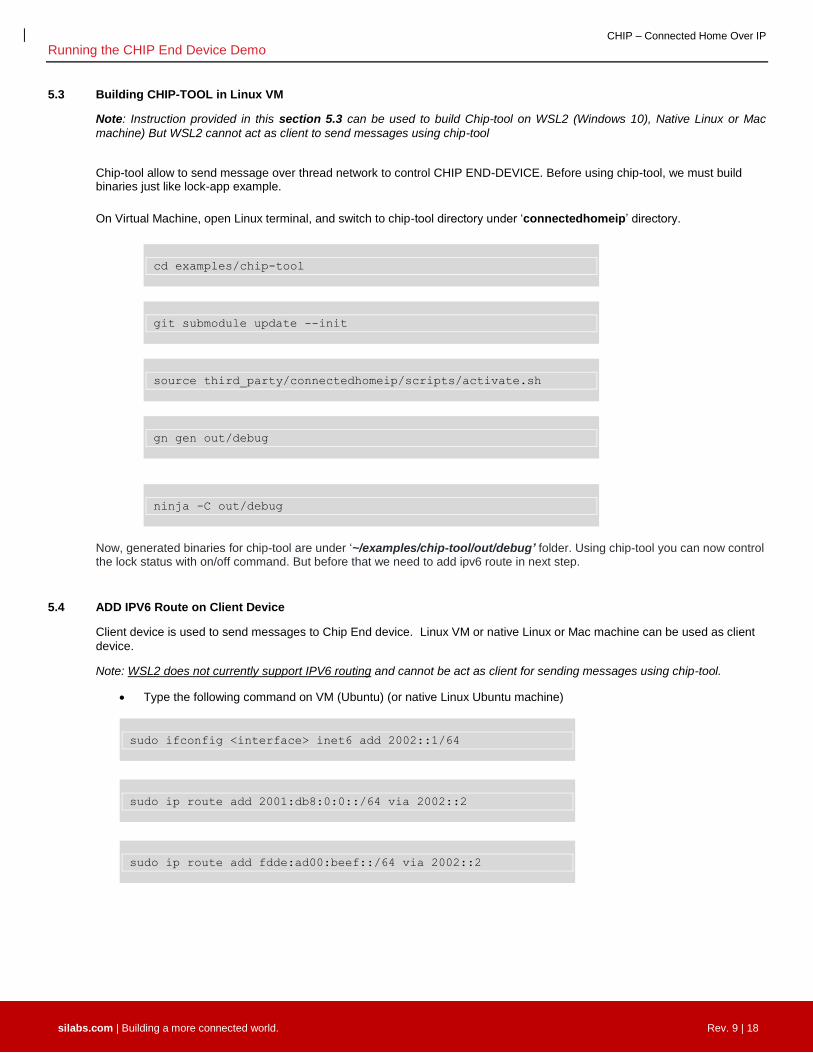
Type the following command on VM (Ubuntu) (or native Linux Ubuntu machine)
cd examples/chip-tool
git submodule update --init
source third_party/connectedhomeip/scripts/activate.sh
gn gen out/debug
ninja -C out/debug
sudo ifconfig <interface> inet6 add 2002::1/64
sudo ip route add 2001:db8:0:0::/64 via 2002::2
sudo ip route add fdde:ad00:beef::/64 via 2002::2
CHIP – Connected Home Over IP Running the CHIP End Device Demo
silabs.com | Building a more connected world. Rev. 9 | 19
On Mac machine, following commands can be used to add ipv6 routes
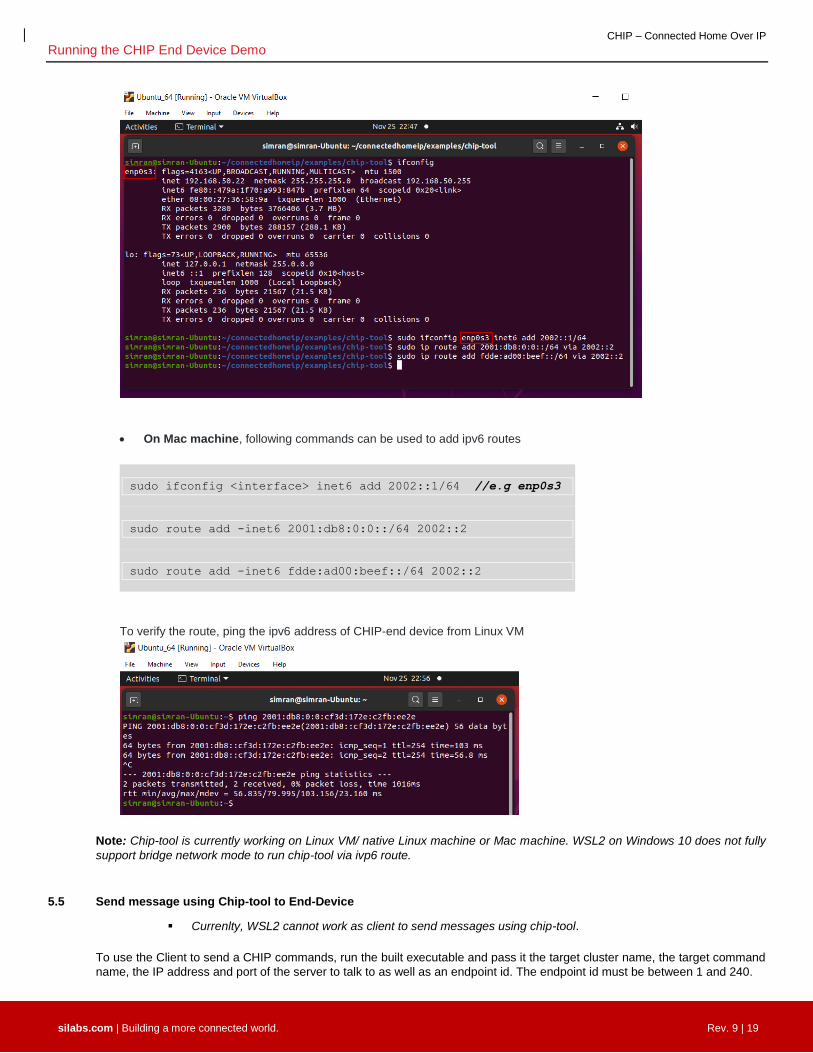
To verify the route, ping the ipv6 address of CHIP-end device from Linux VM
Note: Chip-tool is currently working on Linux VM/ native Linux machine or Mac machine. WSL2 on Windows 10 does not fully
support bridge network mode to run chip-tool via ivp6 route.
5.5 Send message using Chip-tool to End-Device
Currenlty, WSL2 cannot work as client to send messages using chip-tool.
To use the Client to send a CHIP commands, run the built executable and pass it the target cluster name, the target command
name, the IP address and port of the server to talk to as well as an endpoint id. The endpoint id must be between 1 and 240.
sudo ifconfig <interface> inet6 add 2002::1/64 //e.g enp0s3
sudo route add -inet6 2001:db8:0:0::/64 2002::2
sudo route add -inet6 fdde:ad00:beef::/64 2002::2
CHIP – Connected Home Over IP Running the CHIP End Device Demo
silabs.com | Building a more connected world. Rev. 9 | 20
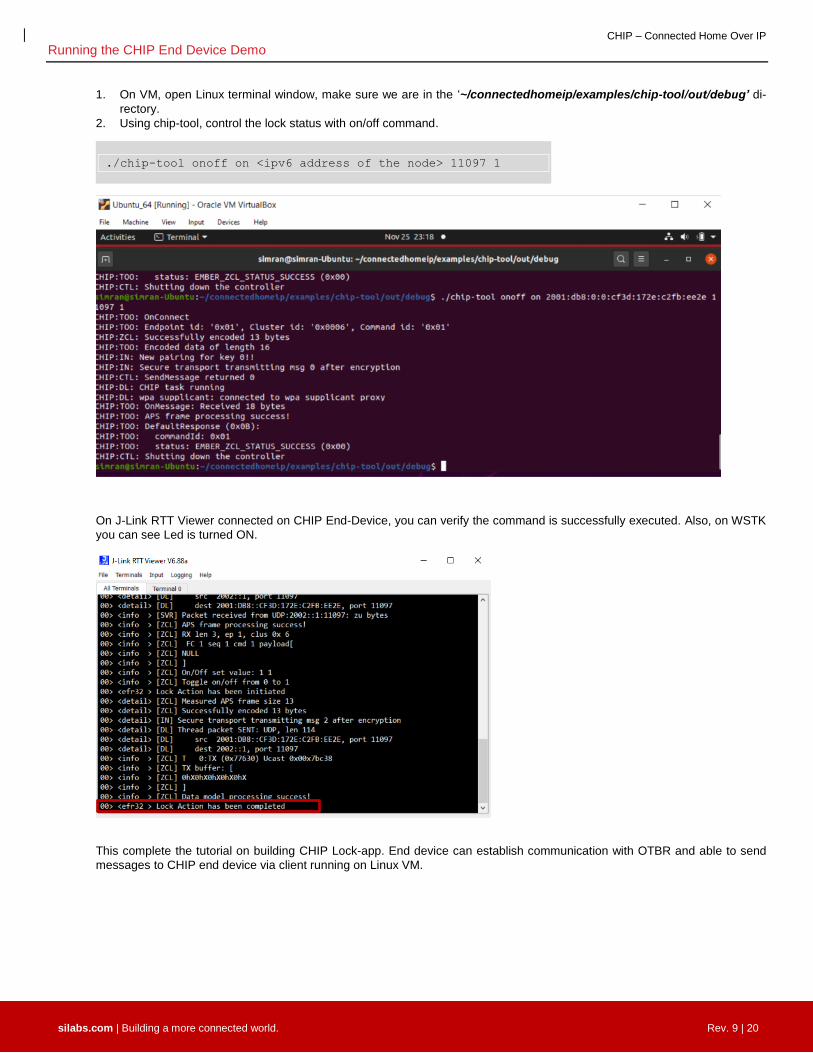
1. On VM, open Linux terminal window, make sure we are in the ‘~/connectedhomeip/examples/chip-tool/out/debug’ di-
rectory.
2. Using chip-tool, control the lock status with on/off command.
On J-Link RTT Viewer connected on CHIP End-Device, you can verify the command is successfully executed. Also, on WSTK
you can see Led is turned ON.
This complete the tutorial on building CHIP Lock-app. End device can establish communication with OTBR and able to send
messages to CHIP end device via client running on Linux VM.
./chip-tool onoff on <ipv6 address of the node> 11097 1