Embed Size (px)
Citation preview
Features
Manual
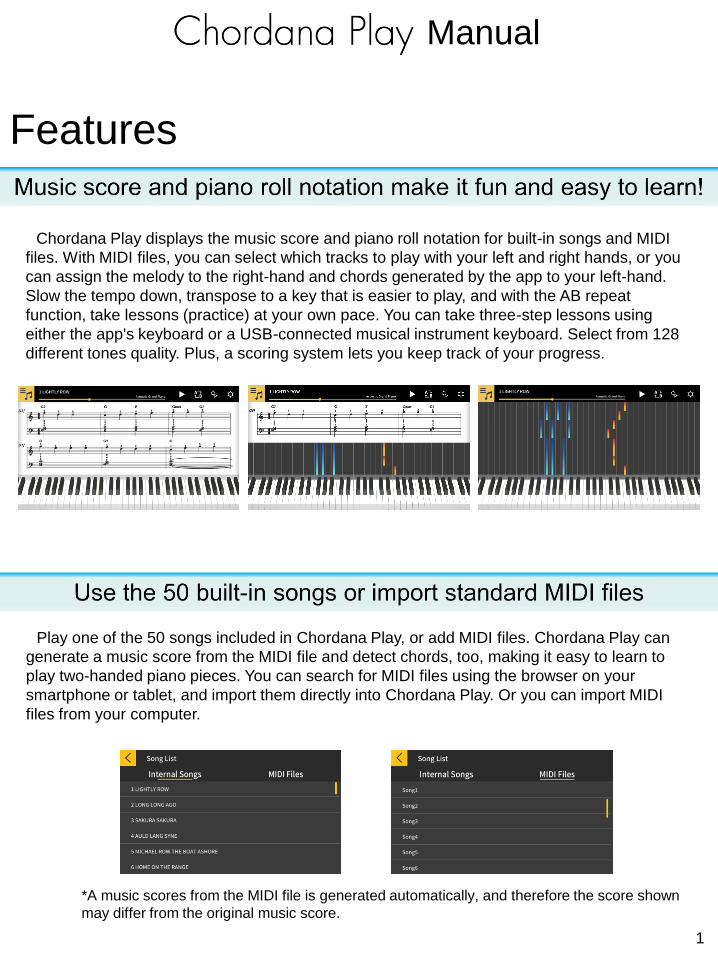
Play one of the 50 songs included in Chordana Play, or add MIDI files. Chordana Play can
generate a music score from the MIDI file and detect chords, too, making it easy to learn to
play two-handed piano pieces. You can search for MIDI files using the browser on your
smartphone or tablet, and import them directly into Chordana Play. Or you can import MIDI
files from your computer.
Chordana Play displays the music score and piano roll notation for built-in songs and MIDI
files. With MIDI files, you can select which tracks to play with your left and right hands, or you
can assign the melody to the right-hand and chords generated by the app to your left-hand.
Slow the tempo down, transpose to a key that is easier to play, and with the AB repeat
function, take lessons (practice) at your own pace. You can take three-step lessons using
either the app's keyboard or a USB-connected musical instrument keyboard. Select from 128
different tones quality. Plus, a scoring system lets you keep track of your progress.
*A music scores from the MIDI file is generated automatically, and therefore the score shown
may differ from the original music score.
1

Practice anytime and anywhere
Using either the app's keyboard or a USB-connected musical instrument keyboard, you can
take a three-step lesson while following the music score and piano roll. The scoring feature
makes mastering a song even more fun.
●Supported CASIO Keyboard models
CT-S200, CT-S300, LK-S250
●What is needed for connecting and the connection method used
See here for more details on connections.
*1 Do not connect a USB cable and audio cable to the smart device at the same time.
*2 Set the connected smart device to a mode that prevents mobile data communication, such
as In-Flight mode.
2
Using Chordana Play
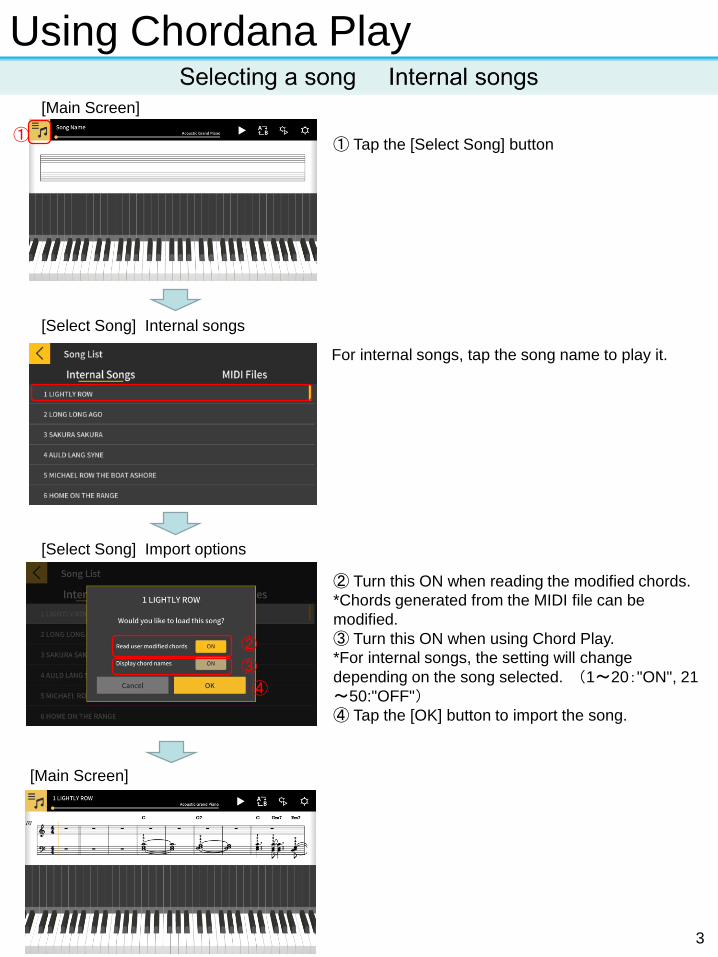
For internal songs, tap the song name to play it.
② Turn this ON when reading the modified chords.
*Chords generated from the MIDI file can be
modified.
③ Turn this ON when using Chord Play.
*For internal songs, the setting will change
depending on the song selected. (1~20:"ON", 21
~50:"OFF")④ Tap the [OK] button to import the song.
[Select Song] Internal songs
[Select Song] Import options
[Main Screen]
① Tap the [Select Song] button
④
②
③
①
[Main Screen]
3
④
②
③
①
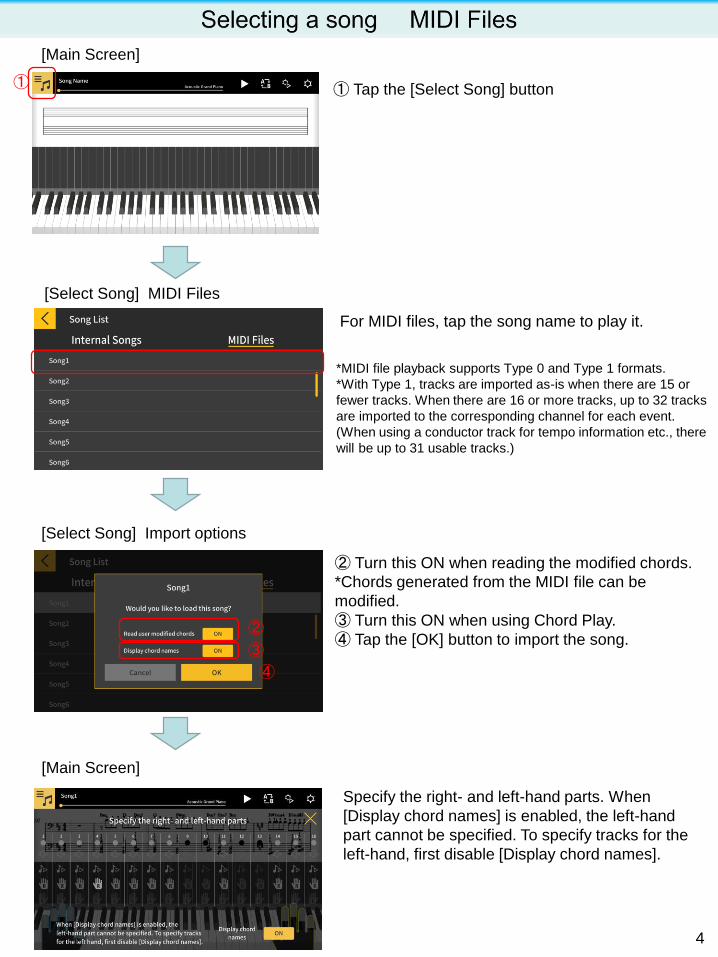
Specify the right- and left-hand parts. When
[Display chord names] is enabled, the left-hand
part cannot be specified. To specify tracks for the
left-hand, first disable [Display chord names].
[Select Song] MIDI Files
For MIDI files, tap the song name to play it.
*MIDI file playback supports Type 0 and Type 1 formats.
*With Type 1, tracks are imported as-is when there are 15 or
fewer tracks. When there are 16 or more tracks, up to 32 tracks
are imported to the corresponding channel for each event.
(When using a conductor track for tempo information etc., there
will be up to 31 usable tracks.)
① Tap the [Select Song] button
② Turn this ON when reading the modified chords.
*Chords generated from the MIDI file can be
modified.
③ Turn this ON when using Chord Play.
④ Tap the [OK] button to import the song.
[Main Screen]
[Main Screen]
[Select Song] Import options
4
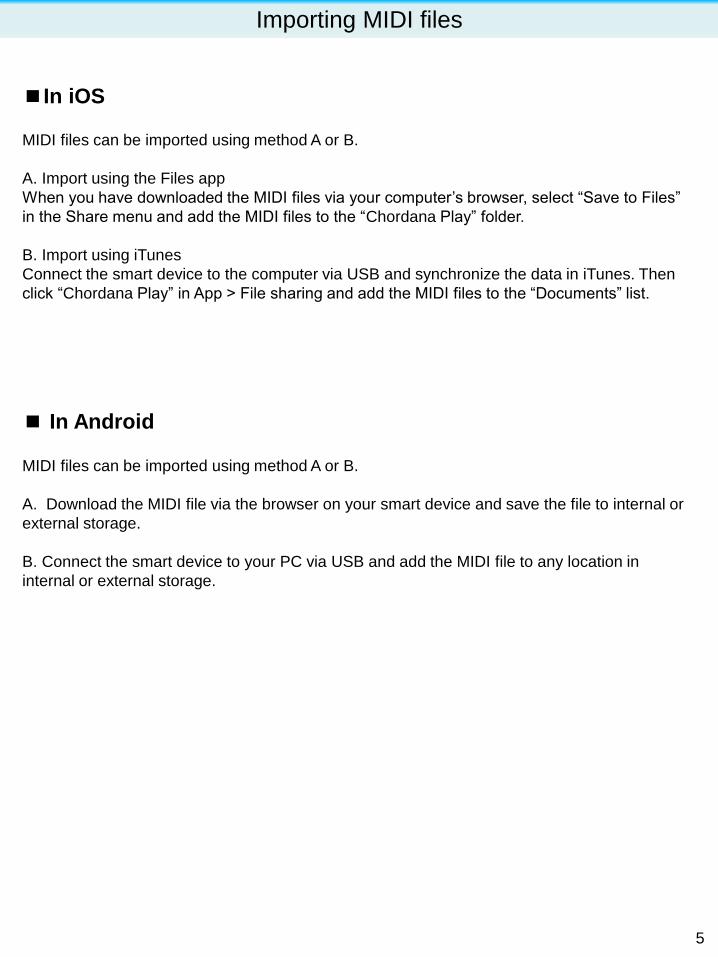
Importing MIDI files
■In iOS
■ In Android
MIDI files can be imported using method A or B.
A. Import using the Files app
When you have downloaded the MIDI files via your computer’s browser, select “Save to Files”
in the Share menu and add the MIDI files to the “Chordana Play” folder.
B. Import using iTunes
Connect the smart device to the computer via USB and synchronize the data in iTunes. Then
click “Chordana Play” in App > File sharing and add the MIDI files to the “Documents” list.
MIDI files can be imported using method A or B.
A. Download the MIDI file via the browser on your smart device and save the file to internal or
external storage.
B. Connect the smart device to your PC via USB and add the MIDI file to any location in
internal or external storage.
5

① Tap to begin playback or pause the song.
② Shows the position within the song. Tap or
swipe in the area when the song is paused to
change the location in the song.
③ Swipe left or right in the music score window to
move backwards or forwards through the song.
[Main Screen]
④ Tap the [AB Repeat] button to enable
continuous repetition of a specific part.
⑤ Tapping the [AB Repeat] button sets the
current playback location as the start point (A) of
the portion you wish to repeat.
⑥ Tap or swipe in this area to set the end point
(B) of the portion you wish to repeat.
④
②
③
①
⑤
⑥
6
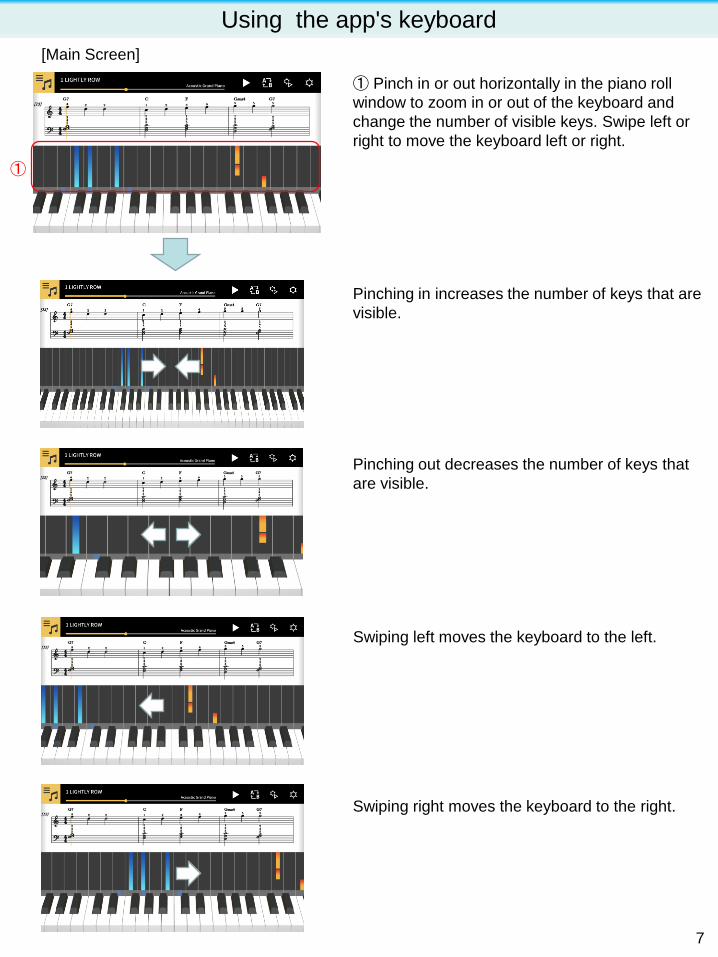
[Main Screen]
Using the app's keyboard
① Pinch in or out horizontally in the piano roll
window to zoom in or out of the keyboard and
change the number of visible keys. Swipe left or
right to move the keyboard left or right.
Pinching in increases the number of keys that are
visible.
Pinching out decreases the number of keys that
are visible.
Swiping left moves the keyboard to the left.
①
Swiping right moves the keyboard to the right.
7

[Main Screen]
① Tap the [Play Settings] button.
[Play Settings]
② Change the tempo (from 20 to 300 bpm).
- Hold the [+/-] buttons to increase or decrease
the number.
- Tap the [Reset] button to return to the original
tempo.
③ Transpose
- Tap the [+/-] buttons to change the key relative
to the original.
- Tap the [Reset] button to return to the original
key.
④ Select left-hand, right-hand, or both hands.
- The selected part will be shown in the music
score and piano roll.
⑤ Toggle the fingering guide on or off.
⑥ Select the step lesson [Step].
OFF: Normal playback.
1: Playback pauses until notes are played on
either the app's keyboard or a USB-connected
musical instrument keyboard.
2: Playback pauses until the correct notes are
played on either the app's keyboard or a USB-
connected musical instrument keyboard.
3: You perform the part yourself.
⑦ Return to the [Main Screen].
When you are learning to play a song, you can learn more efficiently by adjusting the
tempo and practicing the left-hand and right-hand parts separately. You can also try using
the fingering guides and step lessons.
[Fingering] on
④
② ③
①
⑤
⑥
⑦
8
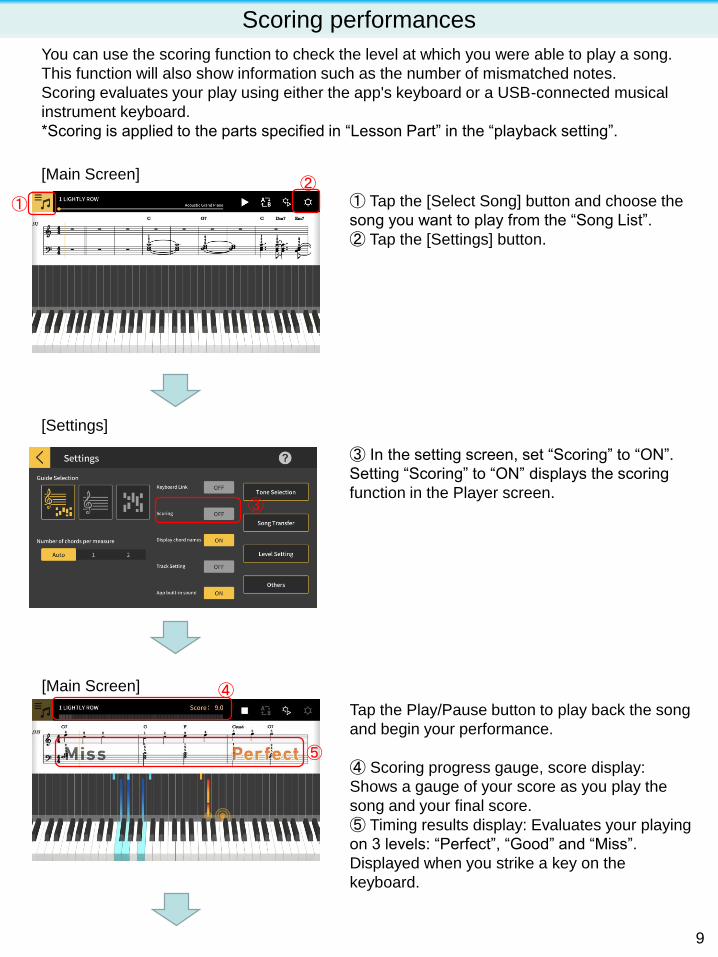
Scoring performances
You can use the scoring function to check the level at which you were able to play a song.
This function will also show information such as the number of mismatched notes.
Scoring evaluates your play using either the app's keyboard or a USB-connected musical
instrument keyboard.
*Scoring is applied to the parts specified in “Lesson Part” in the “playback setting”.
① Tap the [Select Song] button and choose the
song you want to play from the “Song List”.
② Tap the [Settings] button.
[Main Screen]
①
③ In the setting screen, set “Scoring” to “ON”.
Setting “Scoring” to “ON” displays the scoring
function in the Player screen.
[Settings]
②
Tap the Play/Pause button to play back the song
and begin your performance.
④ Scoring progress gauge, score display:
Shows a gauge of your score as you play the
song and your final score.
⑤ Timing results display: Evaluates your playing
on 3 levels: “Perfect”, “Good” and “Miss”.
Displayed when you strike a key on the
keyboard.
[Main Screen] ④
⑤
③
9
①
④
⑤②
③
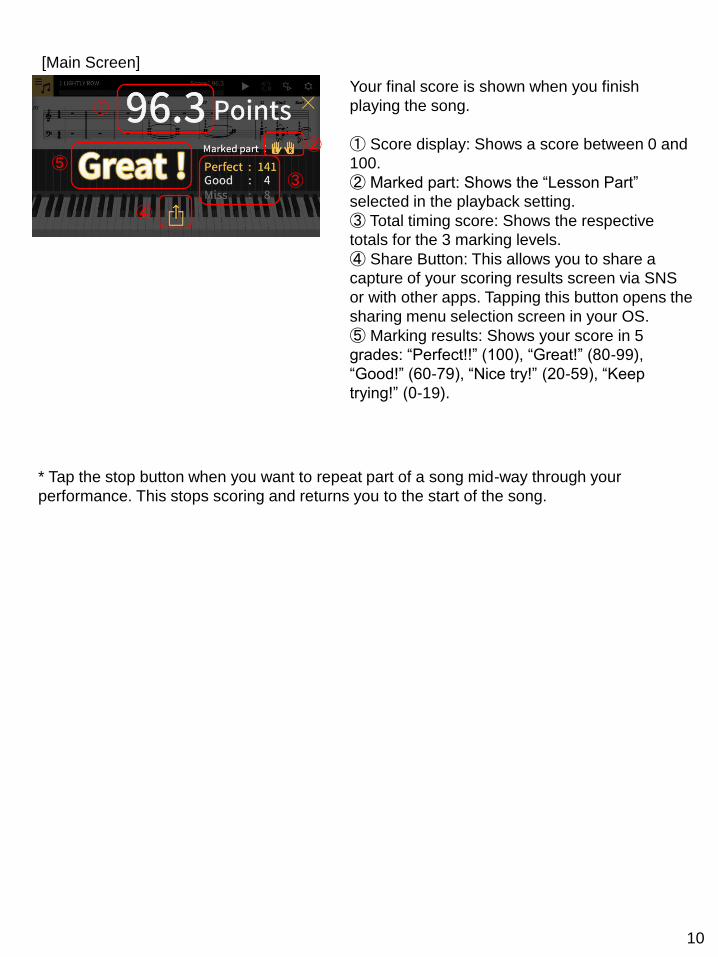
Your final score is shown when you finish
playing the song.
① Score display: Shows a score between 0 and
100.
② Marked part: Shows the “Lesson Part”
selected in the playback setting.
③ Total timing score: Shows the respective
totals for the 3 marking levels.
④ Share Button: This allows you to share a
capture of your scoring results screen via SNS
or with other apps. Tapping this button opens the
sharing menu selection screen in your OS.
⑤ Marking results: Shows your score in 5
grades: “Perfect!!” (100), “Great!” (80-99),
“Good!” (60-79), “Nice try!” (20-59), “Keep
trying!” (0-19).
[Main Screen]
* Tap the stop button when you want to repeat part of a song mid-way through your
performance. This stops scoring and returns you to the start of the song.
10
[Main Screen]
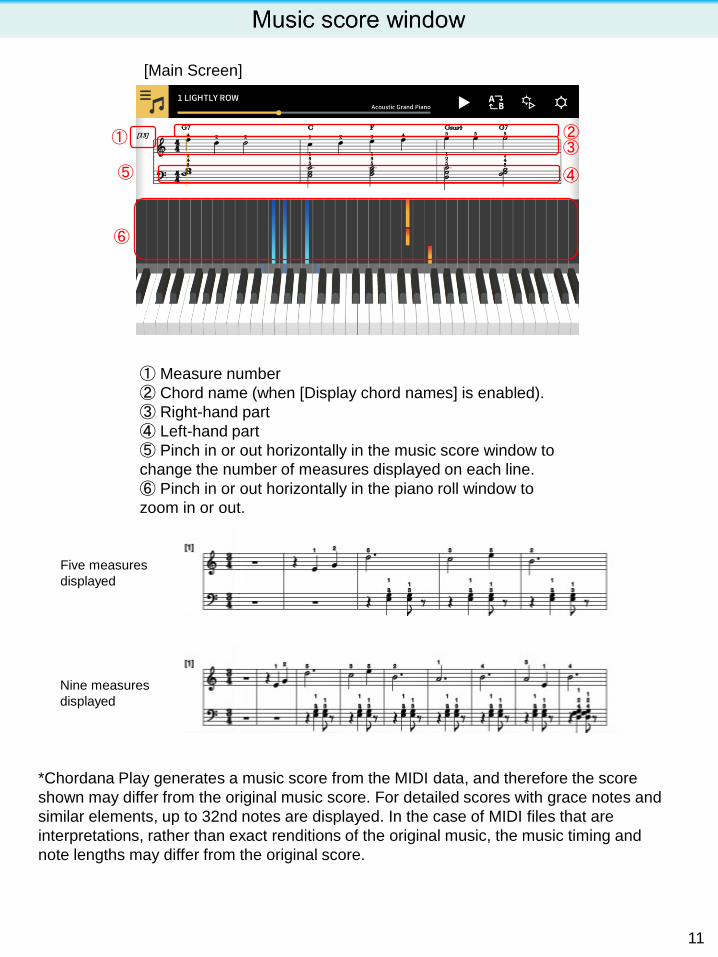
① Measure number
② Chord name (when [Display chord names] is enabled).
③ Right-hand part
④ Left-hand part
⑤ Pinch in or out horizontally in the music score window to
change the number of measures displayed on each line.
⑥ Pinch in or out horizontally in the piano roll window to
zoom in or out.
Five measures
displayed
Nine measures
displayed
*Chordana Play generates a music score from the MIDI data, and therefore the score
shown may differ from the original music score. For detailed scores with grace notes and
similar elements, up to 32nd notes are displayed. In the case of MIDI files that are
interpretations, rather than exact renditions of the original music, the music timing and
note lengths may differ from the original score.
① ②③
④⑤
⑥
11

[Main Screen]
① Touch and hold in the music score window.
[Score Display] options ② [Fixed measure width] Select whether to show
measures with equal width, or adjusted to best
display the score.
③ [Fingering] Show or hide fingering information
(finger numbers).
④ [Multiple voices] Divide the left-hand and right-
hand parts and show them on separate lines, or
keep them together.
⑤ [Quantization] Select the shortest notes that
can be displayed. Select either 16th notes or 32nd
notes.
[Fixed measure width] Off [Fixed measure width] On
[Fingering] Off[Fingering] On
[Multiple voices] Off[Multiple voices] On
[Quantization] 16 [Quantization] 32
○ Configuring the score display
①
② ③ ④ ⑤
12
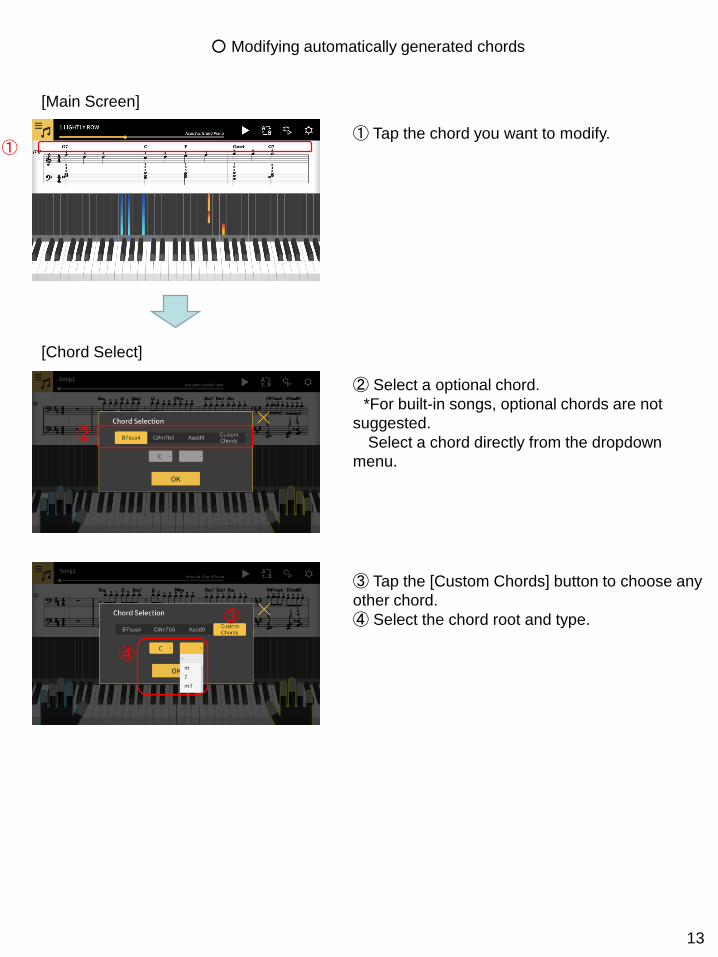
○ Modifying automatically generated chords
[Main Screen]
① Tap the chord you want to modify.
[Chord Select]
② Select a optional chord.
*For built-in songs, optional chords are not
suggested.
Select a chord directly from the dropdown
menu.
③ Tap the [Custom Chords] button to choose any
other chord.
④ Select the chord root and type.
①
②
③
④
13

The keyboard link function enables you to use an audio cable to send melody and chord
data along with the audio playback. Use the keyboard's light-up function and practice
step-up lessons directly on the keyboard itself. The function has two modes.
■ Performance mode
When a song is played, the light-up keyboard shows the left-hand part and the melody.
The notes and chords for the melody are shown on the keyboard's LCD.
■ Save mode
You can transfer and save the song's right-hand melody and left-hand chord data, or the
left-hand performance data, to the keyboard. You can then play along to the song and use
the step-up lesson function.
- Stereo mini to stereo mini cable required.
- Compatible with Casio LK-265, LK-266, CTK-2500, CTK-2550 and CTK-3500 keyboard
models.
- Song audio is sent using the left channel of the smart device stereo output, while the
melody and chord data is sent on the right channel.
- On the CTK-2500, CTK-2550 and CTK-3500, notes and chords for the melody are shown
on the LCD
- If using right-hand (melody) and chord data, up to approximately 880 notes of the right-
hand part can be transferred to the keyboard, assuming two chords per measure for 200
measures.
- If using right-hand (melody) and left-hand (accompaniment) data, up to approximately
1100 notes can be transferred.
- If non-note MIDI data (patches, pedals, etc.) is included, this reduces the number of
notes that can be transferred, leading to potential errors even if the approximate limit of
880 or 1100 notes is observed.
14
○ IMPORTANT
・ To use the keyboard link function, ensure that a compatible keyboard is connected with
the cable, and that the app function is enabled. In the following circumstances, you may
hear the sound of data being transferred:
- When connected to a non-compatible keyboard
- When headphones or other audio equipment are connected
・ Do not use an audio cable with electrical resistance.
・It may not function on incompatible smart devices.
・ Some smart devices use audio effects and equalizers for playback, which may interfere
with keyboard link function. Please turn off audio effects and equalizers.
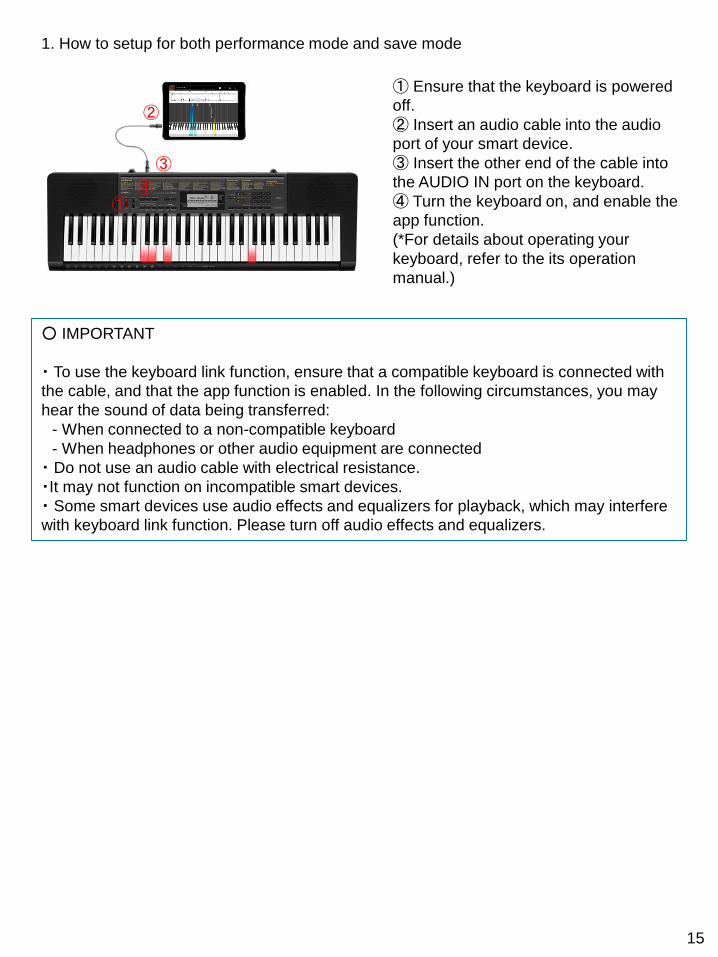
1. How to setup for both performance mode and save mode
③
②
① Ensure that the keyboard is powered
off.
② Insert an audio cable into the audio
port of your smart device.
③ Insert the other end of the cable into
the AUDIO IN port on the keyboard.
④ Turn the keyboard on, and enable the
app function.
(*For details about operating your
keyboard, refer to the its operation
manual.)
①④
15

[Main Screen]
① Tap the [Settings] button.
[Settings]
② Tap the [Keyboard Link] button.
2. Using performance mode
[Keyboard Link Settings]
③ Make sure that the cable connection and
keyboard settings are completed, then tap the
[OK] button.
*[App Mode] will be displayed on the keyboard's
LCD.
After this, the melody and chords will be
transmitted as the song plays.
①
②
③
③
16
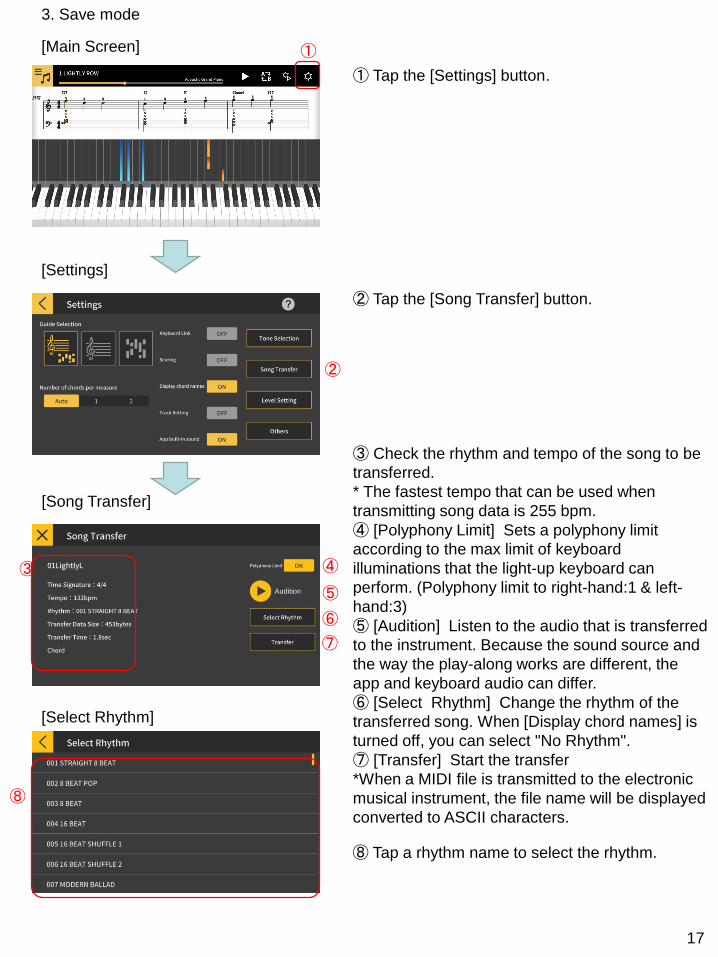
[Main Screen]
① Tap the [Settings] button.
[Settings]
② Tap the [Song Transfer] button.
3. Save mode
[Song Transfer]
③ Check the rhythm and tempo of the song to be
transferred.
* The fastest tempo that can be used when
transmitting song data is 255 bpm.
④ [Polyphony Limit] Sets a polyphony limit
according to the max limit of keyboard
illuminations that the light-up keyboard can
perform. (Polyphony limit to right-hand:1 & left-
hand:3)
⑤ [Audition] Listen to the audio that is transferred
to the instrument. Because the sound source and
the way the play-along works are different, the
app and keyboard audio can differ.
⑥ [Select Rhythm] Change the rhythm of the
transferred song. When [Display chord names] is
turned off, you can select "No Rhythm".
⑦ [Transfer] Start the transfer
*When a MIDI file is transmitted to the electronic
musical instrument, the file name will be displayed
converted to ASCII characters.
[Select Rhythm]
⑧ Tap a rhythm name to select the rhythm.
①
②
③ ④
⑤
⑥
⑧
⑦
17
[Main Screen]
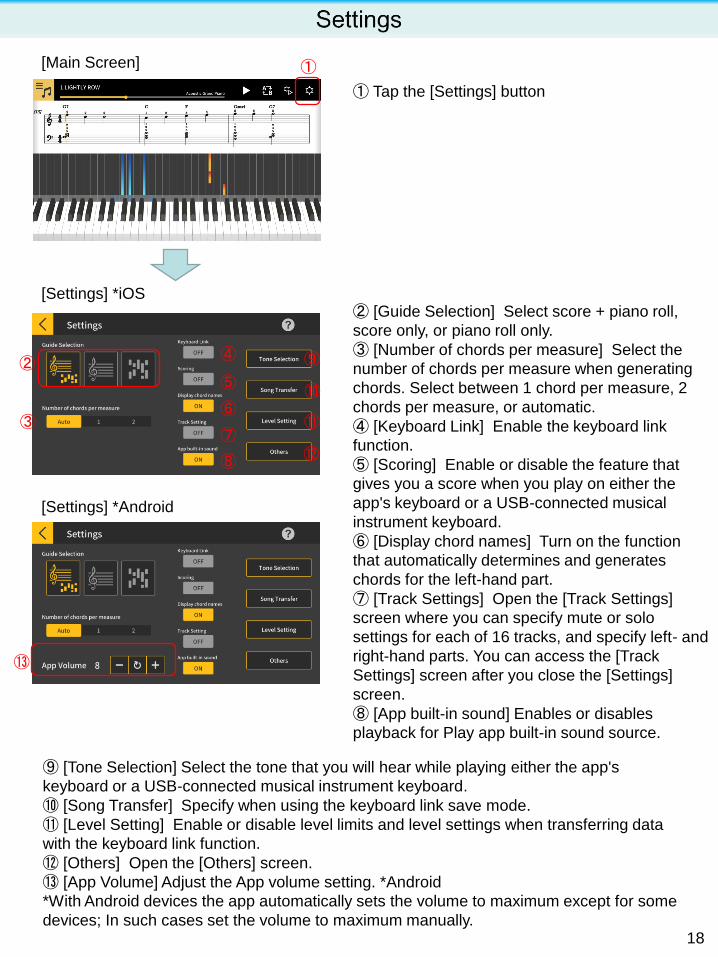
① Tap the [Settings] button
[Settings] *iOS② [Guide Selection] Select score + piano roll,
score only, or piano roll only.
③ [Number of chords per measure] Select the
number of chords per measure when generating
chords. Select between 1 chord per measure, 2
chords per measure, or automatic.
④ [Keyboard Link] Enable the keyboard link
function.
⑤ [Scoring] Enable or disable the feature that
gives you a score when you play on either the
app's keyboard or a USB-connected musical
instrument keyboard.
⑥ [Display chord names] Turn on the function
that automatically determines and generates
chords for the left-hand part.
⑦ [Track Settings] Open the [Track Settings]
screen where you can specify mute or solo
settings for each of 16 tracks, and specify left- and
right-hand parts. You can access the [Track
Settings] screen after you close the [Settings]
screen.
⑧ [App built-in sound] Enables or disables
playback for Play app built-in sound source.
⑨ [Tone Selection] Select the tone that you will hear while playing either the app's
keyboard or a USB-connected musical instrument keyboard.
⑩ [Song Transfer] Specify when using the keyboard link save mode.
⑪ [Level Setting] Enable or disable level limits and level settings when transferring data
with the keyboard link function.
⑫ [Others] Open the [Others] screen.
⑬ [App Volume] Adjust the App volume setting. *Android
*With Android devices the app automatically sets the volume to maximum except for some
devices; In such cases set the volume to maximum manually.
①
②
③
④
⑪
⑨
⑧
⑦
⑥
⑤⑩
[Settings] *Android
⑫
⑬
18

[Track Settings]
[Tone Selection]
① Shows the state of each track, as follows:
- No data
- Playing
- Has data, but not playing
② You can specify "mute" or "solo" for each track.
If any track is set to play solo, the mute option is
disabled and only that track will play. If no tracks
are set to solo, all un-muted tracks will play.
③ Specify the right- and left-hand parts. When
[Display chord names] is enabled, the left-hand
part cannot be specified. To specify tracks for the
left-hand, first disable [Display chord names].
④ Tap the tone name to perform with that tone on
either the app's keyboard or a USB-connected
musical instrument keyboard.
[Level Settings]⑤ [Reset] Adjust the data signal level for the
keyboard link function. If the keyboard link fails to
work, an error message reading either "App Vol+"
or [App Vol-] may appear on the keyboard's LCD.
In this case, first tap the [Reset] button.
⑥ Tap this button if the keyboard error message is
"App Vol-".
⑦ Tap this button if the keyboard error message is
[App Vol+].
⑧ [Level Limit] This limits the volume of the song
audio as required for the keyboard link function,
but it can be disabled. Switch this to "OFF" if you
want to increase the volume beyond the limit.
Switch this to "ON" if the keyboard link function
does not work correctly.
*The Keyboard link function may not work properly
if the volume is not set at the right level.
①
④
⑧⑦⑥ ⑤
②
③
19

© 2019 CASIO COMPUTER CO., LTD.
IOS(iOS) is a trademark or registered trademark of Cisco Systems, Inc. in the United
States and certain other countries.
Android is a trademark or registered trademark of Google Inc.
Other service and product names, etc., mentioned herein may be trademarks or
registered trademarks of their respective companies.
20