Embed Size (px)
Citation preview

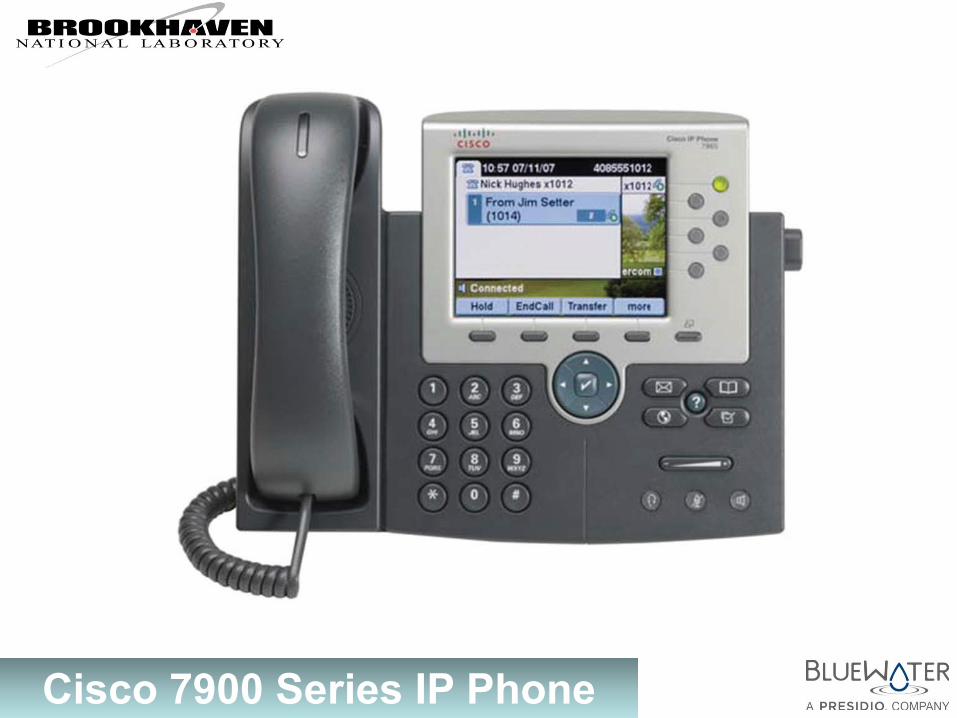
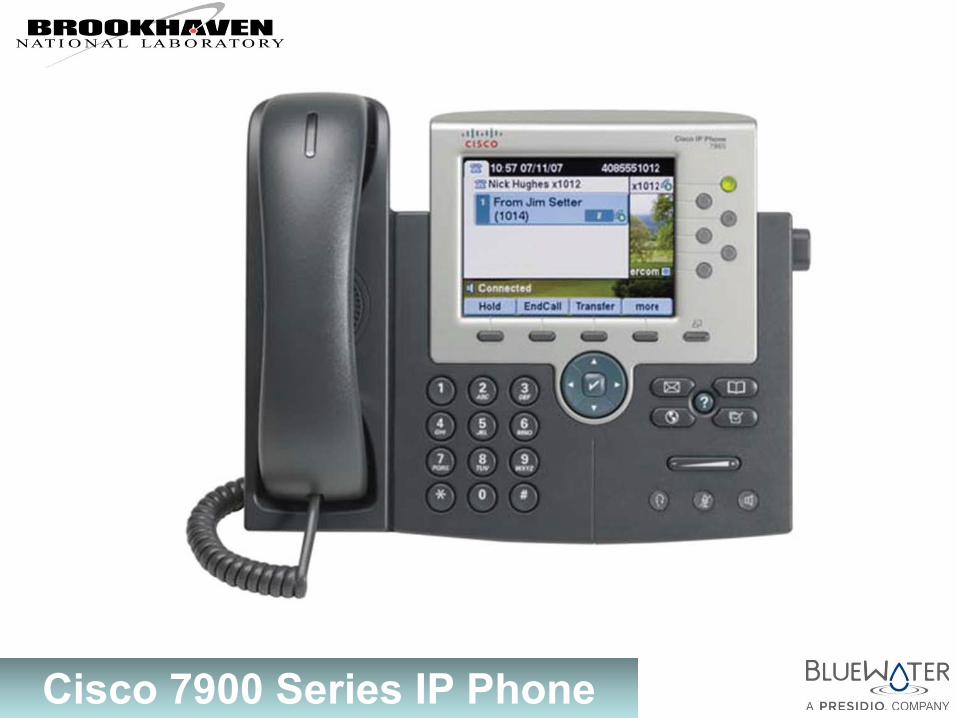
Cisco 7900 Series IP Phone
Cisco 7900 Series IP Phone
Cisco 7900 Series IP Phone
Main Menu
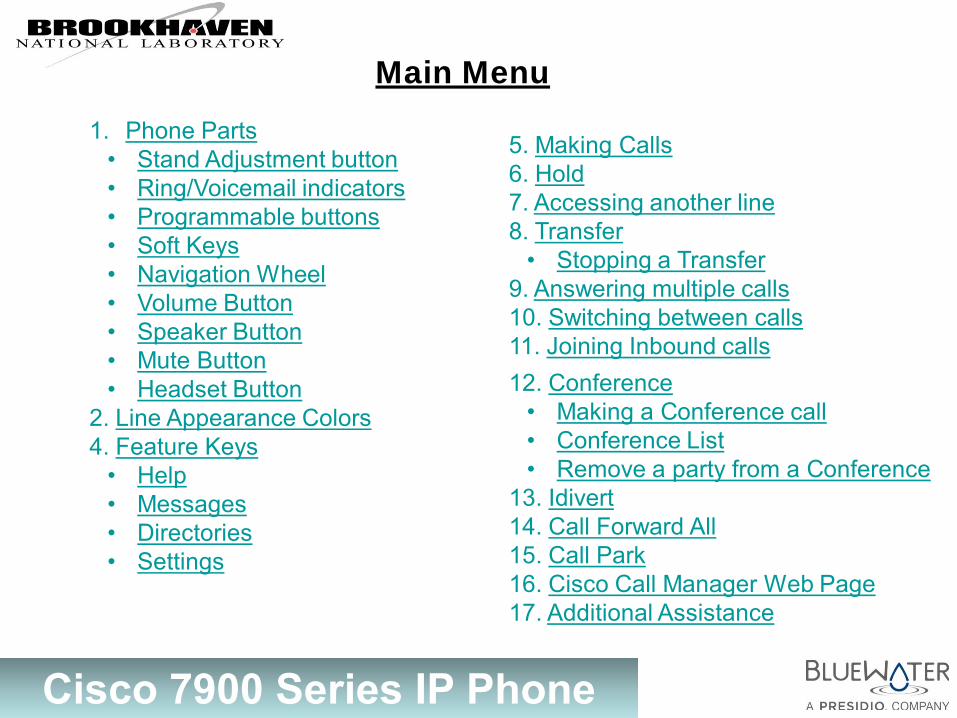
1. Phone Parts • Stand Adjustment button • Ring/Voicemail indicators • Programmable buttons • Soft Keys • Navigation Wheel • Volume Button • Speaker Button • Mute Button • Headset Button
2. Line Appearance Colors 4. Feature Keys
• Help • Messages • Directories • Settings
5. Making Calls 6. Hold 7. Accessing another line 8. Transfer
• Stopping a Transfer 9. Answering multiple calls 10. Switching between calls 11. Joining Inbound calls 12. Conference
• Making a Conference call • Conference List • Remove a party from a Conference
13. Idivert 14. Call Forward All 15. Call Park 16. Cisco Call Manager Web Page 17. Additional Assistance
Cisco 7900 Series IP Phone
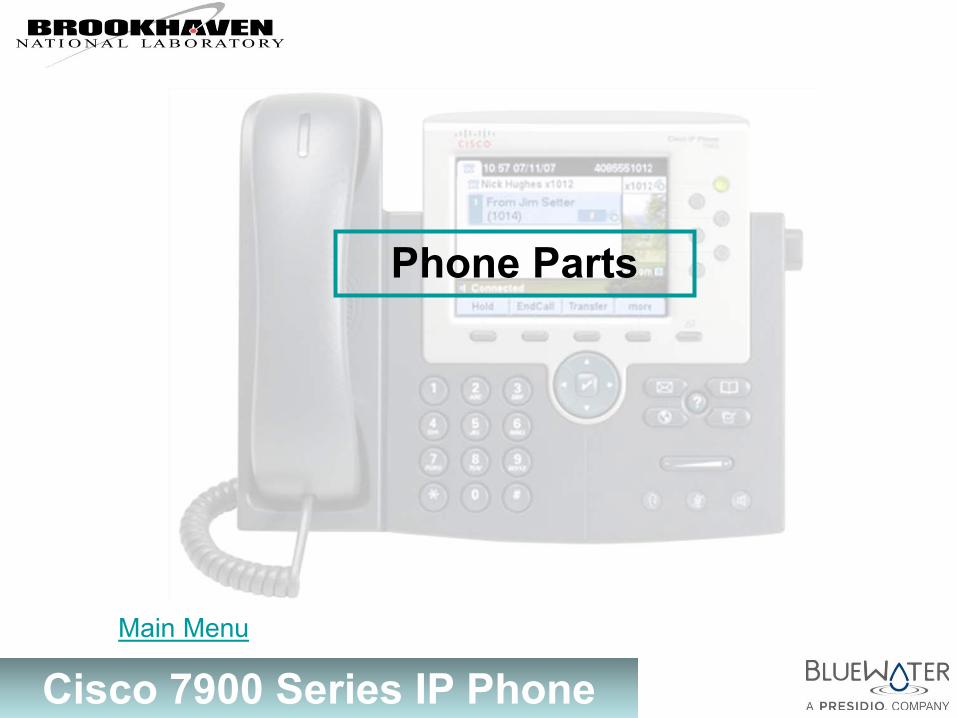
Phone Parts
Main Menu
Cisco 7900 Series IP Phone
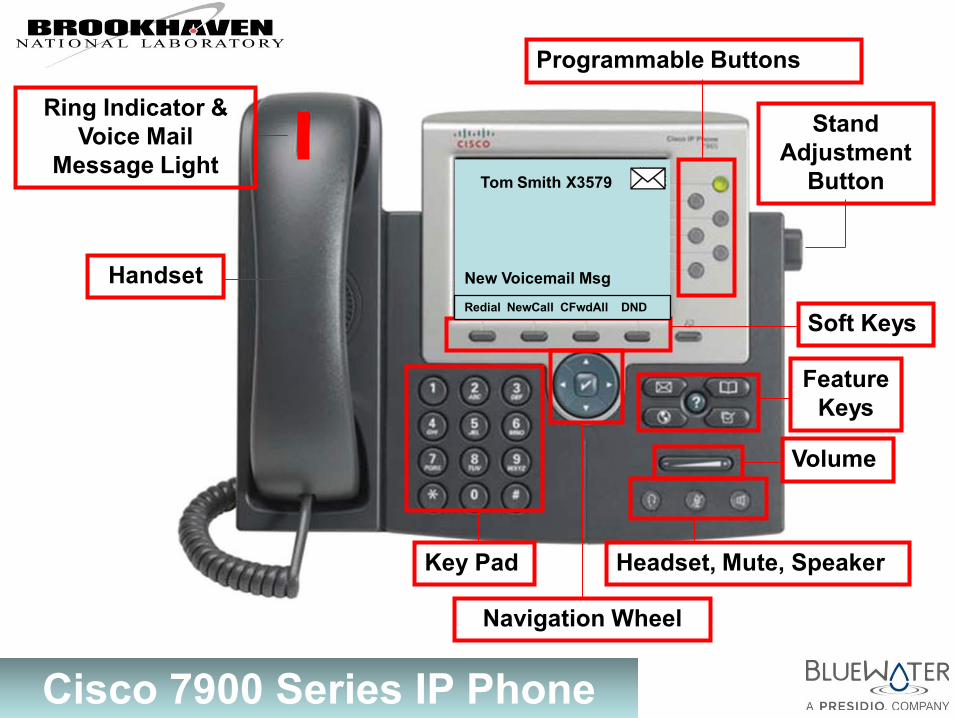
New Voicemail Msg
Tom Smith X3579
Stand Adjustment
Button
Ring Indicator & Voice Mail
Message Light
Handset
Programmable Buttons
Key Pad
Soft Keys
Navigation Wheel
Volume
Feature Keys
Headset, Mute, Speaker
Redial NewCall CFwdAll DND
Cisco 7900 Series IP Phone
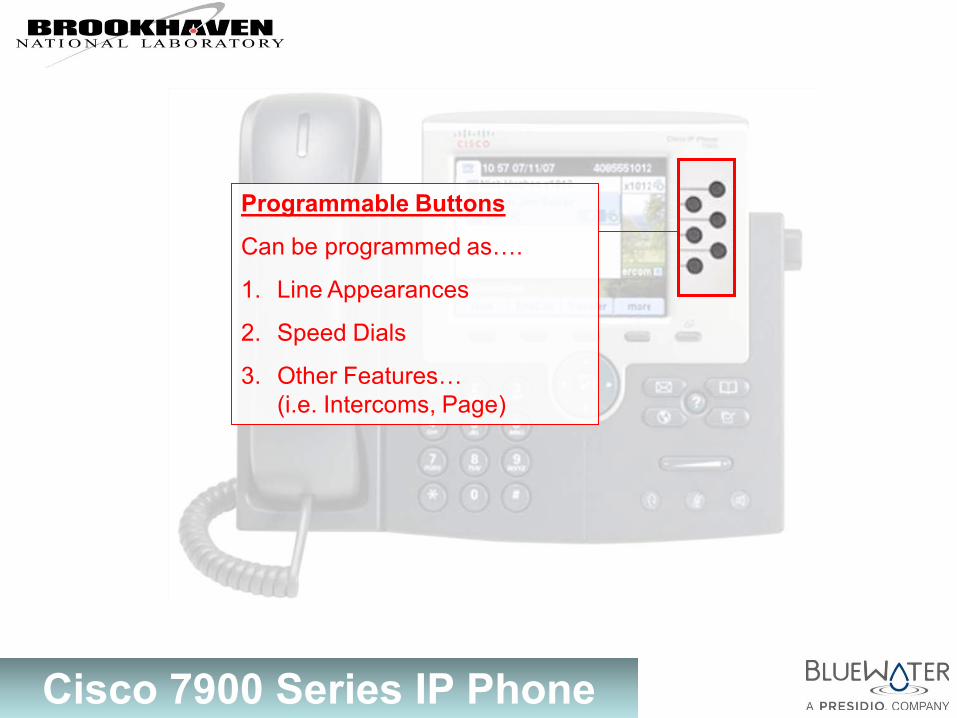
Programmable Buttons
Can be programmed as….
1. Line Appearances
2. Speed Dials
3. Other Features… (i.e. Intercoms, Page)
Cisco 7900 Series IP Phone
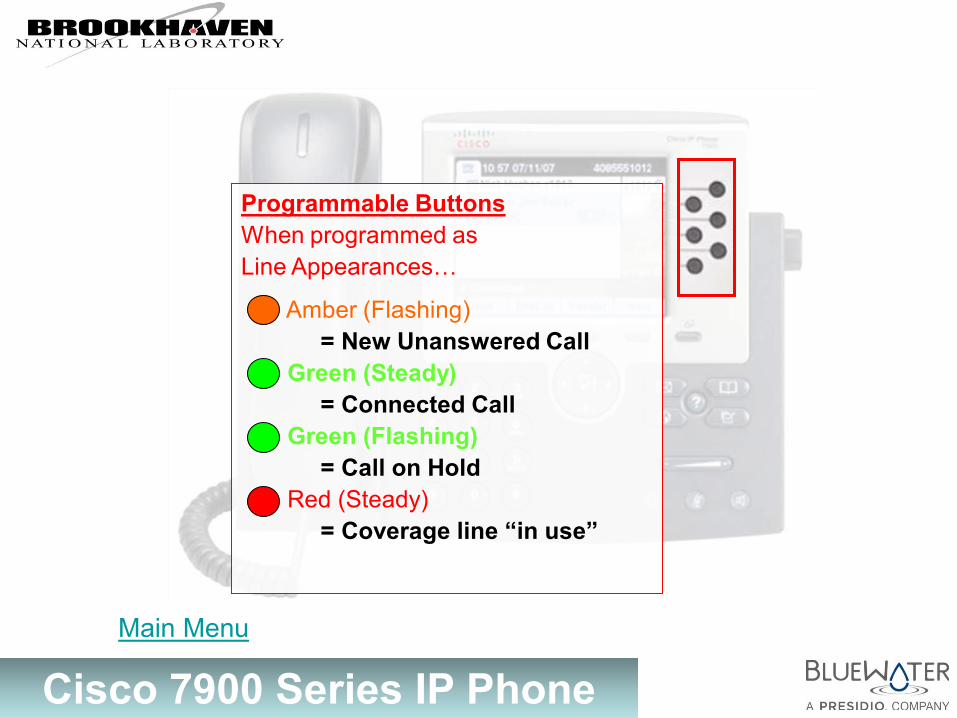
Programmable Buttons When programmed as Line Appearances…
Amber (Flashing) = New Unanswered Call Green (Steady) = Connected Call Green (Flashing) = Call on Hold Red (Steady) = Coverage line “in use”
Main Menu
Cisco 7900 Series IP Phone
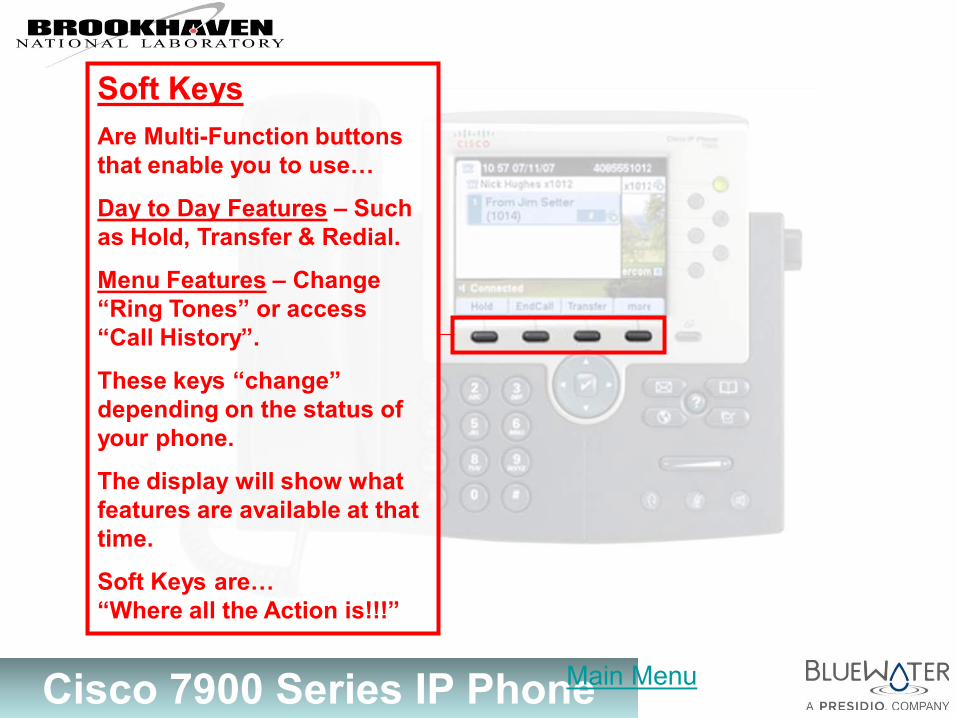
Soft Keys
Are Multi-Function buttons that enable you to use…
Day to Day Features – Such as Hold, Transfer & Redial.
Menu Features – Change “Ring Tones” or access “Call History”.
These keys “change” depending on the status of your phone.
The display will show what features are available at that time.
Soft Keys are… “Where all the Action is!!!”
Main Menu
Cisco 7900 Series IP Phone
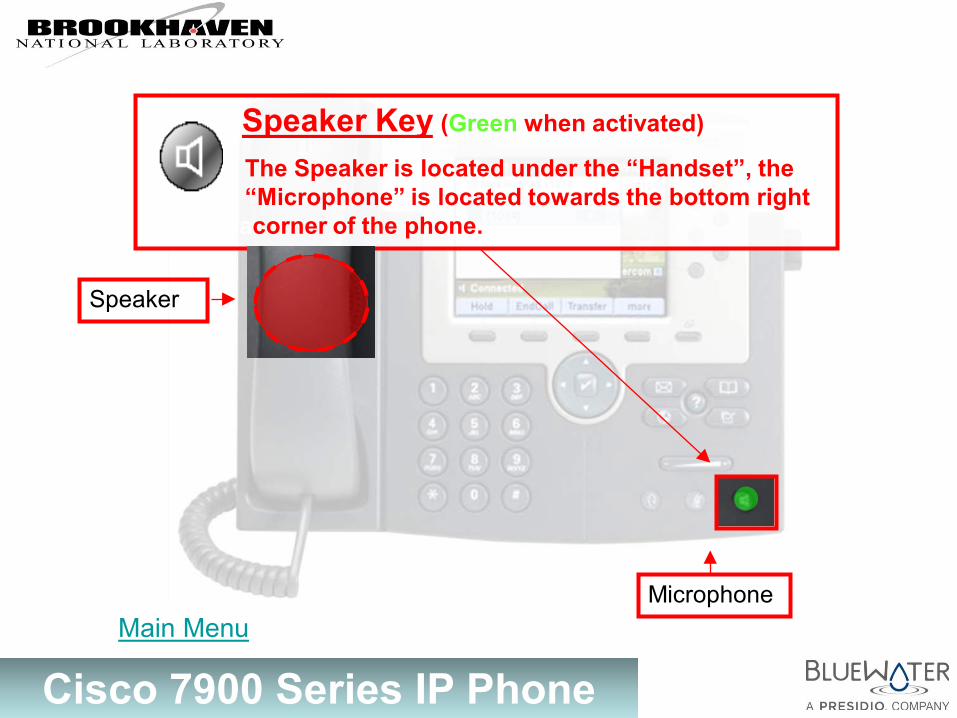
Speaker Key (Green when activated)
The Speaker is located under the “Handset”, the aaaaaaa “Microphone” is located towards the bottom right aaaaaaaacorner of the phone.
Microphone
Speaker
Main Menu
Cisco 7900 Series IP Phone
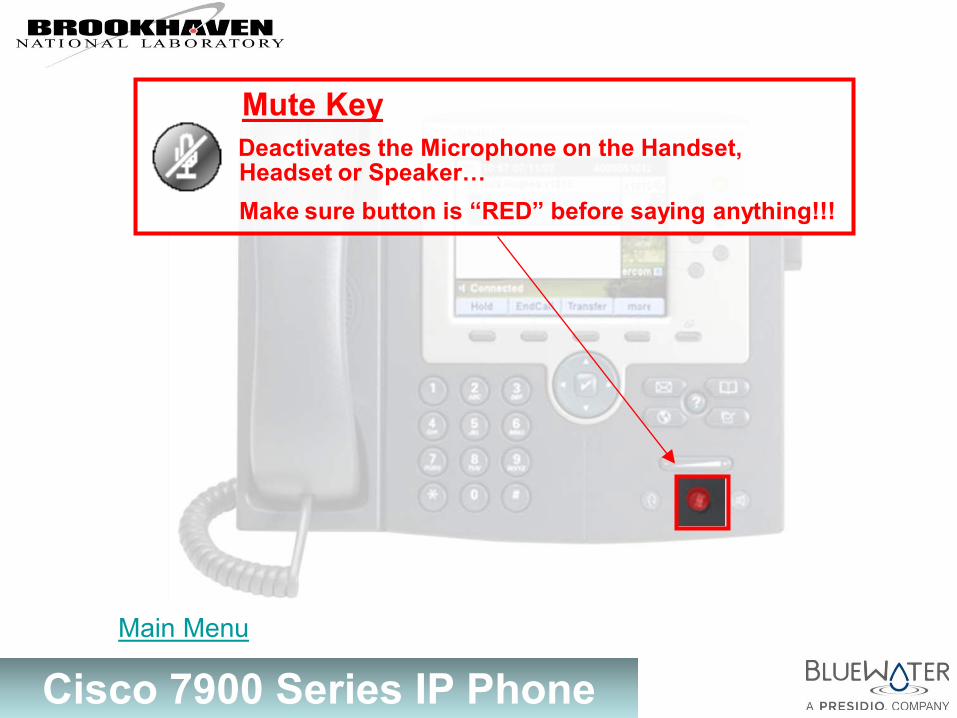
Mute Key Deactivates the Microphone on the Handset, aaaaaaaHeadset or Speaker… aaaaaaaMake sure button is “RED” before saying anything!!!
Main Menu
Cisco 7900 Series IP Phone
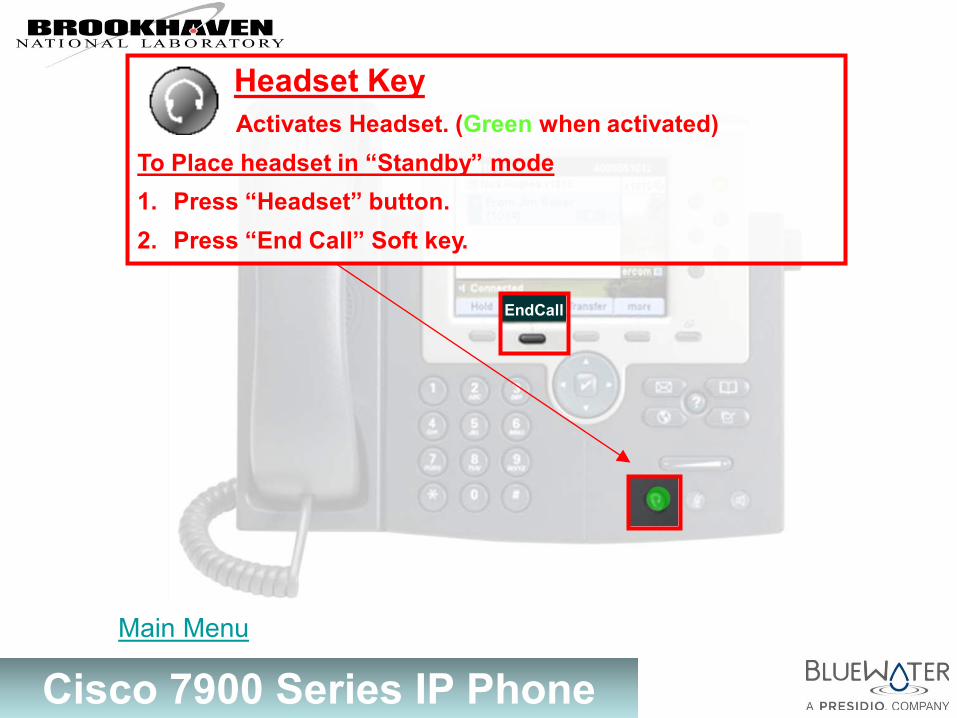
Headset Key Activates Headset. (Green when activated) To Place headset in “Standby” mode 1. Press “Headset” button. 2. Press “End Call” Soft key.
EndCall
Main Menu
Cisco 7900 Series IP Phone
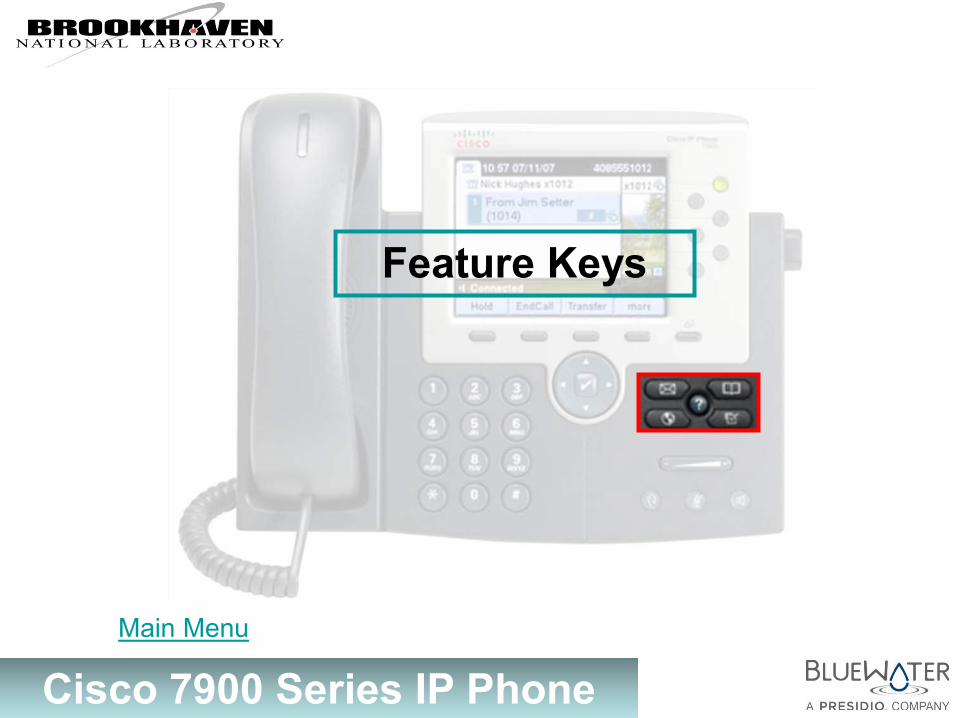
Feature Keys
Main Menu
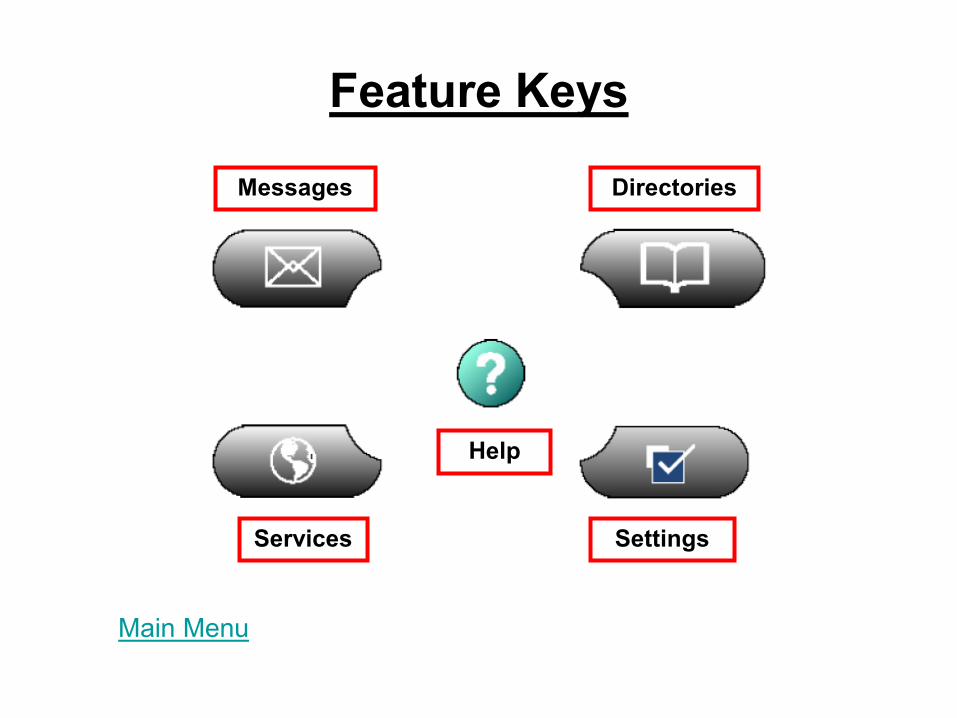
Help
Services Settings
Directories Messages
Feature Keys
Main Menu
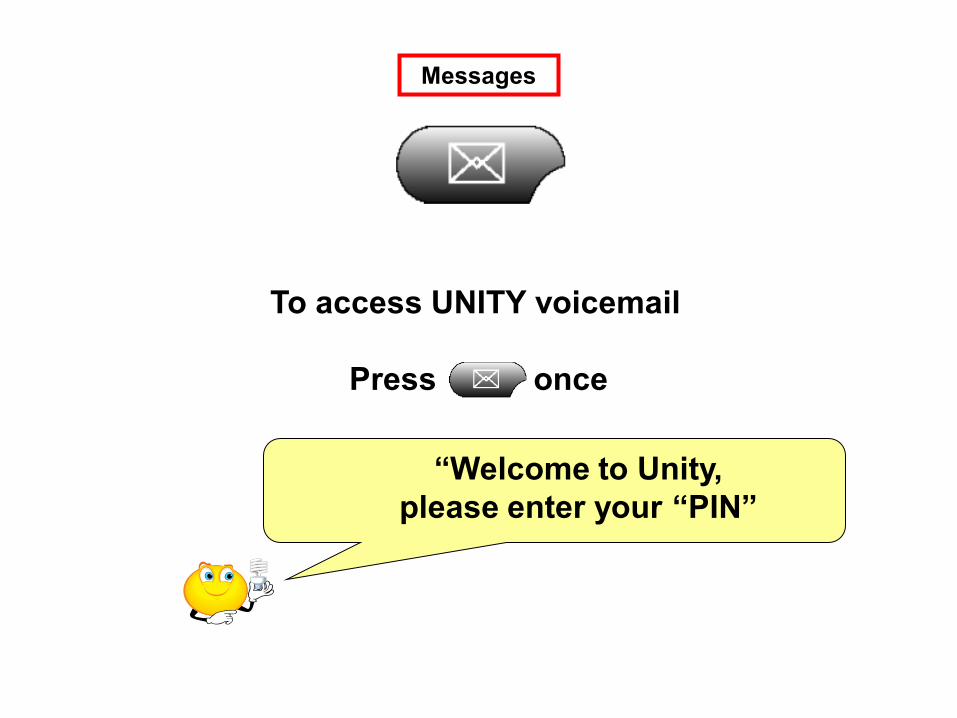
To access UNITY voicemail
Press once
Messages
“Welcome to Unity, please enter your “PIN”
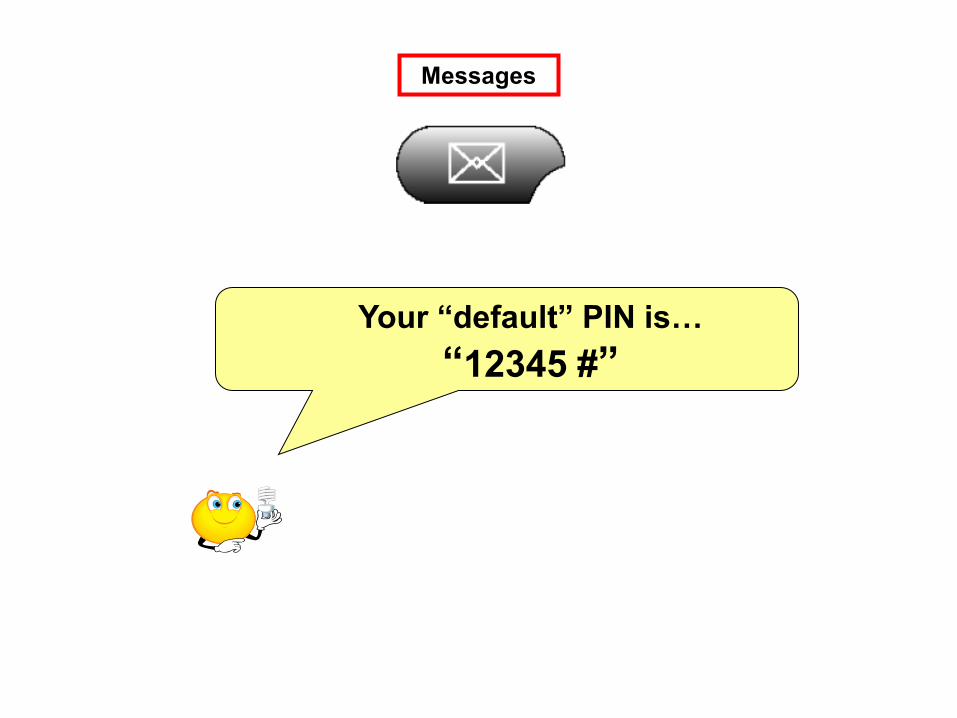
Your “default” PIN is… “12345 #”
Messages

Review “Call History” of calls that you’ve missed, received, and/or placed. (Each category stores 100 entries)
Also has a Personal & Corporate Directory
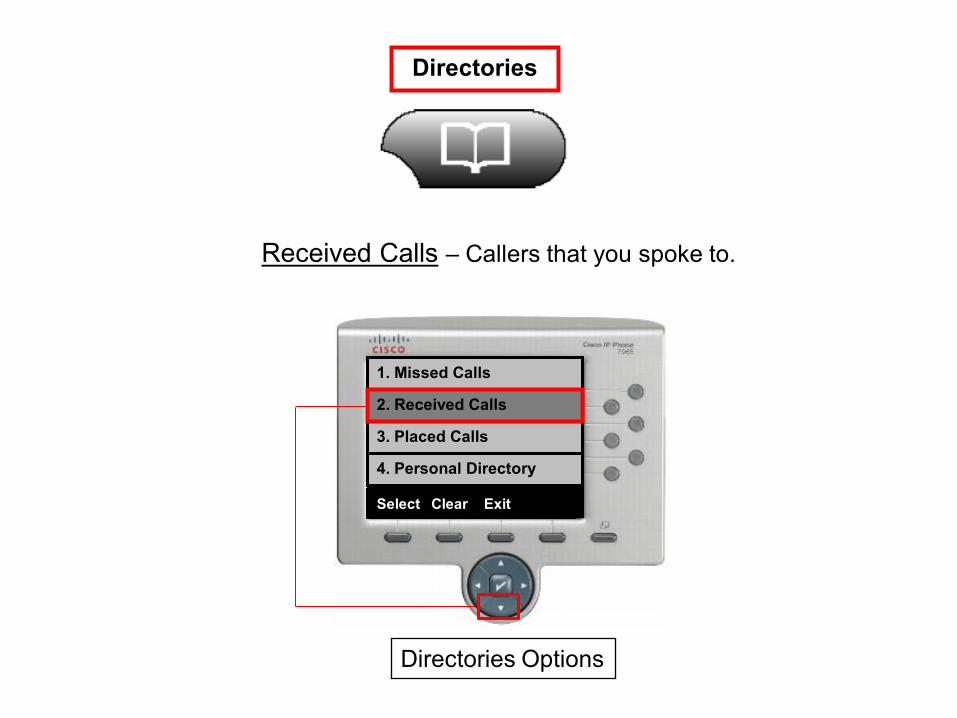
Directories
1. Missed Calls
2. Received Calls
3. Placed Calls
4. Personal Directory
Directories Options
Select Clear Exit

Directories
Missed Calls – Callers that “hung up” or went to “Voicemail”.
2. Received Calls
3. Placed Calls
4. Personal Directory
1. Missed Calls
Directories Options
Select Clear Exit
Directories
Received Calls – Callers that you spoke to.
1. Missed Calls
3. Placed Calls
4. Personal Directory
2. Received Calls
Directories Options
Select Clear Exit
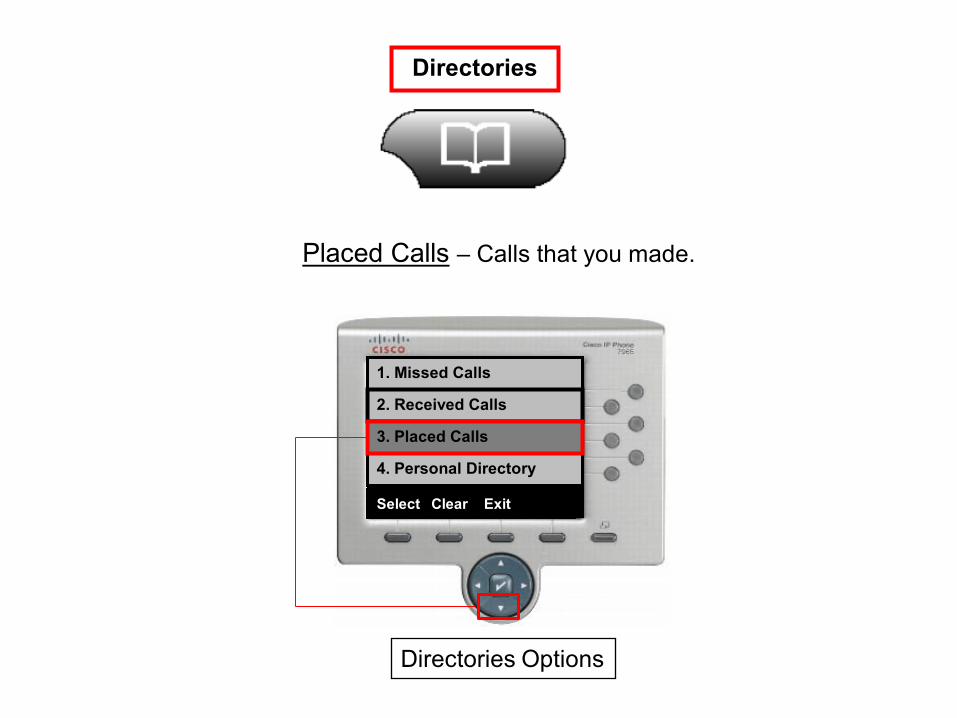
Directories
Placed Calls – Calls that you made.
1. Missed Calls
2. Received Calls
4. Personal Directory
3. Placed Calls
Directories Options
Select Clear Exit
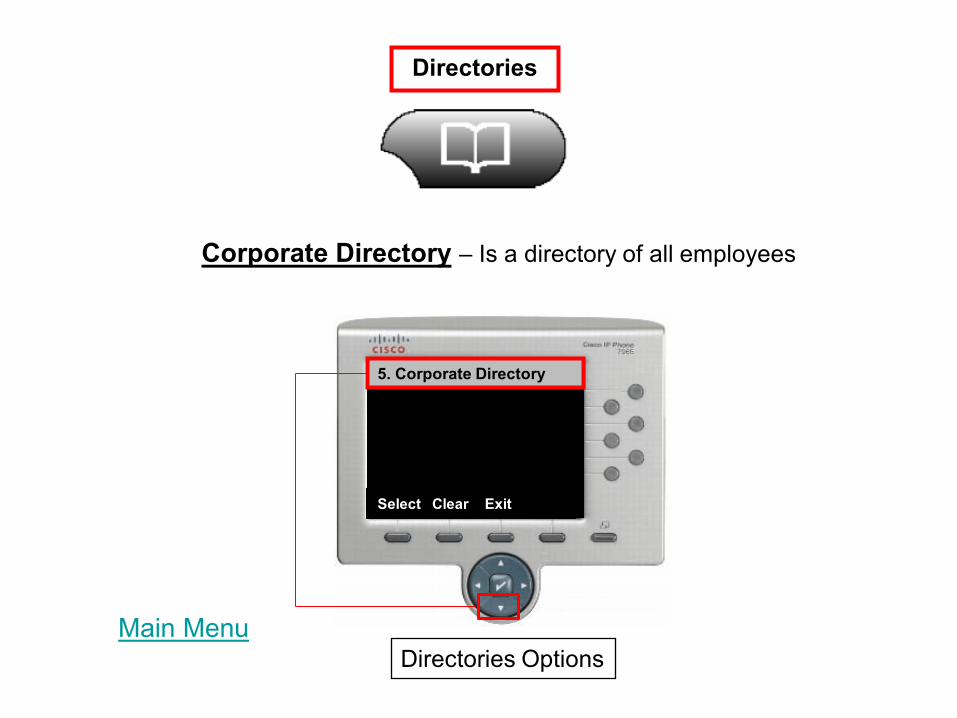
5. Corporate Directory
Directories Options
Select Clear Exit
Directories
Corporate Directory – Is a directory of all employees
Main Menu
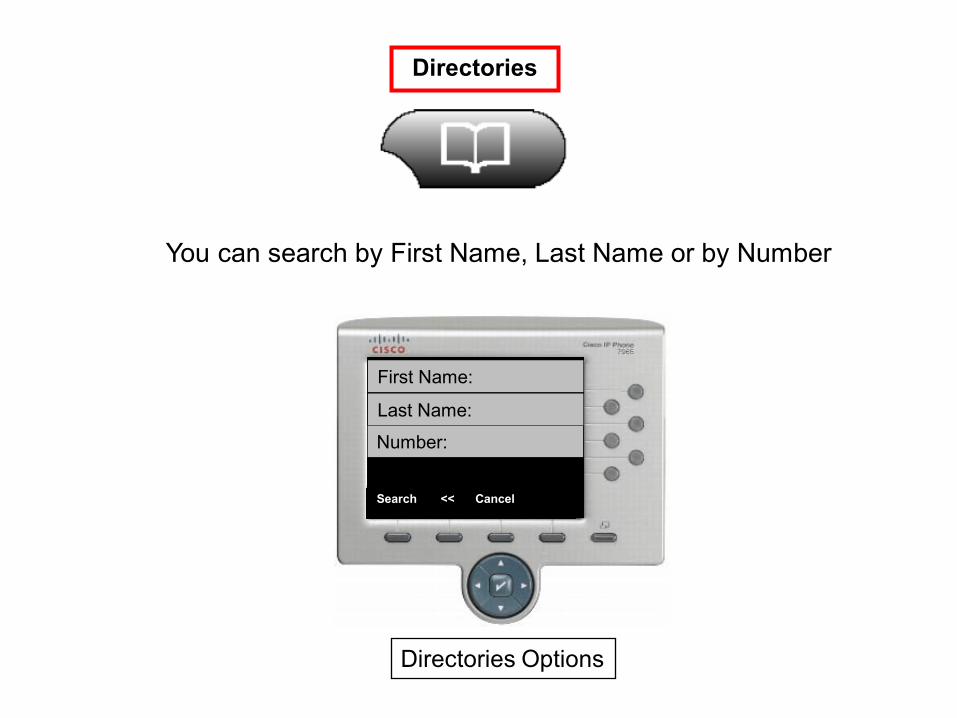
Directories
You can search by First Name, Last Name or by Number
Directories Options
Select Clear Exit Search << Cancel
Number:
First Name:
Last Name:

Select Clear Exit Search << Cancel
Number:
First Name:
Last Name:
Search <<
First Name: Jes_
Cancel
Number:
Last Name:
Dial EditDial More Select Clear Exit
Settings Options
Select Default Exit
3579
Chirp 1
1. Default Ring
Chirp 1
Settings
Highlight “Default Ring”
Then Press “Select”
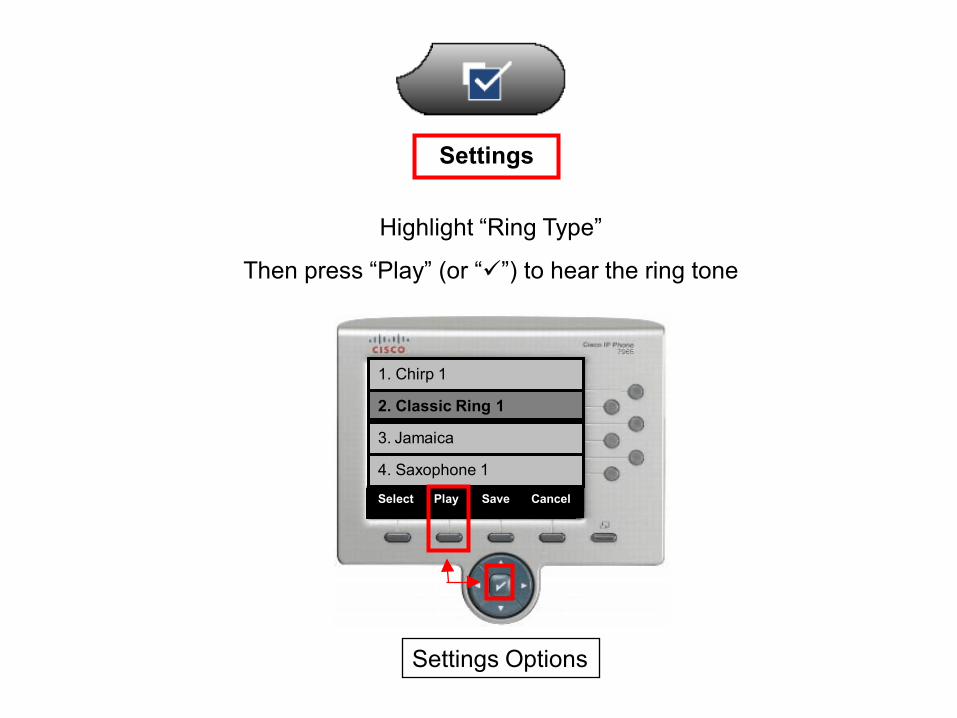
Settings
Highlight “Ring Type”
Then press “Play” (or “”) to hear the ring tone
Select Clear Exit Search << Cancel
Number:
First Name:
Last Name:
Search <<
First Name: Jes_
Cancel
Number:
Last Name:
Settings Options
1. Chirp 1
2. Classic Ring 1
3. Jamaica
4. Saxophone 1
Select Cancel Play Save
Cisco 7900 Series IP Phone
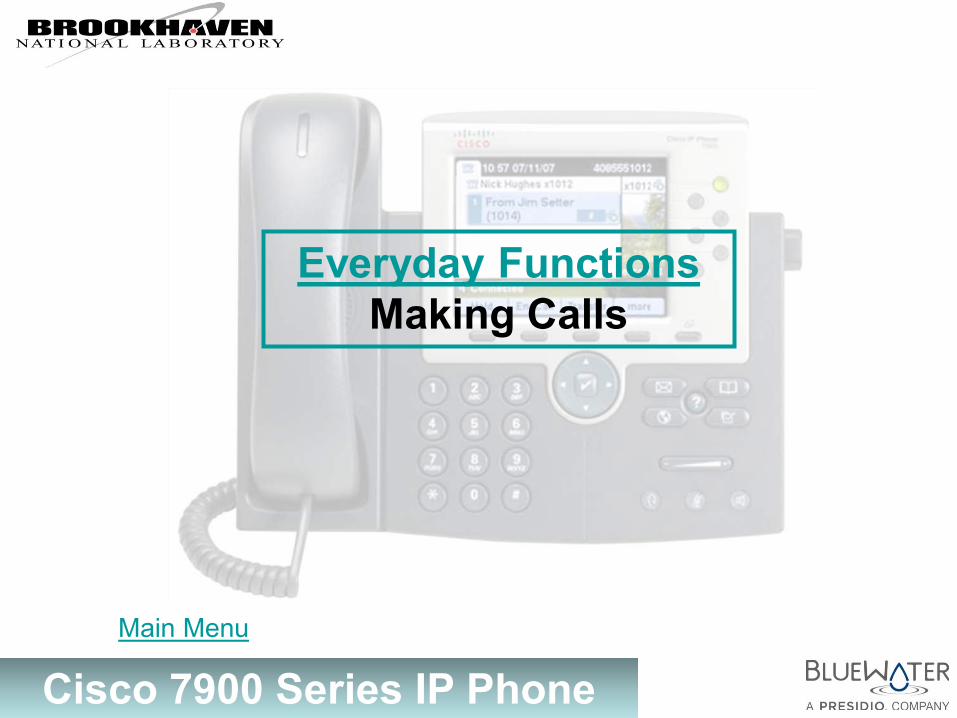
Everyday Functions Making Calls
Main Menu
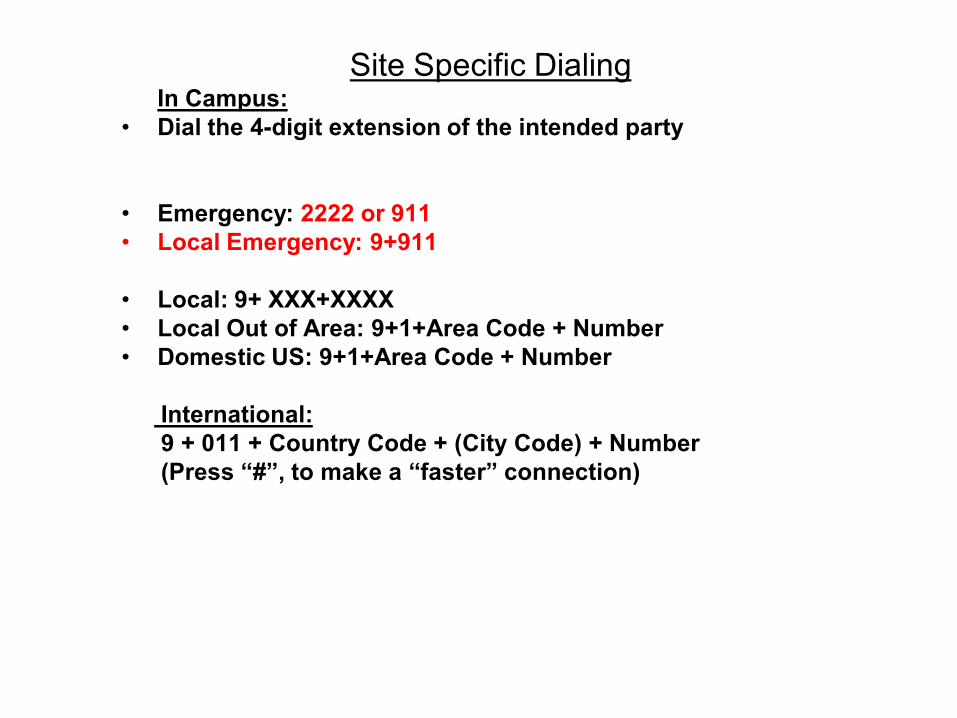
Site Specific Dialing In Campus:
• Dial the 4-digit extension of the intended party • Emergency: 2222 or 911 • Local Emergency: 9+911 • Local: 9+ XXX+XXXX • Local Out of Area: 9+1+Area Code + Number • Domestic US: 9+1+Area Code + Number International: 9 + 011 + Country Code + (City Code) + Number (Press “#”, to make a “faster” connection)
Cisco 7900 Series IP Phone
Tom Smith X3579
Redial NewCall CFwdAll DND
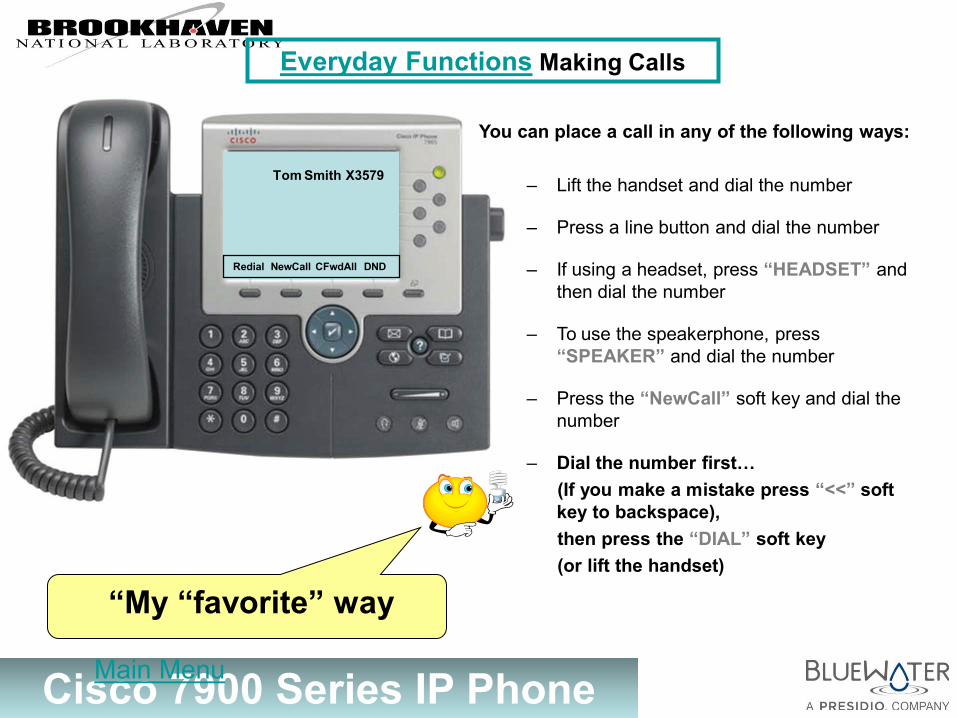
You can place a call in any of the following ways:
– Lift the handset and dial the number
– Press a line button and dial the number
– If using a headset, press “HEADSET” and then dial the number
– To use the speakerphone, press “SPEAKER” and dial the number
– Press the “NewCall” soft key and dial the number
– Dial the number first… (If you make a mistake press “<<” soft
key to backspace), then press the “DIAL” soft key (or lift the handset) “My “favorite” way
Everyday Functions Making Calls
Main Menu
Cisco 7900 Series IP Phone
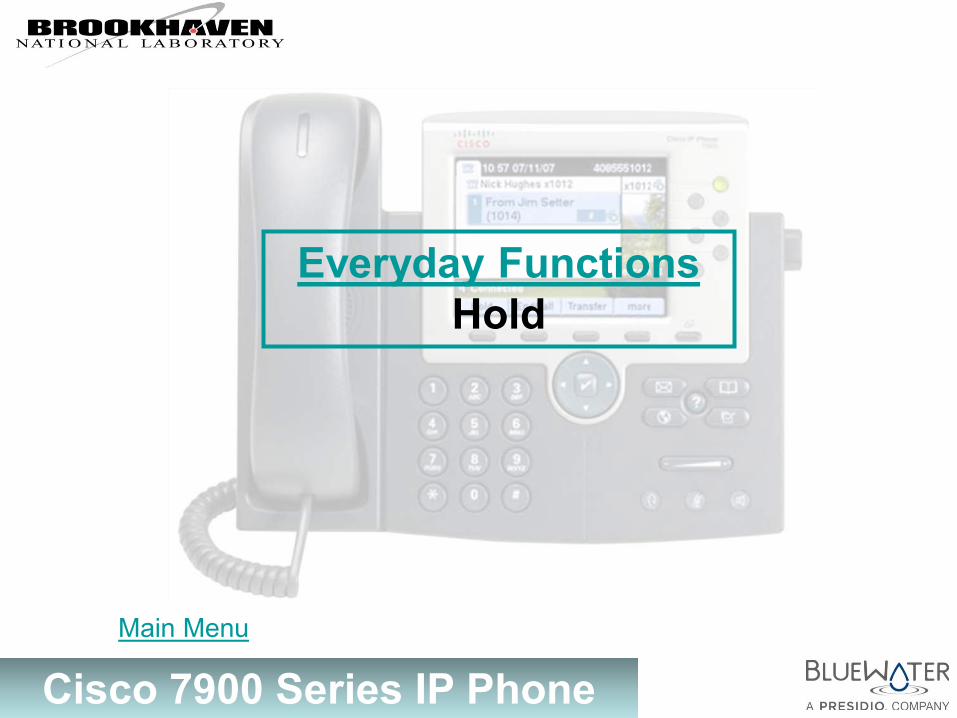
Everyday Functions Hold
Main Menu
Cisco 7900 Series IP Phone
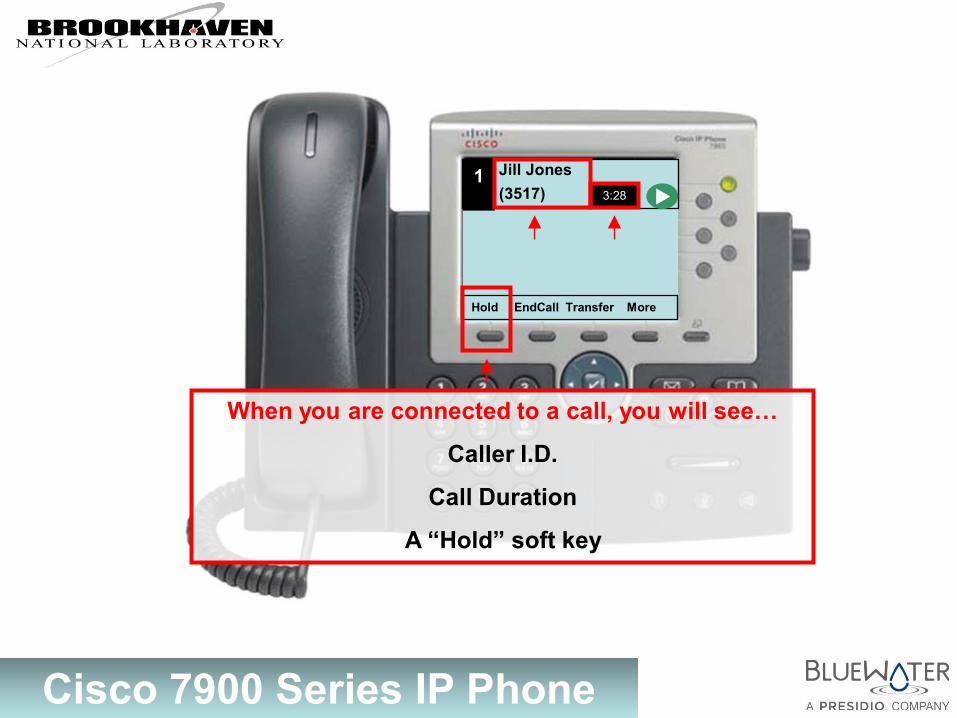
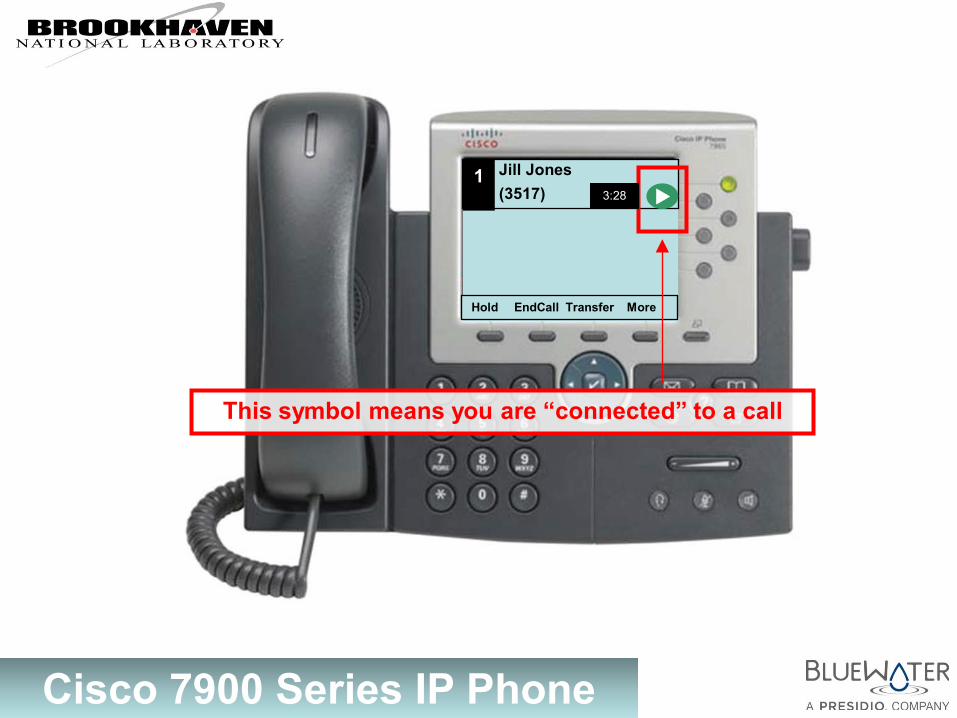
Jill Jones (3517)
When you are connected to a call, you will see…
Caller I.D.
Call Duration
A “Hold” soft key
1 3:28
Hold EndCall Transfer More
Cisco 7900 Series IP Phone
Jill Jones (3517) 1 3:28
This symbol means you are “connected” to a call
Hold EndCall Transfer More
Cisco 7900 Series IP Phone
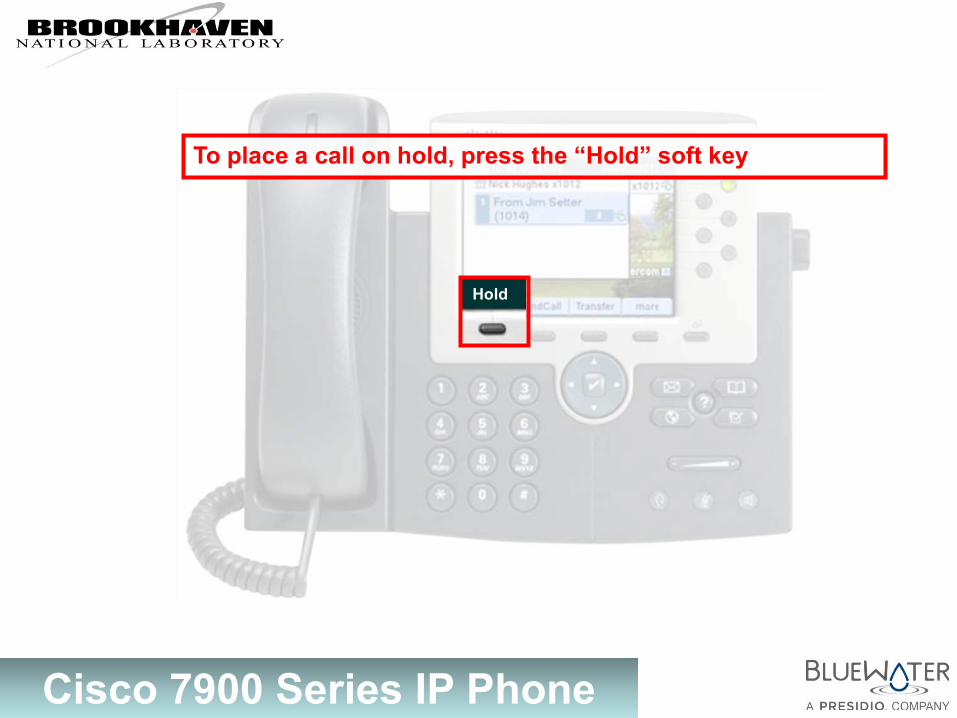
To place a call on hold, press the “Hold” soft key
Hold
Cisco 7900 Series IP Phone
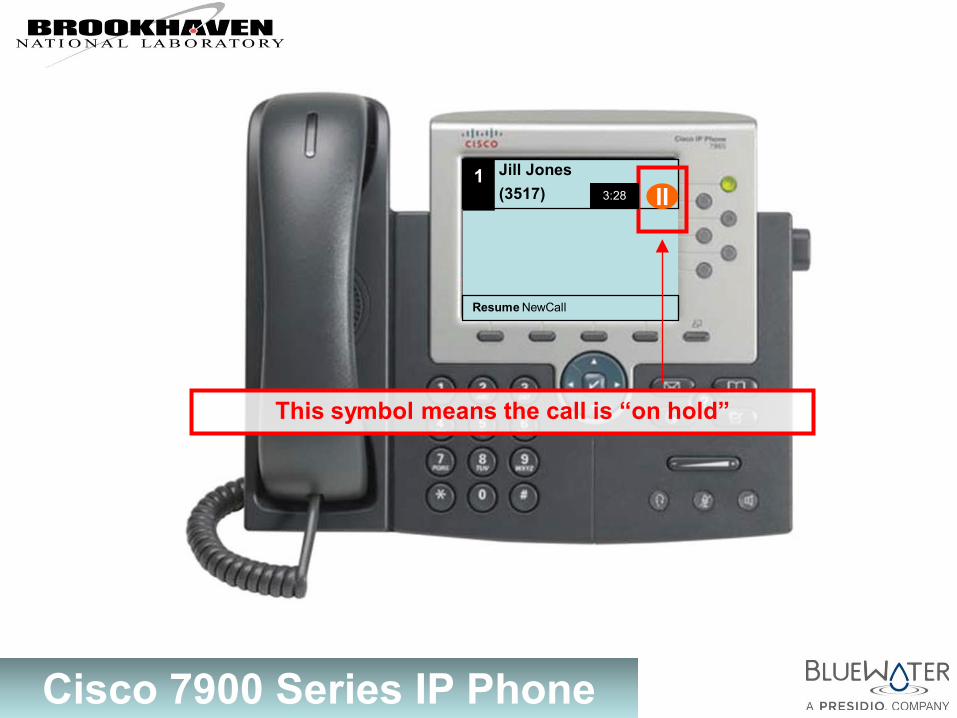
Jill Jones (3517)
Resume NewCall
1 3:28 II
This symbol means the call is “on hold”
Cisco 7900 Series IP Phone
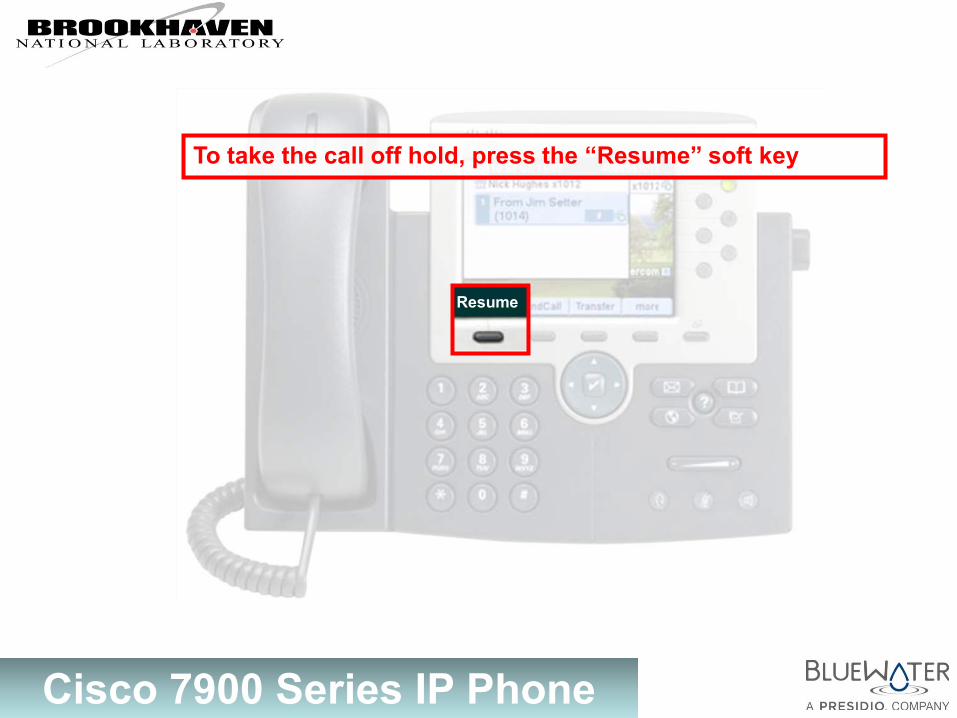
To take the call off hold, press the “Resume” soft key
Resume

Cisco 7900 Series IP Phone
Hold EndCall Transfer More
You are now “reconnected” to your call
Jill Jones (3517) 1 3:28
Main Menu
Cisco 7900 Series IP Phone
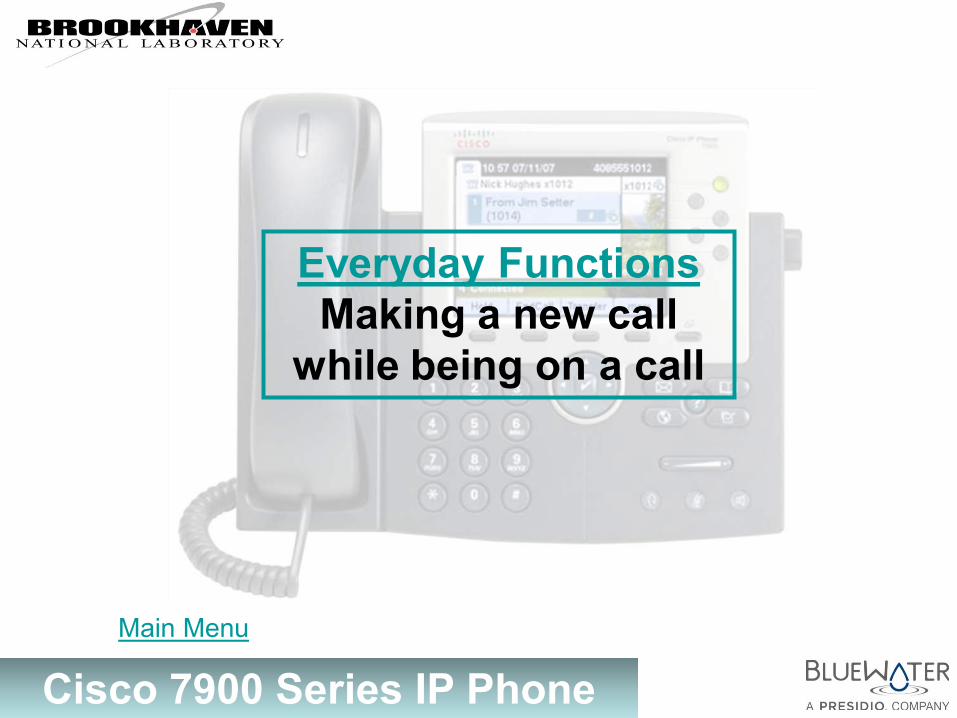
Everyday Functions Making a new call
while being on a call
Main Menu

Cisco 7900 Series IP Phone
Hold EndCall Transfer More
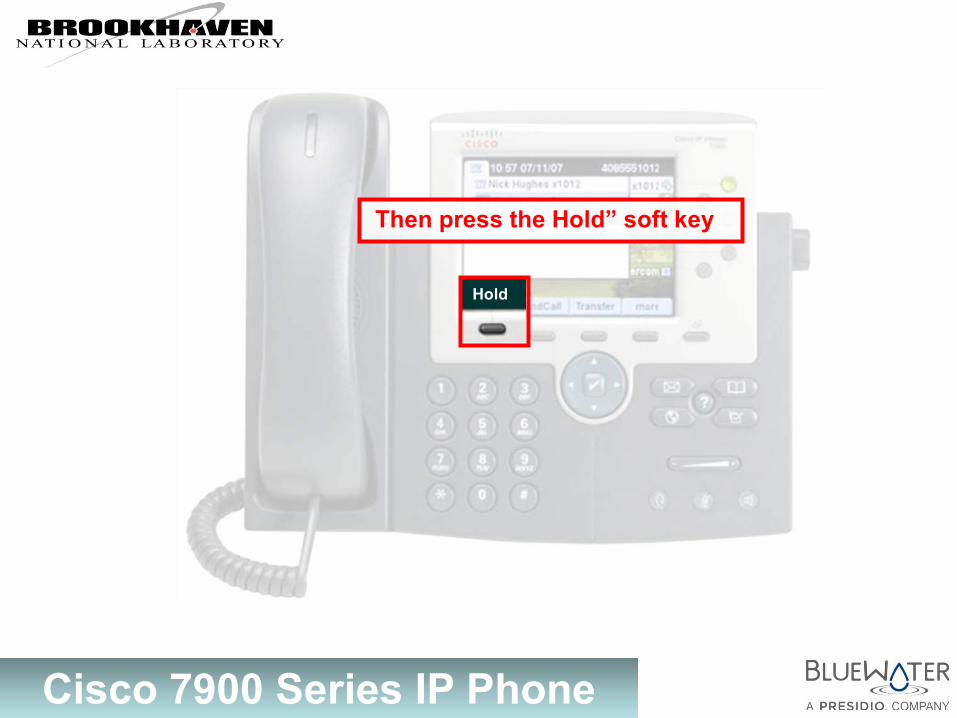
While you are connected to a call, ask caller to hold
Jill Jones (3517) 1 3:28
Cisco 7900 Series IP Phone
Then press the Hold” soft key
Hold
Cisco 7900 Series IP Phone
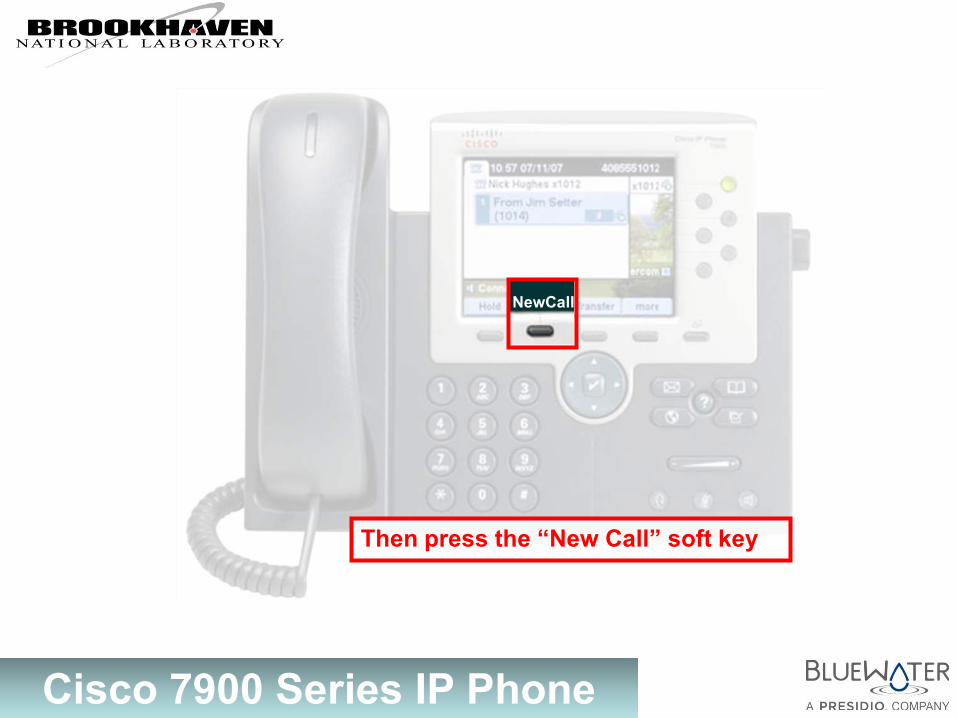
Then press the “New Call” soft key
NewCall
Cisco 7900 Series IP Phone
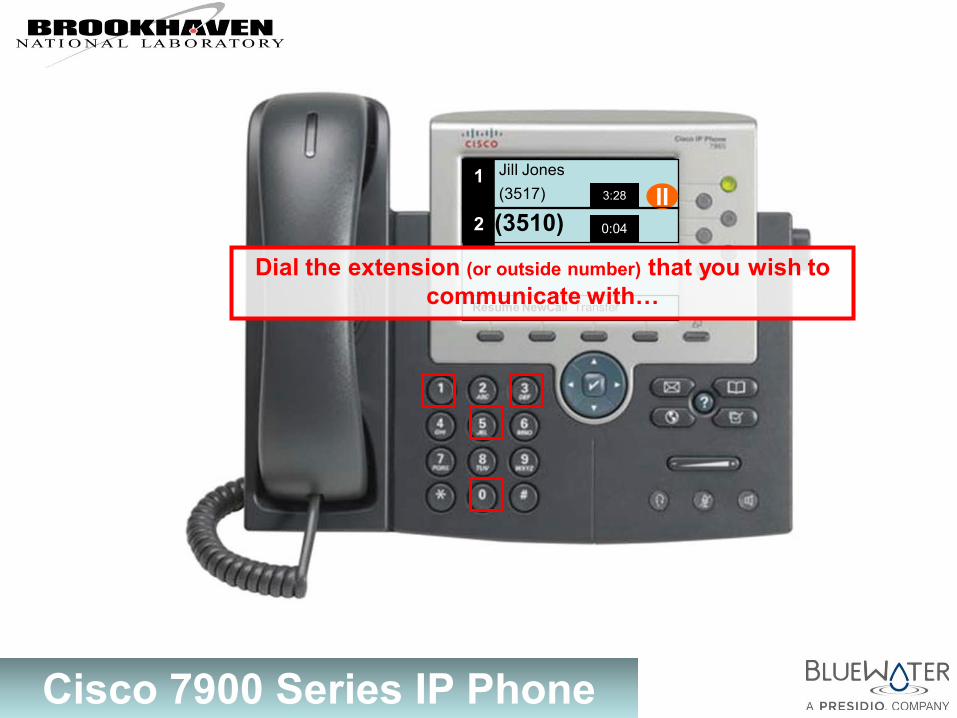
Resume NewCall Transfer
Jill Jones (3517) 1 3:28 II
(3510) 2
0:04
Dial the extension (or outside number) that you wish to communicate with…
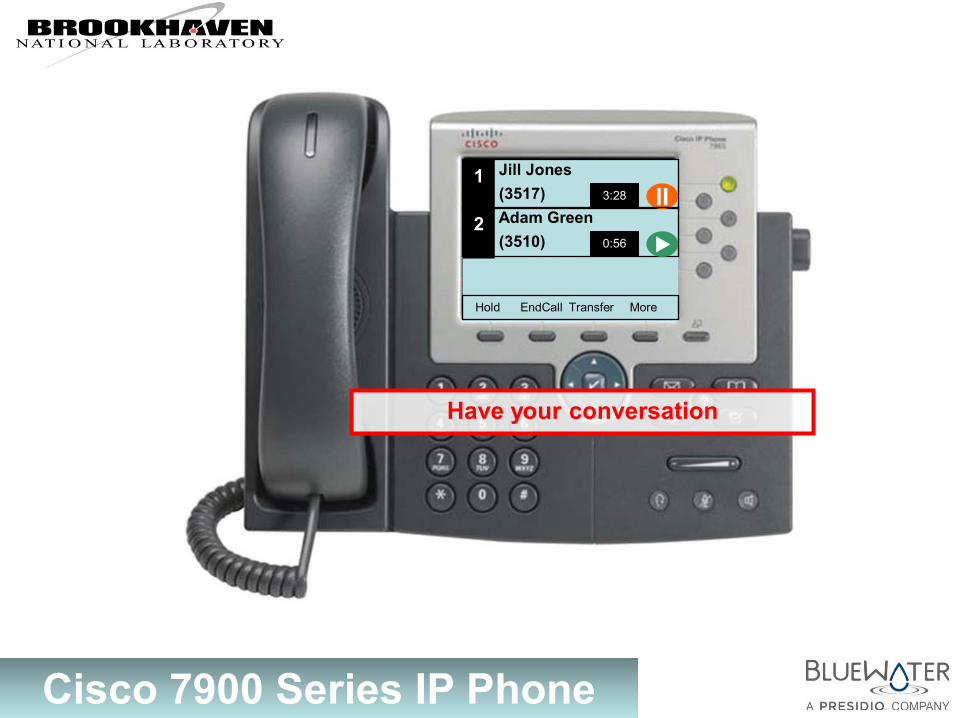
Cisco 7900 Series IP Phone
Hold EndCall Transfer More
Have your conversation
Jill Jones (3517) 1 3:28 II
Adam Green (3510) 2 0:56
Cisco 7900 Series IP Phone
Hold EndCall Transfer More
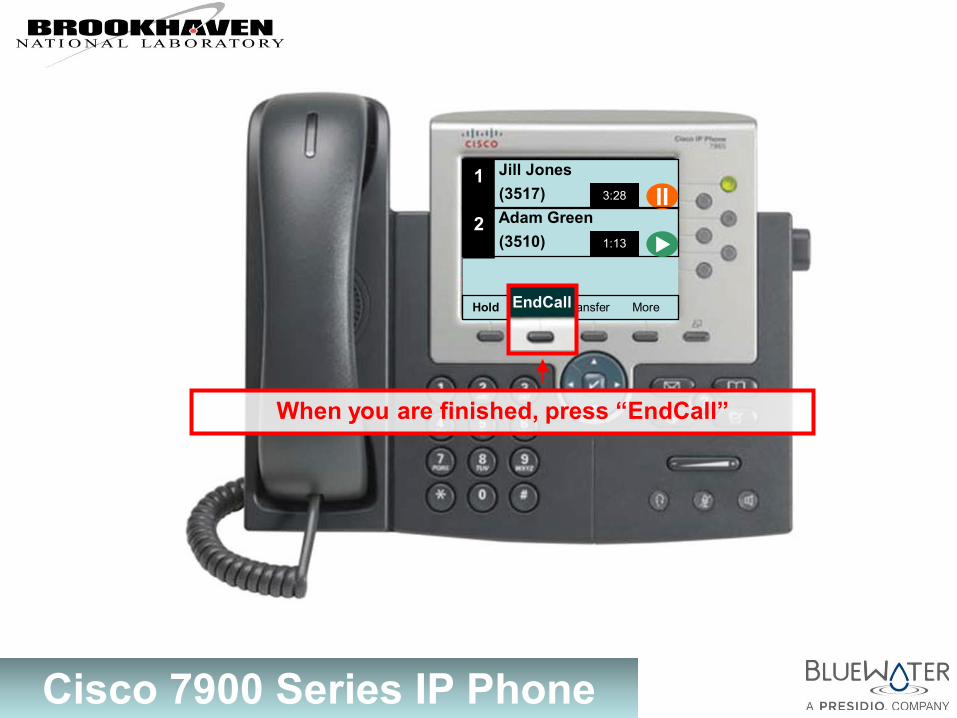
When you are finished, press “EndCall”
Jill Jones (3517) 1 3:28 II
Adam Green (3510) 2 1:13
EndCall
Cisco 7900 Series IP Phone
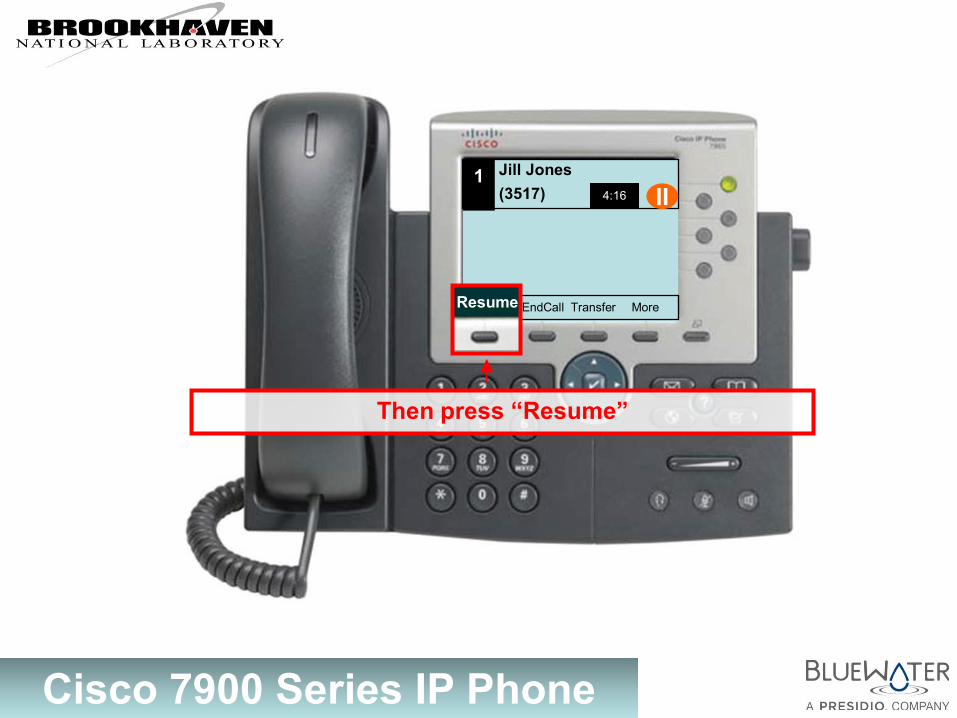
Resume EndCall Transfer More
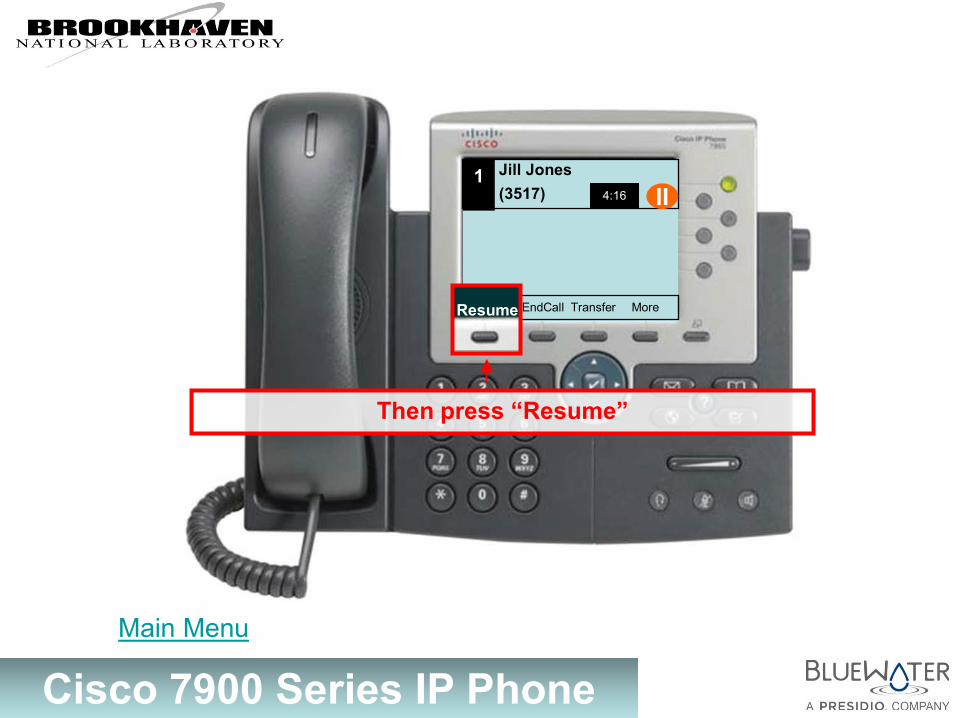
Then press “Resume”
Jill Jones (3517) 1 4:16 II
Resume
Cisco 7900 Series IP Phone
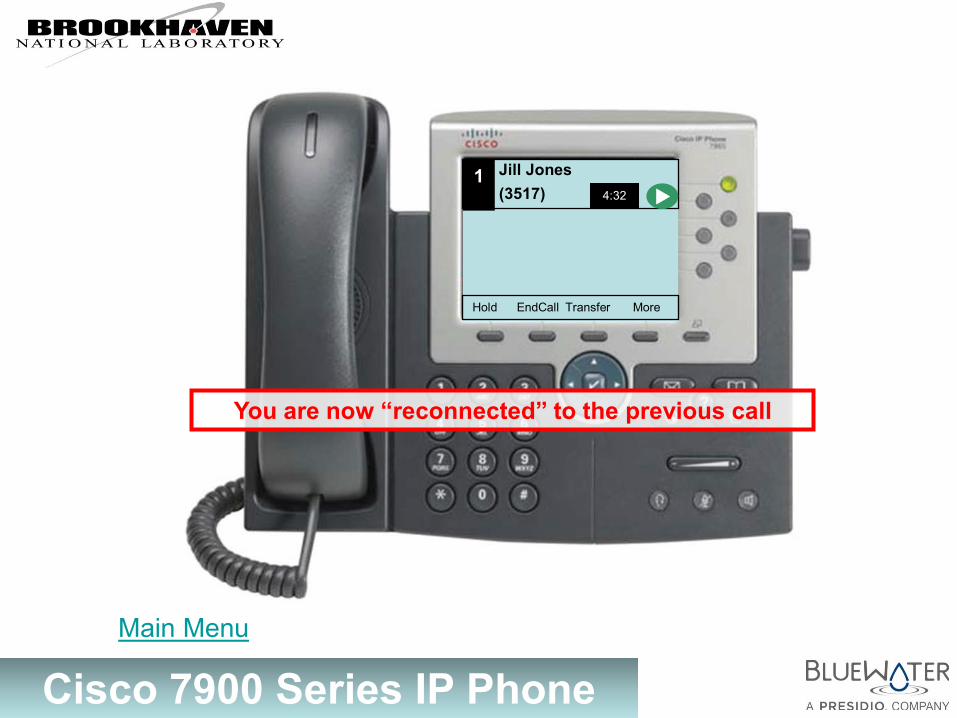
Jill Jones (3517)
Hold EndCall Transfer More
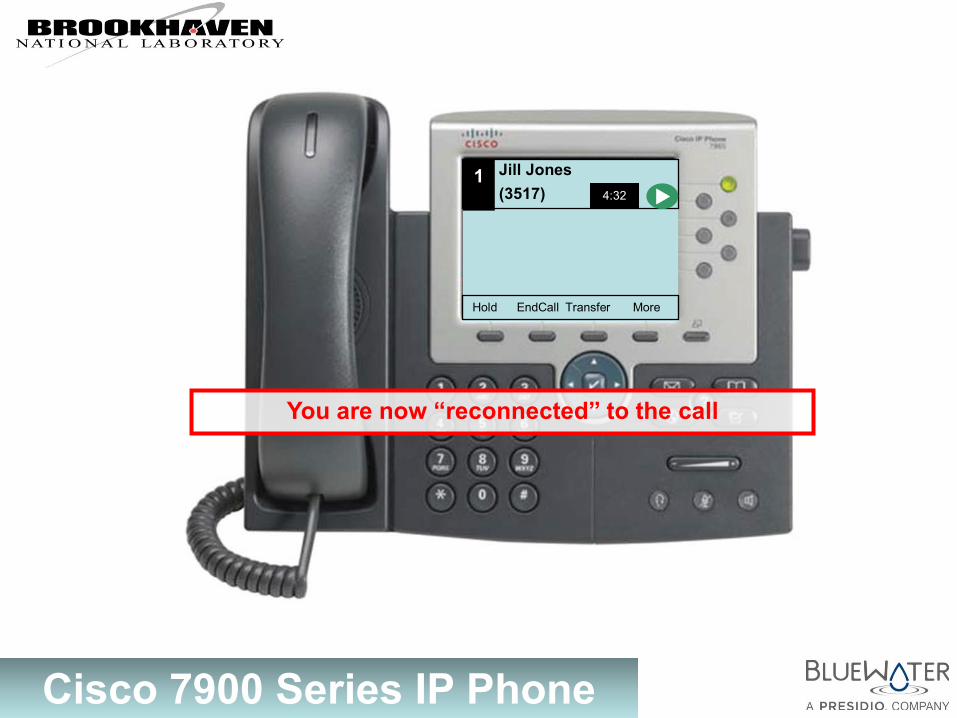
You are now “reconnected” to the previous call
1 4:32
Main Menu
Cisco 7900 Series IP Phone
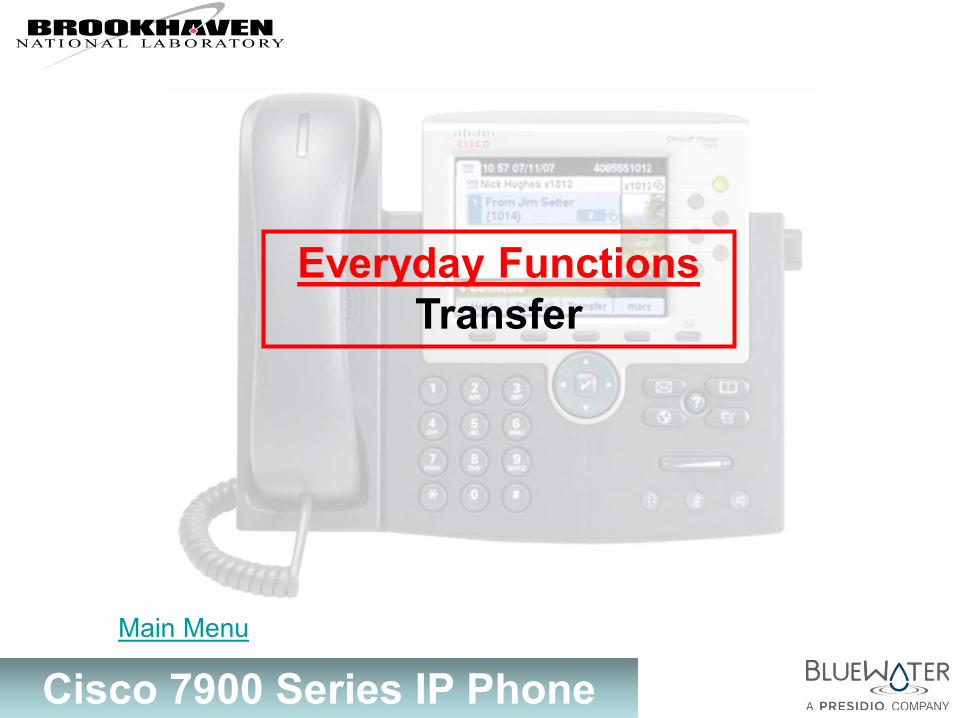
Everyday Functions Transfer
Main Menu
Cisco 7900 Series IP Phone
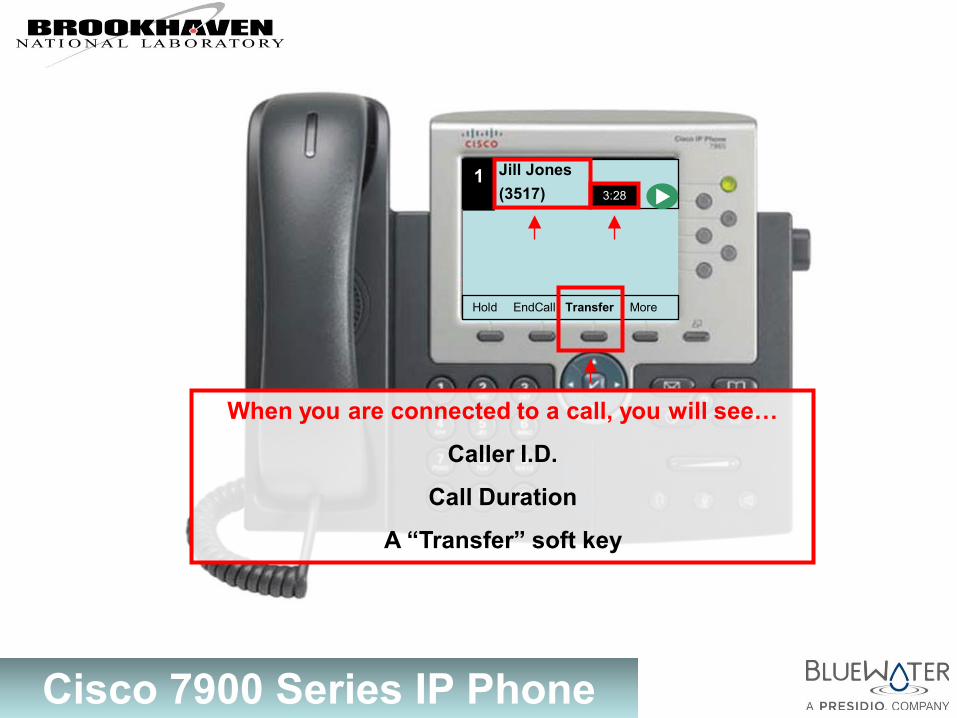
Jill Jones (3517)
Hold EndCall Transfer More
When you are connected to a call, you will see…
Caller I.D.
Call Duration
A “Transfer” soft key
1 3:28
Cisco 7900 Series IP Phone
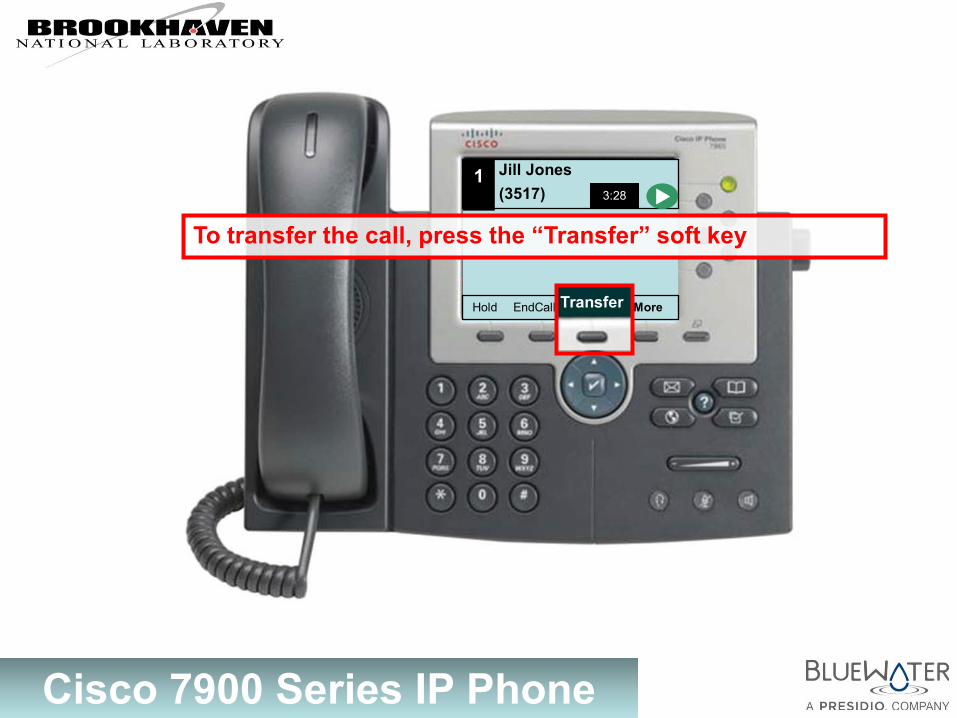
Jill Jones (3517) 1 3:28
To transfer the call, press the “Transfer” soft key
Hold EndCall Transfer More Transfer
Cisco 7900 Series IP Phone
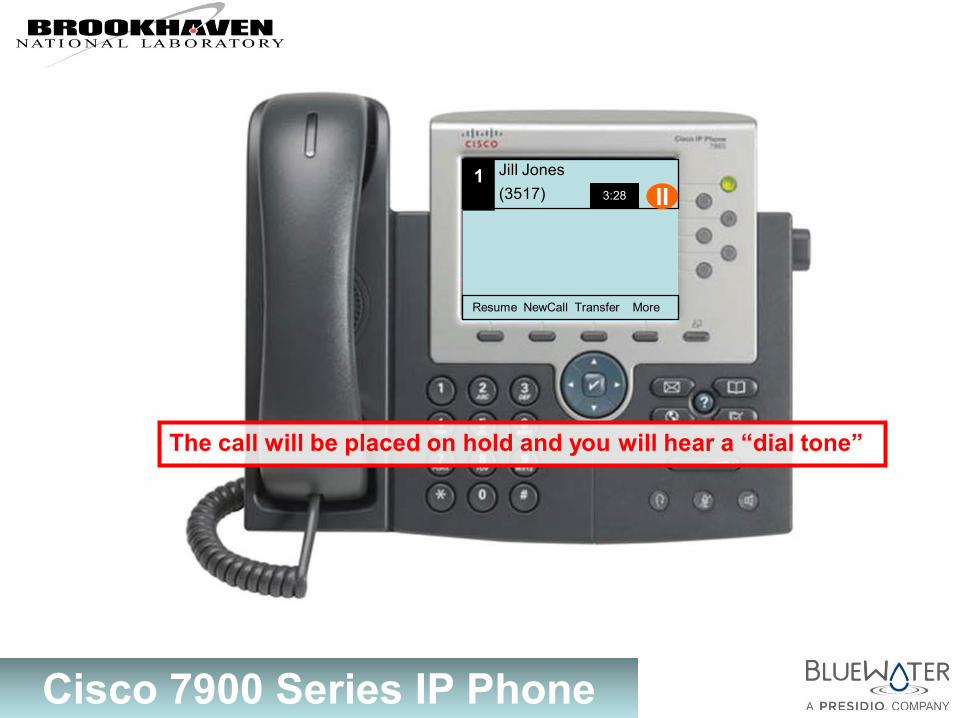
The call will be placed on hold and you will hear a “dial tone”
Resume NewCall Transfer More
Jill Jones (3517) 1 3:28 II
Cisco 7900 Series IP Phone
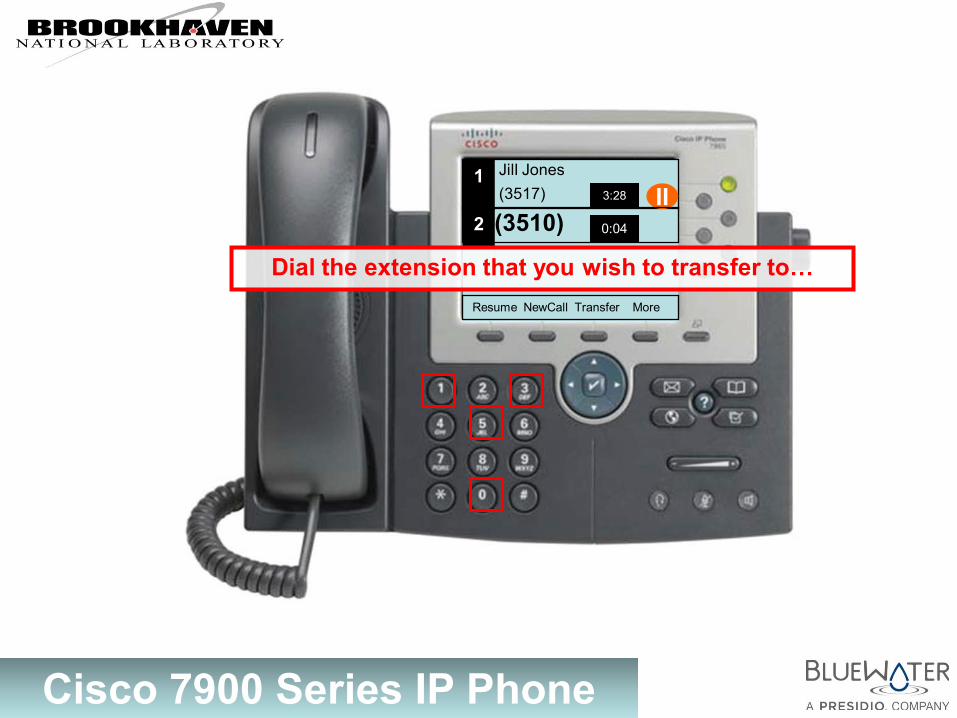
Jill Jones (3517) 1 3:28 II
(3510) 2
0:04
Dial the extension that you wish to transfer to…
Resume NewCall Transfer More
Cisco 7900 Series IP Phone
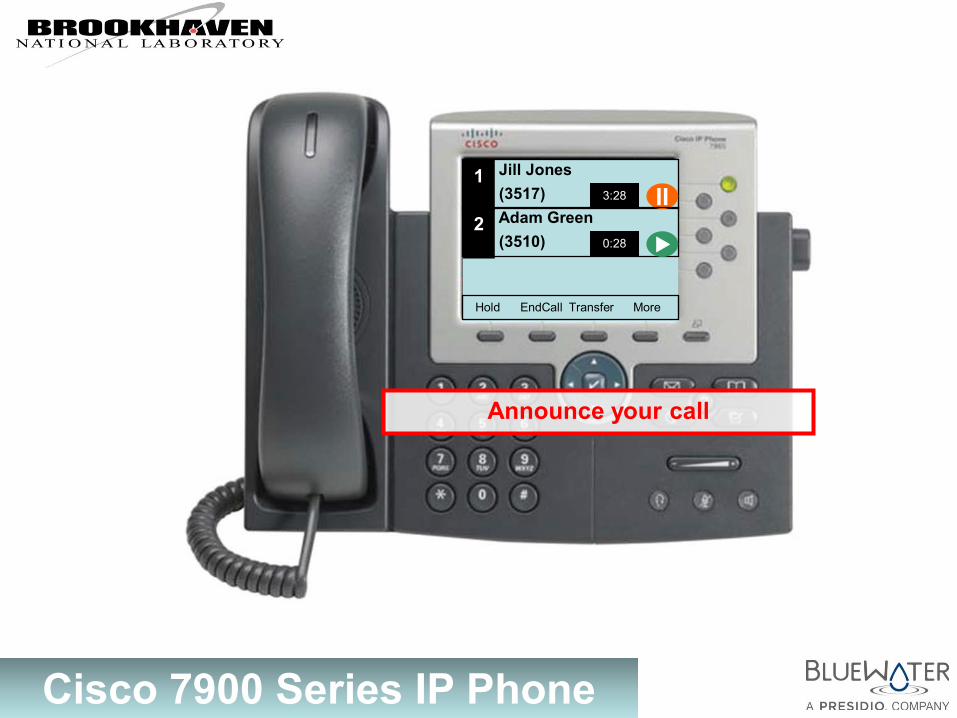
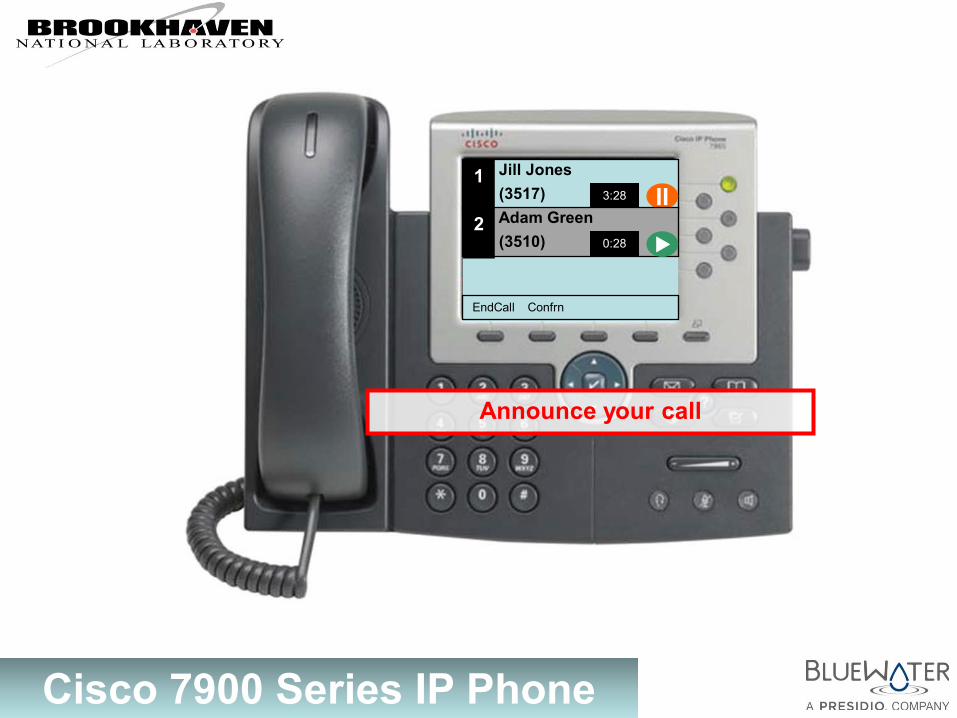
Announce your call
Jill Jones (3517) 1 3:28 II
Adam Green (3510) 2 0:28
Hold EndCall Transfer More

Cisco 7900 Series IP Phone
Hold EndCall Transfer
Press “Transfer” again
Jill Jones (3517) 1 3:28 II
Adam Green (3510) 2 0:45
Transfer

Cisco 7900 Series IP Phone
Tom Smith X3579
Redial NewCall CFwdAll DND
The Call is now transferred.
Main Menu
Cisco 7900 Series IP Phone
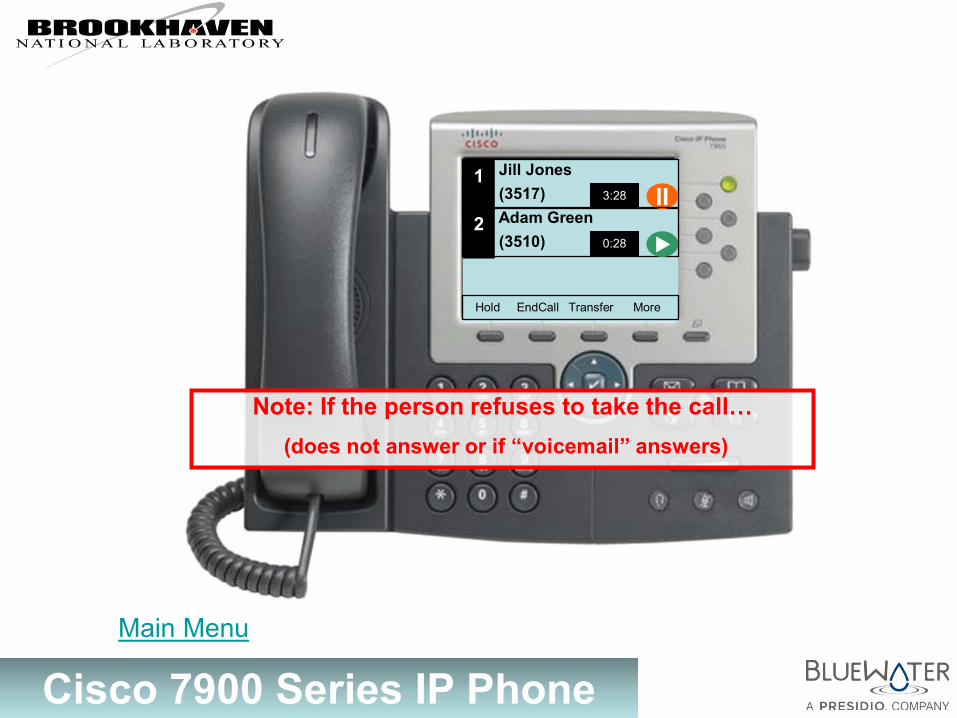
Note: If the person refuses to take the call… (does not answer or if “voicemail” answers)
Jill Jones (3517) 1 3:28 II
Adam Green (3510) 2 0:28
Hold EndCall Transfer More
Main Menu
Cisco 7900 Series IP Phone
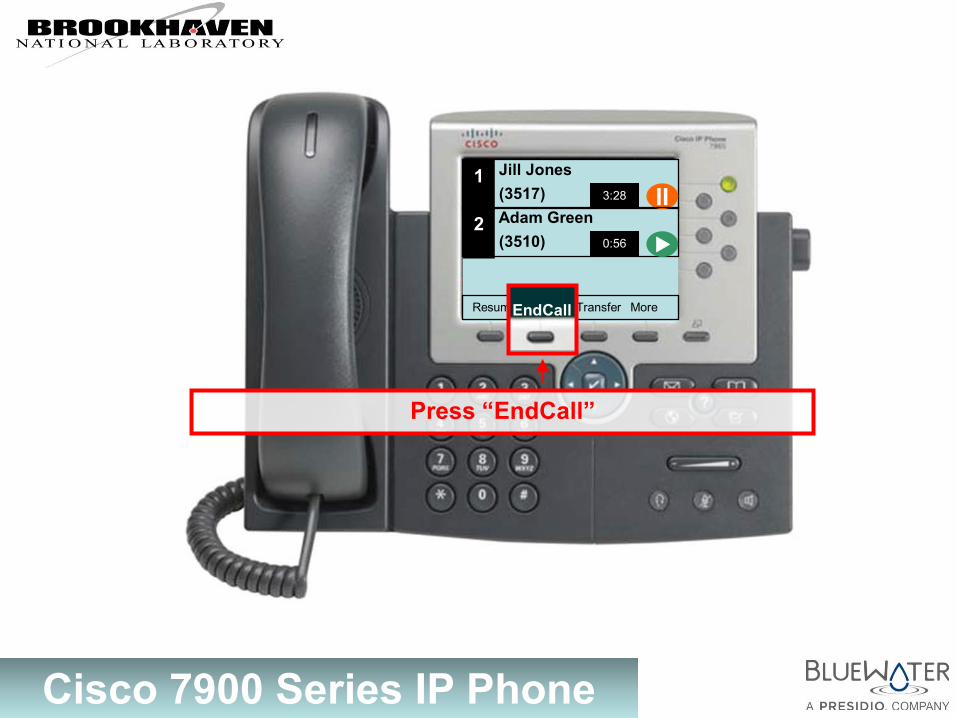
Resume EndCall Transfer More
Press “EndCall”
Jill Jones (3517) 1 3:28 II
Adam Green (3510) 2 0:56
EndCall
Cisco 7900 Series IP Phone
Resume EndCall Transfer More
Then press “Resume”
Jill Jones (3517) 1 4:16 II
Resume
Main Menu
Cisco 7900 Series IP Phone
Jill Jones (3517)
Hold EndCall Transfer More
You are now “reconnected” to the call
1 4:32
Cisco 7900 Series IP Phone
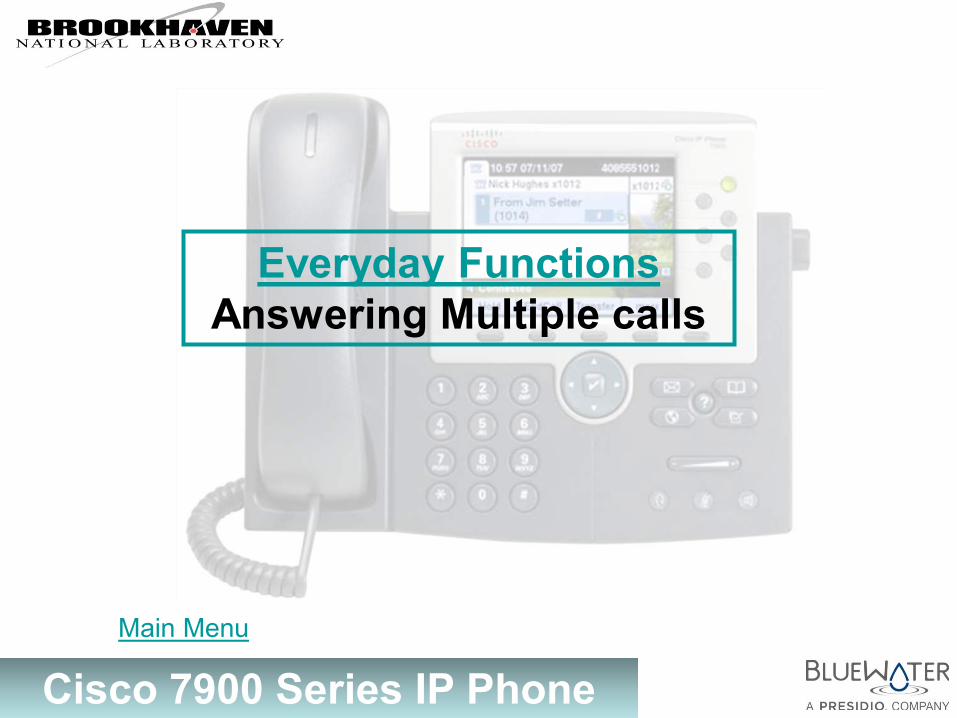
Everyday Functions Answering Multiple calls
Main Menu
Cisco 7900 Series IP Phone
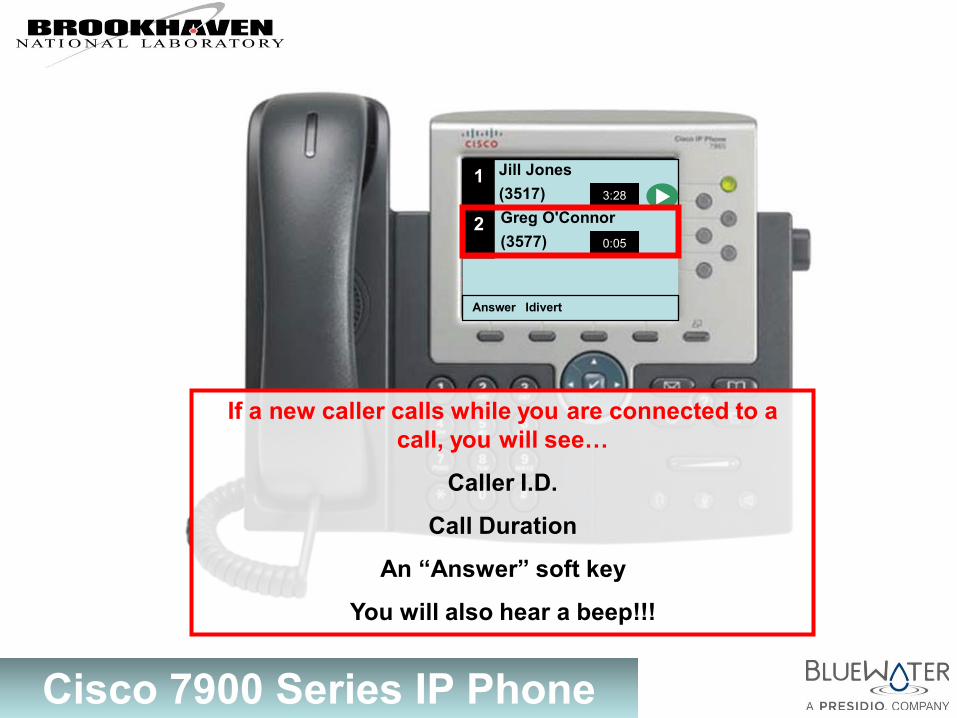
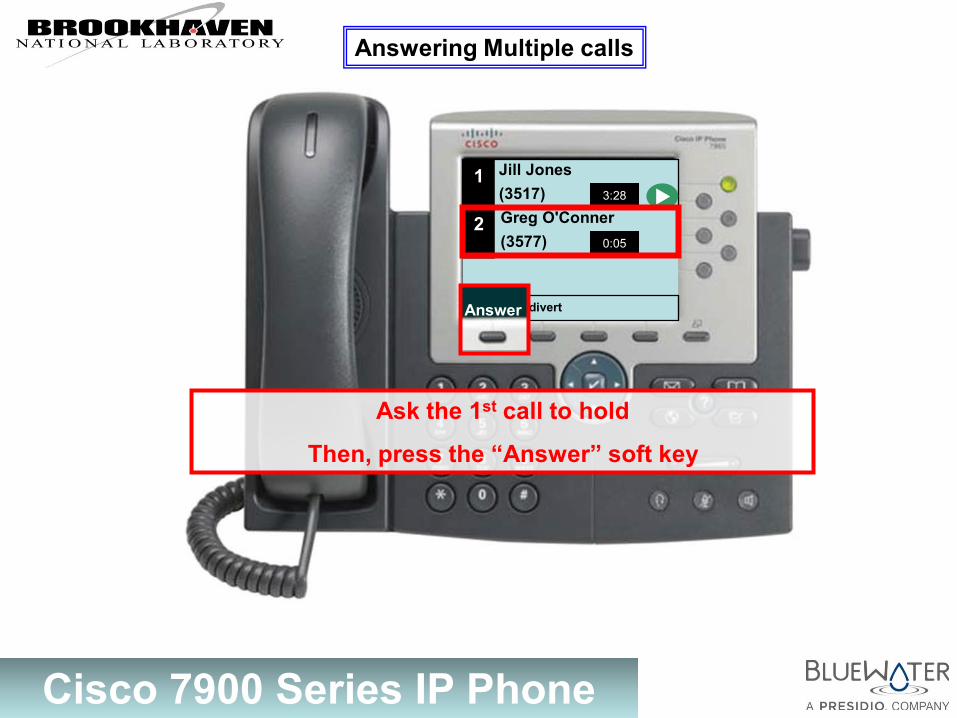
Jill Jones (3517)
Answer Idivert
If a new caller calls while you are connected to a call, you will see…
Caller I.D.
Call Duration
An “Answer” soft key
You will also hear a beep!!!
1 3:28
Greg O'Connor (3577)
2 0:05
Cisco 7900 Series IP Phone
Jill Jones (3517)
Answer Idivert
1 3:28
Greg O'Conner (3577)
2 0:05
Answer
Ask the 1st call to hold
Then, press the “Answer” soft key
Answering Multiple calls
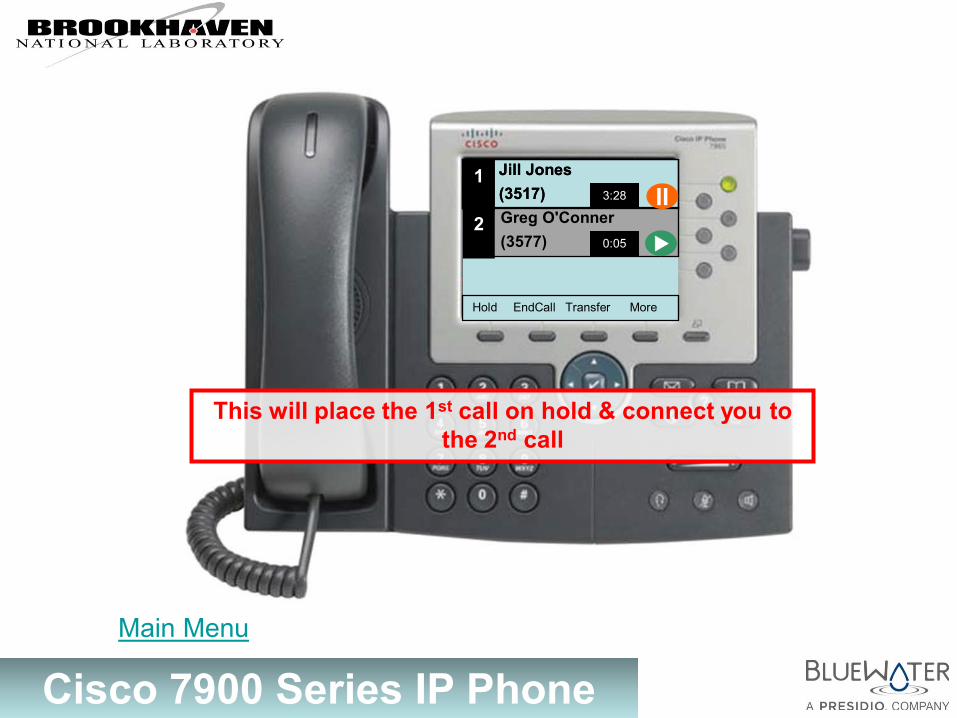
Cisco 7900 Series IP Phone
Jill Jones (3517) 1 3:28
Greg O'Conner (3577)
2 0:05
This will place the 1st call on hold & connect you to the 2nd call
Jill Jones (3517) 1 3:28 II
Hold EndCall Transfer More
Main Menu
Cisco 7900 Series IP Phone
Switching between calls
Main Menu
Cisco 7900 Series IP Phone
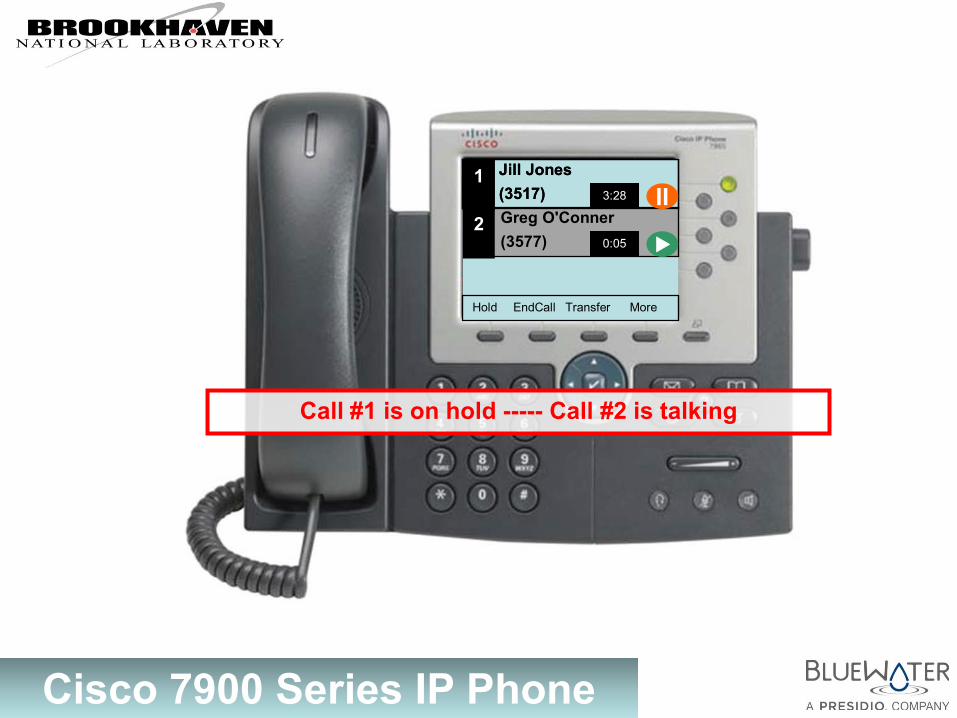
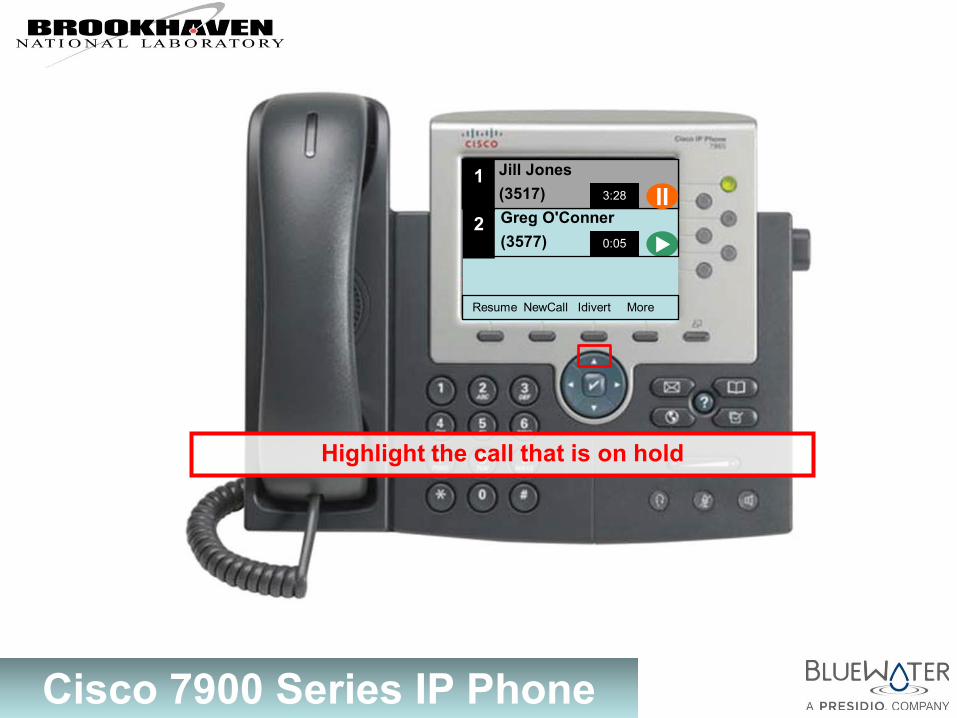
Jill Jones (3517) 1 3:28
Greg O'Conner (3577)
2 0:05
Call #1 is on hold ----- Call #2 is talking
Jill Jones (3517) 1 3:28 II
Hold EndCall Transfer More
Cisco 7900 Series IP Phone
Jill Jones (3517) 1 3:28
Greg O'Conner (3577)
2 0:05
Highlight the call that is on hold
Jill Jones (3517) 1 3:28 II
Resume NewCall Idivert More
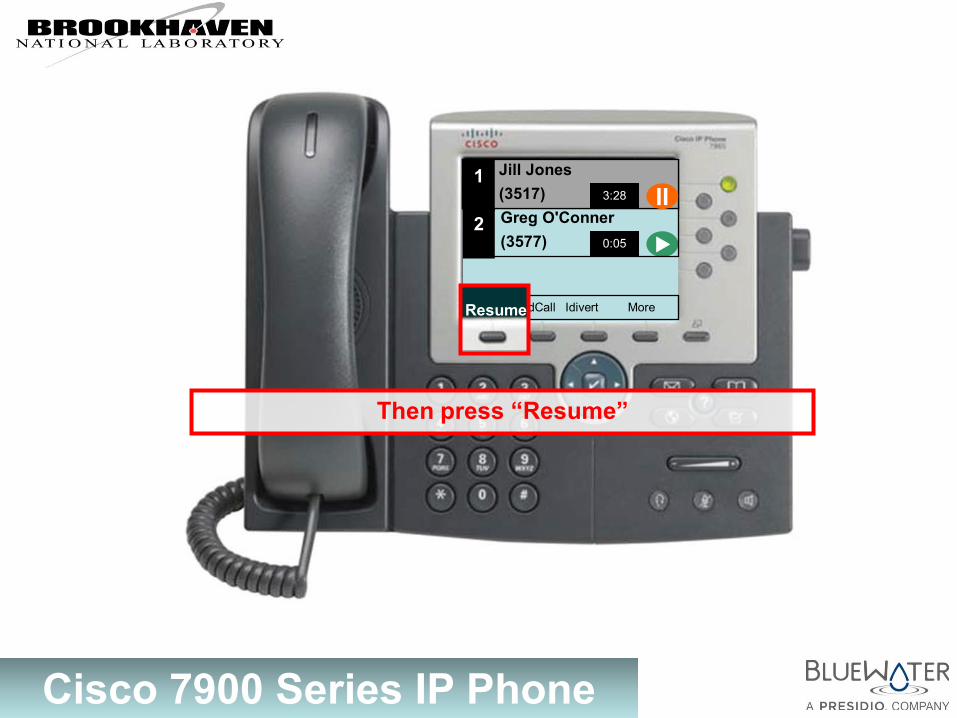
Cisco 7900 Series IP Phone
Jill Jones (3517) 1 3:28
Greg O'Conner (3577)
2 0:05
Then press “Resume”
Jill Jones (3517) 1 3:28 II
Hold EndCall Idivert More Resume
Cisco 7900 Series IP Phone
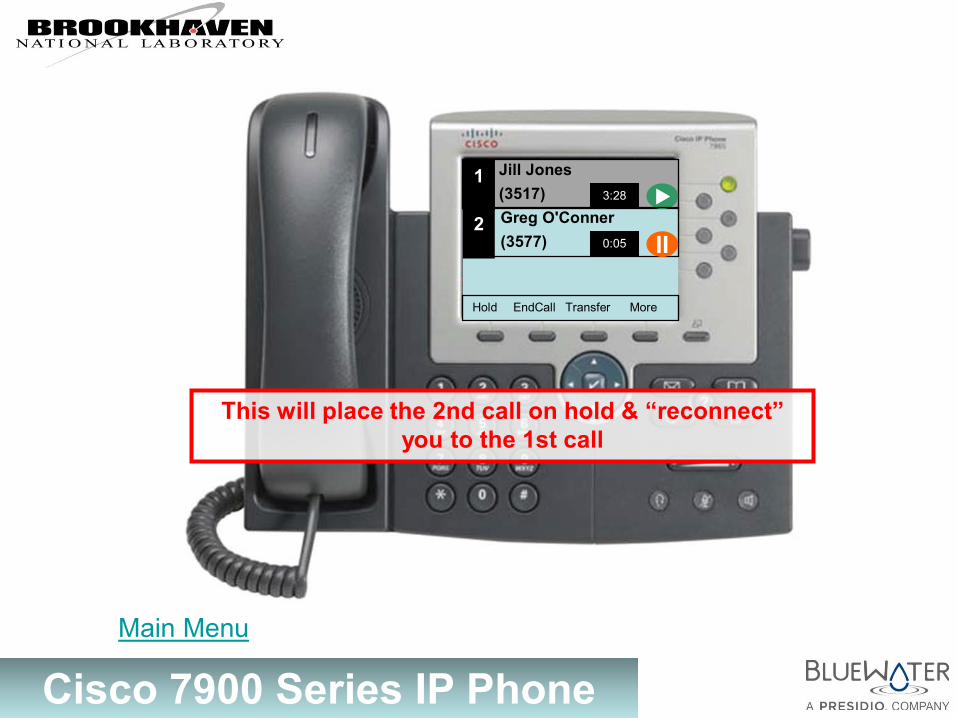
Jill Jones (3517) Jill Jones (3517) 1 3:28
Greg O'Conner (3577)
2 0:05
This will place the 2nd call on hold & “reconnect” you to the 1st call
1 3:28
II
Hold EndCall Transfer More
Main Menu
Cisco 7900 Series IP Phone
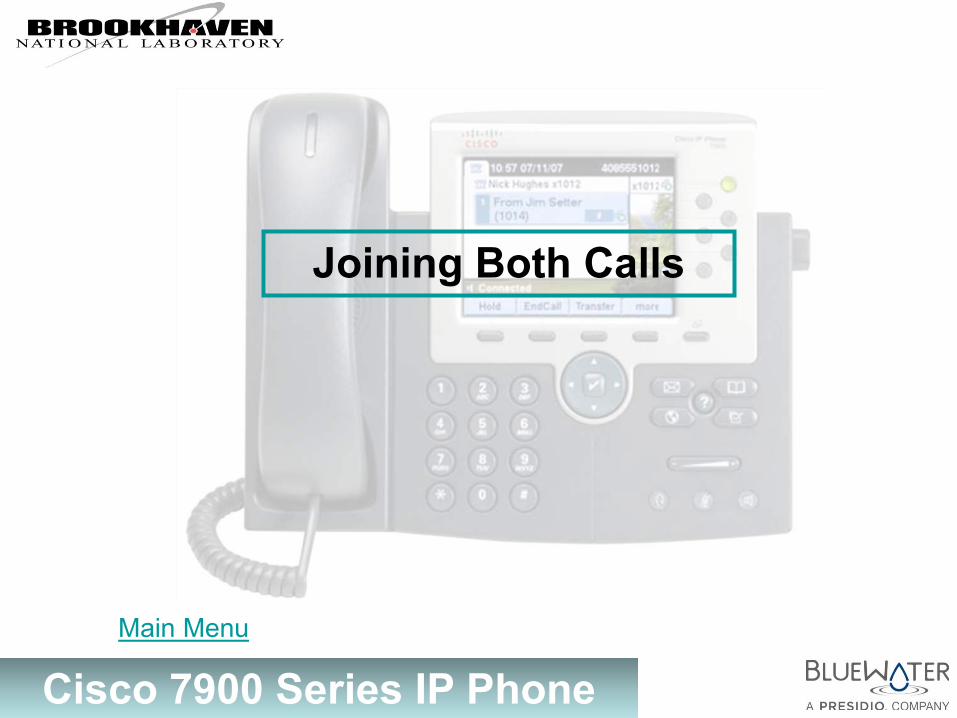
Joining Both Calls
Main Menu
Cisco 7900 Series IP Phone
Jill Jones (3517) Jill Jones (3517) 1 3:28
Greg O'Conner (3577)
2 0:05
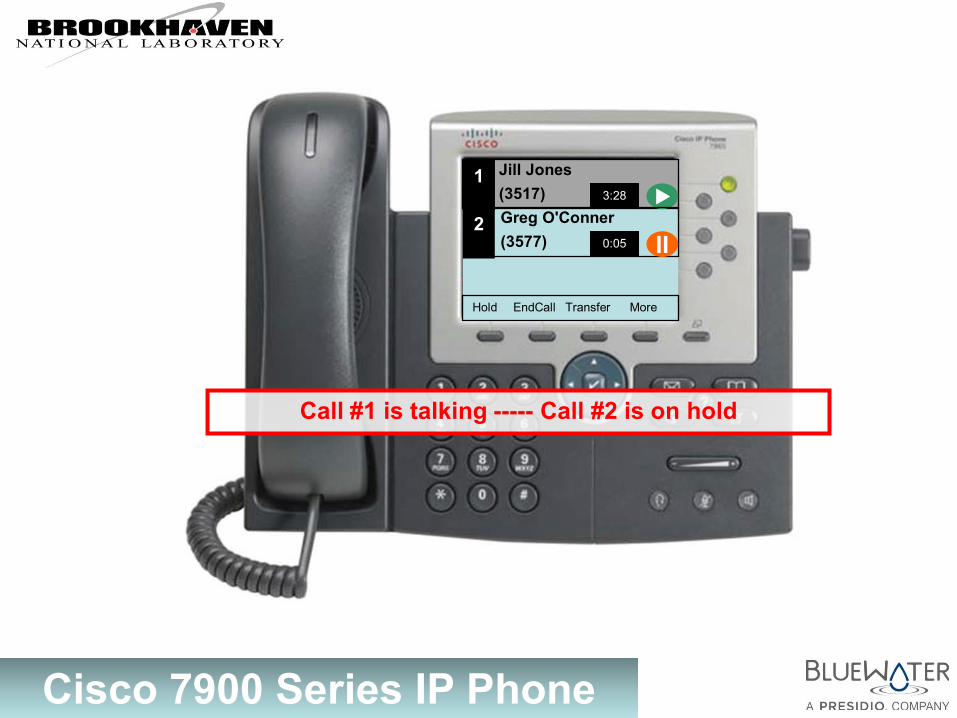
Call #1 is talking ----- Call #2 is on hold
1 3:28
II
Hold EndCall Transfer More
Cisco 7900 Series IP Phone
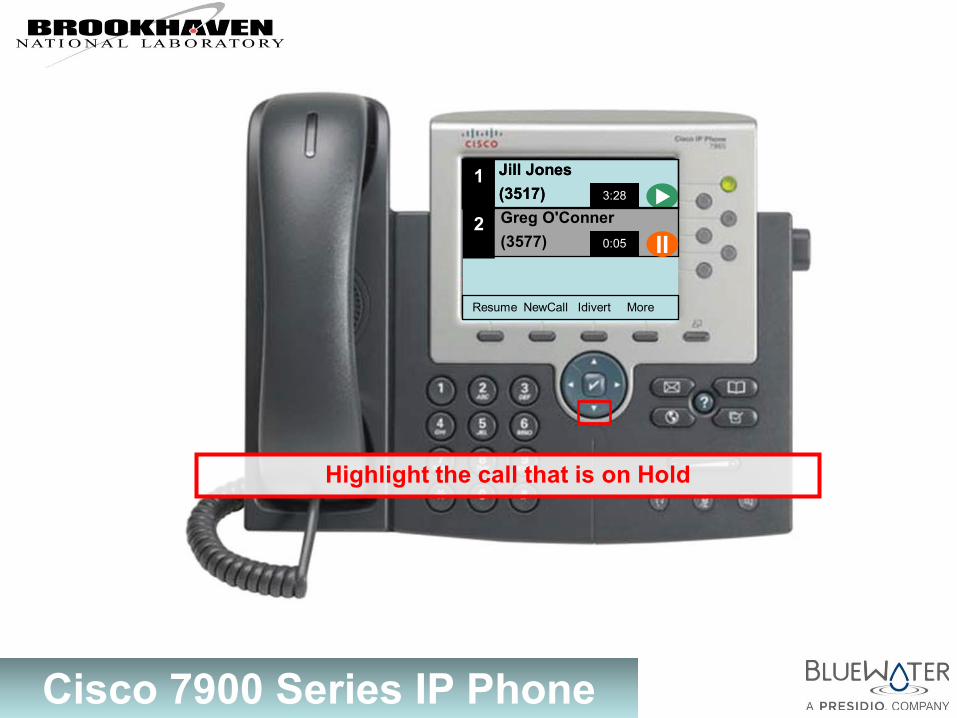
Jill Jones (3517) 1 3:28
Greg O'Conner (3577)
2 0:05
Highlight the call that is on Hold
Jill Jones (3517) 1 3:28
II
Resume NewCall Idivert More
Cisco 7900 Series IP Phone
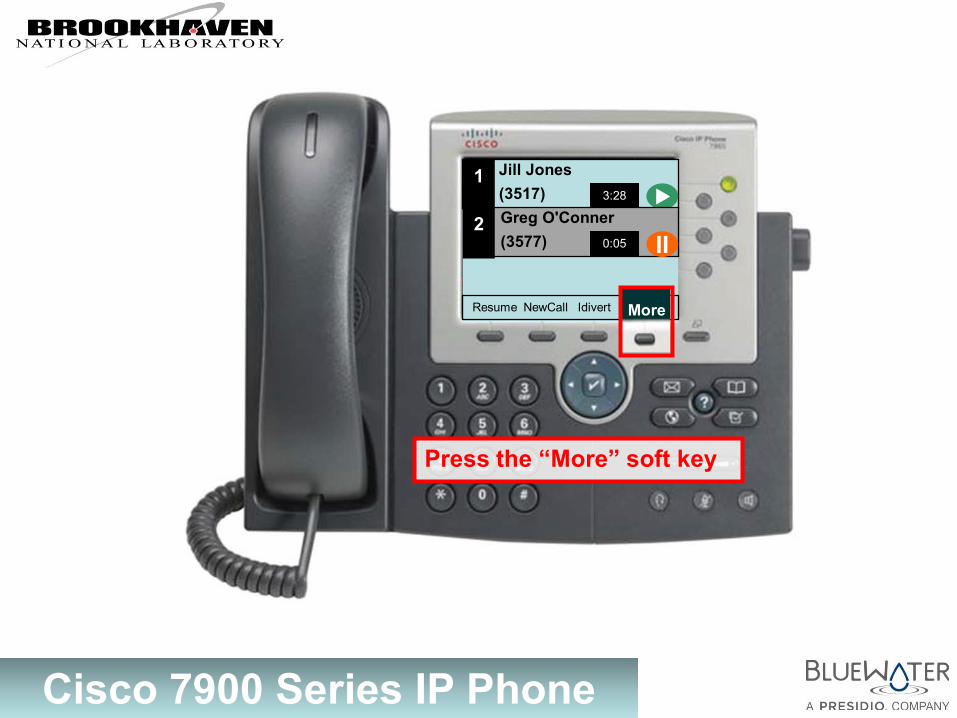
Jill Jones (3517) 1 3:28
Press the “More” soft key
Resume NewCall Idivert More More
Greg O'Conner (3577)
2 II 0:05
Cisco 7900 Series IP Phone
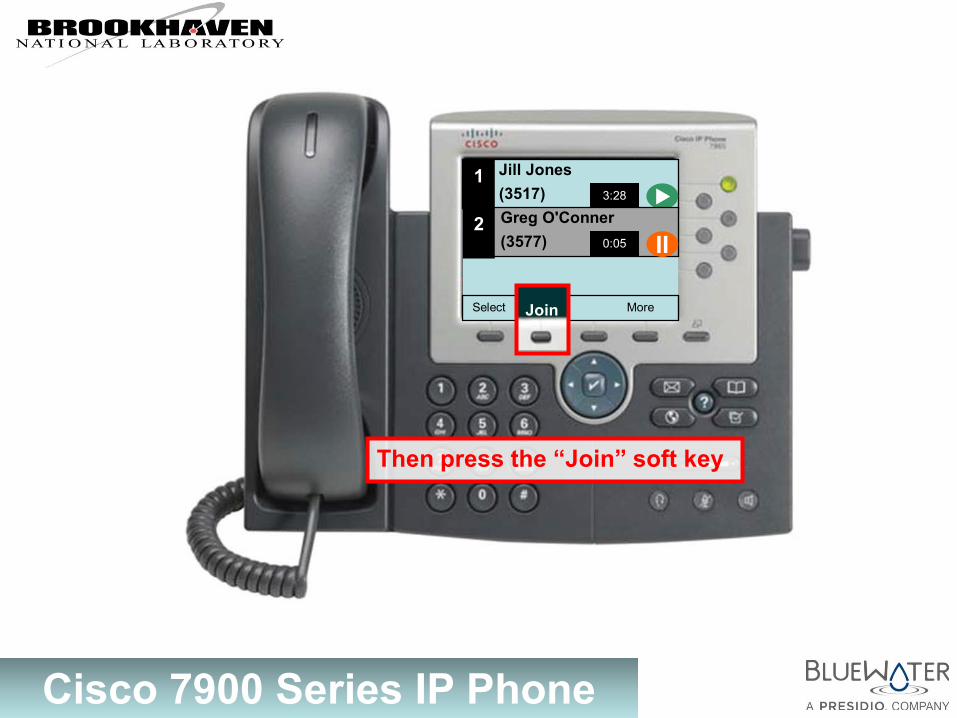
Jill Jones (3517) 1 3:28
Then press the “Join” soft key
Select EndCall More Join
Greg O'Conner (3577)
2 II 0:05

Cisco 7900 Series IP Phone
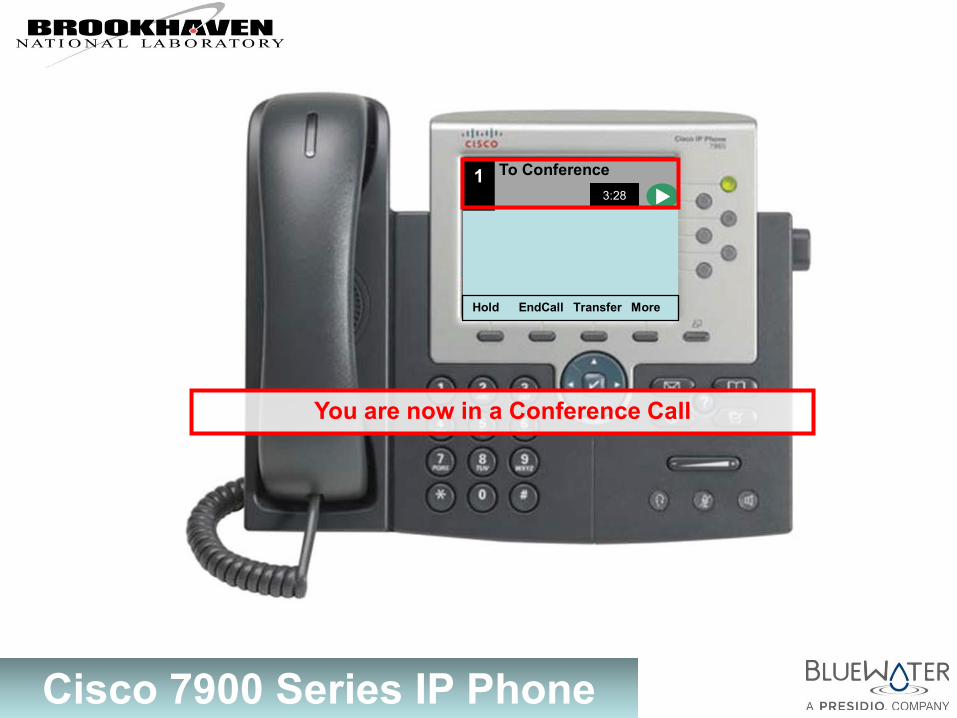
Hold EndCall Transfer More
You are now in a Conference Call
To Conference 1 3:28
Main Menu
Cisco 7900 Series IP Phone
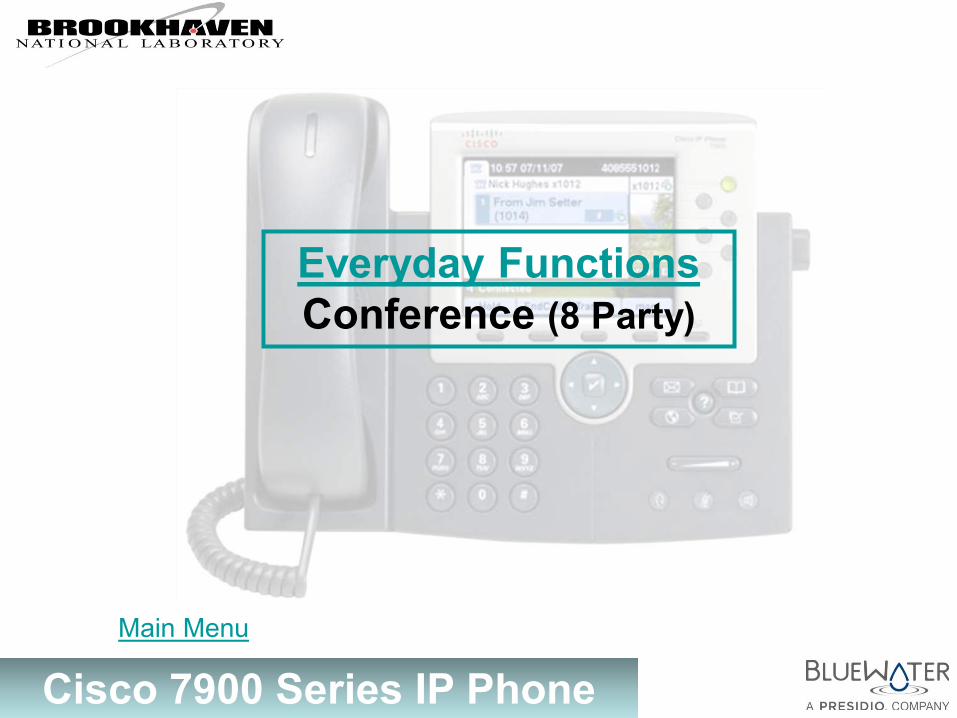
Everyday Functions Conference (8 Party)
Main Menu
Cisco 7900 Series IP Phone
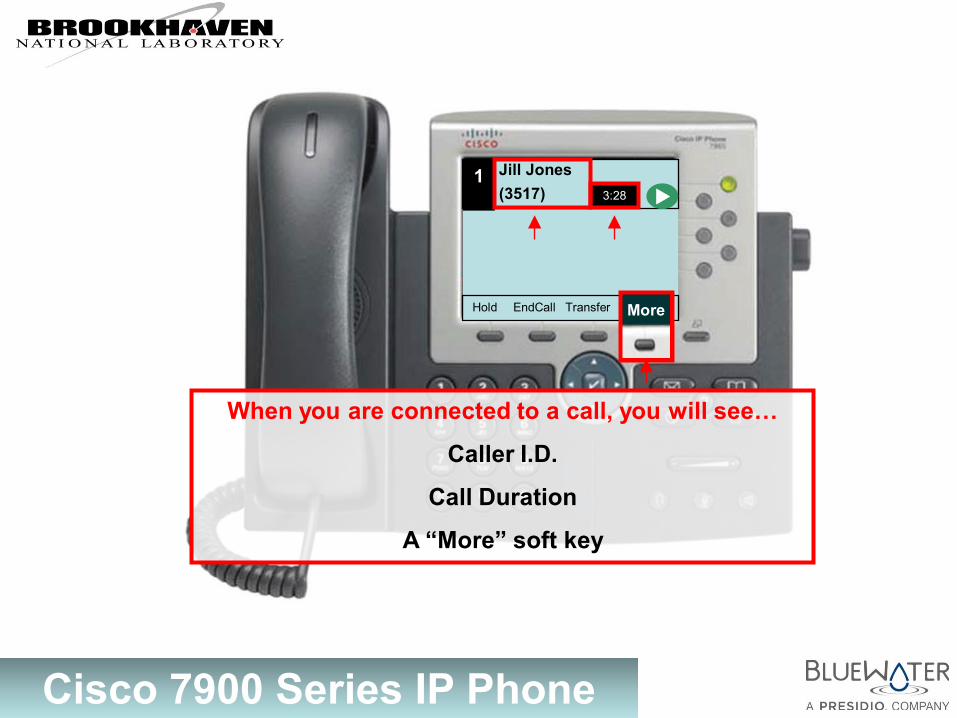
Jill Jones (3517)
Hold EndCall Transfer More
When you are connected to a call, you will see…
Caller I.D.
Call Duration
A “More” soft key
1 3:28
More
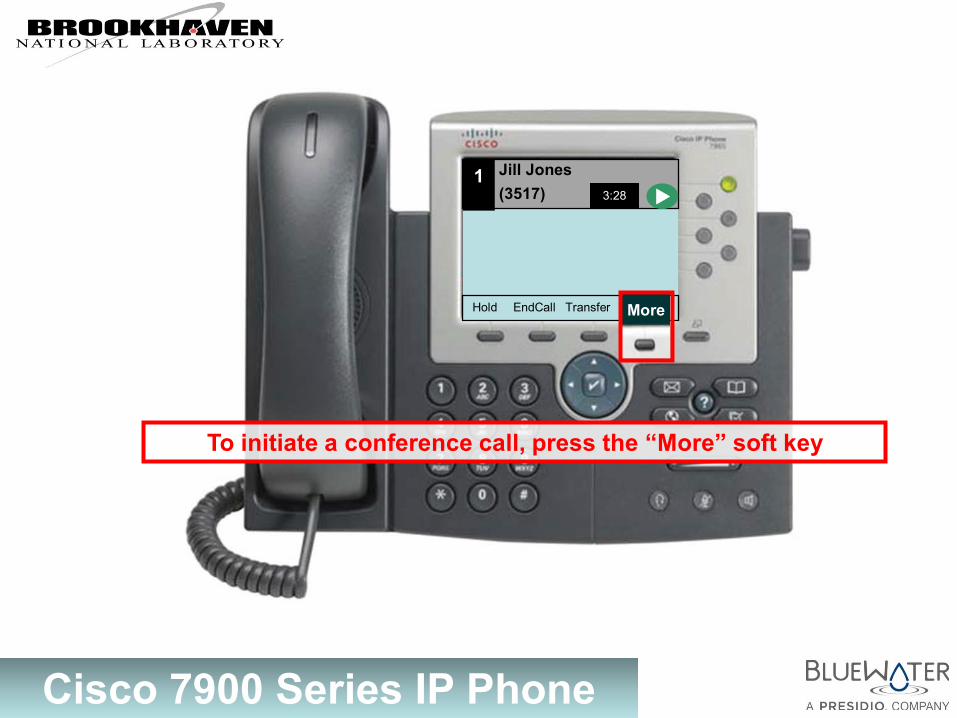
Cisco 7900 Series IP Phone
Jill Jones (3517) 1 3:28
To initiate a conference call, press the “More” soft key
Hold EndCall Transfer More More
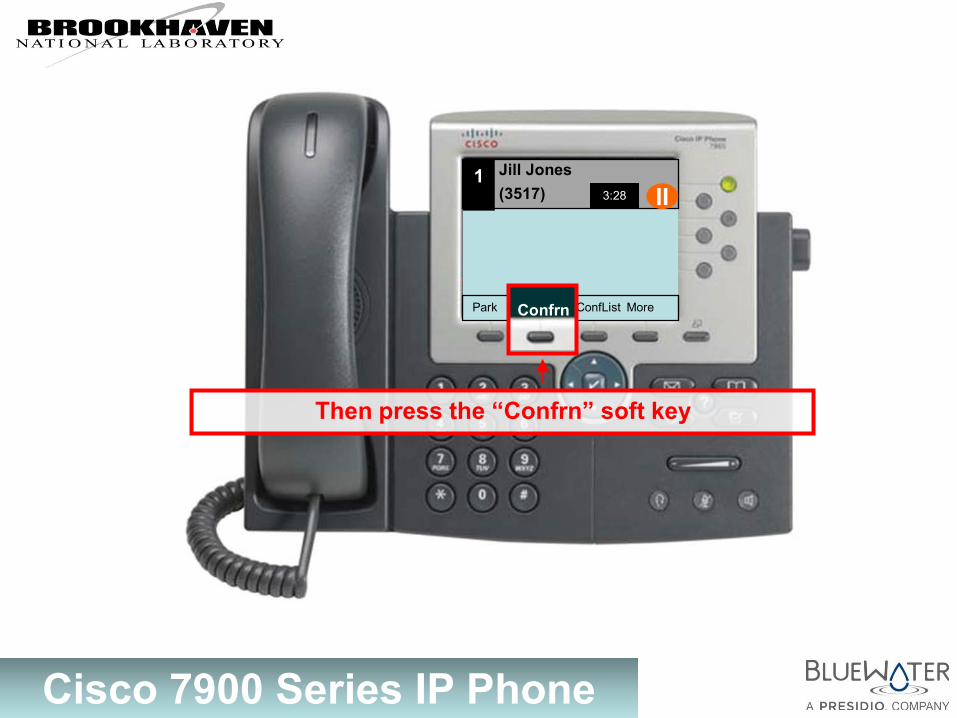
Cisco 7900 Series IP Phone
Park EndCall ConfList More
Then press the “Confrn” soft key
Jill Jones (3517) 1 3:28 II
Confrn

Cisco 7900 Series IP Phone
Resume NewCall Transfer
Jill Jones (3517) 1 3:28 II
(3510) 2
0:04
Dial the extension (or outside number) that you wish to conference with…
Cisco 7900 Series IP Phone
EndCall Confrn
Announce your call
Jill Jones (3517) 1 3:28 II
Adam Green (3510) 2 0:28

Cisco 7900 Series IP Phone
EndCalllst More
Press “Confrn” again
Jill Jones (3517) 1 3:28 II
Adam Green (3510) 2 0:45
Confrn
Cisco 7900 Series IP Phone
Hold EndCall Transfer More
You are now in a Conference Call
To Conference 1 3:28
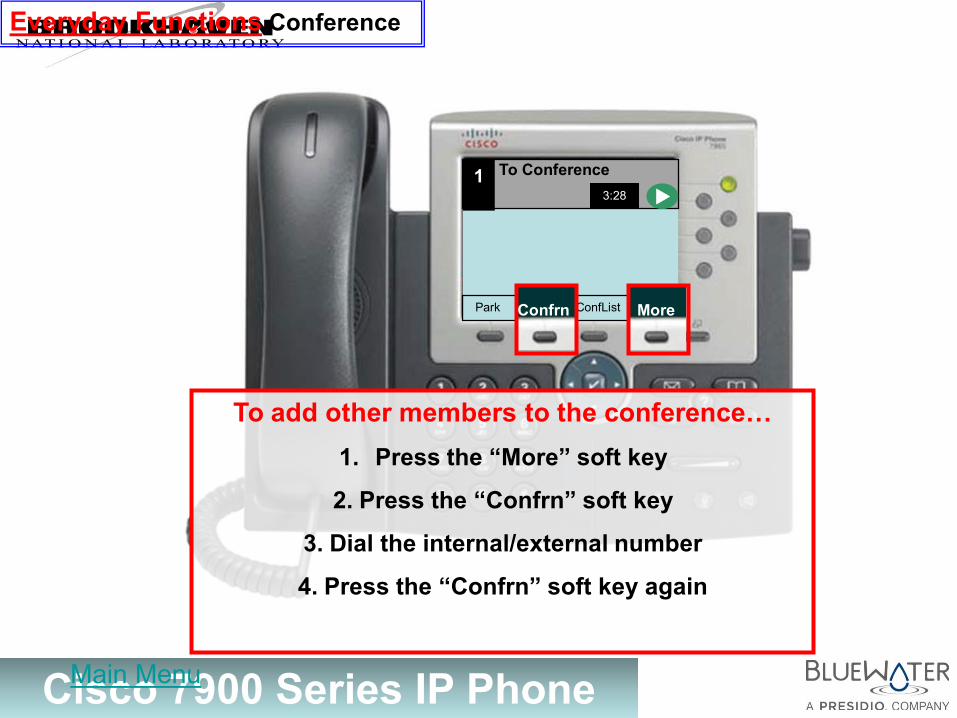
Cisco 7900 Series IP Phone
To Conference 1 3:28
To add other members to the conference… 1. Press the “More” soft key
2. Press the “Confrn” soft key
3. Dial the internal/external number
4. Press the “Confrn” soft key again
Park Confrn ConfList More More Confrn
Everyday Functions Conference
Main Menu
Cisco 7900 Series IP Phone
Everyday Functions
Conference – Viewing Members
Main Menu

Cisco 7900 Series IP Phone
To Conference 1 3:28
To view members in the conference…
1. Press the “More” soft key
Hold EndCall Transfer ore More

Cisco 7900 Series IP Phone
To Conference 1 3:28
To view members in the conference…
1. Press the “More” soft key
2. Then press the “ConfList” soft key
Park Confrn ConfList More ConfList

Cisco 7900 Series IP Phone
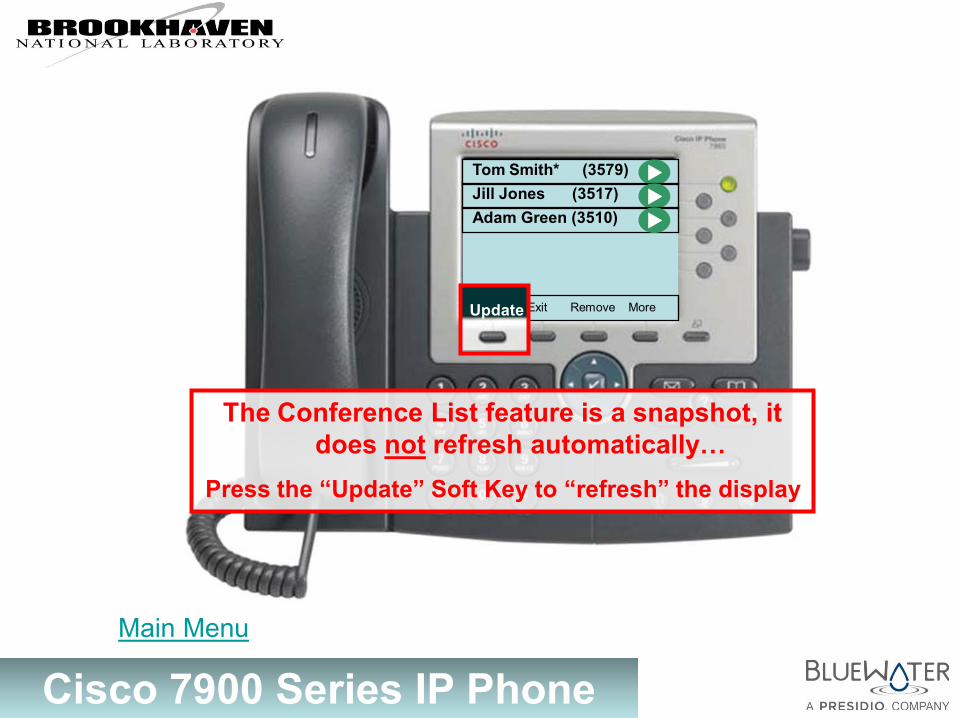
Tom Smith* (3579)
Update Exit Remove More
Jill Jones (3517) Adam Green (3510)
You will see all parties connected
Cisco 7900 Series IP Phone
Tom Smith* (3579)
Update Exit Remove More
Jill Jones (3517) Adam Green (3510)
The Conference List feature is a snapshot, it does not refresh automatically…
Press the “Update” Soft Key to “refresh” the display
Update
Main Menu
Cisco 7900 Series IP Phone
Everyday Functions
Conference – Removing Members
Main Menu
Cisco 7900 Series IP Phone
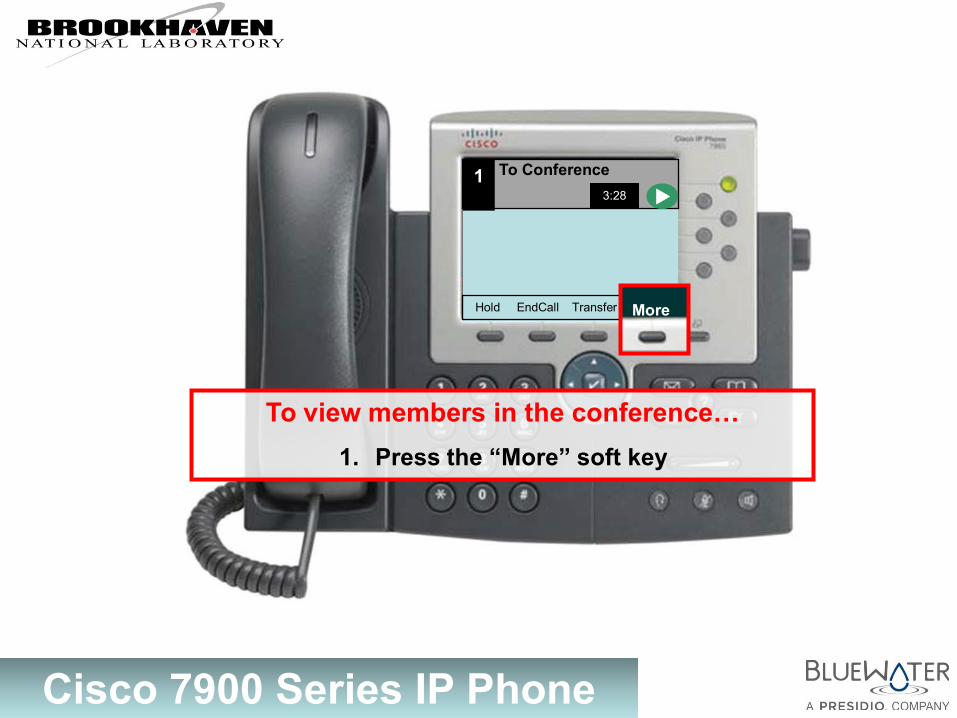
To Conference 1 3:28
To view members in the conference…
1. Press the “More” soft key
Hold EndCall Transfer ore More
Cisco 7900 Series IP Phone
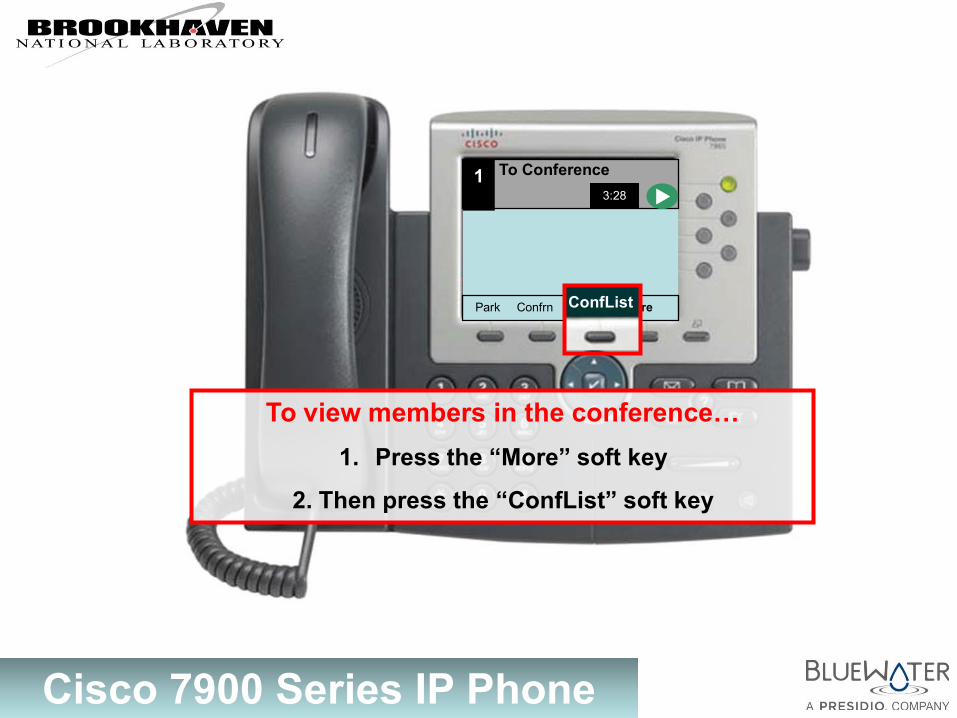
To Conference 1 3:28
To view members in the conference…
1. Press the “More” soft key
2. Then press the “ConfList” soft key
Park Confrn ConfList More ConfList
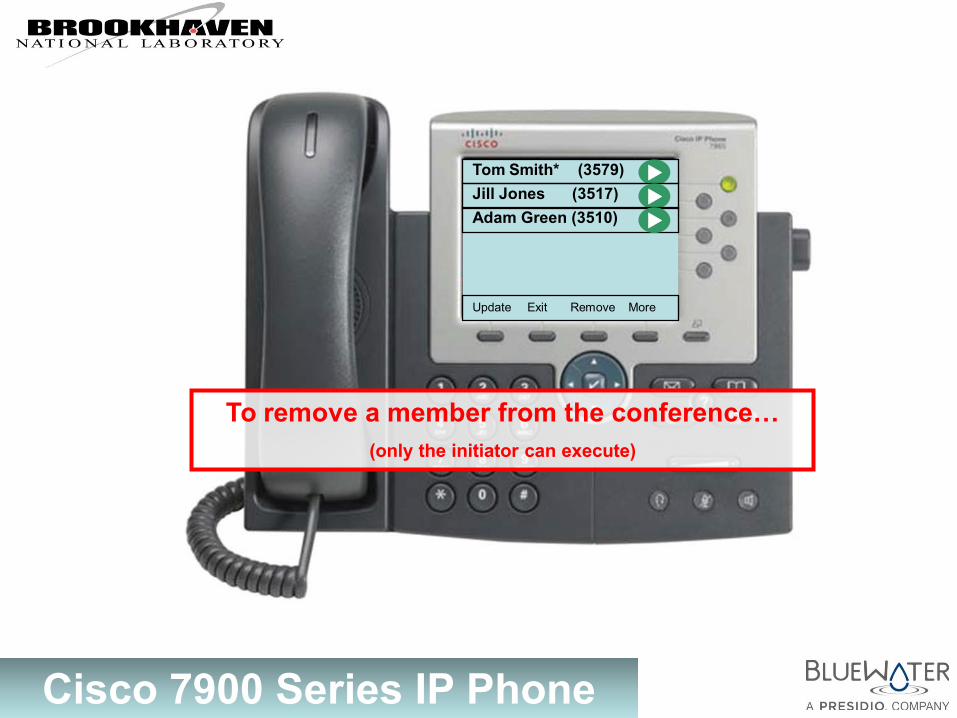
Cisco 7900 Series IP Phone
Tom Smith* (3579)
Update Exit Remove More
Jill Jones (3517) Adam Green (3510)
To remove a member from the conference… (only the initiator can execute)
Cisco 7900 Series IP Phone
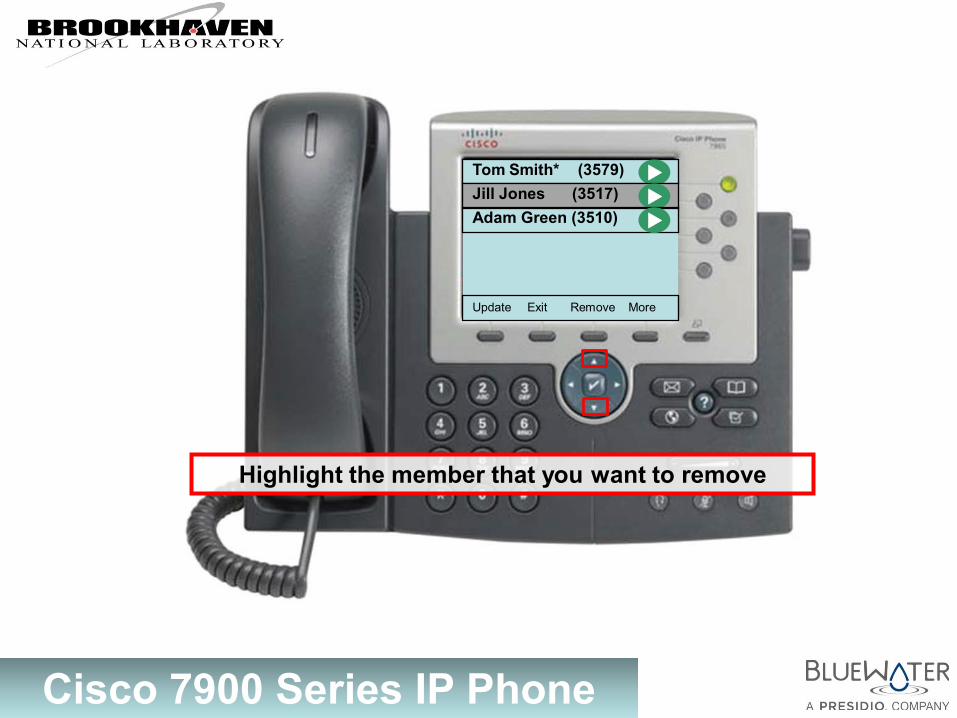
Tom Smith* (3579)
Update Exit Remove More
Jill Jones (3517) Adam Green (3510)
Highlight the member that you want to remove
Cisco 7900 Series IP Phone
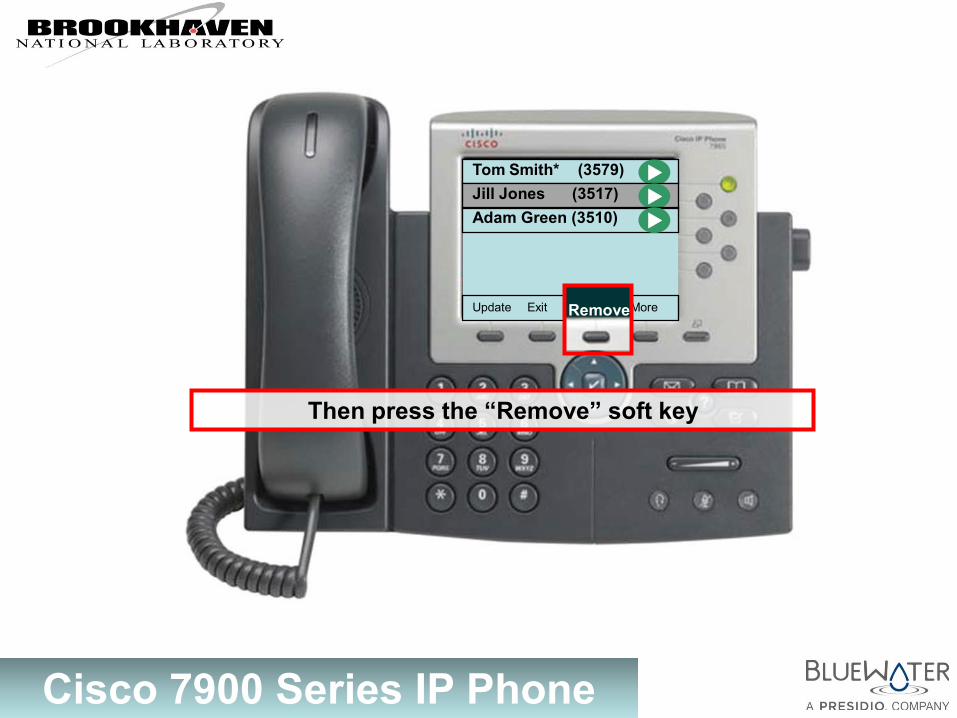
Tom Smith* (3579)
Update Exit Remove More
Jill Jones (3517) Adam Green (3510)
Then press the “Remove” soft key
Remove
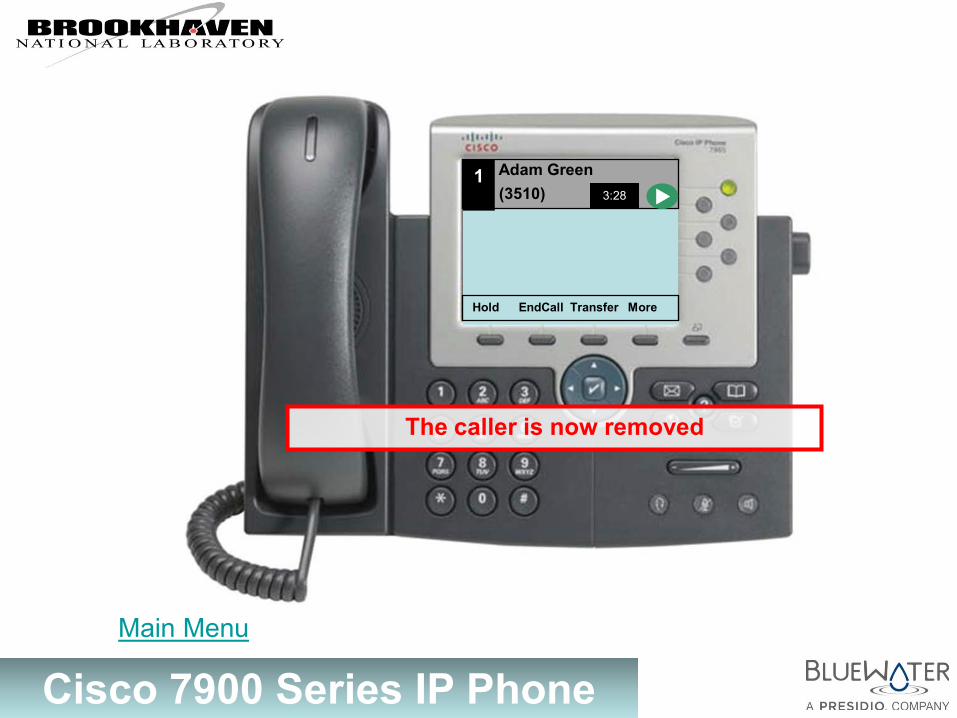
Cisco 7900 Series IP Phone
Hold EndCall Transfer More
The caller is now removed
Adam Green (3510) 1 3:28
Main Menu
Cisco 7900 Series IP Phone
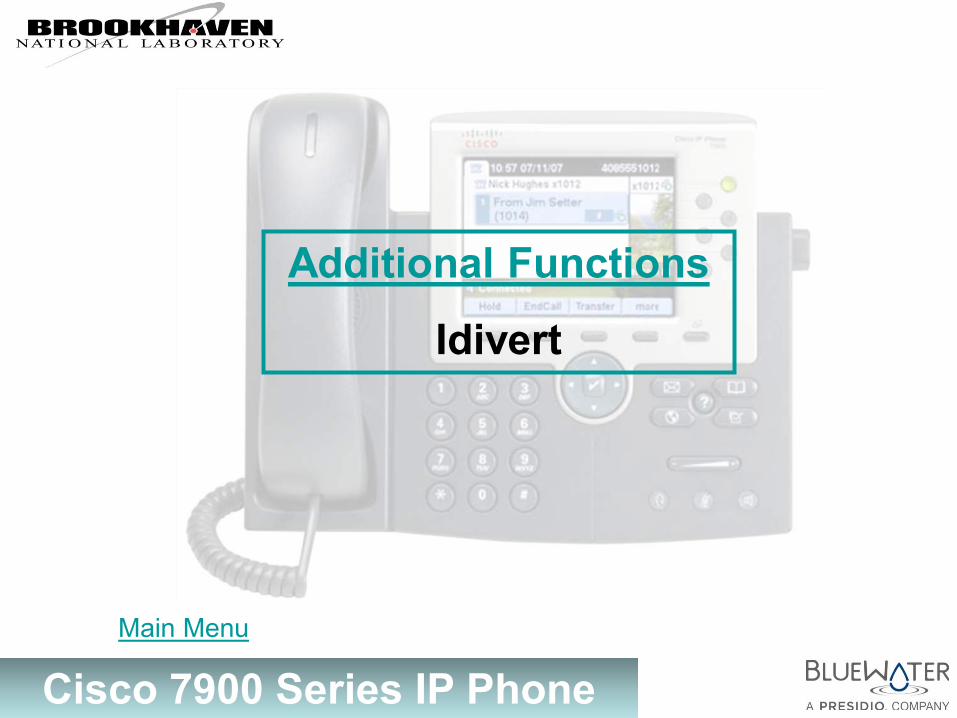
Additional Functions
Idivert
Main Menu
Cisco 7900 Series IP Phone
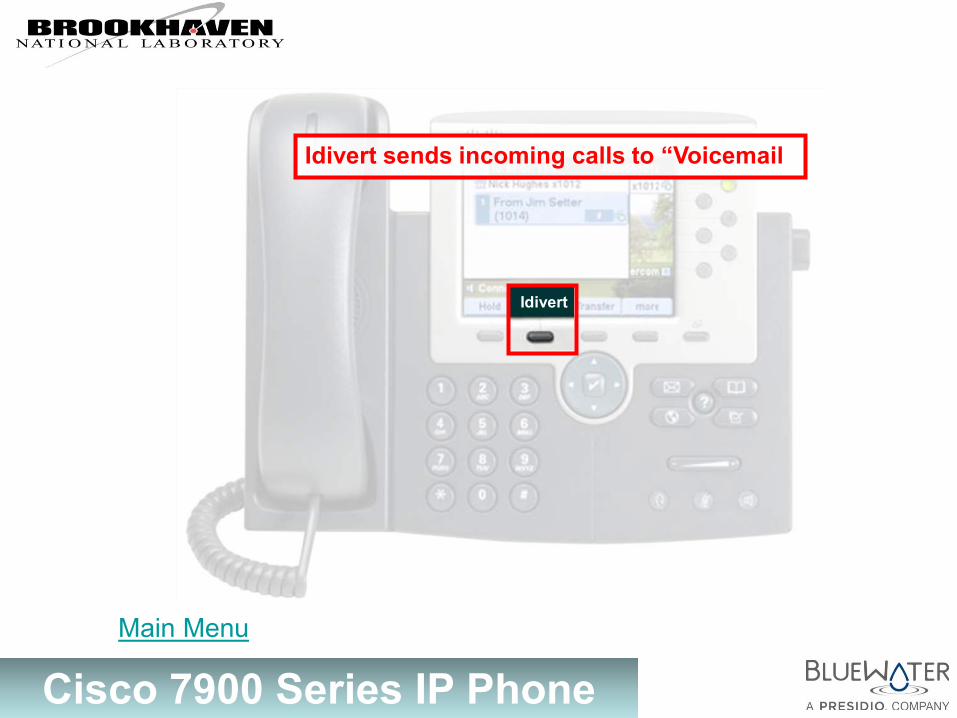
Idivert sends incoming calls to “Voicemail
Idivert
Main Menu
Cisco 7900 Series IP Phone
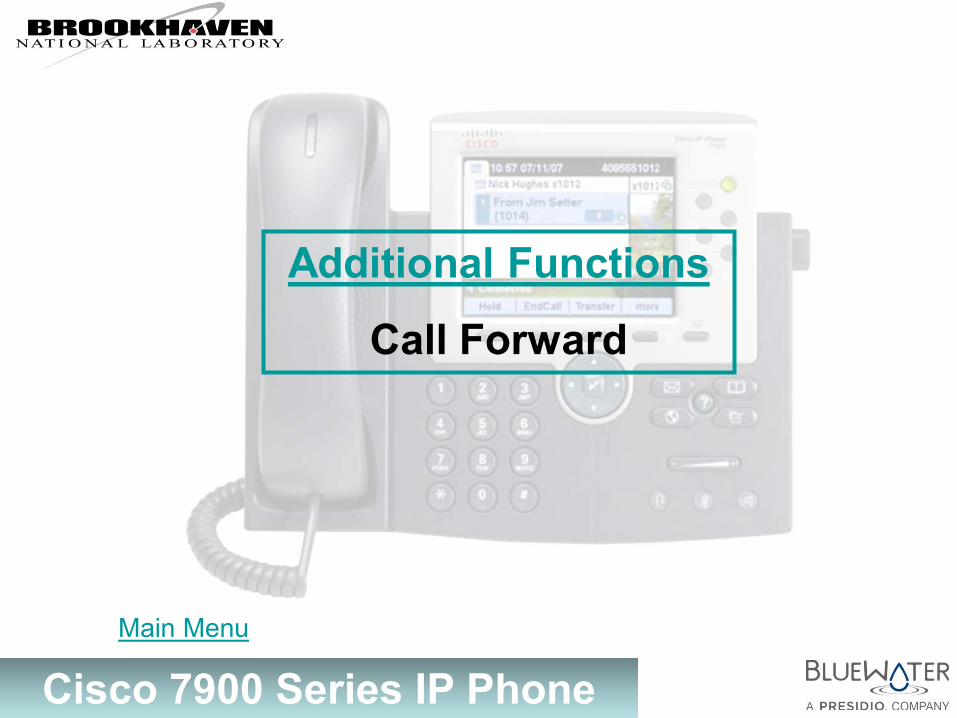
Additional Functions
Call Forward
Main Menu
Cisco 7900 Series IP Phone
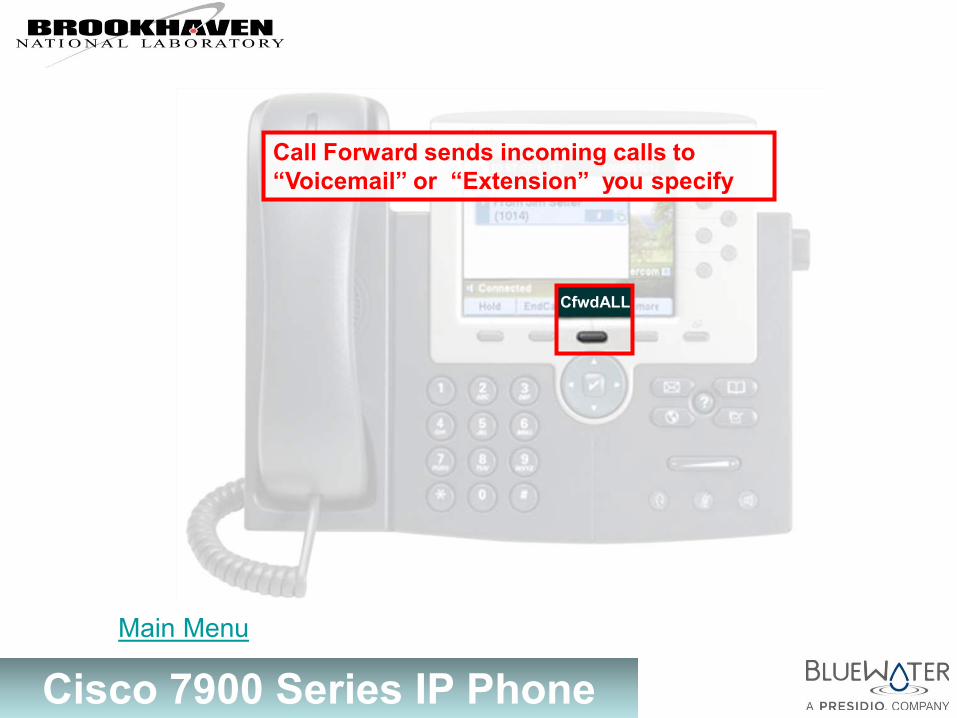
Call Forward sends incoming calls to “Voicemail” or “Extension” you specify
CfwdALL
Main Menu

Cisco 7900 Series IP Phone
Additional Functions
Call Park
Main Menu
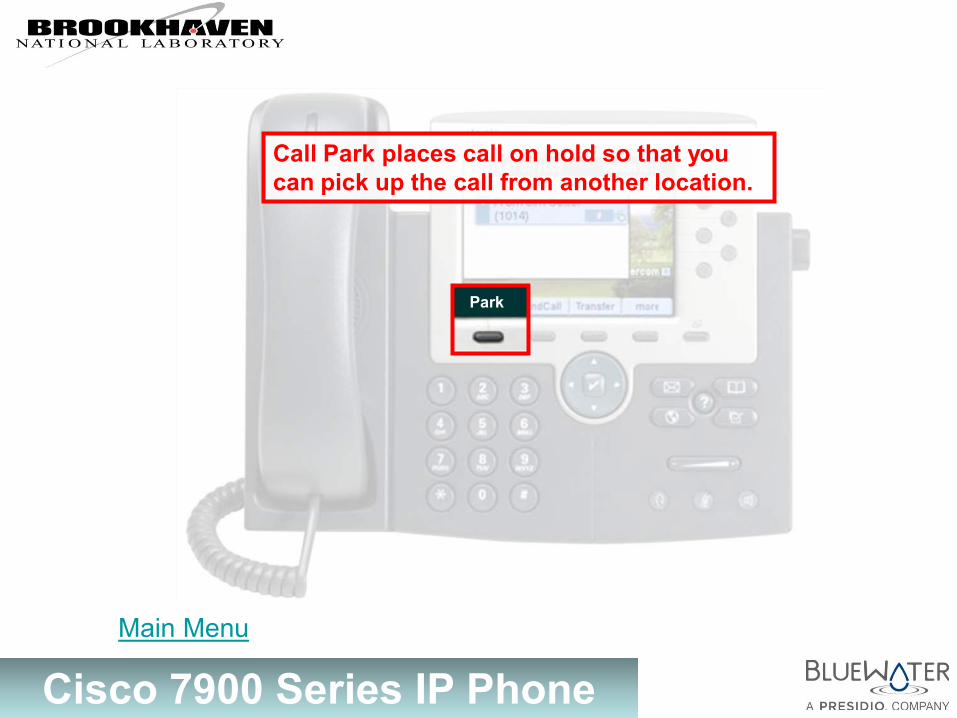
Cisco 7900 Series IP Phone
Call Park places call on hold so that you can pick up the call from another location.
Park
Main Menu
Cisco 7900 Series IP Phone
Cisco 7900 Series IP Phone
Cisco Call Manager Webpage (CCM)
Main Menu
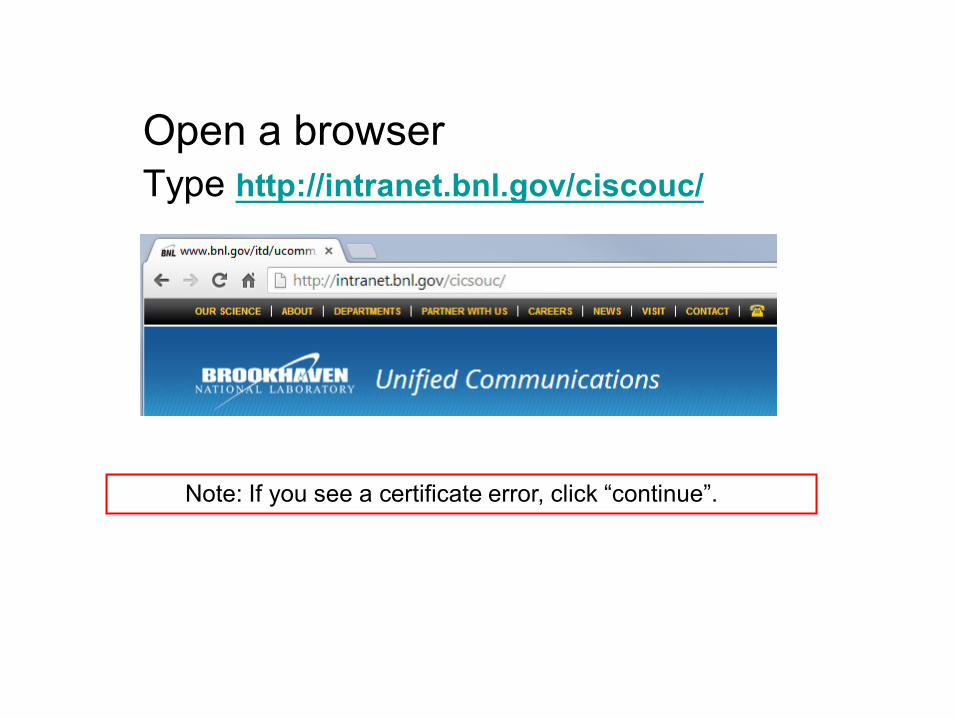
Open a browser Type http://intranet.bnl.gov/ciscouc/
Note: If you see a certificate error, click “continue”.
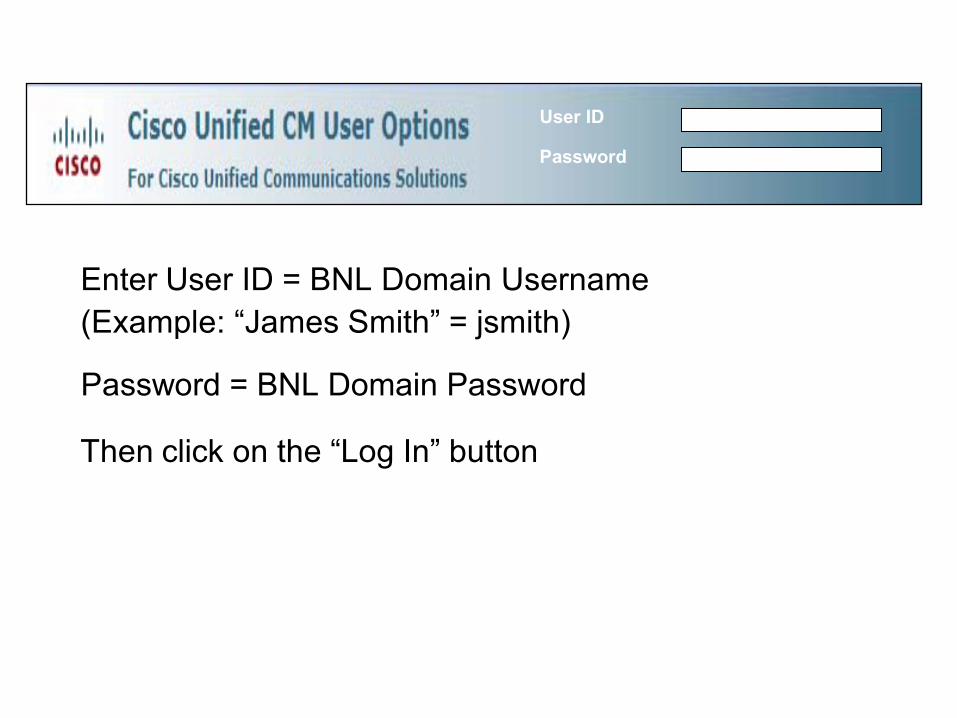
User ID
Password
Enter User ID = BNL Domain Username(Example: “James Smith” = jsmith)
Password = BNL Domain Password
Then click on the “Log In” button

Click “User Options” to access all features…
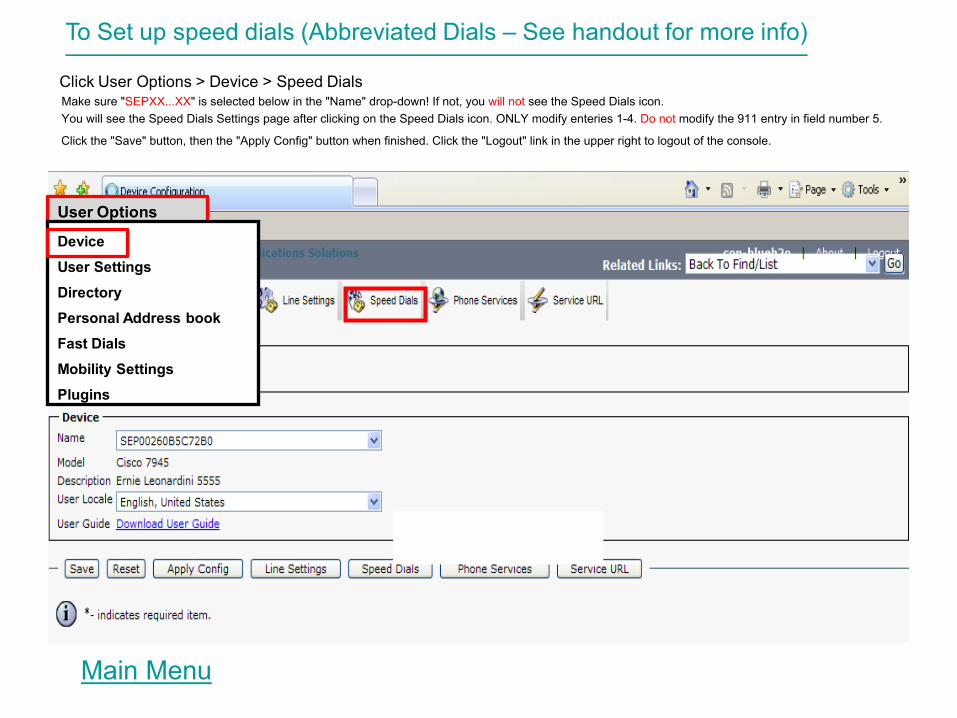
To Set up speed dials (Abbreviated Dials – See handout for more info)
User Options
Device User Settings Directory Personal Address book Fast Dials Mobility Settings Plugins
Main Menu
Click User Options > Device > Speed Dials Make sure "SEPXX...XX" is selected below in the "Name" drop-down! If not, you will not see the Speed Dials icon. You will see the Speed Dials Settings page after clicking on the Speed Dials icon. ONLY modify enteries 1-4. Do not modify the 911 entry in field number 5.
Click the "Save" button, then the "Apply Config" button when finished. Click the "Logout" link in the upper right to logout of the console.
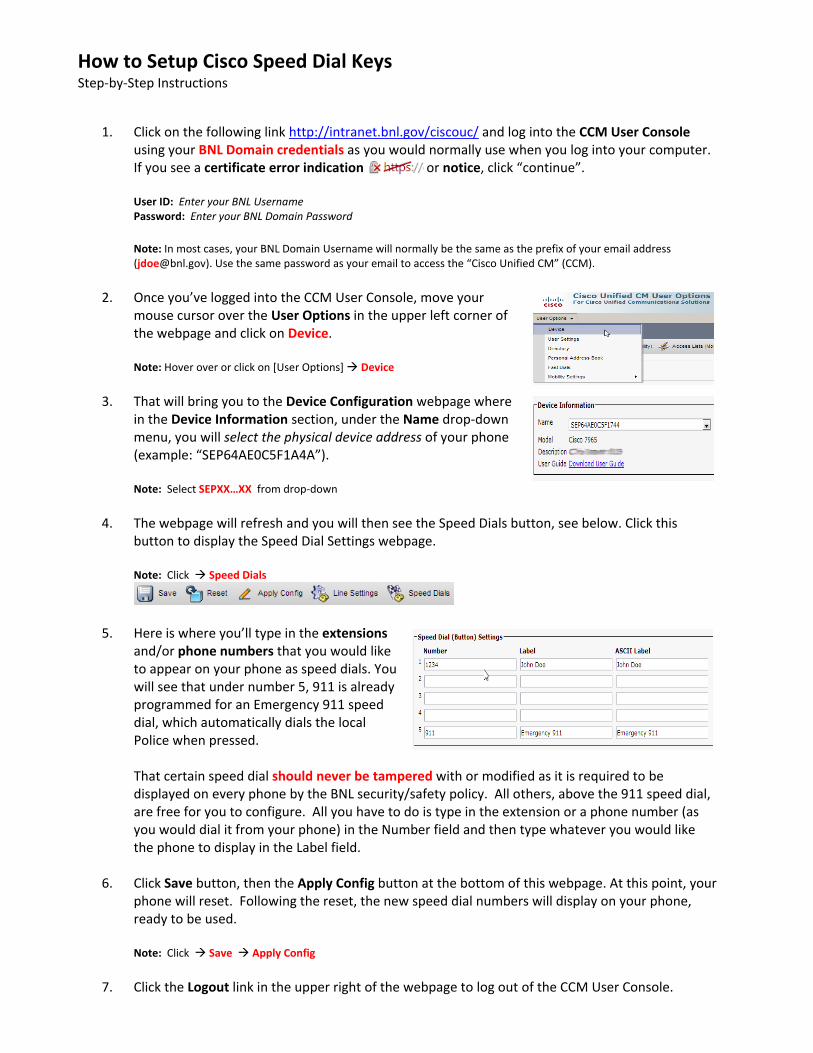
How to Setup Cisco Speed Dial Keys Step‐by‐Step Instructions
1. Click on the following link http://intranet.bnl.gov/ciscouc/ and log into the CCM User Console using your BNL Domain credentials as you would normally use when you log into your computer. If you see a certificate error indication or notice, click “continue”. User ID: Enter your BNL Username Password: Enter your BNL Domain Password Note: In most cases, your BNL Domain Username will normally be the same as the prefix of your email address ([email protected]). Use the same password as your email to access the “Cisco Unified CM” (CCM).
2. Once you’ve logged into the CCM User Console, move your mouse cursor over the User Options in the upper left corner of the webpage and click on Device. Note: Hover over or click on [User Options] Device
3. That will bring you to the Device Configuration webpage where in the Device Information section, under the Name drop‐down menu, you will select the physical device address of your phone (example: “SEP64AE0C5F1A4A”). Note: Select SEPXX…XX from drop‐down
4. The webpage will refresh and you will then see the Speed Dials button, see below. Click this button to display the Speed Dial Settings webpage. Note: Click Speed Dials
5. Here is where you’ll type in the extensions and/or phone numbers that you would like to appear on your phone as speed dials. You will see that under number 5, 911 is already programmed for an Emergency 911 speed dial, which automatically dials the local Police when pressed. That certain speed dial should never be tampered with or modified as it is required to be displayed on every phone by the BNL security/safety policy. All others, above the 911 speed dial, are free for you to configure. All you have to do is type in the extension or a phone number (as you would dial it from your phone) in the Number field and then type whatever you would like the phone to display in the Label field.
6. Click Save button, then the Apply Config button at the bottom of this webpage. At this point, your phone will reset. Following the reset, the new speed dial numbers will display on your phone, ready to be used. Note: Click Save Apply Config
7. Click the Logout link in the upper right of the webpage to log out of the CCM User Console.
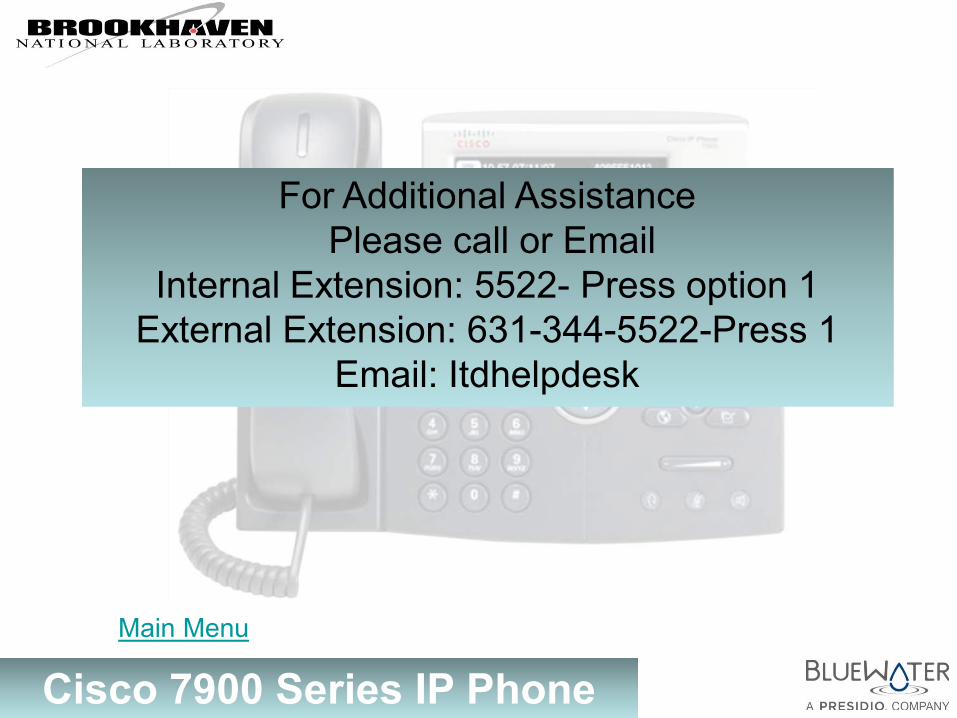
Cisco 7900 Series IP Phone Main Menu
For Additional Assistance Please call or Email
Internal Extension: 5522- Press option 1 External Extension: 631-344-5522-Press 1
Email: Itdhelpdesk