Embed Size (px)
Citation preview
QUICK START GUIDE
Cisco IOS VoiceXML Quick Start GuideCisco IOS Release 12.4(15)T
1 Introduction
2 Getting Started
3 Acme1 Sample—Sample Code for Inbox Regex and Audio Playout
4 Acme2 Sample—Dynamic VoiceXML Documents Using HTTP and PHP
5 Acme3 Sample—Recording to Local Memory
6 Acme4 Sample—Recording to HTTP Server
7 Acme5 Sample—Speech Recognition and Synthesis (ASR/TTS)
8 Acme6 Sample—Bridge Transfer
9 Acme7 Sample—Hybrid VoiceXML and TCL
10 Acme8 Sample—HTTPS Media Server Access
11 Configuration Example
12 VoiceXML Sample Scripts
13 Additional References
1 IntroductionThis document presents sample Voice eXtensible Markup Language (VoiceXML) scripts and gateway configurations for simple voice applications that you can get running quickly and easily. The eight sample applications start with a basic foundation and expand to add features such as dynamically created VoiceXML pages, audio recording, and automatic speech recognition (ASR). This guide describes the commands and tasks for configuring the gateway and verifying your configurations. These simple applications demonstrate Cisco IOS VoiceXML features and enable you to confirm that your development environment is capable of supporting your own customized applications. The applications presented in this document are intended as a starting point for developing more complex applications; they are not intended for use in production-level networks and are therefore not supported.
This section includes the following information:
• Obtaining Documentation, Obtaining Support, and Security Guidelines, page 2
• Audience, page 2
• About Cisco IOS VoiceXML, page 2
• Sample Scenario Description, page 2
• System Components, page 3
• External Server Prerequisites, page 3
Obtaining Documentation, Obtaining Support, and Security GuidelinesFor information on obtaining documentation, obtaining support, providing documentation feedback, security guidelines, and also recommended aliases and general Cisco documents, see the monthly What’s New in Cisco Product Documentation, which also lists all new and revised Cisco technical documentation, at:
http://www.cisco.com/en/US/docs/general/whatsnew/whatsnew.html
AudienceThis guide is intended for web developers or network administrators who are installing, configuring, or maintaining VoiceXML applications. It assumes that you already have a working IP network, or that you know how to set one up, and that you want to add VoiceXML capability to it. You should also be familiar with Cisco IOS software, VoiceXML programming, and web application administration. This guide should be used in conjunction with the following companion guide:
• Cisco IOS TCL and VoiceXML Application Guide
• Cisco VoiceXML Programmer’s Guide
About Cisco IOS VoiceXMLThis release of the Cisco VoiceXML Quick Start Guide adds information pertinent to Cisco IOS Release 12.4(15)T. Cisco IOS Release 12.4(15)T adds support for Media Resource Control Protocol version 2 (MRCP v2) servers and the VoiceXML 2.1 W3C Candidate Recommendation (June 13, 2005). To support newer features (such as the bridge attribute in the transfer element), the command vxml version 2.0 is used in the IOS configuration (see chapter 11). This command enables full VoiceXML 2.0 compliance and the VoiceXML 2.1 features in Cisco IOS 12.4(15)T. Please refer to the Cisco VoiceXML Programmer’s Guide for a complete description of new features supported and the command reference for the vxml version command.
Sample Scenario DescriptionThe applications presented in this guide use a hypothetical call center scenario as the basis for implementing Cisco IOS VoiceXML features. The sample applications, which you download from the Cisco Developer Support website, use a fictitious business named Acme Company to demonstrate some of the typical functions provided by an automated call center, with each sample application building on the previous sample. The concepts introduced in these sample applications also pertain to other types of voice applications such as unified messaging services and voice portals.
2
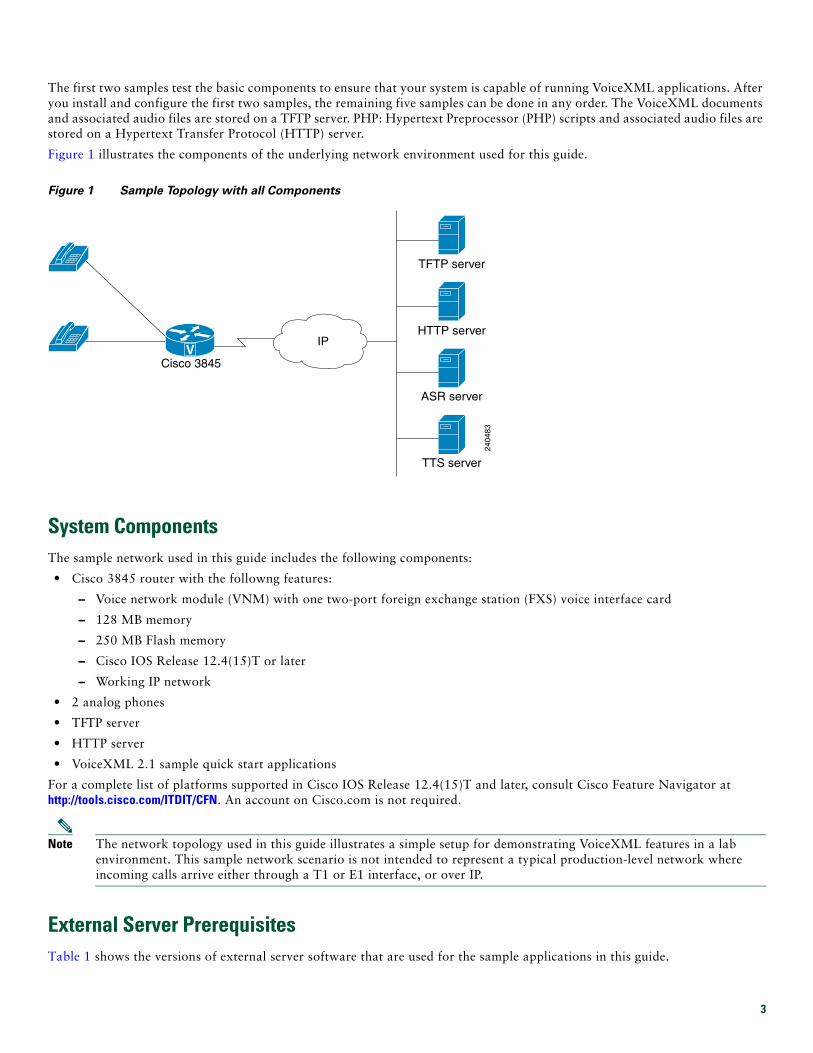
The first two samples test the basic components to ensure that your system is capable of running VoiceXML applications. After you install and configure the first two samples, the remaining five samples can be done in any order. The VoiceXML documents and associated audio files are stored on a TFTP server. PHP: Hypertext Preprocessor (PHP) scripts and associated audio files are stored on a Hypertext Transfer Protocol (HTTP) server.
Figure 1 illustrates the components of the underlying network environment used for this guide.
Figure 1 Sample Topology with all Components
System ComponentsThe sample network used in this guide includes the following components:
• Cisco 3845 router with the followng features:
– Voice network module (VNM) with one two-port foreign exchange station (FXS) voice interface card
– 128 MB memory
– 250 MB Flash memory
– Cisco IOS Release 12.4(15)T or later
– Working IP network
• 2 analog phones
• TFTP server
• HTTP server
• VoiceXML 2.1 sample quick start applications
For a complete list of platforms supported in Cisco IOS Release 12.4(15)T and later, consult Cisco Feature Navigator at http://tools.cisco.com/ITDIT/CFN. An account on Cisco.com is not required.
Note The network topology used in this guide illustrates a simple setup for demonstrating VoiceXML features in a lab environment. This sample network scenario is not intended to represent a typical production-level network where incoming calls arrive either through a T1 or E1 interface, or over IP.
External Server PrerequisitesTable 1 shows the versions of external server software that are used for the sample applications in this guide.
V
2404
83
Cisco 3845
IP
TFTP server
HTTP server
TTS server
ASR server
3
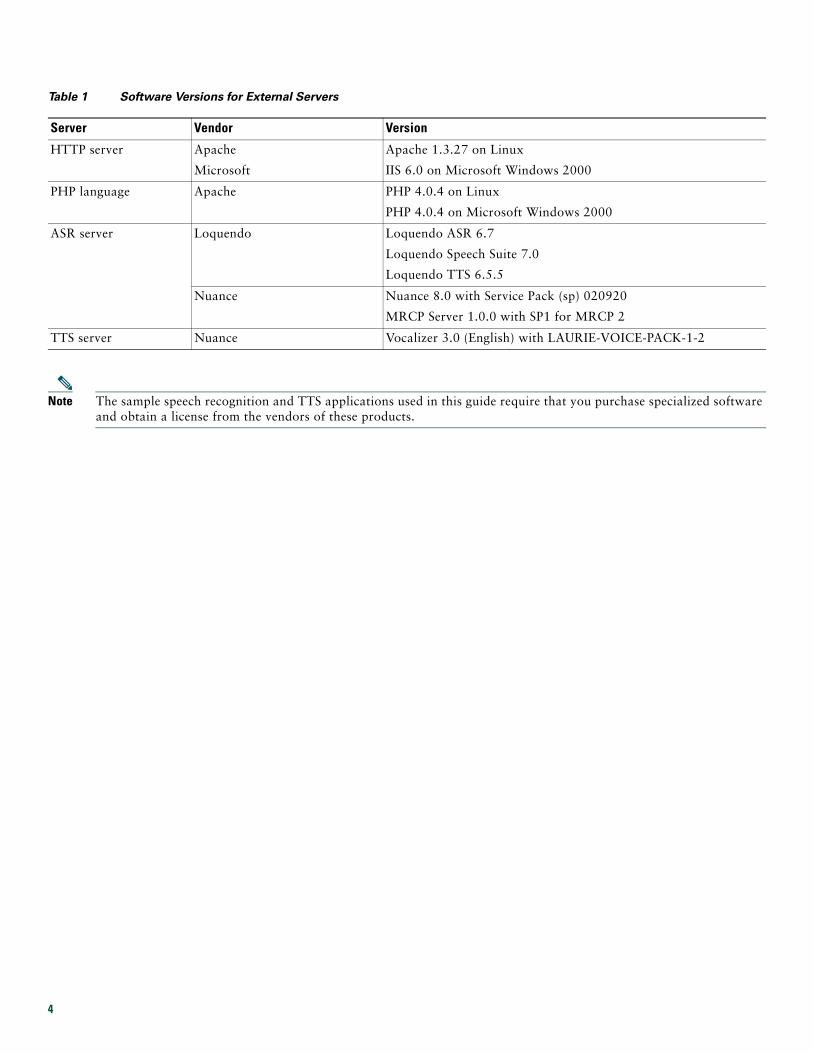
Note The sample speech recognition and TTS applications used in this guide require that you purchase specialized software and obtain a license from the vendors of these products.
Table 1 Software Versions for External Servers
Server Vendor Version
HTTP server Apache
Microsoft
Apache 1.3.27 on Linux
IIS 6.0 on Microsoft Windows 2000
PHP language Apache PHP 4.0.4 on Linux
PHP 4.0.4 on Microsoft Windows 2000
ASR server Loquendo Loquendo ASR 6.7
Loquendo Speech Suite 7.0
Loquendo TTS 6.5.5
Nuance Nuance 8.0 with Service Pack (sp) 020920
MRCP Server 1.0.0 with SP1 for MRCP 2
TTS server Nuance Vocalizer 3.0 (English) with LAURIE-VOICE-PACK-1-2
4
2 Getting StartedBefore you can implement the sample VoiceXML applications described in this guide, you must first perform the following tasks:
• Download the QuickStart Sample Files, page 5
• Verify the Cisco Voice Gateway Requirements, page 6
• Configure Dial Peers on the Gateway, page 8
Download the QuickStart Sample Files
Tip You must have a Cisco.com login to access the site listed below. Qualified users can establish an account on Cisco.com by following the directions at http://tools.cisco.com/RPF/register/register.do. If you have forgotten or lost your account information, send a blank e-mail to [email protected]. An automatic check will verify that your e-mail address is registered with Cisco.com. If the check is successful, account details with a new random password will be e-mailed to you.
To download the sample scripts and audio files that are used in this guide, perform the following steps.
Step 1 Go to the Cisco Developer Support website at:
http://www.cisco.com/pcgi-bin/dev_support/access_level/product_support
Step 2 Click Log in now and enter your password.
Step 3 Select VoiceXML/MRCP from the SOLUTION TECHNOLOGY pull-down menu.
Step 4 Select Quickstart Sample Scripts from the VoiceXML Sample Applications section.
Step 5 Download the quickstart.zip package and extract the files. The files extract into two folders: http_server and tftp_server.
5
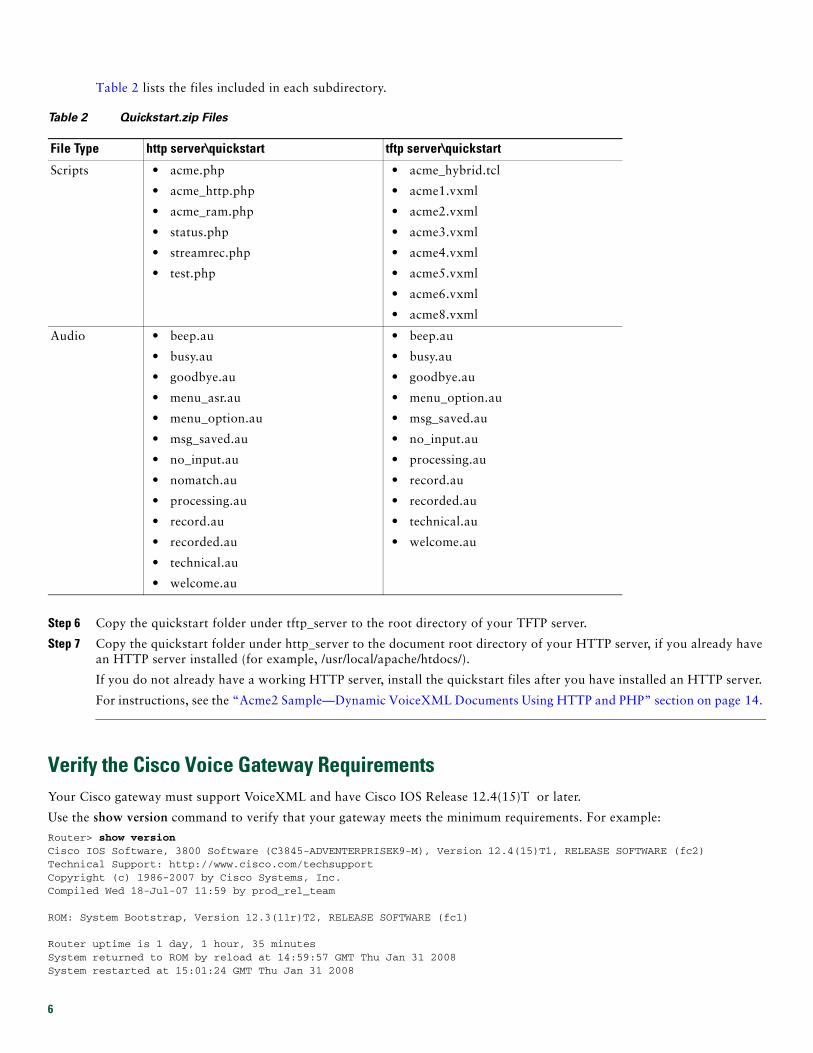
Table 2 lists the files included in each subdirectory.
Step 6 Copy the quickstart folder under tftp_server to the root directory of your TFTP server.
Step 7 Copy the quickstart folder under http_server to the document root directory of your HTTP server, if you already have an HTTP server installed (for example, /usr/local/apache/htdocs/).
If you do not already have a working HTTP server, install the quickstart files after you have installed an HTTP server.
For instructions, see the “Acme2 Sample—Dynamic VoiceXML Documents Using HTTP and PHP” section on page 14.
Verify the Cisco Voice Gateway RequirementsYour Cisco gateway must support VoiceXML and have Cisco IOS Release 12.4(15)T or later.
Use the show version command to verify that your gateway meets the minimum requirements. For example:
Router> show versionCisco IOS Software, 3800 Software (C3845-ADVENTERPRISEK9-M), Version 12.4(15)T1, RELEASE SOFTWARE (fc2)Technical Support: http://www.cisco.com/techsupportCopyright (c) 1986-2007 by Cisco Systems, Inc.Compiled Wed 18-Jul-07 11:59 by prod_rel_team
ROM: System Bootstrap, Version 12.3(11r)T2, RELEASE SOFTWARE (fc1)
Router uptime is 1 day, 1 hour, 35 minutesSystem returned to ROM by reload at 14:59:57 GMT Thu Jan 31 2008System restarted at 15:01:24 GMT Thu Jan 31 2008
Table 2 Quickstart.zip Files
File Type http server\quickstart tftp server\quickstart
Scripts • acme.php
• acme_http.php
• acme_ram.php
• status.php
• streamrec.php
• test.php
• acme_hybrid.tcl
• acme1.vxml
• acme2.vxml
• acme3.vxml
• acme4.vxml
• acme5.vxml
• acme6.vxml
• acme8.vxml
Audio • beep.au
• busy.au
• goodbye.au
• menu_asr.au
• menu_option.au
• msg_saved.au
• no_input.au
• nomatch.au
• processing.au
• record.au
• recorded.au
• technical.au
• welcome.au
• beep.au
• busy.au
• goodbye.au
• menu_option.au
• msg_saved.au
• no_input.au
• processing.au
• record.au
• recorded.au
• technical.au
• welcome.au
6
System image file is "flash:c3845-adventerprisek9-mz.124-15.T1"
This product contains cryptographic features and is subject to UnitedStates and local country laws governing import, export, transfer anduse. Delivery of Cisco cryptographic products does not implythird-party authority to import, export, distribute or use encryption.Importers, exporters, distributors and users are responsible forcompliance with U.S. and local country laws. By using this product youagree to comply with applicable laws and regulations. If you are unableto comply with U.S. and local laws, return this product immediately.
A summary of U.S. laws governing Cisco cryptographic products may be found at:http://www.cisco.com/wwl/export/crypto/tool/stqrg.html
If you require further assistance please contact us by sending email [email protected].
Cisco 3845 (revision 1.0) with 482304K/41984K bytes of memory.Processor board ID FTX0927A04Z16 FastEthernet interfaces3 Gigabit Ethernet interfaces2 Serial(sync/async) interfaces1 terminal line2 Channelized T1/PRI ports1 Virtual Private Network (VPN) Module2 Voice FXS interfaces1 cisco service engine(s)DRAM configuration is 64 bits wide with parity enabled.479K bytes of NVRAM.250368K bytes of ATA System CompactFlash (Read/Write)
Configuration register is 0x2102
Note If you do not have Cisco IOS Release 12.4(15)T or later installed on your gateway, refer to the Download Software Area at http://www.cisco.com/kobayashi/sw-center/index.shtml to download the required image.
About FXS Voice Ports
The hardware setup for this guide uses simple analog telephones connected through FXS interfaces on a Cisco 3800 series router. An FXS interface is an RJ-11 connector for connecting basic equipment such as telephones, modems, and fax machines, and it supplies ring, voltage, and dial tone.
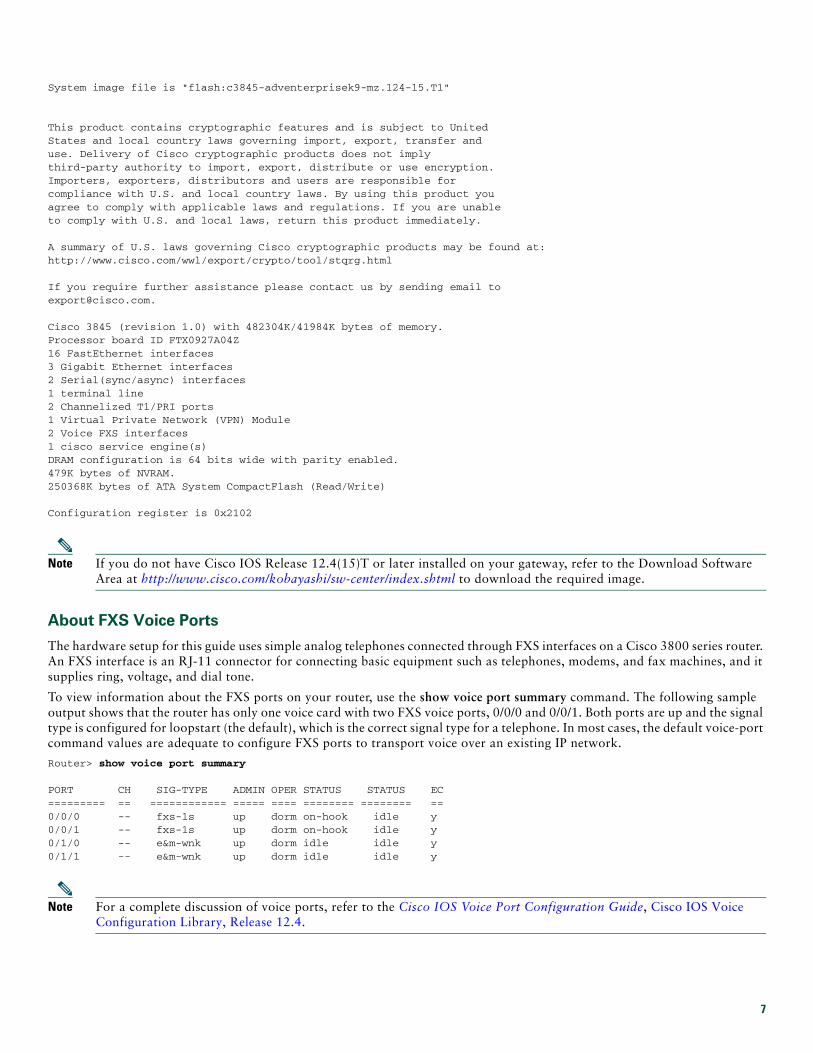
To view information about the FXS ports on your router, use the show voice port summary command. The following sample output shows that the router has only one voice card with two FXS voice ports, 0/0/0 and 0/0/1. Both ports are up and the signal type is configured for loopstart (the default), which is the correct signal type for a telephone. In most cases, the default voice-port command values are adequate to configure FXS ports to transport voice over an existing IP network.
Router> show voice port summary
PORT CH SIG-TYPE ADMIN OPER STATUS STATUS EC ========= == ============ ===== ==== ======== ======== == 0/0/0 -- fxs-1s up dorm on-hook idle y0/0/1 -- fxs-1s up dorm on-hook idle y0/1/0 -- e&m-wnk up dorm idle idle y0/1/1 -- e&m-wnk up dorm idle idle y
Note For a complete discussion of voice ports, refer to the Cisco IOS Voice Port Configuration Guide, Cisco IOS Voice Configuration Library, Release 12.4.
7
Configure Dial Peers on the GatewayBefore making voice calls, you must configure dial peers on the Cisco voice gateway. This section describes what you need to know about dial peers and how to configure them to make a simple voice call.
About Dial Peers
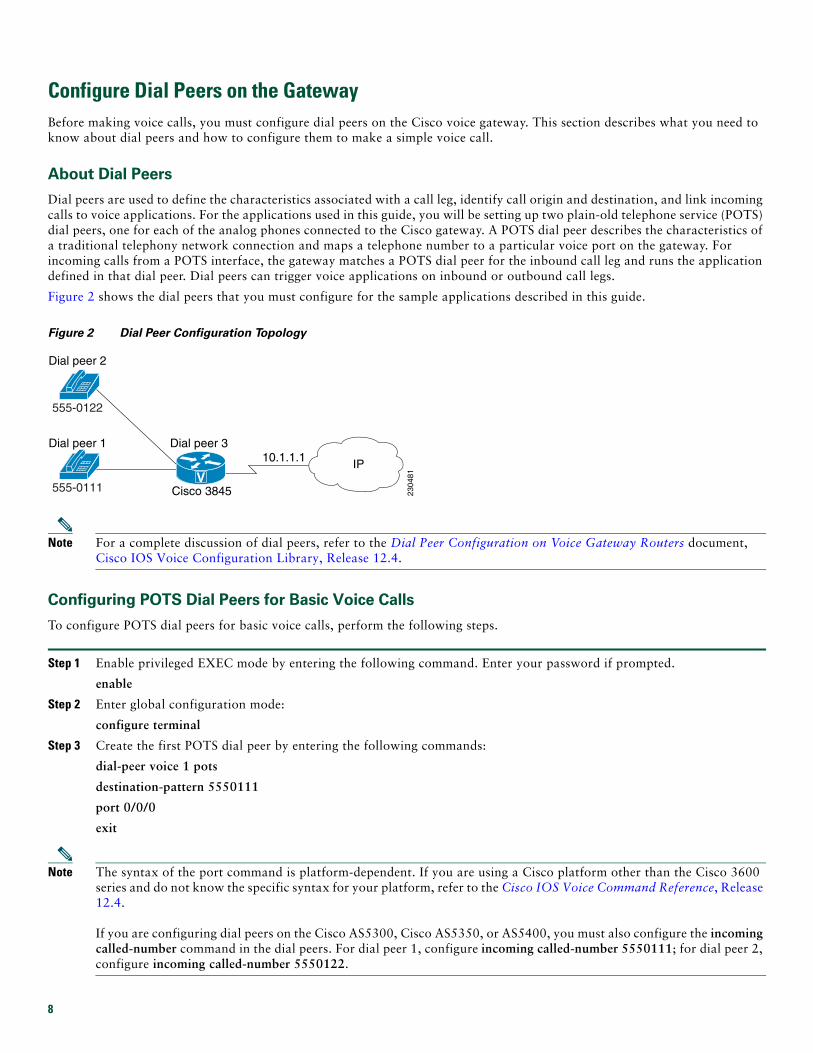
Dial peers are used to define the characteristics associated with a call leg, identify call origin and destination, and link incoming calls to voice applications. For the applications used in this guide, you will be setting up two plain-old telephone service (POTS) dial peers, one for each of the analog phones connected to the Cisco gateway. A POTS dial peer describes the characteristics of a traditional telephony network connection and maps a telephone number to a particular voice port on the gateway. For incoming calls from a POTS interface, the gateway matches a POTS dial peer for the inbound call leg and runs the application defined in that dial peer. Dial peers can trigger voice applications on inbound or outbound call legs.
Figure 2 shows the dial peers that you must configure for the sample applications described in this guide.
Figure 2 Dial Peer Configuration Topology
Note For a complete discussion of dial peers, refer to the Dial Peer Configuration on Voice Gateway Routers document, Cisco IOS Voice Configuration Library, Release 12.4.
Configuring POTS Dial Peers for Basic Voice Calls
To configure POTS dial peers for basic voice calls, perform the following steps.
Step 1 Enable privileged EXEC mode by entering the following command. Enter your password if prompted.
enable
Step 2 Enter global configuration mode:
configure terminal
Step 3 Create the first POTS dial peer by entering the following commands:
dial-peer voice 1 pots
destination-pattern 5550111
port 0/0/0
exit
Note The syntax of the port command is platform-dependent. If you are using a Cisco platform other than the Cisco 3600 series and do not know the specific syntax for your platform, refer to the Cisco IOS Voice Command Reference, Release 12.4.
If you are configuring dial peers on the Cisco AS5300, Cisco AS5350, or AS5400, you must also configure the incoming called-number command in the dial peers. For dial peer 1, configure incoming called-number 5550111; for dial peer 2, configure incoming called-number 5550122.
V
2304
81555-0122
555-0111
Dial peer 1
Dial peer 2
Dial peer 310.1.1.1
Cisco 3845
IP
8
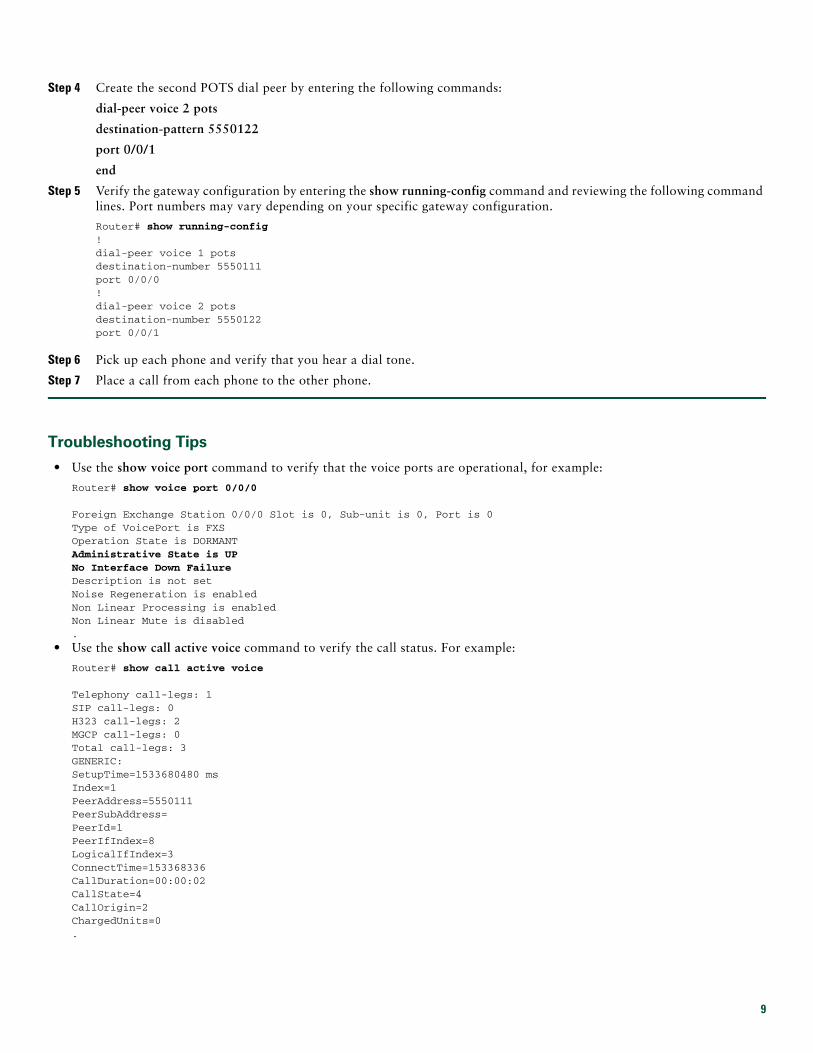
Step 4 Create the second POTS dial peer by entering the following commands:
dial-peer voice 2 pots
destination-pattern 5550122
port 0/0/1
end
Step 5 Verify the gateway configuration by entering the show running-config command and reviewing the following command lines. Port numbers may vary depending on your specific gateway configuration.
Router# show running-config ! dial-peer voice 1 pots destination-number 5550111 port 0/0/0 ! dial-peer voice 2 pots destination-number 5550122 port 0/0/1
Step 6 Pick up each phone and verify that you hear a dial tone.
Step 7 Place a call from each phone to the other phone.
Troubleshooting Tips
• Use the show voice port command to verify that the voice ports are operational, for example:
Router# show voice port 0/0/0
Foreign Exchange Station 0/0/0 Slot is 0, Sub-unit is 0, Port is 0 Type of VoicePort is FXS Operation State is DORMANT Administrative State is UP No Interface Down Failure Description is not set Noise Regeneration is enabled Non Linear Processing is enabled Non Linear Mute is disabled .
• Use the show call active voice command to verify the call status. For example:
Router# show call active voice
Telephony call-legs: 1 SIP call-legs: 0 H323 call-legs: 2 MGCP call-legs: 0 Total call-legs: 3 GENERIC: SetupTime=1533680480 ms Index=1 PeerAddress=5550111 PeerSubAddress= PeerId=1 PeerIfIndex=8 LogicalIfIndex=3 ConnectTime=153368336 CallDuration=00:00:02 CallState=4 CallOrigin=2 ChargedUnits=0 .
9

Tip For a detailed description of the output from these commands, refer to the Cisco IOS Voice Command Reference, Release 12.4.
What to Do Next
Proceed to the “Acme1 Sample—Sample Code for Inbox Regex and Audio Playout” section on page 11.
10
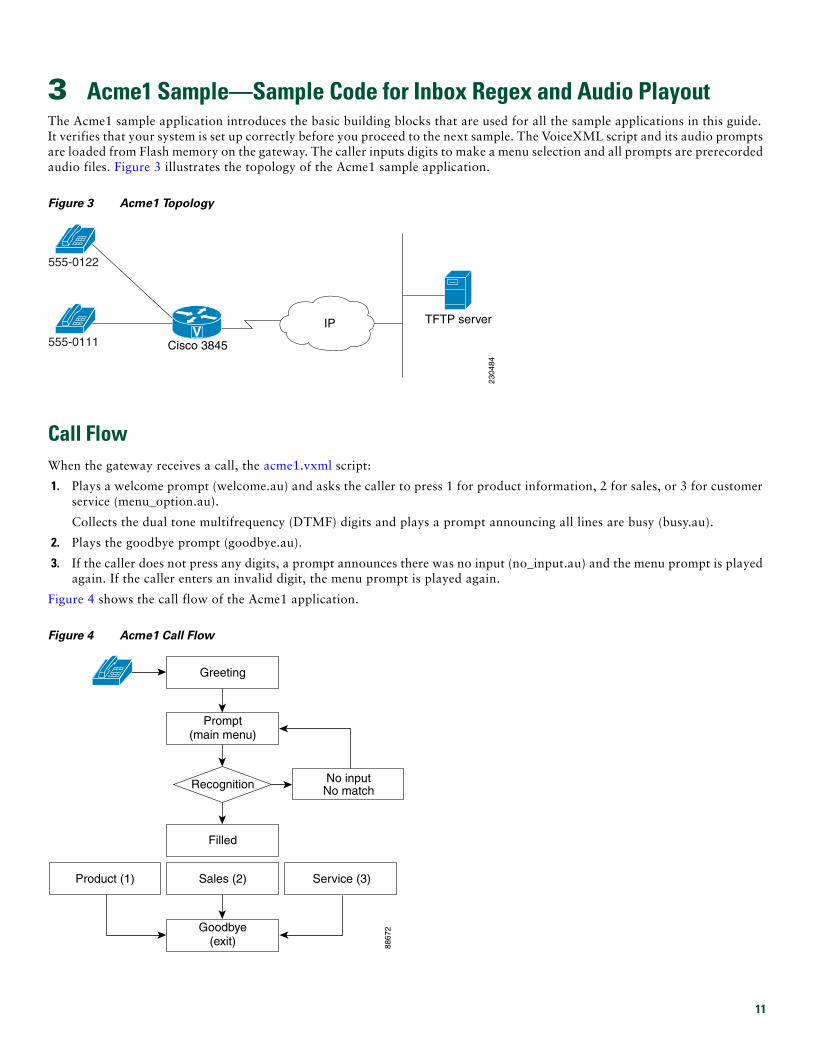
3 Acme1 Sample—Sample Code for Inbox Regex and Audio PlayoutThe Acme1 sample application introduces the basic building blocks that are used for all the sample applications in this guide. It verifies that your system is set up correctly before you proceed to the next sample. The VoiceXML script and its audio prompts are loaded from Flash memory on the gateway. The caller inputs digits to make a menu selection and all prompts are prerecorded audio files. Figure 3 illustrates the topology of the Acme1 sample application.
Figure 3 Acme1 Topology
Call FlowWhen the gateway receives a call, the acme1.vxml script:
1. Plays a welcome prompt (welcome.au) and asks the caller to press 1 for product information, 2 for sales, or 3 for customer service (menu_option.au).
Collects the dual tone multifrequency (DTMF) digits and plays a prompt announcing all lines are busy (busy.au).
2. Plays the goodbye prompt (goodbye.au).
3. If the caller does not press any digits, a prompt announces there was no input (no_input.au) and the menu prompt is played again. If the caller enters an invalid digit, the menu prompt is played again.
Figure 4 shows the call flow of the Acme1 application.
Figure 4 Acme1 Call Flow
V
2304
84
555-0122
555-0111 Cisco 3845
IP TFTP server
8867
2
Greeting
Prompt(main menu)
No inputNo matchRecognition
Filled
Sales (2)
Goodbye(exit)
Product (1) Service (3)
11

Cisco IOS ConfigurationTo configure the Acme1 sample application on your gateway, perform the following steps.
Note This procedure, and all other Cisco IOS configuration tasks in this document, assumes that you logged into the gateway in privileged EXEC mode by using the enable command.
Step 1 Copy the acme1.vxml script from your TFTP server to Flash memory by entering the copy tftp flash command:
Router# copy tftp flash
Address or name of remote host []? 172.31.17.19 Source filename []? quickstart/acme1.vxml Destination filename []? acme1.vxml Accessing tftp://172.31.17.19/quickstart/acme1.vxml... Erase flash: before copying? [confirm]n Loading quickstart/acme1.vxml from 172.31.17.19 (via FastEthernet0): ! [OK - 2420 bytes]
Verifying checksum... OK (0x2FA4) 2420 bytes copied in 0.284 secs (8521 bytes/sec)
Repeat this command until you have copied each of these six files to Flash memory:
• acme1.vxml
• busy.au
• goodbye.au
• menu_option.au
• no_input.au
• welcome.au
Step 2 Verify the files are in Flash memory by entering the show flash command:
Router# show flash
System flash directory: File Length Name/status 1 16712472 c3845-adventerprisek9-mz.124-15.T1.bin 2 2420 acme1.vxm1 3 22262 busy.au 4 13271 goodbye.au 5 67984 menu_option.au 6 17868 no_input.au 7 14895 welcome.au[16851624 bytes used, 7789912 available, 24641536 total] 24576K bytes of processor board System flash (Read/Write)
Step 3 Enter global configuration mode:
configure terminal
Step 4 Load the application into the gateway memory:
application
service acme1 flash:acme1.vxml
Step 5 Assign the application to dial peer 1 by entering these commands:
dial peer voice 1
service acme1
end
12
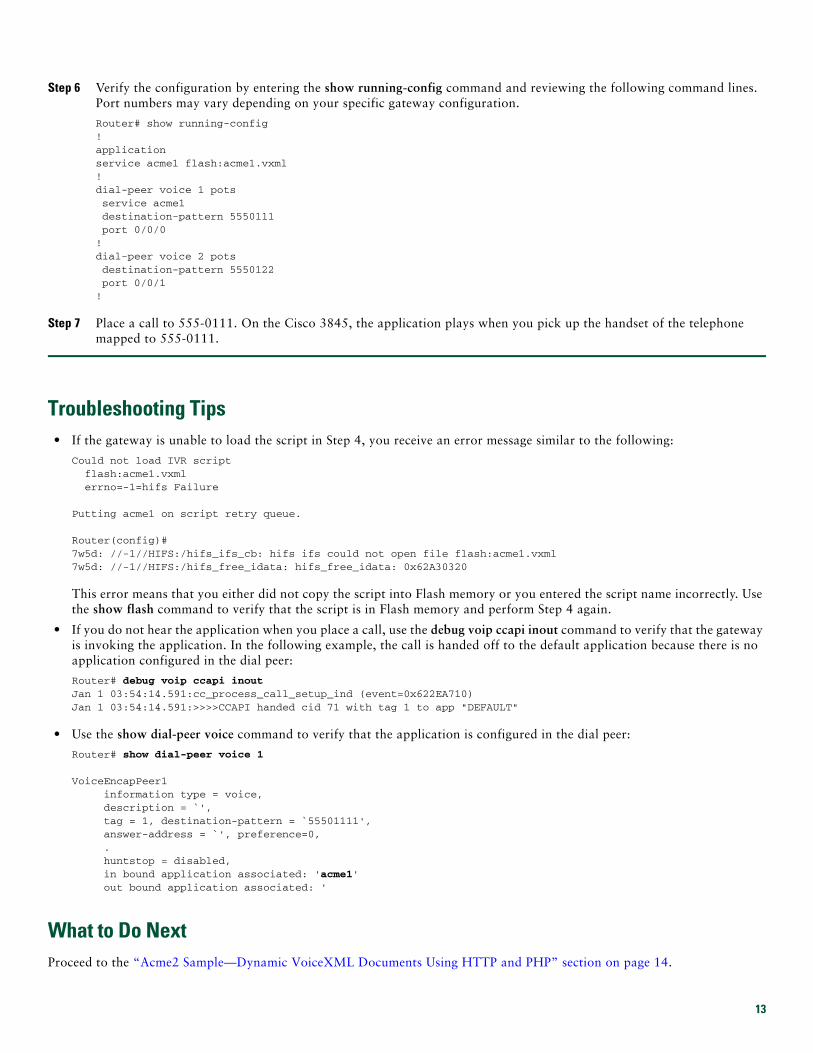
Step 6 Verify the configuration by entering the show running-config command and reviewing the following command lines. Port numbers may vary depending on your specific gateway configuration.
Router# show running-config !applicationservice acme1 flash:acme1.vxml ! dial-peer voice 1 pots service acme1 destination-pattern 5550111 port 0/0/0 ! dial-peer voice 2 pots destination-pattern 5550122 port 0/0/1 !
Step 7 Place a call to 555-0111. On the Cisco 3845, the application plays when you pick up the handset of the telephone mapped to 555-0111.
Troubleshooting Tips• If the gateway is unable to load the script in Step 4, you receive an error message similar to the following:
Could not load IVR script flash:acme1.vxml errno=-1=hifs Failure
Putting acme1 on script retry queue.
Router(config)# 7w5d: //-1//HIFS:/hifs_ifs_cb: hifs ifs could not open file flash:acme1.vxml 7w5d: //-1//HIFS:/hifs_free_idata: hifs_free_idata: 0x62A30320
This error means that you either did not copy the script into Flash memory or you entered the script name incorrectly. Use the show flash command to verify that the script is in Flash memory and perform Step 4 again.
• If you do not hear the application when you place a call, use the debug voip ccapi inout command to verify that the gateway is invoking the application. In the following example, the call is handed off to the default application because there is no application configured in the dial peer:
Router# debug voip ccapi inout Jan 1 03:54:14.591:cc_process_call_setup_ind (event=0x622EA710) Jan 1 03:54:14.591:>>>>CCAPI handed cid 71 with tag 1 to app "DEFAULT"
• Use the show dial-peer voice command to verify that the application is configured in the dial peer:
Router# show dial-peer voice 1
VoiceEncapPeer1 information type = voice, description = `', tag = 1, destination-pattern = `55501111', answer-address = `', preference=0, . huntstop = disabled, in bound application associated: 'acme1' out bound application associated: '
What to Do NextProceed to the “Acme2 Sample—Dynamic VoiceXML Documents Using HTTP and PHP” section on page 14.
13
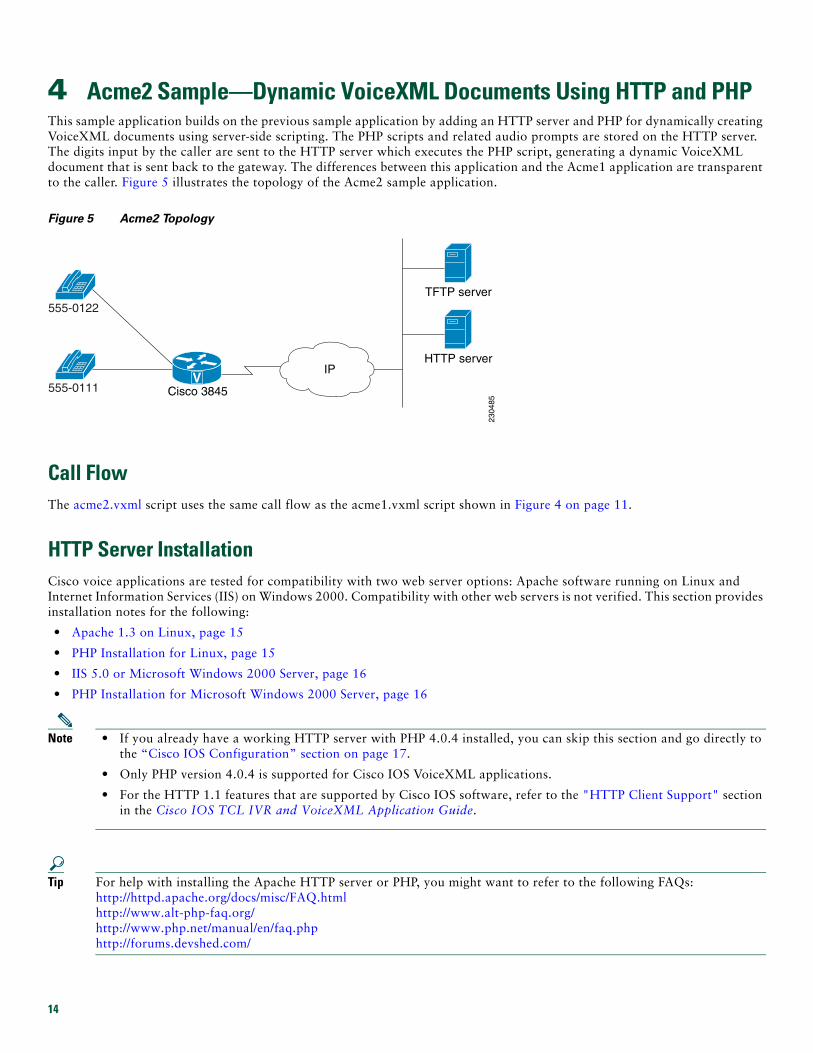
4 Acme2 Sample—Dynamic VoiceXML Documents Using HTTP and PHPThis sample application builds on the previous sample application by adding an HTTP server and PHP for dynamically creating VoiceXML documents using server-side scripting. The PHP scripts and related audio prompts are stored on the HTTP server. The digits input by the caller are sent to the HTTP server which executes the PHP script, generating a dynamic VoiceXML document that is sent back to the gateway. The differences between this application and the Acme1 application are transparent to the caller. Figure 5 illustrates the topology of the Acme2 sample application.
Figure 5 Acme2 Topology
Call FlowThe acme2.vxml script uses the same call flow as the acme1.vxml script shown in Figure 4 on page 11.
HTTP Server InstallationCisco voice applications are tested for compatibility with two web server options: Apache software running on Linux and Internet Information Services (IIS) on Windows 2000. Compatibility with other web servers is not verified. This section provides installation notes for the following:
• Apache 1.3 on Linux, page 15
• PHP Installation for Linux, page 15
• IIS 5.0 or Microsoft Windows 2000 Server, page 16
• PHP Installation for Microsoft Windows 2000 Server, page 16
Note • If you already have a working HTTP server with PHP 4.0.4 installed, you can skip this section and go directly to the “Cisco IOS Configuration” section on page 17.
• Only PHP version 4.0.4 is supported for Cisco IOS VoiceXML applications.
• For the HTTP 1.1 features that are supported by Cisco IOS software, refer to the "HTTP Client Support" section in the Cisco IOS TCL IVR and VoiceXML Application Guide.
Tip For help with installing the Apache HTTP server or PHP, you might want to refer to the following FAQs: http://httpd.apache.org/docs/misc/FAQ.html http://www.alt-php-faq.org/ http://www.php.net/manual/en/faq.php http://forums.devshed.com/
V
2304
85
555-0122
555-0111 Cisco 3845
IP
TFTP server
HTTP server
14
Apache 1.3 on Linux
Perform the following steps to install Apache 1.3 on Linux. The installation takes approximately 15 minutes.
Step 1 Go to the Apache Software Foundation website at http://www.apache.org/.
Step 2 Click HTTP Server under Apache Projects.
Step 3 Click "from a mirror" under Download!
Step 4 Click "Other Binaries" under Apache 1.3.27.
Step 5 Click the Linux directory.
Step 6 Choose apache_1.3.27-ppc-whatever-linux22.tar.gz and download the zip file from your nearest mirror site.
Step 7 Save the zip file to your Linux machine and follow the instructions in the INSTALL file under the apache_1.3.27 directory. The following command lines are a summary of the installation steps.
$ gzip -dc apache_1.3.27-ppc-whatever-linux22.tar.gz | tar xf - $ cd apache_1.3.27 $ ./configure --prefix=/usr/local/apache --enable-module=rewrite --enable-shared=rewrite $ make $ make install
Step 8 After the installation is complete, enter the IP address of the HTTP server in a browser window, for example, http://10.1.1.3. If the installation is correct, a window displays telling you the installation was successful. For installation or troubleshooting information, refer to the Apache Software Foundation website.
PHP Installation for Linux
Perform the following steps to install PHP for Linux. The installation takes approximatle 20 minutes.
Step 1 Go to the Apache Software Foundation website at http://www.apache.org/.
Step 2 Click "PHP" under Apache Projects.
Step 3 Click "Downloads."
Step 4 Select "4.0.4" from under Older Versions of PHP.
Step 5 Select "php-4.0.4.tar.gz" for Linux, and download the zip file from your nearest mirror site.
Step 6 Save the zip file to your Linux machine and extract the files.
Step 7 Follow the instructions in the INSTALL file under the php-4.0.4 directory. The following command lines are a summary of the installation steps.
$ gzip -dc php-4.x.y.tar.gz | tar xf - $ cd php-4.x.y $ ./configure --with-mysql --with-apxs=/usr/local/apache/bin/apxs $ make $ make install $ cp php.ini-dist /usr/local/lib/php.ini
Step 8 Edit the file /usr/local/lib/php.ini:
Change the variable register_globals = Off to register_globals = On.
Step 9 Start the HTTP server with:
$ /usr/local/bin/apachectl start
15
Step 10 Verify that the PHP installation is successful by opening this URL in a browser window:
http://ip_address/quickstart/test.php (Use the IP address of your HTTP server.)
You should see a page with all the PHP configuration information. For installation or troubleshooting information, refer to the Apache Software Foundation website.
IIS 5.0 or Microsoft Windows 2000 Server
Perform the following steps to install IIS 6.0 or the Windows 2000 server. The installation takes approximately 15 minutes.
Step 1 Go to the Microsoft website at http://www.microsoft.com/windows2000/en/advanced/iis/default.asp.
Step 2 Click "Installing IIS" and follow the instructions to install IIS.
PHP Installation for Microsoft Windows 2000 Server
Perform the following steps to install PHP for the Microsoft Windows 2000 server. The installation takes approximately 15 minutes.
Step 1 Go to the Apache Software Foundation website at http://www.apache.org/.
Step 2 Click "PHP" under Apache Projects.
Step 3 Click "Downloads."
Step 4 Click "PHP Museum" under Older Versions of PHP.
Step 5 Click "win32" and download the "php-4.0.4p11-installer.exe" file.
Step 6 Run the installer file.
Step 7 The installer extracts the files to the default directory C:\PHP.
Step 8 Follow the instructions in the install.txt file to enable PHP.
Step 9 Edit the file C:\WINNT\php.ini:
Change the variable register_globals = Off to register_globals = On.
Step 10 Verify that the PHP installation is successful by opening this URL in a browser window:
http://ip_address/quickstart/test.php (Use the IP address of your HTTP server.)
You should see a page with all the PHP configuration information. For installation or troubleshooting information, refer to the Apache Software Foundation website.
Installing PHP Scripts and Audio FilesAfter installing the HTTP server, you must install the sample PHP scripts and associated audio files, if you have not already done so. These files are included in the http_server folder from the quickstart.zip file that you downloaded, as described in the “Download the QuickStart Sample Files” section on page 5.
16
Cisco IOS ConfigurationTo configure the Acme2 sample application on your gateway, perform the following steps.
Step 1 Specify the host name and IP address of your TFTP server:
ip host TFTP-SERVER ip-address (Use the IP address of your TFTP server.)
Step 2 Specify the host name and IP address of your HTTP server:
ip host HTTP-SERVER ip-address (Use the IP address of your HTTP server.)
Step 3 Load the application onto the gateway by entering the following commands:
application
service acme2 tftp://TFTP-SERVER/quickstart/acme2.vxml
Step 4 Assign the application to the dial peer by entering the following commands:
dial-peer voice 1
service acme2
end
Step 5 Verify the gateway configuration by entering the show running-config command and reviewing the following command lines. IP addresses, port numbers, and server directories vary depending on your specific network configuration.
Router# show running-config ! ip host HTTP-SERVER 172.19.140.66 ip host TFTP-SERVER 172.31.17.19 ! application!service acme2 tftp://TFTP-SERVER/quickstart/acme2.vxml ...! dial-peer voice 1 pots service acme2 destination-pattern 5550111 port 0/0/0 ! dial-peer voice 2 pots destination-pattern 5550122 port 0/0/1 !
Step 6 Place a call to 555-0111. On the Cisco 3845, the application plays when you pick up the handset of the telephone mapped to 555-0111.
Troubleshooting Tips• If the gateway does not load the VoiceXML script, you will receive an error message similar to the following:
Could not load IVR script tftp://172.31.17.19/acme2.vxml errno=-1=hifs Failure
Putting acme2 on script retry queue.
Router(config)# 7w0d: //-1//HIFS:/hifs_ifs_cb: hifs ifs could not open file tftp://172.31.17.19/acme2.vxml 7w0d: //-1//HIFS:/hifs_free_idata: hifs_free_idata: 0x6297FC10
17
This error means that the gateway either does not have connectivity to the TFTP server, the script is missing, or you have entered the script name incorrectly.
• Ping the HTTP server to make sure that the gateway has connectivity. For example:
Router# ping 172.31.17.19
Type escape sequence to abort. Sending 5, 100-byte ICMP Echos to 172.31.17.19, timeout is 2 seconds: !!!!! Success rate is 100 percent (5/5), round-trip min/avg/max = 1/2/4 ms
• Use the show http client connection command to display details about the HTTP connection. For a description of the output, refer to the Cisco IOS Voice Command Reference, Release 12.4.
What to Do NextNow that you have successfully installed the first two sample applications, you can proceed to any of the following samples:
• Acme3 Sample—Recording to Local Memory, page 19
• Acme4 Sample—Recording to HTTP Server, page 22
• Acme5 Sample—Speech Recognition and Synthesis (ASR/TTS), page 25
• Acme6 Sample—Bridge Transfer, page 29
• Acme7 Sample—Hybrid VoiceXML and TCL, page 32
• Acme8 Sample—HTTPS Media Server Access, page 35
18
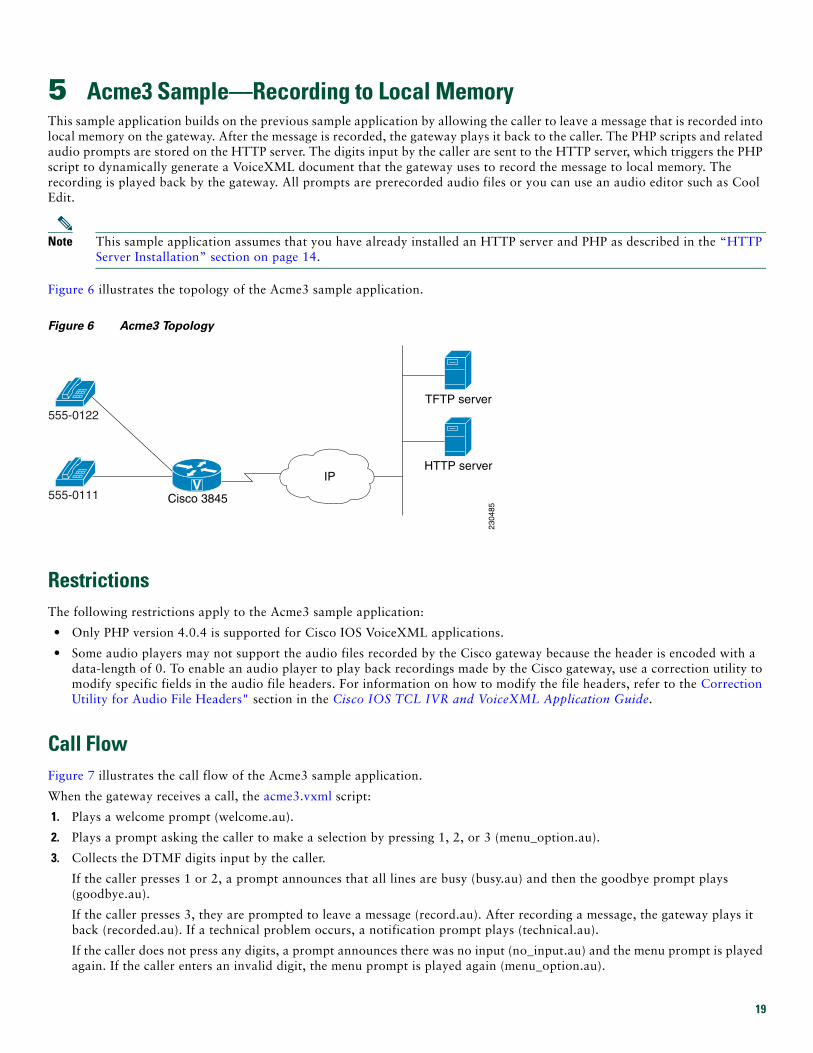
5 Acme3 Sample—Recording to Local MemoryThis sample application builds on the previous sample application by allowing the caller to leave a message that is recorded into local memory on the gateway. After the message is recorded, the gateway plays it back to the caller. The PHP scripts and related audio prompts are stored on the HTTP server. The digits input by the caller are sent to the HTTP server, which triggers the PHP script to dynamically generate a VoiceXML document that the gateway uses to record the message to local memory. The recording is played back by the gateway. All prompts are prerecorded audio files or you can use an audio editor such as Cool Edit.
Note This sample application assumes that you have already installed an HTTP server and PHP as described in the “HTTP Server Installation” section on page 14.
Figure 6 illustrates the topology of the Acme3 sample application.
Figure 6 Acme3 Topology
RestrictionsThe following restrictions apply to the Acme3 sample application:
• Only PHP version 4.0.4 is supported for Cisco IOS VoiceXML applications.
• Some audio players may not support the audio files recorded by the Cisco gateway because the header is encoded with a data-length of 0. To enable an audio player to play back recordings made by the Cisco gateway, use a correction utility to modify specific fields in the audio file headers. For information on how to modify the file headers, refer to the Correction Utility for Audio File Headers" section in the Cisco IOS TCL IVR and VoiceXML Application Guide.
Call FlowFigure 7 illustrates the call flow of the Acme3 sample application.
When the gateway receives a call, the acme3.vxml script:
1. Plays a welcome prompt (welcome.au).
2. Plays a prompt asking the caller to make a selection by pressing 1, 2, or 3 (menu_option.au).
3. Collects the DTMF digits input by the caller.
If the caller presses 1 or 2, a prompt announces that all lines are busy (busy.au) and then the goodbye prompt plays (goodbye.au).
If the caller presses 3, they are prompted to leave a message (record.au). After recording a message, the gateway plays it back (recorded.au). If a technical problem occurs, a notification prompt plays (technical.au).
If the caller does not press any digits, a prompt announces there was no input (no_input.au) and the menu prompt is played again. If the caller enters an invalid digit, the menu prompt is played again (menu_option.au).
V23
0485
555-0122
555-0111 Cisco 3845
IP
TFTP server
HTTP server
19
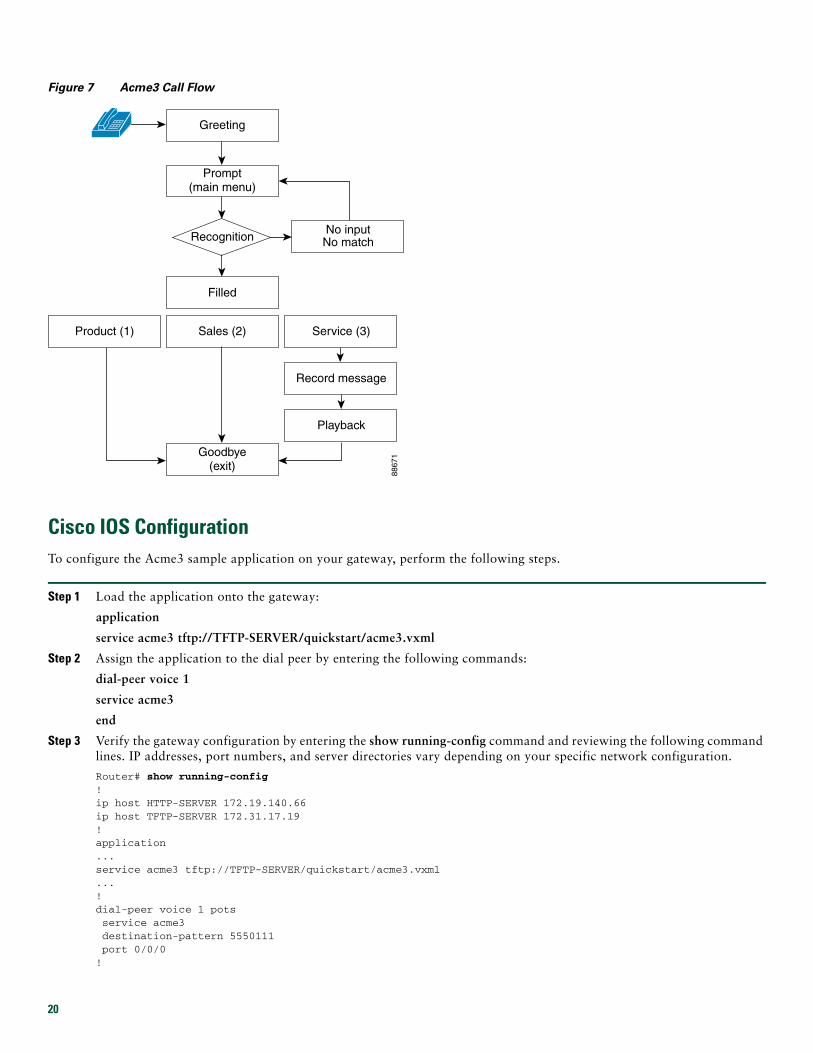
Figure 7 Acme3 Call Flow
Cisco IOS ConfigurationTo configure the Acme3 sample application on your gateway, perform the following steps.
Step 1 Load the application onto the gateway:
application
service acme3 tftp://TFTP-SERVER/quickstart/acme3.vxml
Step 2 Assign the application to the dial peer by entering the following commands:
dial-peer voice 1
service acme3
end
Step 3 Verify the gateway configuration by entering the show running-config command and reviewing the following command lines. IP addresses, port numbers, and server directories vary depending on your specific network configuration.
Router# show running-config ! ip host HTTP-SERVER 172.19.140.66 ip host TFTP-SERVER 172.31.17.19 ! application...service acme3 tftp://TFTP-SERVER/quickstart/acme3.vxml ...! dial-peer voice 1 pots service acme3 destination-pattern 5550111 port 0/0/0 !
8867
1
Greeting
Prompt(main menu)
No inputNo matchRecognition
Filled
Sales (2)
Goodbye(exit)
Product (1) Service (3)
Record message
Playback
20
dial-peer voice 2 pots destination-pattern 5550122 port 0/0/1 !
Step 4 Place a call to 555-0111. On the Cisco 3845, the application plays when you pick up the handset of the telephone mapped to 555-0111.
Troubleshooting TipsSee the “Troubleshooting Tips” section on page 17.
21
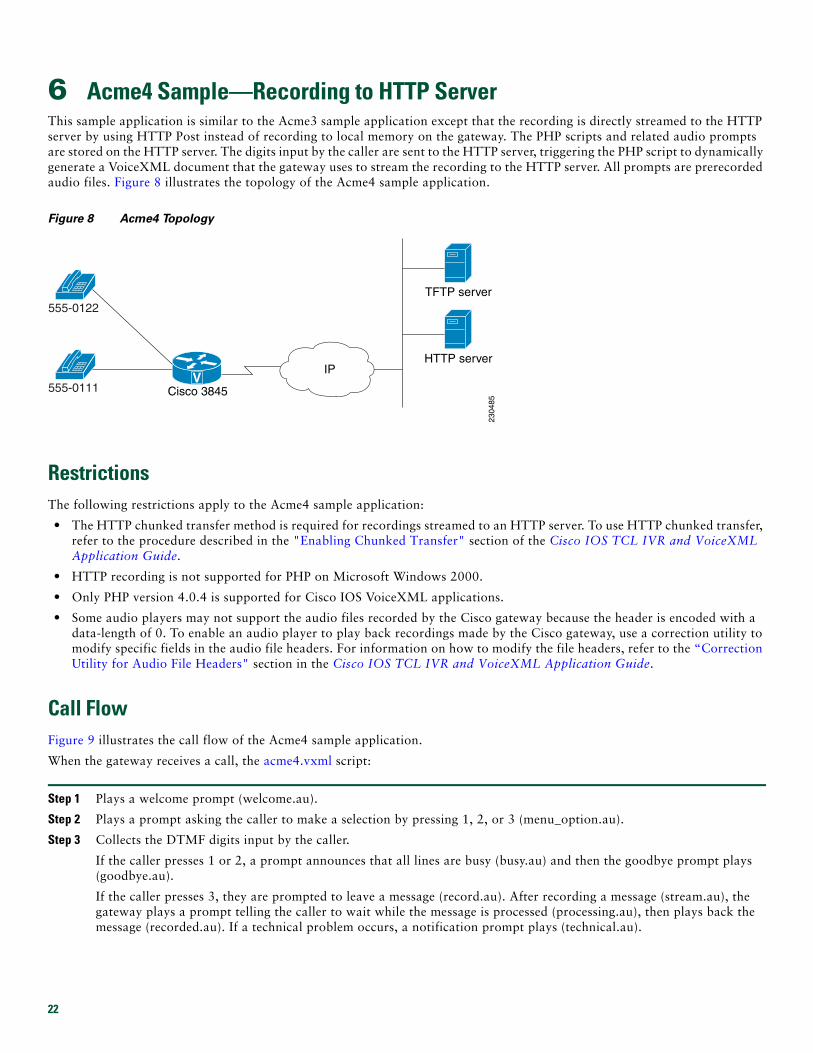
6 Acme4 Sample—Recording to HTTP ServerThis sample application is similar to the Acme3 sample application except that the recording is directly streamed to the HTTP server by using HTTP Post instead of recording to local memory on the gateway. The PHP scripts and related audio prompts are stored on the HTTP server. The digits input by the caller are sent to the HTTP server, triggering the PHP script to dynamically generate a VoiceXML document that the gateway uses to stream the recording to the HTTP server. All prompts are prerecorded audio files. Figure 8 illustrates the topology of the Acme4 sample application.
Figure 8 Acme4 Topology
RestrictionsThe following restrictions apply to the Acme4 sample application:
• The HTTP chunked transfer method is required for recordings streamed to an HTTP server. To use HTTP chunked transfer, refer to the procedure described in the "Enabling Chunked Transfer" section of the Cisco IOS TCL IVR and VoiceXML Application Guide.
• HTTP recording is not supported for PHP on Microsoft Windows 2000.
• Only PHP version 4.0.4 is supported for Cisco IOS VoiceXML applications.
• Some audio players may not support the audio files recorded by the Cisco gateway because the header is encoded with a data-length of 0. To enable an audio player to play back recordings made by the Cisco gateway, use a correction utility to modify specific fields in the audio file headers. For information on how to modify the file headers, refer to the “Correction Utility for Audio File Headers" section in the Cisco IOS TCL IVR and VoiceXML Application Guide.
Call FlowFigure 9 illustrates the call flow of the Acme4 sample application.
When the gateway receives a call, the acme4.vxml script:
Step 1 Plays a welcome prompt (welcome.au).
Step 2 Plays a prompt asking the caller to make a selection by pressing 1, 2, or 3 (menu_option.au).
Step 3 Collects the DTMF digits input by the caller.
If the caller presses 1 or 2, a prompt announces that all lines are busy (busy.au) and then the goodbye prompt plays (goodbye.au).
If the caller presses 3, they are prompted to leave a message (record.au). After recording a message (stream.au), the gateway plays a prompt telling the caller to wait while the message is processed (processing.au), then plays back the message (recorded.au). If a technical problem occurs, a notification prompt plays (technical.au).
V
2304
85
555-0122
555-0111 Cisco 3845
IP
TFTP server
HTTP server
22
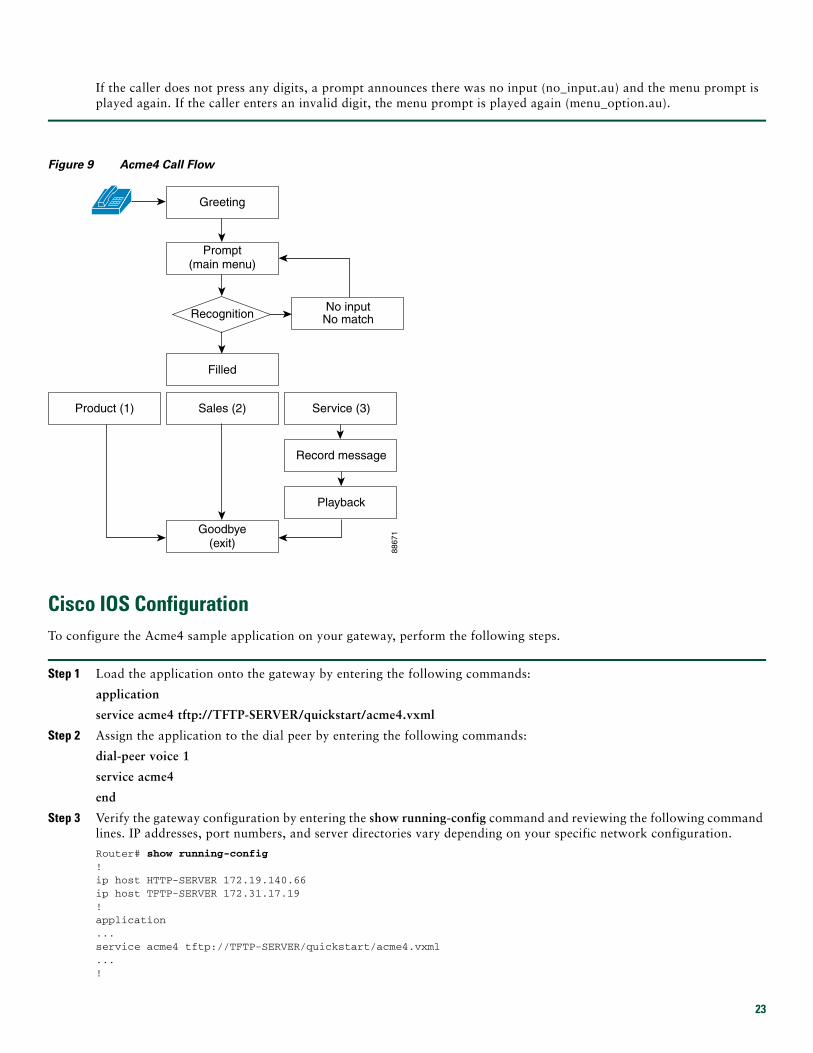
If the caller does not press any digits, a prompt announces there was no input (no_input.au) and the menu prompt is played again. If the caller enters an invalid digit, the menu prompt is played again (menu_option.au).
Figure 9 Acme4 Call Flow
Cisco IOS ConfigurationTo configure the Acme4 sample application on your gateway, perform the following steps.
Step 1 Load the application onto the gateway by entering the following commands:
application
service acme4 tftp://TFTP-SERVER/quickstart/acme4.vxml
Step 2 Assign the application to the dial peer by entering the following commands:
dial-peer voice 1
service acme4
end
Step 3 Verify the gateway configuration by entering the show running-config command and reviewing the following command lines. IP addresses, port numbers, and server directories vary depending on your specific network configuration.
Router# show running-config ! ip host HTTP-SERVER 172.19.140.66 ip host TFTP-SERVER 172.31.17.19 ! application...service acme4 tftp://TFTP-SERVER/quickstart/acme4.vxml ...!
8867
1
Greeting
Prompt(main menu)
No inputNo matchRecognition
Filled
Sales (2)
Goodbye(exit)
Product (1) Service (3)
Record message
Playback
23
dial-peer voice 1 pots service acme4 destination-pattern 5550111 port 0/0/0 ! dial-peer voice 2 pots destination-pattern 5550122 port 0/0/1 !
Step 4 Place a call to 555-0111. On the Cisco 3845, the application plays when you pick up the handset of the telephone mapped to 555-0111.
Troubleshooting TipsSee the “Troubleshooting Tips” section on page 17.
What to Do NextTo implement additional features, you can install any of these other samples:
• Acme3 Sample—Recording to Local Memory, page 19
• Acme5 Sample—Speech Recognition and Synthesis (ASR/TTS), page 25
• Acme6 Sample—Bridge Transfer, page 29
• Acme7 Sample—Hybrid VoiceXML and TCL, page 32
• Acme8 Sample—HTTPS Media Server Access, page 35
24
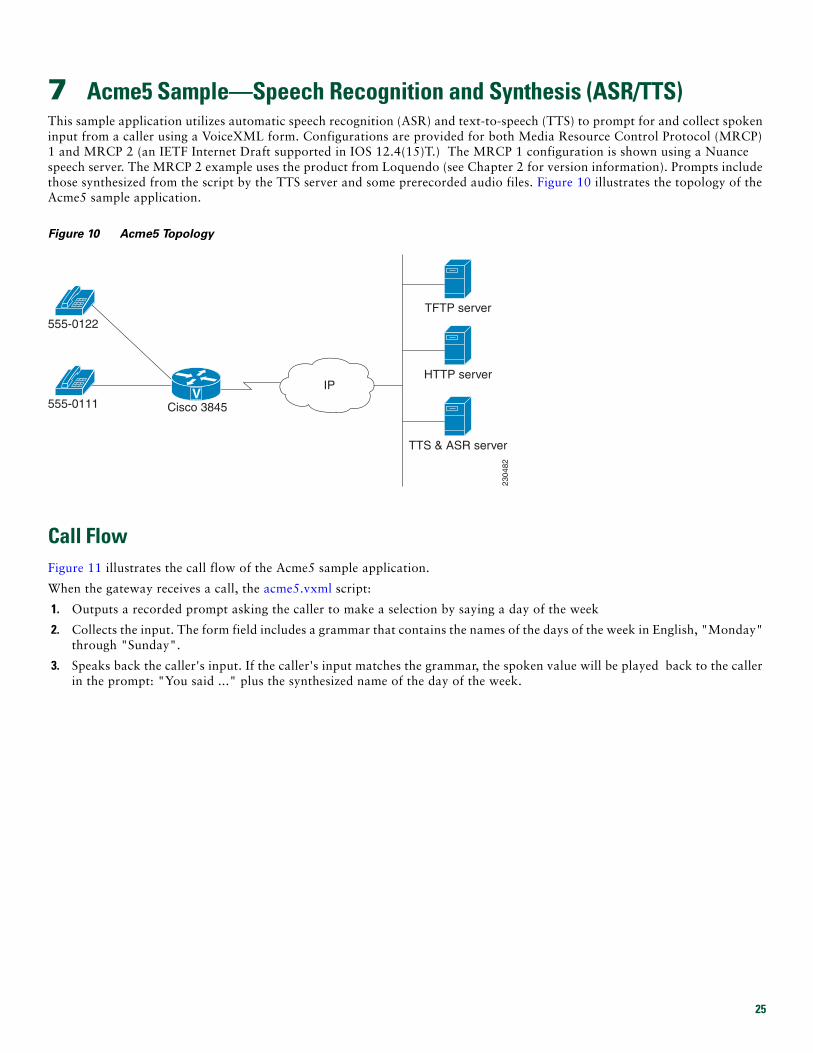
7 Acme5 Sample—Speech Recognition and Synthesis (ASR/TTS)This sample application utilizes automatic speech recognition (ASR) and text-to-speech (TTS) to prompt for and collect spoken input from a caller using a VoiceXML form. Configurations are provided for both Media Resource Control Protocol (MRCP) 1 and MRCP 2 (an IETF Internet Draft supported in IOS 12.4(15)T.) The MRCP 1 configuration is shown using a Nuance speech server. The MRCP 2 example uses the product from Loquendo (see Chapter 2 for version information). Prompts include those synthesized from the script by the TTS server and some prerecorded audio files. Figure 10 illustrates the topology of the Acme5 sample application.
Figure 10 Acme5 Topology
Call FlowFigure 11 illustrates the call flow of the Acme5 sample application.
When the gateway receives a call, the acme5.vxml script:
1. Outputs a recorded prompt asking the caller to make a selection by saying a day of the week
2. Collects the input. The form field includes a grammar that contains the names of the days of the week in English, "Monday" through "Sunday".
3. Speaks back the caller's input. If the caller's input matches the grammar, the spoken value will be played back to the caller in the prompt: "You said ..." plus the synthesized name of the day of the week.
V
2304
82
555-0122
555-0111 Cisco 3845
IP
TFTP server
HTTP server
TTS & ASR server
25
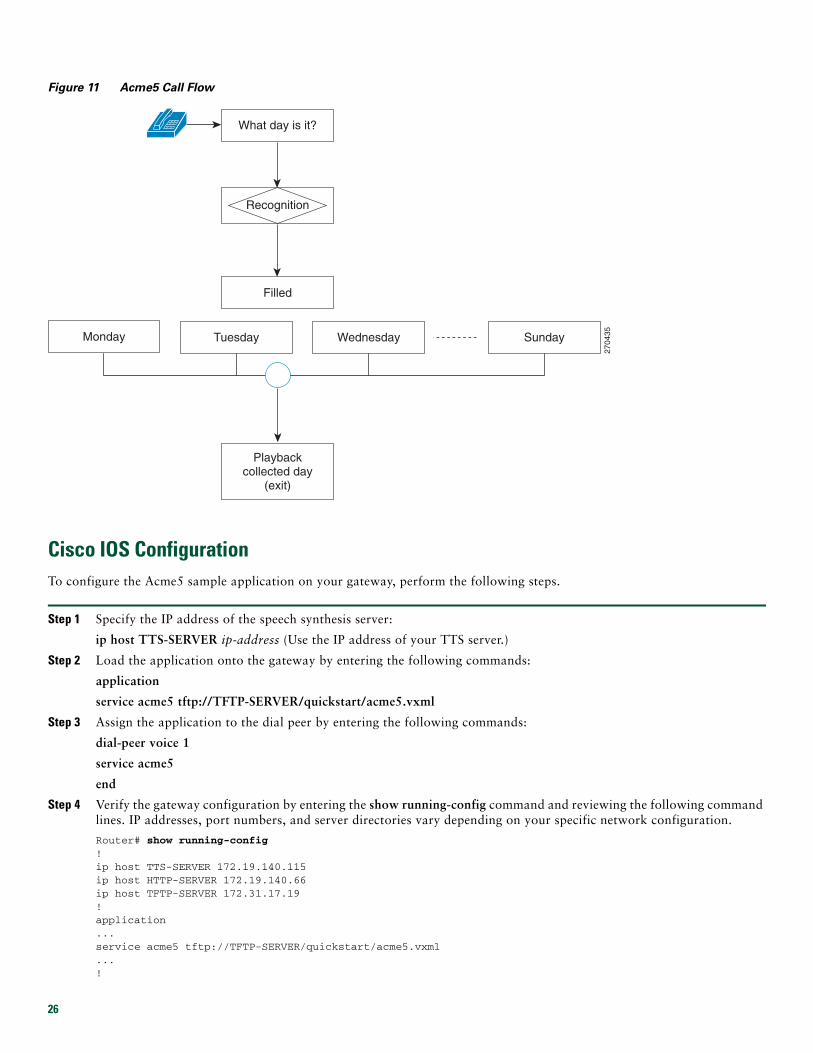
Figure 11 Acme5 Call Flow
Cisco IOS ConfigurationTo configure the Acme5 sample application on your gateway, perform the following steps.
Step 1 Specify the IP address of the speech synthesis server:
ip host TTS-SERVER ip-address (Use the IP address of your TTS server.)
Step 2 Load the application onto the gateway by entering the following commands:
application
service acme5 tftp://TFTP-SERVER/quickstart/acme5.vxml
Step 3 Assign the application to the dial peer by entering the following commands:
dial-peer voice 1
service acme5
end
Step 4 Verify the gateway configuration by entering the show running-config command and reviewing the following command lines. IP addresses, port numbers, and server directories vary depending on your specific network configuration.
Router# show running-config ! ip host TTS-SERVER 172.19.140.115 ip host HTTP-SERVER 172.19.140.66 ip host TFTP-SERVER 172.31.17.19 ! application...service acme5 tftp://TFTP-SERVER/quickstart/acme5.vxml ...!
2704
35
What day is it?
Recognition
Filled
Playbackcollected day
(exit)
Monday Tuesday Wednesday Sunday
26
dial-peer voice 1 pots service acme5 destination-pattern 5550111 port 0/0/0 ! dial-peer voice 2 pots destination-pattern 5550122 port 0/0/1 !
Step 5 Place a call to 555-0111. On the Cisco 3845, the application plays when you pick up the handset of the telephone mapped to 555-0111.
IOS Configuration for MRCP v1To configure MRCP version 1 on your gateway,enter the following commands:
ip host asr-server1 10.1.2.59
ip host asr-server2 10.1.2.99
!
ivr prompt streamed all
ivr asr-server rtsp://10.1.2.59/recognizer
ivr tts-server rtsp://10.1.2.59/synthesizer
!
IOS Configuration for MRCP v2To configure MRCP version 2 on your gateway,enter the following commands:
ip host mrcpv2-server1 10.1.2.201
!
voice class uri LOQUENDO1 sip
pattern LOQUENDO1@mrcpv2-server1
!
ivr asr-server sip:LOQUENDO1@mrcpv2-server1
ivr tts-server sip:LOQUENDO1@mrcpv2-server1
!
Command lines to configure VXML document globally for voice applications:
application
...
service acme5 tftp://TFTP-SERVER/quickstart/acme5.vxml
!
Mapping the application under the dial-peer:
!
dial-peer voice 1000 pots
service acme5
destination-pattern 5550111
direct-inward-dial
27
port 0/0/0
!
Command lines to enable logging and statistics globally for voice applications:
monitor
interface stats
interface event-log
interface max-server-records 100
stats
event-log
history session max-records 100
!
Command line to enable VXML version 2.0:
vxml version 2.0
!
Troubleshooting Tips• Use the following command lines to display the application event logging & statistics:
#show call application history session-level info
#show call application history session-level last
Debugs:
Debug voip application vxml all
Command lines to display MRCPv2 media call data:
#show call active media
#show call history media
aggr5-3845#show call app history session-level info
• Refer to the "Troubleshooting ASR and TTS Server Functionality" section in the Cisco IOS TCL IVR and VoiceXML Application Guide.
What to Do NextTo implement additional features, you can install any of these other samples:
• Acme3 Sample—Recording to Local Memory, page 19
• Acme4 Sample—Recording to HTTP Server, page 22
• Acme6 Sample—Bridge Transfer, page 29
• Acme7 Sample—Hybrid VoiceXML and TCL, page 32
• Acme8 Sample—HTTPS Media Server Access, page 35
28
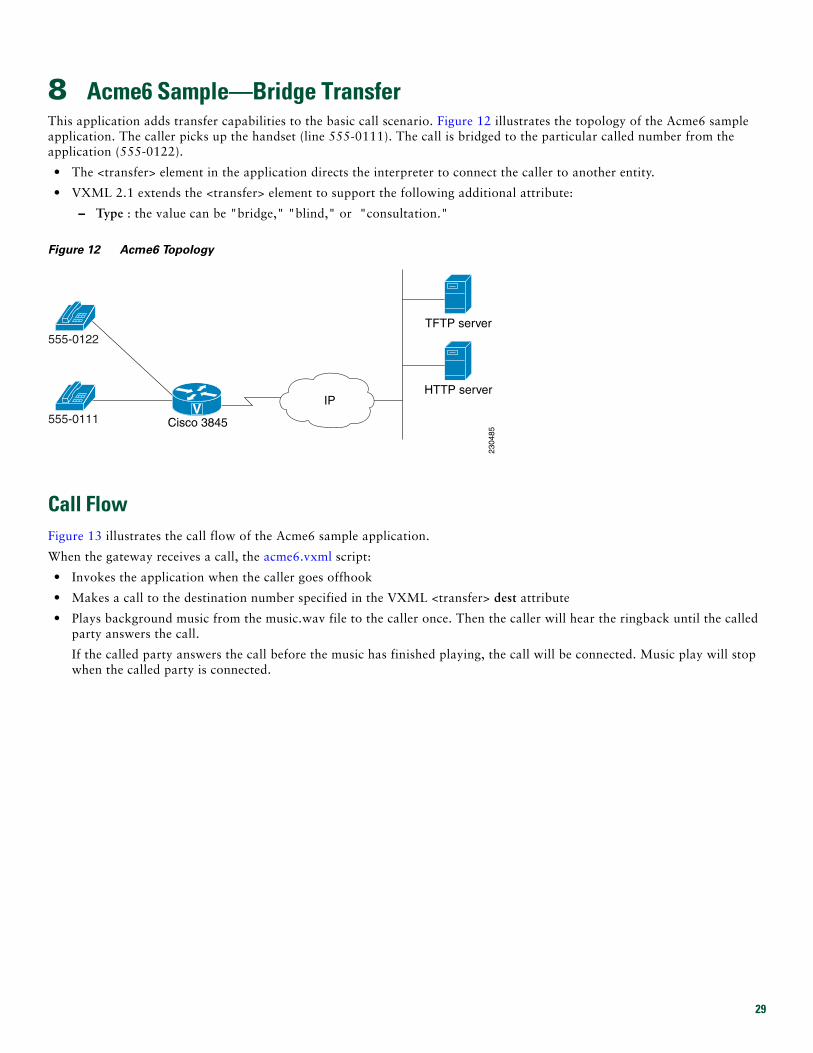
8 Acme6 Sample—Bridge TransferThis application adds transfer capabilities to the basic call scenario. Figure 12 illustrates the topology of the Acme6 sample application. The caller picks up the handset (line 555-0111). The call is bridged to the particular called number from the application (555-0122).
• The <transfer> element in the application directs the interpreter to connect the caller to another entity.
• VXML 2.1 extends the <transfer> element to support the following additional attribute:
– Type : the value can be "bridge," "blind," or "consultation."
Figure 12 Acme6 Topology
Call FlowFigure 13 illustrates the call flow of the Acme6 sample application.
When the gateway receives a call, the acme6.vxml script:
• Invokes the application when the caller goes offhook
• Makes a call to the destination number specified in the VXML <transfer> dest attribute
• Plays background music from the music.wav file to the caller once. Then the caller will hear the ringback until the called party answers the call.
If the called party answers the call before the music has finished playing, the call will be connected. Music play will stop when the called party is connected.
V
2304
85
555-0122
555-0111 Cisco 3845
IP
TFTP server
HTTP server
29
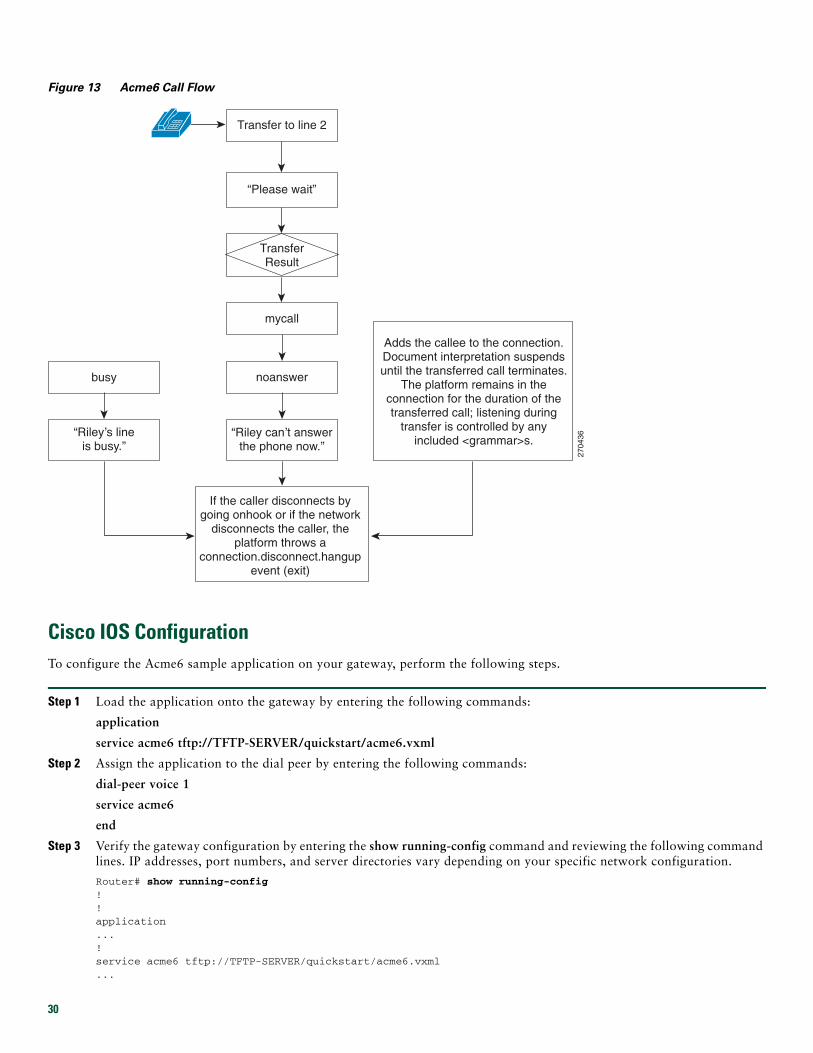
Figure 13 Acme6 Call Flow
Cisco IOS ConfigurationTo configure the Acme6 sample application on your gateway, perform the following steps.
Step 1 Load the application onto the gateway by entering the following commands:
application
service acme6 tftp://TFTP-SERVER/quickstart/acme6.vxml
Step 2 Assign the application to the dial peer by entering the following commands:
dial-peer voice 1
service acme6
end
Step 3 Verify the gateway configuration by entering the show running-config command and reviewing the following command lines. IP addresses, port numbers, and server directories vary depending on your specific network configuration.
Router# show running-config !!application...! service acme6 tftp://TFTP-SERVER/quickstart/acme6.vxml ...
2704
36
Transfer to line 2
“Please wait”
If the caller disconnects bygoing onhook or if the network
disconnects the caller, theplatform throws a
connection.disconnect.hangupevent (exit)
Adds the callee to the connection.Document interpretation suspendsuntil the transferred call terminates.
The platform remains in theconnection for the duration of thetransferred call; listening during
transfer is controlled by anyincluded <grammar>s.
TransferResult
mycall
busy noanswer
30
! dial-peer voice 1 pots service acme6 destination-pattern 5550111 port 0/0/0 ! dial-peer voice 2 pots destination-pattern 5550122 port 0/0/1 !
Step 4 Place a call to 555-0111. On the Cisco 3845, the application plays when you pick up the handset of the telephone mapped to 555-0111.
What to Do NextTo implement additional features, you can install any of these other samples:
• Acme3 Sample—Recording to Local Memory, page 19
• Acme4 Sample—Recording to HTTP Server, page 22
• Acme5 Sample—Speech Recognition and Synthesis (ASR/TTS), page 25
• Acme7 Sample—Hybrid VoiceXML and TCL, page 32
• Acme8 Sample—HTTPS Media Server Access, page 35
31
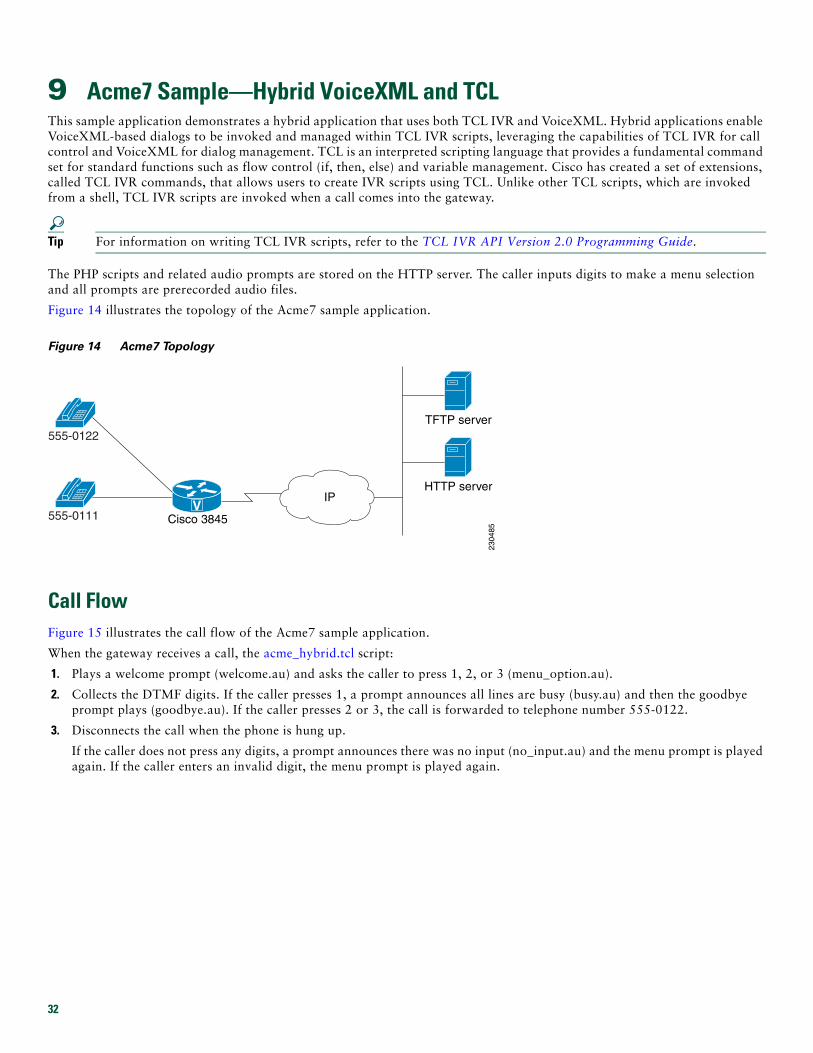
9 Acme7 Sample—Hybrid VoiceXML and TCLThis sample application demonstrates a hybrid application that uses both TCL IVR and VoiceXML. Hybrid applications enable VoiceXML-based dialogs to be invoked and managed within TCL IVR scripts, leveraging the capabilities of TCL IVR for call control and VoiceXML for dialog management. TCL is an interpreted scripting language that provides a fundamental command set for standard functions such as flow control (if, then, else) and variable management. Cisco has created a set of extensions, called TCL IVR commands, that allows users to create IVR scripts using TCL. Unlike other TCL scripts, which are invoked from a shell, TCL IVR scripts are invoked when a call comes into the gateway.
Tip For information on writing TCL IVR scripts, refer to the TCL IVR API Version 2.0 Programming Guide.
The PHP scripts and related audio prompts are stored on the HTTP server. The caller inputs digits to make a menu selection and all prompts are prerecorded audio files.
Figure 14 illustrates the topology of the Acme7 sample application.
Figure 14 Acme7 Topology
Call FlowFigure 15 illustrates the call flow of the Acme7 sample application.
When the gateway receives a call, the acme_hybrid.tcl script:
1. Plays a welcome prompt (welcome.au) and asks the caller to press 1, 2, or 3 (menu_option.au).
2. Collects the DTMF digits. If the caller presses 1, a prompt announces all lines are busy (busy.au) and then the goodbye prompt plays (goodbye.au). If the caller presses 2 or 3, the call is forwarded to telephone number 555-0122.
3. Disconnects the call when the phone is hung up.
If the caller does not press any digits, a prompt announces there was no input (no_input.au) and the menu prompt is played again. If the caller enters an invalid digit, the menu prompt is played again.
V23
0485
555-0122
555-0111 Cisco 3845
IP
TFTP server
HTTP server
32
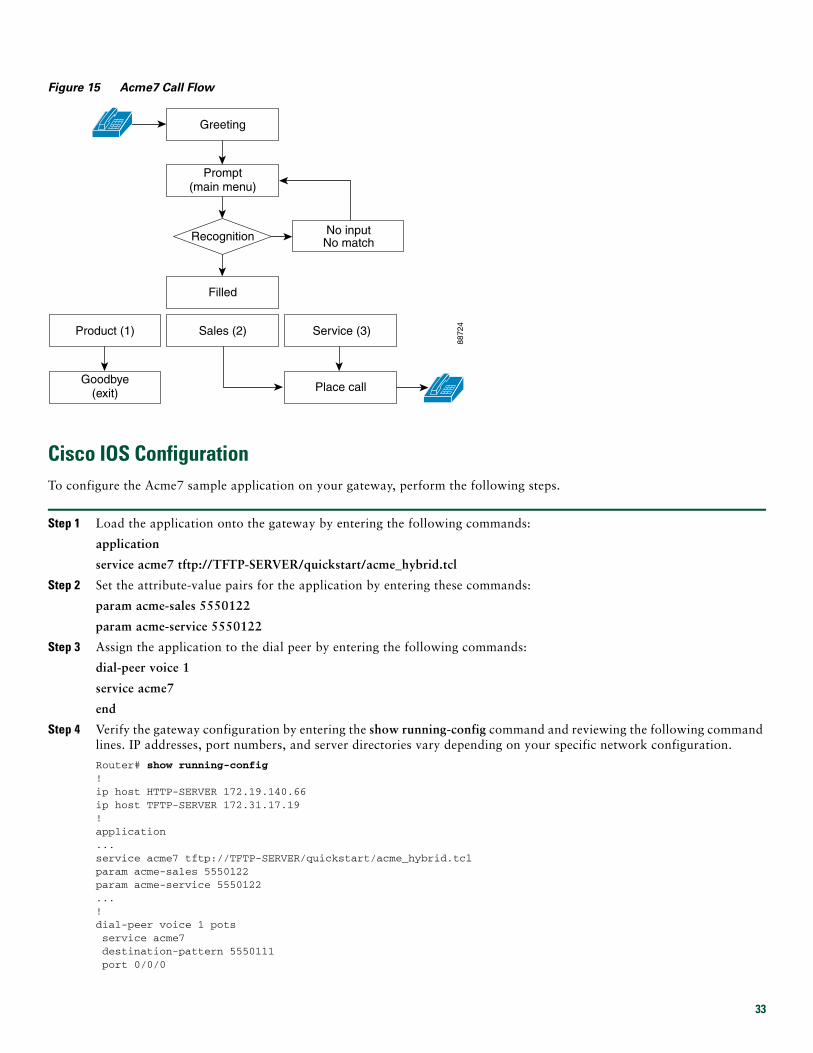
Figure 15 Acme7 Call Flow
Cisco IOS ConfigurationTo configure the Acme7 sample application on your gateway, perform the following steps.
Step 1 Load the application onto the gateway by entering the following commands:
application
service acme7 tftp://TFTP-SERVER/quickstart/acme_hybrid.tcl
Step 2 Set the attribute-value pairs for the application by entering these commands:
param acme-sales 5550122
param acme-service 5550122
Step 3 Assign the application to the dial peer by entering the following commands:
dial-peer voice 1
service acme7
end
Step 4 Verify the gateway configuration by entering the show running-config command and reviewing the following command lines. IP addresses, port numbers, and server directories vary depending on your specific network configuration.
Router# show running-config ! ip host HTTP-SERVER 172.19.140.66 ip host TFTP-SERVER 172.31.17.19 ! application...service acme7 tftp://TFTP-SERVER/quickstart/acme_hybrid.tcl param acme-sales 5550122 param acme-service 5550122 ...! dial-peer voice 1 pots service acme7 destination-pattern 5550111 port 0/0/0
8872
4
Greeting
Prompt(main menu)
No inputNo matchRecognition
Filled
Sales (2)
Goodbye(exit) Place call
Product (1) Service (3)
33
! dial-peer voice 2 pots destination-pattern 5550122 port 0/0/1 !
Step 5 Place a call to 555-0111. On the Cisco 3845, the application plays when you pick up the handset of the telephone mapped to 555-0111.
What to Do NextTo implement additional features, you can install any of these other samples:
• Acme3 Sample—Recording to Local Memory, page 19
• Acme4 Sample—Recording to HTTP Server, page 22
• Acme5 Sample—Speech Recognition and Synthesis (ASR/TTS), page 25
• Acme6 Sample—Bridge Transfer, page 29
• Acme8 Sample—HTTPS Media Server Access, page 35
34
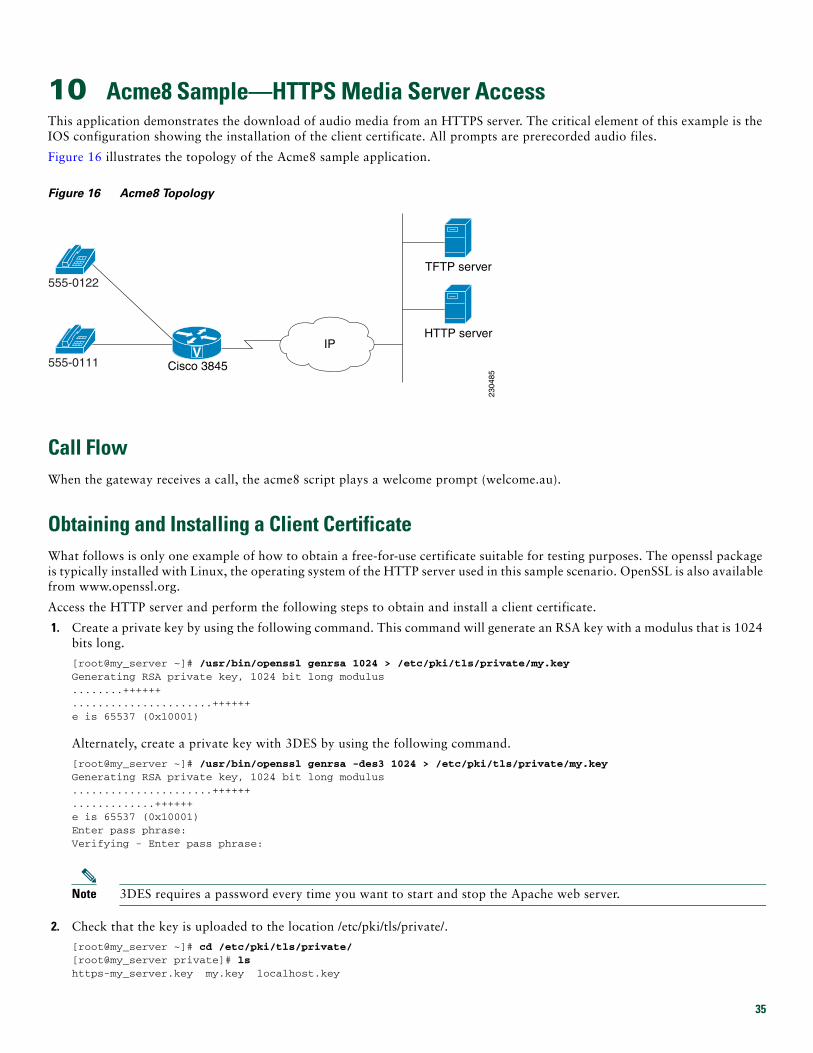
10 Acme8 Sample—HTTPS Media Server AccessThis application demonstrates the download of audio media from an HTTPS server. The critical element of this example is the IOS configuration showing the installation of the client certificate. All prompts are prerecorded audio files.
Figure 16 illustrates the topology of the Acme8 sample application.
Figure 16 Acme8 Topology
Call FlowWhen the gateway receives a call, the acme8 script plays a welcome prompt (welcome.au).
Obtaining and Installing a Client CertificateWhat follows is only one example of how to obtain a free-for-use certificate suitable for testing purposes. The openssl package is typically installed with Linux, the operating system of the HTTP server used in this sample scenario. OpenSSL is also available from www.openssl.org.
Access the HTTP server and perform the following steps to obtain and install a client certificate.
1. Create a private key by using the following command. This command will generate an RSA key with a modulus that is 1024 bits long.
[root@my_server ~]# /usr/bin/openssl genrsa 1024 > /etc/pki/tls/private/my.key Generating RSA private key, 1024 bit long modulus........++++++......................++++++e is 65537 (0x10001)
Alternately, create a private key with 3DES by using the following command.
[root@my_server ~]# /usr/bin/openssl genrsa -des3 1024 > /etc/pki/tls/private/my.key Generating RSA private key, 1024 bit long modulus......................++++++.............++++++e is 65537 (0x10001)Enter pass phrase:Verifying - Enter pass phrase:
Note 3DES requires a password every time you want to start and stop the Apache web server.
2. Check that the key is uploaded to the location /etc/pki/tls/private/.
[root@my_server ~]# cd /etc/pki/tls/private/ [root@my_server private]# ls https-my_server.key my.key localhost.key
V
2304
85
555-0122
555-0111 Cisco 3845
IP
TFTP server
HTTP server
35
[root@my_server private]# file my.key my.key: ASCII text[root@my_server private]# cat my.key -----BEGIN RSA PRIVATE KEY-----Proc-Type: 4,ENCRYPTEDDEK-Info: DES-EDE3-CBC,24ADBDD9CBE00420
WwZRdgYpDln7JLnispfBkyXA+fAmI7on/8iDsDSlNIujH2W2m8c6b9kEBX9//Jnj51KaastIAdRC0hecQxbgUsrgHvuGR8LBWeD7WPh/+j+75eOI12dDtFNrItQ9gY1CTiLo1sKZ3v9hIIrseol42KQEcmhghu691wws1ExB5suNWZOUL7whBCCtbqOQMBYYGfcrrKx5L9+KonZ4DWkOhyOBAAVM9c2B6oerdpeFcnPkfW2ppGDlnrMQam8P6ZpThSyhZsLVH74TBDoSRW048tIY0K3qD0ZNqp+xI40/e34hsajjxHTdXzn+DzMCzpyQh6zeubSO8Xkj/7YrfphwpAFNd3Ng/hNA8r5wa0ucxsd2xlFzoBG29T6cD5SxD/RAADeRsCqi5AdrAD9vbac42tROckM5vAl7NCwbejtyMHhH2zJOz8pjZelKHDL+mH1BtJiBfgN362TpOIyBexX1zqP18t3JJIKg1hs5rzQF5R5ZRM7RUlxp4nvLxkv5syiP13Hq2sxk6oCAa53drLxTW5CoqSZ+caJo8JeByPs/ENx0kSygmPfWhazlhs/gQb+skjprwHaCtabRQitbFa4M/x6I/bZQjk4v7munWugu8oJFeCmHcmHD4aM1QTZfC2jTnl/200izs9c8mCHA2/shky/Q2B0lf8KFMzn8T6inZyt4fPiAI4ycp58oVmhR2qmDz/BjXT6MqkPFSvpnX7q19c+wJ51G0iWX3E8mhLhtwwmFgl3p+4SbyfuBcB8yqfQF32bEPDhhXkmwdv4vwsobYWFV8IzAbbnXQuxBJ+Os5j2ae9AxmpwozQ==-----END RSA PRIVATE KEY-----
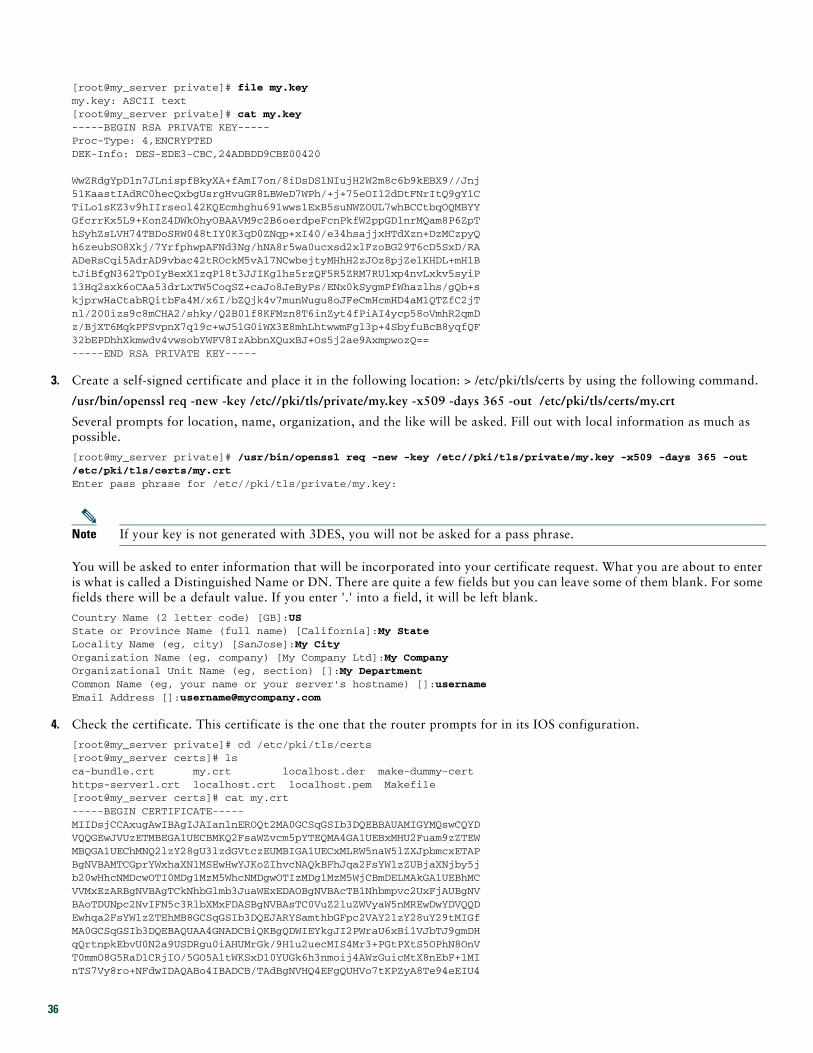
3. Create a self-signed certificate and place it in the following location: > /etc/pki/tls/certs by using the following command.
/usr/bin/openssl req -new -key /etc//pki/tls/private/my.key -x509 -days 365 -out /etc/pki/tls/certs/my.crt
Several prompts for location, name, organization, and the like will be asked. Fill out with local information as much as possible.
[root@my_server private]# /usr/bin/openssl req -new -key /etc//pki/tls/private/my.key -x509 -days 365 -out /etc/pki/tls/certs/my.crt Enter pass phrase for /etc//pki/tls/private/my.key:
Note If your key is not generated with 3DES, you will not be asked for a pass phrase.
You will be asked to enter information that will be incorporated into your certificate request. What you are about to enter is what is called a Distinguished Name or DN. There are quite a few fields but you can leave some of them blank. For some fields there will be a default value. If you enter '.' into a field, it will be left blank.
Country Name (2 letter code) [GB]:USState or Province Name (full name) [California]:My State Locality Name (eg, city) [SanJose]:My City Organization Name (eg, company) [My Company Ltd]:My Company Organizational Unit Name (eg, section) []:My Department Common Name (eg, your name or your server's hostname) []:username Email Address []:[email protected]
4. Check the certificate. This certificate is the one that the router prompts for in its IOS configuration.
[root@my_server private]# cd /etc/pki/tls/certs[root@my_server certs]# lsca-bundle.crt my.crt localhost.der make-dummy-certhttps-server1.crt localhost.crt localhost.pem Makefile[root@my_server certs]# cat my.crt-----BEGIN CERTIFICATE-----MIIDsjCCAxugAwIBAgIJAIanlnEROQt2MA0GCSqGSIb3DQEBBAUAMIGYMQswCQYDVQQGEwJVUzETMBEGA1UECBMKQ2FsaWZvcm5pYTEQMA4GA1UEBxMHU2Fuam9zZTEWMBQGA1UEChMNQ2lzY28gU3lzdGVtczEUMBIGA1UECxMLRW5naW5lZXJpbmcxETAPBgNVBAMTCGprYWxhaXNlMSEwHwYJKoZIhvcNAQkBFhJqa2FsYWlzZUBjaXNjby5jb20wHhcNMDcwOTI0MDg1MzM5WhcNMDgwOTIzMDg1MzM5WjCBmDELMAkGA1UEBhMCVVMxEzARBgNVBAgTCkNhbGlmb3JuaWExEDAOBgNVBAcTB1Nhbmpvc2UxFjAUBgNVBAoTDUNpc2NvIFN5c3RlbXMxFDASBgNVBAsTC0VuZ2luZWVyaW5nMREwDwYDVQQDEwhqa2FsYWlzZTEhMB8GCSqGSIb3DQEJARYSamthbGFpc2VAY2lzY28uY29tMIGfMA0GCSqGSIb3DQEBAQUAA4GNADCBiQKBgQDWIEYkgJI2PWraU6xBi1VJbTJ9gmDHqQrtnpkEbvU0N2a9USDRgu0iAHUMrGk/9H1u2uecMIS4Mr3+PGtPXtS5OPhN8OnVT0mmO8G5RaDlCRjIO/5GO5AltWKSxD10YUGk6h3nmoij4AWzGuicMtX8nEbF+lMInTS7Vy8ro+NFdwIDAQABo4IBADCB/TAdBgNVHQ4EFgQUHVo7tKPZyA8Te94eEIU4
36
Zw6ZYWkwgc0GA1UdIwSBxTCBwoAUHVo7tKPZyA8Te94eEIU4Zw6ZYWmhgZ6kgZswgZgxCzAJBgNVBAYTAlVTMRMwEQYDVQQIEwpDYWxpZm9ybmlhMRAwDgYDVQQHEwdTYW5qb3NlMRYwFAYDVQQKEw1DaXNjbyBTeXN0ZW1zMRQwEgYDVQQLEwtFbmdpbmVlcmluZzERMA8GA1UEAxMIamthbGFpc2UxITAfBgkqhkiG9w0BCQEWEmprYWxhaXNlQGNpc2NvLmNvbYIJAIanlnEROQt2MAwGA1UdEwQFMAMBAf8wDQYJKoZIhvcNAQEEBQADgYEAoi98+ud/czoe7rOqjRpkcM/ayBgFbNeheSRiBxT0TAY3zyqXiMR0fq854iIYT3INhZA61fJvMB+eb6ocWi2hf2+Yh64DVN+COoMInFn6VjWNS+QgUDejOEhxuUQDS2Z8mNdKGtHLo41Y4K64MaBY4fjxnowvA/SLHrAI4Ap7ODM=-----END CERTIFICATE-----
Cisco IOS ConfigurationThe HTTPS for VXML feature is available on the following IOS voice k9 images:
• advanced ip/enterprise services k9 images
• classic ik9s images
• classic jk9s images
It is supported on the following platforms:
• Cisco 2600 XM router
• Cisco 2800 series Integrated Services Routers
• Cisco 3700 series Integrated Services Routers
• Cisco 3800 series Integrated Services Routers
• Cisco AS5350 and AS5400 Voice Gateways
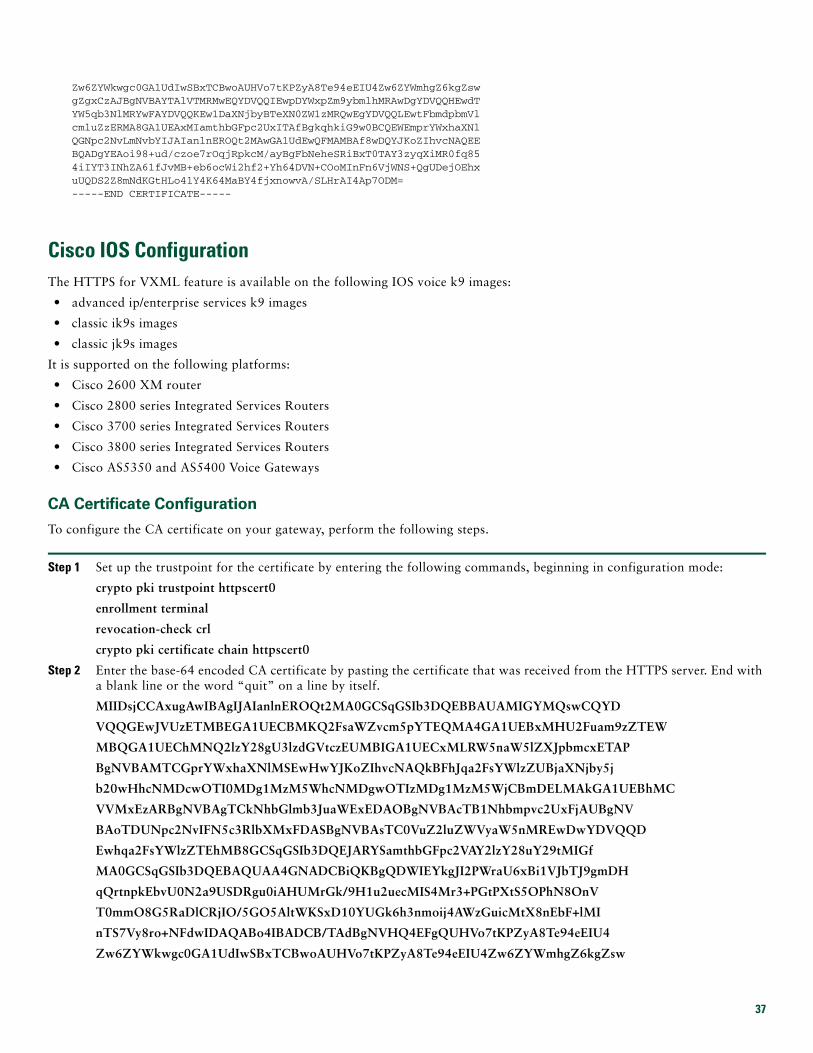
CA Certificate Configuration
To configure the CA certificate on your gateway, perform the following steps.
Step 1 Set up the trustpoint for the certificate by entering the following commands, beginning in configuration mode:
crypto pki trustpoint httpscert0
enrollment terminal
revocation-check crl
crypto pki certificate chain httpscert0
Step 2 Enter the base-64 encoded CA certificate by pasting the certificate that was received from the HTTPS server. End with a blank line or the word “quit” on a line by itself.
MIIDsjCCAxugAwIBAgIJAIanlnEROQt2MA0GCSqGSIb3DQEBBAUAMIGYMQswCQYD
VQQGEwJVUzETMBEGA1UECBMKQ2FsaWZvcm5pYTEQMA4GA1UEBxMHU2Fuam9zZTEW
MBQGA1UEChMNQ2lzY28gU3lzdGVtczEUMBIGA1UECxMLRW5naW5lZXJpbmcxETAP
BgNVBAMTCGprYWxhaXNlMSEwHwYJKoZIhvcNAQkBFhJqa2FsYWlzZUBjaXNjby5j
b20wHhcNMDcwOTI0MDg1MzM5WhcNMDgwOTIzMDg1MzM5WjCBmDELMAkGA1UEBhMC
VVMxEzARBgNVBAgTCkNhbGlmb3JuaWExEDAOBgNVBAcTB1Nhbmpvc2UxFjAUBgNV
BAoTDUNpc2NvIFN5c3RlbXMxFDASBgNVBAsTC0VuZ2luZWVyaW5nMREwDwYDVQQD
Ewhqa2FsYWlzZTEhMB8GCSqGSIb3DQEJARYSamthbGFpc2VAY2lzY28uY29tMIGf
MA0GCSqGSIb3DQEBAQUAA4GNADCBiQKBgQDWIEYkgJI2PWraU6xBi1VJbTJ9gmDH
qQrtnpkEbvU0N2a9USDRgu0iAHUMrGk/9H1u2uecMIS4Mr3+PGtPXtS5OPhN8OnV
T0mmO8G5RaDlCRjIO/5GO5AltWKSxD10YUGk6h3nmoij4AWzGuicMtX8nEbF+lMI
nTS7Vy8ro+NFdwIDAQABo4IBADCB/TAdBgNVHQ4EFgQUHVo7tKPZyA8Te94eEIU4
Zw6ZYWkwgc0GA1UdIwSBxTCBwoAUHVo7tKPZyA8Te94eEIU4Zw6ZYWmhgZ6kgZsw
37
gZgxCzAJBgNVBAYTAlVTMRMwEQYDVQQIEwpDYWxpZm9ybmlhMRAwDgYDVQQHEwdT
YW5qb3NlMRYwFAYDVQQKEw1DaXNjbyBTeXN0ZW1zMRQwEgYDVQQLEwtFbmdpbmVl
cmluZzERMA8GA1UEAxMIamthbGFpc2UxITAfBgkqhkiG9w0BCQEWEmprYWxhaXNl
QGNpc2NvLmNvbYIJAIanlnEROQt2MAwGA1UdEwQFMAMBAf8wDQYJKoZIhvcNAQEE
BQADgYEAoi98+ud/czoe7rOqjRpkcM/ayBgFbNeheSRiBxT0TAY3zyqXiMR0fq85
4iIYT3INhZA61fJvMB+eb6ocWi2hf2+Yh64DVN+COoMInFn6VjWNS+QgUDejOEhx
uUQDS2Z8mNdKGtHLo41Y4K64MaBY4fjxnowvA/SLHrAI4Ap7ODM=
quit
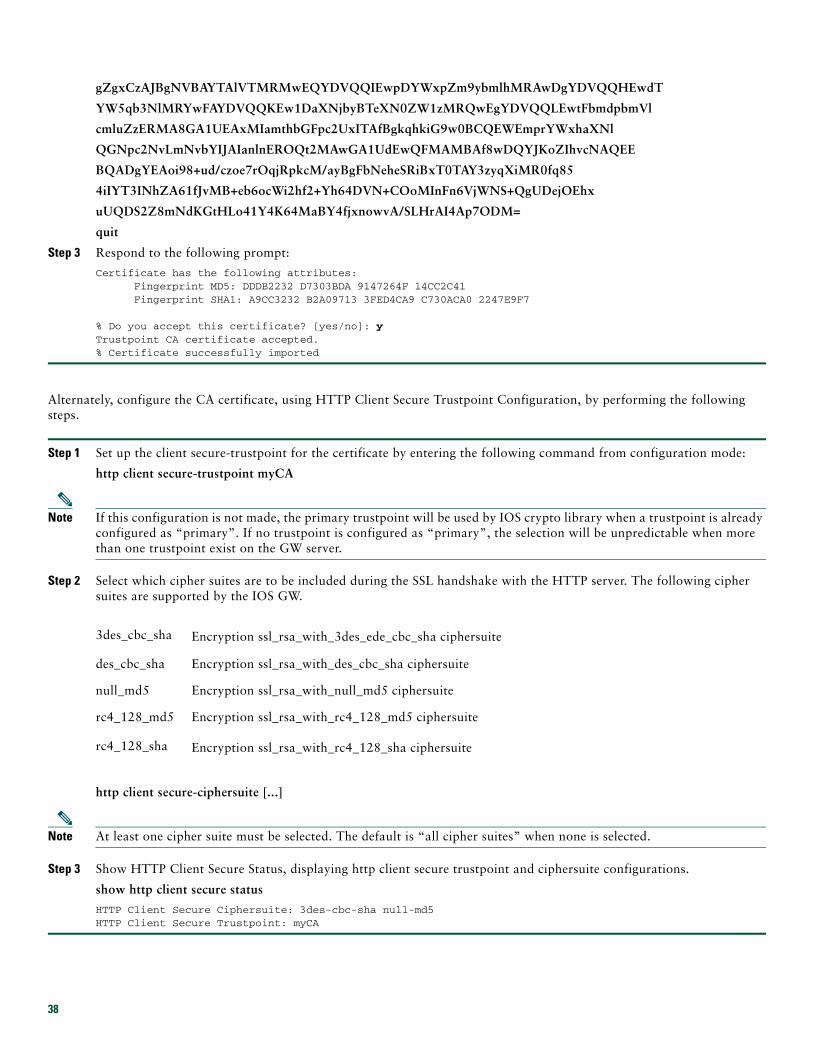
Step 3 Respond to the following prompt:
Certificate has the following attributes: Fingerprint MD5: DDDB2232 D7303BDA 9147264F 14CC2C41 Fingerprint SHA1: A9CC3232 B2A09713 3FED4CA9 C730ACA0 2247E9F7
% Do you accept this certificate? [yes/no]: yTrustpoint CA certificate accepted.% Certificate successfully imported
Alternately, configure the CA certificate, using HTTP Client Secure Trustpoint Configuration, by performing the following steps.
Step 1 Set up the client secure-trustpoint for the certificate by entering the following command from configuration mode:
http client secure-trustpoint myCA
Note If this configuration is not made, the primary trustpoint will be used by IOS crypto library when a trustpoint is already configured as “primary”. If no trustpoint is configured as “primary”, the selection will be unpredictable when more than one trustpoint exist on the GW server.
Step 2 Select which cipher suites are to be included during the SSL handshake with the HTTP server. The following cipher suites are supported by the IOS GW.
http client secure-ciphersuite [...]
Note At least one cipher suite must be selected. The default is “all cipher suites” when none is selected.
Step 3 Show HTTP Client Secure Status, displaying http client secure trustpoint and ciphersuite configurations.
show http client secure status
HTTP Client Secure Ciphersuite: 3des-cbc-sha null-md5HTTP Client Secure Trustpoint: myCA
3des_cbc_sha Encryption ssl_rsa_with_3des_ede_cbc_sha ciphersuite
des_cbc_sha Encryption ssl_rsa_with_des_cbc_sha ciphersuite
null_md5 Encryption ssl_rsa_with_null_md5 ciphersuite
rc4_128_md5 Encryption ssl_rsa_with_rc4_128_md5 ciphersuite
rc4_128_sha Encryption ssl_rsa_with_rc4_128_sha ciphersuite
38
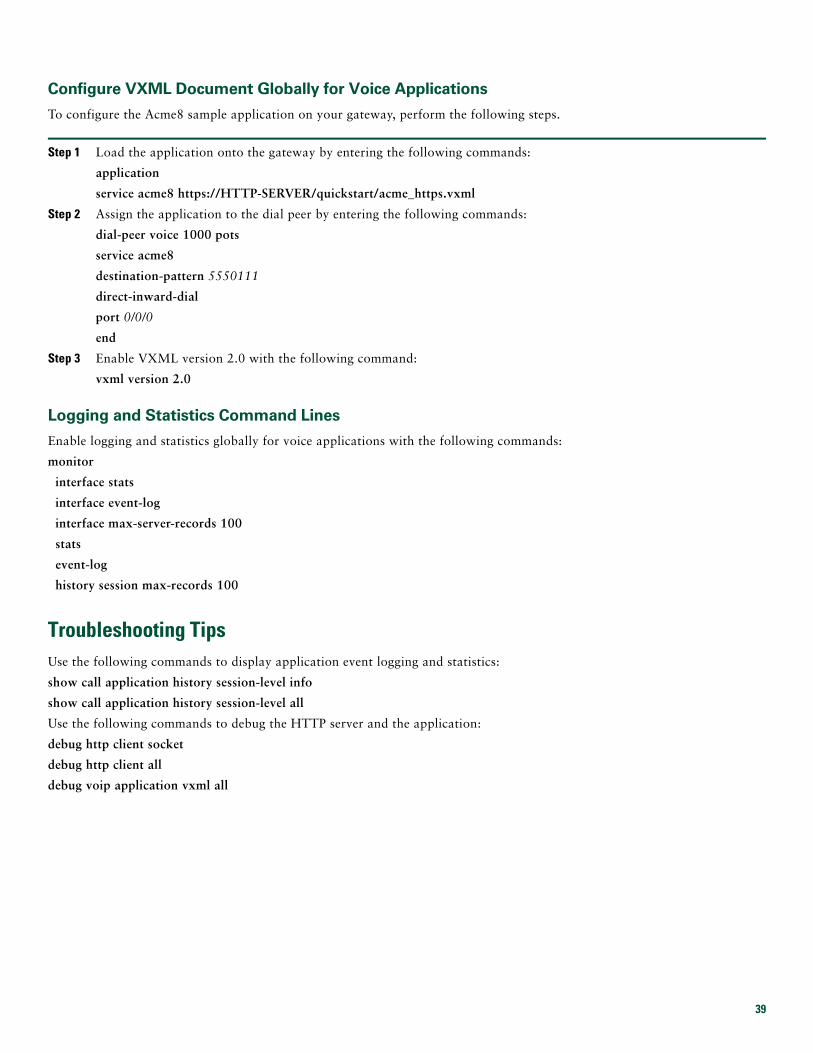
Configure VXML Document Globally for Voice Applications
To configure the Acme8 sample application on your gateway, perform the following steps.
Step 1 Load the application onto the gateway by entering the following commands:
application
service acme8 https://HTTP-SERVER/quickstart/acme_https.vxml
Step 2 Assign the application to the dial peer by entering the following commands:
dial-peer voice 1000 pots
service acme8
destination-pattern 5550111
direct-inward-dial
port 0/0/0
end
Step 3 Enable VXML version 2.0 with the following command:
vxml version 2.0
Logging and Statistics Command Lines
Enable logging and statistics globally for voice applications with the following commands:
monitor
interface stats
interface event-log
interface max-server-records 100
stats
event-log
history session max-records 100
Troubleshooting TipsUse the following commands to display application event logging and statistics:
show call application history session-level info
show call application history session-level all
Use the following commands to debug the HTTP server and the application:
debug http client socket
debug http client all
debug voip application vxml all
39
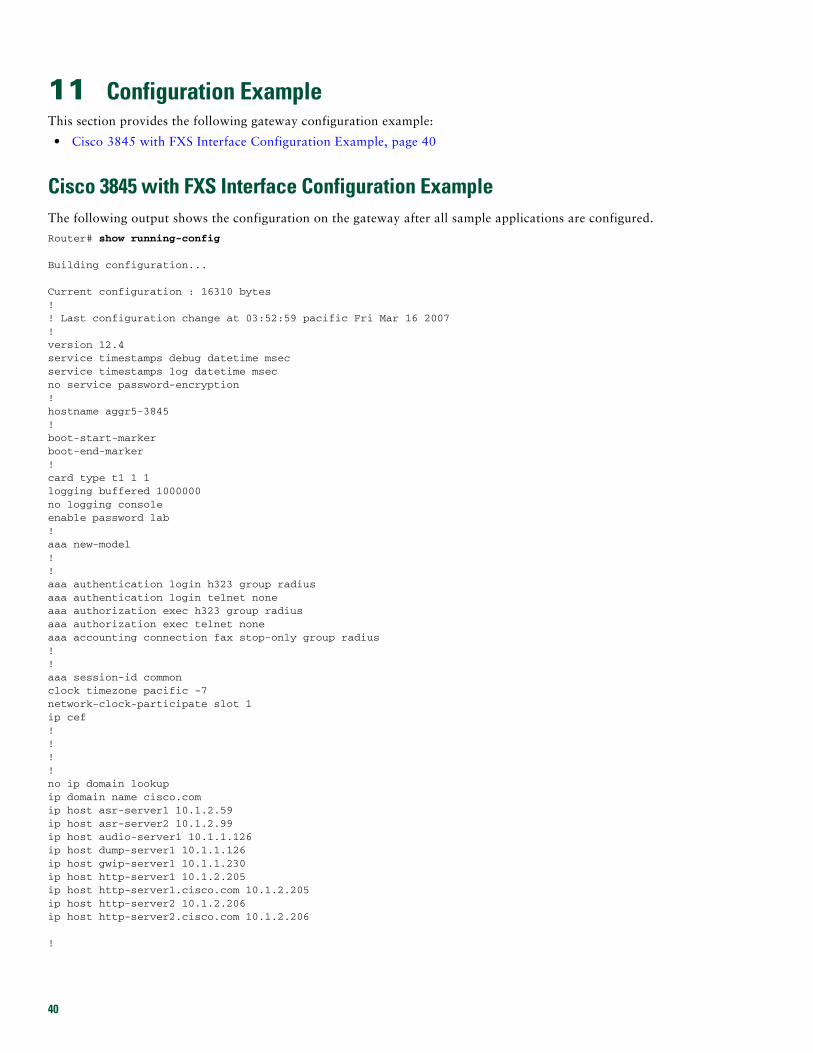
11 Configuration ExampleThis section provides the following gateway configuration example:
• Cisco 3845 with FXS Interface Configuration Example, page 40
Cisco 3845 with FXS Interface Configuration Example The following output shows the configuration on the gateway after all sample applications are configured.
Router# show running-config
Building configuration...
Current configuration : 16310 bytes!! Last configuration change at 03:52:59 pacific Fri Mar 16 2007!version 12.4service timestamps debug datetime msecservice timestamps log datetime msecno service password-encryption!hostname aggr5-3845!boot-start-markerboot-end-marker!card type t1 1 1logging buffered 1000000no logging consoleenable password lab!aaa new-model!!aaa authentication login h323 group radiusaaa authentication login telnet noneaaa authorization exec h323 group radius aaa authorization exec telnet none aaa accounting connection fax stop-only group radius!!aaa session-id commonclock timezone pacific -7network-clock-participate slot 1 ip cef!!!!no ip domain lookupip domain name cisco.comip host asr-server1 10.1.2.59ip host asr-server2 10.1.2.99ip host audio-server1 10.1.1.126ip host dump-server1 10.1.1.126ip host gwip-server1 10.1.1.230ip host http-server1 10.1.2.205ip host http-server1.cisco.com 10.1.2.205ip host http-server2 10.1.2.206ip host http-server2.cisco.com 10.1.2.206
!
40
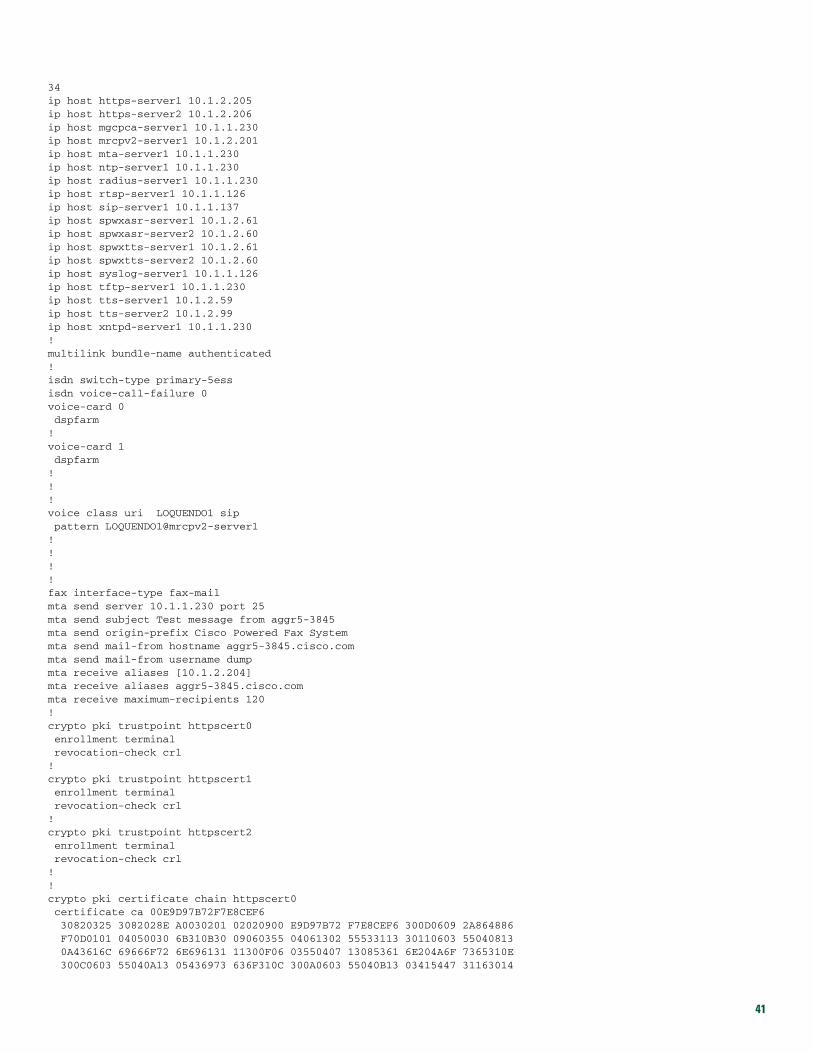
34 ip host https-server1 10.1.2.205ip host https-server2 10.1.2.206ip host mgcpca-server1 10.1.1.230ip host mrcpv2-server1 10.1.2.201ip host mta-server1 10.1.1.230ip host ntp-server1 10.1.1.230ip host radius-server1 10.1.1.230ip host rtsp-server1 10.1.1.126ip host sip-server1 10.1.1.137ip host spwxasr-server1 10.1.2.61ip host spwxasr-server2 10.1.2.60ip host spwxtts-server1 10.1.2.61ip host spwxtts-server2 10.1.2.60ip host syslog-server1 10.1.1.126ip host tftp-server1 10.1.1.230ip host tts-server1 10.1.2.59ip host tts-server2 10.1.2.99ip host xntpd-server1 10.1.1.230!multilink bundle-name authenticated!isdn switch-type primary-5essisdn voice-call-failure 0voice-card 0 dspfarm!voice-card 1 dspfarm!!!voice class uri LOQUENDO1 sip pattern LOQUENDO1@mrcpv2-server1!!!!fax interface-type fax-mailmta send server 10.1.1.230 port 25mta send subject Test message from aggr5-3845mta send origin-prefix Cisco Powered Fax Systemmta send mail-from hostname aggr5-3845.cisco.commta send mail-from username dumpmta receive aliases [10.1.2.204]mta receive aliases aggr5-3845.cisco.commta receive maximum-recipients 120!crypto pki trustpoint httpscert0 enrollment terminal revocation-check crl!crypto pki trustpoint httpscert1 enrollment terminal revocation-check crl!crypto pki trustpoint httpscert2 enrollment terminal revocation-check crl!!crypto pki certificate chain httpscert0 certificate ca 00E9D97B72F7E8CEF6 30820325 3082028E A0030201 02020900 E9D97B72 F7E8CEF6 300D0609 2A864886 F70D0101 04050030 6B310B30 09060355 04061302 55533113 30110603 55040813 0A43616C 69666F72 6E696131 11300F06 03550407 13085361 6E204A6F 7365310E 300C0603 55040A13 05436973 636F310C 300A0603 55040B13 03415447 31163014
41
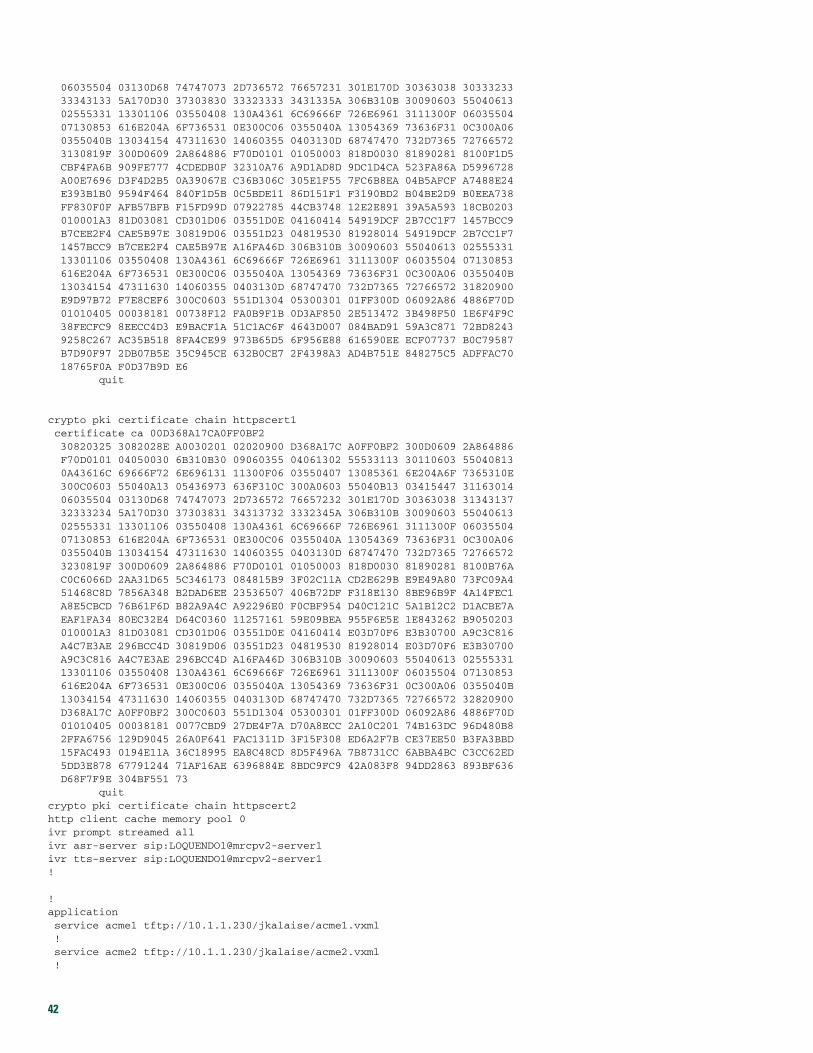
06035504 03130D68 74747073 2D736572 76657231 301E170D 30363038 30333233 33343133 5A170D30 37303830 33323333 3431335A 306B310B 30090603 55040613 02555331 13301106 03550408 130A4361 6C69666F 726E6961 3111300F 06035504 07130853 616E204A 6F736531 0E300C06 0355040A 13054369 73636F31 0C300A06 0355040B 13034154 47311630 14060355 0403130D 68747470 732D7365 72766572 3130819F 300D0609 2A864886 F70D0101 01050003 818D0030 81890281 8100F1D5 CBF4FA6B 909FE777 4CDEDB0F 32310A76 A9D1AD8D 9DC1D4CA 523FA86A D5996728 A00E7696 D3F4D2B5 0A39067E C36B306C 305E1F55 7FC6B8EA 04B5AFCF A7488E24 E393B1B0 9594F464 840F1D5B 0C5BDE11 86D151F1 F3190BD2 B04BE2D9 B0EEA738 FF830F0F AFB57BFB F15FD99D 07922785 44CB3748 12E2E891 39A5A593 18CB0203 010001A3 81D03081 CD301D06 03551D0E 04160414 54919DCF 2B7CC1F7 1457BCC9 B7CEE2F4 CAE5B97E 30819D06 03551D23 04819530 81928014 54919DCF 2B7CC1F7 1457BCC9 B7CEE2F4 CAE5B97E A16FA46D 306B310B 30090603 55040613 02555331 13301106 03550408 130A4361 6C69666F 726E6961 3111300F 06035504 07130853 616E204A 6F736531 0E300C06 0355040A 13054369 73636F31 0C300A06 0355040B 13034154 47311630 14060355 0403130D 68747470 732D7365 72766572 31820900 E9D97B72 F7E8CEF6 300C0603 551D1304 05300301 01FF300D 06092A86 4886F70D 01010405 00038181 00738F12 FA0B9F1B 0D3AF850 2E513472 3B498F50 1E6F4F9C 38FECFC9 8EECC4D3 E9BACF1A 51C1AC6F 4643D007 084BAD91 59A3C871 72BD8243 9258C267 AC35B518 8FA4CE99 973B65D5 6F956E88 616590EE ECF07737 B0C79587 B7D90F97 2DB07B5E 35C945CE 632B0CE7 2F4398A3 AD4B751E 848275C5 ADFFAC70 18765F0A F0D37B9D E6 quit
crypto pki certificate chain httpscert1 certificate ca 00D368A17CA0FF0BF2 30820325 3082028E A0030201 02020900 D368A17C A0FF0BF2 300D0609 2A864886 F70D0101 04050030 6B310B30 09060355 04061302 55533113 30110603 55040813 0A43616C 69666F72 6E696131 11300F06 03550407 13085361 6E204A6F 7365310E 300C0603 55040A13 05436973 636F310C 300A0603 55040B13 03415447 31163014 06035504 03130D68 74747073 2D736572 76657232 301E170D 30363038 31343137 32333234 5A170D30 37303831 34313732 3332345A 306B310B 30090603 55040613 02555331 13301106 03550408 130A4361 6C69666F 726E6961 3111300F 06035504 07130853 616E204A 6F736531 0E300C06 0355040A 13054369 73636F31 0C300A06 0355040B 13034154 47311630 14060355 0403130D 68747470 732D7365 72766572 3230819F 300D0609 2A864886 F70D0101 01050003 818D0030 81890281 8100B76A C0C6066D 2AA31D65 5C346173 084815B9 3F02C11A CD2E629B E9E49A80 73FC09A4 51468C8D 7856A348 B2DAD6EE 23536507 406B72DF F318E130 8BE96B9F 4A14FEC1 A8E5CBCD 76B61F6D B82A9A4C A92296E0 F0CBF954 D40C121C 5A1B12C2 D1ACBE7A EAF1FA34 80EC32E4 D64C0360 11257161 59E09BEA 955F6E5E 1E843262 B9050203 010001A3 81D03081 CD301D06 03551D0E 04160414 E03D70F6 E3B30700 A9C3C816 A4C7E3AE 296BCC4D 30819D06 03551D23 04819530 81928014 E03D70F6 E3B30700 A9C3C816 A4C7E3AE 296BCC4D A16FA46D 306B310B 30090603 55040613 02555331 13301106 03550408 130A4361 6C69666F 726E6961 3111300F 06035504 07130853 616E204A 6F736531 0E300C06 0355040A 13054369 73636F31 0C300A06 0355040B 13034154 47311630 14060355 0403130D 68747470 732D7365 72766572 32820900 D368A17C A0FF0BF2 300C0603 551D1304 05300301 01FF300D 06092A86 4886F70D 01010405 00038181 0077CBD9 27DE4F7A D70A8ECC 2A10C201 74B163DC 96D480B8 2FFA6756 129D9045 26A0F641 FAC1311D 3F15F308 ED6A2F7B CE37EE50 B3FA3BBD 15FAC493 0194E11A 36C18995 EA8C48CD 8D5F496A 7B8731CC 6ABBA4BC C3CC62ED 5DD3E878 67791244 71AF16AE 6396884E 8BDC9FC9 42A083F8 94DD2863 893BF636 D68F7F9E 304BF551 73 quitcrypto pki certificate chain httpscert2http client cache memory pool 0ivr prompt streamed allivr asr-server sip:LOQUENDO1@mrcpv2-server1ivr tts-server sip:LOQUENDO1@mrcpv2-server1!
!application service acme1 tftp://10.1.1.230/jkalaise/acme1.vxml ! service acme2 tftp://10.1.1.230/jkalaise/acme2.vxml !
42
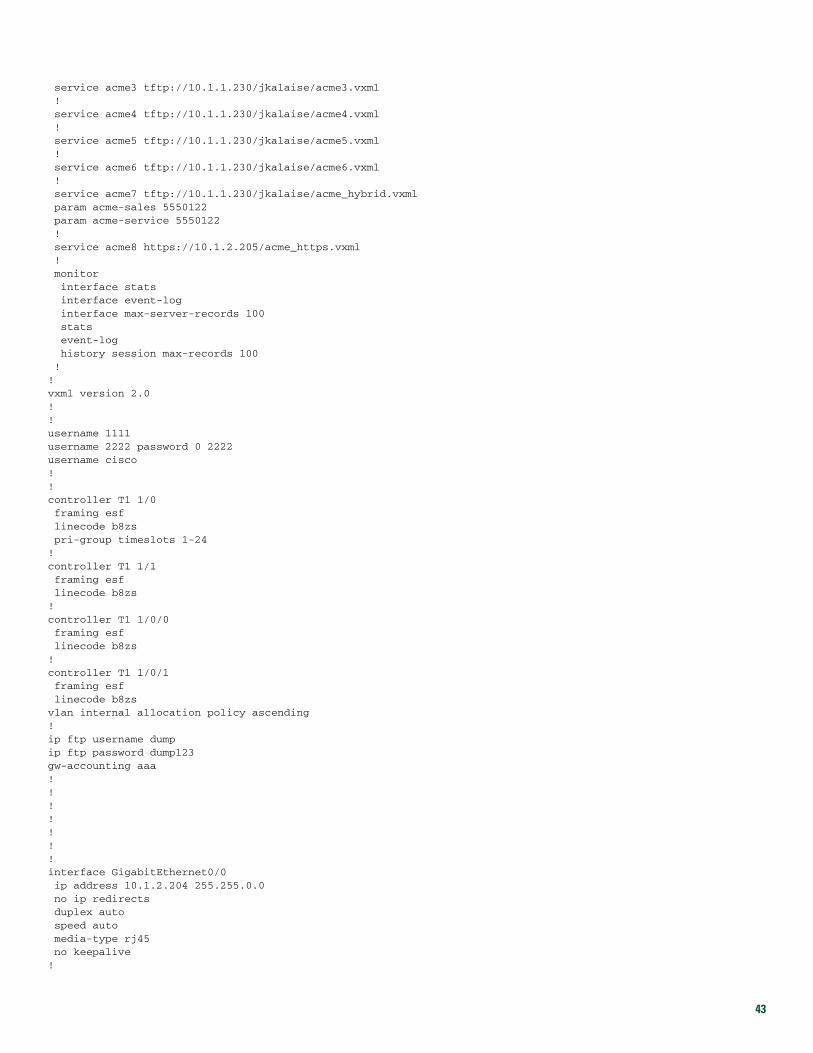
service acme3 tftp://10.1.1.230/jkalaise/acme3.vxml ! service acme4 tftp://10.1.1.230/jkalaise/acme4.vxml ! service acme5 tftp://10.1.1.230/jkalaise/acme5.vxml ! service acme6 tftp://10.1.1.230/jkalaise/acme6.vxml ! service acme7 tftp://10.1.1.230/jkalaise/acme_hybrid.vxml param acme-sales 5550122 param acme-service 5550122 ! service acme8 https://10.1.2.205/acme_https.vxml ! monitor interface stats interface event-log interface max-server-records 100 stats event-log history session max-records 100 !!vxml version 2.0!!username 1111username 2222 password 0 2222username cisco!!controller T1 1/0 framing esf linecode b8zs pri-group timeslots 1-24!controller T1 1/1 framing esf linecode b8zs!controller T1 1/0/0 framing esf linecode b8zs!controller T1 1/0/1 framing esf linecode b8zsvlan internal allocation policy ascending!ip ftp username dumpip ftp password dump123gw-accounting aaa!! !!!!!interface GigabitEthernet0/0 ip address 10.1.2.204 255.255.0.0 no ip redirects duplex auto speed auto media-type rj45 no keepalive!
43
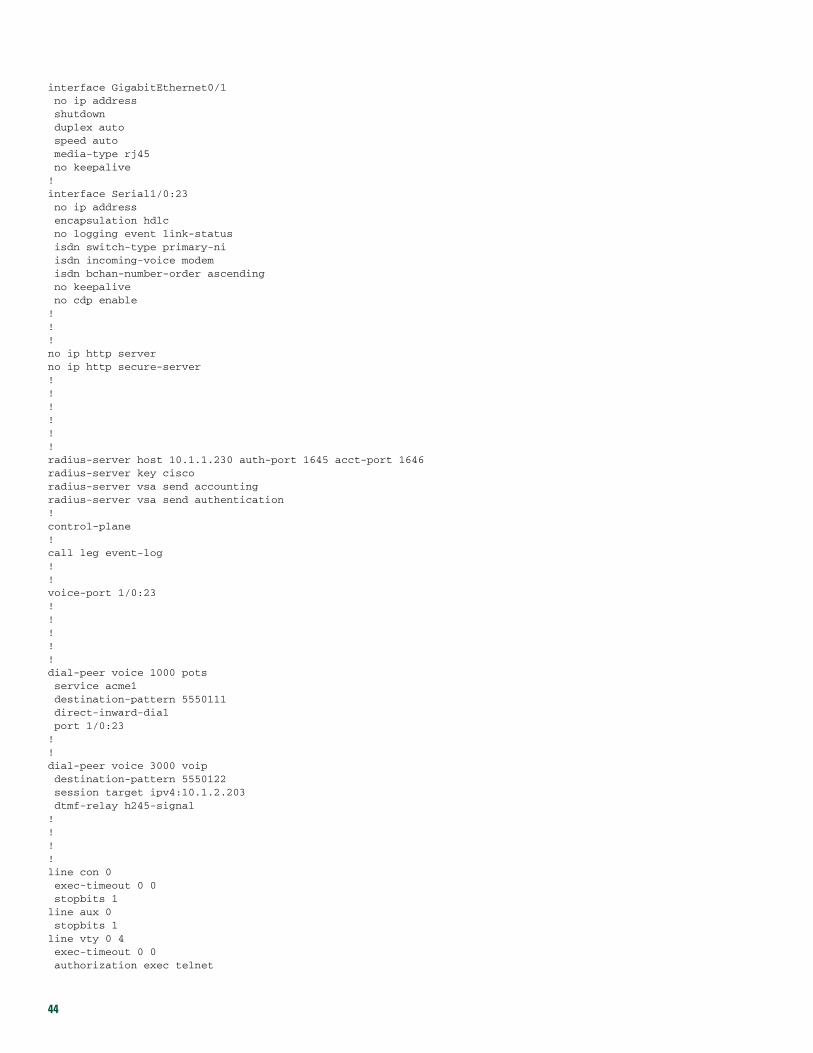
interface GigabitEthernet0/1 no ip address shutdown duplex auto speed auto media-type rj45 no keepalive!interface Serial1/0:23 no ip address encapsulation hdlc no logging event link-status isdn switch-type primary-ni isdn incoming-voice modem isdn bchan-number-order ascending no keepalive no cdp enable!!!no ip http serverno ip http secure-server!!!!!!radius-server host 10.1.1.230 auth-port 1645 acct-port 1646radius-server key ciscoradius-server vsa send accountingradius-server vsa send authentication!control-plane!call leg event-log!!voice-port 1/0:23!!!!!dial-peer voice 1000 pots service acme1 destination-pattern 5550111 direct-inward-dial port 1/0:23!!dial-peer voice 3000 voip destination-pattern 5550122 session target ipv4:10.1.2.203 dtmf-relay h245-signal!!!!line con 0 exec-timeout 0 0 stopbits 1line aux 0 stopbits 1line vty 0 4 exec-timeout 0 0 authorization exec telnet
44

login authentication telnet!exception core-file router-coreexception protocol ftpexception dump 10.1.1.126scheduler allocate 20000 1000ntp clock-period 17179590ntp server 10.1.1.230
!webvpn cef!!end
45
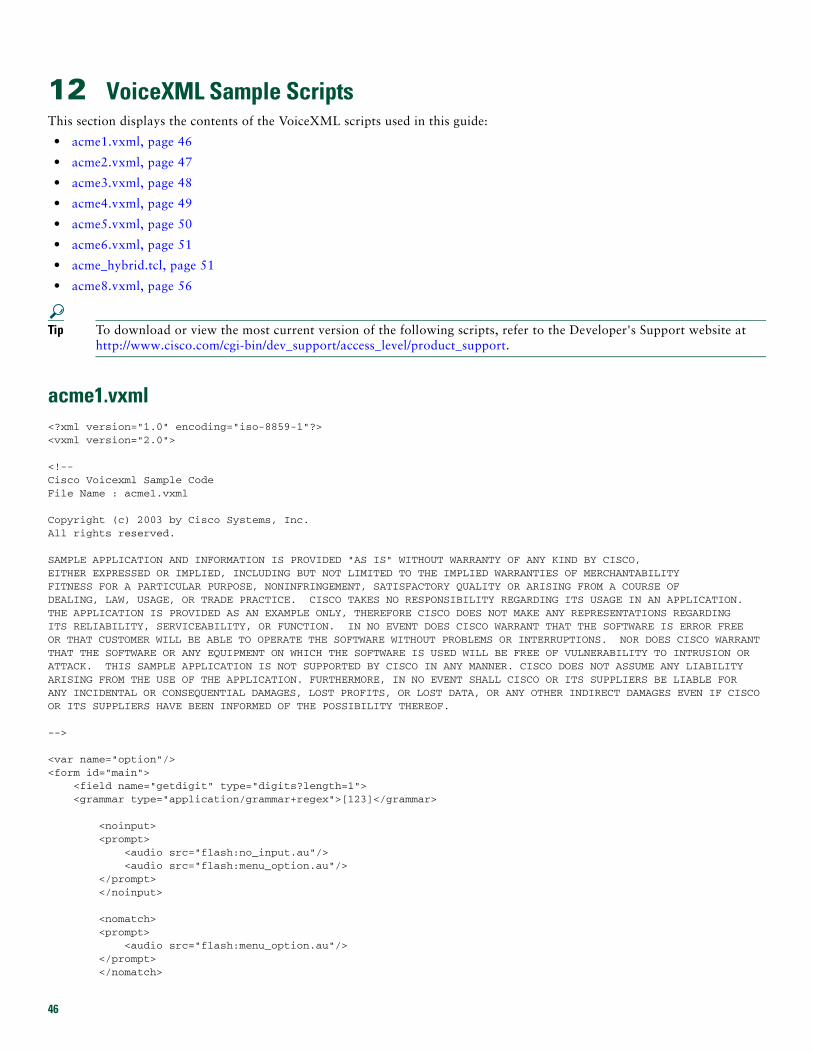
12 VoiceXML Sample ScriptsThis section displays the contents of the VoiceXML scripts used in this guide:
• acme1.vxml, page 46
• acme2.vxml, page 47
• acme3.vxml, page 48
• acme4.vxml, page 49
• acme5.vxml, page 50
• acme6.vxml, page 51
• acme_hybrid.tcl, page 51
• acme8.vxml, page 56
Tip To download or view the most current version of the following scripts, refer to the Developer's Support website at http://www.cisco.com/cgi-bin/dev_support/access_level/product_support.
acme1.vxml<?xml version="1.0" encoding="iso-8859-1"?> <vxml version="2.0">
<!-- Cisco Voicexml Sample Code File Name : acme1.vxml
Copyright (c) 2003 by Cisco Systems, Inc. All rights reserved.
SAMPLE APPLICATION AND INFORMATION IS PROVIDED "AS IS" WITHOUT WARRANTY OF ANY KIND BY CISCO, EITHER EXPRESSED OR IMPLIED, INCLUDING BUT NOT LIMITED TO THE IMPLIED WARRANTIES OF MERCHANTABILITY FITNESS FOR A PARTICULAR PURPOSE, NONINFRINGEMENT, SATISFACTORY QUALITY OR ARISING FROM A COURSE OF DEALING, LAW, USAGE, OR TRADE PRACTICE. CISCO TAKES NO RESPONSIBILITY REGARDING ITS USAGE IN AN APPLICATION. THE APPLICATION IS PROVIDED AS AN EXAMPLE ONLY, THEREFORE CISCO DOES NOT MAKE ANY REPRESENTATIONS REGARDING ITS RELIABILITY, SERVICEABILITY, OR FUNCTION. IN NO EVENT DOES CISCO WARRANT THAT THE SOFTWARE IS ERROR FREE OR THAT CUSTOMER WILL BE ABLE TO OPERATE THE SOFTWARE WITHOUT PROBLEMS OR INTERRUPTIONS. NOR DOES CISCO WARRANT THAT THE SOFTWARE OR ANY EQUIPMENT ON WHICH THE SOFTWARE IS USED WILL BE FREE OF VULNERABILITY TO INTRUSION OR ATTACK. THIS SAMPLE APPLICATION IS NOT SUPPORTED BY CISCO IN ANY MANNER. CISCO DOES NOT ASSUME ANY LIABILITY ARISING FROM THE USE OF THE APPLICATION. FURTHERMORE, IN NO EVENT SHALL CISCO OR ITS SUPPLIERS BE LIABLE FOR ANY INCIDENTAL OR CONSEQUENTIAL DAMAGES, LOST PROFITS, OR LOST DATA, OR ANY OTHER INDIRECT DAMAGES EVEN IF CISCO OR ITS SUPPLIERS HAVE BEEN INFORMED OF THE POSSIBILITY THEREOF.
-->
<var name="option"/> <form id="main"> <field name="getdigit" type="digits?length=1"> <grammar type="application/grammar+regex">[123]</grammar>
<noinput> <prompt> <audio src="flash:no_input.au"/> <audio src="flash:menu_option.au"/> </prompt> </noinput>
<nomatch> <prompt> <audio src="flash:menu_option.au"/> </prompt> </nomatch>
46
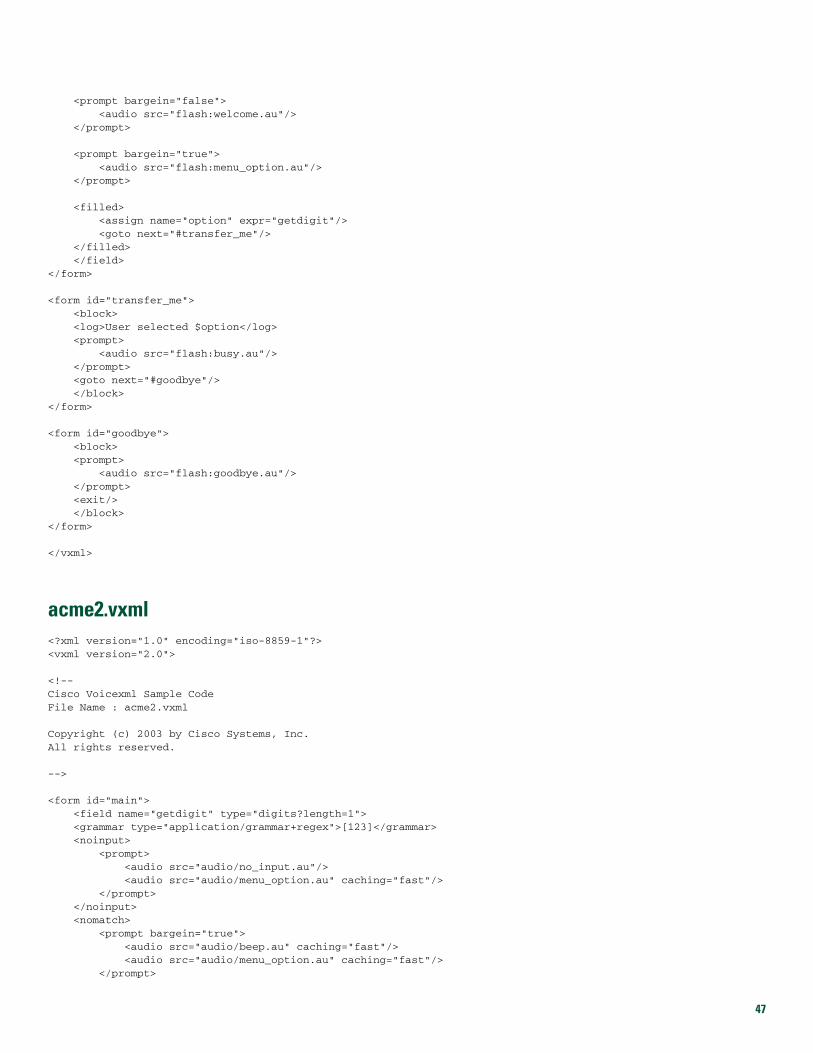
<prompt bargein="false"> <audio src="flash:welcome.au"/> </prompt>
<prompt bargein="true"> <audio src="flash:menu_option.au"/> </prompt>
<filled> <assign name="option" expr="getdigit"/> <goto next="#transfer_me"/> </filled> </field> </form>
<form id="transfer_me"> <block> <log>User selected $option</log> <prompt> <audio src="flash:busy.au"/> </prompt> <goto next="#goodbye"/> </block> </form>
<form id="goodbye"> <block> <prompt> <audio src="flash:goodbye.au"/> </prompt> <exit/> </block> </form>
</vxml>
acme2.vxml<?xml version="1.0" encoding="iso-8859-1"?> <vxml version="2.0">
<!-- Cisco Voicexml Sample Code File Name : acme2.vxml
Copyright (c) 2003 by Cisco Systems, Inc. All rights reserved.
-->
<form id="main"> <field name="getdigit" type="digits?length=1"> <grammar type="application/grammar+regex">[123]</grammar> <noinput> <prompt> <audio src="audio/no_input.au"/> <audio src="audio/menu_option.au" caching="fast"/> </prompt> </noinput> <nomatch> <prompt bargein="true"> <audio src="audio/beep.au" caching="fast"/> <audio src="audio/menu_option.au" caching="fast"/> </prompt>
47
</nomatch>
<prompt bargein="false"> <audio src="audio/welcome.au"/> </prompt>
<prompt bargein="true"> <audio src="audio/menu_option.au" caching="fast"/> </prompt>
<filled> <submit next="http://HTTP-SERVER/quickstart/acme.php" method="post" namelist="getdigit"/> </filled> </field> </form>
</vxml>
acme3.vxml<?xml version="1.0" encoding="iso-8859-1"?> <vxml version="2.0">
<!-- Cisco Voicexml Sample Code File Name : acme3.vxml Description: RAM recording demo
Copyright (c) 2003 by Cisco Systems, Inc. All rights reserved.
-->
<form id="main"> <field name="getdigit" type="digits?length=1"> <grammar type="application/grammar+regex">[123]</grammar> <noinput> <prompt> <audio src="audio/no_input.au"/> <audio src="audio/menu_option.au" caching="fast"/> </prompt> </noinput> <nomatch> <prompt bargein="true"> <audio src="audio/beep.au" caching="fast"/> <audio src="audio/menu_option.au" caching="fast"/> </prompt> </nomatch>
<prompt bargein="false"> <audio src="audio/welcome.au"/> </prompt>
<prompt bargein="true"> <audio src="audio/menu_option.au" caching="fast"/> </prompt>
<filled> <submit next="http://HTTP-SERVER/quickstart/acme_ram.php" method="post" namelist="getdigit"/> </filled> </field> </form>
</vxml>
48
acme4.vxml<?xml version="1.0" encoding="iso-8859-1"?> <vxml version="2.0">
<!-- Cisco Voicexml Sample Code File Name : acme4.vxml Description: HTTP recording demo
Copyright (c) 2003 by Cisco Systems, Inc. All rights reserved.
-->
<var name="option"/>
<form id="main"> <field name="getdigit" type="digits?length=1"> <grammar type="application/grammar+regex">[123]</grammar> <noinput> <prompt> <audio src="audio/no_input.au"/> <audio src="audio/menu_option.au" caching="fast"/> </prompt> </noinput> <nomatch> <prompt bargein="true"> <audio src="audio/beep.au" caching="fast"/> <audio src="audio/menu_option.au" caching="fast"/> </prompt> </nomatch>
<prompt bargein="false"> <audio src="audio/welcome.au"/> </prompt>
<prompt bargein="true"> <audio src="audio/menu_option.au" caching="fast"/> </prompt>
<filled> <assign name="option" expr="getdigit"/> <if cond="getdigit=='3'"> <goto next="#stream_recording"/> <else/> <submit next="http://HTTP-SERVER/quickstart/acme.php" method="post" namelist="getdigit"/> </if> </filled> </field> </form>
<form id="stream_recording"> <var name="mydur"/> <var name="myterm"/> <var name="mysiz"/>
<record name="recording" type="audio/basic;codec=g711ulaw" maxtime="60s" cisco-destexpr="'http://HTTP-SERVER/quickstart/streamrec.php?audiofile=stream.au'" dtmfterm="true"> <prompt> <audio src="audio/record.au" caching="fast"/> </prompt> <prompt> <audio src="audio/beep.au"/>
49
</prompt> </record> <block> <cisco-puts>Audio sent to streamrec.php PHP servlet</cisco-puts> <!-- Replaying recorded file --> <prompt> <audio src="audio/processing.au"/> </prompt> <prompt> <audio src="audio/recorded.au"/> </prompt> <prompt> <audio src="http://HTTP-SERVER/quickstart/stream.au" caching="safe" fetchint="10s"/> </prompt> <prompt> <audio src="audio/goodbye.au"/> </prompt> </block>
<filled namelist="recording"> <assign name="mydur" expr="recording$.duration"/> <assign name="mysiz" expr="recording$.size"/> <assign name="myterm" expr="recording$.termchar"/> <cisco-puts>DURATION IS <cisco-putvar namelist="mydur"/></cisco-puts> <cisco-puts>SIZE IS <cisco-putvar namelist="mysiz"/></cisco-puts> <cisco-puts>TERMCHAR IS <cisco-putvar namelist="myterm"/></cisco-puts> </filled> </form>
</vxml>
acme5.vxml<?xml version="1.0" encoding="UTF-8"?><vxml xmlns="http://www.w3.org/2001/vxml" xmlns:conf="http://www.w3.org/2002/vxml-conformance" version="2.0"><!--Cisco Voicexml Sample Code for testing tts/asr server with mrcp.This script should work with both mrcp1 and mrcp2.File Name : acme2.vxml
Copyright (c) 2003 by Cisco Systems, Inc.All rights reserved.-->
<form><field name="day"> <prompt> What day is it </prompt> <grammar version="1.0" xml:lang="en-US" root="action" xmlns="http://www.w3.org/2001/06/grammar"> <rule id="action" scope="public"> <one-of> <item> monday </item> <item> tuesday </item> <item> wednesday </item> <item> thursday </item> <item> friday </item> <item> saturday </item> <item> sunday </item>
</one-of> </rule> </grammar>
50
<filled><prompt> You said <value expr="day"/></prompt> </filled> </field> </form></vxml>
acme6.vxml<?xml version="1.0" encoding="UTF-8"?><vxml xmlns="http://www.w3.org/2001/vxml" xmlns:conf="http://www.w3.org/2002/vxml-conformance" version="2.0"><!--Cisco Voicexml Sample Code for bridge-transfer.File Name : acme4.vxmlCopyright (c) 2003 by Cisco Systems, Inc.All rights reserved.--><catch event="connection.disconnect.transfer"> <log> Connection with the callee established </log> </catch> <form id="xfer"> <!-- Play music while attempting to connect to far-end --> <transfer name="mycall" dest="tel:+5550122" transferaudio="music.wav" connecttimeout="60s" bridge="true"> <!-- queued and played before starting the transfer --> <prompt> Please wait... </prompt> <filled> <if cond="mycall == 'busy'"> <prompt> Riley's line is busy. </prompt> <elseif cond="mycall == 'noanswer'"/> <prompt> Riley can't answer the phone now. </prompt> </if> </filled> </transfer></form>
</vxml>
acme_hybrid.tcl# Script Version: 1.0.0 # Script Name: acme_hybrid # #------------------------------------------------------------------------------ # # Copyright (c) 2003 by Cisco Systems, Inc. # All rights reserved. # #------------------------------------------------------------------------------ # # Description: # # This sample TCL-VXML hybrid application demonstrates how to separate the VXML # portion to handle the IVR and the TCL portion to handle call control. The VXML # dialogs will play prompts and collect inputs. The main TCL script handles the # call control portion which provides the equivalent function of the standard VXML # Transfer. When the user calls into the gateway, a VXML dialog is invoked. The # VXML dialog queries user input from a menu option. # The VXML document returned presents the user with choices of whom he can call. # The TCL document reads av pair values with a phone number corresponding to user # input and places the call.
51
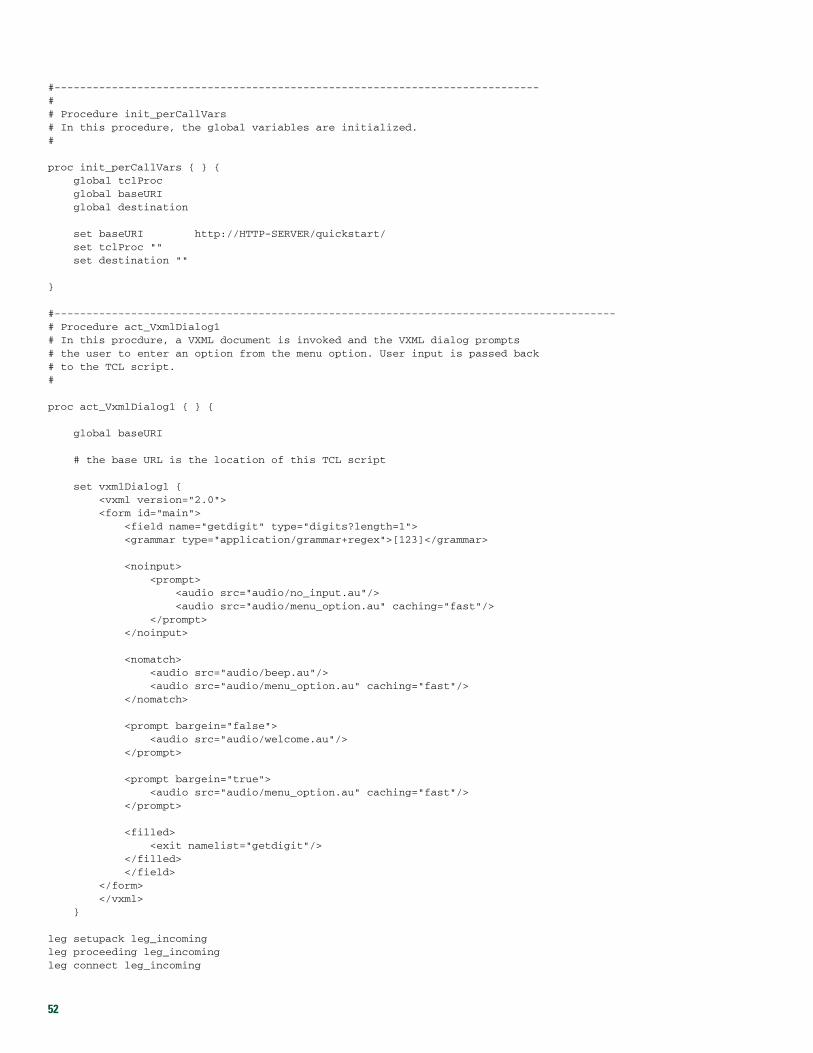
#---------------------------------------------------------------------------- # # Procedure init_perCallVars # In this procedure, the global variables are initialized. #
proc init_perCallVars { } { global tclProc global baseURI global destination
set baseURI http://HTTP-SERVER/quickstart/ set tclProc "" set destination ""
}
#---------------------------------------------------------------------------------------- # Procedure act_VxmlDialog1 # In this procdure, a VXML document is invoked and the VXML dialog prompts # the user to enter an option from the menu option. User input is passed back # to the TCL script. #
proc act_VxmlDialog1 { } {
global baseURI
# the base URL is the location of this TCL script
set vxmlDialog1 { <vxml version="2.0"> <form id="main"> <field name="getdigit" type="digits?length=1"> <grammar type="application/grammar+regex">[123]</grammar>
<noinput> <prompt> <audio src="audio/no_input.au"/> <audio src="audio/menu_option.au" caching="fast"/> </prompt> </noinput>
<nomatch> <audio src="audio/beep.au"/> <audio src="audio/menu_option.au" caching="fast"/> </nomatch>
<prompt bargein="false"> <audio src="audio/welcome.au"/> </prompt>
<prompt bargein="true"> <audio src="audio/menu_option.au" caching="fast"/> </prompt>
<filled> <exit namelist="getdigit"/> </filled> </field> </form> </vxml> }
leg setupack leg_incoming leg proceeding leg_incoming leg connect leg_incoming
52
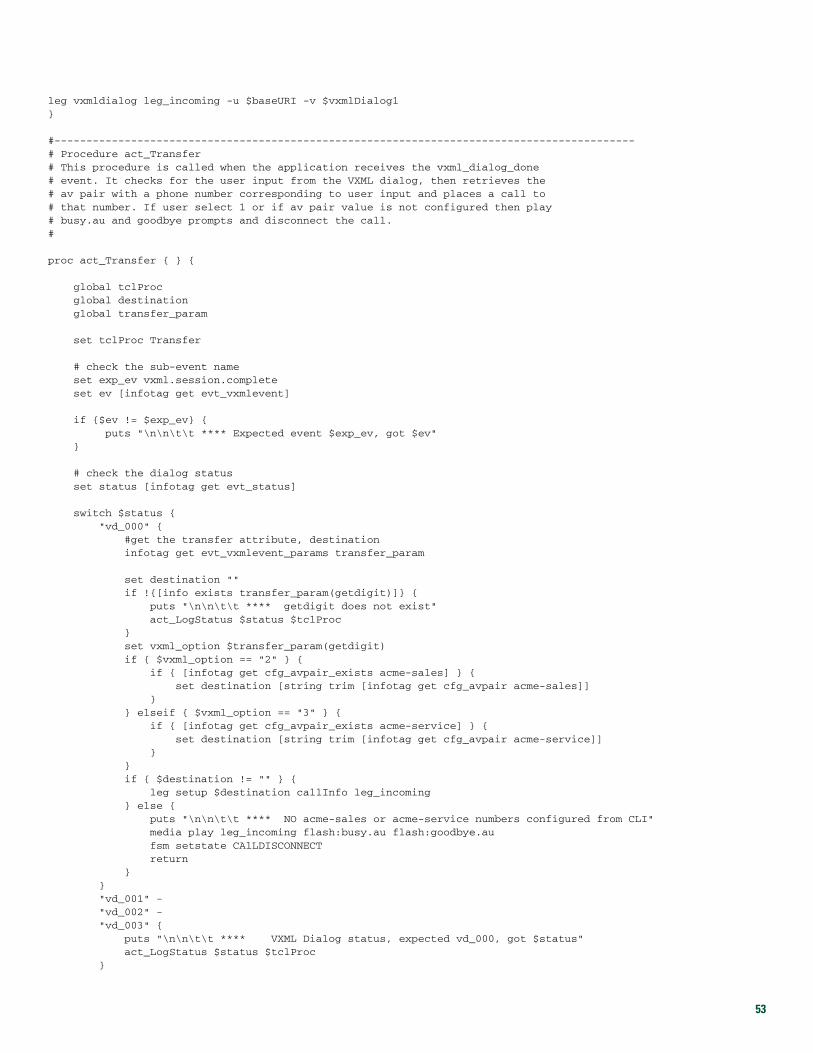
leg vxmldialog leg_incoming -u $baseURI -v $vxmlDialog1 }
#------------------------------------------------------------------------------------------- # Procedure act_Transfer # This procedure is called when the application receives the vxml_dialog_done # event. It checks for the user input from the VXML dialog, then retrieves the # av pair with a phone number corresponding to user input and places a call to # that number. If user select 1 or if av pair value is not configured then play # busy.au and goodbye prompts and disconnect the call. #
proc act_Transfer { } {
global tclProc global destination global transfer_param
set tclProc Transfer
# check the sub-event name set exp_ev vxml.session.complete set ev [infotag get evt_vxmlevent]
if {$ev != $exp_ev} { puts "\n\n\t\t **** Expected event $exp_ev, got $ev" }
# check the dialog status set status [infotag get evt_status]
switch $status { "vd_000" { #get the transfer attribute, destination infotag get evt_vxmlevent_params transfer_param
set destination "" if !{[info exists transfer_param(getdigit)]} { puts "\n\n\t\t **** getdigit does not exist" act_LogStatus $status $tclProc } set vxml_option $transfer_param(getdigit) if { $vxml_option == "2" } { if { [infotag get cfg_avpair_exists acme-sales] } { set destination [string trim [infotag get cfg_avpair acme-sales]] } } elseif { $vxml_option == "3" } { if { [infotag get cfg_avpair_exists acme-service] } { set destination [string trim [infotag get cfg_avpair acme-service]] } } if { $destination != "" } { leg setup $destination callInfo leg_incoming } else { puts "\n\n\t\t **** NO acme-sales or acme-service numbers configured from CLI" media play leg_incoming flash:busy.au flash:goodbye.au fsm setstate CAlLDISCONNECT return } } "vd_001" - "vd_002" - "vd_003" { puts "\n\n\t\t **** VXML Dialog status, expected vd_000, got $status" act_LogStatus $status $tclProc }
53
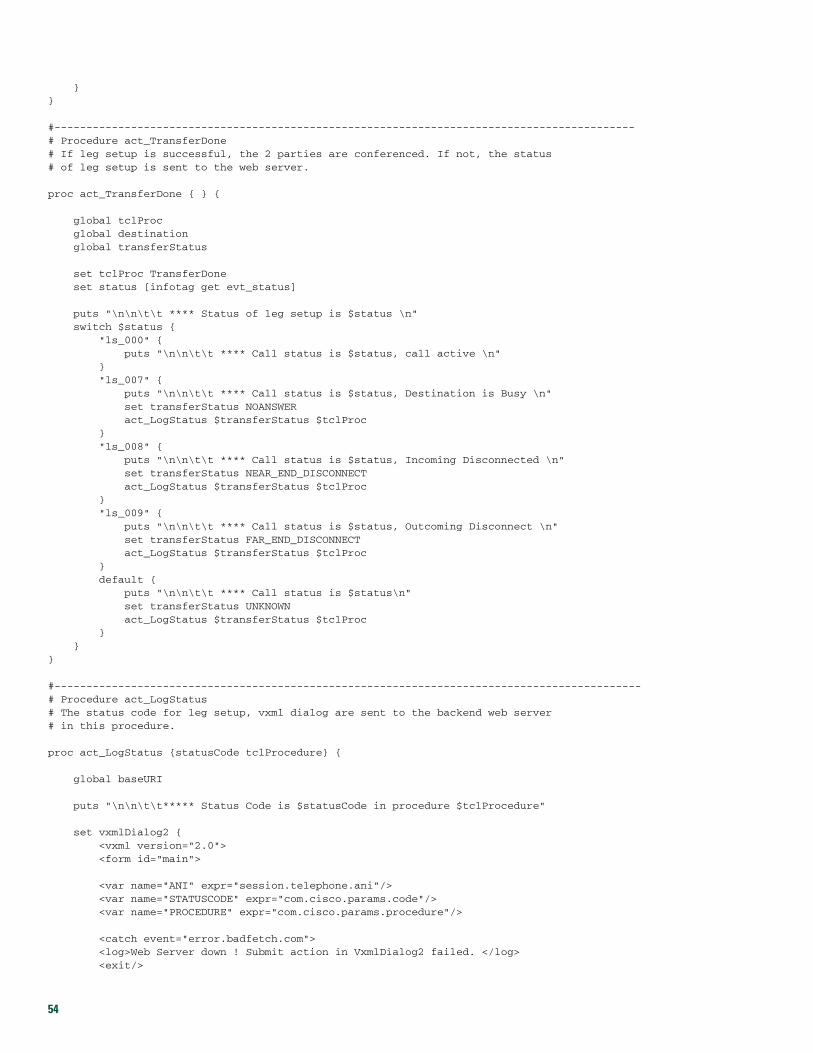
} }
#------------------------------------------------------------------------------------------- # Procedure act_TransferDone # If leg setup is successful, the 2 parties are conferenced. If not, the status # of leg setup is sent to the web server.
proc act_TransferDone { } {
global tclProc global destination global transferStatus
set tclProc TransferDone set status [infotag get evt_status]
puts "\n\n\t\t **** Status of leg setup is $status \n" switch $status { "ls_000" { puts "\n\n\t\t **** Call status is $status, call active \n" } "ls_007" { puts "\n\n\t\t **** Call status is $status, Destination is Busy \n" set transferStatus NOANSWER act_LogStatus $transferStatus $tclProc } "ls_008" { puts "\n\n\t\t **** Call status is $status, Incoming Disconnected \n" set transferStatus NEAR_END_DISCONNECT act_LogStatus $transferStatus $tclProc } "ls_009" { puts "\n\n\t\t **** Call status is $status, Outcoming Disconnect \n" set transferStatus FAR_END_DISCONNECT act_LogStatus $transferStatus $tclProc } default { puts "\n\n\t\t **** Call status is $status\n" set transferStatus UNKNOWN act_LogStatus $transferStatus $tclProc } } }
#-------------------------------------------------------------------------------------------- # Procedure act_LogStatus # The status code for leg setup, vxml dialog are sent to the backend web server # in this procedure.
proc act_LogStatus {statusCode tclProcedure} {
global baseURI
puts "\n\n\t\t***** Status Code is $statusCode in procedure $tclProcedure"
set vxmlDialog2 { <vxml version="2.0"> <form id="main">
<var name="ANI" expr="session.telephone.ani"/> <var name="STATUSCODE" expr="com.cisco.params.code"/> <var name="PROCEDURE" expr="com.cisco.params.procedure"/>
<catch event="error.badfetch.com"> <log>Web Server down ! Submit action in VxmlDialog2 failed. </log> <exit/>
54
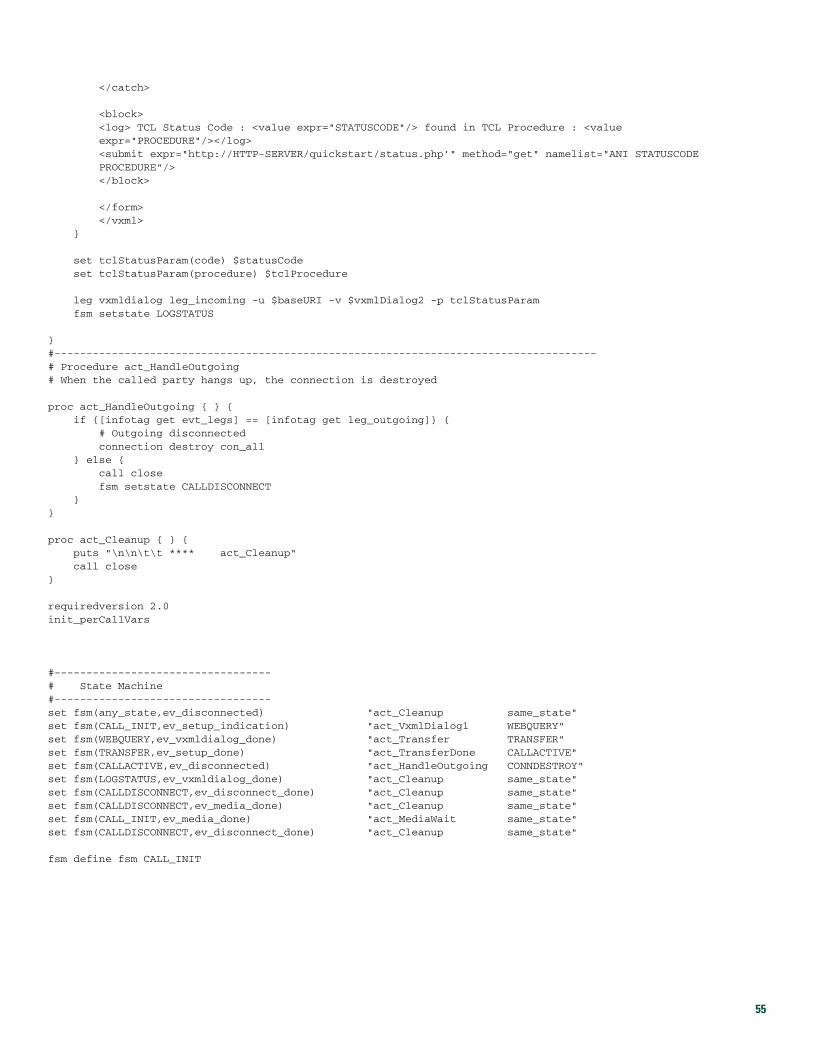
</catch>
<block> <log> TCL Status Code : <value expr="STATUSCODE"/> found in TCL Procedure : <value expr="PROCEDURE"/></log> <submit expr="http://HTTP-SERVER/quickstart/status.php'" method="get" namelist="ANI STATUSCODE PROCEDURE"/> </block>
</form> </vxml> }
set tclStatusParam(code) $statusCode set tclStatusParam(procedure) $tclProcedure
leg vxmldialog leg_incoming -u $baseURI -v $vxmlDialog2 -p tclStatusParam fsm setstate LOGSTATUS
} #------------------------------------------------------------------------------------- # Procedure act_HandleOutgoing # When the called party hangs up, the connection is destroyed
proc act_HandleOutgoing { } { if {[infotag get evt_legs] == [infotag get leg_outgoing]} { # Outgoing disconnected connection destroy con_all } else { call close fsm setstate CALLDISCONNECT } }
proc act_Cleanup { } { puts "\n\n\t\t **** act_Cleanup" call close }
requiredversion 2.0 init_perCallVars
#---------------------------------- # State Machine #---------------------------------- set fsm(any_state,ev_disconnected) "act_Cleanup same_state" set fsm(CALL_INIT,ev_setup_indication) "act_VxmlDialog1 WEBQUERY"set fsm(WEBQUERY,ev_vxmldialog_done) "act_Transfer TRANSFER"set fsm(TRANSFER,ev_setup_done) "act_TransferDone CALLACTIVE"set fsm(CALLACTIVE,ev_disconnected) "act_HandleOutgoing CONNDESTROY"set fsm(LOGSTATUS,ev_vxmldialog_done) "act_Cleanup same_state" set fsm(CALLDISCONNECT,ev_disconnect_done) "act_Cleanup same_state" set fsm(CALLDISCONNECT,ev_media_done) "act_Cleanup same_state" set fsm(CALL_INIT,ev_media_done) "act_MediaWait same_state" set fsm(CALLDISCONNECT,ev_disconnect_done) "act_Cleanup same_state"
fsm define fsm CALL_INIT
55
acme8.vxml<?xml version="1.0" encoding="iso-8859-1"?><vxml version="2.0"><!--Cisco Voicexml Sample Code for using secure http url access.File Name : acme1.vxmlCopyright (c) 2003 by Cisco Systems, Inc.All rights reserved.--><form id="form0"><property name="fetchtimeout" value="20s"/> <block> <log> VXML APP TRIGGERED </log> </block> <block> <prompt> <audio src="https://http-server1/audio/welcome.au"/> </prompt> <log> testing secure http url access:END: passed</log> </block> </form></vxml>
56
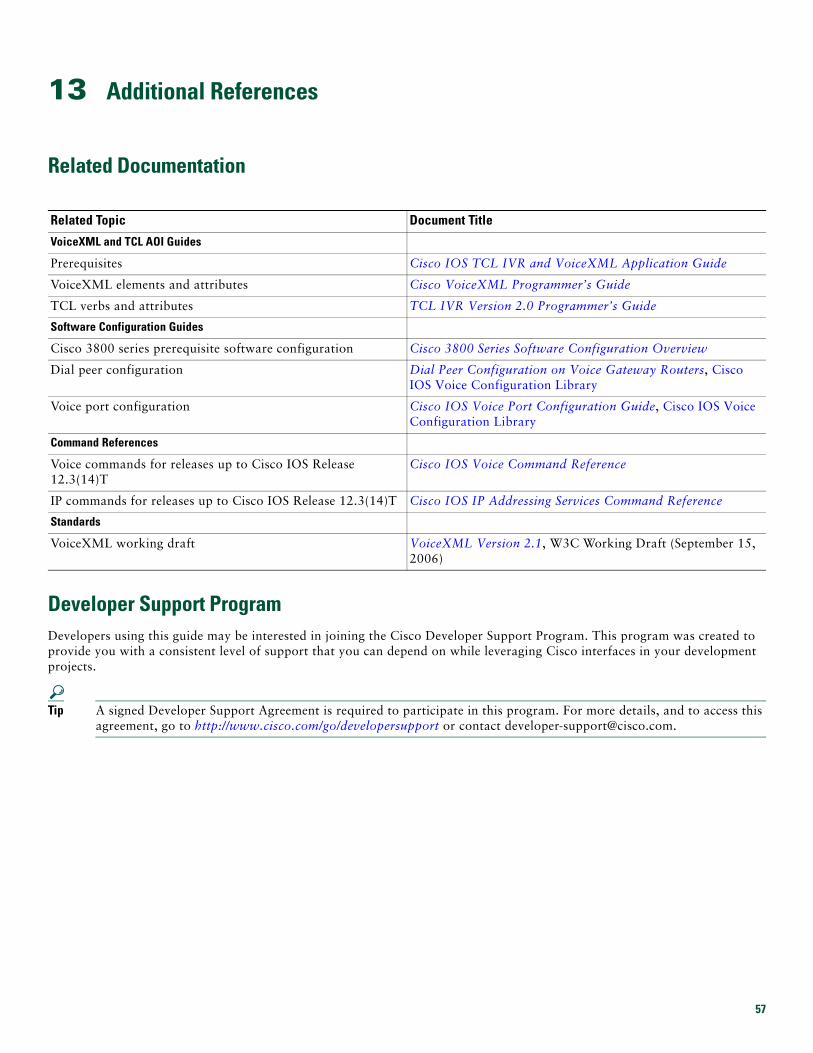
13 Additional References
Related Documentation
Developer Support ProgramDevelopers using this guide may be interested in joining the Cisco Developer Support Program. This program was created to provide you with a consistent level of support that you can depend on while leveraging Cisco interfaces in your development projects.
Tip A signed Developer Support Agreement is required to participate in this program. For more details, and to access this agreement, go to http://www.cisco.com/go/developersupport or contact [email protected].
Related Topic Document Title
VoiceXML and TCL AOI Guides
Prerequisites Cisco IOS TCL IVR and VoiceXML Application Guide
VoiceXML elements and attributes Cisco VoiceXML Programmer’s Guide
TCL verbs and attributes TCL IVR Version 2.0 Programmer’s Guide
Software Configuration Guides
Cisco 3800 series prerequisite software configuration Cisco 3800 Series Software Configuration Overview
Dial peer configuration Dial Peer Configuration on Voice Gateway Routers, Cisco IOS Voice Configuration Library
Voice port configuration Cisco IOS Voice Port Configuration Guide, Cisco IOS Voice Configuration Library
Command References
Voice commands for releases up to Cisco IOS Release 12.3(14)T
Cisco IOS Voice Command Reference
IP commands for releases up to Cisco IOS Release 12.3(14)T Cisco IOS IP Addressing Services Command Reference
Standards
VoiceXML working draft VoiceXML Version 2.1, W3C Working Draft (September 15, 2006)
57
Americas HeadquartersCisco Systems, Inc.170 West Tasman DriveSan Jose, CA 95134-1706USAwww.cisco.comTel: 408 526-4000
800 553-NETS (6387)Fax: 408 527-0883
Asia Pacific HeadquartersCisco Systems, Inc.168 Robinson Road#28-01 Capital TowerSingapore 068912www.cisco.comTel: +65 6317 7777Fax: +65 6317 7799
Europe HeadquartersCisco Systems International BVHaarlerbergparkHaarlerbergweg 13-191101 CH AmsterdamThe Netherlandswww-europe.cisco.comTel: 31 0 800 020 0791Fax: 31 0 20 357 1100
Cisco has more than 200 offices worldwide. Addresses, phone numbers, and fax numbers are listed on the Cisco Website at www.cisco.com/go/offices.
Cisco, Cisco Systems, the Cisco logo, and the Cisco Systems logo are registered trademarks or trademarks of Cisco Systems, Inc. and/or its affiliatesin the United States and certain other countries. All other trademarks mentioned in this document or Website are the property of their respectiveowners. The use of the word partner does not imply a partnership relationship between Cisco and any other company. (0705R)
© 2007, 2008 Cisco Systems, Inc. All rights reserved.
Printed in the USA on recycled paper containing 10% postconsumer waste.