Embed Size (px)
Citation preview

Cisco dCloud
dCloud: The Cisco Demo Cloud
© 2014 Cisco and/or its affiliates. All rights reserved. This document is Cisco Public Information. Page 1 of 20
Cisco Nexus 9000: NX-OS Programmability v1 Last Updated: 15-AUG-2014
About This Solution
The business demands f or f lexible, simplif ied and automated IT workf lows are driv ing the need f or Automation and
Programmability capabilities in the components of the data center - computing, networking, storage, and serv ices resources. A
modern network dev ice, be it a switch, a router or a serv ice appliance, has to support a wide range of automation f eatures and
prov ide robust APIs f or external tools. Both of f -the-shelf and custom-built, to be able to automatically prov ision network resources,
prov ide bandwidth allocation and latency guarantees to support network serv ice-lev el agreements (SLAs) and monitor the network
f or perf ormance and compliance needs.
Cisco Nexus 9000 Programmability f ocuses on the tools av ailable in Nexus 9000 f or programming on y our standalone switches.
About This Demonstration
This preconf igured demonstration includes scripted scenarios demonstrating the powerf ul capabilities of Nexus 9000
Programmability , such as:
Programmability : Py thon Scripting
o Serv iceability : Reduce Time-to-Resolution
o Visibility : Embedded Ev ent Manager (EEM) Integration
o Visibility : Graphite integration
Programmability : NX-API
o Dev elopment Tools: Sandbox
o Management/Monitoring Solutions: Splunk
o Execute Py thon Script remotely (manually )
o Orchestration and Automation: OnePK
o Conf iguration by Puppet
Demonstration Requirements
The table below outlines the requirements f or this preconf igured demonstration.
Table 1. Demonstration Requirements
Required Optional
● Laptop ● Cisco AnyConnect
Cisco dCloud
dCloud: The Cisco Demo Cloud
© 2014 Cisco and/or its affiliates. All rights reserved. This document is Cisco Public Information. Page 2 of 20
Demonstration Configuration
This demonstration contains pre-conf igured components to illustrate the scripted scenarios and f eatures of this solution. All access
inf ormation needed to complete the demonstration is located in the Topology and Servers menus of y our activ e demonstration.
Topology Menu. Click on any serv er in the topology and a popup window will appear with av ailable serv er options.
Servers Menu. Click on or next to any serv er name to display the av ailable serv er options and credentials.
Figure 1. Demonstration Topology
Demonstration Preparation
BEFORE DEMONSTRATING
We strongly recommend that y ou go through this process at least once, bef ore presenting in f ront of a liv e audience. This wil l allow
y ou to become f amiliar with the structure of the document and the demonstration.
PREPARATION IS KEY TO A SUCCESSFUL CUSTOMER PRESENTATION.
Follow the steps below to schedule y our demonstration and conf igure y our demonstration env ironment .
1. Browse to dcloud.cisco.com, select the location closest to y ou, and then login with y our Cisco.com credentials.
2. Schedule a demonstration. [Show Me How]
3. Test y our bandwidth f rom the demonstration location bef ore perf orming any demonstration scenario. [Show Me How]
4. Verif y y our demonstration has a status of Active under My Demonstrations on the My Dashboard page in the Cisco dCloud
UI.
It may take up to 15 minutes for your demonstration to become active.

Cisco dCloud
dCloud: The Cisco Demo Cloud
© 2014 Cisco and/or its affiliates. All rights reserved. This document is Cisco Public Information. Page 3 of 20
5. Access the demonstration workstation named wkst1 located at 198.18.133.36 and login using the f ollowing credentials:
Username: dcloud\demouser, Password: C1sco12345.
Recommended method : Use Cisco AnyConnect [Show Me How] and the local RDP client on your laptop . [Show Me
How]
Alternate method: Use the Cisco dCloud Remote Desktop client with HTML5. [Show Me How]
Accept any certif icates or warning.
Cisco dCloud
dCloud: The Cisco Demo Cloud
© 2014 Cisco and/or its affiliates. All rights reserved. This document is Cisco Public Information. Page 4 of 20
Scenario 1: Programmability: Python Scripting
In this scenario, we will show how Py thon is implemented on the N9000 by completing the f ollowing tasks:
Execute Py thon Script (in box) that will gather troubleshooting inf ormation and send it as an attachment to a prov ided email
address. This script will be executed by the py thon interpreter running on the N9K.
Embedded Ev ent Monitor (EEM) conf igured to detect when a user enters “conf iguration mode”. The action triggered by this
ev ent will call a py thon script (n9k_v isibility _1.py) which will create a backup of the current conf iguration f ile, store it locally and
send it to [email protected] as an attachment.
Use of Cisco Scheduler with Py thon Scripting. In this case, the Scheduler is conf igured to execute a Py thon Script ev ery
minute. The script gathers CPU utilization statistics, wraps it and sends it to the Graphite Server.
Demonstration Steps
Serviceability: Reduce Time-to-Resolution
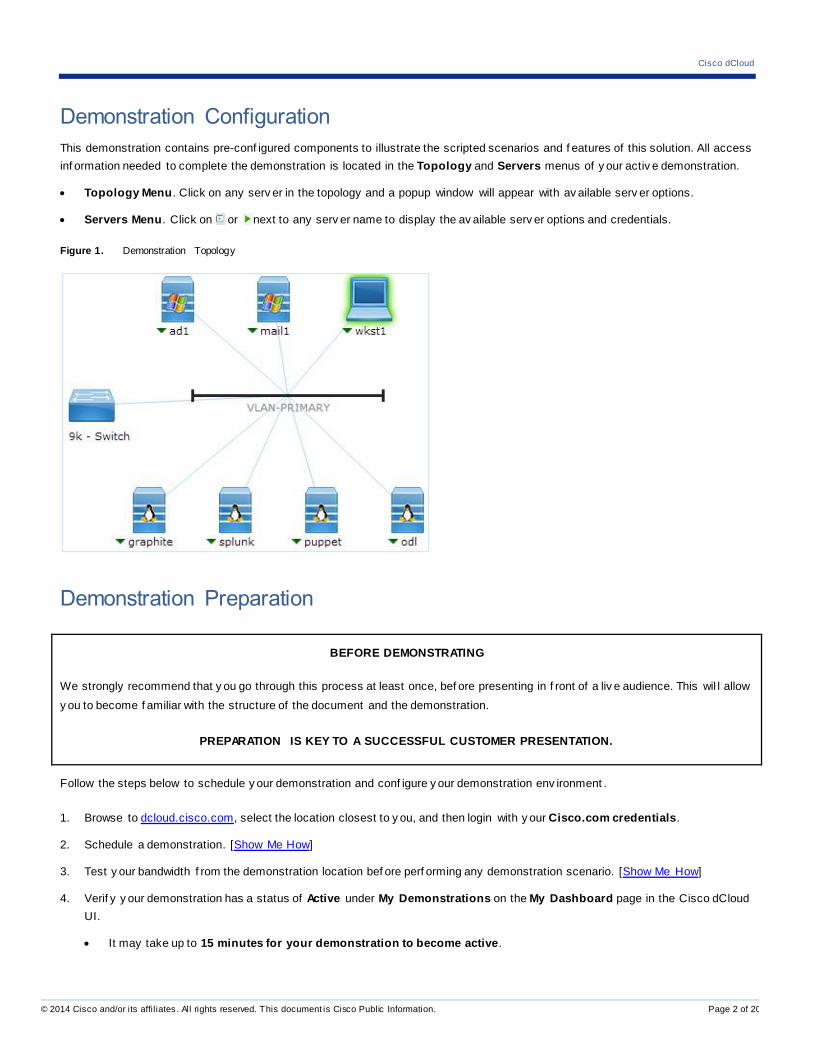
1. From the demonstration workstation, open an SSH session to the N9K.
2. From the taskbar, double click the PuTTY icon, select the pre-def ined N9K entry , and then login with the f ollowing credentials:
Username: admin, Password: C1sco12345.
Figure 2. PuTTY Window
NOTE: You might get a security warning when try ing to establish a SSH session with the N9K. Please ignore and click YES.
Cisco dCloud
dCloud: The Cisco Demo Cloud
© 2014 Cisco and/or its affiliates. All rights reserved. This document is Cisco Public Information. Page 5 of 20
3. This will establish an SSH session. Execute the f ollowing command: dir scripts and v erif y that the f ile
n9k_serviceability.py is present.
4. To check the proper f unctionality of the script, open a browser window by selecting the Google Chrome icon in the taskbar, or
on the desktop, and click the Outlook Web App icon in the browsers’ f av orites bar. The credentials will be pre- populated with
User name: dcloud\demouser and Password: C1sco12345. Click the Sign in button.
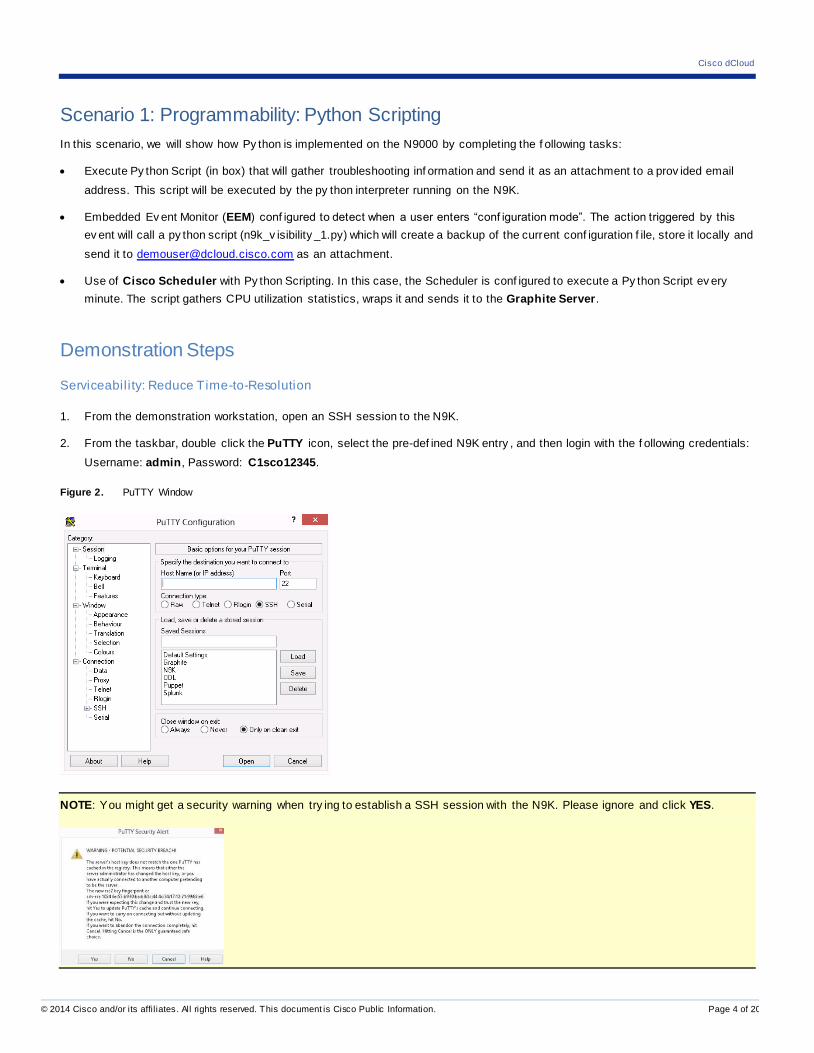
5. In the PuTTY window insert the f ollowing command: python scripts/n9k_serviceability.py. Wait f or the
troubleshooting inf ormation f or menu to appear the User is f ree to select any option. For this demonstration, we will select
option 2: Cisco OnePK by ty ping 2 and pressing enter.
NOTE: In some cases, depending on the size of the attachment, the exchange serv er will ref use the connection. Please try option
1 or 4 which ty pically inv olve smaller attachments.
Figure 3. Troubleshooting Information Menu
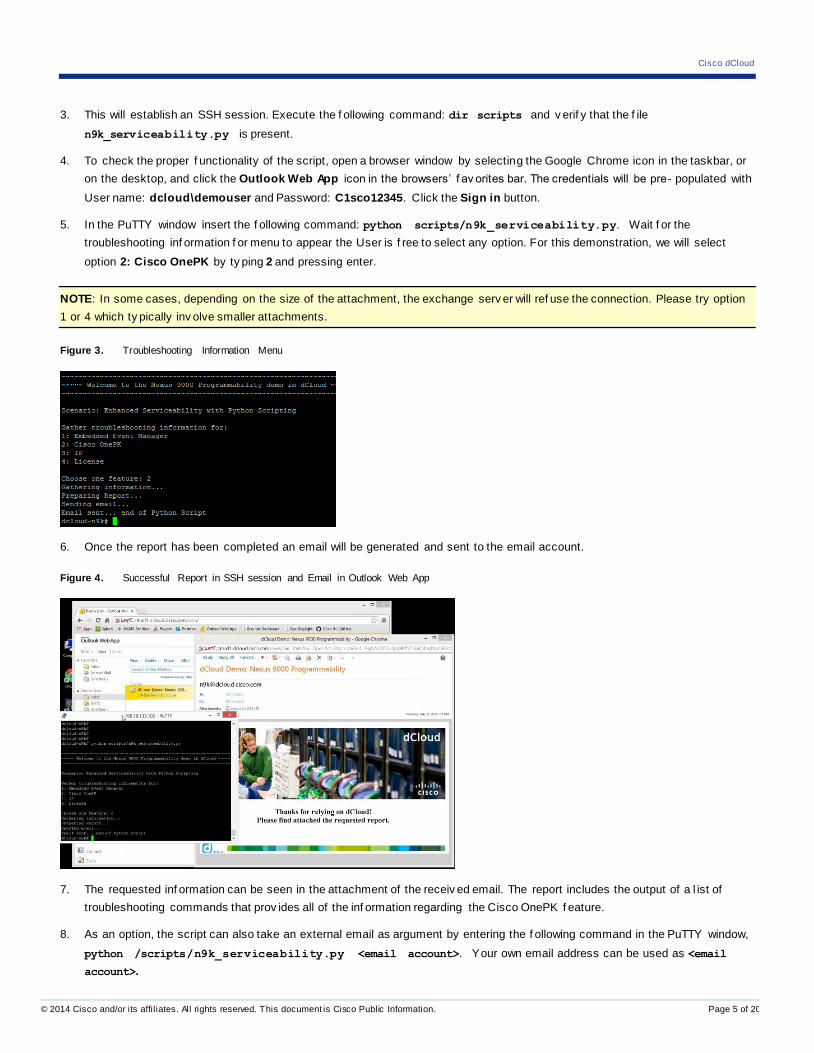
6. Once the report has been completed an email will be generated and sent to the email account.
Figure 4. Successful Report in SSH session and Email in Outlook Web App
7. The requested inf ormation can be seen in the attachment of the receiv ed email. The report includes the output of a l ist of
troubleshooting commands that prov ides all of the inf ormation regarding the Cisco OnePK f eature.
8. As an option, the script can also take an external email as argument by entering the f ollowing command in the PuTTY window,
python /scripts/n9k_serviceability.py <email account>. Your own email address can be used as <email
account>.
Cisco dCloud
dCloud: The Cisco Demo Cloud
© 2014 Cisco and/or its affiliates. All rights reserved. This document is Cisco Public Information. Page 6 of 20
9. Select option 2, Cisco OnePK again, and an email will be sent to the Cisco dCloud email account and to the external email
account entered abov e.
Visibil ity: Embedded Event Manager (EEM) Integration
The Embedded Ev ent Monitor (EEM) is conf igured to detect when a user enters show run eem. The action triggered by this
ev ent will call a py thon script which will create a backup of the current conf iguration f ile, store it locally and send it to
[email protected] as an attachment.
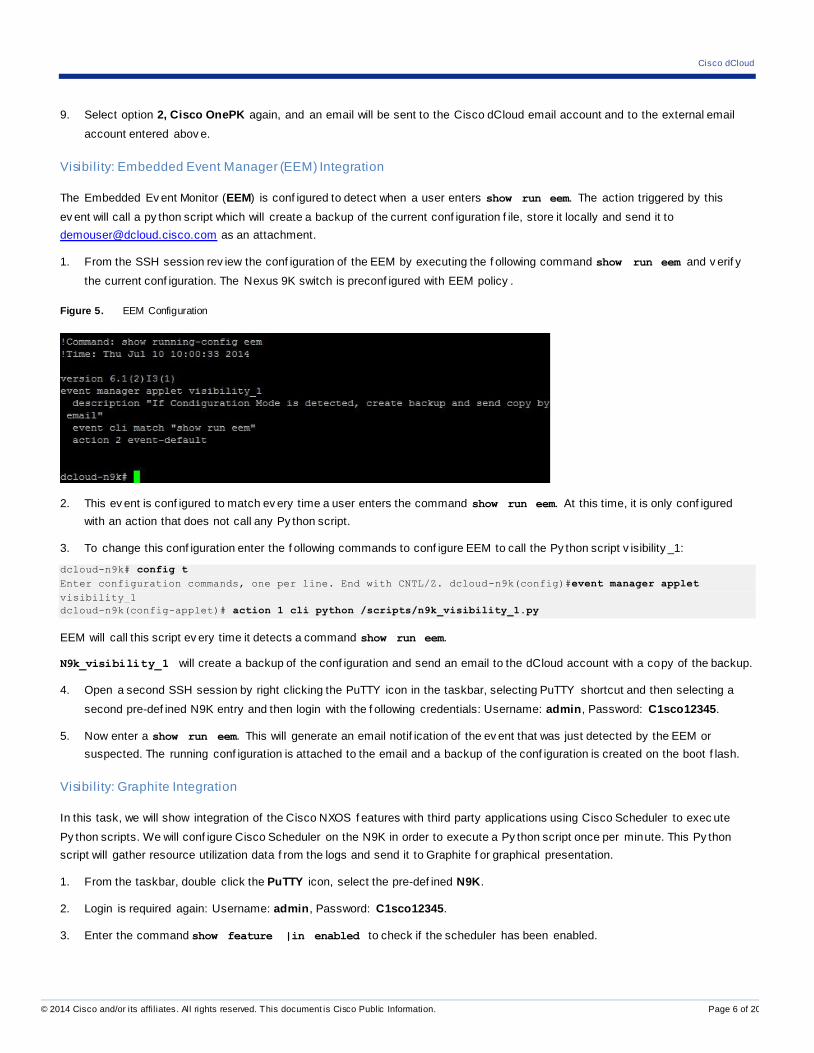
1. From the SSH session rev iew the conf iguration of the EEM by executing the f ollowing command show run eem and v erif y
the current conf iguration. The Nexus 9K switch is preconf igured with EEM policy .
Figure 5. EEM Configuration
2. This ev ent is conf igured to match ev ery time a user enters the command show run eem. At this time, it is only conf igured
with an action that does not call any Py thon script.
3. To change this conf iguration enter the f ollowing commands to conf igure EEM to call the Py thon script v isibility _1:
dcloud-n9k# config t
Enter configuration commands, one per line. End with CNTL/Z. dcloud-n9k(config)#event manager applet
visibility_1
dcloud-n9k(config-applet)# action 1 cli python /scripts/n9k_visibility_1.py
EEM will call this script ev ery time it detects a command show run eem.
N9k_visibility_1 will create a backup of the conf iguration and send an email to the dCloud account with a copy of the backup.
4. Open a second SSH session by right clicking the PuTTY icon in the taskbar, selecting PuTTY shortcut and then selecting a
second pre-def ined N9K entry and then login with the f ollowing credentials: Username: admin, Password: C1sco12345.
5. Now enter a show run eem. This will generate an email notif ication of the ev ent that was just detected by the EEM or
suspected. The running conf iguration is attached to the email and a backup of the conf iguration is created on the boot f lash.
Visibil ity: Graphite Integration
In this task, we will show integration of the Cisco NXOS f eatures with third party applications using Cisco Scheduler to exec ute
Py thon scripts. We will conf igure Cisco Scheduler on the N9K in order to execute a Py thon script once per minute. This Py thon
script will gather resource utilization data f rom the logs and send it to Graphite f or graphical presentation.
1. From the taskbar, double click the PuTTY icon, select the pre-def ined N9K.
2. Login is required again: Username: admin, Password: C1sco12345.
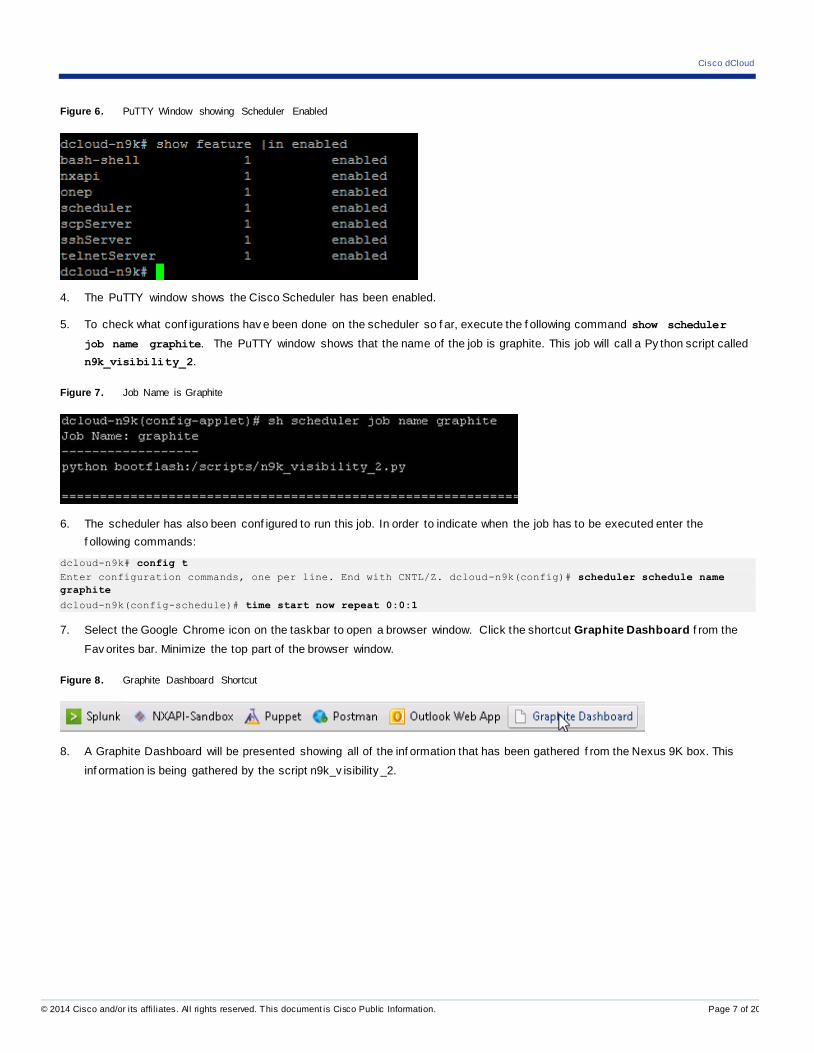
3. Enter the command show feature |in enabled to check if the scheduler has been enabled.
Cisco dCloud
dCloud: The Cisco Demo Cloud
© 2014 Cisco and/or its affiliates. All rights reserved. This document is Cisco Public Information. Page 7 of 20
Figure 6. PuTTY Window showing Scheduler Enabled
4. The PuTTY window shows the Cisco Scheduler has been enabled.
5. To check what conf igurations hav e been done on the scheduler so f ar, execute the f ollowing command show scheduler
job name graphite. The PuTTY window shows that the name of the job is graphite. This job will call a Py thon script called
n9k_visibility_2.
Figure 7. Job Name is Graphite
6. The scheduler has also been conf igured to run this job. In order to indicate when the job has to be executed enter the
f ollowing commands:
dcloud-n9k# config t
Enter configuration commands, one per line. End with CNTL/Z. dcloud-n9k(config)# scheduler schedule name
graphite
dcloud-n9k(config-schedule)# time start now repeat 0:0:1
7. Select the Google Chrome icon on the taskbar to open a browser window. Click the shortcut Graphite Dashboard f rom the
Fav orites bar. Minimize the top part of the browser window.
Figure 8. Graphite Dashboard Shortcut
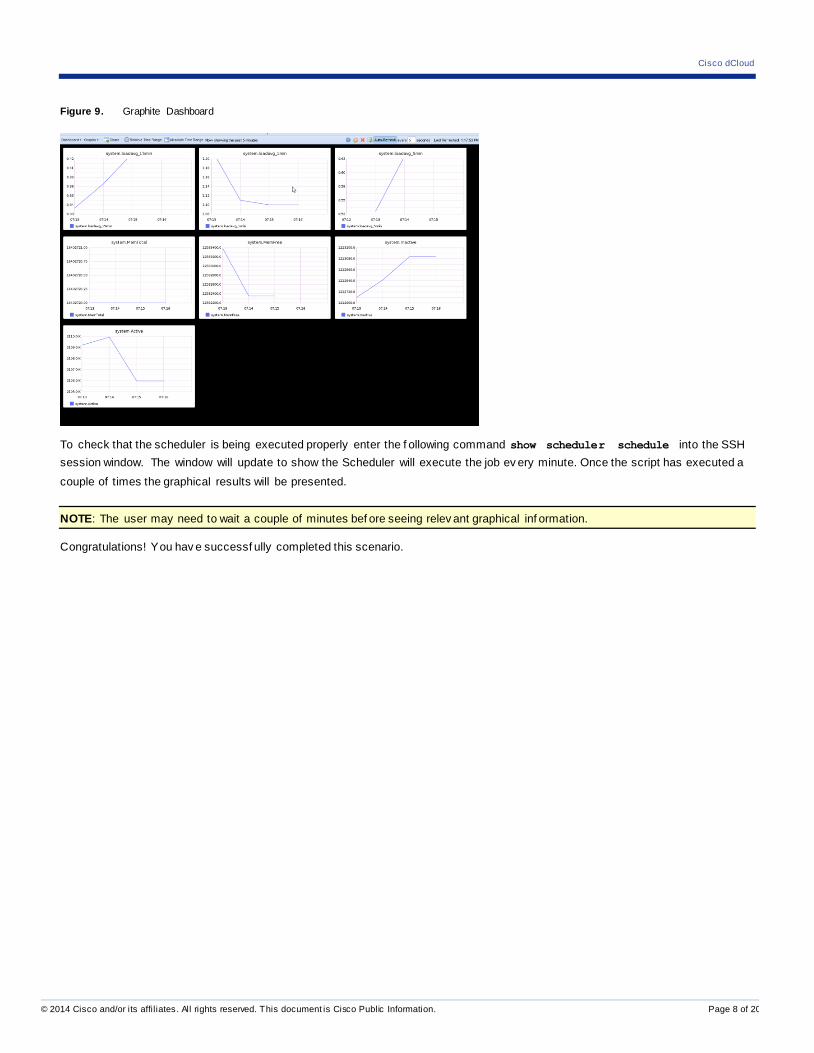
8. A Graphite Dashboard will be presented showing all of the inf ormation that has been gathered f rom the Nexus 9K box. This
inf ormation is being gathered by the script n9k_v isibility _2.
Cisco dCloud
dCloud: The Cisco Demo Cloud
© 2014 Cisco and/or its affiliates. All rights reserved. This document is Cisco Public Information. Page 8 of 20
Figure 9. Graphite Dashboard
To check that the scheduler is being executed properly enter the f ollowing command show scheduler schedule into the SSH
session window. The window will update to show the Scheduler will execute the job ev ery minute. Once the script has executed a
couple of times the graphical results will be presented.
NOTE: The user may need to wait a couple of minutes bef ore seeing relev ant graphical inf ormation.
Congratulations! You hav e successf ully completed this scenario.
Cisco dCloud
dCloud: The Cisco Demo Cloud
© 2014 Cisco and/or its affiliates. All rights reserved. This document is Cisco Public Information. Page 9 of 20
Scenario 2: Programmability: NX-API
In this scenario, we will cov er Programmability with Py thon using the NX-API Interf ace built into the Nexus 9K boxes. The f ollowing
tasks will be completed:
Explore Sandbox Web Interf ace
Dev elopment Tools: Postman
Splunk Integration
Running Py thon Remotely
Demonstration Steps
WEB NX-API Interface “Sandbox”
1. From the taskbar, click the Google Chrome icon, select the NXAPI Sandbox shortcut f rom the Fav orites bar. The standard
Cisco dCloud credentials, Username: admin, Password: C1sco12345, will auto-populate. Click the Log In button to be
presented with the Sandbox Interf ace.
NOTE: The user needs to be f amiliar with the HTTP POST and REST interf ace standards.
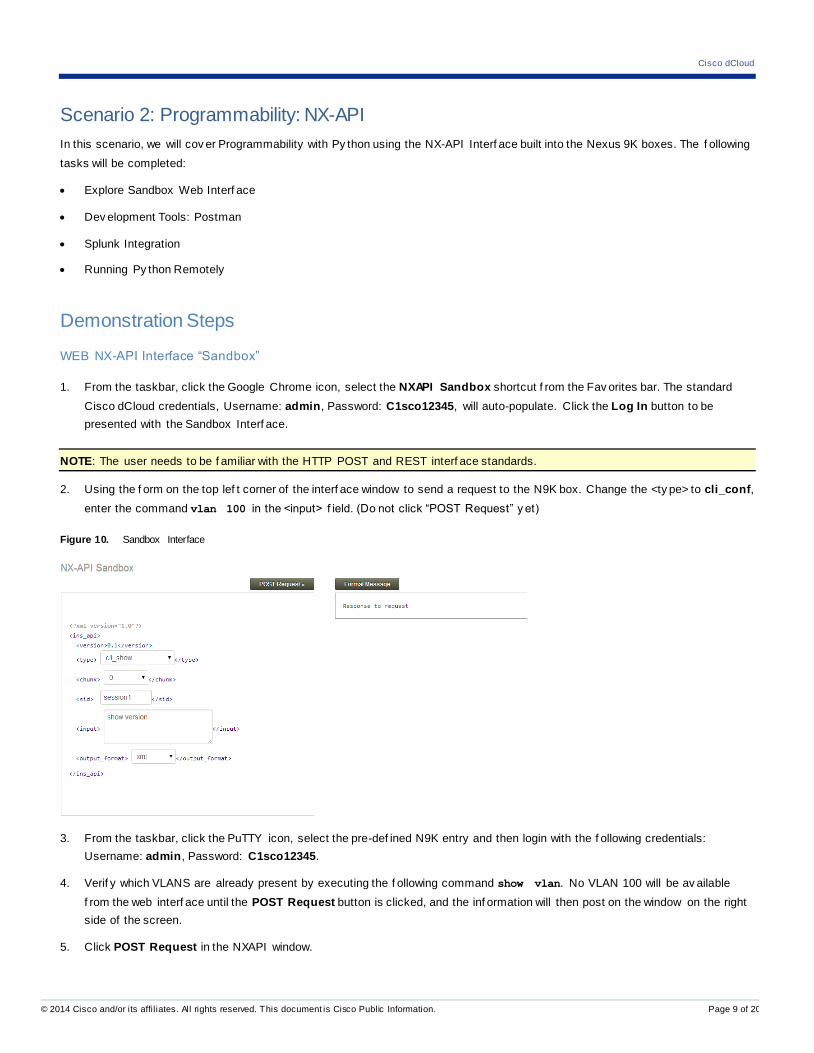
2. Using the f orm on the top lef t corner of the interf ace window to send a request to the N9K box. Change the <ty pe> to cli_conf,
enter the command vlan 100 in the <input> f ield. (Do not click “POST Request” y et)
Figure 10. Sandbox Interface
3. From the taskbar, click the PuTTY icon, select the pre-def ined N9K entry and then login with the f ollowing credentials:
Username: admin, Password: C1sco12345.
4. Verif y which VLANS are already present by executing the f ollowing command show vlan. No VLAN 100 will be av ailable
f rom the web interf ace until the POST Request button is clicked, and the inf ormation will then post on the window on the right
side of the screen.
5. Click POST Request in the NXAPI window.

Cisco dCloud
dCloud: The Cisco Demo Cloud
© 2014 Cisco and/or its affiliates. All rights reserved. This document is Cisco Public Information. Page 10 of 20
Figure 11. VLAN 100 Data
6. Go back to the SSH session to v iew the created VLAN 100, by executing the f ollowing command show vlan.
Figure 12. View VLAN 100 in a SSH
NOTE: Some other VLANS might hav e been created by other scripts, so expect to see VLANS other than “125”
Development Tools: Postman
Postman is a built-in web interf ace that is v ery usef ul for dev elopment and test purpose. REST is based on standards and so third
party applications like Postman which is an application in Google Chrome can be used.
1. From the taskbar, click the Google Chrome icon, select the Postman shortcut f rom the Fav orites bar.
2. From the Postman interf ace select the Basic Auth tab and enter the f ollowing credentials, Username: admin, Password:
C1sco12345. Click the Refresh headers button.
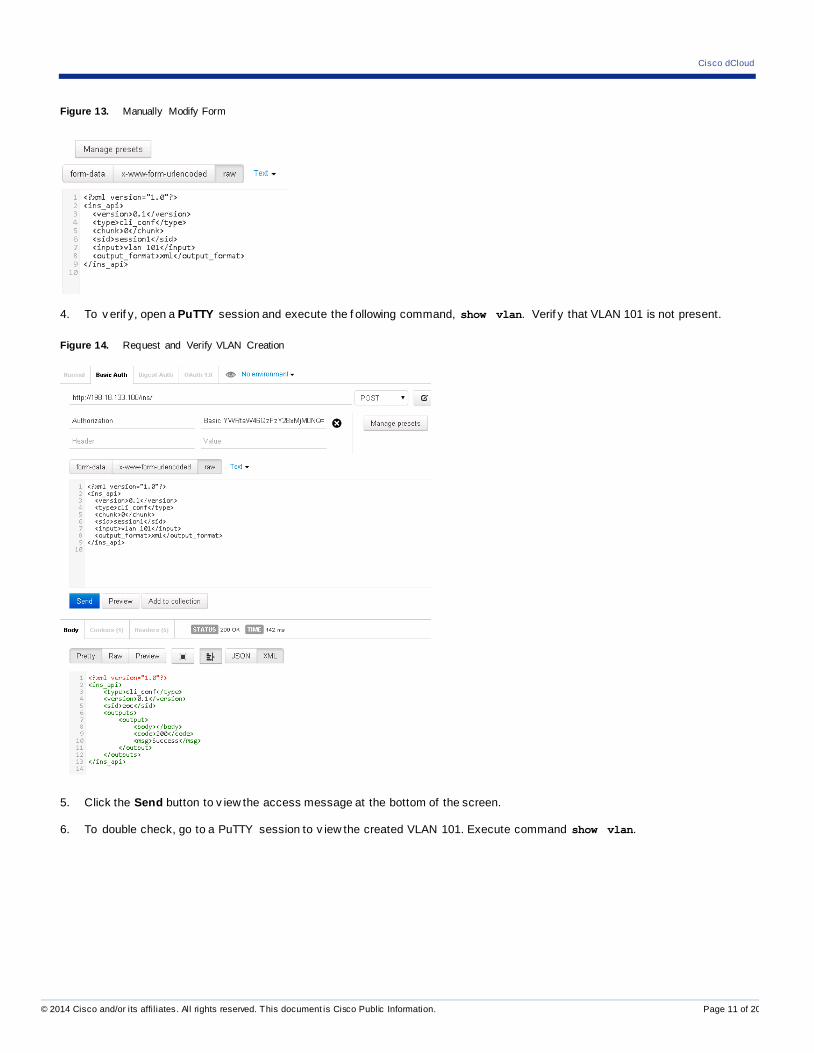
3. Check that the f orm contains <ty pe> cli_conf and the <input> vlan 101. If not, manually modif y the f orm.
Cisco dCloud
dCloud: The Cisco Demo Cloud
© 2014 Cisco and/or its affiliates. All rights reserved. This document is Cisco Public Information. Page 11 of 20
Figure 13. Manually Modify Form
4. To v erif y, open a PuTTY session and execute the f ollowing command, show vlan. Verif y that VLAN 101 is not present.
Figure 14. Request and Verify VLAN Creation
5. Click the Send button to v iew the access message at the bottom of the screen.
6. To double check, go to a PuTTY session to v iew the created VLAN 101. Execute command show vlan.
Cisco dCloud
dCloud: The Cisco Demo Cloud
© 2014 Cisco and/or its affiliates. All rights reserved. This document is Cisco Public Information. Page 12 of 20
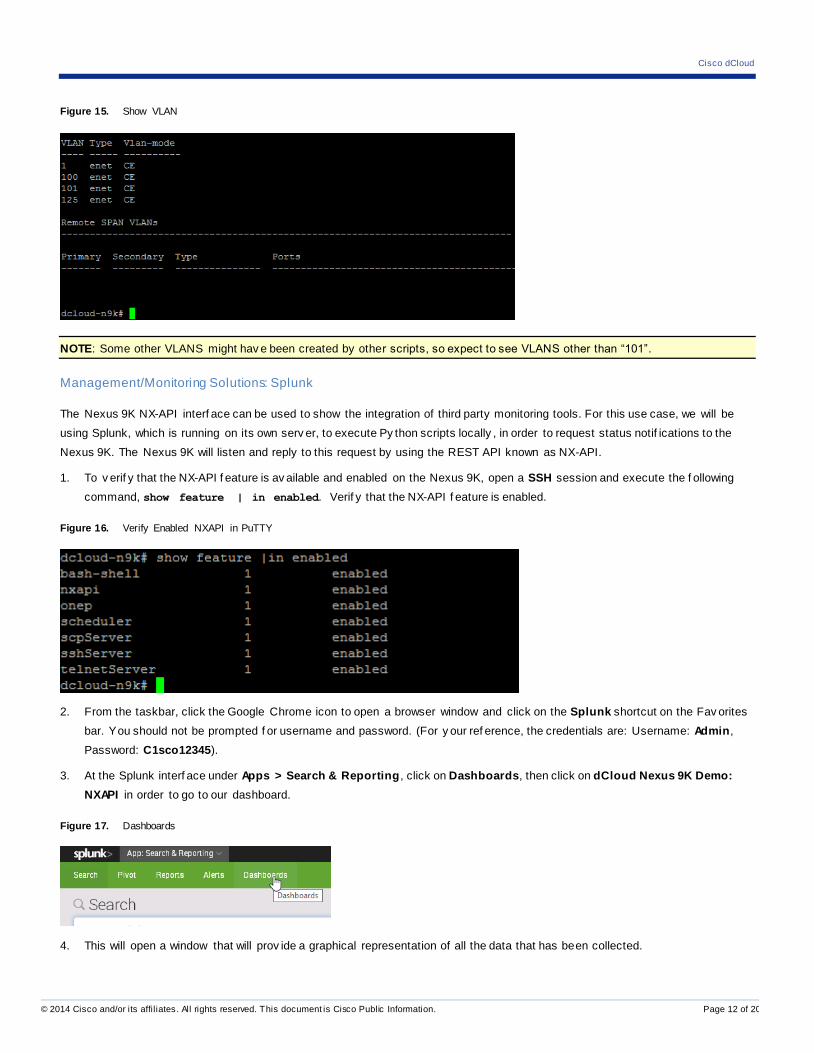
Figure 15. Show VLAN
NOTE: Some other VLANS might hav e been created by other scripts, so expect to see VLANS other than “101”.
Management/Monitoring Solutions: Splunk
The Nexus 9K NX-API interf ace can be used to show the integration of third party monitoring tools. For this use case, we will be
using Splunk, which is running on its own serv er, to execute Py thon scripts locally , in order to request status notif ications to the
Nexus 9K. The Nexus 9K will listen and reply to this request by using the REST API known as NX-API.
1. To v erif y that the NX-API f eature is av ailable and enabled on the Nexus 9K, open a SSH session and execute the f ollowing
command, show feature | in enabled. Verif y that the NX-API f eature is enabled.
Figure 16. Verify Enabled NXAPI in PuTTY
2. From the taskbar, click the Google Chrome icon to open a browser window and click on the Splunk shortcut on the Fav orites
bar. You should not be prompted f or username and password. (For y our ref erence, the credentials are: Username: Admin,
Password: C1sco12345).
3. At the Splunk interf ace under Apps > Search & Reporting , click on Dashboards, then click on dCloud Nexus 9K Demo:
NXAPI in order to go to our dashboard.
Figure 17. Dashboards
4. This will open a window that will prov ide a graphical representation of all the data that has been collected.

Cisco dCloud
dCloud: The Cisco Demo Cloud
© 2014 Cisco and/or its affiliates. All rights reserved. This document is Cisco Public Information. Page 13 of 20
Figure 18. Splunk Dashboard Graphs
NOTE: In case the graphs are not automatically showing data, please re-enable the scripts. From the window shown abov e, click
on Settings > Data Inputs > Scripts and proceed to disable all the scripts of source ty pe _json. Then enable them again.
5. Click on Settings in the upper right taskbar. From the Data section of the pop down window select Data inputs, and then
Scripts. The Scripts window will open showing a list of Py thon scripts that are being used f or each graphic display ed on the
dashboard. Each script will automatically generate the XML f orm and send the request to the NX-API interf ace of the Nexus
9K.
Figure 19. Python Scripts Being Used
6. At the Splunk interf ace under Apps > Search & Reporting , click on Dashboards > dCloud Nexus 9K Demo:NXAPI .

Cisco dCloud
dCloud: The Cisco Demo Cloud
© 2014 Cisco and/or its affiliates. All rights reserved. This document is Cisco Public Information. Page 14 of 20
7. To check the current f unction of the integration between Splunk and the NX-API, open a SSH session and create a VLAN by
executing the f ollowing commands:
dcloud-n9k# config t
dcloud-n9k(config)# vlan 103
8. Once the VLAN has been created, return to the Splunk dashboard to v iew the total VLANS on the Nexus 9K. One additional
VLAN has been created and the increment can be v iewed on the graph in real time.
Figure 20. Splunk Dashboard Graphs
Execute Python Script Remotely (manually)
Using a script to run Py thon ov er Windows on the dCloud workstation to connect to the Nexus 9K v ia NX-API. The Py thon script
will create XML f orms and send it to the Cisco Nexus 9K interf ace to create and delete VLANS in the Nexus 9K box in an inf ini te
loop. The result can be observ ed in the workstation command line or in the Splunk’s dashboard. Py thon has already been
installed.
NOTE: The user has to execute the script (shortcut in desktop) and press Ctrl+C in order to stop script execution. This script is just
done f or demonstration purposes.
1. From the Cisco dCloud workstation desktop click the Py thon script shortcut, n9k_nxapi_v…[ ]. This Py thon script will
create and delete VLANS in the loop.

Cisco dCloud
dCloud: The Cisco Demo Cloud
© 2014 Cisco and/or its affiliates. All rights reserved. This document is Cisco Public Information. Page 15 of 20
Figure 21. VLANS being created
2. From the Splunk Dashboard window y ou can v iew the increments on the total VLANS graph.
3. Af ter a f ew minutes of hav ing the script running y ou will be able to see on the Splunk Dashboard how the total VLANS has
increases with time.
Figure 22. VLAN Total in real-time
4. To stop the script press Ctrl+C on the window.
Congratulations! You hav e successf ully completed this scenario.
Cisco dCloud
dCloud: The Cisco Demo Cloud
© 2014 Cisco and/or its affiliates. All rights reserved. This document is Cisco Public Information. Page 16 of 20
Scenario 3: Automation/Orchestration with OnePK
In this scenario, we will cov er how Puppet Master interacts with Nexus 9000, to manage its conf iguration. The f ollowing task will be
completed:
Conf iguration Management with Puppet
Demonstration Steps
Configuration Management with Puppet
1. From the taskbar, or desktop, click the Google Chrome icon, select the Puppet shortcut f rom the Fav orites bar. This will
connect y ou directly to the Puppet Enterprise Console.
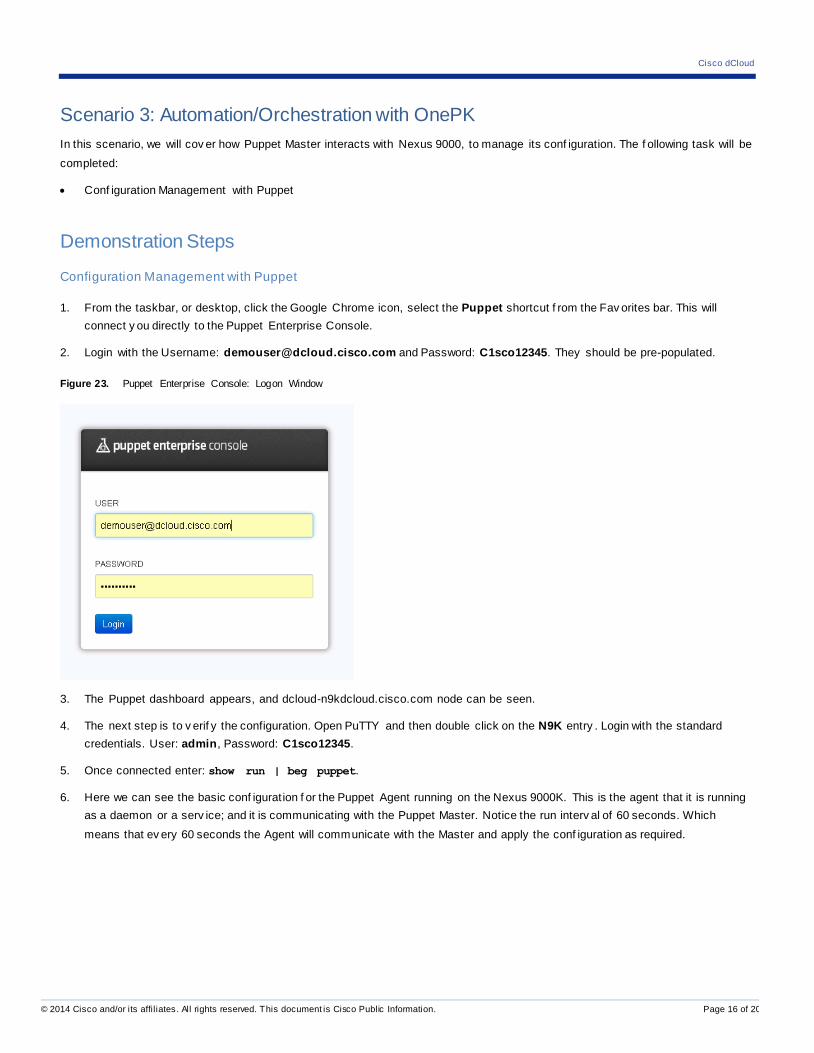
2. Login with the Username: [email protected] and Password: C1sco12345. They should be pre-populated.
Figure 23. Puppet Enterprise Console: Logon Window
3. The Puppet dashboard appears, and dcloud-n9kdcloud.cisco.com node can be seen.
4. The next step is to v erif y the configuration. Open PuTTY and then double click on the N9K entry . Login with the standard
credentials. User: admin, Password: C1sco12345.
5. Once connected enter: show run | beg puppet.
6. Here we can see the basic conf igurat ion f or the Puppet Agent running on the Nexus 9000K. This is the agent that it is running
as a daemon or a serv ice; and it is communicating with the Puppet Master. Notice the run interv al of 60 seconds. Which
means that ev ery 60 seconds the Agent will communicate with the Master and apply the conf iguration as required.

Cisco dCloud
dCloud: The Cisco Demo Cloud
© 2014 Cisco and/or its affiliates. All rights reserved. This document is Cisco Public Information. Page 17 of 20
Figure 24. Puppet Configuration (Partial output of the “show run |beg puppet” command)
NOTE: The output of the “show run |beg puppet” command might include conf iguration of other f eatures. For illustration purposes,
we show only the relev ant conf iguration on the f igure abov e.
7. Return to the Puppet Enterprise Console.
Figure 25. Puppet Enterprise Console
8. Click on dcloud-n9k.dcloud.cisco.com, to see the Classes that are assigned to this node.
9. On the top right corner, click on Edit.

Cisco dCloud
dCloud: The Cisco Demo Cloud
© 2014 Cisco and/or its affiliates. All rights reserved. This document is Cisco Public Information. Page 18 of 20
Figure 26. Edit Node
10. Under Classes > cisco_onep::vlan , click on Edit parameters.
Figure 27. Edit Class Parameters
11. We can v erif y the f unctionality of the conf iguration that the Puppet is pushing to the Nexus 9K.
Cisco dCloud
dCloud: The Cisco Demo Cloud
© 2014 Cisco and/or its affiliates. All rights reserved. This document is Cisco Public Information. Page 19 of 20
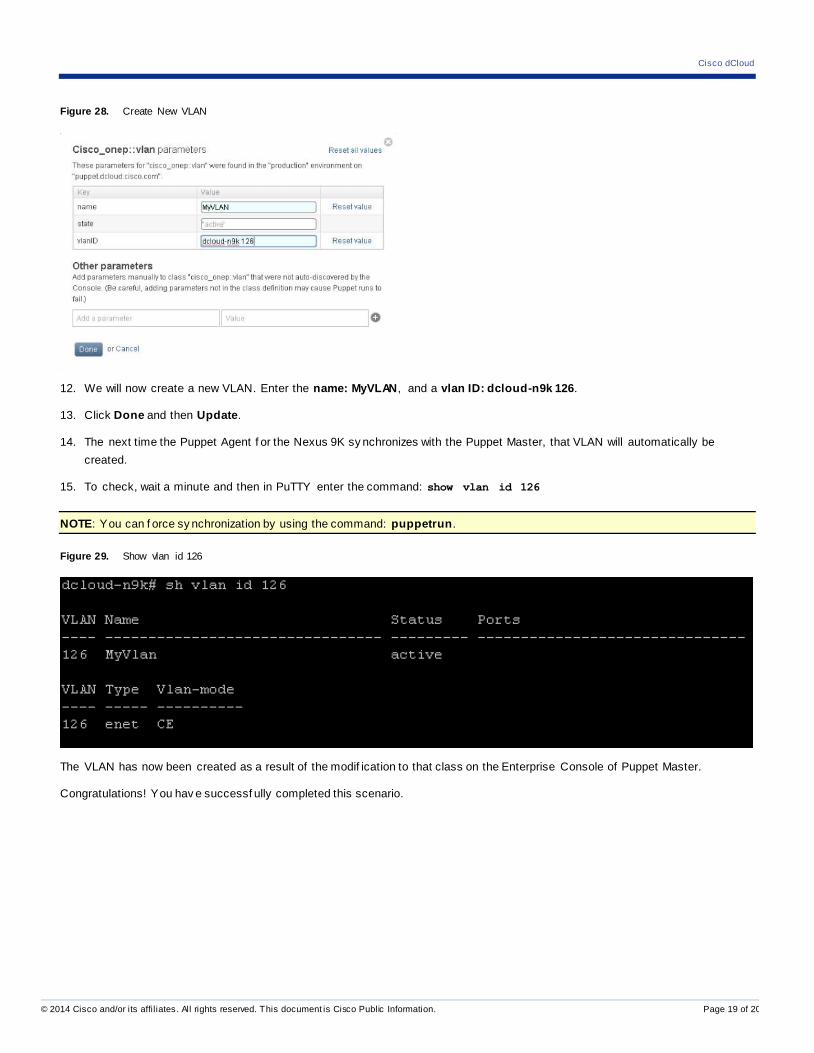
Figure 28. Create New VLAN
12. We will now create a new VLAN. Enter the name: MyVLAN, and a vlan ID: dcloud-n9k 126.
13. Click Done and then Update.
14. The next time the Puppet Agent f or the Nexus 9K sy nchronizes with the Puppet Master, that VLAN will automatically be
created.
15. To check, wait a minute and then in PuTTY enter the command: show vlan id 126
NOTE: You can f orce sy nchronization by using the command: puppetrun.
Figure 29. Show vlan id 126
The VLAN has now been created as a result of the modif ication to that class on the Enterprise Console of Puppet Master.
Congratulations! You hav e successf ully completed this scenario.
Cisco dCloud
dCloud: The Cisco Demo Cloud
© 2014 Cisco and/or its affiliates. All rights reserved. This document is Cisco Public Information. Page 20 of 20
Appendix A: Additional Information
For more inf ormation about the Cisco Nexus 9000 in standalone mode, v isit the f ollowing links or contact y our local Cisco acc ount
representativ e.
Network Programmability and Automation with Cisco Nexus 9000 Series Switches
http://www.cisco.com/c/en/us/products/collateral/cloud-systems-management/aci-fabric-controller/white-paper-c11-729385.html
http://www.cisco.com/assets/swa/vid/nexus93128TX/index.html
http://www.cisco.com/assets/swa/vid/nexus9396PX/index.html