Embed Size (px)
Citation preview
Cisco Prime Infrastructure Appliance Hardware Installation GuideRelease 3.0August 2015
Americas HeadquartersCisco Systems, Inc.170 West Tasman DriveSan Jose, CA 95134-1706 USAhttp://www.cisco.comTel: 408 526-4000
800 553-NETS (6387)Fax: 408 527-0883
Text Part Number:

THE SPECIFICATIONS AND INFORMATION REGARDING THE PRODUCTS IN THIS MANUAL ARE SUBJECT TO CHANGE WITHOUT NOTICE. ALL STATEMENTS, INFORMATION, AND RECOMMENDATIONS IN THIS MANUAL ARE BELIEVED TO BE ACCURATE BUT ARE PRESENTED WITHOUT WARRANTY OF ANY KIND, EXPRESS OR IMPLIED. USERS MUST TAKE FULL RESPONSIBILITY FOR THEIR APPLICATION OF ANY PRODUCTS.
THE SOFTWARE LICENSE AND LIMITED WARRANTY FOR THE ACCOMPANYING PRODUCT ARE SET FORTH IN THE INFORMATION PACKET THAT SHIPPED WITH THE PRODUCT AND ARE INCORPORATED HEREIN BY THIS REFERENCE. IF YOU ARE UNABLE TO LOCATE THE SOFTWARE LICENSE OR LIMITED WARRANTY, CONTACT YOUR CISCO REPRESENTATIVE FOR A COPY.
The following information is for FCC compliance of Class A devices: This equipment has been tested and found to comply with the limits for a Class A digital device, pursuant to part 15 of the FCC rules. These limits are designed to provide reasonable protection against harmful interference when the equipment is operated in a commercial environment. This equipment generates, uses, and can radiate radio-frequency energy and, if not installed and used in accordance with the instruction manual, may cause harmful interference to radio communications. Operation of this equipment in a residential area is likely to cause harmful interference, in which case users will be required to correct the interference at their own expense.
The following information is for FCC compliance of Class B devices: This equipment has been tested and found to comply with the limits for a Class B digital device, pursuant to part 15 of the FCC rules. These limits are designed to provide reasonable protection against harmful interference in a residential installation. This equipment generates, uses and can radiate radio frequency energy and, if not installed and used in accordance with the instructions, may cause harmful interference to radio communications. However, there is no guarantee that interference will not occur in a particular installation. If the equipment causes interference to radio or television reception, which can be determined by turning the equipment off and on, users are encouraged to try to correct the interference by using one or more of the following measures:
• Reorient or relocate the receiving antenna.
• Increase the separation between the equipment and receiver.
• Connect the equipment into an outlet on a circuit different from that to which the receiver is connected.
• Consult the dealer or an experienced radio/TV technician for help.
Modifications to this product not authorized by Cisco could void the FCC approval and negate your authority to operate the product.
The Cisco implementation of TCP header compression is an adaptation of a program developed by the University of California, Berkeley (UCB) as part of UCB’s public domain version of the UNIX operating system. All rights reserved. Copyright © 1981, Regents of the University of California.
NOTWITHSTANDING ANY OTHER WARRANTY HEREIN, ALL DOCUMENT FILES AND SOFTWARE OF THESE SUPPLIERS ARE PROVIDED “AS IS” WITH ALL FAULTS. CISCO AND THE ABOVE-NAMED SUPPLIERS DISCLAIM ALL WARRANTIES, EXPRESSED OR IMPLIED, INCLUDING, WITHOUT LIMITATION, THOSE OF MERCHANTABILITY, FITNESS FOR A PARTICULAR PURPOSE AND NONINFRINGEMENT OR ARISING FROM A COURSE OF DEALING, USAGE, OR TRADE PRACTICE.
IN NO EVENT SHALL CISCO OR ITS SUPPLIERS BE LIABLE FOR ANY INDIRECT, SPECIAL, CONSEQUENTIAL, OR INCIDENTAL DAMAGES, INCLUDING, WITHOUT LIMITATION, LOST PROFITS OR LOSS OR DAMAGE TO DATA ARISING OUT OF THE
USE OR INABILITY TO USE THIS MANUAL, EVEN IF CISCO OR ITS SUPPLIERS HAVE BEEN ADVISED OF THE POSSIBILITY OF SUCH DAMAGES.Cisco and the Cisco logo are trademarks or registered trademarks of Cisco and/or its affiliates in the U.S. and other countries. To view a list of Cisco trademarks, go to this URL: www.cisco.com/go/trademarks. Third-party trademarks mentioned are the property of their respective owners. The use of the word partner does not imply a partnership relationship between Cisco and any other company. (1110R)
Any Internet Protocol (IP) addresses and phone numbers used in this document are not intended to be actual addresses and phone numbers. Any examples, command display output, network topology diagrams, and other figures included in the document are shown for illustrative purposes only. Any use of actual IP addresses or phone numbers in illustrative content is unintentional and coincidental.
Cisco Prime Infrastructure Hardware Installation Guide© 2015 Cisco Systems, Inc. All rights reserved.
C O N T E N T S
Preface 1
Objective 1
Audience 1
General Warnings, Regulatory and Safety 1
Related Documentation 2
C H A P T E R 1 Installation and Initial Configuration 1-1
System Configuration 1-1
Setting Up the Appliance 1-1
Improving Performance on Gen2 Appliances 1-3
C H A P T E R 2 Installing the ISO on the Appliance 2-1
Managing the Appliance Using CIMC 2-2
Monitoring the Appliance 2-2
Related Documentation 2-3
A P P E N D I X A Additional Functions A-1
Connecting to the Console A-1
Connecting to the Console Using Serial Over LAN A-1
Connecting to the vKVM Console A-2
DVD Mount Options A-2
Mounting vKVM DVD A-3
Mounting a CIMC vMedia DVD A-3
Password Recovery A-4
1Cisco Prime Infrastructure Appliance Hardware Installation Guide

Contents
2Cisco Prime Infrastructure Appliance Hardware Installation Guide

Preface
ObjectiveThis guide provides step-by-step instructions on how to install and power on the Cisco Prime Infrastructure appliance.
Audience This guide is for the networking or computer technician responsible for installing the Cisco Prime Infrastructure appliance. We assume that you are familiar with the concepts and technology of Ethernet and local area networking.
General Warnings, Regulatory and Safety
ConventionsSafety warnings appear throughout this guide in procedures that may harm you if performed incorrectly. A warning symbol precedes each warning statement. Specific warnings are included in the sections to which they apply.
Warning This warning symbol means danger. You are in a situation that could cause bodily injury. Before you work on any equipment, be aware of the hazards involved with electrical circuitry and be familiar with standard practices for preventing accidents. Use the statement number provided at the end of each warning to locate its translation in the translated safety warnings that accompanied this device. Statement 1071
SAVE THESE INSTRUCTIONS
Caution Means reader be careful. In this situation, you might do something that could result in equipment damage or loss of data.
-1Cisco Prime Infrastructure Appliance Hardware Installation Guide
Chapter
WarningsThe following warnings are general warnings that are applicable to the entire guide. Specific warnings are included in the sections to which they apply.
Warning There is the danger of explosion if the battery is replaced incorrectly. Replace the battery only with the same or equivalent type recommended by the manufacturer. Dispose of used batteries according to the manufacturer’s instructions. Statement 1015
Warning This equipment must be grounded. Never defeat the ground conductor or operate the equipment in the absence of a suitably installed ground conductor. Contact the appropriate electrical inspection authority or an electrician if you are uncertain that suitable grounding is available. Statement 1024
Warning Read the installation instructions before connecting the system to the power source. Statement 1004
Warning Only trained and qualified personnel should be allowed to install, replace, or service this equipment. Statement 1030
Warning Ultimate disposal of this product should be handled according to all national laws and regulations. Statement 1040
Regulatory and Safety InformationBefore you install, operate, or service a server, review the Regulatory Compliance and Safety Information for Cisco UCS C-Series Servers for important regulatory and safety information.
Related DocumentationSee the Cisco Prime Infrastructure Documentation Overview for a list of all Prime Infrastructure guides. We sometimes update the documentation after original publication. Therefore, you should also review the documentation on Cisco.com for any updates.
-2Cisco Prime Infrastructure Appliance Hardware Installation Guide
Cisco Prime Inf78-100625-01A0
C H A P T E R 1
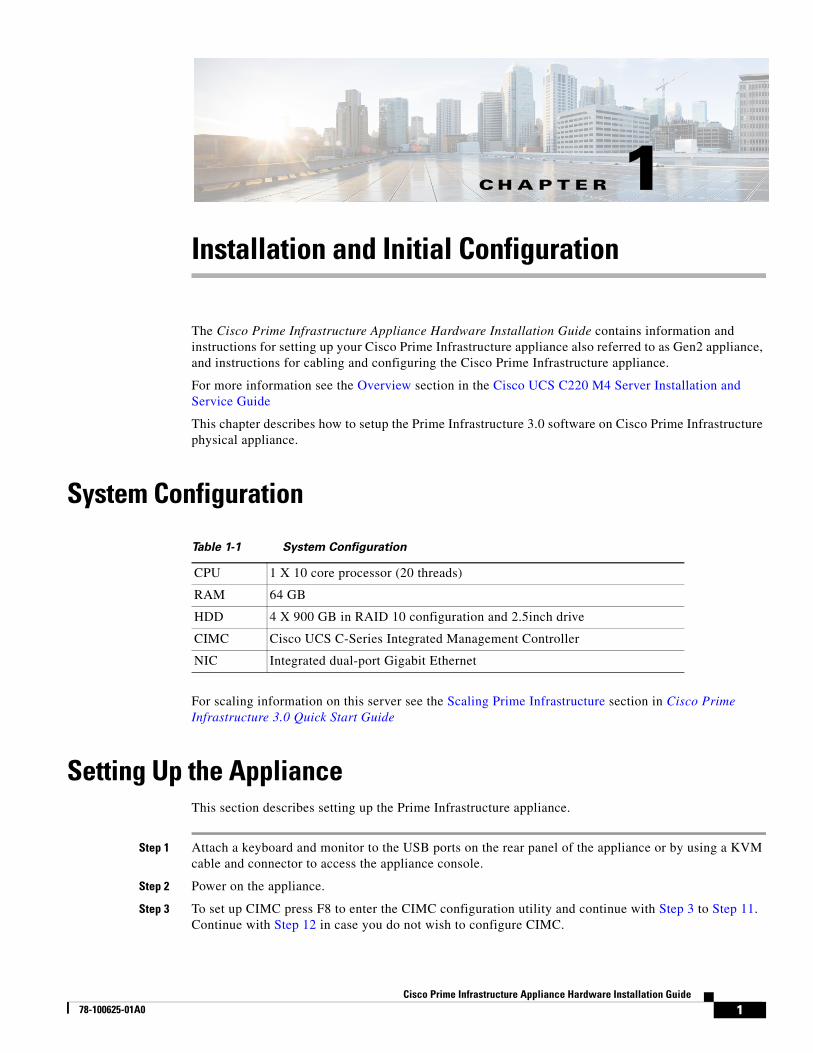
Installation and Initial ConfigurationThe Cisco Prime Infrastructure Appliance Hardware Installation Guide contains information and instructions for setting up your Cisco Prime Infrastructure appliance also referred to as Gen2 appliance, and instructions for cabling and configuring the Cisco Prime Infrastructure appliance.
For more information see the Overview section in the Cisco UCS C220 M4 Server Installation and Service Guide
This chapter describes how to setup the Prime Infrastructure 3.0 software on Cisco Prime Infrastructure physical appliance.
System Configuration
For scaling information on this server see the Scaling Prime Infrastructure section in Cisco Prime Infrastructure 3.0 Quick Start Guide
Setting Up the ApplianceThis section describes setting up the Prime Infrastructure appliance.
Step 1 Attach a keyboard and monitor to the USB ports on the rear panel of the appliance or by using a KVM cable and connector to access the appliance console.
Step 2 Power on the appliance.
Step 3 To set up CIMC press F8 to enter the CIMC configuration utility and continue with Step 3 to Step 11. Continue with Step 12 in case you do not wish to configure CIMC.
Table 1-1 System Configuration
CPU 1 X 10 core processor (20 threads)
RAM 64 GB
HDD 4 X 900 GB in RAID 10 configuration and 2.5inch drive
CIMC Cisco UCS C-Series Integrated Management Controller
NIC Integrated dual-port Gigabit Ethernet
1rastructure Appliance Hardware Installation Guide
Chapter Setting Up the Appliance
You might need to press the function keys (F8, F6 and F2) more than once until the system responds. If you do not press F8 quickly enough you may enter the EFI shell. Press Ctrl, Alt, Del to reboot the system and press F8 again.
Note The Cisco Integrated Management Controller (CIMC) is the management service that you use to remotely access, configure, administer, and monitor the Prime Infrastructure server.
Step 4 In the Configuration Utility window, change the following fields as specified:
• NIC mode—Select Dedicated.
• IP (Basic)—Select IPV4.
• DHCP—Disable DHCP if enabled.
• CIMC IP—Enter the IP address of the CIMC.
• Prefix/Subnet—Enter the subnet of the CIMC.
• Gateway—Enter the Gateway address.
• Pref DNS Server—Enter the preferred DNS server address.
• NIC Redundancy—Null
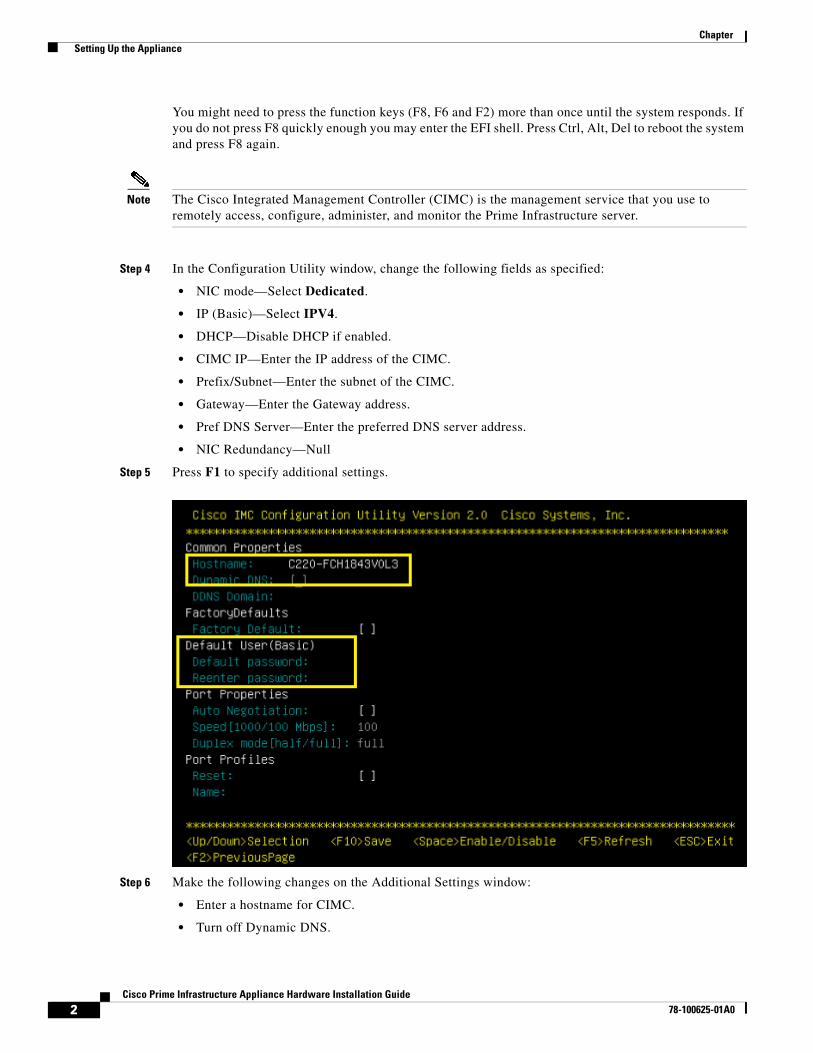
Step 5 Press F1 to specify additional settings.
Step 6 Make the following changes on the Additional Settings window:
• Enter a hostname for CIMC.
• Turn off Dynamic DNS.
2Cisco Prime Infrastructure Appliance Hardware Installation Guide
78-100625-01A0
Chapter Setting Up the Appliance
• Enter the admin password. If you leave the password field blank, the default password is password.
Step 7 Press F10 to save the settings.
Step 8 Press escape to exit and reboot the server.
For remote management move to current step 7
Step 9 After the settings are saved, open a browser and enter the following URL:
https://CIMC_ip_address where CIMC_IP_address is the IP address that you entered in Step 3 above.
Step 10 Log in to CIMC web interface using the following credentials:
• Username—admin
• Password—the password configured in Step 6
You will be prompted to reset the password if you did not change the default password in Step 6.
Step 11 Launch the vKVM Console.
See Connecting to the vKVM Console for more information on how to connect to the vKVM console.
Step 12 Enter setup at the login prompt when prompted to initiate the installation.
See Installing the Server section in the Cisco Prime Infrastructure 3.0 Quick Start Guide for more information.
After the setup is completed, the system reboots and the login prompt appears it is ready for use. See Logging in to the Prime Infrastructure User Interface in the Cisco Prime Infrastructure 3.0 Quick Start Guide for more information.
Improving Performance on Gen2 AppliancesFor better performance on the Prime Infrastructure Appliance (Gen 2, UCS based), make sure you configure the virtual drive Write Policy to Write Back Good BBU. To configure the virtual drive Write Policy, follow these steps:
Step 1 Launch the CIMC web interface.
Step 2 Click the Storage tab, click on the SAS Modular Controller name, click the Virtual Drive tab, then click Edit Virtual Drive.
Step 3 Click OK on the dialog box that appears.
Step 4 In the Write Policy field, select Write Back Good BBU, then click Save Changes.
3Cisco Prime Infrastructure Appliance Hardware Installation Guide
78-100625-01A0

Chapter Setting Up the Appliance
4Cisco Prime Infrastructure Appliance Hardware Installation Guide
78-100625-01A0
Cisco Prime Inf78-100625-01A0
C H A P T E R 2
Installing the ISO on the ApplianceThe appliance is shipped with the software version preinstalled. You do not have to perform these steps during the initial installation of the appliance.However in case you need to re-image the appliance, you can install the software from the ISO file.
To reduce the installation time, choose Admin > Network > Network Settings in the CIMC interface and check the Auto Negotiation check box.
Before You Begin
Extract the ISO file PI-APL-3.0.0.0.78-1-K9.iso from the PI-APL-3.0.0.0.78-1-K9.iso.zip archive file downloaded from cisco.com. Once you have extracted it, ensure the checksum matches for the ISO file as below
• MD5 Checksum: 5641a6795ae02644e53a9f46dcb7d3b0
• SHA512 Checksum: 3837d5e5876c8592ff617e7268d12cefbebb6c3e38e468df3c6600a591353d34a05e2e50e9275b28fd6f90090413b360d969b83ab73cd61139b18fb34d43d7a5
Step 1 Connect to the console using one of the options mentioned in Connecting to the Console.
Step 2 Mount ISO using any one of the mounting options. See DVD Mount Options for more details.
Step 3 Reboot the appliance by pressing the power switch or select Power > Reset System(Warm Boot) if you are using vKVM to restart.
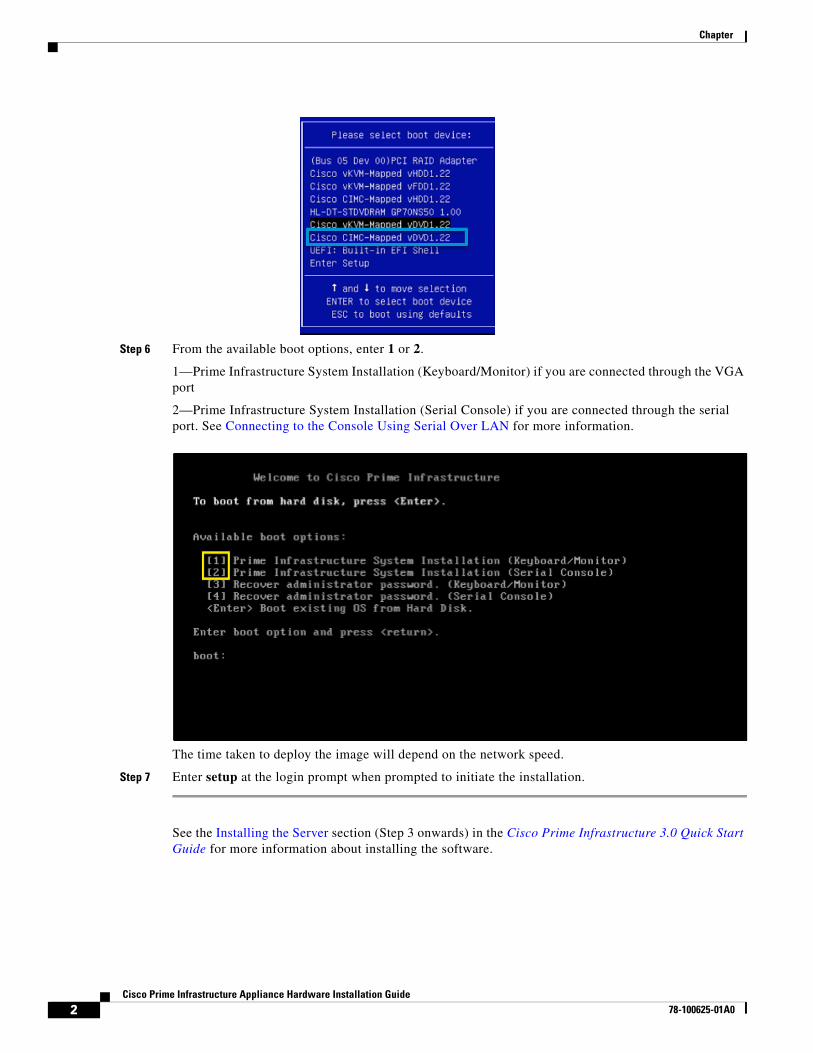
Step 4 After the appliance reboots, press F6 to enter the boot option.
Step 5 Select one of the DVD mount option with the Cisco Prime Infrastructure 3.0 software image. See DVD Mount Options for more information.
1rastructure Appliance Hardware Installation Guide
Chapter
Step 6 From the available boot options, enter 1 or 2.
1—Prime Infrastructure System Installation (Keyboard/Monitor) if you are connected through the VGA port
2—Prime Infrastructure System Installation (Serial Console) if you are connected through the serial port. See Connecting to the Console Using Serial Over LAN for more information.
The time taken to deploy the image will depend on the network speed.
Step 7 Enter setup at the login prompt when prompted to initiate the installation.
See the Installing the Server section (Step 3 onwards) in the Cisco Prime Infrastructure 3.0 Quick Start Guide for more information about installing the software.
2Cisco Prime Infrastructure Appliance Hardware Installation Guide
78-100625-01A0
Chapter Managing the Appliance Using CIMC
Managing the Appliance Using CIMCYou can connect to the vKVM console by launching the CIMC and log in using your username and password configured in Setting Up the Appliance. Using the vKVM console you can do the following:
• Remotely power on or off the server.
• Monitor the server and disk status.
• Change the BIOS settings.
• Launch a virtual console on the appliance.
• Mount iso files as virtual DVD drives.
• Other server management function.
See Cisco Integrated Management Controller documentation for more information.
Monitoring the ApplianceAfter you have installed the Prime Infrastructure software, you can monitor the appliance by choosing Administration > Settings > Appliance. Prime Infrastructure generates an alarm if any hardware failures are detected. See Cisco UCS C-Series Servers Integrated Management Controller GUI Configuration Guide for more information.
Related Documentation• Cisco Integrated Management Controller documentation:
http://www.cisco.com/c/en/us/support/servers-unified-computing/ucs-c-series-integrated-management-controller/tsd-products-support-series-home.html
• Cisco UCS C220 M4 Rack Server Specifications Sheet:
http://www.cisco.com/c/dam/en/us/products/collateral/servers-unified-computing/ucs-c-series-rack-servers/c220m4-sff-spec-sheet.pdf
• Cisco UCS C220 Server Installation and Service Guide: http://www.cisco.com/c/en/td/docs/unified_computing/ucs/hw/C220/install/C220.html
3Cisco Prime Infrastructure Appliance Hardware Installation Guide
78-100625-01A0

Chapter Related Documentation
4Cisco Prime Infrastructure Appliance Hardware Installation Guide
78-100625-01A0
Cisco Prime Infrastruc
A
P P E N D I X A
Additional FunctionsThis appendix lists some additional operations:.
Connecting to the ConsoleYou can physically connect to the console on the server using the VGA port or the serial port on the server. You can also connect to console remotely using the following options:
• Serial over LAN
• vKVM
Connecting to the Console Using Serial Over LANYou can connect use a terminal server to connect to the serial port of the appliance or use Serial over Lan (SOL) to connect to the serial console over the network.
To enable Serial over LAN (SOL):
Step 1 Launch CIMC and log in using your username and password configured in Setting Up the Appliance.
Step 2 Select Server > Remote Presence > Serial Over LAN.
Step 3 Check the check box Enabled.
A-1ture Appliance Hardware Installation Guide

Appendix A Additional Functions DVD Mount Options
Connecting to the vKVM Console
Step 1 Launch CIMC and log in using your username and password configured in Setting Up the Appliance.
Step 2 Select Server > Summary > Actions.
Step 3 Click Launch vKVM Console.
The Security Warning dialogue box opens.
Step 4 Click Continue.
The vKVM console is downloaded and the credentials are verified.
Step 5 Click Run to install the vKVM console.
DVD Mount OptionsTo re-image the appliance from an iso file the DVD mount options available are:
The following DVD mounting options are available:
• Physical DVD Mount
Burn the iso file to a DVD and mount it through a physical DVD drive connected to the USB port of the appliance. A physical DVD mount is used when CIMC remote management is not configured. This is the fastest option.
• CIMC mapped vMedia
A-2Cisco Prime Infrastructure Appliance Hardware Installation Guide
Appendix A Additional Functions DVD Mount Options
The iso file is on the HTTPS, CIFS or NFS server and the speed depends on the Prime Infrastructure Server and File-Server bandwidth. The client server must remain connected till the installation is completed. This is the preferred mode for mounting the iso file.
• vKVM DVD mount
The iso file can also be mounted using a virtual console. The iso file is on client machine and the speed depends on server appliance bandwidth.
Mounting vKVM DVD The virtual KVM console (vKVM) is an interface accessible from CIMC that emulates a direct keyboard, video, and mouse connection to the server.
To mount an iso file from the desktop client using the vKVM DVD mount:
Step 1 Connect to the vKVM console. See Connecting to the vKVM Console for more details.
Step 2 Click Continue in the Warning-Security dialog box to launch the vKVM Console.
Step 3 Select Virtual Media > Activate Virtual Devices.
The Uncrypted Virtual Media Session dialogue box opens.
Step 4 Select the radio button Accept this session.
Step 5 Click Apply.
The Virtual Device is activated.
Step 6 Select Virtual Media > Map CD/DVD and browse to the Prime Infrastructure 3.0 ISO image on your computer.
After mounting the vKVM DVD continue with Installing the ISO on the Appliance
Mounting a CIMC vMedia DVD To mount an iso file from CIFS, NFS, HTTP server as a virtual DVD drive on the appliance:
Step 1 Launch CIMC and log in using your username and password configured in Setting Up the Appliance.
Step 2 Select Server > Remote Presence > Virtual Media.
Step 3 Click Add New Media.
Step 4 Select the Mount Type from the drop down list.
Step 5 Enter the following parameters:
• Volume
• Remote Share
• Remote File
• Mount Options
A-3Cisco Prime Infrastructure Appliance Hardware Installation Guide
Appendix A Additional Functions Password Recovery
• User Name
• Password
Step 6 Click Save.
Password RecoveryYou can recover (that is, reset) administrator passwords on Prime Infrastructure virtual machines (also known as OVAs) installed on your own hardware and administrator passwords on Prime Infrastructure physical appliances. See Recovering Administrator Passwords on Virtual Appliances and Recovering Administrator Passwords on Physical Appliances in the Cisco Prime Infrastructure 3.0 Administrator Guide for ,more information
A-4Cisco Prime Infrastructure Appliance Hardware Installation Guide