Embed Size (px)
Citation preview

© 2004 Cisco System s, Inc. All right reserved. Im portant notices, privacy statem ents, and tradem arks of Cisco System s, Inc. can be found on cisco.com
Page 1 of 21
Application Note
Cisco Router and Security Device Manager USB Storage
Introduction
The USB Storage feature on the Cisco® Router and Security Device Manager (Cisco SDM) allows the Cisco 871 and Cisco 1800, 2800, and
3800 series integrated services routers to support USB flash modules with SmartCard technology in a USB key form factor (also referred to as a
USB token) to provide secure router access. USB token provides secure configuration distribution and allows users to store VPN credentials for
deployment. USB flash drivers allow users to store images and configurations externally. For more detail information, please refer to the eToken
and USB Flash Features Support document.
This document includes the following topics:
• Configuring a router using USB token and USB flash
• Importing a signature definition file (SDF) from USB flash
• Configuring the USB token PIN
• Configuring public key infrastructure (PKI) storage
• File management
Prerequisites for USB Storage Before you can use a USB flash module or a USB token, you should have the following system requirements:
• A Cisco 871, Cisco 1800 Series, Cisco 2800 Series, or a Cisco 3800 Series Integrated Services Router
• At minimum, Cisco IOS® Software Release 12.3(14)T image running on any of the supported platforms
• A Cisco supported USB flash or USB token
Roles of the USB Token and the USB Flash Module The USB token can securely store any type of file within its available storage space (32 KB). Configuration files that are stored on the USB
token can be encrypted and accessed only with a user PIN. The router will not load the configuration file unless the correct PIN has been
configured for secure deployment of router configuration files.
After you plug the USB token into the router, you must first log into the USB token before you can securely store and transfer digital
certificates, preshared keys, and router configurations between the USB token and the router. You can also perform administrative tasks, such as
changing the user PIN and copying files between the router and the USB token.

© 2005 Cisco System s, Inc. All right reserved.
Im portant notices, privacy statem ents, and tradem arks of Cisco System s, Inc. can be found on cisco.com Page 2 of 21
A Cisco USB flash module allows you to store and deploy router configurations and Cisco IOS Software images in a nonsecure format. Cisco
USB flash modules are available in 64 MB, 128 MB, and 256 MB versions. The USB flash is not a replacement for the router compact flash;
the compact flash must be present for the router to boot.
USB Storage Supported by the Cisco Router and Security Device Manager The Cisco Router and Security Device Manager (Cisco SDM) allows users to manage (add, view, and delete) router configuration files on the
USB flash module; move files between the SDM management host and the USB flash module, or between USB flash module and the router
compact flash; store credentials on the USB token; and modify default settings on the USB token, such as the user PIN and the maximum
number of allowable login failures.
This document contains information on using Cisco SDM Express to configure a new router using USB token and USB flash, importing SDF
from USB flash, storing credentials to a USB token for IP Security (IPSec) VPN, and managing USB devices.
Configuring a Router Using USB Token and USB Flash
If Cisco SDM Express is installed on the router flash for initial setup, when you access a router for the first time, Cisco SDM Express is
launched and displays the Basic Configuration screen. When a USB token is connected to your router, it displays the “Provision From USB
Token” window (Figure 1).
Cisco SDM Express looks for a configuration file named CCCD1 in the USB token. If the configuration file does not exist, Cisco SDM Express
will fail the operation. (Note: If the USB token and the USB flash device are both connected to your router, Cisco SDM Express will use the
USB token by default. If you want to use the USB flash device (Figure 2) connected to your router, all USB tokens must be removed from your
router before running Cisco SDM Express.)
Figure 1. Provision From USB Token
1 You can use a Token Management System (TMS) software from Aladdin Knowledge Systems to load the CCCD file to the USB token. For more details, go http://www.aladdin.com and look for Token Management.

© 2005 Cisco System s, Inc. All right reserved.
Im portant notices, privacy statem ents, and tradem arks of Cisco System s, Inc. can be found on cisco.com Page 3 of 21
To provision your router from an USB token, follow these steps:
1. Select the checkbox to enable provisioning your router from a USB token.
2. Choose to use the default device and PIN, or to specify a device and PIN to log into the USB token. The USB token used in this
example is usbtoken1 and has the default PIN. Select Specify device and default PIN2.
• USB Token: usbtoken1:
• PIN: **********
3. Click Login to log into the USB token. You should see the Login to the USB Token Successful window.
4. Click Preview… to display the contents of the file3 in the lower panel (Figure 2).
Figure 2. Provision From USB Token
2 In this example, the default PIN used by Cisco SDM is the default PIN of the USB token manufactured by Aladdin Knowledge Systems. 3 A USB token can securely store any type of file within its available storage space. Configuration files that are stored on the USB token can be encrypted and accessed only through a user PIN. The router will not load the configuration file unless the proper PIN has been configured for secure deployment of router configuration files.

© 2005 Cisco System s, Inc. All right reserved.
Im portant notices, privacy statem ents, and tradem arks of Cisco System s, Inc. can be found on cisco.com Page 4 of 21
5. Click Next.
6. Cisco SDM Express Summary screen appears; if you are satisfied with the configuration, click Finish.
To provision your router from a USB flash, follow these steps:
If no USB token is connected to the router, Cisco SDM Express will look for a USB flash. When a USB flash is connected to your router, Cisco
SDM Express displays the “Provision From USB Flash” window.
1. Select the checkbox to enable provisioning your router from a USB flash device.
2. Enter the File Name of the configuration file with full path, or click Browse... to open a file selection window.
• File Name: usbflash0:/branch-23-cpe.cfg4
3. Click Preview… to display the contents of the file in the lower panel (Figure 3).
4. Click Next.
Figure 3. Provision from USB Flash
4 The file must have the extension .cfg

© 2005 Cisco System s, Inc. All right reserved.
Im portant notices, privacy statem ents, and tradem arks of Cisco System s, Inc. can be found on cisco.com Page 5 of 21
5. Cisco SDM Express Summary screen appears; if you are satisfied with the configuration, click Finish.
Cisco SDM Express configures the router without going through the standard Cisco SDM Express Setup routine including Dynamic Host
Configuration Protocol (DHCP) configuration, LAN/WAN configuration, Firewall configuration, and Security configuration. Launch Cisco
SDM to check if the configuration is loaded to the router.
Cisco SDM also supports router provisioning using USB token or USB flash. The configuration file from the USB token or USB flash device is
merged with your router’s running configuration file to create a new running configuration file. Launch Cisco SDM, and at the Configure Mode
screen, select Additional Tasks, select Router Provisioning, and click the Router Provisioning… button to launch Router Provisioning window.
(Note: If both USB token and USB flash are connected to the router, Cisco SDM uses USB token for router provisioning. If you want to use the
USB flash device, all USB tokens must be removed from your router.)
1. Router Provisioning
• Choose the device type: Use USB token
• USB Token: usbtoken1:
• Token PIN: 1234567890
• Filename: ipsec.cfg (if you are not sure about the file name, click Browse… to view files stored in usbtoken1, and select the file
(Figure 4)
Figure 4. File Selection

© 2005 Cisco System s, Inc. All right reserved.
Im portant notices, privacy statem ents, and tradem arks of Cisco System s, Inc. can be found on cisco.com Page 6 of 21
2. Click Preview File… to display the contents of the file in the lower panel (optional).
3. Click OK.
4. Click Yes to continue if the configuration file on the USB device is correct.
Importing an SDF from a USB Flash
An USB flash can provide an optional secondary storage space that can be used to import SDFs to the router.
Launch Cisco SDM, and at the Configure Mode screen, select Intrusion Prevention. If IPS is not enabled on the router, click Create IPS tab,
and click Launch IPS Rule Wizard… to launch the wizard:
1. Click Next when finishing reading the Welcome to IPS Policies Wizard message
2. Select the interfaces and the traffic direction, click Next
3. SDF Location window displays, click Add…
4. Add a Signature Location window displays, Cisco SDM automatically checks the USB flash for SDFs. SDFs will be listed when USB
flash is selected for Location (Figure 5).
• Location: usbflash0
• File Name: attack-drop.sdf
• Click OK

© 2005 Cisco System s, Inc. All right reserved.
Im portant notices, privacy statem ents, and tradem arks of Cisco System s, Inc. can be found on cisco.com Page 7 of 21
Figure 5. Add a Signature Location
5. You will be redirected back to SDF Location window, click Next
6. Click Finish
7. Click OK
To verify the IPS configuration, at Configure mode, select Intrusion Prevention, click Edit IPS tab, select Global Settings. The
usbflash0://attack-drop.sdf should be listed in the Configured SDF Locations in the lower panel (Figure 6).
Figure 6. Configured SDF Locations

© 2005 Cisco System s, Inc. All right reserved.
Im portant notices, privacy statem ents, and tradem arks of Cisco System s, Inc. can be found on cisco.com Page 8 of 21
If IPS has been enabled on the router, follow these steps to import an SDF file from a USB flash:
1. At the Configure Mode, select Intrusion Prevention, click Edit IPS tab, select Signatures
2. From the Signature working panel, click Import on the upper panel, and select From router flash (Figure 7)
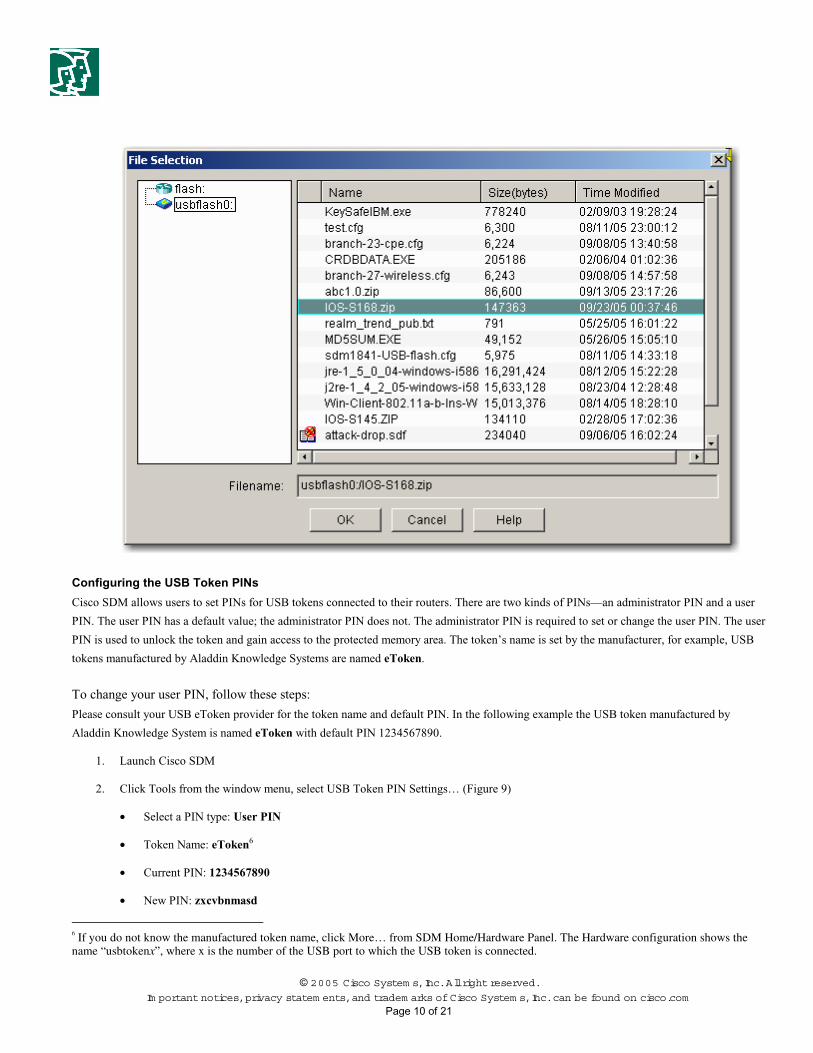
3. The File Selection window appears, select the USB flash. In this example, click usbflash0: (Figure 8)
4. Select the SDF file you want to import, click OK. In this example, select IOS-S168.zip5
5. The IPS Import window appears, select the signatures listed on the right upper panel
6. Select Merge to import the signatures on the lower panel, click OK
Figure 7. Import SDF From Router Flash
5 An SDF file must be either an XML file or a zip file with extension .zip

© 2005 Cisco System s, Inc. All right reserved.
Im portant notices, privacy statem ents, and tradem arks of Cisco System s, Inc. can be found on cisco.com Page 9 of 21
Figure 8. File Selection
© 2005 Cisco System s, Inc. All right reserved.
Im portant notices, privacy statem ents, and tradem arks of Cisco System s, Inc. can be found on cisco.com Page 10 of 21
Configuring the USB Token PINs
Cisco SDM allows users to set PINs for USB tokens connected to their routers. There are two kinds of PINs—an administrator PIN and a user
PIN. The user PIN has a default value; the administrator PIN does not. The administrator PIN is required to set or change the user PIN. The user
PIN is used to unlock the token and gain access to the protected memory area. The token’s name is set by the manufacturer, for example, USB
tokens manufactured by Aladdin Knowledge Systems are named eToken.
To change your user PIN, follow these steps:
Please consult your USB eToken provider for the token name and default PIN. In the following example the USB token manufactured by
Aladdin Knowledge System is named eToken with default PIN 1234567890.
1. Launch Cisco SDM
2. Click Tools from the window menu, select USB Token PIN Settings… (Figure 9)
• Select a PIN type: User PIN
• Token Name: eToken6
• Current PIN: 1234567890
• New PIN: zxcvbnmasd
6 If you do not know the manufactured token name, click More… from SDM Home/Hardware Panel. The Hardware configuration shows the name “usbtokenx”, where x is the number of the USB port to which the USB token is connected.

© 2005 Cisco System s, Inc. All right reserved.
Im portant notices, privacy statem ents, and tradem arks of Cisco System s, Inc. can be found on cisco.com Page 11 of 21
• Confirm PIN: zxcvbnmasd
3. Click OK
Figure 9. USB Token PIN Settings
Configuring Automatic Login and Administrative Parameters
Automatic login is required when a router reboots or a USB token is inserted and connected to the router. At the Configure Mode screen, select
VPN, expand VPN Components, expand Public Key Infrastructure, and select USB Tokens.
1. Click Add… button on the USB Tokens window
2. Add Token Configuration window displays (Figure 10)
• Token Name: eToken
• Current PIN: <None>
• Enter New PIN: zxcvbnmasd (optional)
• Reenter New PIN: zxcvbnmasd
• Maximum PIN Retries: 15 (optional)

© 2005 Cisco System s, Inc. All right reserved.
Im portant notices, privacy statem ents, and tradem arks of Cisco System s, Inc. can be found on cisco.com Page 12 of 21
• Removal Timeout: 20 (optional)
• Secondary Config File: (optional)
Figure 10. USB Tokens
3. Click OK
Configuring PKI Storage
You can use Cisco SDM to create a PIN that automatically allows the router to log into the USB token at the router7. You can set the
administrative parameters on the USB token, such the number of seconds that the router will wait before removing the RSA keys that are stored
in the USB token after the USB token has been removed from the router8. You can also set the maximum number of consecutive failed login
attempts allowed before access to the USB token is denied, and configure the secondary configuration stored in the USB token during boot
time9. For more information please refer to Storing PKI Credentials.
Generating RSA Key Pair
At the Configure Mode screen, select VPN, expand VPN Components, expand Public Key Infrastructure, and select RSA Keys.
1. Click Add… button on the RSA Keys window. You will be prompted to enter SSH Credentials. If you have not entered the
credentials, enter the username/password and click OK.
2. Generate RSA Key Pair window displays (Figure 11).
7 Automatic Login allows the router to completely come back up without any user or operator intervention. 8 If the removal timeout is not set, all RSA keys and IPSec tunnels associated with the USB token are torn down immediately after the USB token is removed from the router. 9 A secondary configuration allows users to load their IPSec configuration.

© 2005 Cisco System s, Inc. All right reserved.
Im portant notices, privacy statem ents, and tradem arks of Cisco System s, Inc. can be found on cisco.com Page 13 of 21
• Label: SDM-RSAKey-1126535864000 (Note: It is recommended to use the SDM randomly generated label name starting with
SDM-RSAKey- followed by numbers. In this example the label = SDM-RSAKey-1126535864000)
• Modulus: 512
• Key is exportable: (optional)
• Save keys to a secure USB toke: check
• USB token: usbtoken1:
• PIN: 1234567890
• Click Login… to verify the router can log into the USB token. Click OK to close the information window if successfully logged
into the USB token; otherwise check that the USB token and PIN are correctly entered.
Figure 11. Generate RSA Key Pair
3. Click Generate.
4. You will be prompted by Warning information; read the information and click Yes.
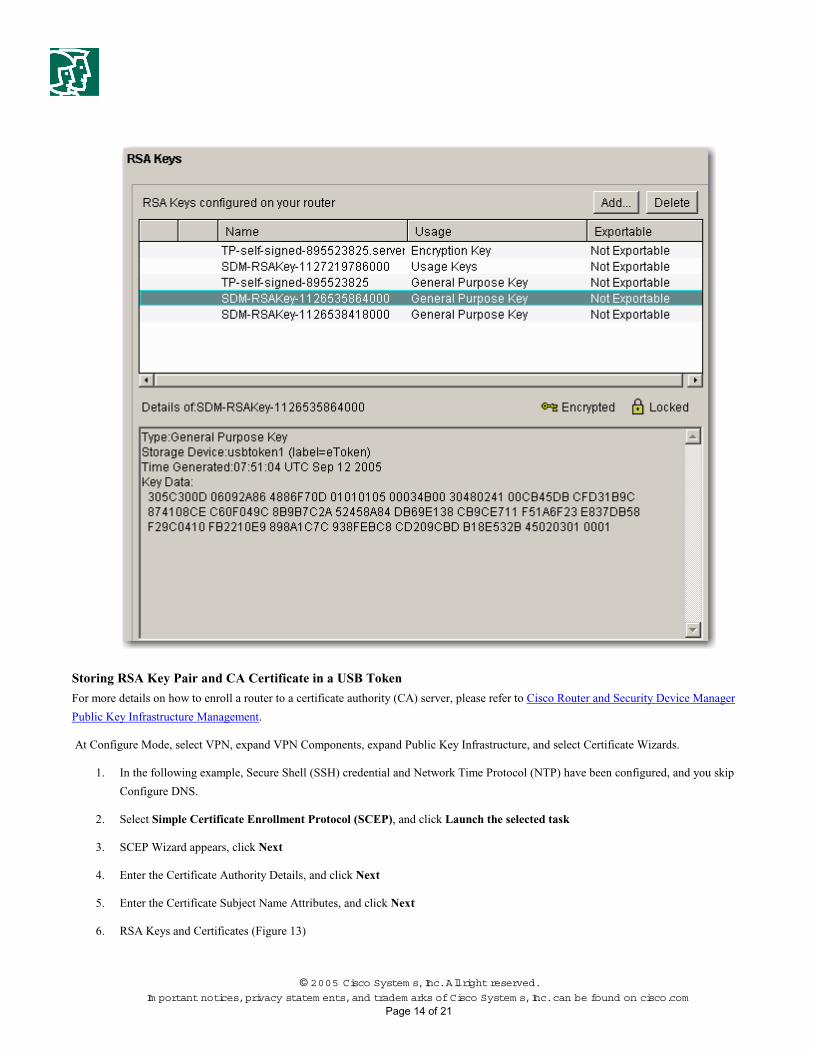
5. You will be redirected to the RSA Keys window after SDM-RSAKey-112653586400 is generated (Figure 12). Select the Key, and
you should see Storage Device:usbtoken1 shown on the lower panel.
Figure 12. RSA Keys
© 2005 Cisco System s, Inc. All right reserved.
Im portant notices, privacy statem ents, and tradem arks of Cisco System s, Inc. can be found on cisco.com Page 14 of 21
Storing RSA Key Pair and CA Certificate in a USB Token
For more details on how to enroll a router to a certificate authority (CA) server, please refer to Cisco Router and Security Device Manager
Public Key Infrastructure Management.
At Configure Mode, select VPN, expand VPN Components, expand Public Key Infrastructure, and select Certificate Wizards.
1. In the following example, Secure Shell (SSH) credential and Network Time Protocol (NTP) have been configured, and you skip
Configure DNS.
2. Select Simple Certificate Enrollment Protocol (SCEP), and click Launch the selected task
3. SCEP Wizard appears, click Next
4. Enter the Certificate Authority Details, and click Next
5. Enter the Certificate Subject Name Attributes, and click Next
6. RSA Keys and Certificates (Figure 13)

© 2005 Cisco System s, Inc. All right reserved.
Im portant notices, privacy statem ents, and tradem arks of Cisco System s, Inc. can be found on cisco.com Page 15 of 21
• Select Generate new key pair(s)
• Modulus: 512
• Save keys and certificates to secure USB token: check
• USB token: usbtoken1:
• PIN: 1234567890
• Click Login… to verify the router can login to the USB token. Click OK to close the information window if successfully
login to the USB token
• Click Next
Figure 13. RSA Keys and Certificates
7. You will be prompted by Warning information; read the information and click Yes
8. Read the Summary, and if you are satisfied with the data, click Next, otherwise click Back to modify the information
9. You will see Generating RSA Key Message
10. You will see the router start to contact the CA server

© 2005 Cisco System s, Inc. All right reserved.
Im portant notices, privacy statem ents, and tradem arks of Cisco System s, Inc. can be found on cisco.com Page 16 of 21
11. Click Yes when you are prompted by CA Server Certificate window to verify the CA server’s certificate to complete the certificate
enrollment process
12. Click Yes when you are prompted to copy the certificates and keys to secure the USB token (Figure 14)
Figure 14. Copy the Certificates and Keys to Secure USB Token
13. Click OK to delivery the configuration
14. You will be directed to Enrollment Status window; click Finish
The newly generated RSA Key pair and certificate are stored in the USB token.
For the existing certificates on the router, you can copy the certificates to the USB token. At Configure Mode, select VPN, expand VPN
Components, expand Public Key Infrastructure, select Router Certificates.
1. The Router Certificates window lists existing certificates on the router (Figure 15).
2. Click Save Certificates to USB Token button to copy all the available certificates in the USB token.
3. The USB Token Credentials window appears (Figure 16), enter PIN, click OK
4. Cisco SDM creates a folder named SDM_CERTS in the USB token, and the certificates are copied to the folder.
Figure 15. Available Certificates

© 2005 Cisco System s, Inc. All right reserved.
Im portant notices, privacy statem ents, and tradem arks of Cisco System s, Inc. can be found on cisco.com Page 17 of 21
Figure 16. USB Token Credentials
© 2005 Cisco System s, Inc. All right reserved.
Im portant notices, privacy statem ents, and tradem arks of Cisco System s, Inc. can be found on cisco.com Page 18 of 21
Deleting RSA Key Pair in a USB Token
Cisco SDM Version 2.2 supports RSA key deletion from the USB token. It does not support certificate deletion from the USB token.
At Configure Mode, select VPN, expand VPN Components, expand Public Key Infrastructure, and select RSA Key.
1. The RSA Keys window lists the RSA Keys configured on the router (Figure 12).
2. Select key RSA Key stored in the USB Token you want to delete, and click Delete button on the right upper window.
3. You will be prompted by a warning message; click Yes if you want to delete the RSA key.
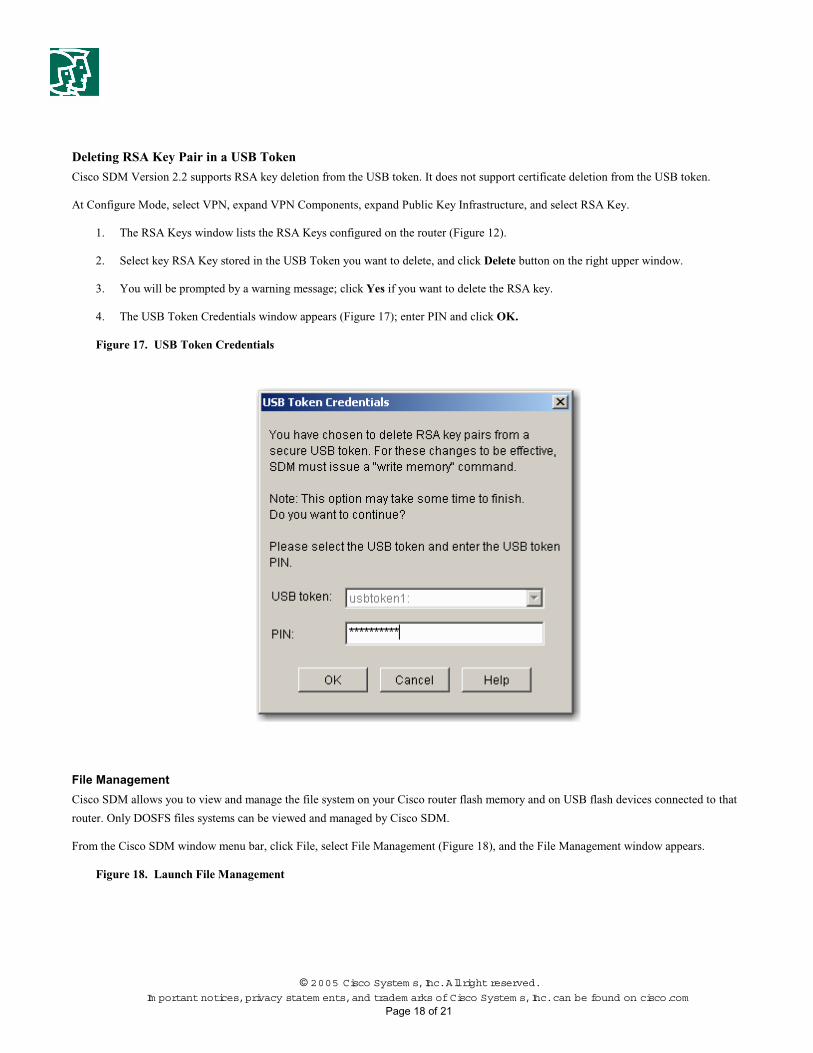
4. The USB Token Credentials window appears (Figure 17); enter PIN and click OK.
Figure 17. USB Token Credentials
File Management
Cisco SDM allows you to view and manage the file system on your Cisco router flash memory and on USB flash devices connected to that
router. Only DOSFS files systems can be viewed and managed by Cisco SDM.
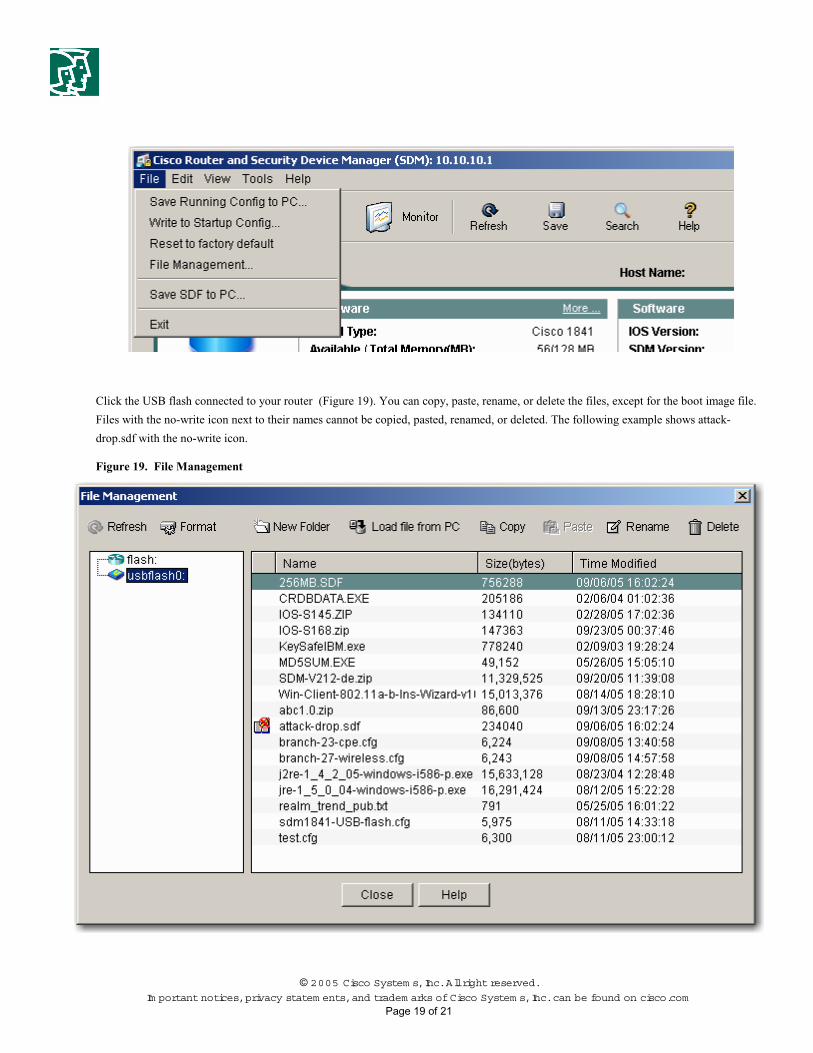
From the Cisco SDM window menu bar, click File, select File Management (Figure 18), and the File Management window appears.
Figure 18. Launch File Management
© 2005 Cisco System s, Inc. All right reserved.
Im portant notices, privacy statem ents, and tradem arks of Cisco System s, Inc. can be found on cisco.com Page 19 of 21
Click the USB flash connected to your router (Figure 19). You can copy, paste, rename, or delete the files, except for the boot image file.
Files with the no-write icon next to their names cannot be copied, pasted, renamed, or deleted. The following example shows attack-
drop.sdf with the no-write icon.
Figure 19. File Management

© 2005 Cisco System s, Inc. All right reserved.
Im portant notices, privacy statem ents, and tradem arks of Cisco System s, Inc. can be found on cisco.com Page 20 of 21
In summary, Cisco SDM and Cisco SDM Express can help you easily and effectively manage Cisco IOS Software images, digital certificate storage, and secure credentials with USB token and USB flash.

© 2005 Cisco System s, Inc. All right reserved.
Im portant notices, privacy statem ents, and tradem arks of Cisco System s, Inc. can be found on cisco.com Page 21 of 21
For More Information For more information about USB storage, please visit:
http://www.cisco.com/en/US/partner/products/sw/iosswrel/ps5207/products_feature_guide09186a0080420500.html
Corporate Headquarters Cisco Systems, Inc. 170 West Tasman Drive San Jose, CA 95134-1706 USA www.cisco.com Tel: 408 526-4000 800 553-NETS (6387) Fax: 408 526-4100
European Headquarters Cisco Systems International BV Haarlerbergpark Haarlerbergweg 13-19 1101 CH Amsterdam The Netherlands www-europe.cisco.com Tel: 31 0 20 357 1000 Fax: 31 0 20 357 1100
Americas Headquarters Cisco Systems, Inc. 170 West Tasman Drive San Jose, CA 95134-1706 USA www.cisco.com Tel: 408 526-7660 Fax: 408 527-0883
Asia Pacific Headquarters Cisco Systems, Inc. Capital Tower 168 Robinson Road #22-01 to #29-01 Singapore 068912 www.cisco.com Tel: +65 317 7777 Fax: +65 317 7799
Cisco Systems has more than 200 offices in the following countries and regions. Addresses, phone numbers, and fax numbers are listed on
the Cisco Website at www.cisco.com/go/offices. Argentina • Australia • Austria • Belgium • Brazil • Bulgaria • Canada • Chile • China PRC • Colombia • Costa Rica • Croatia • Czech Republic • Denmark • Dubai, UAE • Finland • France • Germany • Greece • Hong Kong SAR • Hungary • India • Indonesia • Ireland • Israel • Italy • Japan • Korea • Luxembourg • Malaysia • Mexico• The Netherlands • New Zealand • Norway • Peru • Philippines • Poland • Portugal • Puerto Rico • Romania • Russia • Saudi Arabia • Scotland • Singapore • Slovakia • Slovenia • South Africa • Spain • Sweden • Switzerland • Taiwan • Thailand • Turkey Ukraine • United Kingdom • United States • Venezuela • Vietnam • Zimbabwe Copyright 2004 Cisco Systems, Inc. All rights reserved. CCSP, the Cisco Square Bridge logo, Cisco Unity, Follow Me Browsing, FormShare, and StackWise are trademarks of Cisco Systems, Inc.; Changing the Way We Work, Live, Play, and Learn, and iQuick Study are service marks of Cisco Systems, Inc.; and Aironet, ASIST, BPX, Catalyst, CCDA, CCDP, CCIE, CCIP, CCNA, CCNP, Cisco, the Cisco Certified Internetwork Expert logo, Cisco IOS, Cisco Press, Cisco Systems, Cisco Systems Capital, the Cisco Systems logo, Empowering the Internet Generation, Enterprise/Solver, EtherChannel, EtherFast, EtherSwitch, Fast Step, GigaDrive, GigaStack, HomeLink, Internet Quotient, IOS, IP/TV, iQ Expertise, the iQ logo, iQ Net Readiness Scorecard, LightStream, Linksys, MeetingPlace, MGX, the Networkers logo, Networking Academy, Network Registrar, Packet, PIX, Post-Routing, Pre-Routing, ProConnect, RateMUX, Registrar, ScriptShare, SlideCast, SMARTnet, StrataView Plus, SwitchProbe, TeleRouter, The Fastest Way to Increase Your Internet Quotient, TransPath, and VCO are registered trademarks of Cisco Systems, Inc. and/or its affiliates in the United States and certain other countries. All other trademarks mentioned in this document or Website are the property of their respective owners. The use of the word partner does not imply a partnership relationship between Cisco and any other company. (0502R) Printed in the USA