Embed Size (px)
Citation preview
Citrix Session Recording 7.6.200
Technology Preview Administrator's Guide For IT administrators who want to install, configure, and explore the new and enhanced features in Session Recording
November 2015
Session Recording Technology Preview Administrator’s Guide
citrix.com
Disclaimers ............................................................................................................................................ 5
About this technology preview ............................................................................................................. 5 Summary of new and enhanced features ............................................................................................ 5 Limitations and caveats ......................................................................................................................... 5 Known issues ........................................................................................................................................ 5 Fixed issues .......................................................................................................................................... 8 System requirements ............................................................................................................................ 8
Session Recording Administration components .............................................................................. 8 Session Recording components ........................................................................................................ 10 Security recommendations.................................................................................................................. 11 Scalability considerations .................................................................................................................... 15
Hardware recommendations .......................................................................................................... 15 Important deployment notes................................................................................................................ 16 Install Session Recording .................................................................................................................... 17
Session Recording installation files ............................................................................................... 18 Install Session Recording Administration components .................................................................. 18 Install the Session Recording Database ........................................................................................ 19 Install the Session Recording Server ............................................................................................. 20 Install the Session Recording Agent .............................................................................................. 20 Install Session Recording Player ................................................................................................... 21
Uninstall Session Recording ............................................................................................................... 21 Configure Director to use the Session Recording Server ................................................................... 21 Automating installations ...................................................................................................................... 22 Configure Session Recording to play and record sessions ................................................................ 23
Authorize users to play recorded sessions .................................................................................... 23 Authorize users to administer recording policies ........................................................................... 24 Set the active recording policy to record sessions ........................................................................ 24 Configure Session Recording Player ............................................................................................. 25
Grant access rights to users ............................................................................................................... 25 To assign users to roles ................................................................................................................. 25
Create and activate recording policies ................................................................................................ 26
Use system policies ....................................................................................................................... 26 To configure custom policies ......................................................................................................... 27 Using Active Directory Groups ....................................................................................................... 27 White Listing Users ........................................................................................................................ 28 Create a new policy ....................................................................................................................... 28 Modify a policy ............................................................................................................................... 28
Session Recording Technology Preview Administrator’s Guide
citrix.com
Delete a policy ............................................................................................................................... 28
Disable or enable recording ................................................................................................................ 29 To disable or enable recording on a desktop or server ................................................................. 29
Configure the connection to the Session Recording Server ............................................................... 29 Create notification messages .............................................................................................................. 30
To create a new notification message ........................................................................................... 30 Enable custom event recording .......................................................................................................... 30
To enable custom event recording on a server ............................................................................. 31 Enable or disable live session playback ............................................................................................. 31 Enable or disable playback protection ................................................................................................ 31 Enable and disable digital signing ....................................................................................................... 32
To enable digital signing ................................................................................................................ 32 To disable digital signing................................................................................................................ 32
Specify where recordings are stored .................................................................................................. 32 To specify the location for recorded files ....................................................................................... 32 To specify a restore directory for archived files ............................................................................. 32
View recordings ................................................................................................................................... 33 To launch the Session Recording Player ....................................................................................... 33 To display or hide window elements .............................................................................................. 34 To change Session Recording Servers ......................................................................................... 34
Open and play recordings ................................................................................................................... 34 To open and play a recording in the search results area .............................................................. 34 To open and play a recording by accessing the file ...................................................................... 34 Use favorites .................................................................................................................................. 35
Search for recorded sessions ............................................................................................................. 35 To perform a quick search ............................................................................................................. 35 To perform an advanced search .................................................................................................... 36 To set search options ..................................................................................................................... 36
Play recorded sessions ....................................................................................................................... 36 Use player controls ........................................................................................................................ 37 Use the seek slider ........................................................................................................................ 37
To change the playback speed ...................................................................................................... 38 To skip over spaces where no action occurred ............................................................................. 39
Use events and bookmarks................................................................................................................. 39 To display events and bookmarks in the list .................................................................................. 39 To insert a bookmark ..................................................................................................................... 40 To add or change an annotation .................................................................................................... 40
Session Recording Technology Preview Administrator’s Guide
citrix.com
To delete a bookmark .................................................................................................................... 40
To go to an event or bookmark ...................................................................................................... 40 Change the playback display .............................................................................................................. 40
To display the Player window in full-screen format ....................................................................... 41 To display the Player window in a separate window ..................................................................... 41 To scale the session playback to fit the Player window ................................................................. 41 To pan the image ........................................................................................................................... 41 To display a red border around the session recording .................................................................. 41
Cache recorded session files .............................................................................................................. 42 To enable caching .......................................................................................................................... 42 To empty cache ............................................................................................................................. 42
Troubleshooting Session Recording ................................................................................................... 42 Session Recording Agent cannot connect ..................................................................................... 42 Session Recording Server cannot connect to the Session Recording Database .......................... 43 Sessions are not recording ............................................................................................................ 44 Unable to view live session playback ............................................................................................ 44 Recordings are corrupt or incomplete ............................................................................................ 45 Test connection of the database instance failed when installing the Session Recording Database or Session Recording Server ............................................................................................................. 45 Verify component connections ....................................................................................................... 45 Test IIS connectivity ....................................................................................................................... 46 Troubleshoot certificate issues ...................................................................................................... 47 Search for recordings if the Session Recording Player fails .......................................................... 48 Troubleshoot MSMQ ...................................................................................................................... 49 Change your communication protocol ........................................................................................... 49 Reference: Manage your database records .................................................................................. 51
Quick reference chart .......................................................................................................................... 51 Reference ............................................................................................................................................ 53
About Citrix Systems ...................................................................................................................... 53 Attributions ..................................................................................................................................... 53 Copyright ........................................................................................................................................ 53
Session Recording Technology Preview Administrator’s Guide
citrix.com 5
Disclaimers This document is furnished "AS IS." CITRIX DISCLAIMS ALL WARRANTIES REGARDING THE CONTENTS OF THIS DOCUMENT, INCLUDING, BUT NOT LIMITED TO, IMPLIED WARRANTIES OF MERCHANTABILITY AND FITNESS FOR ANY PARTICULAR PURPOSE. This document may contain technical or other inaccuracies or typographical errors. Citrix reserves the right to revise the information in this document at any time without notice. This document and the software described in this document constitute confidential information of Citrix and its licensors and are furnished under a license from Citrix. This document and the software may be used and copied only as agreed upon by the Technology Preview Agreement.
About this technology preview Share feedback about this technology preview through the link provided on the download site. You cannot upgrade from this version of the product, and you cannot upgrade to it from earlier Session Recording versions. Citrix recommends using this technology preview software in a test deployment.
Summary of new and enhanced features
Session Recording 7.6.200 includes support for Platinum XenApp 7.6 FP 3 and XenDesktop 7.6 FP 3. This support includes:
x VDI desktops recording
x Delivery Group rules
x Keyword filtering during rule configuration
x Special handling for unsupported graphics modes
Limitations and caveats x Session Recording is available only in English for this Technology Preview. x This technology preview is not recommended for use in a production environment. Upgrades to or
from this technology preview are not supported. x Session Recording does not support Desktop Composition Redirection (DCR) display mode. By
default Session Recording disables DCR in a session if the session is to be recorded by recording policy. You can configure this behavior in Session Recording Agent properties.
x Session Recording does not support Framehawk display mode and cannot record sessions in Framehawk display mode.
Known issues x Session Recording does not support published applications named Desktop. Such applications
cannot be added into the recording rules in the Policy Console. [#588707]
x Session Recording does not support the rollover feature for sessions from Desktop OS VDAs. [#584890]
Session Recording Technology Preview Administrator’s Guide
citrix.com 6
x When Machine Creation Services (MCS) or Provisioning Services creates a VDA with configured master image and Microsoft Message Queuing (MSMQ) installed, the VDA has the same QMId as the MSMQ. This might cause various issues, such as:
x Sessions mighty not be recorded even if the recording agreement is accepted. x The session logoff signal might not be received by the Session Recording server, which leads
to the session always in Live status. [#528678]
The workaround to create a unique and persistent QMId for each VDA is to use a script. To use the script, do the following:
1. Make sure the execution policy is set to RemoteSigned or Unrestricted, in PowerShell.
Set-ExecutionPolicy RemoteSigned
2. Create a scheduled task and set the trigger as At system startup and run with SYSTEM account on the Provisioning Services or MCS master image machine.
3. Add the command as a startup task.
powershell.exe -file C:\GenQMID.ps1
Warning: Editing the registry incorrectly can cause serious problems that may require you to reinstall your operating system. Citrix cannot guarantee that problems resulting from the incorrect use of Registry Editor can be solved. Use Registry Editor at your own risk. Be sure to back up the registry before you edit it.
Summary of the script:
1. Generate the QMid based on the hash value of the machine FQDN. 2. Stop related services, including CitrixSmAudAgent and MSMQ. 3. Set the QMid in the registry. 4. Start services that stopped previously to apply QMId’s change.
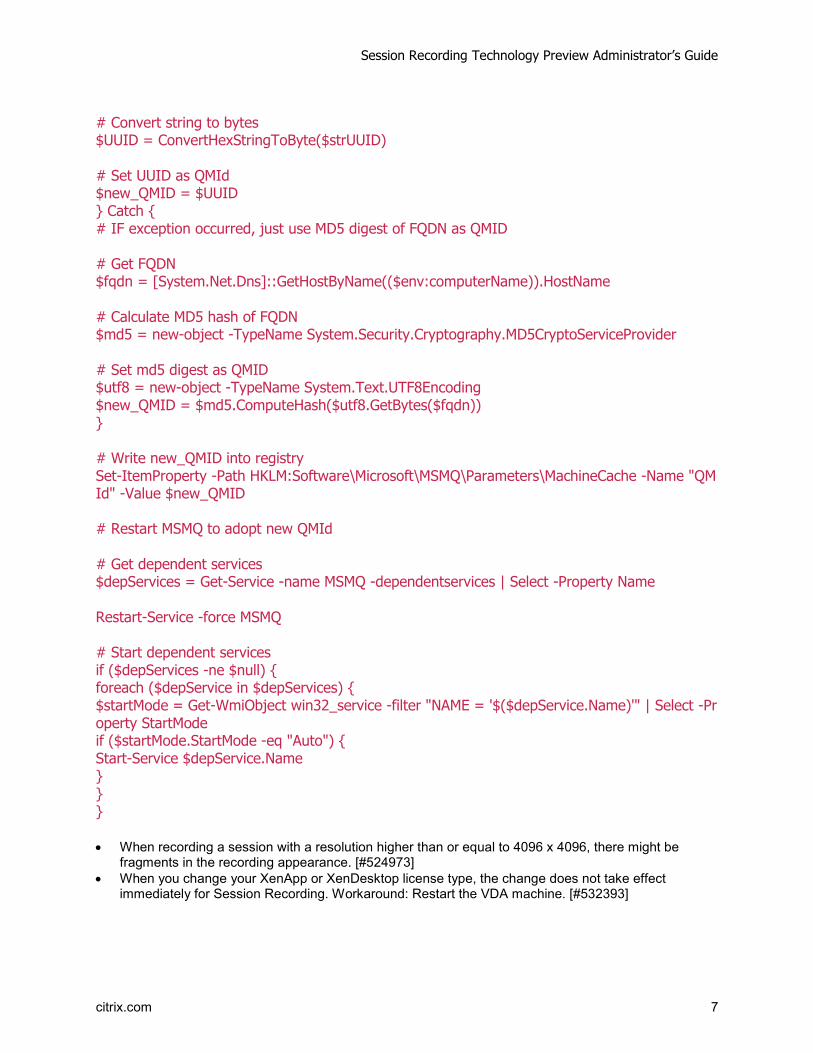
THIS SCRIPT IS FOR REFERENCE:
function ConvertHexStringToByte($theString) { $bytes = New-Object Byte[] ($theString.Length / 2) for ($i = 0; $i -lt $theString.Length; $i += 2) { $bytes[$i / 2] = [System.Convert]::ToByte($theString.Substring($i, 2), 16) } return $bytes } Try { # Get UUID of machine $strUUID = (Get-WmiObject -Class Win32_ComputerSystemProduct | Select-Object -Property UUID).UUID # Remove "-" $strUUID = $strUUID.ToString().Replace("-", "")
Session Recording Technology Preview Administrator’s Guide
citrix.com 7
# Convert string to bytes $UUID = ConvertHexStringToByte($strUUID) # Set UUID as QMId $new_QMID = $UUID } Catch { # IF exception occurred, just use MD5 digest of FQDN as QMID # Get FQDN $fqdn = [System.Net.Dns]::GetHostByName(($env:computerName)).HostName # Calculate MD5 hash of FQDN $md5 = new-object -TypeName System.Security.Cryptography.MD5CryptoServiceProvider # Set md5 digest as QMID $utf8 = new-object -TypeName System.Text.UTF8Encoding $new_QMID = $md5.ComputeHash($utf8.GetBytes($fqdn)) } # Write new_QMID into registry Set-ItemProperty -Path HKLM:Software\Microsoft\MSMQ\Parameters\MachineCache -Name "QMId" -Value $new_QMID # Restart MSMQ to adopt new QMId # Get dependent services $depServices = Get-Service -name MSMQ -dependentservices | Select -Property Name Restart-Service -force MSMQ # Start dependent services if ($depServices -ne $null) { foreach ($depService in $depServices) { $startMode = Get-WmiObject win32_service -filter "NAME = '$($depService.Name)'" | Select -Property StartMode if ($startMode.StartMode -eq "Auto") { Start-Service $depService.Name } } }
x When recording a session with a resolution higher than or equal to 4096 x 4096, there might be fragments in the recording appearance. [#524973]
x When you change your XenApp or XenDesktop license type, the change does not take effect immediately for Session Recording. Workaround: Restart the VDA machine. [#532393]
Session Recording Technology Preview Administrator’s Guide
citrix.com 8
x Limitation for Session Recording to support the Pre-Launched application sessions [#561109]
x Problem: � If the active policy tries to match the application name, the application launched in
the pre-launched session will not be matched, which results in the session not being recorded.
� If the active policy records every application, when the user logs into the Windows Receiver (at the same time the pre-launched session is established) a notification for recording will appear and the empty session and any applications that will be launched in this session later will be recorded.
x Workaround: � Publish the applications in separate Delivery Groups according to their recording
policy. Do not use the application name as the recording condition. This will ensure pre-launch sessions will be recorded. However, notifications will still appear.
Fixed issues
x You might receive an Installation failed error in the following two cases. You can ignore the message, but to avoid receiving the message, restart the machine before reinstalling the Session Recording components. [#544579]
x Uninstalled the Session Recording components, and then reinstalled them without restarting the machine.
x Installation failed and rollback happened, and then you tried to reinstall the Session Recording components without restarting the machine.
System requirements Session Recording Administration components
The Session Recording Administration components (Session Recording Database, Session Recording Server, and Session Recording Policy Console) can be installed on a single server or on different servers.
Session Recording Database
Supported Windows operating systems:
x Microsoft Windows Server 2012 R2 x Microsoft Windows Server 2012 x Microsoft Windows Server 2008 R2 with Service Pack 1
Requirements:
x Microsoft SQL Server 2014 (Enterprise and Express editions), Microsoft SQL Server 2012 (Enterprise and Express editions) with Service Pack 2, or Microsoft SQL Server 2008 R2 (Enterprise and Express editions) with Service Pack 3
x NET Framework Version 3.5 Service Pack 1 (Windows Server 2008 R2 only), .NET Framework Version 4.5.1., and .NET Framework 4.6
Session Recording Technology Preview Administrator’s Guide
citrix.com 9
Session Recording Server
Supported Windows operating systems:
x Microsoft Windows Server 2012 R2 x Microsoft Windows Server 2012 x Microsoft Windows Server 2008 R2 with Service Pack 1
Requirements:
x Before starting the Session Recording installation, you must install some prerequisites. Open the Server Manager and add the IIS role. Select the following options:
x Application Development - ASP.NET 4.5 on Windows Server 2012 and Windows Server 2012 R2, ASP.NET on Windows Server 2008 R2 (other components are automatically selected. Click Add to accept required roles)
x Management Tools — IIS 6 Management Compatibility � IIS 6 Metabase Compatibility � IIS 6 WMI Compatibility � IIS 6 Scripting Tools � IIS 6 Management Console
x NET Framework Version 3.5 Service Pack 1 (Windows Server 2008 R2 only), .NET Framework Version 4.5.1., and .NET Framework 4.6
x If the Session Recording Server uses HTTPS as its communications protocol, and a valid certificate. Session Recording uses HTTPS by default, which Citrix recommends.
x Microsoft Message Queuing (MSMQ), with Active Directory integration disabled, and MSMQ HTTP support enabled.
Session Recording Policy Console
Supported Windows operating systems:
x Microsoft Windows Server 2012 R2 x Microsoft Windows Server 2012 x Microsoft Windows Server 2008 R2 with Service Pack 1
Requirements:
NET Framework Version 3.5 Service Pack 1 (Windows Server 2008 R2 only), .NET Framework Version 4.5.1., and .NET Framework 4.6
Session Recording Agent
Install the Session Recording Agent on every XenApp and XenDesktop VDA machine on which you want to record sessions.
Supported Windows operating systems:
x Microsoft Windows Server 2012 R2 x Microsoft Windows Server 2012
Session Recording Technology Preview Administrator’s Guide
citrix.com 10
x Microsoft Windows Server 2008 R2 with Service Pack 1 x Microsoft Windows 10 x Microsoft Windows 8.1 x Microsoft Windows 8 x Microsoft Windows 7 SP1
Requirements:
x XenApp 7.6 FP3 or XenDesktop 7.6 FP 3 with Platinum license x .NET Framework Version 4.5.1 and .Net Framework 4.6 x Microsoft Message Queuing (MSMQ), with Active Directory integration disabled, and MSMQ HTTP
support enabled
Session Recording Player
Supported Windows operating systems:
x Microsoft Windows 10 x Microsoft Windows 8.1 x Microsoft Windows 8 x Microsoft Windows 7 with Service Pack 1
Requirements:
NET Framework Version 3.5 Service Pack 1 (Windows Server 2008 R2 only), .NET Framework Version 4.5.1., and .NET Framework 4.6
For optimal results, install Session Recording Player on a workstation with:
x Screen resolution of 1024 x 768 x Color depth of at least 32-bit x Memory: 1GB RAM (minimum)—additional RAM and CPU/GPU resources can improve performance
when playing graphics intensive recordings; especially when there are a lot of animations in the recordings.
The seek response time depends on the size of the recording and your machine's hardware specification.
Session Recording components
x Session Recording Agent. A component installed on each VDA or VDI machine to enable recording. It is responsible for recording session data.
x Session Recording Server. A server that hosts:
o The Broker. An IIS 6.0+ hosted Web application that handles the search queries and file download requests from the Session Recording Player, handles policy administration requests from the Session Recording Policy Console, and evaluates recording policies for each XenApp and XenDesktop session.
o The Storage Manager. A Windows service that manages the recorded session files received from each Session Recording-enabled computer running XenApp and XenDesktop.
Session Recording Technology Preview Administrator’s Guide
citrix.com 11
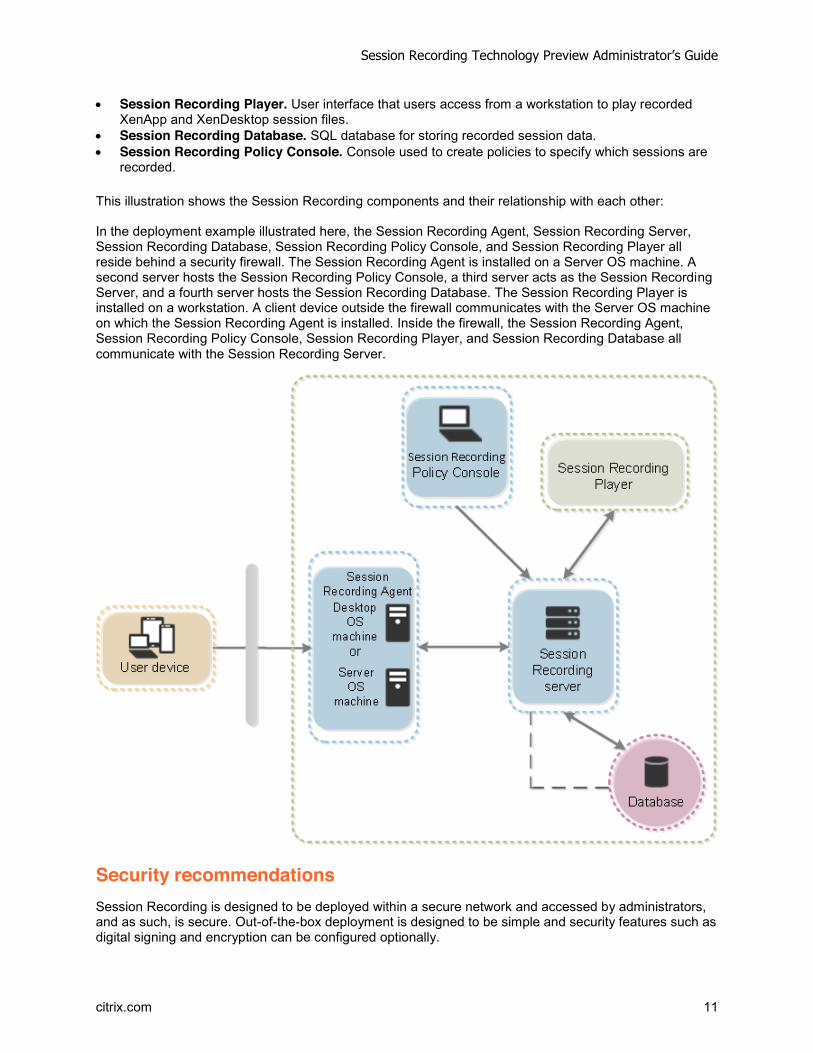
x Session Recording Player. User interface that users access from a workstation to play recorded XenApp and XenDesktop session files.
x Session Recording Database. SQL database for storing recorded session data. x Session Recording Policy Console. Console used to create policies to specify which sessions are
recorded.
This illustration shows the Session Recording components and their relationship with each other:
In the deployment example illustrated here, the Session Recording Agent, Session Recording Server, Session Recording Database, Session Recording Policy Console, and Session Recording Player all reside behind a security firewall. The Session Recording Agent is installed on a Server OS machine. A second server hosts the Session Recording Policy Console, a third server acts as the Session Recording Server, and a fourth server hosts the Session Recording Database. The Session Recording Player is installed on a workstation. A client device outside the firewall communicates with the Server OS machine on which the Session Recording Agent is installed. Inside the firewall, the Session Recording Agent, Session Recording Policy Console, Session Recording Player, and Session Recording Database all communicate with the Session Recording Server.
Security recommendations Session Recording is designed to be deployed within a secure network and accessed by administrators, and as such, is secure. Out-of-the-box deployment is designed to be simple and security features such as digital signing and encryption can be configured optionally.
Session Recording Technology Preview Administrator’s Guide
citrix.com 12
Communication between Session Recording components is achieved through Internet Information Services (IIS) and Microsoft Message Queuing (MSMQ). IIS provides the web services communication link between each Session Recording component. MSMQ provides a reliable data transport mechanism for sending recorded session data from the Session Recording Agent to the Session Recording Server.
Consider these security recommendations when planning your deployment:
x Ensure you properly isolate the different administrator roles in the corporate network, in the Session Recording system, or on individual machines. By not doing so, security threats that can impact the system functionality or abuse the system might occur. Citrix recommends that you assign different administrator roles to different persons or accounts that you do not allow general session users to have administrator privileges to the VDA system.
o XenApp and XenDesktop administrators should not grant VDA local admin role to any users of published apps or desktops. If the local admin role is a requirement, protect the Session Recording Agent components with Windows mechanisms or 3rd-party solutions.
o Separately assign the Session Recording’s database administrator and Session Recording policy administrator.
o Citrix does NOT recommend installing Session Recording for Remote PC. If this is a requirement, use Windows mechanisms or 3rd-party solutions to protect Session Recording components.
o Session Recording Server local administration account must be strictly protected o Control access to machines installed with Session Recording Player. If a user is not
authorized as the Player role, do not grant that user local administrator role for any player machine. Disable anonymous access.
o Citrix recommends using a physical machine as a storage server for Session Recording. x Session Recording records session graphics activities without regard to the sensitivity of the data.
Under certain circumstances, sensitive data (including but not limited to user credentials, privacy information, and third-party screens) might be recorded unintentionally. Take the following measures to prevent risks:
o Disable core memory dump for VDA machines unless for specific troubleshooting cases.
To disable core memory dump:
1) Right-click My Computer, and then click Properties. 2) Click the Advanced tab, and then under Startup and Recovery, click Settings. 3) Under Write Debugging Information, select (none).
See the Microsoft article https://support.microsoft.com/en-us/kb/307973.
o Ensure log on credentials or security information does not appear in all local and Web applications published or used inside the corporation or they are recorded by Session Recording.
o Users should close any application that might expose sensitive information before switching to a remote ICA session.
o Session owners should notify attendees that online meetings and remote assistance software might get recorded if a desktop session is being recorded.
o Allow only automatic authentication methods (for example, single sign on, smartcard) for accessing published desktops or applications.
x Session Recording relies on certain hardware and hardware infrastructure (for example, corporate network devices, operation system) to function properly and to meet security needs. Take measures at the infrastructure levels to prevent damage or abuse to those infrastructures and make the Session Recording function secure and reliable.
Session Recording Technology Preview Administrator’s Guide
citrix.com 13
o Properly protect and keep network infrastructure supporting Session Recording available. o Citrix recommends using a 3rd-party security solution or Windows mechanism to protect Session
Recording components. Session Recording components include:
On Session Recording Server
o Processes: SsRecStoragemanager.exe and SsRecAnalyticsService.exe o Services: CitrixSsRecStorageManager and CitrixSsRecAnalyticsService o All files in Session Recording Server installation folder o Registry keys at HKLM\Software\Citrix\SmartAuditor\Server
On Session Recording Agent
o Process: SsRecAgent.exe o Service: CitrixSmAudAgent o All files in Session Recording Agent installation folder o Registry keys at HKLM\Software\Citrix\SmartAuditor\Server
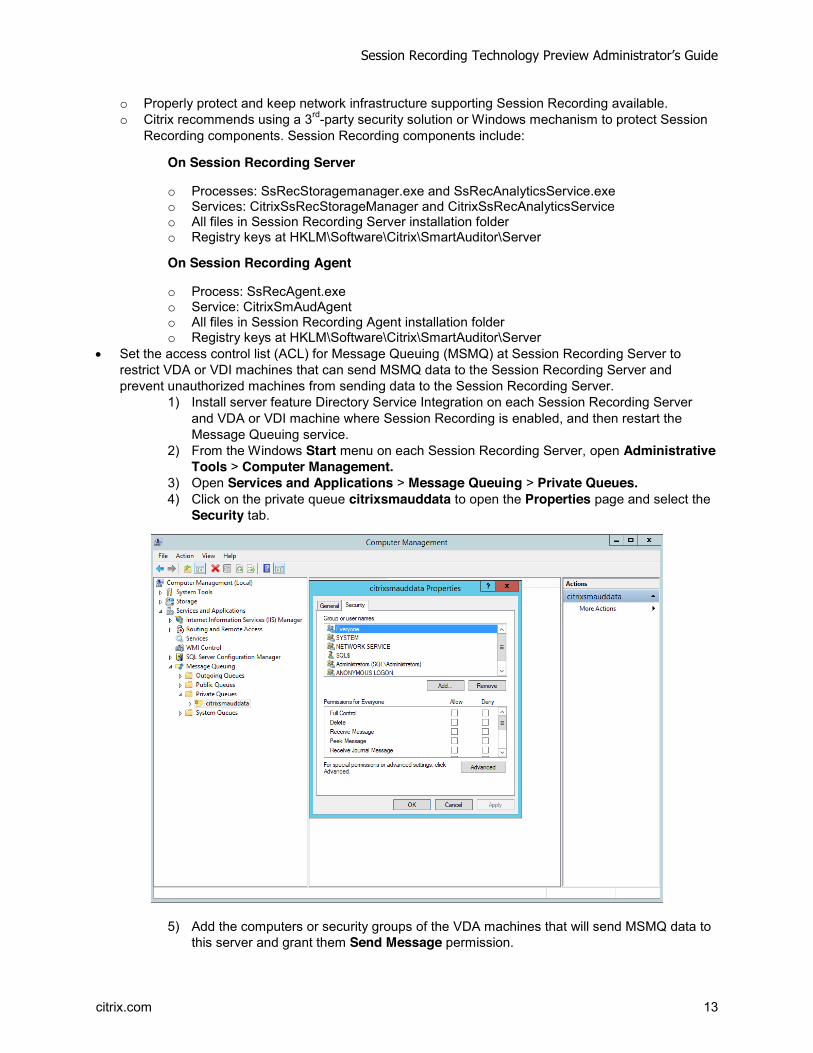
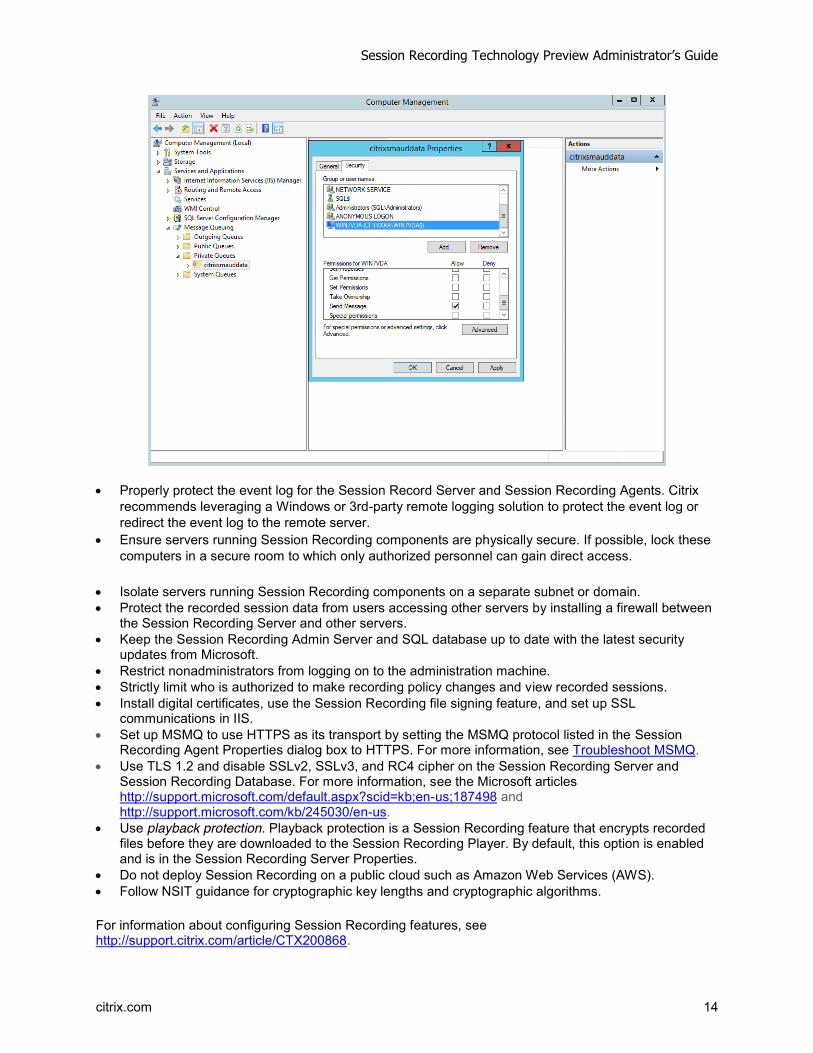
x Set the access control list (ACL) for Message Queuing (MSMQ) at Session Recording Server to restrict VDA or VDI machines that can send MSMQ data to the Session Recording Server and prevent unauthorized machines from sending data to the Session Recording Server.
1) Install server feature Directory Service Integration on each Session Recording Server and VDA or VDI machine where Session Recording is enabled, and then restart the Message Queuing service.
2) From the Windows Start menu on each Session Recording Server, open Administrative Tools > Computer Management.
3) Open Services and Applications > Message Queuing > Private Queues. 4) Click on the private queue citrixsmauddata to open the Properties page and select the
Security tab.
5) Add the computers or security groups of the VDA machines that will send MSMQ data to this server and grant them Send Message permission.
Session Recording Technology Preview Administrator’s Guide
citrix.com 14
x Properly protect the event log for the Session Record Server and Session Recording Agents. Citrix recommends leveraging a Windows or 3rd-party remote logging solution to protect the event log or redirect the event log to the remote server.
x Ensure servers running Session Recording components are physically secure. If possible, lock these computers in a secure room to which only authorized personnel can gain direct access.
x Isolate servers running Session Recording components on a separate subnet or domain. x Protect the recorded session data from users accessing other servers by installing a firewall between
the Session Recording Server and other servers. x Keep the Session Recording Admin Server and SQL database up to date with the latest security
updates from Microsoft. x Restrict nonadministrators from logging on to the administration machine. x Strictly limit who is authorized to make recording policy changes and view recorded sessions. x Install digital certificates, use the Session Recording file signing feature, and set up SSL
communications in IIS. x Set up MSMQ to use HTTPS as its transport by setting the MSMQ protocol listed in the Session
Recording Agent Properties dialog box to HTTPS. For more information, see Troubleshoot MSMQ. x Use TLS 1.2 and disable SSLv2, SSLv3, and RC4 cipher on the Session Recording Server and
Session Recording Database. For more information, see the Microsoft articles http://support.microsoft.com/default.aspx?scid=kb;en-us;187498 and http://support.microsoft.com/kb/245030/en-us.
x Use playback protection. Playback protection is a Session Recording feature that encrypts recorded files before they are downloaded to the Session Recording Player. By default, this option is enabled and is in the Session Recording Server Properties.
x Do not deploy Session Recording on a public cloud such as Amazon Web Services (AWS). x Follow NSIT guidance for cryptographic key lengths and cryptographic algorithms.
For information about configuring Session Recording features, see http://support.citrix.com/article/CTX200868.
Session Recording Technology Preview Administrator’s Guide
citrix.com 15
Scalability considerations Installing and running Session Recording requires few additional resources beyond what is necessary to run XenApp or XenDesktop. However, if you plan to use Session Recording to record a large number of sessions or if the sessions you plan to record will result in large session files (for example, graphically intense applications), consider the performance of your system when planning your Session Recording deployment.
For more information about building a highly scalable Session Recording system, see http://support.citrix.com/article/CTX200869.
Hardware recommendations
Consider how much data you will be sending to each Session Recording Server and how quickly the servers can process and store this data. The rate at which your system can store incoming data must be higher than the data input rate.
To estimate your data input rate, multiply the number of sessions recorded by the average size of each recorded session and divide by the period of time for which you are recording sessions. For example, you might record 5,000 Microsoft Outlook sessions of 20MB each over an 8-hour work day. In this case, the data input rate is approximately 3.5MBps. (5,000 sessions times 20MB divided by 8 hours, divided by 3,600 seconds per hour.)
You can improve performance by optimizing the performance of a single Session Recording Server or by installing multiple Session Recording Servers on different computers.
Disk and storage hardware
Disk and storage hardware are the most important factors to consider when planning a Session Recording deployment. The write performance of your storage solution is especially important. The faster data can be written to disk, the higher the performance of the system overall.
Storage solutions suitable for use with Session Recording include a set of local disks controlled as RAID arrays by a local disk controller or by an attached Storage Area Network (SAN).
Note: Session Recording should not be used with Network-Attached Storage (NAS), due to performance and security problems associated with writing recording data to a network drive.
For a local drive set up, a disk controller with built-in cache memory enhances performance. A caching disk controller must have a battery backup facility to ensure data integrity in case of a power failure.
Network capacity
A 100Mbps network link is suitable for connecting a Session Recording Server. A gigabit Ethernet connection may improve performance, but does not result in 10 times greater performance than a 100Mbps link.
Ensure that network switches used by Session Recording are not shared with third-party applications that may compete for available network bandwidth. Ideally, network switches are dedicated for use with the Session Recording Server.
Session Recording Technology Preview Administrator’s Guide
citrix.com 16
Computer processing capacity
Consider the following specification for the computer on which a Session Recording Server is installed:
x A dual CPU or dual-core CPU is recommended x 2GB to 4GB of RAM is recommended
Exceeding these specifications does not significantly improve performance.
Deploy multiple Session Recording servers
If a single Session Recording Server does not meet your performance needs, you can install more Session Recording Servers on different machines. In this type of deployment, each Session Recording Server has its own dedicated storage, network switches, and database. To distribute the load, point the Session Recording Agents in your deployment to different Session Recording Servers.
Database scalability
The Session Recording Database requires Microsoft SQL Server 2014, Microsoft SQL Server 2012, or Microsoft SQL Server 2008 R2. The volume of data sent to the database is very small because the database stores only metadata about the recorded sessions. The files of the recorded sessions themselves are written to a separate disk. Typically, each recorded session requires only about 1KB of space in the database, unless the Session Recording Event API is used to insert searchable events into the session.
The Express Editions of Microsoft SQL Server 2014, Microsoft SQL Server 2012, and Microsoft SQL Server 2008 R2 impose a database size limitation of 10GB. At 1KB per recording session, the database can catalog about four million sessions. Other editions of Microsoft SQL Server have no database size restrictions and are limited only by available disk space. As the number of sessions in the database increases, performance of the database and speed of searches diminishes only negligibly.
If you are not making customizations through the Session Recording Event API, each recorded session generates four database transactions: two when recording starts, one when the user logs onto the session being recorded, and one when recording ends. If you used the Session Recording Event API to customize sessions, each searchable event recorded generates one transaction. Because even the most basic database deployment can handle hundreds of transactions per second, the processing load on the database is unlikely to be stressed. The impact is light enough that the Session Recording Database can run on the same SQL Server as other databases, including the XenApp or XenDesktop data store database.
If your Session Recording deployment requires many millions of recorded sessions to be cataloged in the database, follow Microsoft guidelines for SQL Server scalability.
Important deployment notes
x To enable Session Recording components to communicate with each other, ensure you install them in the same domain or across trusted domains that have a transitive trust relationship. The system cannot be installed into a workgroup or across domains that have an external trust relationship.
x Session Recording does not support the clustering of two or more Session Recording Servers in a deployment.
x Due to its intense graphical nature and memory usage when playing back large recordings, Citrix does not recommend installing the Session Recording Player as a published application.
x The Session Recording installation is configured for SSL/HTTPS communication. Ensure that you install a certificate on the Session Recording Server and that the root certificate authority (CA) is trusted on the Session Recording components.
Session Recording Technology Preview Administrator’s Guide
citrix.com 17
x If you install the Session Recording Database on a stand-alone server running SQL Server 2014 Express Edition, SQL Server 2012 Express Edition, or SQL Server 2008 R2 Express Edition, the server must have TCP/IP protocol enabled and SQL Server Browser service running. These settings are disabled by default, but they must be enabled for the Session Recording Server to communicate with the database. See the Microsoft documentation for information about enabling these settings.
x Consider the effects of session sharing when planning your Session Recording deployment. Session sharing for published applications can conflict with Session Recording recording policy rules for published applications. Session Recording matches the active policy with the first published application that a user opens. After the user opens the first application, any subsequent applications opened during the same session continue to follow the policy that is in force for the first application. For example, if a policy states that only Microsoft Outlook should be recorded, the recording commences when the user opens Outlook. However, if the user opens a published Microsoft Word second (while Outlook is running), Word also is recorded. Conversely, if the active policy does not specify that Word should be recorded, and the user launches Word before Outlook (which should be recorded, according to the policy), Outlook is not recorded.
Install Session Recording
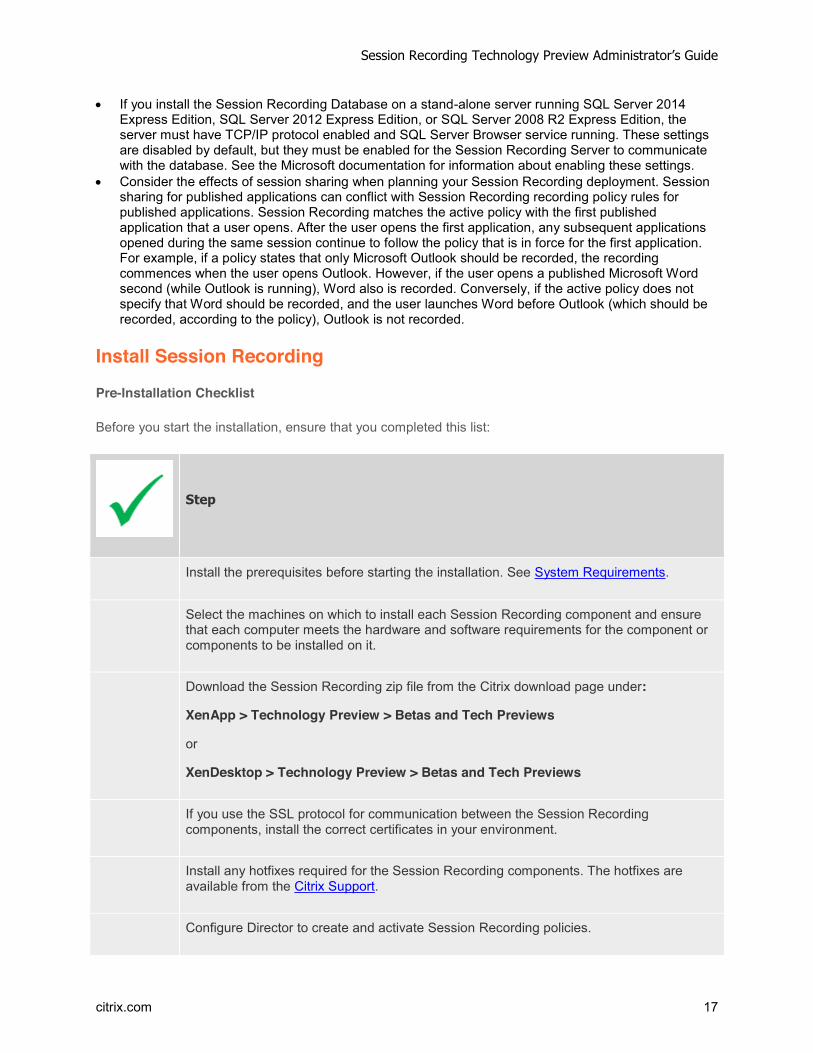
Pre-Installation Checklist
Before you start the installation, ensure that you completed this list:
Step
Install the prerequisites before starting the installation. See System Requirements.
Select the machines on which to install each Session Recording component and ensure that each computer meets the hardware and software requirements for the component or components to be installed on it.
Download the Session Recording zip file from the Citrix download page under:
XenApp > Technology Preview > Betas and Tech Previews
or
XenDesktop > Technology Preview > Betas and Tech Previews
If you use the SSL protocol for communication between the Session Recording components, install the correct certificates in your environment.
Install any hotfixes required for the Session Recording components. The hotfixes are available from the Citrix Support.
Configure Director to create and activate Session Recording policies.
Session Recording Technology Preview Administrator’s Guide
citrix.com 18
Trial license file - download a trial license file from the download page and import it into your License Server. Connect your XenDesktop or XenApp to the License Server and select the correct license type.
Notes:
x Citrix recommends dividing the published applications into separate delivery groups based on the recording policies because session sharing for published applications can conflict with active policies if they are in the same delivery group. Session Recording matches the active policy with the first published application that a user opens.
x If you are planning to use Machine Creation Services (MCS) or Provisioning Services with XenApp, prepare the server for a unique QMId. See the description in Known issues. Failure to do this step might result in lost recording data.
x SQL server requires that TCP/IP is enabled, the SQL Server Browser service is running, and Windows Authentication.
x If you want to use HTTPS, configure server certificates for SSL/HTTPS.
Session Recording installation files
You need the following installation files from the Citrix download page:
x Session Recording Administration files o Broker_PowerShellSnapIn_x64.msi o SessionRecordingAdministrationx64.msi
x Session Recording Agent files o SessionRecordingAgentx64.msi o WS VDA Patch (folder)
o install.bat o usage.txt o x64 (folder)
- files o x86 (folder)
- files x Session Recording Player files
o SessionRecordingPlayer.msi
Install Session Recording Administration components
The Session Recording Administration components are the Session Recording Database, Session Recording Server, and the Session Recording Policy Console. You can choose which of these components to install on a server.
Before installing the Session Recording Administration components, ensure you have all the prerequisites installed. See Session Recording Administration components.
1. Run the Broker_PowerShellSnapIn_x64.msi and follow the instructions to complete the installation.
2. Start the Windows command prompt as Administrator, and then run this command:
msiexec /i SessionRecordingAdministrationx64.msi
or double click the .msi file.
Session Recording Technology Preview Administrator’s Guide
citrix.com 19
3. On the installation UI, select Next and accept the license agreement. 4. On the Session Recording Administration Setup screen, select the Session Recording
Administration components you want to install.
Install the Session Recording Database
Before installing the Session Recording Database, ensure you have all the prerequisites installed. See Session Recording Administration components.
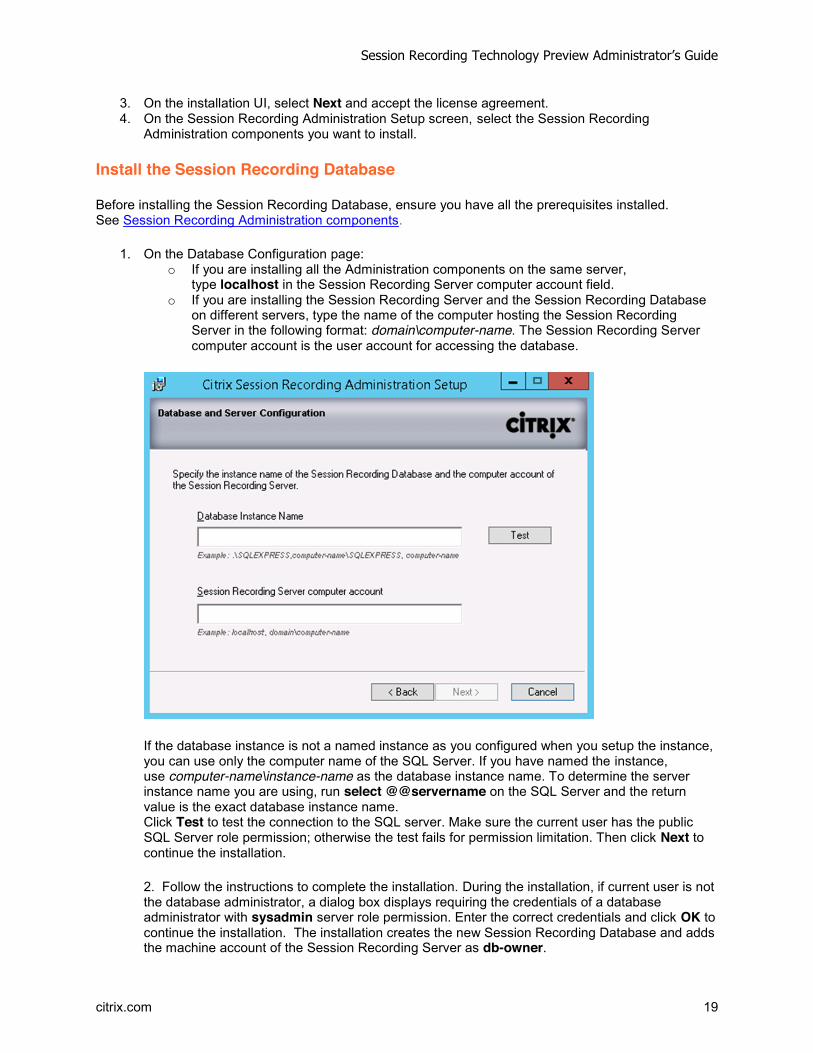
1. On the Database Configuration page: o If you are installing all the Administration components on the same server,
type localhost in the Session Recording Server computer account field. o If you are installing the Session Recording Server and the Session Recording Database
on different servers, type the name of the computer hosting the Session Recording Server in the following format: domain\computer-name. The Session Recording Server computer account is the user account for accessing the database.
If the database instance is not a named instance as you configured when you setup the instance, you can use only the computer name of the SQL Server. If you have named the instance, use computer-name\instance-name as the database instance name. To determine the server instance name you are using, run select @@servername on the SQL Server and the return value is the exact database instance name. Click Test to test the connection to the SQL server. Make sure the current user has the public SQL Server role permission; otherwise the test fails for permission limitation. Then click Next to continue the installation.
2. Follow the instructions to complete the installation. During the installation, if current user is not the database administrator, a dialog box displays requiring the credentials of a database administrator with sysadmin server role permission. Enter the correct credentials and click OK to continue the installation. The installation creates the new Session Recording Database and adds the machine account of the Session Recording Server as db-owner.
Session Recording Technology Preview Administrator’s Guide
citrix.com 20
Install the Session Recording Server
Before installing the Session Recording Server, ensure you have all the prerequisites installed. See Session Recording Administration components.
1. Enter the name of your SQL server in the Database Instance Name text box. If you are using a named instance, enter computer-name\instance-name; otherwise enter a computer-name only.
2. Click Test to test the connection to the SQL server. Make sure the current user has the public SQL Server role permission; otherwise the test fails for permission limitation. Then click Next to continue the installation and follow the instructions to complete the installation.
3. At the end of the installation wizard, you can choose to participate in the Citrix Customer Experience Improvement Program. When you join this program, anonymous statistics and usage information is sent to Citrix; for more information, see About the Citrix Customer Experience Improvement Program (CEIP).
Install the Session Recording Agent
The Session Recording Agent must be installed on the VDA or VDI machine on which you want to record sessions.
1. Use the Server Manager to install .NET Framework 3.5 and Microsoft Message Queuing (MSMQ) with HTTP support on the XenApp 7.6 FP3 Server OS VDA or XenDesktop 7.6 FP3 VDI.
2. If you install Session Recording Agent on the Windows Desktop OS machine, deploy the WS VDA Patch. In the WS VDA Patch folder, right click install.bat, and then select Run as administrator. Restart the computer after you apply the patch.
3. Start the Windows command prompt as Administrator, and then run this command:
msiexec /i SessionRecordingAgentx64.msi
or
msiexec /i SessionRecordingAgent.msi
or double click the .msi file. Use the correct .msi file based on platform type: SessionRecordingAgent.msi for 32 bit systems and SessionRecordingAgentx64.msi for 64 bit systems.
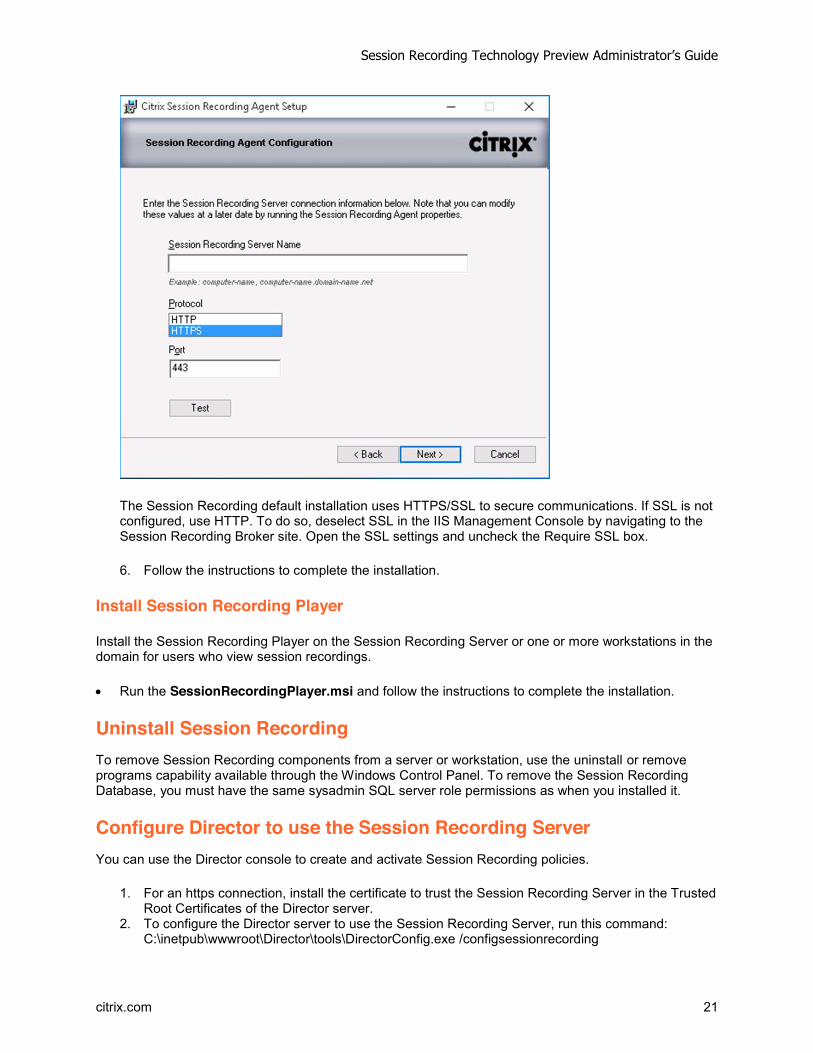
4. On the installation UI, select Next and accept the license agreement. 5. In the Session Recording Agent Configuration page, enter the name of the computer where you
installed the Session Recording Server and the protocol and port information for the connection to the Session Recording Server.
Session Recording Technology Preview Administrator’s Guide
citrix.com 21
The Session Recording default installation uses HTTPS/SSL to secure communications. If SSL is not configured, use HTTP. To do so, deselect SSL in the IIS Management Console by navigating to the Session Recording Broker site. Open the SSL settings and uncheck the Require SSL box.
6. Follow the instructions to complete the installation.
Install Session Recording Player
Install the Session Recording Player on the Session Recording Server or one or more workstations in the domain for users who view session recordings.
x Run the SessionRecordingPlayer.msi and follow the instructions to complete the installation.
Uninstall Session Recording To remove Session Recording components from a server or workstation, use the uninstall or remove programs capability available through the Windows Control Panel. To remove the Session Recording Database, you must have the same sysadmin SQL server role permissions as when you installed it.
Configure Director to use the Session Recording Server You can use the Director console to create and activate Session Recording policies.
1. For an https connection, install the certificate to trust the Session Recording Server in the Trusted Root Certificates of the Director server.
2. To configure the Director server to use the Session Recording Server, run this command: C:\inetpub\wwwroot\Director\tools\DirectorConfig.exe /configsessionrecording
Session Recording Technology Preview Administrator’s Guide
citrix.com 22
3. Enter the IP/FQDN of the Session Recording Server, the port number and connection type (http/https) from the Session Recording Agent to Session Recording Broker on Director server.
Automating installations To install Session Recording Agent on multiple servers, write a script that uses silent installation.
The following command line installs the Session Recording Agent and creates a log file to capture the install information.
For 64 bit systems:
msiexec /i SessionRecordingAgentx64.msi sessionrecordingservername=yourservername sessionrecordingbrokerprotoco=yourbrokerprotocol sessionrecordingbrokerport=yourbrokerport /l*v yourinstallationlog /q For 32 bit systems: msiexec /i SessionRecordingAgent.msi sessionrecordingservername=yourservername sessionrecordingbrokerprotoco=yourbrokerprotocol sessionrecordingbrokerport=yourbrokerport /l*v yourinstallationlog /q where:
yourservername is the NetBIOS name or FQDN of the computer hosting the Session Recording Server. If not specified, this value defaults to localhost.
yourbrokerprotocol is either HTTP or HTTPS, and represents the protocol that Session Recording Agent uses to communicate with Session Recording Broker; this value defaults to HTTPS if not specified.
yourbrokerport is an integer representing the port Session Recording Agent uses to communicate with Session Recording Broker. If not specified, this value defaults to zero, which directs Session Recording Agent to use the default port number for the selected protocol: 80 for HTTP or 443 for HTTPS.
/l*v specifies verbose mode logging
yourinstallationlog is the location of the setup log file created.
/q specifies quiet mode.
Session Recording Technology Preview Administrator’s Guide
citrix.com 23
Configure Session Recording to play and record sessions After you install the Session Recording components, perform these steps to configure Session Recording to record XenApp or XenDesktop sessions and allow users to view them:
x Authorize users to play recordings x Authorize users to administer recording policies x Change the active recording policy to one that records sessions x Configure Session Recording Player to connect to the Session Recording Server
Authorize users to play recorded sessions
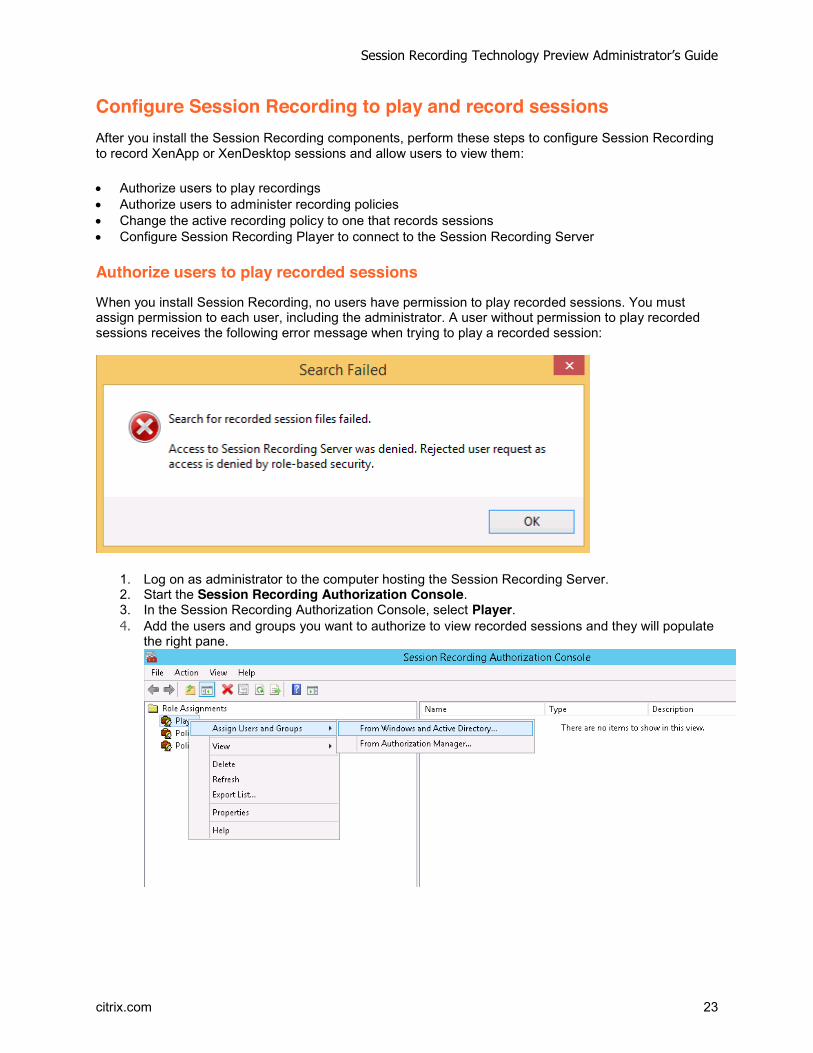
When you install Session Recording, no users have permission to play recorded sessions. You must assign permission to each user, including the administrator. A user without permission to play recorded sessions receives the following error message when trying to play a recorded session:
1. Log on as administrator to the computer hosting the Session Recording Server. 2. Start the Session Recording Authorization Console. 3. In the Session Recording Authorization Console, select Player. 4. Add the users and groups you want to authorize to view recorded sessions and they will populate
the right pane.
Session Recording Technology Preview Administrator’s Guide
citrix.com 24
Authorize users to administer recording policies
When you install Session Recording, domain administrators grant permission to control the recording policies by default. You can change the authorization setting.
1. Log on as administrator to the machine hosting the Session Recording Server. 2. Start the Session Recording Authorization Console and select PolicyAdministrators. 3. Add the users and groups who can administer recording policies.
Set the active recording policy to record sessions
The active recording policy specifies session recording behavior on all VDAs or VDI s that have Session Recording Agent installed and connected to the Session Recording Server. When you install Session Recording, the active recording policy is Do not record. Sessions cannot be recorded until you change the active recording policy.
Important: A policy can contain many rules, but there can be only one active policy running at a time.
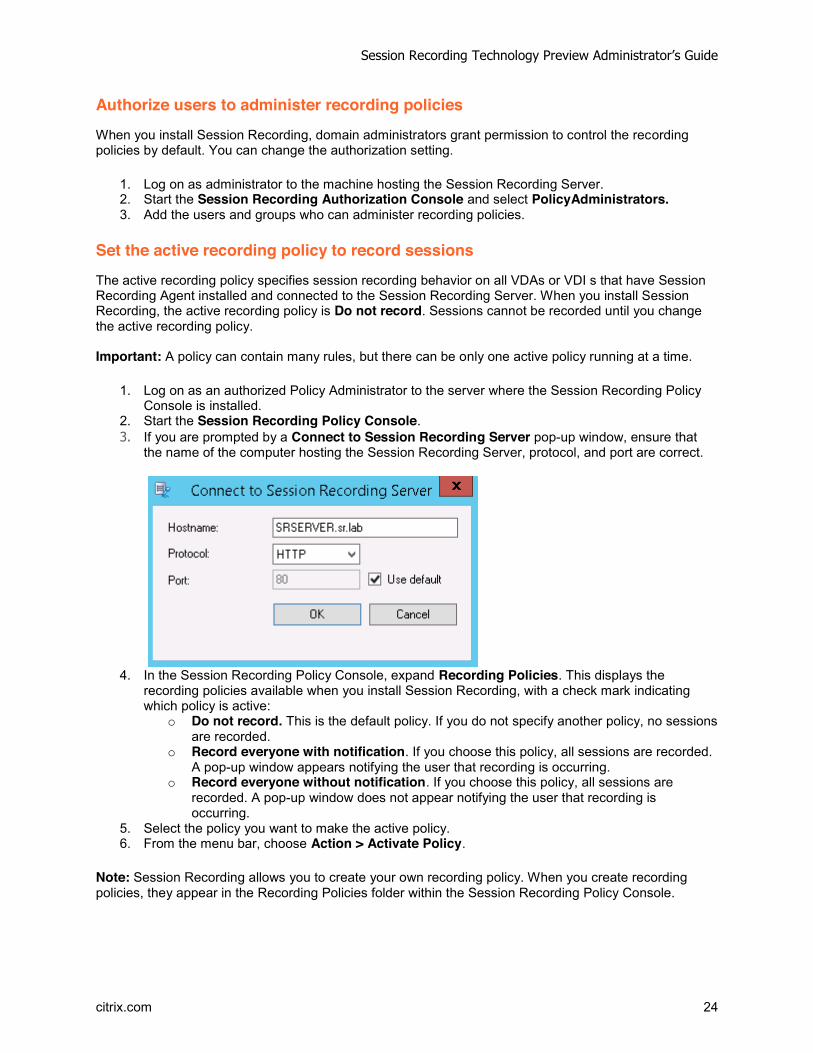
1. Log on as an authorized Policy Administrator to the server where the Session Recording Policy Console is installed.
2. Start the Session Recording Policy Console. 3. If you are prompted by a Connect to Session Recording Server pop-up window, ensure that
the name of the computer hosting the Session Recording Server, protocol, and port are correct.
4. In the Session Recording Policy Console, expand Recording Policies. This displays the
recording policies available when you install Session Recording, with a check mark indicating which policy is active:
o Do not record. This is the default policy. If you do not specify another policy, no sessions are recorded.
o Record everyone with notification. If you choose this policy, all sessions are recorded. A pop-up window appears notifying the user that recording is occurring.
o Record everyone without notification. If you choose this policy, all sessions are recorded. A pop-up window does not appear notifying the user that recording is occurring.
5. Select the policy you want to make the active policy. 6. From the menu bar, choose Action > Activate Policy.
Note: Session Recording allows you to create your own recording policy. When you create recording policies, they appear in the Recording Policies folder within the Session Recording Policy Console.
Session Recording Technology Preview Administrator’s Guide
citrix.com 25
The generic recording policy might not fit your requirements. You can configure policies and rules based on users, VDA and VDI servers, Delivery Groups, and applications. For more information about custom policies, see Create custom recording policies.
Configure Session Recording Player
Before a Session Recording Player can play sessions, you must configure it to connect to the Session Recording Server that stores the recorded sessions. Each Session Recording Player can be configured with the ability to connect to multiple Session Recording Servers, but can connect to only one Session Recording Server at a time. If the Player is configured with the ability to connect to multiple Session Recording Servers, users can change which Session Recording Server the Player connects to by selecting a check box on the Connections tab at Tools > Options.
1. Log on to the workstation where Session Recording Player is installed. 2. Start the Session Recording Player. 3. From the Session Recording Player menu bar, choose Tools > Options. 4. In the Connections tab, click Add. 5. In the Hostname field, type the name or Internet protocol (IP) address of the computer hosting
the Session Recording Server and select the protocol. By default Session Recording is configured to use HTTPS/SSL to secure communications. If SSL is not configured, select HTTP.
6. If you want to configure the Session Recording Player with the ability to connect to more than one Session Recording Server, repeat Steps 4 and 5 for each Session Recording Server.
7. Ensure that the check box for the Session Recording Server you want to connect to is selected.
Grant access rights to users Note: For security reasons, grant users only the rights they need to perform specific functions, such as viewing recorded sessions.
You grant rights to Session Recording users by assigning them to roles using the Session Recording Authorization Console on the Session Recording Server. Session Recording users have three roles:
x Player. Grants the right to view recorded XenApp or XenDesktop sessions. There is no default membership in this role.
x PolicyQuery. Allows the servers hosting the Session Recording Agent to request recording policy evaluations. By default, authenticated users are members of this role.
x PolicyAdministrator. Grants the right to view, create, edit, delete, and enable recording policies. By default, administrators of the computer hosting the Session Recording Server are members of this role.
Session Recording supports users and groups defined in Active Directory.
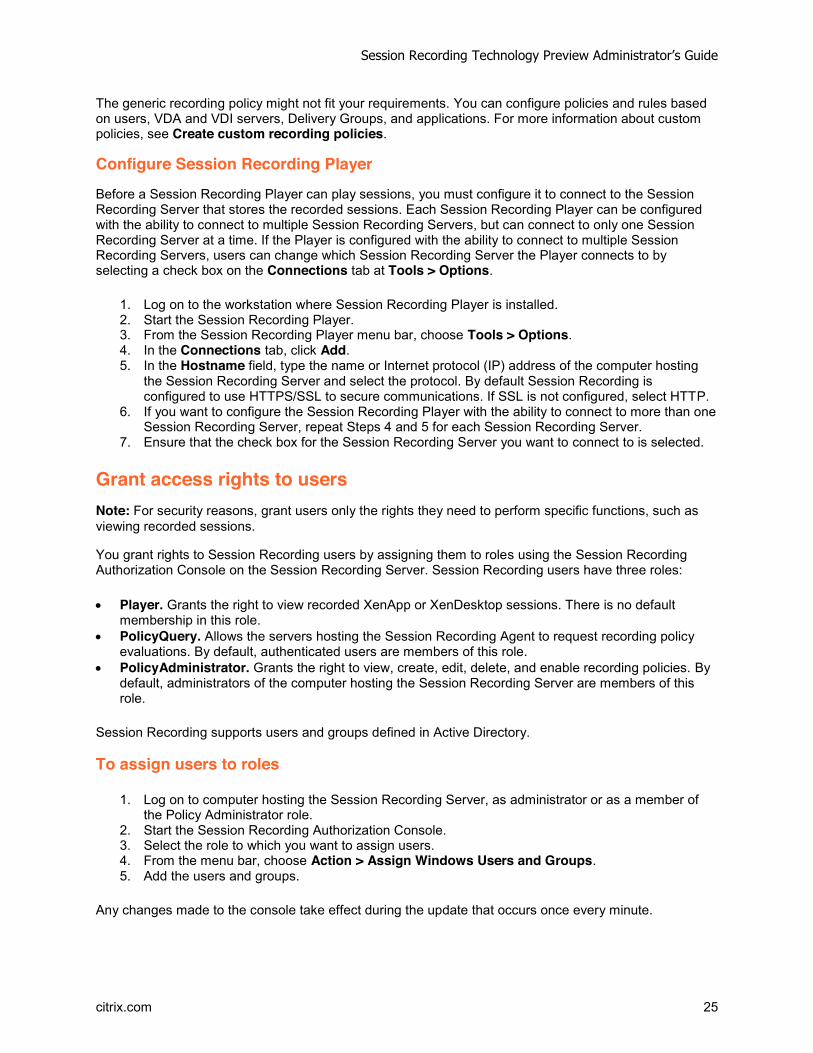
To assign users to roles
1. Log on to computer hosting the Session Recording Server, as administrator or as a member of the Policy Administrator role.
2. Start the Session Recording Authorization Console. 3. Select the role to which you want to assign users. 4. From the menu bar, choose Action > Assign Windows Users and Groups. 5. Add the users and groups.
Any changes made to the console take effect during the update that occurs once every minute.
Session Recording Technology Preview Administrator’s Guide
citrix.com 26
Create and activate recording policies Use the Session Recording Policy Console to create and activate policies that determine which sessions are recorded.
You can activate system policies available when Session Recording is installed or create and activate your own custom policies. Session Recording system policies apply a single rule to all users, published resources, Delivery Groups, and servers. Custom policies specify which users, published resources, Delivery Groups, and servers are recorded.
The active policy determines which sessions are recorded. Only one policy is active at a time.
Use system policies
Session Recording provides these system policies:
x Do not record. If you choose this policy, no sessions are recorded. This is the default policy; if you do not specify another policy, no sessions are recorded.
x Record everyone with notification. If you choose this policy, all sessions are recorded. A pop-up window appears notifying the user that recording is occurring.
x Record everyone without notification. If you choose this policy, all sessions are recorded. A pop-up window does not appear notifying the user that recording is occurring.
System policies cannot be modified or deleted.
To activate a policy
1. Log on to the server where the Session Recording Policy Console is installed. 2. Start the Session Recording Policy Console. 3. If you are prompted by a Connect to Session Recording Server pop-up window, ensure that
the name of the Session Recording Server, protocol, and port are correct. Click OK. 4. In the Session Recording Policy Console, expand Recording Policies. 5. Select the policy you want to make the active policy. 6. From the menu bar, choose Action > Activate Policy.
Create custom recording policies
When you create your own policy, you make rules to specify which users and groups, published resources, Delivery Groups, and servers have their sessions recorded. A wizard within the Session Recording Policy Console helps you create rules. To obtain the list of published resources, Delivery Groups, and servers, you must have the site administrator read permission. Configure that on this site's Delivery Controller.
For each rule you create, you specify a recording action and a rule criteria. The recording action applies to sessions that meet the rule criteria.
For each rule, choose one recording action:
x Do not record. (Choose Disable session recording within the rules wizard.) This recording action specifies that sessions that meet the rule criteria are not recorded.
x Record with notification. (Choose Enable session recording with notification within the rules wizard.) This recording action specifies that sessions that meet the rule criteria are recorded. A pop-up window appears notifying the user that recording is occurring.
Session Recording Technology Preview Administrator’s Guide
citrix.com 27
x Record without notification. (Choose Enable session recording without notification within the rules wizard.) This recording action specifies that sessions that meet the rule criteria are recorded. Users are unaware that they are being recorded.
For each rule, choose at least one of the following to create the rule criteria:
x Users or Groups. You create a list of users or groups to which the recording action of the rule applies.
x Published Resources. You create a list of published applications or desktops to which the recording action of the rule applies. Within the rules wizard, choose the XenApp/XenDesktop site or sites on which the applications or desktops are available.
x Delivery Groups or Machines. You create a list of Delivery Groups or machines to which the recording action of the rule applies. Within the rules wizard, choose the location where the Delivery Groups or machines reside.
When you create more than one rule in a recording policy, some sessions may match the criteria for more than one rule. In these cases, the rule with the highest priority is applied to the session.
The recording action of a rule determines its priority:
x Rules with the Do not record action have the highest priority x Rules with the Record with notification action have the next highest priority x Rules with the Record without notification action have the lowest priority
Some sessions might not meet any rule criteria in a recording policy. For these sessions, the recording action of the policies fallback rule applies. The recording action of the fallback rule is always Do not record. The fallback rule cannot be modified or deleted.
To configure custom policies
1. Log on as an authorized Policy Administrator to the server where the Session Recording Policy Console is installed.
2. Start the Session Recording Policy Console and select Recording Policies in the left pane and from the menu bar, choose Action > Add New Policy.
3. Right click the New policy and select Add Rule. 4. Select a recording option - In the Rules wizard, select Enable Session Recording with
notification (or without notification), and then click Next. 5. Select the rule criteria – You can choose one or any combination of the three options:
Users or Groups Published resources Delivery Groups or Machines.
6. Edit the rule criteria - To edit, click the underlined values. The values are underlined based on the criteria you chose in the previous step.
7. Follow the wizard to finish the configuration.
Using Active Directory Groups
Session Recording allows you to use Active Directory groups when creating policies. Using Active Directory groups instead of individual users simplifies creation and management of rules and policies. For example, if users in your company’s finance department are contained in an Active Directory group named Finance, you can create a rule that applies to all members of this group by selecting the Finance group within the rules wizard when creating the rule.
Session Recording Technology Preview Administrator’s Guide
citrix.com 28
White Listing Users
You can create Session Recording policies that ensure that the sessions of some users in your organization are never recorded. This is called white listing these users. White listing is useful for users who handle privacy-related information or when your organization does not want to record the sessions of a certain class of employees.
For example, if all managers in your company are members of an Active Directory group named Executive, you can ensure that these users’ sessions are never recorded by creating a rule that disables session recording for the Executive group. While the policy containing this rule is active, no sessions of members of the Executive group are recorded. The sessions of other members of your organization are sessions recorded based on other rules in the active policy.
Create a new policy
Note: When using the rules wizard, you may be prompted to “click on underlined value to edit” when no underlined value appears. Underlined values appear only when applicable. If no underline values appear, ignore the step.
1. Log on to the server where Session Recording Policy Console is installed. 2. Start the Session Recording Policy Console. 3. If you are prompted by a Connect to Session Recording Server pop-up window, ensure that
the name of the Session Recording Server, protocol, and port are correct. Click OK. 4. In the left pane of the Session Recording Policy Console, right-click Recording Policies. 5. From the menu, choose Add New Policy. A policy called New Policy appears in the left pane. 6. Right-click the new policy and choose Rename from the menu. 7. Type a name for the policy you are about to create and press Enter or click anywhere outside the
new name. 8. Right-click the policy, choose Add Rule from the menu to launch the rules wizard. 9. Follow the instructions to create the rules for this policy.
Modify a policy
1. Log on to the server where the Session Recording Policy Console is installed. 2. Start the Session Recording Policy Console. 3. If you are prompted by a Connect to Session Recording Server pop-up window, ensure that
the name of the Session Recording Server, protocol, and port are correct. Click OK. 4. In the left pane of the Session Recording Policy Console, expand Recording Policies. 5. Select the policy you want to modify. The rules for the policy appear in the right pane. 6. Add a new rule, modify a rule, or delete a rule:
o From the menu bar, choose Action > Add New Rule. If the policy is active, a pop-up window appears requesting confirmation of the action. Use the rules wizard to create a new rule.
o Select the rule you want to modify, right-click, and choose Properties. Use the rules wizard to modify the rule.
o Select the rule you want to delete, right-click, and choose Delete Rule.
Delete a policy
Important: You cannot delete a system policy or a policy that is active.
1. Log on to the server where the Session Recording Policy Console is installed. 2. Start the Session Recording Policy Console.
Session Recording Technology Preview Administrator’s Guide
citrix.com 29
3. If you are prompted by a Connect to Session Recording Server pop-up window, ensure that the name of the Session Recording Server, protocol, and port are correct. Click OK.
4. In the Session Recording Policy Console, expand Recording Policies. 5. In the left pane, select the policy you want to delete. If the policy is active, you must activate
another policy. 6. From the menu bar, choose Action > Delete Policy. 7. Select Yes to confirm the action.
Disable or enable recording You install the Session Recording Agent on each Server OS machine for which you want to record sessions. Within each agent is a setting that enables recording for the server on which it is installed. After recording is enabled, Session Recording evaluates the active recording policy, which determines which sessions are recorded.
When you install the Session Recording Agent, recording is enabled. Citrix recommends that you disable Session Recording on servers that are not recorded because they experience a small impact on performance, even if no recording takes place.
To disable or enable recording on a desktop or server
1. Log on to the machine where the Session Recording Agent is installed. 2. From the Start menu, choose Session Recording Agent Properties. 3. Under Session Recording, select or clear the Enable session recording for this Server OS
VDA check box to specify whether or not sessions can be recorded for this server. 4. When prompted, restart the Session Recording Agent Service to accept the change.
Note: When you install Session Recording, the active policy is Do not record (no sessions are recorded on any machine). To begin recording, use the Session Recording Policy Console to activate a different policy.
Configure the connection to the Session Recording Server The connection between the Session Recording Agent and the Session Recording Server is typically configured when the Session Recording Agent is installed. To configure this connection after Session Recording Agent is installed, use Session Recording Agent Properties.
1. Log on to the server where Session Recording Agent is installed. 2. From the Start menu, choose Session Recording Agent Properties. 3. Click the Connections tab. 4. In the Session Recording Server field, type the server name or its Internet protocol (IP)
address. 5. In the Session Recording Storage Manager message queue section, select the protocol that is
used by the Session Recording Storage Manager to communicate and modify the default port number, if necessary.
6. In the Message life field, accept the default of 7200 seconds (two hours) or type a new value for the number of seconds each message is retained in the queue if there is a communication failure. After this period of time elapses, the message is deleted and the file is playable until the point where the data is lost.
7. In the Session Recording Broker section, select the communication protocol the Session Recording Broker uses to communicate and modify the default port number, if necessary.
8. When prompted, restart the Session Recording Agent Service to accept the changes.
Session Recording Technology Preview Administrator’s Guide
citrix.com 30
Create notification messages If the active recording policy specifies that users are notified when their sessions are recorded, a pop-up window appears displaying a notification message after users type their credentials. The following message is the default notification: “Your activity with one or more of the programs you recently started is being recorded. If you object to this condition, close the programs.” The user clicks OK to dismiss the window and continue the session.
The default notification message appears in the language of the operating system of the computers hosting the Session Recording Server.
You can create custom notifications in languages of your choice; however, you can have only one notification message for each language. Your users see the notification message in the language corresponding to their user preferred locale settings.
To create a new notification message
1. Log on to the computer hosting the Session Recording Server. 2. From the Start menu, choose Session Recording Server Properties. 3. In Session Recording Server Properties, click the Notifications tab. 4. Click Add. 5. Choose the language for the message and type the new message. You can create only one
message for each language.
After accepting and activating, the new message appears in the Language-specific notification messages box.
Enable custom event recording Session Recording allows you to use third-party applications to insert custom data, known as events, into recorded sessions. These events appear when the session is viewed using the Session Recording Player. They are part of the recorded session file and cannot be modified after the session is recorded.
For example, an event might contain the following text: “User opened a browser.” Each time a user opens a browser during a session that is being recorded, the text is inserted into the recording at that point. When the session is played using the Session Recording Player, the viewer can locate and count the times that the user opened a browser by noting the number of markers that appear in the Events and Bookmarks list in the Session Recording Player.
To insert custom events into recordings on a server:
x Use Session Recording Agent Properties to enable a setting on each server where you want to insert custom events. You must enable each server separately; you cannot globally enable all servers in a site.
x Write applications built on the Event API that runs within each user’s XenApp session (to inject the data into the recording).
The Session Recording installation includes an event recording COM application (API) that allows you to insert text from third-party applications into a recording. You can use the API from many programming languages including Visual Basic, C++, or C#. The Session Recording Event API .dll is installed as part of the Session Recording installation. You can find it at C:\Program Files\Citrix\SessionRecording\Agent\Bin\Interop.UserApi.dll.
Session Recording Technology Preview Administrator’s Guide
citrix.com 31
To enable custom event recording on a server
1. Log on to the server where the Session Recording Agent is installed. 2. From the Start menu, choose Session Recording Agent Properties. 3. In Session Recording Agent Properties, click the Recording tab. 4. Under Custom event recording, select the Allow third party applications to record custom
data on this XenApp server check box.
Enable or disable live session playback Using Session Recording Player, you can view a session after or while it is being recorded. Viewing a session that is currently recording is similar to seeing actions happening live; however, there is actually a one to two second delay as the data propagates from the XenApp server.
Some functionality is not available when viewing sessions that have not completed recording:
x A digital signature cannot be assigned until recording is complete. If digital signing is enabled, you can view live playback sessions, but they are not digitally signed and you cannot view certificates until the session is completed.
x Playback protection cannot be applied until recording is complete. If playback protection is enabled, you can view live playback sessions, but they are not encrypted until the session is completed.
x You cannot cache a file until recording is complete.
By default, live session playback is enabled.
1. Log on to the computer hosting the Session Recording Server. 2. From the Start menu, choose Session Recording Server Properties. 3. In Session Recording Server Properties, click the Playback tab. 4. Select or clear the Allow live session playback check box.
Enable or disable playback protection As a security precaution, Session Recording automatically encrypts recorded files before they are downloaded for viewing in the Session Recording Player. This playback protection prevents them from being copied and viewed by anyone other than the user who downloaded the file. The files cannot be played back on another workstation or by another user. Encrypted files are identified with an .icle extension; unencrypted files are identified with an .icl extension. The files remain encrypted while they reside in the cache on the workstation where the Session Recording Player is installed until they are opened by an authorized user.
Citrix recommends that you use HTTPS to protect the transfer of data.
By default, playback protection is enabled.
1. Log on to the computer hosting the Session Recording Server. 2. From the Start menu, choose Session Recording Server Properties. 3. In Session Recording Server Properties, click the Playback tab. 4. Select or clear the Encrypt session recording files downloaded for playback check box.
Session Recording Technology Preview Administrator’s Guide
citrix.com 32
Enable and disable digital signing If you installed certificates on the computers on which the Session Recording components are installed, you can enhance the security of your Session Recording deployment by assigning digital signatures to session recording.
By default, digital signing is disabled.
To enable digital signing
1. Log on to the computer hosting the Session Recording Server. 2. From the Start menu, choose Session Recording Server Properties. 3. In Session Recording Server Properties, click the Signing tab. 4. Browse to the certificate that enables secure communication among the computers on which the
Session Recording components are installed.
To disable digital signing
1. Log on to the computer hosting the Session Recording Server. 2. From the Start menu, choose Session Recording Server Properties. 3. In Session Recording Server Properties, click the Signing tab. 4. Click Clear.
Specify where recordings are stored Use Session Recording Server Properties to specify where recordings are stored and where archived recordings are restored.
Note: To archive files or restore deleted files, use the icldb command.
To specify the location for recorded files
By default, recordings are stored in the drive:\SessionRecordings directory of the computer hosting the Session Recording Server. You can change the directory where the recordings are stored, add additional directories to load-balance across multiple volumes, or make use of additional space. Multiple directories in the list indicate recordings are load-balanced across the directories. You can add a directory multiple times. Load balancing cycles through the directories.
1. Log on to the computer hosting the Session Recording Server. 2. From the Start menu, choose Session Recording Server Properties. 3. In Session Recording Server Properties, click the Storage tab. 4. Use the File storage directories list to manage the directories where recordings are stored.
You can create file storage directories on the local drive, the SAN volume, or a location specified by a UNC network path. Network mapped drive letters are not supported. Do not use Session Recording with Network-Attached Storage (NAS), due to serious performance and security problems associated with writing recording data to a network drive.
To specify a restore directory for archived files
By default, archived recordings are restored to the drive:\SessionRecordingsRestore directory of the computer hosting the Session Recording Server. You can change the directory where the archived recordings are restored.
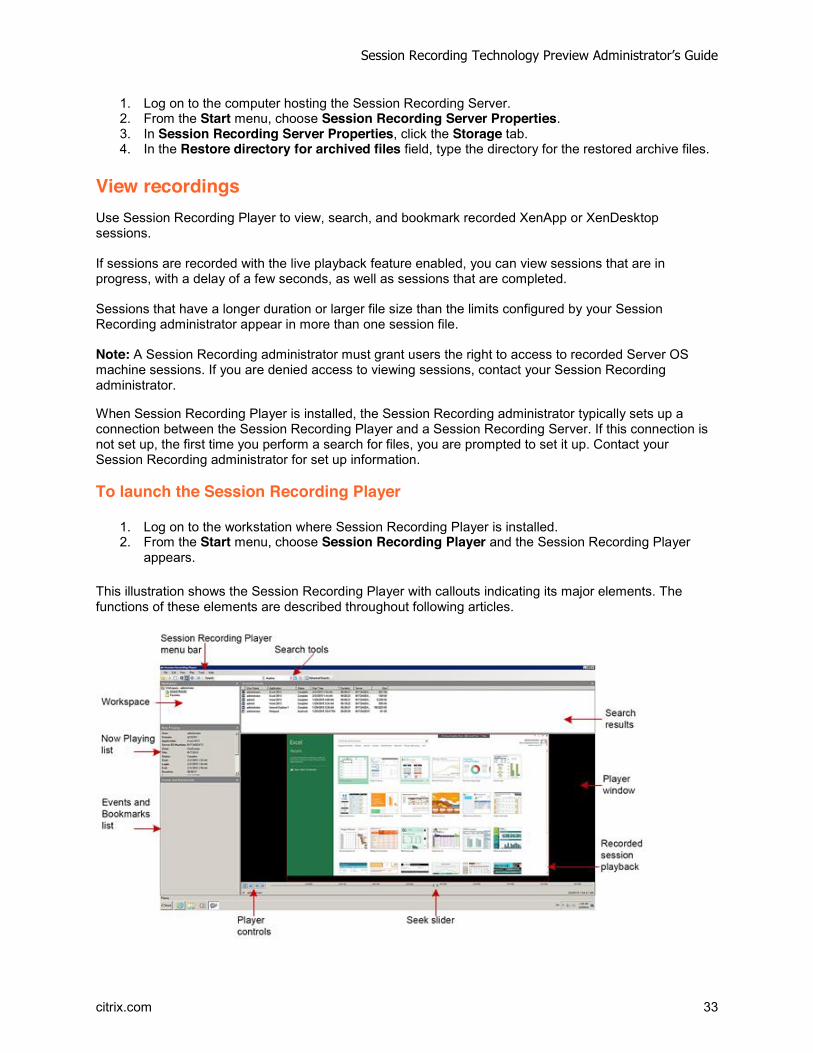
Session Recording Technology Preview Administrator’s Guide
citrix.com 33
1. Log on to the computer hosting the Session Recording Server. 2. From the Start menu, choose Session Recording Server Properties. 3. In Session Recording Server Properties, click the Storage tab. 4. In the Restore directory for archived files field, type the directory for the restored archive files.
View recordings Use Session Recording Player to view, search, and bookmark recorded XenApp or XenDesktop sessions.
If sessions are recorded with the live playback feature enabled, you can view sessions that are in progress, with a delay of a few seconds, as well as sessions that are completed.
Sessions that have a longer duration or larger file size than the limits configured by your Session Recording administrator appear in more than one session file.
Note: A Session Recording administrator must grant users the right to access to recorded Server OS machine sessions. If you are denied access to viewing sessions, contact your Session Recording administrator.
When Session Recording Player is installed, the Session Recording administrator typically sets up a connection between the Session Recording Player and a Session Recording Server. If this connection is not set up, the first time you perform a search for files, you are prompted to set it up. Contact your Session Recording administrator for set up information.
To launch the Session Recording Player
1. Log on to the workstation where Session Recording Player is installed. 2. From the Start menu, choose Session Recording Player and the Session Recording Player
appears.
This illustration shows the Session Recording Player with callouts indicating its major elements. The functions of these elements are described throughout following articles.
Session Recording Technology Preview Administrator’s Guide
citrix.com 34
To display or hide window elements
The Session Recording Player has window elements that toggle on and off.
1. Log on to the workstation where the Session Recording Player is installed. 2. From the Start menu, choose Session Recording Player. 3. From the Session Recording Player menu bar, choose View. 4. Choose the elements that you want to display. Selecting an element causes it to appear
immediately. A check mark indicates that the element is selected.
To change Session Recording Servers
If the Session Recording administrator set up your Session Recording Player with the ability to connect to more than one Session Recording Server, you can select the Session Recording Server that the Session Recording Player connects to. The Session Recording Player can connect to only one Session Recording Server at a time.
1. Log on to the workstation where the Session Recording Player is installed. 2. From the Start menu, choose Session Recording Player. 3. From the Session Recording Player menu bar, choose Tools > Options > Connections. 4. Select the Session Recording Server to which you want to connect.
Open and play recordings You can open session recordings in Session Recording Player in three ways:
x Perform a search using the Session Recording Player. Recorded sessions that meet the search criteria appear in the search results area.
x Access recorded session files directly from your local disk drive or a share drive. x Access recorded session files from a Favorites folder
When you open a file that was recorded without a digital signature, a warning appears telling you that the origin and integrity of the file was not verified. If you are confident of the integrity of the file, click Yes in the warning pop-up window to open the file.
To open and play a recording in the search results area
1. Log on to the workstation where Session Recording Player is installed. 2. From the Start menu, choose Session Recording Player. 3. Perform a search. 4. If the search results area is not visible, select Search Results in the Workspace pane. 5. In the search results area, select the session you want to play. 6. Do any of the following:
o Double-click the session o Right-click and select Play o From the Session Recording Player menu bar, select Play > Play
To open and play a recording by accessing the file
Recorded session file names begin with an i_, followed by a unique alphanumeric file ID, followed by the .icl and .icle file extension: .icl for recordings without playback protection applied, .icle for recordings with playback protection applied. Session Recording saves recorded session files in a directory structure that
Session Recording Technology Preview Administrator’s Guide
citrix.com 35
incorporates the date the session was recorded. For example, the file for a session recorded on December 22, 2014, is saved in folder path 2014\12\22.
1. Log on to the workstation where Session Recording Player is installed. 2. From the Start menu, choose Session Recording Player. 3. Do any of the following:
o From the Session Recording Player menu bar, select File > Open and browse for the file. o Using Windows Explorer, navigate to the file and drag the file into the Player window. o Using Windows Explorer, navigate to and double-click the file. o If you created Favorites in the Workspace pane, select Favorites and open the file from
the Favorites area in the same way you open files from the search results area.
Use favorites
Creating Favorites folders allows you to quickly access recordings that you view frequently. These Favorites folders reference recorded session files that are stored on your workstation or on a network drive. You can import and export these files to other workstations and share these folders with other Session Recording Player users.
Note: Only users with access rights to Session Recording Player can download the recorded session files associated with Favorites folders. Contact your Session Recording administrator for access rights.
To create a Favorites subfolder:
1. Log on to the workstation where Session Recording Player is installed. 2. From the Start menu, choose Session Recording Player. 3. In the Session Recording Player, select the Favorites folder in your Workspace pane. 4. From the menu bar, choose File > Folder > New Folder. A new folder appears under the
Favorites folder. 5. Type the folder name, then press Enter or click anywhere to accept the new name.
Use the other options that appear in the File > Folder menu to delete, rename, move, copy, import, and export the folders.
Search for recorded sessions Session Recording Player allows you to perform quick searches, perform advanced searches, and specify options that apply to all searches. Results of searches appear in the search results area of the Session Recording Player.
Note: To display all available recorded sessions, up to the maximum number of sessions that may appear in a search, perform a search without specifying any search parameters.
To perform a quick search
1. Log on to the workstation where Session Recording Player is installed. 2. From the Start menu, choose Session Recording Player. 3. Define your search criteria:
o Enter a search criterion in the Search field. To assist you: o Move the mouse pointer over the Search label to display a list of parameters to use as a
guideline o Click the arrow to the right of the Search field to display the text for the last 64 searches
you performed

Session Recording Technology Preview Administrator’s Guide
citrix.com 36
o Use the drop-down list to the right of the Search field to select a period or duration specifying when the session was recorded.
4. Click the binocular icon to the right of the drop-down list to start the search.
To perform an advanced search
Tip: Advanced searches might take up to 20 seconds to return results containing more than 150K entities. Citrix recommends using more accurate search conditions such as a date range or user to reduce the result number.
1. Log on to the workstation where Session Recording Player is installed. 2. From the Start menu, choose Session Recording Player. 3. In the Session Recording Player window, click Advanced Search on the tool bar or choose
Tools > Advanced Search. 4. Define your search criteria in the tabs of the Advanced Search dialog box:
o Common allows you to search by domain or account authority, site, group, Delivery Group, machine, application, or file ID.
o Date/Time allows you to search date, day of week, and time of day. o Events allows you to search on custom events that your Session Recording
administrator inserted to the sessions. o Other allows you to search by session name, client name, client address, and recording
duration. It also allows you to specify, for this search, the maximum number of search results displayed and whether or not archived files are included in the search.
As you specify search criteria, the query you are creating appears in the pane at the bottom of the dialog box.
5. Click Search to start the search.
Tip: You can save and retrieve advanced search queries. Click Save within the Advanced Search dialog box to save the current query. Click Open within the Advanced Search dialog box to retrieve a saved query. Queries are saved as files with an .isq extension.
To set search options
Session Recording Player search options allow you to limit maximum number of session recordings that appear in search results and to specify whether or not search results include archived session files.
1. Log on to the workstation where Session Recording Player is installed. 2. From the Start menu, choose Session Recording Player. 3. From the Session Recording Player menu bar, choose Tools > Options > Search. 4. In the Maximum result to display field, type the number of search results you want to display. A
maximum of 500 results can be displayed. 5. To set whether or not archived files are included in searches, select or clear Include archived
files.
Play recorded sessions After you open a recorded session in the Session Recording Player, you can navigate through the recorded sessions using these methods:
x Use the player controls to play, stop, pause, and increase or decrease playback speed x Use the seek slider to move forward or backward
Session Recording Technology Preview Administrator’s Guide
citrix.com 37
If you have inserted markers into the recording or if the recorded session contains custom events, you can also navigate through the recorded session by going to those markers and events.
Note:
x During playback of a recorded session, a second mouse pointer may appear. The second pointer appears at the point in the recording when the user navigated within Internet Explorer and clicked an image that was originally larger than the screen but was scaled down automatically by Internet Explorer. While only one pointer appears during the session, two may appear during playback.
x This version of Session Recording does not support SpeedScreen Multimedia Acceleration for XenApp or the Flash quality adjustment policy setting for XenApp. When this option is enabled, playback displays a black square.
x Session Recording cannot record the webcam video when using the HDX RealTime Optimization Pack.
Use player controls
You can click the player controls under the Player window or access them by choosing Play from the Session Recording Player menu bar. Use Player controls to:
Play the selected session file.
Pause playback.
Stop playback. If you click Stop, then Play, the recording restarts at the beginning of the file.
Halve the current playback speed down to a minimum of one-quarter normal speed.
Double the current playback speed up to a maximum of 32 times normal speed.
Use the seek slider
Use the seek slider below the Player window to jump to a different position within the recorded session. You can drag the seek slider to the point in the recording you want to view or click anywhere on the slider bar to move to that location.
You can also use the following keyboard keys to control the seek slider:
Key: Seek action:
Home Seek to the beginning.
End Seek to the end.
Session Recording Technology Preview Administrator’s Guide
citrix.com 38
Key: Seek action:
Right Arrow Seek forward five seconds.
Left Arrow Seek backward five seconds.
Move mouse wheel one notch down
Seek forward 15 seconds.
Move mouse wheel one notch up
Seek backward 15 seconds.
Ctrl + Right Arrow Seek forward 30 seconds.
Ctrl + Left Arrow Seek backward 30 seconds.
Page Down Seek forward one minute.
Page Up Seek backward one minute.
Ctrl + Move mouse wheel one notch down
Seek forward 90 seconds.
Ctrl + Move mouse wheel one notch up
Seek backward 90 seconds.
Ctrl + Page Down Seek forward six minutes.
Ctrl + Page Up Seek backward six minutes.
Note: To adjust the speed of the seek slider: From the Session Recording Player menu bar, choose Tools > Options > Player and drag the slider to increase or decrease the seek response time. A faster response time requires more memory. The response might be slow depending on the size of of the recordings and your machine's hardware.
To change the playback speed
You can set Session Recording Player to play recorded sessions in exponential increments from one-quarter normal playback speed to 32 times normal playback speed.
1. Log on to the workstation where the Session Recording Player is installed. 2. From the Start menu, choose Session Recording Player. 3. From the Session Recording Player menu bar, choose Play > Play Speed. 4. Choose a speed option.

Session Recording Technology Preview Administrator’s Guide
citrix.com 39
The speed adjusts immediately. A number indicating the increased or decreased speed appears below the Player window controls. Text indicating the exponential rate appears briefly in green in the Player window.
To skip over spaces where no action occurred
Fast review mode allows you to set Session Recording Player to skip the portions of recorded sessions in which no action takes place. This setting saves time for playback viewing; however, it does not skip animated sequences such as animated mouse pointers, flashing cursors, or displayed clocks with second hand movements.
1. Log on to the workstation where Session Recording Player is installed. 2. From the Start menu, choose Session Recording Player. 3. From the Session Recording Player menu bar, choose Play > Fast Review Mode.
The option toggles on and off. Each time you choose it, its status appears briefly in green in the Player window.
Use events and bookmarks You can use events and bookmarks to help you navigate through recorded sessions.
Events are inserted to sessions as they are recorded, using the Event API and a third-party application. Events are saved as part of the session file. You cannot delete or alter them using the Session Recording Player.
Bookmarks are markers you insert into the recorded sessions using the Session Recording Player. Bookmarks are associated with the recorded session until you delete them, but they are not saved as part of the session file. By default, each bookmark is labeled with the text Bookmark, but you can change this to any text annotation up to 128 characters long.
Events and bookmarks appear as dots under the Player window. Events appear as yellow dots; bookmarks appear as blue dots. Moving the mouse over these dots displays the text label associated with them. You can also display the events and bookmarks in the events and bookmarks list of the Session Recording Player. They appear in this list with their text labels and the times in the recorded session at which they appear, in chronological order.
You can use events and bookmarks to help you navigate through recorded sessions. By going to an event or bookmark, you can skip to the point in the recorded session where the event or bookmark is inserted.
To display events and bookmarks in the list
The events and bookmarks list displays the events and bookmarks inserted in the recorded session that is currently playing. It can show events only, bookmarks only, or both.
1. Log on to the workstation where the Session Recording Player is installed. 2. From the Start menu, choose Session Recording Player. 3. Move the mouse pointer into the events and bookmarks list area and right-click to display the
menu. 4. Choose Show Events Only, Show Bookmarks Only, or Show All.
Session Recording Technology Preview Administrator’s Guide
citrix.com 40
To insert a bookmark
1. Log on to the workstation where the Session Recording Player is installed. 2. From the Start menu, choose Session Recording Player. 3. Begin playing the recorded session to which you want to add a bookmark. 4. Move the seek slider to the position where you want to insert the bookmark. 5. Move the mouse pointer into the Player window area and right-click to display the menu. 6. Add a bookmark with the default label Bookmark or create an annotation:
o To add a bookmark with the default label Bookmark, choose Add Bookmark. o To add a bookmark with a descriptive text label that you create, choose Add Annotation.
Type the text label you want to assign to the bookmark, up to 128 characters. Click OK.
To add or change an annotation
After a bookmark is created, you can add an annotation to it or change its annotation.
1. Log on to the workstation where Session Recording Player is installed. 2. From the Start menu, choose Session Recording Player. 3. Begin playing the recorded session containing the bookmark. 4. Ensure that the events and bookmarks list is displaying bookmarks. 5. Select the bookmark in the events and bookmarks list and right-click to display the menu. 6. Choose Edit Annotation. 7. In the window that appears, type the new annotation and click OK.
To delete a bookmark
1. Log on to the workstation where Session Recording Player is installed. 2. From the Start menu, choose Session Recording Player. 3. Begin playing the recorded session containing the bookmark. 4. Ensure that the events and bookmarks list is displaying bookmarks. 5. Select the bookmark in the events and bookmarks list and right-click to display the menu. 6. Choose Delete.
To go to an event or bookmark
Going to an event or bookmark causes the Session Recording Player to go to the point in the recorded session where the event or bookmark is inserted.
1. Log on to the workstation where the Session Recording Player is installed. 2. From the Start menu, choose Session Recording Player. 3. Begin playing a session recording containing events or bookmarks. 4. Go to an event or bookmark:
o In the area below the Player window, click the dot representing the event or bookmark to go to the event or bookmark.
o In the events and bookmarks list, double-click the event or bookmark to go to it. To go to the next event or bookmark, select any event or bookmark from the list, right-click to display the menu, and choose Seek to Bookmark.
Change the playback display Options allow you to change how recorded sessions appear in the Player window. You can pan and scale the image, show the playback in full-screen mode, display the Player window in a separate window, and display a red border around the recorded session to differentiate it from the Player window background.
Session Recording Technology Preview Administrator’s Guide
citrix.com 41
To display the Player window in full-screen format
1. Log on to the workstation where the Session Recording Player is installed. 2. From the Start menu, choose Session Recording Player. 3. From the Session Recording Player menu bar, choose View > Player Full Screen. 4. To return to the original size, press ESC or F11.
To display the Player window in a separate window
1. Log on to the workstation where the Session Recording Player is installed. 2. From the Start menu, choose Session Recording Player. 3. From the Session Recording Player menu bar, choose View > Player in Separate Window. A
new window appears containing the Player window. You can drag and resize the window. 4. To embed the Player window in the main window, choose View > Player in Separate Window,
or press F10.
To scale the session playback to fit the Player window
1. Log on to the workstation where the Session Recording Player is installed. 2. From the Start menu, choose Session Recording Player. 3. From the Session Recording Player menu bar, choose Play > Panning and Scaling > Scale to
Fit. o Scale to Fit (Fast Rendering) shrinks the image while providing a good quality image.
Images are drawn quicker than when using the High Quality option but the images and text are not as sharp. Use this option if you are experiencing performance issues when using the High Quality mode.
o Scale to Fit (High Quality) shrinks the image while providing high quality images and text. Using this option may cause the images to be drawn more slowly than the Fast Rendering option.
To pan the image
1. Log on to the workstation where the Session Recording Player is installed. 2. From the Start menu, choose Session Recording Player. 3. From the Session Recording Player menu bar, choose Play > Panning and Scaling >
Panning. The pointer changes to a hand and a small representation of the screen appears in the top right of the Player window.
4. Drag the image. The small representation indicates where you are in the image. 5. To stop panning, choose one of the scaling options.
To display a red border around the session recording
1. Log on to the workstation where the Session Recording Player is installed. 2. From the Start menu, choose Session Recording Player. 3. From the Session Recording Player menu bar, choose Tools > Options > Player. 4. Select the Show border around session recording check box.
Tip: If the Show border around session recording check box is not selected, you can temporarily view the red border by clicking and holding down the left mouse button while the pointer is in the Player window.
Session Recording Technology Preview Administrator’s Guide
citrix.com 42
Cache recorded session files Each time you open a recorded session file, the Session Recording Player downloads the file from the location where the recordings are stored. If you download the same files frequently, you can save download time by caching the files on your workstation. Cached files are stored on your workstation in this folder:
userprofile\AppData\Local\Citrix\SessionRecording\Player\Cache
You can specify how much disk space is used for the cache. When the recordings fill the specified disk space, Session Recording deletes the oldest, least used recordings to make room for new recordings. You can empty the cache at any time to free up disk space.
To enable caching
1. Log on to the workstation where the Session Recording Player is installed. 2. From the Start menu, choose Session Recording Player. 3. From the Session Recording Player menu bar, choose Tools > Options > Cache. 4. Select the Cache downloaded files on local machine check box. 5. If you want to limit the amount of disk space used for caching, select the Limit amount of disk
space to use check box and specify the number of megabytes to be used for cache. 6. Click OK.
To empty cache
1. Log on to the workstation where the Session Recording Player is installed. 2. From the Start menu, choose Session Recording Player. 3. From the Session Recording Player menu bar, choose Tools > Options > Cache. 4. Select the Cache downloaded files on local machine check box. 5. In the Session Recording Player, choose Tools > Options > Cache. 6. Click Purge Cache, then OK to confirm the action.
Troubleshooting Session Recording This troubleshooting information contains solutions to some issues you may encounter during and after installing Session Recording components:
x Components failing to connect to each other x Sessions failing to record x Problems with the Session Recording Player or Session Recording Policy Console x Issues involving your communication protocol
Session Recording Agent cannot connect
When Session Recording Agent cannot connect, the Exception caught while sending poll messages to Session Recording Broker event message is logged, followed by the exception text. The exception text provides the reason why the connection failed. These reasons include:
o The underlying connection was closed. Could not establish a trust relationship for the SSL/TLS secure channel. This exception means that the Session Recording Server is using a certificate that is signed by a CA that the server on which the Session Recording Agent resides does not trust, or have a CA certificate for. Alternatively, the certificate may have expired or been revoked.
Session Recording Technology Preview Administrator’s Guide
citrix.com 43
Resolution: Verify that the correct CA certificate is installed on the server hosting the Session Recording Agent or use a CA that is trusted.
o The remote server returned an error: (403) forbidden. (Event ID 3030) This is a standard HTTPS error displayed when you attempt to connect using HTTP (nonsecure protocol). The computer hosting the Session Recording Server rejects the connection because it accepts only secure connections.
Resolution: Use Session Recording Agent Properties to change the Session Recording Broker protocol to HTTPS.
The Session Recording Broker returned an unknown error while evaluating a record policy query. Error code 5 (Access Denied). See the Event log on the Session Recording Server for more details. This error occurs when sessions are started and a request for a record policy evaluation is made. The error is a result of the Authenticated Users group (this is the default member) being removed from the Policy Query role of the Session Recording Authorization Console.
Resolution: Add the Authenticated Users group back into this role, or add each server hosting each Session Recording Agent to the PolicyQuery role.
The underlying connection was closed. A connection that was expected to be kept alive was closed by the server. This error means that the Session Recording Server is down or unavailable to accept requests. This could be due to IIS being offline or restarted, or the entire server may be offline.
Resolution: Verify that the Session Recording Server is started, IIS is running on the server, and the server is connected to the network.
Session Recording Server cannot connect to the Session Recording Database
When the Session Recording Server cannot connect to the Session Recording Database, you may see a message similar to one of the following:
Event Source:
A network-related or instance-specific error occurred while establishing a connection to SQL Server. This error appears in the applications event log with ID 2047 in the Event Viewer of the computer hosting the Session Recording Server.
Citrix Session Recording Storage Manager Description: Exception caught while establishing database connection. This error appears in the applications event log in the Event Viewer of the computer hosting the Session Recording Server.
Unable to connect to the Session Recording Server. Ensure that the Session Recording Server is running. This error message appears when you launch the Session Recording Policy Console.
Resolution:
x The Express Edition of Microsoft SQL Server 2008 R2, Microsoft SQL Server 2012, or Microsoft SQL Server 2014 is installed on a stand-alone server and does not have the correct services or settings configured for Session Recording. The server must have TCP/IP protocol enabled and SQL Server Browser service running. See the Microsoft documentation for information about enabling these settings.
x During the Session Recording installation (administration portion), incorrect server and database information was given. Uninstall the Session Recording Database and reinstall it, supplying the correct information.
x The Session Recording Database Server is down. Verify that the server has connectivity.
Session Recording Technology Preview Administrator’s Guide
citrix.com 44
x The computer hosting the Session Recording Server or the computer hosting the Session Recording Database Server cannot resolve the FQDN or NetBIOS name of the other. Use the ping command to verify the names can be resolved.
x Check the firewall configuration on the Session Recording Database to ensure the SQL Server connections are allowed. Refer to Microsoft article: https://msdn.microsoft.com/en-us/library/cc646023.aspx.
Logon failed for user ‘NT_AUTHORITY\ANONYMOUS LOGON’. This error message means that the services are logged on incorrectly as .\administrator.
Resolution: Restart the services as local system user and restart the SQL services.
Sessions are not recording
If your application sessions are not recording successfully, start by checking the application event log in the Event Viewer on the Server OS machine running the Session Recording Agent and Session Recording Server. This may provide valuable diagnostic information.
If sessions are not recording, these issues might be the cause:
x Component connectivity and certificates. If the Session Recording components cannot communicate with each other, this can cause session recordings to fail. To troubleshoot recording issues, verify that all components are configured correctly to point to the correct computers and that all certificates are valid and correctly installed.
x Non-Active Directory domain environments. Session Recording is designed to run in a Microsoft Active Directory domain environment. If you are not running in an Active Directory environment, you may experience recording issues. Ensure that all Session Recording components are running on computers that are members of an Active Directory domain.
x Session sharing conflicts with the active policy. Session Recording matches the active policy with the first published application that a user opens. Subsequent applications opened during the same session continue to follow the policy that is in force for the first application. To prevent session sharing from conflicting with the active policy, publish the conflicting applications on separate Server OS machines.
x Recording is not enabled. By default, installing the Session Recording Agent on a Server OS machine enables the server for recording. Recording will not occur until an active recording policy is configured to allow this.
x The active recording policy does not permit recording. For a session to be recorded, the active recording policy must permit the sessions for the user, server, or published application to be recorded.
x Session Recording services are not running. For sessions to be recorded, the Session Recording Agent service must be running on the Server OS machine and the Session Recording Storage Manager service must be running on the computer hosting the Session Recording Server.
x MSMQ is not configured. If MSMQ is not correctly configured on the server running the Session Recording Agent and the computer hosting the Session Recording Server, recording problems may occur.
Unable to view live session playback
If you experience difficulties when viewing recordings using the Session Recording Player, the following error message may appear on the screen:
Download of recorded session file failed. Live session playback is not permitted. The server has been configured to disallow this feature. This error indicates that the server is configured to disallow the action.
Session Recording Technology Preview Administrator’s Guide
citrix.com 45
Resolution: In the Session Recording Server Properties dialog box, choose the Playback tab and select the Allow live session playback check box.
Recordings are corrupt or incomplete
When recordings are becoming corrupt or incomplete when viewing them using the Session Recording Player, you may also see warnings in the Event logs on the Session Recording Agent.
Event Source: Citrix Session Recording Storage Manager
Description: Data lost while recording file <icl file name>
This usually happens when Machine Creation Services (MCS) or Provisioning Services is used to create VDAs with a configured master image and Microsoft Message Queuing (MSMQ) installed. In this condition the VDAs have the same QMIds for MSMQ.
Resolution: Create the unique QMId for each VDA. A workaround is introduced in Known Issues.
Test connection of the database instance failed when installing the Session Recording Database or Session Recording Server
When you install Session Recording Database or Session Recording Server, the test connection fails with the error message Database connection test failed. Please correct Database instance name even if the database instance name is correct.
Resolution: Make sure the current user has the public SQL Server role permission to correct the permission limitation failure.
Verify component connections
During the setup of Session Recording, the components may not connect to other components. All the components communicate with the Session Recording Server (Broker). By default, the Broker (an IIS component) is secured using the IIS default Web site certificate. If one component cannot connect to the Session Recording Server, the other components may also fail when attempting to connect.
The Session Recording Agent and Session Recording Server (Storage Manager and Broker) log connection errors in the applications event log in the Event Viewer of the computer hosting the Session Recording Server, while the Session Recording Policy Console and Session Recording Player display connection error messages on screen when they fail to connect.
Verify Session Recording Agent is connected
1. Log on to the server where the Session Recording Agent is installed. 2. From the Start menu, choose Session Recording Agent Properties. 3. In Session Recording Server Properties, click Connection. 4. Verify that the value for Session Recording Server is the correct server name of the computer
hosting the Session Recording Server. 5. Verify that the server given as the value for Session Recording Server can be contacted by the
Server OS machine.
Note: Check the application event log for errors and warnings.
Session Recording Technology Preview Administrator’s Guide
citrix.com 46
Verify Session Recording Server is connected
Caution: Using Registry Editor can cause serious problems that can require you to reinstall the operating system. Citrix cannot guarantee that problems resulting from incorrect use of Registry Editor can be solved. Use Registry Editor at your own risk.
1. Log on to the computer hosting the Session Recording Server. 2. Open the Registry Editor. 3. Browse to HKEY_LOCAL_MACHINE\SOFTWARE\Citrix\SmartAuditor\Server. 4. Verify the value of SmAudDatabaseInstance correctly references the Session Recording
Database you installed in your SQL Server instance.
Verify Session Recording Database is connected
1. Using a SQL Management tool, open your SQL instance that contains the Session Recording Database you installed.
2. Open the Security permissions of the Session Recording Database. 3. Verify the Session Recording Computer Account has access to the database. For example, if the
computer hosting the Session Recording Server is named SsRecSrv in the MIS domain, the computer account in your database should be configured as MIS\SsRecSrv$. This value is configured during the Session Recording Database install.
Test IIS connectivity
Testing connections to the Session Recording Server IIS site by using a Web browser to access the Session Recording Broker Web page can help you determine whether problems with communication between Session Recording components stem from misconfigured protocol configuration, certification issues, or problems starting Session Recording Broker.
To verify IIS connectivity for the Session Recording Agent
1. Log on to the server where the Session Recording Agent is installed. 2. Launch a Web browser and type the following address:
o For HTTPS: https://servername/SessionRecordingBroker/RecordPolicy.rem?wsdl, where servername is the name of the computer hosting the Session Recording Server
o For HTTP: http://servername/SessionRecordingBroker/RecordPolicy.rem?wsdl, where servername is the name of the computer hosting the Session Recording Server
3. If you are prompted for NT LAN Manager (NTLM) authentication, log on with a domain administrator account.
If you see an XML document within your browser, this verifies that the computer running the Session Recording Agent is connected to the computer hosting the Session Recording Server using the configure protocol.
To verify IIS connectivity for the Session Recording Player
1. Log on to the workstation where the Session Recording Player is installed. 2. Launch a Web browser and type the following address:
o For HTTPS: https://servername/SessionRecordingBroker/Player.rem?wsdl, where servername is the name of the computer hosting the Session Recording Server
o For HTTP: http://servername/SessionRecordingBroker/Player.rem?wsdl, where servername is the name of the computer hosting the Session Recording Server
3. If you are prompted for NT LAN Manager (NTLM) authentication, log on with a domain administrator account.
Session Recording Technology Preview Administrator’s Guide
citrix.com 47
If you see an XML document within your browser, this verifies that the computer running the Session Recording Player is connected to the computer hosting the Session Recording Server using the configure protocol.
To verify IIS connectivity for the Session Recording Policy Console
1. Log on to the server where the Session Recording Policy Console is installed. 2. Launch a Web browser and type the following address:
o For HTTPS: https://servername/SessionRecordingBroker/PolicyAdministration.rem?wsdl, where servername is the name of the computer hosting the Session Recording Server
o For HTTP: http://servername/SessionRecordingBroker/PolicyAdministration.rem?wsdl, where servername is the name of the computer hosting the Session Recording Server
3. If you are prompted for NT LAN Manager (NTLM) authentication, log on with a domain administrator account.
If you see an XML document within your browser, this verifies that the computer running the Session Recording Policy Console is connected to the computer hosting the Session Recording Server using the configure protocol.
Troubleshoot certificate issues
If you are using HTTPS as your communication protocol, the computer hosting the Session Recording Server must be configured with a server certificate. All component connections to the Session Recording Server must have root certificate authority (CA). Otherwise, attempted connections between the components fail.
You can test your certificates by accessing the Session Recording Broker Web page as you would when testing IIS connectivity. If you are able to access the XML page for each component, the certificates are configured correctly.
Here are some common ways certificate issues cause connections to fail:
x Invalid or missing certificates. If the server running the Session Recording Agent does not have a root certificate to trust the server certificate, cannot trust and connect to the Session Recording Server over HTTPS, causing connectivity to fail. Verify that all components trust the server certificate on the Session Recording Server.
x Inconsistent naming. If the server certificate assigned to the computer hosting the Session Recording Server is created using a fully qualified domain name (FQDN), then all connecting components must use the FQDN when connecting to the Session Recording Server. If a NetBIOS name is used, configure the components with a NetBIOS name for the Session Recording Server.
x Expired certificates. If a server certificate expired, connectivity to the Session Recording Server through HTTPS fails. Verify the server certificate assigned to the computer hosting the Session Recording Server is valid and has not expired. If the same certificate is used for the digital signing of session recordings, the event log of the computer hosting the Session Recording Server provides error messages that the certificate expired or warning messages when it is about to expire.
Session Recording Technology Preview Administrator’s Guide
citrix.com 48
Search for recordings if the Session Recording Player fails
If you experience difficulties when searching for recordings using the Session Recording Player, the following error messages may appear on the screen:
x Search for recorded session files failed. The remote server name could not be resolved: servername. where servername is the name of the server to which the Session Recording Player is attempting to connect. The Session Recording Player cannot contact the Session Recording Server. Two possible reasons for this are an incorrectly typed server name or the DNS cannot resolve the server name.
x Resolution: From the Player menu bar, choose Tools > Options > Connections and verify that the server name in the Session Recording Servers list is correct. If it is correct, from a command prompt, run the ping command to see if the name can be resolved. When the Session Recording Server is down or offline, the search for recorded session files failed error message is Unable to contact the remote server.
x Unable to contact the remote server. This error occurs when the Session Recording Server is down or offline.
x Resolution: Verify that the Session Recording Server is connected.
x Access denied error. An access denied error can occur if the user was not given permission to search for and download recorded session files.
x Resolution: Assign the user to the Player role using the Session Recording Authorization Console.
x Search for recorded session files failed. The underlying connection was closed. Could not establish a trust relationship for the SSL/TLS secure channel. This exception is caused by the Session Recording Server using a certificate that is signed by a CA that the client device does not trust or have a CA certificate for.
x Resolution: Install the correct or trusted CA certificate workstation where the Session Recording Player is installed.
x The remote server returned an error: (403) forbidden. This error is a standard HTTPS error that occurs when you attempt to connect using HTTP (nonsecure protocol). The server rejects the connection because, by default, it is configured to accept only secure connections.
x Resolution: From the Session Recording Player menu bar, choose Tools > Options > Connections. Select the server from the Session Recordings Servers list, then click Modify. Change the protocol from HTTP to HTTPS.
Session Recording Technology Preview Administrator’s Guide
citrix.com 49
Troubleshoot MSMQ
If your users see the notification message but the viewer cannot find the recordings after performing a search in the Session Recording Player, there could be a problem with MSMQ. Verify that the queue is connected to the Session Recording Server (Storage Manager) and use a Web browser to test for connection errors (if you are using HTTP or HTTPS as your MSMQ communication protocol).
To verify that the queue is connected:
1. Log on to the server hosting the Session Recording Agent and view the outgoing queues. 2. Verify that the queue to the computer hosting the Session Recording Server has a connected
state. o If the state is “waiting to connect,” there are a number of messages in the queue, and the
protocol is HTTP or HTTPS (corresponding to the protocol selected in the Connections tab in the Session Recording Agent Properties dialog box), perform Step 3.
o If state is “connected” and there are no messages in the queue, there may be a problem with the server hosting the Session Recording Server. Skip Step 3 and perform Step 4.
3. If there are a number of messages in the queue, launch a Web browser and type the following address:
o For HTTPS: https://servername/msmq/private$/CitrixSmAudData, where servername is the name of the computer hosting the Session Recording Server
o For HTTP: http://servername/msmq/private$/CitrixSmAudData, where servername is the name of the computer hosting the Session Recording Server
If the page returns an error such as The server only accepts secure connections, change the MSMQ protocol listed in the Session Recording Agent Properties dialog box to HTTPS. Otherwise, if the page reports a problem with the Web site’s security certificate, there may be a problem with a trust relationship for the SSL/TLS secure channel. In that case, install the correct CA certificate or use a CA that is trusted.
4. If there are no messages in the queue, log on to the computer hosting the Session Recording Server and view private queues. Select citrixsmauddata. If there are a number of messages in the queue (Number of Messages Column), verify that the Session Recording StorageManager service is started. If it is not, restart the service.
Change your communication protocol
For security reasons, Citrix does not recommend using HTTP as a communication protocol. The Session Recording installation is configured to use HTTPS. If you want to use HTTP instead of HTTPS, you must change several settings.
To use HTTP as the communication protocol
1. Log on to the computer hosting the Session Recording Server and disable secure connections for Session Recording Broker in IIS.
2. Change the protocol setting from HTTPS to HTTP in each Session Recording Agent Properties dialog box:
a. Log on to each server where the Session Recording Agent is installed. b. From the Start menu, choose Session Recording Agent Properties. c. In Session Recording Agent Properties, choose the Connections tab. d. In the Session Recording Broker area, select HTTP from the Protocol drop-down list
and choose OK to accept the change. If you are prompted to restart the service, choose Yes.
Session Recording Technology Preview Administrator’s Guide
citrix.com 50
3. Change the protocol setting from HTTPS to HTTP in the Session Recording Player settings:
a. Log on to each workstation where the Session Recording Player is installed. b. From the Start menu, choose Session Recording Player. c. From the Session Recording Player menu bar, choose Tools > Options >
Connections, select the server and choose Modify. d. Select HTTP from the Protocol drop-down list and click OK twice to accept the change
and exit the dialog box.
4. Change the protocol setting from HTTPS to HTTP in the Session Recording Policy Console:
a. Log on to the server where the Session Recording Policy Console is installed. b. From the Start menu, choose Session Recording Policy Console. c. Choose HTTP from the Protocol drop-down list and choose OK to connect. If the
connection is successful, this setting is remembered the next time you launch the Session Recording Policy Console.
To revert to HTTPS as the communication protocol
1. Log on to the computer hosting the Session Recording Server and enable secure connections for the Session Recording Broker in IIS.
2. Change the protocol setting from HTTP to HTTPS in each Session Recording Agent Properties dialog box:
a. Log on to each server where the Session Recording Agent is installed. b. From the Start menu, choose Session Recording Agent Properties. c. In Session Recording Agent Properties, choose the Connections tab. d. In the Session Recording Broker area, select HTTPS from the Protocol drop-down list
and choose OK to accept the change. If you are prompted to restart the service, choose Yes.
3. Change the protocol setting from HTTP to HTTPS in the Session Recording Player settings:
a. Log on to each workstation where the Session Recording Player is installed. b. From the Start menu, choose Session Recording Player. c. From the Session Recording Player menu bar, choose Tools > Options >
Connections, select the server and choose Modify. d. Select HTTPS from the Protocol drop-down list and click OK twice to accept the change
and exit the dialog box.
4. Change the protocol setting from HTTP to HTTPS in the Session Recording Policy Console:
a. Log on to the server where the Session Recording Policy Console is installed. b. From the Start menu, choose Session Recording Policy Console. c. Choose HTTPS from the Protocol drop-down list and choose OK to connect. If the
connection is successful, this setting is remembered the next time you launch the Session Recording Policy Console.
Session Recording Technology Preview Administrator’s Guide
citrix.com 51
Reference: Manage your database records
The ICA Log database (ICLDB) utility is a database command-line utility used to manipulate the session recording database records. This utility is installed during the Session Recording installation in the drive:\Program Files\Citrix\SessionRecording\Server\Bin directory at the server hosting the Session Recording Server software.
Quick reference chart The following table lists the commands and options that are available for the ICLDB utility. Type the commands using the following format:
icldb [version | locate | dormant | import | archive | remove | removeall] command-options [/l] [/f] [/s] [/?]
Note: More extensive instructions are available in the help associated with the utility. To access the help, from a command prompt, type drive:\Program Files\Citrix\SessionRecording\Server\Bin directory, type icldb /?. To access help for specific commands, type icldb command /?.
Command Description
archive Archives the session recording files older than the retention period specified.
Use this command to archive files.
dormant Displays or counts the session recording files that are considered dormant. Dormant files are session recordings that were not completed due to data loss.
Use this command to verify if you suspect that you are losing data. You can verify if the session recording files are becoming dormant for the entire database, or only recordings made within the specified number of days, hours, or minutes.
import Imports session recording files into the Session Recording database.
Use this command to rebuild the database if you lose database records.
Additionally, use this command to merge databases (if you have two databases, you can import the files from one of the databases).
locate Locates and displays the full path to a session recording file using the file ID as the criteria.
Use this command when you are looking for the storage location of a session recording file.
It is also one way to verify if the database is up-to-date with a specific file.
remove Removes the references to session recording files from the database.
Use this command (with caution) to clean up the database. Specify the retention period to be used as the criteria.
Session Recording Technology Preview Administrator’s Guide
citrix.com 52
Command Description
You can also remove the associated physical file.
removeall Removes all of the references to session recording files from the Session Recording Database and returns the database to its original state. The actual physical files are not deleted; however you cannot search for these files in the Session Recording Player.
Use this command (with caution) to clean up the database. Deleted references can be reversed only by restoring from your backup.
version Displays the Session Recording Database schema version.
/l Logs the results and errors to the Windows event log.
/f Forces the command to run without prompts.
/s Suppresses the copyright message.
/? Displays help for the commands.
Session Recording Technology Preview Administrator’s Guide
citrix.com 53
Reference
About Citrix Systems
Citrix (NASDAQ:CTXS) is leading the transition to software-defining the workplace, uniting virtualization, mobility management, networking and SaaS solutions to enable new ways for businesses and people to work better. Citrix solutions power business mobility through secure, mobile workspaces that provide people with instant access to apps, desktops, data and communications on any device, over any network and cloud. With annual revenue in 2014 of $3.14 billion, Citrix solutions are in use at more than 330,000 organizations and by over 100 million users globally. Learn more at www.citrix.com.
Attributions
Third Party Notices
Session Recording may include third party software components licensed under the following terms. This list was generated using third party software as of the date listed. This list may change with specific versions of the product and may not be complete; it is provided “As-Is.” TO THE EXTENT PERMITTED BY APPLICABLE LAW, CITRIX AND ITS SUPPLIERS MAKE NO REPRESENTATIONS OR WARRANTIES, EXPRESS OR IMPLIED, STATUTORY OR OTHERWISE, WITH REGARD TO THE LIST OR ITS ACCURACY OR COMPLETENESS, OR WITH RESPECT TO ANY RESULTS TO BE OBTAINED FROM USE OR DISTRIBUTION OF THE LIST. BY USING OR DISTRIBUTING THE LIST, YOU AGREE THAT IN NO EVENT SHALL CITRIX BE HELD LIABLE FOR ANY SPECIAL, DIRECT, INDIRECT OR CONSEQUENTIAL DAMAGES OR ANY OTHER DAMAGES WHATSOEVER RESULTING FROM ANY USE OR DISTRIBUTION OF THIS LIST.
MMC .NET Library
Licensed under the Common Public License, Version 1.0
Copyright
Copyright © 2015 Citrix Systems, Inc. All rights reserved. Citrix, Citrix Receiver, and StoreFront are trademarks of Citrix Systems, Inc. and/or one of its subsidiaries, and may be registered in the U.S. and other countries. Other product and company names mentioned herein may be trademarks of their respective companies.