Embed Size (px)
Citation preview

1
City of St. Louis Permits On the Web at
www.stlcitypermits.com
We are pleased to announce the arrival of our new web-based permit application and inspection management system. Through secure accounts contractors licensed in the City can apply and pay for permits and request inspections for jobs at their convenience on line. Below please find instructions on how to get an on-line account set up and an outline of some of the basic features the system offers our customers.
1. Requesting Access
Requesting access is simple; just go to our site located at www.stlcitypermits.com and click on ei-ther one of the two “Register” links in the upper right-hand corner of the page. Enter the licensee information on this page and make sure to have your current, city-issued license number handy as well as the expiration date.
After you fill out the form, just click on the button labeled “Request Access”. Once your application is reviewed and approved, you will receive your user-name and password via email, and you will be ready to go - easy!
2. Log In
Once you’ve received your username and password from the City you can log in and start using the sys-tem.
3. Admin Console
When you first log in you will notice the Administrative Console at the top of the page . Here is listed a summary of how much is remaining in your escrow account, the user name of the person who is signed in and quick links to “My Account” where you can manage your account settings as well as a quick link to “Logout”.
user

2
Important Notice: No Banking or Credit Card information is
stored on this system!
4. Paying for Permits Online
You can pay for permits 2 ways. You can establish an escrow account from which permit fees can be deducted or you can pay for permits one at a time. An escrow account can be funded in 2 ways. You can deposit funds into your escrow account via credit card or e-check. If you want to pay for permits as you need them, then you will need to use a credit card.
Method of Payment
At this time the City is not able to absorb the transaction costs that the credit card processing com-panies charge so there is an additional fee associated with each type of payment.
The City does not receive any of these fees.
There is a flat fee of $1.00 for processing e-checks.
The fee for credit card processing is 3.5% of the total amount being charged.
The credit cards that are currently being accepted by the City are:
MasterCard and
Discover
Managing the Escrow Account
On the control panel there is a button labeled “Add Funds”. When you want to make a deposit to your escrow account click on this button and the system will take you to the appropriate screens.
Enter in the amount you would like to deposit to your account and then select the payment mode. You can select from either E-Check or Credit Card. Depending on the mode selected you will be prompted for the required information in the next screens. Remember there is a $1.00 fee for e-check and a 3.5% fee for credit cards that will be added to the amount charged for the deposit.
3
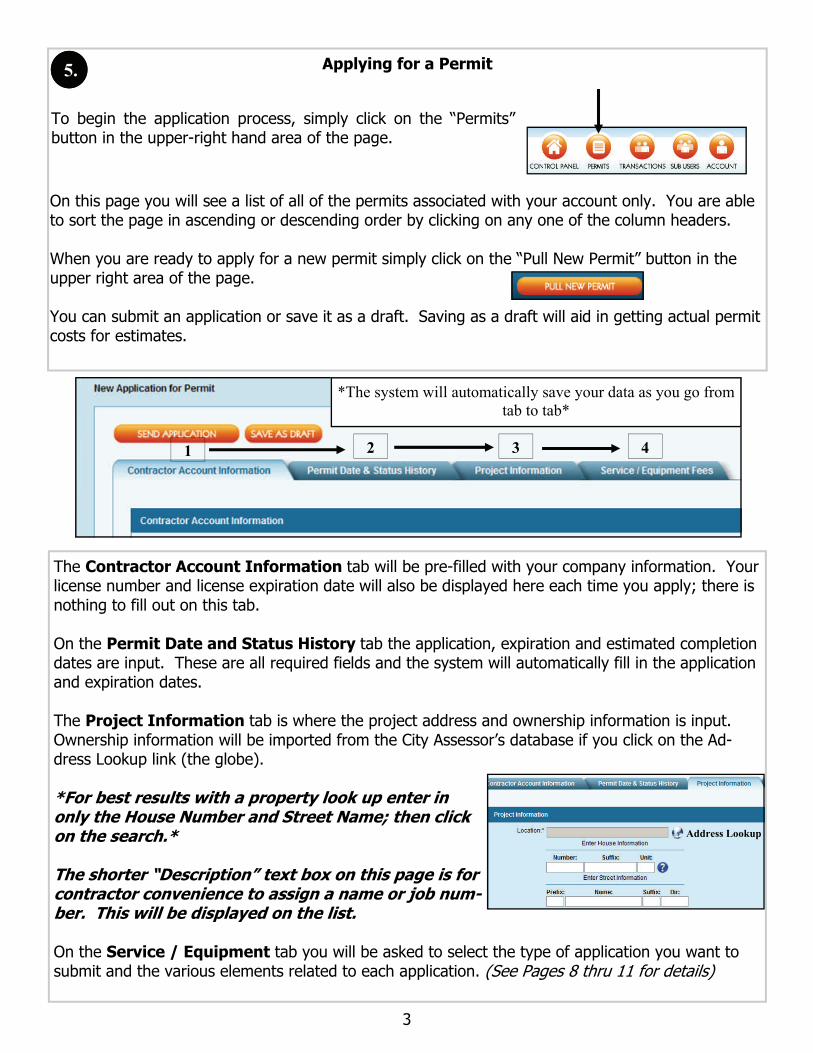
5.
To begin the application process, simply click on the “Permits” button in the upper-right hand area of the page.
On this page you will see a list of all of the permits associated with your account only. You are able to sort the page in ascending or descending order by clicking on any one of the column headers. When you are ready to apply for a new permit simply click on the “Pull New Permit” button in the upper right area of the page. You can submit an application or save it as a draft. Saving as a draft will aid in getting actual permit costs for estimates.
Applying for a Permit
The Contractor Account Information tab will be pre-filled with your company information. Your license number and license expiration date will also be displayed here each time you apply; there is nothing to fill out on this tab. On the Permit Date and Status History tab the application, expiration and estimated completion dates are input. These are all required fields and the system will automatically fill in the application and expiration dates. The Project Information tab is where the project address and ownership information is input. Ownership information will be imported from the City Assessor’s database if you click on the Ad-dress Lookup link (the globe). *For best results with a property look up enter in only the House Number and Street Name; then click on the search.* The shorter “Description” text box on this page is for contractor convenience to assign a name or job num-ber. This will be displayed on the list. On the Service / Equipment tab you will be asked to select the type of application you want to submit and the various elements related to each application. (See Pages 8 thru 11 for details)
Address Lookup
1 2 3 4
*The system will automatically save your data as you go from tab to tab*
4
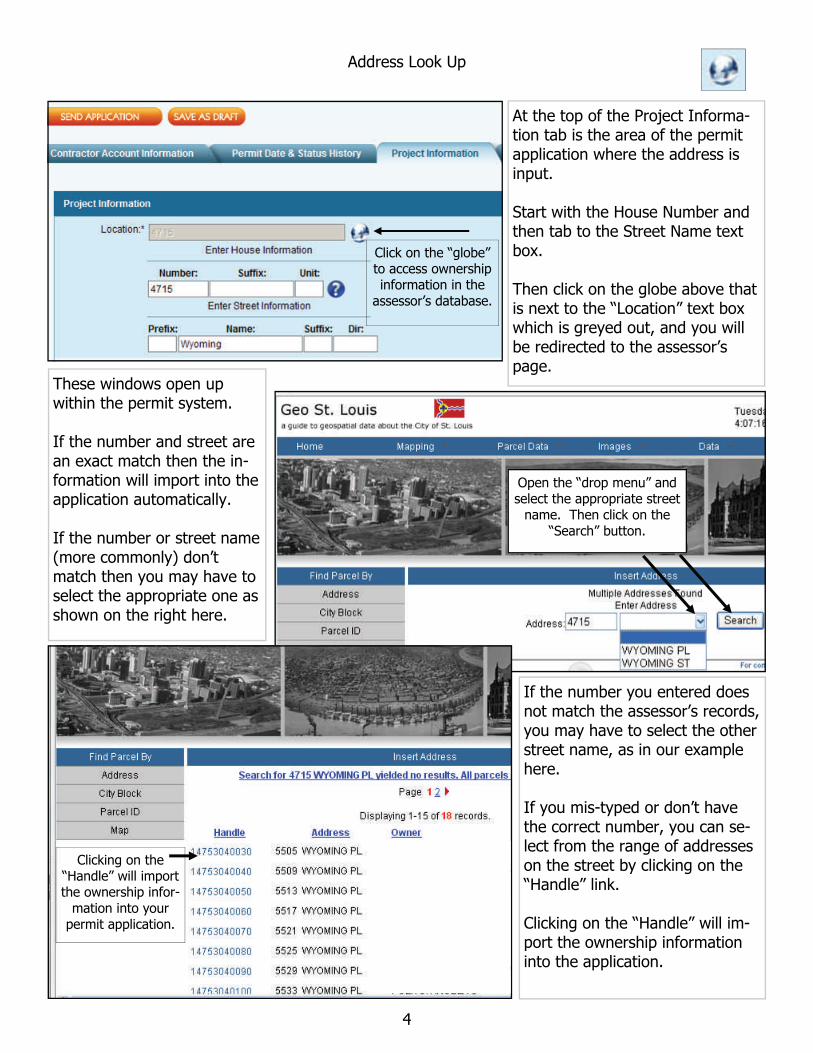
Address Look Up
At the top of the Project Informa-tion tab is the area of the permit application where the address is input. Start with the House Number and then tab to the Street Name text box. Then click on the globe above that is next to the “Location” text box which is greyed out, and you will be redirected to the assessor’s page.
Click on the “globe” to access ownership information in the
assessor’s database.
These windows open up within the permit system. If the number and street are an exact match then the in-formation will import into the application automatically. If the number or street name (more commonly) don’t match then you may have to select the appropriate one as shown on the right here.
Open the “drop menu” and select the appropriate street
name. Then click on the “Search” button.
If the number you entered does not match the assessor’s records, you may have to select the other street name, as in our example here. If you mis-typed or don’t have the correct number, you can se-lect from the range of addresses on the street by clicking on the “Handle” link. Clicking on the “Handle” will im-port the ownership information into the application.
Clicking on the “Handle” will import the ownership infor-
mation into your permit application.

5
6. Printing a Permit After the City has approved your application, you will receive an email notification with your permit number. You can now access your information online and print the official permit for the jobsite just by clicking on the “Print Approved Permit” button in the Permit Detail area.
Tip: Install the latest, free Acrobat
Reader from www.adobe.com. The latest version
is 9.2
7. Requesting Inspections
Once your permit is approved, you can request inspections on your jobs through the portal; just
click on the “Request Inspection” button on the permit tab of the job you want inspected.
Inspection Type
Once the inspection detail page opens you can select the type of inspection you want from the drop-down menu.

6
Requested Date
Click on the calendar icon to open up a calendar view. This will allow you to select a date for your inspection. The earliest you can request an inspection is for the following week-day. If you need a same-day inspection, then you will need to call the inspec-tor assigned to your permit. When you first open the inspection detail the cal-endar date will default to the next week day that is available for request. You have the ability to request an inspection as far in advance as you need. Blacked-out dates will be displayed as grayed-out on the calendar as January 20th is in the exam-ple to the right.
Notes
You can enter in notes for the inspector in the Notes text box. Notes you enter here will be included in the email alert that is sent to the in-spectors as well as the requested in-spection instance in their list. Some items to consider: contact names, desired times, lock-box codes, locations, contact phone numbers, etc.
Requesting Multiple Inspections at the Same Job If you want to schedule a single inspection in multiple areas of a job, a “wall cover” on floors 3, 4 and 5 for example, simply request the type and you can input the locations in the “notes” text box. If you want to schedule multiple and different inspections on the same job, maybe a “ground cover” in the parking lot and a “ceiling cover” on the 3rd floor, you will want to request them separately and put the appropriate explanations in the “notes” text box of each request. Just make the first request; Click on Save, and then make the second requested inspection.

7
Requesting Inspections for Services and Metered Subpanels You are able to request inspections for services or metered subpanels simply by selecting the type of inspection (Temp or Final), the date and then check one or any of the boxes next to the items you want to have inspected. If you select multiple items for inspection, the system will break these out into separate instances so individual results can be tracked. Once a service or subpanel has had an inspection requested, the “check box” is replaced by the word “pending” so you know that results should be forthcoming. When a service or metered subpanel is inspected, then the word pending will be replaced with “pass” or “fail”. Also, the system will send you and Ameren an email as soon as the results are entered by the in-spector.

8
Requesting a Follow-Up Inspection
If there is a failed inspection, once the inspector inputs the results, the system will send an email alert to the user who applied for the permit. There is also a link to all “Failed and Open” inspections on the control panel. Simply click on the link to the right and the system will show you a list of any and all failed inspec-tions that have not had a follow-up inspection with a “Passed” result. When you opened the permit or failed inspection, simply click on the “Schedule Follow Up Inspec-tion” button to request an inspection.
The inspectors notes, reasons and / or code references will be included in any “failed” inspection result. Additionally, an inspector can attach a photo of the area or item that needs attention.
Click on the + or - to expand or col-lapse an area in the list of inspections.
To schedule a follow-up inspection to a previously failed inspection, just click on the “Schedule Follow Up In-spection button.
The follow-up request is just like an original inspection request ex-cept that it is “tied” to the failed inspection. If this inspection is passed it will close out the previous, open failure.

9
8. Contractors: Sub-User Accounts Once your master account has been approved and established by the City, you will be able to add sub-users to your account and give them various levels of access to the system. Only the master account has access to create sub-user accounts for other users within the same company. Only the “Permits” and “Transactions” privileges affect sub-user accounts. This is how the privi-leges break down: Permits: View: (check View box only) allows the sub-user account to see all permits, save per-mit applications as a draft only (cannot submit to the City) and can request inspections. Permits: Edit: (check Edit box) same privileges as above, and allows the sub-user to send per-mit applications to the City with the ability to pay via Escrow or Credit Card. Permits: Admin: (check Admin box) same as all above, but also gives the sub-user account ac-cess to the “Add Funds” button for the escrow account. Transactions: View: (check View box only) allows the sub-user to view only the transactions associated with their account. Transactions: Admin: (check Admin box) allows the sub-user to view all transactions listed for the contractor account. Inspections: A Place-Holder for now.
Canceling a Requested Inspection
If you want to cancel a requested or scheduled inspection you will need to call the inspector and notify him.

10
9. E-Mail Alerts
The system will send you email alerts when: Your user account has been established by the City Sub-user accounts are set up by the contractor You have submitted an application for review and approval. The city has approved your application The city has approved your application with changes that affect the price of the permit You have requested an inspection An inspector has scheduled your requested inspection An inspector has passed or failed an inspection or wiring approval The system also sends a copy of Wiring Approval alerts to Ameren All email alerts that are generated by the system are addressed from “[email protected]”. Please be sure to check your spam or junk folders at first and mark the emails so they will be allowed into your in-box in the future.
10. Application Types
Following is a breakout of some of the differences in the various types of applications:

11
Commercial, Industrial and Residential Applications
The commercial, industrial and residential applications all look and operate pretty much the same. Here are some of the items that may stand out:
An Ameren Premise # is required to submit an application on a service.
Click here to add multiple services to the application
Premise #’s are not required to submit on metered sub-panels, but they will be needed at the time of inspection.
This “Description” text box is here for a short narrative of your project if needed. The smaller “Description” text on the previous tab is for the contractor to better identify multiple jobs at one address. You can enter a short job name or number there and it will dis-play on your list of permits.
If the item you want to install is not listed in the “Type” drop menu then just input the quantity and enter the type in the Description text box.
Raceway is for future use race-way only. Enter in increments of 10’ (ie: 100’ = 10 on application)

12
Fire Alarm Applications
Building Permit numbers are required to submit a Fire Alarm application. If the item you are looking for is not in the drop menu simply enter the quantity and the appropri-ate item in the description text box. Click on the Add button for additional line items.
Sign Applications A Building Permit number is required for new, exterior signs. There is room on the application to designate the type and location of signs if they are being installed in various areas of a project. You can also input the number of disconnects, if any, associated with each type of sign. Just click on the “Add” button for an additional line item when needed.

13
Residential Burglar Alarm Applications
Simply enter in the number of systems you are installing and the system will calculate the fee.
Communications Contractors
Communications Contractors have access to the Low Voltage section of the Residential, Commercial and Industrial applications as well as Fire Alarm and Residential Burglar Alarm applications.
11.
12. Contractors’ Home Page
By clicking on the STL City Permits logo you will be re-directed to the Electrical Contractors’ Home Page. Here, the city may distribute news regarding their schedules or process and updates about the system. Please note that you have NOT logged out. Simply click on the words “Control Panel” in the upper right-hand corner and you will return to the permitting system, or click on “Logout” to end your session.
Click on the Logo to find the latest news from the
City.
Click on “Control Panel” to return or “Logout” to quit.