Embed Size (px)
Citation preview
1 | www.texwipe.com
SMALL & LARGE SURFACES
www.texwipe.com
Cleaning & Disinfecting
Guide
2 1Cleaning & Disinfecting Guide | www.texwipe.com | www.texwipe.com
1
Cleaners and Disinfectants Differentiation . . 1
Cleaning and Disinfecting Small Surfaces . . . . . . . . . . . . . . . . . . . . . . . 2
Cleaning and Disinfecting Large Surfaces (Walls & Floors) . . . . . . . . . . 4
Disinfectant Classifications . . . . . . . . . . . . . . 8
Pre-Wet Wipers. . . . . . . . . . . . . . . . . . . . . . 10
Mop and Bucket Systems. . . . . . . . . . . . . . 11
Cleaning Validation . . . . . . . . . . . . . . . . . . . 12
Cleaning Rotation Recommendations . . . . . 13
Table of Contents
About Texwipe
Texwipe’s commitment to innovation, leadership and quality in cleanroom consumable products spans more than fifty years. We invest in technology to respond to our customers’ evolving needs in contamination control.
Texwipe’s Core Values are:
• Innovation - Texwipe pioneers the latest technologies to provide innovation in contamination control products and processes.
• Quality - Texwipe product quality is maintained by the most advanced testing and quality control standards in the industry.
• Technology Leadership - Texwipe leads our industry in testing metrology, methods and processes to reduce contamination.
Throughout Texwipe’s global operations, we support our customers with products designed to exceed the requirements for cleanroom consumable products. Our highly professional team will help you select and develop products for any critical environment application.
texwipe.com
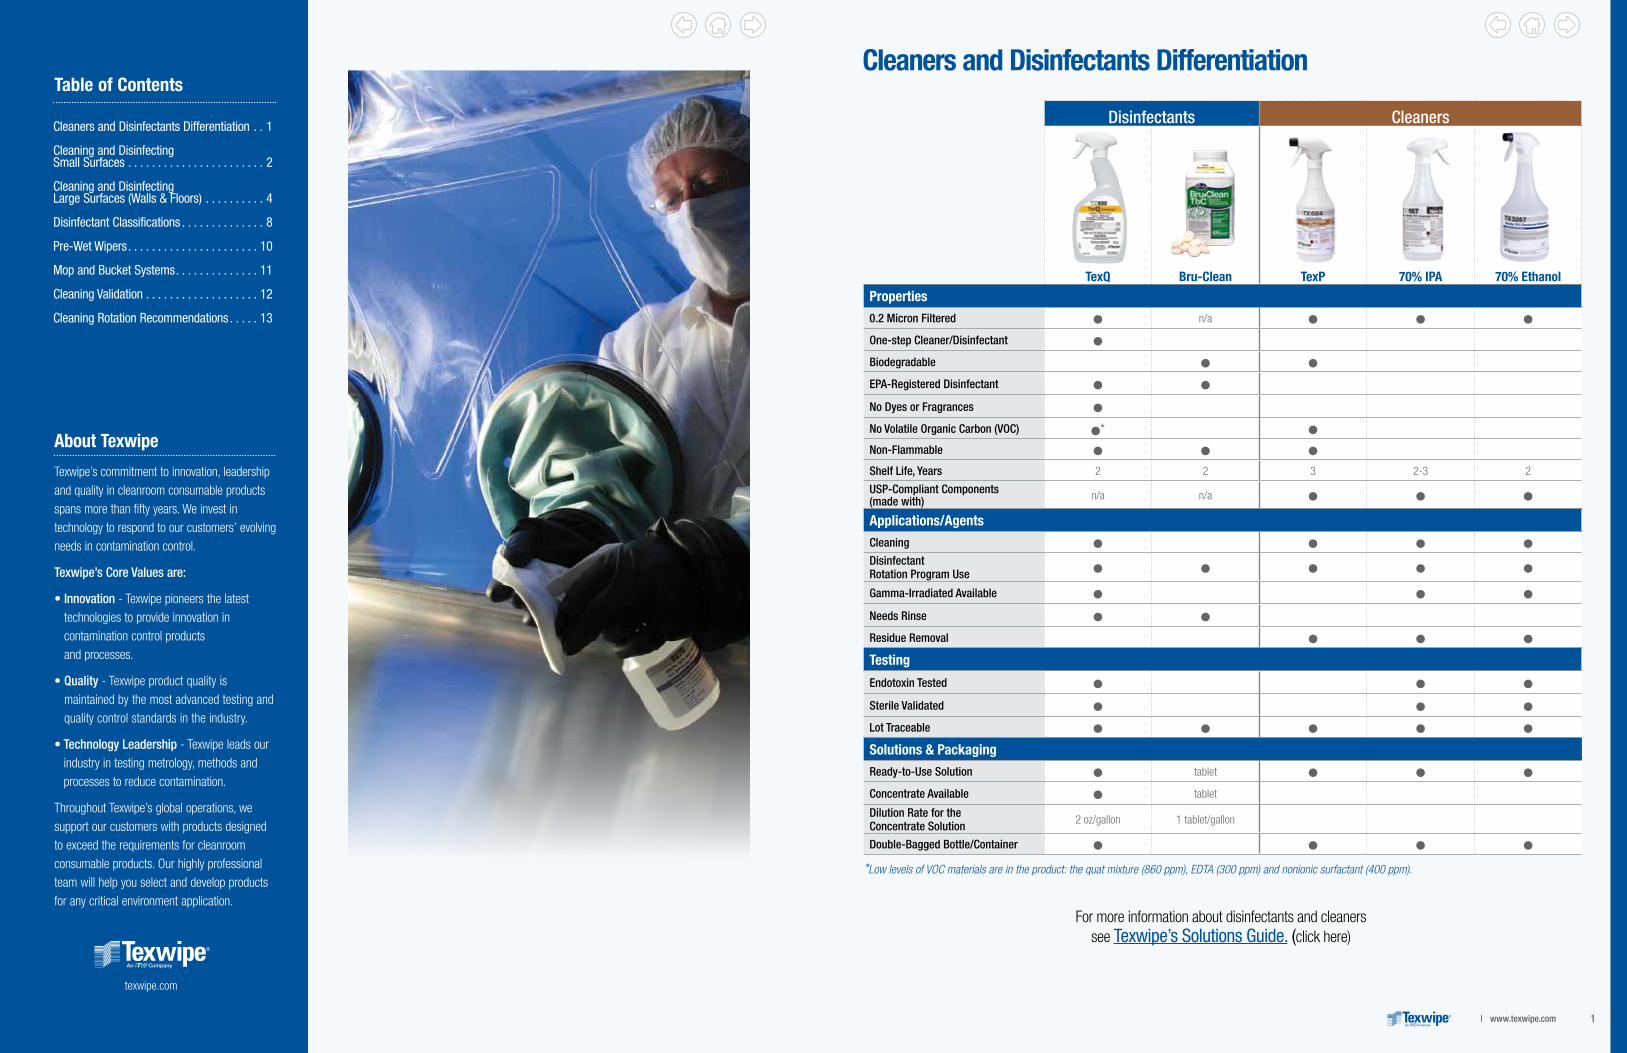
Disinfectants Cleaners
TexQ Bru-Clean TexP 70% IPA 70% Ethanol
Properties
0.2 Micron Filtered ● n/a ● ● ●
One-step Cleaner/Disinfectant ●
Biodegradable ● ●
EPA-Registered Disinfectant ● ●
No Dyes or Fragrances ●
No Volatile Organic Carbon (VOC) ●* ●
Non-Flammable ● ● ●
Shelf Life, Years 2 2 3 2-3 2
USP-Compliant Components (made with) n/a n/a ● ● ●
Applications/Agents
Cleaning ● ● ● ●
Disinfectant Rotation Program Use ● ● ● ● ●
Gamma-Irradiated Available ● ● ●
Needs Rinse ● ●
Residue Removal ● ● ●
Testing
Endotoxin Tested ● ● ●
Sterile Validated ● ● ●
Lot Traceable ● ● ● ● ●
Solutions & Packaging
Ready-to-Use Solution ● tablet ● ● ●
Concentrate Available ● tablet
Dilution Rate for the Concentrate Solution 2 oz/gallon 1 tablet/gallon
Double-Bagged Bottle/Container ● ● ● ●
*Low levels of VOC materials are in the product: the quat mixture (860 ppm), EDTA (300 ppm) and nonionic surfactant (400 ppm).
Cleaners and Disinfectants Differentiation
For more information about disinfectants and cleaners see Texwipe’s Solutions Guide. (click here)
2 3Cleaning & Disinfecting Guide | www.texwipe.com | www.texwipe.com
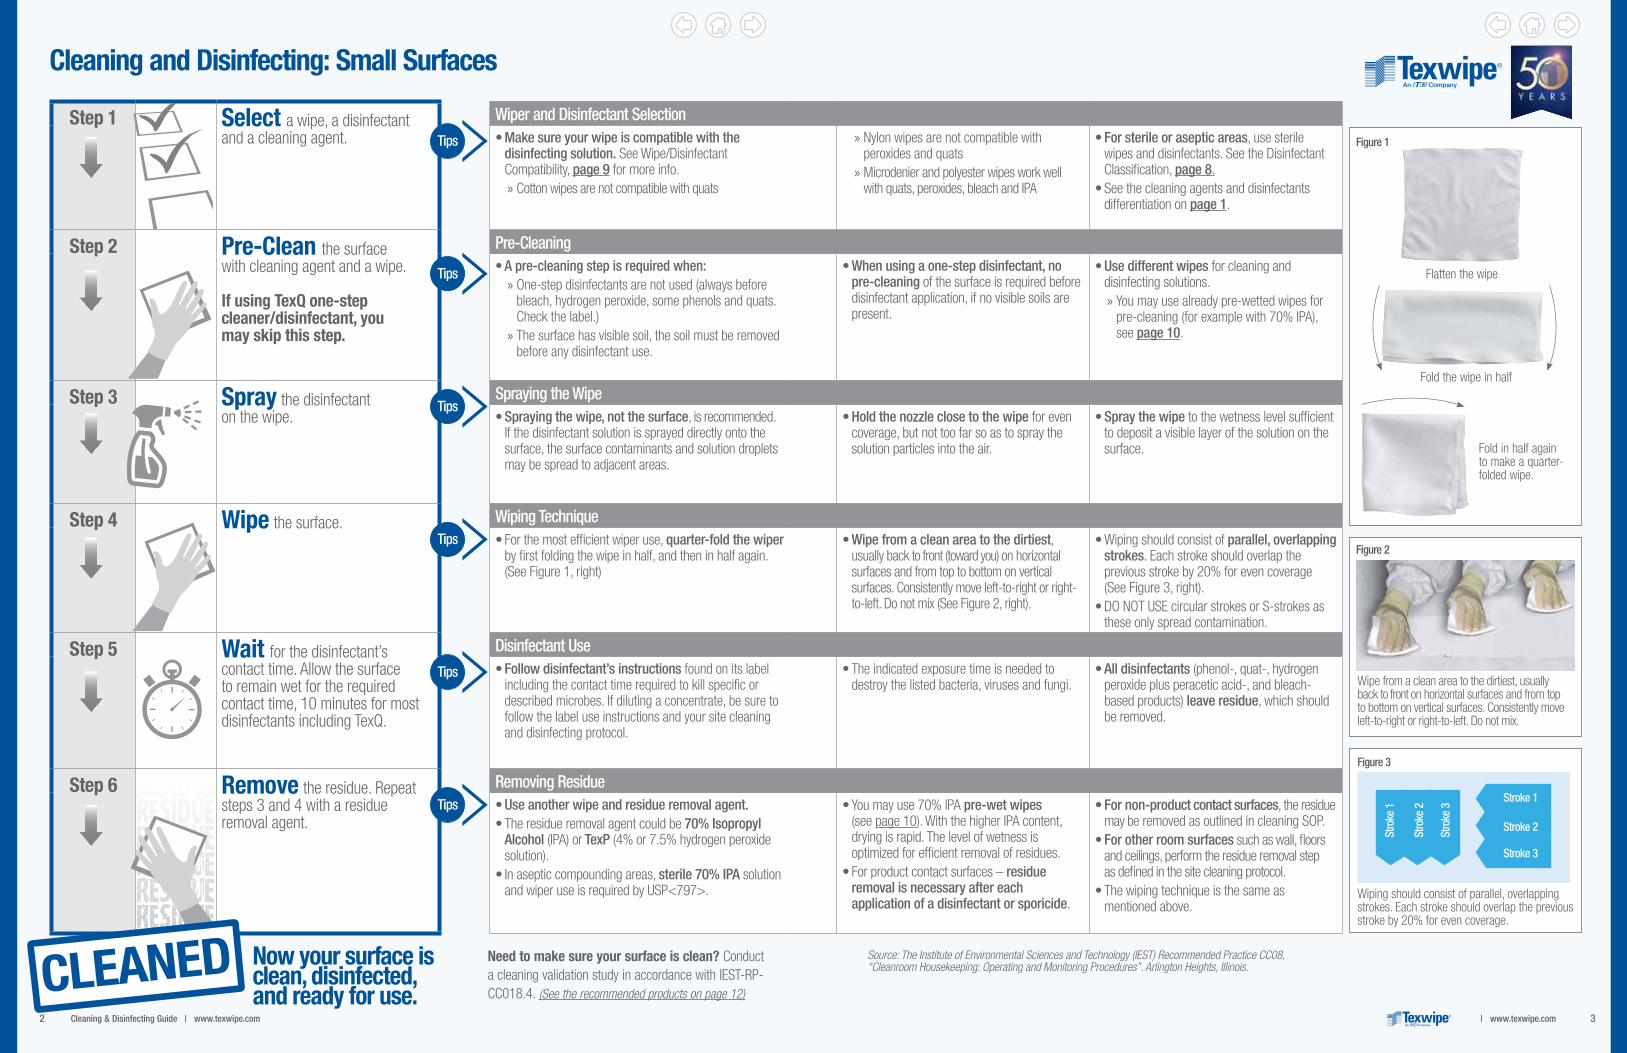
Cleaning and Disinfecting: Small Surfaces
Source: The Institute of Environmental Sciences and Technology (IEST) Recommended Practice CC08, “Cleanroom Housekeeping: Operating and Monitoring Procedures”. Arlington Heights, Illinois.
Need to make sure your surface is clean? Conduct a cleaning validation study in accordance with IEST-RP-CC018.4. (See the recommended products on page 12)
Step 1 Select a wipe, a disinfectant and a cleaning agent.
Wiper and Disinfectant Selection• Make sure your wipe is compatible with the
disinfecting solution. See Wipe/Disinfectant Compatibility, page 9 for more info.
» Cotton wipes are not compatible with quats
» Nylon wipes are not compatible with peroxides and quats » Microdenier and polyester wipes work well with quats, peroxides, bleach and IPA
• For sterile or aseptic areas, use sterile wipes and disinfectants. See the Disinfectant Classification, page 8.
• See the cleaning agents and disinfectants differentiation on page 1.
Step 2 Pre-Clean the surface with cleaning agent and a wipe. If using TexQ one-step cleaner/disinfectant, you may skip this step.
Pre-Cleaning• A pre-cleaning step is required when:
» One-step disinfectants are not used (always before bleach, hydrogen peroxide, some phenols and quats. Check the label.) » The surface has visible soil, the soil must be removed before any disinfectant use.
• When using a one-step disinfectant, no pre-cleaning of the surface is required before disinfectant application, if no visible soils are present.
• Use different wipes for cleaning and disinfecting solutions.
» You may use already pre-wetted wipes for pre-cleaning (for example with 70% IPA), see page 10.
Step 3 Spray the disinfectant on the wipe.
Spraying the Wipe• Spraying the wipe, not the surface, is recommended.
If the disinfectant solution is sprayed directly onto the surface, the surface contaminants and solution droplets may be spread to adjacent areas.
• Hold the nozzle close to the wipe for even coverage, but not too far so as to spray the solution particles into the air.
• Spray the wipe to the wetness level sufficient to deposit a visible layer of the solution on the surface.
Step 4 Wipe the surface. Wiping Technique• For the most efficient wiper use, quarter-fold the wiper
by first folding the wipe in half, and then in half again. (See Figure 1, right)
• Wipe from a clean area to the dirtiest, usually back to front (toward you) on horizontal surfaces and from top to bottom on vertical surfaces. Consistently move left-to-right or right-to-left. Do not mix (See Figure 2, right).
• Wiping should consist of parallel, overlapping strokes. Each stroke should overlap the previous stroke by 20% for even coverage (See Figure 3, right).
• DO NOT USE circular strokes or S-strokes as these only spread contamination.
Step 5 Wait for the disinfectant’s contact time. Allow the surface to remain wet for the required contact time, 10 minutes for most disinfectants including TexQ.
Disinfectant Use• Follow disinfectant’s instructions found on its label
including the contact time required to kill specific or described microbes. If diluting a concentrate, be sure to follow the label use instructions and your site cleaning and disinfecting protocol.
• The indicated exposure time is needed to destroy the listed bacteria, viruses and fungi.
• All disinfectants (phenol-, quat-, hydrogen peroxide plus peracetic acid-, and bleach-based products) leave residue, which should be removed.
Step 6 Remove the residue. Repeat steps 3 and 4 with a residue removal agent.
Removing Residue• Use another wipe and residue removal agent.• The residue removal agent could be 70% Isopropyl
Alcohol (IPA) or TexP (4% or 7.5% hydrogen peroxide solution).
• In aseptic compounding areas, sterile 70% IPA solution and wiper use is required by USP<797>.
• You may use 70% IPA pre-wet wipes (see page 10). With the higher IPA content, drying is rapid. The level of wetness is optimized for efficient removal of residues.
• For product contact surfaces – residue removal is necessary after each application of a disinfectant or sporicide.
• For non-product contact surfaces, the residue may be removed as outlined in cleaning SOP.
• For other room surfaces such as wall, floors and ceilings, perform the residue removal step as defined in the site cleaning protocol.
• The wiping technique is the same as mentioned above.
Tips
Tips
Tips
Tips
Tips
Tips
Now your surface is clean, disinfected, and ready for use.
Figure 1
Flatten the wipe
Fold the wipe in half
Fold in half again to make a quarter-folded wipe.
Figure 2
Wipe from a clean area to the dirtiest, usually back to front on horizontal surfaces and from top to bottom on vertical surfaces. Consistently move left-to-right or right-to-left. Do not mix.
Figure 3
Stroke 1
Stroke 2
Stroke 3
Stro
ke 1
Stro
ke 2
Stro
ke 3
Wiping should consist of parallel, overlapping strokes. Each stroke should overlap the previous stroke by 20% for even coverage.
CLEANED
4 5Cleaning & Disinfecting Guide | www.texwipe.com | www.texwipe.com
Cleaning and Disinfecting: Large Surfaces (Walls & Floors)
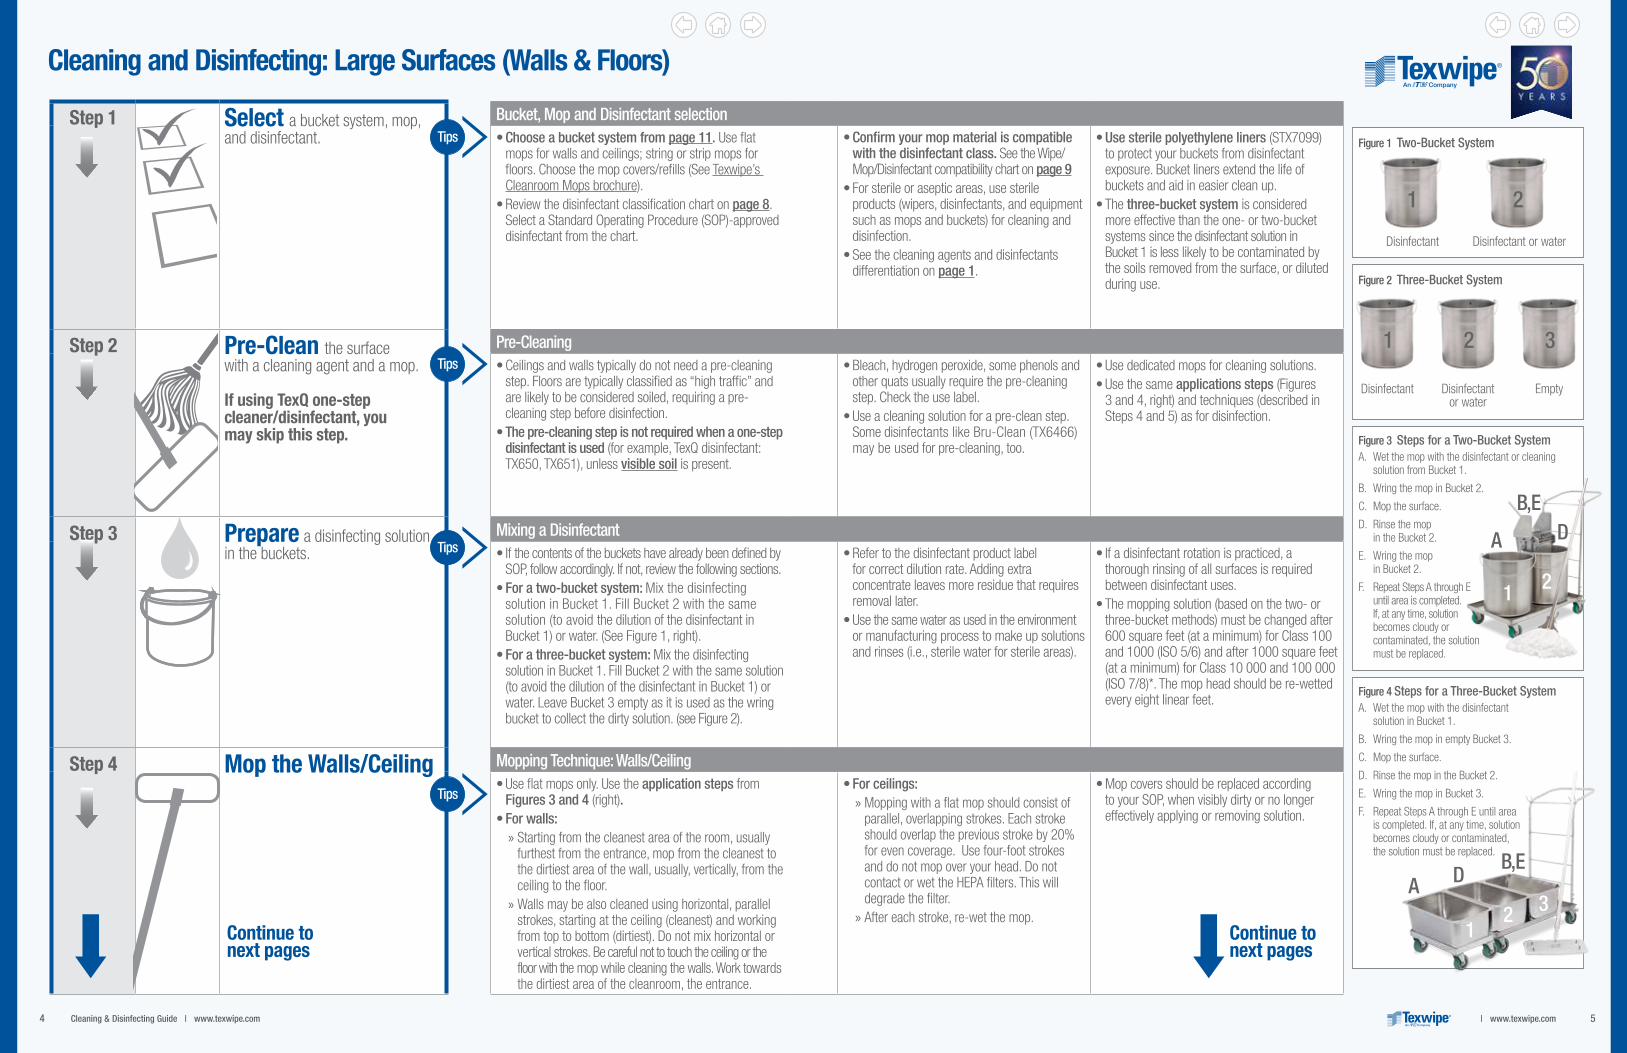
Step 1 Select a bucket system, mop, and disinfectant.
Bucket, Mop and Disinfectant selection• Choose a bucket system from page 11. Use flat
mops for walls and ceilings; string or strip mops for floors. Choose the mop covers/refills (See Texwipe’s Cleanroom Mops brochure).
• Review the disinfectant classification chart on page 8. Select a Standard Operating Procedure (SOP)-approved disinfectant from the chart.
• Confirm your mop material is compatible with the disinfectant class. See the Wipe/Mop/Disinfectant compatibility chart on page 9
• For sterile or aseptic areas, use sterile products (wipers, disinfectants, and equipment such as mops and buckets) for cleaning and disinfection.
• See the cleaning agents and disinfectants differentiation on page 1.
• Use sterile polyethylene liners (STX7099) to protect your buckets from disinfectant exposure. Bucket liners extend the life of buckets and aid in easier clean up.
• The three-bucket system is considered more effective than the one- or two-bucket systems since the disinfectant solution in Bucket 1 is less likely to be contaminated by the soils removed from the surface, or diluted during use.
Step 2 Pre-Clean the surface with a cleaning agent and a mop. If using TexQ one-step cleaner/disinfectant, you may skip this step.
Pre-Cleaning• Ceilings and walls typically do not need a pre-cleaning
step. Floors are typically classified as “high traffic” and are likely to be considered soiled, requiring a pre-cleaning step before disinfection.
• The pre-cleaning step is not required when a one-step disinfectant is used (for example, TexQ disinfectant: TX650, TX651), unless visible soil is present.
• Bleach, hydrogen peroxide, some phenols and other quats usually require the pre-cleaning step. Check the use label.
• Use a cleaning solution for a pre-clean step. Some disinfectants like Bru-Clean (TX6466) may be used for pre-cleaning, too.
• Use dedicated mops for cleaning solutions.• Use the same applications steps (Figures
3 and 4, right) and techniques (described in Steps 4 and 5) as for disinfection.
Step 3 Prepare a disinfecting solution in the buckets.
Mixing a Disinfectant• If the contents of the buckets have already been defined by
SOP, follow accordingly. If not, review the following sections.• For a two-bucket system: Mix the disinfecting
solution in Bucket 1. Fill Bucket 2 with the same solution (to avoid the dilution of the disinfectant in Bucket 1) or water. (See Figure 1, right).
• For a three-bucket system: Mix the disinfecting solution in Bucket 1. Fill Bucket 2 with the same solution (to avoid the dilution of the disinfectant in Bucket 1) or water. Leave Bucket 3 empty as it is used as the wring bucket to collect the dirty solution. (see Figure 2).
• Refer to the disinfectant product label for correct dilution rate. Adding extra concentrate leaves more residue that requires removal later.
• Use the same water as used in the environment or manufacturing process to make up solutions and rinses (i.e., sterile water for sterile areas).
• If a disinfectant rotation is practiced, a thorough rinsing of all surfaces is required between disinfectant uses.
• The mopping solution (based on the two- or three-bucket methods) must be changed after 600 square feet (at a minimum) for Class 100 and 1000 (ISO 5/6) and after 1000 square feet (at a minimum) for Class 10 000 and 100 000 (ISO 7/8)*. The mop head should be re-wetted every eight linear feet.
Step 4 Mop the Walls/Ceiling Mopping Technique: Walls/Ceiling• Use flat mops only. Use the application steps from
Figures 3 and 4 (right).• For walls:
» Starting from the cleanest area of the room, usually furthest from the entrance, mop from the cleanest to the dirtiest area of the wall, usually, vertically, from the ceiling to the floor. » Walls may be also cleaned using horizontal, parallel strokes, starting at the ceiling (cleanest) and working from top to bottom (dirtiest). Do not mix horizontal or vertical strokes. Be careful not to touch the ceiling or the floor with the mop while cleaning the walls. Work towards the dirtiest area of the cleanroom, the entrance.
• For ceilings: » Mopping with a flat mop should consist of parallel, overlapping strokes. Each stroke should overlap the previous stroke by 20% for even coverage. Use four-foot strokes and do not mop over your head. Do not contact or wet the HEPA filters. This will degrade the filter. » After each stroke, re-wet the mop.
• Mop covers should be replaced according to your SOP, when visibly dirty or no longer effectively applying or removing solution.
Tips
Tips
Tips
Tips
Figure 1 Two-Bucket System
Figure 3 Steps for a Two-Bucket SystemA. Wet the mop with the disinfectant or cleaning
solution from Bucket 1.
B. Wring the mop in Bucket 2.
C. Mop the surface.
D. Rinse the mop in the Bucket 2.
E. Wring the mop in Bucket 2.
F. Repeat Steps A through E until area is completed. If, at any time, solution becomes cloudy or contaminated, the solution must be replaced.
Figure 4 Steps for a Three-Bucket SystemA. Wet the mop with the disinfectant
solution in Bucket 1.
B. Wring the mop in empty Bucket 3.
C. Mop the surface.
D. Rinse the mop in the Bucket 2.
E. Wring the mop in Bucket 3.
F. Repeat Steps A through E until area is completed. If, at any time, solution becomes cloudy or contaminated, the solution must be replaced.
Figure 2 Three-Bucket System
Disinfectant
Disinfectant
Disinfectant or water
Disinfectant or water
Empty
1
1
1
2
2 3
1
A DB, E
2
12 3
A DB, E
Continue to next pages
Continue to next pages
6 7Cleaning & Disinfecting Guide | www.texwipe.com | www.texwipe.com
Cleaning and Disinfecting: Large Surfaces (Walls & Floors)
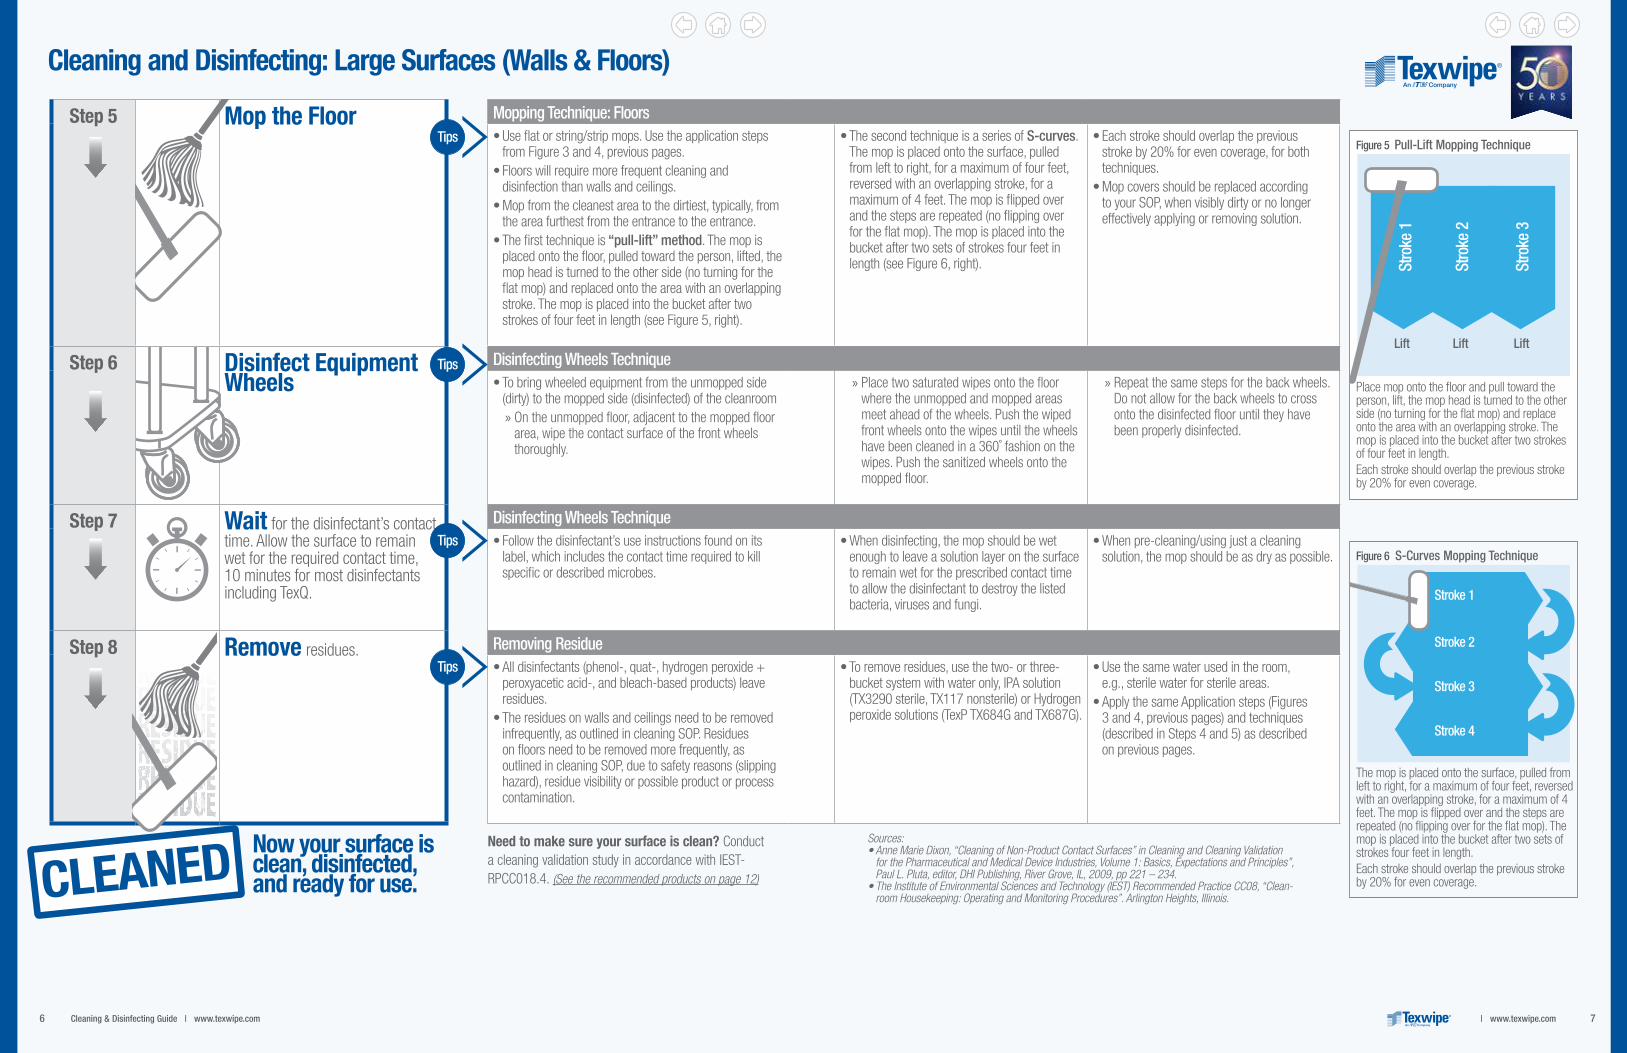
Step 5 Mop the Floor Mopping Technique: Floors• Use flat or string/strip mops. Use the application steps
from Figure 3 and 4, previous pages. • Floors will require more frequent cleaning and
disinfection than walls and ceilings. • Mop from the cleanest area to the dirtiest, typically, from
the area furthest from the entrance to the entrance.• The first technique is “pull-lift” method. The mop is
placed onto the floor, pulled toward the person, lifted, the mop head is turned to the other side (no turning for the flat mop) and replaced onto the area with an overlapping stroke. The mop is placed into the bucket after two strokes of four feet in length (see Figure 5, right).
• The second technique is a series of S-curves. The mop is placed onto the surface, pulled from left to right, for a maximum of four feet, reversed with an overlapping stroke, for a maximum of 4 feet. The mop is flipped over and the steps are repeated (no flipping over for the flat mop). The mop is placed into the bucket after two sets of strokes four feet in length (see Figure 6, right).
• Each stroke should overlap the previous stroke by 20% for even coverage, for both techniques.
• Mop covers should be replaced according to your SOP, when visibly dirty or no longer effectively applying or removing solution.
Step 6 Disinfect Equipment Wheels
Disinfecting Wheels Technique• To bring wheeled equipment from the unmopped side
(dirty) to the mopped side (disinfected) of the cleanroom » On the unmopped floor, adjacent to the mopped floor area, wipe the contact surface of the front wheels thoroughly.
» Place two saturated wipes onto the floor where the unmopped and mopped areas meet ahead of the wheels. Push the wiped front wheels onto the wipes until the wheels have been cleaned in a 360˚ fashion on the wipes. Push the sanitized wheels onto the mopped floor.
» Repeat the same steps for the back wheels. Do not allow for the back wheels to cross onto the disinfected floor until they have been properly disinfected.
Step 7 Wait for the disinfectant’s contact time. Allow the surface to remain wet for the required contact time, 10 minutes for most disinfectants including TexQ.
Disinfecting Wheels Technique• Follow the disinfectant’s use instructions found on its
label, which includes the contact time required to kill specific or described microbes.
• When disinfecting, the mop should be wet enough to leave a solution layer on the surface to remain wet for the prescribed contact time to allow the disinfectant to destroy the listed bacteria, viruses and fungi.
• When pre-cleaning/using just a cleaning solution, the mop should be as dry as possible.
Step 8 Remove residues. Removing Residue• All disinfectants (phenol-, quat-, hydrogen peroxide +
peroxyacetic acid-, and bleach-based products) leave residues.
• The residues on walls and ceilings need to be removed infrequently, as outlined in cleaning SOP. Residues on floors need to be removed more frequently, as outlined in cleaning SOP, due to safety reasons (slipping hazard), residue visibility or possible product or process contamination.
• To remove residues, use the two- or three-bucket system with water only, IPA solution (TX3290 sterile, TX117 nonsterile) or Hydrogen peroxide solutions (TexP TX684G and TX687G).
• Use the same water used in the room, e.g., sterile water for sterile areas.
• Apply the same Application steps (Figures 3 and 4, previous pages) and techniques (described in Steps 4 and 5) as described on previous pages.
Tips
Tips
Tips
Tips
Now your surface is clean, disinfected, and ready for use.
Sources: • Anne Marie Dixon, “Cleaning of Non-Product Contact Surfaces” in Cleaning and Cleaning Validation
for the Pharmaceutical and Medical Device Industries, Volume 1: Basics, Expectations and Principles”, Paul L. Pluta, editor, DHI Publishing, River Grove, IL, 2009, pp 221 – 234.
• The Institute of Environmental Sciences and Technology (IEST) Recommended Practice CC08, “Clean-room Housekeeping: Operating and Monitoring Procedures”. Arlington Heights, Illinois.
Need to make sure your surface is clean? Conduct a cleaning validation study in accordance with IEST-RPCC018.4. (See the recommended products on page 12)
Figure 5 Pull-Lift Mopping Technique
Lift Lift Lift
Figure 6 S-Curves Mopping Technique
The mop is placed onto the surface, pulled from left to right, for a maximum of four feet, reversed with an overlapping stroke, for a maximum of 4 feet. The mop is flipped over and the steps are repeated (no flipping over for the flat mop). The mop is placed into the bucket after two sets of strokes four feet in length. Each stroke should overlap the previous stroke by 20% for even coverage.
Place mop onto the floor and pull toward the person, lift, the mop head is turned to the other side (no turning for the flat mop) and replace onto the area with an overlapping stroke. The mop is placed into the bucket after two strokes of four feet in length.Each stroke should overlap the previous stroke by 20% for even coverage.
CLEANED
Stro
ke 1
Stro
ke 2
Stro
ke 3
Stroke 1
Stroke 2
Stroke 3
Stroke 4
8 9Cleaning & Disinfecting Guide | www.texwipe.com | www.texwipe.com
Isopropyl Alcohol
Chlorine Compounds, Bleach Sodium
Hypochlorite 5.25% (bleach concentrate) Phenolics
Quaternary Ammonium Compounds (QACs)
Oxidizing Disinfectants,
Hydrogen peroxideDescription Variable activity against
some bacterial and fungal species. Bactericidal disinfectant.70% IPA is proved to be the most effective concentration.
Bactericidal (kills bacteria, viruses & fungi) at <5000ppm sodium hypochlorite.Sporicidal (kills spores) at >5000ppm Sodium Hypochlorite.
Bactericidal disinfectant (kills bacteria, viruses, fungi), tuberculocidal.
Bactericidal disinfectant (kills bacteria, viruses and fungi). Some products are tuberculocidal.
This group includes oxygen-releasing compounds (peroxygens) such as peracetic acid and hydrogen peroxide.Bactericidal (kills bacteria, viruses, fungi), tuberculocidal. Sporicidal (kills spores).
Pre-cleaning Needed
Surfaces must be pre-cleaned.
Surfaces must be pre-cleaned.
Surfaces must be pre-cleaned. Some products are registered as one-step disinfectant cleaners.
Product specific. Some products registered as one-step disinfectant cleaners.
Product specific. Surfaces must be pre-cleaned, depending on formulation.
Advantages • Quick evaporation• Removes many surface
contaminants• Removes residual
disinfectant• Leaves extremely low
residue• Can be a good general
use disinfectant• Compatibility combined with
other disinfectants (quaternaries, phenolics)
• No rinse required
• The same product can be used for routine and special event tasks, by changing the concentration
• Relatively quick microbial kill• May be used on food
preparation surfaces requiring a surface rinse depending on bleach concentration
• Can be tuberculocidal and sporicidal with increased concentration
• Some products are tuberculocidal
• Mostly presented in concentrate formulations, need to be mixed to make the ready-to-use solution
• Some products are tuberculocidal
• Effective over large pH range• Some products are one-step
disinfectants cleaners
• One-step formulations contain a detergent to help loosen soil, no pre-clean step needed
• Colorless, odorless (but act as deodorizers)
• Less corrosive• May be used on food
preparation surfaces (need rinse)
• Effective at temperatures up to 212°F
• Hydrogen peroxide is non-corrosive in diluted form but is corrosive in combination with peracetic acid
• No rinsing required• Some products are odorless• Clear and colorless, thereby
avoiding surface staining• Fast, broad spectrum activity,
sporicidal• Can be safer for personnel
(less toxic) depending on concentration
Disadvantages • Poor cleaner (does not contain detergents)
• Limited contact time, not sufficient for broad range killing, evaporates quickly
• VOC emissions• Flammable, not to be used
near a flame• Not active against certain
types of viruses• Low toxicity but an
eye irritant
• Toxic. May damage floor finishes, carpets, clothing and other fibers when used in higher concentrations
• Has an unpleasant odor• Must be stored separately
from ammonia and flammable products
• Rinsing is required• Corrodes metals such as
stainless, aluminum• Increase in alkalinity
decreases bactericidal properties
• Eye, skin, and respiratory irritant
• Considered a persistent bio accumulative toxin by EPA
• Disposal restrictions in some states. Check state and local regulations
• Not for use on food or food utensils
• May damage floor finishes and other surfaces
• Unpleasant odor• Effectiveness reduced by
alkaline pH or natural soap• Prolonged contact
deteriorates rubber• Can cause skin & eye irritation • Corrosive & toxic
• Ineffective against bacterial spores, TBC, some viruses
• Effectiveness influenced by hard water
• RTU formulations are non-irritating to skin but avoid skin or eye contact; toxic
• Neutralized by anionic soap (common) and effectiveness reduced by organic material
• Pre-rinse may be required when rotating disinfectants
• Rinsing is required
• Rinsing is required where direct skin or oral contact can occur
• Corrosive to soft metals• Pre-cleaning step is required• Temperature and light
sensitive• Pungent odor (vinegar)• Pure hydrogen peroxide
formulations do not require rinse
CDC Disinfection Level
Intermediate Intermediate level disinfectant
Some are intermediate some are low level noted on label.
Low level disinfectant Product specific. Low, intermediate or high level disinfectant (depends on concentration and exposure time).
EPA Toxicity Category (See chart below)
Category IV Category I Category I or II Category III Category III or IV, product specific.
Storage Stable in storage. Keep away from oxidizing agents, heat and flames.
If used for disinfecting purposes, bleach should not be stored longer than three months. When mixed with water the solution is only effective as a disinfectant for 24 hours. The available chlorine level (NaOCl) must be monitored.
Stable in storage. Flammable if in aerosol form.
Stable in storage. Stable in storage. Two year shelf life is available depending on concentration and formulation. Keep away from heat and light.
**EPA Toxicity Categories Require These Warnings:
Signal Word Category Oral Lethal Dose1
DANGER, POISON (Skull and crossbones) I Highly toxic A few drops to a teaspoonful
WARNING II Moderately toxic Over a teaspoonful to one ounce
CAUTION III Slightly toxic Over one ounce to one pint
CAUTION IV Relatively non-toxic Over one pint to one pound1Based on a 150-pound person
Disinfectants Classifications
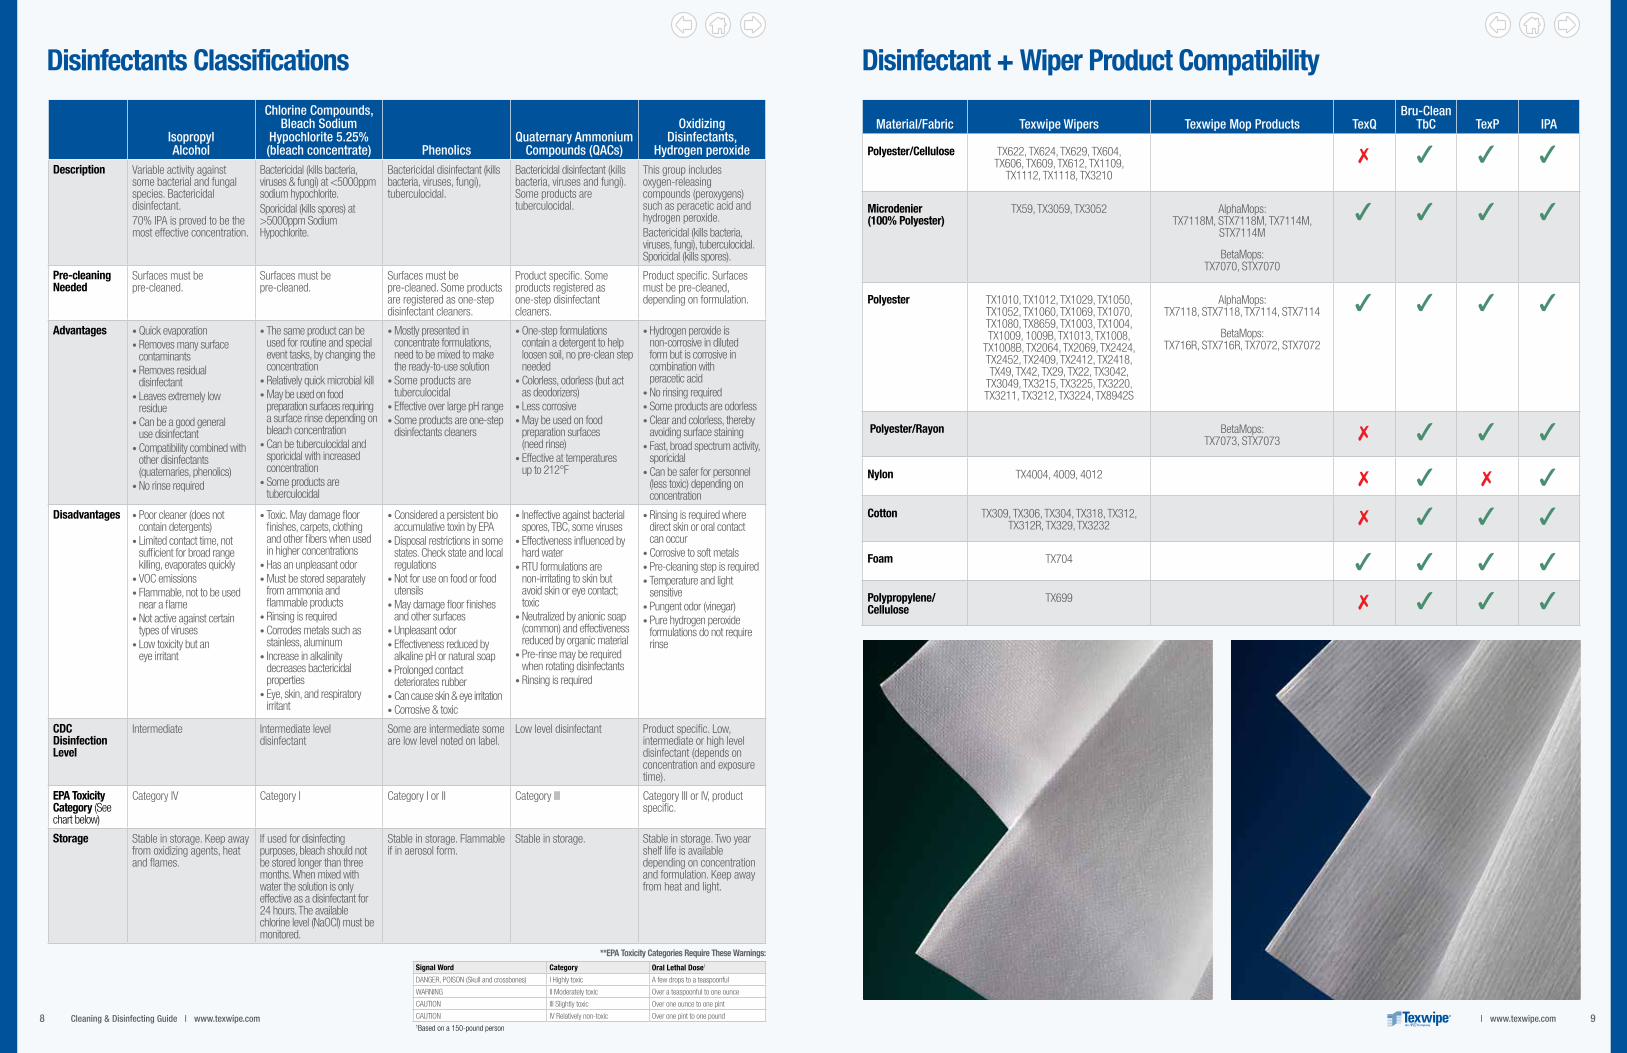
Material/Fabric Texwipe Wipers Texwipe Mop Products TexQBru-Clean
TbC TexP IPA
Polyester/Cellulose TX622, TX624, TX629, TX604, TX606, TX609, TX612, TX1109,
TX1112, TX1118, TX3210
7 3 3 3
Microdenier (100% Polyester)
TX59, TX3059, TX3052 AlphaMops: TX7118M, STX7118M, TX7114M,
STX7114M
BetaMops: TX7070, STX7070
3 3 3 3
Polyester TX1010, TX1012, TX1029, TX1050, TX1052, TX1060, TX1069, TX1070, TX1080, TX8659, TX1003, TX1004, TX1009, 1009B, TX1013, TX1008,
TX1008B, TX2064, TX2069, TX2424, TX2452, TX2409, TX2412, TX2418, TX49, TX42, TX29, TX22, TX3042,
TX3049, TX3215, TX3225, TX3220, TX3211, TX3212, TX3224, TX8942S
AlphaMops: TX7118, STX7118, TX7114, STX7114
BetaMops: TX716R, STX716R, TX7072, STX7072
3 3 3 3
Polyester/Rayon BetaMops: TX7073, STX7073 7 3 3 3
Nylon TX4004, 4009, 4012 7 3 7 3
Cotton TX309, TX306, TX304, TX318, TX312, TX312R, TX329, TX3232 7 3 3 3
Foam TX704 3 3 3 3
Polypropylene/Cellulose
TX699 7 3 3 3
Disinfectant + Wiper Product Compatibility
10 11Cleaning & Disinfecting Guide | www.texwipe.com | www.texwipe.com
Solution Material Name Size TX# Bag Qty Case Qty ISO Class EU Grade
Non-Sterile IPA 70% Polyester Vertex® HS 12" x 12" (30 cm x 30 cm) TX42P 50 4 3-7 A-D
9" x 9" (23 cm x 23 cm) TX49P 75 4 3-7 A-D
AlphaSat® 4" x 4" (10 cm x 10 cm) TX1034 200 4 4-8 A-D
6" x 6" (15 cm x 15 cm) TX1036 75 12 4-8 A-D
9" x 9" (23 cm x 23 cm) TX1039 50 4 4-8 A-D
QuanSat™ 9" x 9" (23 cm x 23 cm) TX1084 50 12 3-7 A-D
Polyester/Cellulose TechniCloth® 6" x 8" (15 cm x 20 cm) TX1045 100 12 5-8 B-D
9" x 11" (23 cm x 28 cm) TX1041 70 12 5-8 B-D
9" x 11" (23 cm x 28 cm) TX1065 50 24 5-8 B-D
7" x 11" (18 cm x 28 cm) TX1067 200 4 5-8 B-D
Polypropylene PolySat® 7" x 11" (18 cm x 28 cm) TX1040 200 4 5-8 B-D
9" x 11" (23 cm x 28 cm) TX1051 50 24 5-8 B-D
6" x 11" (15 cm x 28 cm) TX8723 75 24 5-8 B-D
6" x 11" (15 cm x 28 cm) TX8727 75 20 & 1 case container
5-8 B-D
Ethanol 70% Polyester/Cellulose TechniCloth® 7" x 11" (18 cm x 28 cm) TX1068 25 20 5-8 A-D
Sterile IPA 70% Polyester Vertex® HS 12" x 12" (30 cm x 30 cm) TX3042P 25 5 3-7 A-D
9" x 9" (23 cm x 23 cm) TX3049P 25 5 3-7 A-D
AlphaSat® 12" x 12" (30 cm x 30 cm) TX3252 25 5 4-8 A-D
AlphaSat® 10 12" x 12" (30 cm x 30 cm) TX3280 50 5 2-7 A-D
9" x 9" (23 cm x 23 cm) TX3285 20 20 2-7 A-D
Polyester/Cellulose TechniCloth® 9" x 11" (23 cm x 28 cm) TX3214 50 24 5-8 B-D
9" x 11" (23 cm x 28 cm) TX3217 20 24 5-8 B-D
Polypropylene PolySat® 9" x 11" (23 cm x 28 cm) TX3213 50 24 5-8 B-D
9" x 11" (23 cm x 28 cm) TX3216 20 24 5-8 B-D
Ethanol 70% Polyester/Cellulose TechniCloth® 7" x 11" (18 cm x 28 cm) STX1068 50 20 5-8 B-D
Polyester Vertex® HS 12" x 12" (30 cm x 30 cm) TX3044P 25 5 3-7 A-D
Pre-Wet Wipers
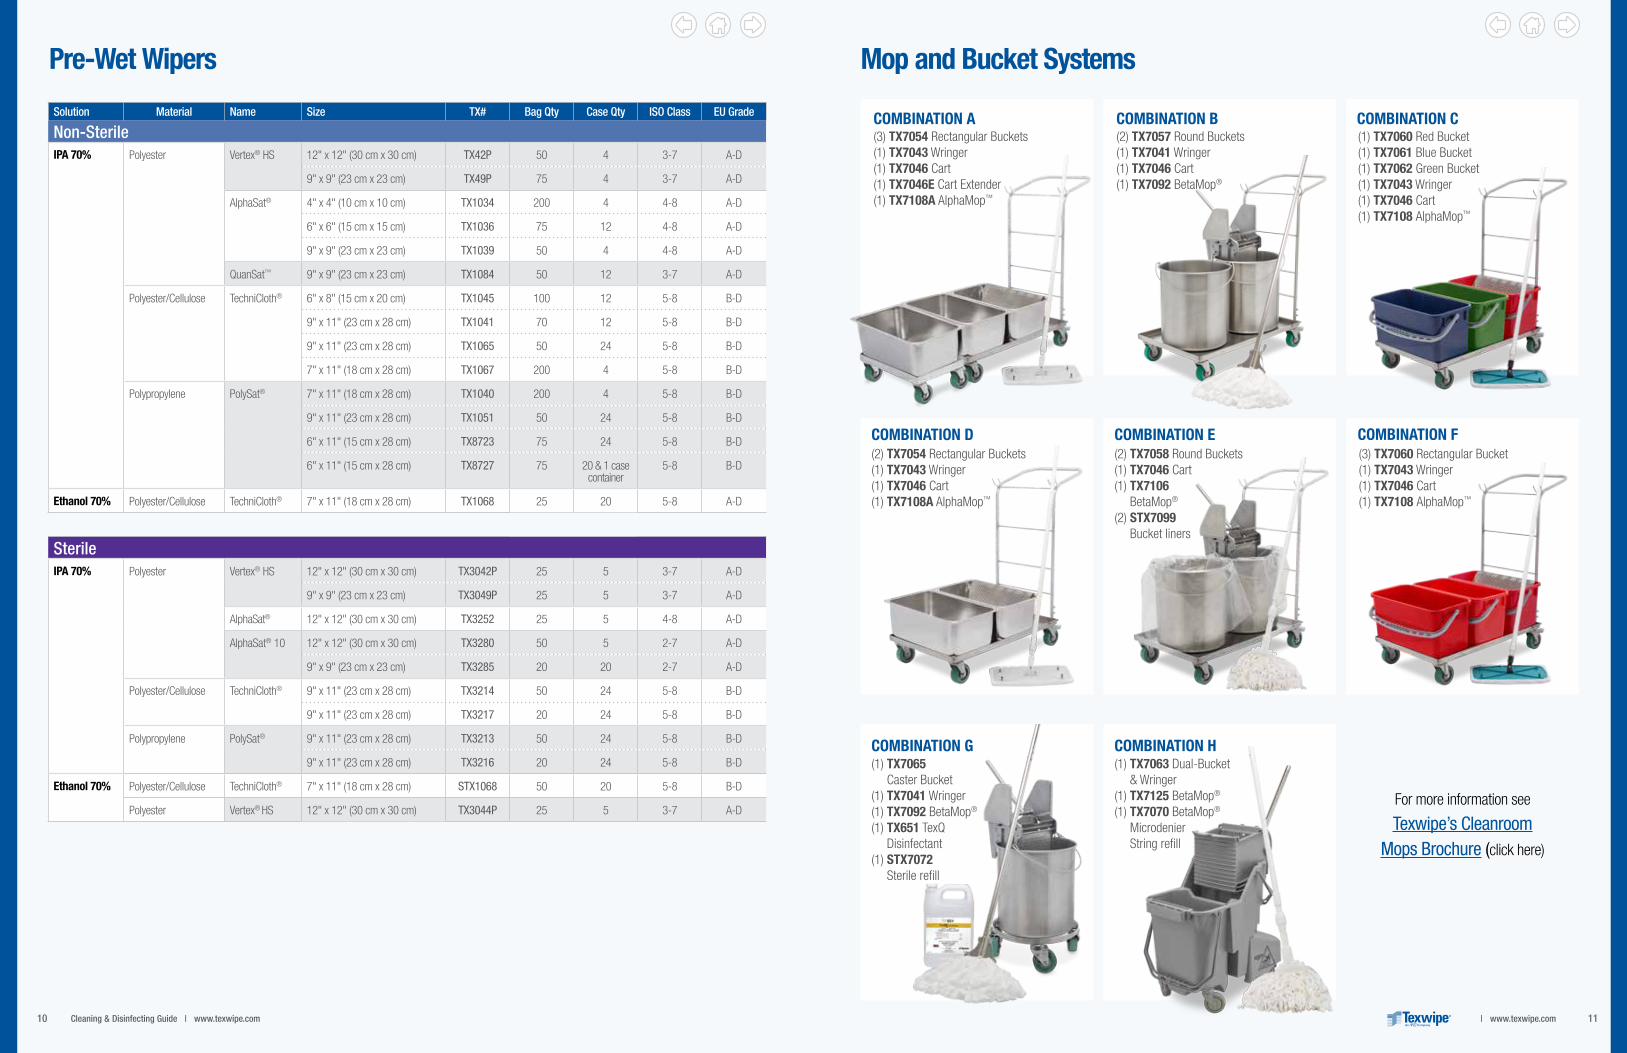
COMBINATION G(1) TX7065
Caster Bucket(1) TX7041 Wringer(1) TX7092 BetaMop® (1) TX651 TexQ
Disinfectant(1) STX7072
Sterile refill
COMBINATION H(1) TX7063 Dual-Bucket
& Wringer(1) TX7125 BetaMop®
(1) TX7070 BetaMop® Microdenier String refill
COMBINATION D(2) TX7054 Rectangular Buckets(1) TX7043 Wringer(1) TX7046 Cart(1) TX7108A AlphaMop™
COMBINATION F(3) TX7060 Rectangular Bucket(1) TX7043 Wringer(1) TX7046 Cart(1) TX7108 AlphaMop™
COMBINATION E(2) TX7058 Round Buckets(1) TX7046 Cart(1) TX7106
BetaMop® (2) STX7099
Bucket liners
COMBINATION A(3) TX7054 Rectangular Buckets(1) TX7043 Wringer(1) TX7046 Cart(1) TX7046E Cart Extender(1) TX7108A AlphaMop™
COMBINATION B(2) TX7057 Round Buckets(1) TX7041 Wringer(1) TX7046 Cart(1) TX7092 BetaMop®
COMBINATION C(1) TX7060 Red Bucket(1) TX7061 Blue Bucket (1) TX7062 Green Bucket (1) TX7043 Wringer(1) TX7046 Cart(1) TX7108 AlphaMop™
Mop and Bucket Systems
For more information see
Texwipe’s Cleanroom Mops Brochure (click here)
12 13Cleaning & Disinfecting Guide | www.texwipe.com | www.texwipe.com
Part No. TX714K Head Width Head Thickness Head Length Handle Width Handle Thickness Handle Length Total Swab Length Packaging
12.7mm (0.500")
4.2mm (0.165")
25.7mm (1.012")
5.2mm (0.205")
3.0mm (0.118")
101.8mm (4.008")
127.5mm (5.020")
20 swabs per bag 50 bags per case
Part No. TX715 Head Width Head Thickness Head Length Handle Width Handle Thickness Handle Length Total Swab Length Packaging
12.7mm (0.500")
4.2mm (0.165")
25.7mm (1.012")
5.2mm (0.205")
3.0mm (0.118")
101.8mm (4.008")
127.5mm (5.020")
100 swabs per bag 2 inner bags of 50 swabs 10 bags per case
Part No. TX761K Head Width Head Thickness Head Length Handle Width Handle Thickness Handle Length Total Swab Length Packaging
6.8mm (0.268")
2.8mm (0.110")
16.8mm (0.661")
3.2mm (0.126")
3.2mm (0.126")
145.5mm (5.728")
162.3mm (6.390")
20 swabs per bag 50 bags per case
Part No. TX716 Head Width Head Thickness Head Length Handle Width Handle Thickness Handle Length Total Swab Length Packaging
12.7mm (0.500")
4.2mm (0.165")
25.7mm (1.012")
5.2mm (0.205")
3.0mm (0.118")
101.8mm (4.008")
127.5mm (5.020")
20 swabs per bag 50 bags per case
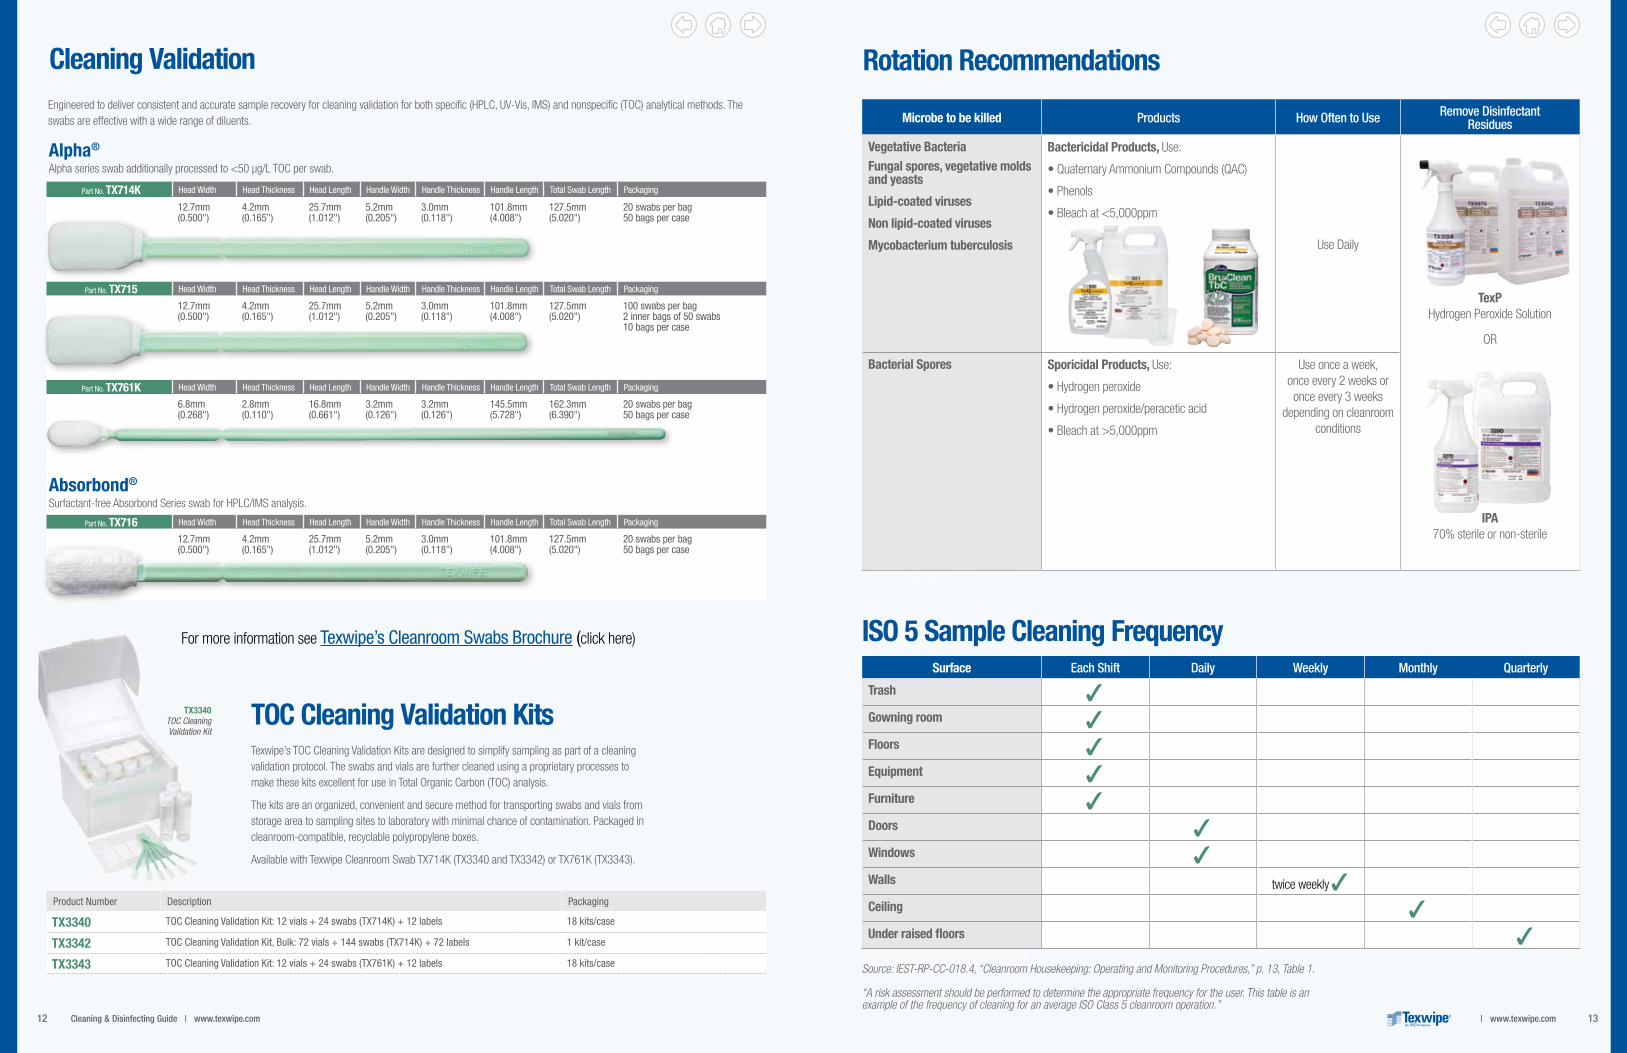
Engineered to deliver consistent and accurate sample recovery for cleaning validation for both specific (HPLC, UV-Vis, IMS) and nonspecific (TOC) analytical methods. The swabs are effective with a wide range of diluents.
Alpha®
Alpha series swab additionally processed to <50 μg/L TOC per swab.
Absorbond®
Surfactant-free Absorbond Series swab for HPLC/IMS analysis.
TX3340 TOC Cleaning Validation Kit
Product Number Description Packaging
TX3340 TOC Cleaning Validation Kit: 12 vials + 24 swabs (TX714K) + 12 labels 18 kits/case
TX3342 TOC Cleaning Validation Kit, Bulk: 72 vials + 144 swabs (TX714K) + 72 labels 1 kit/case
TX3343 TOC Cleaning Validation Kit: 12 vials + 24 swabs (TX761K) + 12 labels 18 kits/case
Texwipe’s TOC Cleaning Validation Kits are designed to simplify sampling as part of a cleaning validation protocol. The swabs and vials are further cleaned using a proprietary processes to make these kits excellent for use in Total Organic Carbon (TOC) analysis.
The kits are an organized, convenient and secure method for transporting swabs and vials from storage area to sampling sites to laboratory with minimal chance of contamination. Packaged in cleanroom-compatible, recyclable polypropylene boxes.
Available with Texwipe Cleanroom Swab TX714K (TX3340 and TX3342) or TX761K (TX3343).
Cleaning Validation
TOC Cleaning Validation Kits
Microbe to be killed Products How Often to Use Remove Disinfectant Residues
Vegetative BacteriaFungal spores, vegetative molds and yeasts
Lipid-coated viruses
Non lipid-coated viruses
Mycobacterium tuberculosis
Bactericidal Products, Use:
• Quaternary Ammonium Compounds (QAC)
• Phenols
• Bleach at <5,000ppm
Use Daily
TexP Hydrogen Peroxide Solution
OR
IPA 70% sterile or non-sterile
Bacterial Spores Sporicidal Products, Use:
• Hydrogen peroxide
• Hydrogen peroxide/peracetic acid
• Bleach at >5,000ppm
Use once a week, once every 2 weeks or once every 3 weeks
depending on cleanroom conditions
*Review product label for specific kill claims
ISO 5 Sample Cleaning FrequencySurface Each Shift Daily Weekly Monthly Quarterly
Trash 3Gowning room 3Floors 3Equipment 3Furniture 3Doors 3Windows 3Walls twice weekly 3Ceiling 3Under raised floors 3
*Review product label for specific kill claimsSource: IEST-RP-CC-018.4, “Cleanroom Housekeeping: Operating and Monitoring Procedures,” p. 13, Table 1.
“A risk assessment should be performed to determine the appropriate frequency for the user. This table is an example of the frequency of cleaning for an average ISO Class 5 cleanroom operation.”
Rotation Recommendations
For more information see Texwipe’s Cleanroom Swabs Brochure (click here)

14 TEXWIPE | www.texwipe.com
Texwipe Americas +1 336 996 7046Texwipe Europe +31 88 1307 410Texwipe Asia +63 049 530 3390Texwipe China +65 6468 9433texwipe.com