Embed Size (px)
Citation preview
(Geology Module) Page 1
User Manual
For
Geology Module Client: Department of Mines and Geology Government of Karnataka
Last Updated: 1-July-2013Document No. : - 1Document version: - 1
(Geology Module) Page 2
Revision HistoryName Date Description Version
Review HistoryReviewer Date Reviewer Comments Review Func.
(Geology Module) Page 3
About This Document This User Manual is a guide to the department user for Geology Module which comes under the Department of Mines and Geology Government of Karnataka and describes details of the various features available in Geology Module. It is assumed that the User of the present system has Hands-On experience of Basic Computer, Internet Usage and also has conceptual understanding about the working of this system.
Important It is our endeavor to deliver correct & informative documentation and every effort has been made with this intention. Despite of our all efforts, the possibility of error always remains. E-Connect undertake to correct such errors wherever possible, and requests feedback from users in this regard. However, E-Connect Solutions Pvt. Ltd. is not responsible for any consequential losses arising from the usage / wrong usage.
Copyright Notice This manual is a copyright with all rights reserved. No part of this publication may be reproduced, stored in a retrieval system or transmitted in any form or by any means without prior written permission of Copyright Owner.
(Geology Module) Page 4
Table of Contents1. Introduction & General Guidelines
1.1 User Interface…………………………………………………………………………………………...51.2 Menu Structure…………………………………………………………………………………………51.3 Master...…………………………………………………………………………………………………….5
1.3.1 Prospecting Agency……………………………………………………………………………51.3.2 Field Program……………………...…………………………………………………………….51.3.3 Reserved Area…………………………………………………………………………………...5
2. Getting Started2.1. Log on to Department login……………………………….……………………………………..6
3. Working with Geology Module3.1. Masters……………………………………………………………………………..…………………….83.1.1. Prospecting Agency ………………………………………………………………………………93.1.2. Field Program...……………………………………………………………..................................103.1.3. Reserved Area …....................................................................................................................17
(Geology Module) Page 5
1. Introduction and General Guidelines
This manual is intended to serve as a Reference Guide on implementation of geological data inDepartment of Mines and Geology Government of Karnataka. The Geology Module is an integrated software application that makes a Single window, for filling geology information. The System is an on-line computerized system which manages the online filling of filed survey report and reserved area data operations for the department user.
1.1. User Interface System allows the user to login into the application.
1.2. Menu Structure System allows the user to view the menu according to the modules
1.3. Masters System allows the user to view the different types of forms.
1.3.1 Prospecting AgencySystem allows the user to view the list of all agencies.System allows user to view the detail of a particular agency.System allows user to enter to edit the agency data.
1.3.2 Filed ProgramSystem allows user to view the detail of all filed programs.System allows user to enter to edit the field program data.
1.3.3 Reserved AreaSystem allows user to view the list of all reserved areaSystem allows user to enter to edit the reserved area related information.
(Geology Module) Page 6
2. Getting Started
2.1 Log on Department Login
To Log into system every applicant need to follow steps below
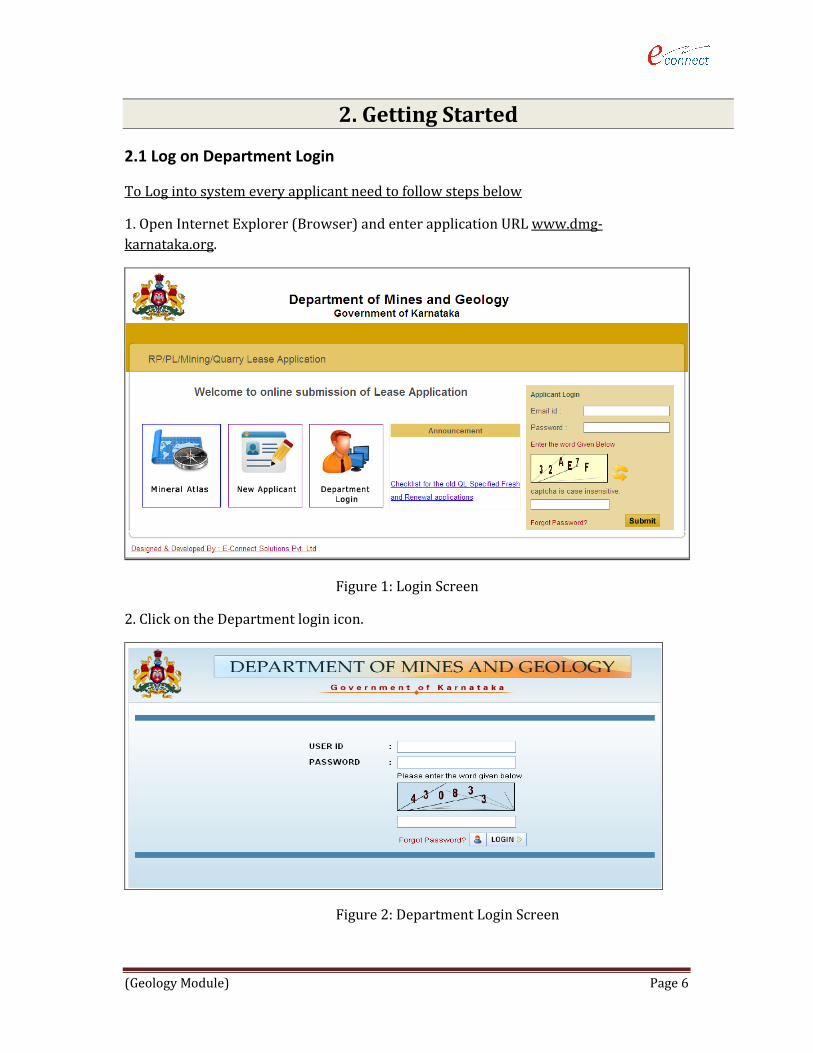
1. Open Internet Explorer (Browser) and enter application URL www.dmg-karnataka.org.
Figure 1: Login Screen
2. Click on the Department login icon.
Figure 2: Department Login Screen
(Geology Module) Page 7
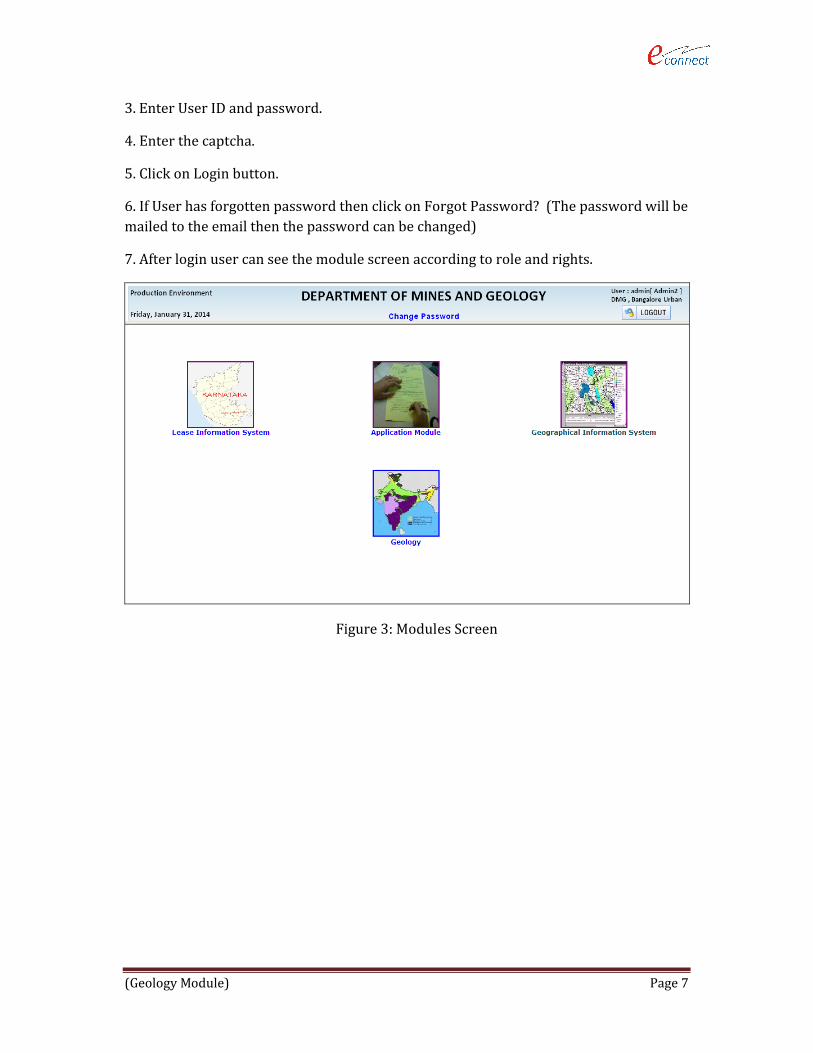
3. Enter User ID and password.
4. Enter the captcha.
5. Click on Login button.
6. If User has forgotten password then click on Forgot Password? (The password will be mailed to the email then the password can be changed)
7. After login user can see the module screen according to role and rights.
Figure 3: Modules Screen

(Geology Module) Page 8
3. Working with Geology Module
This module will enable a user to enter and update the Filed Program and Reserved Area data.
3.1. Masters
When user clicks on Geology Module then below screen will open.
Figure 4: Main Menu Screen (Geology)
1. When user can click on master tab/link below screen will display.
Figure 5: Masters (Geology)
(Geology Module) Page 9
2. Once a module is selected, the module specific menu will be shown. The left side panel lists the menu in two levels. You can expand or compress the options by clicking on the plus / minus sign against the first level.
3.1.1. Prospecting Agency
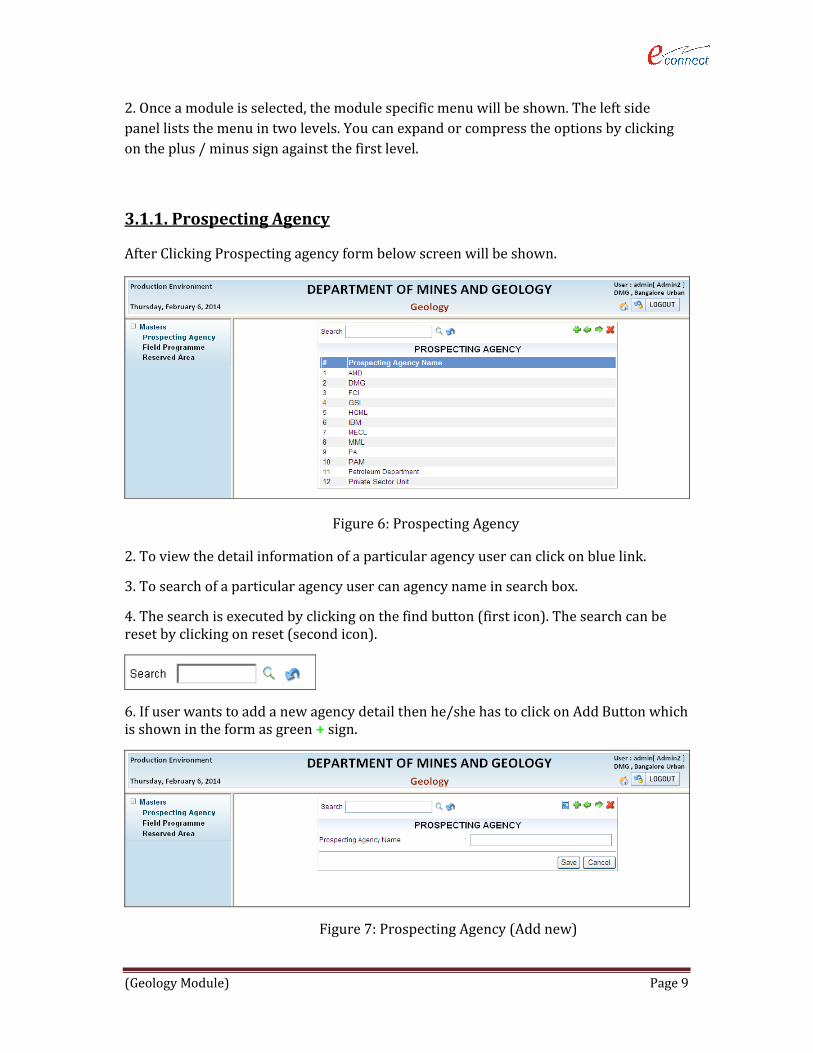
After Clicking Prospecting agency form below screen will be shown.
Figure 6: Prospecting Agency
2. To view the detail information of a particular agency user can click on blue link.
3. To search of a particular agency user can agency name in search box.
4. The search is executed by clicking on the find button (first icon). The search can be reset by clicking on reset (second icon).
6. If user wants to add a new agency detail then he/she has to click on Add Button which is shown in the form as green + sign.
Figure 7: Prospecting Agency (Add new)
(Geology Module) Page 10
7. In the list of leases initial 100 records will be shown and user can use next, last, pervious and first button in navigation bar for other records.
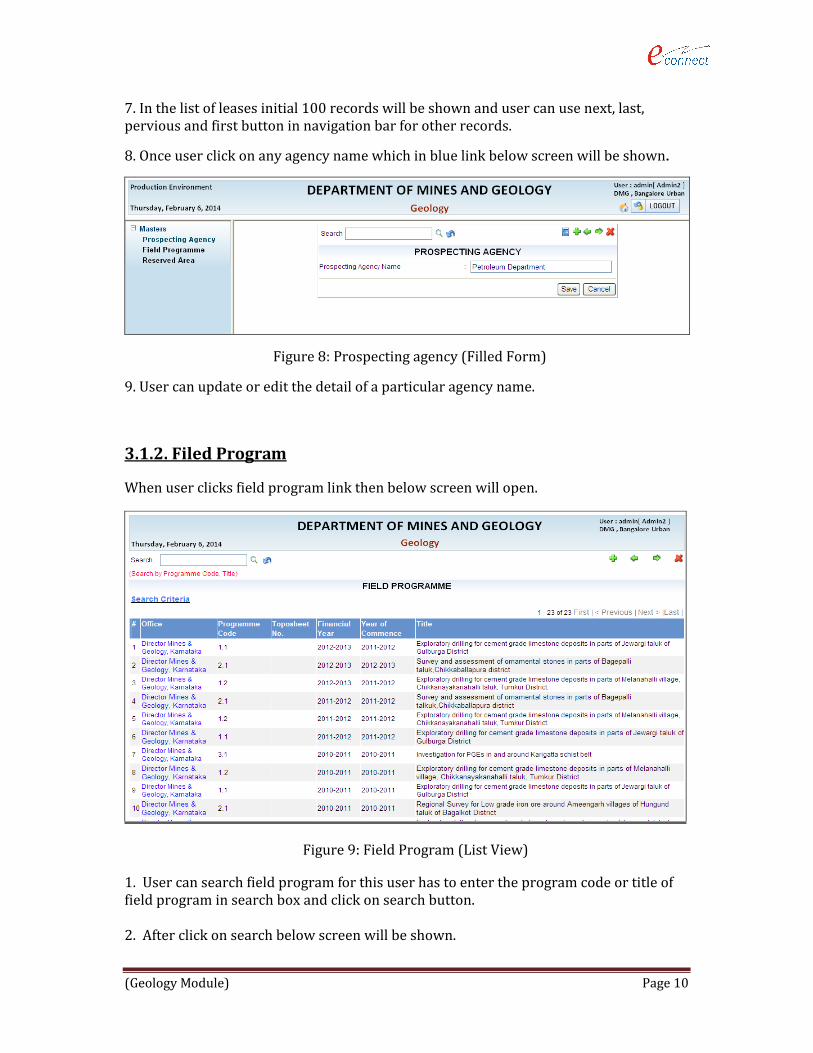
8. Once user click on any agency name which in blue link below screen will be shown.
Figure 8: Prospecting agency (Filled Form)
9. User can update or edit the detail of a particular agency name.
3.1.2. Filed Program
When user clicks field program link then below screen will open.
Figure 9: Field Program (List View)
1. User can search field program for this user has to enter the program code or title of field program in search box and click on search button.
2. After click on search below screen will be shown.
(Geology Module) Page 11
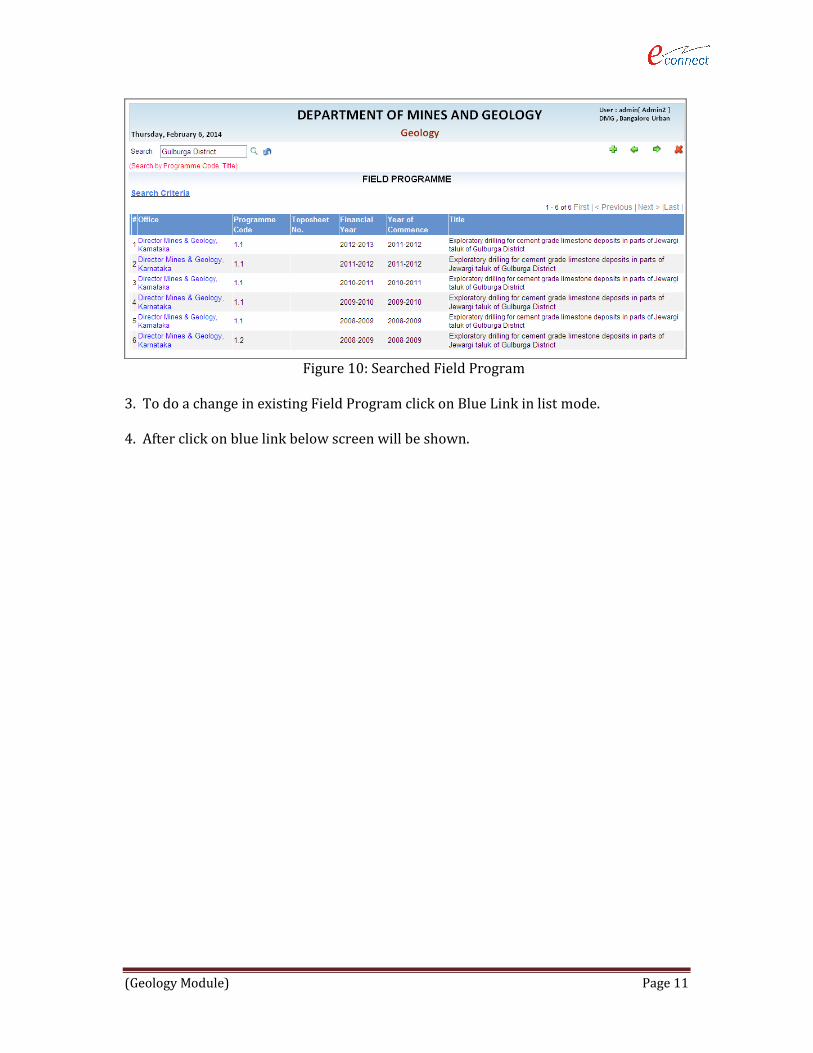
Figure 10: Searched Field Program
3. To do a change in existing Field Program click on Blue Link in list mode.
4. After click on blue link below screen will be shown.
(Geology Module) Page 12
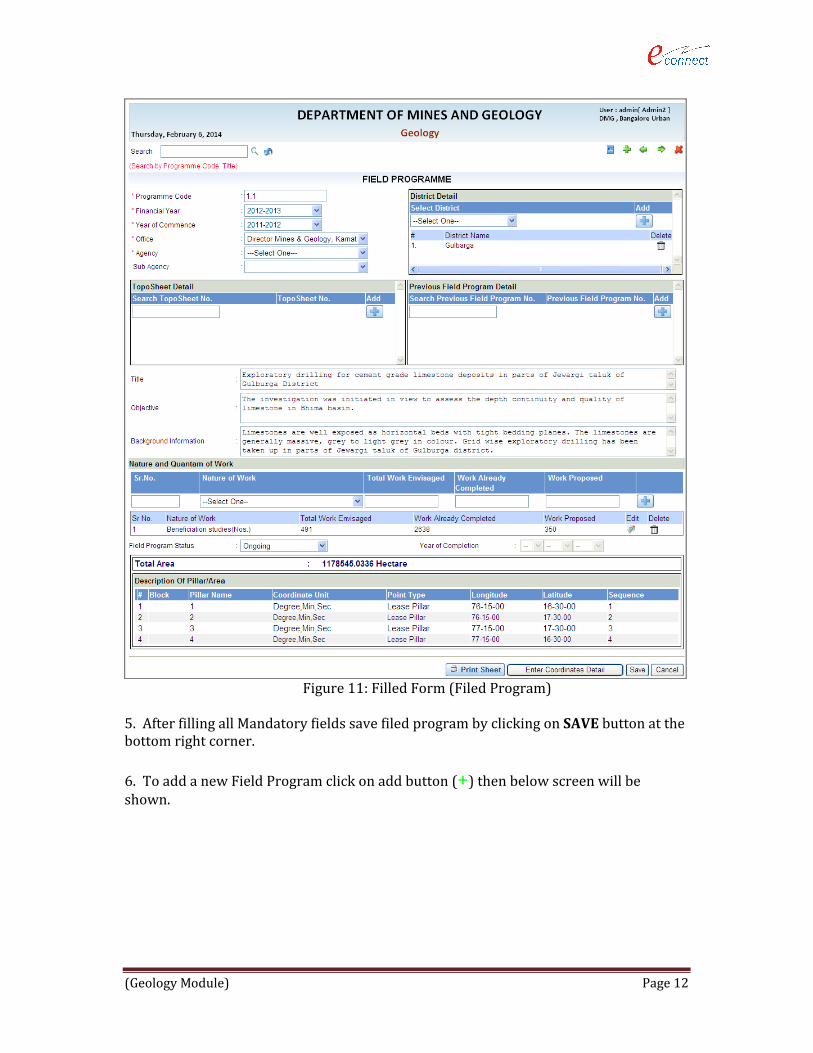
Figure 11: Filled Form (Filed Program)
5. After filling all Mandatory fields save filed program by clicking on SAVE button at the bottom right corner.
6. To add a new Field Program click on add button (+) then below screen will be shown.
(Geology Module) Page 13
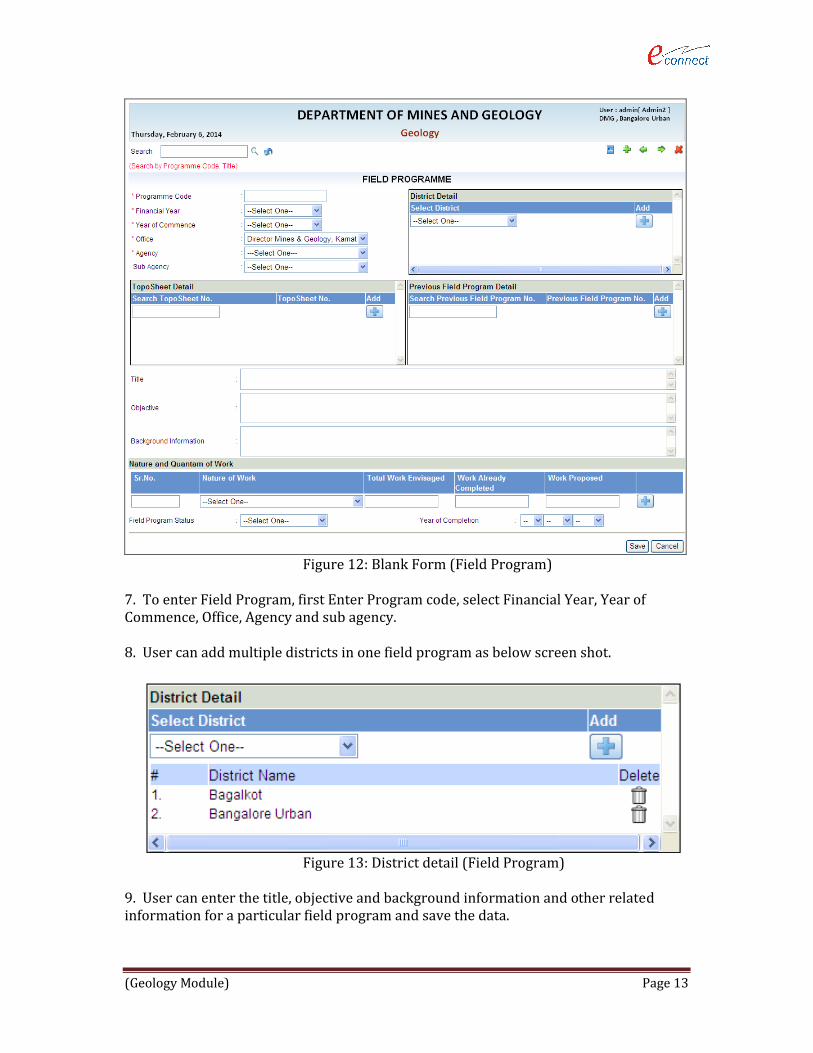
Figure 12: Blank Form (Field Program)
7. To enter Field Program, first Enter Program code, select Financial Year, Year of Commence, Office, Agency and sub agency.
8. User can add multiple districts in one field program as below screen shot.
Figure 13: District detail (Field Program)
9. User can enter the title, objective and background information and other related information for a particular field program and save the data.
(Geology Module) Page 14
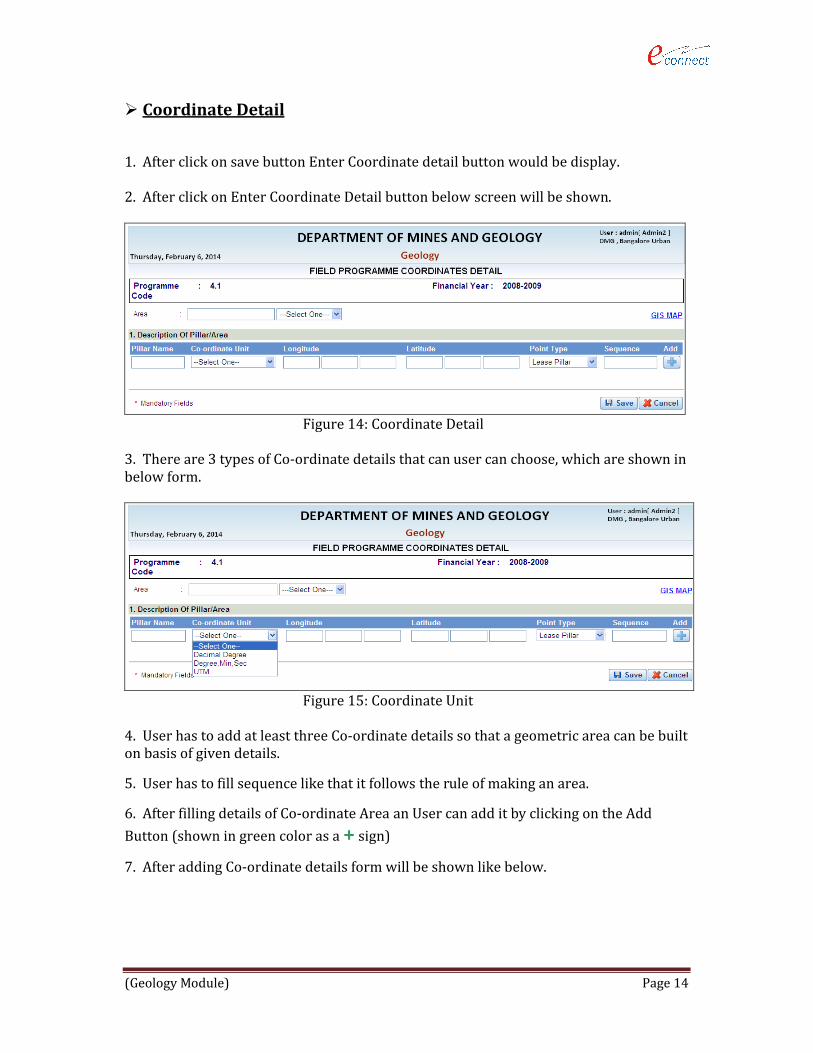
Coordinate Detail
1. After click on save button Enter Coordinate detail button would be display.
2. After click on Enter Coordinate Detail button below screen will be shown.
Figure 14: Coordinate Detail
3. There are 3 types of Co-ordinate details that can user can choose, which are shown in below form.
Figure 15: Coordinate Unit
4. User has to add at least three Co-ordinate details so that a geometric area can be built on basis of given details.
5. User has to fill sequence like that it follows the rule of making an area.
6. After filling details of Co-ordinate Area an User can add it by clicking on the Add
Button (shown in green color as a + sign)
7. After adding Co-ordinate details form will be shown like below.
(Geology Module) Page 15
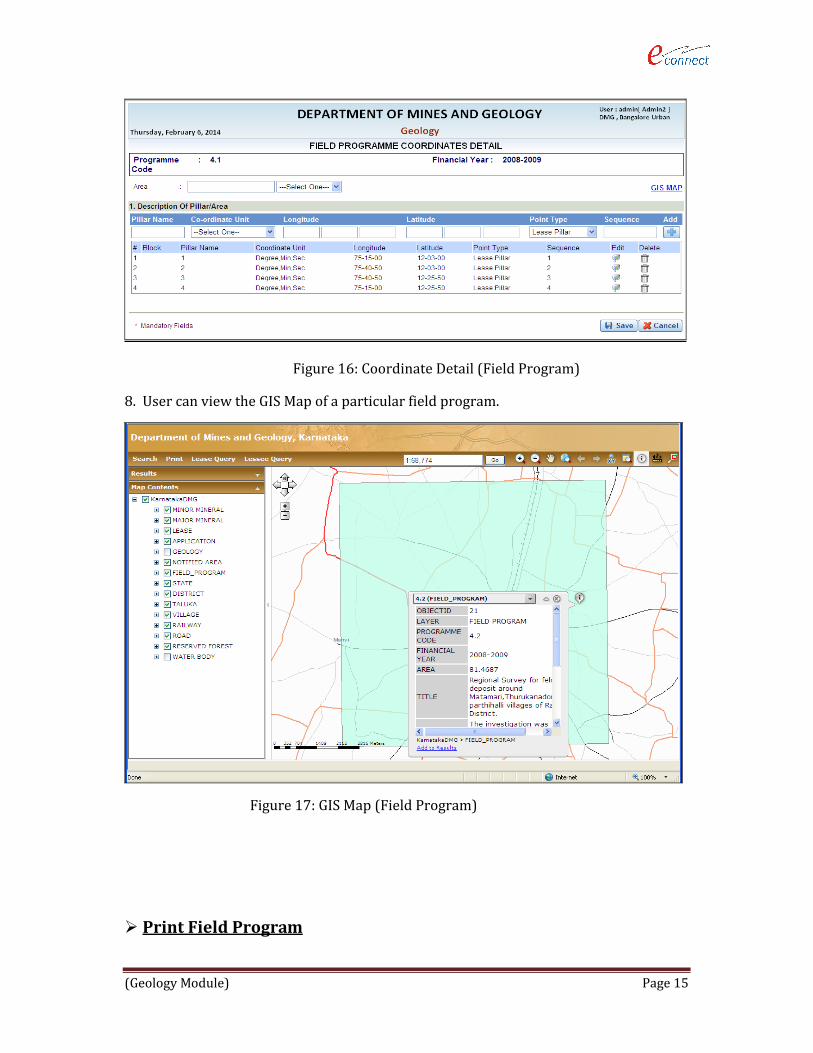
Figure 16: Coordinate Detail (Field Program)
8. User can view the GIS Map of a particular field program.
Figure 17: GIS Map (Field Program)
Print Field Program
(Geology Module) Page 16
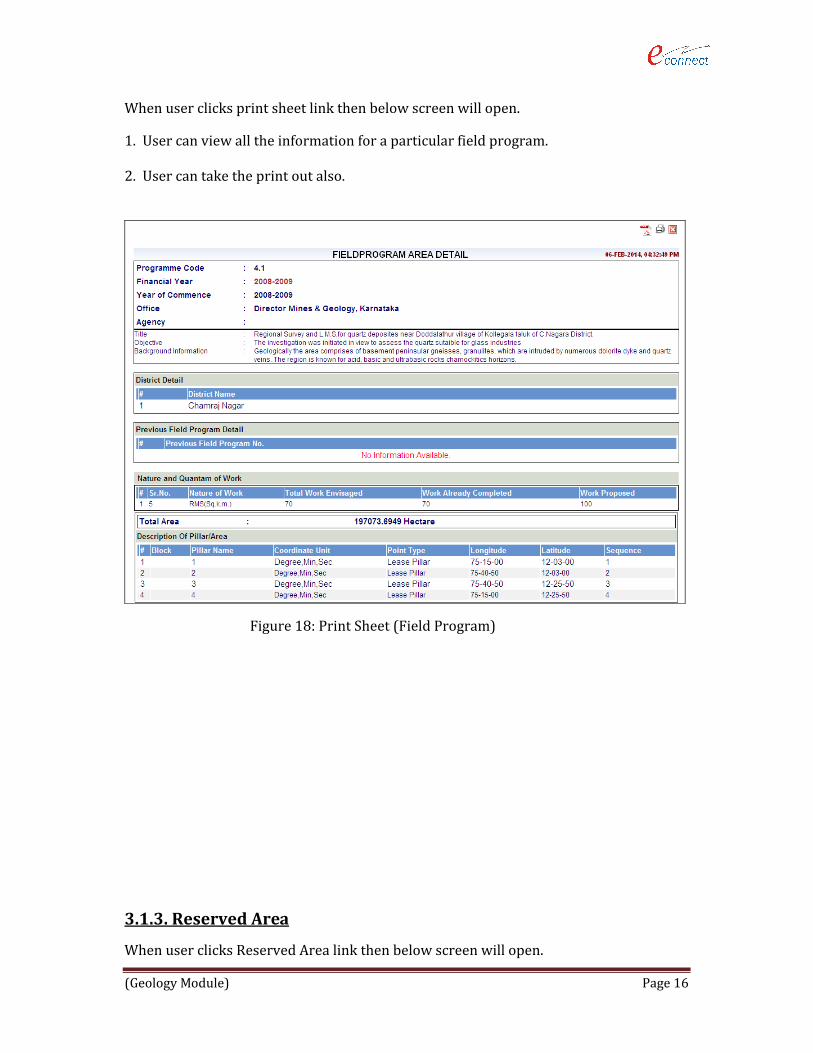
When user clicks print sheet link then below screen will open.
1. User can view all the information for a particular field program.
2. User can take the print out also.
Figure 18: Print Sheet (Field Program)
3.1.3. Reserved Area
When user clicks Reserved Area link then below screen will open.
(Geology Module) Page 17
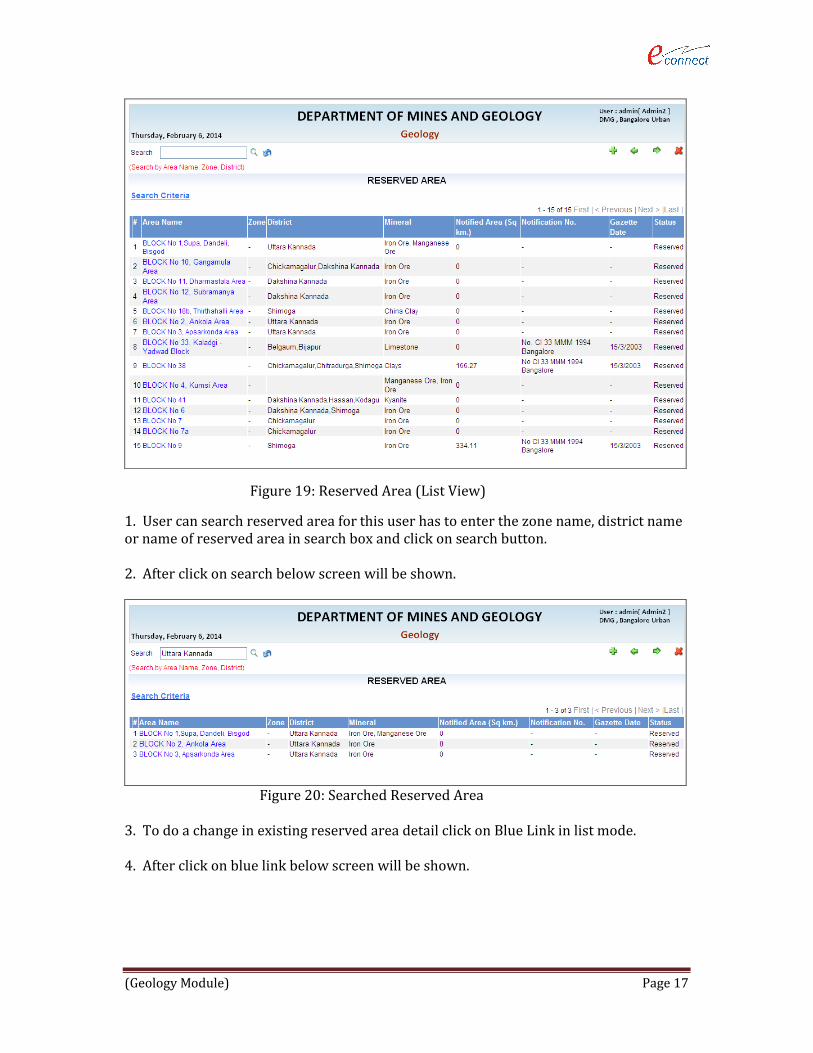
Figure 19: Reserved Area (List View)
1. User can search reserved area for this user has to enter the zone name, district name or name of reserved area in search box and click on search button.
2. After click on search below screen will be shown.
Figure 20: Searched Reserved Area
3. To do a change in existing reserved area detail click on Blue Link in list mode.
4. After click on blue link below screen will be shown.
(Geology Module) Page 18
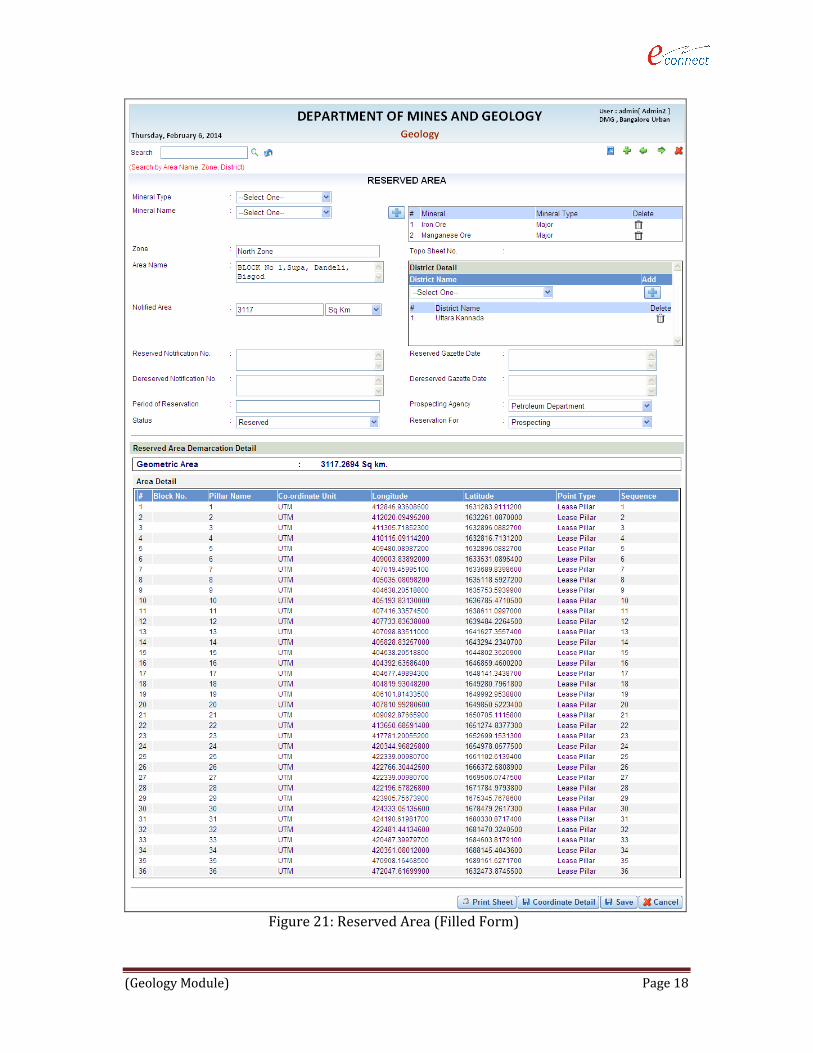
Figure 21: Reserved Area (Filled Form)
(Geology Module) Page 19
5. After filling all Mandatory fields save reserved area detail by clicking on SAVE button at the bottom right corner.
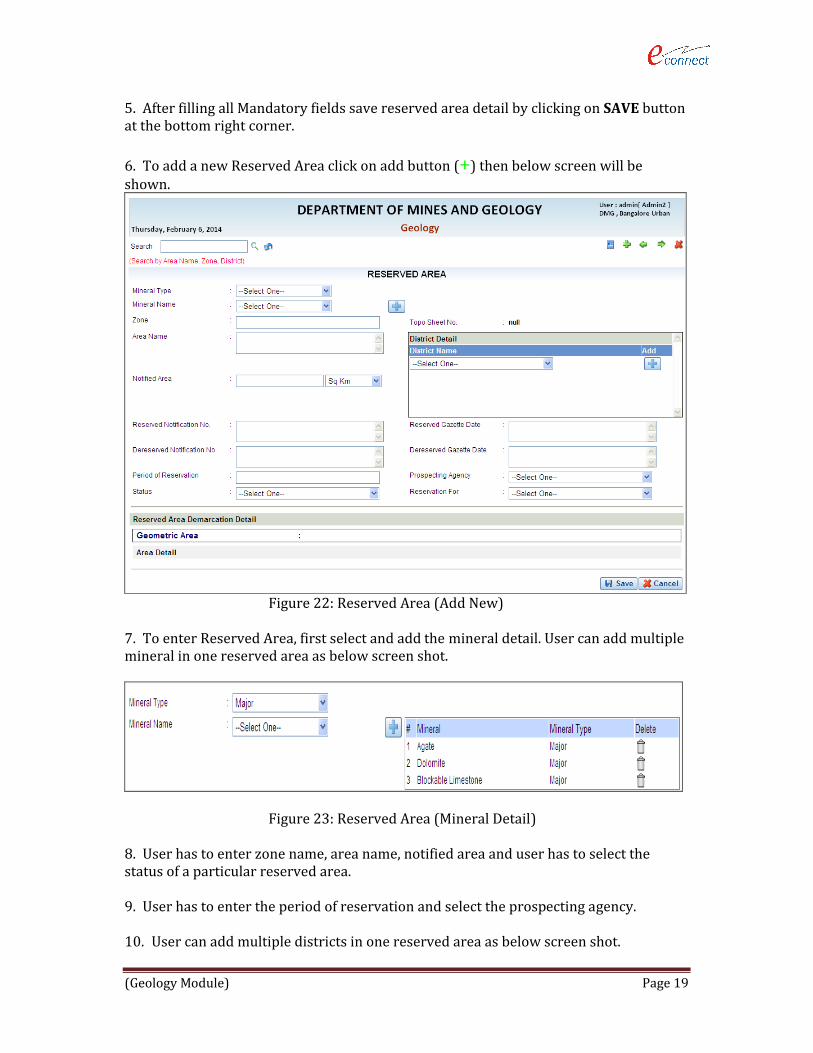
6. To add a new Reserved Area click on add button (+) then below screen will be shown.
Figure 22: Reserved Area (Add New)
7. To enter Reserved Area, first select and add the mineral detail. User can add multiple mineral in one reserved area as below screen shot.
Figure 23: Reserved Area (Mineral Detail)
8. User has to enter zone name, area name, notified area and user has to select the status of a particular reserved area.
9. User has to enter the period of reservation and select the prospecting agency.
10. User can add multiple districts in one reserved area as below screen shot.

(Geology Module) Page 20
Figure 24: Reserved Area (District Detail)
Coordinate Detail
1. After click on save button Enter Coordinate detail button would be display.
2. After click on Coordinate Detail button below screen will be shown.
Figure 25: Coordinate Detail (Reserved Area)
3. . User has to select the * Multiple Block option yes/no. if user select the yes then he/she has to enter the block no for a particular. After selecting the yes option below screen will be shown.

(Geology Module) Page 21
Figure 26: Coordinate Detail (Block Wise)
4. There are 3 types of Co-ordinate details that can user can choose, which are shown in below form.
Figure 27: Coordinate Unit
5. User has to add at least three Co-ordinate details so that a geometric area can be built on basis of given details.
6. User has to fill sequence like that it follows the rule of making an area.
7. After filling details of Co-ordinate Area User can add it by clicking on the Add Button
(shown in green color as a + sign).
8. After adding Co-ordinate details form will be shown like below.
(Geology Module) Page 22
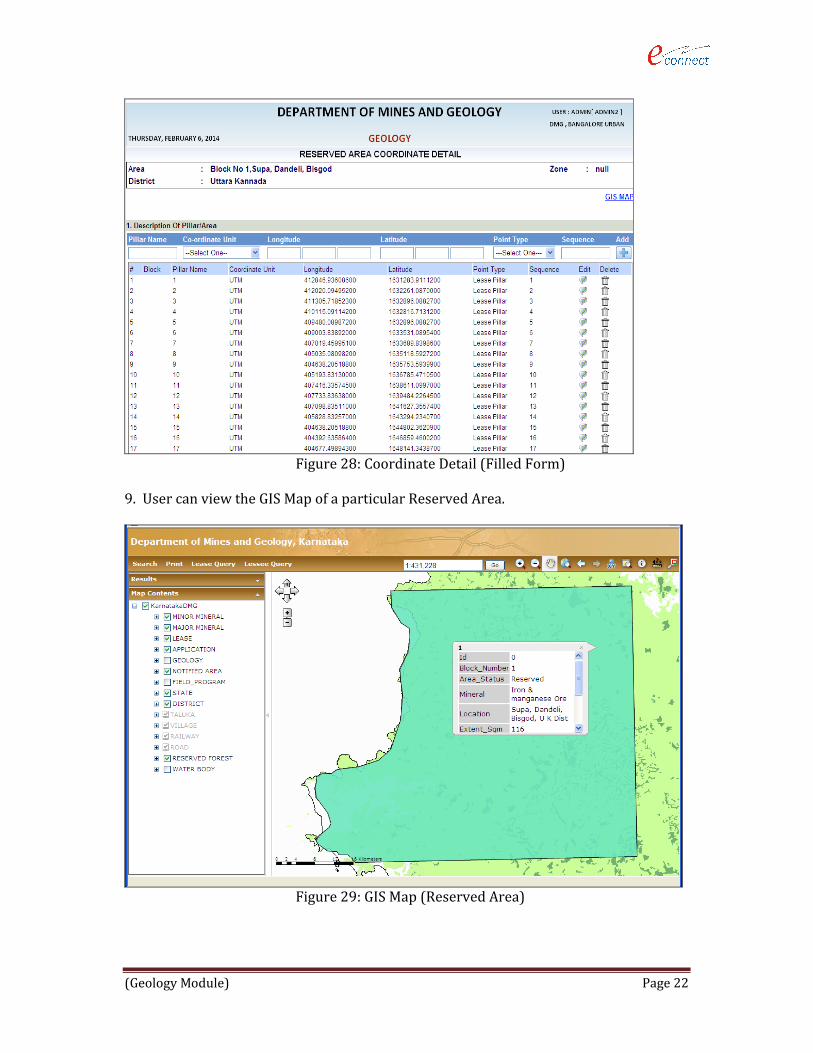
Figure 28: Coordinate Detail (Filled Form)
9. User can view the GIS Map of a particular Reserved Area.
Figure 29: GIS Map (Reserved Area)
(Geology Module) Page 23
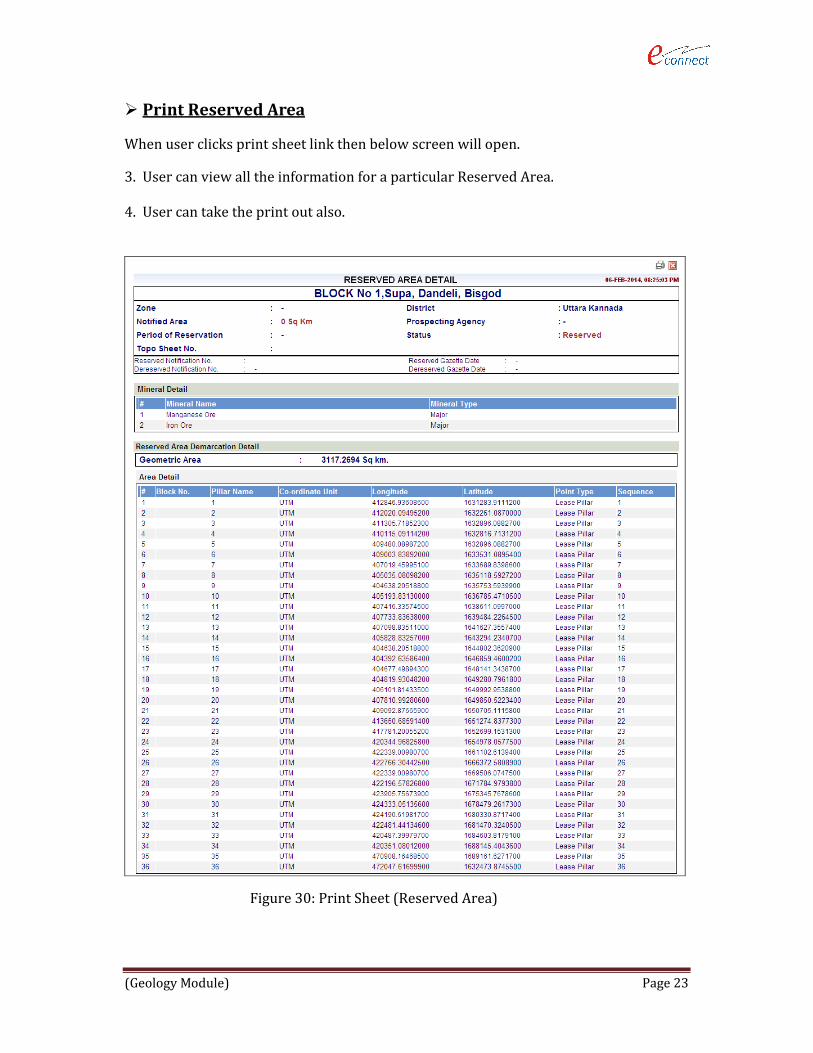
Print Reserved Area
When user clicks print sheet link then below screen will open.
3. User can view all the information for a particular Reserved Area.
4. User can take the print out also.
Figure 30: Print Sheet (Reserved Area)


![DIVISION OF MINES AND GEOLOGY JAMES F. …15] Map NOA California by USGS.pdfGeologic Map of California, California Department of Conservation, Division of Mines and Geology, Geologic](https://img.pdfslide.net/doc/110x75/5f0641ca7e708231d4171575/division-of-mines-and-geology-james-f-15-map-noa-california-by-usgspdf-geologic.jpg)


![]MINES GEOLOGY BULLETIN - dggs.alaska.gov](https://img.pdfslide.net/doc/110x75/6262825a07202b4bed242f61/mines-geology-bulletin-dggs-.jpg)