Embed Size (px)
Citation preview

March 2008 This distribution contains change pages for patch MD*1.0*14 of the Clinical Procedures 1.0 User Manual. The following documentation change pages should be inserted before these replacement pages: File Name: Patch:MD_1_P2_UM.PDF MD*1.0*2 MD_1_P10_UM.PDF MD*1.0*10 MD_1_P4_UM.PDF MD*1.0*4 Patch MD*1.0*14 pages: Replace Pages: With Pages: Title page Title page Revision History Revision History Table of Contents Table of Contents Chapter 3 Chapter 3 Chapter 7 (Index) Chapter 7 (Index)


CLINICAL PROCEDURES
USER MANUAL
Version 1.0
April 2004
Revised March 2008
Department of Veterans Affairs Health Systems Design and Development
Provider Systems


Revision History Description Date Technical Writer Originally released. April 2004 1Patch MD*1.0*2 released. July 2004 2Patch MD*1.0*10 released. March 2005 3Patch MD*1.0*4 released. September 2006 Alfred Bustamante 4Patch MD*1.0*14 released. Added new sections for Auto Study Check-In to Ch. 3.
March 2008 Shirley Ackerman, Alfred Bustamante
1 Patch MD*1.0*2 July 2004 Patch 2 release added. 2 Patch MD*1.0*10 March 2005 Patch 10 release added. 3 Patch MD*1.0*4 September 2006 Patch 4 release added. 4 Patch MD*1.0*14 March 2008 Patch release added.


Table of Contents
1. Introduction.......................................................................................................................... 1-1 Intended Audience ......................................................................................................... 1-6 Related Manuals............................................................................................................. 1-6 Product Benefits ............................................................................................................. 1-6
2. Working with CP User ........................................................................................................ 2-1 Opening CP User............................................................................................................ 2-1 Defining CP User Icons ................................................................................................. 2-1 Selecting a Patient .......................................................................................................... 2-2 Defining the Parts of the Main CP User Window....................................................... 2-3
3. Clinical Procedures Process, Part 1 ................................................................................... 3-1 Ordering a Consult Procedure in CPRS...................................................................... 3-1 Auto Study Check-In ..................................................................................................... 3-9 Auto Check-In Without Appointment ....................................................................... 3-10
Setting Up the Procedure ......................................................................................... 3-10 Procedure Request in CPRS..................................................................................... 3-15 Confirm the Auto Study Check-In........................................................................... 3-17
Auto Study Check-In With Appointment.................................................................. 3-17 Check-In a New Study ................................................................................................. 3-26 Updating Study Status to Correct Errors.................................................................. 3-32
4. Clinical Procedures Process, Part 2 ................................................................................... 4-1 Completing the Procedure ............................................................................................ 4-1
Entering the interpretation into the TIU Note............................................................ 4-1 Entering Encounter Information ................................................................................ 4-7 Signing Off............................................................................................................... 4-12
Viewing Clinical Procedures Results ......................................................................... 4-14 Linking Consent Forms and Images to CP Documents ........................................... 4-19
5. Viewing the Reports............................................................................................................. 5-1 Abnormal ................................................................................................................... 5-3 Brief Report ............................................................................................................... 5-7 Full Captioned............................................................................................................ 5-8 Full Report ............................................................................................................... 5-13 Procedures (local only) ............................................................................................ 5-18 Procedures................................................................................................................ 5-21
Configuring the Medicine Report to Display in CPRS............................................. 5-23
6. Glossary ................................................................................................................................ 6-1
7. Index...................................................................................................................................... 7-1
April 2004 Clinical Procedures V. 1.0 i User Manual

Table of Contents
ii Clinical Procedures V. 1.0 April 2004 User Manual

3. Clinical Procedures Process, Part 1 This chapter describes the process to follow for ordering clinical procedures. (Although you can order several types of procedures in CPRS, you must follow the steps in this chapter to order clinical procedures.) This chapter uses the example of ordering a colonoscopy test to describe the Clinical Procedures ordering process. Be sure to follow the required steps in sequential order. You can do the optional steps as needed.
1. Order a consult procedure in CPRS. Required 2. Check in a new study. Required 3. Update study status to correct errors. Optional
Ordering a Consult Procedure in CPRS This section describes how to order a CP procedure, such as a study, a test, or an invasive intervention, such as a surgical or medical procedure, through CPRS. Keep in mind that you can only order a Clinical Procedure as a procedure order and not as a consult request. In addition to becoming familiar with the CPRS ordering process, you can learn about the interpreter, which is the new user role within ASU that supports CP. The interpreter is a new User Role created by ASU that defines a user who can interpret (sign-off or verify) the procedure’s final report. Clinical application coordinators define interpreters in the Consults package. If you are an interpreter for a specific procedure, you can receive an alert when the procedure results are ready for review. Additional comments can be added if necessary along with the Procedure Summary code and the electronic signature. The following example describes how to order a colonoscopy procedure through the CPRS Consults tab.
April 2004 Clinical Procedures V. 1.0 3-1 User Manual

Clinical Procedures Process, Part 1
1. Logon to CPRS. The Patient Selection window is displayed, Figure 3-1.
Figure 3-1
2. Select a patient. Notice that CPPATIENT, ONE is the selected patient. The Cover Sheet
window is displayed, Figure 3-2.
3-2 Clinical Procedures V. 1.0 April 2004 User Manual

Clinical Procedures Process, Part 1
Figure 3-2
3. Click the Consults tab at the bottom of the window, Figure 3-3.
April 2004 Clinical Procedures V. 1.0 3-3 User Manual

Clinical Procedures Process, Part 1
Figure 3-3
4. If you want to review an existing Consult or procedure, select one in the list from the
upper left panel. The lower left panel contains any supporting documents for the selected consult or procedure, and the larger right panel contains the order details.
5. Click New Procedure on the left side of the Consults tab. You can also order a clinical
procedure from the Orders tab. Since CPPATIENT, ONE is an inpatient, the Order a Procedure window, Figure 3-5, is displayed. Go to step 7 to order the procedure.
(If you were to select an outpatient, Figure 3-4displays so you can enter a location. Go to step 6.)
3-4 Clinical Procedures V. 1.0 April 2004 User Manual

Clinical Procedures Process, Part 1
Figure 3-4
6. For Outpatients, select either the Clinic Appointments or New Visit tab.
- Select Clinic Appointments if the patient already has an appointment through Scheduling. - Select New Visit if an appointment has not been made through Scheduling, and then select a location from the list of Visit Locations. The Encounter Location is filled in automatically. - If the patient had existing admissions, these are displayed under the Hospital Admissions tab. - Go to step 7 to order the procedure.
April 2004 Clinical Procedures V. 1.0 3-5 User Manual
Clinical Procedures Process, Part 1
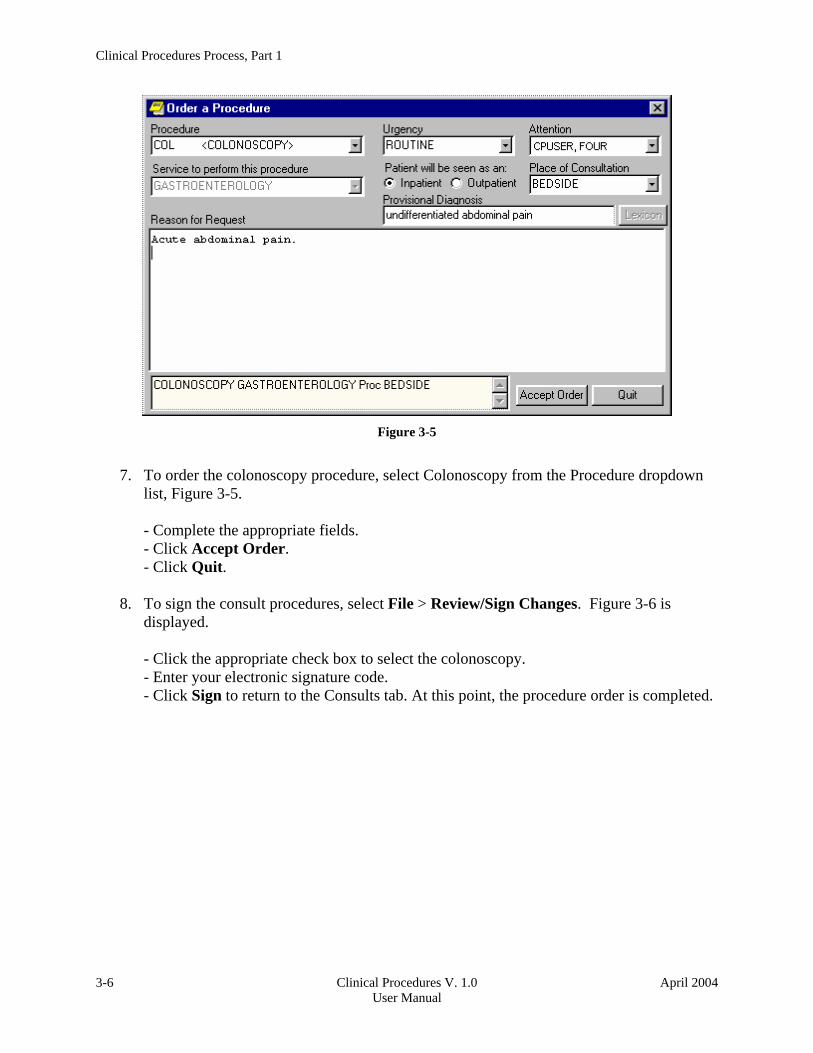
Figure 3-5
7. To order the colonoscopy procedure, select Colonoscopy from the Procedure dropdown
list, Figure 3-5. - Complete the appropriate fields. - Click Accept Order. - Click Quit.
8. To sign the consult procedures, select File > Review/Sign Changes. Figure 3-6 is
displayed. - Click the appropriate check box to select the colonoscopy. - Enter your electronic signature code. - Click Sign to return to the Consults tab. At this point, the procedure order is completed.
3-6 Clinical Procedures V. 1.0 April 2004 User Manual

Clinical Procedures Process, Part 1
Figure 3-6
9. Click the Orders tab to review the ordered procedures. These procedure orders appear
on the Active Orders sheet (Figure 3-7).
April 2004 Clinical Procedures V. 1.0 3-7 User Manual

Clinical Procedures Process, Part 1
Figure 3-7
3-8 Clinical Procedures V. 1.0 April 2004 User Manual

Clinical Procedures Process, Part 1
1Auto Study Check-In The auto study check in is a new enhancement introduced with patch MD*1.0*14. The site can specify a procedure to have auto study check in using the MD AUTO CHECK-IN SETUP option. Refer to the Clinical procedures Implementation Guide to set up a procedure for the auto study check-in. This new functionality can be used if the site schedules an appointment for the patient or not. If the site does not use appointments, the study will be checked in as soon as the order is requested in CPRS. The status of the study will be “Pending Instrument Data.” If the site uses appointments, the study will have a status of “New” until the day of the appointment and the status will change to “Pending Instrument Data.” For procedures that require multiple encounters from the patient such as hemodialysis, respiratory therapy, and sleep studies, each encounter will generate a study check-in if there is an appointment scheduled for each encounter. If no appointment is used, only the initial check-in will be auto checked-in and the additional encounters will still require manual check-in. Once a procedure is set up to use the auto study check-in functionality in the MD CHECK-IN SETUP option, the software will check-in any existing order requests with the status of “PENDING,” “ACTIVE,” and “SCHEDULED” in the Consult Request Tracking package. If you have set up a procedure for auto check-in, you can skip the section on Check in a new study. The study will be checked-in for you when the order is requested in CPRS. Note 1: If the patient is a no show, you must remove the study that was checked-in. You can delete the check-in in CP User or you can cancel the procedure in CPRS. If you cancel or discontinue the order in CPRS, the status of the CP study will be changed to “Cancelled”. If the appointment is rescheduled, the study will still need to be removed. Note 2: Please make sure the studies are completed on time. If a previous study is still in “Pending Instrument Data” or “Ready to Complete” status, the subsequent study check-in for the subsequent encounter will not be effective until the previous study is complete. Note 3: In the case of an emergency procedure, the procedure will be performed prior to the order request. The order request will be entered after the procedure and the study will be auto checked in. You will need to attach the result manually as a uni-directional interface and submit the result. Since the study is auto checked-in for the bi-directional device, you will need to clean up and remove the patient name from the selection list on the device. In order to set up a procedure for auto-check-in, make sure you already have the procedure set up in Clinical Procedures and Consults/Request Tracking. If your site is just implementing Clinical Procedures for the first time, set up the procedure and instrument for the regular Clinical Procedure interface before implementing the procedure for auto study check-in.
1 Patch MD*1.0*14 March 2008 Added new section for Auto Study Check in.
April 2004 Clinical Procedures V. 1.0 3-9 User Manual

Clinical Procedures Process, Part 1
Auto Check-In Without Appointment Once a procedure is set up to use the auto study check-in functionality, the software will check-in any existing order requests with the status of “PENDING,” “ACTIVE,” and “SCHEDULED” in the Consult Request Tracking package. In this section, the following workflows are described:
• Setting Up the Procedure for auto study check-in. • Procedure Request in CPRS. • Confirming the auto study check-in
Setting Up the Procedure Use the option MD AUTO CHECK-IN SETUP to indicate which procedure will use the auto check-in functionality. Note: If your site uses appointments, schedule them before you enter the procedures for auto check-in. If you do not, the patients associated with those appointments will need to be manually checked in. This option collects the following information:
1) Use Appointment with procedure? (Yes/No) (Required) – The default is “NO” if the site does not schedule procedures before the order is entered. Enter “YES” if the procedure appointment is scheduled before the order is entered and the ordering provider selects the appointment for the procedure during ordering in CPRS. Take the default of “NO” if the provider sometimes selects the appointment scheduled and sometime doesn’t. This prompt only applies to outpatients.
2) Procedure (Required) – Enter the CP Definition that will be using the auto study check-in functionality.
3) Schedule Appointment? (Required) – Enter 0 for None, 1 for Outpatient, 2 for Inpatient, or 3 for Both. This indicates that the site schedules appointments for inpatient, outpatients, both, or none.
4) Clinic (Optional) – Enter the hospital location(s) that will be used for the scheduled procedure. You can enter more than one location for a procedure. After you have entered one hospital location, you will be asked if you want to enter another.
NOTE: If no clinic is entered in the setup, CP will use the hospital location defined in the HOSPITAL LOCATION field of the CP Definition file (#702.01) as the location of the visit for the CP study check-in.
In the following example, an EKG Routine (12 Leads) procedure is set up for auto study check-in.
3-10 Clinical Procedures V. 1.0 April 2004 User Manual

Clinical Procedures Process, Part 1
Select OPTION NAME: MD AUTO CHECK-IN SETUP Auto Study Check-In Setup Auto Study Check-In Setup Use Appointment with procedure? NO// ? Default should be 'N' as most sites do not schedule procedures before the order is entered. Select 'Y' if the procedure appointment is scheduled before the order is entered and the ordering provider selects the appointment for the procedure. Enter either 'Y' or 'N'. Use Appointment with procedure? NO// Procedure: ? Enter a CP Definition for the procedure to have auto CP study check-in. Answer with CP DEFINITION NAME Do you want the entire CP DEFINITION List? y (Yes) Choose from: COL BIOPSY COLONOSCOPY EKG, ROUTINE (12 LEADS) HEMODIALYSIS, REPEATED EVAL. PULMONARY PROCEDURES Procedure: EKG, ROUTINE (12 LEADS) Schedule Appointment?: ? REQUIRED field for the procedure to have auto CP study check-in. Enter a "^" will exit completely. Enter 0 if you do not schedule appointments. 1 if you only schedule appointments for outpatients. 2 if you only schedule appointments for inpatients. 3 if you schedule appointments for both 1 and 2. Select one of the following: 0 None 1 Outpatient 2 Inpatient 3 Both Schedule Appointment?: 0 None Procedure:
In the example shown above, the EKG Routine (12 Leads) is set up for auto check-in without an appointment involved. The default of “NO” was entered for the question “Use Appointment with procedure?” and 0 was entered for the question “Schedule Appointment?” Use CPManager.exe and verify for the EKG procedure that you have 1) the hospital location field filled in, 2) the Active checkbox is checked, and 3) One bi-directional instrument checkbox is checked.
April 2004 Clinical Procedures V. 1.0 3-11 User Manual

Clinical Procedures Process, Part 1
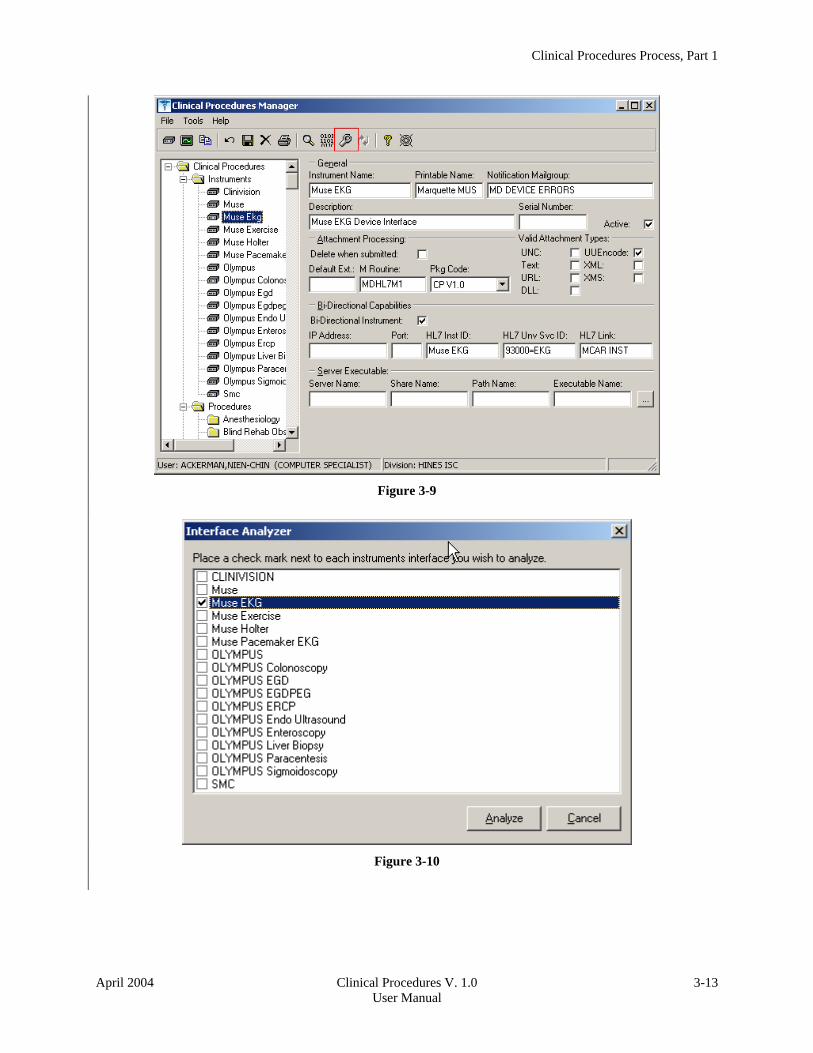
Figure 3-8
Use CP Manager.exe and verify that the Muse EKG instrument is set up. Use the Interface Analyzer button, check the instrument Muse EKG and click Analyze. The Ready Status should be “Pass.” Note: Make sure the instrument is Active, has a Notification Mailgroup, and HL7 link.
3-12 Clinical Procedures V. 1.0 April 2004 User Manual
Clinical Procedures Process, Part 1
Figure 3-9
Figure 3-10
April 2004 Clinical Procedures V. 1.0 3-13 User Manual

Clinical Procedures Process, Part 1
Figure 3-11
Use the GMRC PROCEDURE SETUP to verify that EKG, ROUTINE (12 LEADS) is linked to a GMRC Procedure in Consult. Select OPTION NAME: GMRC PROCEDURE SETUP Setup procedures Setup procedures Select Procedure:CP EKG 1 CP EKG 12 LEAD STAT 2 CP EKG INPATIENT,48 HRS, CONS CHOICE 3 CP EKG INPATIENT,STAT CHOOSE 1-5: 1 EKG 12 LEAD STAT NAME: CP EKG 12 LEAD STAT// INACTIVE: NO// Select SYNONYM: EKG// INTERNAL NAME: Select RELATED SERVICES: CARDIOLOGY CLINIC// TYPE OF PROCEDURE: CLINICAL PROCEDURE: EKG, ROUTINE (12 LEADS) PREREQUISITE: 1> PROVISIONAL DX PROMPT: PROVISIONAL DX INPUT: DEFAULT REASON FOR REQUEST: 1> RESTRICT DEFAULT REASON EDIT: Orderable Item Updated
3-14 Clinical Procedures V. 1.0 April 2004 User Manual

Clinical Procedures Process, Part 1
Procedure Request in CPRS The procedure request is ordered and signed as you would for any other procedure in CPRS.
Figure 3-12
April 2004 Clinical Procedures V. 1.0 3-15 User Manual

Clinical Procedures Process, Part 1
Figure 3-13
3-16 Clinical Procedures V. 1.0 April 2004 User Manual

Clinical Procedures Process, Part 1
Confirm the Auto Study Check-In Once the procedure is requested and signed in CPRS, the study for the EKG procedure will be auto checked-in in CPUSER with the status of “Pending Instrument Data.”
Figure 3-14
Auto Study Check-In With Appointment If your site scheduled an appointment for the procedure, the study will be checked in and the study will not take into effect until the day of the appointment. In this section, we will follow an example workflow of the auto study check-in for a procedure with appointment involved. In the next example, the Pulmonary Procedure is used to show the setup of the procedure for auto check-in and both inpatient and outpatient have an appointment scheduled. A new visit is not an appointment scheduled. If your site only creates a new visit for the patient upon order request, it would not be considered an appointment scheduled. Select OPTION NAME: MD AUTO CHECK-IN SETUP Auto Study Check-In Setup Auto Study Check-In Setup Use Appointment with procedure? NO// ?
April 2004 Clinical Procedures V. 1.0 3-17 User Manual

Clinical Procedures Process, Part 1
Default should be 'N' as most sites do not schedule procedures before the order is entered. Select 'Y' if the procedure appointment is scheduled before the order is entered and the ordering provider selects the appointment for the procedure. Enter either 'Y' or 'N'. Use Appointment with procedure? NO// Procedure Schedule Appt. Clinic --------- -------------- ------ EKG, ROUTINE (12 LEADS) None None Procedure: ? Enter a CP Definition for the procedure to have auto CP study check-in. Answer with CP DEFINITION NAME Do you want the entire CP DEFINITION List? y (Yes) Choose from: COL BIOPSY COLONOSCOPY EKG, ROUTINE (12 LEADS) HEMODIALYSIS, REPEATED EVAL. PULMONARY PROCEDURES Procedure: PULMONARY PROCEDURES Schedule Appointment?: ? REQUIRED field for the procedure to have auto CP study check-in. Enter a "^" will exit completely. Enter 0 if you do not schedule appointments. 1 if you only schedule appointments for outpatients. 2 if you only schedule appointments for inpatients. 3 if you schedule appointments for both 1 and 2. Select one of the following: 0 None 1 Outpatient 2 Inpatient 3 Both Schedule Appointment?: 3 Both Clinic: ? Only required, if appointments are scheduled for the procedure. Enter the clinic used for scheduling the procedure. Answer with HOSPITAL LOCATION NAME, or ABBREVIATION, or TEAM Do you want the entire 112-Entry HOSPITAL LOCATION List? N Clinic: PFT LAB Enter another clinic for the same procedure? NO// ? Enter either 'Y' or 'N', if you want to assign more than one clinic. Enter another clinic for the same procedure? NO// YES Clinic: SHIR 1 SHIRL CLINIC 2 SHIRL-2 CHOOSE 1-2: 2 SHIRL-2
3-18 Clinical Procedures V. 1.0 April 2004 User Manual

Clinical Procedures Process, Part 1
Enter another clinic for the same procedure? NO// Procedure:
Use CPManager.exe and verify for the PULMONARY PROCEDURE that you have 1) left the hospital location field blank, 2) checked the Active checkbox, and 3) checked One Bi-directional instrument checkbox. Note: The Hospital Location field is blank because the location of the appointment will be used for workload.
Figure 3-15
Use CP Manager.exe and verify that the SMC instrument is set up. Use the Interface Analyzer button and check the instrument SMC and click Analyze. The Ready Status should be “Pass.” Note: Make sure the instrument is Active, has a Notification Mailgroup and an HL7 link.
April 2004 Clinical Procedures V. 1.0 3-19 User Manual

Clinical Procedures Process, Part 1
Figure 3-16
Use the option “GMRC PROCEDURE SETUP” and verify the Pulmonary procedure is linked to a GMRC Procedure. Add the text “Visit Date: |VISIT DATE|“ to the first line of the DEAFULT REASON FOR REQUEST field. Select OPTION NAME: GMRC PRO 1 GMRC PROCEDURE SETUP Setup procedures 2 GMRC PROTOCOL DETAILED REPORT Detailed Report of GMRC Protocols 3 GMRC PROTOCOL LIST List GMRC Protocols CHOOSE 1-3: 1 GMRC PROCEDURE SETUP Setup procedures Setup procedures Select Procedure:CP PULMONARY FUNCTION TEST ...OK? Yes// (Yes) NAME: CP PULMONARY FUNCTION TEST Replace INACTIVE: NO// Select SYNONYM: PFT// INTERNAL NAME: Select RELATED SERVICES: PULMONARY// TYPE OF PROCEDURE: CLINICAL PROCEDURE: PULMONARY PROCEDURES PREREQUISITE: 1> PROVISIONAL DX PROMPT: OPTIONAL// PROVISIONAL DX INPUT: LEXICON// DEFAULT REASON FOR REQUEST: 1>Visit Date: |VISIT DATE| 2> 3>This is a Pulmonary Procedure.
3-20 Clinical Procedures V. 1.0 April 2004 User Manual

Clinical Procedures Process, Part 1
RESTRICT DEFAULT REASON EDIT: Orderable Item Updated
The appointment can either be scheduled prior to the order request or after the order request. The appointment has to be for a future date. In the next two figures, they show a scheduled appointment to the Pft Lab for an outpatient and a scheduled appointment to Shirl-2 for an inpatient. Appt Mgt Module Dec 17, 2007@15:13:53 Page: 1 of 1 Patient: TEST,D (4444) MT: REQ Outpatient Total Appointment Profile * - New GAF Required 11/17/07 thru 09/11/10 Clinic Appt Date/Time Status 1 Pft Lab 12/18/2007@10:00 Future Enter ?? for more actions CI Check In CD Change Date Range DX Diagnosis Update UN Unscheduled Visit EP Expand Entry DL Wait List Display MA Make Appointment AE Add/Edit DE Delete Check Out CA Cancel Appointment RT Record Tracking WD Wait List Disposition NS No Show PD Patient Demographics CP Procedure Update DC Discharge Clinic CO Check Out PC PCMM Assign or Unassign AL Appointment Lists EC Edit Classification TI Display Team Information PT Change Patient PR Provider Update CL Change Clinic WE Wait List Entry Select Action: Quit//
Appt Mgt Module Dec 17, 2007@15:15:37 Page: 1 of 1 Patient: TEST,NAJEE (8888) MT: NOT REQ Ward: 3AS Total Appointment Profile * - New GAF Required 11/17/07 thru 09/11/10 Clinic Appt Date/Time Status 1 Shirl-2 12/18/2007@11:00 Inpatient/Future Enter ?? for more actions CI Check In CD Change Date Range DX Diagnosis Update UN Unscheduled Visit EP Expand Entry DL Wait List Display MA Make Appointment AE Add/Edit DE Delete Check Out CA Cancel Appointment RT Record Tracking WD Wait List Disposition NS No Show PD Patient Demographics CP Procedure Update DC Discharge Clinic CO Check Out PC PCMM Assign or Unassign AL Appointment Lists EC Edit Classification TI Display Team Information PT Change Patient PR Provider Update CL Change Clinic WE Wait List Entry Select Action: Quit// When you request an order for outpatient, you will be prompted for a visit. If the ordering provider selects the appointment during ordering with the procedure, the appointment will be selected below. Otherwise, a new visit is created.
April 2004 Clinical Procedures V. 1.0 3-21 User Manual
Clinical Procedures Process, Part 1
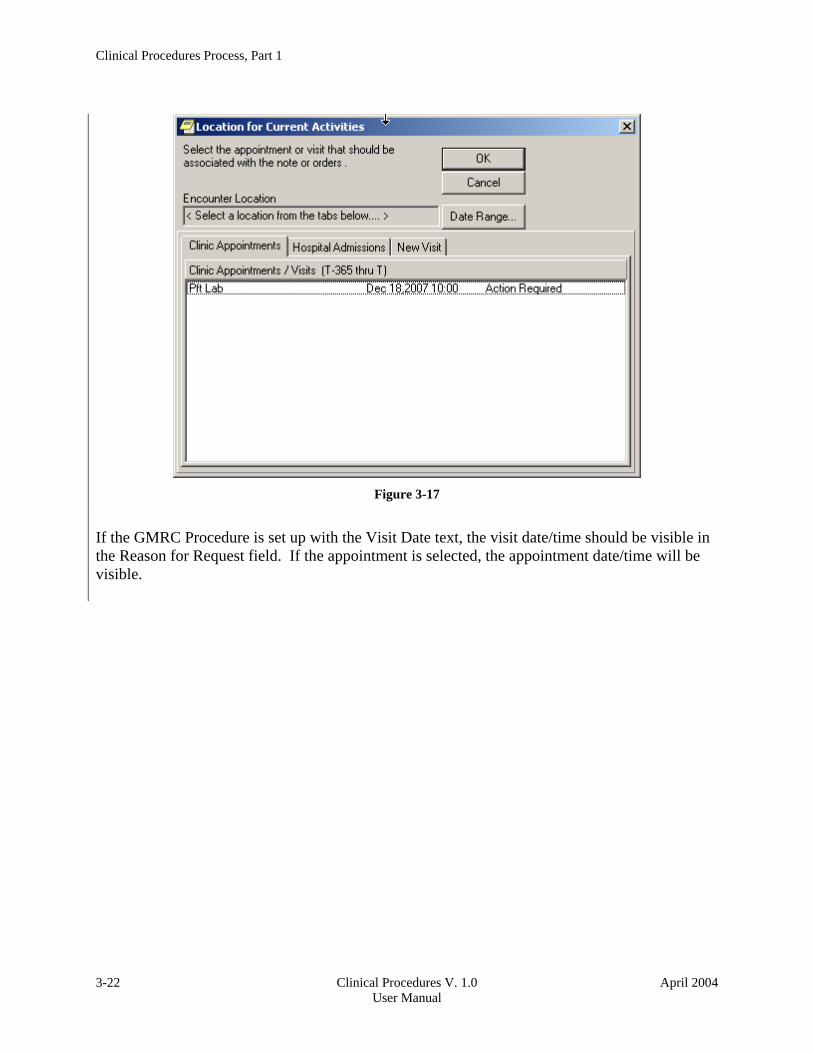
Figure 3-17
If the GMRC Procedure is set up with the Visit Date text, the visit date/time should be visible in the Reason for Request field. If the appointment is selected, the appointment date/time will be visible.
3-22 Clinical Procedures V. 1.0 April 2004 User Manual

Clinical Procedures Process, Part 1
Figure 3-18
For the inpatient, the admission date/time will be visible in the Reason for Request field. After the order is placed for both the inpatient and outpatient, the studies are checked-in for the Pulmonary Procedure in CPUser with the status of “New.”
April 2004 Clinical Procedures V. 1.0 3-23 User Manual

Clinical Procedures Process, Part 1
Figure 3-19
The status changes to “Pending Instrument Data” on the day of the appointment.
3-24 Clinical Procedures V. 1.0 April 2004 User Manual

Clinical Procedures Process, Part 1
Figure 3-20
Note 1: If the status of the study does not change to “Pending Instrument Data” upon the day of the appointment, have your IRM Support check if they scheduled the two options MD SCHEDULED STUDIES and MD STUDY CHECK-IN to run daily. Note 2: If the procedure requires multiple encounters, the subsequent appointment scheduled will generate a study checked-in on the day of the appointment. If you do not use appointments, it is recommended that you do not implement auto check-in for the procedure because you will need to manually check-in each subsequent encounter for the procedure.
April 2004 Clinical Procedures V. 1.0 3-25 User Manual

Clinical Procedures Process, Part 1
Check-In a New Study Checking in a new study is the next step in the Clinical Procedures process. You need to check in a new study in CP User after a procedure has been ordered. (Keep in mind that the CP check-in is not related to the Scheduling check-in process.) 1If you want to link multiple results to one procedure, you can check in multiple studies for the same procedure that you ordered through Consults. A warning screen displays telling you that this consult procedure order has already been checked in (Figure 3-22). After you ensure that you have the correct consult procedure order, you can continue to check in the study. In this way, you do not have to order multiple procedure requests. In this example, the colonoscopy procedure was ordered and a new study for the colonoscopy procedure is being checked in.
1. To check in a new study, first logon to CP User and select the patient. Refer to Selecting a Patient, 2-2.
2. Choose File > Check in New Study to check in the patient.
Figure 3-21
3. Select a Consult procedure order for the selected patient. See Figure 3-21. The Clinical
Procedure column lists the consult procedure orders. Notice that the colonoscopy procedure is selected.
1 Patch MD*1.0*4 September 2006 Check in multiple consult procedure orders warning screen added.
3-26 Clinical Procedures V. 1.0 April 2004 User Manual

Clinical Procedures Process, Part 1
Note: You can only select from Clinical Procedure request orders that are in the Pending (p), Scheduled (s), Partial Results (pr), Complete (c), and Active (a) statuses. Discontinue (d) and Cancel statuses are excluded. 1If the consult procedure order you selected has already been checked in, a warning screen displays (Figure 3-22). After you ensure that you have the correct consult procedure order, you can continue to check in the study.
Figure 3-22
4. Depending on the consult procedure you selected, the appropriate instruments for that
procedure are displayed. Click the appropriate instrument if more than one is listed, or click No Instrument if no instrument is associated with this procedure. OLYMPUS is the appropriate instrument in this case and is selected.
5. You must associate each CP study with a PCE visit, which is the hospital location where
the procedure is performed. Required.
For the majority of TIU notes created through CP, the visit association is completed in the background. If a visit has already been recorded but the note wasn’t linked (standalone visits, such as telephone or walk-in visits), you can select a visit from the Clinical Procedures Check In edit screen (Figure 3-21). To link the CP study to the visit, select information from the Outpatients Visits tab on Figure 3-21. You can also select the New Visit tab and enter NOW for the date and time.
6. Click Check-In. The main CP User window, Figure 3-23, is displayed.
1 Patch MD*1.0*4 September 2006 Check in multiple consult procedure orders warning screen added.
April 2004 Clinical Procedures V. 1.0 3-27 User Manual

Clinical Procedures Process, Part 1
Figure 3-23
7. If the study is checked-in for an instrument with a uni-directional interface, the status is
Ready to Complete. If the study is checked-in for an instrument supported by a bi-directional interface, the status is Pending Instrument Data. (Notice on Figure 3-23, the colonoscopy status for 3/25 and 3/26 is Pending Instrument Data.)
8. At this point, the clinician performs the procedure on the instrument and transmits the results back to VistA. If the instrument is bi-directional and the Auto Submit to VistA Imaging checkbox is selected for the procedure in CP Manager, the study status changes from Pending Instrument Data to Complete. This occurs after the result has been transmitted to VistA, matched to the study, and copied over to VistA Imaging successfully. The study is ready for interpretation. At this time, the CP process is complete and attachments cannot be associated with this study. See Clinical Procedures Process, Part 2. If the instrument is uni-directional or if the instrument is bi-directional and the Auto Submit to VistA Imaging checkbox is not selected, the study status is Ready to Complete. Go to the next step (9) to manually complete the CP process.
3-28 Clinical Procedures V. 1.0 April 2004 User Manual

Clinical Procedures Process, Part 1
9. Open the study (Figure 3-23) and add the instrument results and/or external attachments.
You can only open studies that have an Error, Complete, Ready to Complete, or New status. When a study is in the Ready to Complete or New status, you can open the study and finish entering any data that was missed. An example of missed data is an external attachment that was not associated with the study.
- Open this study and add results and/or external attachments. Click Open Study or select File > Open Study. Figure 3-24 is displayed.
- Click +Results to select and submit the result to Vista Imaging. Only results for the patient and instrument used for the procedure are displayed. To select multiple results, hold down the CTRL key. To select a range of results, highlight the initial result, hold down the Shift key, and then click the last result, Figure 3-25.
- You can also click +Files (Figure 3-24) to add additional attachments from the External Attachment Directory. If the External Attachment Directory has not been defined for this procedure, the last directory that was accessed may be displayed. You can browse for other attachments to link to the study.
Note: If the system parameter Allow Non-Instrument Attachments was not selected in CP Manager, +Files does not appear on the Clinical Procedures Study screen, you are not permitted to associate additional attachments with the procedure.
10. Submit the study. The images are copied to the RAID and the TIU document is created and associated with the procedure order.
April 2004 Clinical Procedures V. 1.0 3-29 User Manual

Clinical Procedures Process, Part 1
Figure 3-24
Figure 3-25
3-30 Clinical Procedures V. 1.0 April 2004 User Manual

Clinical Procedures Process, Part 1
11. From Figure 3-24, click the magnifying glass under TIU Note to view the TIU Note for that study if it is available. The magnifying glass for the TIU document is unavailable if the result has not been submitted to Vista imaging. Once the result is copied to VistA Imaging, you can view the TIU document of the study before or after the interpretation has been entered, Figure 3-26.
Figure 3-26
12. From Figure 3-24, you can also click the magnifying glass under Consult to view the
Consult report for that study.
April 2004 Clinical Procedures V. 1.0 3-31 User Manual

Clinical Procedures Process, Part 1
Figure 3-27
Updating Study Status to Correct Errors If you open a study in the Error status and have the MD MANAGER key, the Update Study Status window is displayed. You must have the MD Manager key to access the Update Study Status menu option. See your clinical application coordinator or IRM for access to Update Study Status. You can use Update Study Status to change the status of any study. Be careful when changing the status of a study. With Update Study Status, you can force a status change of a study if a problem occurs that you cannot fix with the Open a Study option.
1. Select File > Update Study Status, Figure 3-28.
2. Select the status you want to change and click OK.
3. After you change the status, choose File > Open a Study and click Submit to resubmit the study.
3-32 Clinical Procedures V. 1.0 April 2004 User Manual

Clinical Procedures Process, Part 1
Figure 3-28
April 2004 Clinical Procedures V. 1.0 3-33 User Manual

Clinical Procedures Process, Part 1
3-34 Clinical Procedures V. 1.0 April 2004 User Manual

7. Index
A Auto Check-In Without Appointment, 3-10 Auto Study Check in, 3-9 Auto Study Check-in With Appointment, 3-17
B benefits, 1-6
C checking in
studies, 3-26 complete
status, 2-4 Confirm the Auto Study Check-in, 3-17 consent forms
linking, 4-19 consult procedures
ordering, 3-1 CP process, 3-1, 4-1 CP results
viewing, 4-14 CP User, 2-1
Icons, 2-1 opening, 2-1 selecting a patient, 2-2
CPRS ordering a consult procedure, 3-1
D defining the CP User window, 2-3 deleting
study, 2-5
E encounter information, 4-7 errors
status, 2-4 updating, 3-32
F file types, 1-7
G Glossary, 6-1
H hospital location, 1-7
I images
displaying, 4-14 imaging
capture, 4-19 display, 4-14
imaging file types, 1-7 intended audience, 1-6 interpretations
entering, 4-1 introduction, 1-1
M Medicine/CP Reports, 5-1
Abnormal, 5-3 Brief Report, 5-7 Configuring, 5-23 Full Captioned, 5-8 Full Report, 5-13 Procedures, 5-21 Procedures (local only), 5-18
N new
status, 2-3
O ordering
consult procedures, 3-1
P patient
selecting, 2-2 selecting in CP User, 2-2
pending instrument data status, 2-4
process flow diagrams, 1-2
R ready to complete
status, 2-4 related manuals, 1-6
April 2004 Clinical Procedures V. 1.0 7-1 User Manual

Index
S sign off, 4-12 status
complete, 2-4 error, 2-4 types of, 2-3
study checking in, 3-26 completing, 4-1 deleting, 2-5 fixing errors, 3-32 submitting, 3-29 updating status, 3-32
study status types of, 2-3
submitted
status, 2-4 submitting
studies, 3-29
T TIU
entering interpretations, 4-1
V viewing results, 4-14
W workload reporting, 1-7
7-2 Clinical Procedures V. 1.0 April 2004 User Manual