Embed Size (px)
Citation preview

M899061 V. 03-07.2017 Page 1 of 26
Clostridium difficile Panel REF: 899061 Test kit for 192 determinations
Store at -20°C For use with the NanoCHIP® 400 Instrument
For Professional Use Only
Savyon Diagnostics Ltd. 3 Habosem St. Ashdod 7761003 ISRAEL Tel.: +(972).8.8562920 Fax: +(972).8.8523176 E-mail: [email protected]
European Authorized Representative: Obelis s.a. Boulevard Général Wahis 53 1030 Brussels, BELGIUM Tel: +(32) 2. 732.59.54 Fax: +(32) 2.732.60.03 E-Mail : [email protected]

M899061 V. 03-07.2017 Page 2 of 26
Table of Content
Intended Use 3 Background and Explanations of the Procedure 3 Principles of the procedure 4 Kit Contents 4 Kit Box Storage 4 Using NanoCHIP
® Cartridge 4
NanoCHIP® Cartridge Handling 4
Kit Reagents Contents 5 Materials Available From Savyon 5 Equipment and Materials Required But Not Provide 6
Precautions 7
Sample Collection/Transport 8 Sample Storage and Stability 8 Sample Preparation for PCR 8 Sample Plate Preparation 10
Preparing Solutions for use in the NanoCHIP®
400 instrument 11
Preparing the NanoCHIP®
400 Cartridge and Instrument 11
Creating a Protocol 13 Running the Assay 14 Results 15
17 Clostridium Difficile Panel Worksheets 16 Data Calculations 19 Troubleshooting 20 Limitations of The Procedure 21 Clinical Sensitivity and Specificity 22 Appendix A 23 Appendix B 25
I. INTRODUCTION
IV. INSTRUCTIONS FOR USE
II. MATERIALS AND EQUIPMENT
III. PRECAUTIONS
V. OPERATING THE NANOCHIP® 400 SYSTEM
VI. CLOSTRIDIUM DIFFICILE DATA ANALYSIS
VII. PERFORMANCE CHARACTERISTICS
APPENDICES

M899061 V. 03-07.2017 Page 3 of 26
I. INTRODUCTION
Intended Use
The NanoCHIP® Clostridium Difficile Panel performed on the NanoCHIP® system is an automated
qualitative in vitro diagnostic test for the direct detection the Clostridium difficile antigen and its toxins in
human liquid or soft stool specimens from patients suspected of having C. difficile infection (CDI). The
test is performed directly on extracted DNA from stool specimens and detects DNA gene markers of C.
difficile. The test is intended to be used in the clinical laboratory in healthcare settings.
For in-vitro professional diagnostic use.
Background and Explanation of the Procedure The gram-positive anaerobic bacillus Clostridium difficile is the leading causative agent of antibiotic-
associated diarrhea and pseudomembranous colitis (1). This pathogen is capable of causing disease
that could be severe or fatal if not diagnosed on time and treated. Exposure to antibiotics is the major
risk factor for C. difficile infection. Infection can develop if the normal gastrointestinal flora is disrupted
by antibiotic therapy and a person acquires toxin-producing C. difficile, typically via the fecal-oral route
(2). C. difficile’s key virulence factors are toxin A and toxin B (3, 4). These toxins show high sequence
and functional homology. Toxin A has been described as a tissue damaging enterotoxin which attracts
neutrophils and monocytes and toxin B as a potent cytotoxin that degrades the colonic epithelial cells
(5). Most virulent strains produce both toxins, however, toxin A negative/toxin B positive strains are also
capable of causing disease (6, 7). All strains of C. difficile produce high levels of GDH (8, 9). Therefore,
C. difficile’s GDH enzyme is considered a very good antigen marker for detection of this organism.
It is now evident that Hospital Acquired Infections (HAI) can be widely prevented through screening
of patients before or during hospital admission and proper patient isolation and management. The
NanoCHIP® Clostridium Difficile Panel is aiming to respond to this purpose as being a molecular-based
diagnostic screening test for C. difficile directly from a variety of swab sample types. The detection relies
on the identification of specific genes, known to be associated with the pathogen enzyme glutamate
dehydrogenase (GDH) and its toxins A and B in stool samples. (Table 1).
The NanoCHIP® Clostridium Difficile Panel test is based on detecting genes that specifically mark
the presence of the pathogen and its toxins in the sample. Following a multiplex Polymerase Chain
Reaction (PCR) in a single tube, the resulted amplicons are hybridized to complementary capture
oligonucleotides, which are embedded in a hydrogel layer that covers the microarray. The capture
oligonucleotides are biotinylated at the 5' or 3' end, and are bound to streptavidin which has been
previously incorporated in the hydrogel. The capture oligonucleotides as well as the amplicons are
electronically addressed to specific loci upon their applications. Target identification is made by specific
fluorescent reporter oligonucleotides that passively hybridize to complementary sequences on the
amplicons. Sequential cycles of hybridization-imaging-thermal stripping of the fluorescent reporters
allow the high multiplex capabilities of the system.
Table 1: Target genes used for identification of the bacteria in the Clostridium difficile Panel assay
Bacteria Target gene
Clostridium difficile (+Toxins) gdh, tcdA, tcdB

M899061 V. 03-07.2017 Page 4 of 26
Principles of the Procedure Specimen is collected and transported to the laboratory using the recommended swab (refer to
“Equipment and Materials Required But Not Provided” section). The swab is then subjected to a short
and simple procedure of DNA extraction by the user, alternatively the DNA can be purified from the
swab by automation process. Once DNA is extracted, 2.5 μl of each sample is loaded into the PCR plate
along with the PCR mix reagents for multiplex amplification in a thermo-cycler. As soon as the
amplification process is completed, the PCR plate is loaded onto the NanoCHIP® 400 instrument along
with the NanoCHIP® cartridge and the NanoCHIP® Clostridium Difficile Panel kit reagents, the run is
started and no further operator intervention is required. The assay also includes a sample extraction
control for each tested sample and one positive control to indicate that the whole process from DNA
extraction throughout the NanoCHIP® reactions functions properly.
Kit Contents
The NanoCHIP® Clostridium Difficile Panel Kit contains enough purification, amplification and primer
mix buffers for 192 samples/controls and enough detection reagents for four detection runs. One to 96
samples/controls can be analyzed in a single detection run. Refer to product package insert for
performance characteristics and additional storage information.
Kit Box Storage
≤ -20°C
Using NanoCHIP® Cartridge
The NanoCHIP® Clostridium Difficile Panel Kit is designed to analyze up to 192 samples on a
NanoCHIP® 400 Cartridge. A cartridge may be used until the available test sites on the chip are utilized.
Store either brand new or used cartridges at 2-8°C. The used cartridge may be reused up to 2 months
if stored properly.
NanoCHIP® Cartridge Handling
Handle the cartridge by holding the outer black covering only; do not touch the clear plastic or electrical
contact area. Exposure to static electricity may damage the cartridge and may affect results. Ensure
that the flowcell window (clear plastic on the underside of the cartridge) is clear of any debris. If debris
is present, always use a new (not previously opened) Bausch & Lomb Pre-Moistened Tissue to clean
the window. DO NOT use excessive force when wiping the flowcell window. Clean the flowcell window
only if debris is present.
M899061 V. 03-07.2017 Page 5 of 26
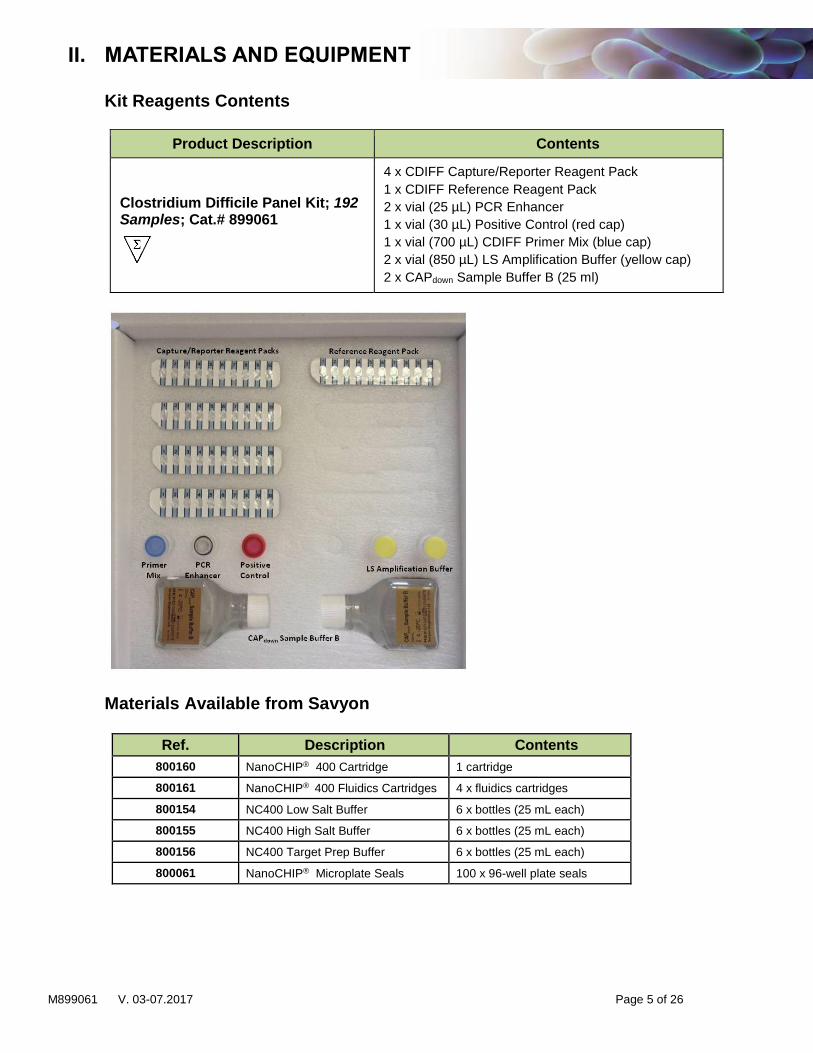
II. MATERIALS AND EQUIPMENT Kit Reagents Contents
Product Description Contents
Clostridium Difficile Panel Kit; 192 Samples; Cat.# 899061
4 x CDIFF Capture/Reporter Reagent Pack
1 x CDIFF Reference Reagent Pack
2 x vial (25 µL) PCR Enhancer
1 x vial (30 µL) Positive Control (red cap)
1 x vial (700 µL) CDIFF Primer Mix (blue cap)
2 x vial (850 µL) LS Amplification Buffer (yellow cap)
2 x CAPdown Sample Buffer B (25 ml)
Materials Available from Savyon
Ref. Description Contents
800160 NanoCHIP® 400 Cartridge 1 cartridge
800161 NanoCHIP® 400 Fluidics Cartridges 4 x fluidics cartridges
800154 NC400 Low Salt Buffer 6 x bottles (25 mL each)
800155 NC400 High Salt Buffer 6 x bottles (25 mL each)
800156 NC400 Target Prep Buffer 6 x bottles (25 mL each)
800061 NanoCHIP® Microplate Seals 100 x 96-well plate seals

M899061 V. 03-07.2017 Page 6 of 26
Equipment and Materials Required But Not Provided Plasticware and Consumables
Sample Plates - 96-well ABI PCR plates (ABI N801-0560) or 96-well Thermo-Fast PCR plates (AB-1100)
MicroAmp™ Compression Pads (ABI 4312639)
0.2 µm filters (Nalgene 5660020)
Cotten swabs Reagents
FastStart Taq DNA polymerase (Roche) Cat# 04 738 420 001
Reagents to run NanoCHIP® 400 system: - L-histidine (Sigma H-8000) - Triton® X-100 (Sigma X-100) - Water, deionized
Required Equipment NanoCHIP® 400 System
A Thermal Cycler1
1 The following models are recommended:
GeneAmp® Thermal Cycler 2700, 2720, or 9700 MJ Research Peltier Thermal Cycler PTC200 Biometra T Gradient Thermocycler

M899061 V. 03-07.2017 Page 7 of 26
III. PRECAUTIONS
Amplification technologies can amplify target nucleic acid sequences over a billion-fold and provide a
means of detecting very low concentrations of target. Care must be taken to avoid contamination of
samples with target molecules from other samples, or amplicons from previous amplifications. Follow
these recommendations to help control contamination.
1. Separate pre-amplification steps from post-amplification steps. Use separate locations for pre- and
post-amplification. Use dedicated lab equipmentfor each stage. Prepare samples in a laminar flow
hood using dedicated equipment to minimize contamination. Set up the post-amplification area in a
low-traffic area with dedicated equipment.
2. Use disposable containers, disposable barrier pipette tips, disposable bench pads, and disposable
gloves. Avoid washable lab wear.
3. Use a diluted bleach solution (0.2% sodium hypochlorite) to treat waste from the post-amplification
and detection areas, as the waste contains amplicon. Use the bleach solution to wipe down
equipment and bench areas, and to treat drains used to dispose of liquid waste.
4. Monitor contamination with regular swabbing. Use a wet cotton swab to wipe areas of the bench or
equipment, and rinse the swab with 500 µL of water. Test a few microliters of the rinse solution in
the amplification assay to detect possible contamination. If contamination is detected, follow internal
de-contamination procedures.
5. Use negative controls to monitor for possible contamination during reaction setup. If reagent
contamination is detected, dispose of the suspect reagents.
References for Contamination Control
Kwok, S. and Higuchi, R. (1989). Avoiding false positives with PCR. Nature (London) 339, 237.
Victor, T. et al. (1993). Laboratory experience and guidelines for avoiding false positive polymerase chain reaction
results. Eur. J. Clin. Chem. Clin. Biochem. 31, 531.
Yap, E.P.H. et al. (1994). False-positives and contamination in PCR. In: PCR Technology: Current Innovations. Griffin,
H.G. and Griffin, A.M., eds., CRC Press, Boca Raton, FL.

M899061 V. 03-07.2017 Page 8 of 26
IV. INSTRUCTIONS FOR USE
Sample Collection/Transport
In order to obtain an adequate sample, the procedure for sample collection must be followed closely. Using a dry, clean container, liquid or soft stool samples are collected and according to the following procedure.
Transfer liquid or soft stool (but not urine) into the container. Avoid mixing toilet paper, water or soap with the sample. Label the container. Ship the container to the laboratory according to the hospital standard operating procedures (Refer to ‘‘Storage and Stability’’ section).
Sample storage and stability
Collected specimens received in the laboratory should be processed upon arrival. In case of delay, store
specimens refrigerated (2-8°C) for up to 72 hours or at -20°C for a longer period. Store purified nucleic
acids at ≤ – 20°C. Protect against exposure to excessive heat.
Sample Preparation for PCR DNA pretreatment manual Procedure
1. Prepare 2 ml screw cap tubes with 500 µl of Extraction Buffer*.
2. Open the sample container, dip and coat lightly (with swirl movements) a cotton swab with the
sample.
3. Take out carefully the swab from the container into the 2ml buffer tube. Swirl the swab vigorously in
the Extraction buffer and dispose the swab
4. Close the 2ml tube cap and Incubate at 97°C for 30 min.
5. Carefully remove the samples from the heater.
6. Take 2.5 µl sample for PCR amplification process.
7. Store crowd DNA at -20°C.
* Extraction buffer is provided upon request.
DNA Extraction Automate Procedure
DNA can be extracted from the sample's swabs using available commercial kits, according to the
manufacture instructions.
Amplification
The following will be performed in an amplicon-free area. 1. Remove the LS Amplification Buffer and the CDIFF Primer Mix from the ≤ -20°C freezer. Thaw at
room temperature and vortex. 2. Prepare PCR Master Mix using the following guidelines per sample (see Table 2). To ensure an
adequate volume of Master Mix, take the number of reactions and add 2. Multiply the sum by the volume of each component shown in Table 2. Note: Remove the Taq DNA Polymerase from the freezer immediately prior to use, and return to the freezer promptly after use.

M899061 V. 03-07.2017 Page 9 of 26
Table 2: PCR1 Guidelines for preparing the Master Mix
3. Add 10 µl of the PCR Master Mix to reaction wells in the PCR plate.
4. Add 2.5 µl of the Positive Control into the first position of the samples in the PCR plate.
5. Add 2.5 µl of each sample’s nucleic acid to individual reaction wells containing the Master Mix.
6. Add 2.5 µl of ultra-pure water for the Negative Control to the last well containing the Master Mix.
Notes: Do not scale up an amplification reaction; always use 12.5 µl reaction volumes. The
concentration of the template DNA should be at least 10 ng/µl.
7. Seal the PCR plate with a microplate seal and place it into a thermal cycler.
Notes: Place the ABI MicroAmp Compression Pad over the sealed PCR 96-well plate and close the
lid of the thermal cycler.
8. Program the thermal cycler using the parameters described in Table 3.
Table 3: Clostridium Difficile Panel Assay, Thermal Cycler Parameters
Temperature (°C) Time Number of Cycles
95 4 minutes 1
95 30 seconds
43 60 1 min
72 45 seconds
72 5 minutes 1
4 Hold
9. Once cycling is completed, remove the PCR plate from the thermal cycler. The prepared plate may
be stored at 2-8°C for up to one week, or at ≤ -20°C for up to six months.
To optimize workflow, you can begin other activities during sample amplification. For example, you can prepare the system and thaw reagents. During cartridge initialization, you can write the protocol and prepare the sample plate.
1 Refer to Appendix C: Legal Notices, for PCR information.
Component Volume per one
reaction (µl)
LS Amplification Buffer 6.35
PCR Enhancer 0.15
CDIFF Primer Mix 3
Taq DNA Polymerase 0.5
Total Master Mix 10
M899061 V. 03-07.2017 Page 10 of 26
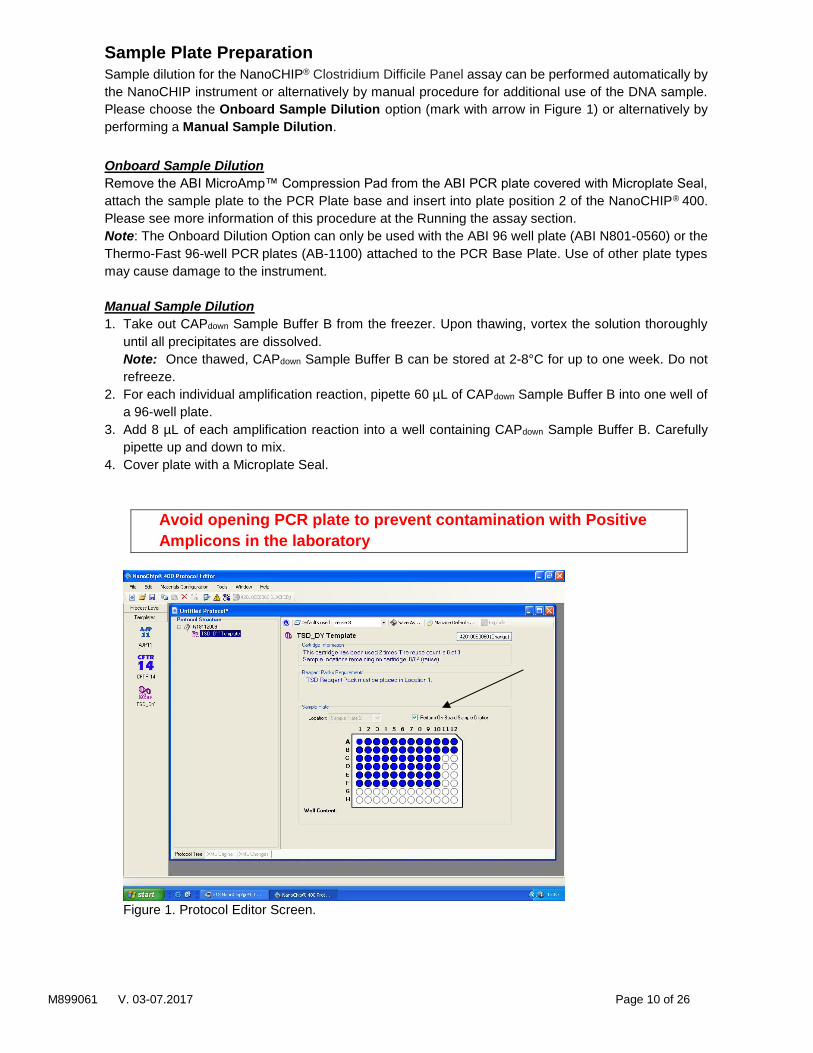
Sample Plate Preparation
Sample dilution for the NanoCHIP® Clostridium Difficile Panel assay can be performed automatically by
the NanoCHIP instrument or alternatively by manual procedure for additional use of the DNA sample.
Please choose the Onboard Sample Dilution option (mark with arrow in Figure 1) or alternatively by
performing a Manual Sample Dilution.
Onboard Sample Dilution
Remove the ABI MicroAmp™ Compression Pad from the ABI PCR plate covered with Microplate Seal,
attach the sample plate to the PCR Plate base and insert into plate position 2 of the NanoCHIP® 400.
Please see more information of this procedure at the Running the assay section.
Note: The Onboard Dilution Option can only be used with the ABI 96 well plate (ABI N801-0560) or the
Thermo-Fast 96-well PCR plates (AB-1100) attached to the PCR Base Plate. Use of other plate types
may cause damage to the instrument.
Manual Sample Dilution
1. Take out CAPdown Sample Buffer B from the freezer. Upon thawing, vortex the solution thoroughly
until all precipitates are dissolved.
Note: Once thawed, CAPdown Sample Buffer B can be stored at 2-8°C for up to one week. Do not
refreeze.
2. For each individual amplification reaction, pipette 60 µL of CAPdown Sample Buffer B into one well of
a 96-well plate.
3. Add 8 µL of each amplification reaction into a well containing CAPdown Sample Buffer B. Carefully
pipette up and down to mix.
4. Cover plate with a Microplate Seal.
Avoid opening PCR plate to prevent contamination with Positive
Amplicons in the laboratory
Figure 1. Protocol Editor Screen.

M899061 V. 03-07.2017 Page 11 of 26
V. OPERATING THE NANOCHIP® 400 SYSTEM Refer to the NanoCHIP® 400 User’s Guide (REF 140530) for detailed instructions on the basic operation of the system, including system maintenance and cartridge handling.
Preparing Solutions for Use in the NanoCHIP® 400 Instrument
Preparing Wash Solution
It is required to prepare fresh Wash Solution (50 mM histidine, 0.1% Triton X-100) prior to daily run.
Leftover of the solution should be disposed at the end of the day.
1. Add 500 mL of the 50 mM histidine solution to a 1L buffer bottle.
2. Add 2.5 mL of the 20% Triton X-100 solution and mix thoroughly.
50 mM histidine solution: In a bottle/beaker, add 7.8 g of L-histidine to a final volume of 1 L of dH2O for 50 mM
histidine. Mix until histidine powder is dissolved completely. Filter the solution using a 0.2 m filter.
Note: This solution is stable for up to two weeks at 2–8oC.
20% Triton X-100 solution: Add 4 mL or 4.24 g of Triton X-100 to approximately 15 mL of dH2O for a final
volume of 20 mL. Mix solution thoroughly (approximately 10 minutes).
Note: This solution is stable for up to three months at 2-8oC.
Additional Solutions Required for the Run (Provided by Savyon)
The following table describes the required solutions, and their assigned locations within the instrument.
Table 4: Location of Bottles in the NanoCHIP® 400 Instrument
Solution Bottle Location Minimum Volume*
Water 1 L H2O position 500 mL
Wash Solution 1 L BUF position 500 mL
High Salt Buffer 30 mL Position 1 25 mL
Low Salt Buffer 30 mL Position 2 25 mL
Target Prep Buffer 30 mL Position 3 25 mL
**CAPdown Sample Buffer B
30 mL Position 4 25 mL
* The minimum volume of liquid that should be in the listed bottle before starting the assay run.
**CAPdown Sample Buffer B is only required when performing OnBoard dilution.
Preparing the NanoCHIP® Cartridge and Instrument 1. Take the following reagent packs out from the freezer and place them at room temperature to thaw.
CDIFF Capture/Reporter Reagent Pack
CDIFF Reference Reagent Pack
The CDIFF Reference Reagent Pack is only required for the first use of a cartridge.
Notes: These reagent packs must be used within 8 hours of thawing. All items listed above are single
use only, discard after use.
2. Take a NanoCHIP® Cartridge out from 2-8°C storage. Keep at room temperature for at least 15
minutes before using.
Note: Bringing the cartridge to room temperature before insertion into the instrument avoids the
formation of condensation in the cartridge window, which could cause the cartridge to fail
initialization.

M899061 V. 03-07.2017 Page 12 of 26
3. Initialize and prime the NanoCHIP® 400 Instrument following the guidelines listed in the NanoCHIP®
400 User’s Guide.
4. From the Dock Bar, select the instrument icon to start the NanoCH IP® 400 Instrument Manager
5. Ensure that the flowcell window (clear plastic on the underside of the cartridge) is clear of any debris.
If debris is present, use a new (not previously opened) Bausch & Lomb Pre-Moistened Tissue to
clean the window.
Note: Do not use excessive force when wiping the flowcell window. Clean the flowcell only when
debris is present.
6. Scan the barcode of the NanoCHIP® Cartridge using the attached barcode scanner.
Note: The barcode will not be displayed in the Instrument Manager until step 8 has been completed.
7. Insert the cartridge into the instrument, ensuring that it is properly seated.
8. Close the cartridge door by pressing the button located below the cartridge slot on the instrument.
9. When the Cartridge Initialization window appears, select Initialize Cartridge with Hydration (see
figure 2).
Figure 2: NC instrument Manager
10. Cartridge initialization will take approximately 18 minutes. When initialization is completed, the LCD
will display “Instrument Ready”.
11. Write the protocol as described in the following section.
Note: The protocol can be written while the cartridge is initializing.
Creating a Protocol
Using the Protocol Editor, create the following protocol to address and report 1-96 samples. Create a
new protocol for each sample run. For detailed instructions on using Protocol Editor, see the NanoCHIP®
400 User’s Guide.
1. From the Dock Bar select Protocol Editor (see figure 3).

M899061 V. 03-07.2017 Page 13 of 26
Figure 3. NanoChip 400 DockBar.
2. Select Create A New Protocol; select OK.
3. Select the CDIFF icon from the available templates on the left column.
Note: The CDIFF template automatically determines prior pad utilization, and maps capture and
sample addressing beginning with the first unused sample position.
4. The Plate Specification Window appears; choose the correct plate type intended for the assay from
the options in the pull-down menu. Select OK.
Note: Selecting a sample plate type other than what is placed on the NanoCHIP® 400 Instrument
deck at the start of a run can cause damage to the system and fail the run. Use caution to select the
appropriate plate type.
5. The Set Cartridge window appears; choose Select The Cartridge. From the pull-down menu, select
the serial number of the cartridge that will be used in the run (or type the serial number into the
window). Select OK.
Note: If the cartridge selected is still initializing, a cartridge presently in use window will appear.
Select Yes to indicate that you still want to use this cartridge for the protocol you are creating.
Warning: Select No if the cartridge selected is in use with a Clostridium Difficile Panel Protocol and
wait for the protocol to complete before creating a new Clostridium Difficile Panel protocol for the
selected cartridge. If Yes is selected, the pad usage for the new protocol may not map correctly.
6. When a screen like the one shown in figure 4 appears, mark the wells with the samples on the plate
drawing and select “Perform On Board Dilution”.
Figure 4. Protocol Editor Screen
7. Click on the run name you entered earlier (located under protocol structure), if no name was inserted
it will appear as "untitled". Scroll to ‘Plate location 2’ (See figure 5). Here you can either write down
your samples names or import it from an excel sheet. LIS connection is also optional.
Note: A cartridge may be used up to 7 times for the CDIFF assay, or until the available test sites are
utilized, whichever comes first.

M899061 V. 03-07.2017 Page 14 of 26
Figure 5. Protocol Editor Screen
8. Click the template (located on the left under protocol structure) click ‘ok’ on the popup, this will
make sure the template is updated with your recently added information. Make sure that on the plate
drawing the wells you chose are blue with black dote in them.
9. Go to the Protocol Editor Toolbar and select the Protocol Summary icon . A summary will display
the materials configuration checklist that can be used when setting up the materials to run the
protocol. To print out the summary, select the Print icon at the top left-hand side of the screen.
Note: that the following details can be found in the Protocol Summary.
• Estimated protocol run time.
• Estimated waste volume to be generated.
• Materials Configuration Checklist, including:
- Water and Buffer Bottle contents and approximate volume consumption;
- Reagent bottle contents and approximate volume consumption;
- Reagent pack location and well contents;
- Sample plate location with well contents and volumes.
• Specific pad use.
10. Save the protocol by going to file “save as”, click ok on the pad mapping popup and save the file
under the proper library. Your protocol is now ready for run. Close the protocol editor
Running the Assay 1. Select the Instrument Manager icon from the DockBar to display an Instrument Manager screen.
Selecting the Open button generates a browser allowing the user to select the desired protocol.
When a protocol is selected the screen updates to display the details for that protocol
2. Ensure that the correct protocol is displayed before selecting the Run button. A pop-up showing the
calculated volume of fluid waste that the protocol will be generates. If the waste container does not
have enough room to hold the waste, empty the container and return it to its position under the

M899061 V. 03-07.2017 Page 15 of 26
Instrument before selecting the OK button. After selecting the OK button, the user will be prompted
to place the protocol materials in the Instrument.
3. Load reagents on the instrument deck
a. Place the following buffer bottles on the instrument deck as instructed by the Instrument LCD
prompts.
Table 5: Location of Bottles in the NanoCHIP® 400 Instrument
Solution Bottle Size Location
High Salt Buffer 30 mL Slot 1
Low Salt Buffer 30 mL Slot 2
Target Prep Buffer 30 mL Slot 3
CAPdown Sample Buffer B* 30 mL Slot 4
*Required for Onboard Sample Dilution option only. This position is left empty when sample dilution is done
manually.
b. Place the CDIFF Capture/Reporter Reagent Pack and the CDIFF Reference Pack Plate in the
Reference Pack Plate before they are placed in the instrument deck as follows:
CDIFF Capture/Reporter– Position 1
CDIFF Reference Pack– Position 2
c. Place the Reagent Pack Plate in the instrument deck (Location 1) as instructed by the LCD
prompt.
4. Place the sample plate in Plate (Location 2) of the instrument deck as instructed by LCD prompt.
Notes: When using an ABI 96-well sample plate on deck, always position the plate with well A1 in
the upper left-hand corner.
5. Once the protocol materials are placed in the Instrument and the robot door is closed, the Instrument
automatically runs the protocol. If the instrument needs to be stopped or paused, press the Pause
or Stop buttons on the computer screen or the Pause button on the front of the Instrument. When
the protocol has completed running, the Instrument LCD displays the message INSTRUMENT
READY.
6. After the run is complete, select Eject from the Instrument Manager screen. When the LCD displays
“Remove Cartridge”, remove the cartridge from the instrument. If the cartridge has not been fully
used, return the cartridge to its pouch and store at 2 - 8°C. If the cartridge has been fully used, discard
it.
Note: When the eject button is selected, a window will appear asking the user to strip and/or fill the
cartridge before ejecting: Select Fill; Scroll down and Choose Water.
7. Remove all buffers and replace the Wash Buffer with water. Perform routine maintenance as is
appropriate.
Results The data are analyzed in a Microsoft Office Excel based spreadsheet. Refer to section IV for a
description of the CDIFF Data Analysis Spreadsheet features, instructions for setting preferences, and
data calculations.
1. Export the data from the NanoCHIP® 400 run as follows:

M899061 V. 03-07.2017 Page 16 of 26
A. Select Data Analysis from the NanoCHIP® 400 DockBar
B. Select Export Processed Data. Select Next.
C. Select the appropriate cartridge and session number. The session numbers are listed by date,
followed by the time the assay run started.
D. Select all red and green image data files; select Finish.
E. A new screen appears. In the View tab, select Show Non-Activated Pads.
F. Select Export on the lower right side of the NanoCHIP® 400 Data Analysis window.
G. A new screen will appear; be sure to check all the boxes and select Export.
H. Enter a file name (for example, the cartridge serial number and date of the run) and select Save.
An Excel spreadsheet will automatically be generated.
I. Close the NanoCHIP® 400 Data Analysis software.
2. Import the CDIFF Panel data into the CDIFF Data Analysis Spreadsheet:
A. Open the CDIFF Data Analysis Spreadsheet.
B. Select the Import button. Find the file you just saved and select Open.
C. A new message appears that prompts the user to save the Data Analysis Spreadsheet. A default
name is given, but another name may be assigned.
Notes: If Show Non-Activated Pads was not selected during data export, an error message will
appear when data import is attempted to the CDIFF Panel Data Analysis Spreadsheet. If this
occurs, repeat the data export process by selecting the Show Non-Activated Pads. To prevent
data overwriting, the Import button is removed after a set of data is imported.
D. Select Analyze to view your results.
E. Save your changes to the spreadsheet
VI. CLOSTRIDIUM DIFFICILE PANEL DATA ANALYSIS
Clostridium Difficile Panel Worksheets
After importing and analyzing the test results into the "CDIFF Data Analysis Spreadsheet" (as explained in the Results section) the user can move between the different fields appearing in each sheet. Samples Worksheet
The sample ID, cartridge number, cartridge session number, operator ID and instrument ID are imported
to the Samples Worksheet. The Sample IDs and Sample ethnicities may be edited on this sheet. Boxes
for the information header and comments are provided. All other cells are protected and cannot be
edited. Footer with lines for “Reviewed By” and “Approved By” is on the printed sheet See figure 6.

M899061 V. 03-07.2017 Page 17 of 26
Figure 6. CDIFF Data Analysis Spreadsheet; Samples worksheet.
Summary Worksheet
This sheet provides an overview of the sample calls. Sample positions that were run in the current
session, sample IDs, Sample ethnicities, and results are displayed in adjacent columns as indicated in
Figure 7. The interpretation relays on the presence of the fragments enhanced and detected in the
reaction as mentioned in Table 1 and indicated in Table 6. The sample is Negative if all the markers are
negative (-) and the Negative Validation Control (NVC) is positive. The sample is designated as "Invalid
Sample" if all the target markers are negative (-). In this case there is a need for a new DNA extraction.).
Figure 7. CDIFF Data Analysis Spreadsheet; Summary worksheet

M899061 V. 03-07.2017 Page 18 of 26
The Summary Worksheet also displays the information header, cartridge number, cartridge session
number, and operator ID. When printed, a footer with lines for “Reviewed By” and "Approved By” will
appear. The print settings for this sheet are editable. All cells in this sheet are protected and cannot be
edited
.
Table 6: Data Interpretation by Target Gene for Clostridium Difficile Panel NVC gdh tcdB tcdA Interpretation
-/+ - - + No organism found
-/+ - + - C. diff (toxA/B)
-/+ - + + C. diff (toxA/B)
-/+ + + + C. diff (toxA/B)
-/+ + - + C. diff (toxA/B)
-/+ + + - C. diff (toxA/B)
-/+ + - - C. diff (GDH)
+ - - - No organism found
- - - - Invalid sample
Data Table Worksheet
The information displayed in the Data Table sheet are sample ID, cartridge number, cartridge session
number, operator ID, and the calculated data that are described below. The information displayed for
each sample and mix is the Green signal.
The Data Table Worksheet also displays the information header, cartridge number, cartridge session
number, and operator ID. When printed, a footer with lines for “Reviewed By” and “Approved By” will
appear. The print settings for this worksheet are editable. All cells in this sheet are protected and cannot
be edited.
The Positive Control sample is used for the validation of the PCR. The call designated for the Positive
Control is "Pass" as appearing in position 0 of the table.
References Worksheet
The signal data for the References and average Reference Mix backgrounds are listed on this sheet
(Figure 8). Additionally, it lists whether or not the references pass the signal threshold and signal-to-
background criteria. In the event that a Reference fails, all samples are designated as “Reference
Failure” and no calls can be made on the Summary Worksheet or Data Table Worksheet. In this case,
please refer to Table 8 below for further actions.
The References Worksheet also displays the information header, cartridge number, cartridge session
number, and operator ID. When printed, footer with lines for “Reviewed By” and “Approved By” will
appear. The print settings for this worksheet are editable. All cells in this sheet are protected and cannot
be edited.

M899061 V. 03-07.2017 Page 19 of 26
Figure 8. Clostridium Difficile Panel Data Analysis Spreadsheet; Reference worksheet
Data Calculations
Data calculation and analysis are performed automatically by the Excel software. The raw
data is available for the user convenience.
In order to determine if a specific amplicon is present in the tested sample, the signal corresponding to
this sample is compared to the signal from the irrelevant capture (background). The Flowchart in figure
9 describe the NanoCHIP Clostridium Difficile Panel application algorithm for determine if a certain
sample is positive or negative
In viewing the Data Table Worksheet, the first column indicates the sample position on the cartridge.
The sample column lists the sample ID. The marker column lists the markers present in the mix. Each
row of markers for a sample corresponds to capture mixes 1 and 2 in order. The Green listed is the raw
signals for that pad. The Control signal is the sample specific background. The ratio listed is the value
of the Green signal of the sample divided by the Control signal of the same sample. This value
determines the signal requirements and ratio criteria described in Table 7. For example, if a certain
sample presenting signal above 4000 and ratio >4 for gdh reporter then the sample is indicated as
positive for gdh antigen, namely presence of Clostridium difficile. If for the same sample, toxin A and/or
B markers (reporters) are also positive according to the cut-off, the call will be designated as " C. difficile
(tox A/B), i.e., toxigenic strain of Clostridium difficile.

M899061 V. 03-07.2017 Page 20 of 26
Perform test
Target markers(-)
At least one of target markers
(+)
NVC(+)
NVC(-)
Negative(-)
Invalid Sample
Interpretation valid
Figure 9. Data interpretation flowchart.
Table 7: Signal level and Ratio (S/N) of the C. difficile markers in the test.
Target Minimum Signal Minimum Ratio
C. difficile (tcdB) 5000 4
C. difficile (tcdA) 4000 4
C. difficile (gdh) 4000 4
NVC 5000 2
Troubleshooting
When the following observations of 1) Invalid sample 2) False positive in the negative control well or 3) Reference failure are noted in the Summary Worksheet of the assay, please follow the recommended solution.
Table 8: Troubleshooting
OBSERVATION ACTION PROBABALE CAUSE SOLUTION
Specific samples are invalid
Nucleic acid extraction failure Re-extract all invalid samples
PC failed and/ or all clinical samples are invalid
Check PC and NVC target's in the Data Table sheet
Specific problem of the PC sample or failed extraction process
Re-extract all samples tested in case and NVC signal reading is negative for all samples
False positive signal observed at the Negative control sample
Presence of contamination Apply decontamination control plan. Repeat PCR amplification after decontaminating the work area
Reference failure Improper NanoCHIP® procedure- user error
Repeat the NanoCHIP procedure according to manual
M899061 V. 03-07.2017 Page 21 of 26
Limitations of the Procedure
1. The NanoCHIP® assays can only be performed only on the NanoCHIP® instruments.
2. The NanoCHIP® assay is a qualitative test and does not provide the quantitative value of detected
organism present.
3. The NanoCHIP® Clostridium Difficile panel assay is intended for use only with cotton swab.
4. Positive results obtained using the NanoCHIP® Clostridium Difficile panel assay are presumptive.
All results should be used and interpreted in the context of a full clinical evaluation as an aid in the
diagnosis of gastrointestinal infection.
5. Error results may occur from improper sample collection, handling, storage, technical error, sample
mix-up, or because the number of organisms in the sample is below the analytical sensitivity of the
test.
6. As with all PCR-based in vitro diagnostic tests, extremely low levels of target below the analytical
sensitivity of the assay may be detected, but results may not be reproducible.
7. If a certain sample result is Invalid then the sample should be repeated from DNA extraction.
8. NanoCHIP® failed Positive Control sample indicate of a problem in the amplification process and
require new PCR for all samples in the same run.
9. As with all in vitro diagnostic tests, positive and negative predictive values are highly dependent on
prevalence. The NanoCHIP® Clostridium Difficile panel performance may vary depending on the
prevalence and population tested.

M899061 V. 03-07.2017 Page 22 of 26
VII. PERFORMANCE CHARACTERISTICS
Clinical Sensitivity and Specificity
Clinical performance characteristics of the NanoCHIP® Clostridium Difficile Panel were assessed in a
clinical study performed in external site by evaluation of clinically-obtained retrospective (frozen)
specimens. Study specimens consisted of unpreserved samples (parasites testing) or Cary-Blair
preserved (bacteria testing) liquid to soft stools from symptomatic patients with acute gastroenteritis for
whom diagnostic procedures were indicated and ordered.
Specimens were characterized by the source site routine laboratory methodologies and included direct
culture, microscopy or immunoassay which comprised the reference method for specimens obtained
from the site. Genomic DNA was extracted using NucliSENS easyMag (bioMerieux) DNA extraction
automated systems, as well as with manual stool DNA extraction kit (Qiagen). All extracts were stored
at -20˚C before and after use.
Table 9, presents results obtained from retrospective evaluation performed in UK in comparison to the
lab reference methods
Table 9: sensitivity and specificity of the NanoCHIP® Clostridium difficile panel assay from a
retrospective study.
Pathogen
External evaluation
Positive Agreement Negative Agreement
TP/ (TP+FN) Percent
TN/ (TN+FP) Percent
C. difficile(tcdA, tcdB) 84/84 100 998/1001 99.7
C. difficile(gdh) 99/99 100 555/594* 93.3*
* GIP combi I detected 139 C. difficile-gdh positive samples, whereas only 57 detected by laboratory routine. Forty two samples
were confirmed by reference method. Further 40 identified as C. difficile (gdh) by GIP combi I, could not be confirmed since
there was no target for gdh in the reference kit used during this evaluation.

M899061 V. 03-07.2017 Page 23 of 26
APPENDICES
Appendix A: Clostridium Difficile Panel Format
The Clostridium Difficile Panel assay uses a capture down format to recognize the markers based on
identified sample ethnicity. Following the single tube multiplex polymerase chain reaction, the amplicons
are specifically bound to a permeation layer that covers the electronic microarray via hybridization to
complementary capture oligonucleotides. These captured oligonucleotides are biotinylated at the 5’ or
3' end and are bound to streptavidin that has been incorporated into the permeation layer.
The Clostridium Difficile Panel Kit components include the following:
1. CDIFF Primer Mix: set of forward and reverse amplification primers that specifically amplify fragments
(markers) that are shown to be associated or conferring resistance to antibiotic agents (Table 1).
2. LS Amplification Buffer: a general purpose reagent used for the PCR amplification of DNA in an ionic
environment optimized for analysis on the NanoCHIP®400 electronic microarray.
3. CDIFF Capture/Reporter Pack: the pack containing a set of 2 unique capture mixes and 3 unique
reporter mixes. Each capture is a biotinylated synthetic oligonucleotide complementary to one of the
amplicons generated with the CDIFF Primer Mix. Each capture is present in one of the 2 capture
mixes. Reporter mixes contain discriminators and universal reporters. Each discriminator contains a
segment that is complementary to the fragments that specifically characterize the pathogens of
interest. Each Clostridium Difficile reporter mix contains numerous pairs of discriminators.
4. CDIFF Reference Pack: the pack containing a set of 2 unique mixes of biotinylated reference
oligonucleotides. The reference oligonucleotides have a segment complementary to one or more
discriminator oligonucleotides. The green/red signals generated from the references indicate that the
reporter mixes and reporting protocol are working properly.
5. CAPdown Sample Buffer B: a general purpose reagent used for the delivery of amplicons to the
activated test sites on the NanoCHIP®400 electronic microarray.
Starting with the amplified material, the Clostridium Difficile Panel protocols generated as described in
the “Creating a Protocol” section consist of the following five steps.
1. Capture addressing: the capture oligonucleotide mixes specific for the Clostridium Difficile Panel
assay are electronically addressed to predetermined pads across the cartridge in a sequential
manner. The number of pads addressed with each mix is equal to the number of samples/controls
being analyzed. Wells 1 and 2 of the CDIFF Capture/Reporter Reagent Pack contain Capture Mixes
1 and 2.
2. Reference addressing: the reference oligonucleotide mixes specific for the Clostridium Difficile
Panel assay are electronically addressed to predetermined pads in the NanoCHIP® microarray. Each
reference mix is addressed in two separate electronic activation events to separate pads. References
are addressed in the first use of the cartridge subsequent cartridge runs utilize references addressed
in the first use. The reference mixes are in wells 1 and 2 of the Clostridium Difficile Panel Reference
Reagent Pack.
3. Amplicon Hybridization: amplification reaction products diluted in CAPdown Sample Buffer B are
simultaneously addressed to 2 pads that comprise the full set of the Capture Mixes 1 and 2. The
amplicons are sorted across the 2 pads by hybridization to specific captures. An amplicon hybridizes
only 1 of the 2 capture pads.
4. Reporting: sequential cycles of passive hybridization-thermal discrimination-fluorescence imaging-
thermal stripping ensure for each of the 3 reporter mixes contained in the CDIFF Capture/Reporter
Reagent Pack in wells 3-5. The thermal stripping step removes the discriminator/universal reporters
but leaves the amplicon bound to the capture oligonucleotide for the next reporter mix.

M899061 V. 03-07.2017 Page 24 of 26
5. Reverse Bias Washing: each pad that was addressed with sample is subjected to a reverse bias
wash to remove bound amplicon that can potentially interfere with future assays on the microarray.
After Reverse Bias Washing, the system automatically fills the cartridge with Water for storage
between uses.
Figure 10: Map of capture Mix Pads arrangement
Table 12 displays the markers in the context of the capture/reporter mixture matrix. Each reporter mix
reports markers across the 2 sample pads and has a minimum of one pad not used. The unused pad
serves as the background for that reporting. Each sample has its own background pad.
Table 12: Map of Reporter Mixes 1–3 across Capture Pads 1–2
Reporter Mix 1 Reporter Mix 2 Reporter Mix 3
RED GREEN GREEN RED
Capture Mix 1 tcdA tcdB Control gdh
Capture Mix 2 Control Control NVC Control
Capture mix 2Capture mix 1

M899061 V. 03-07.2017 Page 25 of 26
Appendix B: Legal Notices
Notice to Recipients about Licenses
Certain usages of the product described herein have been licensed from Beckman-Coulter Incorporated
under United States Patent No. 5,653,939 and foreign counterparts thereof, and may be covered by
Genetic Technologies Limited, United States Patent No. 5,612,179, applications and foreign
counterparts thereof.
You are authorized to practice the methods covered by or claimed in the above patent, but such
authorized use is strictly limited to practice of such methods for or with the use of the product or products
described herein. Any other use or commercialization of such methods requires a license directly from
MIT and Genetic Technologies Limited. Persons wishing information regarding licensing terms should
write to: MIT's Technology Licensing Office, One Cambridge Center, Kendall Square, NE 18-501,
Cambridge, MA 02142-1493, USA; and Genetic Technologies Limited, Attention: Licensing Department,
60-66 Hanover Street, Fitzroy, Victoria 3065, Australia.
PCR information
Although patents covering the basic polymerase chain reaction (PCR) have expired, patents covering
the use of certain enzymes and other uses of the PCR process owned by Hoffman-LaRoche and others
remain in effect and may require a license. Purchase of this product does not include or provide a
license with respect to these patents. Savyon Diagnostics Ltd. does not encourage or support the
unauthorized or unlicensed use of the PCR process. Use of this product is recommended for persons
that either have the license to perform PCR or are not required to obtain a license. No license under
the patents to use the PCR process is conveyed expressly or by implication to the purchaser by the
purchase of this product. Nothing herein is to be construed as recommending any practice or any
products in violation of any patent or in violation of any law or regulation.
Limited Product Warranty
Savyon Diagnostics Ltd. warrants that this product will meet the specifications stated above. If any
component of this product does not conform to these specifications, Savyon Diagnostics Ltd. will at its
sole discretion, as its sole and exclusive liability and as the users’ sole and exclusive remedy, replace
the product at no charge or refund the cost of the product; provided that notice of non-conformance is
given to Savyon Diagnostics Ltd. , within sixty (60) days of receipt of the product.
This warranty limits Savyon Diagnostics Ltd’s liability to the replacement of this product or refund of the
cost of the product. NO OTHER WARRANTIES OF ANY KIND, EXPRESS OR IMPLIED, INCLUDING
WITHOUT LIMITATION IMPLIED WARRANTY OF MERCHANTABILITY OR FITNESS FOR A
PARTICULAR PURPOSE OR NON-INFRINGEMENT, ARE PROVIDED BY SAVYON DIAGNOSTICS
LTD. Savyon Diagnostics Ltd. shall have no liability for any direct, indirect, consequential or incidental
damages arising out of the use, the results of use or the inability to use this product and its components.
In no event shall Savyon Diagnostics Ltd. be liable for claims for any other damages, whether direct,
incidental, foreseeable, consequential, or special (including but not limited to loss of use, revenue or
profit), whether based upon warranty, contract, tort (including negligence) or strict liability arising in
connection with the sale or use or the failure of Savyon Diagnostics Ltd. products to perform in
accordance with the stated specifications.
Some components of nucleic acid analysis, such as specific methods and compositions for manipulating
or visualizing nucleic acids for analysis, may be covered by one or more patents owned by other parties.
Similarly, nucleic acids containing specific nucleotides sequences may be patented. Making, using,
offering for sale, or selling such components or nucleic acids may require one or more licenses. Nothing
in this document should be construed as an authorization or implicit license to make, use or sell any so
covered component or nucleic acid under any such patents.

M899061 V. 03-07.2017 Page 26 of 26
Registered Trademarks GeneAmp® is a registered trademark of Applied Biosystems.
Microsoft® is a registered trademark of Microsoft Corporation
Mastercycler® is a registered trademark of Eppendorf-Netheler-Hinz GmbH.
Triton® is a registered trademark of Union Carbide Chemicals and Plastics Co., Inc.
MicroAmp® is a registered trademark of Applera Corporation or its subsidiaries in the US and/or certain
other countries.
REFERENCES
1. Cloud J, Kelly CP. Update on Clostridium difficile associated disease. Curr Opin Gastroenterol. 2007
Jan;23(1):4-9. 2. Owens RC Jr, Donskey CJ, Gaynes RP, Loo VG. Muto CA. Antimicrobial-associated risk factors for
Clostridium difficile infection.Clin Infect Dis. 2008 Jan 15;46 Suppl 1:S19-31. 3. Kelly CP, Pothoulakis C, LaMont JT. Clostridium difficile colitis. N Engl J Med. 1994 Jan 27;330(4):257-
62 4. Voth DE, Ballard JD. Clostridium difficile toxins: mechanism of action and role in disease. Clin Microbiol
Rev. 2005 Apr;18(2):247-63. 5. Savidge TC, Pan WH, Newman P, O'brien M, Anton PM, Pothoulakis C. Clostridium difficile toxin B is
an inflammatory enterotoxin in human intestine. Gastroenterology. 2003 Aug;125(2):413-20. 6. Pituch H, van den Braak N, van Leeuwen W, van Belkum A, Martirosian G, Obuch-Woszczatyński P,
Łuczak M, Meisel-Mikołajczyk F. Clonal dissemination of a toxin-A-negative/toxin-B-positive Clostridium difficile strain from patients with antibiotic-associated diarrhea in Poland. Clin Microbiol Infect. 2001 Aug;7(8):442-6.
7. Shin BM, Kuak EY, Yoo SJ, Shin WC, Yoo HM., Emerging toxin A-B+ variant strain of Clostridium difficile responsible for pseudomembranous colitis at a tertiary care hospital in Korea. Diagn Microbiol Infect Dis. 2008 Apr;60(4):333-7.
8. Lyerly DM, Barroso LA, Wilkins TD. Identification of the latex test-reactive protein of Clostridium difficile as glutamate dehydrogenase. J Clin Microbiol. 1991 Nov;29(11):2639-42.
9. Carman RJ, Wickham KN, Chen L, Lawrence AM, Boone JH, Wilkins TD, Kerkering TM, Lyerly DM. Glutamate dehydrogenase is highly conserved among Clostridium difficile ribotypes. J Clin Microbiol. 2012 Apr;50(4):1425-6.