Embed Size (px)
Citation preview
Cloud Report, Dashboard, and Profile Warehouse Template User Guide
Introduction The Cloud Data Quality Report, Dashboard and Profile Warehouse Template is designed to provide a framework to capture reporting metrics for data quality issues, and access data available in the profile warehouse. Furthermore, it demonstrates how to visualize the data in a business intelligence tool or incorporate into Informatica Axon. The template includes a database schema, sample data and mappings to load metadata about the objects in Cloud and the data quality metrics which are stored in Informatica Cloud into dimension tables, sample reports and Dashboards illustrating DQ metrics. In addition, it includes sample data to load into the schema to allow you to view the reports without having the system up and running and generating metrics.
Overview
Cloud Report and Dashboard
The Cloud Data Quality Reporting and Dashboard component is designed to provide you a
framework to capture reporting metrics for data quality issues. The template includes a database
schema, sample data and mappings to load metadata about the objects in Cloud into dimension
tables, sample reports and Dashboards illustrating DQ metrics. In addition, it includes sample data
to load into the schema to allow you to view the reports without having the system up and running
and generating metrics.
Cloud Report and Dashboard Profile Warehouse
The Cloud Data Quality Reporting and Dashboard Profile Warehouse is designed to provide you a
framework to capture reporting metrics for data quality issues by extracting the Profile Details
from the CDQ Profile Warehouse. These assets include additions to the database schema for CDQ
Dashboards and Reporting, CAI assets to extract the statistics from Profiles that contain Data
Quality Rules and CAI assets to integrate the results into Axon Local Data Quality Rules.
Axon Integration
In the age of Data governance, it makes complete sense to integrate your data reporting system
with your data governance system. By integrating Informatica Axon Data governance with a
reporting system, such as this sample template, the data quality rules defined and used within the
report are those defined and governed with your organization. Additionally, the data quality scores
derived from execution of data quality rules for the reporting are synchronized and accurately
reported within Axon as well. Everyone within the organization is using the same rules to define
and measure your data quality and they all see the same results across the various systems used.
If there are issues or changes required, Axon Change Request workflow assure the proper
ownership and change control is followed and documented. While the template will function
without integration to Axon, it completes the holistic picture.
Package Information & Before You Begin
Package Name
CDQ_Reporting_V2.zip
Package Contents
Folder Description
Report_Content Contains two folders Snowflake_DDL and Tableau_Report.
Snowflake_DDL
Contains the DDL scripts used to create the Snowflake database
tables, views and sequences used in the reporting schema.
Snowflake is used as an example, but any relational database
supported by Informatica cloud can be used, such as Oracle, MS
SQL, MySQL.
Tableau_Report
CDQ_Dashboard_template.twbx
Resources Contains two folders Axon_Assets and Reporting_Data
Contains optional data files that are used to populate the
dimension tables. Data for the Fact Result table has also been provided to allow
for a quick demonstration of the reports without setting up the
test mappings.
Axon Assets Axon bulk upload examples for loading the governing
information regarding the data quality rules referenced and
monitored in the mapping. This will load a System, Glossary,
Data Set, Attributes and Local Data Quality Rules.
JDBC Drivers
snowflake-jdbc-3.12.11.jar for the JDBC Connection
Snowflake-CDQ-Reporting-JDBC - Application Connection
Reporting_Data
Contains optional data files that can be used by the users to
populate the dimension tables.
Data for the Fact Result table has also been provided to allow
for a quick demonstration of the reports without setting up the
test mappings.
Data for Snowflake is SQL insert and bulk load files.
Template_Content Contains CDQ bundle files to be imported into IICS and the Snowflake JDBC driver jar file.
Template_Sources Contains test data files to be copied to the DQ server. Use
content installer to install.
Infrastructure
• Informatica Intelligent Cloud Services (IICS) • Informatica Cloud Data Quality (CDQ) • Informatica Cloud Application Integration (CAI)
• Informatica Axon v7.0 or higher • Snowflake Cloud Data Warehouse V2
Pre-Requisite Secure Agent Settings The following options are advised to have set. If these are not set, please have an Administrator user add these property settings. These changes will cause the Data Integration service to restart. If these options are not set, it may cause runtime issues with the Snowflake v2 connection.
• Open the Administrator service and go to Runtime Environments
• Click on the Secure Agent name (usually is a machine name), the Blue Link name.
• Scroll down to the System Configuration Details section
• Click the Dropdown list and select Data Integration Service
• Scroll down to find the Tomcat JRE INFA_MEMORY property. This option should be set at a minimum to ‘-Xms512m -Xmx2048m’
• Next scroll down to the DTM JVMOption1. This should be set at a minimum to ‘-Xms1024m’.
• Ensure that the “Process Server” is up and running in the Secure Agent.
If edits are necessary, click the Edit button (upper right) and make the changes needed. Click Save.
Pre-Requisite Licenses
The following licenses need to be present for CDQ reporting:
• Connector: Snowflake Cloud Data Warehouse V2 (if the target for the reporting schema
is Snowflake) – connectors are licensed by Informatica
• Editions: API and App Integration
Section 1
1.1 Reporting and Dashboard Technical Overview Reporting Schema – Dashboard
1.2 Profile Warehouse Reports and Dashboard Technical Overview
This is the same Reporting Schema with the addition of 3 staging tables 1.3 Cloud Data Quality Assets
The Reporting and Dashboard template supplies mappings and other assets to support usage of the template.
1.4 Cloud Application Integration and Mapping Assets The assets are used to extract the details from the CDQ Profile Warehouse and
build out the Fact and Dimension tables.
Section 2
2.1 Installing the Reporting and Dashboard Template
2.2 Install the CDQ/CDI/CAI Profile Process Assets 2.3 Verifying the Reporting and Dashboard Template
2.4 Display Profiling Results in Dashboard
Section 3
3.1 Axon Integration
Section 1
1.1 Reporting and Dashboard Technical Overview
Reporting Schema
The following diagram outlines the Reporting Schema used by the template for reporting data quality metrics.
The schema utilizes a star schema format which captures aggregated pass/fail metrics for
data quality tests across a number of dimensions.
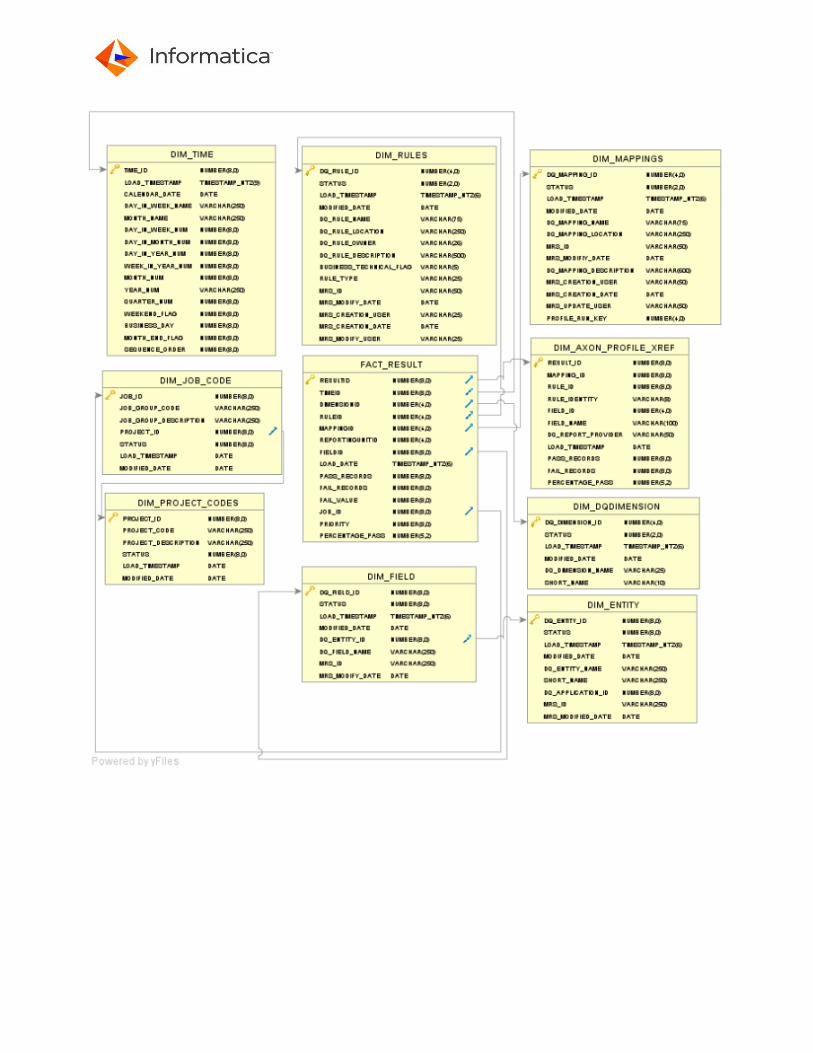

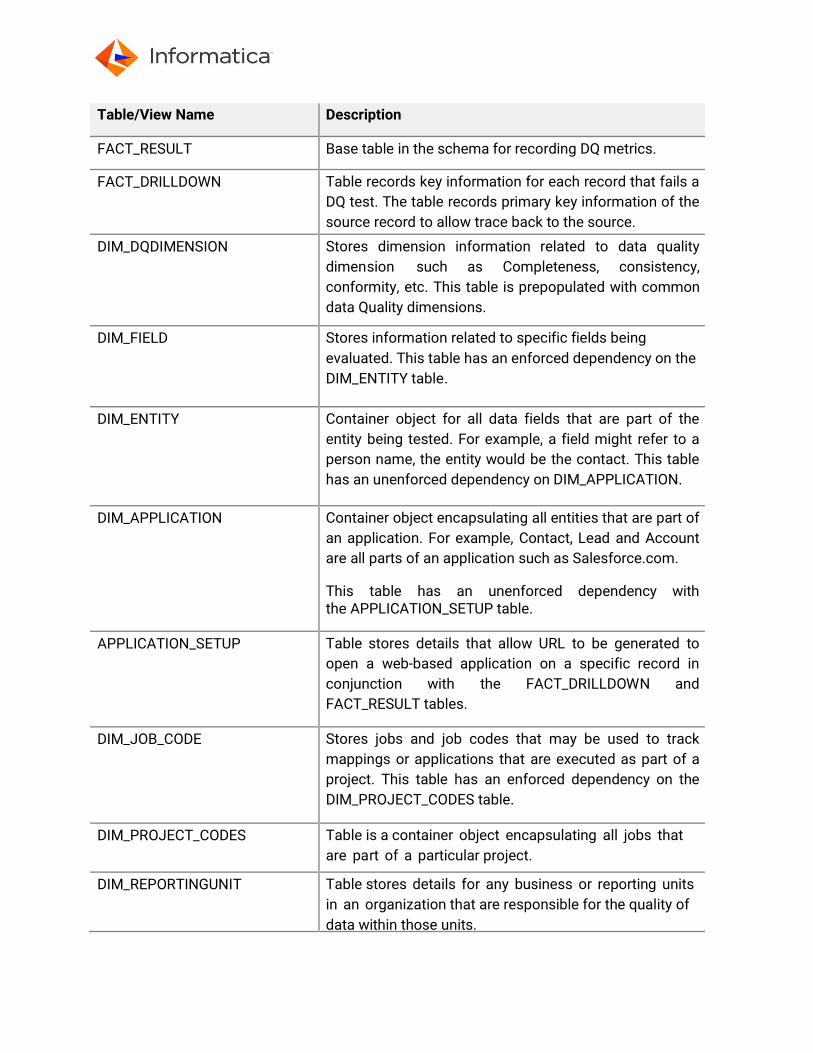
Table/View Name Description
FACT_RESULT Base table in the schema for recording DQ metrics.
FACT_DRILLDOWN Table records key information for each record that fails a
DQ test. The table records primary key information of the
source record to allow trace back to the source.
DIM_DQDIMENSION Stores dimension information related to data quality
dimension such as Completeness, consistency,
conformity, etc. This table is prepopulated with common
data Quality dimensions.
DIM_FIELD Stores information related to specific fields being
evaluated. This table has an enforced dependency on the
DIM_ENTITY table.
DIM_ENTITY Container object for all data fields that are part of the
entity being tested. For example, a field might refer to a
person name, the entity would be the contact. This table
has an unenforced dependency on DIM_APPLICATION.
DIM_APPLICATION Container object encapsulating all entities that are part of
an application. For example, Contact, Lead and Account
are all parts of an application such as Salesforce.com. This table has an unenforced dependency with the APPLICATION_SETUP table.
APPLICATION_SETUP Table stores details that allow URL to be generated to
open a web-based application on a specific record in
conjunction with the FACT_DRILLDOWN and
FACT_RESULT tables.
DIM_JOB_CODE Stores jobs and job codes that may be used to track
mappings or applications that are executed as part of a
project. This table has an enforced dependency on the
DIM_PROJECT_CODES table.
DIM_PROJECT_CODES Table is a container object encapsulating all jobs that
are part of a particular project.
DIM_REPORTINGUNIT Table stores details for any business or reporting units
in an organization that are responsible for the quality of
data within those units.
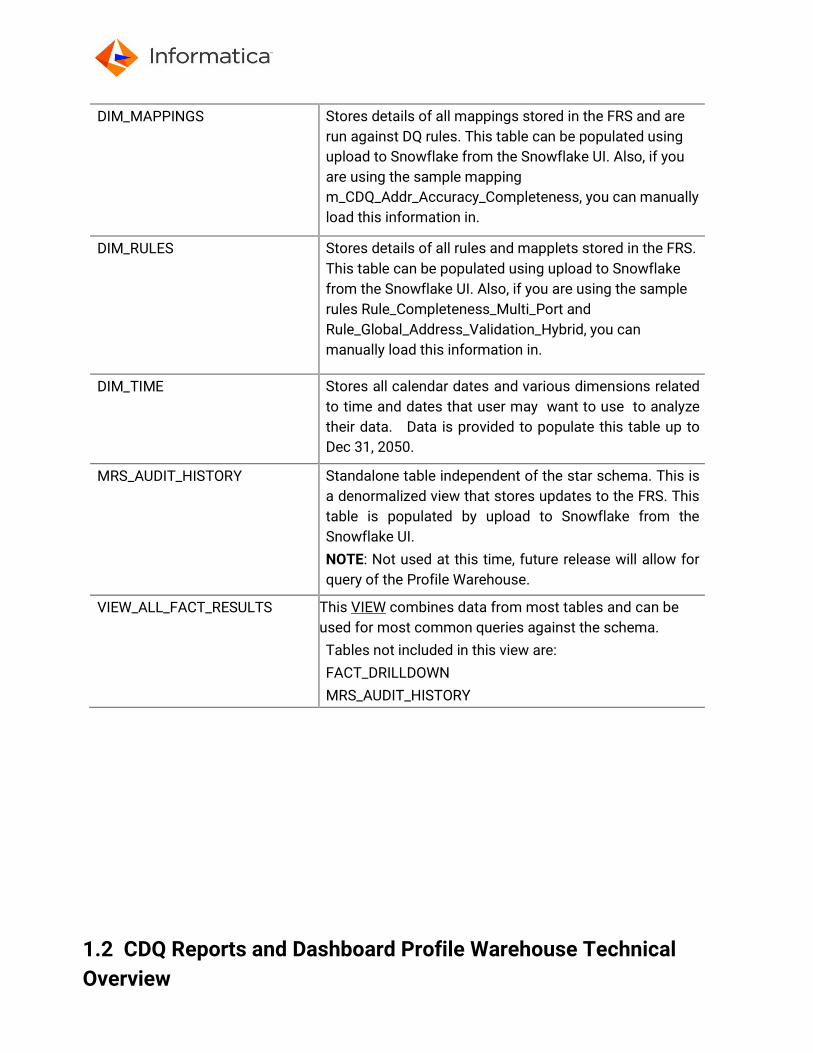
DIM_MAPPINGS Stores details of all mappings stored in the FRS and are
run against DQ rules. This table can be populated using
upload to Snowflake from the Snowflake UI. Also, if you
are using the sample mapping
m_CDQ_Addr_Accuracy_Completeness, you can manually
load this information in.
DIM_RULES Stores details of all rules and mapplets stored in the FRS.
This table can be populated using upload to Snowflake
from the Snowflake UI. Also, if you are using the sample
rules Rule_Completeness_Multi_Port and
Rule_Global_Address_Validation_Hybrid, you can
manually load this information in.
DIM_TIME Stores all calendar dates and various dimensions related
to time and dates that user may want to use to analyze
their data. Data is provided to populate this table up to
Dec 31, 2050.
MRS_AUDIT_HISTORY Standalone table independent of the star schema. This is
a denormalized view that stores updates to the FRS. This
table is populated by upload to Snowflake from the
Snowflake UI.
NOTE: Not used at this time, future release will allow for
query of the Profile Warehouse.
VIEW_ALL_FACT_RESULTS This VIEW combines data from most tables and can be
used for most common queries against the schema.
Tables not included in this view are:
FACT_DRILLDOWN
MRS_AUDIT_HISTORY
1.2 CDQ Reports and Dashboard Profile Warehouse Technical
Overview

Reporting Schema
The following diagram outlines the Reporting Schema additions and the Dimension tables used by the solution. This is the same Reporting Schema with the addition of 3 staging tables;
The schema utilizes a star schema format which captures aggregated pass/fail (Valid/Invalid)
metrics of Profile runs that have Rules.
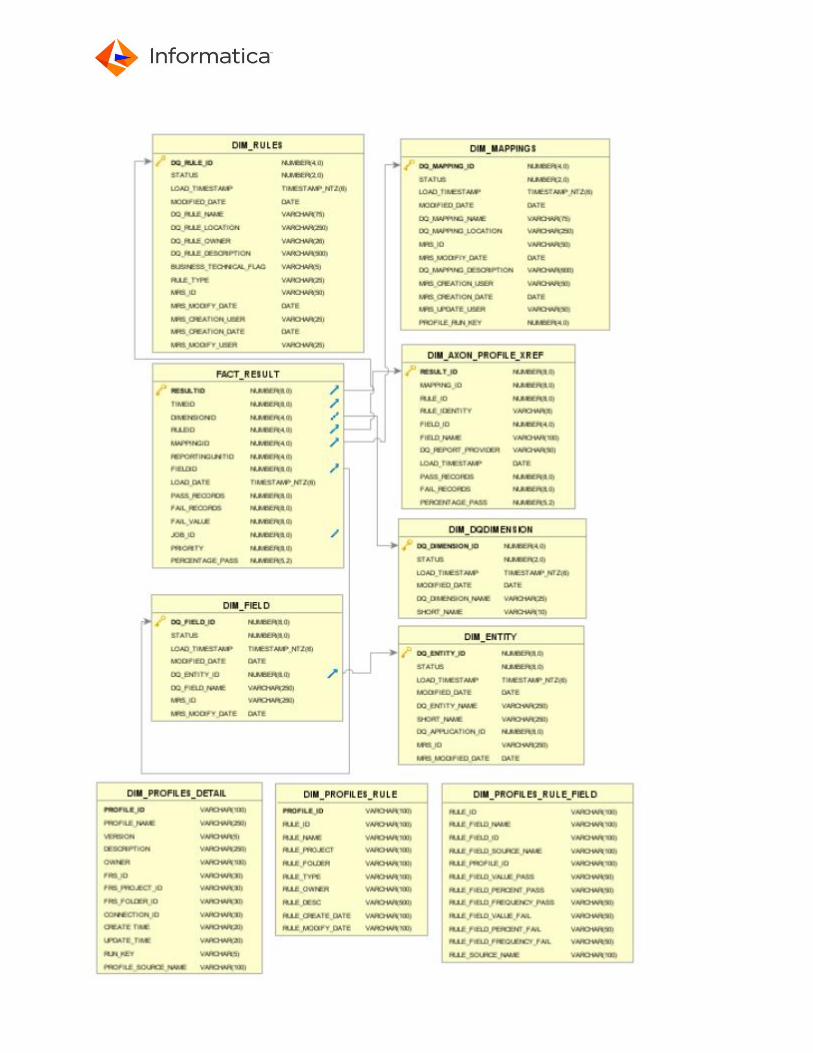
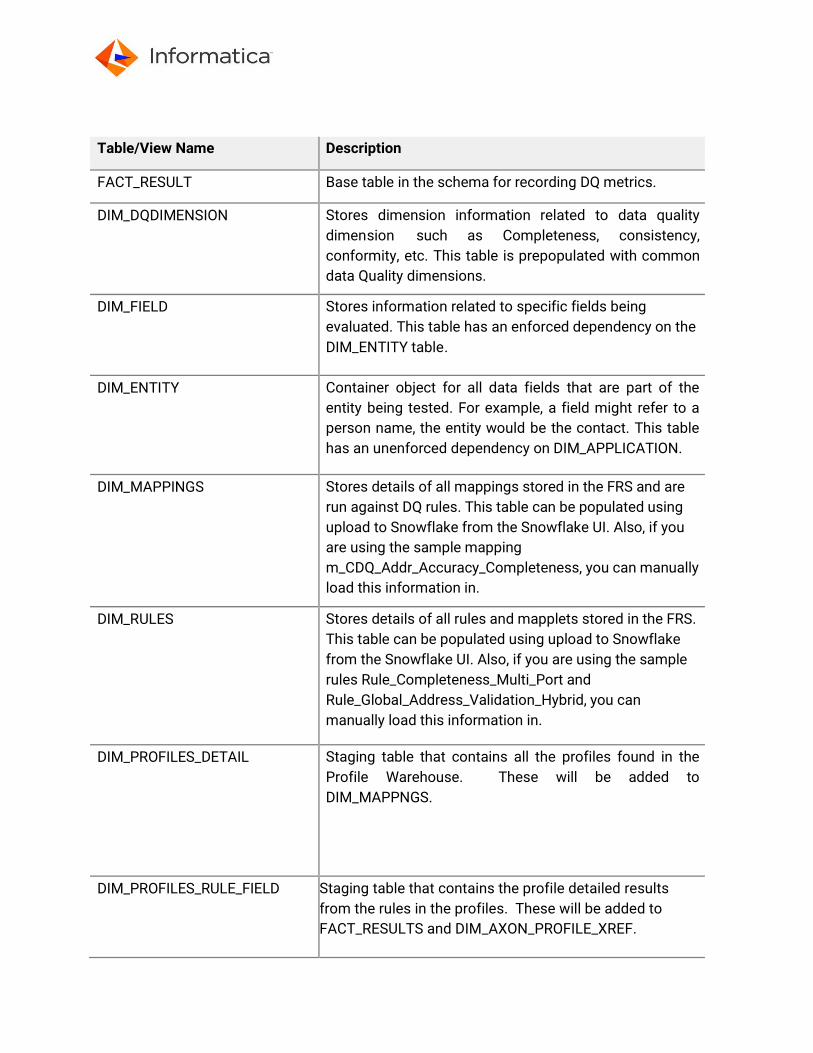
Table/View Name Description
FACT_RESULT Base table in the schema for recording DQ metrics.
DIM_DQDIMENSION Stores dimension information related to data quality
dimension such as Completeness, consistency,
conformity, etc. This table is prepopulated with common
data Quality dimensions.
DIM_FIELD Stores information related to specific fields being
evaluated. This table has an enforced dependency on the
DIM_ENTITY table.
DIM_ENTITY Container object for all data fields that are part of the
entity being tested. For example, a field might refer to a
person name, the entity would be the contact. This table
has an unenforced dependency on DIM_APPLICATION.
DIM_MAPPINGS Stores details of all mappings stored in the FRS and are
run against DQ rules. This table can be populated using
upload to Snowflake from the Snowflake UI. Also, if you
are using the sample mapping
m_CDQ_Addr_Accuracy_Completeness, you can manually
load this information in.
DIM_RULES Stores details of all rules and mapplets stored in the FRS.
This table can be populated using upload to Snowflake
from the Snowflake UI. Also, if you are using the sample
rules Rule_Completeness_Multi_Port and
Rule_Global_Address_Validation_Hybrid, you can
manually load this information in.
DIM_PROFILES_DETAIL Staging table that contains all the profiles found in the
Profile Warehouse. These will be added to
DIM_MAPPNGS.
DIM_PROFILES_RULE_FIELD Staging table that contains the profile detailed results
from the rules in the profiles. These will be added to
FACT_RESULTS and DIM_AXON_PROFILE_XREF.
DIM_PROFILES_RULES Staging table that contains all the rules found in the Profile
Warehouse that the profiles are using. These will be added
to DIM_RULES.
DIM_AXON_PROFILE_XREF Staging table used to update the metrics to Local Data
Quality Rules in Axon.
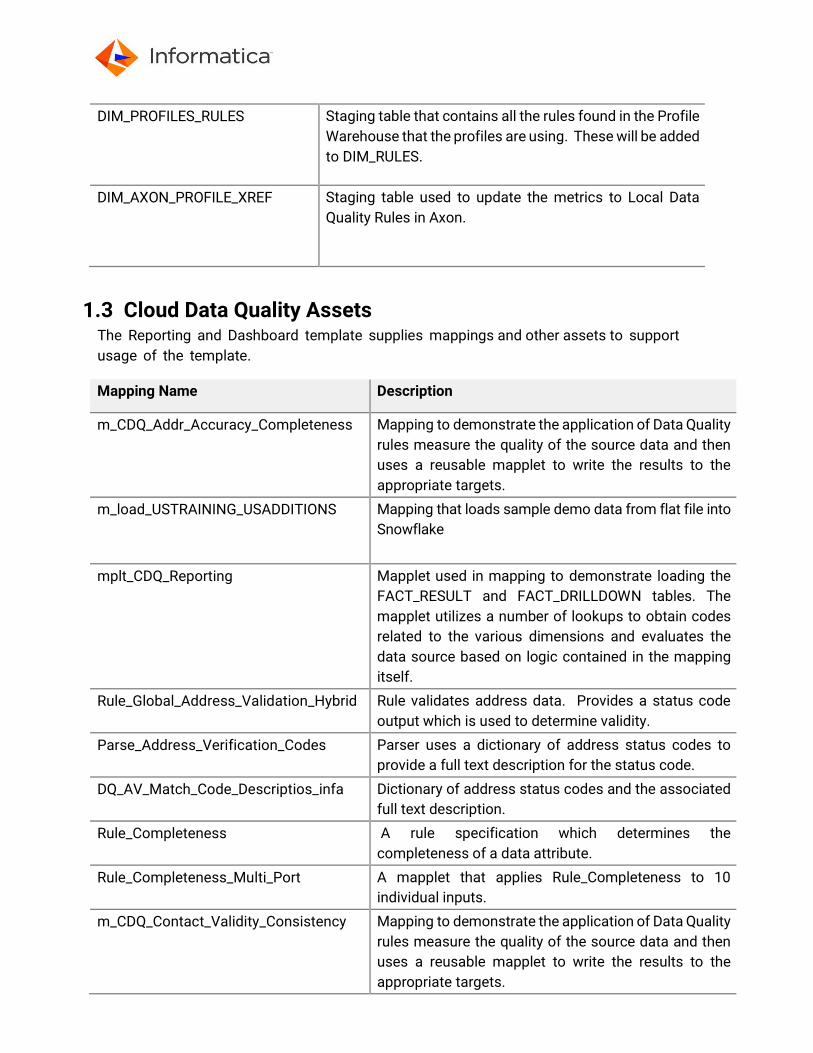
1.3 Cloud Data Quality Assets The Reporting and Dashboard template supplies mappings and other assets to support
usage of the template.
Mapping Name Description
m_CDQ_Addr_Accuracy_Completeness Mapping to demonstrate the application of Data Quality
rules measure the quality of the source data and then
uses a reusable mapplet to write the results to the
appropriate targets.
m_load_USTRAINING_USADDITIONS Mapping that loads sample demo data from flat file into
Snowflake
mplt_CDQ_Reporting Mapplet used in mapping to demonstrate loading the
FACT_RESULT and FACT_DRILLDOWN tables. The
mapplet utilizes a number of lookups to obtain codes
related to the various dimensions and evaluates the
data source based on logic contained in the mapping
itself.
Rule_Global_Address_Validation_Hybrid Rule validates address data. Provides a status code
output which is used to determine validity.
Parse_Address_Verification_Codes Parser uses a dictionary of address status codes to
provide a full text description for the status code.
DQ_AV_Match_Code_Descriptios_infa Dictionary of address status codes and the associated
full text description.
Rule_Completeness A rule specification which determines the
completeness of a data attribute.
Rule_Completeness_Multi_Port A mapplet that applies Rule_Completeness to 10
individual inputs.
m_CDQ_Contact_Validity_Consistency Mapping to demonstrate the application of Data Quality
rules measure the quality of the source data and then
uses a reusable mapplet to write the results to the
appropriate targets.
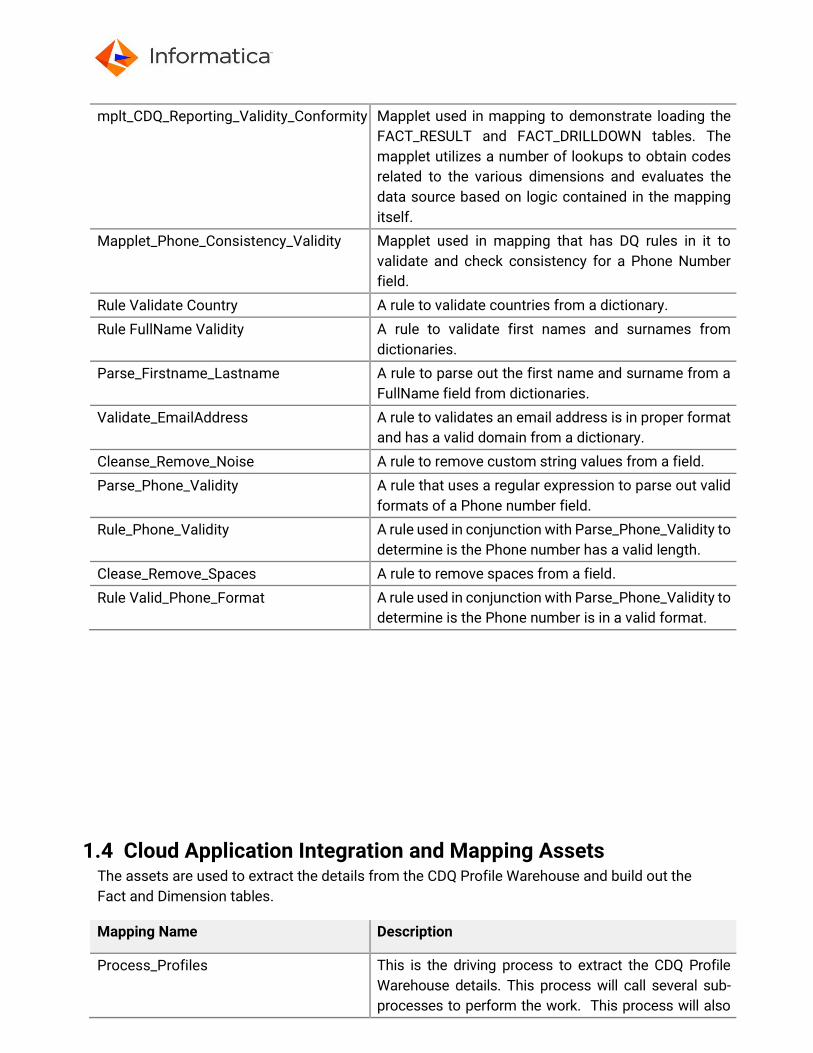
mplt_CDQ_Reporting_Validity_Conformity Mapplet used in mapping to demonstrate loading the
FACT_RESULT and FACT_DRILLDOWN tables. The
mapplet utilizes a number of lookups to obtain codes
related to the various dimensions and evaluates the
data source based on logic contained in the mapping
itself.
Mapplet_Phone_Consistency_Validity Mapplet used in mapping that has DQ rules in it to
validate and check consistency for a Phone Number
field.
Rule Validate Country A rule to validate countries from a dictionary.
Rule FullName Validity A rule to validate first names and surnames from
dictionaries.
Parse_Firstname_Lastname A rule to parse out the first name and surname from a
FullName field from dictionaries.
Validate_EmailAddress A rule to validates an email address is in proper format
and has a valid domain from a dictionary.
Cleanse_Remove_Noise A rule to remove custom string values from a field.
Parse_Phone_Validity A rule that uses a regular expression to parse out valid
formats of a Phone number field.
Rule_Phone_Validity A rule used in conjunction with Parse_Phone_Validity to
determine is the Phone number has a valid length.
Clease_Remove_Spaces A rule to remove spaces from a field.
Rule Valid_Phone_Format A rule used in conjunction with Parse_Phone_Validity to
determine is the Phone number is in a valid format.
1.4 Cloud Application Integration and Mapping Assets The assets are used to extract the details from the CDQ Profile Warehouse and build out the
Fact and Dimension tables.
Mapping Name Description
Process_Profiles This is the driving process to extract the CDQ Profile
Warehouse details. This process will call several sub-
processes to perform the work. This process will also

execute 4 mapping tasks to execute mappings that read
from the staging tables and populate the Fact and
Dimension tables.
mt_Load_Rules_Dimension and m_Load_Rules_Dimension
Mapping task and mapping that populate the
DIM_RULES Dimension table.
mt_Load_Mappings_Dimension and m_Load_Mappings_Dimension
Mapping task and mapping that populate the
DIM_MAPPINGS Dimension table.
mt_Load_Fields_Dimension and m_Load_ Fields _Dimension
Mapping task and mapping that populate the
DIM_FIELDS Dimension table.
mt_Load_Profile_Fact_Results and m_Load_ Profile_Fact_Results
Mapping task and mapping that populate the
FACT_RESULTS Fact table.
Process_Axon_Fact_Results This is the driving process to integrate with Axon to
update Local Data Quality Rules Metrics.
Section 2
2.1 Installing the Reporting and Dashboard Template
To install a Reporting and Dashboard template, complete the following tasks:
Step 1 Create a Warehouse in Snowflake (CDQ_REPORTING)
Step 2 Create a Database in Snowflake (REPORTING)
Step3 Create a Schema in Snowflake (REPORTING)
Step 4 Create a File Format in Snowflake (LOAD_TIMESTAMP_DATE)
- This can be done from the Snowflake Database/Schema view OR the SQL is below that can be used in the Worksheet.
SQL to create the File Formats, Run these SQL scripts within the REPORTING schema: CREATE FILE FORMAT "REPORTING"."REPORTING".LOAD_TIMESTAMP_DATE TYPE = 'CSV' COMPRESSION = 'AUTO' FIELD_DELIMITER = ',' RECORD_DELIMITER = '\n' SKIP_HEADER = 0 FIELD_OPTIONALLY_ENCLOSED_BY = '\047' TRIM_SPACE = FALSE
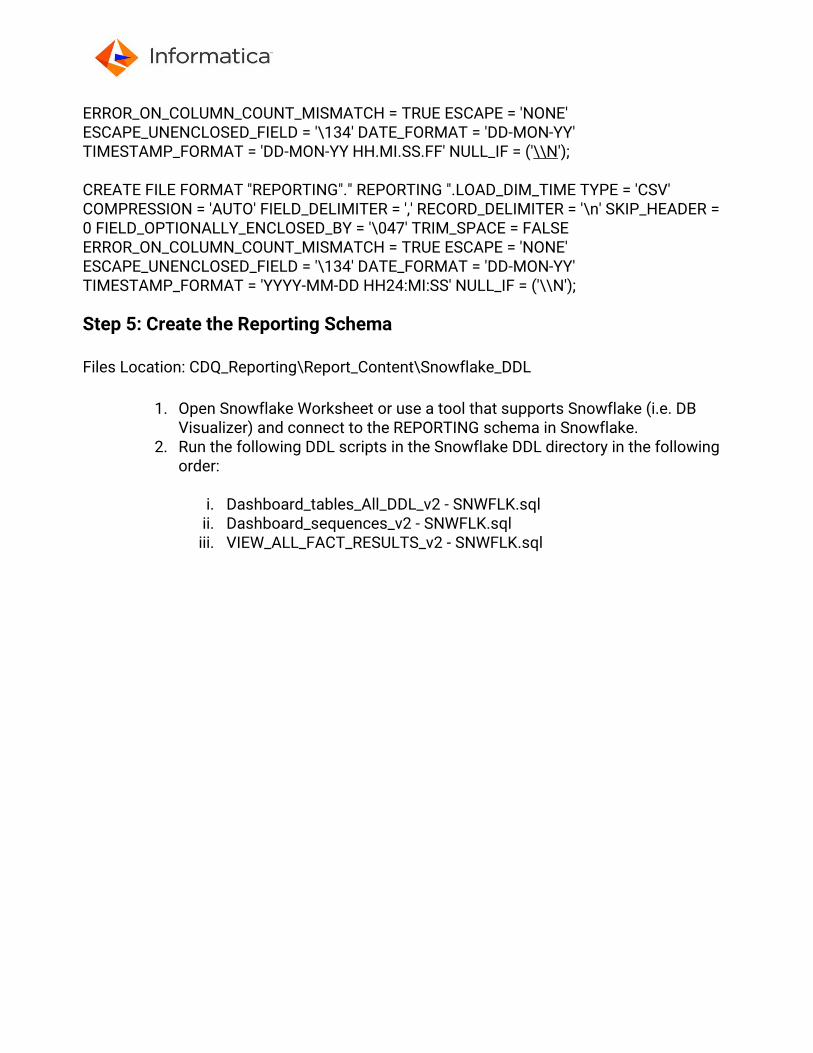
ERROR_ON_COLUMN_COUNT_MISMATCH = TRUE ESCAPE = 'NONE' ESCAPE_UNENCLOSED_FIELD = '\134' DATE_FORMAT = 'DD-MON-YY' TIMESTAMP_FORMAT = 'DD-MON-YY HH.MI.SS.FF' NULL_IF = ('\\N'); CREATE FILE FORMAT "REPORTING"." REPORTING ".LOAD_DIM_TIME TYPE = 'CSV' COMPRESSION = 'AUTO' FIELD_DELIMITER = ',' RECORD_DELIMITER = '\n' SKIP_HEADER = 0 FIELD_OPTIONALLY_ENCLOSED_BY = '\047' TRIM_SPACE = FALSE ERROR_ON_COLUMN_COUNT_MISMATCH = TRUE ESCAPE = 'NONE' ESCAPE_UNENCLOSED_FIELD = '\134' DATE_FORMAT = 'DD-MON-YY' TIMESTAMP_FORMAT = 'YYYY-MM-DD HH24:MI:SS' NULL_IF = ('\\N');
Step 5: Create the Reporting Schema Files Location: CDQ_Reporting\Report_Content\Snowflake_DDL
1. Open Snowflake Worksheet or use a tool that supports Snowflake (i.e. DB
Visualizer) and connect to the REPORTING schema in Snowflake. 2. Run the following DDL scripts in the Snowflake DDL directory in the following
order:
i. Dashboard_tables_All_DDL_v2 - SNWFLK.sql ii. Dashboard_sequences_v2 - SNWFLK.sql iii. VIEW_ALL_FACT_RESULTS_v2 - SNWFLK.sql
Step 6: Load the Dimension and source tables These tables can be loaded as ‘Insert Statements’ from the Snowflake Worksheet or a tool of your choice: Files Location: CDQ_Reporting\Resources\Reporting_Data
1. DIM_APPLICATION_DATA_TABLE_SNWFLK.sql 2. DIM_DQDIMENSION_DATA_TABLE_SNWFLK.sql 3. DIM_ENTITY_DATA_TABLE_SNWFLK.sql 4. DIM_FIELD_DATA_TABLE_SNWFLK.sql 5. DIM_JOB_CODE_DATA_TABLE_SNWFLK.sql 6. DIM_PROJECT_CODES_DATA_TABLE_SNWFLK.sql 7. DIM_REPORTINGUNIT_DATA_TABLE_SNWFLK.sql 8. DIM_RULES_DATA_TABLE_SNWFLK.sql 9. DIM_MAPPINGS_DATA_TABLE_SNWFLK.sql
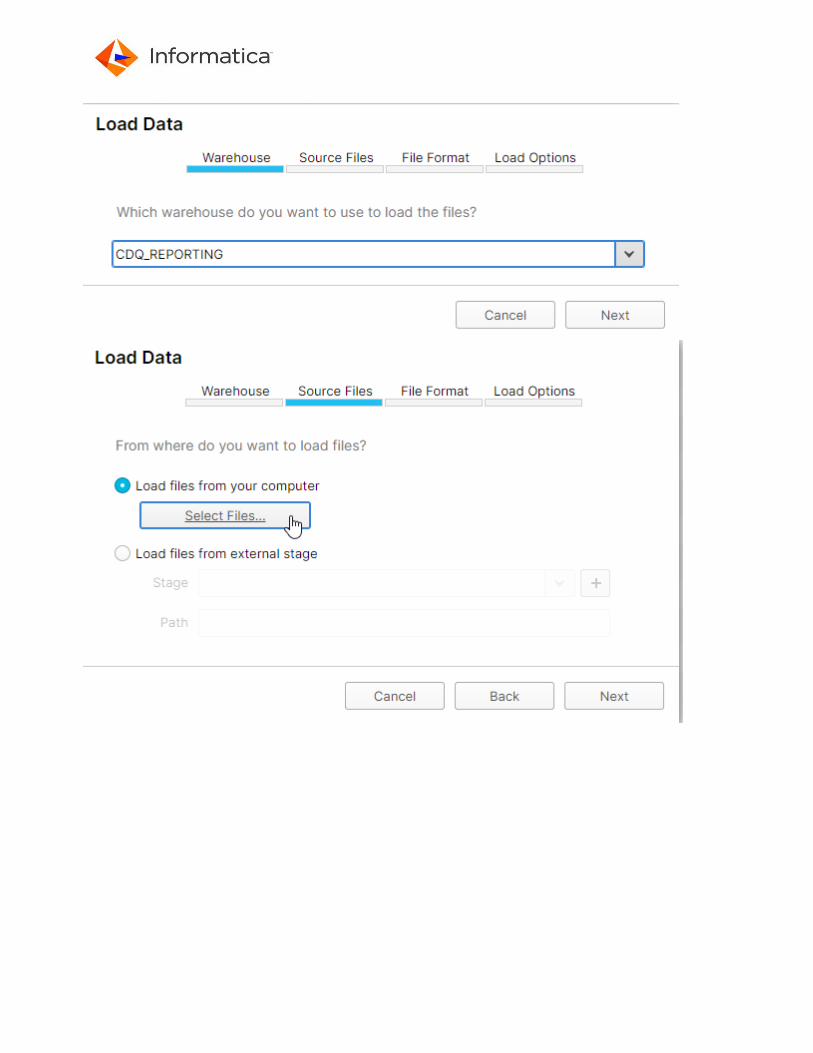
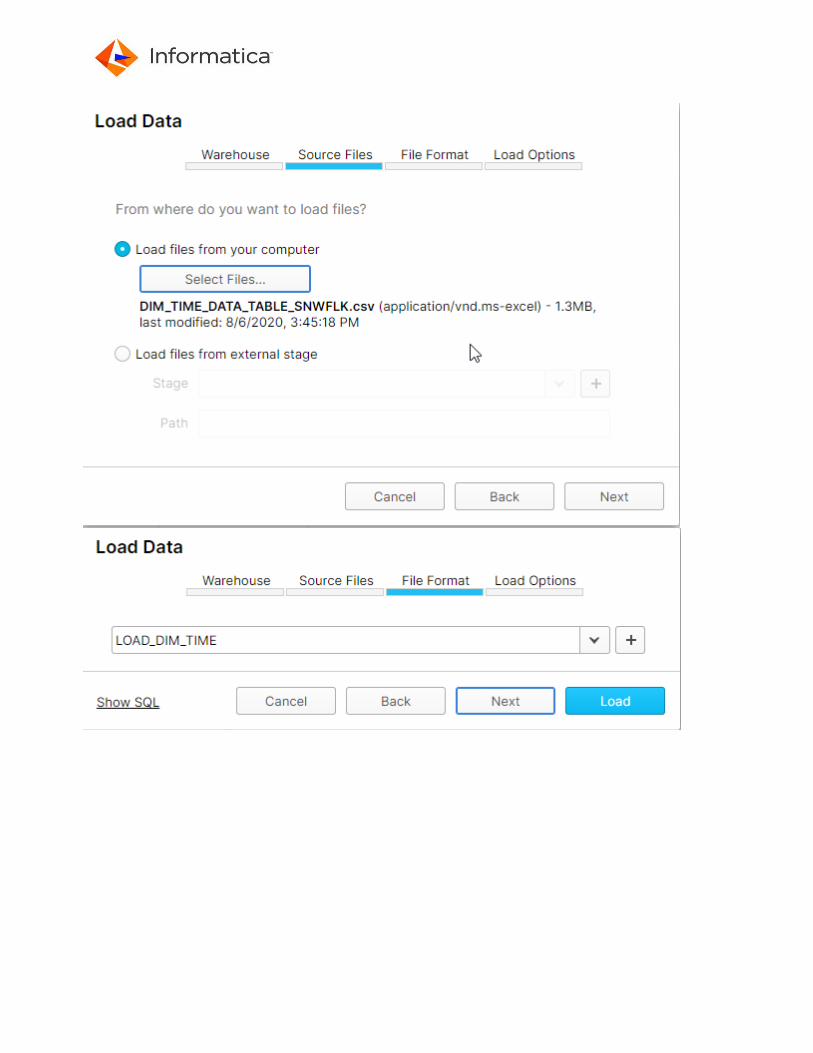
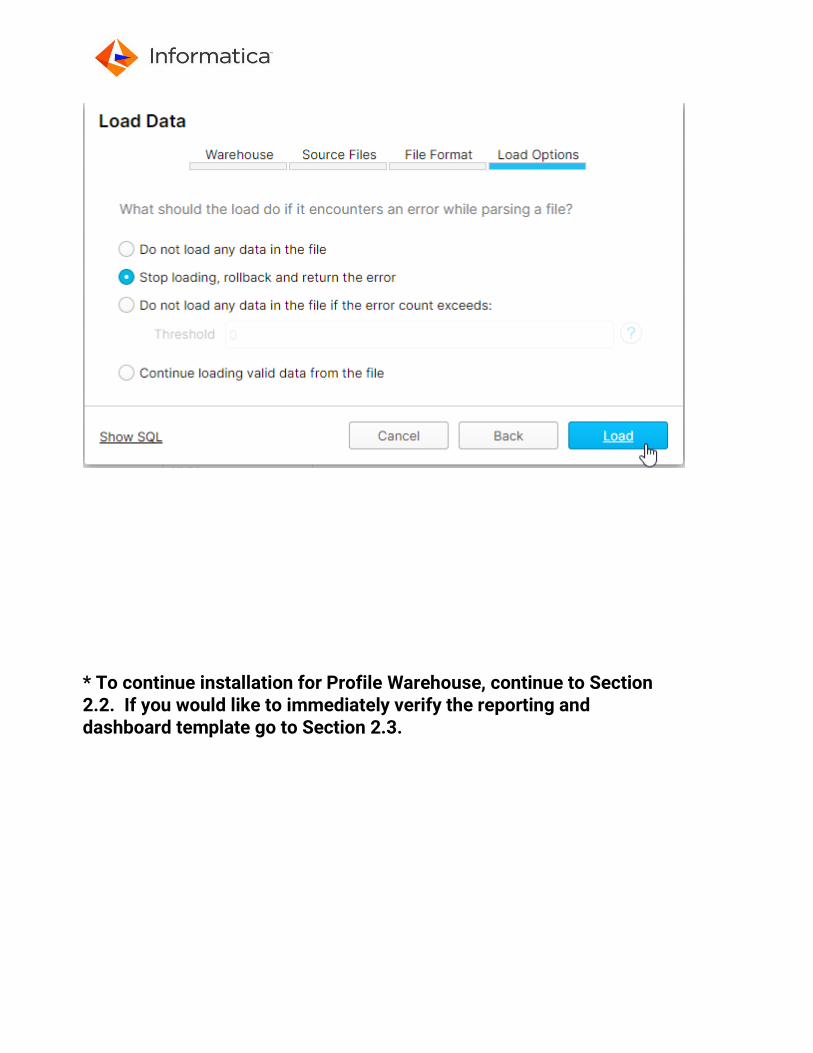
The following tables should be bulk loaded from the Snowflake Database/Schema view. Follow the procedure outlined in the screen shots below for each of the following files. You will need to use File Formats as follows:
TABLE NAME FILE TO LOAD FILE FORMAT DIM_TIME DIM_TIME_DATA_TABLE_SNWFLK.csv LOAD_DIM_TIME
DIM_MAPPINGS DIM_MAPPINGS_DATA_TABLE_SNWFLK.csv LOAD_TIMESTAMP_DATE FACT_DRILLDOWN FACT_DRILLDOWN_DATA_TABLE_SNWFLK.csv LOAD_TIMESTAMP_DATE FACT_RESULT FACT_RESULT_DATA_TABLE_SNWFLK.csv LOAD_TIMESTAMP_DATE DIM_RULES DIM_RULES_DATA_TABLE_SNWFLK.csv LOAD_TIMESTAMP_DATE
Files Location: CDQ_Reporting\Resources\Reporting_Data Load DIM_TIME_DATA_TABLE_SNWFLK.csv into the DIM_TIME table Load DIM_MAPPINGS_DATA_TABLE_SNWFLK.csv into the DIM_MAPPINGS table Load FACT_DRILLDOWN_DATA_TABLE_SNWFLK.csv into the FACT_DRILLDOWN table Load FACT_RESULT_DATA_TABLE_SNWFLK.csv into the FACT_RESULT table Load DIM_RULES_DATA_TABLE_SNWFLK.csv into the DIM_RULES table
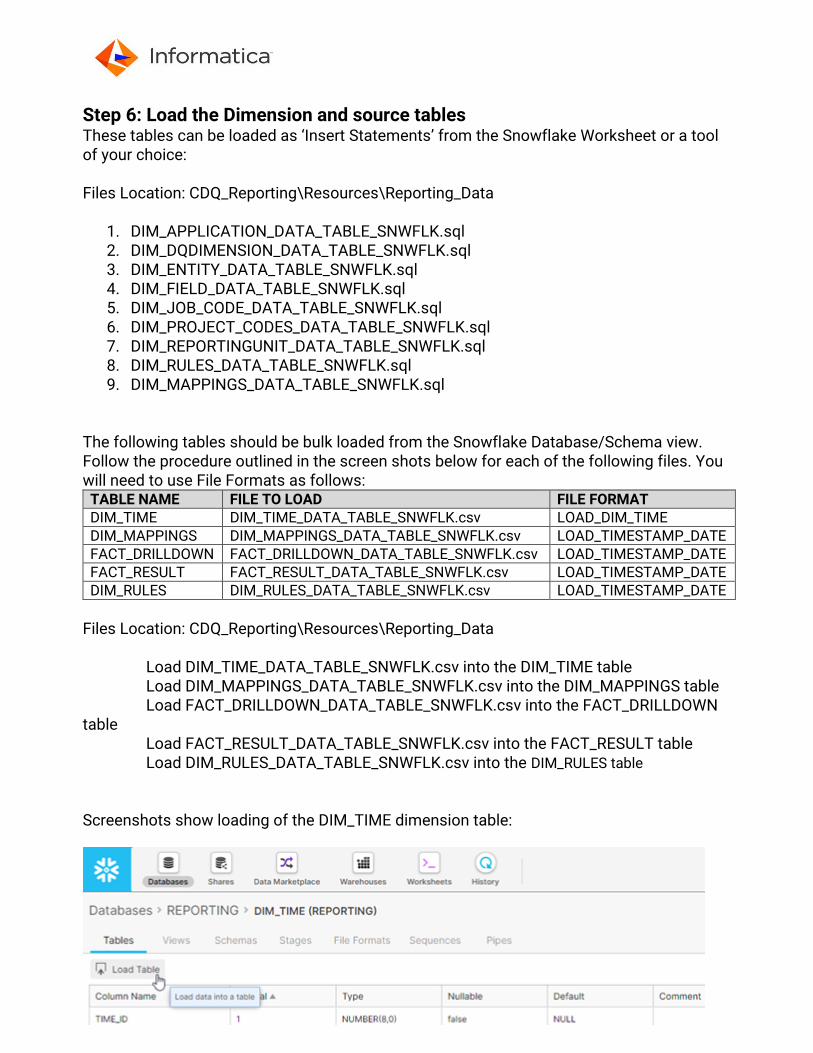
Screenshots show loading of the DIM_TIME dimension table:
* To continue installation for Profile Warehouse, continue to Section 2.2. If you would like to immediately verify the reporting and dashboard template go to Section 2.3.
2.2 Install the CDQ/CDI/CAI Profile Process Assets
Install the CDQ/CDI/CAI Profile Process Assets The solution works as follows: The CAI processes (Process_Profiles and several sub processes) will make API calls to CDQ to extract the key assets and build the staging tables. Once the staging tables have been populated, there are 4 mapping tasks that the process will call. These will use the staging tables to insert/update the reporting schema dimension tables as well as the staging table to be used for the Axon integration. The table DIM_AXON_PROFILE_XREF will then need to be updated with the appropriate Local DQ Rules (i.e. DQ-1200). The other 3 staging tables will be truncated.
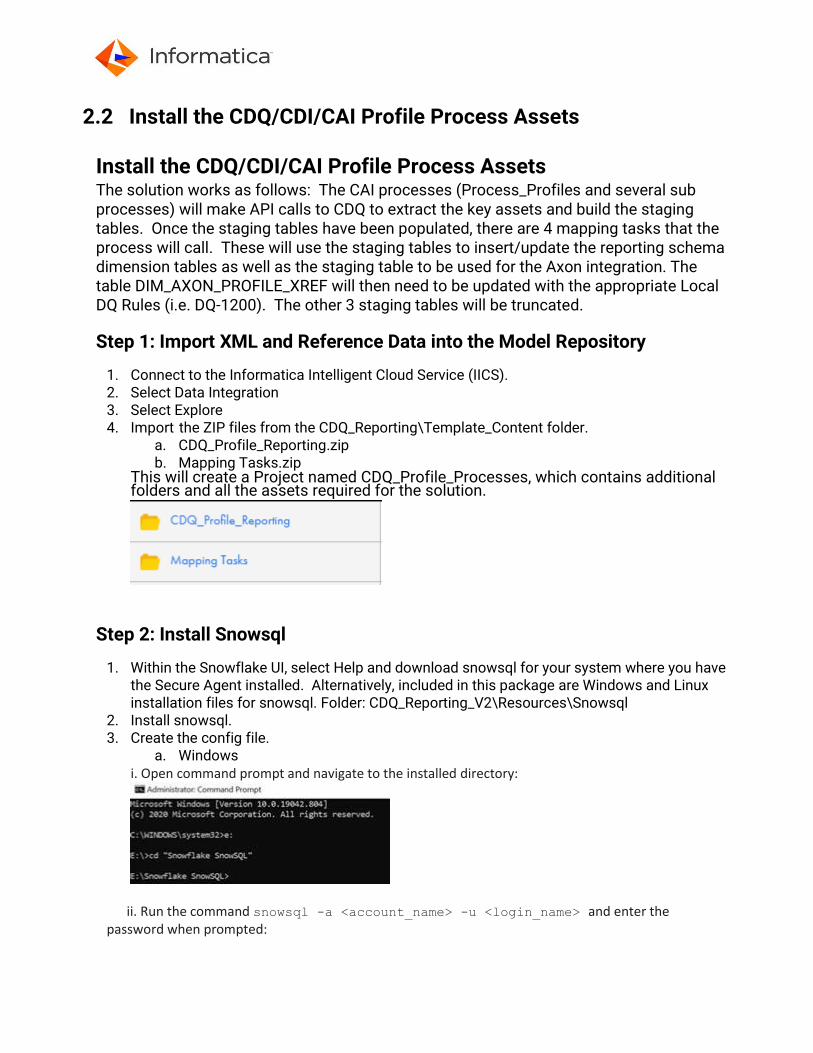
Step 1: Import XML and Reference Data into the Model Repository
1. Connect to the Informatica Intelligent Cloud Service (IICS). 2. Select Data Integration 3. Select Explore 4. Import the ZIP files from the CDQ_Reporting\Template_Content folder.
a. CDQ_Profile_Reporting.zip b. Mapping Tasks.zip
This will create a Project named CDQ_Profile_Processes, which contains additional folders and all the assets required for the solution.
Step 2: Install Snowsql
1. Within the Snowflake UI, select Help and download snowsql for your system where you have the Secure Agent installed. Alternatively, included in this package are Windows and Linux installation files for snowsql. Folder: CDQ_Reporting_V2\Resources\Snowsql
2. Install snowsql. 3. Create the config file.
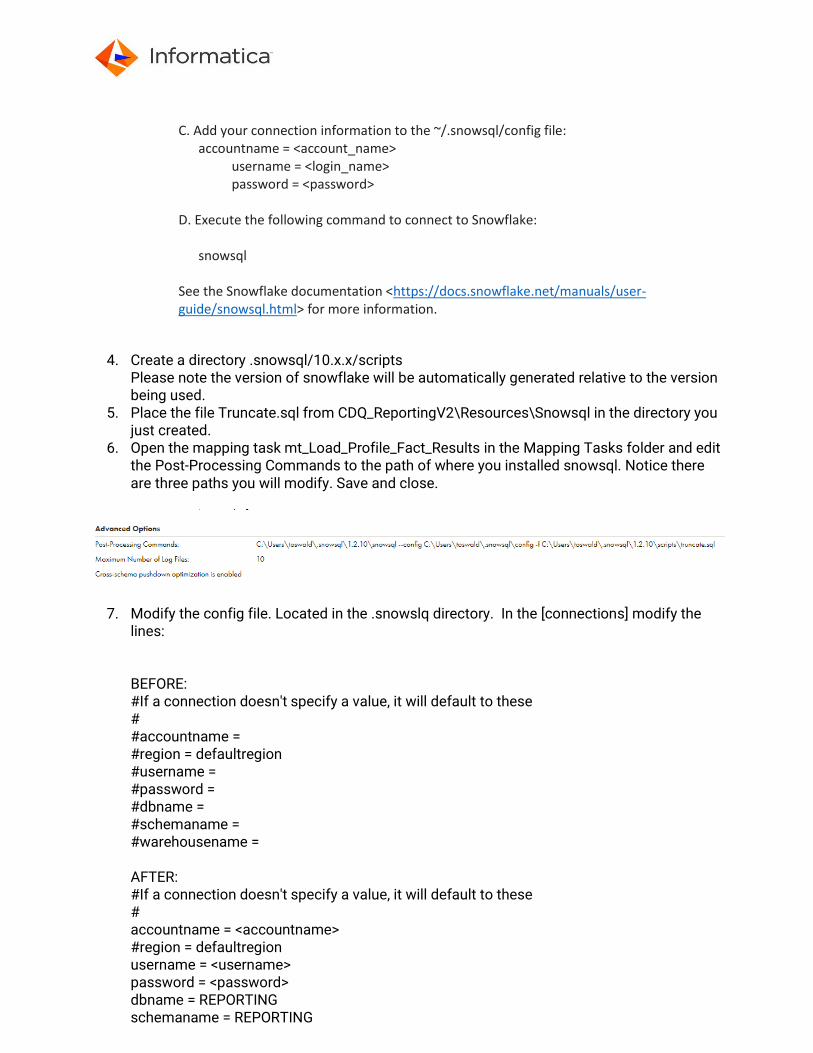
a. Windows i. Open command prompt and navigate to the installed directory:
ii. Run the command snowsql -a <account_name> -u <login_name> and enter the password when prompted:

iii. We can now see the .snowsql directory created (this happens as soon as “Installing version” hits 100%). It contains the config file:
b. Linux
The .snowsql directory does exist after you run the script, but the config file is not created until you run the ‘test connection’ command. ~]$ sh snowsql-1.2.12-linux_x86_64.bash ********************************************************************* Installing SnowSQL, Snowflake CLI. ********************************************************************** Specify the directory in which the SnowSQL components will be installed. [~/bin] ./SnowSql Do you want to add ./SnowSql to PATH in /home/user/.bash_profile? [y/N] y Updating /home/user/.bash_profile to have ./SnowSql in PATH Open a new terminal session to make the updated PATH take effect. Adding prelink config for SnowSQL in /etc/prelink.conf.d/snowsql.conf. You may need sudo privilege. ********************************************************************** Congratulations! Follow the steps to connect to Snowflake DB. ********************************************************************** A. Open a new terminal window. B. Execute the following command to test your connection: snowsql -a <account_name> -u <login_name> Enter your password when prompted. Enter !quit to quit the connection.
C. Add your connection information to the ~/.snowsql/config file: accountname = <account_name> username = <login_name> password = <password> D. Execute the following command to connect to Snowflake: snowsql See the Snowflake documentation <https://docs.snowflake.net/manuals/user-guide/snowsql.html> for more information.
4. Create a directory .snowsql/10.x.x/scripts Please note the version of snowflake will be automatically generated relative to the version being used.
5. Place the file Truncate.sql from CDQ_ReportingV2\Resources\Snowsql in the directory you just created.
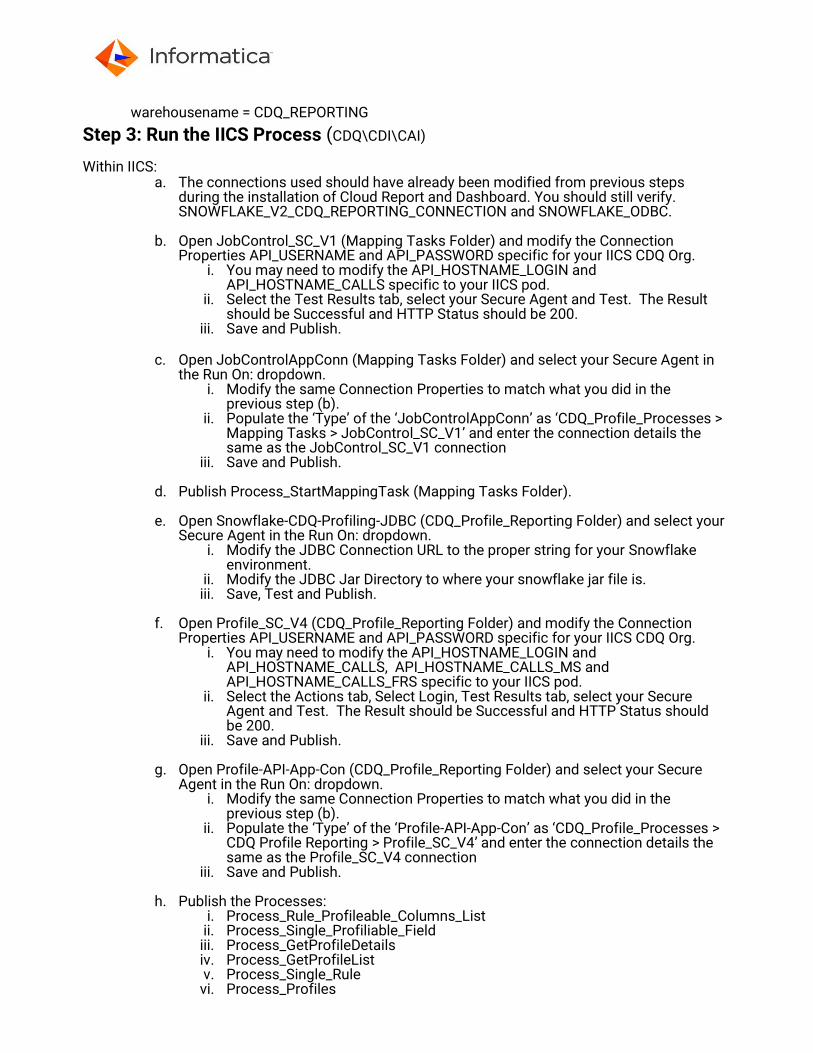
6. Open the mapping task mt_Load_Profile_Fact_Results in the Mapping Tasks folder and edit the Post-Processing Commands to the path of where you installed snowsql. Notice there are three paths you will modify. Save and close.
7. Modify the config file. Located in the .snowslq directory. In the [connections] modify the lines: BEFORE: #If a connection doesn't specify a value, it will default to these # #accountname = #region = defaultregion #username = #password = #dbname = #schemaname = #warehousename = AFTER: #If a connection doesn't specify a value, it will default to these # accountname = <accountname> #region = defaultregion username = <username> password = <password> dbname = REPORTING schemaname = REPORTING
warehousename = CDQ_REPORTING
Step 3: Run the IICS Process (CDQ\CDI\CAI) Within IICS:
a. The connections used should have already been modified from previous steps during the installation of Cloud Report and Dashboard. You should still verify. SNOWFLAKE_V2_CDQ_REPORTING_CONNECTION and SNOWFLAKE_ODBC.
b. Open JobControl_SC_V1 (Mapping Tasks Folder) and modify the Connection Properties API_USERNAME and API_PASSWORD specific for your IICS CDQ Org.
i. You may need to modify the API_HOSTNAME_LOGIN and API_HOSTNAME_CALLS specific to your IICS pod.
ii. Select the Test Results tab, select your Secure Agent and Test. The Result should be Successful and HTTP Status should be 200.
iii. Save and Publish.
c. Open JobControlAppConn (Mapping Tasks Folder) and select your Secure Agent in the Run On: dropdown.
i. Modify the same Connection Properties to match what you did in the previous step (b).
ii. Populate the ‘Type’ of the ‘JobControlAppConn’ as ‘CDQ_Profile_Processes > Mapping Tasks > JobControl_SC_V1’ and enter the connection details the same as the JobControl_SC_V1 connection
iii. Save and Publish.
d. Publish Process_StartMappingTask (Mapping Tasks Folder).
e. Open Snowflake-CDQ-Profiling-JDBC (CDQ_Profile_Reporting Folder) and select your Secure Agent in the Run On: dropdown.
i. Modify the JDBC Connection URL to the proper string for your Snowflake environment.
ii. Modify the JDBC Jar Directory to where your snowflake jar file is. iii. Save, Test and Publish.
f. Open Profile_SC_V4 (CDQ_Profile_Reporting Folder) and modify the Connection
Properties API_USERNAME and API_PASSWORD specific for your IICS CDQ Org. i. You may need to modify the API_HOSTNAME_LOGIN and
API_HOSTNAME_CALLS, API_HOSTNAME_CALLS_MS and API_HOSTNAME_CALLS_FRS specific to your IICS pod.
ii. Select the Actions tab, Select Login, Test Results tab, select your Secure Agent and Test. The Result should be Successful and HTTP Status should be 200.
iii. Save and Publish.
g. Open Profile-API-App-Con (CDQ_Profile_Reporting Folder) and select your Secure Agent in the Run On: dropdown.
i. Modify the same Connection Properties to match what you did in the previous step (b).
ii. Populate the ‘Type’ of the ‘Profile-API-App-Con’ as ‘CDQ_Profile_Processes > CDQ Profile Reporting > Profile_SC_V4’ and enter the connection details the same as the Profile_SC_V4 connection
iii. Save and Publish.
h. Publish the Processes: i. Process_Rule_Profileable_Columns_List
ii. Process_Single_Profiliable_Field iii. Process_GetProfileDetails iv. Process_GetProfileList v. Process_Single_Rule vi. Process_Profiles
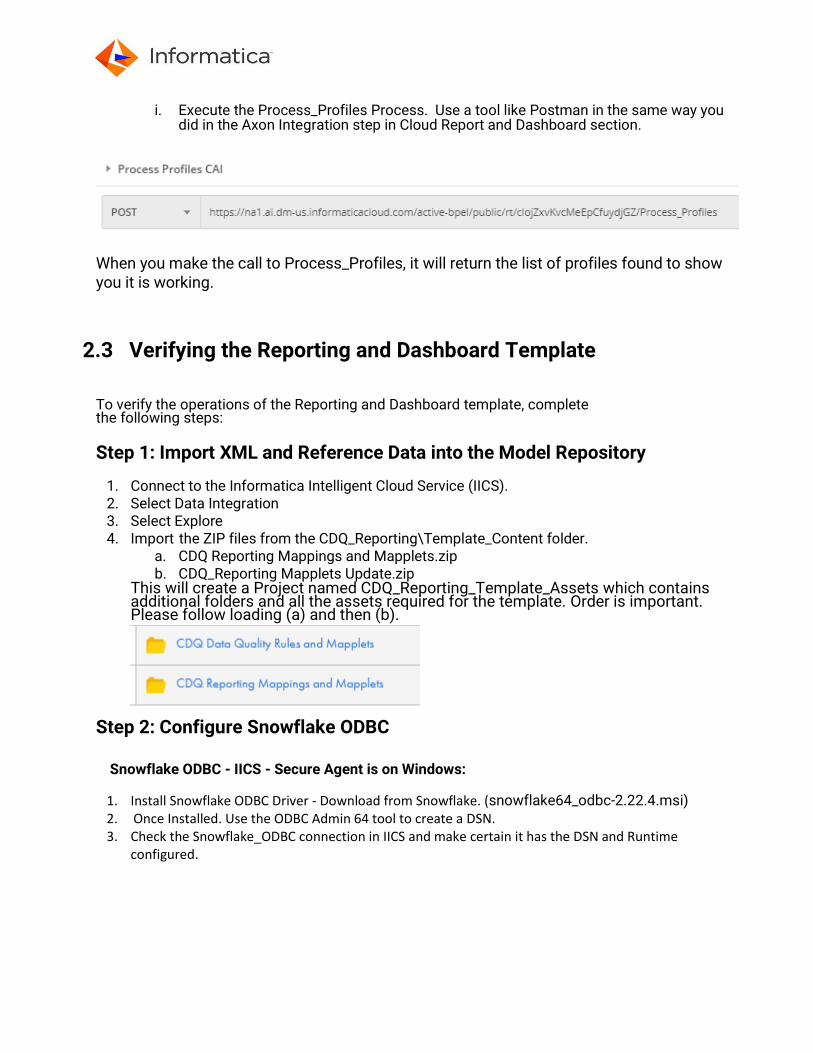
i. Execute the Process_Profiles Process. Use a tool like Postman in the same way you
did in the Axon Integration step in Cloud Report and Dashboard section.
When you make the call to Process_Profiles, it will return the list of profiles found to show you it is working.
2.3 Verifying the Reporting and Dashboard Template
To verify the operations of the Reporting and Dashboard template, complete the following steps:
Step 1: Import XML and Reference Data into the Model Repository
1. Connect to the Informatica Intelligent Cloud Service (IICS). 2. Select Data Integration 3. Select Explore 4. Import the ZIP files from the CDQ_Reporting\Template_Content folder.
a. CDQ Reporting Mappings and Mapplets.zip b. CDQ_Reporting Mapplets Update.zip
This will create a Project named CDQ_Reporting_Template_Assets which contains additional folders and all the assets required for the template. Order is important. Please follow loading (a) and then (b).
Step 2: Configure Snowflake ODBC Snowflake ODBC - IICS - Secure Agent is on Windows:
1. Install Snowflake ODBC Driver - Download from Snowflake. (snowflake64_odbc-2.22.4.msi) 2. Once Installed. Use the ODBC Admin 64 tool to create a DSN. 3. Check the Snowflake_ODBC connection in IICS and make certain it has the DSN and Runtime
configured.
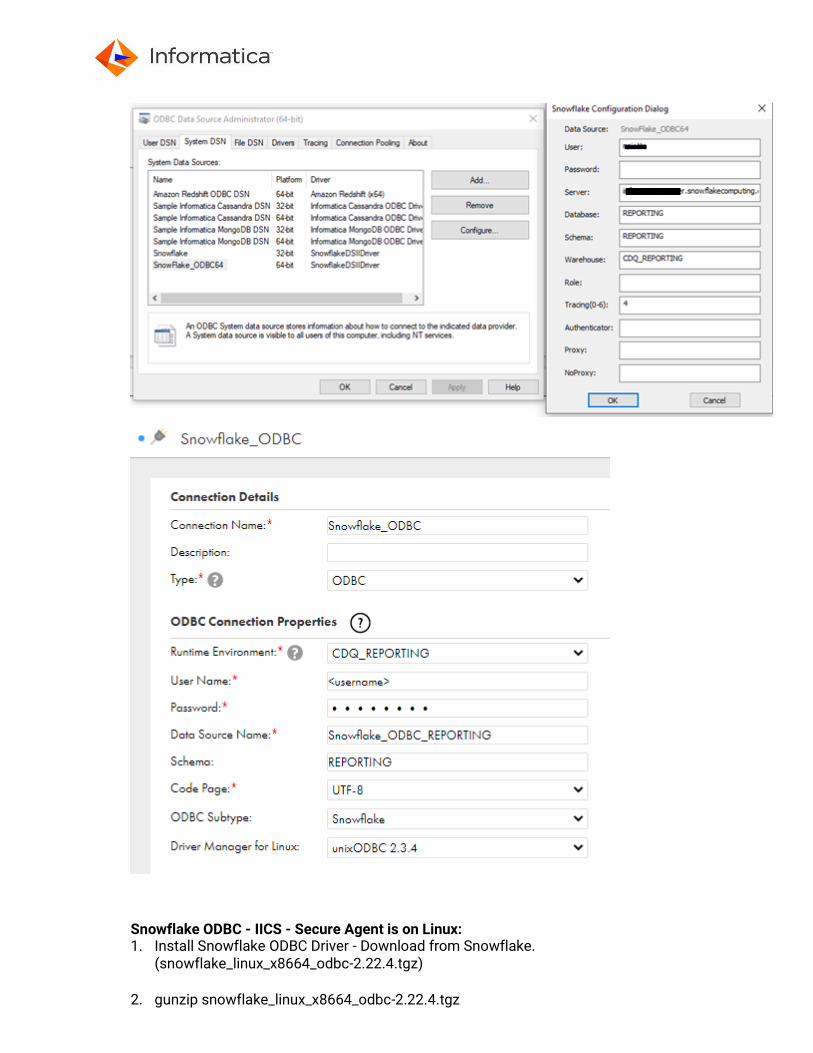
Snowflake ODBC - IICS - Secure Agent is on Linux: 1. Install Snowflake ODBC Driver - Download from Snowflake.
(snowflake_linux_x8664_odbc-2.22.4.tgz)
2. gunzip snowflake_linux_x8664_odbc-2.22.4.tgz
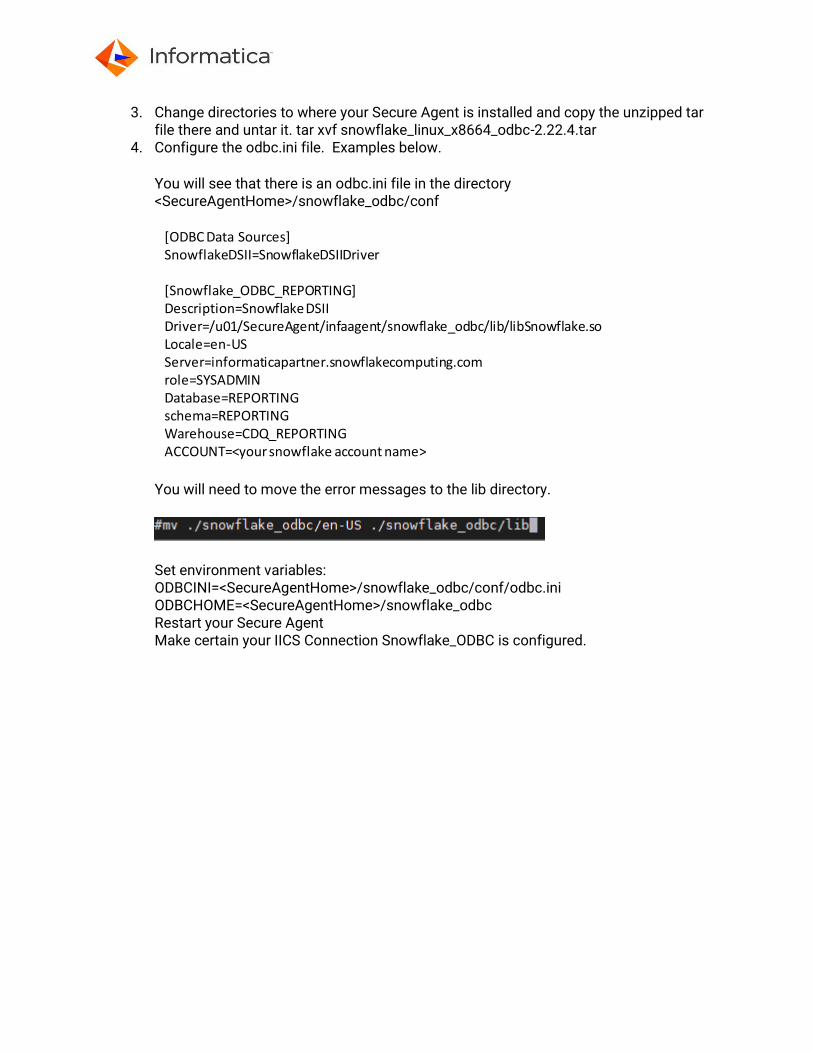
3. Change directories to where your Secure Agent is installed and copy the unzipped tar file there and untar it. tar xvf snowflake_linux_x8664_odbc-2.22.4.tar
4. Configure the odbc.ini file. Examples below.
You will see that there is an odbc.ini file in the directory <SecureAgentHome>/snowflake_odbc/conf
You will need to move the error messages to the lib directory.
Set environment variables: ODBCINI=<SecureAgentHome>/snowflake_odbc/conf/odbc.ini ODBCHOME=<SecureAgentHome>/snowflake_odbc Restart your Secure Agent Make certain your IICS Connection Snowflake_ODBC is configured.
[ODBC Data Sources]SnowflakeDSII=SnowflakeDSIIDriver
[Snowflake_ODBC_REPORTING]Description=Snowflake DSIIDriver=/u01/SecureAgent/infaagent/snowflake_odbc/lib/libSnowflake.soLocale=en-USServer=informaticapartner.snowflakecomputing.comrole=SYSADMINDatabase=REPORTINGschema=REPORTINGWarehouse=CDQ_REPORTINGACCOUNT=<your snowflake account name>
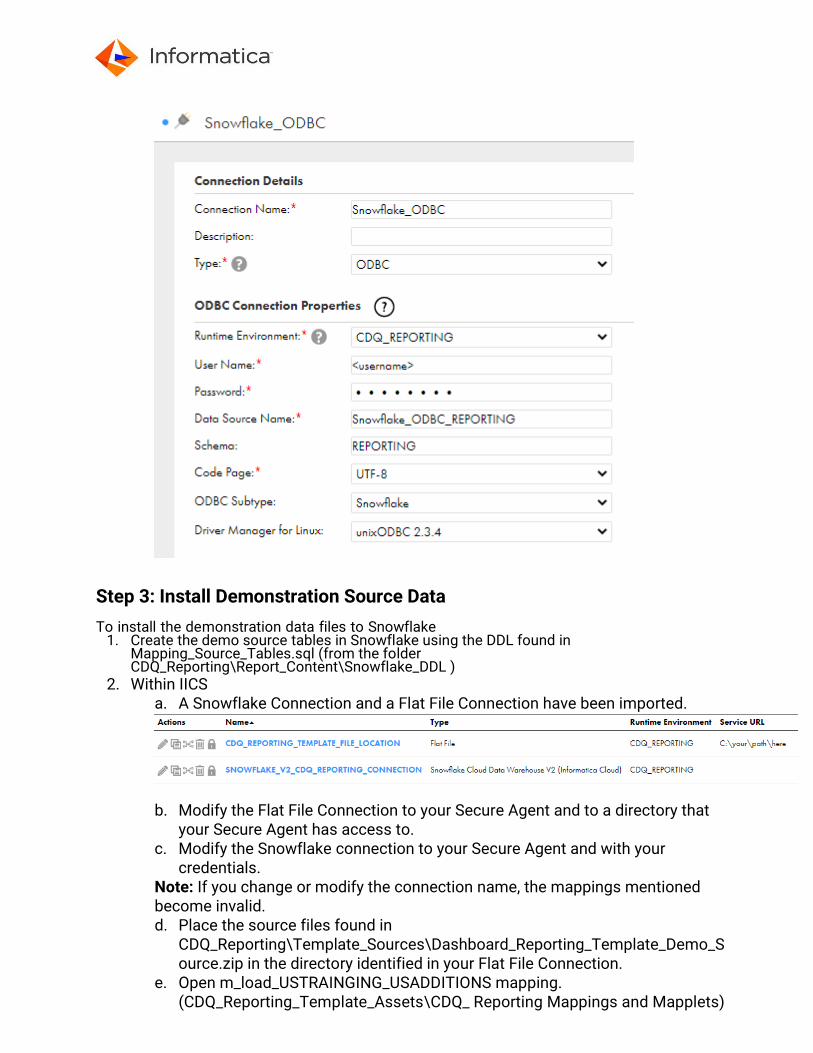
Step 3: Install Demonstration Source Data
To install the demonstration data files to Snowflake 1. Create the demo source tables in Snowflake using the DDL found in
Mapping_Source_Tables.sql (from the folder CDQ_Reporting\Report_Content\Snowflake_DDL )
2. Within IICS a. A Snowflake Connection and a Flat File Connection have been imported.
b. Modify the Flat File Connection to your Secure Agent and to a directory that
your Secure Agent has access to. c. Modify the Snowflake connection to your Secure Agent and with your
credentials. Note: If you change or modify the connection name, the mappings mentioned become invalid. d. Place the source files found in
CDQ_Reporting\Template_Sources\Dashboard_Reporting_Template_Demo_Source.zip in the directory identified in your Flat File Connection.
e. Open m_load_USTRAINGING_USADDITIONS mapping. (CDQ_Reporting_Template_Assets\CDQ_ Reporting Mappings and Mapplets)
f. The Sources and Targets should already have the Connections that were
imported and that you modified. Please verify.
g. Run the m_load_USTRAINGING_USADDITIONS mapping.
Step 4: Run the IICS Mapping (CDQ\CDI)
2. Within IICS: a. Open mplt_CDQ_Reporting. (CDQ_Reporting_Template_Assets\CDQ_
Reporting Mappings and Mapplets) b. The Targets and Lookups should already have the Connections that were
imported and that you modified. Please verify by clicking only on the Preview Data button in the Source asset. If you select a new connection or data object, the mapping becomes invalid and you will need to re-map the ports/fields.
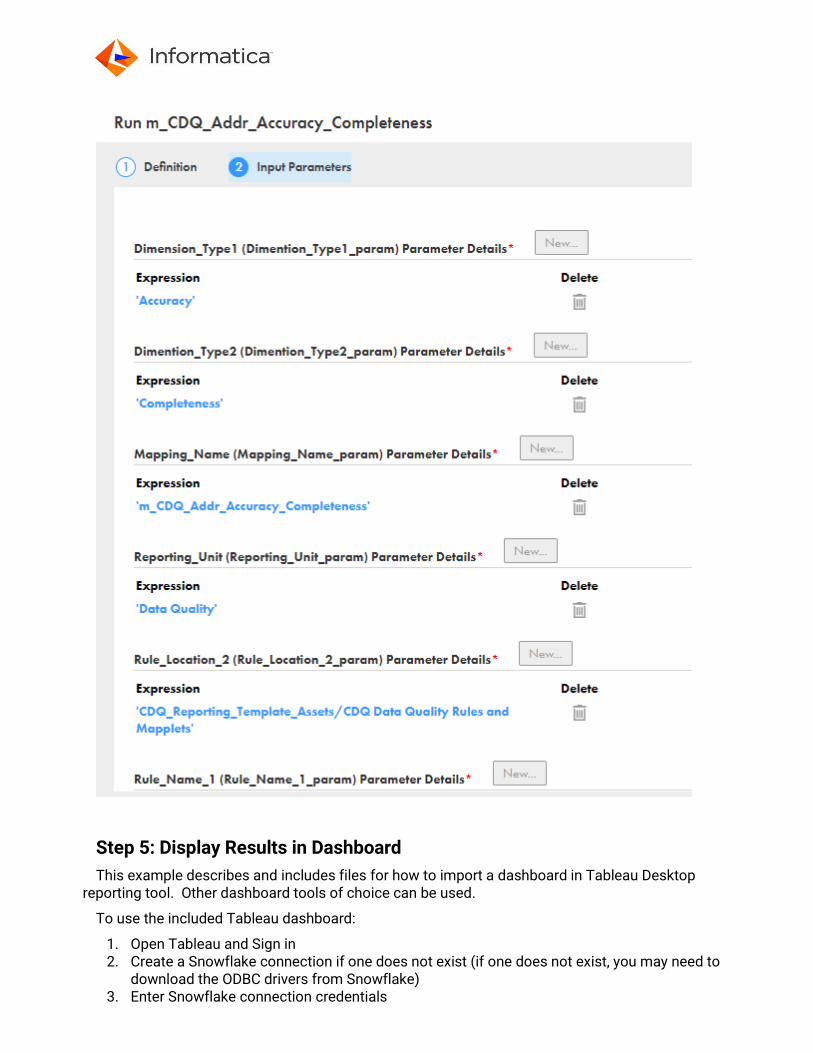
c. Open m_CDQ_Addr_Accuracy_Completeness mapping. (CDQ_Reporting_Template_Assets\CDQ_ Reporting Mappings and Mapplets)
d. The Sources and Targets should already have the Connections that were imported and that you modified. Please verify.
e. Run the m_CDQ_Addr_Accuracy_Completeness mapping. f. You can perform the same process (a-e) for the
m_CDQ_Contact_Validity_Consistency and mplt_CDQ_Reporting_Validity_Conformity assets.
g. Run the Mappings consecutively, not concurrently. This is due to generating the IDs, since a lookup to the max ID’s is performed in the mappings. Note: These mappings are parameter driven. The default parameter settings are in-line with the sample mapping, rules and data provided. These parameters are used to drive the path of the mapping. The parameters define the mapping name, rule(s) name, rule(s) folder, dimension type and reporting unit. You may use the mapping, rules and mapplet as templates to create your own DQ reporting data. You will modify the dimension tables as appropriate to what you create.
Step 5: Display Results in Dashboard
This example describes and includes files for how to import a dashboard in Tableau Desktop reporting tool. Other dashboard tools of choice can be used.
To use the included Tableau dashboard:
1. Open Tableau and Sign in 2. Create a Snowflake connection if one does not exist (if one does not exist, you may need to
download the ODBC drivers from Snowflake) 3. Enter Snowflake connection credentials
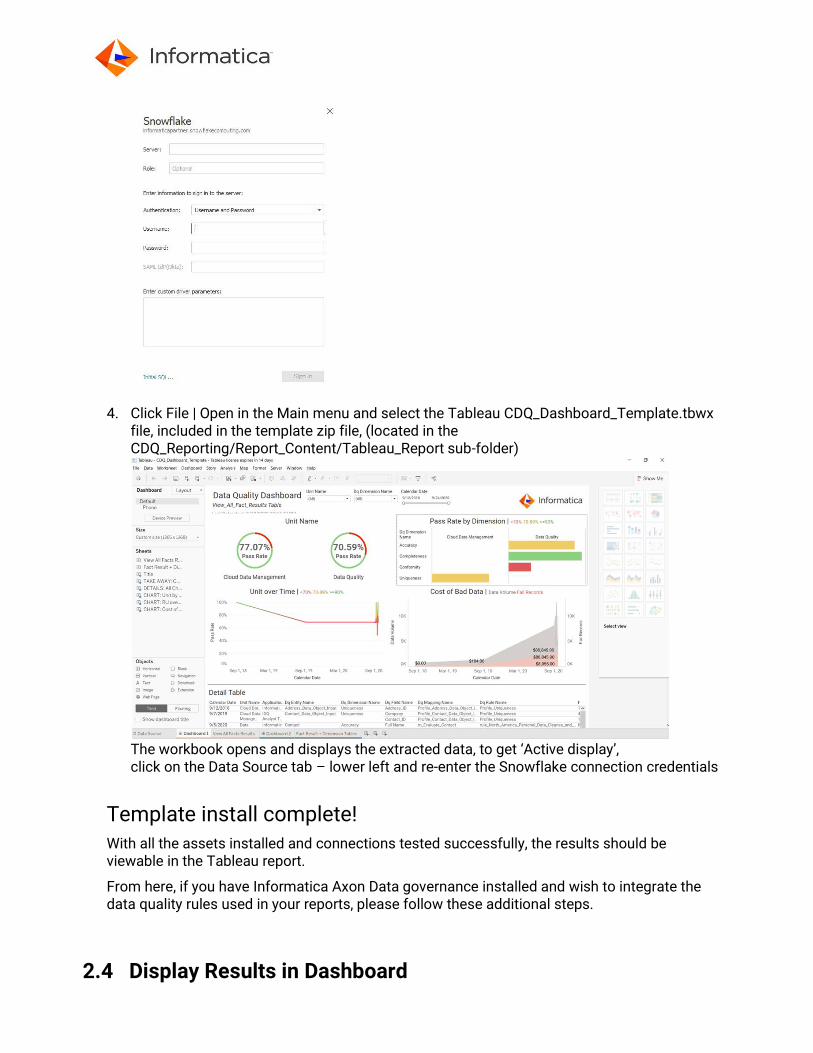
4. Click File | Open in the Main menu and select the Tableau CDQ_Dashboard_Template.tbwx file, included in the template zip file, (located in the CDQ_Reporting/Report_Content/Tableau_Report sub-folder)
The workbook opens and displays the extracted data, to get ‘Active display’, click on the Data Source tab – lower left and re-enter the Snowflake connection credentials
Template install complete!
With all the assets installed and connections tested successfully, the results should be viewable in the Tableau report.
From here, if you have Informatica Axon Data governance installed and wish to integrate the data quality rules used in your reports, please follow these additional steps.
2.4 Display Results in Dashboard
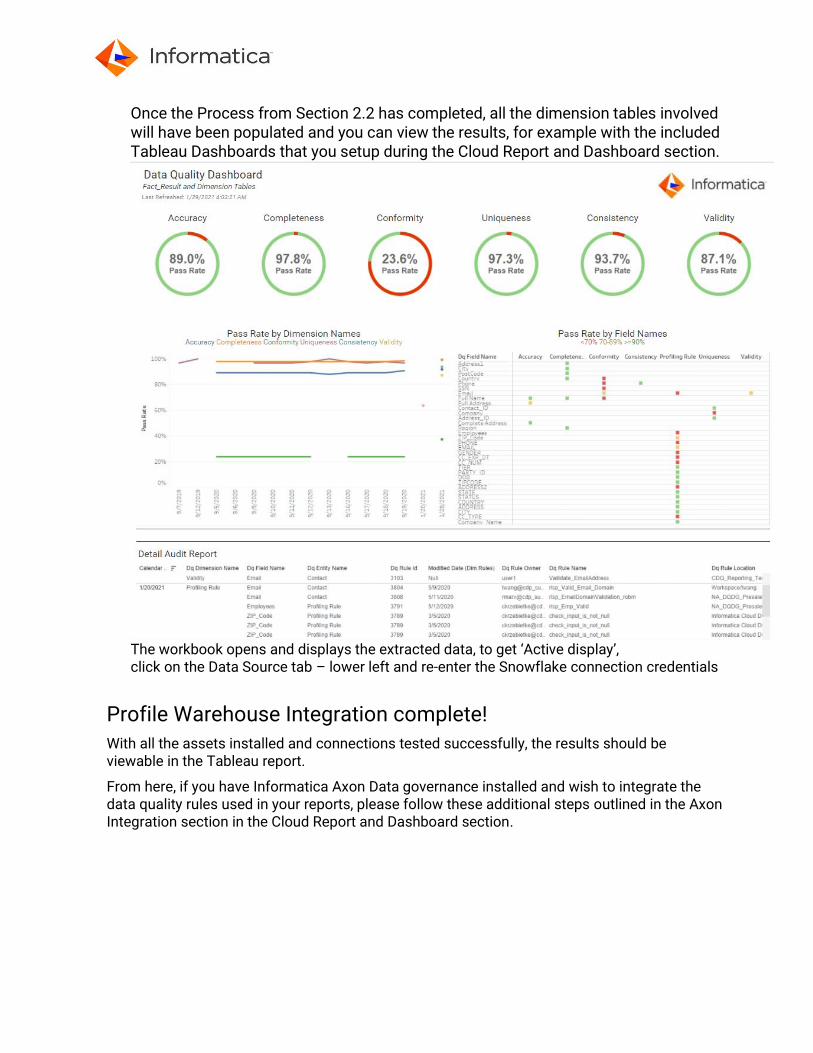
Once the Process from Section 2.2 has completed, all the dimension tables involved will have been populated and you can view the results, for example with the included Tableau Dashboards that you setup during the Cloud Report and Dashboard section.
The workbook opens and displays the extracted data, to get ‘Active display’, click on the Data Source tab – lower left and re-enter the Snowflake connection credentials
Profile Warehouse Integration complete!
With all the assets installed and connections tested successfully, the results should be viewable in the Tableau report.
From here, if you have Informatica Axon Data governance installed and wish to integrate the data quality rules used in your reports, please follow these additional steps outlined in the Axon Integration section in the Cloud Report and Dashboard section.
Section 3
3.1 Axon Integration
The template provides the necessary Application Integration processes and API connection
assets needed to accomplish the integration. It is quite technical so, please read and follow
each step, in order, carefully. We have attempted to make it as easy as possible, providing the
main assets which typically only require the user to add their specific connection detail.
Use the Axon Excel files template to bulk load the sample Axon objects in the following order
(Glossary, System, Data Set, Attributes and Local DQ Rules).
There is a new Data Quality Rule Type (Conformity). You will need to add this to your Axon
environment.
Note: If you already have objects in Axon you want to use, you may skip this.
Additionally, you should make sure the objects defined in these upload files, do not conflict with
objects in your Axon environment.
Step 1: Load Axon Objects and Cross Reference Data
1. Open the Admin Panel. Got to Meta-Model Administration → Dropdown Configurations.
2. Select Data Quality Rule Type and add Conformity.
3. Load the Axon_CDQ_Reporting_glossary.xlsx Template
4. Load the Axon_CDQ_Reporting_system.xlsx Template
5. You will need to modify some of the load files.
a. ‘Glossary Ref.’ in Axon_CDQ_Reporting_data-set.xlsx to the ‘Ref.’ of the
‘Customer_CDQ’ Term.
b. Load Axon_CDQ_Reporting_data-set.xlsx Template.
c. ‘Attribute Data Set Ref.’ in Axon_CDQ_Reporting_attribute.xlsx to the ‘Ref’. of the
‘Customer Addresses_CDQ’ Data Set.
d. ‘Glossary Ref.’ in Axon_CDQ_Reporting_attribute.xlsx to the ‘Ref.’ of the ‘Customer
Term.
e. Load Axon_CDQ_Reporting_attribute.xlsx Template.
f. ‘Attribute Ref.’ in Axon_CDQ_Reporting_data-quality-rule.xlsx to the ‘Ref.’ for each
Attribute created.
g. Load Axon_CDQ_Reporting_data-quality-rule.xlsx Template.
6. The DIM_AXON_PROFILE_XREF Table will be loaded during the mapping executions.
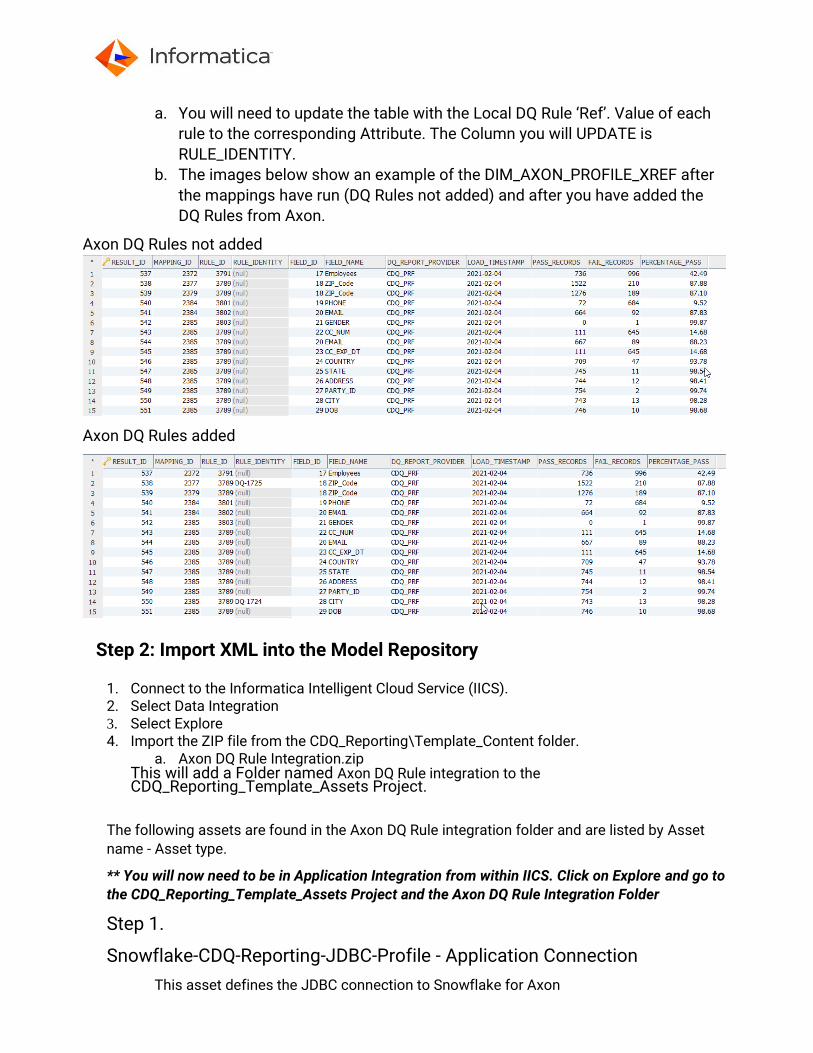
a. You will need to update the table with the Local DQ Rule ‘Ref’. Value of each
rule to the corresponding Attribute. The Column you will UPDATE is
RULE_IDENTITY.
b. The images below show an example of the DIM_AXON_PROFILE_XREF after
the mappings have run (DQ Rules not added) and after you have added the
DQ Rules from Axon.
Axon DQ Rules not added
Axon DQ Rules added
Step 2: Import XML into the Model Repository
1. Connect to the Informatica Intelligent Cloud Service (IICS). 2. Select Data Integration 3. Select Explore
4. Import the ZIP file from the CDQ_Reporting\Template_Content folder. a. Axon DQ Rule Integration.zip
This will add a Folder named Axon DQ Rule integration to the CDQ_Reporting_Template_Assets Project.
The following assets are found in the Axon DQ Rule integration folder and are listed by Asset
name - Asset type.
** You will now need to be in Application Integration from within IICS. Click on Explore and go to
the CDQ_Reporting_Template_Assets Project and the Axon DQ Rule Integration Folder
Step 1.
Snowflake-CDQ-Reporting-JDBC-Profile - Application Connection
This asset defines the JDBC connection to Snowflake for Axon

For this asset, you need the Snowflake JDBC driver file. This jar file, snowflake-jdbc-
3.12.11.jar, is included with the template package.
1. Copy the snowflake-jdbc-3.12.11.jar file to a path that is accessible by the Secure Agent. (i.e. Create a directory called C:\Program Files\Informatica Cloud Secure Agent\ExternalDrivers )
Modify the ‘Run on:’ and Connection Properties
1. Open the Snowflake-CDQ-Reporting-JDBC-Profile asset for editing 2. Set the Run On: property to the correct Secure Agent name 3. Set the JDBC Connection URL: property appropriately (i.e.
jdbc:snowflake://<youraccount>.snowflakecomputing.com/?warehouse=CDQ_REPORTING&db=REPORTING&schema=REPORTING)
4. Set the JDBC Jar Directory: property to the existing or newly created location
of the driver jar file. (i.e. C:\Program Files\Informatica Cloud Secure
Agent\ExternalDrivers)
5. Set Schema: (Default: REPORTING) 6. Set Username: <your Snowflake user name> 7. Password: <your Snowflake password> 8. Click Save 9. Click Test to ensure the connection works properly. 10. Publish Snowflake-CDQ-Reporting-JDBC-Profile
a. Click on the three dots icon, upper right b. Select Publish
Step 2.
Axon-Service Connector-Profile - Service Connector
This asset defines the REST call to the Axon server.
Modify the Connection Properties
1. API_HOSTNAME: property, enter your Axon URL and port <FQD hostname:port> (i.e. http://myaxonserver.com:9999)
2. API_USERNAME: property, enter an Axon Administrator username 3. API_PASSWORD: property, Axon Administrator password 4. Test the connection is working properly
a. Test getting a Token i. Go to Actions
ii. Select GetLoginToken iii. Go to Test Results iv. Select your Secure Agent and Test
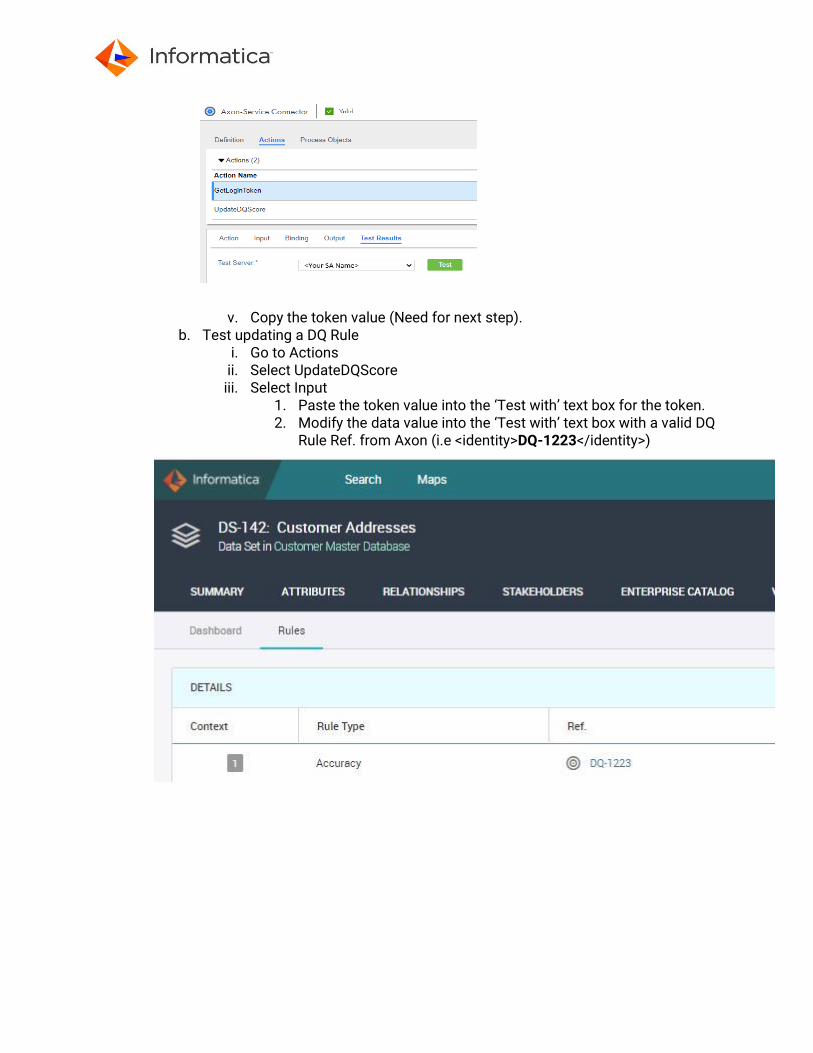
v. Copy the token value (Need for next step). b. Test updating a DQ Rule
i. Go to Actions ii. Select UpdateDQScore iii. Select Input
1. Paste the token value into the ‘Test with’ text box for the token. 2. Modify the data value into the ‘Test with’ text box with a valid DQ
Rule Ref. from Axon (i.e <identity>DQ-1223</identity>)
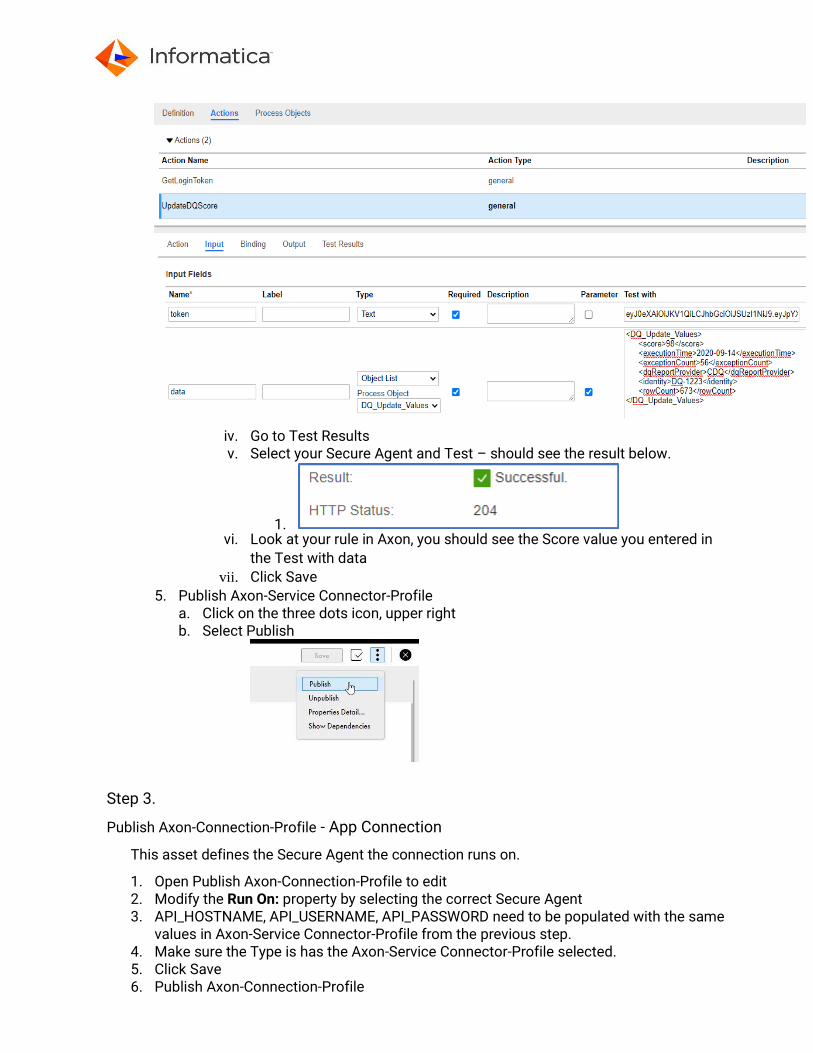
iv. Go to Test Results v. Select your Secure Agent and Test – should see the result below.
1. vi. Look at your rule in Axon, you should see the Score value you entered in
the Test with data
vii. Click Save
5. Publish Axon-Service Connector-Profile a. Click on the three dots icon, upper right b. Select Publish
Step 3.
Publish Axon-Connection-Profile - App Connection
This asset defines the Secure Agent the connection runs on.
1. Open Publish Axon-Connection-Profile to edit 2. Modify the Run On: property by selecting the correct Secure Agent 3. API_HOSTNAME, API_USERNAME, API_PASSWORD need to be populated with the same
values in Axon-Service Connector-Profile from the previous step. 4. Make sure the Type is has the Axon-Service Connector-Profile selected. 5. Click Save 6. Publish Axon-Connection-Profile
Step 4.
Process_Send_To_Axon – Process
This is a subprocess that makes the REST calls to Axon.
1. Publish Process_Send_To_Axon
Step 5.
Process_Axon_Fact_Results - Process
This is a subprocess that populates a process object CDQ_RPT_FACTS with the rows found in the DIM_AXON_PROFILE_XREF.
1. Publish Process_Axon_Fact_Results
2. Open Properties Detail
3. Copy the Service URL and test the service in Step 6
Step 6.
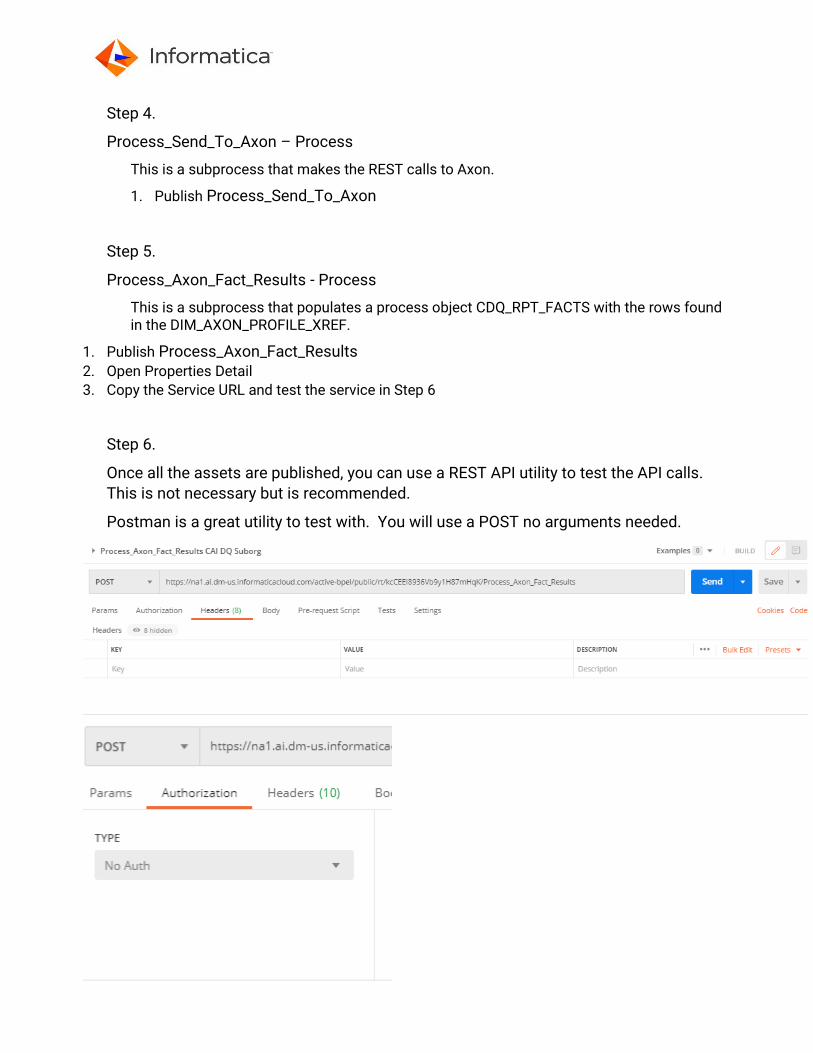
Once all the assets are published, you can use a REST API utility to test the API calls.
This is not necessary but is recommended.
Postman is a great utility to test with. You will use a POST no arguments needed.
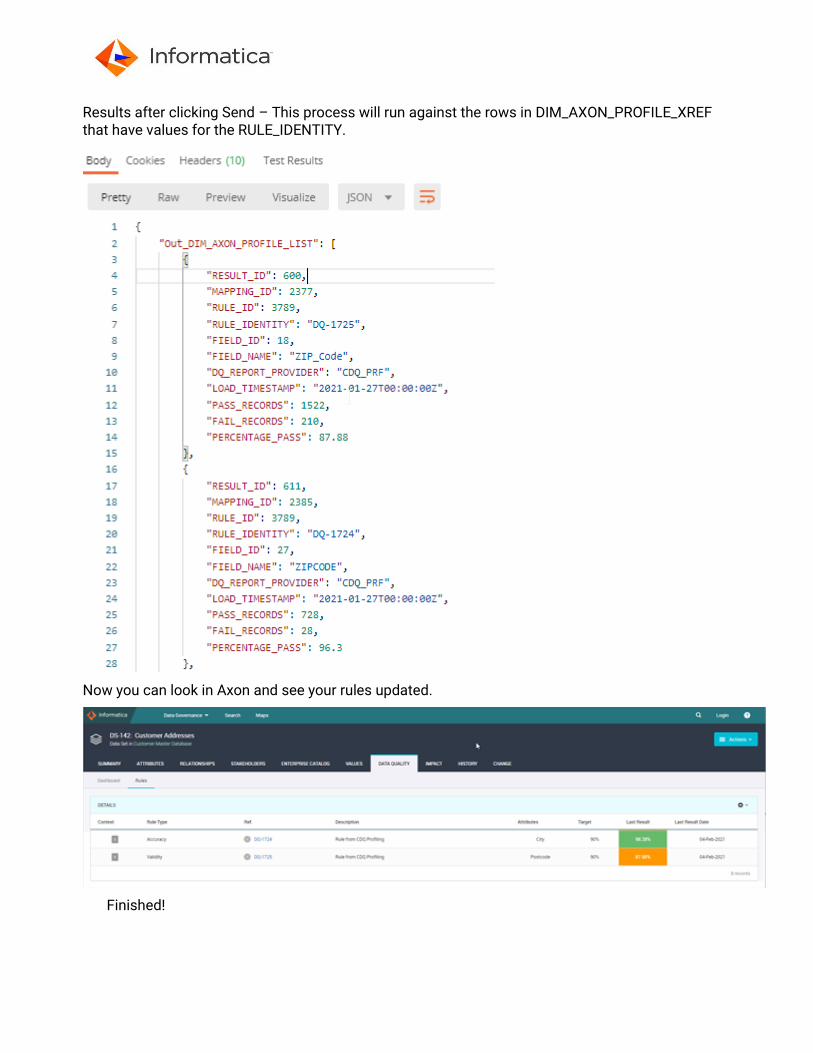
Results after clicking Send – This process will run against the rows in DIM_AXON_PROFILE_XREF that have values for the RULE_IDENTITY.
Now you can look in Axon and see your rules updated.
Finished!