Embed Size (px)
Citation preview
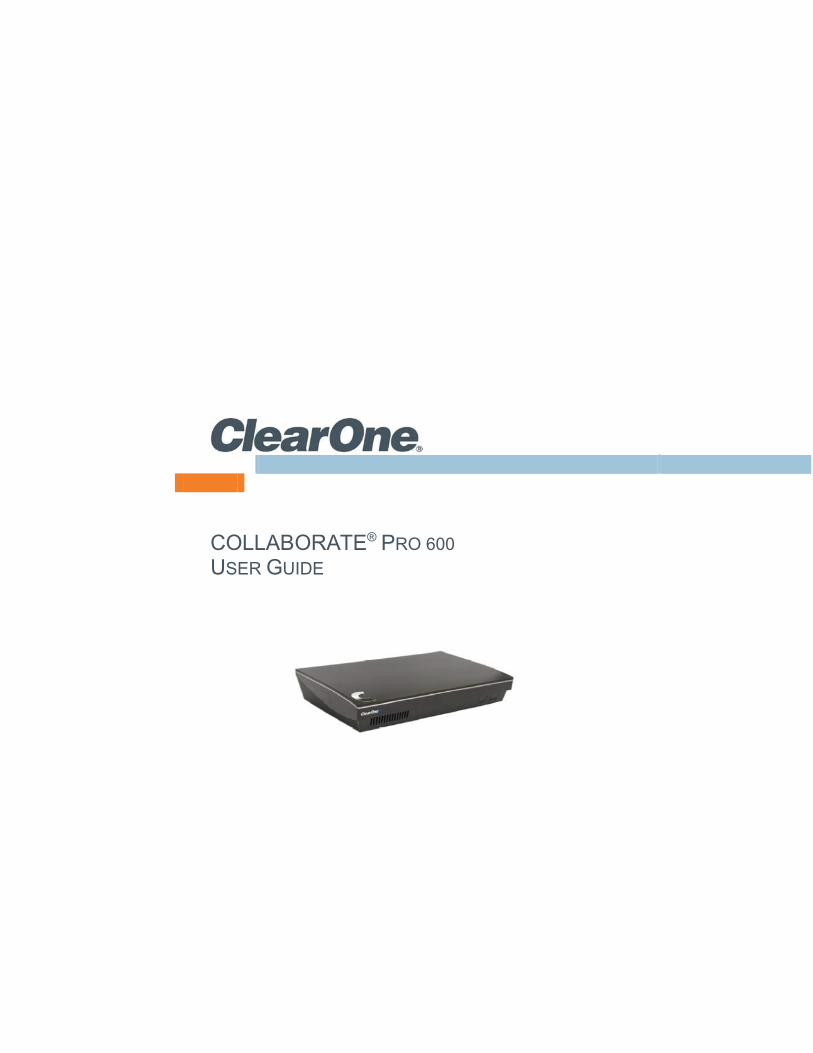
COLLABORATE® PRO 600
USER GUIDE
2 | C O L L A B O R A T E P R O : U s e r G u i d e
ClearOne
5225 Wiley Post Way Suite 500 Salt Lake City, UT 84116
Telephone 1.800.283.5936
Tech Sales 1.800.705.2103
FAX 1.801.974.3669
E-mail [email protected]
On the Web www.clearone.com
COLLABORATE Pro USER GUIDE
CLEARONE DOCUMENT
DOC-0156-001 REV 1.3 – May 2018 © 2018 ClearOne Inc. - All rights reserved. No part of this document may be reproduced in any form or by any means without written permission from ClearOne. Printed in the United States of America. ClearOne reserves specific privileges.
Information in this document is subject to change without notice.
NOTICE: This Class A device complies with Part 15 of the FCC rules and Canadian ICES-003. Operation is subject to the following two conditions: (1) this device may not cause harmful interference, and (2) this device must accept any interference received, including interference that may cause undesired operation.
3 | C O L L A B O R A T E P R O : U s e r G u i d e
TABLE OF CONTENTS
Chapter 1: Introduction .................................................................................................................... 6
IN THIS CHAPTER .................................................................................................................................................... 6
COLLABORATE PRO 600 OVERVIEW .................................................................................................................... 6
MAIN FEATURES ...................................................................................................................................................... 8
COMPARISON TABLE .............................................................................................................................................. 9
FEATURE HIGHLIGHTS ........................................................................................................................................... 9
Chapter 2: Getting Started .............................................................................................................. 10
IN THIS CHAPTER .................................................................................................................................................. 10
USING THE REMOTE CONTROL .......................................................................................................................... 10
NAVIGATION ARROWS AND ADDITIONAL BUTTONS ......................................................................................... 12
USING THE ON-SCREEN MENU ........................................................................................................................... 13
SYSTEM ICONS ...................................................................................................................................................... 15
DISPLAYING SYSTEM INFORMATION ................................................................................................................. 16
COLLABORATE SETUP ......................................................................................................................................... 18
Chapter 3: Configuration .............................................................................................................. 21
IN THIS CHAPTER .................................................................................................................................................. 21
CONFIGURING THE AUDIO ................................................................................................................................... 21
CONFIGURING THE CAMERA ............................................................................................................................... 23
CONFIGURING MULTIPLE CAMERAS .................................................................................................................. 24
CONTROLLING MULTIPLE CAMERAS ................................................................................................................. 25
CONFIGURING THE DISPLAY ............................................................................................................................... 26
SERIAL PORT ......................................................................................................................................................... 27
LAN SETTINGS ....................................................................................................................................................... 28
FIREWALL SETTINGS ............................................................................................................................................ 30
SOFTWARE UPDATES ........................................................................................................................................... 31
Chapter 4: Video Collaboration ..................................................................................................... 32
IN THIS CHAPTER .................................................................................................................................................. 32
STARTING LAN CALLS .......................................................................................................................................... 32
AUTO-ANSWERING CALLS ................................................................................................................................... 33
ENDING CALLS ....................................................................................................................................................... 33
MUTING THE VIDEO .............................................................................................................................................. 34
SWITCHING CALL VIEW MODES .......................................................................................................................... 34
USING PICTURE-IN-PICTURE (PIP) MODES ....................................................................................................... 34
4 | C O L L A B O R A T E P R O : U s e r G u i d e
CALL STATE INDICATIONS ................................................................................................................................... 35
USING CALL TONES .............................................................................................................................................. 37
RECORDING AND STREAMING ............................................................................................................................ 38
DATA SHARING ...................................................................................................................................................... 40
USING MULTICASTING .......................................................................................................................................... 44
Chapter 5: Quick Dialing Methods ................................................................................................ 46
IN THIS CHAPTER .................................................................................................................................................. 46
USING THE CONTACTS ......................................................................................................................................... 46
USING THE RECENT CALLS ................................................................................................................................. 48
USING DIRECTORY ............................................................................................................................................... 49
USING SPONTANIA CONTACTS ........................................................................................................................... 49
Chapter 6: Skype for Business ..................................................................................................... 50
IN THIS CHAPTER .................................................................................................................................................. 50
STARTING SKYPE FOR BUSINESS CALLS ......................................................................................................... 50
STARTING SKYPE FOR BUSINESS MULTI CONFERENCE CALLS ................................................................... 51
USING SKYPE FOR BUSINESS CONTACTS ........................................................................................................ 55
Chapter 7: Advanced Settings ....................................................................................................... 56
IN THIS CHAPTER .................................................................................................................................................. 56
ADMIN SETTINGS .................................................................................................................................................. 57
DIRECTORY PROPERTIES .................................................................................................................................... 58
H.323 PROTOCOL SETTINGS ............................................................................................................................... 60
SIP PROTOCOL SETTINGS ................................................................................................................................... 63
MULTICAST SETTINGS .......................................................................................................................................... 63
SPONTANIA SETTINGS ......................................................................................................................................... 65
EXCHANGE SETTINGS .......................................................................................................................................... 66
SKYPE FOR BUSINESS SETTINGS ...................................................................................................................... 67
Chapter 8: General Settings ........................................................................................................... 69
IN THIS CHAPTER .................................................................................................................................................. 69
CALL SETTINGS ..................................................................................................................................................... 69
MCU SETTINGS ...................................................................................................................................................... 70
RECORDING SETTINGS ........................................................................................................................................ 71
RECORD COLLABORATE PRO INTO STANDARD NAS ...................................................................................... 72
STREAMING SETTINGS ......................................................................................................................................... 73
PRESENTATION SETTINGS .................................................................................................................................. 75
5 | C O L L A B O R A T E P R O : U s e r G u i d e
PREFERENCE SETTINGS ..................................................................................................................................... 76
SECURITY SETTINGS ............................................................................................................................................ 77
Chapter 9: Spontania ..................................................................................................................... 78
IN THIS CHAPTER .................................................................................................................................................. 78
STARTING / JOINING A SPONTANIA MEETING .................................................................................................. 78
SPONTANIA SETTINGS ......................................................................................................................................... 79
PRESENTATION ..................................................................................................................................................... 83
PARTICIPANTS ....................................................................................................................................................... 84
END MEETING ........................................................................................................................................................ 85
Chapter 10: Web Access and Management ............................................................................... 85
IN THIS CHAPTER .................................................................................................................................................. 85
ACCESSING COLLABORATE PRO VIA BROWSER ............................................................................................. 86
VIEWING A STREAM SESSION ............................................................................................................................. 87
VIEWING A MULTICAST VIDEO COLLABORATION ............................................................................................ 88
DOWNLOADING COLLABORATE SHARE ............................................................................................................ 88
IMPORTING/EXPORTING THE LICENSE .............................................................................................................. 88
VIEWING THE RECORDING ARCHIVE ................................................................................................................. 90
SENDING RUNNING TEXT IN A CALL .................................................................................................................. 91
VIEWING CALL STATUS ........................................................................................................................................ 92
PERFORMING SYSTEM UPGRADE ...................................................................................................................... 93
PERFORMING SYSTEM BACKUP ......................................................................................................................... 93
PERFORMING SYSTEM RESTORE FROM BACKUP FILE .................................................................................. 96
PERFORMING SYSTEM RESTORE FROM FTP ................................................................................................... 97
ACCESS TO SYSTEM RECOVERY WITH USB DEVICE ...................................................................................... 99
Chapter 11: Telnet Commands .................................................................................................. 100
ENABLING THE TELNET API ............................................................................................................................... 100
DESCRIPTIONS OF THE TELNET API (COLLABORATE PRO) ......................................................................... 100
DESCRIPTIONS OF THE TELNET API (SPONTANIA) ........................................................................................ 105
DESCRIPTIONS OF THE TELNET API (Skype For Business) ............................................................................ 106
Chapter 12: Specifications ...................................................................................................... 112
Chapter 13: Network Requirements .......................................................................................... 115
IN THIS CHAPTER ................................................................................................................................................ 115
SYSTEM PLACED IN THE DMZ: .......................................................................................................................... 115
SYSTEM PLACED IN LAN: ................................................................................................................................... 115
6 | C O L L A B O R A T E P R O : U s e r G u i d e
Chapter 1: Introduction
IN THIS CHAPTER This chapter introduces the COLLABORATE Pro 600 video collaboration system and includes the following sections:
COLLABORATE Pro 600 Overview
Main Features
Comparison Table
Feature Highlights
COLLABORATE PRO 600 OVERVIEW The COLLABORATE Pro (COLLABORATE Pro 600) is an all-in-one high- definition executive videoconferencing system, featuring an embedded MCU, built-in recording capability, streaming of live and recorded sessions, data sharing, and more.
COLLABORATE Pro provides an interface to videoconferencing via its plug-and-play application-in-a-box, providing on-screen operation controls and advanced call control options during conferencing. Utilizing the newest H.264 video standard and clear, crisp audio, the COLLABORATE Pro brings users face-to-face with other people and organizations.
COLLABORATE Pro enables you to record and stream video calls to multiple locations with up to 8 additional participants.
COLLABORATE Pro incorporates advanced data sharing capabilities, allowing you to turn any videoconference into a fully interactive meeting. It can display presentations or videos on large monitors, connect to an external laptop for data sharing, and open various file types from USB storage devices.
COLLABORATE Pro is ideal for users who need a powerful videoconference solution, offering point-to-point/multipoint capabilities, powered by ClearOne’s COLLABORATE Pro software.
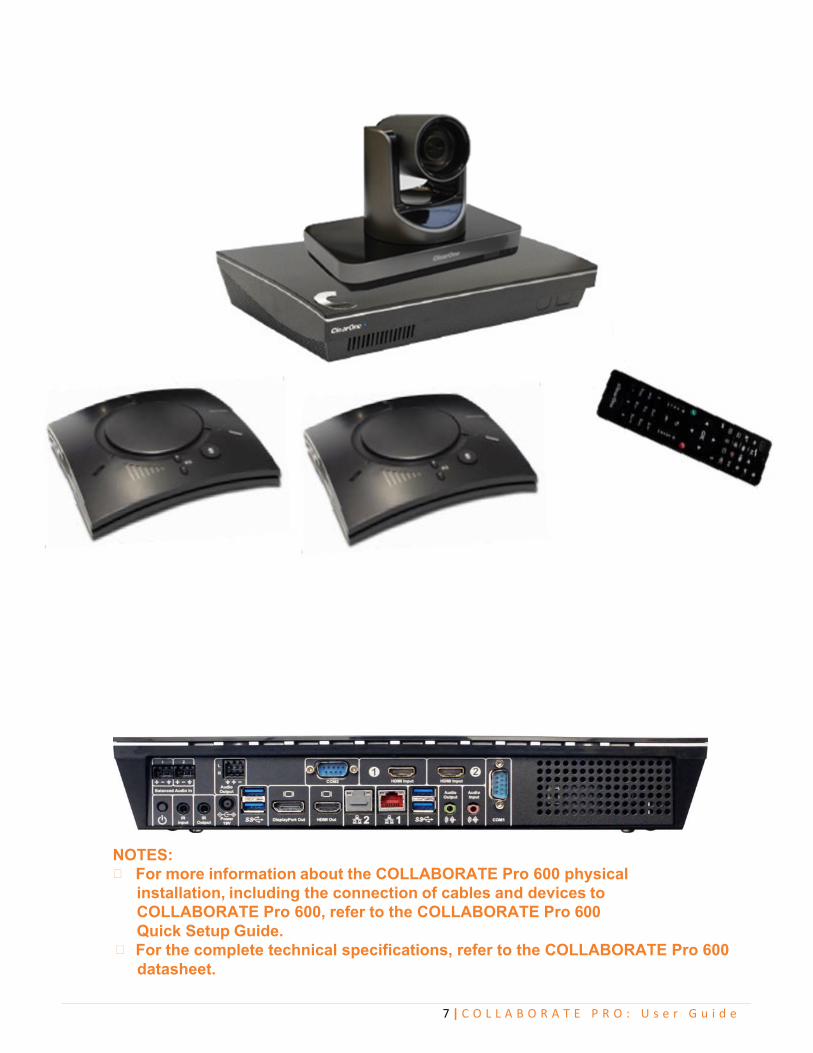
Various accessories, such as a PTZ camera, ClearOne CHATAttach 150 Speakerphone and ClearOne DataPoint HD – can be installed and integrated as part of the COLLABORATE Pro system.
7 | C O L L A B O R A T E P R O : U s e r G u i d e
NOTES: For more information about the COLLABORATE Pro 600 physical
installation, including the connection of cables and devices to COLLABORATE Pro 600, refer to the COLLABORATE Pro 600 Quick Setup Guide.
For the complete technical specifications, refer to the COLLABORATE Pro 600 datasheet.

8 | C O L L A B O R A T E P R O : U s e r G u i d e
MAIN FEATURES COLLABORATE Pro allows you to call a destination via LAN, and to interact via video and data-sharing during calls. Some of the primary capabilities of the system include:
Point-to-point or multipoint connections
Recording, streaming, and data sharing
Recording and playback of point-to-point and multipoint (MCU based) sessions
Streaming via a Web interface, Windows Media Player or VLC player
Sharing files via a USB flash drive
Sharing data via Collaborate share
Sharing cable-connected laptop or wireless via network.
Access files on a USB flash drive while in idle mode
Side-by-side Picture-In-Picture (PIP) view
Session multicast
Embedded MCU for multipoint sessions
Embedded multicast viewer
Calling via Contacts or Recent calls
Calling via online directories
Calling Via URI
Multipoint videoconferences support
Configurable audio, video and displays, and automatic answering
Display on-screen running text to all participants via Web management during a call
Supports ClearOne CHATAttach 150 Speakerphone
Far End mute indicator
Telnet interface
Communicating in standalone mode, COLLABORATE Central mode and gatekeeper mode
Turn unit into sleep mode and wake it up using the remote control
Web-based management
Regulatory Compliance: UL, CSA (cUL), TUV, TUV-CB, CE-LVD, CE, FCC Class B, BSMi, VCCI, C-Tick, RoHS.
9 | C O L L A B O R A T E P R O : U s e r G u i d e
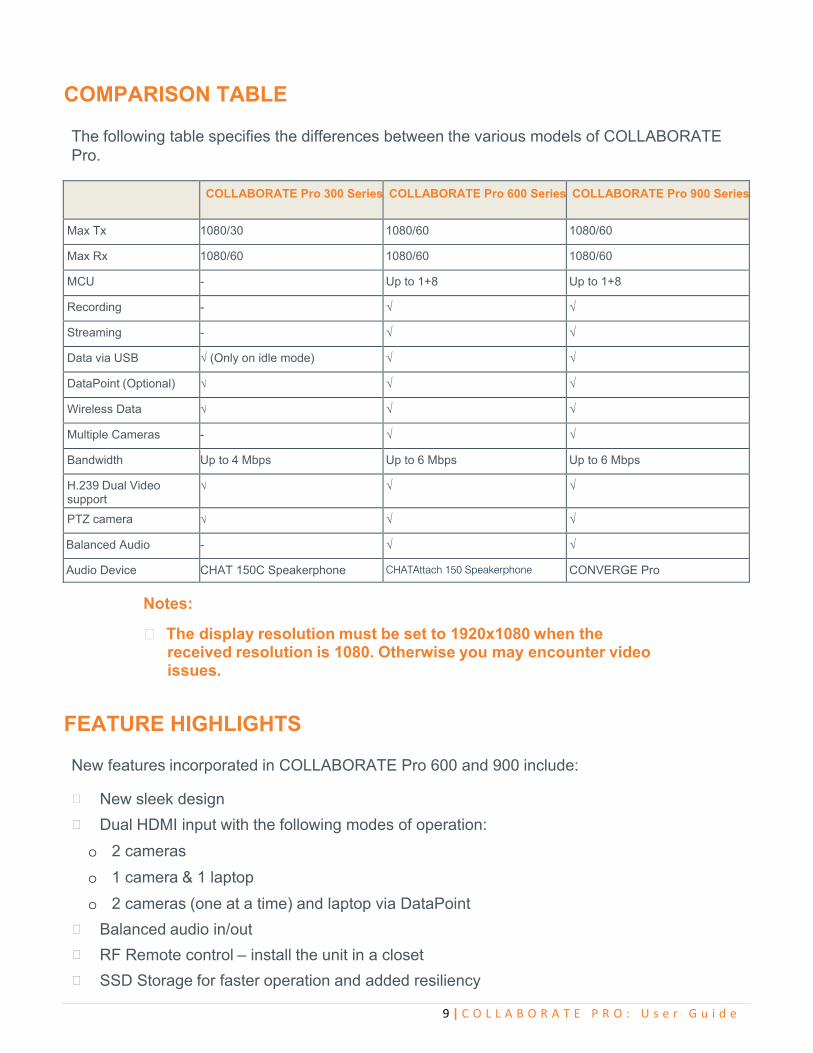
COMPARISON TABLE
The following table specifies the differences between the various models of COLLABORATE Pro.
COLLABORATE Pro 300 Series COLLABORATE Pro 600 Series COLLABORATE Pro 900 Series
Max Tx 1080/30 1080/60 1080/60
Max Rx 1080/60 1080/60 1080/60
MCU - Up to 1+8 Up to 1+8
Recording - √ √
Streaming - √ √
Data via USB √ (Only on idle mode) √ √
DataPoint (Optional) √ √ √
Wireless Data √ √ √
Multiple Cameras - √ √
Bandwidth Up to 4 Mbps Up to 6 Mbps Up to 6 Mbps
H.239 Dual Video support
√ √ √
PTZ camera √ √ √
Balanced Audio - √ √
Audio Device CHAT 150C Speakerphone CHATAttach 150 Speakerphone CONVERGE Pro
Notes:
The display resolution must be set to 1920x1080 when the received resolution is 1080. Otherwise you may encounter video issues.
FEATURE HIGHLIGHTS New features incorporated in COLLABORATE Pro 600 and 900 include:
New sleek design
Dual HDMI input with the following modes of operation:
o 2 cameras
o 1 camera & 1 laptop
o 2 cameras (one at a time) and laptop via DataPoint
Balanced audio in/out
RF Remote control – install the unit in a closet
SSD Storage for faster operation and added resiliency
10 | C O L L A B O R A T E P R O : U s e r G u i d e
Chapter 2: Getting Started
IN THIS CHAPTER Once the COLLABORATE Pro unit is installed, connected and turned on, it is ready for use. This chapter describes the following basic operations:
Using the Remote Control
Using the On-Screen Menu
System Icons
Displaying System Information
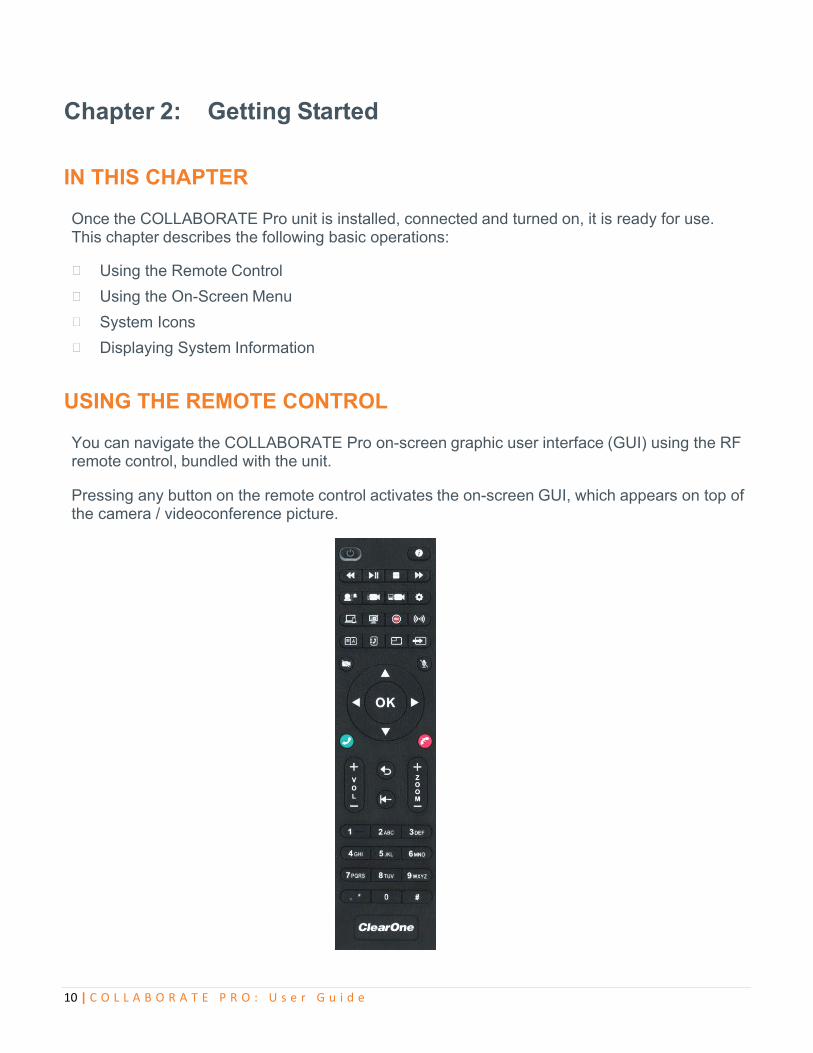
USING THE REMOTE CONTROL You can navigate the COLLABORATE Pro on-screen graphic user interface (GUI) using the RF remote control, bundled with the unit.
Pressing any button on the remote control activates the on-screen GUI, which appears on top of the camera / videoconference picture.
11 | C O L L A B O R A T E P R O : U s e r G u i d e
The remote control includes the following button types:
Alphanumeric Keypad Command Buttons
Navigation arrows and Additional Buttons
ALPHANUMERIC KEYPAD
The remote control includes an alphanumeric keypad with buttons from 0 to 9. In the Dot button you can find the following signs: '.'',', '*', '#', '^', '@', '$', ':', '=', '-', '_', '!' etc. In addition, Clear button to erase entered characters.
In different windows, you can toggle between numbers and letters, depending on the field. Some fields accept numbers only.
Switch between letters and numbers by pressing a few times on the corresponding key
When DTMF dialing is requested, use the numeric keypad.
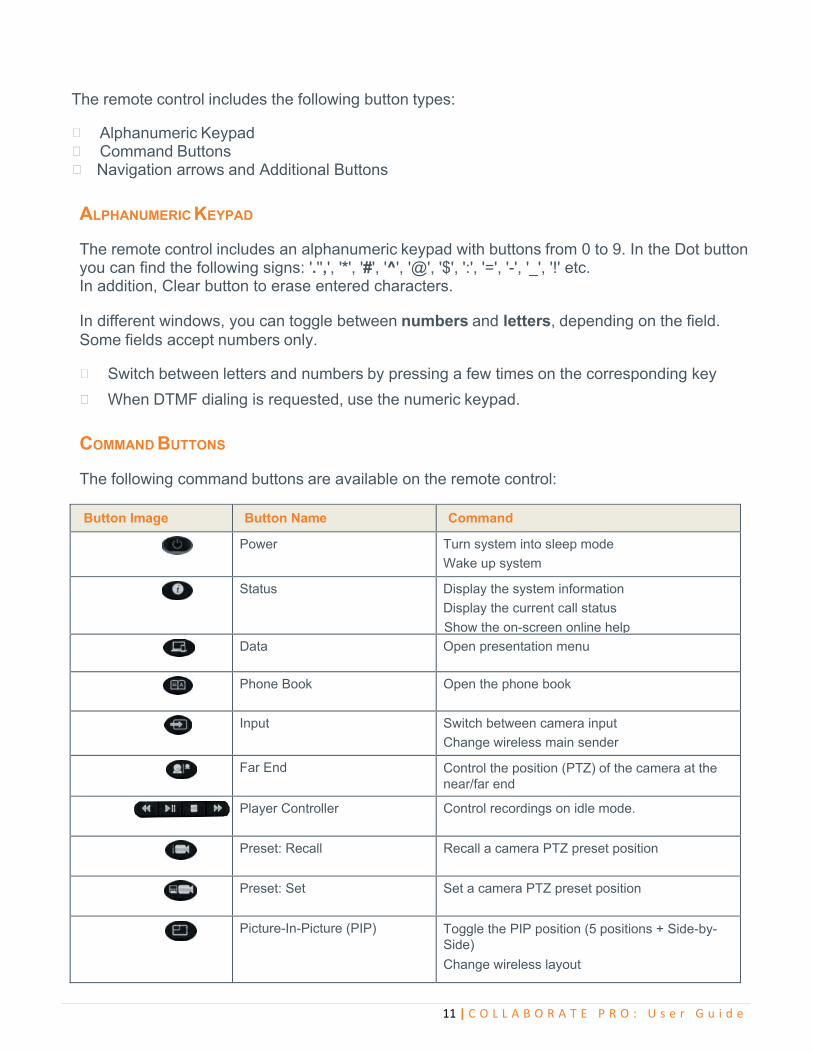
COMMAND BUTTONS
The following command buttons are available on the remote control:
Button Image Button Name Command
Power Turn system into sleep mode
Wake up system
Status Display the system information
Display the current call status
Show the on-screen online help
Data Open presentation menu
Phone Book Open the phone book
Input Switch between camera input
Change wireless main sender
Far End Control the position (PTZ) of the camera at the near/far end
Player Controller Control recordings on idle mode.
Preset: Recall Recall a camera PTZ preset position
Preset: Set Set a camera PTZ preset position
Picture-In-Picture (PIP) Toggle the PIP position (5 positions + Side-by-
Side)
Change wireless layout
12 | C O L L A B O R A T E P R O : U s e r G u i d e
Button Name Command
Recent Calls Display the current Recent Calls
Mute Mic Mute the local microphone
Recording Start \ Stop recording
Streaming Start \ Stop streaming
Settings Open the settings menu
Mute Video Temporarily disable the local video camera and
its transmission
Delete Delete characters
Delete recording
White Board Open Spontania white board
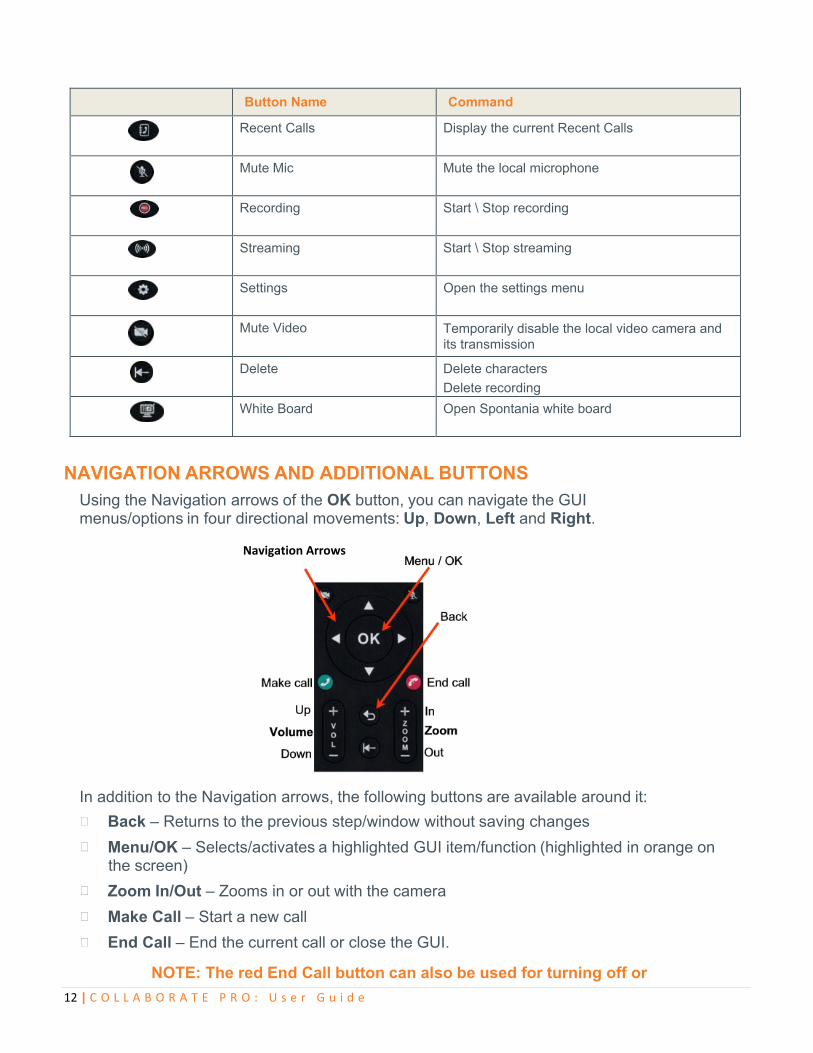
NAVIGATION ARROWS AND ADDITIONAL BUTTONS
Using the Navigation arrows of the OK button, you can navigate the GUI menus/options in four directional movements: Up, Down, Left and Right.
In addition to the Navigation arrows, the following buttons are available around it:
Back – Returns to the previous step/window without saving changes
Menu/OK – Selects/activates a highlighted GUI item/function (highlighted in orange on the screen)
Zoom In/Out – Zooms in or out with the camera
Make Call – Start a new call
End Call – End the current call or close the GUI.
NOTE: The red End Call button can also be used for turning off or
Navigation Arrows
13 | C O L L A B O R A T E P R O : U s e r G u i d e
restarting the unit. Press and hold the button until the power confirmation prompt appears.
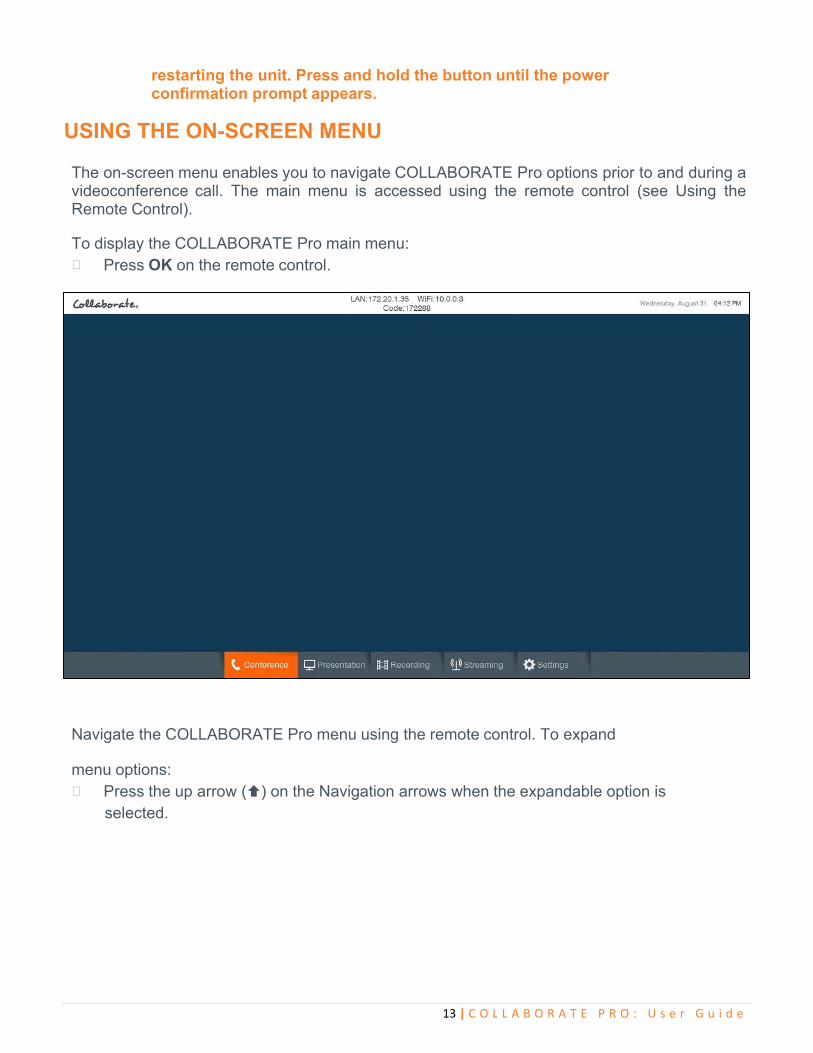
USING THE ON-SCREEN MENU The on-screen menu enables you to navigate COLLABORATE Pro options prior to and during a videoconference call. The main menu is accessed using the remote control (see Using the Remote Control).
To display the COLLABORATE Pro main menu:
Press OK on the remote control.
Navigate the COLLABORATE Pro menu using the remote control. To expand
menu options: Press the up arrow () on the Navigation arrows when the expandable option is
selected.
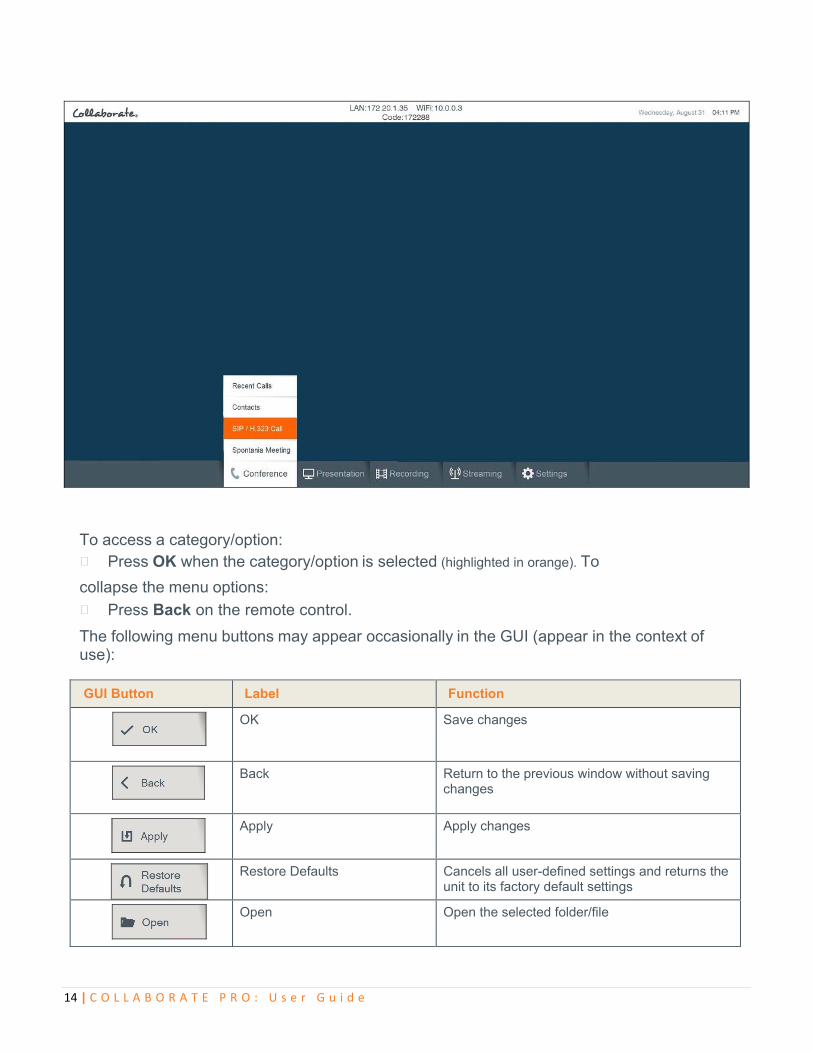
14 | C O L L A B O R A T E P R O : U s e r G u i d e
To access a category/option: Press OK when the category/option is selected (highlighted in orange). To
collapse the menu options: Press Back on the remote control.
The following menu buttons may appear occasionally in the GUI (appear in the context of use):
GUI Button Label Function
OK Save changes
Back Return to the previous window without saving changes
Apply Apply changes
Restore Defaults Cancels all user-defined settings and returns the unit to its factory default settings
Open Open the selected folder/file
15 | C O L L A B O R A T E P R O : U s e r G u i d e
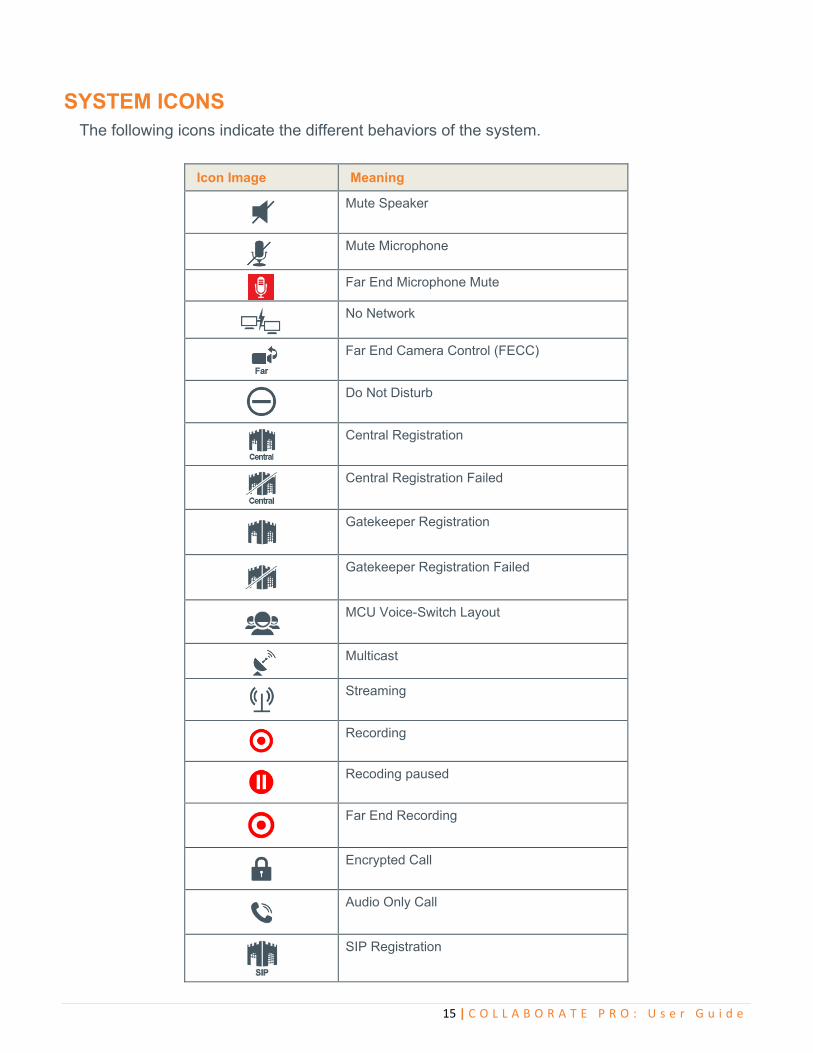
SYSTEM ICONS The following icons indicate the different behaviors of the system.
Icon Image Meaning
Mute Speaker
Mute Microphone
Far End Microphone Mute
No Network
Far End Camera Control (FECC)
Do Not Disturb
Central Registration
Central Registration Failed
Gatekeeper Registration
Gatekeeper Registration Failed
MCU Voice-Switch Layout
Multicast
Streaming
Recording
Recoding paused
Far End Recording
Encrypted Call
Audio Only Call
SIP Registration
16 | C O L L A B O R A T E P R O : U s e r G u i d e
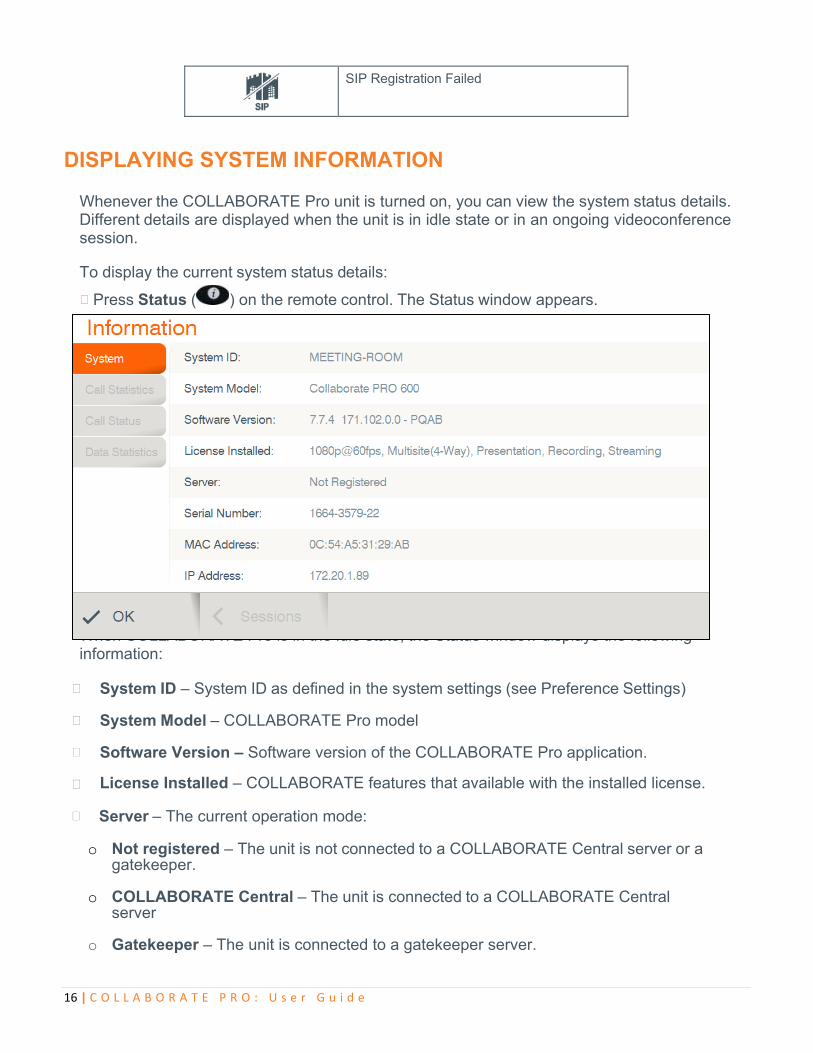
DISPLAYING SYSTEM INFORMATION
Whenever the COLLABORATE Pro unit is turned on, you can view the system status details. Different details are displayed when the unit is in idle state or in an ongoing videoconference session.
To display the current system status details:
Press Status ( ) on the remote control. The Status window appears.
When COLLABORATE Pro is in the idle state, the Status window displays the following information: System ID – System ID as defined in the system settings (see Preference Settings)
System Model – COLLABORATE Pro model Software Version – Software version of the COLLABORATE Pro application.
License Installed – COLLABORATE features that available with the installed license.
Server – The current operation mode:
o Not registered – The unit is not connected to a COLLABORATE Central server or a gatekeeper.
o COLLABORATE Central – The unit is connected to a COLLABORATE Central server
o Gatekeeper – The unit is connected to a gatekeeper server.
SIP Registration Failed

17 | C O L L A B O R A T E P R O : U s e r G u i d e
o SIP Proxy – The unit is connected to a SIP proxy server. Serial Number – The unit unique serial number.
MAC Address – MAC address of the COLLABORATE Pro unit
IP Address – IP Address of the COLLABORATE Pro unit, as automatically assigned by the
DHCP server or as manually configured via Settings>System>LAN. You can use this IP Address to access and manage the unit via a browser (see Accessing COLLABORATE Pro via Browser)
NOTE: During a videoconference call, you can display additional/different relevant information by selecting Call Status / Call Statistics in the Status window.
18 | C O L L A B O R A T E P R O : U s e r G u i d e
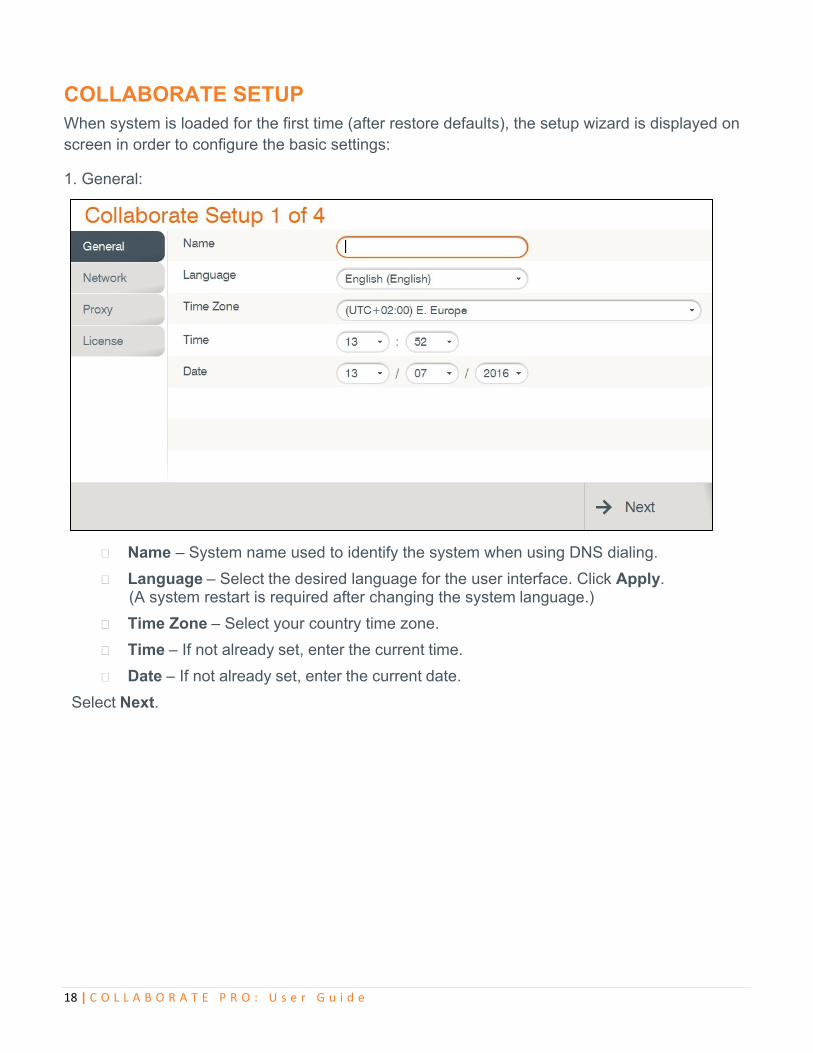
COLLABORATE SETUP When system is loaded for the first time (after restore defaults), the setup wizard is displayed on screen in order to configure the basic settings:
1. General:
Name – System name used to identify the system when using DNS dialing.
Language – Select the desired language for the user interface. Click Apply. (A system restart is required after changing the system language.)
Time Zone – Select your country time zone.
Time – If not already set, enter the current time.
Date – If not already set, enter the current date.
Select Next.
19 | C O L L A B O R A T E P R O : U s e r G u i d e
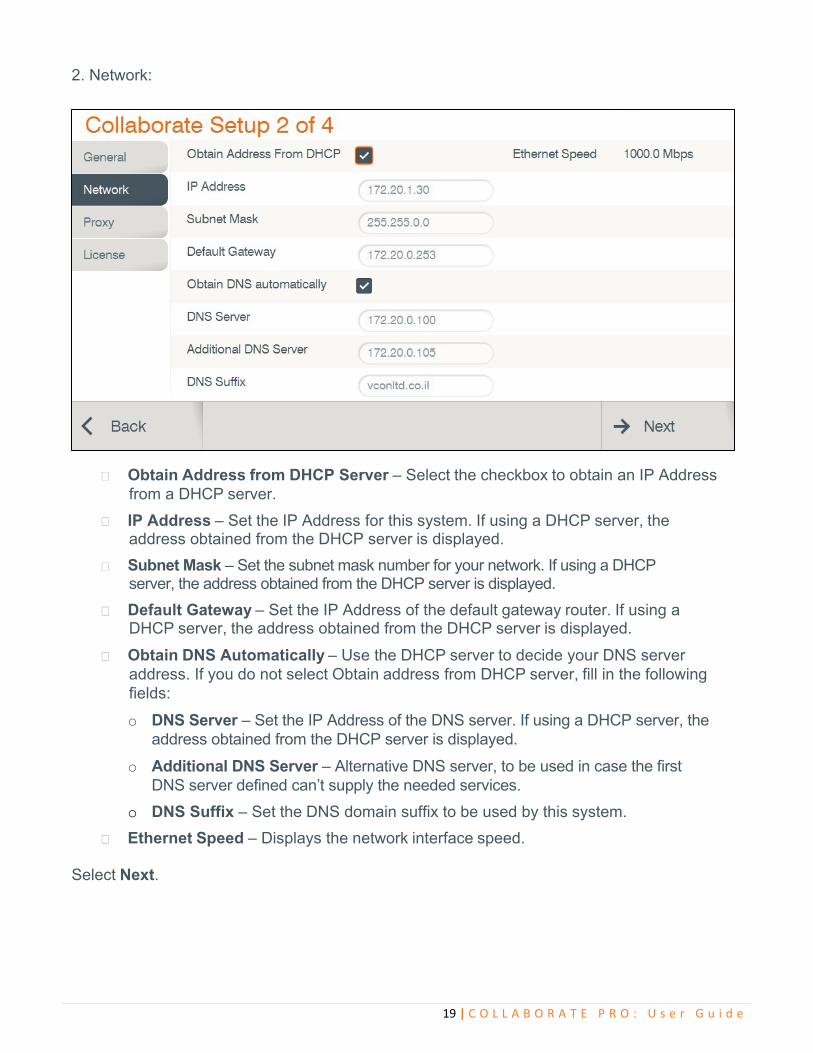
2. Network:
Obtain Address from DHCP Server – Select the checkbox to obtain an IP Address from a DHCP server.
IP Address – Set the IP Address for this system. If using a DHCP server, the address obtained from the DHCP server is displayed.
Subnet Mask – Set the subnet mask number for your network. If using a DHCP server, the address obtained from the DHCP server is displayed.
Default Gateway – Set the IP Address of the default gateway router. If using a DHCP server, the address obtained from the DHCP server is displayed.
Obtain DNS Automatically – Use the DHCP server to decide your DNS server address. If you do not select Obtain address from DHCP server, fill in the following fields:
o DNS Server – Set the IP Address of the DNS server. If using a DHCP server, the address obtained from the DHCP server is displayed.
o Additional DNS Server – Alternative DNS server, to be used in case the first DNS server defined can’t supply the needed services.
o DNS Suffix – Set the DNS domain suffix to be used by this system.
Ethernet Speed – Displays the network interface speed. Select Next.
20 | C O L L A B O R A T E P R O : U s e r G u i d e
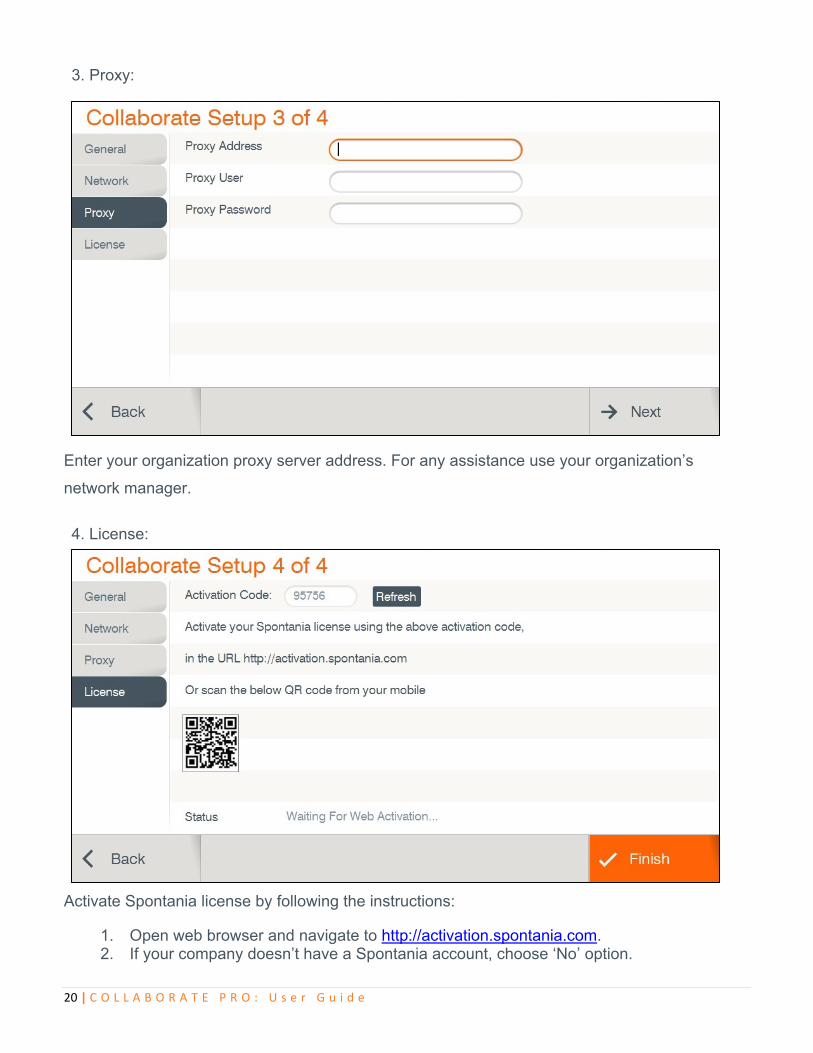
3. Proxy:
Enter your organization proxy server address. For any assistance use your organization’s
network manager.
4. License:
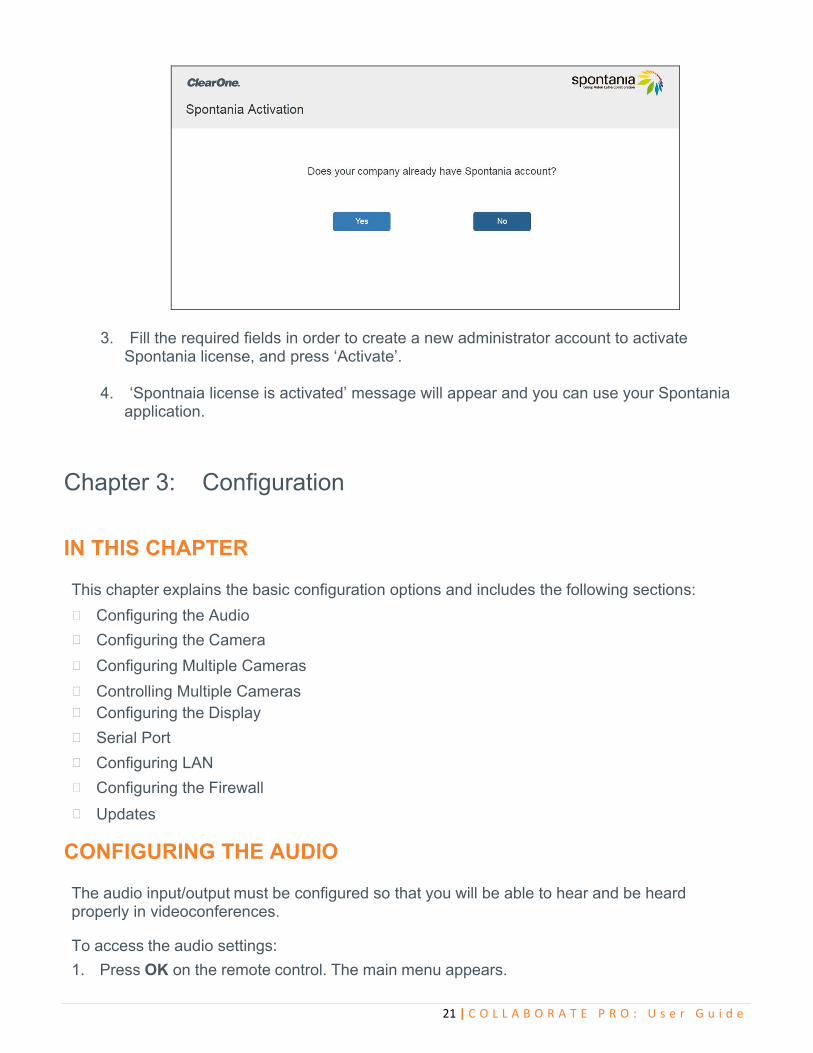
Activate Spontania license by following the instructions:
1. Open web browser and navigate to http://activation.spontania.com. 2. If your company doesn’t have a Spontania account, choose ‘No’ option.
21 | C O L L A B O R A T E P R O : U s e r G u i d e
3. Fill the required fields in order to create a new administrator account to activate Spontania license, and press ‘Activate’.
4. ‘Spontnaia license is activated’ message will appear and you can use your Spontania application.
Chapter 3: Configuration
IN THIS CHAPTER This chapter explains the basic configuration options and includes the following sections:
Configuring the Audio
Configuring the Camera
Configuring Multiple Cameras
Controlling Multiple Cameras
Configuring the Display
Serial Port
Configuring LAN
Configuring the Firewall
Updates
CONFIGURING THE AUDIO The audio input/output must be configured so that you will be able to hear and be heard properly in videoconferences.
To access the audio settings:
1. Press OK on the remote control. The main menu appears.
22 | C O L L A B O R A T E P R O : U s e r G u i d e
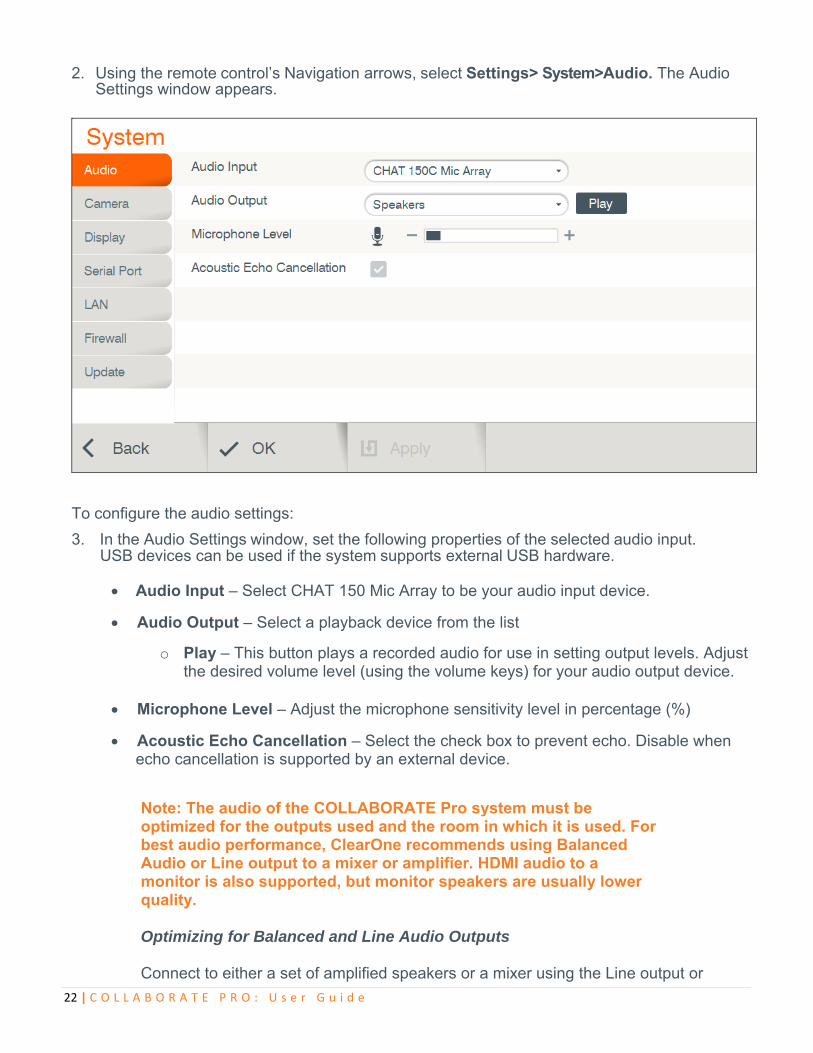
2. Using the remote control’s Navigation arrows, select Settings> System>Audio. The Audio Settings window appears.
To configure the audio settings:
3. In the Audio Settings window, set the following properties of the selected audio input. USB devices can be used if the system supports external USB hardware. Audio Input – Select CHAT 150 Mic Array to be your audio input device.
Audio Output – Select a playback device from the list
o Play – This button plays a recorded audio for use in setting output levels. Adjust the desired volume level (using the volume keys) for your audio output device.
Microphone Level – Adjust the microphone sensitivity level in percentage (%)
Acoustic Echo Cancellation – Select the check box to prevent echo. Disable when echo cancellation is supported by an external device.
Note: The audio of the COLLABORATE Pro system must be optimized for the outputs used and the room in which it is used. For best audio performance, ClearOne recommends using Balanced Audio or Line output to a mixer or amplifier. HDMI audio to a monitor is also supported, but monitor speakers are usually lower quality.
Optimizing for Balanced and Line Audio Outputs Connect to either a set of amplified speakers or a mixer using the Line output or
23 | C O L L A B O R A T E P R O : U s e r G u i d e
Balanced Audio connections. Set the COLLABORATE Pro Volume to 50%. Play the sample audio by pressing the Play button. Use the external amplifier or mixer to adjust the volume within the room to a comfortable level. Afterward, the COLLABORATE Pro audio control can be used to increase/decrease the audio to a desired level during sessions. Optimizing for HDMI Audio with Beamforming Microphone Array Using the COLLABORATE Pro with the Beamforming Microphone Array with the HMDI output to monitor speakers requires adjustment for audio levels and echo cancellation. Volume After attaching the HDMI output to the monitor, set the COLLABORATE Pro Volume to 50%, then play the sample audio by pressing the Play button. Use the monitor audio adjustment to set the volume within the room to a comfortable level. Afterward, the COLLABORATE Pro audio control can be used to increase/decrease the audio to a desired level during sessions.
4. Select Apply.
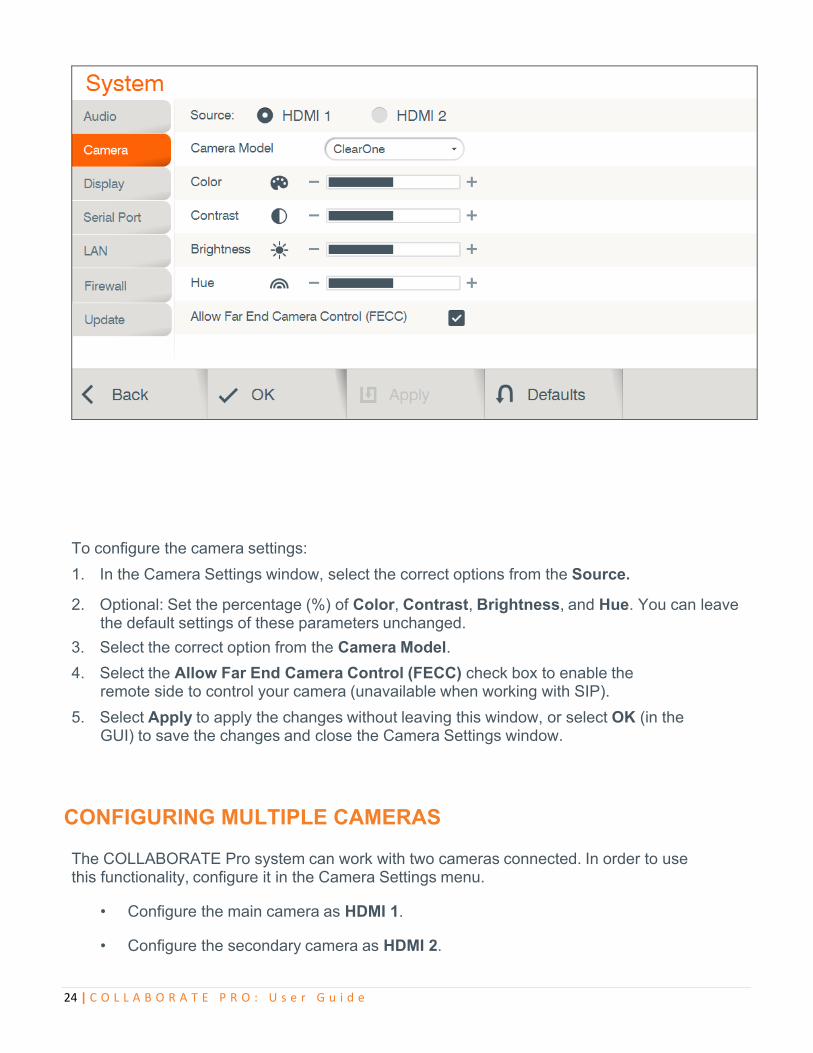
CONFIGURING THE CAMERA Before you begin videoconferencing, you need to make sure that the cameras connected to the COLLABORATE Pro are properly configured. Cameras are configured via the Camera Settings window.
To access the camera settings:
1. Press OK on the remote control. The main menu appears.
2. Using the remote control’s Navigation arrows, select Settings > System > Camera. The Camera Settings window appears.
24 | C O L L A B O R A T E P R O : U s e r G u i d e
To configure the camera settings:
1. In the Camera Settings window, select the correct options from the Source.
2. Optional: Set the percentage (%) of Color, Contrast, Brightness, and Hue. You can leave the default settings of these parameters unchanged.
3. Select the correct option from the Camera Model.
4. Select the Allow Far End Camera Control (FECC) check box to enable the remote side to control your camera (unavailable when working with SIP).
5. Select Apply to apply the changes without leaving this window, or select OK (in the GUI) to save the changes and close the Camera Settings window.
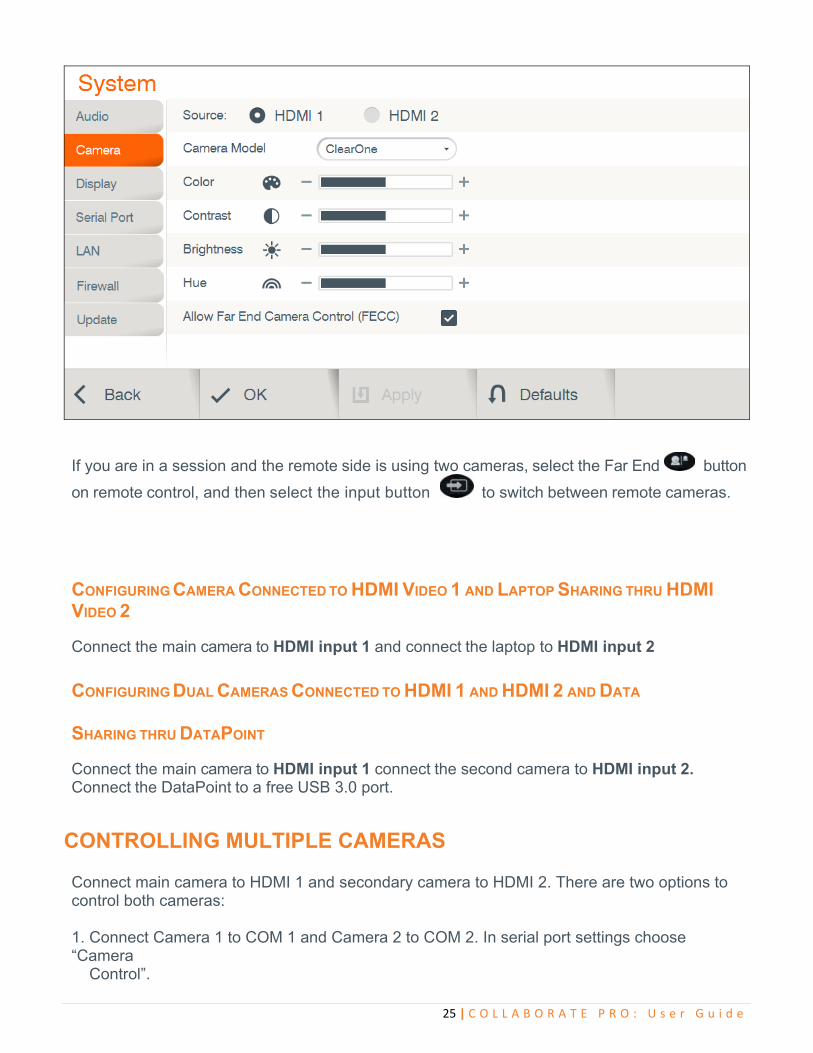
CONFIGURING MULTIPLE CAMERAS The COLLABORATE Pro system can work with two cameras connected. In order to use this functionality, configure it in the Camera Settings menu.
• Configure the main camera as HDMI 1.
• Configure the secondary camera as HDMI 2.
25 | C O L L A B O R A T E P R O : U s e r G u i d e
If you are in a session and the remote side is using two cameras, select the Far End button
on remote control, and then select the input button to switch between remote cameras.
CONFIGURING CAMERA CONNECTED TO HDMI VIDEO 1 AND LAPTOP SHARING THRU HDMI VIDEO 2
Connect the main camera to HDMI input 1 and connect the laptop to HDMI input 2
CONFIGURING DUAL CAMERAS CONNECTED TO HDMI 1 AND HDMI 2 AND DATA
SHARING THRU DATAPOINT
Connect the main camera to HDMI input 1 connect the second camera to HDMI input 2. Connect the DataPoint to a free USB 3.0 port.
CONTROLLING MULTIPLE CAMERAS Connect main camera to HDMI 1 and secondary camera to HDMI 2. There are two options to control both cameras: 1. Connect Camera 1 to COM 1 and Camera 2 to COM 2. In serial port settings choose “Camera Control”.
26 | C O L L A B O R A T E P R O : U s e r G u i d e
2. Connect Camera 1 to COM 1. Connect Camera 2 to Camera 1 via VISCA cable. In serial port settings choose “Serial Control”. These settings will turn Daisy Chain Cameras on.
CONFIGURING THE DISPLAY The display settings determine the method by which video is displayed on the screen. Adjust the display settings depending on the room you are using for videoconferencing and on your distance from the screen.
NOTE: The term “screen” refers to any type of monitor you are using (LED, LCD, and so on).
To access the display settings:
1. Press OK on the remote control. The main menu appears.
2. Using the remote control’s Navigation arrows, select Settings>System > Display. The Display Settings window appears.

27 | C O L L A B O R A T E P R O : U s e r G u i d e
To configure the basic display settings:
1. Display Mode (Configured automatically) –
o Single Mode – Both videoconference parties are displayed on a single screen.
o Dual Mode – Conferences are displayed on two screens.
NOTE: Incoming resolution in dual mode is limited to 1080@30.
Display Remote on Main – When using multiple monitors, display the remote side on the main display. Uncheck to display the remote on the secondary monitor.
Device and Resolution – Select an option from the lists.
Keep Aspect Ratio – Select this option to keep the original aspect ratio on screens that have different aspect ratio.
Secondary Display Used For Data Only – Select to use secondary monitor only when data is sent / received.
2. Click OK.
SERIAL PORT
Configure system’s COM port 1 or 2. It can be connected to camera and control its PTZ or it can be connected to external management device.
To access the serial port settings:
1. Press OK on the remote control. The main menu appears.
2. Using the remote control’s Navigation arrows, select Settings>System > Serial Port. The Serial Port Settings window appears.
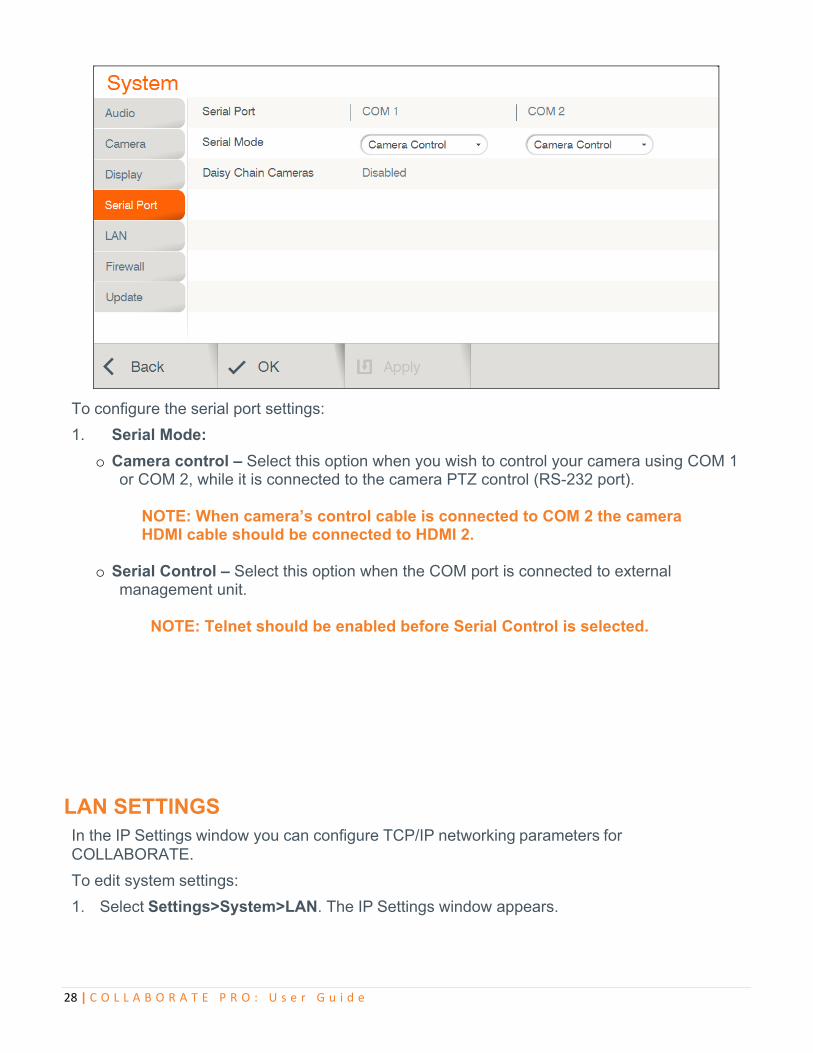
28 | C O L L A B O R A T E P R O : U s e r G u i d e
To configure the serial port settings:
1. Serial Mode:
o Camera control – Select this option when you wish to control your camera using COM 1 or COM 2, while it is connected to the camera PTZ control (RS-232 port). NOTE: When camera’s control cable is connected to COM 2 the camera HDMI cable should be connected to HDMI 2.
o Serial Control – Select this option when the COM port is connected to external management unit. NOTE: Telnet should be enabled before Serial Control is selected.
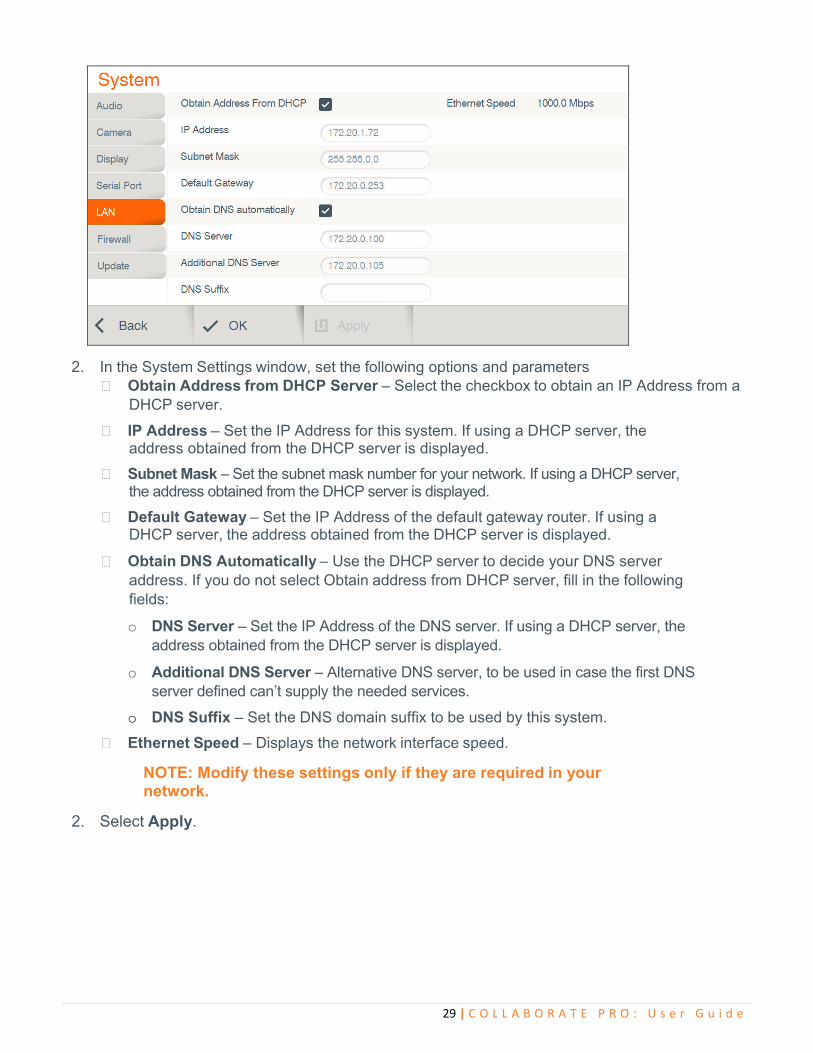
LAN SETTINGS In the IP Settings window you can configure TCP/IP networking parameters for COLLABORATE.
To edit system settings:
1. Select Settings>System>LAN. The IP Settings window appears.
29 | C O L L A B O R A T E P R O : U s e r G u i d e
2. In the System Settings window, set the following options and parameters Obtain Address from DHCP Server – Select the checkbox to obtain an IP Address from a
DHCP server.
IP Address – Set the IP Address for this system. If using a DHCP server, the address obtained from the DHCP server is displayed.
Subnet Mask – Set the subnet mask number for your network. If using a DHCP server,
the address obtained from the DHCP server is displayed.
Default Gateway – Set the IP Address of the default gateway router. If using a DHCP server, the address obtained from the DHCP server is displayed.
Obtain DNS Automatically – Use the DHCP server to decide your DNS server
address. If you do not select Obtain address from DHCP server, fill in the following fields:
o DNS Server – Set the IP Address of the DNS server. If using a DHCP server, the
address obtained from the DHCP server is displayed.
o Additional DNS Server – Alternative DNS server, to be used in case the first DNS server defined can’t supply the needed services.
o DNS Suffix – Set the DNS domain suffix to be used by this system.
Ethernet Speed – Displays the network interface speed.
NOTE: Modify these settings only if they are required in your network.
2. Select Apply.
30 | C O L L A B O R A T E P R O : U s e r G u i d e
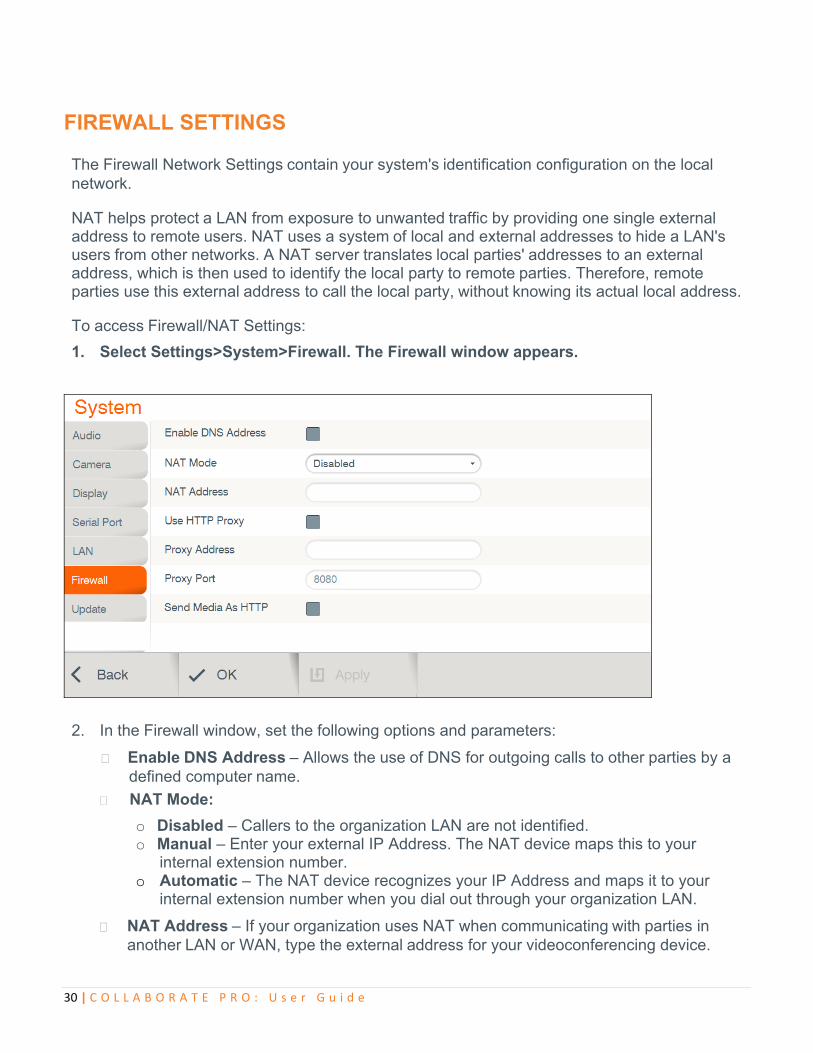
FIREWALL SETTINGS
The Firewall Network Settings contain your system's identification configuration on the local network.
NAT helps protect a LAN from exposure to unwanted traffic by providing one single external address to remote users. NAT uses a system of local and external addresses to hide a LAN's users from other networks. A NAT server translates local parties' addresses to an external address, which is then used to identify the local party to remote parties. Therefore, remote parties use this external address to call the local party, without knowing its actual local address.
To access Firewall/NAT Settings:
1. Select Settings>System>Firewall. The Firewall window appears.
2. In the Firewall window, set the following options and parameters:
Enable DNS Address – Allows the use of DNS for outgoing calls to other parties by a defined computer name.
NAT Mode:
o Disabled – Callers to the organization LAN are not identified. o Manual – Enter your external IP Address. The NAT device maps this to your
internal extension number. o Automatic – The NAT device recognizes your IP Address and maps it to your
internal extension number when you dial out through your organization LAN.
NAT Address – If your organization uses NAT when communicating with parties in another LAN or WAN, type the external address for your videoconferencing device.
31 | C O L L A B O R A T E P R O : U s e r G u i d e
Tunneling Port – The default tunneling port is 443. Tunneling is available only when working with COLLABORATE Central.
Use HTTP Proxy – If your organization uses Proxy server, configure in the Proxy Address and Proxy Port.
Send Media As HTTP – Disguising tunneling traffic as HTTP.
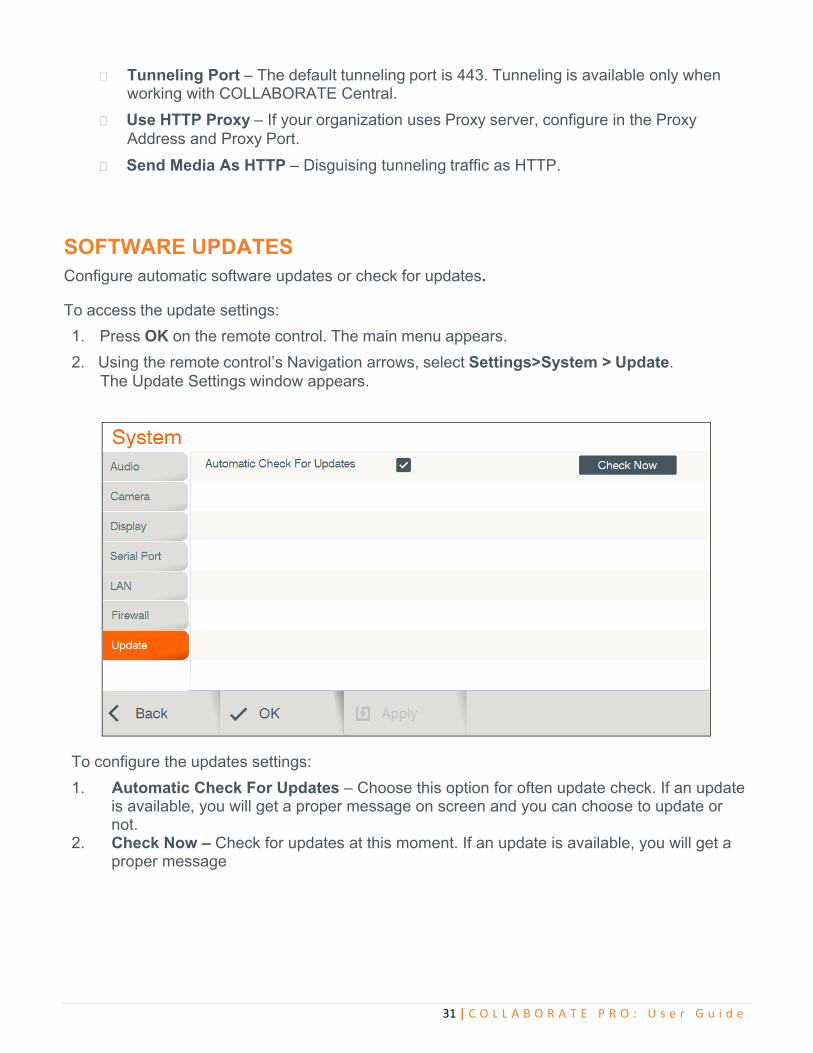
SOFTWARE UPDATES Configure automatic software updates or check for updates.
To access the update settings:
1. Press OK on the remote control. The main menu appears.
2. Using the remote control’s Navigation arrows, select Settings>System > Update. The Update Settings window appears.
To configure the updates settings:
1. Automatic Check For Updates – Choose this option for often update check. If an update is available, you will get a proper message on screen and you can choose to update or not. 2. Check Now – Check for updates at this moment. If an update is available, you will get a proper message
32 | C O L L A B O R A T E P R O : U s e r G u i d e
Chapter 4: Video Collaboration
IN THIS CHAPTER This chapter explains the video collaboration basics and options using COLLABORATE Pro, and includes the following sections:
Starting Calls
Auto-Answering Calls
Ending Calls
Muting the Video
Switching Image Modes
Switching Call View Modes
Using Picture-In-Picture (PIP) Modes
Call State Indications
Using Call Tones
Recording and Streaming
Data Sharing
Using Multicasting
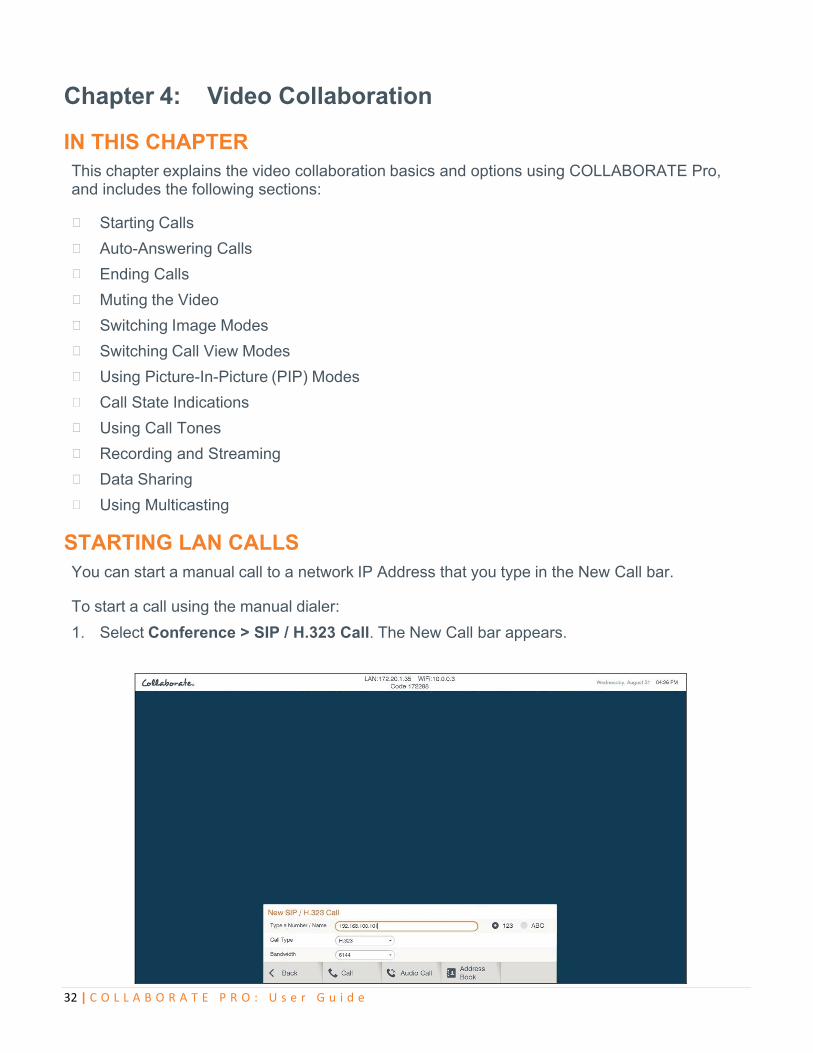
STARTING LAN CALLS You can start a manual call to a network IP Address that you type in the New Call bar.
To start a call using the manual dialer:
1. Select Conference > SIP / H.323 Call. The New Call bar appears.

33 | C O L L A B O R A T E P R O : U s e r G u i d e
2. Select the type of call you want to make:
H.323 or SIP – an IP-based call via the connected local network (LAN).
3. In the Type a Number/Name field, type the IP Address to which you want to call. Alternatively, instead of an IP Address, you can also use an Alias, E.164 number, or a DNS Address (if such are defined on your network).
To type numbers, make sure that the 123 option is selected.
To type letters and numbers, make sure that the ABC option is selected.
4. Select the maximum bandwidth for the video call and press Call. For audio only call press Audio Call.
NOTE: Audio only call bandwidth is 64 Kbps.
For video call, you can also press the Make Call (green button) on the remote control.
The Calling screen appears.
When the call is answered on the far end, the system switches to the Call mode.
AUTO-ANSWERING CALLS The auto-answer option is found in the Call Settings window (see Call Settings).
When the auto-answer option is not selected and an incoming call is received, a message is displayed on the screen. You can accept or reject the call using the buttons on the remote control or via the screen message.
NOTE: Auto-answering does not apply to MCU calls. (To configure auto-answering in MCU sessions, see MCU Settings.)
ENDING CALLS
You can disconnect the current videoconference call at any time. To
end the current call: On the remote control, press the red End Call button,
– or –
Select Conference>Hang Up in the GUI and then press OK on the remote control.
34 | C O L L A B O R A T E P R O : U s e r G u i d e
MUTING THE VIDEO
Muting during a videoconference is a preference which is selected via the remote control. When you press Mute Video during a call, the remote side sees the Mute Video BMP image, which indicates that your video source has been mute.
SWITCHING CALL VIEW MODES Depending on the type of screen and video interface you are using (HDMI/Display Port); a call may be displayed in single, dual or presentation mode.
SINGLE MODE Single mode presents a single screen showing the output of the local video camera in the Picture-In-Picture (PIP) screen area (see Using Picture-In-Picture (PIP) Modes) and the output of the remote video camera on the main screen area.
DUAL MODE
Two screens: one showing the output of the local video camera, and a second screen showing the output of the remote video camera. When Secondary Display Used For Data Only is checked, the conference will be in a single mode. Once data is shared, the second monitor will display the data. NOTE: Incoming resolution in dual mode is limited to 1080@30. PRESENTATION MODE
When recordings or files are displayed in data sharing mode, the remote video is shown in a PIP area, while the recordings/files are presented on the main screen area.
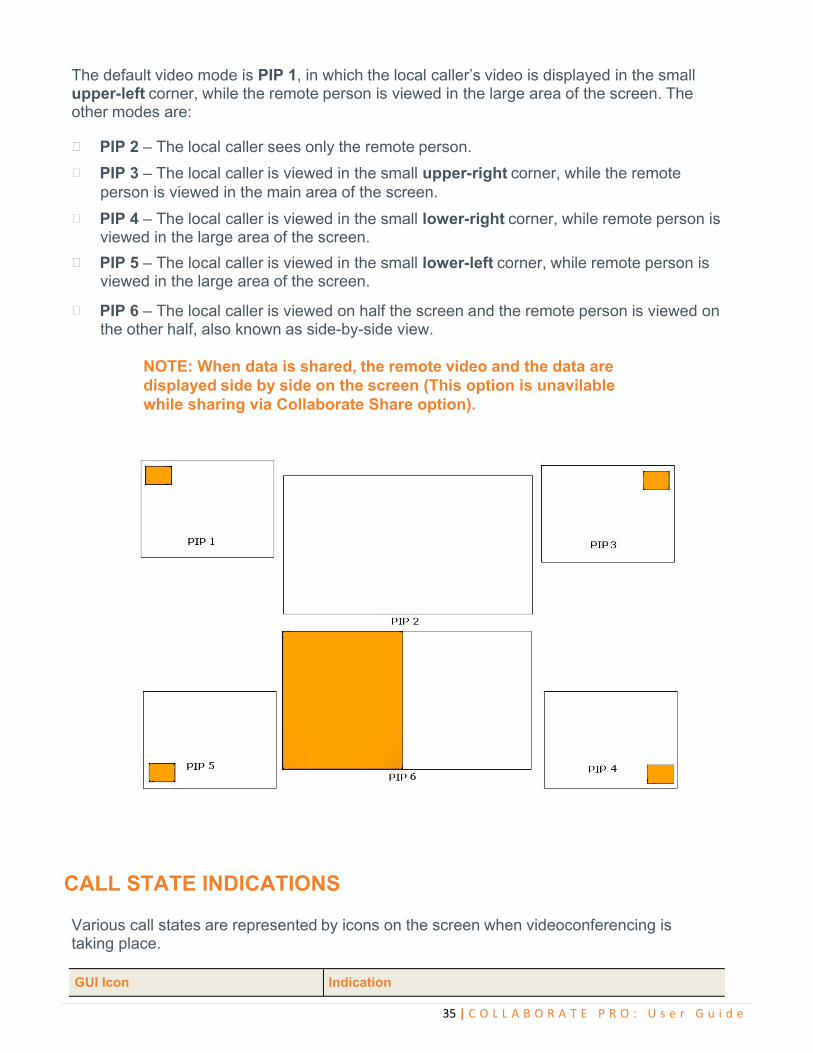
USING PICTURE-IN-PICTURE (PIP) MODES When a conference begins, the local video appears on the monitor in a small rectangular inset located in the upper left corner of the larger remote video display. This display mode is called Picture-In-Picture (PIP).
Each time you press the PIP button on the remote control, the PIP image rotates counter- clockwise to the next corner of the screen. Pressing the PIP button after the PIP completes a rotation to all corners then hides the PIP image, and starts again on a subsequent button press.
35 | C O L L A B O R A T E P R O : U s e r G u i d e
The default video mode is PIP 1, in which the local caller’s video is displayed in the small upper-left corner, while the remote person is viewed in the large area of the screen. The other modes are:
PIP 2 – The local caller sees only the remote person.
PIP 3 – The local caller is viewed in the small upper-right corner, while the remote person is viewed in the main area of the screen.
PIP 4 – The local caller is viewed in the small lower-right corner, while remote person is viewed in the large area of the screen.
PIP 5 – The local caller is viewed in the small lower-left corner, while remote person is viewed in the large area of the screen.
PIP 6 – The local caller is viewed on half the screen and the remote person is viewed on the other half, also known as side-by-side view.
NOTE: When data is shared, the remote video and the data are displayed side by side on the screen (This option is unavilable while sharing via Collaborate Share option).
CALL STATE INDICATIONS Various call states are represented by icons on the screen when videoconferencing is taking place.
GUI Icon Indication
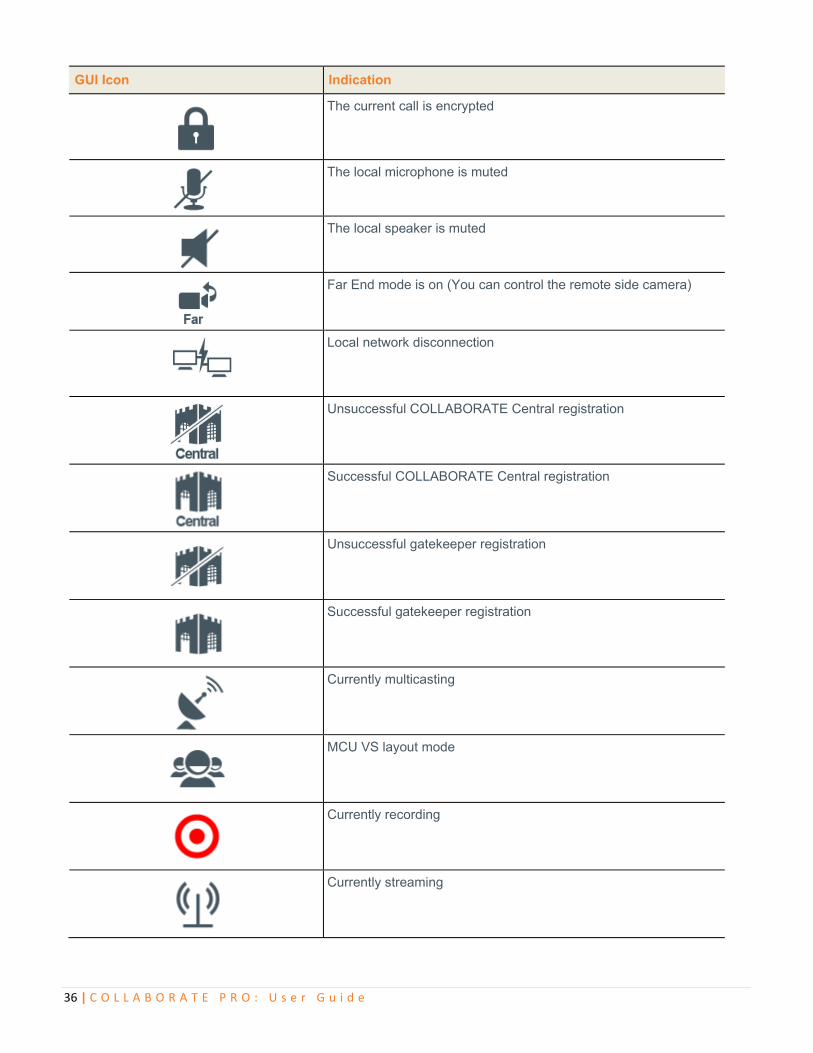
36 | C O L L A B O R A T E P R O : U s e r G u i d e
GUI Icon Indication
The current call is encrypted
The local microphone is muted
The local speaker is muted
Far End mode is on (You can control the remote side camera)
Local network disconnection
Unsuccessful COLLABORATE Central registration
Successful COLLABORATE Central registration
Unsuccessful gatekeeper registration
Successful gatekeeper registration
Currently multicasting
MCU VS layout mode
Currently recording
Currently streaming
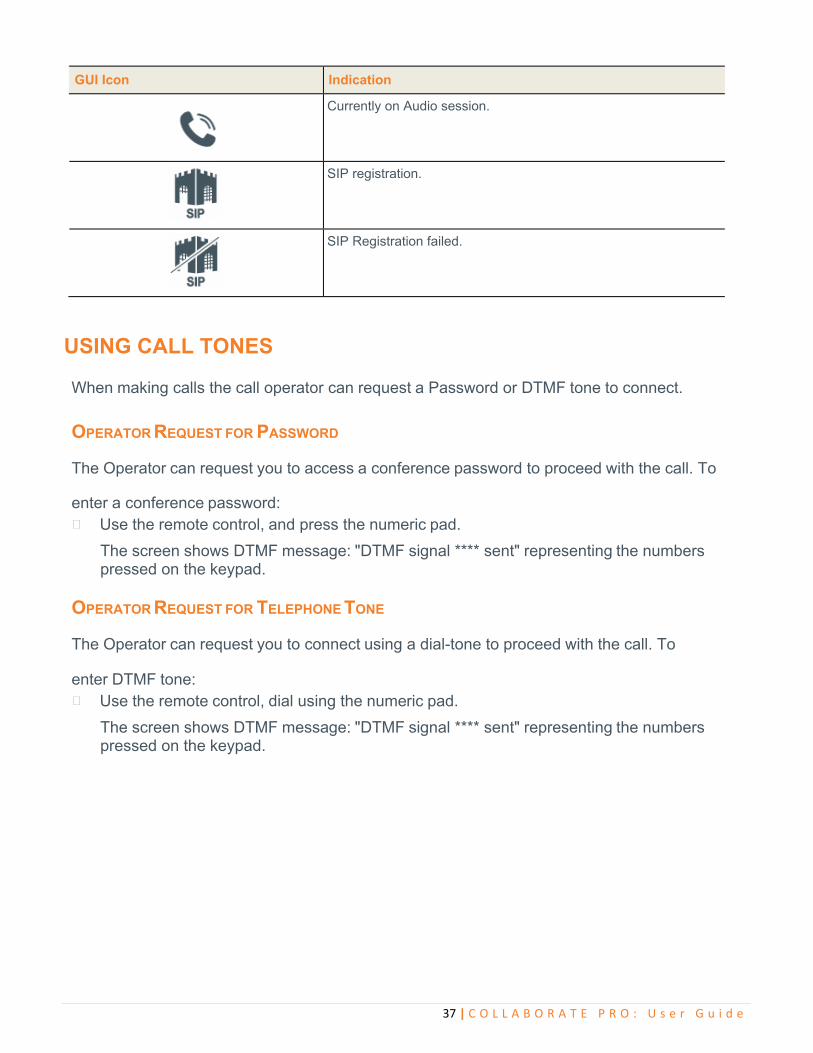
37 | C O L L A B O R A T E P R O : U s e r G u i d e
GUI Icon Indication
Currently on Audio session.
SIP registration.
SIP Registration failed.
USING CALL TONES When making calls the call operator can request a Password or DTMF tone to connect.
OPERATOR REQUEST FOR PASSWORD
The Operator can request you to access a conference password to proceed with the call. To
enter a conference password: Use the remote control, and press the numeric pad.
The screen shows DTMF message: "DTMF signal **** sent" representing the numbers pressed on the keypad.
OPERATOR REQUEST FOR TELEPHONE TONE
The Operator can request you to connect using a dial-tone to proceed with the call. To
enter DTMF tone: Use the remote control, dial using the numeric pad.
The screen shows DTMF message: "DTMF signal **** sent" representing the numbers pressed on the keypad.
38 | C O L L A B O R A T E P R O : U s e r G u i d e
RECORDING AND STREAMING The recording and playback functionality allows you to record idle, point-to-point and multipoint (MCU based) sessions, and view them at a later time. You can share the recorded file during a videoconference with the parties connected, through the recording sharing option.
Through the COLLABORATE Pro Web access system, remote users can view all previously recorded sessions and download them for later viewing with Media Player or VLC player. Alternatively, using streaming, remote users can view a live stream of whatever the camera and microphone are currently transmitting.
You can also view any previously recorded session when you are not in a call by selecting the file from the stored recordings list. For more information about the recording settings, see Recording and Streaming Settings.
START RECORDING
You can start recording a call at any point during a call or idle session. To
start recording: Select Recording>Start Recording. The message "Recording started" appears for
a few seconds, and the Record icon appears for the duration of the recording.
NOTE: The Record icon ( ) appears on the remote participant’s side to indicate that the videoconference is being recorded (legal requirement).
Press on the recording button on the remote control ( ) PAUSE RECORDING
You can pause and resume recording at any point during a call or idle session. Pause / Resume:
Select Recording>Pause Recording. The recording icon will be changed ( )
Press on the pause button on the remote control ( ) To resume recording select Recording>Resume Recording.
STOP RECORDING
You can stop an on-going recording whenever you want. To
stop recording:
Select Recording>Stop Recording. The message "Do you want to stop
39 | C O L L A B O R A T E P R O : U s e r G u i d e
recording?" appears. Press Yes.
Press on the recording button on the remote control ( )
NOTE: When recording in idle mode (not during a videoconference), you can stop the recording by pressing the End Call button on the remote control. A confirmation message appears and requires you to select Yes.
VIEW RECORDING You can view recordings in either of the following ways:
Via the Web interface
Browse the locally saved recordings by selecting Recording> View Recordings.
NOTE: You can start recording on idle mode. In order to record video and shared data check ‘Record And Stream Data’ in recording settings.
Using The Media Controllers You can control the player by using remote control player controllers when watching a recording on idle mode.
START STREAMING Session streaming allows any remote system with Media Player or VLC player applications to view streaming from the COLLABORATE Pro system.
To start streaming to remote users:
Select Streaming>Start Streaming. The message "Streaming Started" appears for a few seconds, and the Streaming Icon appears for the duration of the streaming.
NOTE: Refer to Web Access and Management for information on recording and streaming via the Internet. NOTE: You can start streaming on Idle mode. In order to stream video and shared data check ‘Record And Stream Data’ in Recording settings.
Press on the streaming button on the remote control ( )
STOP STREAMING
You can stop the streaming when it is no longer needed. To
40 | C O L L A B O R A T E P R O : U s e r G u i d e
stop streaming:
Select Streaming>Stop Streaming. The message "Do you want to stop Streaming?" Press Yes.
Press on the streaming button on the remote control ( )
NOTE: When streaming in idle mode (not during a videoconference), you can stop the streaming by pressing the End Call button on the remote control. A confirmation message appears and requires you to select Yes.
VIEW STREAMING You can view the streaming in either of the following ways:
From the COLLABORATE Pro Web management application (see Web Access and
Management) by clicking View Stream button on the left menu. This takes you to a page with the proper media player embedded in the webpage, displaying the ongoing session.
To watch WMV streaming on your computer, open Windows Media Player and press Ctrl+U and enter the following: http://IP_ADDRESS:PORT where IP_ADDRESS is the unit IP and the port is the streaming port (Default value is 12100).
To watch MP4 streaming on your computer open VLC player. In Media>Open URL from clipboard enter to following: rtsp://IP_ADDRESS where IP_ADDRESS is the unit IP.
NOTE: In order to watch MP4 streaming, a VLC player should be installed on your computer.
DATA SHARING Data Sharing can be accessed via the menu or via Data on the remote control. Data Sources are selected inside the Presentation menu. Press Data a second time to stop the data sharing.
CHOOSING THE DATA SOURCE In order for the system to recognize data sources, you need to be connected to a USB flash drive, a laptop, Collaborate share running on your PC, or have recorded files saved locally in your system.
To choose a data source:
1. Select Presentation on the main menu. The Data Sharing menu opens. 2. Depending on the connected data sources, select either HDMI or USB or DataPoint or
Wireless (if available). 3. Select Share Recording, to share your recorded file.
41 | C O L L A B O R A T E P R O : U s e r G u i d e
CONNECTING TO A PC
Laptop computers can be connected to the COLLABORATE Pro using one of two methods:
1. Connect the laptop to HDMI Input.
2. Connect the laptop using a DataPoint device When you select HDMI as data source, the screen switches to display the data on the screen.
CONNECTING A USB FLASH DRIVE
You can view and share files that are stored on a portable USB flash drive.
To view and share files from a USB flash drive:
1. Insert a USB flash drive to one of the COLLABORATE Pro USB ports. The message "USB device inserted" is displayed.
2. Select Presentation>USB. The File Selection window appears.
4. Select the file you want and then press OK on the remote control. The following files are supported: *.jpg, *.jpeg, *.gif, *.png, *.tiff, *.tif, *.bmp, *.wmf, *.mpg, *.mpeg, *.wmv, *.mp4, *.avi, *.pdf, *.pps, *.ppt, *.doc, *.rtf, *.xls, *.xlsx, *.pptx, *.ppsx and *.docx.
5. Select Open. The file is displayed. If the file is opened during a videoconference, it is shared with all the viewers.
42 | C O L L A B O R A T E P R O : U s e r G u i d e
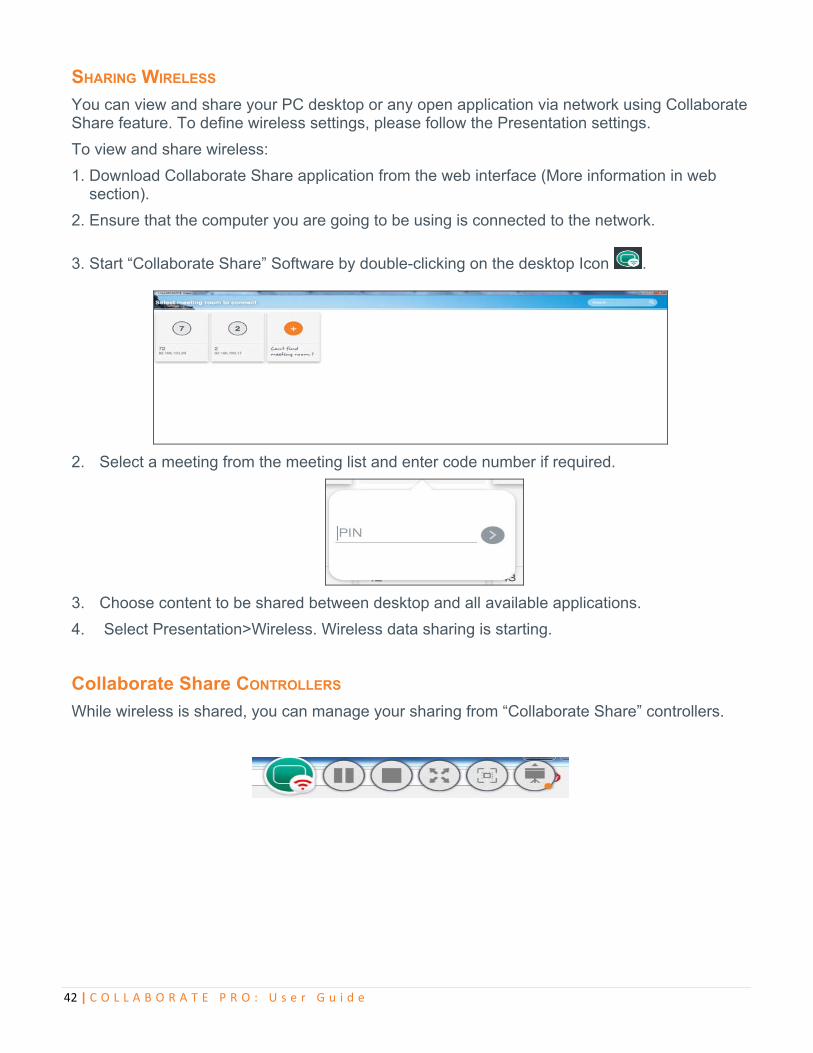
SHARING WIRELESS
You can view and share your PC desktop or any open application via network using Collaborate Share feature. To define wireless settings, please follow the Presentation settings.
To view and share wireless:
1. Download Collaborate Share application from the web interface (More information in web section).
2. Ensure that the computer you are going to be using is connected to the network.
3. Start “Collaborate Share” Software by double-clicking on the desktop Icon .
2. Select a meeting from the meeting list and enter code number if required.
3. Choose content to be shared between desktop and all available applications.
4. Select Presentation>Wireless. Wireless data sharing is starting.
Collaborate Share CONTROLLERS
While wireless is shared, you can manage your sharing from “Collaborate Share” controllers.
43 | C O L L A B O R A T E P R O : U s e r G u i d e
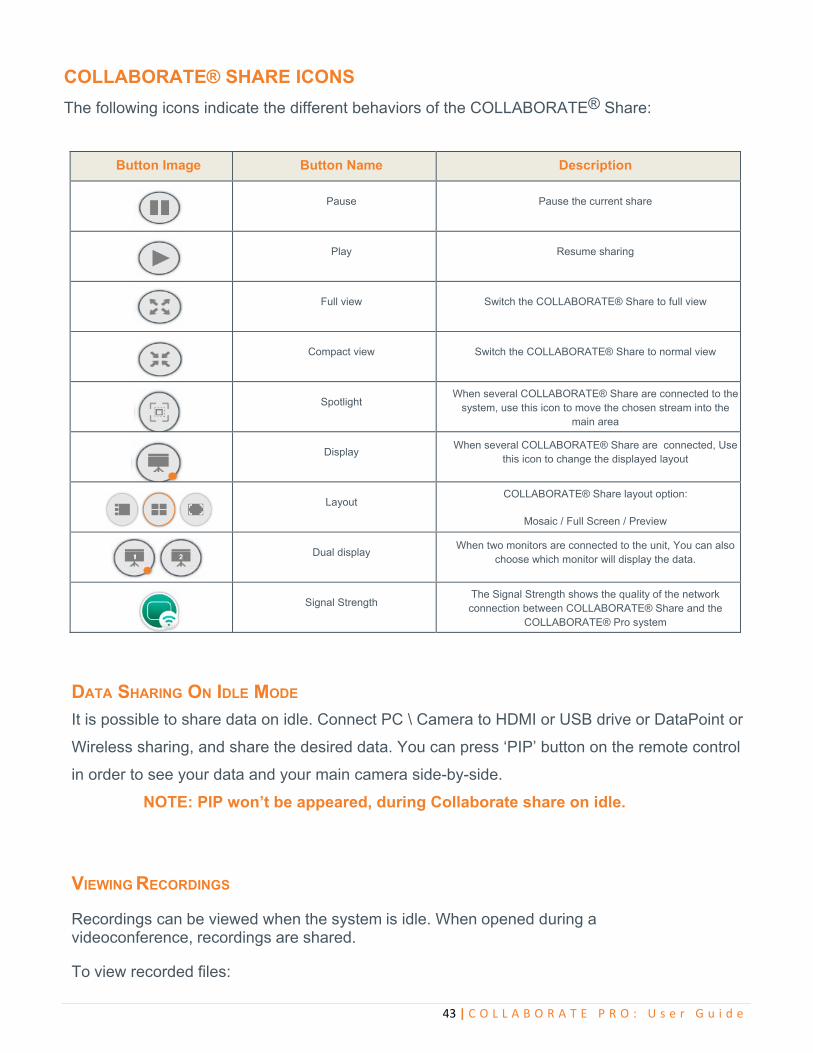
COLLABORATE® SHARE ICONS
The following icons indicate the different behaviors of the COLLABORATE® Share:
Button Image Button Name Description
Pause Pause the current share
Play Resume sharing
Full view Switch the COLLABORATE® Share to full view
Compact view Switch the COLLABORATE® Share to normal view
Spotlight When several COLLABORATE® Share are connected to the
system, use this icon to move the chosen stream into the main area
Display When several COLLABORATE® Share are connected, Use
this icon to change the displayed layout
Layout COLLABORATE® Share layout option:
Mosaic / Full Screen / Preview
Dual display When two monitors are connected to the unit, You can also
choose which monitor will display the data.
Signal Strength The Signal Strength shows the quality of the network connection between COLLABORATE® Share and the
COLLABORATE® Pro system
DATA SHARING ON IDLE MODE
It is possible to share data on idle. Connect PC \ Camera to HDMI or USB drive or DataPoint or
Wireless sharing, and share the desired data. You can press ‘PIP’ button on the remote control
in order to see your data and your main camera side-by-side.
NOTE: PIP won’t be appeared, during Collaborate share on idle.
VIEWING RECORDINGS Recordings can be viewed when the system is idle. When opened during a videoconference, recordings are shared.
To view recorded files:
44 | C O L L A B O R A T E P R O : U s e r G u i d e
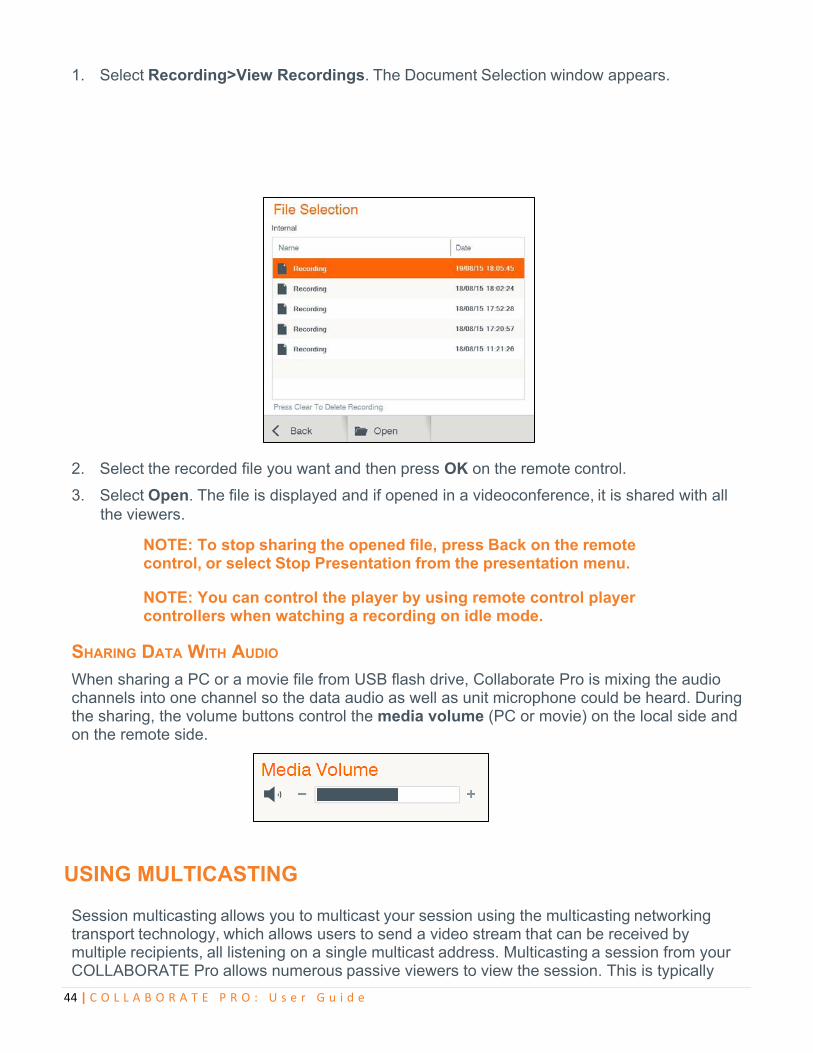
1. Select Recording>View Recordings. The Document Selection window appears.
2. Select the recorded file you want and then press OK on the remote control.
3. Select Open. The file is displayed and if opened in a videoconference, it is shared with all the viewers.
NOTE: To stop sharing the opened file, press Back on the remote control, or select Stop Presentation from the presentation menu.
NOTE: You can control the player by using remote control player controllers when watching a recording on idle mode.
SHARING DATA WITH AUDIO
When sharing a PC or a movie file from USB flash drive, Collaborate Pro is mixing the audio channels into one channel so the data audio as well as unit microphone could be heard. During the sharing, the volume buttons control the media volume (PC or movie) on the local side and on the remote side.
USING MULTICASTING Session multicasting allows you to multicast your session using the multicasting networking transport technology, which allows users to send a video stream that can be received by multiple recipients, all listening on a single multicast address. Multicasting a session from your COLLABORATE Pro allows numerous passive viewers to view the session. This is typically
45 | C O L L A B O R A T E P R O : U s e r G u i d e
used at lectures, or any session that passive viewers can benefit from. Multicast sessions can be viewed by all ClearOne endpoints, the free ClearOne multicast viewer, and the Apple QuickTime viewer.
You can join a multicast call as a passive participant. You can hear and see the call, but you cannot contribute to it.
SETTING UP MULTICAST CALLS See Multicast Settings.
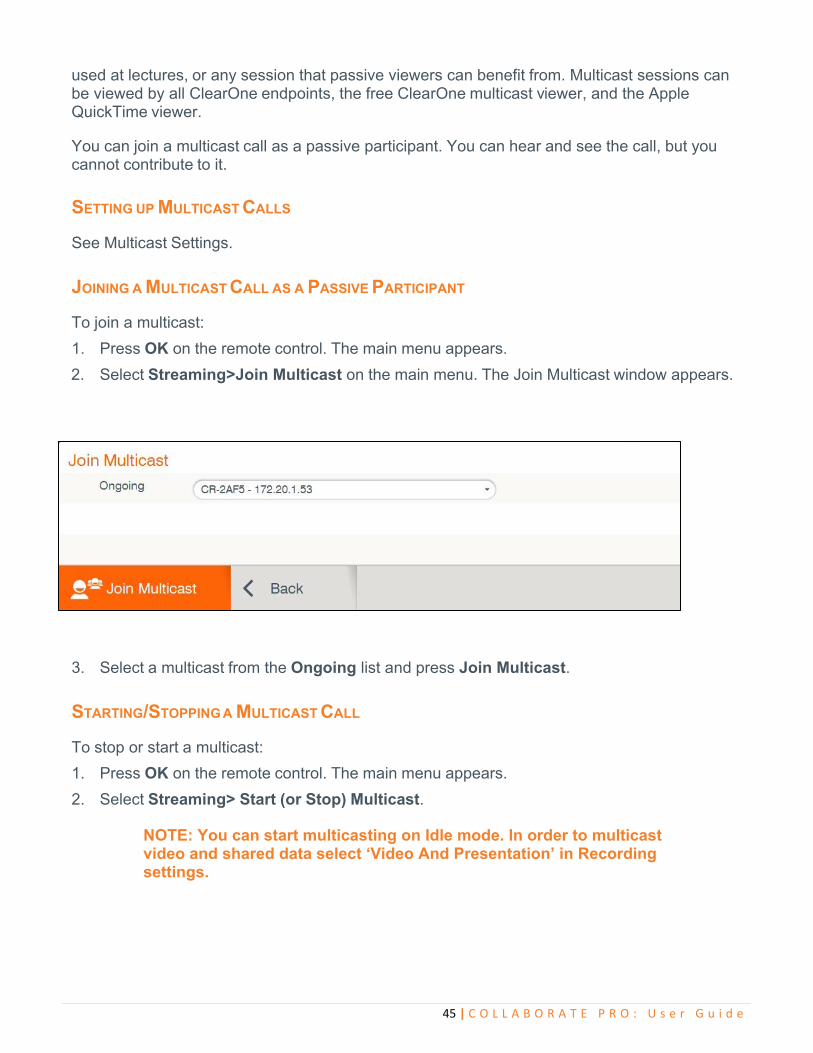
JOINING A MULTICAST CALL AS A PASSIVE PARTICIPANT To join a multicast:
1. Press OK on the remote control. The main menu appears.
2. Select Streaming>Join Multicast on the main menu. The Join Multicast window appears.
3. Select a multicast from the Ongoing list and press Join Multicast.
STARTING/STOPPING A MULTICAST CALL To stop or start a multicast:
1. Press OK on the remote control. The main menu appears.
2. Select Streaming> Start (or Stop) Multicast.
NOTE: You can start multicasting on Idle mode. In order to multicast video and shared data select ‘Video And Presentation’ in Recording settings.
46 | C O L L A B O R A T E P R O : U s e r G u i d e
Chapter 5: Quick Dialing Methods
IN THIS CHAPTER This chapter describes the different quick dialing methods that are available in COLLABORATE Pro, and includes the following sections:
Using the Contacts
Using the Recent Calls
Using Online Directories
Using Spontania Contacts
Using Skype For Business Contacts
USING THE CONTACTS The Contacts enables you to make calls to addresses stored on the local system. You can add frequently used addresses to the Contacts.
USING THE CONTACTS VIA THE REMOTE CONTROL
You can select the Contacts using the remote control. To select the Contacts via the remote control:
1. On the remote control, press Phone Book ( ). The Contacts window appears.
2. In the Contacts tab, select the number to dial, and then press Make Call button
( ) on the remote control.
USING CONTACTS VIA THE COLLABORATE PRO GUI
You can display the Contacts using the COLLABORATE Pro GUI menus. To select the
Contacts via the COLLABORATE Pro GUI:
1. Select Conference>Contacts. The Contacts window appears (use the left arrow button to skip to the left tabs).
2. In the Contacts tab, select the number to dial, and then press Make Call button
( ) on the remote control.
47 | C O L L A B O R A T E P R O : U s e r G u i d e
USING THE CONTACTS VIA THE NEW CALL BAR
You can select the Contacts from the New Call bar. To select the Contacts via the New Call bar:
1. Select SIP / H.323 Call on the main menu. The New Call bar, appears.
2. In the New Call bar, select Address Book. The Contacts window appears. (Use the left arrow button to skip to the left tabs)
3. In the Contacts tab, select the entry to dial, and then press Make Call button
( ) on the remote control.
ADDING ENTRIES TO THE CONTACTS You can add frequently used addresses to the Contacts list from where calls can be made directly.
To add a new contact to the Contacts list:
1. In the Contacts, select Add and press OK. The Name/Address bar opens.
2. Type in the new contact’s name and IP Address, and then select Save. The new contact is added to the Contacts list.
NOTE: You can also set the dialing method (H.323 or SIP) and the bandwidth that you want to use specifically for the contact that you add.
EDITING ENTRIES IN THE CONTACTS You can edit frequently used numbers already in the Contacts list and save them for repeated use.
To edit a contact’s details in the Contacts list:
1. In the Contacts list, select the entry you want to edit and then press OK on the remote control.
2. Select Edit in the GUI. The Name/Address bar opens.
3. Edit the contact name and IP Address, and then select Save.
NOTE: If necessary, you can change the dialing method (H.323 or SIP) and bandwidth that are used specifically for the contact that you edit.
DELETING ENTRIES FROM THE CONTACTS You can delete and thus manage Contacts entries when they are no longer in use. To delete a contact from the Contacts: 1. In the Contacts, select the contact you want to delete, select Delete and then press OK.
The following message is displayed: "Are you sure?"
48 | C O L L A B O R A T E P R O : U s e r G u i d e
2. Select Yes to delete, or No to cancel.
USING THE RECENT CALLS Log entries are automatically logged to the Recent Calls when an outgoing call is made or when an incoming call is received. You can add log entries to the Contacts, or delete them from the Recent Calls log.
NOTE: Log entries cannot be edited.
USING THE RECENT CALLS VIA THE REMOTE CONTROL
To select the Recent Calls via the remote control: 1. On the remote control, press Recent Calls ( ) – or – on the Main Menu, select
Conference>Recent Calls. The Recent Calls window appears.
2. Select the entry and press Dial.
DISPLAYING THE RECENT CALLS FROM THE CONTACTS
To display the Recent Calls via the Contacts: In the Contacts, select Recent Calls by pressing up with the Navigation arrows and
scrolling up.
ADDING A RECENT CALLS ENTRY TO THE CONTACTS
You can add entries for Recent Calls to the Contacts for reuse later. To add Recent Calls entry to the Contacts:
1. In the Recent Calls, select the entry you want to add to the Contacts and then press OK on the remote control.
2. Select Add. The Name/Address bar appears.
3. Edit in the contact Name or Address if needed, and then select Save. The log entry is added to the Contacts.
CLEARING THE RECENT CALLS
You can delete and thus manage Recent Calls when you do not require them any longer. To delete a Recent Calls or clear the entire log:
1. In the Recent Calls window, select which log entry to delete.
2. Select Delete to delete just the selected entry, or Clear All to delete all entries, and then press OK. The following message is displayed when clearing all: "Are you sure?"
3. Select Yes to delete, or No to cancel.
49 | C O L L A B O R A T E P R O : U s e r G u i d e
USING DIRECTORY The Directory is an external directory which can be used for calling. If you are registered in the Directory, you can view the Directory in the Contacts under the Directory tab.
ACCESSING A DIRECTORY VIA THE REMOTE CONTROL
To access the Contacts via the remote control: 1. On the remote control, press the Contacts button. The Contacts opens.
2. Select the Directory tab, and on the number to dial press Dial.
ACCESSING THE DIRECTORY VIA THE CONTACTS
To access the Directory via the Contacts:
1. In the Contacts, select Directory by pressing down with the Navigation arrows.
2. Select the Directory tab, select the number to dial and press Dial.
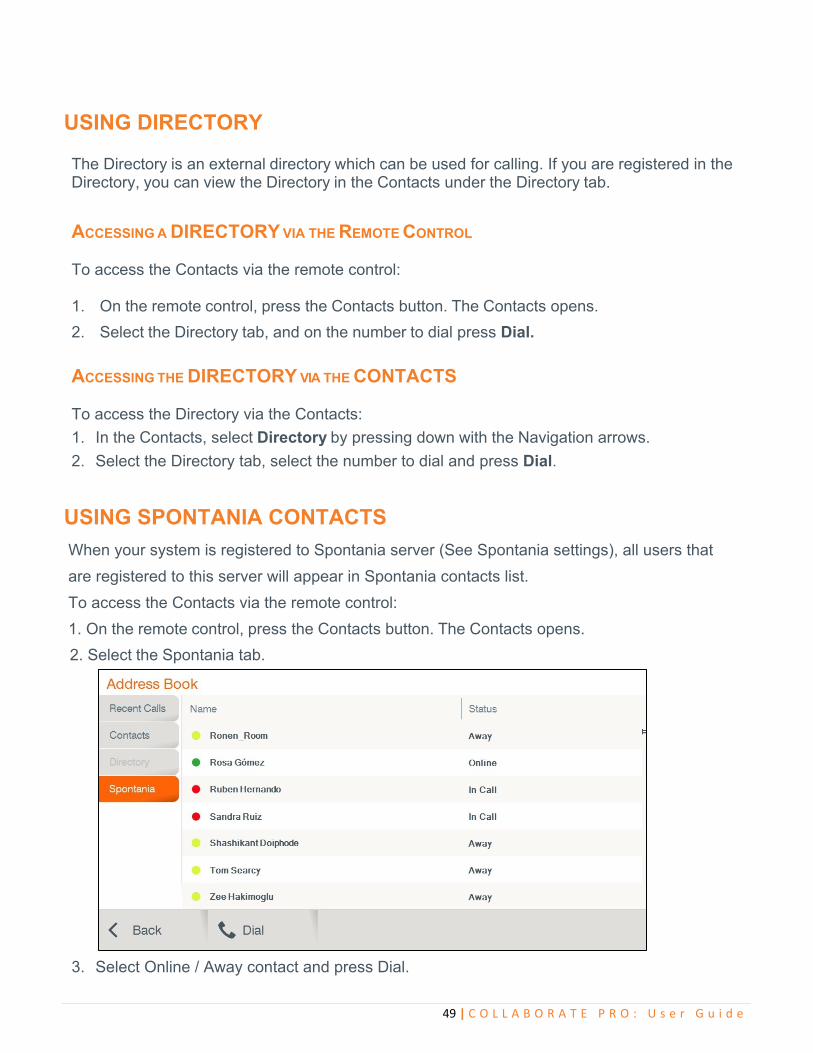
USING SPONTANIA CONTACTS
When your system is registered to Spontania server (See Spontania settings), all users that
are registered to this server will appear in Spontania contacts list.
To access the Contacts via the remote control:
1. On the remote control, press the Contacts button. The Contacts opens.
2. Select the Spontania tab. 3. Select Online / Away contact and press Dial.
50 | C O L L A B O R A T E P R O : U s e r G u i d e
Chapter 6: Skype for Business
IN THIS CHAPTER This chapter covers Skype for Business calling, and includes the following sections:
Starting Skype for Business calls
Starting Skype for Business Multi Conference Calls Presentation sharing Display Layouts Join scheduled Skype for Business Meetings
STARTING SKYPE FOR BUSINESS CALLS In order to start a Skype for Business call follow these step-by-step instructions:
1. Make sure you’re logged into Skype for Business server (To register your system to Skype for Business server please refer to Skype for Business settings). To verify
registration, Press info button ( ) on remote control and check if you are registered to Skype for Business server.
2. Select Conference > Skype for Business > Contacts, and select the name of the contact you want to call.

51 | C O L L A B O R A T E P R O : U s e r G u i d e
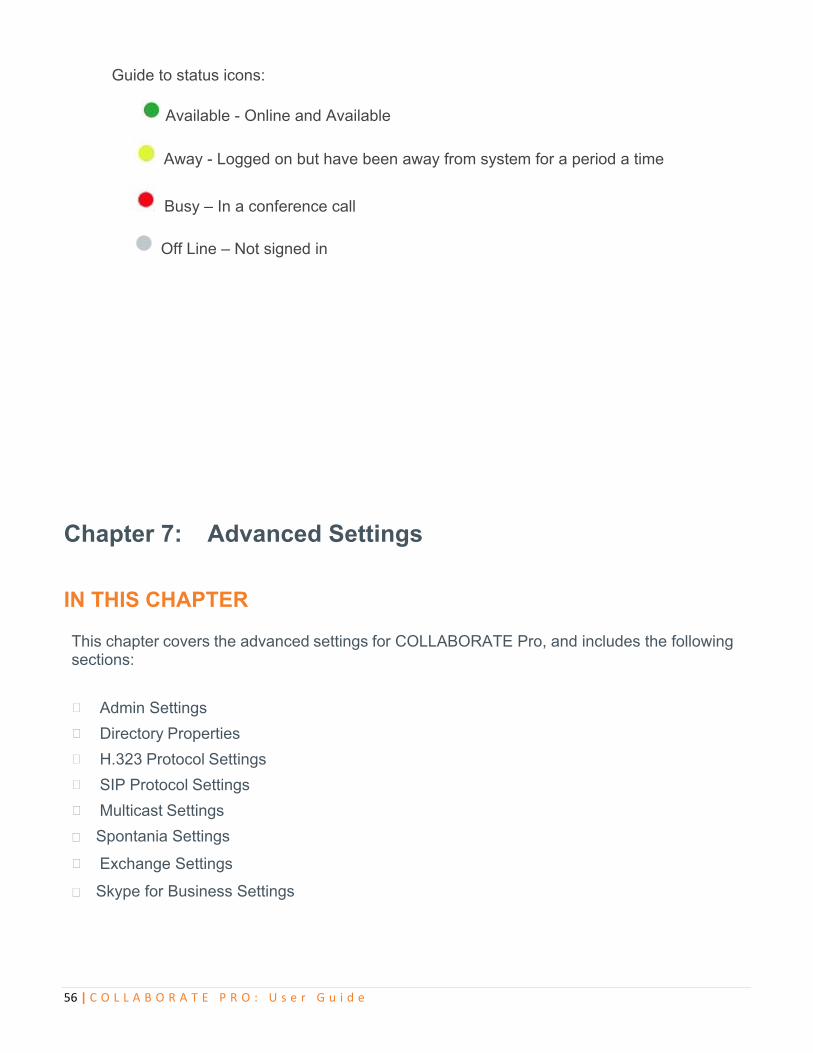
Guide to status icons:
Available - Online and Available
Away - Logged on but have been away from system for a period a time
Busy – In a conference call
Off Line – Not signed in
STARTING SKYPE FOR BUSINESS MULTI CONFERENCE CALLS
If you need to add more people to your conference call, you can select their names from your Contacts list:
1. Make sure your contacts are available by checking their present status first. 2. Select contact from the list, and then click Dial.

52 | C O L L A B O R A T E P R O : U s e r G u i d e
Participants -During a Skype for Business call, click on the Participants menu to see all of the Participants in the call
53 | C O L L A B O R A T E P R O : U s e r G u i d e
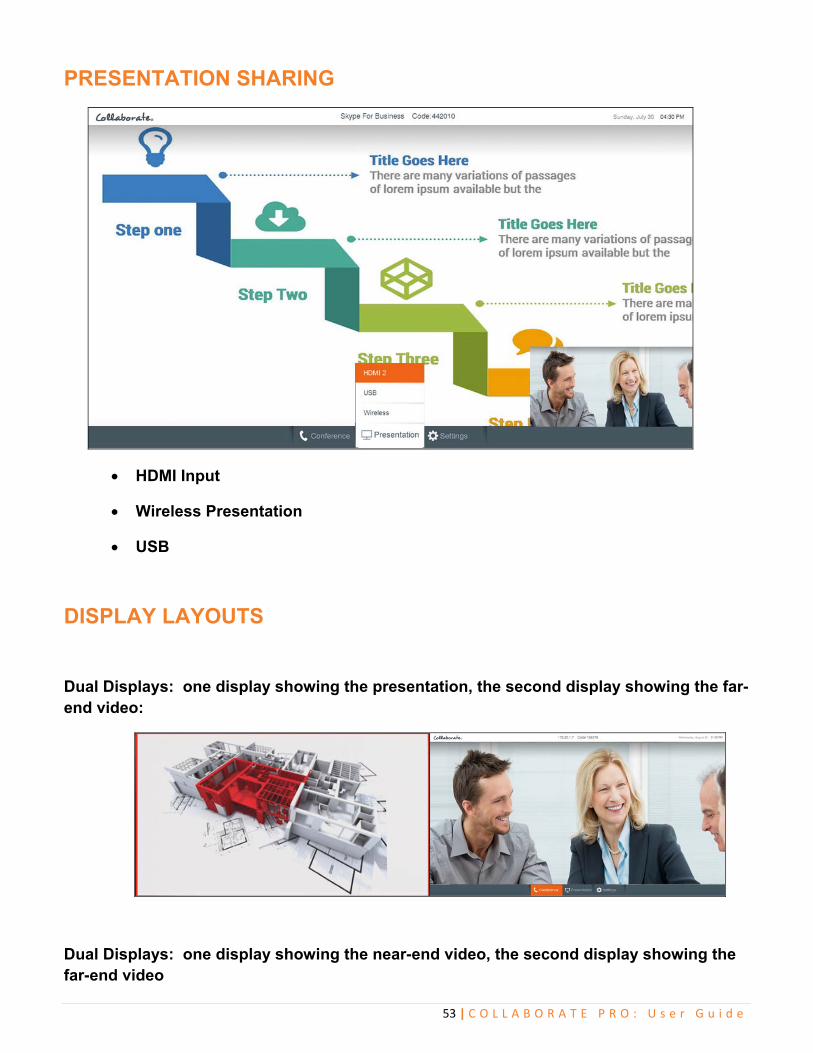
PRESENTATION SHARING
HDMI Input
Wireless Presentation
USB
DISPLAY LAYOUTS
Dual Displays: one display showing the presentation, the second display showing the far-end video:
Dual Displays: one display showing the near-end video, the second display showing the far-end video

54 | C O L L A B O R A T E P R O : U s e r G u i d e
Voice Switched Mode: displays the party that is talking in a point-to-point, or multi-party calls.
JOIN SCHEDULED SKYPE FOR BUSINESS MEETINGS
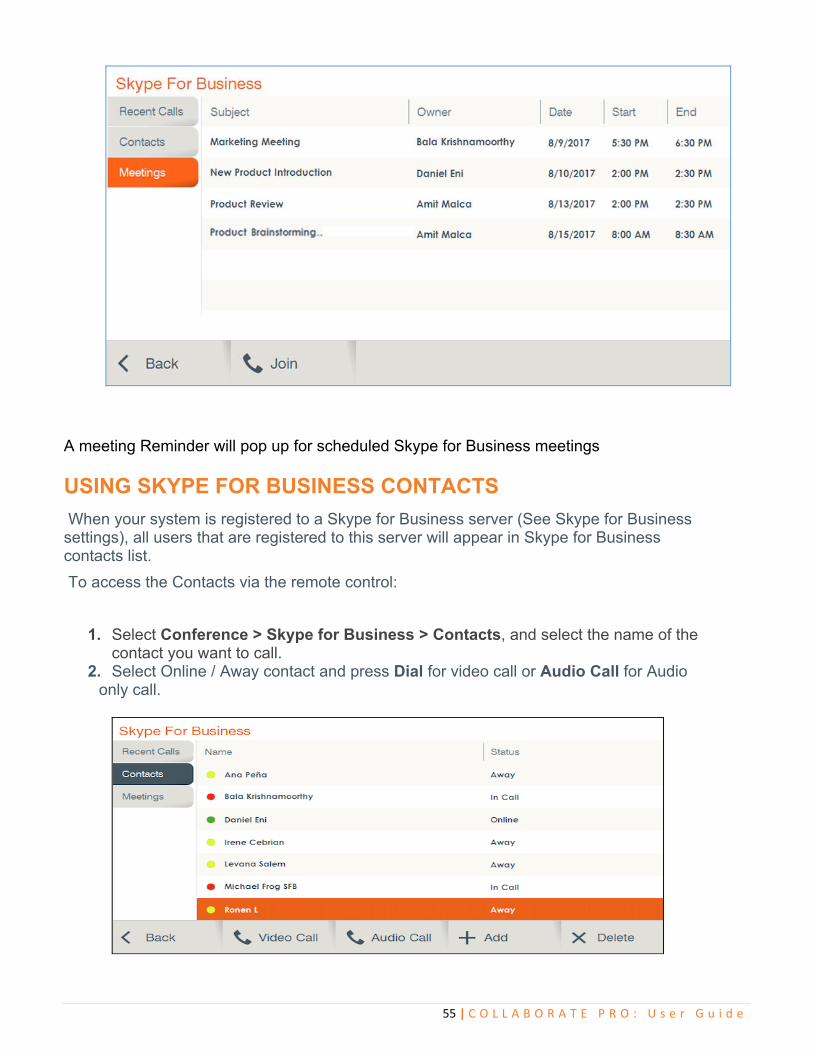
55 | C O L L A B O R A T E P R O : U s e r G u i d e
A meeting Reminder will pop up for scheduled Skype for Business meetings
USING SKYPE FOR BUSINESS CONTACTS
When your system is registered to a Skype for Business server (See Skype for Business settings), all users that are registered to this server will appear in Skype for Business contacts list.
To access the Contacts via the remote control:
1. Select Conference > Skype for Business > Contacts, and select the name of the contact you want to call.
2. Select Online / Away contact and press Dial for video call or Audio Call for Audio only call.
56 | C O L L A B O R A T E P R O : U s e r G u i d e
Guide to status icons:
Available - Online and Available
Away - Logged on but have been away from system for a period a time
Busy – In a conference call
Off Line – Not signed in
Chapter 7: Advanced Settings
IN THIS CHAPTER This chapter covers the advanced settings for COLLABORATE Pro, and includes the following sections:
Admin Settings
Directory Properties
H.323 Protocol Settings
SIP Protocol Settings
Multicast Settings
Spontania Settings
Exchange Settings
Skype for Business Settings
57 | C O L L A B O R A T E P R O : U s e r G u i d e
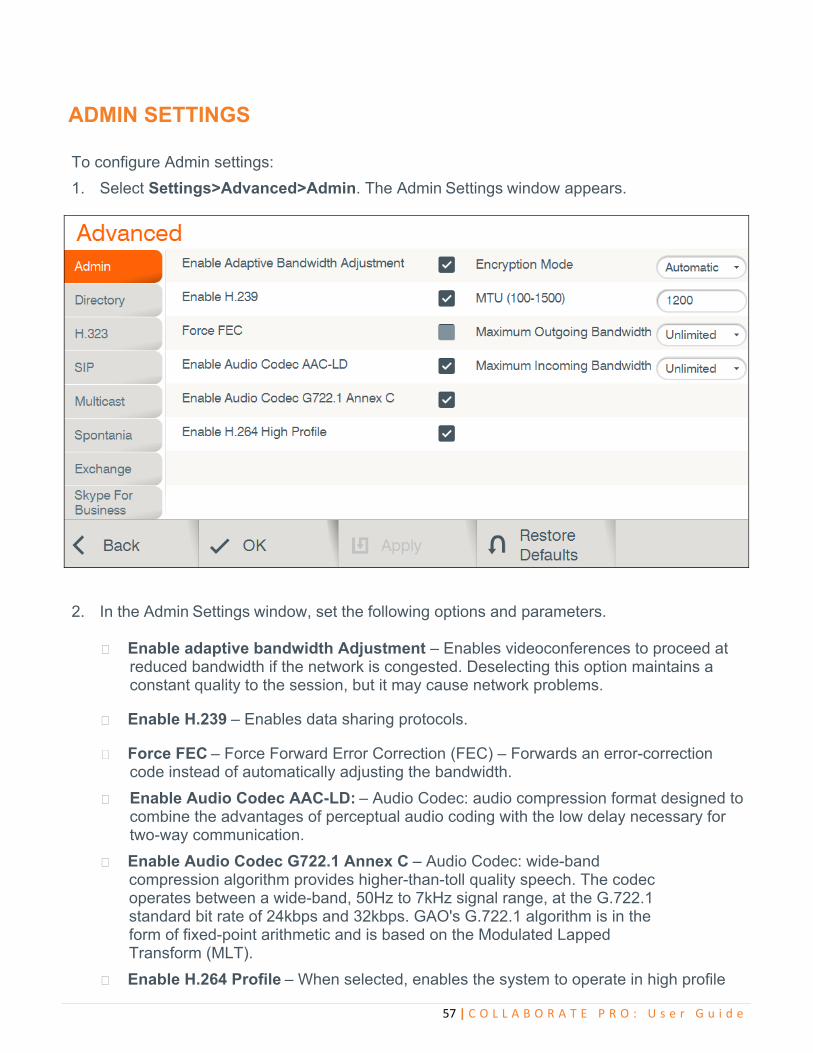
ADMIN SETTINGS To configure Admin settings:
1. Select Settings>Advanced>Admin. The Admin Settings window appears.
2. In the Admin Settings window, set the following options and parameters.
Enable adaptive bandwidth Adjustment – Enables videoconferences to proceed at reduced bandwidth if the network is congested. Deselecting this option maintains a constant quality to the session, but it may cause network problems.
Enable H.239 – Enables data sharing protocols.
Force FEC – Force Forward Error Correction (FEC) – Forwards an error-correction code instead of automatically adjusting the bandwidth.
Enable Audio Codec AAC-LD: – Audio Codec: audio compression format designed to combine the advantages of perceptual audio coding with the low delay necessary for two-way communication.
Enable Audio Codec G722.1 Annex C – Audio Codec: wide-band compression algorithm provides higher-than-toll quality speech. The codec operates between a wide-band, 50Hz to 7kHz signal range, at the G.722.1 standard bit rate of 24kbps and 32kbps. GAO's G.722.1 algorithm is in the form of fixed-point arithmetic and is based on the Modulated Lapped Transform (MLT).
Enable H.264 Profile – When selected, enables the system to operate in high profile
58 | C O L L A B O R A T E P R O : U s e r G u i d e
mode.
Encryption mode – Encryption Mode - Calling securely requires setting the encryption protocol or using defaults which include automatic encryption. Alternatively, you can disable the encryption if it is not needed. Calls that are made using encryption will have a lock icon on the right-bottom corner of the screen.
o Automatic –The default option; enables encryption automatically.
o AES –An encryption algorithm included in the H.235 security protocol.
o No Encryption –No encryption will be used.
MTU (100–1500)– Set the designated MTU (Maximum Transfer Unit) value. The default value is 1200. Applies only to RTP streams.
Maximum Outgoing Bandwidth – Maximum upload bandwidth (0 for unlimited).
Maximum Incoming Bandwidth – Maximum download bandwidth (0 for unlimited).
3. Press Restore Defaults to reset system into factory settings.
DIRECTORY PROPERTIES Online directories are lists of contacts (such as Internet Location Server, or ILS) whose videoconferencing systems are online and registered with that directory. If your system is not registered with a COLLABORATE Central®, the Directory Settings provide a way to register with a Directory.
NOTE: Directory settings are available only in COLLABORATE Pro systems that are not managed by a ClearOne COLLABORATE Central.
To configure the Directory settings: 1. Select Settings>Advanced>Directory. The Directory Settings window appears.
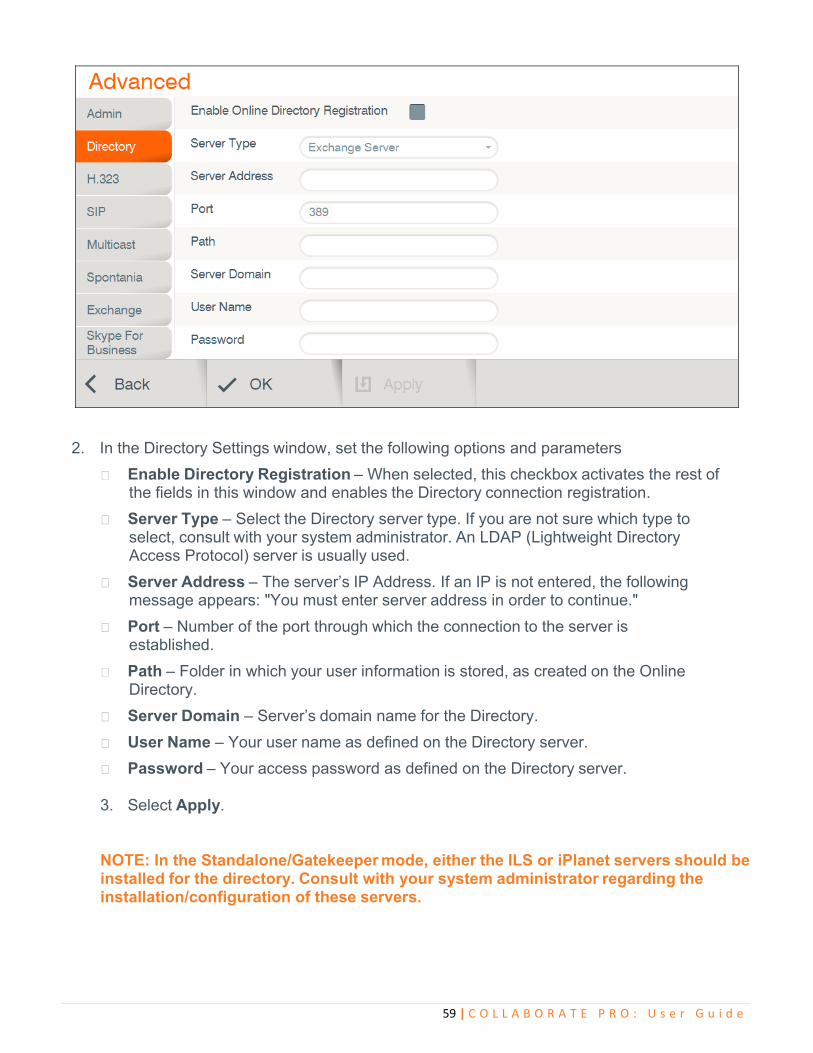
59 | C O L L A B O R A T E P R O : U s e r G u i d e
2. In the Directory Settings window, set the following options and parameters
Enable Directory Registration – When selected, this checkbox activates the rest of the fields in this window and enables the Directory connection registration.
Server Type – Select the Directory server type. If you are not sure which type to select, consult with your system administrator. An LDAP (Lightweight Directory Access Protocol) server is usually used.
Server Address – The server’s IP Address. If an IP is not entered, the following message appears: "You must enter server address in order to continue."
Port – Number of the port through which the connection to the server is established.
Path – Folder in which your user information is stored, as created on the Online Directory.
Server Domain – Server’s domain name for the Directory.
User Name – Your user name as defined on the Directory server.
Password – Your access password as defined on the Directory server. 3. Select Apply. NOTE: In the Standalone/Gatekeeper mode, either the ILS or iPlanet servers should be installed for the directory. Consult with your system administrator regarding the installation/configuration of these servers.
60 | C O L L A B O R A T E P R O : U s e r G u i d e
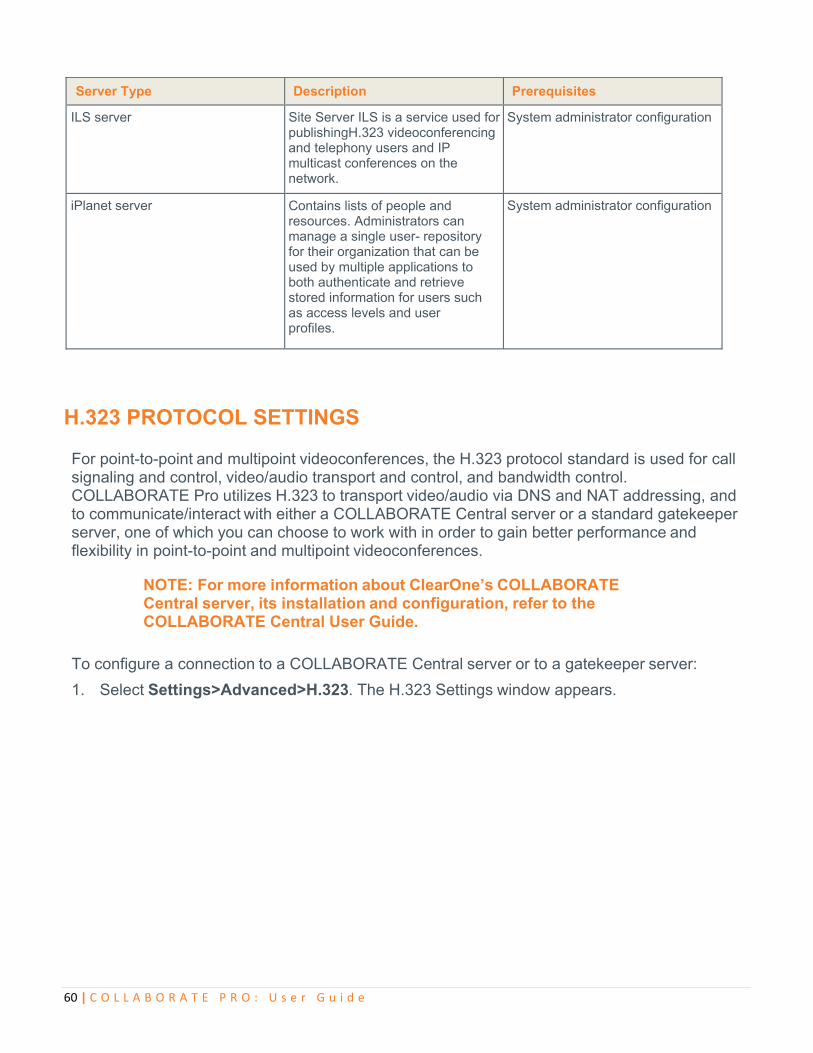
Server Type Description Prerequisites
ILS server Site Server ILS is a service used for publishingH.323 videoconferencing and telephony users and IP multicast conferences on the network.
System administrator configuration
iPlanet server Contains lists of people and resources. Administrators can manage a single user- repository for their organization that can be used by multiple applications to both authenticate and retrieve stored information for users such as access levels and user profiles.
System administrator configuration
H.323 PROTOCOL SETTINGS For point-to-point and multipoint videoconferences, the H.323 protocol standard is used for call signaling and control, video/audio transport and control, and bandwidth control. COLLABORATE Pro utilizes H.323 to transport video/audio via DNS and NAT addressing, and to communicate/interact with either a COLLABORATE Central server or a standard gatekeeper server, one of which you can choose to work with in order to gain better performance and flexibility in point-to-point and multipoint videoconferences.
NOTE: For more information about ClearOne’s COLLABORATE Central server, its installation and configuration, refer to the COLLABORATE Central User Guide.
To configure a connection to a COLLABORATE Central server or to a gatekeeper server:
1. Select Settings>Advanced>H.323. The H.323 Settings window appears.
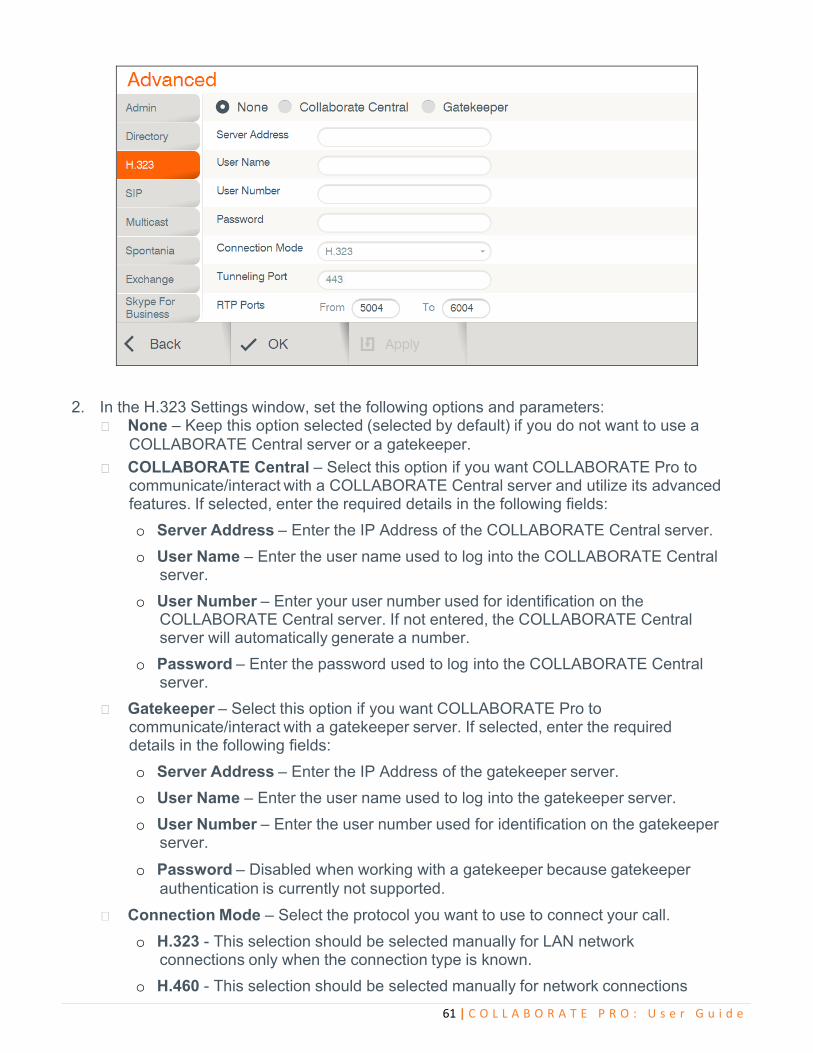
61 | C O L L A B O R A T E P R O : U s e r G u i d e
2. In the H.323 Settings window, set the following options and parameters: None – Keep this option selected (selected by default) if you do not want to use a
COLLABORATE Central server or a gatekeeper.
COLLABORATE Central – Select this option if you want COLLABORATE Pro to communicate/interact with a COLLABORATE Central server and utilize its advanced features. If selected, enter the required details in the following fields:
o Server Address – Enter the IP Address of the COLLABORATE Central server.
o User Name – Enter the user name used to log into the COLLABORATE Central server.
o User Number – Enter your user number used for identification on the COLLABORATE Central server. If not entered, the COLLABORATE Central server will automatically generate a number.
o Password – Enter the password used to log into the COLLABORATE Central server.
Gatekeeper – Select this option if you want COLLABORATE Pro to communicate/interact with a gatekeeper server. If selected, enter the required details in the following fields:
o Server Address – Enter the IP Address of the gatekeeper server.
o User Name – Enter the user name used to log into the gatekeeper server.
o User Number – Enter the user number used for identification on the gatekeeper server.
o Password – Disabled when working with a gatekeeper because gatekeeper authentication is currently not supported.
Connection Mode – Select the protocol you want to use to connect your call.
o H.323 - This selection should be selected manually for LAN network connections only when the connection type is known.
o H.460 - This selection should be selected manually for network connections
62 | C O L L A B O R A T E P R O : U s e r G u i d e
over Firewall/NAT only when the connection type is known.
o Tunneling (not available when working with a gatekeeper) - This selection should be selected manually for ClearOne Proprietary Tunneling. The default tunneling port is configured by the System Administrator (see NetPoint/ COLLABORATE Central Administration Configuration Manager).
NOTE: Changing this setting causes COLLABORATE Pro to reload.
RTP Ports – In the two boxes, set the RTP range:
o From – Enter the minimum RTP value.
o To – Enter the maximum RTP value.
3. Select Apply.
NOTE: In COLLABORATE Central mode, the system administrator should configure the LDAP settings for COLLABORATE Central on the server side.
To verify that COLLABORATE Central mode is active:
1. Press Status on the remote control and check in the displayed information that a COLLABORATE Central icon appears.
2. Select Settings>Advanced>H.323 and check the displayed information.
The New Call IP number shows the extension number that the system received when initiating COLLABORATE Central mode, which is the ID number.
WORKING IN COLLABORATE CENTRAL MODE In a point-to-point call and when COLLABORATE Central mode is active, you can add another participant to the call without hanging up, i.e. – the call continues while the additional participant is being invited.
To add participants to the call in COLLABORATE Central mode:
1. Select Conference>Invite. The Invite call window is displayed.
NOTE: The COLLABORATE Central >Invite option is available on the menu only when COLLABORATE Central mode is active.
2. Type in the participant COLLABORATE Central alias/IP number, and select Invite. The call is connected
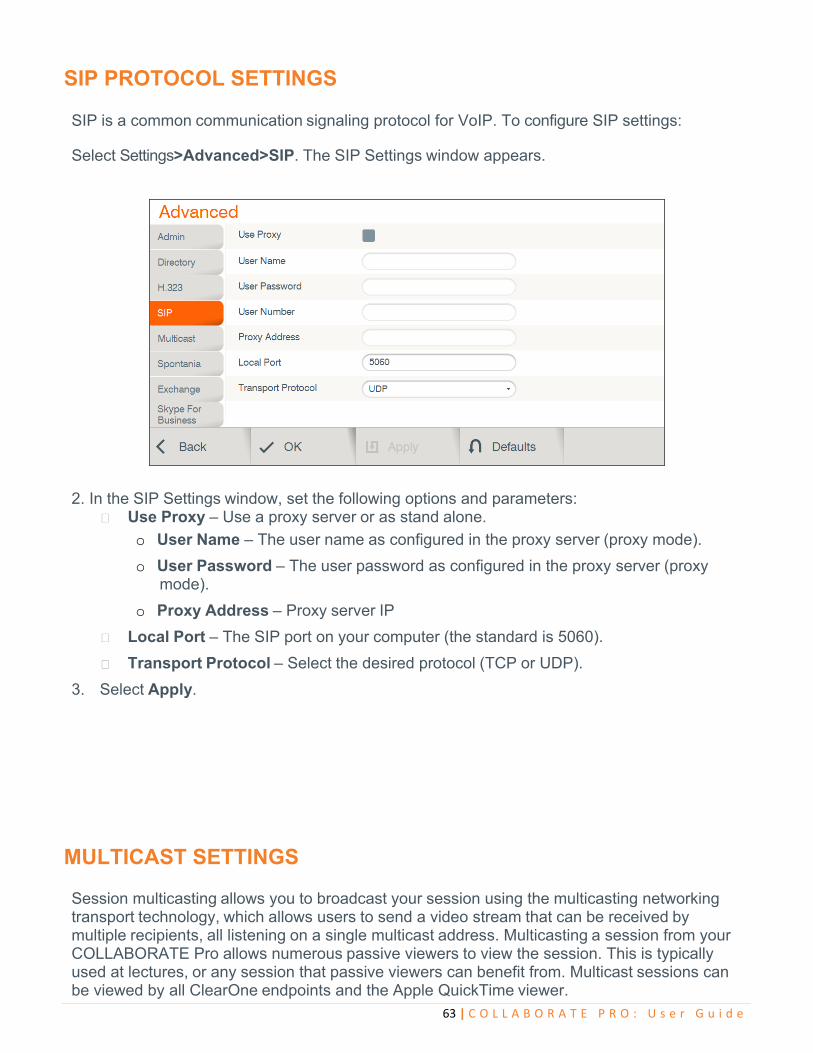
63 | C O L L A B O R A T E P R O : U s e r G u i d e
SIP PROTOCOL SETTINGS
SIP is a common communication signaling protocol for VoIP. To configure SIP settings:
Select Settings>Advanced>SIP. The SIP Settings window appears.
2. In the SIP Settings window, set the following options and parameters: Use Proxy – Use a proxy server or as stand alone.
o User Name – The user name as configured in the proxy server (proxy mode).
o User Password – The user password as configured in the proxy server (proxy mode).
o Proxy Address – Proxy server IP
Local Port – The SIP port on your computer (the standard is 5060).
Transport Protocol – Select the desired protocol (TCP or UDP).
3. Select Apply.
MULTICAST SETTINGS Session multicasting allows you to broadcast your session using the multicasting networking transport technology, which allows users to send a video stream that can be received by multiple recipients, all listening on a single multicast address. Multicasting a session from your COLLABORATE Pro allows numerous passive viewers to view the session. This is typically used at lectures, or any session that passive viewers can benefit from. Multicast sessions can be viewed by all ClearOne endpoints and the Apple QuickTime viewer.
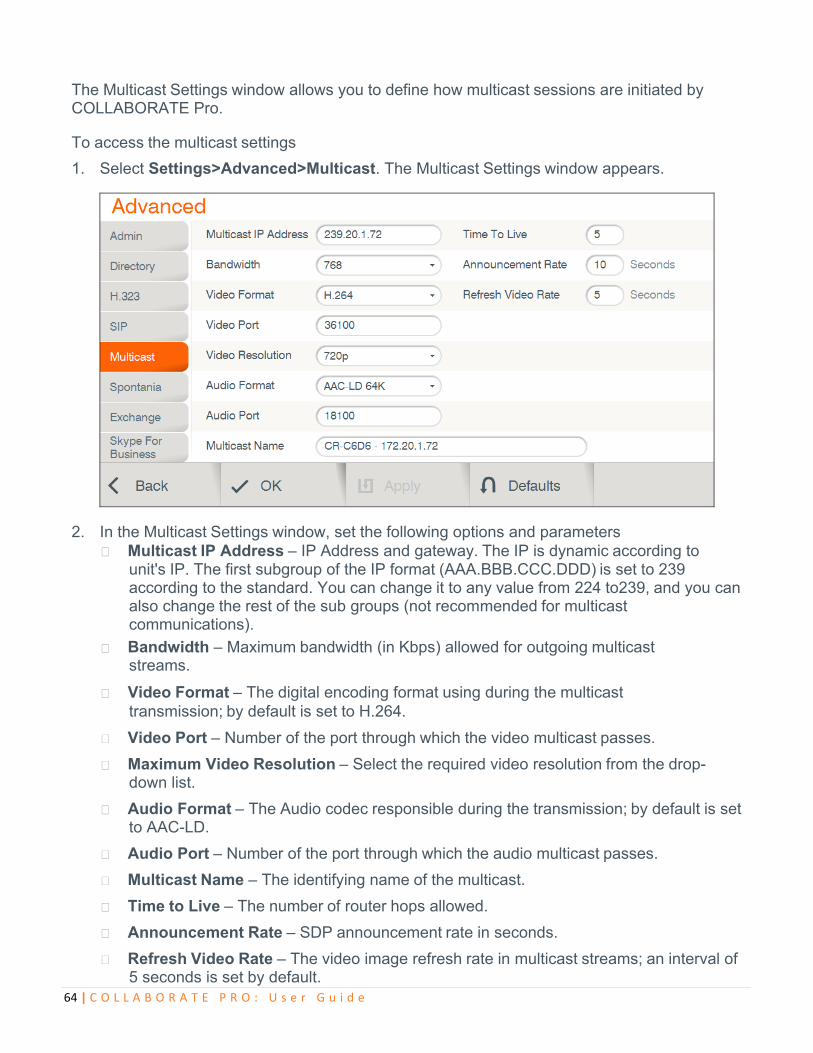
64 | C O L L A B O R A T E P R O : U s e r G u i d e
The Multicast Settings window allows you to define how multicast sessions are initiated by COLLABORATE Pro.
To access the multicast settings
1. Select Settings>Advanced>Multicast. The Multicast Settings window appears.
2. In the Multicast Settings window, set the following options and parameters Multicast IP Address – IP Address and gateway. The IP is dynamic according to
unit's IP. The first subgroup of the IP format (AAA.BBB.CCC.DDD) is set to 239 according to the standard. You can change it to any value from 224 to239, and you can also change the rest of the sub groups (not recommended for multicast communications).
Bandwidth – Maximum bandwidth (in Kbps) allowed for outgoing multicast streams.
Video Format – The digital encoding format using during the multicast transmission; by default is set to H.264.
Video Port – Number of the port through which the video multicast passes.
Maximum Video Resolution – Select the required video resolution from the drop- down list.
Audio Format – The Audio codec responsible during the transmission; by default is set to AAC-LD.
Audio Port – Number of the port through which the audio multicast passes.
Multicast Name – The identifying name of the multicast.
Time to Live – The number of router hops allowed.
Announcement Rate – SDP announcement rate in seconds.
Refresh Video Rate – The video image refresh rate in multicast streams; an interval of 5 seconds is set by default.
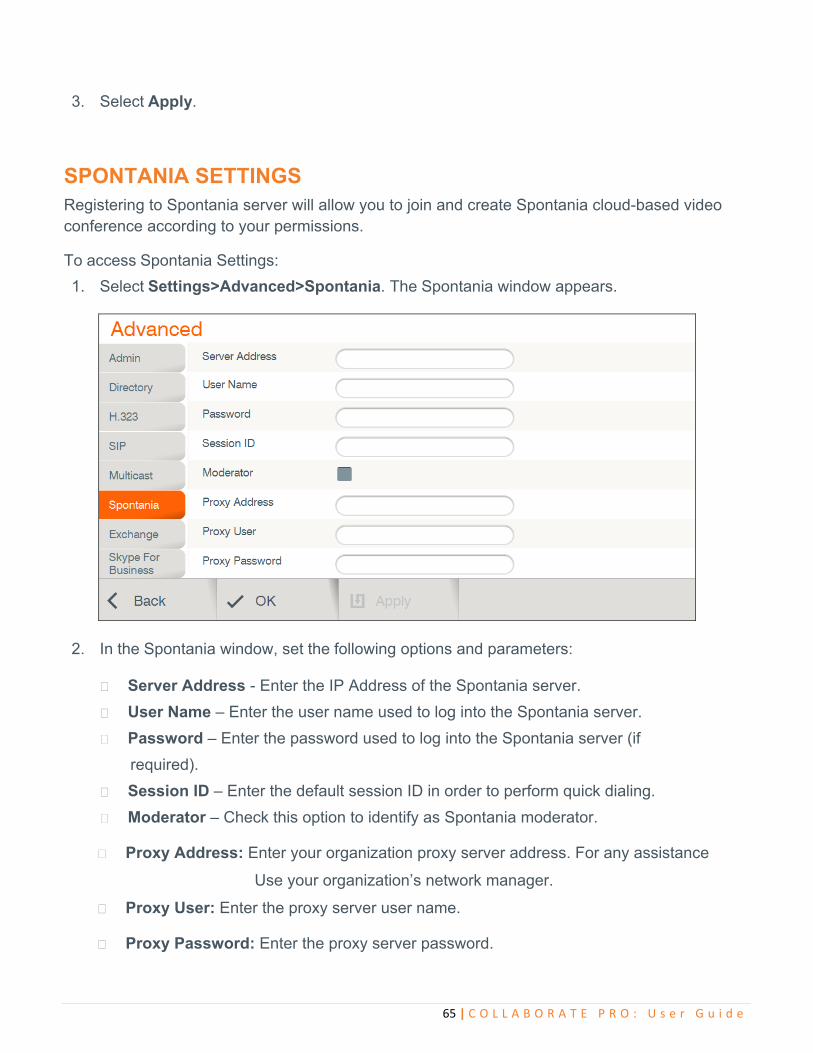
65 | C O L L A B O R A T E P R O : U s e r G u i d e
3. Select Apply.
SPONTANIA SETTINGS
Registering to Spontania server will allow you to join and create Spontania cloud-based video conference according to your permissions.
To access Spontania Settings:
1. Select Settings>Advanced>Spontania. The Spontania window appears.
2. In the Spontania window, set the following options and parameters: Server Address - Enter the IP Address of the Spontania server.
User Name – Enter the user name used to log into the Spontania server.
Password – Enter the password used to log into the Spontania server (if
required).
Session ID – Enter the default session ID in order to perform quick dialing.
Moderator – Check this option to identify as Spontania moderator.
Proxy Address: Enter your organization proxy server address. For any assistance
Use your organization’s network manager.
Proxy User: Enter the proxy server user name.
Proxy Password: Enter the proxy server password.
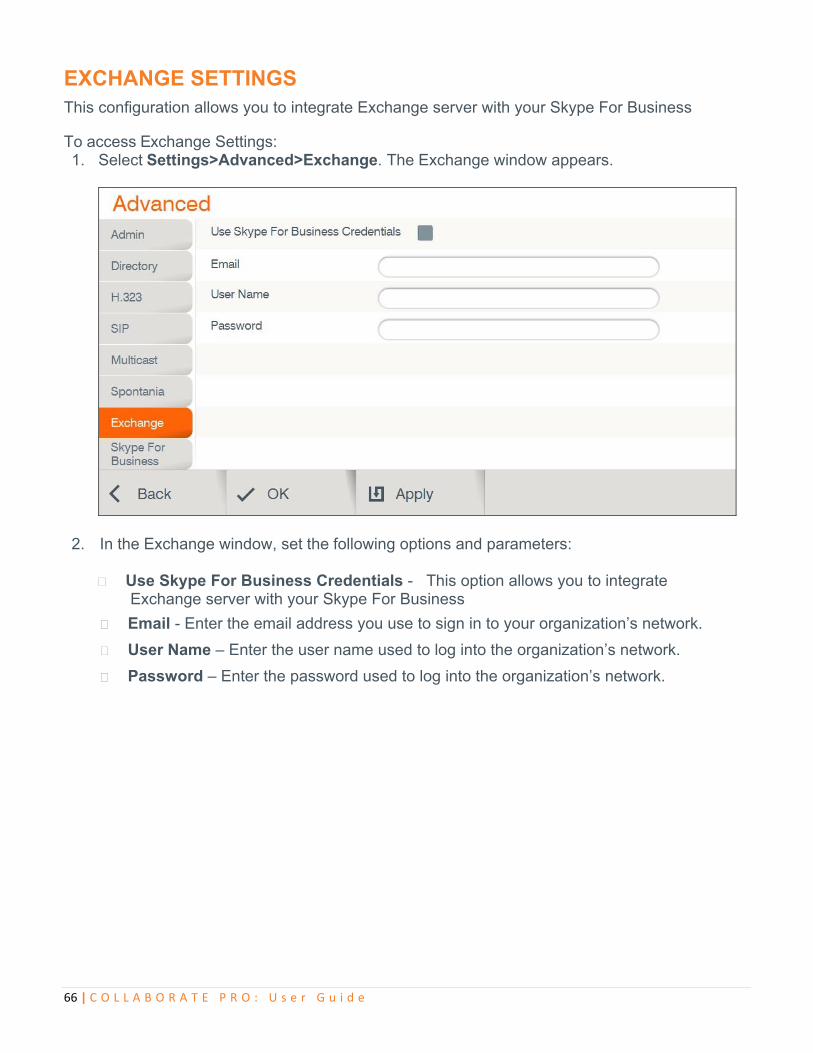
66 | C O L L A B O R A T E P R O : U s e r G u i d e
EXCHANGE SETTINGS
This configuration allows you to integrate Exchange server with your Skype For Business
To access Exchange Settings: 1. Select Settings>Advanced>Exchange. The Exchange window appears.
2. In the Exchange window, set the following options and parameters: Use Skype For Business Credentials - This option allows you to integrate Exchange server with your Skype For Business
Email - Enter the email address you use to sign in to your organization’s network.
User Name – Enter the user name used to log into the organization’s network.
Password – Enter the password used to log into the organization’s network.
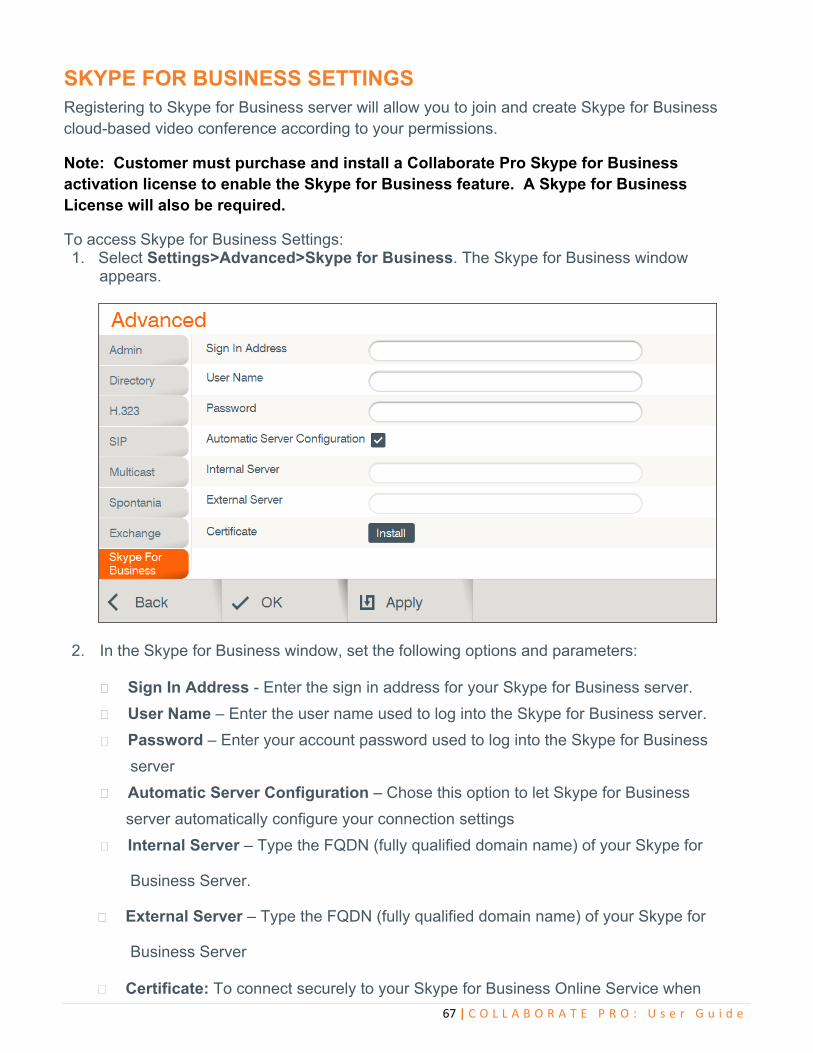
67 | C O L L A B O R A T E P R O : U s e r G u i d e
SKYPE FOR BUSINESS SETTINGS
Registering to Skype for Business server will allow you to join and create Skype for Business cloud-based video conference according to your permissions.
Note: Customer must purchase and install a Collaborate Pro Skype for Business activation license to enable the Skype for Business feature. A Skype for Business License will also be required.
To access Skype for Business Settings: 1. Select Settings>Advanced>Skype for Business. The Skype for Business window
appears.
2. In the Skype for Business window, set the following options and parameters: Sign In Address - Enter the sign in address for your Skype for Business server.
User Name – Enter the user name used to log into the Skype for Business server.
Password – Enter your account password used to log into the Skype for Business
server
Automatic Server Configuration – Chose this option to let Skype for Business
server automatically configure your connection settings
Internal Server – Type the FQDN (fully qualified domain name) of your Skype for
Business Server.
External Server – Type the FQDN (fully qualified domain name) of your Skype for
Business Server Certificate: To connect securely to your Skype for Business Online Service when
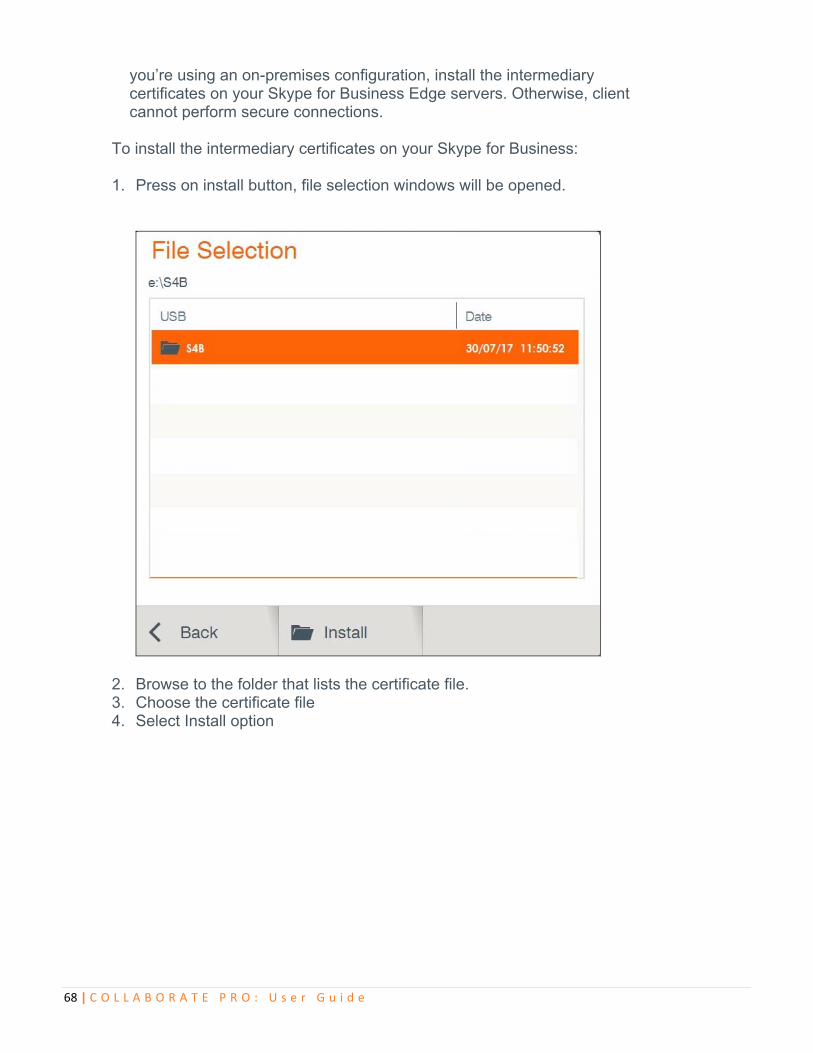
68 | C O L L A B O R A T E P R O : U s e r G u i d e
you’re using an on-premises configuration, install the intermediary certificates on your Skype for Business Edge servers. Otherwise, client cannot perform secure connections. To install the intermediary certificates on your Skype for Business: 1. Press on install button, file selection windows will be opened.
2. Browse to the folder that lists the certificate file. 3. Choose the certificate file 4. Select Install option
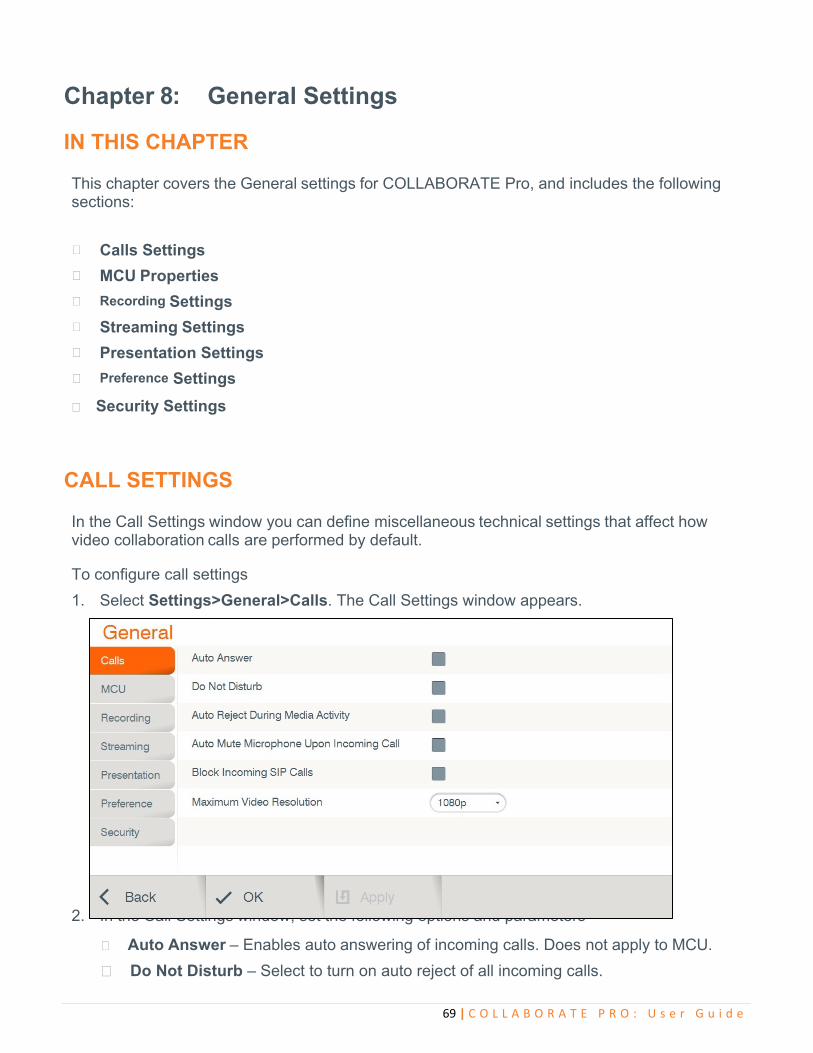
69 | C O L L A B O R A T E P R O : U s e r G u i d e
Chapter 8: General Settings
IN THIS CHAPTER This chapter covers the General settings for COLLABORATE Pro, and includes the following sections:
Calls Settings
MCU Properties
Recording Settings
Streaming Settings
Presentation Settings
Preference Settings
Security Settings
CALL SETTINGS In the Call Settings window you can define miscellaneous technical settings that affect how video collaboration calls are performed by default.
To configure call settings
1. Select Settings>General>Calls. The Call Settings window appears.
2. In the Call Settings window, set the following options and parameters
Auto Answer – Enables auto answering of incoming calls. Does not apply to MCU.
Do Not Disturb – Select to turn on auto reject of all incoming calls.
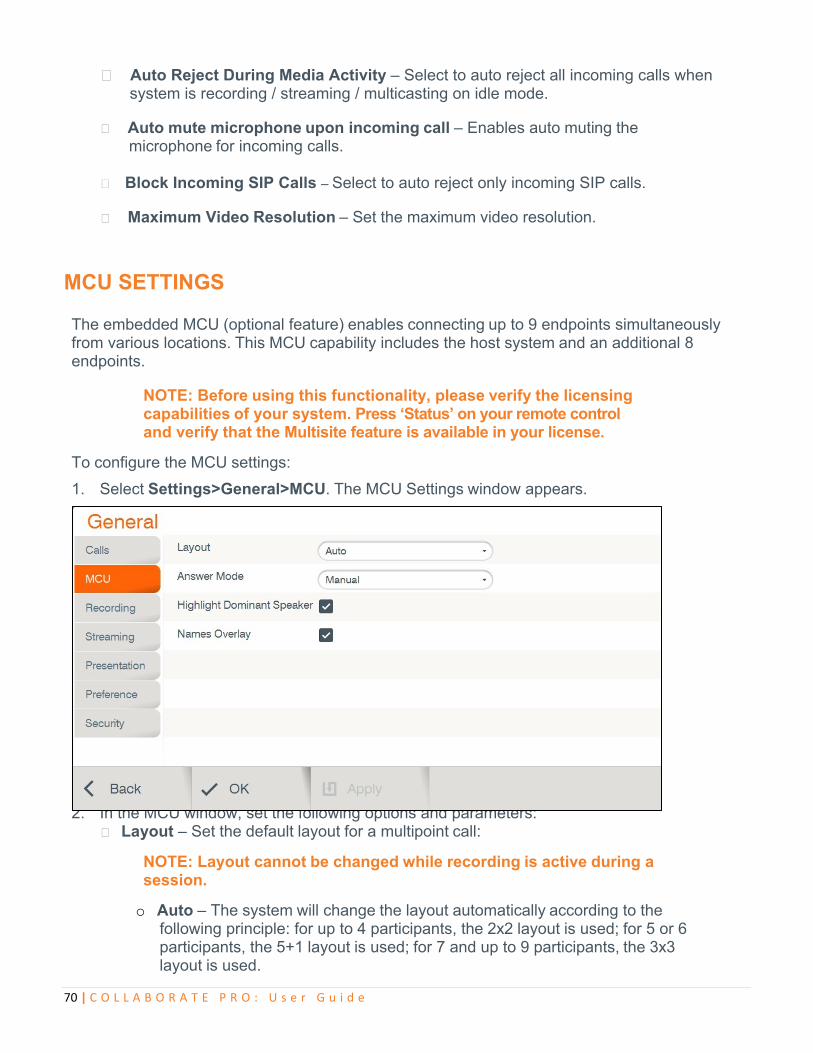
70 | C O L L A B O R A T E P R O : U s e r G u i d e
Auto Reject During Media Activity – Select to auto reject all incoming calls when system is recording / streaming / multicasting on idle mode.
Auto mute microphone upon incoming call – Enables auto muting the microphone for incoming calls.
Block Incoming SIP Calls – Select to auto reject only incoming SIP calls.
Maximum Video Resolution – Set the maximum video resolution.
MCU SETTINGS
The embedded MCU (optional feature) enables connecting up to 9 endpoints simultaneously from various locations. This MCU capability includes the host system and an additional 8 endpoints.
NOTE: Before using this functionality, please verify the licensing capabilities of your system. Press ‘Status’ on your remote control and verify that the Multisite feature is available in your license.
To configure the MCU settings:
1. Select Settings>General>MCU. The MCU Settings window appears.
2. In the MCU window, set the following options and parameters: Layout – Set the default layout for a multipoint call:
NOTE: Layout cannot be changed while recording is active during a session.
o Auto – The system will change the layout automatically according to the following principle: for up to 4 participants, the 2x2 layout is used; for 5 or 6 participants, the 5+1 layout is used; for 7 and up to 9 participants, the 3x3 layout is used.
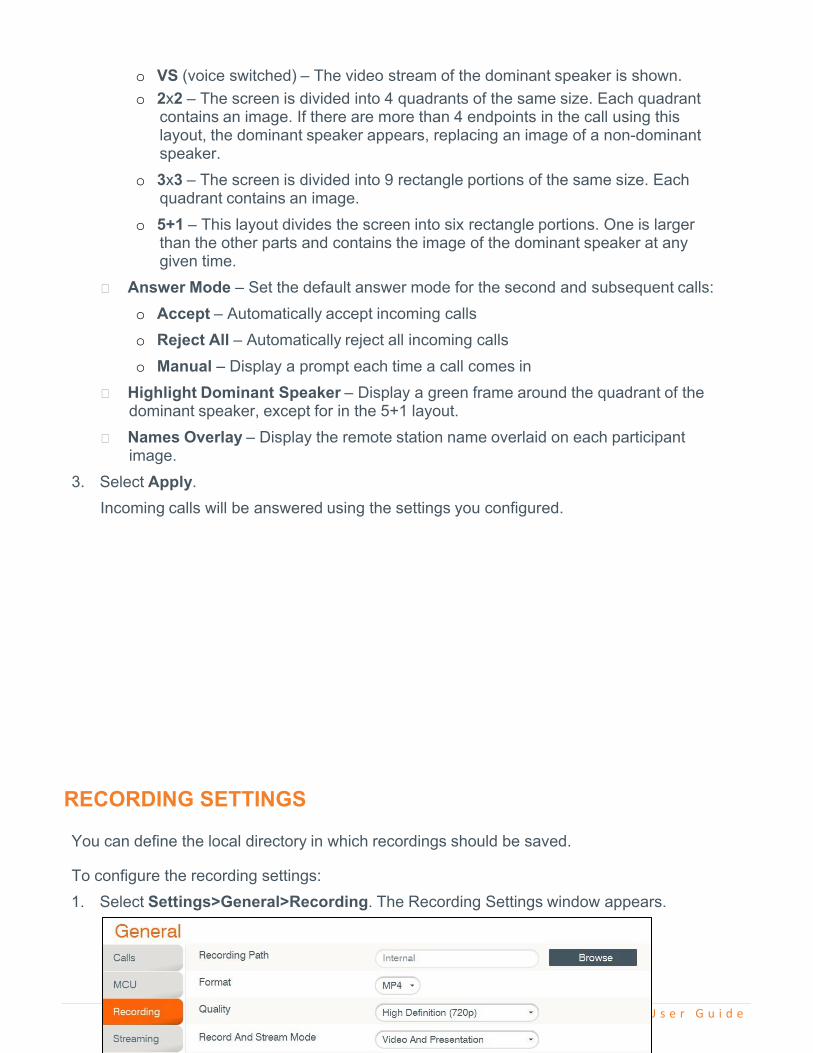
71 | C O L L A B O R A T E P R O : U s e r G u i d e
o VS (voice switched) – The video stream of the dominant speaker is shown.
o 2x2 – The screen is divided into 4 quadrants of the same size. Each quadrant contains an image. If there are more than 4 endpoints in the call using this layout, the dominant speaker appears, replacing an image of a non-dominant speaker.
o 3x3 – The screen is divided into 9 rectangle portions of the same size. Each quadrant contains an image.
o 5+1 – This layout divides the screen into six rectangle portions. One is larger than the other parts and contains the image of the dominant speaker at any given time.
Answer Mode – Set the default answer mode for the second and subsequent calls:
o Accept – Automatically accept incoming calls
o Reject All – Automatically reject all incoming calls
o Manual – Display a prompt each time a call comes in
Highlight Dominant Speaker – Display a green frame around the quadrant of the dominant speaker, except for in the 5+1 layout.
Names Overlay – Display the remote station name overlaid on each participant image.
3. Select Apply.
Incoming calls will be answered using the settings you configured.
RECORDING SETTINGS
You can define the local directory in which recordings should be saved. To configure the recording settings:
1. Select Settings>General>Recording. The Recording Settings window appears.
72 | C O L L A B O R A T E P R O : U s e r G u i d e
2. In the Recording Settings window the following properties can be configured:
Recording Path – Select to set the path of the recording directory. This option is useful when changing the recording location to a USB flash drive or to a remote computer that in the same work group.
Format – Choose between WMV and MP4 formats.
Quality – Select the quality of the video recordings and streaming made on COLLABORATE Pro:
a. Full High Definition (1080p) – Record/Stream at image resolution of 1920x1080
pixels.
b. High Definition (720p) – Record/Stream at image resolution of 1280x720 pixels.
c. Standard Definition – Record/Stream at image resolution of 672x384 pixels.
Record And Stream Mode – Choose streams to be streamed between videos and presentation.
Source – Choose videos to be streamed between local and remote.
Layout - Choose streaming layout:
o Vertical – Stream video in top and bottom mode.
o Horizontal – Stream video in side by side mode.
3. Select Apply.
NOTE: Changing the quality of the recordings is changing also the quality of the Streaming.
RECORD COLLABORATE PRO INTO STANDARD NAS
You can record from the COLLABORATE Pro to a Standard Network Attached Storage (NAS).
1. Verify that the recording destination PC /server workgroup is WORKGROUP (under advanced system settings).
2. Create new folder in destination PC 3. Right-click on the folder/drive that you wish for sharing the recording and select
73 | C O L L A B O R A T E P R O : U s e r G u i d e
Properties. 4. Select the Sharing tab and click on Advanced Sharing... 5. Select the Share this folder box and enter a share name for it. 6. Click on permissions, mark the group entry “Everyone” and check the network
permissions checkbox: Read, Change and Full control. Click OK. 7. In the sharing tab, click on Share. In the text field choose everyone and click Add. Set
the permission level of everyone to Read/Write. 8. Right-click on the folder and select Properties again. 9. Select the tab “Security” and click on Edit..”, followed by Add.... 10. In this window, enter “everyone” into the empty field at the bottom and click on OK. 11. Examine the permissions for “Everyone” and make sure they are all set correctly. If
everything is in order, close all windows with OK”. 12. Open your control panel and then open the “Network and Sharing Center”. 13. Click on Change advanced sharing settings. 14. Look for your active profile at the top, expand it (if it isn't already) and scroll down to the
Password protected sharing option. 15. Select the Turn off password protected sharing option and click on Save changes. Be
advised that this will make all the shared folders readily accessible for anyone inside your home network.
16. In COLLABORATE Web, open recording settings tab (Settings / General /Recording). 17. Uncheck the default check box and enter the folder path: \\destination IP \ folder name (
e.g. \\172.20.1.78\Collaborate). 18. Start recording
STREAMING SETTINGS To configure the streaming settings:
1. Select Settings>General>Streaming. The Streaming Settings window appears.
74 | C O L L A B O R A T E P R O : U s e r G u i d e
2. In
the
Streaming Settings window the following properties can be configured:
Streaming Port – Enter the streaming port number. The default port is 12100 for WMV and 554 for MP4.
NOTE: Port number of MP4 streaming cannot be modified.
Number Of Ports – Enter the number of streaming ports. The default number of streaming ports is 10. Streaming Mode - Choose between unicast and multicast.
Streaming Quality – Select the quality of the video recordings and streaming made on COLLABORATE Pro:
d. Full High Definition (1080p) – Record/Stream at image resolution of 1920x1080 pixels.
e. High Definition (720p) – Record/Stream at image resolution of 1280x720 pixels.
f. Standard Definition – Record/Stream at image resolution of 672x384 pixels.

75 | C O L L A B O R A T E P R O : U s e r G u i d e
Record And Stream Mode – Choose streams to be streamed between videos and presentation.
Source – Choose videos to be streamed between local and remote.
Layout - Choose streaming layout:
o Vertical – Stream video in top and bottom mode.
o Horizontal – Stream video in side by side mode.
Multicast IP Address – The destination IP of the multicast.
Commence Streaming On Startup – Select to auto start streaming when
system is loaded.
NOTE: Changing the quality of the streaming is changing also the quality of the recording.
PRESENTATION SETTINGS To configure the presentation settings:
1. Select Settings>General>Presentation. The Presentation Settings window appears.
2. In the Presentation Settings window the following properties can be configured:
Enable Wireless Sharing – Allow wireless data sharing from any PC with Collaborate
Share application.
Auto Display Wireless Presentation – Wireless auto-sharing once sender is connected.
Wireless Sharing Code – Wireless security code need to be entered by sender.
Presentation Sharing Mode – Depending on the type of presentation material being
transmitted you can choose the data transmit mode priorities either motion or sharpness:
76 | C O L L A B O R A T E P R O : U s e r G u i d e
o Motion - provides the highest possible frame rate. Used when there is a need for
higher frame rates, when there is a lot of motion in the data.
o Sharpness - provides the highest possible resolution. Used when you want the
highest quality of detailed images and graphics.
3. Select Apply.
PREFERENCE SETTINGS
The preference settings define general system properties. To configure preference settings:
1. Select Settings>General> Preference. The preference Settings window appears.
2. In the Preference Settings window, set the following options and parameters.
System ID – System ID used to identify the system when using DNS dialing.
Name – Set the system title that will represent the unit during a session.
Language – Select the desired language for the user interface. Click Apply. (A system restart is required after changing the system language.)
Time Zone – Select your country time zone.
Time – If not already set, enter the current time.
Date – If not already set, enter the current date.
Sleep Timeout – Duration of idle time (in minutes) before the system goes into sleep mode.
3. Select Apply.
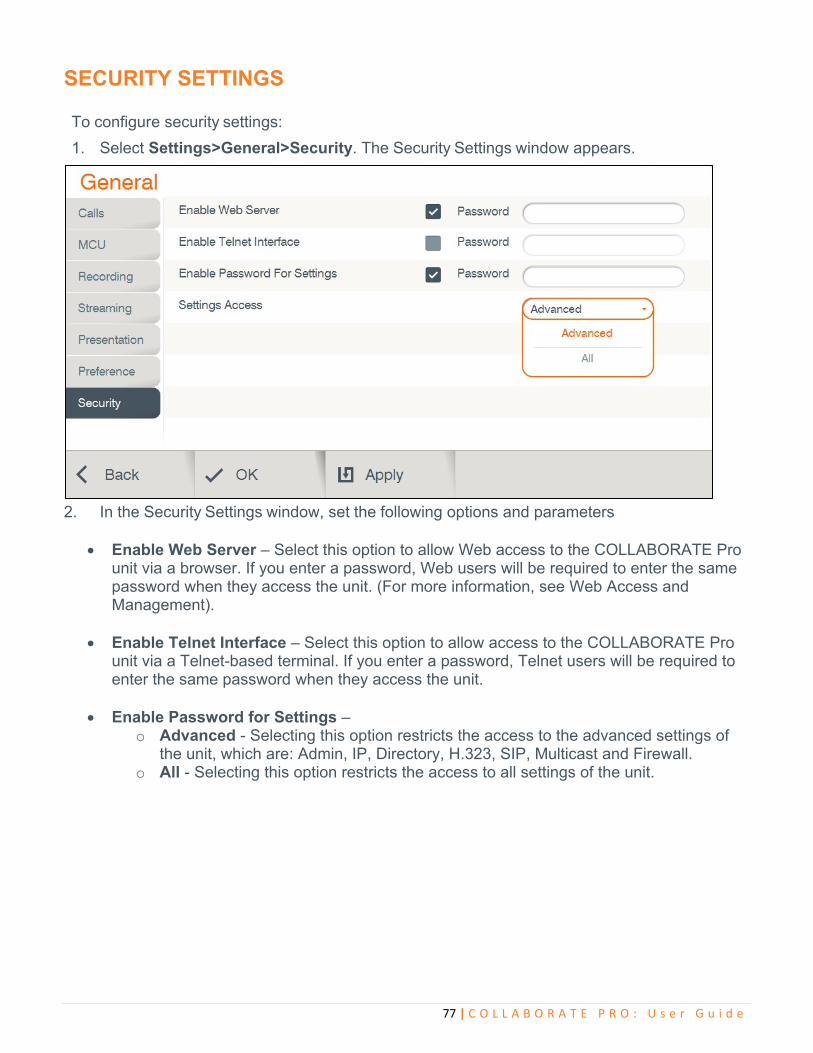
77 | C O L L A B O R A T E P R O : U s e r G u i d e
SECURITY SETTINGS To configure security settings:
1. Select Settings>General>Security. The Security Settings window appears.
2. In the Security Settings window, set the following options and parameters
Enable Web Server – Select this option to allow Web access to the COLLABORATE Pro unit via a browser. If you enter a password, Web users will be required to enter the same password when they access the unit. (For more information, see Web Access and Management).
Enable Telnet Interface – Select this option to allow access to the COLLABORATE Pro
unit via a Telnet-based terminal. If you enter a password, Telnet users will be required to enter the same password when they access the unit.
Enable Password for Settings –
o Advanced - Selecting this option restricts the access to the advanced settings of the unit, which are: Admin, IP, Directory, H.323, SIP, Multicast and Firewall.
o All - Selecting this option restricts the access to all settings of the unit.
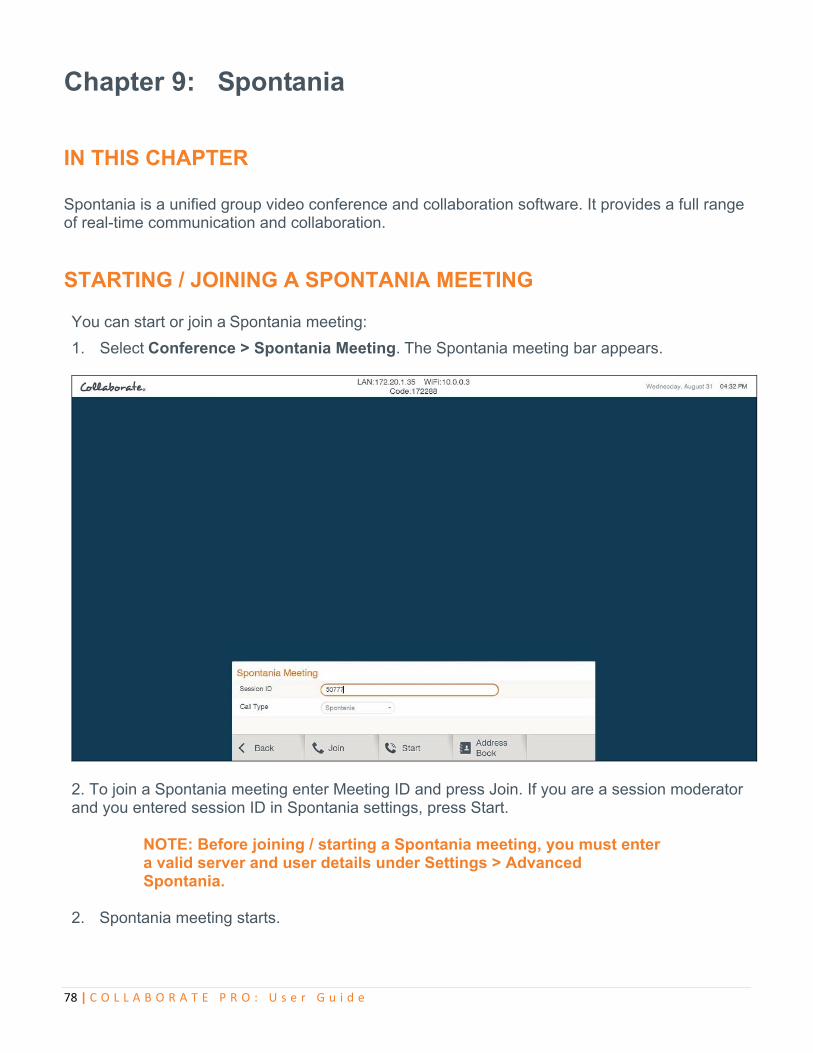
78 | C O L L A B O R A T E P R O : U s e r G u i d e
Chapter 9: Spontania
IN THIS CHAPTER Spontania is a unified group video conference and collaboration software. It provides a full range of real-time communication and collaboration.
STARTING / JOINING A SPONTANIA MEETING
You can start or join a Spontania meeting:
1. Select Conference > Spontania Meeting. The Spontania meeting bar appears.
2. To join a Spontania meeting enter Meeting ID and press Join. If you are a session moderator and you entered session ID in Spontania settings, press Start.
NOTE: Before joining / starting a Spontania meeting, you must enter a valid server and user details under Settings > Advanced Spontania.
2. Spontania meeting starts.
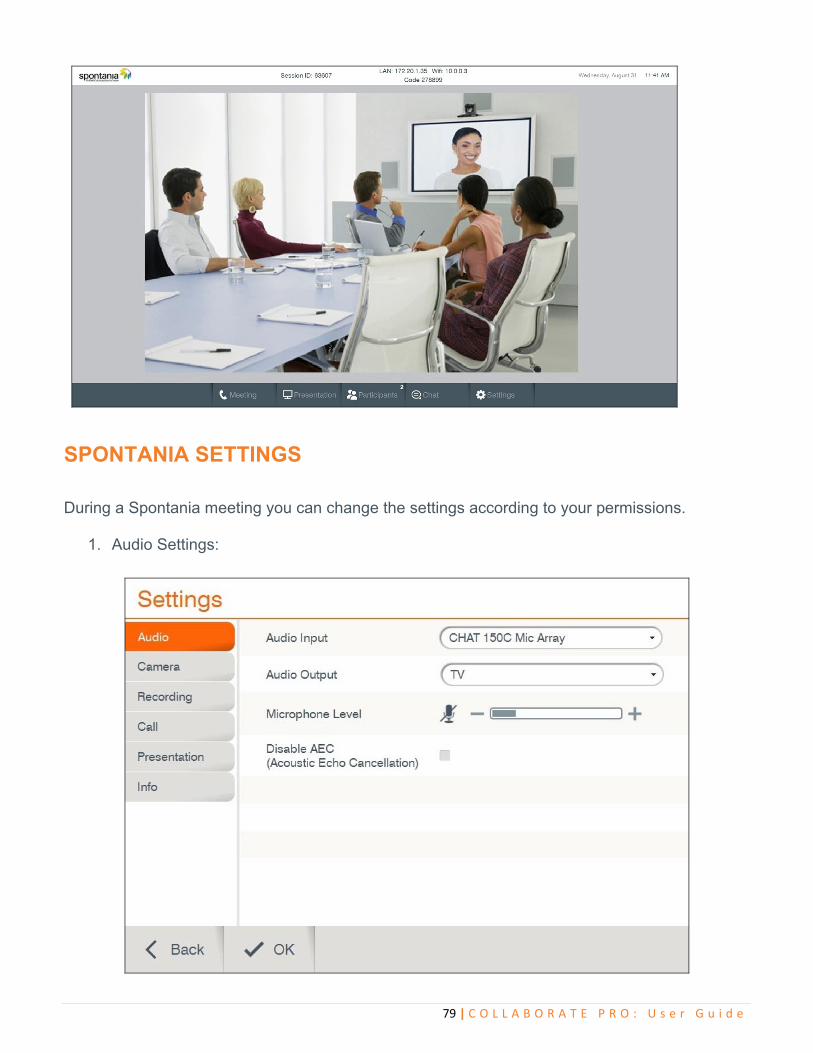
79 | C O L L A B O R A T E P R O : U s e r G u i d e
SPONTANIA SETTINGS
During a Spontania meeting you can change the settings according to your permissions.
1. Audio Settings:
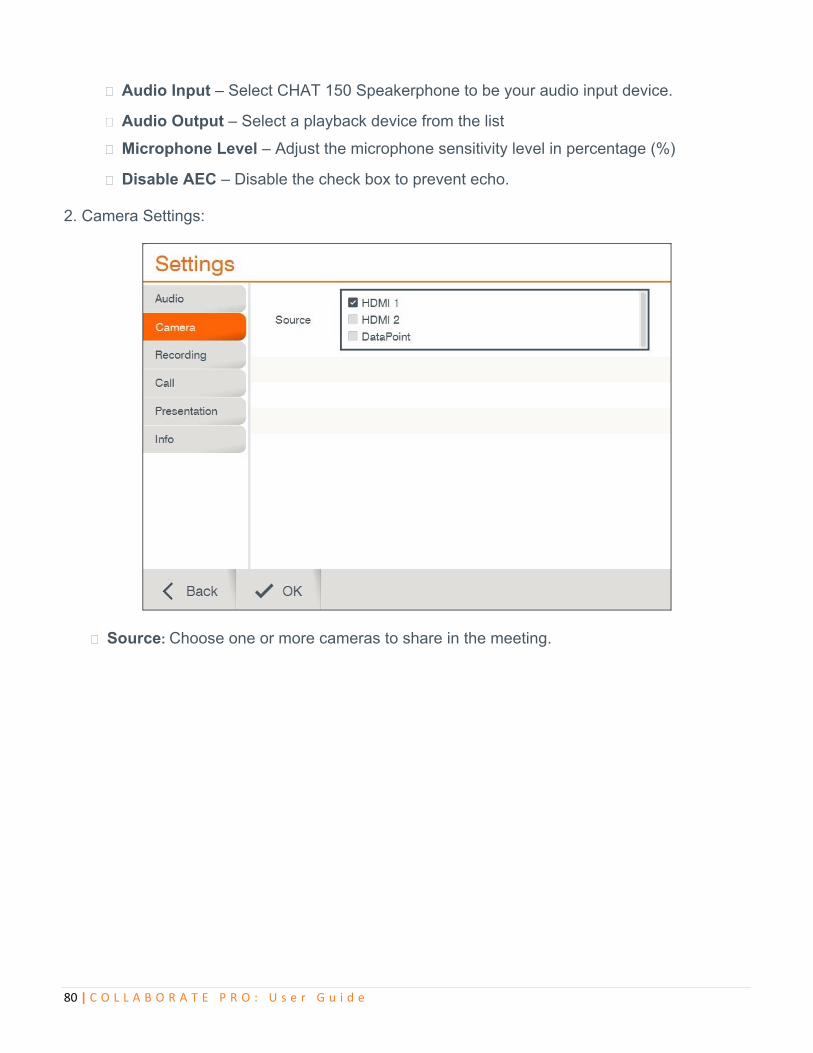
80 | C O L L A B O R A T E P R O : U s e r G u i d e
Audio Input – Select CHAT 150 Speakerphone to be your audio input device.
Audio Output – Select a playback device from the list
Microphone Level – Adjust the microphone sensitivity level in percentage (%)
Disable AEC – Disable the check box to prevent echo. 2. Camera Settings:
Source: Choose one or more cameras to share in the meeting.
81 | C O L L A B O R A T E P R O : U s e r G u i d e
2. Recording Settings (Available only for moderator):
Recording Path – The path where the recordings will be saved.
Format – Choose between MP4 and WCONF.
Quality – Choose recording quality (MP4 format only).
Background Image – Choose image to be in the background when the recording
layout is not covering the all screen (MP4 format only).
3. Call Settings (Available only for moderator):
82 | C O L L A B O R A T E P R O : U s e r G u i d e
Application: shows the general configuration of quality for the signal transmission in the participants’ application sharing service. It is divided into 3 fields:
o Predefined - shows a list of pre-established configurations regarding the quality of the application sharing service, which sets up specific values for the fields “Bandwidth” and “Depth”.
o Bandwidth - offers a list of values of network speed (in kilobits per second) associated with the signal transmission of the application sharing service, if this service is activated during the session.
o Depth - provides a list of values (in number of colors) associated with the sharpness of the application sharing service, if this service is activated during the session.
4. Presentation Settings:
Wireless Layout: Choose wireless sharing layout:
o Automatic: All senders will be displayed and arranged in the same size.
o Single: Only one sender will be displayed. You can switch between senders with input button in your remote control.
o Preview: All senders will be displayed. The chosen main sender will be displayed in big size and other senders will be displayed in small size. You can switch between senders with input button in your remote control.
83 | C O L L A B O R A T E P R O : U s e r G u i d e
PRESENTATION
HDMI 1 / 2 – Depending on your camera source, if available, share second HDMI input.
DataPoint – Share your HDMI input via DataPoint device.
File Transfer – Transfer a file to the other participants.
Share Video – Share video file from USB storage device or share a recording.
Whiteboard – Graphic space to draw or take notes on a new “canvas”.
Start Recording (Moderator only) – Start recording the current meeting.
Hand Raise - Request permission to speak during the session.
Wireless – Start wireless sharing, when sender is connected to the unit.
84 | C O L L A B O R A T E P R O : U s e r G u i d e
PARTICIPANTS
Lists of connected participants, showing the communication and collaboration services activated for each of them. Only moderator can manage these services.
Icon - This icon allows the moderator to act on the specific configuration parameters of a
certain user.
Icon - appears on the left of each user’s name. It shows the quality of connection for that
user.
To activate any of the Spontania communication and collaboration services for a participant,
the moderator must act on the corresponding user’s checkbox (listed in rows) and service
(listed in columns) and mark them with the icon. To carry out the opposite action, that is, to
deactivate one of the services for a participant, the moderator must click on the checkbox
showing the active state to change it to the icon deactivated.
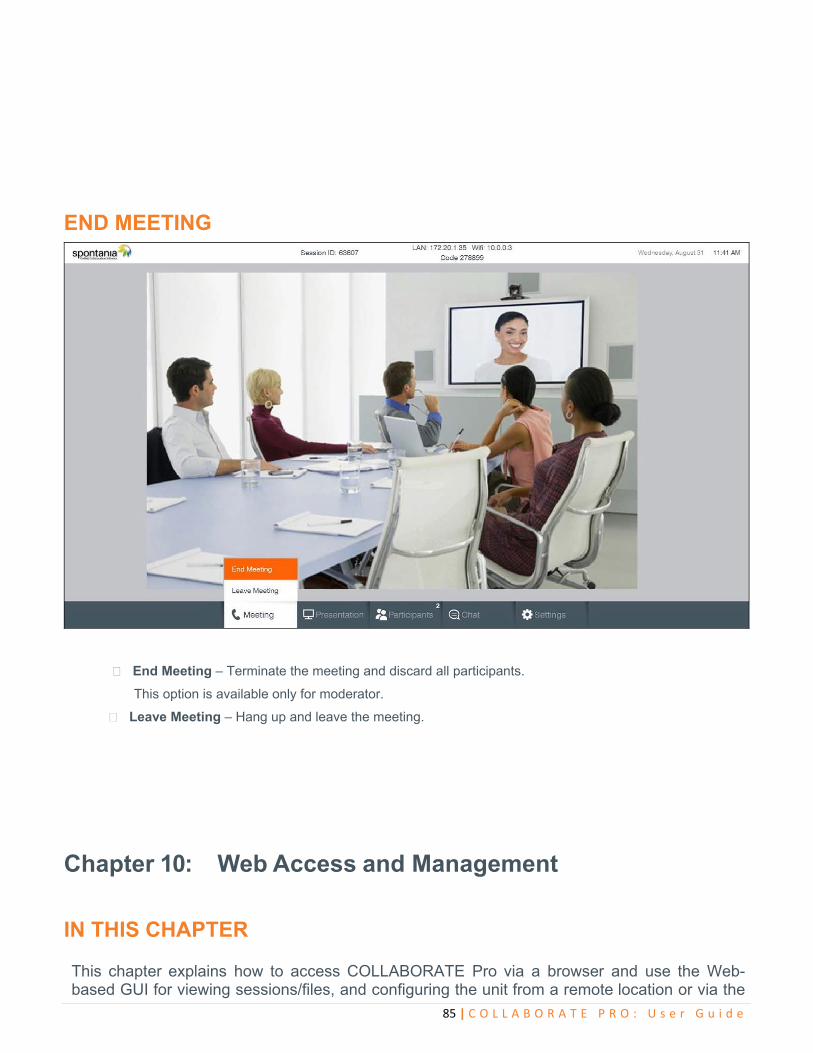
85 | C O L L A B O R A T E P R O : U s e r G u i d e
END MEETING
End Meeting – Terminate the meeting and discard all participants.
This option is available only for moderator.
Leave Meeting – Hang up and leave the meeting.
Chapter 10: Web Access and Management
IN THIS CHAPTER This chapter explains how to access COLLABORATE Pro via a browser and use the Web-based GUI for viewing sessions/files, and configuring the unit from a remote location or via the
86 | C O L L A B O R A T E P R O : U s e r G u i d e
LAN. The Web interface includes all the options that are available via the regular on-screen GUI, as well as some additional configuration options that are not available via the regular GUI.
Since the user options shared by both GUIs are generally the same, this chapter focuses mainly on the exclusive web options, and includes the following sections:
Accessing COLLABORATE Pro via Browser
Viewing a Stream Session
Download Collaborate Share for wireless sharing
Viewing a Multicast Video Collaboration
Importing/Exporting the License
Viewing the Recording Archive
Sending Running Text in a Call
Viewing Call Status
Performing System Upgrade
Performing System Backup
Performing System Restore from Backup File
Performing System Restore from FTP
ACCESSING COLLABORATE PRO VIA BROWSER You can access COLLABORATE Pro via a standard Web browser from any remote location or from your LAN.
To access COLLABORATE Pro via a browser:
1. Open your browser. 2. In the browser’s address bar, type the direct IP Address of the COLLABORATE
Pro unit. The COLLABORATE Pro Web login page appears. For example: http://172.100.100.25
NOTE: If you do not know the IP Address of the COLLABORATE Pro unit, request help from a user close to the unit, who can check the unit’s IP Address as explained in Displaying System Information.
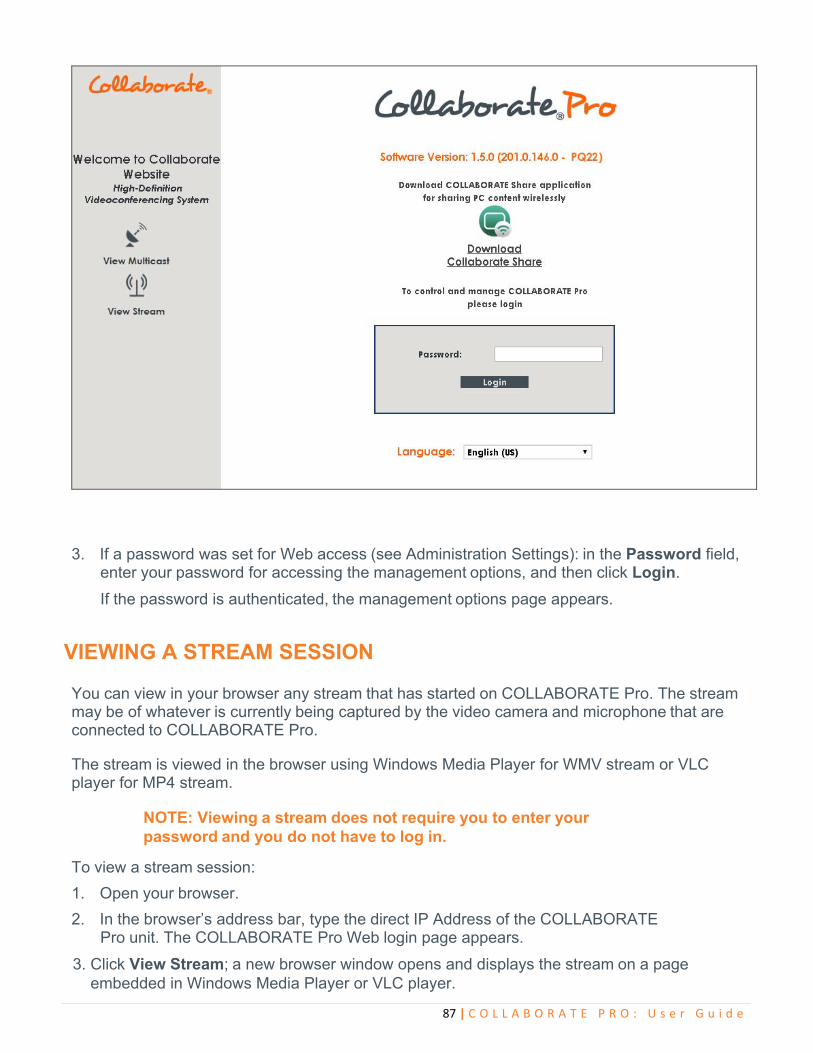
87 | C O L L A B O R A T E P R O : U s e r G u i d e
3. If a password was set for Web access (see Administration Settings): in the Password field, enter your password for accessing the management options, and then click Login.
If the password is authenticated, the management options page appears.
VIEWING A STREAM SESSION You can view in your browser any stream that has started on COLLABORATE Pro. The stream may be of whatever is currently being captured by the video camera and microphone that are connected to COLLABORATE Pro.
The stream is viewed in the browser using Windows Media Player for WMV stream or VLC player for MP4 stream.
NOTE: Viewing a stream does not require you to enter your password and you do not have to log in.
To view a stream session:
1. Open your browser.
2. In the browser’s address bar, type the direct IP Address of the COLLABORATE Pro unit. The COLLABORATE Pro Web login page appears.
3. Click View Stream; a new browser window opens and displays the stream on a page embedded in Windows Media Player or VLC player.
88 | C O L L A B O R A T E P R O : U s e r G u i d e
VIEWING A MULTICAST VIDEO COLLABORATION You can view in your browser an ongoing multicast video collaboration that has started via the COLLABORATE Pro unit.
The multicast video collaboration is viewed in the browser using an embedded Apple QuickTime plug-in.
NOTE: Viewing a multicast video collaboration does not require you to enter your password and you do not have to log in.
To view a stream session:
1. Open your browser.
2. In the browser’s address bar, type the direct IP Address of the COLLABORATE Pro unit. The COLLABORATE Pro Web login page appears.
3. Click View Multicast; a new browser window opens and displays the video collaboration on a page with QuickTime embedded to it.
NOTE: in order to view the Multicast via QuickTime, multicast settings should be configured to H.261 for video codec and G.711 for audio.
DOWNLOADING COLLABORATE SHARE You can share your PC desktop or an application via the network. To use this feature you need to download Collaborate Share application.
To download Collaborate Share:
1. Open your browser.
2. In the browser’s address bar, type the direct IP Address of the COLLABORATE Pro unit. The COLLABORATE Pro Web login page appears.
3. Click on Collaborate Share icon. The application download will be start automatically.
IMPORTING/EXPORTING THE LICENSE Some features and functionalities in COLLABORATE Pro require licensing, and are activated
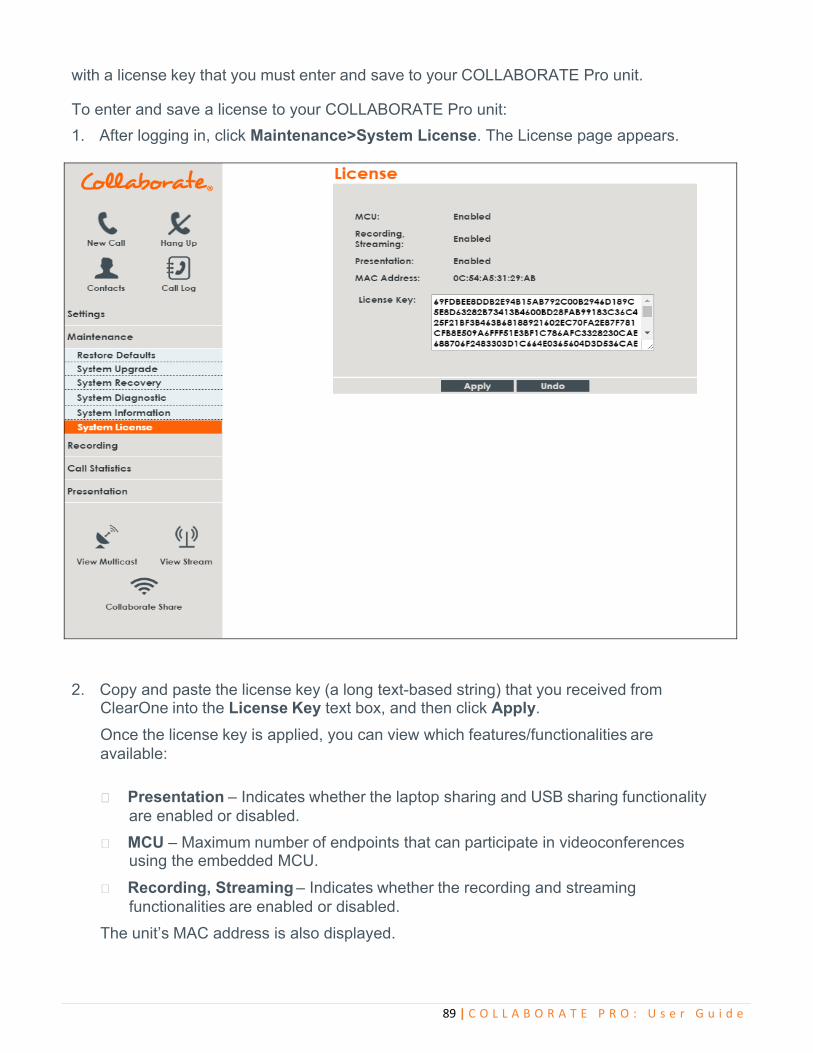
89 | C O L L A B O R A T E P R O : U s e r G u i d e
with a license key that you must enter and save to your COLLABORATE Pro unit. To enter and save a license to your COLLABORATE Pro unit:
1. After logging in, click Maintenance>System License. The License page appears.
2. Copy and paste the license key (a long text-based string) that you received from ClearOne into the License Key text box, and then click Apply.
Once the license key is applied, you can view which features/functionalities are available:
Presentation – Indicates whether the laptop sharing and USB sharing functionality are enabled or disabled.
MCU – Maximum number of endpoints that can participate in videoconferences using the embedded MCU.
Recording, Streaming – Indicates whether the recording and streaming functionalities are enabled or disabled.
The unit’s MAC address is also displayed.
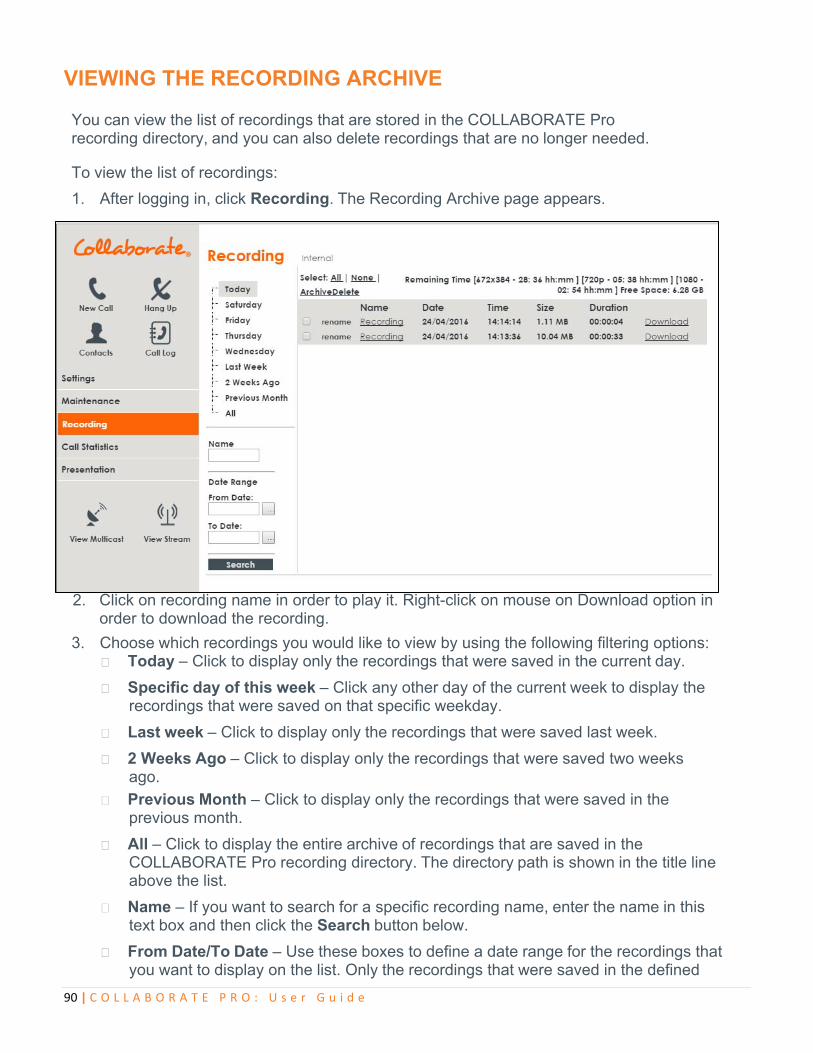
90 | C O L L A B O R A T E P R O : U s e r G u i d e
VIEWING THE RECORDING ARCHIVE You can view the list of recordings that are stored in the COLLABORATE Pro recording directory, and you can also delete recordings that are no longer needed.
To view the list of recordings:
1. After logging in, click Recording. The Recording Archive page appears.
2. Click on recording name in order to play it. Right-click on mouse on Download option in order to download the recording.
3. Choose which recordings you would like to view by using the following filtering options: Today – Click to display only the recordings that were saved in the current day.
Specific day of this week – Click any other day of the current week to display the recordings that were saved on that specific weekday.
Last week – Click to display only the recordings that were saved last week.
2 Weeks Ago – Click to display only the recordings that were saved two weeks ago.
Previous Month – Click to display only the recordings that were saved in the previous month.
All – Click to display the entire archive of recordings that are saved in the COLLABORATE Pro recording directory. The directory path is shown in the title line above the list.
Name – If you want to search for a specific recording name, enter the name in this text box and then click the Search button below.
From Date/To Date – Use these boxes to define a date range for the recordings that you want to display on the list. Only the recordings that were saved in the defined
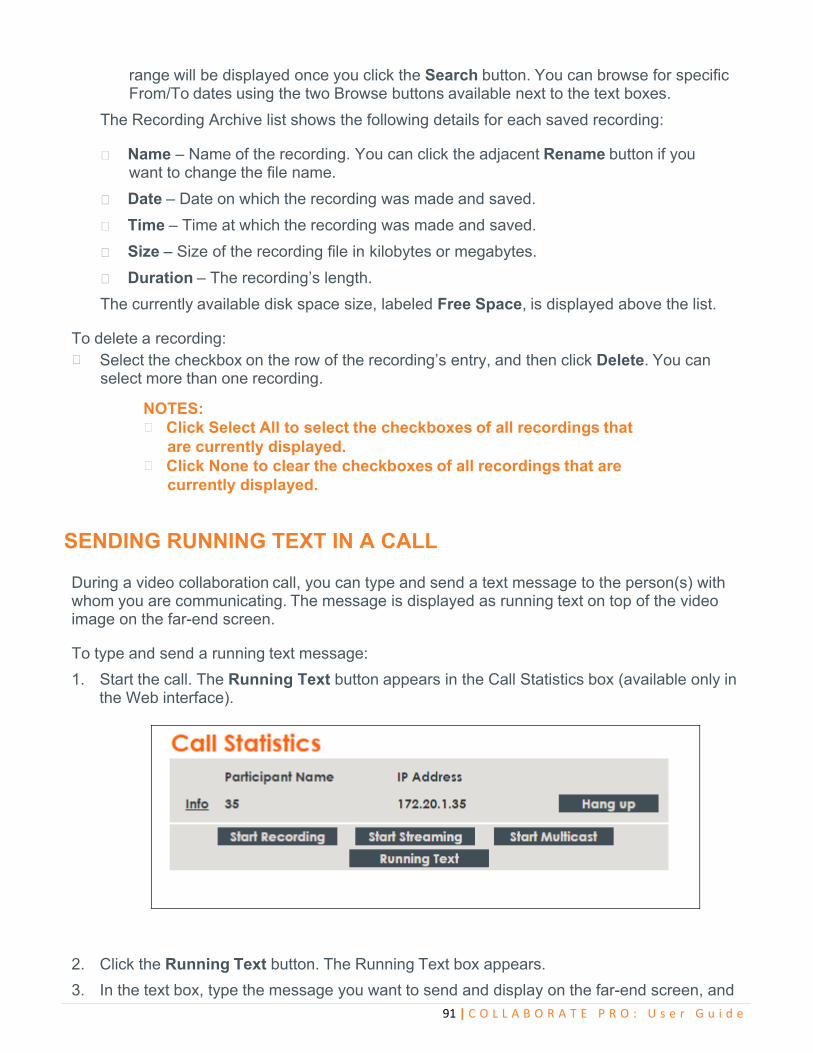
91 | C O L L A B O R A T E P R O : U s e r G u i d e
range will be displayed once you click the Search button. You can browse for specific From/To dates using the two Browse buttons available next to the text boxes.
The Recording Archive list shows the following details for each saved recording:
Name – Name of the recording. You can click the adjacent Rename button if you want to change the file name.
Date – Date on which the recording was made and saved.
Time – Time at which the recording was made and saved.
Size – Size of the recording file in kilobytes or megabytes.
Duration – The recording’s length.
The currently available disk space size, labeled Free Space, is displayed above the list. To delete a recording:
Select the checkbox on the row of the recording’s entry, and then click Delete. You can select more than one recording.
NOTES: Click Select All to select the checkboxes of all recordings that
are currently displayed. Click None to clear the checkboxes of all recordings that are
currently displayed.
SENDING RUNNING TEXT IN A CALL During a video collaboration call, you can type and send a text message to the person(s) with whom you are communicating. The message is displayed as running text on top of the video image on the far-end screen.
To type and send a running text message:
1. Start the call. The Running Text button appears in the Call Statistics box (available only in the Web interface).
2. Click the Running Text button. The Running Text box appears.
3. In the text box, type the message you want to send and display on the far-end screen, and
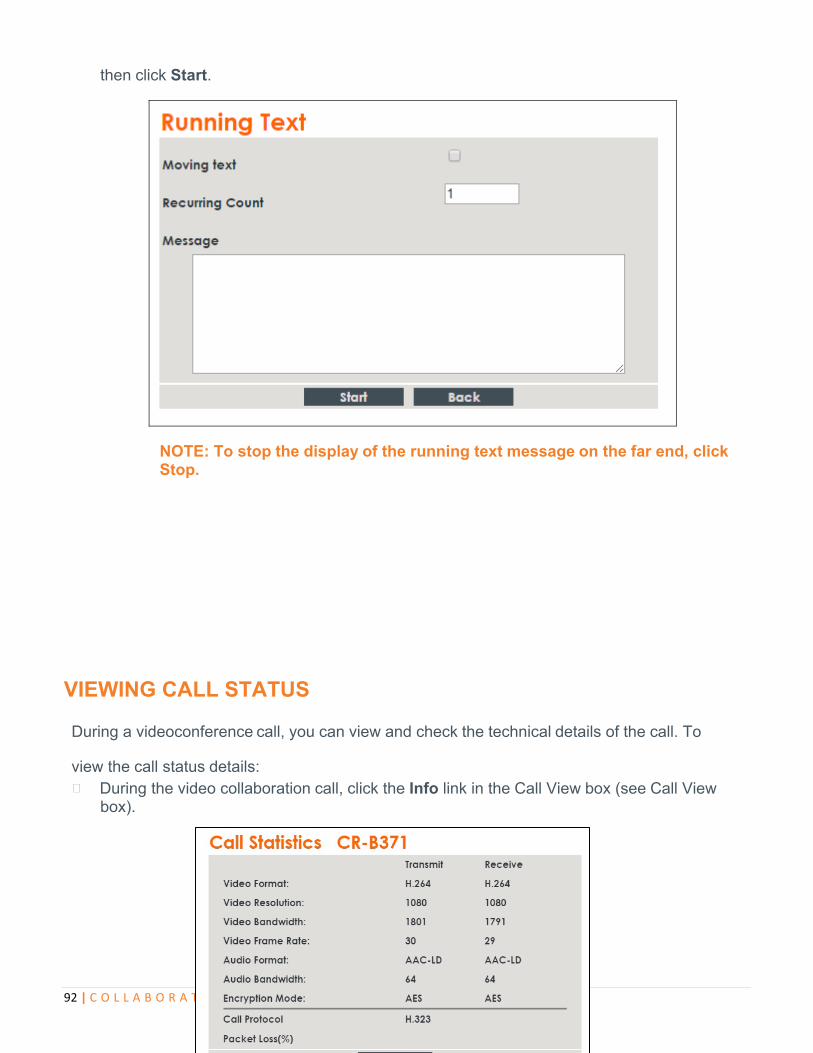
92 | C O L L A B O R A T E P R O : U s e r G u i d e
then click Start.
NOTE: To stop the display of the running text message on the far end, click Stop.
VIEWING CALL STATUS
During a videoconference call, you can view and check the technical details of the call. To
view the call status details: During the video collaboration call, click the Info link in the Call View box (see Call View
box).
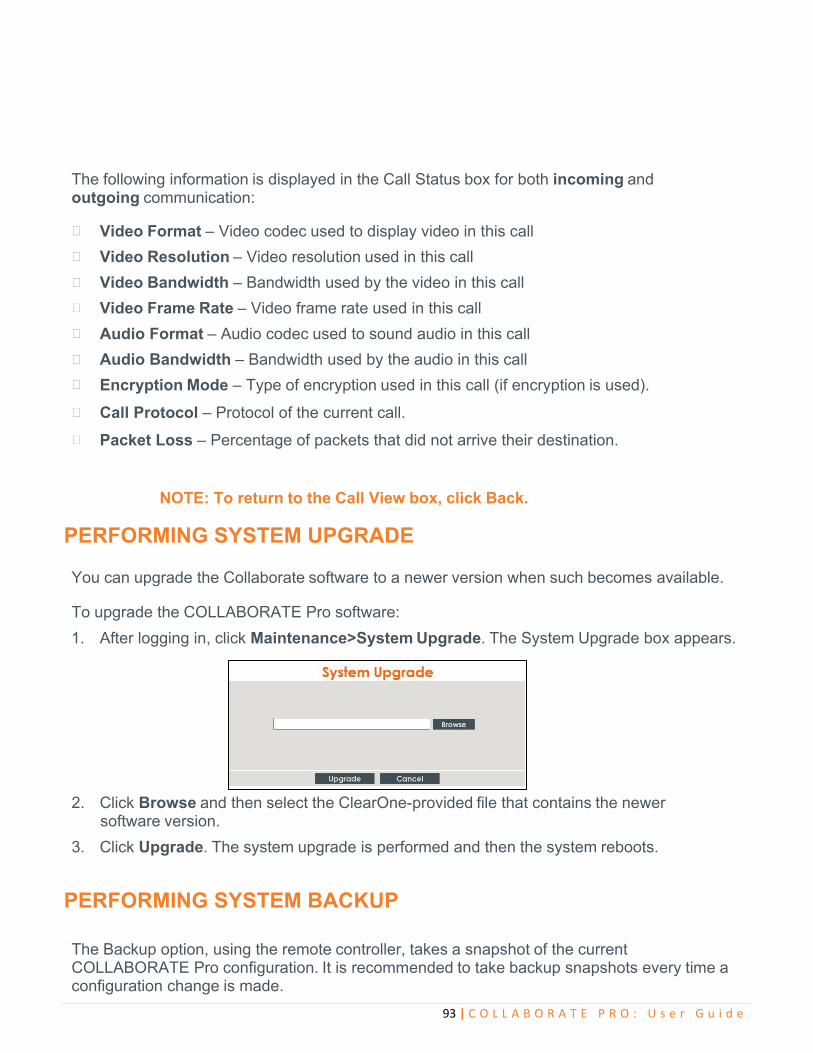
93 | C O L L A B O R A T E P R O : U s e r G u i d e
The following information is displayed in the Call Status box for both incoming and outgoing communication:
Video Format – Video codec used to display video in this call
Video Resolution – Video resolution used in this call
Video Bandwidth – Bandwidth used by the video in this call
Video Frame Rate – Video frame rate used in this call
Audio Format – Audio codec used to sound audio in this call
Audio Bandwidth – Bandwidth used by the audio in this call
Encryption Mode – Type of encryption used in this call (if encryption is used).
Call Protocol – Protocol of the current call.
Packet Loss – Percentage of packets that did not arrive their destination.
NOTE: To return to the Call View box, click Back.
PERFORMING SYSTEM UPGRADE
You can upgrade the Collaborate software to a newer version when such becomes available. To upgrade the COLLABORATE Pro software:
1. After logging in, click Maintenance>System Upgrade. The System Upgrade box appears.
2. Click Browse and then select the ClearOne-provided file that contains the newer software version.
3. Click Upgrade. The system upgrade is performed and then the system reboots.
PERFORMING SYSTEM BACKUP
The Backup option, using the remote controller, takes a snapshot of the current COLLABORATE Pro configuration. It is recommended to take backup snapshots every time a configuration change is made.

94 | C O L L A B O R A T E P R O : U s e r G u i d e
1. After logging in, click Maintenance>System Recovery
2. The system will reboot and a Recovery screen will appear
3. Select the Backup option. The Backup screen will appear.

95 | C O L L A B O R A T E P R O : U s e r G u i d e
4. Using the remote control to enter letters and numbers, enter the Backup name and click on the Create button to create the backup file of the configuration.
5. Once it is done, press the Exit button and reboot the system. Shutdown the system by pressing few seconds on the power button; then press the power button again in order to turn on the system.
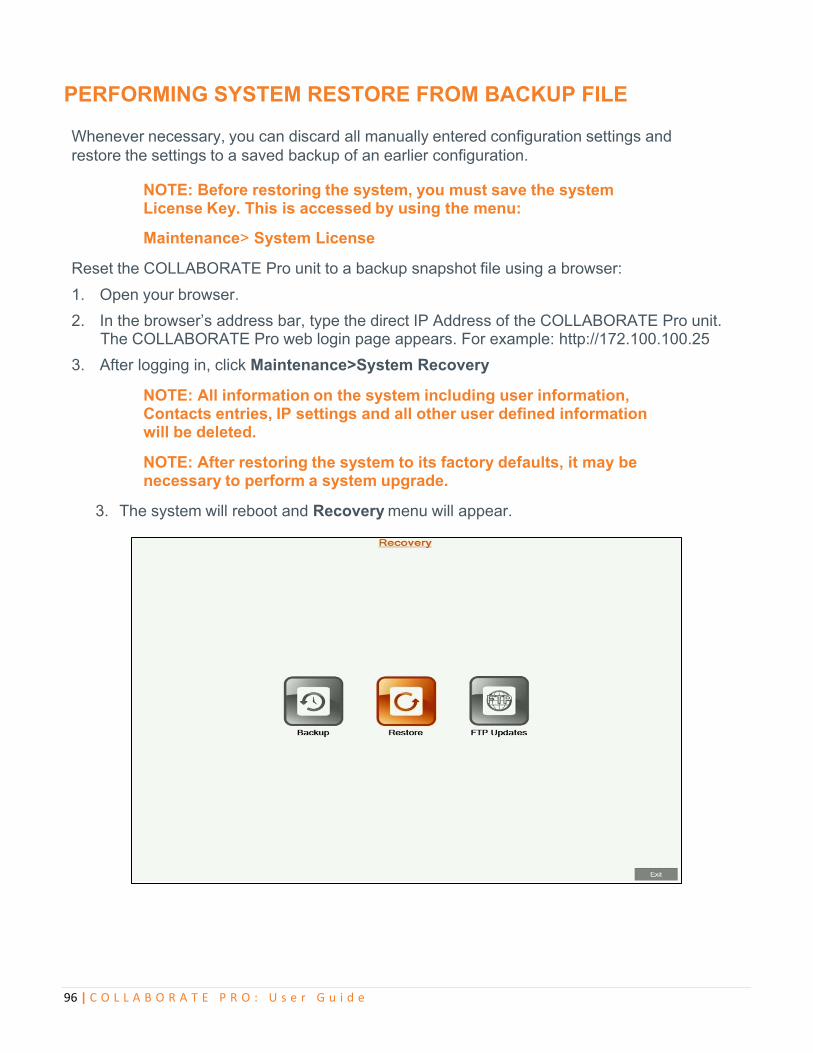
96 | C O L L A B O R A T E P R O : U s e r G u i d e
PERFORMING SYSTEM RESTORE FROM BACKUP FILE
Whenever necessary, you can discard all manually entered configuration settings and restore the settings to a saved backup of an earlier configuration.
NOTE: Before restoring the system, you must save the system License Key. This is accessed by using the menu:
Maintenance> System License
Reset the COLLABORATE Pro unit to a backup snapshot file using a browser:
1. Open your browser.
2. In the browser’s address bar, type the direct IP Address of the COLLABORATE Pro unit. The COLLABORATE Pro web login page appears. For example: http://172.100.100.25
3. After logging in, click Maintenance>System Recovery
NOTE: All information on the system including user information, Contacts entries, IP settings and all other user defined information will be deleted.
NOTE: After restoring the system to its factory defaults, it may be necessary to perform a system upgrade.
3. The system will reboot and Recovery menu will appear.
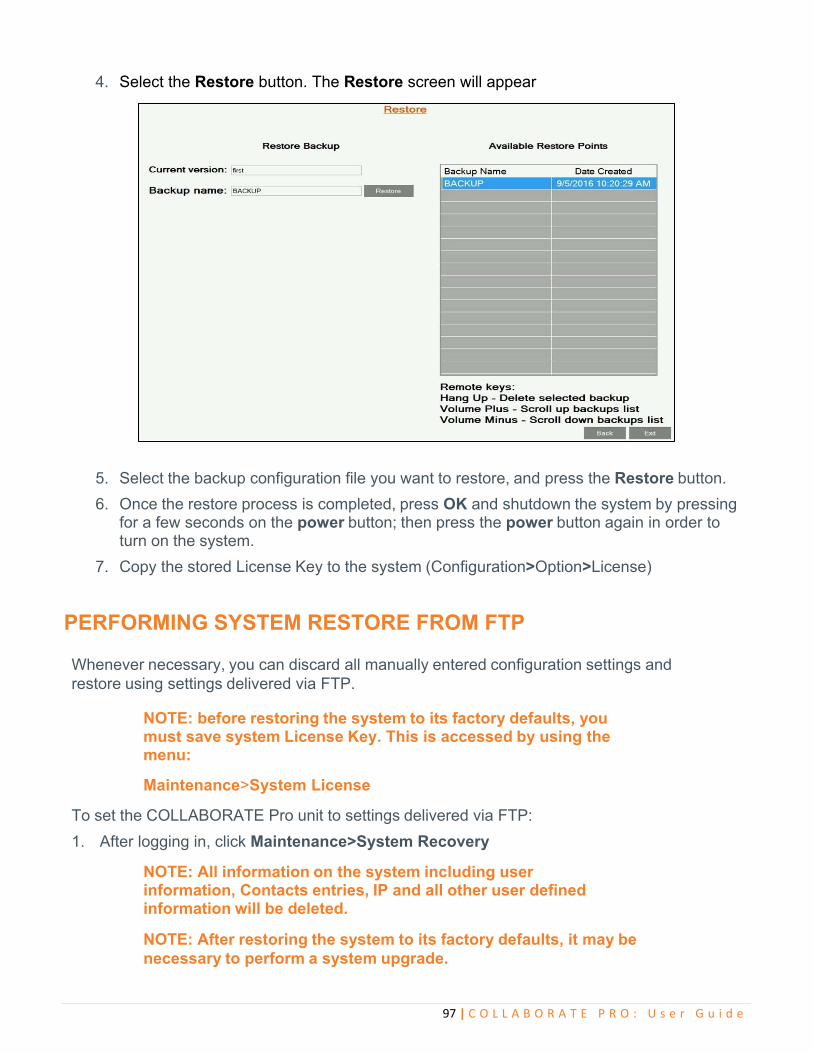
97 | C O L L A B O R A T E P R O : U s e r G u i d e
4. Select the Restore button. The Restore screen will appear
5. Select the backup configuration file you want to restore, and press the Restore button.
6. Once the restore process is completed, press OK and shutdown the system by pressing for a few seconds on the power button; then press the power button again in order to turn on the system.
7. Copy the stored License Key to the system (Configuration>Option>License)
PERFORMING SYSTEM RESTORE FROM FTP
Whenever necessary, you can discard all manually entered configuration settings and restore using settings delivered via FTP.
NOTE: before restoring the system to its factory defaults, you must save system License Key. This is accessed by using the menu:
Maintenance>System License
To set the COLLABORATE Pro unit to settings delivered via FTP:
1. After logging in, click Maintenance>System Recovery
NOTE: All information on the system including user information, Contacts entries, IP and all other user defined information will be deleted.
NOTE: After restoring the system to its factory defaults, it may be necessary to perform a system upgrade.
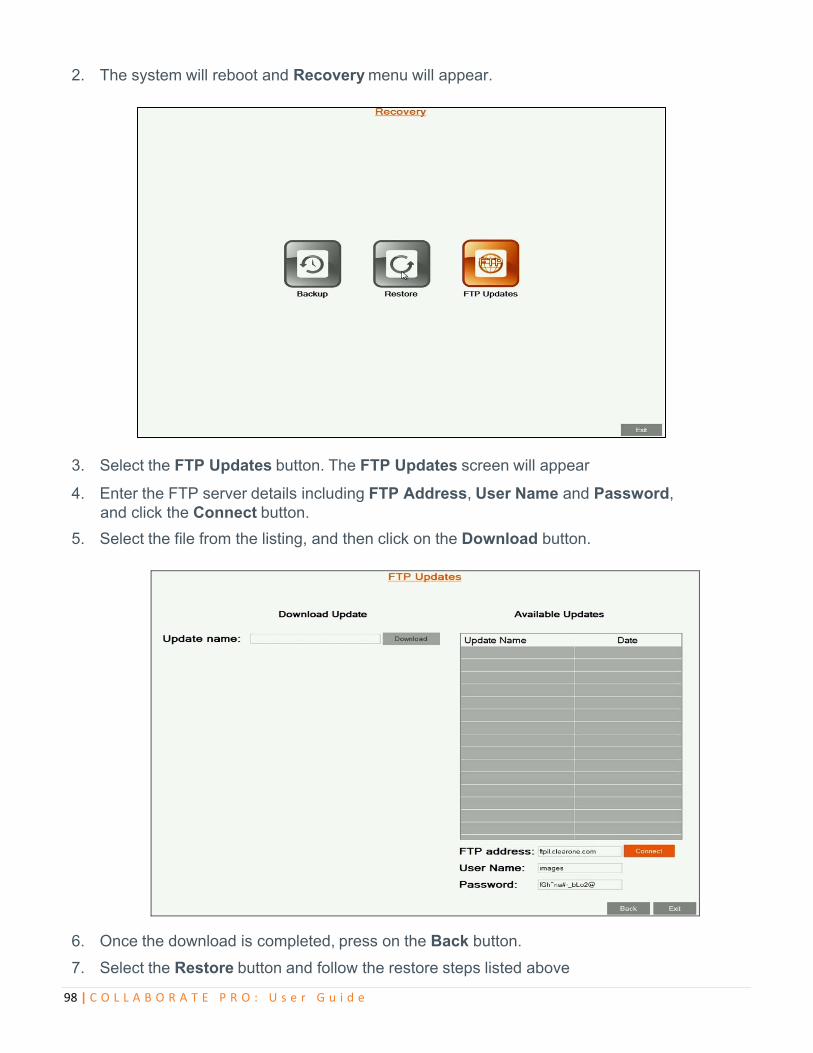
98 | C O L L A B O R A T E P R O : U s e r G u i d e
2. The system will reboot and Recovery menu will appear.
3. Select the FTP Updates button. The FTP Updates screen will appear
4. Enter the FTP server details including FTP Address, User Name and Password, and click the Connect button.
5. Select the file from the listing, and then click on the Download button.
6. Once the download is completed, press on the Back button.
7. Select the Restore button and follow the restore steps listed above
99 | C O L L A B O R A T E P R O : U s e r G u i d e
ACCESS TO SYSTEM RECOVERY WITH USB DEVICE
In addition to web server, you can reach recovery mode with designated USB device.
1. Connect Recovery USB and a keyboard to the system.
2. Restart you system (Settings > Power > Restart).
3. During restart, press F10 on your keyboard.
4. In the boot manager, Choose Recovery USB device.
NOTE: System recovery management via USB device is with the keyboard, while recovery management via Web Server is with the remote control.
100 | C O L L A B O R A T E P R O : U s e r G u i d e
Chapter 11: Telnet Commands
The Telnet commands allow you to communicate with a remote computer that is using the Telnet protocol.
You can run telnet without parameters in order to enter the telnet context, indicated by the Telnet prompt (telnet>). From the Telnet prompt, use the following commands to manage a computer running Telnet Client.
ENABLING THE TELNET API To enable the Telnet API:
1. Click Settings > General >Security
2. Check the Enable Telnet Interface checkbox.
DESCRIPTIONS OF THE TELNET API (COLLABORATE PRO)
Key Description Arguments Example
accept Accept incoming call — accept
hangup Hanging up session hangup
reject Rejecting incoming call reject
change_camera Set current camera by index (call cameralist for list of
il bl id
Index:1-9 change_camera 1
callinfo Request call info values SessionID: Valid session IDnumber
callinfo 1
camerahome Return PTZ camera to default position
— camerahome
cameralist Return list of available video d i
— cameralist
camerapos Save or restore camera position from preset
Action: save, restore
Position: 1-9 camerapos save 2
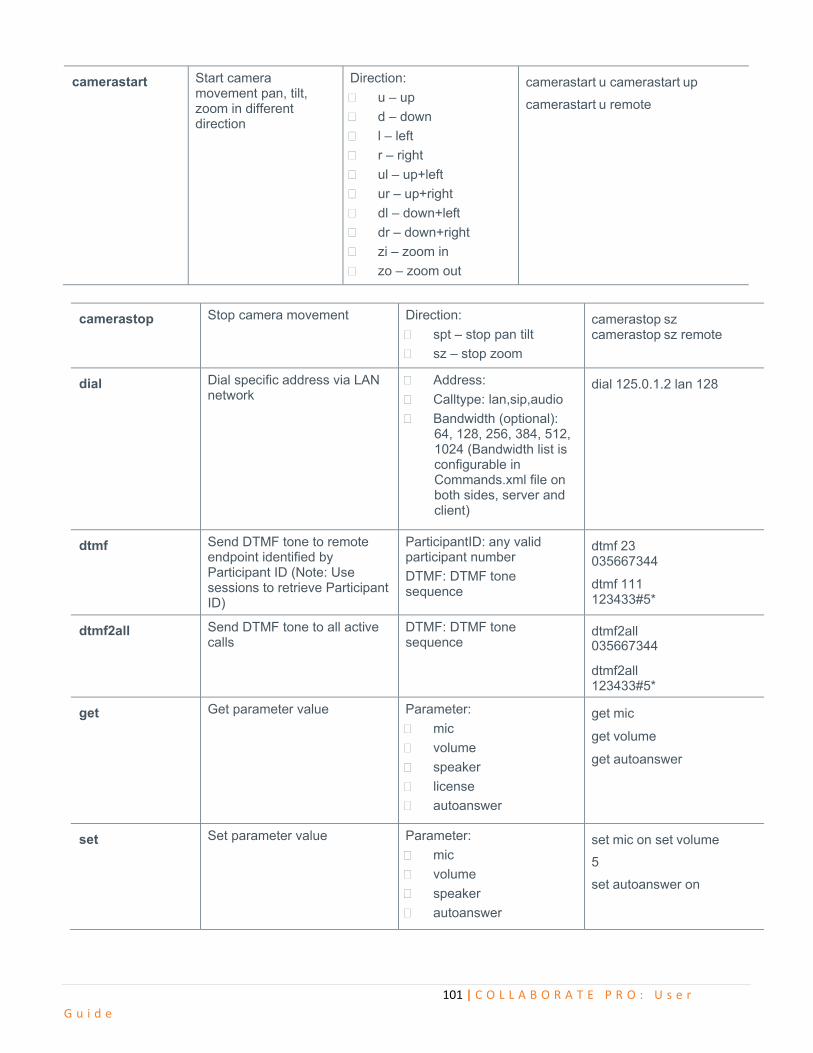
101 | C O L L A B O R A T E P R O : U s e r
G u i d e
camerastart Start camera movement pan, tilt, zoom in different direction
Direction:
u – up
d – down
l – left
r – right
ul – up+left
ur – up+right
dl – down+left
dr – down+right
zi – zoom in
zo – zoom out
camerastart u camerastart up
camerastart u remote
camerastop Stop camera movement Direction:
spt – stop pan tilt
sz – stop zoom
camerastop sz camerastop sz remote
dial Dial specific address via LAN network
Address:
Calltype: lan,sip,audio
Bandwidth (optional): 64, 128, 256, 384, 512, 1024 (Bandwidth list is configurable in Commands.xml file on both sides, server and client)
dial 125.0.1.2 lan 128
dtmf Send DTMF tone to remote endpoint identified by Participant ID (Note: Use sessions to retrieve Participant ID)
ParticipantID: any valid participant number
DTMF: DTMF tone sequence
dtmf 23 035667344
dtmf 111 123433#5*
dtmf2all Send DTMF tone to all active calls
DTMF: DTMF tone sequence
dtmf2all 035667344
dtmf2all 123433#5*
get Get parameter value Parameter:
mic
volume
speaker
license
autoanswer
get mic
get volume
get autoanswer
set Set parameter value Parameter:
mic
volume
speaker
autoanswer
set mic on set volume
5
set autoanswer on

102 | C O L L A B O R A T E P R O : U s e r G u i d e
multicast / recording / streaming
Start or stop media activity. Parameter:
start
stop
recording start
streaming stop
donotdisturb Start or stop do not disturb mode.
Parameter:
enable
disable
donotdisturb enable
help Display all telnet commands andnotifications.
help
shutdown / restart Shutdown or restart the unit. restart
sharehdmi1 / sharehdmi2
Start sharing HDMI content depending on connected devices.
Parameter:
start
stop
sharehdmi2 start
sharelaptop Share DataPoint when it is connected to the unit.
Parameter:
start
stop
sharelaptop start
sharewireless Start wireless sharing when there is at least 1 sender connected to the unit.
Parameter:
start
stop
sharewireless start
changewirelesslayout Change wireless layout while wireless is being shared.
Parameter:
auto
single
preview
changewirelesslayout
single
nextsender When more than one sender is shared in preview or single layout, change between main senders.
nextsender
startsession Start Spontania meeting as a moderator.
start session
listcontacts Retrieve the local user contact list.
listcontacts

103 | C O L L A B O R A T E P R O : U s e r
G u i d e
joinsession Join Spontania meeting as a participant.
Session ID. joinsession 12345
sessions Display all active sessions and their sessions ID.
sessions
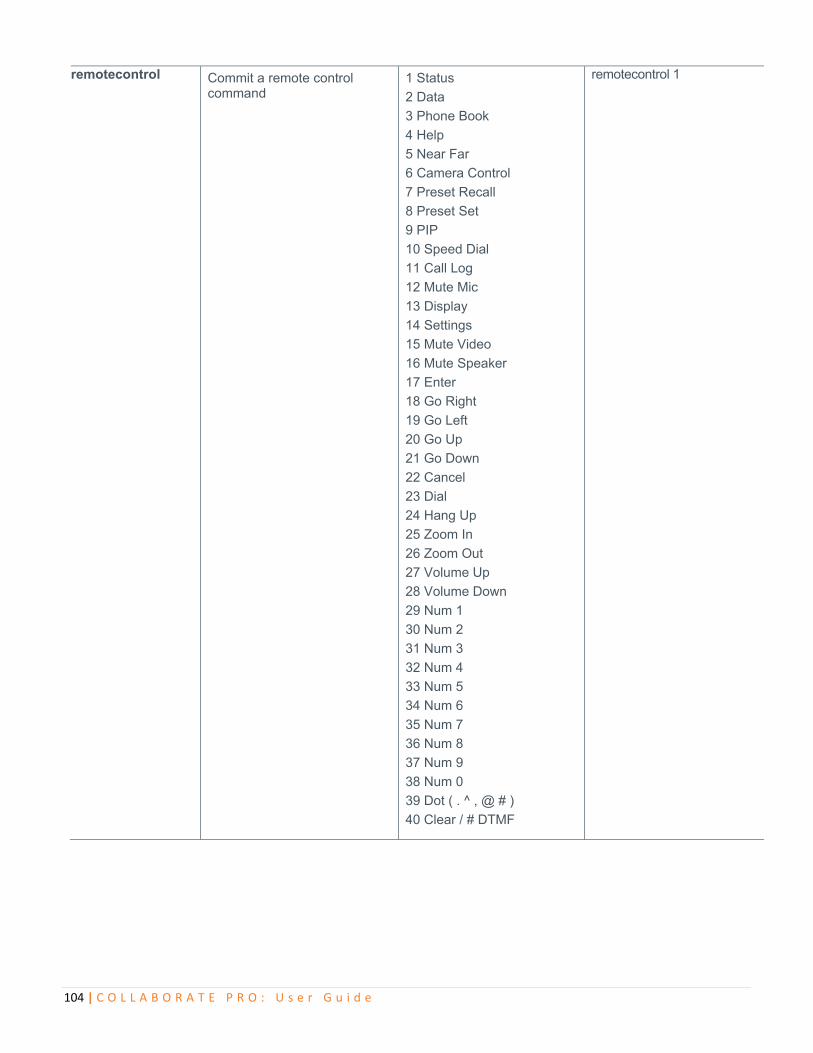
104 | C O L L A B O R A T E P R O : U s e r G u i d e
remotecontrol Commit a remote control command
1 Status
2 Data
3 Phone Book
4 Help
5 Near Far
6 Camera Control
7 Preset Recall
8 Preset Set
9 PIP
10 Speed Dial
11 Call Log
12 Mute Mic
13 Display
14 Settings
15 Mute Video
16 Mute Speaker
17 Enter
18 Go Right
19 Go Left
20 Go Up
21 Go Down
22 Cancel
23 Dial
24 Hang Up
25 Zoom In
26 Zoom Out
27 Volume Up
28 Volume Down
29 Num 1
30 Num 2
31 Num 3
32 Num 4
33 Num 5
34 Num 6
35 Num 7
36 Num 8
37 Num 9
38 Num 0
39 Dot ( . ^ , @ # )
40 Clear / # DTMF
remotecontrol 1
105 | C O L L A B O R A T E P R O : U s e r
G u i d e
STARTING AN API SESSION USING AN RS-232 (COM 2) INTERFACE
The COLLABORATE Pro can run API sessions from the RS-232 interface – COM 2. 1. Enable telnet interface in the Security settings. 2. In Serial Port settings, choose Serial control. 3. Power off the computer or control system and the COLLABORATE Pro system. 4. Use an RS-232 cable to connect the computer or control system RS-232 port to COM 2 on
COLLABORATE Pro. 5. Power on the computer and the COLLABORATE Pro system. 6. From the computer or control system, start a serial session using HyperTerminal or another appropriate utility. 7. Set up the serial session as follows:
Connection name: Protocol: Serial Port: The COM Port number on your PC (Check under Device Manager) Baud Rate: 9600 Data Bits: 8 Parity: None Stop bits: 1
Using the API with a LAN Connection If you have a computer connected to the LAN, you can send API commands to the COLLABORATE Pro system through telnet port 23. 1. On the computer, open a command line interface. 2. Start a Telnet session using the COLLABORATE system IP address.
Note: You cannot use Telnet to access the system if the Telnet Interface is disabled. Enable the Telnet API.
DESCRIPTIONS OF THE TELNET API (SPONTANIA)
The Telnet commands allow you to communicate with a remote computer that is using the Telnet protocol.
You can run telnet without parameters in order to enter the telnet context, indicated by the Telnet prompt (telnet>). From the Telnet prompt, use the following commands to manage a computer running Telnet Client.
ENABLING THE TELNET API (Before entering Spontania)
To enable the Telnet API:
106 | C O L L A B O R A T E P R O : U s e r G u i d e
1. Click Settings > General >Security
2. Check the Enable Telnet Interface checkbox.
DESCRIPTIONS OF THE TELNET API (Skype For Business)
To enable the Telnet API:
1. Click Settings > General >Security
3. Check the Enable Telnet Interface checkbox
Key Description Arguments Example
hangup Hanging up session hangup
camerahome Return PTZ camera to default
position —
camerahome
camerapos Save or restore camera
position from preset Action: save, restore
Position: 1-9 camerapos save 2
camerastart Start camera movement pan,
tilt, zoom in different direction Direction:
u – up
d – down
l – left
r – right
zi – zoom in
zo – zoom out
camerastart u
camerastart up
camerastop Stop camera movement Direction:
spt – stop pan tilt
sz – stop zoom
camerastop sz
help Display all telnet commands and notifications.
help
recording Start or stop recording. Parameter:
start
stop
recording start
changelayout Toggles the layout in Spontania.
changelayout
rotatevideos Rotates the video users list in Spontania
rotatevideos
listcontacts Retrieve the local user contact list.
listcontacts
107 | C O L L A B O R A T E P R O : U s e r
G u i d e
invite Invites a contact to join the current session
User ID invite 12345
set Set parameter value Parameter:
camera
mic_all
camera_all
set mic_all on
set camera_all off
sharelaptop Share DataPoint when it is connected to the unit.
Parameter:
start
stop
sharelaptop start
sharewireless Start wireless sharing when there is at least 1 sender connected to the unit.
Parameter:
start
stop
sharewireless start
changewirelesslayout Change wireless layout while wireless is being shared.
Parameter:
auto
single
preview
changewirelesslayout
single
nextsender When more than one sender is shared in preview or single layout, change between main senders.
nextsender
sharehdmi1 / sharehdmi2
Start sharing HDMI content depending on connected devices.
Parameter:
start
stop
sharehdmi2 start
108 | C O L L A B O R A T E P R O : U s e r G u i d e
remotecontrol Commit a remote control command
1 Status
2 Data
3 Phone Book
4 Help
5 Near Far
6 Camera Control
7 Preset Recall
8 Preset Set
9 PIP
10 Speed Dial
11 Call Log
12 Mute Mic
13 Display
14 Settings
15 Mute Video
16 Mute Speaker
17 Enter
18 Go Right
19 Go Left
20 Go Up
21 Go Down
22 Cancel
23 Dial
24 Hang Up
25 Zoom In
26 Zoom Out
27 Volume Up
28 Volume Down
29 Num 1
30 Num 2
31 Num 3
32 Num 4
33 Num 5
34 Num 6
35 Num 7
36 Num 8
37 Num 9
38 Num 0
39 Dot ( . ^ , @ # )
40 Clear / # DTMF
remotecontrol 1
TELNET API (Skype For Business)
Key Description Arguments Example
accept Accept incoming call —
accept
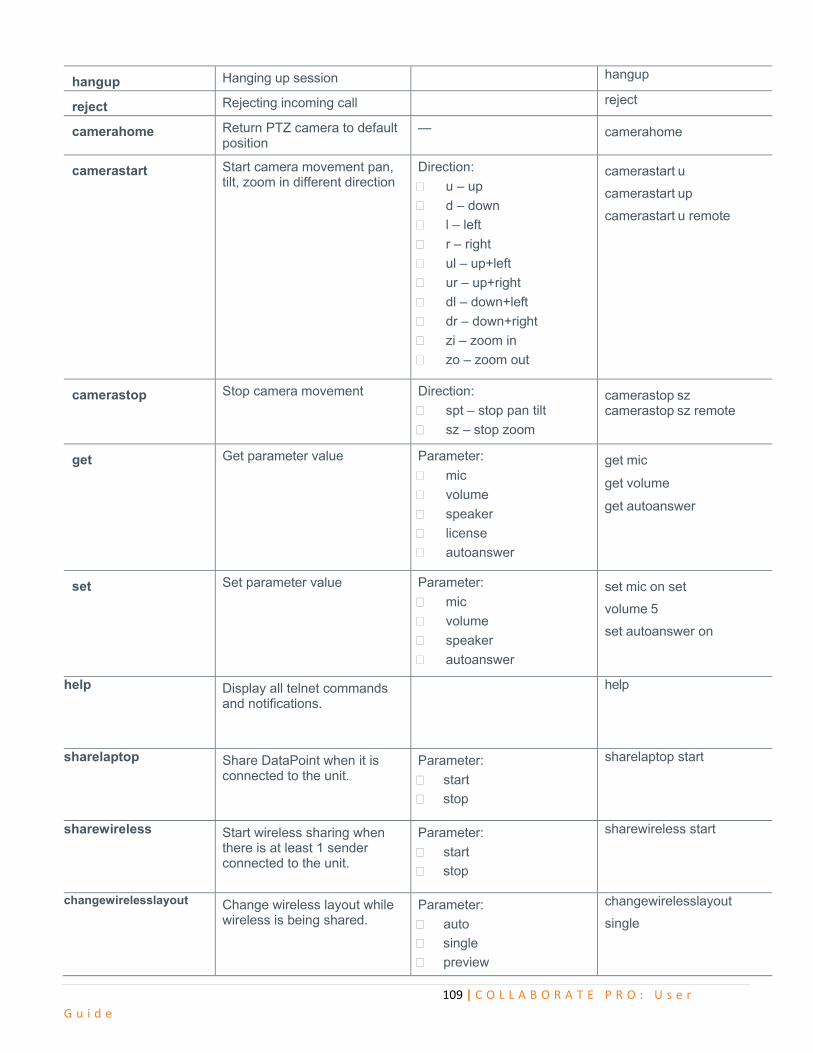
109 | C O L L A B O R A T E P R O : U s e r
G u i d e
hangup Hanging up session hangup
reject Rejecting incoming call reject
camerahome Return PTZ camera to default position
—
camerahome
camerastart Start camera movement pan, tilt, zoom in different direction
Direction:
u – up
d – down
l – left
r – right
ul – up+left
ur – up+right
dl – down+left
dr – down+right
zi – zoom in
zo – zoom out
camerastart u
camerastart up
camerastart u remote
camerastop Stop camera movement Direction:
spt – stop pan tilt
sz – stop zoom
camerastop sz camerastop sz remote
get Get parameter value Parameter:
mic
volume
speaker
license
autoanswer
get mic
get volume
get autoanswer
set Set parameter value Parameter:
mic
volume
speaker
autoanswer
set mic on set
volume 5
set autoanswer on
help Display all telnet commands and notifications.
help
sharelaptop Share DataPoint when it is connected to the unit.
Parameter:
start
stop
sharelaptop start
sharewireless Start wireless sharing when there is at least 1 sender connected to the unit.
Parameter:
start
stop
sharewireless start
changewirelesslayout Change wireless layout while wireless is being shared.
Parameter:
auto
single
preview
changewirelesslayout
single
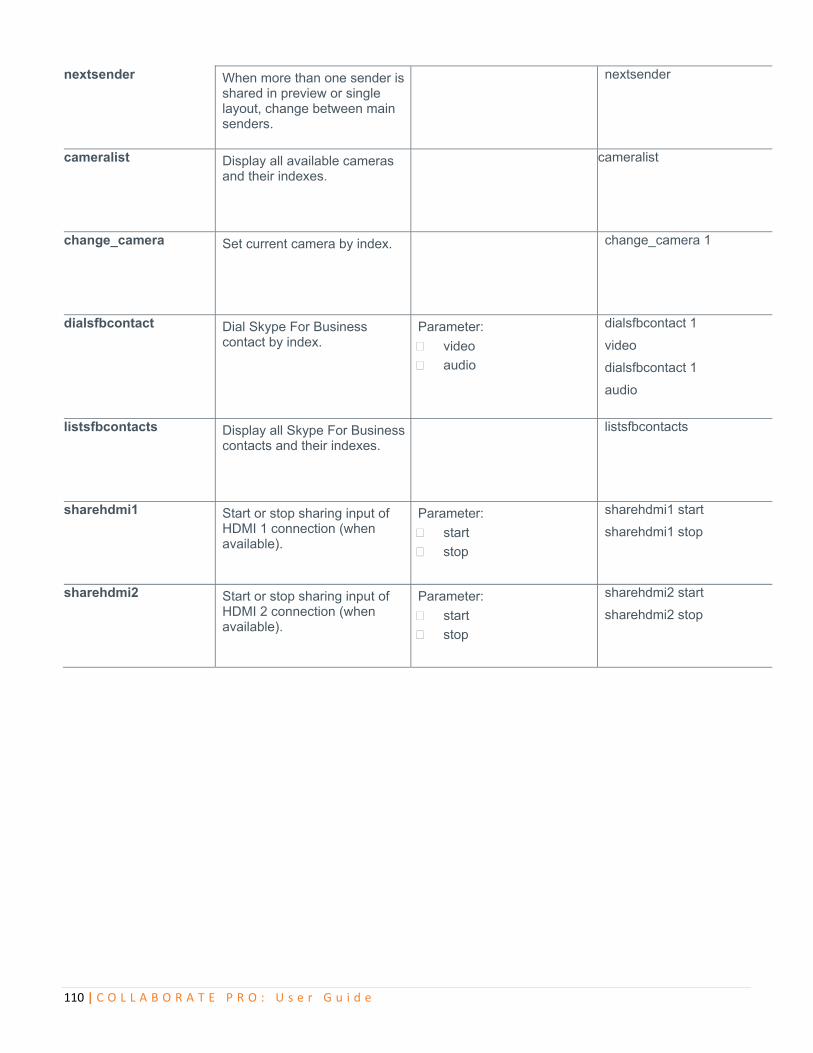
110 | C O L L A B O R A T E P R O : U s e r G u i d e
nextsender When more than one sender is shared in preview or single layout, change between main senders.
nextsender
cameralist
Display all available cameras and their indexes.
cameralist
change_camera Set current camera by index. change_camera 1
dialsfbcontact Dial Skype For Business contact by index.
Parameter:
video
audio
dialsfbcontact 1
video
dialsfbcontact 1
audio
listsfbcontacts Display all Skype For Business contacts and their indexes.
listsfbcontacts
sharehdmi1 Start or stop sharing input of HDMI 1 connection (when available).
Parameter:
start
stop
sharehdmi1 start
sharehdmi1 stop
sharehdmi2 Start or stop sharing input of HDMI 2 connection (when available).
Parameter:
start
stop
sharehdmi2 start
sharehdmi2 stop

111 | C O L L A B O R A T E P R O : U s e r
G u i d e
remotecontrol Commit a remote control command
1 Status
2 Data
3 Phone Book
4 Help
5 Near Far
6 Camera Control
7 Preset Recall
8 Preset Set
9 PIP
10 Speed Dial
11 Call Log
12 Mute Mic
13 Display
14 Settings
15 Mute Video
16 Mute Speaker
17 Enter
18 Go Right
19 Go Left
20 Go Up
21 Go Down
22 Cancel
23 Dial
24 Hang Up
25 Zoom In
26 Zoom Out
27 Volume Up
28 Volume Down
29 Num 1
30 Num 2
31 Num 3
32 Num 4
33 Num 5
34 Num 6
35 Num 7
36 Num 8
37 Num 9
38 Num 0
39 Dot ( . ^ , @ # )
40 Clear / # DTMF
remotecontrol 1
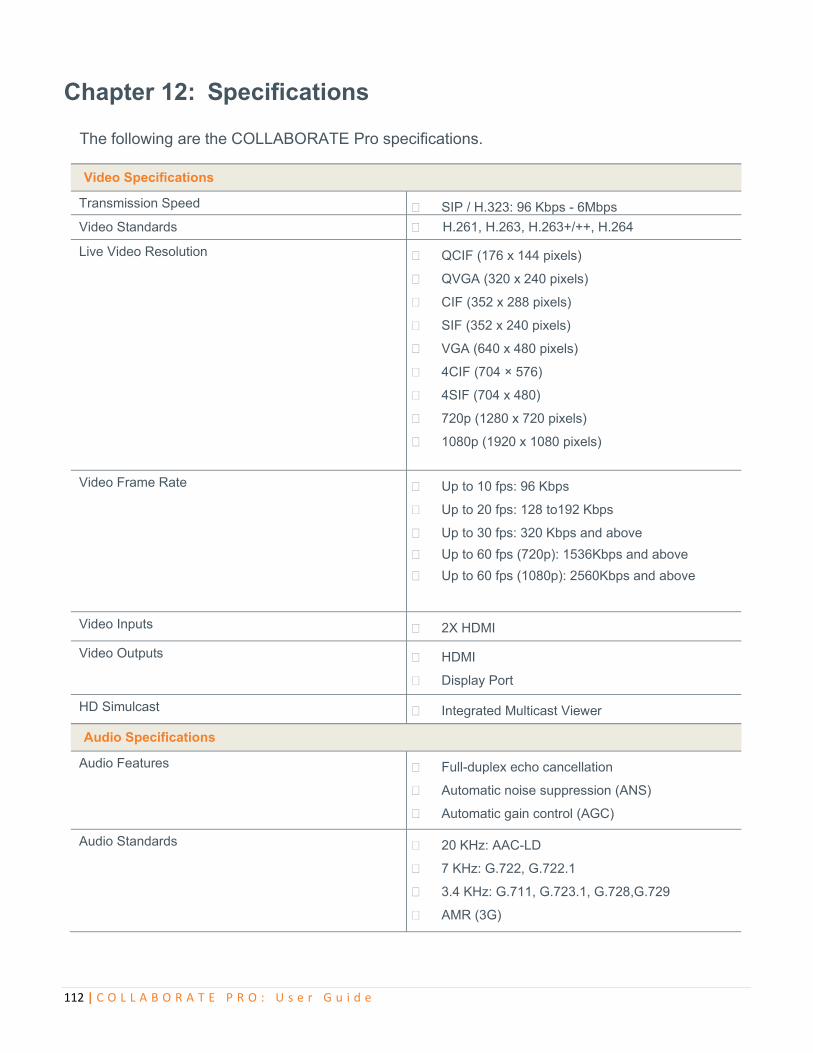
112 | C O L L A B O R A T E P R O : U s e r G u i d e
Chapter 12: Specifications
The following are the COLLABORATE Pro specifications.
Video Specifications
Transmission Speed SIP / H.323: 96 Kbps - 6Mbps
Video Standards H.261, H.263, H.263+/++, H.264
Live Video Resolution QCIF (176 x 144 pixels)
QVGA (320 x 240 pixels)
CIF (352 x 288 pixels)
SIF (352 x 240 pixels)
VGA (640 x 480 pixels)
4CIF (704 × 576)
4SIF (704 x 480)
720p (1280 x 720 pixels)
1080p (1920 x 1080 pixels)
Video Frame Rate Up to 10 fps: 96 Kbps
Up to 20 fps: 128 to192 Kbps
Up to 30 fps: 320 Kbps and above
Up to 60 fps (720p): 1536Kbps and above
Up to 60 fps (1080p): 2560Kbps and above
Video Inputs 2X HDMI
Video Outputs HDMI
Display Port
HD Simulcast Integrated Multicast Viewer
Audio Specifications
Audio Features Full-duplex echo cancellation
Automatic noise suppression (ANS)
Automatic gain control (AGC)
Audio Standards 20 KHz: AAC-LD
7 KHz: G.722, G.722.1
3.4 KHz: G.711, G.723.1, G.728,G.729
AMR (3G)
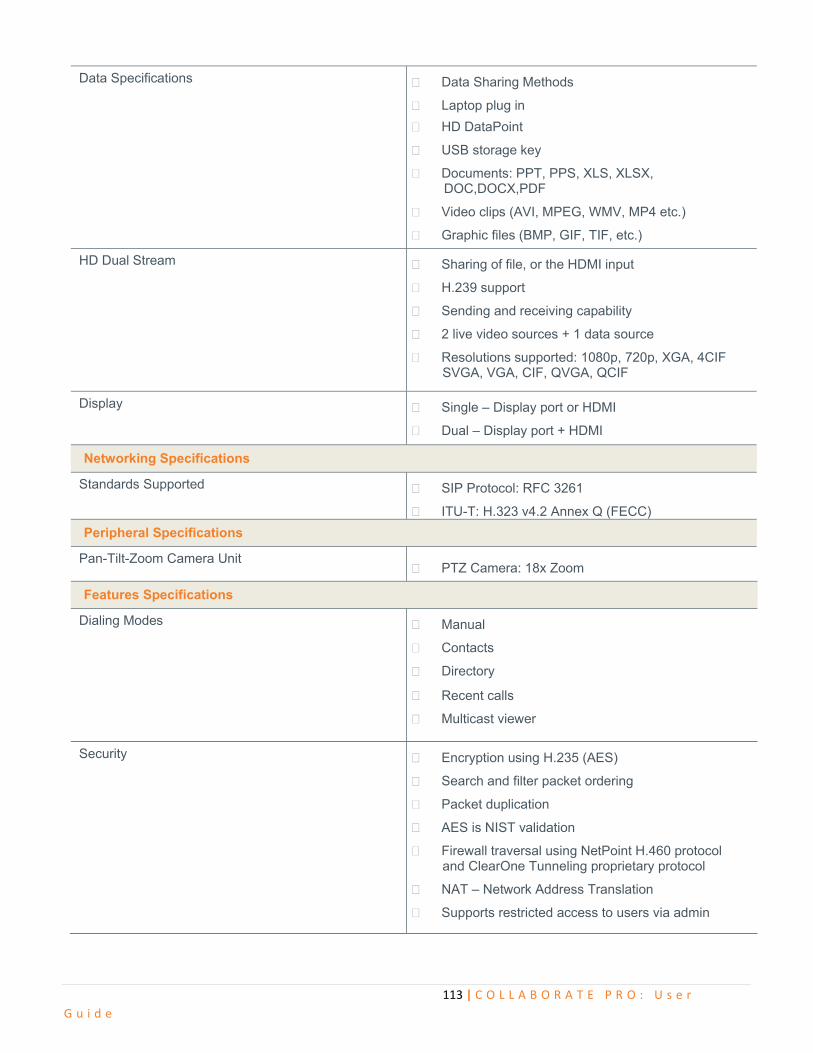
113 | C O L L A B O R A T E P R O : U s e r
G u i d e
Data Specifications Data Sharing Methods
Laptop plug in
HD DataPoint
USB storage key
Documents: PPT, PPS, XLS, XLSX, DOC,DOCX,PDF
Video clips (AVI, MPEG, WMV, MP4 etc.)
Graphic files (BMP, GIF, TIF, etc.)
HD Dual Stream Sharing of file, or the HDMI input
H.239 support
Sending and receiving capability
2 live video sources + 1 data source
Resolutions supported: 1080p, 720p, XGA, 4CIF SVGA, VGA, CIF, QVGA, QCIF
Display Single – Display port or HDMI
Dual – Display port + HDMI
Networking Specifications
Standards Supported SIP Protocol: RFC 3261
ITU-T: H.323 v4.2 Annex Q (FECC)
Peripheral Specifications
Pan-Tilt-Zoom Camera Unit PTZ Camera: 18x Zoom
Features Specifications
Dialing Modes Manual
Contacts
Directory
Recent calls
Multicast viewer
Security Encryption using H.235 (AES)
Search and filter packet ordering
Packet duplication
AES is NIST validation
Firewall traversal using NetPoint H.460 protocol and ClearOne Tunneling proprietary protocol
NAT – Network Address Translation
Supports restricted access to users via admin
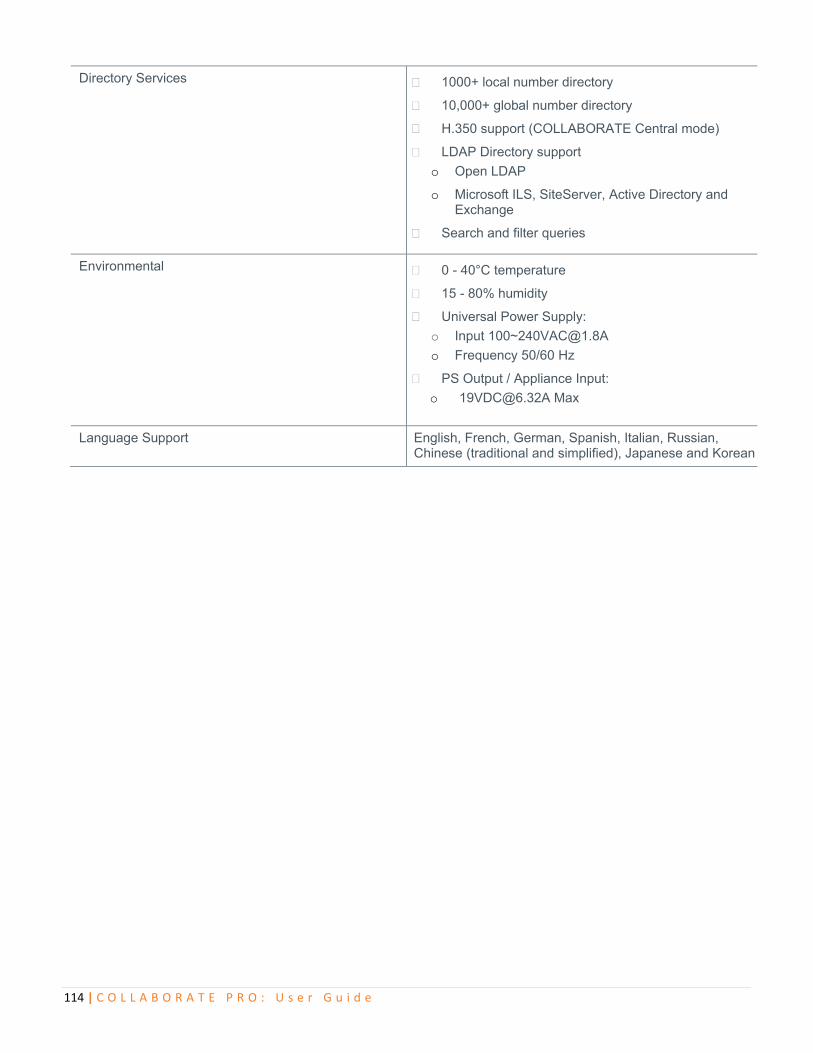
114 | C O L L A B O R A T E P R O : U s e r G u i d e
Directory Services 1000+ local number directory
10,000+ global number directory
H.350 support (COLLABORATE Central mode)
LDAP Directory support
o Open LDAP
o Microsoft ILS, SiteServer, Active Directory and Exchange
Search and filter queries
Environmental 0 - 40°C temperature
15 - 80% humidity
Universal Power Supply:
o Input [email protected]
o Frequency 50/60 Hz
PS Output / Appliance Input:
o [email protected] Max
Language Support English, French, German, Spanish, Italian, Russian, Chinese (traditional and simplified), Japanese and Korean
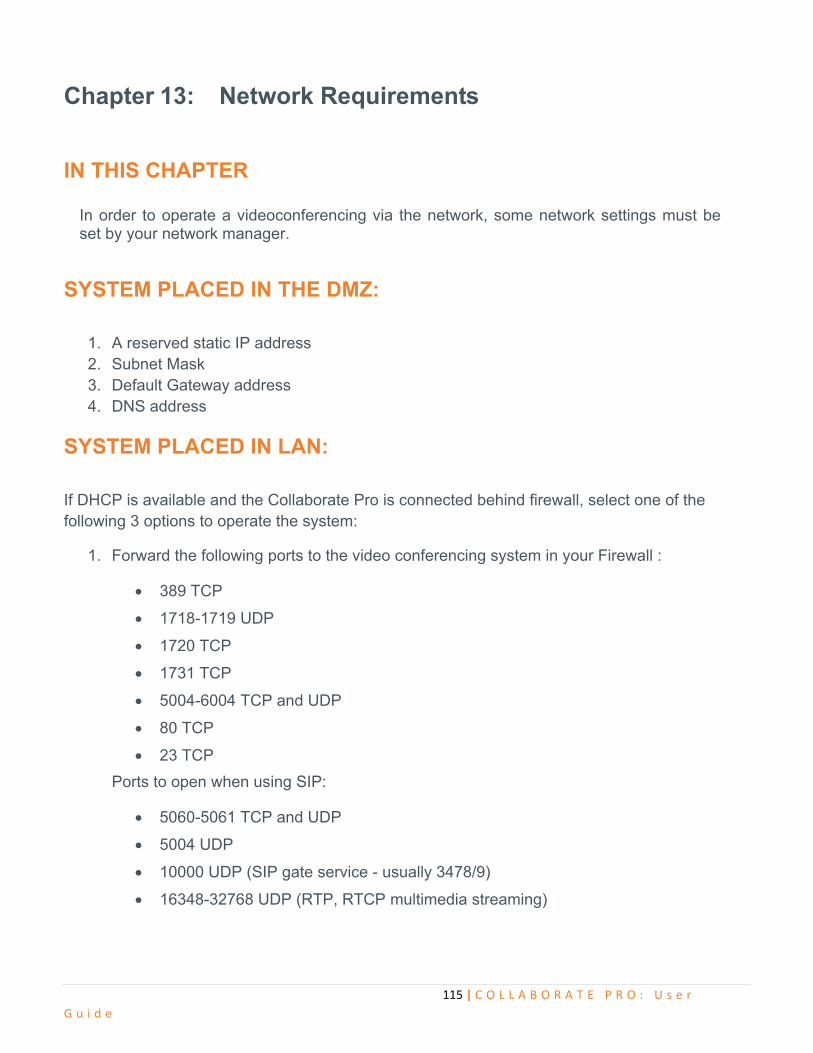
115 | C O L L A B O R A T E P R O : U s e r
G u i d e
Chapter 13: Network Requirements
IN THIS CHAPTER
In order to operate a videoconferencing via the network, some network settings must be set by your network manager.
SYSTEM PLACED IN THE DMZ:
1. A reserved static IP address 2. Subnet Mask 3. Default Gateway address 4. DNS address
SYSTEM PLACED IN LAN:
If DHCP is available and the Collaborate Pro is connected behind firewall, select one of the following 3 options to operate the system:
1. Forward the following ports to the video conferencing system in your Firewall :
389 TCP
1718-1719 UDP
1720 TCP
1731 TCP
5004-6004 TCP and UDP
80 TCP
23 TCP
Ports to open when using SIP:
5060-5061 TCP and UDP
5004 UDP
10000 UDP (SIP gate service - usually 3478/9)
16348-32768 UDP (RTP, RTCP multimedia streaming)

116 | C O L L A B O R A T E P R O : U s e r G u i d e
Ports to open when using Spontania:
443 TCP
6000-6100 UDP
5222 TCP (Presence)
Ports to open when using Collaborate share:
9050 TCP
9051 TCP
56789 TCP
56987 TCP
2203
9052 – 9058 UDP
2. Network Address Translation (NAT):
The NAT address can be configured from Collaborate Pro Network settings form (Settings Advanced Firewall. The NAT mode can be configured to Automatic / Manual. Configure the system IP in the Broadband Router DMZ host.
3. Firewall Traversal server:
The Collaborate Pro can be registered to NetPoint firewall traversal server. The NetPoint server allows end points behind firewalls to communicate with other end points, both in WAN and behind other firewalls (NetPoint server address can be provided by ClearOne representative).
In network SettingsAdvancedH.323, To configure a connection to a NetPoint server enter the required details in the following fields: Server address (NetPoint IP address) and user name. Select the protocol you want to use to connect your call, H.460 or Tunneling.