Embed Size (px)
Citation preview

NAVIGATING CMiC
Page | 1
COLLABORATION
Reference Guide covers the following items:
• How to login
• Launching applications and their typical action buttons
• Querying & filtering log views
• Export log views to Excel
• User Profile – Update info / Change Password / Set Email Notifications
How to Login
CMiC is web based software program and Pankow utilizes Internet Explorer 11.
Note: Other web browsers are supported but Pankow might not be able to help you with questions or errors
related to CMiC.
The project collaboration team lead from Pankow will send you an email with your username and password.
CMiC is accessed via www.pankow.com website. Below is screen shots on how to access the collaboration
page.
CMiC Access
Go to www.pankow.com and click the “Fly Out Menu”. From here navigate to “Collaboration Page”

NAVIGATING CMiC
Page | 2
COLLABORATION
“Collaboration Page” link will appear above Pankow Logo
Clicking this link opens up the Collaboration Page where the CMiC Access link resides
NAVIGATING CMiC
Page | 3
COLLABORATION
Once you Click “CMiC Access” the login page will open up
• User Name = Enter your user name
• Password: Enter your password
** If you have an issue logging in, you might need to adjust your Internet Explorer Settings due to security.
Follow these steps to adjust:
• Internet Options > Security Tab > Sites
o Add “ https://v10-pm.pankow.com “

NAVIGATING CMiC
Page | 4
COLLABORATION
• Internet Options > Advanced Tab > Settings (Scroll to Bottom of List)
o Make sure Security boxes for SSL/TLS are All checked
� Click Apply and Okay
NAVIGATING CMiC
Page | 5
COLLABORATION
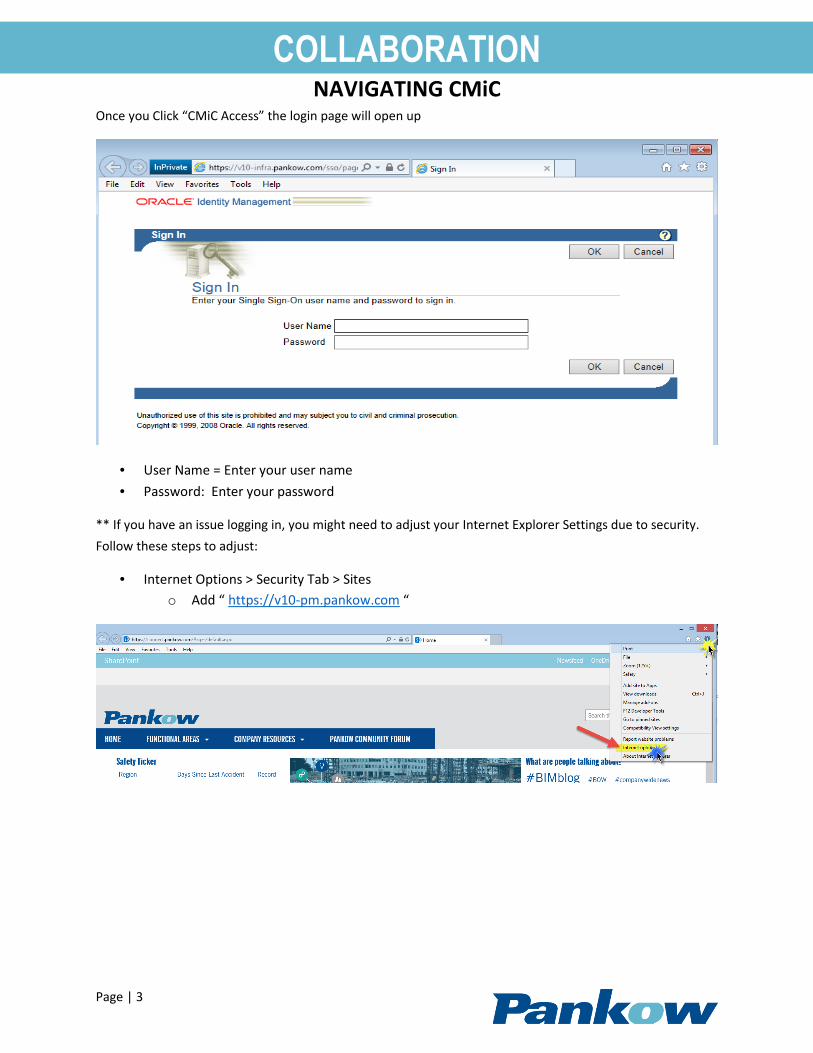
Upon logging in, CMiC will load the projects and tree view menu items you have been granted access to (this
varies depending on your role on the project). The start page will default to "My Actions". This is a system
generated to do list for items that you have been designated as the "To:" or "Responsible" person on
applications, like RFI's.
The tree view is defaulted to have the Communication Management folder expanded, but all other folders
are collapsed. To expand these folders, click directly on the [+] sign.
Launching an Application
To launch an application, click directly on the name of the application in the tree view menu. In the screen
where "My Actions" is, a log view of that application will appear (Screen shot below, shows example of the
RFI Log).

NAVIGATING CMiC
Page | 6
COLLABORATION
To open an individual item, click on a blue text item – above example shows RFI # and Subject have blue text,
by clicking on the blue text the RFI will open.
• Communication folder applications will be Bolded and with black or blue numbers (Similar to
Outlook) for items that are New (Black) or Updated (Blue) indicating you haven't looked at
them. Once you view them, these will update automatically - RFI Log (3, 1)
Log View Header Buttons
Each log view will have Header Buttons. Below are the most common
• [Add XXXX]: Add new record
• [Show Filter]: This shows the "Log View" Filter and allows the user to modify what is seen on
the screen. User can save his own defaults.
• [Send to Spreadsheet]: This sends the "Log View" to excel. Only sends what is visible in the log.
o Scroll to bottom of the log to verify that all rows are showing
o If you want to show filtered items as well need to clear filter
• [Enter Query]: Opens the Query fields at the top of each column for filtering based on your
criteria
Application Field Hints
• Date fields: To enter a date you can manually type it, format = MMDDYY or you can click on the
calendar icon to pull a calendar then by clicking the day it will fill in this field
• Blue Up or Down Arrows: By clicking on the error, a popup
widow will display a LOV (List of Values) specific to that field that can be selected.
• Search: You can search an application by key words and it will list the items in the log view

NAVIGATING CMiC
Page | 7
COLLABORATION
Note: Need to make sure when done searching, to remove the key word
Filtering / Querying Information
CMiC Log views can be filtered, queried and exported to excel. Once you open the application, the view you
see we call a "Log View". The column headers describe the information shown. Most logs are pre-filtered
and this will be shown in the far right corner as (Filtered).
Standard Action Buttons on Log Views
• [Add XXXX]: Add new record
• [Show Filter]: Shows the fields that are filtered. Also allows user to enter different filter
requirements
• [Send to Spreadsheet]: User can send the log to Excel templates
• [Enter Query]: Adds a query line to the log view. The user can then query on each column. This
query will pull all info that is in the log even if filtered out of the normal view.
Filtering
To display, clear and/or change the default filter for the Log View, click on "Show Filter" button. The filter will
appear and show the items being filtered by default.
Action Buttons
• [Save as Default]: User can define, then save their own default filter that will remain in place till
user resets
• [Reset To System Defaults]: Resets filter to system defaults

NAVIGATING CMiC
Page | 8
COLLABORATION
• [Show All Filters]: Shows all the columns that the user can filter by, even if the column doesn't
show up in the on screen log view
• [Clear]: Clears the filter
• [Reset]: Resets the filter
• [Submit]: Executes the filter
• [Cancel]: Cancels the request
Example of how to filter – This Example will show how to filter on the "Attachments" column
• Column: Shows the columns which the user can filter on
• Operator: Provides a LOV from which the user can choose the operator you want to filter that
column on
• Value: Enter the filter criteria – follow the "Example Value" Column on how to enter the criteria
• Example Value: Shows how the "Value" should be entered into CMiC
1. From the Log View, click "Show Filter" then click "Show All Filters" to show all the columns that
can be filtered
2. To filter on the "Attachments" column, select the operator. Two different options for this
example
a. Operator = IS NOT NULL – no value is required and will filter out rows that do not have a
value in them
b. Operator = Like – Value = '%' – filter rows with a value in them only

NAVIGATING CMiC
Page | 9
COLLABORATION
Example of how to query – This Example will show how to query on the "Subject" column
1. Click "Enter Query" and the log view will add a row which will have blue highlighted fields. You
can query on any combination of the columns
2. Enter the operator and the value to query by (See below for the different operators)
3. Once value is entered, click "Execute Query". The query will bring in ALL records even items
filtered out by default
a. Example 1: Query using %????
b. Example 2: Query using ????%
c. Example 3: Query using %????%
4. Click "Clear Query" then "Execute Query" to take you back to default view
There are too many query combinations that can be used to show examples for each. Queries only filter
data, so feel free to play around with different symbols and see what kind of results are shown
� _ Underscore character represents a single character
� % Percent sign represents any combination of characters
� = Equal To
� != Not Equal To
� <> Not Equal To
� > Greater Than
� >= Greater Than or Equal To
� < Less Than
� <= Less Than or Equal To
� Between Between Two Values
� Not Between Results will be outside of the "Not Between" values
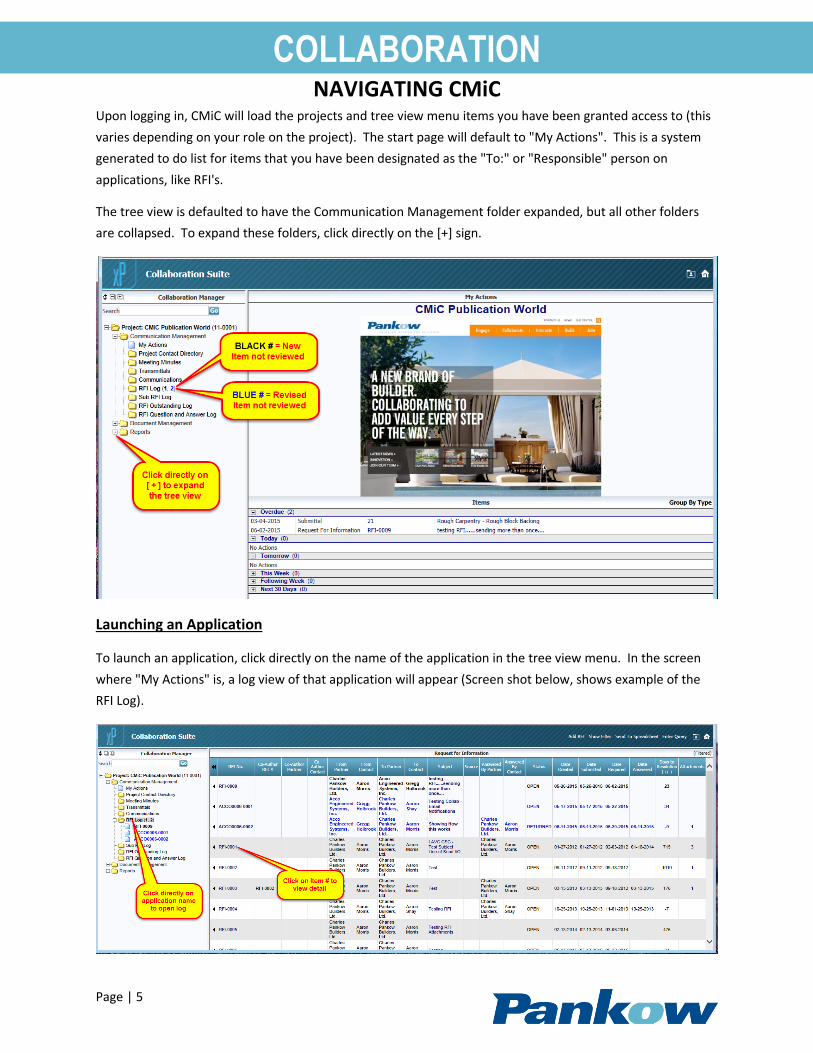
Export Log views to Excel
Log views have the ability for the items listed on the screen within the view to be "Sent to
Spreadsheet" to preformatted Pankow excel spreadsheets.
1. After opening the application – Click "Send to Spreadsheet" – a pop-up window will
appear that allows the user to select a template
2. Click on the template name or description to open the file – in this example – RFI Log is
selected.
NAVIGATING CMiC
Page | 10
COLLABORATION
• The Named Templates are preformatted reports (Logo, Print Area, Formatted Rows
& Columns, etc.)
o If you select "No Template" – the file will dump into excel as raw data – excel
will not be preformatted and will be in file type csv.
3. If this dialog box appears – click "Open"
4. The file will open in excel, click on "Options" to enable Marcos.
Change Password / Set Email Notifications
Once logged into CMiC you can change your password and set your email notifications you
receive from the system.
NAVIGATING CMiC
Page | 11
COLLABORATION
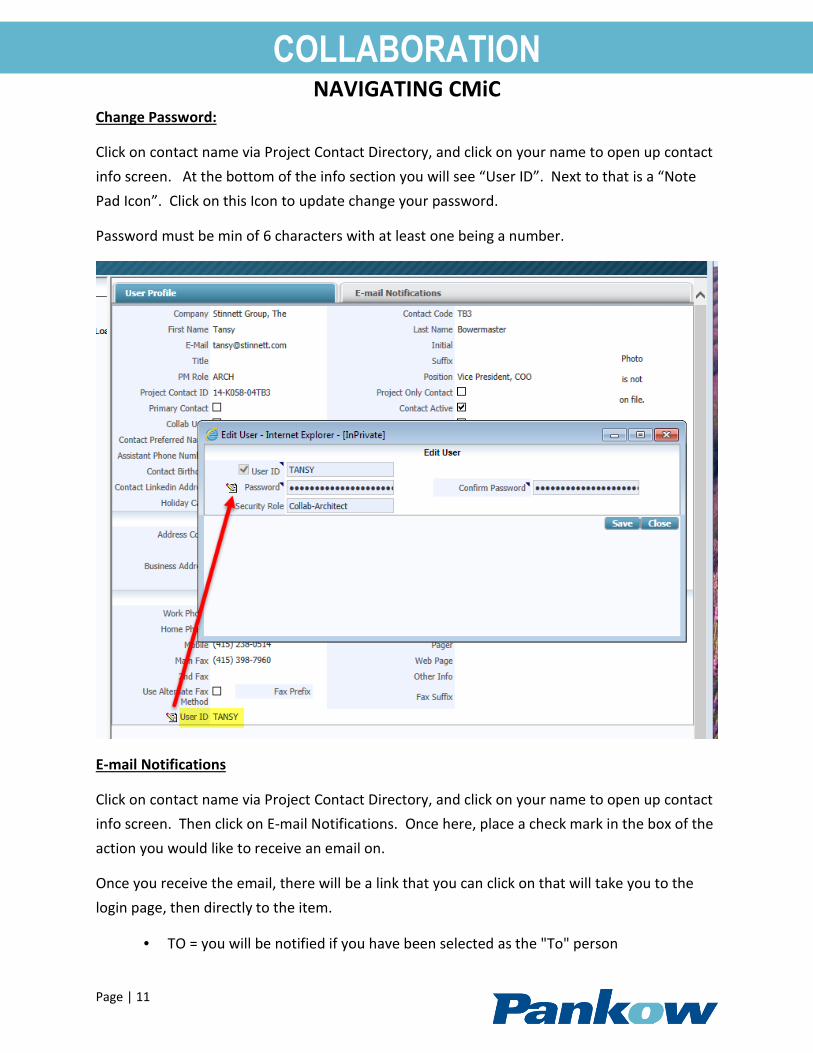
Change Password:
Click on contact name via Project Contact Directory, and click on your name to open up contact
info screen. At the bottom of the info section you will see “User ID”. Next to that is a “Note
Pad Icon”. Click on this Icon to update change your password.
Password must be min of 6 characters with at least one being a number.
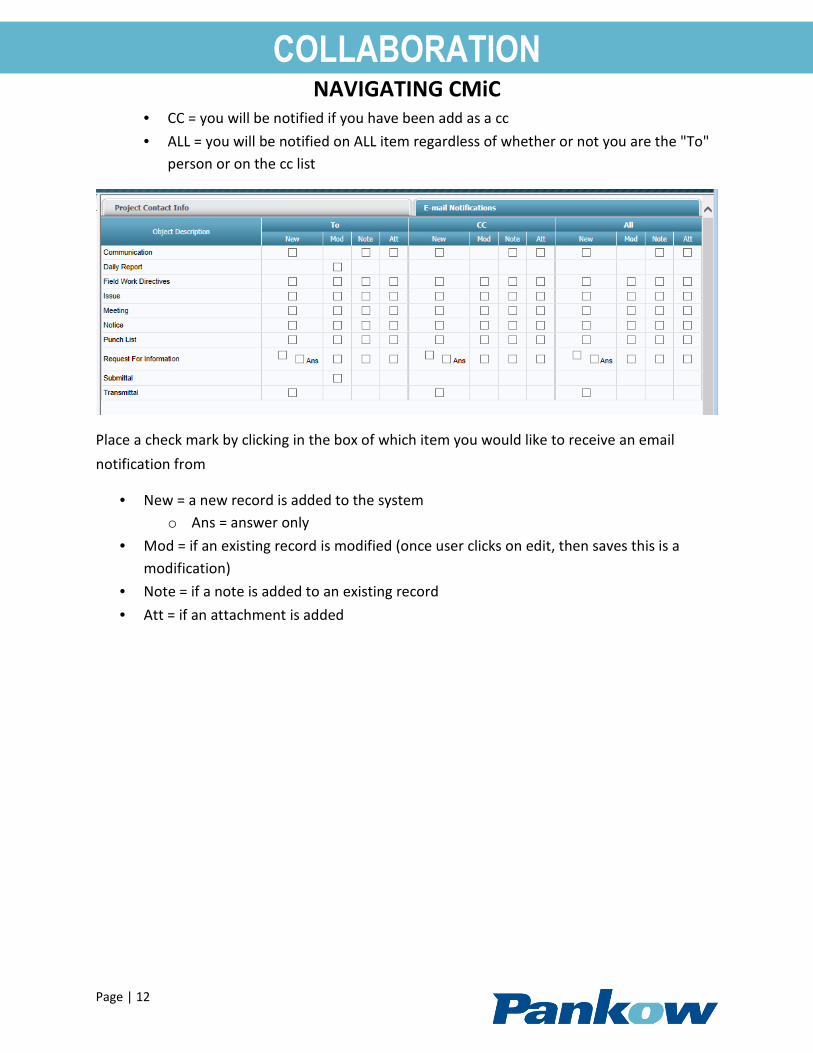
E-mail Notifications
Click on contact name via Project Contact Directory, and click on your name to open up contact
info screen. Then click on E-mail Notifications. Once here, place a check mark in the box of the
action you would like to receive an email on.
Once you receive the email, there will be a link that you can click on that will take you to the
login page, then directly to the item.
• TO = you will be notified if you have been selected as the "To" person
NAVIGATING CMiC
Page | 12
COLLABORATION
• CC = you will be notified if you have been add as a cc
• ALL = you will be notified on ALL item regardless of whether or not you are the "To"
person or on the cc list
Place a check mark by clicking in the box of which item you would like to receive an email
notification from
• New = a new record is added to the system
o Ans = answer only
• Mod = if an existing record is modified (once user clicks on edit, then saves this is a
modification)
• Note = if a note is added to an existing record
• Att = if an attachment is added