Embed Size (px)
Citation preview

Experiential Learning Project:5-String Fretless BassDesigned and Fabricated by Chris O’ConnellJan 2015 - Aug 2015
Combining Interests

my father, Jim O’Connell, who introduced me to music.
This project began as an exploration into how to combine my passion in music with my college major of Industrial Design.
IN MEMORY OF
Musician
Designer

I met with David today to discuss the guitar’s design and realized how little I knew about guitars. I haven’t thought much about what sound I am trying to achieve with the bass I am building. I have been so focused on the instrument’s aesthetics and construction that I forgot the most important feature of the instrument: the sound! The choice of woods, combinations of pickups, hardware, and strings all influence the sound of the instrument.
I have sketched a few new designs of the guitar. I am getting closer to a final design. I want to make what’s referred to as a single cut guitar, with a hole in the cut-less side of the guitar body. Basically the horn of the instrument touches the neck of the guitar. This may cause an issue with the truss rod and inhibit playability around the top of the neck, but I’ll have to do more research on that.
I ended up choosing to make this a 5-string fretless bass, for a few reasons. For one, a fretless bass has a smooth sound resembling an upright bass, which sounds great in jazz music and opens up the possibility of playing eastern music. Secondly, putting frets into a fret board is a complicated operation that requires a great deal of precision and a set of tools that I don’t have. Lastly, basses without frets look a lot nicer because they lack the visual clutter that a bass with frets has. In addition to deciding on the type of bass, we found hardware, a preamp, a pickup (we decided to just use one pickup and a preamp as opposed to two pickups), and flatwound strings online (flatwound strings sound better on a fretless bass and they slide easier, making it easier to play. I have not ordered anything yet, because I want to search around and make sure I’m not getting ripped off.
Tuesday, January 6th 2015Phase 1
Design


Tuesday, January 13th 2015I started looking for woods today. There are many suppliers of tonewoods and hardwoods. I haven’t decided who to buy from yet. I contacted Justin Kennedy today over Facebook to ask his opinion on wood suppliers. He suggested Woodcraft as a first option. I’ll go there tomorrow once I figure out the sizes and species I’ll need.
My dad’s basses are still at my parents’ house, so I got some out and started measuring them to roughly estimate the sizes I’ll need for the lumber.
I also started practicing some bass scales to develop bass technique, by watching YouTube videos. I want to get a feel for the instrument’s natural balance on a professionally built instrument, and since I want to get a video of myself playing it I figure I should get my chops up to speed.
Phase 2
Prototype

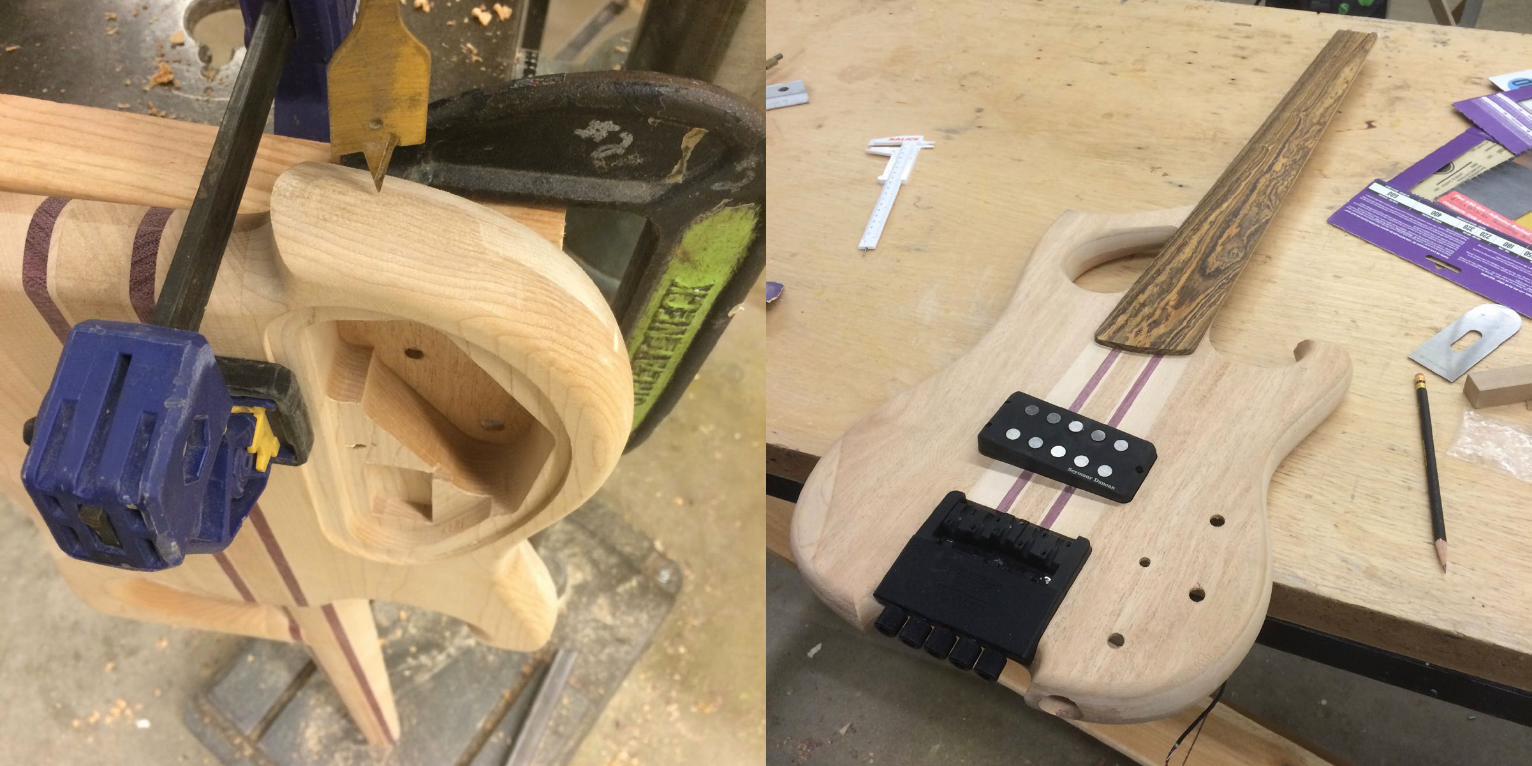
Today I bought the wood for the guitar. I ended up going to Woodcraft, which probably wasn’t the cheapest option, but it was the closest and most convenient option, especially because I got to hand-pick the wood the I am going to use. I bought four boards of differing wood species: bacote, mahogany, maple, and purpleheart. I chose the bacote as the finger-board material. Originally I was planning on getting ebony because it has a tight grain and very dense, but I saw the striking pattern of a certain bacote board and just had to buy it. Bacote is a member of the rosewood family of woods, and is sometimes used in guitar fret-boards. I chose mahogany for the front of the guitar body because it finishes excellently and looks good with the bacote fretboard. Maple is a strong inexpensive hardwood that makes a solid guitar neck, and purpleheart adds decoration when placed as strips within the guitar neck.
I’m behind schedule for this project. I have been spending time with family for most of break and haven’t had much time to think about this project. The projected end date is tomorrow, and only by some kind of miracle will I have a fully finished guitar by tomorrow. I start co-op next week, and I suspect that will slow my progress on this guitar further. It may be another month before I have any sort of finished product.
Thursday, January 15th 2015

I took a visit to DAAP today, and found that the woodshop is closed on weekends in January and February (likely due to the low volume of students so far before final models are due). This complicates the process of building the guitar. I had planned on mocking up a prototype of the guitar in modeling foam, because it is such an inexpensive material. The point of the mock-up is to go through the motions for the first time and familiarize myself with the process, that way I can be more prepared when handling the expensive wood. Guitar making is a very precise art, and I don’t want to make a mistake that will cost me $100 worth of lumber.
The parts I ordered from Ed Roman’s guitar shop in Las Vegas (bridge and headpiece) arrived today. I’m not exactly sure how they work, so I’ll have to reunite with David sometime over the next week to understand the mechanisms and how they are installed into the guitar. I could use his help brainstorming how we could make this guitar without the DAAP woodshop. If that’s not possible, that would delay the project’s completion until late March, most likely.
The biggest challenge I have faced so far is balancing co-op, this project, and taking care of my mom, who is fairly independent but is often very weak due to a chronic skin disease. Of course, if I were in school right now, there would be no chance of this project being completed, so I’m glad I have a little free time now to do this.
Monday, February 2nd 2015

I did not get as much done in the past month as I would have liked. Despite a very snowy and brutally cold February, I did succeed in starting a prototype model of the guitar. I have a truss rod picked out online. I just need to order it now ( I want to make sure I order every-thing I would need from Stewart MacDonald at one time because shipping is expensive).
This prototype is made of pine boards that I hand selected to match the size of the hard-wood boards I had already purchased for the final model. It took about 8 hours in the shop to get from raw boards to where I am now – a laminated neck and two body halves. I still need to plane and shape the neck, round the edges of the body, rout sections for the hard-ware and electronics, rout the channel for the truss rod, make a feaux fingerboard, and design and create volume and tuning knobs. Now that the woodshop is open from 8am-8pm all week and from 11am-5pm on weekends, continuing this project will be much easier.
I have learned a lot by making this prototype. First of all, I was planning on cutting wedges for the neck strips, but discovered that cutting wedges is a very complicated process that involves a jig, and that cutting strips as thin as I had planned on would be nearly impos-sible. Instead, I decided to make the strips of the neck non-tapered. I will taper the neck after it has been laminated. This won’t look as cool, but it is much easier to execute. I also learned that I could print the shape of the body on paper and use that to trace the shape of the body onto the wood that is to be cut. I learned to make sure I have plenty of glue before starting the gluing process.
Looking ahead: In addition to completing this sketch model, I can probably start measuring the wood and drawing where to cut it. I need to continue ordering parts: truss rod, strings, wood glue, dowels, finishing oil, electronics plates and lining, output jack, and strap pegs.
Monday, March 2nd 2015


Things I’ve done:The pine guitar has come pretty far along. I have glued all the large pieces together and used a router to round all the edges. Although it’s a rough model, I am able to feel the way it is weighted (right nor the guitar’s center of gravity is toward the middle of the body, which is perfect. The handle makes the bass very easy to carry, just as I thought it would.
I laminated the hardwoods together and planed the neck flat. The resulting wood looks very even and symmetrical. There are only 2 gaps in the thin maple strips where the planer cut deeper than it should have. I cut the bacote board down the center so that I have two boards. One is a backup in case I ruin the other. I think I have enough wood to build a second guitar if I decide to.
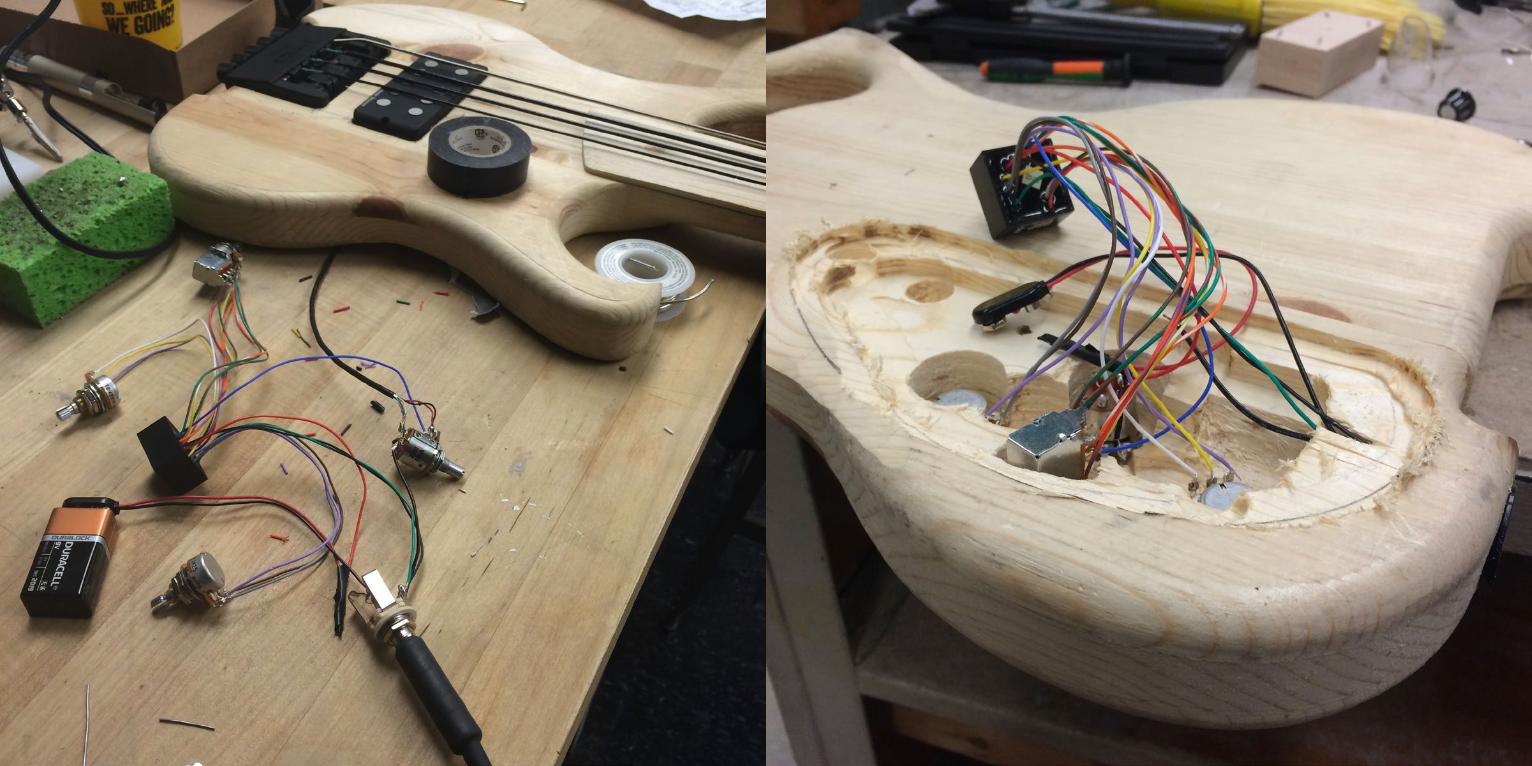
I met with David and discussed a lot about the guitar’s design. I realized that I had made my neck too short (I made the neck 36” long and planned on making a 34” scale length, but due to the position of the hardware, the 36” neck can only be a 32” scale length, so I will have to extend the neck 2”. For the truss rod adjustment nut, we decided to use magnets underneath a portion of fretboard to access the nut. He suggested that I chamber the body, which is a technique in which holes are drilled into a guitar body to relieve weight and produce a rounder overall sound from the instrument.
I have decided to use DAAP’s Komo autoprofiler (as per the advice with Dan Krimer) to machine the final version of the guitar, so that I can be as precise as possible. I contacted Colin Cormier (who has operated the Komo in the past) for advice and instruction.
I ordered a lot of parts from Stewart MacDonald: fretwire, truss rod, miscellaneous hardware.
I still need strings, magnets, and knowledge on how to rout the hole for electronics in conjunction with the chamber holes.
Tuesday, March 24th 2015


So here’s what I still need to do:Model the Guitar in CAD Determine Dimensions Length of neck for scale of 34” Height of fretboard off of neck Fretboard radius (compound?) Pickup distance from stringsMeet with Justin K. to validate and receive advice Ask what I should do for the electronics plate Pickup placement Advice on truss rod installationChamber the guitar wingsGlue the Mahogany top on the wings – mark mahogany where chambering isPlane the wood even with the neckGlue the wings on - drySubmit to the RPC queuePurchase stringsGlue Truss rod into place Research correct methodsGlue the fretboard into place on the neckInstall the hardware and electronics Install bridge Install inserts for headpiece Glue magents into place (truss rod cap) Install Pickups Install Pots Install Pot covers Drill hole for output jack Install output jack & jack plate Solder all electronics together Install strings Test electronics Fix errorsFinish the guitar – in a well ventilated dust-free environment Decide on a finishing application (tung, linseed, laquer?) Apply finish – dry, repeat if necessary Reinstall hardware
Tuesday, May 19th 2015Since last entry:I test-fit the truss rod, bridge, and pickups into the pine guitar model. I ordered output jacks and installed the strap pegs. I haven’t tested the balance yet, but I think with the chambering, the balance should be good. I think I want to reduce the size of the wings on final guitar as well, so that the bass is more compact.I presented the bass project to some colleagues of mine at my co-op at Ethicon. My boss introduced me to a design engineer who is a jazz bassist and builds his own guitars and amps. We have sent a few emails back and forth but I have not discussed the project at length with him yet. I started an independent study with one of my professors so that I can use the RPC to mill out the guitar. I need to make a gannt chart before he can approve the study.

Phase 3
Fabricate


Phase 3
Play!
https://www.youtube.com/watch?v=NmMCmZds3_E
https://www.youtube.com/watch?v=8o-62PnOZgs

Justin Kennedy for giving me honest advice about guitar building.
Erin Alanson for helping me set up this project in accordance with univeristy of cincinnati honors project guidelines, and for encouraging me to pursue this interest while i could.
David Shook. without you, i wouldn’t have known where to begin to make a guitar. thanks for all your help on electronics.
Steve Doehler, for helping me schedule this project in order to complete it by the end of summer, fulfilling an independant study course.
Dan Krimer, the DAAP woodshop supervisor, who always told me when i was doing something the wrong way. if it weren’t for you, I would have tried to make thisguitar by hand, as opposed to using an autoprofiler.
Nick and Andre in the rapid prototyping center, who did an amazing job milling the guitar out to its final shape.
SPECIAL THANKS TO