Embed Size (px)
Citation preview


2
Compared to real or cast stone, StoneWorks polyurethane products are designedfor an easier and quicker installation because it requires fewer steps and does not require masonry skills.
This manual sets forth the basic guidelines for StoneWorks installation.Additionally it is recommended that installers review applicable building codes for variations that may apply to specific products or geographic areas.
This publication is not intended to provide specific advice, legal or otherwise, on particular products or processes. Readers should consult with their own legal and technical advisors, suppliers, and other appropriate sources (including but not limited to product or package labels, technical bulletins and sales literature) that contain information about known and reasonably foreseeable health and safety
risks of their proprietary products and processes. StoneWorks does not assumeany responsibility for the users compliance with applicable laws and regulations, nor for any persons relying on the information contained in this guide.
FORWARD

3
Forward ….....…………………………………………………… 2
Important Notes …………………………………………………… 4
Product Line ……………………………………………..…….. 5 - 7
Basic Tools and Equipment ……………………………………...... 8
Preparing the Wall …………………...…………………………..…9 - 10
Starter Strip Installation …………………………..…………….. 11
Corner Installation ….……………………………….....……….... 12 - 19
Panel Installation …………………………………………………. 20 - 24
Accent Rock Installation (Random Rock)……………………….... 25
Trim Installation …….………………………………...………….. 26 - 30
Touch Up …………………………………………………………. 31
Clean Up ………………………………………………………..… 32
Frequently Asked Questions …………………………………..…... 33 - 34
StoneWorks Take Off Guide …………….……………………..…. 35 - 37
CONTENTS

4
IMPORTANT NOTES
The Manufacturer has provided these suggested instructions as installation guidelines. The manufacturer, however neither installs the panels nor has any control over the installation. It is the responsibility of the contractor and/or the installer to ensure panels are installed in accordance with these instructions and any applicable building codes. The manufacturer assumes no liability for either improper installation or personal injury resulting from improper use or installation.
STORAGE AND TRANSPORTATION
Be sure to store all panels flat, in the box, until ready for installation. Store panels around 65° before installing when possible. While polyurethane has minimal expansion and contraction, the effects of expansion and contraction can be minimized by avoiding installation during periods of extreme heat or cold. Do not store in direct sunlight before installing.
INSTALLATION BASICS
Never leave cut edges of StoneWorks products exposed. Exposed polyurethanewill discolor with exposure to sunlight. Use StoneWorks touch-up paint or colormatch with a good quality latex paint. Any deviation from standard StoneWorksinstallation instructions must be made watertight by use of a vapor barrier behind the product and then sealed with caulk and painted with touch-up paint.
All products must be allowed to acclimate; removed from boxes and stored flat at the installation site for a minimum of 48 hours or until properly acclimated prior to installation. Heat and moisture cause expansion. Best results are obtained by installing cool, dry product. StoneWorks does not warrantagainst gapping caused by expansion and contraction.

5
PRODUCT LINE
PANELS
Limestone Panel - The original StoneWorks product with thelook of quarried stone. Panels are 15 ½" x 48" and cover 4.75 square feet.
Stacked Stone Panel - A more contemporarypanel which provides the look of stacked stone in a mortar-less system. Panels are 1 1/2"x13 1/4"x41/2" and cover 3.63 squarefeet each.
Slate Stone Panel - Slatestone panels are 43"x 8 ¼" x 1 ¾" and cover 2.14 square feet. Stones vary from 1 ¼" to 2" in height and have interlocking ends.
TRIM & ACCESSORIES
Starter Strip 4' lengths-Used to begin the first (bottom) course of
StoneWorks panels to secure the bottom of the panel and insurelevel installation.
Door/Window Trim 4' lengths-Used to trim out around doors and windows and to cap or end panels.
Sandstone Outside Corner 4' heights - Used on 90 degree outside corners. Installed prior to the panels so that the panels fit behind the corner
Sandstone Inside Corner 4' heights - Used on 90 degree inside corners. Installed prior to the panels so that the panels fit behind the corner.
Large and Small Accent Rocks - Add to Random Rock Panels for a castle stone effect. Large ( 11½" x 15 ½") or small (7" x 15 ½") Each box contains 3 rocks; light, medium, and dark.

6
Stacked Stone Outside Corner - 40" lengths-Usedon 90˚ outside corners. Installed prior to the panels so that the panels fit behind the corner.
Stacked Stone Inside Corner - 40" lengths-Usedon 90˚ inside corners. Installed prior to the panels so that the panels fit behind the corner.
Lime Stone Outside Corner - 4 pc per box. 11" x 15 ½" (Long side) and7" x 15 ½"( Short side) Used to wrap corners with Random Rock Panels. Prevents the need for compound miter cuts and caulking 90˚ joints. Colors match the random rock color line. (shown here as 1 left & 1 right)
Stacked Stone Flush Outside Corner - 4 pc per box. 13�" x5" (Long side) and 4�" x 5" (Short side). Used to wrap corners with Drystack pattern. Prevents the need for compound miter cuts and caulking 90˚ joints. Colors match the Drystack line. (shown here as 1 left and 1 right)
Slatestone Outside Corner - 4 pc per box. 12¾" x 8¼" (Long side) and 4 ¼" x 8 ¼" (Short side). Used to wrap corners with Slatestone pattern. Prevents the need for compound miter cuts and caulking 90˚ joint. Colors match the Slatestone line. (shown here as 1 left and 1 right)
PRODUCT LINE

7
Ledger 48" lengths - Used as a water sill to transition to
another product above StoneWorks in wainscotinstallations.
Ledger Outside Corner - 2 pc per box. 4¼" x 6¼" Used to wrap corners in conjunction with Ledgers. Prevents the need for compound miter cuts and caulking 90˚ joints.
Ledger Inside Corner - 2 pc per box. 9 ¾" x 7 �" Used to wrap
corners in conjunction with Ledgers. Prevents the need for compound miter cuts and caulking 90˚ joint.
Small Mounting Block - 8" x 9" Used behind hose bibs, electrical boxes, small electrical fixtures, etc. to provide a flush mounting surface and watertight installation.
Large Mounting Block - 10" x 13" Numerous uses such as mounting large exterior lights or as a house number block. Provides a flush surface for watertight installations.
PRODUCT LINE

8
BASIC TOOLS /EQUIPMENT
SAFETY EQUIPMENT Always wear safety glasses for eye protection. Wearing a dust mask is recommended.
HAND TOOLS Circular saw with steel or carbide tip blade
(StoneWorks does not dull bladesand requires no special blade), 4' level, tape measure, chalk line, power or cordless drill with 4" bits or extension, framing square or speed square, jigsaw or sabre saw, wood rasp, and caulking gun.
FASTENERS Use #6 flat head screws depending on substrate, the length of the screw varies on the panel, trim or accessory piece being installed; verify length under section specific to product being installed. Using the screw guide points, screw through the substrate and into a stud, when practical, with a minimum of 6 screws per
panel and a screw no less than 1" from each end of the tongue as well as in
the bottom right corner of the tongue. For exterior applications, we recommend good quality deck screws or stainless steel screws. Applications to concrete require mechanical fasteners as well as adhesive to allow the adhesive to set up. There are numerous products on the market, such as concrete screws, to accomplish this as well as new adhesives which may not require mechanical fasteners. Plumbers tape is used to install outside corners. Allow 1 roll for 5 outside corners.
ADHESIVE The use of adhesives is optional however it may result in an easier installation
process. StoneWorks recommends use of a good quality polyurethane adhesivesuch as Sonneborn CX- 948, PL Premium Construction Adhesive or Sonneborn Premium. Solvent based adhesives (most construction adhesives) are not compatible with polyurethane and should never be used. The surface where the adhesive is to be applied, must be sanded and cleaned with a vertical application
of the glue. If using an adhesive other than those StoneWorks recommends, teston a panel prior to beginning installation.

9
NEW CONSTRUCTION Step 1
Make sure all studs are straight and true to avoid bulges or dips in the finished wall which will result obvious panel joints on the finished
StoneWorks product. Correct any bowed studs at this time.
Step 2
Make sure all sheathing is properly fastened to the framing according to building code requirements and/or the sheathing manufacturer’s
recommendations. StoneWorks should be applied over a sheathing that providesa smooth, flat, solid, non-expansive, stable surface. Consult local building codes for additional sheathing requirements.
Step 3
Make sure sub wall assembly is weather tight before applying StoneWorksaccessories alone may not constitute a waterproof installation. Wall sheathing
should be weather-resistant, or covered with a weather-resistant barrier
such as fanfold insulation, housewrap, or building paper. Independent
studies indicate that the combination of a weather resistant barrier plus a
housewrap results in improved weather performance. Some building code jurisdictions are currently requiring this protection. A weather-resistant covering should be properly fastened according to the manufacturer’s instructions, and be smooth and even. Flashing and caulking should be added as needed in such
areas as transition from StoneWorks ledgers to other siding products, windows,and doors to control moisture and protect the sub wall assembly.
EXISTING STRUCTURES
Step 1
Secure or remove any loose siding and replace any rotten wood. Scrape off loose
caulk and any other build-up that may interfere with StoneWorks installation.Remove all items such as downspouts, light fixtures, vents. etc. in the area to be covered.
Step 2
Install suitable sheathing, as needed, to provide a smooth, flat, and stable surface
for the installation of the StoneWorks panels. See information in step 3 of thenew construction section for additional instructions on sub wall protection
and flashing.
PREPARING THE WALLS

10
PREPARING THE WALL
OVER MASONRY SUB-SURFACE
Step 1
A smooth, flat, stable surface is required for a proper installation of
StoneWorks. Concrete walls may need some filling to accomplish this unlessthey are in good condition. Uneven walls may require furring strips to provide a flat surface.
Step 2
When applying StoneWorks directly to concrete walls the use of adhesive isrecommended. In order to hold the StoneWorks panels in place until theadhesive sets up, mechanical fasteners, such as concrete screws, may be required. Please refer to page 8 for complete adhesive and fastener
information. StoneWorks recommends testing these products or consultingwith the manufacturer before using this or similar products.

11
STARTER STRIP INSTALLATION
STARTER STRIP
Step 1
In order for StoneWorks panels to be installed properly in a level fashion, thestarter strip at the bottom of the wall must be level.
Step 2
Mark the wall horizontally where you want the bottom of the panel to rest. Measure up 3" and partially drive a nail at one corner for attaching your chalk line.
Step 3
Attach a chalk line: go to the next corner, repeat step 2, and pull the line taut. Make sure the line is level by using a line level or 48" level.
Step 4
Snap the chalk line and repeat the procedure on each area to be covered.
Step 5
Backset the starter from the edge 1 ¾" for outside corners, 2 ¼" for door/window
trim, 3 ¾" for inside corners or 2" for Lime Stone Outside Corners.
Step 6 Place the top edge of the starter strip on the chalk line with the “v” at the bottom away from the wall. Screw the starter to the substrate using screws every 16". Check for level. This will give ¾" clearance from the bottom of the panel to the ground. If additional clearance is required, adjust the starter strip height accordingly.

12
CORNER INSTALLATION
OUTSIDE CORNER
Stacked Stone & Slate Stone
Step 1
Determine how you plan to finish the corner as this will dictate the length of the corner. Corners can be finished with ledger or ledger corners. For ledger finish the top of the corner (the end with the lip on top) should be 1 �" below the top of the flange on the top panel. Dry fit if the top panel must be cut horizontally.
Step 2 Cut 6 pieces of plumbers strap approx 6" long. With the corner upside-down so that the “stair-step” blocks are exposed, attach the strap to the top block on the left side so that it extends out at a right angle to the corner, do the same to the 3rd block and to the bottom block, then to the same three blocks on the right side.
Step 3
Apply the corner so that the bottom of the corner lines up with the bottom of the first panel and screw through the end of the strap into the structure. You may also wish to glue the corner using polyurethane adhesive.
Step 4
If more than one length of outside corner is required, stack the corners by locking the male end at the top of the corner to the female end on the bottom of the corner.

13
INSIDE CORNER
Stacked Stone & Slate Stone
Step 1
Determine how you plan to finish the corner as this will dictate the length of the corner. Corners can be finished with ledger or ledger corners. For ledger finish, the top of the corner (the end with the lip on top) should be 1 �" below the top of the flange on the top panel. Dry fit if the top panel must be cut horizontally.
Step 2 Locate corner so that the bottom of the corner will be flush with the bottom of the bottom panel. Screw thru the recessed channel at top, bottom and middle of each side of the corner using at least a 4 ½" screw. Adhesive maybe applied to the blocks on the back side of the corner, if appropriate for the installation.
Step 3
If more than one length of outside corner is required, stack the corners by locking the male end at the top of the corner to the female end on the bottom of the corner.
CORNER INSTALLATION

14
SANDSTONE FLUSH OUTSIDE CORNER
Step 1 - Install Moisture Barrier
Because flush mounted corners allow possible moisture infiltration between the panel and the corner, a moisture barrier is required behind the panels and corner extending a minimum of 4" from either side of the corner. A self-adhering flashing membrane such as Grace Vycor® is recommended.
Step 2 - Locate the Corner
Flush mounted outside corners are available in 4' heights. The placement of the corners will depend upon how the top of the corner is terminated. For applications which are over 48" in height, the corner pieces are stackable with the top corner cut to the required height. For wainscot applications the corner is normally capped with a ledger attached to the tongue of the top panel and cut with a compound miter at a 45° angle. In this application the top of the corner should be placed 2" below the top of the tongue on the top panel.
Step 3 - Install the Corner
The corner has screw guides or dimples to help the installer position the screw using the correct angle. There are screw guides along the sides. All screws are installed at an angle and at a loca-tion where they will be concealed. Install two screws through the top and at least 4 on each side. Good quality exterior screws that are a #6 or #8 x 2 ½" are recommended.
Step 4 - Install the Panels
Install the rest of the accessories and the panels. The joints between the panels and the corner must be caulked using a good quality caulk to make a water-tight installation. Panel and accessory installation instructions are located in the box
containing the panels or go to www.StoneWorks.com formore details.
NEVER LEAVE CUT EDGES OF StoneWorks PRODUCTS EXPOSED. ANYDEVIATION FROM STANDARD INSTALL INSTRUCTIONS MUST BE MADE
WATER-TIGHT (VAPOR BARRIER) AND SEALED WITH CAULK AND
TOUCH-UP PAINT.
CORNER INSTALLATION

15
CORNER INSTALLATION
Lime Stone OUTSIDE CORNER Step 1 -
Attach Starter Strip
1. Measure 3" up the wall from the base at each end of area to be covered and mark.
2. Snap a chalk line between two marked points.
3. This will provide ¼" clearance between bottom of panel and base or floor. If more
clearance is required adjust accordingly.
4. Backset the starter strip from the corner 1 ¾".
5. After allowing proper width for accessories, position starter strip with top edge
on chalk line and so that “v” is at bottom of starter strip and away from wall.
6. Attach starter strip with screws on 16" centers or into strong substrate
7. Check starter strip with level
Step 2 - Install Lime Stone Outside Corners 1. Corners can be finished with a ledger (requires miter cutting) or Ledger Outside
Corner pieces. Top of corner (end with lip on top) should be 1 �" below top of
flange on top panel. Dry fit if top panel must be cut horizontally. 2. There are 4 designs, alternate design 1,2,3,4 and repeat if going higher up the wall.Be sure and alternate “left” and right” hand pieces to keep stagger and break up vertical lines. 3. Slide the corner piece down onto the starter strip snugly and screw the top nailingstrip where indicated by screw guide points. 4.Slide the second corner over the top of the 1st piece and secure as described above.
Step 3 - Using the Converter strip for Lime Stone Outside Corner. If the job requires 2 outside corners to be finished with no breaks between them, when working from the left moving right, the final panel piece must be cut and converted to a “male” tongue for proper fit and grout lines to be maintained.
1.Measure the distance from the last panel tongue to the leading edge of the outside
corner. Subtract �".Cut the panel to this length.
2.Turn the panel over and measure in from the cut side �". Scribe a line down the back.
3.Set the saw blade for � “ depth and follow the scribed line (Fig. 1). Use a box knife or chisel to
complete the dado channel in the back. 4.Attach the Converter strip using hot glue, Polyurethane adhesive, or super glue gel. Make surethe tongue matches in depth and height. (Fig. 2)
All products must be allowed to acclimate; removed from boxes and stored flat at the installation site for a minimum of 48 hours or until properly acclimated prior to installation. Heat and moisture cause expansion. Best results are obtained by installing cool, dry product. StoneWorks does not warrant against gapping caused by expansion and contraction.

16
Limestone OUTSIDE CORNER, Cont.5.After curing, fill any gaps between the panel face and converter piece with StoneWorks grout. Fill fromthe back side to insure a solid grout line is achieved (Fig. 3). Use putty knife along rock edges to achieve a smooth surface. After it becomes tacky, use touch up kit to paint the exposed edges and grout (Fig. 4).
6.Attach the piece as if it were a full panel (Fig. 5).
1 - If terminating the run on the right side with other trim follow these instructions– For 2 facing
Outside Corners follow Section 3 on previous page-Starting from the left, take a full panel and attach the bottom tongue into the starter strip groove, lock in place, and slide the panel left behind the accessory piece. Using the screw guide points, screw through the substrate and into a stud, when practical, with a minimum of 6 screws per panel and a screw no less than 1" from each end of the tongue as well as in the bottom right corner of the tongue. Working left to right continue installing panels in the bottom course being sure each panel is properly seated in the starter strip. For the last panel in the course,
measure from the edge of the grout line to the accessory piece and add 1" Cut the last
piece and slide behind the accessory piece until the panel is locked in the starter strip, then slide panel back to the left until the shiplap sides are joined. Check for level.
2 - Install the remaining courses by beginning the course from the left with full panels, as the stagger is built in with the corner pieces. Slide the panel down over the tongue of the first row. Then slide the panel left behind the corner piece and screw in place as before. Install remaining panels in the course, end row as before, and check for level. Align panels using the alignment mark at each side on the tongue. Do not align panels using the top of the tongue. The remaining courses are
installed the same way. Stagger the StoneWorks butt joints so that no twocourses are aligned vertically unless separated by three courses. All exposed edges should be behind trim pieces. Any exposed edges must be painted or caulked.
3 - Cut panels around fixtures and other wall protrusions (hose bibs, electrical
boxes, dryer vents, etc) to accommodate StoneWorks Mounting Blocks. See Install instructions, page 25or StoneWorks.com for details on how to cut panels and install the mounting blocks.
OPTIONAL ADHESIVE INSTALLATION
Step 1 - Lightly sand ridges on the back of the panel to remove any mold release agent that may have adhered to the panel. The mold release agent will interfere with the adhesion of the panel.
Step 2 - Apply a �" bead of adhesive along vertical ridges of the panel.
Step 3 - Remember to always use an adhesive which is of good quality and is compatible with polyurethane. In order for adhesives to set up, mechanical fasteners may be required to hold panels in place.
Figure 1 Figure 2 Figure 3 Figure 4 Figure 5

17
DRYSTACK/LEDGESTONE FLUSH OUTSIDE CORNER
Always seat and attach panels tightly together.
Note: Pictures are of Stacked Stone, but Slate Stone installation is identical.
Starter Strip - Determine the height above ground the bottom of the panels should be. Measure up 2 ¾" from this point and strike a level line. Attach the top of the starter strip on this line. End the strip 2" from each side of the corner.
Determine which type of wall installation is required.
Paneling a wall with one outside corner on the right.
Dry fit the first corner into the starter strip. Secure with screws if necessary. Moving from right to left: dry fit panels tightly across the wall. Cut the left hand end of the final panel to be flush with the wall or trim piece. Remove the dry fit panels and corner piece. Continue from corner working left to right to finish wall.
Paneling a wall with outside corners on the right and left.
A. Working from the left outside corner (OC), seat the 1st panel against the OC and down against the starter strip. Continue as described in section 1.
B. Measure the distance from the last full panel to the
edge of the outside corner.
C. Mark a line for the panel length scribing against the
last full panel as shown.
D. Mark a second line for the dado of the back.
E. Cut the panel length using a table saw or compound
miter set to 30˚.
CORNER INSTALLATION All products must be allowed to acclimate; removed from boxes and stored flat at the installation site for a minimum of 48 hours or until properly acclimated prior to installation. Heat and moisture cause expansion. Best results are obtained by installing cool, dry product. StoneWorksdoes not warrant against gapping caused byexpansion and contraction.

18
Stacked Stone/Slate Stone Flush Outside Corner
F. Use a box knife to dado out the back of the cut
panel to fit over the next panels tongue.
G. Using touch up paint, paint the cut edge of the panel.
H. Slide the panel down and secure as previously described.

19
SLATE STONE OUTSIDE CORNER Step 1 Start the 1st run from the outside corner of the wall. Place starter strip top 2 ¾" above the desired starting height of the wall, stopping the strip 2" from each side of the corner edge.
Step 2 Set the SlateStone outside corner piece against the corner and down against the starter strip. Use the screw guides and place at least 3 screws along the tongue. Place 2 screws in the right lap side of the panel where indicated.
Step 3 Attach the panels working out from each side of the corner as previously described.
Note: There are 4 patterns of the SlateStone Outside Corner. 2 Left hand patterns and 2 right hand patterns. Check for the number on the inside of the piece. They are numbered 1 though 4. Alternate left and right hand corners with each row to insure alternating panel offsets and to prevent pattern recognition.
CORNER INSTALLATION All products must be allowed to acclimate; removed from boxes and stored flat at the
installation site for a minimum of 48 hours or until properly acclimated prior to installation. Heat and moisture cause expansion. Best results are obtained by installing cool, dry product. StoneWorks does not warrant against gapping caused byexpansion and contraction.

20
Lime Stone PANELStep 1
Starting from the left, take a full panel and attach the bottom tongue into the starter strip groove, lock in place, and slide the panel behind the accessory piece. Using the screw guide points, screw through the substrate and into a stud, when practical, with a minimum of 6 screws per panel and a screw no less than 1" from each end of the tongue as well as in the bottom right corner of the tongue. Working left to right continue installing panels in the bottom course being sure each panel is properly seated in the starter strip. For the last panel in the course, measure from the edge of the grout
line to the accessory piece and add 1" Cut the last piece and
slide behind the accessory piece until the panel is locked in the starter strip, then slide panel back to the left until the shiplap sides are joined. Check for level.
Step 2
Install the remaining courses by beginning the second course from the left with a portion of a panel, using the off fall from the previous course if possible. Slide the panel down over the tongue of the first row. Then slide the panel left behind the trim piece and screw in place as before. Install remaining panels in the course, end row as before, and check for level. Align panels using the alignment mark at each side on the tongue. Do not align panels using the top of the tongue. The remaining courses
are installed the same way. Stagger the StoneWorks butt joints sothat no two courses are aligned vertically unless separated by three
courses. All exposed edges should be behind trim pieces.
Step 3
Cut panels around fixtures and other wall protrusions (hose bibs, electrical boxes, dryer vents,
etc) to accommodate StoneWorks Mounting Blocks. See page 25for details on how to cut panels and install the mounting blocks.
PANEL INSTALLATION
OPTIONAL ADHESIVE INSTALLATION
Step 1 - Lightly sand ridges on the back of the panel to remove any mold release agent that may have adhered to the panel. The mold release agent will interfere with the adhesion of the panel.
Step 2 - Apply a �" bead of adhesive along vertical ridges of the panel.
Step 3 - Remember to always use an adhesive which is of good quality and is compatible with polyurethane. See page 8 for manufacturer’s recommendations. In order for adhesives to set up, mechanical fasteners may be required to hold panels in place.
2 3 4 1
1 2 3 4
All products must be allowed to acclimate; removed from boxes and stored flat at the installation site for a minimum of 48 hours or until properly acclimated prior to installation. Heat and moisture cause expansion. Best results are obtained by installing cool, dry product. StoneWorks does not warrant against gapping caused byexpansion and contraction.

21
PANEL INSTALLATION
Stacked Stone PANELStep 1
Starting from the left, take a full panel and attach the bottom tongue into the starter strip groove, lock in place, and slide the panel behind the accessory piece (Fig. 1).
Step 2
Using the screw guide points, screw through the substrate and into a stud, when practical, with a minimum of 6 screws per panel and a screw no less than 1" from each end of the tongue as well as in the bottom right corner of the tongue; (preferably 2 screws) should be installed through the lap on
the side of the panel. PRESS DOWN AND PRESS PANEL FIRMLY
AGAINST PIECE TO THE LEFT. Maintain continuous pressure to push the panels tightly together when attaching to the structure. (Fig. 2)
Step 3
For the last panel in the course, measure from the edge of the grout line to
the accessory piece and add 1" Cut the last piece and slide behind the
accessory piece until the panel is locked in the starter strip, then slide panel back to the left until the shiplap sides are joined. Check for level.( Fig. 3)
Step 4 Figure 3
Stacked Stone panels have 8 unique panel configurations numbered, 1 through 8, molded into the back of the panel. Avoid placing like numbered panels next to or above each other. The illustration below shows a random installation using drops from the previous course to start each new course. If there are no drops, randomly cut the starting panel to length.
Figure 1
4 6 7 3 5
5 6 8 4 8
5 8 2 1 4
4 2 1 4 3 8
8 7 3 2 5
Figure 2
OPTIONAL ADHESIVE INSTALLATION
Step 1 - Lightly sand ridges on the back of the panel to remove any mold release agent that may have adhered to the panel. The mold release agent will interfere with the adhesion of the panel.
Step 2 - Apply a �" bead of adhesive along vertical ridges of the panel.
Step 3 - Remember to always use an adhesive which is of good quality and is compatible with polyurethane. See page 8 for manufacturer’s recommendations. In order for adhesives to set up, mechanical fasteners may be required to hold panels in place.
All products must be allowed to acclimate; removed from boxes and stored flat at the installation site for a minimum of 48 hours or until properly acclimated prior to installation. Heat and moisture cause expansion. Best results are obtained by installing cool, dry product. StoneWorks does not warrant against gapping caused byexpansion and contraction.

22
Slate Stone PANELStep 1
Starting from the left, take a full panel and attach the bottom tongue into the starter strip groove, lock in place, and slide the panel behind the accessory piece (Fig. 1).
Step 2
Using the screw guide points, screw through the substrate and into a stud, when practical, with a minimum of 6 screws per panel and a screw no less than 1" from each end of the tongue as well as in the bottom right corner of the tongue; (preferably 2 screws) should be installed through
the lap on the side of the panel. PRESS DOWN AND PRESS
PANEL FIRMLY AGAINST PIECE TO THE LEFT. Maintain continuous pressure to push the panels tightly together when attaching to the structure. (Fig. 2)
Step 3
For the last panel in the course, measure from the edge of the grout
line to the accessory piece and add 1" Cut the last piece and slide
behind the accessory piece until the panel is locked in the starter strip, then slide panel back to the left until the shiplap sides are joined. Check for level.( Fig. 3)
Step 4
Slate Stone panels have 6 unique panel configurations numbered, 1 through 6, molded into the back of the panel. Avoid placing like numbered panels next to or above each other. The illustration below shows a random installation using drops from the previous course to start each new course. If there are no drops, randomly cut the starting panel to length.
1 2 3 4 5
5 6 1 2 3
3 4 5 6 1 2
2 3 4
6 1 2 3 4
5 6
OPTIONAL ADHESIVE INSTALLATION
Step 1 - Lightly sand ridges on the back of the panel to remove any mold release agent that may have adhered to the panel. The mold release agent will interfere with the adhesion of the panel.
Step 2 - Apply a �" bead of adhesive along vertical ridges of the panel.
Step 3 - Remember to always use an adhesive which is of good quality and is compatible with polyurethane. See page 8 for manufacturer’s recommendations. In order for adhesives to set up, mechanical fasteners may be required to hold panels in place.
PANEL INSTALLATION
Figure 1
Figure 2
Figure 3
All products must be allowed to acclimate; removed from boxes and stored flat at the installation site for a minimum of 48 hours or until properly acclimated prior to installation. Heat and moisture cause expansion. Best results are obtained by installing cool, dry product. StoneWorks does not warrant against gapping caused byexpansion and contraction.

23
PANEL INSTALLATION
SLATE STONE PANEL
Always seat and attach panels tightly together
Starter Strip - Determine the height above ground the bottom of the panels should be. Measure up 2 ¾" from this point and strike a level line. Attach the top of the starter strip on this line.
Determine which type of wall installation is required.
Paneling the wall from an inside corner to an inside corner.
Cut the left end of the first panel so that the panel will sit flush against the adjoining wall. Attach to the wall through the screw indicator marks on the top and right hand end tongues. Firmly press the next panel against the first panel and repeat attachment process across the wall. Cut the right hand end of the final panel in the course flush to the wall. Use the off fall from that panel to start the new row. Stagger the joints of the panel ends up the wall. If necessary, cut some additional length from the off fall piece to prevent panel ends from lining up vertically.
Paneling a wall with one outside corner on the right.
Dry fit the first corner into the starter strip. Secure with screws if necessary. Moving from right to left: dry fit panels tightly across the wall. Cut the left hand end of the final panel to be flush with the wall or trim piece. Remove the dry fit panels and corner piece. Panel the wall from left to right as in example 1. Reattach corner over right hand panel. Continue from corner to finish wall.
All products must be allowed to acclimate; removed from boxes and stored flat at the installation site for a minimum of 48 hours or until properly acclimated prior to installation. Heat and moisture cause expansion. Best results are obtained by installing cool, dry product. StoneWorks does not warrant against gapping caused byexpansion and contraction.

24
SLATESTONE PANEL INSTALLATION, Cont. Paneling a wall with outside corners on the right and left.
Working from the left outside corner (OC), seat the 1st panel against the OC and down against the starter strip, continue as described in section 1. Cut the right OC so there is a straight rock edge and attach. Measure the last piece on the row and cut this panel straight to fit snugly against the OC. Caulk the joint if necessary and use touch up paint. Work the right corner from left to right as described in section
1. Work the left OC as described in section 2.
Option 2: (More skill required) Working from the left outside corner (OC), seat the 1st panel against the OC and down against the starter strip, continue as described in section 1. Place the right OC in place for measure-ment. Place a weather barrier cleat such as black tar paper, Tyvek or the equiva-lent to the substrate behind the joint. Measure the last piece on the row and cut this panel using the “T” design for the male tongue. Use an existing panel as a template. A carpenter knife and sabre saw is necessary. Attach against the OC and secure both pieces. Caulk the joint if necessary and use touch up paint. Work the right corner from left to right as described in section 1. Work the left OC as de-
scribed in section 2.
Slatestone panels have 8 unique panel configurations with a number, 1 through 8, molded into the back of the panel. Avoid placing like numbered panels next to
each other.
The illustration below shows a random installation using drops from the
previous course to start each new course. If there are no drops, randomly cut
the starting panel to length.
Using Outside Corners to make Columns
Please refer to the instructions on page 35 and 36 when using Outside Corners to make a Column.
4
4 6 7 3 5
5 8 2 1
4 2 1 4 3 8
8 7 3 2 5

25
ACCENT ROCKS (Lime Stone)
Step 1 - Designing the wall
There are 6 unique Accent Rocks to incorporate into any installation, 3 colors of the large Accent Rock and 3 colors of the small Accent Rock (Lava Gray has only 1 color so there are 2 unique rocks). The installation of Accent Rocks can be to-tally random (for example 2 Random Rock (RR) Panels, 1 large light Accent Rock (AR), 1 RR panel, 1 small medium AR, 3 RR panels, 1 small light AR, 2 RR panels, 1 large dark AR). Or make a pattern which repeats through out the installation (for example, 2 RR panels, 1 large dark AR, 2 RR panels, 1 small light AR, 2 RR panels, 1 Large medium AR, 2 RR panels, 1 small dark AR, 2 RR panels, 1 large light AR, 2 RR panels, 1 small medium AR). The installer must lay out the job to
utilize the four Lime Stone panel configurations properly plus utilize the Accent Rocks. While this installation takes a little more planning and preparation the end result is a unique installation which is more real-istic and effectively conceals joint lines between panels.
Step 2 - Installing the Accent Rock.
Install Lime Stone panels up to the point where the first accent rock is needed. Follow Lime Stone instructions for installing the full Lime Stone panels. Starting from the left, take an Accent Rock panel and lock the bottom groove into the starter strip tongue (if Accent Rock is on the bottom course) or the panel tongue on the course below the one being worked on. Slide the Accent Rock panel to the left so the accent rock lap locks over the random rock panel side shiplap joint. Using the screw guide points, screw through the substrate and into a stud, when practical, with 4 screws for the large Accent Rock and 3 screws for the small Accent Rock. Working left to right continue installing
Lime Stone panels until another Accent Rock panel is needed.
An installation example is below:
ACCENT ROCK INSTALLATION
SAR
LAR RR-1 RR-4 RR-3 SAR
RR-2 RR-1
RR-4 SAR
RR-3 RR-2 LAR RR-1 SAR
RR-4
RR-2 RR-1 RR-4 LAR RR-2 RR-4 LAR
RR-1 RR-2 SAR
RR-4 RR-3 LAR RR-2

26
DOOR / WINDOW TRIM Step 1
Door/Window Trim can be used as a utility trim to
terminate sections of StoneWorks panels, as a cap or as atrim piece around windows and doors. For most applications it needs to be installed prior to the panels.
Step 2
Measure the total height of the wall before the ledger attachment to determine quantity and length of pieces.
Step 3
Use a level when locating Door/Window Trim. Install with dado away from the frame. Screw at a 45° angle through the top of the piece and down along the inside edge, making sure to attach securely to the underlying substrate. To miter for use with ledger, cut the top of the piece on a 15°angle, with the long side of the angle against the wall.
Step 4
If desired a wood rasp can be used to round edges of the door/window trim to provide a more realistic look. Touch-up paint can be applied to the area formed with the rasp. Always use a finished end to start and terminate a section of door window trim. Cut ends can be butted tight and concealed with touch-up paint and caulk. End Ledger runs with factory finished ends. (See ledger installation).
TRIM INSTALLATION
All products must be allowed to acclimate; removed from boxes and stored flat at the installation site for a minimum of 48 hours or until properly acclimated prior to installation. Heat and moisture cause expansion. Best results are obtained by installing cool, dry product. StoneWorks does not warrant against gapping caused byexpansion and contraction.

27
TRIM INSTALLATION
LEDGER
Step 1
The Ledger makes an ideal transition to other materials. The Ledger can attach in 3 different ways: The most common installation is directly over the top row of the tongue. Alternate methods are discussed in the following pages.
Step 2
Measure the total length of Ledger required. It is important to end both sides of the wall with finished ledger ends. It is best to take the total length, and cut equal amounts from ledger pieces in the center of the wall. This allows a tight union between the pieces with finished edges on each side. Measure and cut each ledger required for a center union and cut each end square for a good fit. Use rasp to round edges on factory ends to enhance appearance. Use touch-up paint on the rasped area.
Step 3
Toe Screw the Ledger to the underlying substrate, with screws placed minimum 16" apart. Ledgers can also be attached by toe screwing underneath the ledger piece. Additionally, gluing is recommended. Before gluing, lightly sand the ledger gluing surface for better bonding.
Step 4
Exterior applications require flashing if other siding products are used above the ledger. Flashing can cover screws used to attach the ledger for professional results.
Screw attachment prior to flashing
All products must be allowed to acclimate; removed from boxes and stored flat at the installation site for a minimum of 48 hours or until properly acclimated prior to installation. Heat and moisture cause expansion. Best results are obtained by installing cool, dry product. StoneWorks does not warrant against gapping caused byexpansion and contraction.

28
TRIM - LEDGER, Cont.
Step 5
If the ledger is used to go over the top of outside or inside corner accessories a compound miter is required. (Ledger Inside and Outside Corners can be used and do not require mitering). This can be achieved using a chop saw or radial arm saw. Place the ledger on the saw table with the back of the ledger flush against the fence (just the way it sits when applied), and make a 45° miter cut. The corner
will then require caulking and StoneWorks touch-up paint.
INSTALL LEDGER ON CUT PANEL (ALTERNATE
INSTALLATION METHOD)
If the top panel must be cut horizontally and the tongue removed, the ledger is installed using the flat portion on the bottom of the ledger. The ledger is then glued to the wall behind it and screwed using the methods described above.
LEDGER OUTSIDE AND INSIDE CORNERS
Outside and Inside Corner Ledgers can be used for faster, caulk free installation. Theses pieces are molded for 90˚ angles.
Simply place the ledger over the top panel, using the “v” groove if the panel is full, or the bottom surface of the ledger if the panel has been cut for height.
¼" Bead
Adhesive:
= Full Panel
= Cut Panel

29
INSTALL LEDGER USING MOUNTING BLOCKS
(ALTERNATE INSTALLATION METHOD)
Ledgers can be installed using mounting blocks for a totally concealed fastening system. This installation method is primarily recommended for installations below a casement.
On the back side of the ledger below the tongue are three pockets. These pockets are made to accommodate wood blocks made from standard 1 x 6 nominal material cut 1 ½" long. Viewing the ledger from the front, the centerlines of the pockets are 8 5/16" from the right end, 21 �" from the right end, and 35 �" from the right end.
Dry fit ledger and mark location of the top and right end of the ledger. Blocks should be fastened to the wall and located to align with the pockets. The top of the blocks should be ¾" below the top of the ledger. The ledger is then placed on the panel as with the previously described methods.
After placing the ledger onto the mounting blocks, drive a screw from the bottom of the ledger into the mounting blocks. Adhesive should be applied to the blocks and to the ledger using the method illustrated on the previous page.
TRIM - LEDGER Cont. All products must be allowed to acclimate; removed from boxes and stored flat at the installation site for a minimum of 48 hours or until properly acclimated prior to installation. Heat and moisture cause expansion. Best results are obtained by installing cool, dry product. StoneWorks does not warrant against gapping caused byexpansion and contraction.

30
TRIM INSTALLATION
MOUNTING BLOCKS Step 1
Locate the center of the object to be mounted on the mounting block (outlet box, hose bib, electrical box, etc.). Next, locate on the previous course where the bottom of the panel to be cut out will fall when installed and mark. Then locate where the edge of the panel to be cut out will fall on the panel to the left and mark. Measure from the center of the object to the mark locating bottom of the panel and measure to the mark locating where the left edge of the panel will fall.
Step 2
Transfer these measurements to the back of the panel being cut out and mark. This mark should correspond with the center of the object. Using this mark as center draw a rectangle 7 ½" x 10 ½" for the large mounting block or 5" x 6" for the small mounting block. Mounting blocks can be installed horizontally or vertically.
Step 3
Using the rectangle you drew on the back of the panel as a cutting guide, cutout the panel. Install the cutout panel in the standard fashion.
Step 4
On the back side of the mounting block you will see a preformed area molded into the block. On the large mounting block it is a round area for round outlet boxes. On the small mounting block are preformed areas for plumbing rough-in, single and double outlet boxes, and round fixture cutouts.
Step 5
Determine which cut out and what size is appropriate. Drill a hole on the side of the cut out area to use as a starter hole. Cut the pattern on the block using a sabre saw. Always cut from the back of the mounting block to avoid marring the surface of the mounting block. If necessary, use a wood rasp to fine tune the cutout.
Step 6
Apply caulk and/or adhesive to the back of the mounting block to seal between the mounting block and the panel. Put the mounting block in place and attach with 3" screws. Place screws where they will be concealed by the cover plate of the fixture, if possible.
Step 7
Attach electrical boxes to the face of the cover plate as applicable. Install the fixture and it’s cover plate. Caulk around fixture as necessary.

31
TOUCH UP
FINISHING THE JOB FOR A
PROFESSIONAL APPEARANCE
Cuts which result in exposed
polyurethane must be coated to
prevent discoloration which will
be quite noticeable over time. The
StoneWorks Touch Up Kitcontains paint, instructions and
brushes. Each kit is specific for
color and rock profile.
Step 1
Inspect the job closely for any nicks, scratches or exposed cut edges of panels and apply the appropriate touch-up paint. Some applications may require caulking which can be concealed with touch-up paint. Any areas where deviation from
standard StoneWorks installation practices is required must be caulked andtouched up.
Step 2
StoneWorks touch up paint is a latex base and can be cleaned-up with warm,soapy water. Clean hands, spills and tools immediately after use. The paint has been thinned to be used with the spray gun however additional thinning, if necessary, can be done by adding water. Protect from freezing.
Step 3
Touch – up paint can be applied by using the brush provided. Be sure to shake bottles well before using.
Touch Up Paint Kit

32
The natural appearance of StoneWorks products are maintained with little effort.Although StoneWorks products will get dirty, like anything exposed to theatmosphere, a heavy rain or a simple washing with a garden hose will do wonders. If additional cleaning is required the following steps outline the recommended cleaning procedure.
Step 1
Any liquid soap or a light spray of simple green or the equivalent, followed by
light brushing with a soft bristle brush will work with our product. StoneWorksrecommends using whatever product you choose on a small area first, to check for color fastness. You can either use a soft bristle brush with a garden hose or a pressure washer, but if you use a pressure washer, be SURE not to get closer than 12 inches and not more than 1500 PSI.
Step 2
For mildew we recommend the cleaning solution X-90. It is very effective in
removing mildew from vinyl siding, and will work on our product. StoneWorksproducts are designed to be resistant to the elements as well as all but the most caustic man - made products but it would be prudent to test a small area first with any new product.
CLEAN UP

33
FREQUENTLY ASKED QUESTIONS
Q. What is the StoneWorks product made from?
StoneWorks products are manufactured with advanced hybrid polyurethane compositeswhich allows us to reproduce the most realistic synthetic stone texture and look available.
Q. What is required to cut the StoneWorks product?
StoneWorks products are easily cut with a hand saw, circular saw, or virtually any kindof carpentry saw cutting device.
Q. What type of fastener is used to install StoneWorks products?
StoneWorks was designed with ease of installation in mind therefore, depending on thesubstrate a good quality deck type screw will work.
Q. How are the StoneWorks products installed?
StoneWorks is a mortar-free product that can be easily installed by one or two people usingbasic hand or power tools.
Q. How do you avoid repeating color and stone pattern during installation?
StoneWorks panels were designed with four basic stone patterns, each numbered from one tofour on the back of each panel. There are also four color palettes to help eliminate a repeat of patterns and color during installation.
Q. What preparation is required to install StoneWorks panels? StoneWork only requirement is a clean, dry substrate.
Q. What can I apply StoneWorks to?StoneWorks can be easily applied to virtually any substrate including block, concrete, stucco,or wood framed sheathed walls.
Q. What size panels are available?
StoneWorks Lime Stone face panels are sold in 15 ½" x 48" panels. Stacked Stone panels
are 5" x 47 ¾". Ledgestone panels are 6 �" x 47 ¾". Slatestone panels are 8 ¼" x
43". Q. Is StoneWorks easy to clean?
Because of the closed cell hybrid polyurethane formulation developed by StoneWorks,all products are easily cleaned with a standard garden hose.
Q. Does the product have any R-value?
Yes. Because of StoneWorks' polyurethane formulation, the R value is approximately 4.5per inch thickness.
Q. How much does the product weigh?
StoneWorks weighs approximately one pound per square foot making it extremely easy tohandle and install, thus eliminating the need for a forklift.
Q. What applications are best suited for StoneWorks is perfect for almost all commercialand residential, exterior or interior applications.

34
FREQUENTLY ASKED QUESTIONS Q. What maintenance will be required down the road?
Because of the StoneWorks polyurethane formulation and its durable coating there is virtuallyno maintenance required.
Q. How will StoneWorks handle the elements?StoneWorks products have been tested equivalent to 20 years in an advanced weathertesting chamber with very little discoloration to the products.
Q. How does StoneWorks compare in price to the cultured stone type products currentlyavailable on the market?
StoneWorks products have been competitively priced and will generally cost less than caststone type products. The real savings for the contractor comes from the cost of labor for installation by a carpenter vs. the cost of labor and material provided by a mason. With the
StoneWorks product the value is added and the profit is retained by the contractor. For the do-it-yourselfer, the savings come to those who can install StoneWorks products themselves.
Q. Who can install the StoneWorks panels?Anyone with a basic understanding of carpentry can easily install StoneWorksproducts.
Q. Is StoneWorks easy to clean?Any liquid soap or a light spray of simple green or the equivalent, followed by light brushing
with a soft bristle brush will work with our product. StoneWorks recommends usingwhatever product you choose on a small area first, to check for color fastness. You can either use a soft bristle brush with a garden hose or a pressure washer, but if you use a pressure washer, be SURE not to get closer than 12 inches and not more than 1500 PSI. There is a special mildew cleaning solution called X-90. It is very effective in removing mildew from
vinyl siding, and will work on our product. StoneWorks products are designed to be resistantto the elements as well as all but the most caustic man made products but it would be prudent to test a small area first with any new product
Q. Is StoneWorks flammable and what do all those fire test numbers mean?First, Flame Spread Factor is the distance that the flame spreads across the specimen piece during the test. This is calculated by measuring the distance across the panel the flame spreads every 3 seconds during the test. They then compile the total distance and come up with the Flame Spread Factor. Our product tested at an average of 30.78. Second is the Flame Spread
Index. This is a mathematical calculation using calculus and area under a curve to compute a number relative to two points: Cement and Red Oak. In this index, Red Oak is 100 and cement is 0. There is some confusion between the tests as our 162 Test now calls this number the Radiant Panel Index. Ours is 191.13. In the vinyl siding world, anything under 200 can be placed on wall surfaces. Regardless of tests and numbers, we do not recommend putting any
StoneWorks product near open flames. Although it is not flammable, it will combust in thepresence of flame. We recommend that our product be placed no closer than 12 inches from areas where an open flame may be encountered. You may see similar products claiming to have passed the E-84 flame spread test. This is only a portion of E-84 testing and should not be considered as meeting E-84 requirements.
35
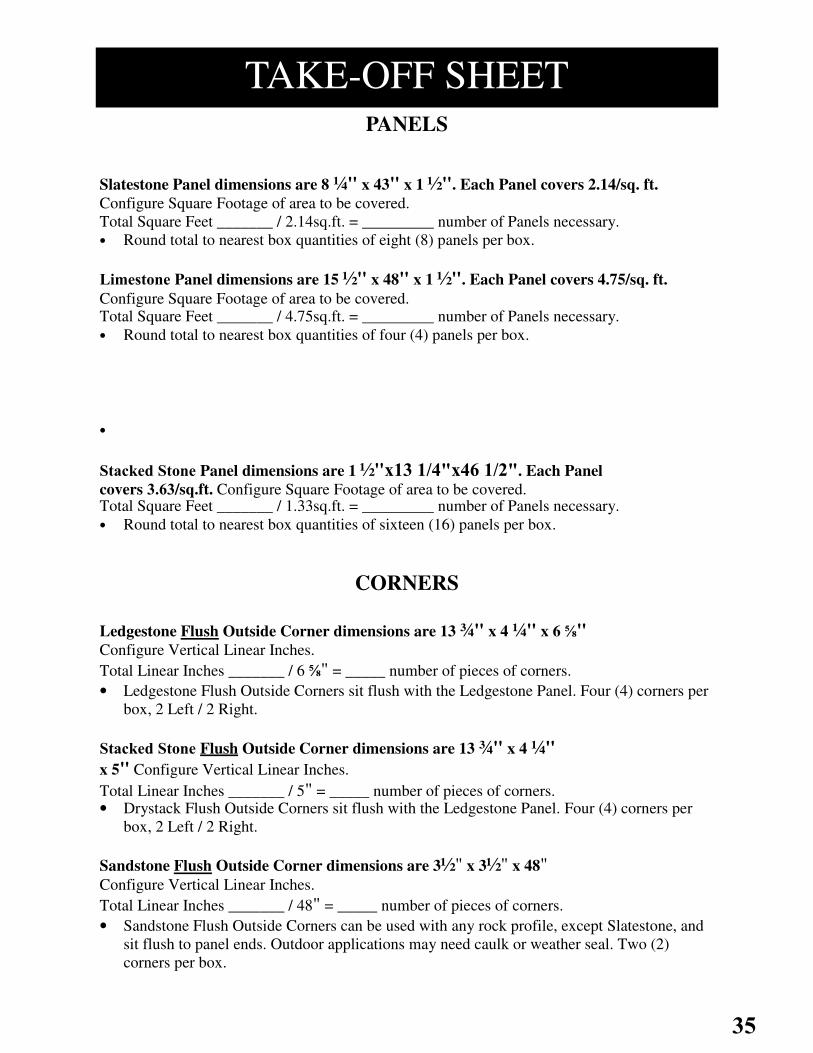
PANELS
Slatestone Panel dimensions are 8 ¼" x 43" x 1 ½". Each Panel covers 2.14/sq. ft.
Configure Square Footage of area to be covered. Total Square Feet _______ / 2.14sq.ft. = _________ number of Panels necessary. • Round total to nearest box quantities of eight (8) panels per box.
Limestone Panel dimensions are 15 ½" x 48" x 1 ½". Each Panel covers 4.75/sq. ft.
Configure Square Footage of area to be covered. Total Square Feet _______ / 4.75sq.ft. = _________ number of Panels necessary.
• Round total to nearest box quantities of four (4) panels per box.
•
Stacked Stone Panel dimensions are 1 ½"x13 1/4"x46 1/2". Each Panel
covers 3.63/sq.ft. Configure Square Footage of area to be covered. Total Square Feet _______ / 1.33sq.ft. = _________ number of Panels necessary.
• Round total to nearest box quantities of sixteen (16) panels per box.
CORNERS
Ledgestone Flush Outside Corner dimensions are 13 ¾" x 4 ¼" x 6 �"
Configure Vertical Linear Inches.
Total Linear Inches _______ / 6 �" = _____ number of pieces of corners.
• Ledgestone Flush Outside Corners sit flush with the Ledgestone Panel. Four (4) corners perbox, 2 Left / 2 Right.
Stacked Stone Flush Outside Corner dimensions are 13 ¾" x 4 ¼"
x 5" Configure Vertical Linear Inches.
Total Linear Inches _______ / 5" = _____ number of pieces of corners. • Drystack Flush Outside Corners sit flush with the Ledgestone Panel. Four (4) corners per
box, 2 Left / 2 Right.
Sandstone Flush Outside Corner dimensions are 3½" x 3½" x 48"
Configure Vertical Linear Inches.
Total Linear Inches _______ / 48" = _____ number of pieces of corners.
• Sandstone Flush Outside Corners can be used with any rock profile, except Slatestone, andsit flush to panel ends. Outdoor applications may need caulk or weather seal. Two (2)corners per box.
TAKE-OFF SHEET

36
•
Stacked Stone Outside Corner dimensions are 5 ½" x 5 ½" x 40"
Configure Vertical Linear Inches.
Total Linear Inches _______ / 40" = _____ number of pieces of corners.
• Drystack Panels fit behind the Drystack Outside Corner. Two (2) corners per box.
Sandstone Outside Corner dimensions are 5 ½" x 5 ½" x 48"
Configure Vertical Linear Inches.
Total Linear Inches _______ / 48" = _____ number of pieces of corners.
• Sandstone Outside Corners can be used with any rock profile, except Slatestone. The Panelwill fit behind the corner. Two (2) corners per box.
.
•
Stacked Stone Inside Corner dimensions are 4 ¾" x 4 ¾" x 40"
Configure Vertical Linear Inches.
Total Linear Inches _______ / 40" = _____ number of pieces of corners.
• Panels fit behind Corners. Two (2) corners per box.
Sandstone Inside Corner dimensions are 3 ½" x 3 ½" x 48"
Configure Vertical Linear Inches.
Total Linear Inches _______ / 48" = _____ number of pieces of corners.
• Panels fit behind Corners. Two (2) corners per box. Sandstone Inside Corners can be usedwith any rock profile except Slatestone.
TAKE-OFF SHEET CORNERS cont.
Slatestone Outside Corner dimensions are 12 ¾" x 4 ½" x 8 ¼"
Configure Vertical Linear Inches.
Total Linear Inches _______ / 8 ¼" = _____ number of pieces of corners.
• Slatestone Outside Corners sit flush with each panel. Four (4) corners per box,2 Left/2Right.
Lime Stone Outside Corner dimensions are 7" x 11" x 15 ½"
Configure Vertical Linear Inches.
Total Linear Inches _______ / 15 ½" = _____ number of pieces of corners.
• Random Rock Outside Corners sit flush with each panel. Four (4) corners per box,2 Left/2Right.

37
ACCESSORIES
1. Sandstone Ledger dimensions are 2 ½" x 4" x 48"Configure Horizontal Linear Feet.
Total Linear Feet ______ / 4' = number of pieces of Ledger.
• This accessory is used to trim out the top row and can be used with any rock profile.Four (4) Ledgers per box.
2. Sandstone Window/Door Trim dimensions are 2 ¼" x 3 ½" x 48"Configure Vertical and Horizontal Linear Feet.
Total Linear Feet _____ / 4' = number of pieces of window/door trim.
• Window/Door Trim will be used on all four window sides as well as the top and sides ofdoor openings and can be used with any rock profile. Four (4) Trim per box.
3. Sandstone Ledger Outside Corner dimensions are 4 ¼" x 6 ¼" x 2 ½"
Sandstone Ledger Inside Corner dimensions are 9 ¾" x 7 �" x 2 ½"
Ledger Outside and Inside Corners are used to cap corners and show a continuous run of the Ledger trim piece. Number of pieces depend on number of corners. Two (2) per box, 1 Left / 1 Right.
4. Metal Starter Strips are in 4' lengths.
Configure Horizontal Linear Feet of area to be covered.
Total Linear Feet _______ / 4' =______ number of pieces of starter strip.
- Used to begin the bottom row, Starter Strips are suggested under each panel in order to avoid face screwing.
5. 12oz. Tubes of Grout _____. (Depending on project, grout/caulk, may or may not be
required).
6. Touch Up Paint Kit _____.
Stacked Stone, Slate Stone, and Random Rock Touch up Paint Kits contain Four 120 cc bottles of paint, one for each panel color and 1 trim color, plus 4 brushes. Slatestone Touch Up Paint Kits contain One 120cc and 2 60cc bottles of paint, plus 1 brush.
TAKE-OFF SHEET