Embed Size (px)
Citation preview

COMPUTER CLEANING SOP
(Standard Operating Procedure)
COMPUTER CLEANING SOP www.computerdust.com 2
Table of Contents
A. CLEANING THE CPU AND TOWER ................................................................................................................... 5
Preparation ................................................................................................................................................................... 5
Case vents and PSU vents ............................................................................................................................................. 6
PSU Fans ........................................................................................................................................................................ 6
CPU Fan and Heatsink ................................................................................................................................................... 6
RAM Sticks and Expansion Slots .................................................................................................................................... 6
Case Fans ....................................................................................................................................................................... 6
Video Card Fan and Heatsink ........................................................................................................................................ 7
The Case ........................................................................................................................................................................ 7
The Ports ....................................................................................................................................................................... 8
Checking the Fan Rotation ............................................................................................................................................ 8
Reassembly ................................................................................................................................................................... 8
B. CLEANING OPTICAL DRIVES AND HARD DRIVES.............................................................................................. 9
C. DECLUTTERING CABLES ................................................................................................................................. 9

COMPUTER CLEANING SOP www.computerdust.com 3
Many computer faults are the result of components overheating due to poor airflow inside the case. Poor
airflow is often caused by dirt and dust accumulated over time. Therefore, it is worthwhile to clean the
computer regularly, for example annually or more often if it is in a particularly dusty environment. In a
household with pets or a smoker it is even more important to clean your computer as hair, cigarette
ashes and chemicals can build up inside your computer. A few minutes of careful cleaning will remove
the “computer killing” dust from your CPU’s fans, heat sinks, electronics and case. This will allow the
heat to dissipate and cool air to flow unimpeded throughout your computer.
Tools and Materials Needed
For a dust and grime-free CPU you need the
following cleaning supplies:
1. No. 2 Philips cross-head screwdriver, all
plastic or nylon if possible
2. A small flat-bladed screwdriver, all
plastic or nylon if possible
3. Canned air (use in short bursts)
CAUTION: Do not use an air compressor
because it often has water and/or
compressor oil in the lines or tank.
4. Five or six kitchen paper-towels or
napkins to wipe down the case
5. One small paintbrush with long natural
bristles. ½ inch size is ideal
6. Several cleaning swabs with
shred resistant foam or polyester tips
7. Insulating tape
8. A new, unsharpened Pencil
9. A flashlight
10. An old newspaper
11. A vacuum cleaner with hose and nozzle
12. Anti-static wrist strap and anti-static mat
Optional Items:
13. Assorted colored stickers
14. Canister vacuum with HEPA-grade
filtration
15. Micro cleaning kit – vacuum nozzle
attachments with suction reducing
mechanism
16. Dust Mask
17. CD Drive cleaner disk

COMPUTER CLEANING SOP www.computerdust.com 4
Things to Consider Before Cleaning
A word of caution – be careful with the power supply or PSU. The PSU is in its own metal box, usually at
the top rear of a tower. NEVER attempt to open the box or stick anything metal into it. There may be an
on/off switch at the back of the power supply and there may be a (red) voltage selection switch. DO NOT
change the voltage selection switch.
Also, DO NOT open your computer while it is running or still has cables attached to it. It is safer to
remove all peripherals, USB cables, audio cables, video cables and especially the power cable.
Move your computer to a well-ventilated area. This is especially important to consider if your computer
has built up a lot of dust that will be blowing around when you clean it. Breathing in all that old,
accumulated dust can be hazardous to your health, so use a dust mask, too.
Finally, note that one should use canned air only in short bursts and waiting intervals, especially if the
computer has not cooled thoroughly (covers off) before you get started. Air out of the can is going to
get very cold if continuously sprayed, and cold air on hot electronics can be almost as damaging as
static discharge.
Internal computer components
COMPUTER CLEANING SOP www.computerdust.com 5
A. CLEANING THE CPU AND TOWER
Preparation
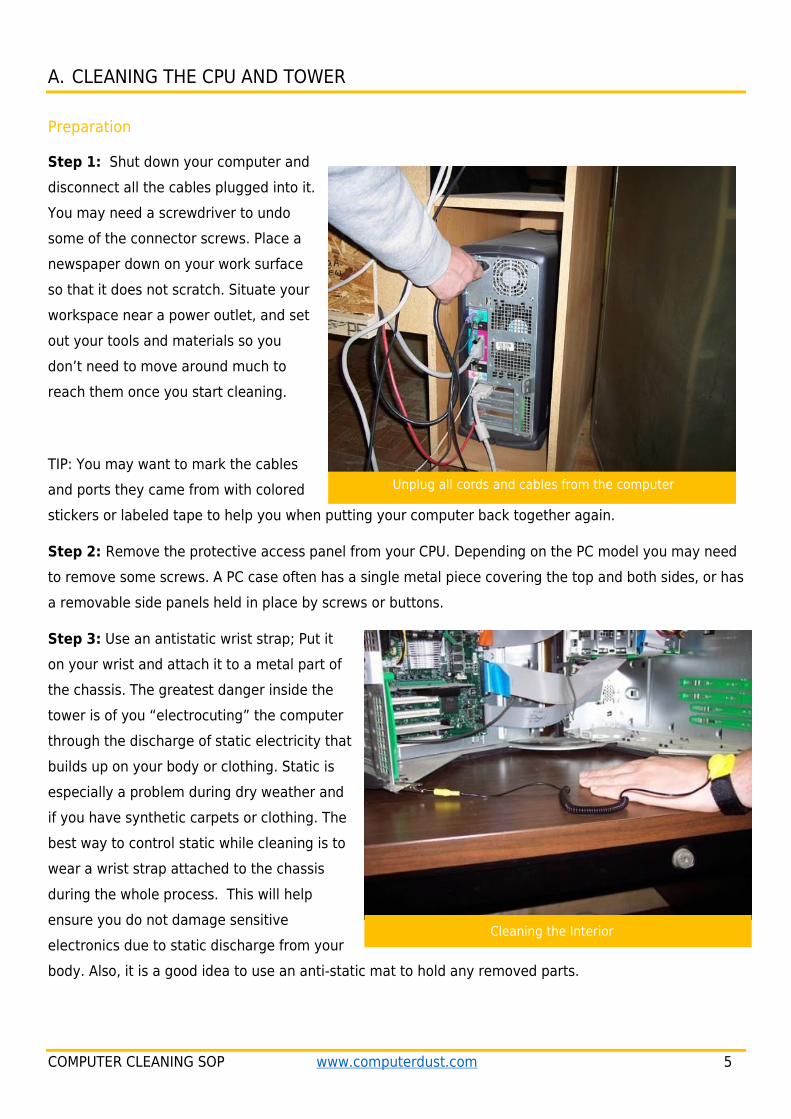
Step 1: Shut down your computer and
disconnect all the cables plugged into it.
You may need a screwdriver to undo
some of the connector screws. Place a
newspaper down on your work surface
so that it does not scratch. Situate your
workspace near a power outlet, and set
out your tools and materials so you
don’t need to move around much to
reach them once you start cleaning.
TIP: You may want to mark the cables
and ports they came from with colored
stickers or labeled tape to help you when putting your computer back together again.
Step 2: Remove the protective access panel from your CPU. Depending on the PC model you may need
to remove some screws. A PC case often has a single metal piece covering the top and both sides, or has
a removable side panels held in place by screws or buttons.
Step 3: Use an antistatic wrist strap; Put it
on your wrist and attach it to a metal part of
the chassis. The greatest danger inside the
tower is of you “electrocuting” the computer
through the discharge of static electricity that
builds up on your body or clothing. Static is
especially a problem during dry weather and
if you have synthetic carpets or clothing. The
best way to control static while cleaning is to
wear a wrist strap attached to the chassis
during the whole process. This will help
ensure you do not damage sensitive
electronics due to static discharge from your
body. Also, it is a good idea to use an anti-static mat to hold any removed parts.
Unplug all cords and cables from the computer
Cleaning the Interior
COMPUTER CLEANING SOP www.computerdust.com 6
Case vents and PSU vents
Step 4: Run the vacuum cleaner nozzle over
any air vents at the front, side and rear of the
case and over any vents in the PSU. Pay special
attention to the air vents on the sides of the PSU
inside your computer. If the covers have vents,
vacuum those as well.
PSU Fans
Step 5: Use the blunt, insulated end of the
pencil to hold the fan blades steadily in place
and blow canned air into the PSU fan(s) and
through the PSU. Substantial dust maybe ejected
from the power supply. Whenever possible blow from inside the case to the outside.
CPU Fan and Heatsink
Step 6: This is a significant part of the cooling system where dust collects on the fan blades and clogs
the heatsink vanes. Use the paintbrush to dust off each blade and off the heatsink vanes if accessible.
Step 7: Using the pencil to hold the fan blades still, blow out
the fan and the heatsink with the compressed air. Blow from
inside the case toward the outside whenever possible.
Step 8: To be thorough moisten a Q-tip with glass cleaning
fluid and wipe down each fan blade.
RAM Sticks and Expansion Slots
Step 9: Aim canned air at a RAM slot,
hold the trigger and move it down the
entire slot. Repeat this for every slot in
your computer case - memory sticks
and the video, sound or modem cards
slots.
Case Fans
Step 10: Case fans are often attached
to the front or rear panels. Using the
pencil to stop fan rotation, remove the dust from the case fans with the brush and canned air.
TIP: It is crucial not to let the CPU fan
or other fans spin up under the air
blast as damaging voltages can be
generated through a dynamo effect.
COMPUTER CLEANING SOP www.computerdust.com 7
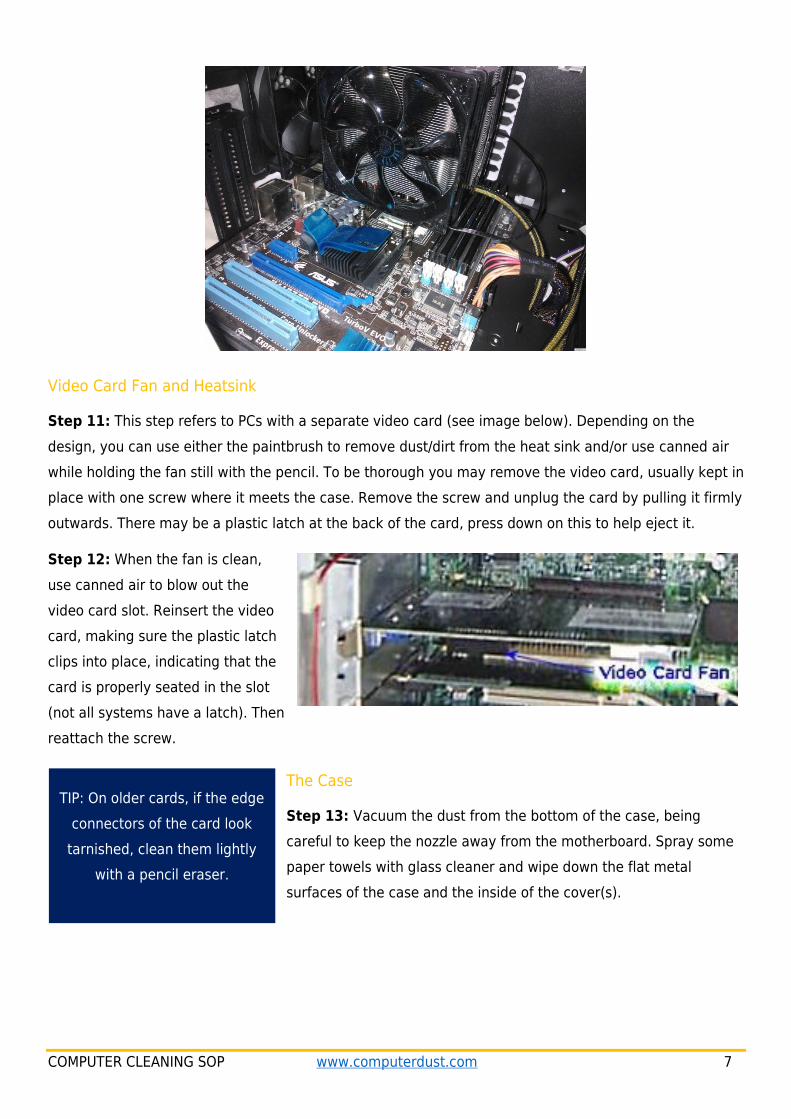
Video Card Fan and Heatsink
Step 11: This step refers to PCs with a separate video card (see image below). Depending on the
design, you can use either the paintbrush to remove dust/dirt from the heat sink and/or use canned air
while holding the fan still with the pencil. To be thorough you may remove the video card, usually kept in
place with one screw where it meets the case. Remove the screw and unplug the card by pulling it firmly
outwards. There may be a plastic latch at the back of the card, press down on this to help eject it.
Step 12: When the fan is clean,
use canned air to blow out the
video card slot. Reinsert the video
card, making sure the plastic latch
clips into place, indicating that the
card is properly seated in the slot
(not all systems have a latch). Then
reattach the screw.
The Case
Step 13: Vacuum the dust from the bottom of the case, being
careful to keep the nozzle away from the motherboard. Spray some
paper towels with glass cleaner and wipe down the flat metal
surfaces of the case and the inside of the cover(s).
TIP: On older cards, if the edge
connectors of the card look
tarnished, clean them lightly
with a pencil eraser.
COMPUTER CLEANING SOP www.computerdust.com 8
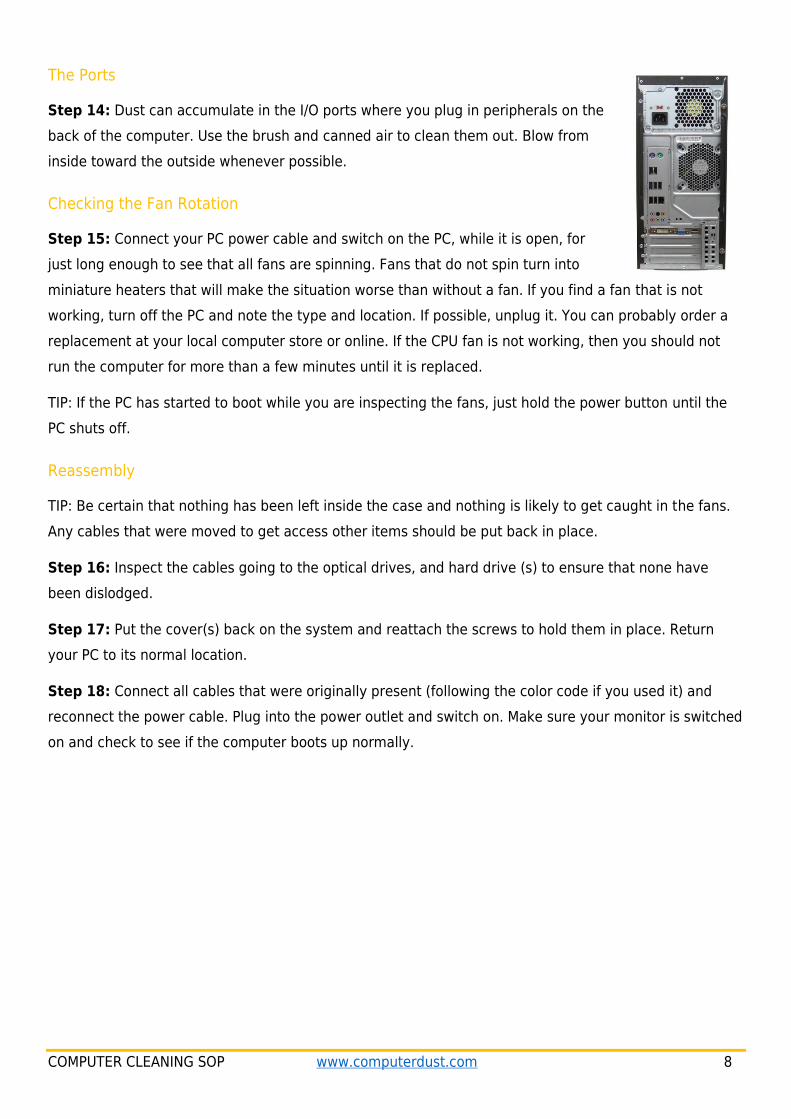
The Ports
Step 14: Dust can accumulate in the I/O ports where you plug in peripherals on the
back of the computer. Use the brush and canned air to clean them out. Blow from
inside toward the outside whenever possible.
Checking the Fan Rotation
Step 15: Connect your PC power cable and switch on the PC, while it is open, for
just long enough to see that all fans are spinning. Fans that do not spin turn into
miniature heaters that will make the situation worse than without a fan. If you find a fan that is not
working, turn off the PC and note the type and location. If possible, unplug it. You can probably order a
replacement at your local computer store or online. If the CPU fan is not working, then you should not
run the computer for more than a few minutes until it is replaced.
TIP: If the PC has started to boot while you are inspecting the fans, just hold the power button until the
PC shuts off.
Reassembly
TIP: Be certain that nothing has been left inside the case and nothing is likely to get caught in the fans.
Any cables that were moved to get access other items should be put back in place.
Step 16: Inspect the cables going to the optical drives, and hard drive (s) to ensure that none have
been dislodged.
Step 17: Put the cover(s) back on the system and reattach the screws to hold them in place. Return
your PC to its normal location.
Step 18: Connect all cables that were originally present (following the color code if you used it) and
reconnect the power cable. Plug into the power outlet and switch on. Make sure your monitor is switched
on and check to see if the computer boots up normally.
COMPUTER CLEANING SOP www.computerdust.com 9
B. CLEANING OPTICAL DRIVES AND HARD DRIVES
The CDROM drives or DVD drives are unlikely to be clogged by dust, but they may collect dirt on the
optical lens which can cause errors. Use the CD lens cleaning disk following the manufacturer’s
instructions to clean the lenses on these drives – this has to be done when the PC is operating.
Hard drives are sealed units and require no cleaning, but to maximize the airflow around them, use the
canned air to blow away any dust from the drive’s upper surfaces.
C. Decluttering Cables
This is highly recommended for custom built computers. Unlike professionally manufactured computers,
custom built computers don’t arrive with nicely tucked away cabling that fits just right. So the best way
to make your case more secure and organized is to use zip ties. This is because you don’t want your CPU
fans, or any other fan for that matter, scraping away at cables because they’re not neatly tucked away.
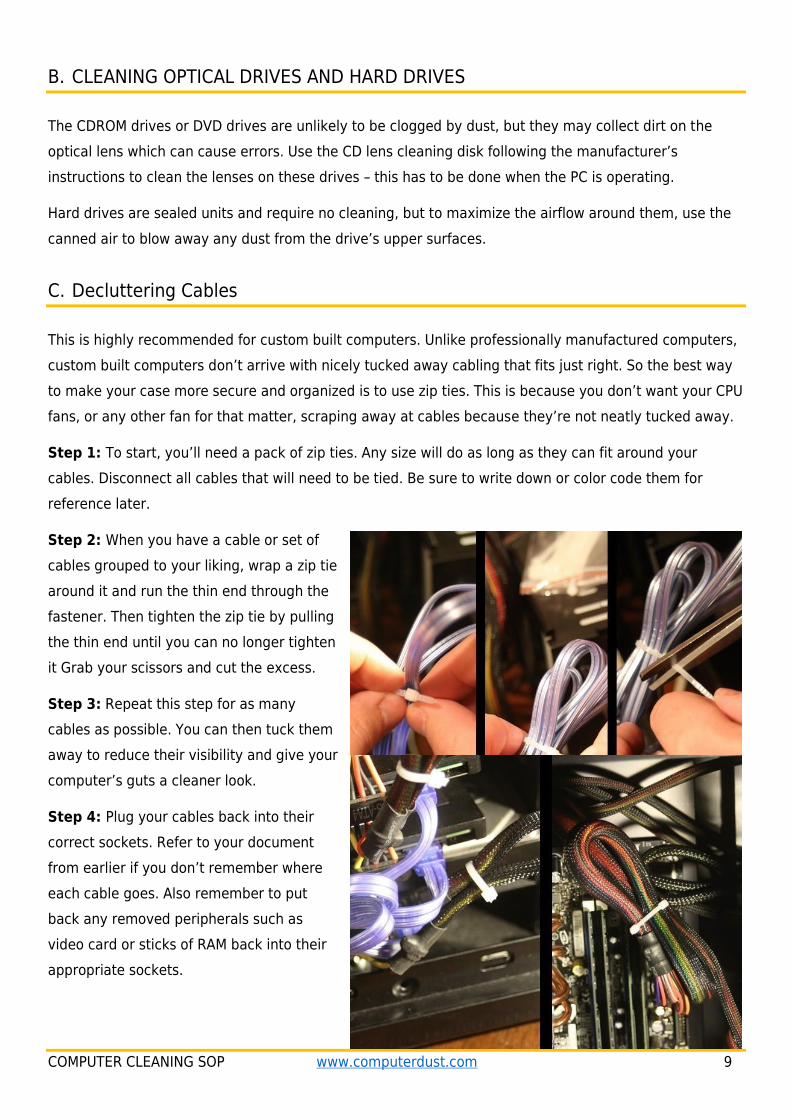
Step 1: To start, you’ll need a pack of zip ties. Any size will do as long as they can fit around your
cables. Disconnect all cables that will need to be tied. Be sure to write down or color code them for
reference later.
Step 2: When you have a cable or set of
cables grouped to your liking, wrap a zip tie
around it and run the thin end through the
fastener. Then tighten the zip tie by pulling
the thin end until you can no longer tighten
it Grab your scissors and cut the excess.
Step 3: Repeat this step for as many
cables as possible. You can then tuck them
away to reduce their visibility and give your
computer’s guts a cleaner look.
Step 4: Plug your cables back into their
correct sockets. Refer to your document
from earlier if you don’t remember where
each cable goes. Also remember to put
back any removed peripherals such as
video card or sticks of RAM back into their
appropriate sockets.
COMPUTER CLEANING SOP www.computerdust.com 10
About Computer Dust Solutions Our goal is to help industry and home computer owners protect their investment by offering top quality dust protection and computer equipment cleaning training. Computer Dust
Solutions is located in Michigan's "Copper Country," known for its copper mining heritage.
As the founder of Computer Dust Solutions, LLC, working in the wood products industry and at Michigan Tech University as a wood research scientist for the past eighteen years has
given me an appreciation of the need for, and innovative theory behind ShopShield™ breathable computer covers.
Several of those years were spent crawling in, around, and on top of materials and equipment in wood composite manufacturing facilities as a quality technician and process improvement
technician. Dust is a major consideration in this type of environment, especially when it affects computers and equipment automating the process and used to monitor process variables.
Computer control rooms and cabinets keep out some of the dust, but not all. I saw that pcs and computers were usually covered in dust, which probably contributed to many of the glitches and other computer breakdown problems. Standard plastic computer covers were
sometimes used when equipment was down, or off-line, but taking them off and putting them back on was a hassle often neglected. The plastic covers even contributed to the clutter
around the work area.
This is where the potential of the ShopShield breathable cover is apparent.They are designed to stay on the computer at all times, even while the computer and monitor are
running. The special filter material allows cool air to circulate through the computer and monitor while filtering out the dust.
Changed on a regular basis, the ShopShields™ keep your computer and monitor clean and cool, avoiding the burnout of sensitive computer components covered in dust. Thousands of
satisfied users have relied on this technology to protect their computers and monitors. It is one of a kind.
If you have computer equipment you need to protect from dust 24/7 read about the
ShopShield here:
http://www.computerdust.com/
Best Regards, Erik Keranen
P.S. Use the code DUSTFREEPC for 15% off your order through 2/9/18