Embed Size (px)
Citation preview
S6700 Series Ethernet SwitchesV200R001C00
Configuration Guide - BasicConfiguration
Issue 05
Date 2013-04-10
HUAWEI TECHNOLOGIES CO., LTD.

Copyright © Huawei Technologies Co., Ltd. 2013. All rights reserved.No part of this document may be reproduced or transmitted in any form or by any means without prior writtenconsent of Huawei Technologies Co., Ltd. Trademarks and Permissions
and other Huawei trademarks are trademarks of Huawei Technologies Co., Ltd.All other trademarks and trade names mentioned in this document are the property of their respective holders. NoticeThe purchased products, services and features are stipulated by the contract made between Huawei and thecustomer. All or part of the products, services and features described in this document may not be within thepurchase scope or the usage scope. Unless otherwise specified in the contract, all statements, information,and recommendations in this document are provided "AS IS" without warranties, guarantees or representationsof any kind, either express or implied.
The information in this document is subject to change without notice. Every effort has been made in thepreparation of this document to ensure accuracy of the contents, but all statements, information, andrecommendations in this document do not constitute a warranty of any kind, express or implied.
Huawei Technologies Co., Ltd.Address: Huawei Industrial Base
Bantian, LonggangShenzhen 518129People's Republic of China
Website: http://enterprise.huawei.com
Issue 05 (2013-04-10) Huawei Proprietary and ConfidentialCopyright © Huawei Technologies Co., Ltd.
i
About This Document
Intended AudienceThis document provides the basic concepts, basic configuration procedures, and configurationexamples supported by the S6700.
This document is intended for:
l Data configuration engineersl Commissioning engineersl Network monitoring engineersl System maintenance engineers
Symbol ConventionsThe symbols that may be found in this document are defined as follows.
Symbol Description
DANGERIndicates a hazard with a high level of risk, which if notavoided, will result in death or serious injury.
WARNINGIndicates a hazard with a medium or low level of risk, whichif not avoided, could result in minor or moderate injury.
CAUTIONIndicates a potentially hazardous situation, which if notavoided, could result in equipment damage, data loss,performance degradation, or unexpected results.
TIP Indicates a tip that may help you solve a problem or savetime.
NOTE Provides additional information to emphasize or supplementimportant points of the main text.
S6700 Series Ethernet SwitchesConfiguration Guide - Basic Configuration About This Document
Issue 05 (2013-04-10) Huawei Proprietary and ConfidentialCopyright © Huawei Technologies Co., Ltd.
ii
Command ConventionsThe command conventions that may be found in this document are defined as follows.
Convention Description
Boldface The keywords of a command line are in boldface.
Italic Command arguments are in italics.
[ ] Items (keywords or arguments) in brackets [ ] are optional.
{ x | y | ... } Optional items are grouped in braces and separated byvertical bars. One item is selected.
[ x | y | ... ] Optional items are grouped in brackets and separated byvertical bars. One item is selected or no item is selected.
{ x | y | ... }* Optional items are grouped in braces and separated byvertical bars. A minimum of one item or a maximum of allitems can be selected.
[ x | y | ... ]* Optional items are grouped in brackets and separated byvertical bars. Several items or no item can be selected.
&<1-n> The parameter before the & sign can be repeated 1 to n times.
# A line starting with the # sign is comments.
Interface Numbering ConventionsInterface numbers used in this manual are examples. In device configuration, use the existinginterface numbers on devices.
Password Setting Conventionsl If a password is set in plain text mode, the password is saved as the plain text in the
configuration file, which brings security risks. Therefore, the cipher text mode isrecommended for password setting. You are advised to change passwords regularly toensure device security.
l If a password is set to a valid cipher text (can be decrypted on the device) string that startsand ends both with %$%$, the same cipher text is displayed when you check theconfiguration file on the device. Therefore, this password setting method is notrecommended.
Change HistoryUpdates between document issues are cumulative. Therefore, the latest document issue containsall updates made in previous issues.
S6700 Series Ethernet SwitchesConfiguration Guide - Basic Configuration About This Document
Issue 05 (2013-04-10) Huawei Proprietary and ConfidentialCopyright © Huawei Technologies Co., Ltd.
iii
Changes in Issue 05 (2013-04-10)The fifth commercial release has the following updates:
l 6.5.2 Configuring an SSL Policy and Loading a Digital Certificate.
Changes in Issue 04 (2012-10-20)The fourth commercial release has the following updates:
l 10 Web System Configuration.
Changes in Issue 03 (2012-07-03)The third commercial release has the following updates:
l Some contents in this document are optimized.
Changes in Issue 02 (2012-05-23)The second commercial release has the following updates:
l Some contents are modified according to updates in the product such as features andcommands.
l Output information of some commands is modified.
Changes in Issue 01 (2012-03-15)Initial commercial release.
S6700 Series Ethernet SwitchesConfiguration Guide - Basic Configuration About This Document
Issue 05 (2013-04-10) Huawei Proprietary and ConfidentialCopyright © Huawei Technologies Co., Ltd.
iv
Contents
About This Document.....................................................................................................................ii
1 Logging In to the System for the First Time............................................................................11.1 Introduction........................................................................................................................................................21.2 Logging In to the Device Through the Console Port..........................................................................................2
1.2.1 Establishing the Configuration Task.........................................................................................................21.2.2 Establishing the Physical Connection........................................................................................................31.2.3 Logging In to the Device...........................................................................................................................3
2 CLI Overview.................................................................................................................................62.1 CLI Introduction.................................................................................................................................................7
2.1.1 Command Line Interface...........................................................................................................................72.1.2 Command Levels.......................................................................................................................................72.1.3 Command Views.......................................................................................................................................8
2.2 Online Help.......................................................................................................................................................102.2.1 Full Help..................................................................................................................................................102.2.2 Partial Help..............................................................................................................................................112.2.3 Error Messages of the Command Line Interface.....................................................................................11
2.3 CLI Features.....................................................................................................................................................122.3.1 Editing.....................................................................................................................................................122.3.2 Displaying................................................................................................................................................132.3.3 Regular Expressions................................................................................................................................132.3.4 Previously-Used Commands...................................................................................................................17
2.4 Shortcut Keys...................................................................................................................................................182.4.1 System Shortcut Keys..............................................................................................................................18
2.5 Configuration Examples...................................................................................................................................192.5.1 Example for Using the Tab Key..............................................................................................................20
3 How to Use Interfaces.................................................................................................................213.1 Introduction to Interfaces..................................................................................................................................223.2 Setting Basic Parameters of an Interface..........................................................................................................24
3.2.1 Establishing the Configuration Task.......................................................................................................253.2.2 Entering the Interface View.....................................................................................................................253.2.3 Viewing All the Commands in the Interface View.................................................................................263.2.4 Configuring the Description for an Interface...........................................................................................26
S6700 Series Ethernet SwitchesConfiguration Guide - Basic Configuration Contents
Issue 05 (2013-04-10) Huawei Proprietary and ConfidentialCopyright © Huawei Technologies Co., Ltd.
v
3.2.5 Starting and Shutting Down an Interface................................................................................................263.2.6 Completing Advanced Configurations on an Interface...........................................................................273.2.7 Checking the Configuration.....................................................................................................................28
3.3 Configuring the Loopback Interface.................................................................................................................283.3.1 Establishing the Configuration Task.......................................................................................................283.3.2 Configuring IPv4 Parameters of the Loopback Interface........................................................................293.3.3 Checking the Configuration.....................................................................................................................29
3.4 Maintaining the Interface..................................................................................................................................293.4.1 Clearing Statistics Information on the Interface......................................................................................30
4 Basic Configuration.....................................................................................................................314.1 Configuring the Basic System Environment....................................................................................................32
4.1.1 Establishing the Configuration Task.......................................................................................................324.1.2 Configuring the Equipment Name...........................................................................................................324.1.3 Setting the System Clock.........................................................................................................................334.1.4 Configuring a Header..............................................................................................................................394.1.5 Configuring Command Levels................................................................................................................40
4.2 Displaying System Status Messages.................................................................................................................414.2.1 Displaying System Configuration...........................................................................................................414.2.2 Displaying System Status........................................................................................................................424.2.3 Collecting System Diagnostic Information.............................................................................................42
5 Configuring User Interfaces......................................................................................................435.1 User Interface Overview...................................................................................................................................445.2 Configuring the Console User Interface...........................................................................................................46
5.2.1 Establishing the Configuration Task.......................................................................................................465.2.2 Setting Physical Attributes of the Console User Interface......................................................................465.2.3 Setting Terminal Attributes of the Console User Interface.....................................................................485.2.4 Configuring User Privilege of the Console User Interface......................................................................495.2.5 Configuring the User Authentication Mode of the Console User Interface............................................495.2.6 Checking the Configurations...................................................................................................................51
5.3 Configuring the VTY User Interface................................................................................................................525.3.1 Establishing the Configuration Task.......................................................................................................525.3.2 Configuring the Maximum Number of VTY User Interfaces.................................................................535.3.3 (Optional) Setting Restrictions for Incoming and Outgoing Calls on VTY User Interfaces...................545.3.4 Setting Terminal Attributes of the VTY User Interface..........................................................................545.3.5 Setting User Priority of the VTY User Interface.....................................................................................555.3.6 Setting the User Authentication Mode of the VTY User Interface.........................................................565.3.7 Checking the Configurations...................................................................................................................58
5.4 Configuration Examples...................................................................................................................................595.4.1 Example for Configuring Console User Interface...................................................................................595.4.2 Example for Configuring a VTY User Interface.....................................................................................61
6 Configuring User Login.............................................................................................................63
S6700 Series Ethernet SwitchesConfiguration Guide - Basic Configuration Contents
Issue 05 (2013-04-10) Huawei Proprietary and ConfidentialCopyright © Huawei Technologies Co., Ltd.
vi
6.1 Overview of User Login...................................................................................................................................646.2 Logging in to the Devices Through the Console Port......................................................................................67
6.2.1 Establishing the Configuration Task.......................................................................................................676.2.2 (Optional) Configuring the Console User Interface................................................................................676.2.3 Logging In to the Device Using a Console Port......................................................................................686.2.4 Checking the Configurations...................................................................................................................70
6.3 Logging in to Devices Using Telnet.................................................................................................................716.3.1 Establishing the Configuration Task.......................................................................................................716.3.2 Configuring the User Access Level and User Authentication Mode of the VTY User Interface...........726.3.3 Enabling the Telnet Service.....................................................................................................................746.3.4 Logging in to the Device Using Telnet...................................................................................................756.3.5 (Optional) Configuring Listening Port Number for Telnet Server..........................................................766.3.6 Checking the Configurations...................................................................................................................77
6.4 Logging in to Devices Using STelnet...............................................................................................................786.4.1 Establishing the Configuration Task.......................................................................................................786.4.2 Configuring the User Access Level and User Authentication Mode of the VTY User Interface...........796.4.3 Configuring SSH for the VTY User Interface.........................................................................................816.4.4 Configuring an SSH User and Specifying the Service Types.................................................................826.4.5 Enabling the STelnet Server Function.....................................................................................................866.4.6 Logging in to the Device Using STelnet.................................................................................................876.4.7 (Optional) Configuring the STelnet Server Parameters...........................................................................886.4.8 Checking the Configurations...................................................................................................................90
6.5 Logging in to the Devices by Using Secure Web Network Management (HTTPS Mode)..............................916.5.1 Establishing the Configuration Task.......................................................................................................916.5.2 Configuring an SSL Policy and Loading a Digital Certificate................................................................926.5.3 Loading a Web Page File.........................................................................................................................946.5.4 Enabling the HTTPS Function................................................................................................................946.5.5 Creating a Web Account..........................................................................................................................956.5.6 Logging In to the Web System................................................................................................................956.5.7 Checking the Configurations...................................................................................................................96
6.6 Common Operations After Login.....................................................................................................................976.6.1 Establishing the Configuration Task.......................................................................................................976.6.2 Switching User Levels.............................................................................................................................986.6.3 Locking User Interfaces...........................................................................................................................996.6.4 Sending Messages to Other User Interfaces............................................................................................996.6.5 Displaying Login Users...........................................................................................................................996.6.6 Clearing Logged-in Users......................................................................................................................1006.6.7 Configuring Configuration Locking......................................................................................................100
6.7 Configuration Examples.................................................................................................................................1016.7.1 Example for Configuring User Login Using a Console Port.................................................................1016.7.2 Example for Configuring User Login Through Telnet..........................................................................1046.7.3 Example for Configuring User Login by Using STelnet.......................................................................107
S6700 Series Ethernet SwitchesConfiguration Guide - Basic Configuration Contents
Issue 05 (2013-04-10) Huawei Proprietary and ConfidentialCopyright © Huawei Technologies Co., Ltd.
vii
6.7.4 Example for Configuring User Login by Using Secure Web Network Management...........................110
7 Managing the File System.......................................................................................................1167.1 File System Overview....................................................................................................................................117
7.1.1 File System............................................................................................................................................1177.1.2 Methods of File Management................................................................................................................117
7.2 Managing Files Using the File System...........................................................................................................1187.2.1 Establishing the Configuration Task.....................................................................................................1197.2.2 Managing Storage Devices....................................................................................................................1197.2.3 Managing Directories............................................................................................................................1207.2.4 Managing Files......................................................................................................................................120
7.3 Managing Files Using FTP.............................................................................................................................1237.3.1 Establishing the Configuration Task.....................................................................................................1237.3.2 Configuring a Local FTP User..............................................................................................................1237.3.3 (Optional) Specifying a Port Number for the FTP Server.....................................................................1247.3.4 Enabling the FTP Server........................................................................................................................1257.3.5 (Optional) Configuring the FTP Server Parameters..............................................................................1267.3.6 (Optional) Configuring an FTP ACL....................................................................................................1267.3.7 Accessing the System by Using FTP.....................................................................................................1277.3.8 Managing Files Using FTP Commands.................................................................................................1287.3.9 Checking the Configurations.................................................................................................................130
7.4 Managing Files Using SFTP...........................................................................................................................1317.4.1 Establishing the Configuration Task.....................................................................................................1317.4.2 Configuring VTY User Interface...........................................................................................................1327.4.3 Configuring SSH for the VTY User Interface.......................................................................................1327.4.4 Configuring an SSH User and Specifying SFTP as One of Service Types...........................................1337.4.5 Enabling the SFTP Service....................................................................................................................1377.4.6 (Optional) Configuring the SFTP Server Parameters............................................................................1387.4.7 Accessing the System Using SFTP.......................................................................................................1397.4.8 Managing Files Using SFTP..................................................................................................................1407.4.9 Checking the Configurations.................................................................................................................142
7.5 Performing File Operations by Means of FTPS.............................................................................................1437.5.1 Establishing the Configuration Task.....................................................................................................1437.5.2 Configuring an SSL Policy and Loading a Digital Certificate..............................................................1447.5.3 Enabling the FTPS Function..................................................................................................................1457.5.4 Accessing an FTPS Server....................................................................................................................1467.5.5 Checking the Configurations.................................................................................................................146
7.6 Configuration Examples.................................................................................................................................1477.6.1 Example for Managing Files Using FTP...............................................................................................1477.6.2 Example for Managing Files Using SFTP.............................................................................................1497.6.3 Example for Performing File Operations by Means of FTPS...............................................................151
8 Configuring System Startup....................................................................................................1578.1 System Startup Overview...............................................................................................................................158
S6700 Series Ethernet SwitchesConfiguration Guide - Basic Configuration Contents
Issue 05 (2013-04-10) Huawei Proprietary and ConfidentialCopyright © Huawei Technologies Co., Ltd.
viii
8.1.1 System Software....................................................................................................................................1588.1.2 Configuration Files................................................................................................................................1588.1.3 Configuration Files and Current Configurations...................................................................................158
8.2 Managing Configuration Files........................................................................................................................1598.2.1 Establishing the Configuration Task.....................................................................................................1598.2.2 Saving Configuration Files....................................................................................................................1608.2.3 Clearing a Configuration File................................................................................................................1618.2.4 Comparing Configuration Files.............................................................................................................1628.2.5 Backing Up the Configuration Files......................................................................................................1638.2.6 Restoring the Configuration Files..........................................................................................................1648.2.7 Checking the Configurations.................................................................................................................165
8.3 Specifying a File for System Startup..............................................................................................................1668.3.1 Establishing the Configuration Task.....................................................................................................1668.3.2 Configuring System Software for a switch to Load for the Next Startup.............................................1678.3.3 Configuring the Configuration File for Switch to Load at the Next Startup.........................................1678.3.4 Checking the Configurations.................................................................................................................168
8.4 Configuration Examples.................................................................................................................................1688.4.1 Example for Configuring System Startup.............................................................................................168
9 Accessing Another Device.......................................................................................................1719.1 Accessing Another Device.............................................................................................................................173
9.1.1 Telnet Method........................................................................................................................................1739.1.2 FTP Method...........................................................................................................................................1759.1.3 TFTP Method........................................................................................................................................1759.1.4 SSH Method..........................................................................................................................................1759.1.5 SSL Mode..............................................................................................................................................1769.1.6 SCP Mode..............................................................................................................................................179
9.2 Logging in to Other Devices Using Telnet.....................................................................................................1799.2.1 Establishing the Configuration Task.....................................................................................................1799.2.2 (Optional) Configuring a Source IP Address for a Telnet Client..........................................................1809.2.3 Logging in to Another Device by Using Telnet....................................................................................1809.2.4 Checking the Configurations.................................................................................................................181
9.3 Logging in to Another Device Using STelnet................................................................................................1829.3.1 Establishing the Configuration Task.....................................................................................................1829.3.2 Configuring the First Successful Login to Another Device (Enabling the First-Time Authentication onthe SSH Client)...............................................................................................................................................1839.3.3 Configuring the First Successful Login to Another Device (Allocating a Public Key to the SSH Server)........................................................................................................................................................................1839.3.4 Logging in to Another Device Using STelnet.......................................................................................1859.3.5 Checking the Configurations.................................................................................................................185
9.4 Accessing Files on Another Device Using TFTP...........................................................................................1869.4.1 Establishing the Configuration Task.....................................................................................................1869.4.2 (Optional) Configuring a Source IP Address for a TFTP Client...........................................................1879.4.3 (Optional) Configuring TFTP Access Authority...................................................................................187
S6700 Series Ethernet SwitchesConfiguration Guide - Basic Configuration Contents
Issue 05 (2013-04-10) Huawei Proprietary and ConfidentialCopyright © Huawei Technologies Co., Ltd.
ix
9.4.4 Downloading Files Using TFTP............................................................................................................1889.4.5 Uploading Files Using TFTP.................................................................................................................1899.4.6 Checking the Configurations.................................................................................................................189
9.5 Accessing Files on Another Device Using FTP.............................................................................................1909.5.1 Establishing the Configuration Task.....................................................................................................1909.5.2 (Optional) Configuring the Source IP Address and Interface of the FTP Client...................................1919.5.3 Connecting to Other Devices Using FTP Commands...........................................................................1919.5.4 Managing Files Using FTP Commands.................................................................................................1929.5.5 Changing Login Users...........................................................................................................................1959.5.6 Disconnecting from the FTP Server......................................................................................................1959.5.7 Checking the Configurations.................................................................................................................196
9.6 Accessing Files on Another Device Using SFTP...........................................................................................1969.6.1 Establishing the Configuration Task.....................................................................................................1969.6.2 Configuring the First Successful Login to Another Device (Enabling the First-Time Authentication onthe SSH Client)...............................................................................................................................................1979.6.3 Configuring the First Successful Login to Another Device (Allocating a Public Key to the SSH Server)........................................................................................................................................................................1989.6.4 Connecting to Other Devices by Using SFTP.......................................................................................1999.6.5 Managing Files Using SFTP Commands..............................................................................................2009.6.6 Checking the Configurations.................................................................................................................201
9.7 Accessing Files on Another Device by Using FTPS......................................................................................2029.7.1 Establishing the Configuration Task.....................................................................................................2029.7.2 Configuring the FTPS Client.................................................................................................................2039.7.3 Configuring the FTPS Server................................................................................................................2059.7.4 Accessing an FTPS Server....................................................................................................................2069.7.5 Checking the Configurations.................................................................................................................209
9.8 Accessing Files on Another Device by Using SCP........................................................................................2109.8.1 Establishing the Configuration Task.....................................................................................................2109.8.2 Configuring the SCP Server..................................................................................................................2119.8.3 Configuring the SCP Client...................................................................................................................2159.8.4 Checking the Configurations.................................................................................................................215
9.9 Configuration Examples.................................................................................................................................2169.9.1 Example for Logging in to Another Device by Using Telnet...............................................................2169.9.2 Example for Configuring the Device as the STelnet Client to Connect to the SSH Server..................2189.9.3 Example for Accessing Files on Another Device by Using TFTP........................................................2259.9.4 Example for Accessing Files on Another Device by Using FTP..........................................................2269.9.5 Example for Accessing Files on Another Device by Using SFTP........................................................2289.9.6 Example for Accessing Files on Another Device by Using FTPS........................................................2359.9.7 Example for Accessing Files on Another Device by Using SCP..........................................................2429.9.8 Example for Configuring the SSH Server to Support the Access from Another Port...........................2449.9.9 Example for Authenticating SSH Through RADIUS............................................................................251
10 Web System Configuration...................................................................................................25610.1 Overview of Web System.............................................................................................................................257
S6700 Series Ethernet SwitchesConfiguration Guide - Basic Configuration Contents
Issue 05 (2013-04-10) Huawei Proprietary and ConfidentialCopyright © Huawei Technologies Co., Ltd.
x

10.2 Starting Web System....................................................................................................................................25710.2.1 Setting the Management IP Address of the Device.............................................................................25710.2.2 Uploading Web Page Files..................................................................................................................25810.2.3 Loading a Web Page File.....................................................................................................................25910.2.4 Creating a Web Account......................................................................................................................26010.2.5 Logging In to the Web System............................................................................................................261
S6700 Series Ethernet SwitchesConfiguration Guide - Basic Configuration Contents
Issue 05 (2013-04-10) Huawei Proprietary and ConfidentialCopyright © Huawei Technologies Co., Ltd.
xi
1 Logging In to the System for the First Time
About This Chapter
You can log in to a new switch through the console port to configure the switch.
1.1 IntroductionYou can configure a device that is powered on for the first time by logging in through the consoleport.
1.2 Logging In to the Device Through the Console PortThis section describes how to establish the configuration environment by using the console portto connect a terminal to a switch.
S6700 Series Ethernet SwitchesConfiguration Guide - Basic Configuration 1 Logging In to the System for the First Time
Issue 05 (2013-04-10) Huawei Proprietary and ConfidentialCopyright © Huawei Technologies Co., Ltd.
1
1.1 IntroductionYou can configure a device that is powered on for the first time by logging in through the consoleport.
The console port is a linear port on the main control board.
A main control board provides a console port To configure a device, connect the user terminalserial port to the device console port.
1.2 Logging In to the Device Through the Console PortThis section describes how to establish the configuration environment by using the console portto connect a terminal to a switch.
1.2.1 Establishing the Configuration TaskBefore logging in to the switch through the console port, familiarize yourself with the usagescenario, complete the pre-configuration tasks, and obtain any data required for theconfiguration.
Applicable Environment
When the switch is powered on for the first time, you could use the console port to log in to theswitch to configure and manage the switch.
Pre-configuration Tasks
Before logging in to the switch through the console port, complete the following tasks:
l Install terminal emulation program on the PC (for example, Windows XP HyperTerminal).
l Prepare the RS-232 cable.
Data Preparation
To log in to the switch through the console port, you need the following data.
No. Data
1 Terminal communication parametersl Baud ratel Data bitl Parityl Stop bitl Flow-control mode
S6700 Series Ethernet SwitchesConfiguration Guide - Basic Configuration 1 Logging In to the System for the First Time
Issue 05 (2013-04-10) Huawei Proprietary and ConfidentialCopyright © Huawei Technologies Co., Ltd.
2
NOTEThe system automatically uses default parameter values for the first login.
1.2.2 Establishing the Physical ConnectionThe console port of the switch must be connected to the COM port of a terminal using a consolecable.
Procedure
Step 1 Power on all devices to perform a self-check.
Step 2 Connect the COM port on the PC and the console port on the switch by a cable.
----End
1.2.3 Logging In to the DeviceTo manage a switch that is powered on for the first time, you can log in to it using the consoleport.
ContextPC terminal attributes, including the transmission rate, data bit, parity bit, stop bit, and flowcontrol mode must be configured to match those configured for the console port. Default valuesfor terminal attributes are used during the first login to the device.
Procedure
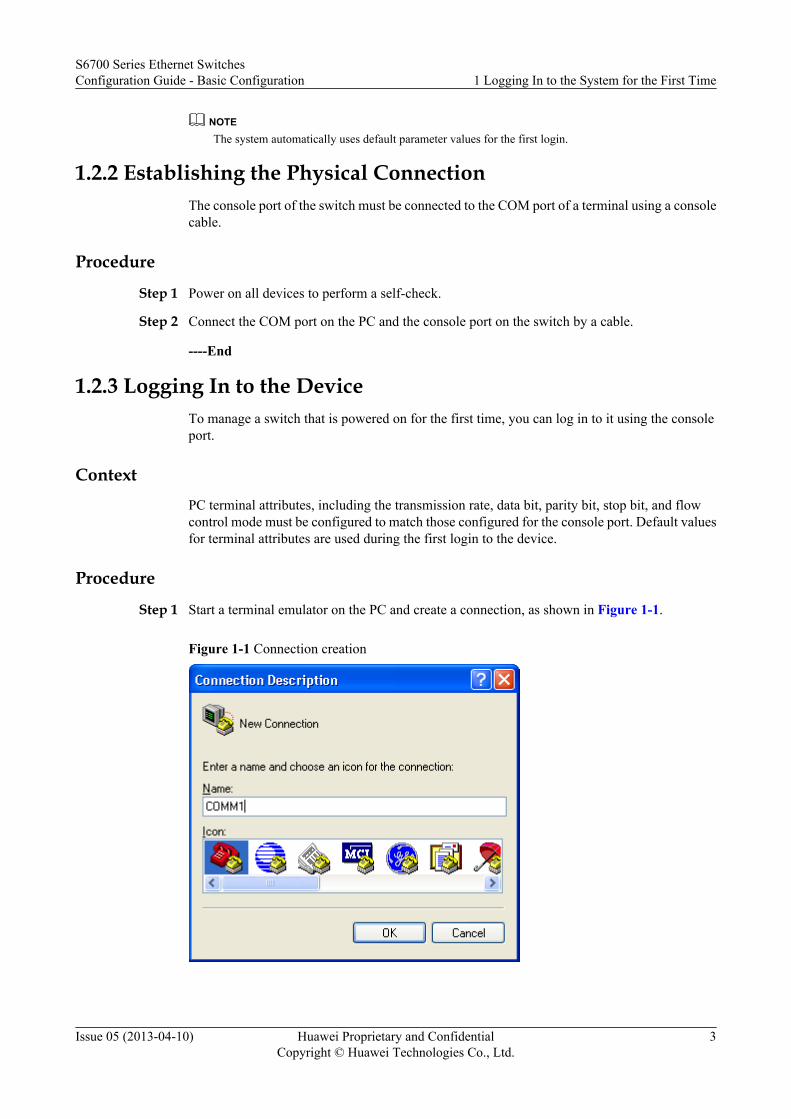
Step 1 Start a terminal emulator on the PC and create a connection, as shown in Figure 1-1.
Figure 1-1 Connection creation
S6700 Series Ethernet SwitchesConfiguration Guide - Basic Configuration 1 Logging In to the System for the First Time
Issue 05 (2013-04-10) Huawei Proprietary and ConfidentialCopyright © Huawei Technologies Co., Ltd.
3
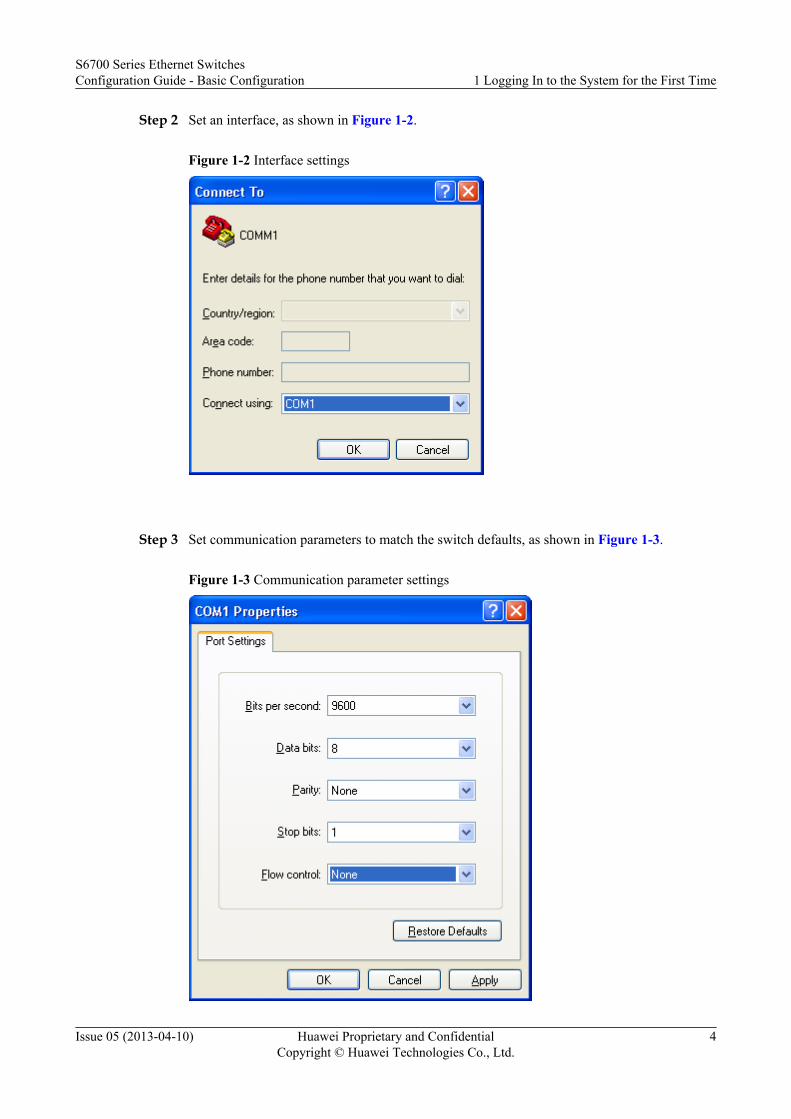
Step 2 Set an interface, as shown in Figure 1-2.
Figure 1-2 Interface settings
Step 3 Set communication parameters to match the switch defaults, as shown in Figure 1-3.
Figure 1-3 Communication parameter settings
S6700 Series Ethernet SwitchesConfiguration Guide - Basic Configuration 1 Logging In to the System for the First Time
Issue 05 (2013-04-10) Huawei Proprietary and ConfidentialCopyright © Huawei Technologies Co., Ltd.
4

Step 4 Press Enter. At the following command-line prompt, set an authentication password. The systemautomatically saves the set password.Please configure the login password (maximum length 16)Enter Password: Confirm Password:
NOTE
l After the password for the user interface is set successfully during the first login, you must enter thispassword for authentication when you relog in to the system in password authentication mode usingthis user interface.
----End
S6700 Series Ethernet SwitchesConfiguration Guide - Basic Configuration 1 Logging In to the System for the First Time
Issue 05 (2013-04-10) Huawei Proprietary and ConfidentialCopyright © Huawei Technologies Co., Ltd.
5
2 CLI Overview
About This Chapter
The command line interface (CLI) is used to configure and maintain devices.
2.1 CLI IntroductionAfter you log in to the switch, a prompt is displayed and you can use the command line interface(CLI). Users can interact with the switch through the CLI.
2.2 Online HelpWhen inputting command lines or configuring services, you can use the online help to obtainreal-time help.
2.3 CLI FeaturesThe CLI provides several features to help users flexibly use it.
2.4 Shortcut KeysSystem or user-defined shortcut keys make it easier to enter commands.
2.5 Configuration ExamplesThis section provides several examples that illustrate the use of command lines.
S6700 Series Ethernet SwitchesConfiguration Guide - Basic Configuration 2 CLI Overview
Issue 05 (2013-04-10) Huawei Proprietary and ConfidentialCopyright © Huawei Technologies Co., Ltd.
6
2.1 CLI IntroductionAfter you log in to the switch, a prompt is displayed and you can use the command line interface(CLI). Users can interact with the switch through the CLI.
2.1.1 Command Line InterfaceYou can use CLI commands to configure and manage the switch.
The CLI provides users access to a number of features and capabilities:
l Local configuration through the console port.l Local or remote configuration through Telnet or Secure Shell (SSH).l The telnet command for directly logging in to and managing other switchs.l FTP service for file uploads and downloads.l A user interface view for specific configuration management.l Hierarchical command protection structure giving certain levels of users permission to run
certain levels of commands.l Entering "?" for online help at any time.l Two authentication modes are supported, namely, password authentication, and
Authentication, Authorization, and Accounting (AAA) authentication. Password and AAAauthentication protect system security by prohibiting unauthorized users from logging into the switch.
l A command line interpreter provides intelligent text entry methods such as key word fuzzymatch and context conjunction. These methods help users to enter commands easily andcorrectly.
l Network test commands such as tracert and ping for fast network diagnostics.l Abundant debugging information to with network diagnostics.l Running a command used previously on the device, like DosKey.
NOTE
l The system supports commands that contain a maximum of 510 characters. A command does not haveto be entered in full, as long as the part of the command entered is unique within the system. Forexample, to use the display current-configuration command, entering d cu, di cu, or dis cu will runthe command. Entering d c or dis c will not run the command, because these entries are not unique tothe command.
l The system saves the complete form of incomplete commands to configuration files. Saved commandsmay have more than 510 characters. When the system is restarted, incomplete commands cannot berestored. Therefore, pay attention to the length of incomplete commands before saving them.
2.1.2 Command LevelsThe system structures access to command functions hierarchically to protect system security.The system administrator sets user access levels that grant specific users access to specificcommand levels.
By default, the command level of a user is a value ranging from 0 to 3, and the user access levelis a value ranging from 0 to 15. Table 2-1 lists the association between user access levels andcommand levels.
S6700 Series Ethernet SwitchesConfiguration Guide - Basic Configuration 2 CLI Overview
Issue 05 (2013-04-10) Huawei Proprietary and ConfidentialCopyright © Huawei Technologies Co., Ltd.
7
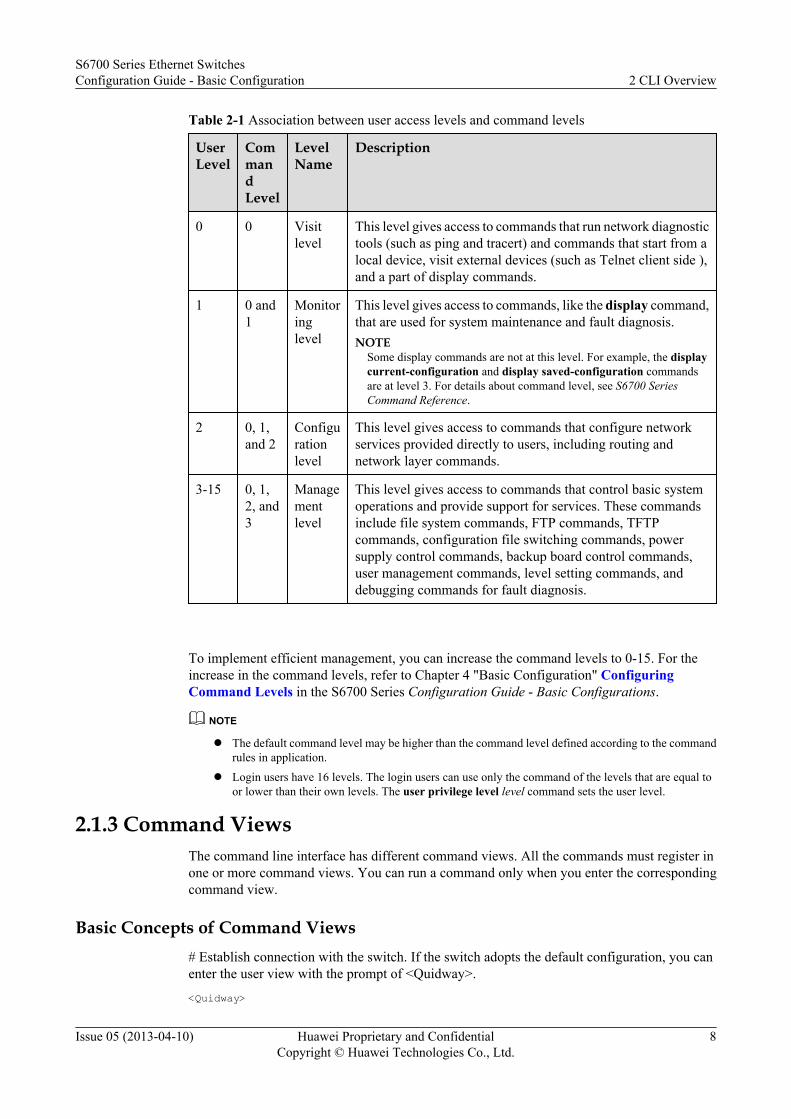
Table 2-1 Association between user access levels and command levels
UserLevel
CommandLevel
LevelName
Description
0 0 Visitlevel
This level gives access to commands that run network diagnostictools (such as ping and tracert) and commands that start from alocal device, visit external devices (such as Telnet client side ),and a part of display commands.
1 0 and1
Monitoringlevel
This level gives access to commands, like the display command,that are used for system maintenance and fault diagnosis.NOTE
Some display commands are not at this level. For example, the displaycurrent-configuration and display saved-configuration commandsare at level 3. For details about command level, see S6700 SeriesCommand Reference.
2 0, 1,and 2
Configurationlevel
This level gives access to commands that configure networkservices provided directly to users, including routing andnetwork layer commands.
3-15 0, 1,2, and3
Managementlevel
This level gives access to commands that control basic systemoperations and provide support for services. These commandsinclude file system commands, FTP commands, TFTPcommands, configuration file switching commands, powersupply control commands, backup board control commands,user management commands, level setting commands, anddebugging commands for fault diagnosis.
To implement efficient management, you can increase the command levels to 0-15. For theincrease in the command levels, refer to Chapter 4 "Basic Configuration" ConfiguringCommand Levels in the S6700 Series Configuration Guide - Basic Configurations.
NOTE
l The default command level may be higher than the command level defined according to the commandrules in application.
l Login users have 16 levels. The login users can use only the command of the levels that are equal toor lower than their own levels. The user privilege level level command sets the user level.
2.1.3 Command ViewsThe command line interface has different command views. All the commands must register inone or more command views. You can run a command only when you enter the correspondingcommand view.
Basic Concepts of Command Views# Establish connection with the switch. If the switch adopts the default configuration, you canenter the user view with the prompt of <Quidway>.
<Quidway>
S6700 Series Ethernet SwitchesConfiguration Guide - Basic Configuration 2 CLI Overview
Issue 05 (2013-04-10) Huawei Proprietary and ConfidentialCopyright © Huawei Technologies Co., Ltd.
8

# Type system-view, and you can enter the system view.
<Quidway> system-view[Quidway]
# Type aaa in the system view, and you can enter the AAA view.
[Quidway] aaa[Quidway-aaa]
NOTE
The prompt <Quidway> indicates the default switch name. The prompt <> indicates the user view and theprompt [] indicates other views.
Some commands that are implemented in the system view can also be implemented in the otherviews; however, the functions that can be implemented are command view-specific.
Common Views
The S6700 provides various command line views. For the methods of entering the commandline views except the following views, see the Quidway S6700 Series Ethernet SwitchesCommand Reference.
l User View
Item Description
Function Displays the running status and statistics of the S6700.
Entry command Enters the user view after the connection is set up.
Prompt uponentry
<Quidway>
Quit command <Quidway>quit
Prompt uponquit
None.
l System View
Item Description
Function Sets the system parameters of the S6700, and enters other functionviews from this view.
Entry command <Quidway> system-view
Prompt uponentry
[Quidway]
Quit command [Quidway] quit
Prompt uponquit
<Quidway>
l Ethernet Interface View
S6700 Series Ethernet SwitchesConfiguration Guide - Basic Configuration 2 CLI Overview
Issue 05 (2013-04-10) Huawei Proprietary and ConfidentialCopyright © Huawei Technologies Co., Ltd.
9
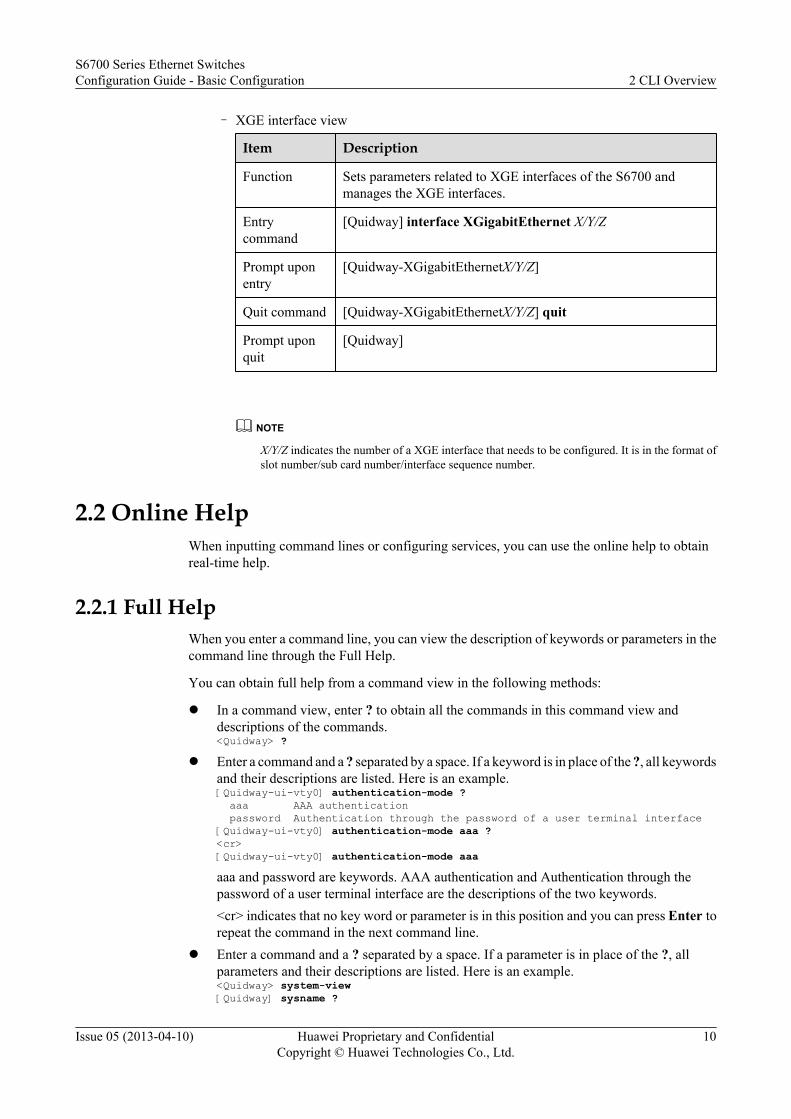
– XGE interface view
Item Description
Function Sets parameters related to XGE interfaces of the S6700 andmanages the XGE interfaces.
Entrycommand
[Quidway] interface XGigabitEthernet X/Y/Z
Prompt uponentry
[Quidway-XGigabitEthernetX/Y/Z]
Quit command [Quidway-XGigabitEthernetX/Y/Z] quit
Prompt uponquit
[Quidway]
NOTE
X/Y/Z indicates the number of a XGE interface that needs to be configured. It is in the format ofslot number/sub card number/interface sequence number.
2.2 Online HelpWhen inputting command lines or configuring services, you can use the online help to obtainreal-time help.
2.2.1 Full HelpWhen you enter a command line, you can view the description of keywords or parameters in thecommand line through the Full Help.
You can obtain full help from a command view in the following methods:
l In a command view, enter ? to obtain all the commands in this command view anddescriptions of the commands.<Quidway> ?
l Enter a command and a ? separated by a space. If a keyword is in place of the ?, all keywordsand their descriptions are listed. Here is an example.[Quidway-ui-vty0] authentication-mode ? aaa AAA authentication password Authentication through the password of a user terminal interface [Quidway-ui-vty0] authentication-mode aaa ?<cr>[Quidway-ui-vty0] authentication-mode aaaaaa and password are keywords. AAA authentication and Authentication through thepassword of a user terminal interface are the descriptions of the two keywords.<cr> indicates that no key word or parameter is in this position and you can press Enter torepeat the command in the next command line.
l Enter a command and a ? separated by a space. If a parameter is in place of the ?, allparameters and their descriptions are listed. Here is an example.<Quidway> system-view[Quidway] sysname ?
S6700 Series Ethernet SwitchesConfiguration Guide - Basic Configuration 2 CLI Overview
Issue 05 (2013-04-10) Huawei Proprietary and ConfidentialCopyright © Huawei Technologies Co., Ltd.
10
TEXT Host name(1 to 246 characters)
TEXT is a parameter and Host name (1 to 246 characters) is the description.
2.2.2 Partial HelpIf you enter only the first or first several characters of a command, partial help provides keywordsthat begin with this character or character string.
Procedurel Use any of the following methods to obtain partial help from a command line.
– Enter a character string followed directly by a question mark (?) to display all commandsthat begin with this character string.<Quidway> d? debugging delete dir display
– Enter a command and a character string followed directly by a question mark (?) todisplay all key words that begin with this character string.<Quidway> display b? bfd bgp bootrom bpdu bpdu-tunnel bridge buffer
– Enter the first several letters of a key word in the command and then press Tab to displaya complete key word. A complete keyword is displayed only if the partial string of lettersuniquely identifies a specific key word. If they do not identify a specific key work,continuing to press Tab will display different key words. You can select the needed keyword.
----End
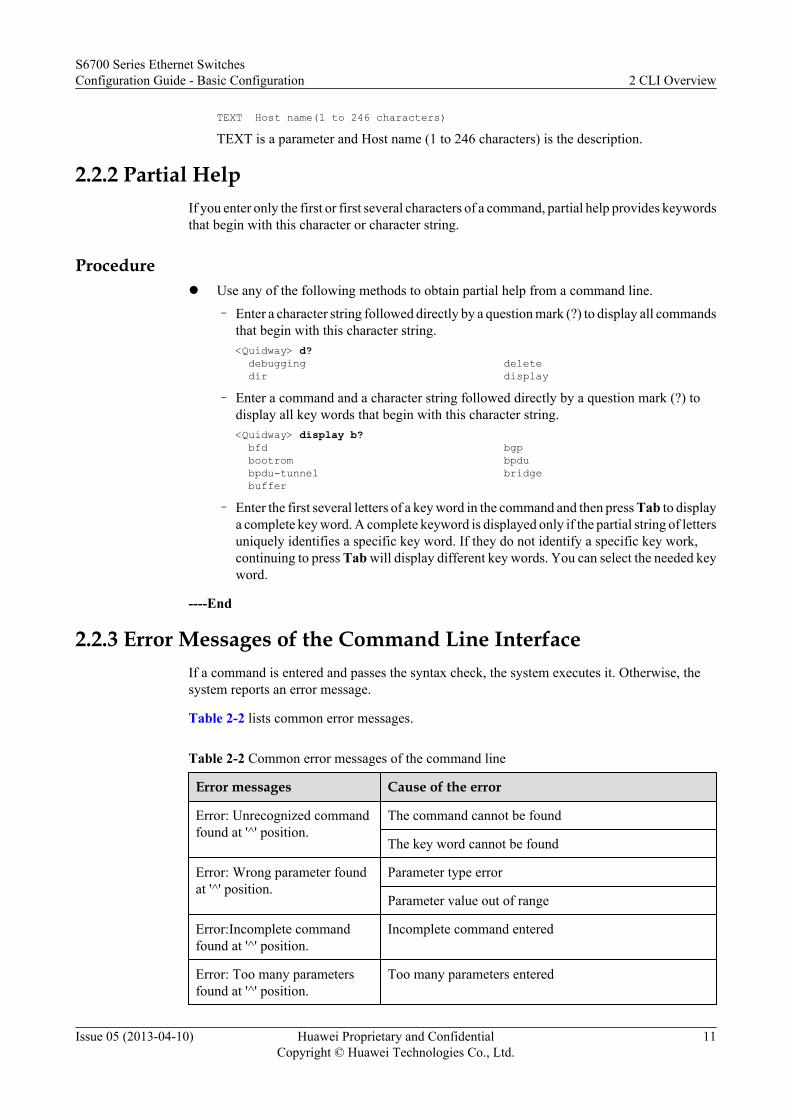
2.2.3 Error Messages of the Command Line InterfaceIf a command is entered and passes the syntax check, the system executes it. Otherwise, thesystem reports an error message.
Table 2-2 lists common error messages.
Table 2-2 Common error messages of the command line
Error messages Cause of the error
Error: Unrecognized commandfound at '^' position.
The command cannot be found
The key word cannot be found
Error: Wrong parameter foundat '^' position.
Parameter type error
Parameter value out of range
Error:Incomplete commandfound at '^' position.
Incomplete command entered
Error: Too many parametersfound at '^' position.
Too many parameters entered
S6700 Series Ethernet SwitchesConfiguration Guide - Basic Configuration 2 CLI Overview
Issue 05 (2013-04-10) Huawei Proprietary and ConfidentialCopyright © Huawei Technologies Co., Ltd.
11
Error messages Cause of the error
Error:Ambiguous commandfound at '^' position.
Ambiguous parameters entered
2.3 CLI FeaturesThe CLI provides several features to help users flexibly use it.
2.3.1 EditingThe command line editing function allows you to edit command lines or obtain help by usingcertain keys.
The command line of S6700 supports multi-line edition. The maximum length of each commandis 510 characters.
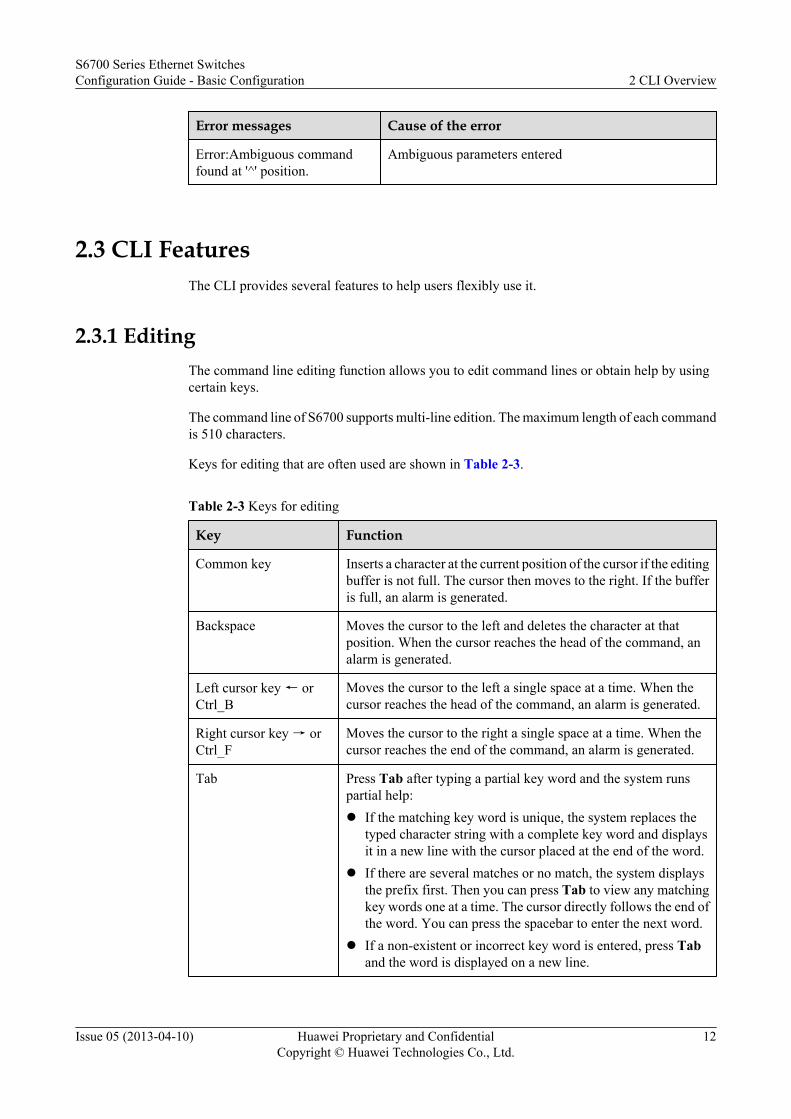
Keys for editing that are often used are shown in Table 2-3.
Table 2-3 Keys for editing
Key Function
Common key Inserts a character at the current position of the cursor if the editingbuffer is not full. The cursor then moves to the right. If the bufferis full, an alarm is generated.
Backspace Moves the cursor to the left and deletes the character at thatposition. When the cursor reaches the head of the command, analarm is generated.
Left cursor key ← orCtrl_B
Moves the cursor to the left a single space at a time. When thecursor reaches the head of the command, an alarm is generated.
Right cursor key → orCtrl_F
Moves the cursor to the right a single space at a time. When thecursor reaches the end of the command, an alarm is generated.
Tab Press Tab after typing a partial key word and the system runspartial help:l If the matching key word is unique, the system replaces the
typed character string with a complete key word and displaysit in a new line with the cursor placed at the end of the word.
l If there are several matches or no match, the system displaysthe prefix first. Then you can press Tab to view any matchingkey words one at a time. The cursor directly follows the end ofthe word. You can press the spacebar to enter the next word.
l If a non-existent or incorrect key word is entered, press Taband the word is displayed on a new line.
S6700 Series Ethernet SwitchesConfiguration Guide - Basic Configuration 2 CLI Overview
Issue 05 (2013-04-10) Huawei Proprietary and ConfidentialCopyright © Huawei Technologies Co., Ltd.
12
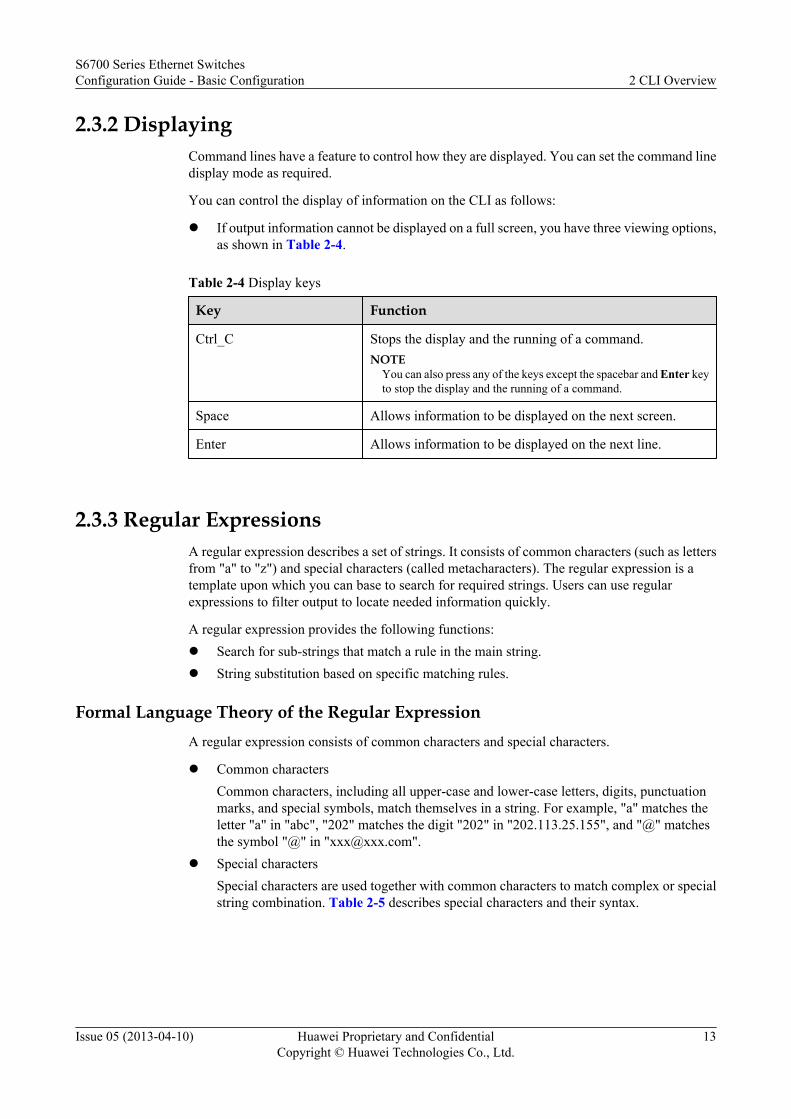
2.3.2 DisplayingCommand lines have a feature to control how they are displayed. You can set the command linedisplay mode as required.
You can control the display of information on the CLI as follows:
l If output information cannot be displayed on a full screen, you have three viewing options,as shown in Table 2-4.
Table 2-4 Display keys
Key Function
Ctrl_C Stops the display and the running of a command.NOTE
You can also press any of the keys except the spacebar and Enter keyto stop the display and the running of a command.
Space Allows information to be displayed on the next screen.
Enter Allows information to be displayed on the next line.
2.3.3 Regular ExpressionsA regular expression describes a set of strings. It consists of common characters (such as lettersfrom "a" to "z") and special characters (called metacharacters). The regular expression is atemplate upon which you can base to search for required strings. Users can use regularexpressions to filter output to locate needed information quickly.
A regular expression provides the following functions:l Search for sub-strings that match a rule in the main string.l String substitution based on specific matching rules.
Formal Language Theory of the Regular ExpressionA regular expression consists of common characters and special characters.
l Common charactersCommon characters, including all upper-case and lower-case letters, digits, punctuationmarks, and special symbols, match themselves in a string. For example, "a" matches theletter "a" in "abc", "202" matches the digit "202" in "202.113.25.155", and "@" matchesthe symbol "@" in "[email protected]".
l Special charactersSpecial characters are used together with common characters to match complex or specialstring combination. Table 2-5 describes special characters and their syntax.
S6700 Series Ethernet SwitchesConfiguration Guide - Basic Configuration 2 CLI Overview
Issue 05 (2013-04-10) Huawei Proprietary and ConfidentialCopyright © Huawei Technologies Co., Ltd.
13
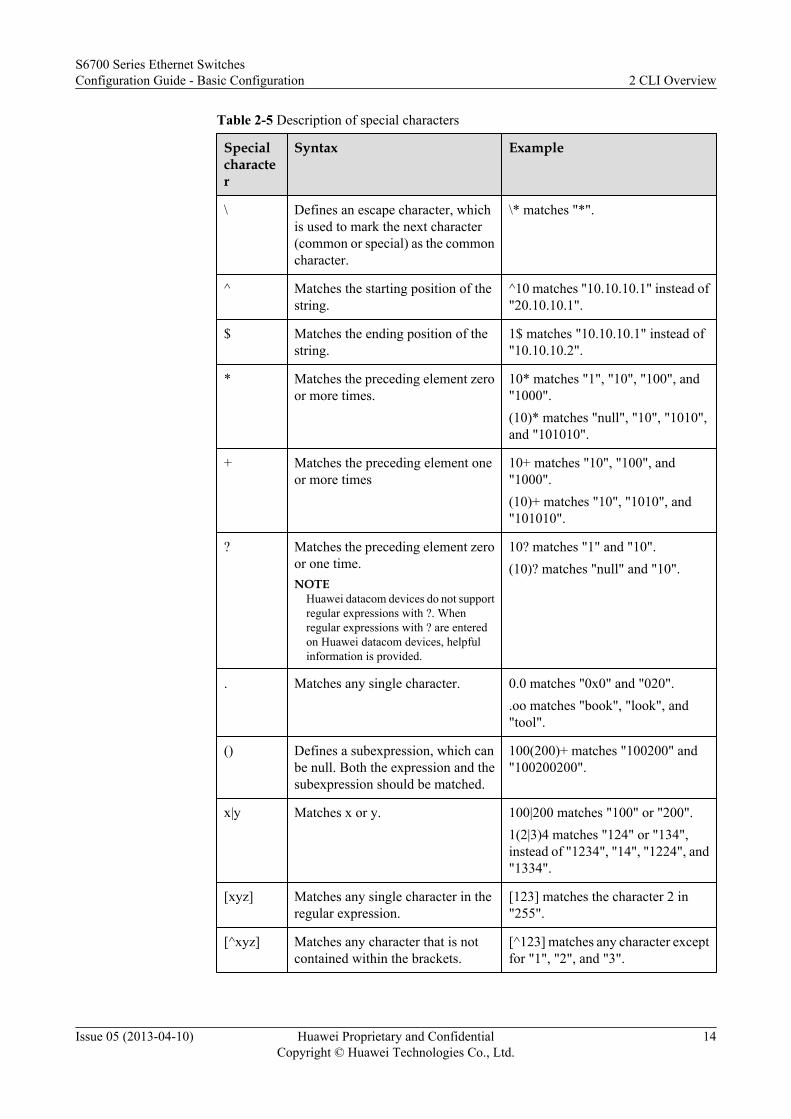
Table 2-5 Description of special characters
Specialcharacter
Syntax Example
\ Defines an escape character, whichis used to mark the next character(common or special) as the commoncharacter.
\* matches "*".
^ Matches the starting position of thestring.
^10 matches "10.10.10.1" instead of"20.10.10.1".
$ Matches the ending position of thestring.
1$ matches "10.10.10.1" instead of"10.10.10.2".
* Matches the preceding element zeroor more times.
10* matches "1", "10", "100", and"1000".(10)* matches "null", "10", "1010",and "101010".
+ Matches the preceding element oneor more times
10+ matches "10", "100", and"1000".(10)+ matches "10", "1010", and"101010".
? Matches the preceding element zeroor one time.NOTE
Huawei datacom devices do not supportregular expressions with ?. Whenregular expressions with ? are enteredon Huawei datacom devices, helpfulinformation is provided.
10? matches "1" and "10".(10)? matches "null" and "10".
. Matches any single character. 0.0 matches "0x0" and "020"..oo matches "book", "look", and"tool".
() Defines a subexpression, which canbe null. Both the expression and thesubexpression should be matched.
100(200)+ matches "100200" and"100200200".
x|y Matches x or y. 100|200 matches "100" or "200".1(2|3)4 matches "124" or "134",instead of "1234", "14", "1224", and"1334".
[xyz] Matches any single character in theregular expression.
[123] matches the character 2 in"255".
[^xyz] Matches any character that is notcontained within the brackets.
[^123] matches any character exceptfor "1", "2", and "3".
S6700 Series Ethernet SwitchesConfiguration Guide - Basic Configuration 2 CLI Overview
Issue 05 (2013-04-10) Huawei Proprietary and ConfidentialCopyright © Huawei Technologies Co., Ltd.
14
Specialcharacter
Syntax Example
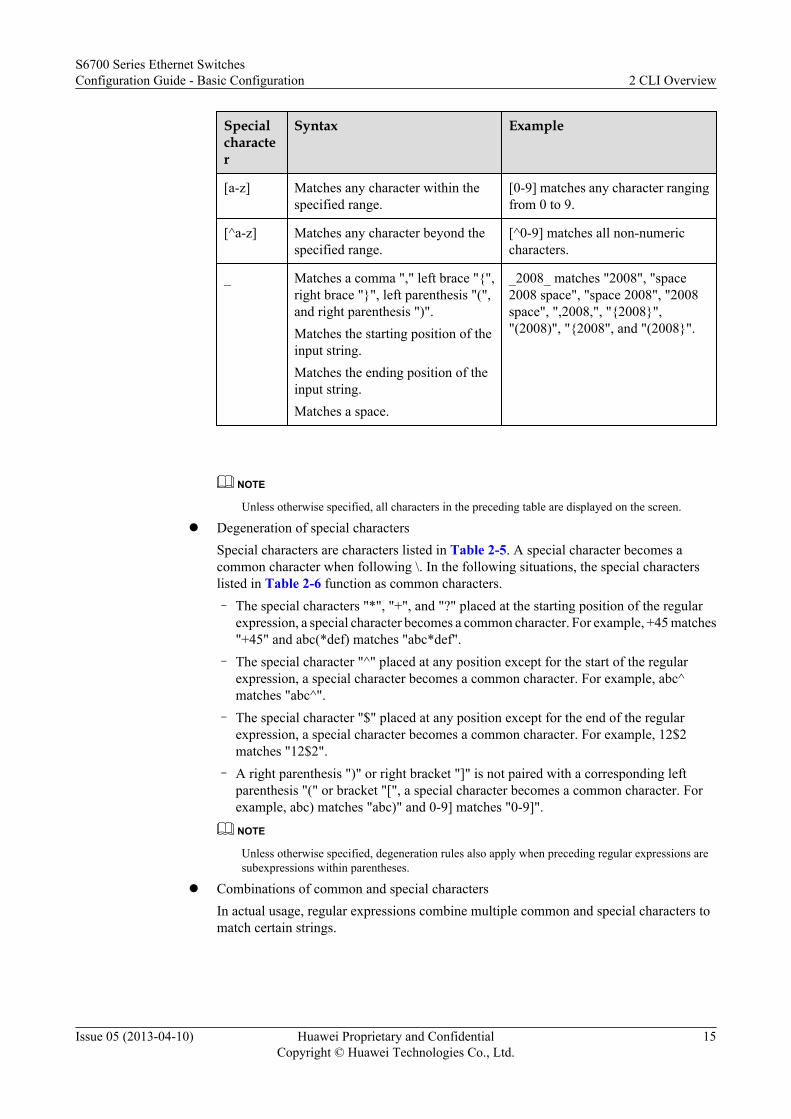
[a-z] Matches any character within thespecified range.
[0-9] matches any character rangingfrom 0 to 9.
[^a-z] Matches any character beyond thespecified range.
[^0-9] matches all non-numericcharacters.
_ Matches a comma "," left brace "{",right brace "}", left parenthesis "(",and right parenthesis ")".Matches the starting position of theinput string.Matches the ending position of theinput string.Matches a space.
_2008_ matches "2008", "space2008 space", "space 2008", "2008space", ",2008,", "{2008}","(2008)", "{2008", and "(2008}".
NOTE
Unless otherwise specified, all characters in the preceding table are displayed on the screen.
l Degeneration of special charactersSpecial characters are characters listed in Table 2-5. A special character becomes acommon character when following \. In the following situations, the special characterslisted in Table 2-6 function as common characters.– The special characters "*", "+", and "?" placed at the starting position of the regular
expression, a special character becomes a common character. For example, +45 matches"+45" and abc(*def) matches "abc*def".
– The special character "^" placed at any position except for the start of the regularexpression, a special character becomes a common character. For example, abc^matches "abc^".
– The special character "$" placed at any position except for the end of the regularexpression, a special character becomes a common character. For example, 12$2matches "12$2".
– A right parenthesis ")" or right bracket "]" is not paired with a corresponding leftparenthesis "(" or bracket "[", a special character becomes a common character. Forexample, abc) matches "abc)" and 0-9] matches "0-9]".
NOTE
Unless otherwise specified, degeneration rules also apply when preceding regular expressions aresubexpressions within parentheses.
l Combinations of common and special charactersIn actual usage, regular expressions combine multiple common and special characters tomatch certain strings.
S6700 Series Ethernet SwitchesConfiguration Guide - Basic Configuration 2 CLI Overview
Issue 05 (2013-04-10) Huawei Proprietary and ConfidentialCopyright © Huawei Technologies Co., Ltd.
15

Regular Expression Examples
The key to using regular expressions is to design accurate regular expressions. Table 2-6 showshow to design regular expressions using special characters and describes the meaning of thoseregular expressions.
Table 2-6 Regular expression examples
RegularExpression
Description
^100 Matches strings beginning with 100, for example, 100085.
200$ Matches strings ending with 200, for example, 255.255.100.200.
[0-9]+ Matches strings of repeated digits ranging from 0 to 9, for example,007
(abc)* Matches strings with abc occurring zero or more times, for example,d and dabc.
^100([0-9]+)*200$ Matches strings beginning with 100 and ending with 200, and withzero or several digits in the middle, for example, 100200.
Windows_(95|98|2000|XP))
Matches Windows 95, Windows 98, Windows 2000, or Windows XP.
100[^0-9]? Matches strings beginning with 100 followed by zero or one non-digitcharacter, for example, 100 or 100@.
.\.\* Matches a string beginning with a single character except \n followedby . and *, for example, 1.* or a.*.
^172\.18\.(10)\.([0-9]+)$
Matches an IP address in a line, for example, 172.18.10.X.
Specifying a Filtering Mode in a Command
CAUTIONThe S6700 Series uses a regular expression to implement the pipe character filtering function.A display command supports the pipe character only when there is excessive output information.
When filtering conditions are set to query output, the first line of the command output starts withinformation containing the regular expression.
Some commands can carry the parameter | count to display the number of matching entries. Theparameter | count can be used together with other parameters.
For commands that support regular expressions, three filtering methods are as follows:
S6700 Series Ethernet SwitchesConfiguration Guide - Basic Configuration 2 CLI Overview
Issue 05 (2013-04-10) Huawei Proprietary and ConfidentialCopyright © Huawei Technologies Co., Ltd.
16
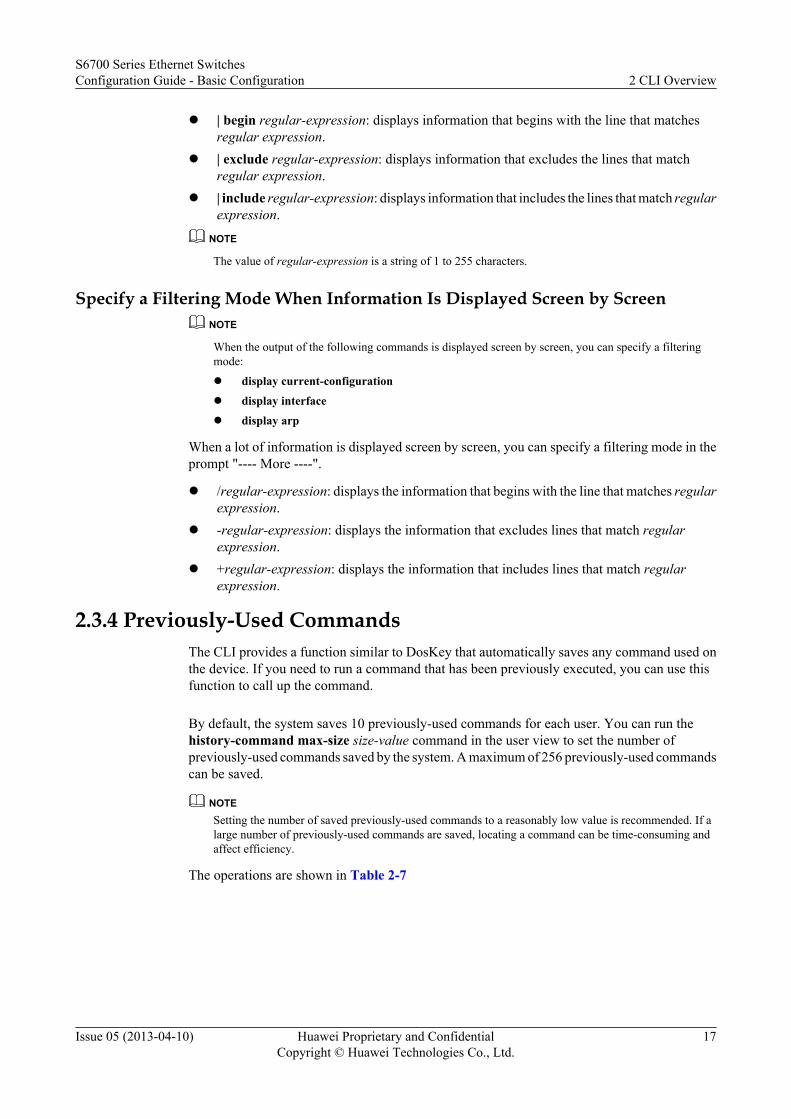
l | begin regular-expression: displays information that begins with the line that matchesregular expression.
l | exclude regular-expression: displays information that excludes the lines that matchregular expression.
l | include regular-expression: displays information that includes the lines that match regularexpression.
NOTE
The value of regular-expression is a string of 1 to 255 characters.
Specify a Filtering Mode When Information Is Displayed Screen by ScreenNOTE
When the output of the following commands is displayed screen by screen, you can specify a filteringmode:
l display current-configurationl display interfacel display arp
When a lot of information is displayed screen by screen, you can specify a filtering mode in theprompt "---- More ----".
l /regular-expression: displays the information that begins with the line that matches regularexpression.
l -regular-expression: displays the information that excludes lines that match regularexpression.
l +regular-expression: displays the information that includes lines that match regularexpression.
2.3.4 Previously-Used CommandsThe CLI provides a function similar to DosKey that automatically saves any command used onthe device. If you need to run a command that has been previously executed, you can use thisfunction to call up the command.
By default, the system saves 10 previously-used commands for each user. You can run thehistory-command max-size size-value command in the user view to set the number ofpreviously-used commands saved by the system. A maximum of 256 previously-used commandscan be saved.
NOTESetting the number of saved previously-used commands to a reasonably low value is recommended. If alarge number of previously-used commands are saved, locating a command can be time-consuming andaffect efficiency.
The operations are shown in Table 2-7
S6700 Series Ethernet SwitchesConfiguration Guide - Basic Configuration 2 CLI Overview
Issue 05 (2013-04-10) Huawei Proprietary and ConfidentialCopyright © Huawei Technologies Co., Ltd.
17
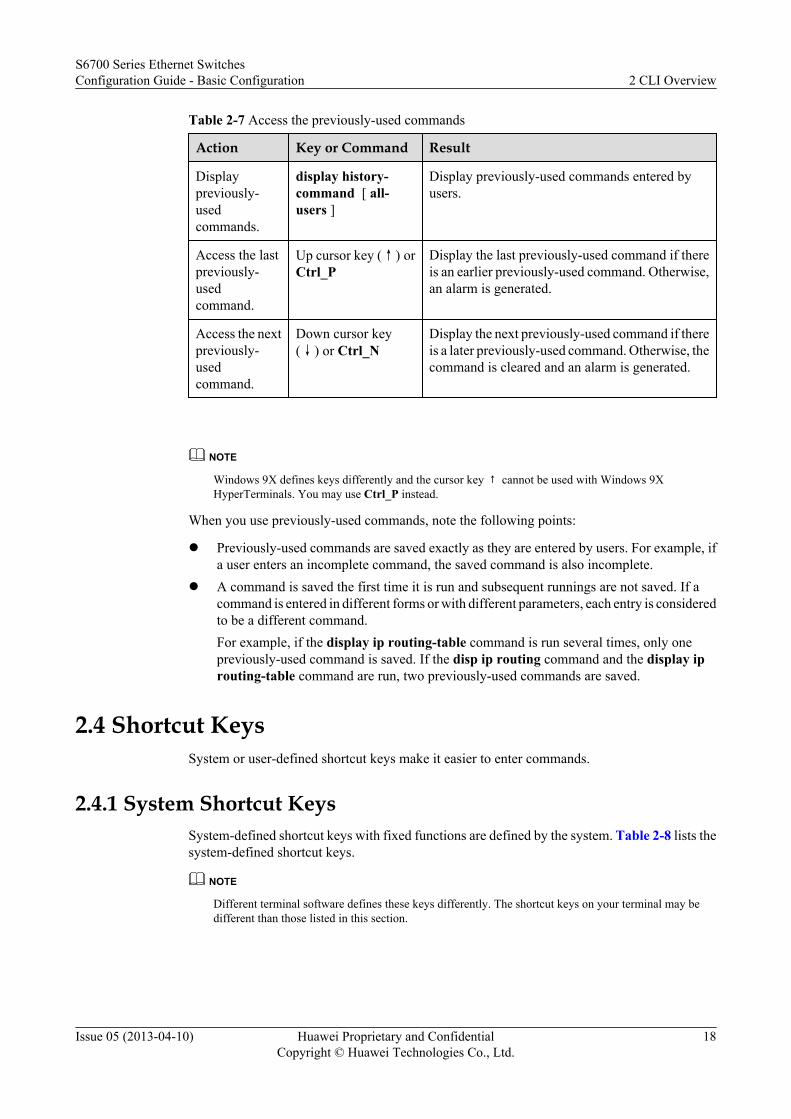
Table 2-7 Access the previously-used commands
Action Key or Command Result
Displaypreviously-usedcommands.
display history-command [ all-users ]
Display previously-used commands entered byusers.
Access the lastpreviously-usedcommand.
Up cursor key (↑) orCtrl_P
Display the last previously-used command if thereis an earlier previously-used command. Otherwise,an alarm is generated.
Access the nextpreviously-usedcommand.
Down cursor key(↓) or Ctrl_N
Display the next previously-used command if thereis a later previously-used command. Otherwise, thecommand is cleared and an alarm is generated.
NOTE
Windows 9X defines keys differently and the cursor key ↑ cannot be used with Windows 9XHyperTerminals. You may use Ctrl_P instead.
When you use previously-used commands, note the following points:
l Previously-used commands are saved exactly as they are entered by users. For example, ifa user enters an incomplete command, the saved command is also incomplete.
l A command is saved the first time it is run and subsequent runnings are not saved. If acommand is entered in different forms or with different parameters, each entry is consideredto be a different command.For example, if the display ip routing-table command is run several times, only onepreviously-used command is saved. If the disp ip routing command and the display iprouting-table command are run, two previously-used commands are saved.
2.4 Shortcut KeysSystem or user-defined shortcut keys make it easier to enter commands.
2.4.1 System Shortcut KeysSystem-defined shortcut keys with fixed functions are defined by the system. Table 2-8 lists thesystem-defined shortcut keys.
NOTE
Different terminal software defines these keys differently. The shortcut keys on your terminal may bedifferent than those listed in this section.
S6700 Series Ethernet SwitchesConfiguration Guide - Basic Configuration 2 CLI Overview
Issue 05 (2013-04-10) Huawei Proprietary and ConfidentialCopyright © Huawei Technologies Co., Ltd.
18
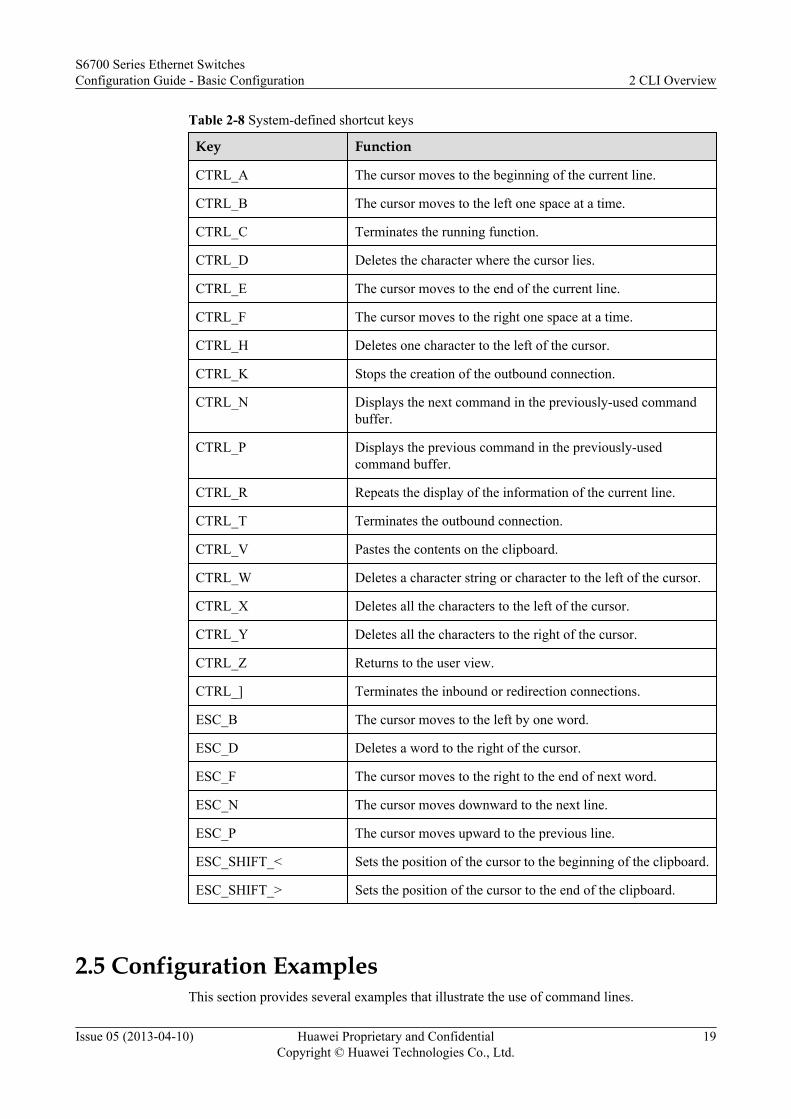
Table 2-8 System-defined shortcut keys
Key Function
CTRL_A The cursor moves to the beginning of the current line.
CTRL_B The cursor moves to the left one space at a time.
CTRL_C Terminates the running function.
CTRL_D Deletes the character where the cursor lies.
CTRL_E The cursor moves to the end of the current line.
CTRL_F The cursor moves to the right one space at a time.
CTRL_H Deletes one character to the left of the cursor.
CTRL_K Stops the creation of the outbound connection.
CTRL_N Displays the next command in the previously-used commandbuffer.
CTRL_P Displays the previous command in the previously-usedcommand buffer.
CTRL_R Repeats the display of the information of the current line.
CTRL_T Terminates the outbound connection.
CTRL_V Pastes the contents on the clipboard.
CTRL_W Deletes a character string or character to the left of the cursor.
CTRL_X Deletes all the characters to the left of the cursor.
CTRL_Y Deletes all the characters to the right of the cursor.
CTRL_Z Returns to the user view.
CTRL_] Terminates the inbound or redirection connections.
ESC_B The cursor moves to the left by one word.
ESC_D Deletes a word to the right of the cursor.
ESC_F The cursor moves to the right to the end of next word.
ESC_N The cursor moves downward to the next line.
ESC_P The cursor moves upward to the previous line.
ESC_SHIFT_< Sets the position of the cursor to the beginning of the clipboard.
ESC_SHIFT_> Sets the position of the cursor to the end of the clipboard.
2.5 Configuration ExamplesThis section provides several examples that illustrate the use of command lines.
S6700 Series Ethernet SwitchesConfiguration Guide - Basic Configuration 2 CLI Overview
Issue 05 (2013-04-10) Huawei Proprietary and ConfidentialCopyright © Huawei Technologies Co., Ltd.
19
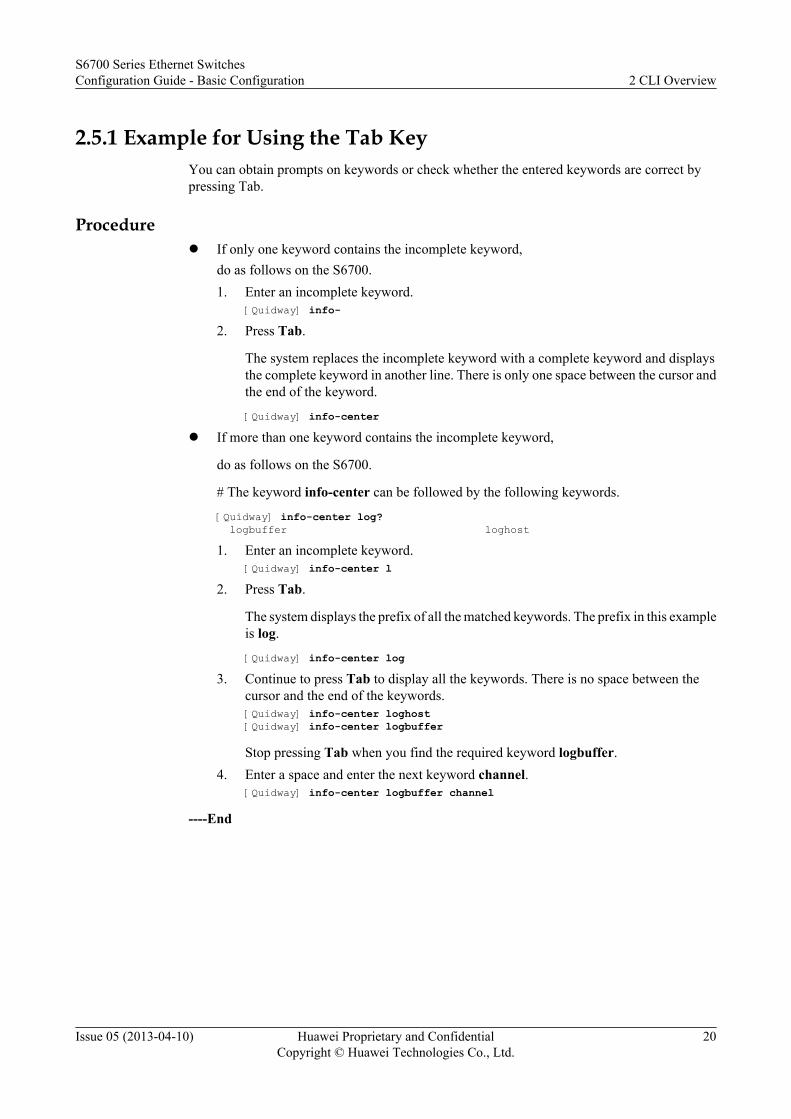
2.5.1 Example for Using the Tab KeyYou can obtain prompts on keywords or check whether the entered keywords are correct bypressing Tab.
Procedurel If only one keyword contains the incomplete keyword,
do as follows on the S6700.1. Enter an incomplete keyword.
[Quidway] info-2. Press Tab.
The system replaces the incomplete keyword with a complete keyword and displaysthe complete keyword in another line. There is only one space between the cursor andthe end of the keyword.
[Quidway] info-centerl If more than one keyword contains the incomplete keyword,
do as follows on the S6700.
# The keyword info-center can be followed by the following keywords.
[Quidway] info-center log? logbuffer loghost1. Enter an incomplete keyword.
[Quidway] info-center l2. Press Tab.
The system displays the prefix of all the matched keywords. The prefix in this exampleis log.
[Quidway] info-center log3. Continue to press Tab to display all the keywords. There is no space between the
cursor and the end of the keywords.[Quidway] info-center loghost[Quidway] info-center logbuffer
Stop pressing Tab when you find the required keyword logbuffer.4. Enter a space and enter the next keyword channel.
[Quidway] info-center logbuffer channel
----End
S6700 Series Ethernet SwitchesConfiguration Guide - Basic Configuration 2 CLI Overview
Issue 05 (2013-04-10) Huawei Proprietary and ConfidentialCopyright © Huawei Technologies Co., Ltd.
20

3 How to Use Interfaces
About This Chapter
This chapter describes the concept of the interface and the basic configuration about the interface.
3.1 Introduction to InterfacesThis section describes different types of interfaces. The interfaces are provided by the S6700 toreceive and send data.
3.2 Setting Basic Parameters of an InterfaceThis section describes how to set the basic parameters of an interface.
3.3 Configuring the Loopback InterfaceThis section describes how to configure the loopback interface.
3.4 Maintaining the InterfaceThis section describes how to maintain the interface.
S6700 Series Ethernet SwitchesConfiguration Guide - Basic Configuration 3 How to Use Interfaces
Issue 05 (2013-04-10) Huawei Proprietary and ConfidentialCopyright © Huawei Technologies Co., Ltd.
21
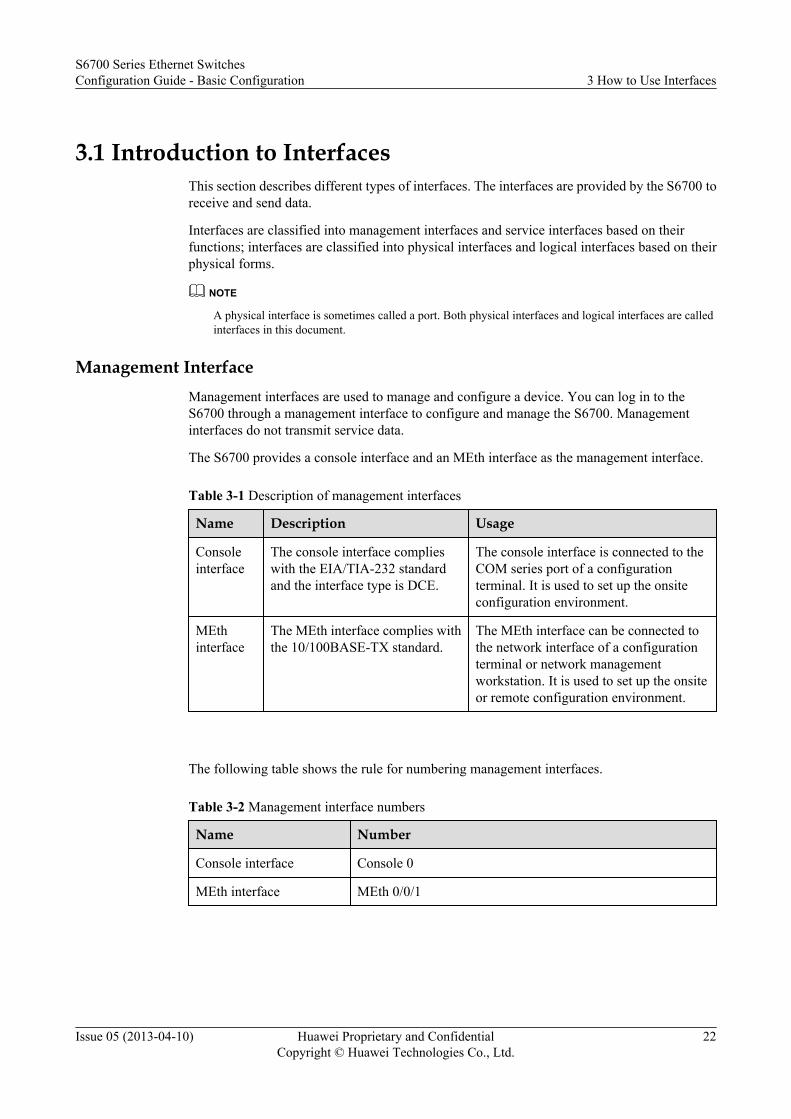
3.1 Introduction to InterfacesThis section describes different types of interfaces. The interfaces are provided by the S6700 toreceive and send data.
Interfaces are classified into management interfaces and service interfaces based on theirfunctions; interfaces are classified into physical interfaces and logical interfaces based on theirphysical forms.
NOTE
A physical interface is sometimes called a port. Both physical interfaces and logical interfaces are calledinterfaces in this document.
Management InterfaceManagement interfaces are used to manage and configure a device. You can log in to theS6700 through a management interface to configure and manage the S6700. Managementinterfaces do not transmit service data.
The S6700 provides a console interface and an MEth interface as the management interface.
Table 3-1 Description of management interfaces
Name Description Usage
Consoleinterface
The console interface complieswith the EIA/TIA-232 standardand the interface type is DCE.
The console interface is connected to theCOM series port of a configurationterminal. It is used to set up the onsiteconfiguration environment.
MEthinterface
The MEth interface complies withthe 10/100BASE-TX standard.
The MEth interface can be connected tothe network interface of a configurationterminal or network managementworkstation. It is used to set up the onsiteor remote configuration environment.
The following table shows the rule for numbering management interfaces.
Table 3-2 Management interface numbers
Name Number
Console interface Console 0
MEth interface MEth 0/0/1
S6700 Series Ethernet SwitchesConfiguration Guide - Basic Configuration 3 How to Use Interfaces
Issue 05 (2013-04-10) Huawei Proprietary and ConfidentialCopyright © Huawei Technologies Co., Ltd.
22
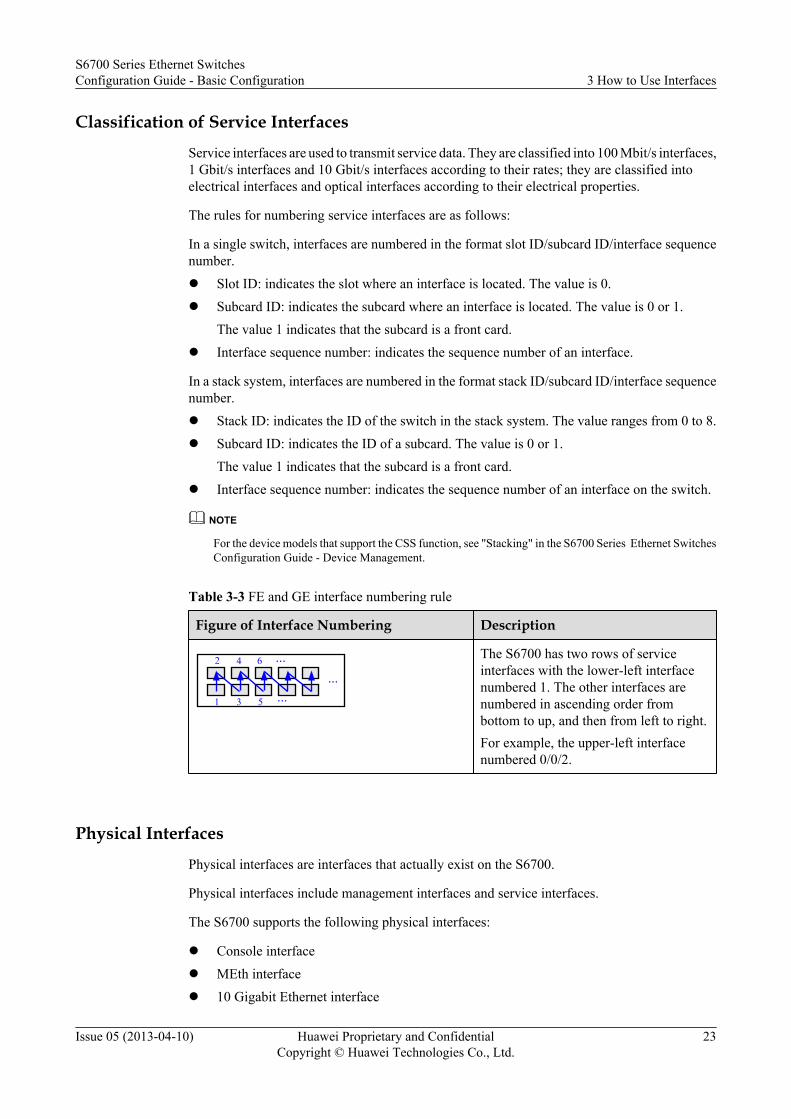
Classification of Service Interfaces
Service interfaces are used to transmit service data. They are classified into 100 Mbit/s interfaces,1 Gbit/s interfaces and 10 Gbit/s interfaces according to their rates; they are classified intoelectrical interfaces and optical interfaces according to their electrical properties.
The rules for numbering service interfaces are as follows:
In a single switch, interfaces are numbered in the format slot ID/subcard ID/interface sequencenumber.l Slot ID: indicates the slot where an interface is located. The value is 0.l Subcard ID: indicates the subcard where an interface is located. The value is 0 or 1.
The value 1 indicates that the subcard is a front card.l Interface sequence number: indicates the sequence number of an interface.
In a stack system, interfaces are numbered in the format stack ID/subcard ID/interface sequencenumber.l Stack ID: indicates the ID of the switch in the stack system. The value ranges from 0 to 8.l Subcard ID: indicates the ID of a subcard. The value is 0 or 1.
The value 1 indicates that the subcard is a front card.l Interface sequence number: indicates the sequence number of an interface on the switch.
NOTE
For the device models that support the CSS function, see "Stacking" in the S6700 Series Ethernet SwitchesConfiguration Guide - Device Management.
Table 3-3 FE and GE interface numbering rule
Figure of Interface Numbering Description
1
4
3
6
5
......
...
2 The S6700 has two rows of serviceinterfaces with the lower-left interfacenumbered 1. The other interfaces arenumbered in ascending order frombottom to up, and then from left to right.For example, the upper-left interfacenumbered 0/0/2.
Physical Interfaces
Physical interfaces are interfaces that actually exist on the S6700.
Physical interfaces include management interfaces and service interfaces.
The S6700 supports the following physical interfaces:
l Console interfacel MEth interfacel 10 Gigabit Ethernet interface
S6700 Series Ethernet SwitchesConfiguration Guide - Basic Configuration 3 How to Use Interfaces
Issue 05 (2013-04-10) Huawei Proprietary and ConfidentialCopyright © Huawei Technologies Co., Ltd.
23
Logical InterfacesLogical interfaces do not exist and are set up by configurations.
The S6700 supports the following logical interfaces:
l Eth-TrunkThe Eth-Trunk consists of Ethernet links only.The Eth-Trunk technique has the following advantages:– Increased bandwidth: The bandwidth of an Eth-Trunk is the total bandwidth of all
member interfaces.– Improved reliability: When a link fails, traffic is automatically switched to other
available links. This ensures link reliability.For details about the Eth-Trunk configuration, see "Configuring the Eth-Trunk" in theS6700 Series Ethernet Switches Configuration Guide - Ethernet.
l Loopback interfaceA loopback interface is a virtual interface. The TCP/IP protocol suite defines IP address127.0.0.0 as a loopback address. When the system starts, it automatically creates aninterface using the loopback address 127.0.0.1 to receive all data packets sent to the localdevice.Some applications such as mutual access between virtual private networks need a localinterface with a specified IP address without affecting the configuration of physicalinterfaces. This IP address has a 32-bit mask (to save IP addresses) and can be advertisedby routing protocols.The status of a loopback interface is always Up; therefore, the IP address of the loopbackinterface can be used as the router ID, the label switching router (LSR) ID, or be land to atunnel.For details, see 3.3 Configuring the Loopback Interface.
l Null interfaceNull interfaces are similar to null devices supported by certain operating systems. Any datapackets sent to a null interface are discarded. Null interfaces are used for route selectionand policy-based routing (PBR). For example, if a packet matches no route during routeselection, the packet is sent to the null interface.
l Tunnel interfaceTunnel interfaces are used to establish IPv6 over IPv4 tunnels.
l VLANIF interfaceWhen the S6700 needs to communicate with devices at the network layer, you can createa logical interface of the Virtual Local Area Network (VLAN) on the S6700, namely, aVLANIF interface. You can assign IP addresses to VLANIF interfaces because VLANIFinterfaces work at the network layer. The S6700 then communicates with devices at thenetwork layer through VLANIF interfaces.For details about the configuration, see "Creating a VLANIF Interface" in the S6700Series Ethernet Switches Configuration Guide - Ethernet.
3.2 Setting Basic Parameters of an InterfaceThis section describes how to set the basic parameters of an interface.
S6700 Series Ethernet SwitchesConfiguration Guide - Basic Configuration 3 How to Use Interfaces
Issue 05 (2013-04-10) Huawei Proprietary and ConfidentialCopyright © Huawei Technologies Co., Ltd.
24
3.2.1 Establishing the Configuration TaskBefore configuring advanced functions of an interface such as the working mode and routes,you need to complete the basic configuration of the interface.
Applicable Environment
To facilitate the configuration and maintenance of an interface, the S6700 provides interfaceviews. The commands related to the interface are valid only in the interface views.
The basic interface configurations include entering an interface view, configuring interfacedescription, enabling an interface, and disabling an interface.
Pre-configuration Tasks
Installing the LPU on the S6700
Data Preparation
To set parameters of an interface, you need the following data.
No. Data
1 Type and number of the interface to be configured
2 Description of the interface
3.2.2 Entering the Interface ViewTo configure an interface, you need to enter the interface view.
Context
Do as follows on the S6700.
Procedure
Step 1 Run:system-view
The system view is displayed.
Step 2 Run:interface interface-type interface-number
The view of a specified interface is displayed.
interface-type specifies the type of the interface and interface-number specifies the number ofthe interface.
----End
S6700 Series Ethernet SwitchesConfiguration Guide - Basic Configuration 3 How to Use Interfaces
Issue 05 (2013-04-10) Huawei Proprietary and ConfidentialCopyright © Huawei Technologies Co., Ltd.
25
3.2.3 Viewing All the Commands in the Interface ViewAfter entering the interface view, you can view all the commands in the interface view.
ContextDo as follows on the S6700.
Procedure
Step 1 Run:system-view
The system view is displayed.
Step 2 Run:interface interface-type interface-number
The view of a specified interface is displayed.
Step 3 Run:?
All the commands in the view of the specified interface are displayed.
----End
3.2.4 Configuring the Description for an InterfaceThe description configured for an interface on the S6700 helps you identify and memorize theusage of the interface, which facilitates the management.
Procedure
Step 1 Run:system-view
The system view is displayed.
Step 2 Run:interface interface-type interface-number
The view of a specified interface is displayed.
Step 3 Run:description description
The description is configured for the interface.
----End
3.2.5 Starting and Shutting Down an InterfaceWhen a physical interface is idle and is not connected to a cable, shut down this interface toprotect the interface against interference. To use a shutdown interface, you need to start theinterface.
S6700 Series Ethernet SwitchesConfiguration Guide - Basic Configuration 3 How to Use Interfaces
Issue 05 (2013-04-10) Huawei Proprietary and ConfidentialCopyright © Huawei Technologies Co., Ltd.
26
ContextNOTE
l A null interface is always Up and cannot be shut down by command.l A loopback interface is always Up and cannot be shut down by command.
Procedurel Shutting down the interface
Do as follows on the S6700.
1. Run:system-view
The system view is displayed.2. Run:
interface interface-type interface-number
The view of a specified interface is displayed.3. Run:
shutdown
The interface is shut down.NOTE
By default, an interface is enabled.
l Starting an interface
Do as follows on the S6700.
1. Run:system-view
The system view is displayed.2. Run:
interface interface-type interface-number
The view of a specified interface is displayed.3. Run:
undo shutdown
The interface is started.
----End
3.2.6 Completing Advanced Configurations on an InterfaceAfter configuring basic parameters on an interface, configure other interface parameters asrequired.
ContextTo access a network through an interface, configure advanced interface parameters based on thenetworking requirements in addition to basic configurations on the interface.
Advanced configurations of an interface include:
S6700 Series Ethernet SwitchesConfiguration Guide - Basic Configuration 3 How to Use Interfaces
Issue 05 (2013-04-10) Huawei Proprietary and ConfidentialCopyright © Huawei Technologies Co., Ltd.
27
l Working model Routing configuration
For details about advanced configurations of an interface, see the S6700 Series Ethernet SwitchesConfiguration Guide - Ethernet and S6700 Series Ethernet Switches Configuration Guide - IPRouting.
3.2.7 Checking the ConfigurationAfter completing the basic configuration of an interface, you can use the display commands tocheck the configuration.
Procedure
Step 1 Run the display interface [ interface-type [ interface-number ] ] command to check the runningstatus of the interface and the statistics on the interface.
Step 2 Run the display interface description command to check the brief information about theinterface
Step 3 Run the display ip interface [ interface-type interface-number ] command to check the mainconfigurations of the interface.
Step 4 Run the display ip interface brief [ interface-type interface-number ] command to check thebrief state of the interface.
----End
3.3 Configuring the Loopback InterfaceThis section describes how to configure the loopback interface.
3.3.1 Establishing the Configuration TaskThe users can create or delete a loopback interface. When being created, the loopback interfaceremains in the Up state until you delete it.
Applicable EnvironmentSome applications such as mutual access between virtual private networks need to be configuredwith a local interface with a specified IP address when the configuration of a physical interfaceis not affected. In this case, the IP address of the local interface needs to be advertised by routingprotocols. Loopback interfaces are used to improve the reliability of the configuration.
Pre-configuration TasksBefore configuring the loopback interface, complete the following task:l Switching on the S6700
Data PreparationTo configure the loopback interface, you need the following data.
S6700 Series Ethernet SwitchesConfiguration Guide - Basic Configuration 3 How to Use Interfaces
Issue 05 (2013-04-10) Huawei Proprietary and ConfidentialCopyright © Huawei Technologies Co., Ltd.
28
No. Data
1 Number of the loopback interface
2 IP address of the loopback interface
3.3.2 Configuring IPv4 Parameters of the Loopback InterfaceA loopback interface can be assigned an IPv4 address, bound to a VPN instance, and configuredto check the source IPv4 addresses of packets.
Procedure
Step 1 Run:system-view
The system view is displayed.
Step 2 Run:interface loopback interface-number
A loopback interface is created.
The value of interface-number ranges from 0 to 1023. A maximum of 1024 loopback interfacescan be created.
Step 3 Run:ip address ip-address { mask | mask-length } [ sub ]
An IPv4 address is assigned to the loopback interface.
Step 4 (Optional) Run:ip verify source-address
The loopback interface is configured to check the source IPv4 addresses of packets.
----End
3.3.3 Checking the ConfigurationAfter configuring a loopback interface, run the following commands to check the configuration.
Procedure
Step 1 Run the display interface loopback [ number ] command to check the status of the loopbackinterface.
----End
3.4 Maintaining the InterfaceThis section describes how to maintain the interface.
S6700 Series Ethernet SwitchesConfiguration Guide - Basic Configuration 3 How to Use Interfaces
Issue 05 (2013-04-10) Huawei Proprietary and ConfidentialCopyright © Huawei Technologies Co., Ltd.
29
3.4.1 Clearing Statistics Information on the InterfaceThe statistics on the interface cannot be restored after you clear them. So, confirm the actionbefore you use the command.
Procedure
Step 1 Run the reset counters interface [ interface-type [ interface-number ] ] command in the userview to clear the statistics on the interface.
----End
S6700 Series Ethernet SwitchesConfiguration Guide - Basic Configuration 3 How to Use Interfaces
Issue 05 (2013-04-10) Huawei Proprietary and ConfidentialCopyright © Huawei Technologies Co., Ltd.
30
4 Basic Configuration
About This Chapter
This chapter describes how to configure the switch to work properly in the network environmentand to suit your needs.
4.1 Configuring the Basic System EnvironmentThis section describes how to configure the basic system environment.
4.2 Displaying System Status MessagesThis section describes how to use display commands to check basic system configurations.
S6700 Series Ethernet SwitchesConfiguration Guide - Basic Configuration 4 Basic Configuration
Issue 05 (2013-04-10) Huawei Proprietary and ConfidentialCopyright © Huawei Technologies Co., Ltd.
31

4.1 Configuring the Basic System EnvironmentThis section describes how to configure the basic system environment.
4.1.1 Establishing the Configuration TaskBefore configuring the basic system environment, familiarize yourself with the usage scenario,complete the pre-configuration tasks, and obtain any data required for the configuration.
Applicable Environment
Before configuring services, you need to configure the basic system environment (for example,the language mode, system time, device name, login information, and command level) to meetenvironmental requirements.
Pre-configuration Tasks
Before configuring the basic system environment, power on the switch.
Data Preparation
To configure the basic system environment, you need the following data.
No. Data
1 System time
2 Host name
3 Login information
4 Command level
4.1.2 Configuring the Equipment NameIf multiple devices on a network need to be managed, set equipment names to identify eachdevice.
Context
New equipment names take effect immediately.
Procedure
Step 1 Run:system-view
The system view is displayed.
S6700 Series Ethernet SwitchesConfiguration Guide - Basic Configuration 4 Basic Configuration
Issue 05 (2013-04-10) Huawei Proprietary and ConfidentialCopyright © Huawei Technologies Co., Ltd.
32
Step 2 Run:sysname host-name
The equipment name is set.
By default, the equipment name of the switch is Quidway.
You can change the name of the switch that appears in the command prompt.
----End
4.1.3 Setting the System ClockThe system clock must be correctly set to ensure synchronization with other devices.
ContextThe system clock is the time indicated by the system timestamp. Because the rules governinglocal time differ in different regions, the system clock can be configured to comply with therules of any given region.
The system clock is calculated using the following formula: System clock = CoordinatedUniversal Time (UTC) + Time zone offset + Daylight saving time offset.
Set the system clock to the correct time to ensure that the device operates properly with otherdevices.
Setting the system clocks of all the devices on a network manually is time-consuming and cannotensure the clock accuracy. Network Time Protocol (NTP) can address this problem bysynchronizing all clocks of devices on the network so that the devices can provide uniform time-based applications.
NOTE
A local system running NTP can be synchronized by other clock sources or acts as a clock source tosynchronize other clocks. In addition, mutual synchronization can be implemented through NTP packetexchanges.
By default, the system clock of NTP-enabled devices is UTC. The time zone and daylight savingtime vary with the country and region, and if a time zone and daylight saving time are configuredon an NTP server, the same time zone and daylight saving time must be configured on NTPclients.
Perform the following steps in the user view to set the system clock:
Procedure
Step 1 Run:clock datetime HH:MM:SS YYYY-MM-DD
The current date and time are set.
NOTE
If the time zone has not been configured or is set to 0, the date and time set by this command are consideredto be UTC. Set the time zone and UTC correctly.
Step 2 Run:clock timezone time-zone-name { add | minus } offset
S6700 Series Ethernet SwitchesConfiguration Guide - Basic Configuration 4 Basic Configuration
Issue 05 (2013-04-10) Huawei Proprietary and ConfidentialCopyright © Huawei Technologies Co., Ltd.
33
The time zone is set.
l If add is configured, the current time is the UTC time plus the time offset. That is, the defaultUTC time plus offset is equal to the time of time-zone-name.
l If minus is configured, the current time is the UTC time minus the time offset. That is, thedefault UTC time minus offset is equal to the time of time-zone-name.
NOTE
UTC stands for the Universal Time Coordinated.
Step 3 Run:clock daylight-saving-time time-zone-name one-year start-time start-date end-time end-date offset
or
clock daylight-saving-time time-zone-name repeating start-time { { first | second | third | fourth | last } weekday month | start-date } end-time { { first | second | third | fourth | last } weekday month | end-date } offset [ start-year [ end-year ] ]
Daylight saving time is set.
By default, daylight saving time is not set.
The start time is the local mean time (LMT), and the end time is the daylight saving time (DST).The start time and end time can be set to date+data, week+week, date+week, or week+dateformat. To configure the daylight saving time, run the clock daylight-saving-time command.
----End
System Clock DisplayThe system clock is determined by the clock datetime, clock timezone, and clock daylight-saving-time commands.
l If none of the preceding three commands have been run, the original system time will bedisplayed after running the display clock command.
l The preceding three commands can also be run in combination with one another toconfigure the system clock, as listed in Table 4-1.
In the following examples, the original system time is 08:00:00 January 1, 2010.l 1: The clock datetime command is run to set the current date and time to date-time.l 2: The clock timezone command is run to configure the time zone with the time zone offset
zone-offset.l 3: The clock daylight-saving-time command is run to configure the daylight saving time
with the offset offset.l [1]: The clock datetime command configuration is optional.
S6700 Series Ethernet SwitchesConfiguration Guide - Basic Configuration 4 Basic Configuration
Issue 05 (2013-04-10) Huawei Proprietary and ConfidentialCopyright © Huawei Technologies Co., Ltd.
34
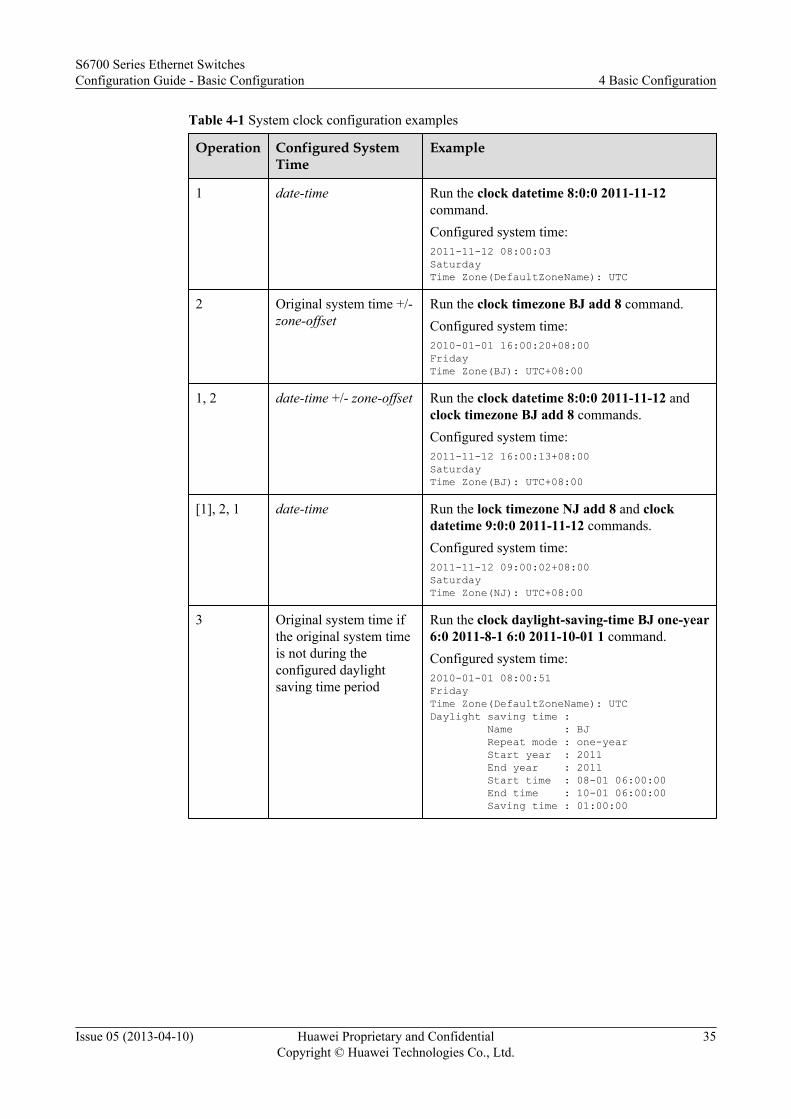
Table 4-1 System clock configuration examples
Operation Configured SystemTime
Example
1 date-time Run the clock datetime 8:0:0 2011-11-12command.Configured system time:2011-11-12 08:00:03SaturdayTime Zone(DefaultZoneName): UTC
2 Original system time +/-zone-offset
Run the clock timezone BJ add 8 command.Configured system time:2010-01-01 16:00:20+08:00FridayTime Zone(BJ): UTC+08:00
1, 2 date-time +/- zone-offset Run the clock datetime 8:0:0 2011-11-12 andclock timezone BJ add 8 commands.Configured system time:2011-11-12 16:00:13+08:00SaturdayTime Zone(BJ): UTC+08:00
[1], 2, 1 date-time Run the lock timezone NJ add 8 and clockdatetime 9:0:0 2011-11-12 commands.Configured system time:2011-11-12 09:00:02+08:00SaturdayTime Zone(NJ): UTC+08:00
3 Original system time ifthe original system timeis not during theconfigured daylightsaving time period
Run the clock daylight-saving-time BJ one-year6:0 2011-8-1 6:0 2011-10-01 1 command.Configured system time:2010-01-01 08:00:51FridayTime Zone(DefaultZoneName): UTCDaylight saving time : Name : BJ Repeat mode : one-year Start year : 2011 End year : 2011 Start time : 08-01 06:00:00 End time : 10-01 06:00:00 Saving time : 01:00:00
S6700 Series Ethernet SwitchesConfiguration Guide - Basic Configuration 4 Basic Configuration
Issue 05 (2013-04-10) Huawei Proprietary and ConfidentialCopyright © Huawei Technologies Co., Ltd.
35
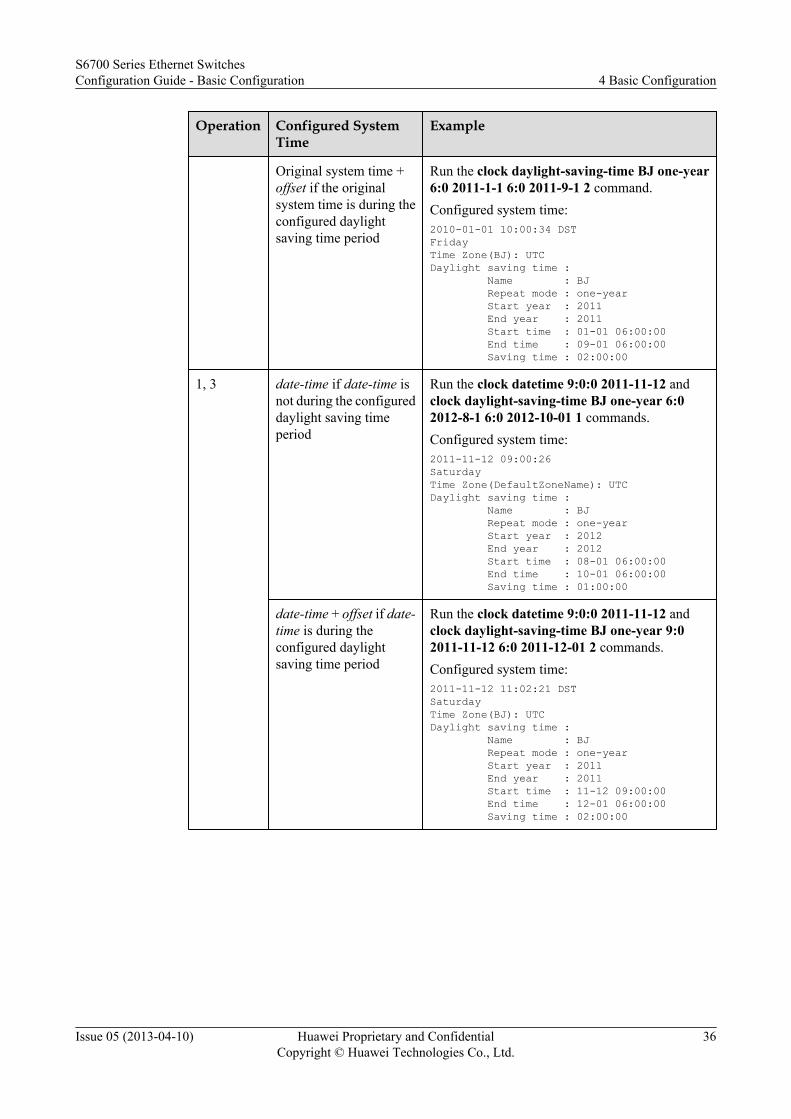
Operation Configured SystemTime
Example
Original system time +offset if the originalsystem time is during theconfigured daylightsaving time period
Run the clock daylight-saving-time BJ one-year6:0 2011-1-1 6:0 2011-9-1 2 command.Configured system time:2010-01-01 10:00:34 DSTFridayTime Zone(BJ): UTCDaylight saving time : Name : BJ Repeat mode : one-year Start year : 2011 End year : 2011 Start time : 01-01 06:00:00 End time : 09-01 06:00:00 Saving time : 02:00:00
1, 3 date-time if date-time isnot during the configureddaylight saving timeperiod
Run the clock datetime 9:0:0 2011-11-12 andclock daylight-saving-time BJ one-year 6:02012-8-1 6:0 2012-10-01 1 commands.Configured system time:2011-11-12 09:00:26SaturdayTime Zone(DefaultZoneName): UTCDaylight saving time : Name : BJ Repeat mode : one-year Start year : 2012 End year : 2012 Start time : 08-01 06:00:00 End time : 10-01 06:00:00 Saving time : 01:00:00
date-time + offset if date-time is during theconfigured daylightsaving time period
Run the clock datetime 9:0:0 2011-11-12 andclock daylight-saving-time BJ one-year 9:02011-11-12 6:0 2011-12-01 2 commands.Configured system time:2011-11-12 11:02:21 DSTSaturdayTime Zone(BJ): UTCDaylight saving time : Name : BJ Repeat mode : one-year Start year : 2011 End year : 2011 Start time : 11-12 09:00:00 End time : 12-01 06:00:00 Saving time : 02:00:00
S6700 Series Ethernet SwitchesConfiguration Guide - Basic Configuration 4 Basic Configuration
Issue 05 (2013-04-10) Huawei Proprietary and ConfidentialCopyright © Huawei Technologies Co., Ltd.
36
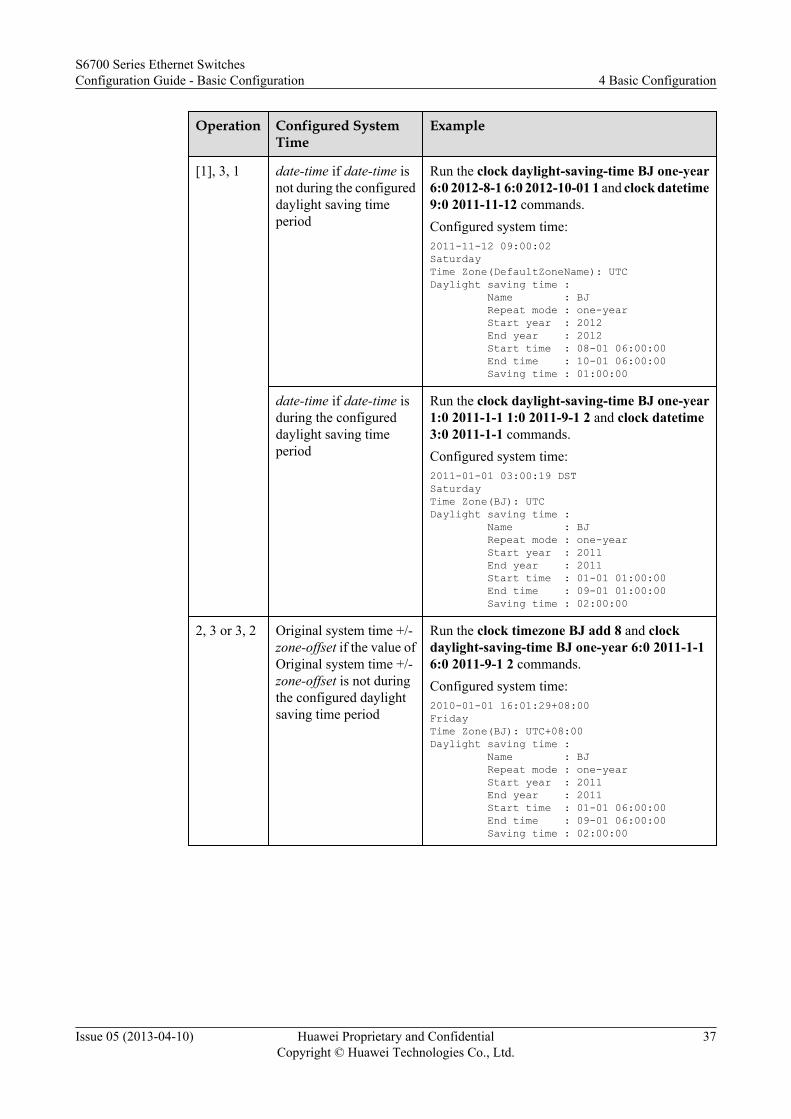
Operation Configured SystemTime
Example
[1], 3, 1 date-time if date-time isnot during the configureddaylight saving timeperiod
Run the clock daylight-saving-time BJ one-year6:0 2012-8-1 6:0 2012-10-01 1 and clock datetime9:0 2011-11-12 commands.Configured system time:2011-11-12 09:00:02SaturdayTime Zone(DefaultZoneName): UTCDaylight saving time : Name : BJ Repeat mode : one-year Start year : 2012 End year : 2012 Start time : 08-01 06:00:00 End time : 10-01 06:00:00 Saving time : 01:00:00
date-time if date-time isduring the configureddaylight saving timeperiod
Run the clock daylight-saving-time BJ one-year1:0 2011-1-1 1:0 2011-9-1 2 and clock datetime3:0 2011-1-1 commands.Configured system time:2011-01-01 03:00:19 DSTSaturdayTime Zone(BJ): UTCDaylight saving time : Name : BJ Repeat mode : one-year Start year : 2011 End year : 2011 Start time : 01-01 01:00:00 End time : 09-01 01:00:00 Saving time : 02:00:00
2, 3 or 3, 2 Original system time +/-zone-offset if the value ofOriginal system time +/-zone-offset is not duringthe configured daylightsaving time period
Run the clock timezone BJ add 8 and clockdaylight-saving-time BJ one-year 6:0 2011-1-16:0 2011-9-1 2 commands.Configured system time:2010-01-01 16:01:29+08:00FridayTime Zone(BJ): UTC+08:00Daylight saving time : Name : BJ Repeat mode : one-year Start year : 2011 End year : 2011 Start time : 01-01 06:00:00 End time : 09-01 06:00:00 Saving time : 02:00:00
S6700 Series Ethernet SwitchesConfiguration Guide - Basic Configuration 4 Basic Configuration
Issue 05 (2013-04-10) Huawei Proprietary and ConfidentialCopyright © Huawei Technologies Co., Ltd.
37
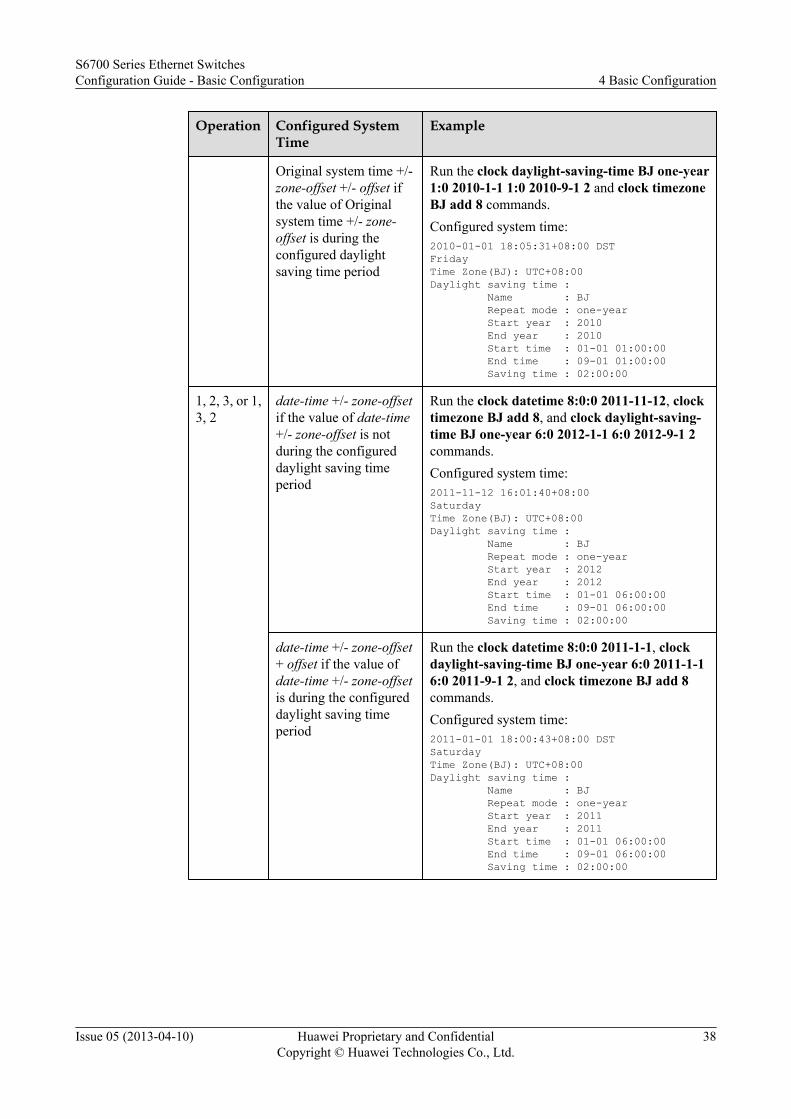
Operation Configured SystemTime
Example
Original system time +/-zone-offset +/- offset ifthe value of Originalsystem time +/- zone-offset is during theconfigured daylightsaving time period
Run the clock daylight-saving-time BJ one-year1:0 2010-1-1 1:0 2010-9-1 2 and clock timezoneBJ add 8 commands.Configured system time:2010-01-01 18:05:31+08:00 DSTFridayTime Zone(BJ): UTC+08:00Daylight saving time : Name : BJ Repeat mode : one-year Start year : 2010 End year : 2010 Start time : 01-01 01:00:00 End time : 09-01 01:00:00 Saving time : 02:00:00
1, 2, 3, or 1,3, 2
date-time +/- zone-offsetif the value of date-time+/- zone-offset is notduring the configureddaylight saving timeperiod
Run the clock datetime 8:0:0 2011-11-12, clocktimezone BJ add 8, and clock daylight-saving-time BJ one-year 6:0 2012-1-1 6:0 2012-9-1 2commands.Configured system time:2011-11-12 16:01:40+08:00SaturdayTime Zone(BJ): UTC+08:00Daylight saving time : Name : BJ Repeat mode : one-year Start year : 2012 End year : 2012 Start time : 01-01 06:00:00 End time : 09-01 06:00:00 Saving time : 02:00:00
date-time +/- zone-offset+ offset if the value ofdate-time +/- zone-offsetis during the configureddaylight saving timeperiod
Run the clock datetime 8:0:0 2011-1-1, clockdaylight-saving-time BJ one-year 6:0 2011-1-16:0 2011-9-1 2, and clock timezone BJ add 8commands.Configured system time:2011-01-01 18:00:43+08:00 DSTSaturdayTime Zone(BJ): UTC+08:00Daylight saving time : Name : BJ Repeat mode : one-year Start year : 2011 End year : 2011 Start time : 01-01 06:00:00 End time : 09-01 06:00:00 Saving time : 02:00:00
S6700 Series Ethernet SwitchesConfiguration Guide - Basic Configuration 4 Basic Configuration
Issue 05 (2013-04-10) Huawei Proprietary and ConfidentialCopyright © Huawei Technologies Co., Ltd.
38
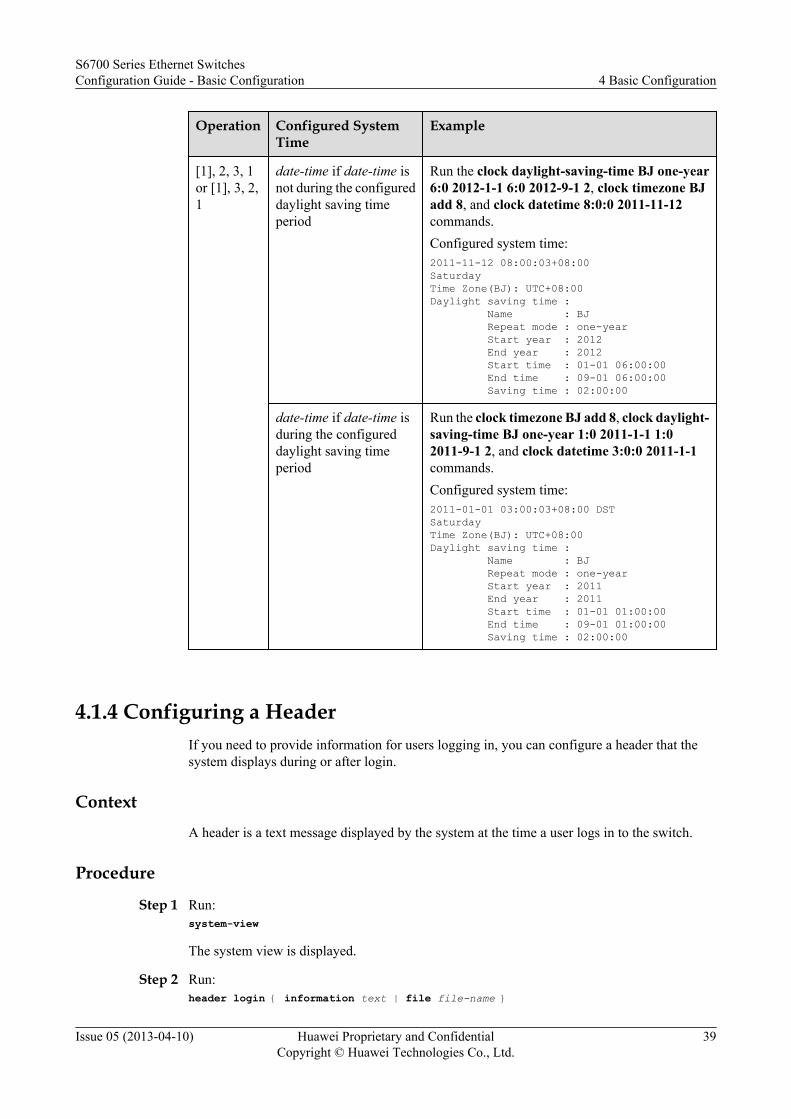
Operation Configured SystemTime
Example
[1], 2, 3, 1or [1], 3, 2,1
date-time if date-time isnot during the configureddaylight saving timeperiod
Run the clock daylight-saving-time BJ one-year6:0 2012-1-1 6:0 2012-9-1 2, clock timezone BJadd 8, and clock datetime 8:0:0 2011-11-12commands.Configured system time:2011-11-12 08:00:03+08:00SaturdayTime Zone(BJ): UTC+08:00Daylight saving time : Name : BJ Repeat mode : one-year Start year : 2012 End year : 2012 Start time : 01-01 06:00:00 End time : 09-01 06:00:00 Saving time : 02:00:00
date-time if date-time isduring the configureddaylight saving timeperiod
Run the clock timezone BJ add 8, clock daylight-saving-time BJ one-year 1:0 2011-1-1 1:02011-9-1 2, and clock datetime 3:0:0 2011-1-1commands.Configured system time:2011-01-01 03:00:03+08:00 DSTSaturdayTime Zone(BJ): UTC+08:00Daylight saving time : Name : BJ Repeat mode : one-year Start year : 2011 End year : 2011 Start time : 01-01 01:00:00 End time : 09-01 01:00:00 Saving time : 02:00:00
4.1.4 Configuring a HeaderIf you need to provide information for users logging in, you can configure a header that thesystem displays during or after login.
Context
A header is a text message displayed by the system at the time a user logs in to the switch.
Procedure
Step 1 Run:system-view
The system view is displayed.
Step 2 Run:header login { information text | file file-name }
S6700 Series Ethernet SwitchesConfiguration Guide - Basic Configuration 4 Basic Configuration
Issue 05 (2013-04-10) Huawei Proprietary and ConfidentialCopyright © Huawei Technologies Co., Ltd.
39
A header displayed during login is set.
Step 3 Run:header shell { information text | file file-name }
A header displayed after login is set.
To display the header when the terminal connection has been activated but the user has not beenauthenticated, configure the parameter login.
To display the header after the user has logged in, configure the parameter shell.
CAUTIONl The header message starts and ends with the same character. Enter the first character of the
header and press Enter. An interactive interface for setting the header is displayed. Input therequired information and end the header by entering the first character when you are finished.The system then exits from the interactive interface.
l If a user logs in to the switch using SSH1.X, the login header is not displayed during login,but the shell header is displayed after login.
l If a user logs in to the switch using SSH2.0, both login and shell headers are displayed.
----End
4.1.5 Configuring Command LevelsThis section describes how to configure command levels to ensure device security or allow low-level users to run high-level commands. By default, commands are registered in the sequenceof Level 0 to Level 3. If refined rights management is required, you can divide commands in to16 levels, that is, from Level 0 to Level 15.
Context
If the user does not adjust a command level separately, after the command level is updated, alloriginally-registered command lines adjust automatically according to the following rules:
l The commands of Level 0 and Level 1 remain unchanged.
l The commands of Level 2 are updated to Level 10 and the commands of Level 3 are updatedto Level 15.
l No command lines exist in Level 2 to Level 9 and Level 11 to Level 14. The user can adjustthe command lines to these levels separately to refine the management of privilege.
CAUTIONChanging the default level of a command is not recommended. If the default level of a commandis changed, some users may be unable to use the command any longer.
S6700 Series Ethernet SwitchesConfiguration Guide - Basic Configuration 4 Basic Configuration
Issue 05 (2013-04-10) Huawei Proprietary and ConfidentialCopyright © Huawei Technologies Co., Ltd.
40
Procedure
Step 1 Run:system-view
The system view is displayed.
Step 2 Run:command-privilege level rearrange
Update the command level in batches.
When no password is configured for a Level 15 user, the system prompts the user to set a super-password for the level 15 user. At the same time, the system asks if the user wants to continuewith the update of command line level. Then, just select "N" to set a password. If you select "Y",the command level can be updated in batches directly. This results in the user not logging inthrough the Console port and failing to update the level.
Step 3 Run:command-privilege level level view view-name command-key
The command level is configured. With the command, you can specify the level and viewmultiple commands at one time (command-key).
All commands have default command views and levels. You do not need to reconfigure them.
----End
4.2 Displaying System Status MessagesThis section describes how to use display commands to check basic system configurations.
ContextYou can use display commands to collect information about system status. The displaycommands perform the following functions:
l Display system configurations.l Display system running status.l Display diagnostic information about a system.l Displays the restart information about the main control board.
See related sections concerning display commands for information on protocols and interfaces.This section only shows system-level display commands.
Run the following commands in any view.
4.2.1 Displaying System ConfigurationThis section describes how to use command lines to check the system version, system time,original configuration, and current configuration.
Procedurel Run the display version command to display the system version.
S6700 Series Ethernet SwitchesConfiguration Guide - Basic Configuration 4 Basic Configuration
Issue 05 (2013-04-10) Huawei Proprietary and ConfidentialCopyright © Huawei Technologies Co., Ltd.
41
l Run the display clock [ utc ] command to display the system time.l Run the display calendar command to display system calendar.l Run the display saved-configuration command to display the original configuration.l Run the display current-configuration command to display the current configuration.
NOTE
l The original configuration refers to information about configuration files used by the device whenit is powered on and initialized. The current configuration refers to the configuration files thattake effect when the device is in use. For details, see the chapter "Configuring System Startup"in the S6700 Basic-Configuration.
----End
4.2.2 Displaying System StatusThis section describes how to use command lines to check system operating status (theconfiguration of the current view).
Procedurel Run the display this command to display the configuration of the current view.
----End
4.2.3 Collecting System Diagnostic InformationThis section describes how to collect information about system modules.
ContextIf you cannot perform routine maintenance, you must run the various display commands tocollect information needed to locate faults. The display diagnostic-information commandgathers information about all system modules currently running.
Procedurel Run:
display diagnostic-information [ file-name ]
System diagnostic information is displayed.
The display diagnostic-information command collects the same information as thedisplay clock, display version, display cpu-usage, display interface, display current-configuration, display saved-configuration, display history-command, and othercommands gather.
----End
S6700 Series Ethernet SwitchesConfiguration Guide - Basic Configuration 4 Basic Configuration
Issue 05 (2013-04-10) Huawei Proprietary and ConfidentialCopyright © Huawei Technologies Co., Ltd.
42
5 Configuring User Interfaces
About This Chapter
When a user uses a console port, Telnet, or SSH (STelnet) to log in to the switch, the systemmanages the session between the user and the switchon the corresponding user interface.
5.1 User Interface OverviewThe system supports console and VTY user interfaces.
5.2 Configuring the Console User InterfaceIf you log in to the device through a console port to perform local maintenance, you can configureattributes for the console user interface as needed.
5.3 Configuring the VTY User InterfaceIf you need to log in to the switch using Telnet or SSH to perform local or remote maintenance,you can configure the VTY user interface as needed.
5.4 Configuration ExamplesThis section provides examples for configuring console and VTY user interfaces. Theseconfiguration examples explain networking requirements, and provide configuration roadmapsand configuration notes.
S6700 Series Ethernet SwitchesConfiguration Guide - Basic Configuration 5 Configuring User Interfaces
Issue 05 (2013-04-10) Huawei Proprietary and ConfidentialCopyright © Huawei Technologies Co., Ltd.
43
5.1 User Interface OverviewThe system supports console and VTY user interfaces.
Each user interface has a user interface view. A user interface view is a command line viewprovided by the system. It is used to configure and manage all the physical and logical interfacesin asynchronous mode.
User Interfaces Supported by the Systeml Console port (CON)
The console port is a serial port provided by the main control board of the device.The main control board provides one EIA/TIA-232 DCE console port. A terminal can usethis port to connect directly to a device in order to perform local configurations.
l Virtual type terminal (VTY)A VTY is a logical terminal line. A VTY connection is set up when a device uses Telnetto connect to a terminal by means of Telnet. This kind of connection is used for local orremote access to a device. A maximum of 15 users can use the VTY user interface to login to the device.
Numbering of a User InterfaceAfter a user logs in to the device, the system assigns the lowest numbered idle user interface tothe user. The type of interface assigned depends on the user's login mode. There are two waysto number user interfaces:
l Relative numberingRelative numbering uses a user interface type + number format.Relative numbering is used to specify user interfaces of a particular type. It can be used tonumber single user interfaces or user interface groups and must adhere to the followingrules:– Number of the console port: CON 0– Number of the VTY: VTY 0 for the first line, VTY 1 for the second line, and so on
l Absolute numberingAbsolute numbering is used to give a single user interface or a group of user interfaces aunique number.Absolute numbering starts with 0. Ports are numbered in a sequence beginning with CON-> VTY. There is only one console port and 0-20 VTY interfaces (VTY interfaces 0 to 14are reserved for Telnet/SSH users and VTY interfaces 16 to 20 are reserved for networkmanagement users). You can use the user-interface maximum-vty command to set themaximum number of user interfaces. The default number is five.Table 5-1 shows absolute numbers for user interfaces in this system.
S6700 Series Ethernet SwitchesConfiguration Guide - Basic Configuration 5 Configuring User Interfaces
Issue 05 (2013-04-10) Huawei Proprietary and ConfidentialCopyright © Huawei Technologies Co., Ltd.
44
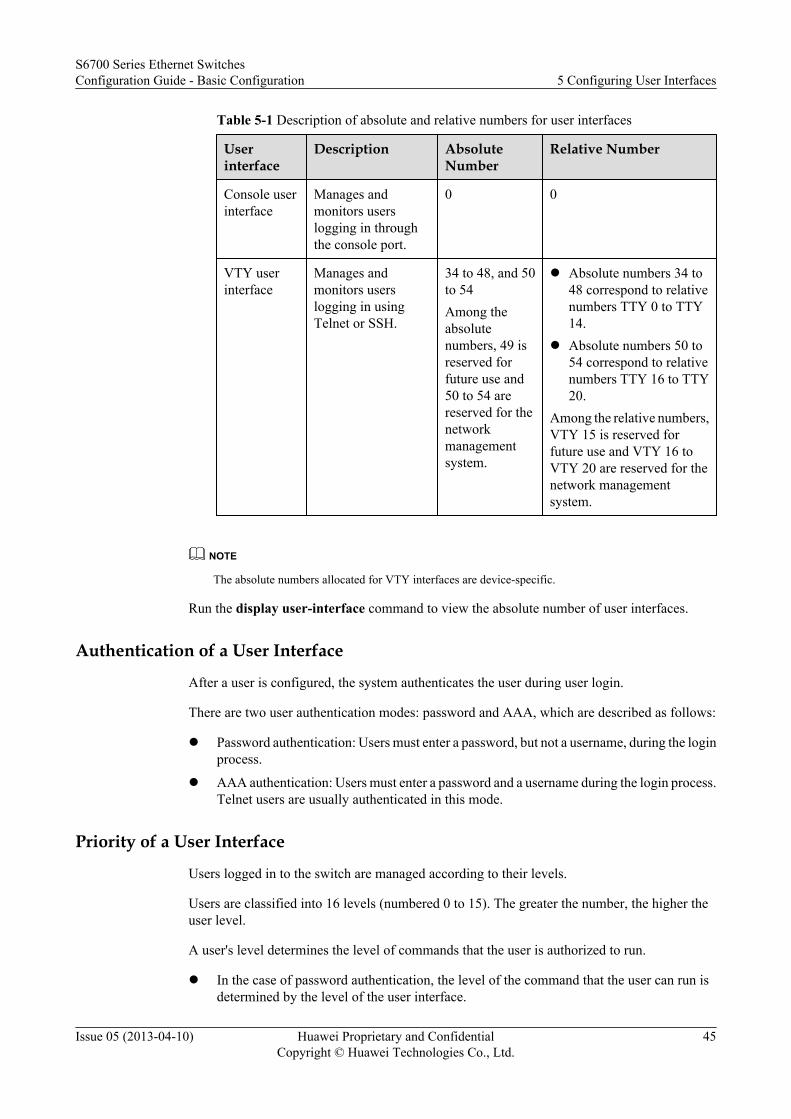
Table 5-1 Description of absolute and relative numbers for user interfaces
Userinterface
Description AbsoluteNumber
Relative Number
Console userinterface
Manages andmonitors userslogging in throughthe console port.
0 0
VTY userinterface
Manages andmonitors userslogging in usingTelnet or SSH.
34 to 48, and 50to 54Among theabsolutenumbers, 49 isreserved forfuture use and50 to 54 arereserved for thenetworkmanagementsystem.
l Absolute numbers 34 to48 correspond to relativenumbers TTY 0 to TTY14.
l Absolute numbers 50 to54 correspond to relativenumbers TTY 16 to TTY20.
Among the relative numbers,VTY 15 is reserved forfuture use and VTY 16 toVTY 20 are reserved for thenetwork managementsystem.
NOTE
The absolute numbers allocated for VTY interfaces are device-specific.
Run the display user-interface command to view the absolute number of user interfaces.
Authentication of a User Interface
After a user is configured, the system authenticates the user during user login.
There are two user authentication modes: password and AAA, which are described as follows:
l Password authentication: Users must enter a password, but not a username, during the loginprocess.
l AAA authentication: Users must enter a password and a username during the login process.Telnet users are usually authenticated in this mode.
Priority of a User Interface
Users logged in to the switch are managed according to their levels.
Users are classified into 16 levels (numbered 0 to 15). The greater the number, the higher theuser level.
A user's level determines the level of commands that the user is authorized to run.
l In the case of password authentication, the level of the command that the user can run isdetermined by the level of the user interface.
S6700 Series Ethernet SwitchesConfiguration Guide - Basic Configuration 5 Configuring User Interfaces
Issue 05 (2013-04-10) Huawei Proprietary and ConfidentialCopyright © Huawei Technologies Co., Ltd.
45
l In the case of AAA authentication, the command that the user can use is determined by thelevel of the local user specified in the AAA configuration.
5.2 Configuring the Console User InterfaceIf you log in to the device through a console port to perform local maintenance, you can configureattributes for the console user interface as needed.
5.2.1 Establishing the Configuration TaskBefore configuring the console user interface, familiarize yourself with the usage scenario,complete the pre-configuration tasks, and obtain any data required for the configuration.
Applicable Environment
If you need to log in to the switch through a console port to perform local maintenance, you canconfigure the corresponding console user interface, including the physical attributes, terminalattributes, user priority, and user authentication mode. These parameters have default values thatrequire no additional configuration, but you may modify these parameters as needed.
Pre-configuration Tasks
Before configuring a console user interface, log in to the switch with a terminal.
Data Preparation
To configure a console user interface, you need the following data.
No. Data
1 Baud rate, flow-control mode, parity, stop bit, and data bit
2 Idle timeout period, terminal screen length, number of characters in each linedisplayed in a terminal screen, and the size of history command buffer
3 User priority
4 User authentication method, username, and password
NOTE
All the default values (excluding the password and username) are stored on the switch and do not needadditional configuration.
5.2.2 Setting Physical Attributes of the Console User InterfaceYou can configure the rate, flow control mode, parity mode, stop bit, and data bit for the consoleport.
S6700 Series Ethernet SwitchesConfiguration Guide - Basic Configuration 5 Configuring User Interfaces
Issue 05 (2013-04-10) Huawei Proprietary and ConfidentialCopyright © Huawei Technologies Co., Ltd.
46
Context
Physical attributes of a console port have default values on the switch and no additionalconfiguration is needed.
NOTE
When a user logs in to a switch through a console port, the physical attributes set for the console port onthe HyperTerminal must be consistent with the attributes of the console user interface on the switch, or theuser will not be able to log in.
Procedure
Step 1 Run:system-view
The system view is displayed.
Step 2 Run:user-interface console interface-number
The console user interface view is displayed.
Step 3 Run:speed speed-value
The baud rate is set.
By default, the baud rate is 9600 bit/s.
Step 4 Run:flow-control { hardware | none | software }
The flow control mode is set. By default, the flow-control mode is none.
Step 5 Run:parity { even | mark | none | odd | space }
The parity mode is set.
By default, the value is none.
Step 6 Run:stopbits { 1.5 | 1 | 2 }
The stop bit is set.
By default, the value is 1 bit.
Step 7 Run:databits { 5 | 6 | 7 | 8 }
The data bit is set.
By default, the data bit is 8.
----End
S6700 Series Ethernet SwitchesConfiguration Guide - Basic Configuration 5 Configuring User Interfaces
Issue 05 (2013-04-10) Huawei Proprietary and ConfidentialCopyright © Huawei Technologies Co., Ltd.
47
5.2.3 Setting Terminal Attributes of the Console User InterfaceThis section describes how to set terminal attributes of the console user interface, including theuser timeout disconnection function, number of lines or number of characters in each linedisplayed in a terminal screen, and size of the history command buffer.
ContextTerminal attributes of the console user interface have default values on the switch that you maymodify as needed.
Procedure
Step 1 Run:system-view
The system view is displayed.
Step 2 Run:user-interface console interface-number
The console user interface view is displayed.
Step 3 Run:shell
The terminal service is started.
Step 4 Run:idle-timeout minutes [ seconds ]
The idle timeout period is set.
If a connection remains idle for the timeout period, the system automatically terminates theconnection.
By default, the idle timeout period on the user interface is 10 minutes.
Step 5 Run:screen-length screen-length [temporary]
The terminal screen length is set.
The parameter temporary is used to display the number of lines to be temporarily displayed ona terminal screen.
By default, the terminal screen length is 24 lines.
Step 6 Run:screen-widthscreen-width
The maximum number of characters in each line displayed on a terminal screen is set.
By default, each line displayed on a terminal screen has a maximum of 80 characters.
Step 7 Run:history-command max-size size-value
The history command buffer is set.
S6700 Series Ethernet SwitchesConfiguration Guide - Basic Configuration 5 Configuring User Interfaces
Issue 05 (2013-04-10) Huawei Proprietary and ConfidentialCopyright © Huawei Technologies Co., Ltd.
48
By default, the size of history command buffer is 10 entries.
----End
5.2.4 Configuring User Privilege of the Console User InterfaceThis section describes how to control a user' authority to log in to the switch and how to improveswitch security by configuring user priority.
Context
l Users are classified into 16 levels (numbered 0 to 15). The greater the number, the higherthe user level.
l This procedure sets the priority of a user who logs in through the console port. A user'slevel determines the level of commands the user is authorized to run.
For details about command levels, see "Command Level".
Procedure
Step 1 Run:system-view
The system view is displayed.
Step 2 Run:user-interface console interface-number
The console user interface view is displayed.
Step 3 Run:user privilege level level
The user privilege is set.
NOTE
l By default, users logging in through the console user interface can use commands at level 3, and userslogging in through other user interfaces can use commands at level 0.
l If the command level and user level are inconsistent, the user level takes precedence.
----End
5.2.5 Configuring the User Authentication Mode of the ConsoleUser Interface
The system provides two authentication modes: AAA, password. Configuring userauthentication modes improves switch security.
Context
The system provides two authentication modes as shown in Table 5-2.
S6700 Series Ethernet SwitchesConfiguration Guide - Basic Configuration 5 Configuring User Interfaces
Issue 05 (2013-04-10) Huawei Proprietary and ConfidentialCopyright © Huawei Technologies Co., Ltd.
49
Table 5-2 Authentication Modes
AuthenticationMode
Advantage Disadvantage
AAA AAA provides user authentication with highsecurity.The user name and password must be enteredfor login.
The configuration is complex.The user name and password forAAA authentication must becreated.
Passwordauthentication
Password authentication is based on VTYchannels, providing security. Theconfiguration is simple and only the loginpassword is needed.
It provides lower securitycompared with AAA.All users can log in to a deviceusing the login password for thedevice.
CAUTIONIf the user authentication mode for the console user interface is password authentication or AAAauthentication, a password or user name must be set.
Procedurel Configuring AAA authentication
1. Run:system-view
The system view is displayed.2. Run:
aaa
The AAA view is displayed.3. Run:
local-user user-name password cipher password
A user name and password for the local user are created.4. Run:
quit
Exit from the AAA view.5. Run:
user-interface console interface-number
The console user interface view is displayed.6. Run:
authentication-mode aaa
The authentication mode is set to AAA authentication.l Configuring password authentication
S6700 Series Ethernet SwitchesConfiguration Guide - Basic Configuration 5 Configuring User Interfaces
Issue 05 (2013-04-10) Huawei Proprietary and ConfidentialCopyright © Huawei Technologies Co., Ltd.
50
1. Run:system-view
The system view is displayed.2. Run:
user-interface console interface-number
The console user interface view is displayed.3. Run:
authentication-mode password
The authentication mode is set to password authentication.4. Run:
set authentication password [ cipher password ]
A password for password authentication is set.
----End
5.2.6 Checking the ConfigurationsAfter configuring the console user interface, you can view information about the user interface,physical attributes and configurations of the user interface, local user list, and online users.
PrerequisitesThe user management function has been configured.
Procedurel Run the display users [ all ] command to check information about the user interface.l Run the display user-interface console ui-number1 [ summary ] command to check
physical attributes and configurations of the user interface.l Run the display local-user command to check the local user list.l Run the display access-user command to check online users.
----End
ExampleRun the display users command to view information about the current user interface.
<Quidway> display users User-Intf Delay Type Network Address AuthenStatus AuthorcmdFlag 0 CON 0 00:00:44 pass noUsername : Unspecified
Run the display user-interface console ui-number1 [ summary ] command to view the physicalattributes and configurations of the user interface.
<Quidway> display user-interface console 0 Idx Type Tx/Rx Modem Privi ActualPrivi Auth Int 0 CON 0 9600 - 3 - N - + : Current UI is active. F : Current UI is active and work in async mode. Idx : Absolute index of UIs. Type : Type and relative index of UIs. Privi: The privilege of UIs.
S6700 Series Ethernet SwitchesConfiguration Guide - Basic Configuration 5 Configuring User Interfaces
Issue 05 (2013-04-10) Huawei Proprietary and ConfidentialCopyright © Huawei Technologies Co., Ltd.
51
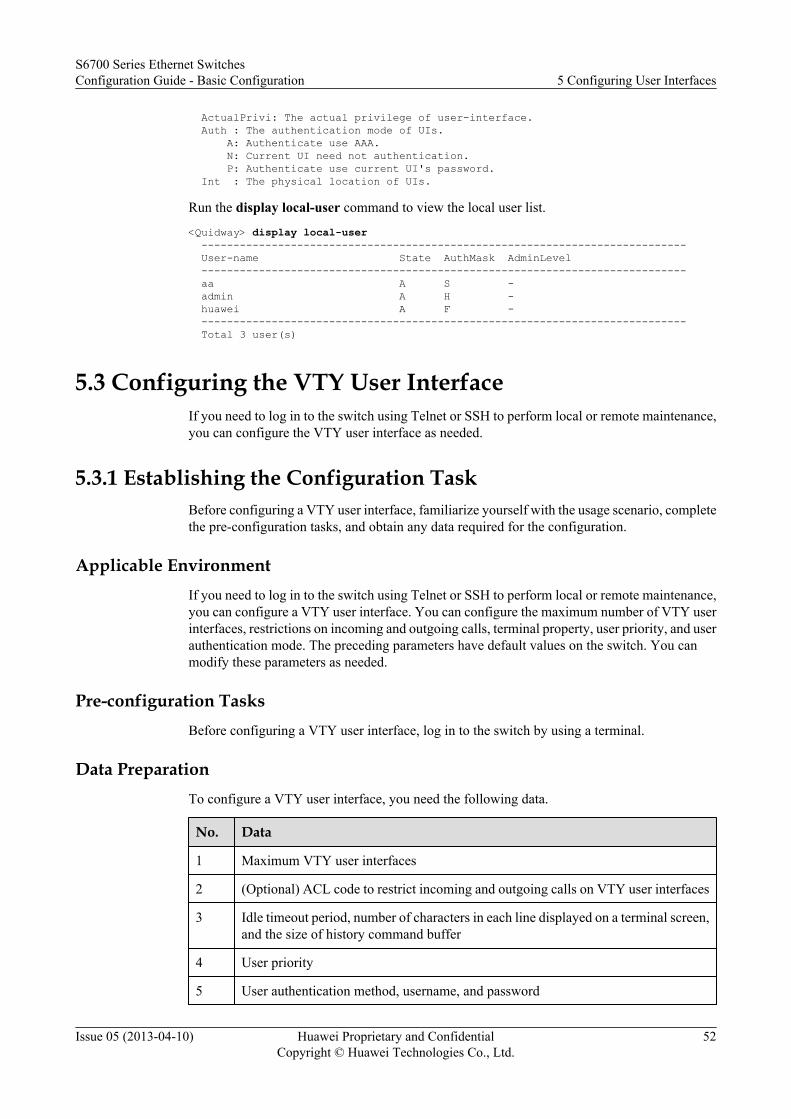
ActualPrivi: The actual privilege of user-interface. Auth : The authentication mode of UIs. A: Authenticate use AAA. N: Current UI need not authentication. P: Authenticate use current UI's password. Int : The physical location of UIs.
Run the display local-user command to view the local user list.
<Quidway> display local-user ---------------------------------------------------------------------------- User-name State AuthMask AdminLevel ---------------------------------------------------------------------------- aa A S - admin A H - huawei A F - ---------------------------------------------------------------------------- Total 3 user(s)
5.3 Configuring the VTY User InterfaceIf you need to log in to the switch using Telnet or SSH to perform local or remote maintenance,you can configure the VTY user interface as needed.
5.3.1 Establishing the Configuration TaskBefore configuring a VTY user interface, familiarize yourself with the usage scenario, completethe pre-configuration tasks, and obtain any data required for the configuration.
Applicable EnvironmentIf you need to log in to the switch using Telnet or SSH to perform local or remote maintenance,you can configure a VTY user interface. You can configure the maximum number of VTY userinterfaces, restrictions on incoming and outgoing calls, terminal property, user priority, and userauthentication mode. The preceding parameters have default values on the switch. You canmodify these parameters as needed.
Pre-configuration TasksBefore configuring a VTY user interface, log in to the switch by using a terminal.
Data PreparationTo configure a VTY user interface, you need the following data.
No. Data
1 Maximum VTY user interfaces
2 (Optional) ACL code to restrict incoming and outgoing calls on VTY user interfaces
3 Idle timeout period, number of characters in each line displayed on a terminal screen,and the size of history command buffer
4 User priority
5 User authentication method, username, and password
S6700 Series Ethernet SwitchesConfiguration Guide - Basic Configuration 5 Configuring User Interfaces
Issue 05 (2013-04-10) Huawei Proprietary and ConfidentialCopyright © Huawei Technologies Co., Ltd.
52
NOTE
All the preceding parameters (excluding the ACL for limiting incoming and outgoing calls in VTY userinterfaces, user authentication method, username, and password) have default values that require noadditional configuration.
5.3.2 Configuring the Maximum Number of VTY User InterfacesThis section describes how to limit the number of users logging in to the switch by configuringthe maximum number of VTY user interfaces.
Context
The maximum number of VTY user interfaces equals the total number of users allowed to login to the switch using Telnet or SSH.
Procedure
Step 1 Run:system-view
The system view is displayed.
Step 2 Run:user-interface maximum-vty number
The maximum number of VTY user interfaces is set.
NOTE
When the maximum number of VTY user interfaces is set to zero, no user (including the networkadministrator) can use a VTY user interface to log in to the switch.
If the set maximum number of VTY user interfaces is smaller than the maximum number ofonline users, a message is displayed indicating that the configuration failed.
If the set maximum number of VTY user interfaces is greater than the maximum number ofcurrent interfaces, the authentication mode and password must be set for newly added userinterfaces.
Consider, for example, a system that allows a maximum of five users to be online. To allow 15VTY users online at the same time, you must run the authentication-mode command toconfigure authentication modes for VTY user interfaces from 5 to 14. The commands are runas follows:
<Quidway> system-view[Quidway] user-interface maximum-vty 15[Quidway] user-interface vty 5 14[Quidway-ui-vty5-14] authentication-mode password
----End
S6700 Series Ethernet SwitchesConfiguration Guide - Basic Configuration 5 Configuring User Interfaces
Issue 05 (2013-04-10) Huawei Proprietary and ConfidentialCopyright © Huawei Technologies Co., Ltd.
53
5.3.3 (Optional) Setting Restrictions for Incoming and OutgoingCalls on VTY User Interfaces
This section describes how to configure an ACL to restrict access of incoming and outgoingcalls on a VTY user interface to specific IP addresses or address segments.
Context
Before setting restrictions for incoming and outgoing calls on a VTY user interface, run theacl command in the system view to create an ACL. Enter the ACL view and run the rulecommand to add rules to the ACL.
NOTE
l The user interface supports the basic ACL ranging from 2000 to 2999 and the advanced ACL rangingfrom 3000 to 3999.
l For ACL configuration details, refer to the S6700 Series Ethernet Switches Configuration Guide -Security.
Procedure
Step 1 Run:system-view
The system view is displayed.
Step 2 Run:user-interface vty first-ui-number [ last-ui-number ]
The VTY user interface view is displayed.
Step 3 Run:acl acl-number { inbound | outbound }
Restrictions for incoming and outgoing calls on the VTY interface are configured.
l If you want to prevent a user with a specific address or segment address from logging in tothe switch, use the inbound command.
l If you want to prevent a user who logs in to a switch from accessing other switchs, use theoutbound command.
----End
5.3.4 Setting Terminal Attributes of the VTY User InterfaceThis section describes how to configure terminal attributes of a VTY user interface, includinguser idle timeout, number of lines or number of characters in each line displayed in a terminalscreen, and size of the history command buffer.
Context
Terminal attributes of a VTY user interface have default values on the switch and you can setthem as needed.
S6700 Series Ethernet SwitchesConfiguration Guide - Basic Configuration 5 Configuring User Interfaces
Issue 05 (2013-04-10) Huawei Proprietary and ConfidentialCopyright © Huawei Technologies Co., Ltd.
54

Procedure
Step 1 Run:system-view
The system view is displayed.
Step 2 Run:user-interface vty number1 [ number2 ]
The VTY user interface view is displayed.
Step 3 Run:shell
VTY terminal service is enabled.
Step 4 Run:idle-timeout minutes [ seconds ]
User idle timeout is enabled.
If the connection remains idle for the timeout period, the system automatically terminates theconnection.
By default, the timeout period is 10 minutes.
Step 5 Run:screen-length screen-length [temporary]
The terminal screen length is set.
The parameter temporary is used to display the number of lines to be temporarily displayed ona terminal screen.
By default, the terminal screen length is 24 lines.
Step 6 Run:history-command max-size size-value
Set the size of the history command buffer.
By default, a maximum number of 10 commands can be cached in the history command buffer.
----End
5.3.5 Setting User Priority of the VTY User InterfaceThis section describes how to control a user' authority to log in to the switch and how to improveswitch security by configuring user priority.
Contextl Users are classified into 16 levels (numbered 0 to 15). The greater the number, the higher
the user level.l This procedure sets the priority of a user who logs in through the console port. A user's
level determines the level of commands the user is authorized to run.For details about command levels, see "Command Level".
S6700 Series Ethernet SwitchesConfiguration Guide - Basic Configuration 5 Configuring User Interfaces
Issue 05 (2013-04-10) Huawei Proprietary and ConfidentialCopyright © Huawei Technologies Co., Ltd.
55
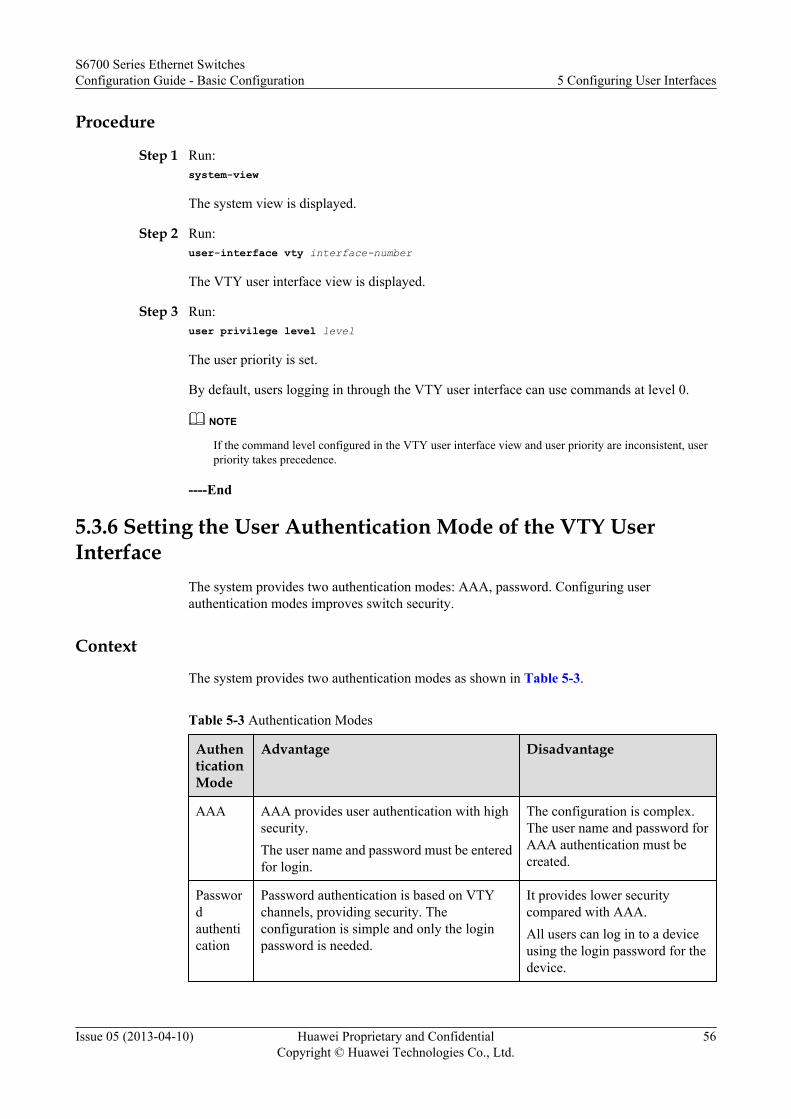
Procedure
Step 1 Run:system-view
The system view is displayed.
Step 2 Run:user-interface vty interface-number
The VTY user interface view is displayed.
Step 3 Run:user privilege level level
The user priority is set.
By default, users logging in through the VTY user interface can use commands at level 0.
NOTE
If the command level configured in the VTY user interface view and user priority are inconsistent, userpriority takes precedence.
----End
5.3.6 Setting the User Authentication Mode of the VTY UserInterface
The system provides two authentication modes: AAA, password. Configuring userauthentication modes improves switch security.
Context
The system provides two authentication modes as shown in Table 5-3.
Table 5-3 Authentication Modes
AuthenticationMode
Advantage Disadvantage
AAA AAA provides user authentication with highsecurity.The user name and password must be enteredfor login.
The configuration is complex.The user name and password forAAA authentication must becreated.
Passwordauthentication
Password authentication is based on VTYchannels, providing security. Theconfiguration is simple and only the loginpassword is needed.
It provides lower securitycompared with AAA.All users can log in to a deviceusing the login password for thedevice.
S6700 Series Ethernet SwitchesConfiguration Guide - Basic Configuration 5 Configuring User Interfaces
Issue 05 (2013-04-10) Huawei Proprietary and ConfidentialCopyright © Huawei Technologies Co., Ltd.
56
CAUTIONl By default, the user authentication mode of the VTY user interface is not configured.
Administrators must manually set a user authentication mode for the VTY user interface. Ifno user authentication mode is set for the VTY user interface, users cannot log in to the deviceusing the VTY user interface.
l If the user authentication mode of the VTY user interface is password authentication or AAAauthentication, a password or user name must be set for logging in to the system. In this case,without password or user name set, users cannot log in to the device using the VTY userinterface.
CAUTIONIf the user authentication mode for the VTY user interface is password or AAA, you must setthe password or user name for logging in to the device.
Procedurel Configuring AAA authentication
1. Run:system-view
The system view is displayed.2. Run:
user-interface vty number1 [ number2 ]
The VTY user interface view is displayed.3. Run:
authentication-mode aaa
The authentication mode is set to AAA authentication.4. Run:
quit
Exit from the VTY user interface view.5. Run:
aaa
The AAA view is displayed.6. Run:
local-user user-name password cipher password
A user name and password for the local user are created.l Configuring password authentication
1. Run:system-view
The system view is displayed.
S6700 Series Ethernet SwitchesConfiguration Guide - Basic Configuration 5 Configuring User Interfaces
Issue 05 (2013-04-10) Huawei Proprietary and ConfidentialCopyright © Huawei Technologies Co., Ltd.
57
2. Run:user-interface vty number1 [ number2 ]
The VTY user interface view is displayed.3. Run:
authentication-mode password
The authentication mode is set to password authentication.4. Run:
set authentication password [ cipher password ]
A password in the encrypted text for password authentication is set.
----End
5.3.7 Checking the ConfigurationsAfter configuring a VTY user interface, you can view information about user interfaces, themaximum number of VTY user interfaces, and physical attributes and configurations of userinterfaces.
PrerequisitesThe VTY user interface has been configured.
Procedurel Run the display users [ all ] command to check information about user interfaces.l Run the display user-interface maximum-vty command to check the maximum number
of VTY user interfaces.l Run the display user-interface [ [ ui-type ] ui-number1 | ui-number ] [ summary ]
command to check the physical attributes and configurations of user interfaces.l Run the display local-user command to check the local user list.l Run the display vty mode command to check the VTY mode.
----End
ExampleRun the display users command to view information about current user interfaces.
<Quidway> display users User-Intf Delay Type Network Address AuthenStatus AuthorcmdFlag 34 VTY 0 00:00:12 TEL 10.138.77.38 no Username : Unspecified+ 35 VTY 1 00:00:00 TEL 10.138.77.57 no Username : Unspecified
Run the display user-interface maximum-vty command to view the maximum number of VTYuser interfaces.
<Quidway> display user-interface maximum-vty Maximum of VTY user:15
Run the display user-interface vty [ ui-number1 | ui-number ] [ summary ] command to checkthe physical attributes and configurations of user interfaces.
<Quidway> display user-interface vty 0
S6700 Series Ethernet SwitchesConfiguration Guide - Basic Configuration 5 Configuring User Interfaces
Issue 05 (2013-04-10) Huawei Proprietary and ConfidentialCopyright © Huawei Technologies Co., Ltd.
58
Idx Type Tx/Rx Modem Privi ActualPrivi Auth Int+ 34 VTY 0 - 14 14 N - + : Current UI is active. F : Current UI is active and work in async mode. Idx : Absolute index of UIs. Type : Type and relative index of UIs. Privi: The privilege of UIs. ActualPrivi: The actual privilege of user-interface. Auth : The authentication mode of UIs. A: Authenticate use AAA. N: Current UI need not authentication. P: Authenticate use current UI's password. Int : The physical location of UIs.
Run the display local-user command to view the local user list.
<Quidway> display local-user ---------------------------------------------------------------------------- User-name State AuthMask AdminLevel ---------------------------------------------------------------------------- aa A S - admin A H - huawei A F - ---------------------------------------------------------------------------- Total 3 user(s)
Run the display vty mode command to view the message indicating that the machine-to-machineinterface is enabled. For example:
<Quidway> display vty modecurrent VTY mode is Machine-Machine interface
5.4 Configuration ExamplesThis section provides examples for configuring console and VTY user interfaces. Theseconfiguration examples explain networking requirements, and provide configuration roadmapsand configuration notes.
5.4.1 Example for Configuring Console User InterfaceIn this example, a console user interface is configured to allow a user in password authenticationmode to log in to the switch. The physical attributes, terminal attributes, user priority, userauthentication mode, and password are set for the interface.
Networking RequirementsA user uses the console user interface to log in to the switch to initialize switch configurationsor perform local router maintenance. You can set console user interface attributes as needed (forexample, security considerations) to allow user logins.
In the console user interface view, the user priority is set to 15, and the password authenticationmode is set (the password is huawei).
If there is no user activity and a connection is idle for more than 30 minutes after login, theconnection is torn down.
Configuration RoadmapThe configuration roadmap is as follows:
S6700 Series Ethernet SwitchesConfiguration Guide - Basic Configuration 5 Configuring User Interfaces
Issue 05 (2013-04-10) Huawei Proprietary and ConfidentialCopyright © Huawei Technologies Co., Ltd.
59
1. Enter the interface view and set physical attributes of the console user interface.2. Set terminal attributes of the console user interface.3. Set the user priority of the console user interface.4. Set the user authentication mode and password of the console user interface.
Data Preparation
To complete the configuration, you need the following data:
l Transmission rate of the console user interface: 4800 bit/s
l Flow control mode of the console user interface: None
l Parity of the console user interface: even
l Stop bit of the console user interface: 2
l Data bit of the console user interface: 6
l Timeout period for disconnecting from the console user interface: 30 minutes
l Number of lines that a terminal screen displays: 30
l Number of characters that a terminal screen displays: 60
l Size of the history command buffer: 20
l User priority: 15
l User authentication mode: password (password: huawei@123)
Procedure
Step 1 Set physical attributes of the console user interface.<Quidway> system-view[Quidway] user-interface console 0[Quidway-ui-console0] speed 4800[Quidway-ui-console0] flow-control none[Quidway-ui-console0] parity even[Quidway-ui-console0] stopbits 2[Quidway-ui-console0] databits 6
Step 2 Set terminal attributes of the console user interface.[Quidway-ui-console0] shell[Quidway-ui-console0] idle-timeout 30[Quidway-ui-console0] screen-length 30[Quidway-ui-console0] screen-width 60[Quidway-ui-console0] history-command max-size 20
Step 3 Set the user priority of the console user interface.[Quidway-ui-console0] user privilege level 15
Step 4 Set the user authentication mode in the console user interface to password.[Quidway-ui-console0] authentication-mode password[Quidway-ui-console0] set authentication password cipher huawei[Quidway-ui-console0] quit
After the console user interface is configured, a user in password authentication mode can usea console port to log in and perform local maintenance on the switch. For details on how a userlogs in to the switch, see the 6 Configuring User Login.
----End
S6700 Series Ethernet SwitchesConfiguration Guide - Basic Configuration 5 Configuring User Interfaces
Issue 05 (2013-04-10) Huawei Proprietary and ConfidentialCopyright © Huawei Technologies Co., Ltd.
60
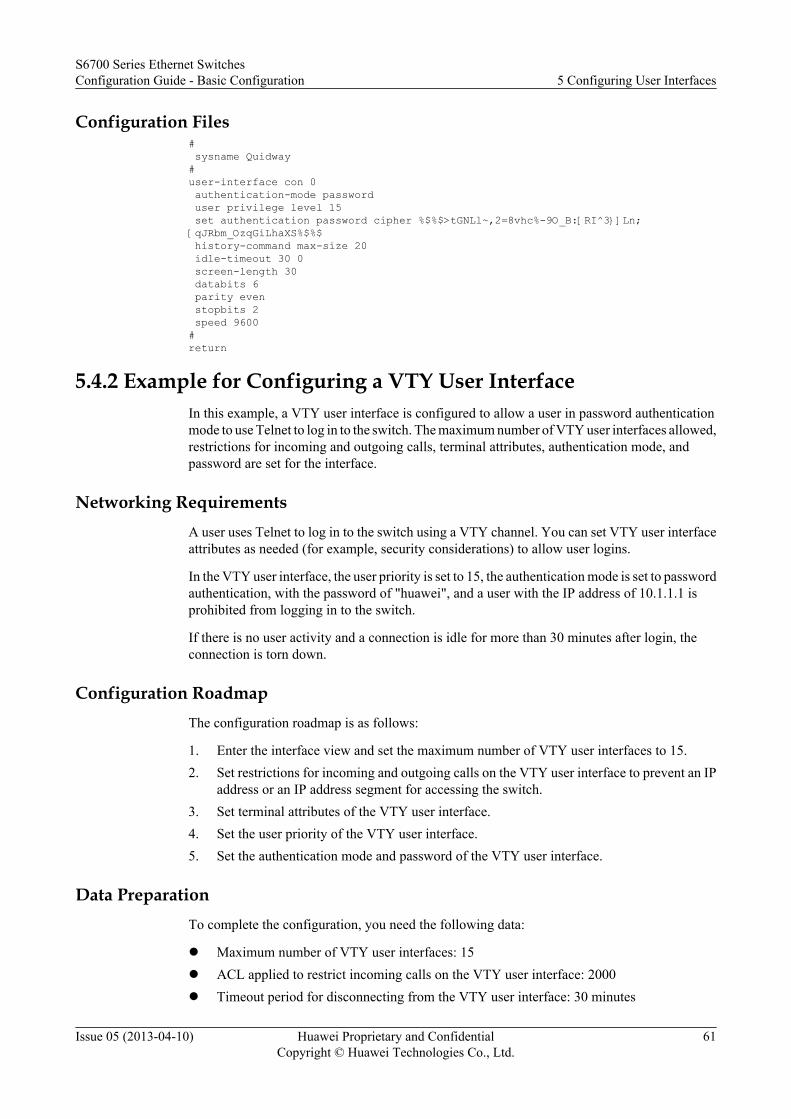
Configuration Files# sysname Quidway#user-interface con 0 authentication-mode password user privilege level 15 set authentication password cipher %$%$>tGNLl~,2=8vhc%-9O_B:[RI^3}]Ln;[qJRbm_OzqGiLhaXS%$%$ history-command max-size 20 idle-timeout 30 0 screen-length 30 databits 6 parity even stopbits 2 speed 9600#return
5.4.2 Example for Configuring a VTY User InterfaceIn this example, a VTY user interface is configured to allow a user in password authenticationmode to use Telnet to log in to the switch. The maximum number of VTY user interfaces allowed,restrictions for incoming and outgoing calls, terminal attributes, authentication mode, andpassword are set for the interface.
Networking RequirementsA user uses Telnet to log in to the switch using a VTY channel. You can set VTY user interfaceattributes as needed (for example, security considerations) to allow user logins.
In the VTY user interface, the user priority is set to 15, the authentication mode is set to passwordauthentication, with the password of "huawei", and a user with the IP address of 10.1.1.1 isprohibited from logging in to the switch.
If there is no user activity and a connection is idle for more than 30 minutes after login, theconnection is torn down.
Configuration RoadmapThe configuration roadmap is as follows:
1. Enter the interface view and set the maximum number of VTY user interfaces to 15.2. Set restrictions for incoming and outgoing calls on the VTY user interface to prevent an IP
address or an IP address segment for accessing the switch.3. Set terminal attributes of the VTY user interface.4. Set the user priority of the VTY user interface.5. Set the authentication mode and password of the VTY user interface.
Data PreparationTo complete the configuration, you need the following data:
l Maximum number of VTY user interfaces: 15l ACL applied to restrict incoming calls on the VTY user interface: 2000l Timeout period for disconnecting from the VTY user interface: 30 minutes
S6700 Series Ethernet SwitchesConfiguration Guide - Basic Configuration 5 Configuring User Interfaces
Issue 05 (2013-04-10) Huawei Proprietary and ConfidentialCopyright © Huawei Technologies Co., Ltd.
61
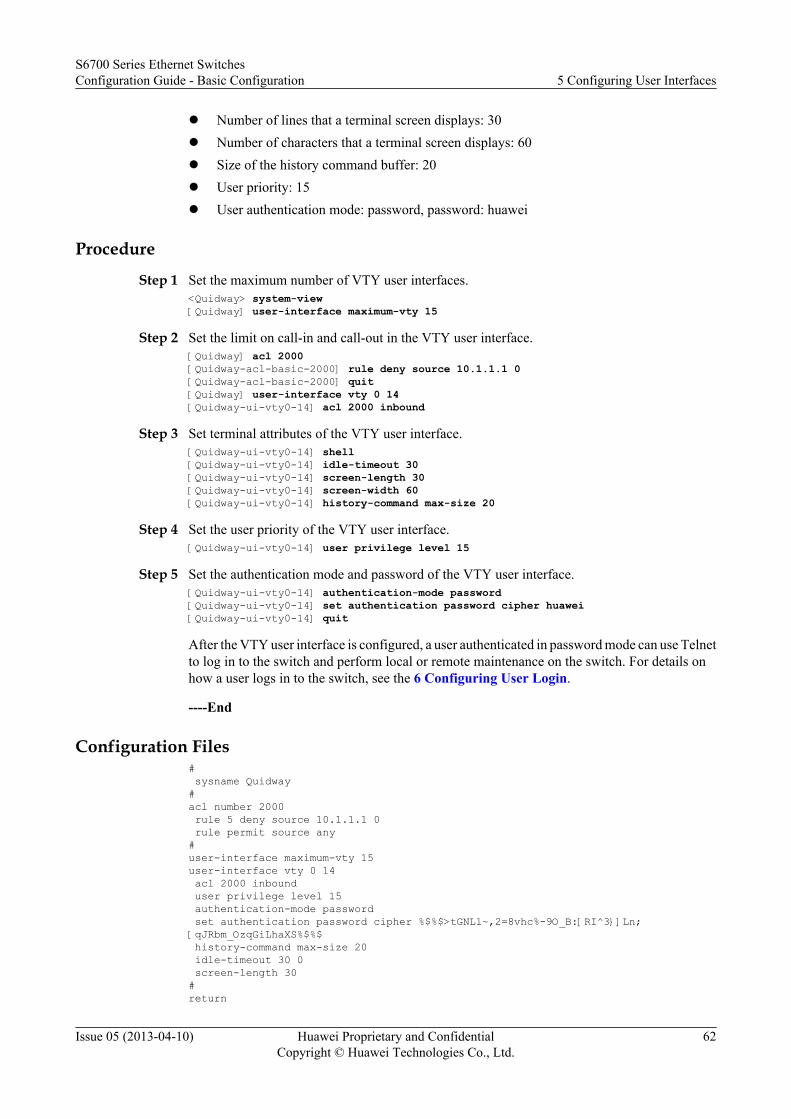
l Number of lines that a terminal screen displays: 30l Number of characters that a terminal screen displays: 60l Size of the history command buffer: 20l User priority: 15l User authentication mode: password, password: huawei
Procedure
Step 1 Set the maximum number of VTY user interfaces.<Quidway> system-view[Quidway] user-interface maximum-vty 15
Step 2 Set the limit on call-in and call-out in the VTY user interface.[Quidway] acl 2000[Quidway-acl-basic-2000] rule deny source 10.1.1.1 0[Quidway-acl-basic-2000] quit[Quidway] user-interface vty 0 14[Quidway-ui-vty0-14] acl 2000 inbound
Step 3 Set terminal attributes of the VTY user interface.[Quidway-ui-vty0-14] shell[Quidway-ui-vty0-14] idle-timeout 30[Quidway-ui-vty0-14] screen-length 30[Quidway-ui-vty0-14] screen-width 60[Quidway-ui-vty0-14] history-command max-size 20
Step 4 Set the user priority of the VTY user interface.[Quidway-ui-vty0-14] user privilege level 15
Step 5 Set the authentication mode and password of the VTY user interface.[Quidway-ui-vty0-14] authentication-mode password[Quidway-ui-vty0-14] set authentication password cipher huawei[Quidway-ui-vty0-14] quit
After the VTY user interface is configured, a user authenticated in password mode can use Telnetto log in to the switch and perform local or remote maintenance on the switch. For details onhow a user logs in to the switch, see the 6 Configuring User Login.
----End
Configuration Files# sysname Quidway#acl number 2000 rule 5 deny source 10.1.1.1 0 rule permit source any#user-interface maximum-vty 15user-interface vty 0 14 acl 2000 inbound user privilege level 15 authentication-mode password set authentication password cipher %$%$>tGNLl~,2=8vhc%-9O_B:[RI^3}]Ln;[qJRbm_OzqGiLhaXS%$%$ history-command max-size 20 idle-timeout 30 0 screen-length 30#return
S6700 Series Ethernet SwitchesConfiguration Guide - Basic Configuration 5 Configuring User Interfaces
Issue 05 (2013-04-10) Huawei Proprietary and ConfidentialCopyright © Huawei Technologies Co., Ltd.
62
6 Configuring User Login
About This Chapter
A user can log in to the switch through a console port, or by using Telnet or SSH (STelnet). Theuser can maintain the switch locally or remotely after login.
6.1 Overview of User LoginWhen the device works as the server, a user can log in to the device through a console port,Telnet, STelnet, or web.
6.2 Logging in to the Devices Through the Console PortWhen a user needs to configure a switch that is powered on for the first time or maintain aswitch locally, the user can log in through a console port.
6.3 Logging in to Devices Using TelnetWhen multiple switchs need to be configured and managed, there is no need to maintain eachswitch locally. Instead, you can use Telnet to log in to the switchs remotely to performmaintenance. This greatly facilitates device management.
6.4 Logging in to Devices Using STelnetSTelnet provides secure remote access over an insecure network. After the client/servernegotiation is complete and a secure connection is established, STelnet login is similar to Telnetlogin.
6.5 Logging in to the Devices by Using Secure Web Network Management (HTTPS Mode)An SSL policy is configured on and a digital certificate is loaded to an HTTP server. The digitalcertificate is used by a client to verify the identity of the server.
6.6 Common Operations After LoginAfter logging in to the switch, you can perform user priority switching, terminal window locking,and other operations as needed.
6.7 Configuration ExamplesThis section provides several examples describing how to configure users to log in through aconsole port, Telnet, or STelnet. The configuration examples provide information and diagramsfor networking requirements, configuration notes, and configuration roadmaps.
S6700 Series Ethernet SwitchesConfiguration Guide - Basic Configuration 6 Configuring User Login
Issue 05 (2013-04-10) Huawei Proprietary and ConfidentialCopyright © Huawei Technologies Co., Ltd.
63
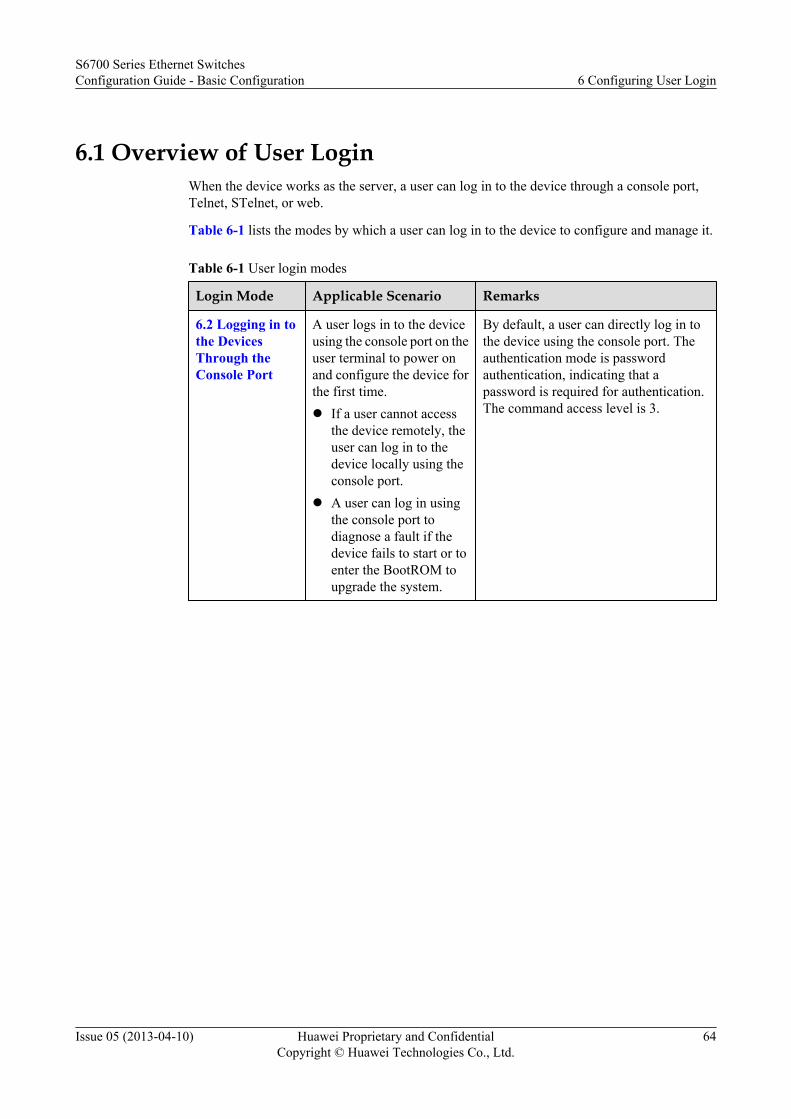
6.1 Overview of User LoginWhen the device works as the server, a user can log in to the device through a console port,Telnet, STelnet, or web.
Table 6-1 lists the modes by which a user can log in to the device to configure and manage it.
Table 6-1 User login modes
Login Mode Applicable Scenario Remarks
6.2 Logging in tothe DevicesThrough theConsole Port
A user logs in to the deviceusing the console port on theuser terminal to power onand configure the device forthe first time.l If a user cannot access
the device remotely, theuser can log in to thedevice locally using theconsole port.
l A user can log in usingthe console port todiagnose a fault if thedevice fails to start or toenter the BootROM toupgrade the system.
By default, a user can directly log in tothe device using the console port. Theauthentication mode is passwordauthentication, indicating that apassword is required for authentication.The command access level is 3.
S6700 Series Ethernet SwitchesConfiguration Guide - Basic Configuration 6 Configuring User Login
Issue 05 (2013-04-10) Huawei Proprietary and ConfidentialCopyright © Huawei Technologies Co., Ltd.
64
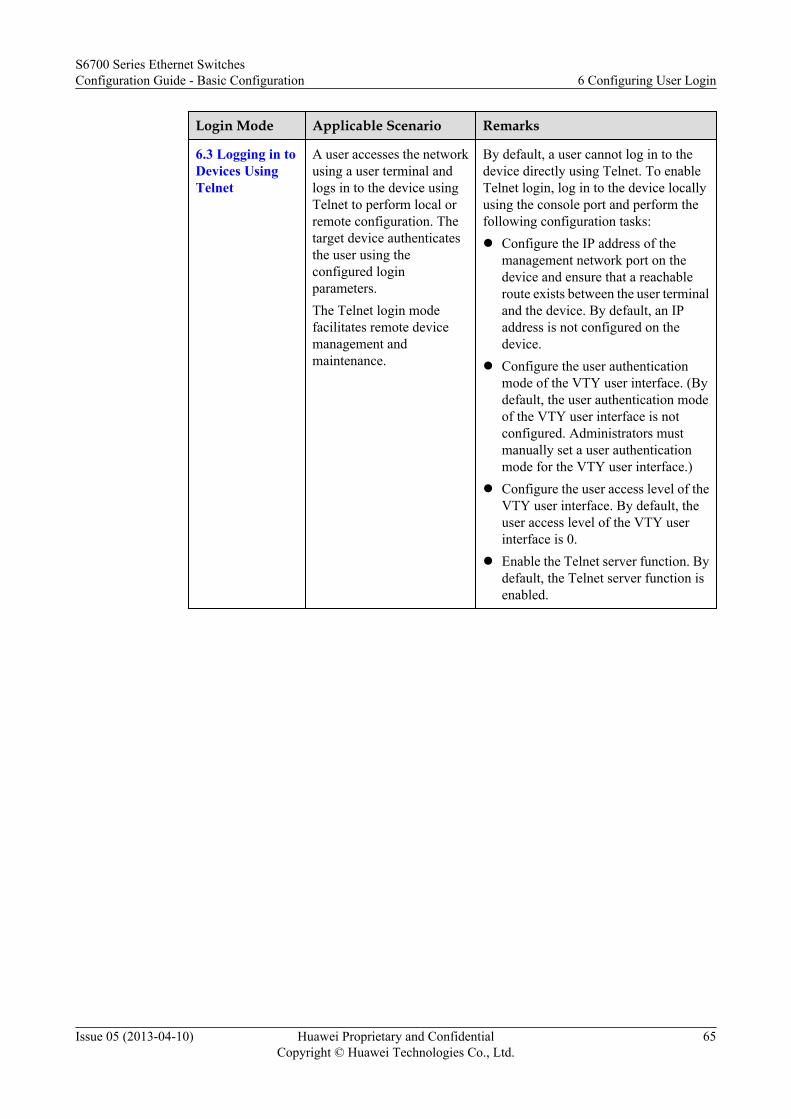
Login Mode Applicable Scenario Remarks
6.3 Logging in toDevices UsingTelnet
A user accesses the networkusing a user terminal andlogs in to the device usingTelnet to perform local orremote configuration. Thetarget device authenticatesthe user using theconfigured loginparameters.The Telnet login modefacilitates remote devicemanagement andmaintenance.
By default, a user cannot log in to thedevice directly using Telnet. To enableTelnet login, log in to the device locallyusing the console port and perform thefollowing configuration tasks:l Configure the IP address of the
management network port on thedevice and ensure that a reachableroute exists between the user terminaland the device. By default, an IPaddress is not configured on thedevice.
l Configure the user authenticationmode of the VTY user interface. (Bydefault, the user authentication modeof the VTY user interface is notconfigured. Administrators mustmanually set a user authenticationmode for the VTY user interface.)
l Configure the user access level of theVTY user interface. By default, theuser access level of the VTY userinterface is 0.
l Enable the Telnet server function. Bydefault, the Telnet server function isenabled.
S6700 Series Ethernet SwitchesConfiguration Guide - Basic Configuration 6 Configuring User Login
Issue 05 (2013-04-10) Huawei Proprietary and ConfidentialCopyright © Huawei Technologies Co., Ltd.
65
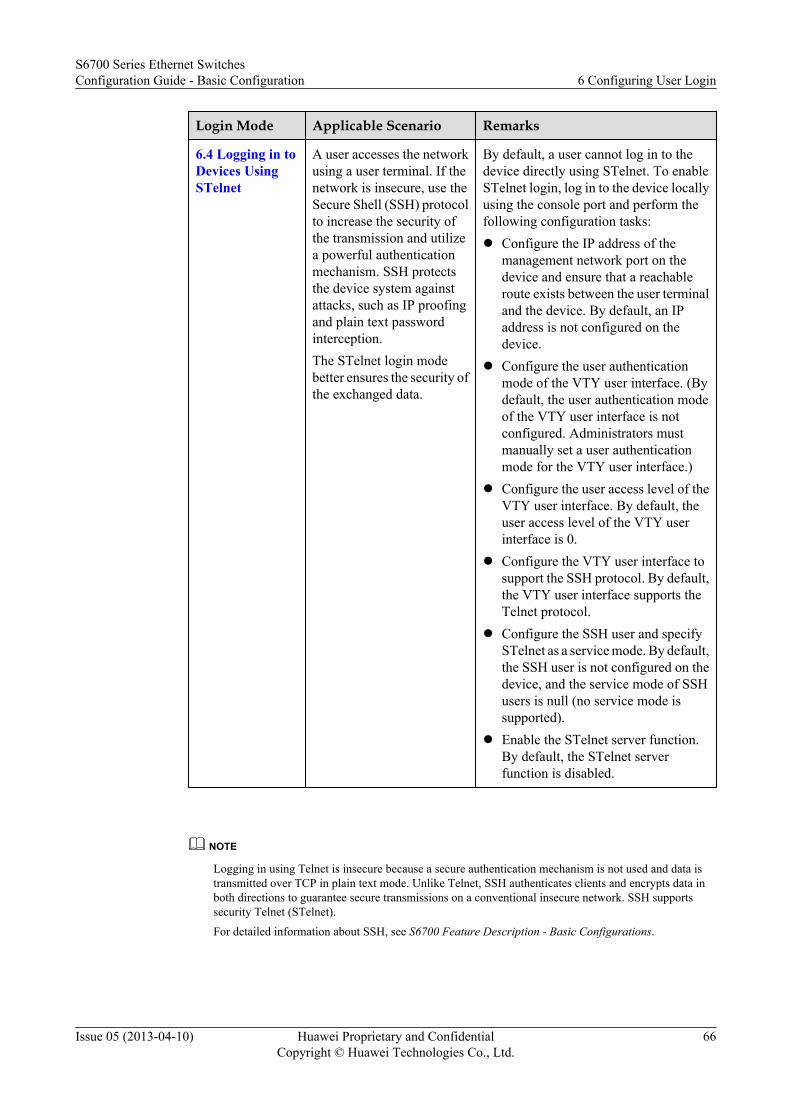
Login Mode Applicable Scenario Remarks
6.4 Logging in toDevices UsingSTelnet
A user accesses the networkusing a user terminal. If thenetwork is insecure, use theSecure Shell (SSH) protocolto increase the security ofthe transmission and utilizea powerful authenticationmechanism. SSH protectsthe device system againstattacks, such as IP proofingand plain text passwordinterception.The STelnet login modebetter ensures the security ofthe exchanged data.
By default, a user cannot log in to thedevice directly using STelnet. To enableSTelnet login, log in to the device locallyusing the console port and perform thefollowing configuration tasks:l Configure the IP address of the
management network port on thedevice and ensure that a reachableroute exists between the user terminaland the device. By default, an IPaddress is not configured on thedevice.
l Configure the user authenticationmode of the VTY user interface. (Bydefault, the user authentication modeof the VTY user interface is notconfigured. Administrators mustmanually set a user authenticationmode for the VTY user interface.)
l Configure the user access level of theVTY user interface. By default, theuser access level of the VTY userinterface is 0.
l Configure the VTY user interface tosupport the SSH protocol. By default,the VTY user interface supports theTelnet protocol.
l Configure the SSH user and specifySTelnet as a service mode. By default,the SSH user is not configured on thedevice, and the service mode of SSHusers is null (no service mode issupported).
l Enable the STelnet server function.By default, the STelnet serverfunction is disabled.
NOTE
Logging in using Telnet is insecure because a secure authentication mechanism is not used and data istransmitted over TCP in plain text mode. Unlike Telnet, SSH authenticates clients and encrypts data inboth directions to guarantee secure transmissions on a conventional insecure network. SSH supportssecurity Telnet (STelnet).
For detailed information about SSH, see S6700 Feature Description - Basic Configurations.
S6700 Series Ethernet SwitchesConfiguration Guide - Basic Configuration 6 Configuring User Login
Issue 05 (2013-04-10) Huawei Proprietary and ConfidentialCopyright © Huawei Technologies Co., Ltd.
66
6.2 Logging in to the Devices Through the Console PortWhen a user needs to configure a switch that is powered on for the first time or maintain aswitch locally, the user can log in through a console port.
6.2.1 Establishing the Configuration TaskBefore configuring user login through a console port, familiarize yourself with the usagescenario, complete the pre-configuration tasks, and obtain any data required for theconfiguration.
Applicable Environment
A user can log in to a device locally through a console port. The user can log in through a consoleport when a device is powered on for the first time.
l If a user cannot access the device remotely, the user can log in to the device locally usingthe console port.
l A user can log in using the console port to diagnose a fault if the device fails to start or toenter the BootROM to upgrade the system.
Pre-configuration Tasks
Before configuring user login through a console port, complete the following tasks:
l Configure the PC/terminal (including the serial port and RS-232 cable).
l Install the terminal emulator (for example, the Windows XP HyperTerminal) to the PC.
Data Preparation
To configure user login through a console port, you need the following data.
No. Data
1 l Transmission rate, flow control mode, parity mode, stop bit, data bitl Number of lines displayed in a terminal screen, number of characters displayed
in a terminal screen, size of the history command bufferl User priorityl User authentication mode, username, and password
6.2.2 (Optional) Configuring the Console User InterfaceIf you log in to the device through a console port to perform local maintenance, you can configureattributes for the console user interface as needed.
S6700 Series Ethernet SwitchesConfiguration Guide - Basic Configuration 6 Configuring User Login
Issue 05 (2013-04-10) Huawei Proprietary and ConfidentialCopyright © Huawei Technologies Co., Ltd.
67
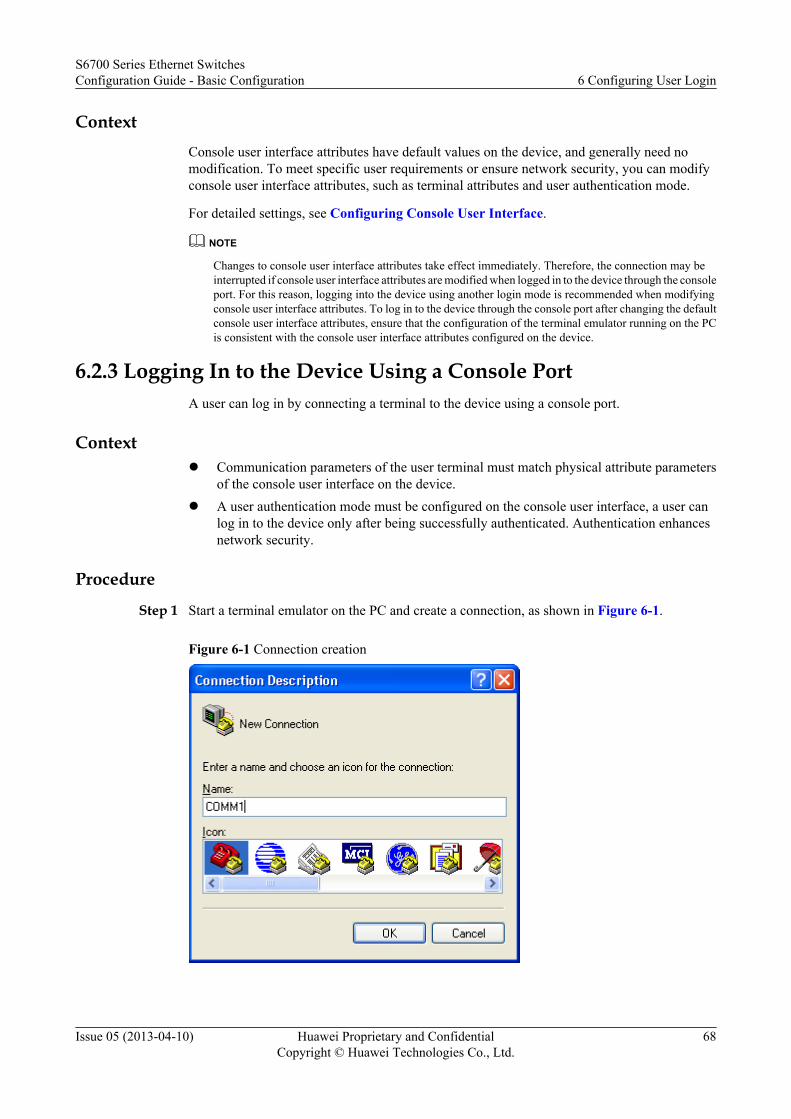
ContextConsole user interface attributes have default values on the device, and generally need nomodification. To meet specific user requirements or ensure network security, you can modifyconsole user interface attributes, such as terminal attributes and user authentication mode.
For detailed settings, see Configuring Console User Interface.
NOTE
Changes to console user interface attributes take effect immediately. Therefore, the connection may beinterrupted if console user interface attributes are modified when logged in to the device through the consoleport. For this reason, logging into the device using another login mode is recommended when modifyingconsole user interface attributes. To log in to the device through the console port after changing the defaultconsole user interface attributes, ensure that the configuration of the terminal emulator running on the PCis consistent with the console user interface attributes configured on the device.
6.2.3 Logging In to the Device Using a Console PortA user can log in by connecting a terminal to the device using a console port.
Contextl Communication parameters of the user terminal must match physical attribute parameters
of the console user interface on the device.l A user authentication mode must be configured on the console user interface, a user can
log in to the device only after being successfully authenticated. Authentication enhancesnetwork security.
Procedure
Step 1 Start a terminal emulator on the PC and create a connection, as shown in Figure 6-1.
Figure 6-1 Connection creation
S6700 Series Ethernet SwitchesConfiguration Guide - Basic Configuration 6 Configuring User Login
Issue 05 (2013-04-10) Huawei Proprietary and ConfidentialCopyright © Huawei Technologies Co., Ltd.
68
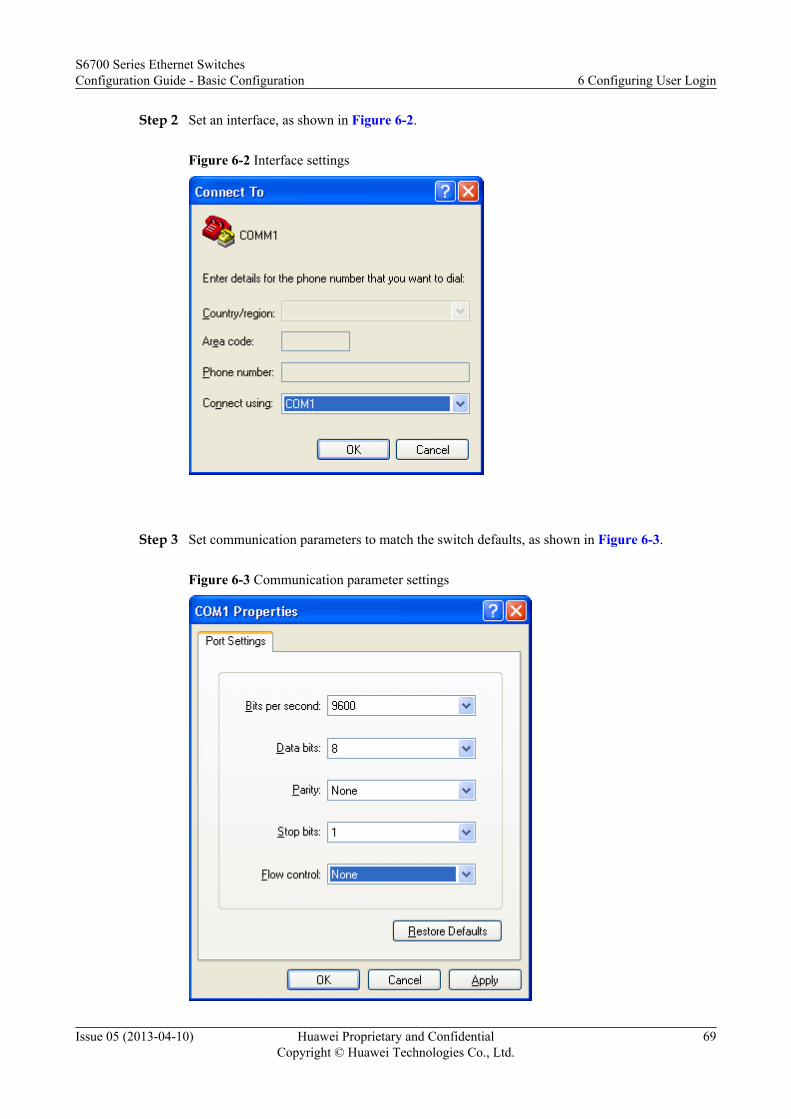
Step 2 Set an interface, as shown in Figure 6-2.
Figure 6-2 Interface settings
Step 3 Set communication parameters to match the switch defaults, as shown in Figure 6-3.
Figure 6-3 Communication parameter settings
S6700 Series Ethernet SwitchesConfiguration Guide - Basic Configuration 6 Configuring User Login
Issue 05 (2013-04-10) Huawei Proprietary and ConfidentialCopyright © Huawei Technologies Co., Ltd.
69
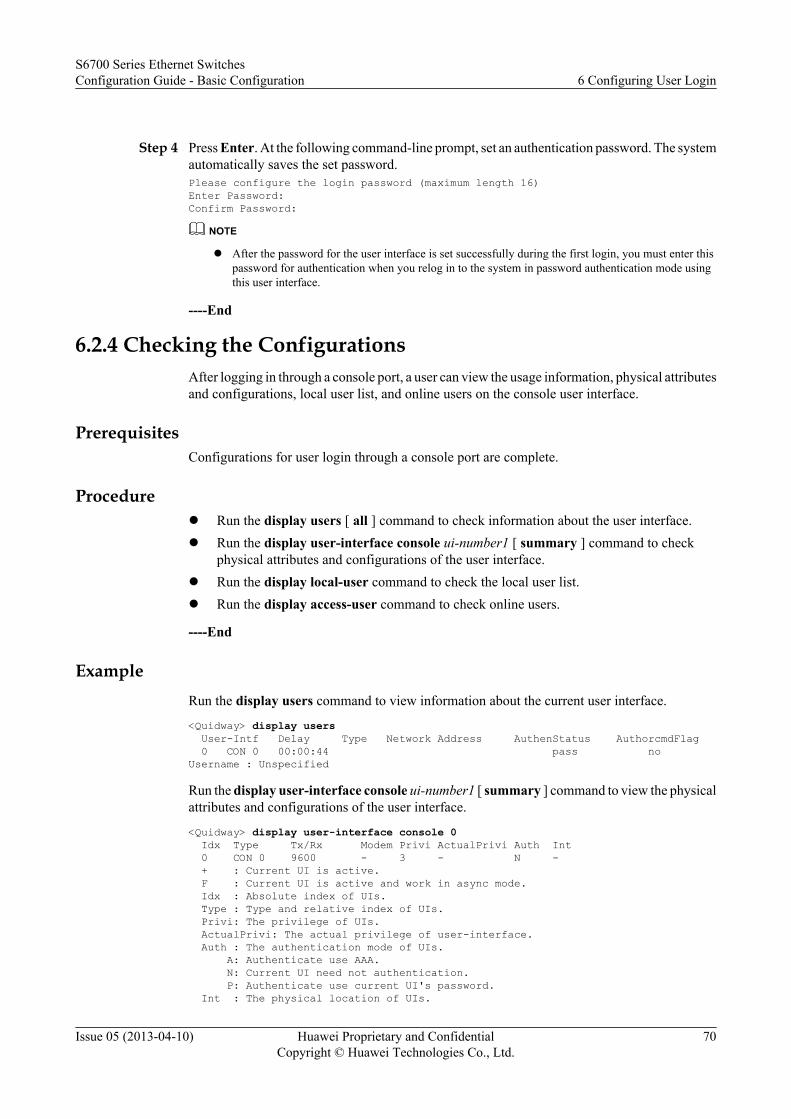
Step 4 Press Enter. At the following command-line prompt, set an authentication password. The systemautomatically saves the set password.Please configure the login password (maximum length 16)Enter Password: Confirm Password:
NOTE
l After the password for the user interface is set successfully during the first login, you must enter thispassword for authentication when you relog in to the system in password authentication mode usingthis user interface.
----End
6.2.4 Checking the ConfigurationsAfter logging in through a console port, a user can view the usage information, physical attributesand configurations, local user list, and online users on the console user interface.
PrerequisitesConfigurations for user login through a console port are complete.
Procedurel Run the display users [ all ] command to check information about the user interface.l Run the display user-interface console ui-number1 [ summary ] command to check
physical attributes and configurations of the user interface.l Run the display local-user command to check the local user list.l Run the display access-user command to check online users.
----End
ExampleRun the display users command to view information about the current user interface.
<Quidway> display users User-Intf Delay Type Network Address AuthenStatus AuthorcmdFlag 0 CON 0 00:00:44 pass noUsername : Unspecified
Run the display user-interface console ui-number1 [ summary ] command to view the physicalattributes and configurations of the user interface.
<Quidway> display user-interface console 0 Idx Type Tx/Rx Modem Privi ActualPrivi Auth Int 0 CON 0 9600 - 3 - N - + : Current UI is active. F : Current UI is active and work in async mode. Idx : Absolute index of UIs. Type : Type and relative index of UIs. Privi: The privilege of UIs. ActualPrivi: The actual privilege of user-interface. Auth : The authentication mode of UIs. A: Authenticate use AAA. N: Current UI need not authentication. P: Authenticate use current UI's password. Int : The physical location of UIs.
S6700 Series Ethernet SwitchesConfiguration Guide - Basic Configuration 6 Configuring User Login
Issue 05 (2013-04-10) Huawei Proprietary and ConfidentialCopyright © Huawei Technologies Co., Ltd.
70
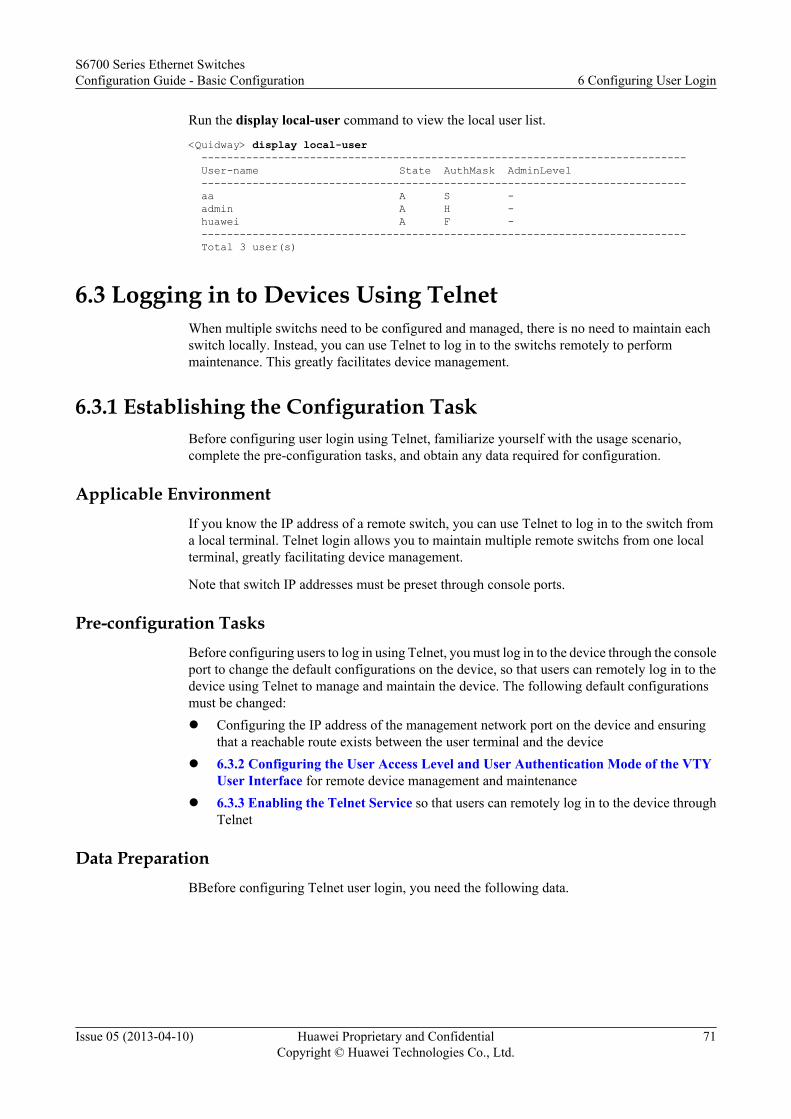
Run the display local-user command to view the local user list.
<Quidway> display local-user ---------------------------------------------------------------------------- User-name State AuthMask AdminLevel ---------------------------------------------------------------------------- aa A S - admin A H - huawei A F - ---------------------------------------------------------------------------- Total 3 user(s)
6.3 Logging in to Devices Using TelnetWhen multiple switchs need to be configured and managed, there is no need to maintain eachswitch locally. Instead, you can use Telnet to log in to the switchs remotely to performmaintenance. This greatly facilitates device management.
6.3.1 Establishing the Configuration TaskBefore configuring user login using Telnet, familiarize yourself with the usage scenario,complete the pre-configuration tasks, and obtain any data required for configuration.
Applicable EnvironmentIf you know the IP address of a remote switch, you can use Telnet to log in to the switch froma local terminal. Telnet login allows you to maintain multiple remote switchs from one localterminal, greatly facilitating device management.
Note that switch IP addresses must be preset through console ports.
Pre-configuration TasksBefore configuring users to log in using Telnet, you must log in to the device through the consoleport to change the default configurations on the device, so that users can remotely log in to thedevice using Telnet to manage and maintain the device. The following default configurationsmust be changed:l Configuring the IP address of the management network port on the device and ensuring
that a reachable route exists between the user terminal and the devicel 6.3.2 Configuring the User Access Level and User Authentication Mode of the VTY
User Interface for remote device management and maintenancel 6.3.3 Enabling the Telnet Service so that users can remotely log in to the device through
Telnet
Data PreparationBBefore configuring Telnet user login, you need the following data.
S6700 Series Ethernet SwitchesConfiguration Guide - Basic Configuration 6 Configuring User Login
Issue 05 (2013-04-10) Huawei Proprietary and ConfidentialCopyright © Huawei Technologies Co., Ltd.
71
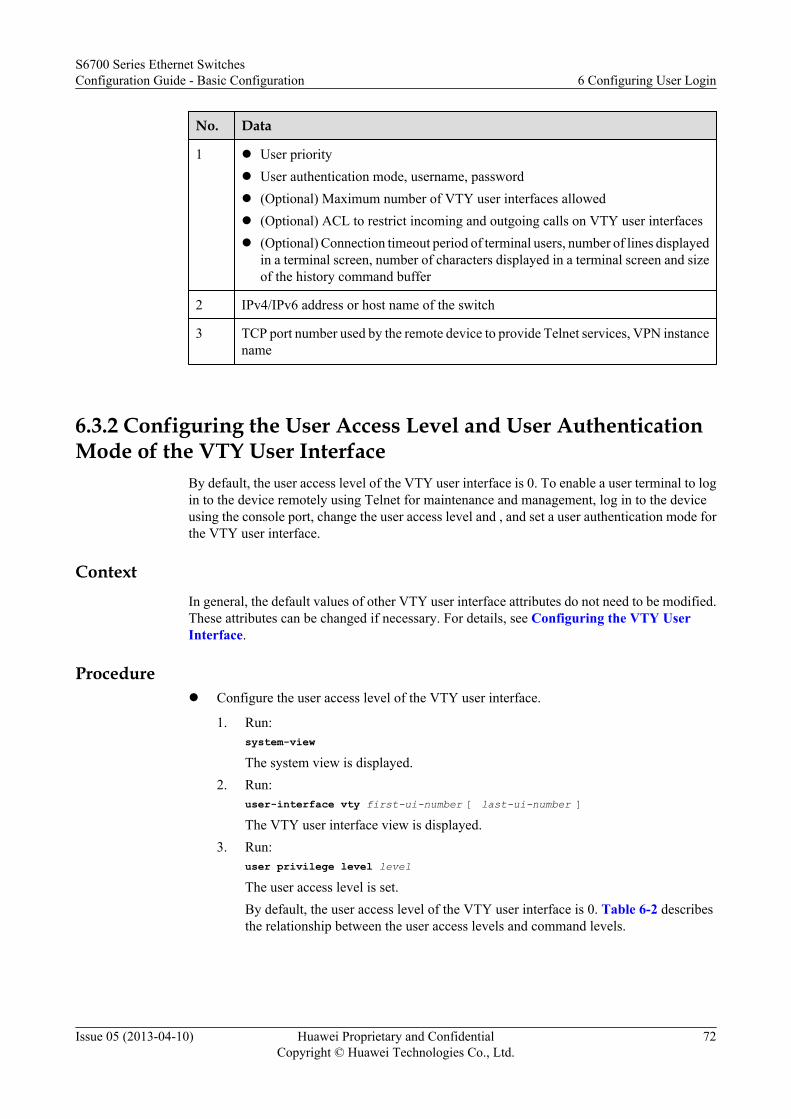
No. Data
1 l User priorityl User authentication mode, username, passwordl (Optional) Maximum number of VTY user interfaces allowedl (Optional) ACL to restrict incoming and outgoing calls on VTY user interfacesl (Optional) Connection timeout period of terminal users, number of lines displayed
in a terminal screen, number of characters displayed in a terminal screen and sizeof the history command buffer
2 IPv4/IPv6 address or host name of the switch
3 TCP port number used by the remote device to provide Telnet services, VPN instancename
6.3.2 Configuring the User Access Level and User AuthenticationMode of the VTY User Interface
By default, the user access level of the VTY user interface is 0. To enable a user terminal to login to the device remotely using Telnet for maintenance and management, log in to the deviceusing the console port, change the user access level and , and set a user authentication mode forthe VTY user interface.
ContextIn general, the default values of other VTY user interface attributes do not need to be modified.These attributes can be changed if necessary. For details, see Configuring the VTY UserInterface.
Procedurel Configure the user access level of the VTY user interface.
1. Run:system-viewThe system view is displayed.
2. Run:user-interface vty first-ui-number [ last-ui-number ]The VTY user interface view is displayed.
3. Run:user privilege level levelThe user access level is set.By default, the user access level of the VTY user interface is 0. Table 6-2 describesthe relationship between the user access levels and command levels.
S6700 Series Ethernet SwitchesConfiguration Guide - Basic Configuration 6 Configuring User Login
Issue 05 (2013-04-10) Huawei Proprietary and ConfidentialCopyright © Huawei Technologies Co., Ltd.
72
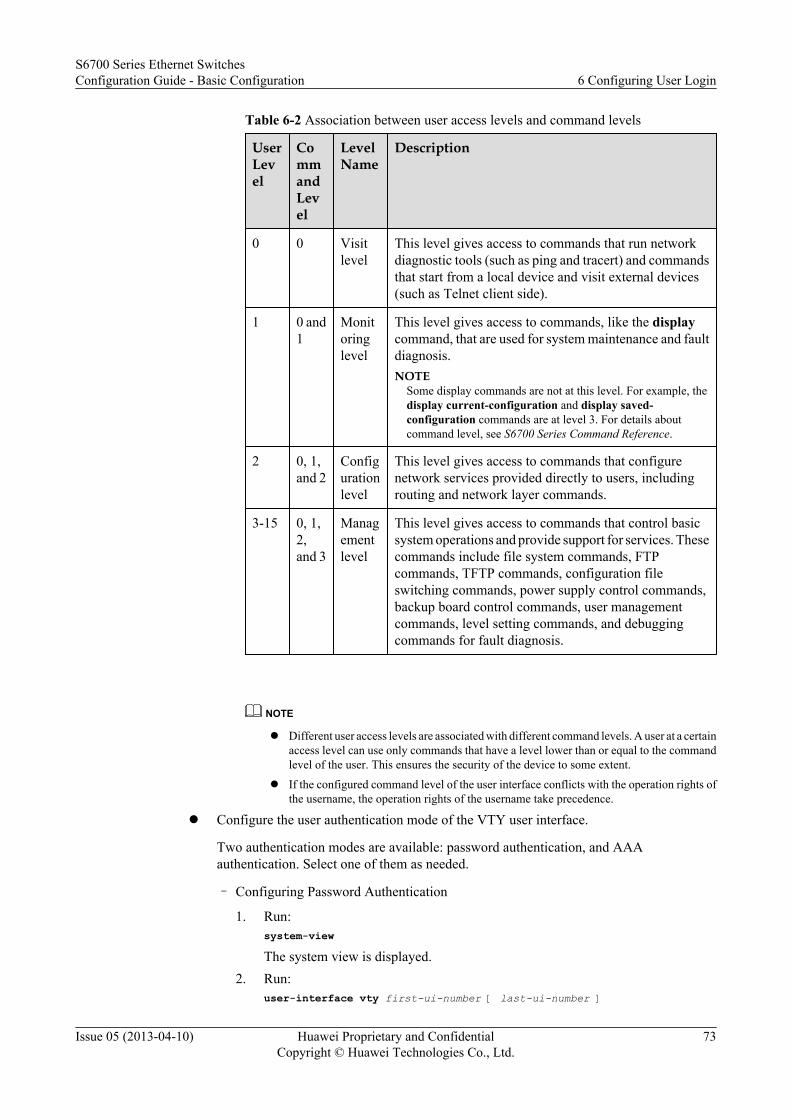
Table 6-2 Association between user access levels and command levels
UserLevel
CommandLevel
LevelName
Description
0 0 Visitlevel
This level gives access to commands that run networkdiagnostic tools (such as ping and tracert) and commandsthat start from a local device and visit external devices(such as Telnet client side).
1 0 and1
Monitoringlevel
This level gives access to commands, like the displaycommand, that are used for system maintenance and faultdiagnosis.NOTE
Some display commands are not at this level. For example, thedisplay current-configuration and display saved-configuration commands are at level 3. For details aboutcommand level, see S6700 Series Command Reference.
2 0, 1,and 2
Configurationlevel
This level gives access to commands that configurenetwork services provided directly to users, includingrouting and network layer commands.
3-15 0, 1,2,and 3
Managementlevel
This level gives access to commands that control basicsystem operations and provide support for services. Thesecommands include file system commands, FTPcommands, TFTP commands, configuration fileswitching commands, power supply control commands,backup board control commands, user managementcommands, level setting commands, and debuggingcommands for fault diagnosis.
NOTE
l Different user access levels are associated with different command levels. A user at a certainaccess level can use only commands that have a level lower than or equal to the commandlevel of the user. This ensures the security of the device to some extent.
l If the configured command level of the user interface conflicts with the operation rights ofthe username, the operation rights of the username take precedence.
l Configure the user authentication mode of the VTY user interface.
Two authentication modes are available: password authentication, and AAAauthentication. Select one of them as needed.
– Configuring Password Authentication
1. Run:system-viewThe system view is displayed.
2. Run:user-interface vty first-ui-number [ last-ui-number ]
S6700 Series Ethernet SwitchesConfiguration Guide - Basic Configuration 6 Configuring User Login
Issue 05 (2013-04-10) Huawei Proprietary and ConfidentialCopyright © Huawei Technologies Co., Ltd.
73
The VTY user interface view is displayed.3. Run:
authentication-mode passwordThe authentication mode is set to password authentication.
4. Run:set authentication password [ cipher password ]A password in the encrypted text for password authentication is set.
– Configuring AAA AuthenticationWhen the user authentication mode of the VTY user interface is set to AAAauthentication, the access type of the local user must be specified.
1. Run:system-viewThe system view is displayed.
2. Run:aaaThe AAA view is displayed.
3. Run:local-user user-name password cipher passwordA username and password for the local user are created.
4. Run:local-user user-name service-type telnetThe access type of the local user is set to Telnet.
5. Run:quitExit from the AAA view.
6. Run:user-interface vty first-ui-number [ last-ui-number ]The VTY user interface view is displayed.
7. Run:authentication-mode aaaThe authentication mode is set to AAA authentication.
----End
6.3.3 Enabling the Telnet ServiceBefore a user terminal establishes a Telnet connection with the device, log in to the devicethrough the console interface to enable the Telnet server function on the device, so that the userterminal can remotely log in to the device using Telnet.
ContextBy default, the Telnet server function is enabled.
Perform the following steps on the device that serves as a Telnet server.
Select and perform one of the following two steps for IPv4 or IPv6.
S6700 Series Ethernet SwitchesConfiguration Guide - Basic Configuration 6 Configuring User Login
Issue 05 (2013-04-10) Huawei Proprietary and ConfidentialCopyright © Huawei Technologies Co., Ltd.
74
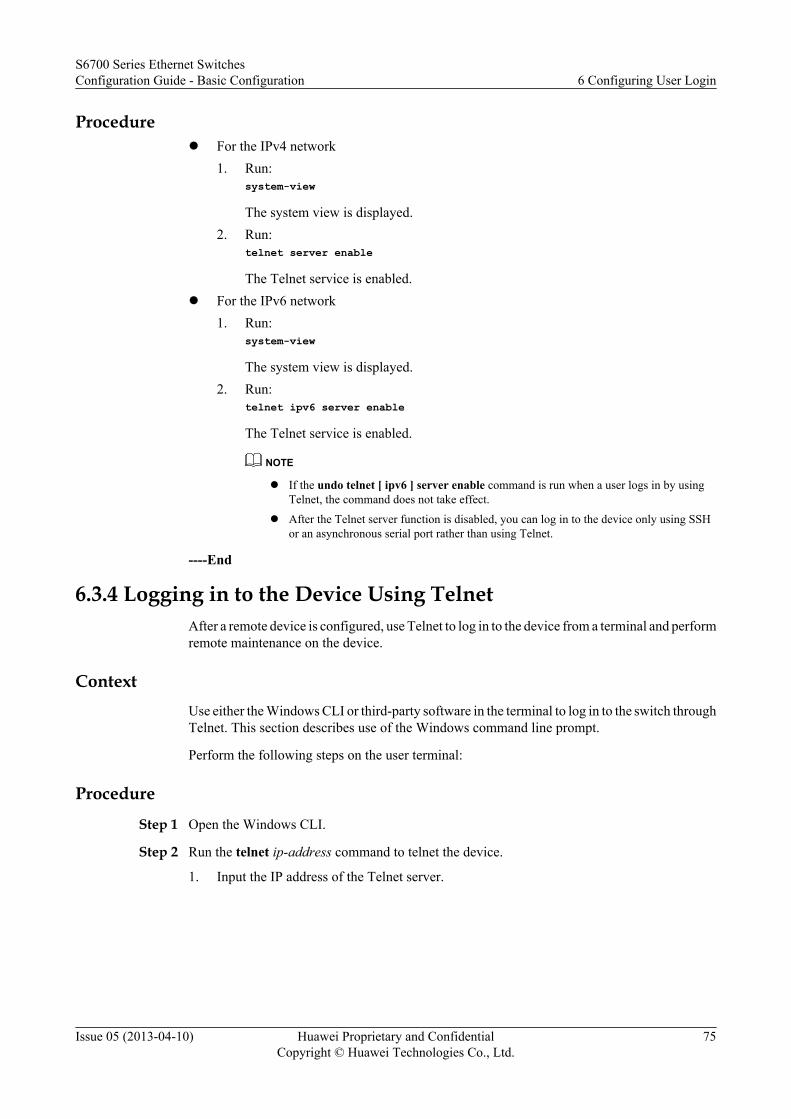
Procedurel For the IPv4 network
1. Run:system-view
The system view is displayed.2. Run:
telnet server enable
The Telnet service is enabled.l For the IPv6 network
1. Run:system-view
The system view is displayed.2. Run:
telnet ipv6 server enable
The Telnet service is enabled.
NOTE
l If the undo telnet [ ipv6 ] server enable command is run when a user logs in by usingTelnet, the command does not take effect.
l After the Telnet server function is disabled, you can log in to the device only using SSHor an asynchronous serial port rather than using Telnet.
----End
6.3.4 Logging in to the Device Using TelnetAfter a remote device is configured, use Telnet to log in to the device from a terminal and performremote maintenance on the device.
ContextUse either the Windows CLI or third-party software in the terminal to log in to the switch throughTelnet. This section describes use of the Windows command line prompt.
Perform the following steps on the user terminal:
Procedure
Step 1 Open the Windows CLI.
Step 2 Run the telnet ip-address command to telnet the device.
1. Input the IP address of the Telnet server.
S6700 Series Ethernet SwitchesConfiguration Guide - Basic Configuration 6 Configuring User Login
Issue 05 (2013-04-10) Huawei Proprietary and ConfidentialCopyright © Huawei Technologies Co., Ltd.
75
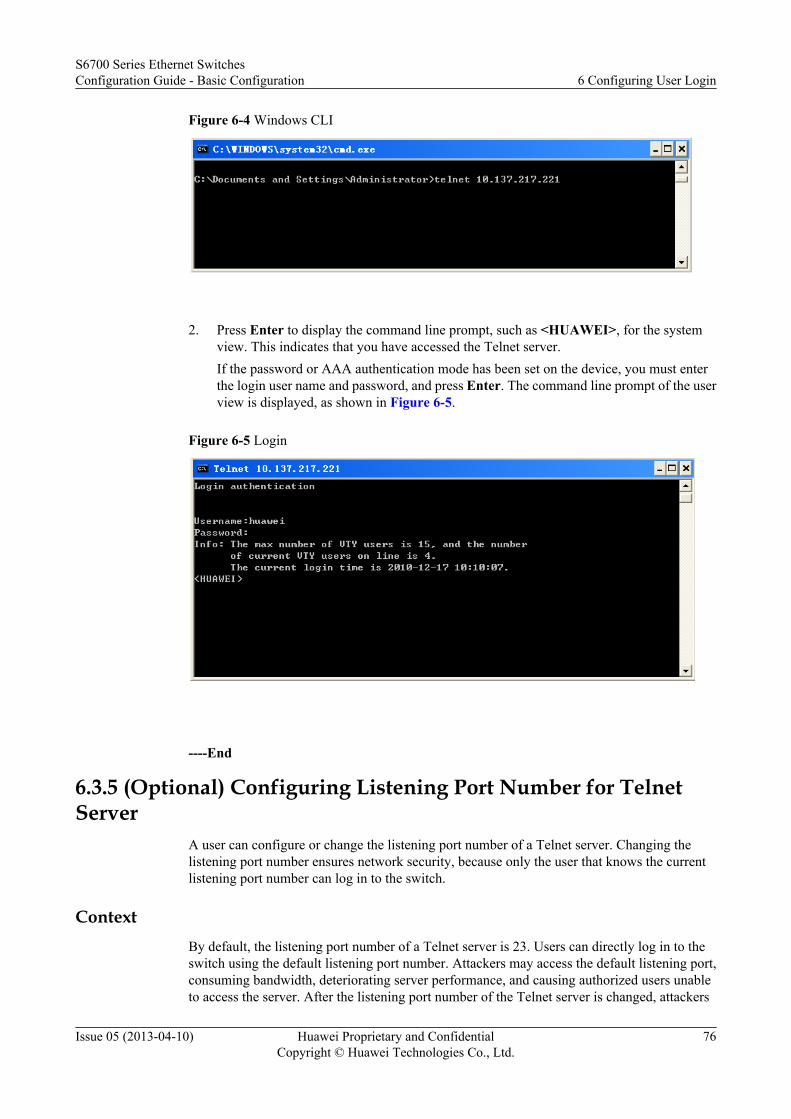
Figure 6-4 Windows CLI
2. Press Enter to display the command line prompt, such as <HUAWEI>, for the system
view. This indicates that you have accessed the Telnet server.If the password or AAA authentication mode has been set on the device, you must enterthe login user name and password, and press Enter. The command line prompt of the userview is displayed, as shown in Figure 6-5.
Figure 6-5 Login
----End
6.3.5 (Optional) Configuring Listening Port Number for TelnetServer
A user can configure or change the listening port number of a Telnet server. Changing thelistening port number ensures network security, because only the user that knows the currentlistening port number can log in to the switch.
ContextBy default, the listening port number of a Telnet server is 23. Users can directly log in to theswitch using the default listening port number. Attackers may access the default listening port,consuming bandwidth, deteriorating server performance, and causing authorized users unableto access the server. After the listening port number of the Telnet server is changed, attackers
S6700 Series Ethernet SwitchesConfiguration Guide - Basic Configuration 6 Configuring User Login
Issue 05 (2013-04-10) Huawei Proprietary and ConfidentialCopyright © Huawei Technologies Co., Ltd.
76
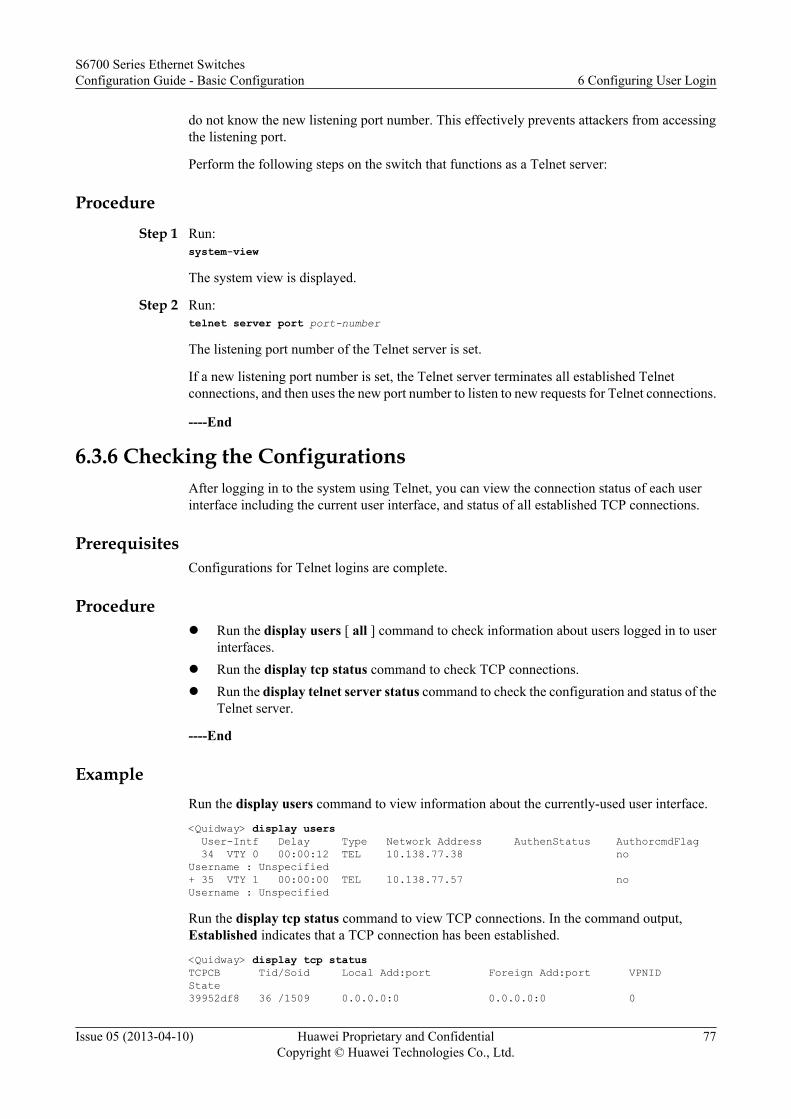
do not know the new listening port number. This effectively prevents attackers from accessingthe listening port.
Perform the following steps on the switch that functions as a Telnet server:
Procedure
Step 1 Run:system-view
The system view is displayed.
Step 2 Run:telnet server port port-number
The listening port number of the Telnet server is set.
If a new listening port number is set, the Telnet server terminates all established Telnetconnections, and then uses the new port number to listen to new requests for Telnet connections.
----End
6.3.6 Checking the ConfigurationsAfter logging in to the system using Telnet, you can view the connection status of each userinterface including the current user interface, and status of all established TCP connections.
PrerequisitesConfigurations for Telnet logins are complete.
Procedurel Run the display users [ all ] command to check information about users logged in to user
interfaces.l Run the display tcp status command to check TCP connections.l Run the display telnet server status command to check the configuration and status of the
Telnet server.
----End
ExampleRun the display users command to view information about the currently-used user interface.
<Quidway> display users User-Intf Delay Type Network Address AuthenStatus AuthorcmdFlag 34 VTY 0 00:00:12 TEL 10.138.77.38 noUsername : Unspecified+ 35 VTY 1 00:00:00 TEL 10.138.77.57 noUsername : Unspecified
Run the display tcp status command to view TCP connections. In the command output,Established indicates that a TCP connection has been established.
<Quidway> display tcp statusTCPCB Tid/Soid Local Add:port Foreign Add:port VPNID State39952df8 36 /1509 0.0.0.0:0 0.0.0.0:0 0
S6700 Series Ethernet SwitchesConfiguration Guide - Basic Configuration 6 Configuring User Login
Issue 05 (2013-04-10) Huawei Proprietary and ConfidentialCopyright © Huawei Technologies Co., Ltd.
77
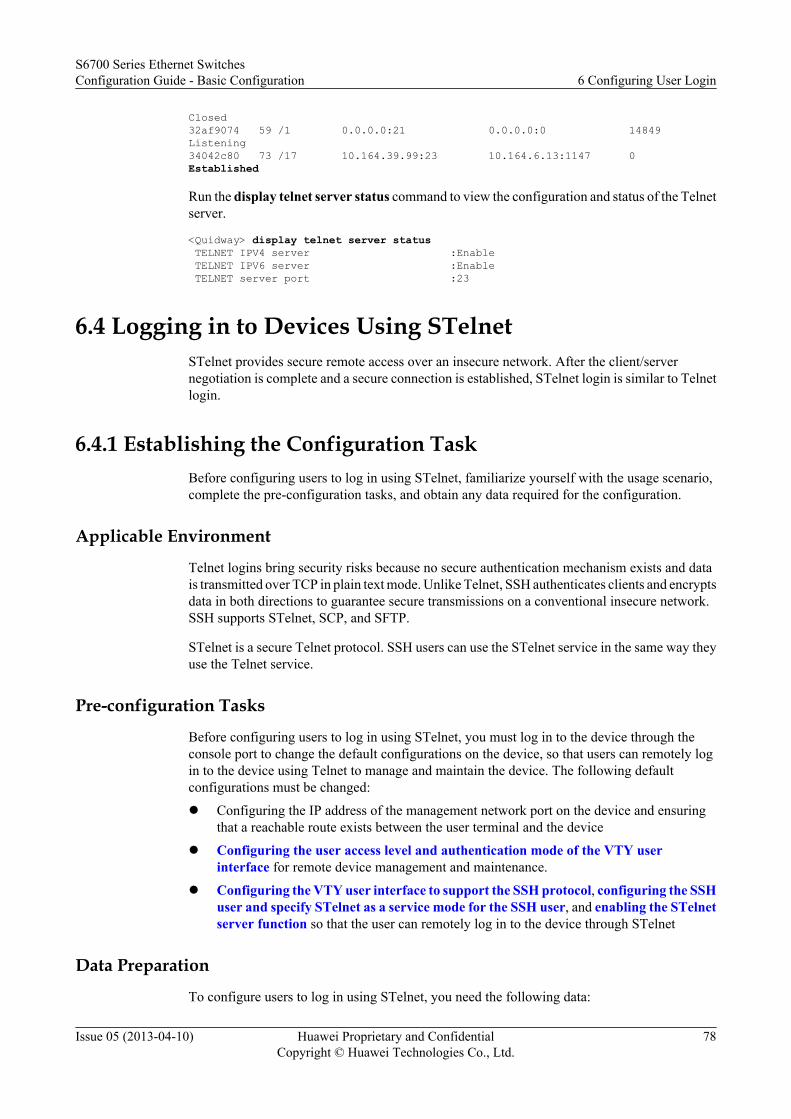
Closed32af9074 59 /1 0.0.0.0:21 0.0.0.0:0 14849 Listening34042c80 73 /17 10.164.39.99:23 10.164.6.13:1147 0 Established
Run the display telnet server status command to view the configuration and status of the Telnetserver.
<Quidway> display telnet server status TELNET IPV4 server :Enable TELNET IPV6 server :Enable TELNET server port :23
6.4 Logging in to Devices Using STelnetSTelnet provides secure remote access over an insecure network. After the client/servernegotiation is complete and a secure connection is established, STelnet login is similar to Telnetlogin.
6.4.1 Establishing the Configuration TaskBefore configuring users to log in using STelnet, familiarize yourself with the usage scenario,complete the pre-configuration tasks, and obtain any data required for the configuration.
Applicable Environment
Telnet logins bring security risks because no secure authentication mechanism exists and datais transmitted over TCP in plain text mode. Unlike Telnet, SSH authenticates clients and encryptsdata in both directions to guarantee secure transmissions on a conventional insecure network.SSH supports STelnet, SCP, and SFTP.
STelnet is a secure Telnet protocol. SSH users can use the STelnet service in the same way theyuse the Telnet service.
Pre-configuration Tasks
Before configuring users to log in using STelnet, you must log in to the device through theconsole port to change the default configurations on the device, so that users can remotely login to the device using Telnet to manage and maintain the device. The following defaultconfigurations must be changed:
l Configuring the IP address of the management network port on the device and ensuringthat a reachable route exists between the user terminal and the device
l Configuring the user access level and authentication mode of the VTY userinterface for remote device management and maintenance.
l Configuring the VTY user interface to support the SSH protocol, configuring the SSHuser and specify STelnet as a service mode for the SSH user, and enabling the STelnetserver function so that the user can remotely log in to the device through STelnet
Data Preparation
To configure users to log in using STelnet, you need the following data:
S6700 Series Ethernet SwitchesConfiguration Guide - Basic Configuration 6 Configuring User Login
Issue 05 (2013-04-10) Huawei Proprietary and ConfidentialCopyright © Huawei Technologies Co., Ltd.
78
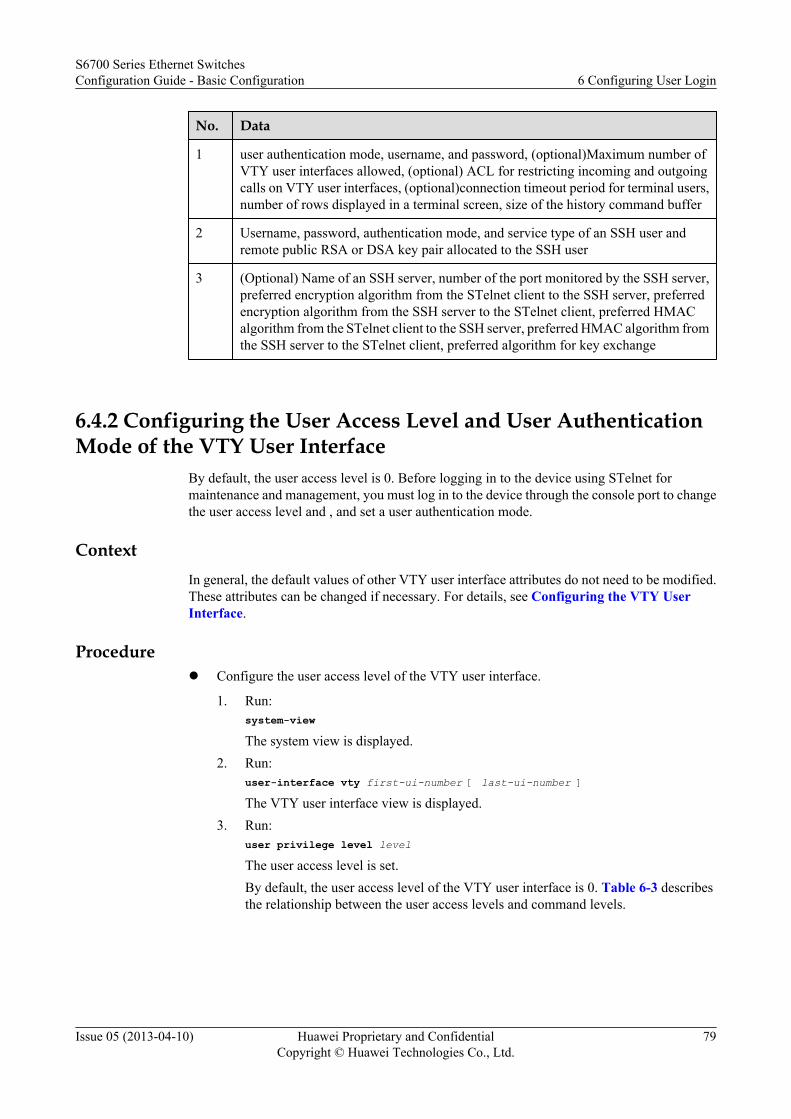
No. Data
1 user authentication mode, username, and password, (optional)Maximum number ofVTY user interfaces allowed, (optional) ACL for restricting incoming and outgoingcalls on VTY user interfaces, (optional)connection timeout period for terminal users,number of rows displayed in a terminal screen, size of the history command buffer
2 Username, password, authentication mode, and service type of an SSH user andremote public RSA or DSA key pair allocated to the SSH user
3 (Optional) Name of an SSH server, number of the port monitored by the SSH server,preferred encryption algorithm from the STelnet client to the SSH server, preferredencryption algorithm from the SSH server to the STelnet client, preferred HMACalgorithm from the STelnet client to the SSH server, preferred HMAC algorithm fromthe SSH server to the STelnet client, preferred algorithm for key exchange
6.4.2 Configuring the User Access Level and User AuthenticationMode of the VTY User Interface
By default, the user access level is 0. Before logging in to the device using STelnet formaintenance and management, you must log in to the device through the console port to changethe user access level and , and set a user authentication mode.
ContextIn general, the default values of other VTY user interface attributes do not need to be modified.These attributes can be changed if necessary. For details, see Configuring the VTY UserInterface.
Procedurel Configure the user access level of the VTY user interface.
1. Run:system-viewThe system view is displayed.
2. Run:user-interface vty first-ui-number [ last-ui-number ]The VTY user interface view is displayed.
3. Run:user privilege level levelThe user access level is set.By default, the user access level of the VTY user interface is 0. Table 6-3 describesthe relationship between the user access levels and command levels.
S6700 Series Ethernet SwitchesConfiguration Guide - Basic Configuration 6 Configuring User Login
Issue 05 (2013-04-10) Huawei Proprietary and ConfidentialCopyright © Huawei Technologies Co., Ltd.
79
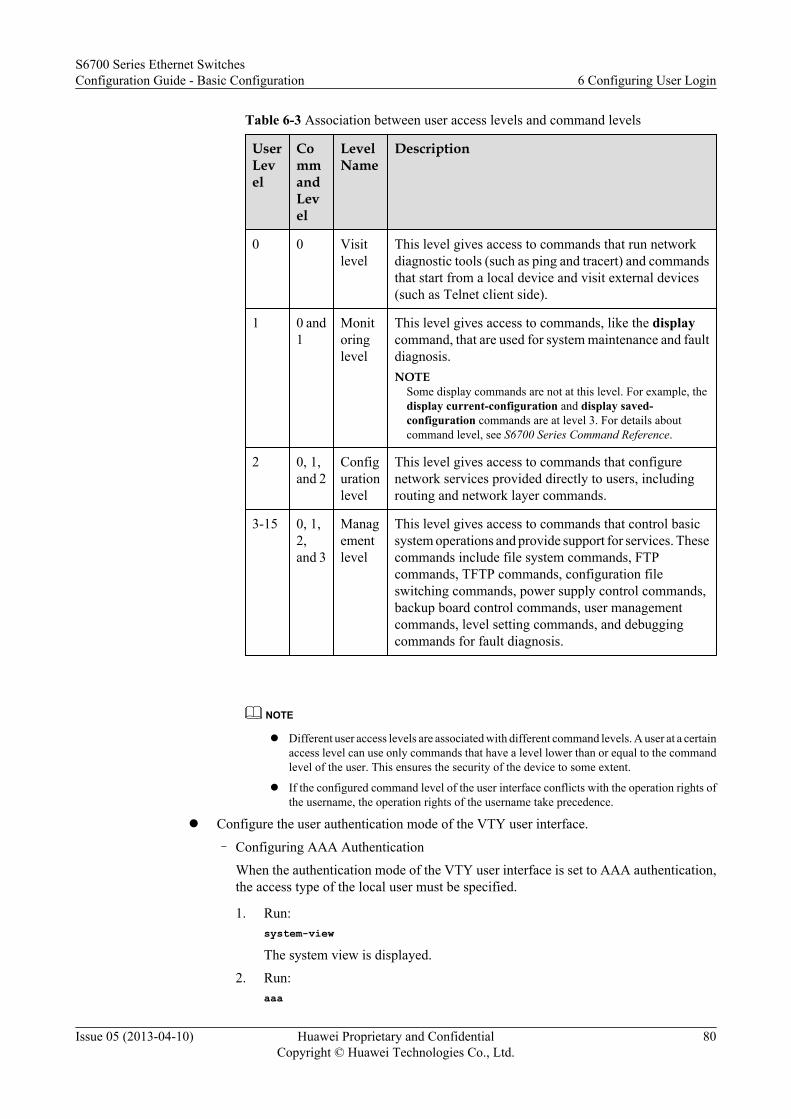
Table 6-3 Association between user access levels and command levels
UserLevel
CommandLevel
LevelName
Description
0 0 Visitlevel
This level gives access to commands that run networkdiagnostic tools (such as ping and tracert) and commandsthat start from a local device and visit external devices(such as Telnet client side).
1 0 and1
Monitoringlevel
This level gives access to commands, like the displaycommand, that are used for system maintenance and faultdiagnosis.NOTE
Some display commands are not at this level. For example, thedisplay current-configuration and display saved-configuration commands are at level 3. For details aboutcommand level, see S6700 Series Command Reference.
2 0, 1,and 2
Configurationlevel
This level gives access to commands that configurenetwork services provided directly to users, includingrouting and network layer commands.
3-15 0, 1,2,and 3
Managementlevel
This level gives access to commands that control basicsystem operations and provide support for services. Thesecommands include file system commands, FTPcommands, TFTP commands, configuration fileswitching commands, power supply control commands,backup board control commands, user managementcommands, level setting commands, and debuggingcommands for fault diagnosis.
NOTE
l Different user access levels are associated with different command levels. A user at a certainaccess level can use only commands that have a level lower than or equal to the commandlevel of the user. This ensures the security of the device to some extent.
l If the configured command level of the user interface conflicts with the operation rights ofthe username, the operation rights of the username take precedence.
l Configure the user authentication mode of the VTY user interface.
– Configuring AAA AuthenticationWhen the authentication mode of the VTY user interface is set to AAA authentication,the access type of the local user must be specified.
1. Run:system-view
The system view is displayed.2. Run:
aaa
S6700 Series Ethernet SwitchesConfiguration Guide - Basic Configuration 6 Configuring User Login
Issue 05 (2013-04-10) Huawei Proprietary and ConfidentialCopyright © Huawei Technologies Co., Ltd.
80

The AAA view is displayed.3. Run:
local-user user-name password cipher password
A username and password for the local user are created.4. Run:
local-user user-name service-type ssh
The access type of the local user is set to SSH.5. Run:
quit
Exit from the AAA view.6. Run:
user-interface vty first-ui-number [ last-ui-number ]
The VTY user interface view is displayed.7. Run:
authentication-mode aaa
The authentication mode is set to AAA authentication.
----End
6.4.3 Configuring SSH for the VTY User InterfaceFor users to log in to the device using STelnet, VTY user interfaces must be configured to supportSSH.
ContextBy default, user interfaces support Telnet. A user interface must be configured to support SSHfor users to log in to the device using STelnet.
NOTE
A VTY user interface configured to support SSH must also be configured with AAA authentication.Otherwise, the protocol inbound ssh command cannot be configured.
Perform the following steps on the switch that serves as an SSH server:
Procedure
Step 1 Run:system-view
The system view is displayed.
Step 2 Run:user-interface [ vty ] first-ui-number [ last-ui-number ]
The VTY user interface is displayed.
Step 3 Run:authentication-mode aaa
The AAA authentication mode is configured.
S6700 Series Ethernet SwitchesConfiguration Guide - Basic Configuration 6 Configuring User Login
Issue 05 (2013-04-10) Huawei Proprietary and ConfidentialCopyright © Huawei Technologies Co., Ltd.
81
Step 4 Run:protocol inbound ssh
The VTY user interface is configured to support SSH.
----End
6.4.4 Configuring an SSH User and Specifying the Service TypesTo implement STelnet access, configure a Secure Shell (SSH) user, create a local Revist-Shamir-Adleman algorithm (RSA) or digital signature algorithm (DSA) key pair, configure a userauthentication mode, and specify a service type for the SSH user.
Context
l There are six SSH user authentication modes: RSA, DSA, password, password-RSA,password-DSA, and all. Password authentication depends on Authentication,Authorization and Accounting (AAA). Before a user logs in to the device in password,password-RSA, or password-DSA authentication mode, you must create a local user withthe specified username in the AAA view.– Password-RSA authentication depends on both password authentication and RSA
authentication.– Password-DSA authentication depends on both password authentication and DSA
authentication.– All authentication depends on either of the following authentications: password
authentication, or DSA authentication and RSA authentication.l The device must be configured to generate local RSA or DSA key pairs, which are a key
part of the SSH login process. If an SSH user logs in to an SSH server in passwordauthentication mode, configure the server to generate a local RSA or DSA key pair. If anSSH user logs in to an SSH server in RSA or DSA authentication mode, configure both theserver and the client to generate local RSA or DSA key pairs.RSA key and DSA key are an algorithm for user authentication in SSH, respectively.Compared with RSA authentication, DSA authentication adopts the DSA encryption modeand is widely used. In many cases, SSH only supports DSA to authenticate the server andthe client. When the RSA or DSA authentication mode is used, the priority of users dependson the priority of the VTY user interfaces used for login.
Perform the following operations on the switch that functions as an SSH server:
Procedure
Step 1 Run:system-view
The system view is displayed.
Step 2 Run:ssh user user-name
An SSH user is created.
If password or password-RSA authentication, or password-DSA is configured for the SSH user,create the same SSH user in the AAA view and set the local user access type to SSH.
S6700 Series Ethernet SwitchesConfiguration Guide - Basic Configuration 6 Configuring User Login
Issue 05 (2013-04-10) Huawei Proprietary and ConfidentialCopyright © Huawei Technologies Co., Ltd.
82
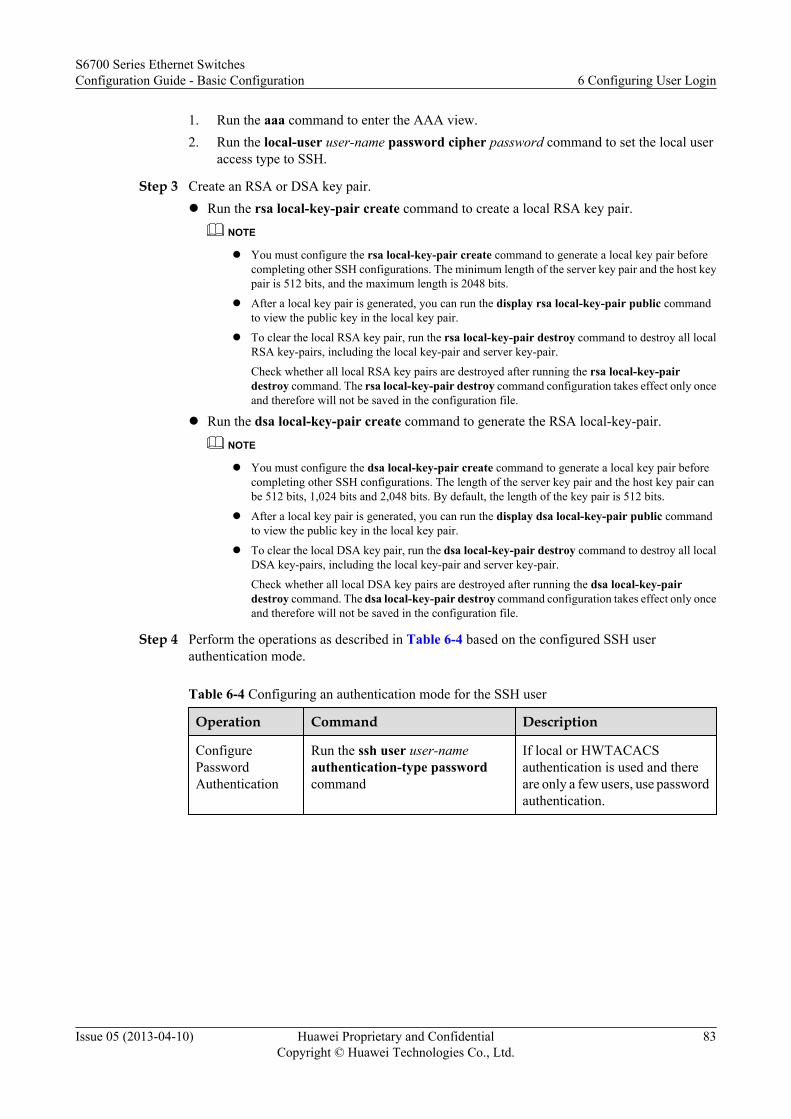
1. Run the aaa command to enter the AAA view.2. Run the local-user user-name password cipher password command to set the local user
access type to SSH.
Step 3 Create an RSA or DSA key pair.l Run the rsa local-key-pair create command to create a local RSA key pair.
NOTE
l You must configure the rsa local-key-pair create command to generate a local key pair beforecompleting other SSH configurations. The minimum length of the server key pair and the host keypair is 512 bits, and the maximum length is 2048 bits.
l After a local key pair is generated, you can run the display rsa local-key-pair public commandto view the public key in the local key pair.
l To clear the local RSA key pair, run the rsa local-key-pair destroy command to destroy all localRSA key-pairs, including the local key-pair and server key-pair.
Check whether all local RSA key pairs are destroyed after running the rsa local-key-pairdestroy command. The rsa local-key-pair destroy command configuration takes effect only onceand therefore will not be saved in the configuration file.
l Run the dsa local-key-pair create command to generate the RSA local-key-pair.
NOTE
l You must configure the dsa local-key-pair create command to generate a local key pair beforecompleting other SSH configurations. The length of the server key pair and the host key pair canbe 512 bits, 1,024 bits and 2,048 bits. By default, the length of the key pair is 512 bits.
l After a local key pair is generated, you can run the display dsa local-key-pair public commandto view the public key in the local key pair.
l To clear the local DSA key pair, run the dsa local-key-pair destroy command to destroy all localDSA key-pairs, including the local key-pair and server key-pair.
Check whether all local DSA key pairs are destroyed after running the dsa local-key-pairdestroy command. The dsa local-key-pair destroy command configuration takes effect only onceand therefore will not be saved in the configuration file.
Step 4 Perform the operations as described in Table 6-4 based on the configured SSH userauthentication mode.
Table 6-4 Configuring an authentication mode for the SSH user
Operation Command Description
ConfigurePasswordAuthentication
Run the ssh user user-nameauthentication-type passwordcommand
If local or HWTACACSauthentication is used and thereare only a few users, use passwordauthentication.
S6700 Series Ethernet SwitchesConfiguration Guide - Basic Configuration 6 Configuring User Login
Issue 05 (2013-04-10) Huawei Proprietary and ConfidentialCopyright © Huawei Technologies Co., Ltd.
83
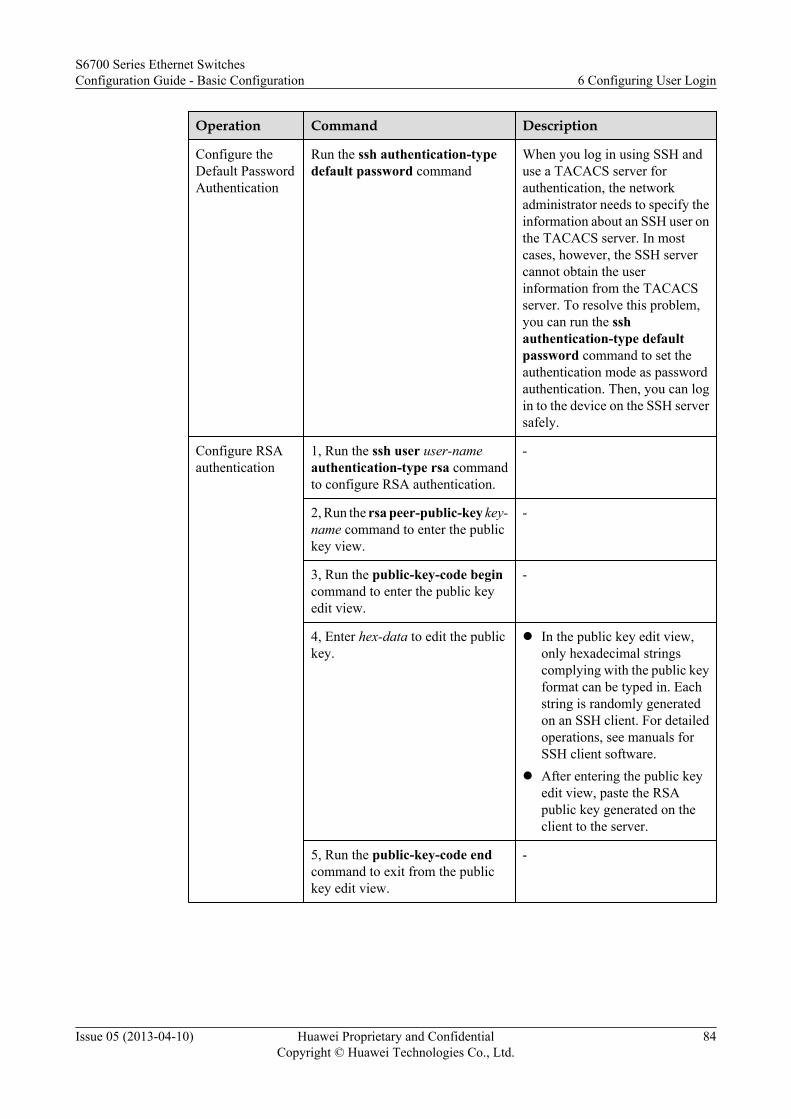
Operation Command Description
Configure theDefault PasswordAuthentication
Run the ssh authentication-typedefault password command
When you log in using SSH anduse a TACACS server forauthentication, the networkadministrator needs to specify theinformation about an SSH user onthe TACACS server. In mostcases, however, the SSH servercannot obtain the userinformation from the TACACSserver. To resolve this problem,you can run the sshauthentication-type defaultpassword command to set theauthentication mode as passwordauthentication. Then, you can login to the device on the SSH serversafely.
Configure RSAauthentication
1, Run the ssh user user-nameauthentication-type rsa commandto configure RSA authentication.
-
2, Run the rsa peer-public-key key-name command to enter the publickey view.
-
3, Run the public-key-code begincommand to enter the public keyedit view.
-
4, Enter hex-data to edit the publickey.
l In the public key edit view,only hexadecimal stringscomplying with the public keyformat can be typed in. Eachstring is randomly generatedon an SSH client. For detailedoperations, see manuals forSSH client software.
l After entering the public keyedit view, paste the RSApublic key generated on theclient to the server.
5, Run the public-key-code endcommand to exit from the publickey edit view.
-
S6700 Series Ethernet SwitchesConfiguration Guide - Basic Configuration 6 Configuring User Login
Issue 05 (2013-04-10) Huawei Proprietary and ConfidentialCopyright © Huawei Technologies Co., Ltd.
84
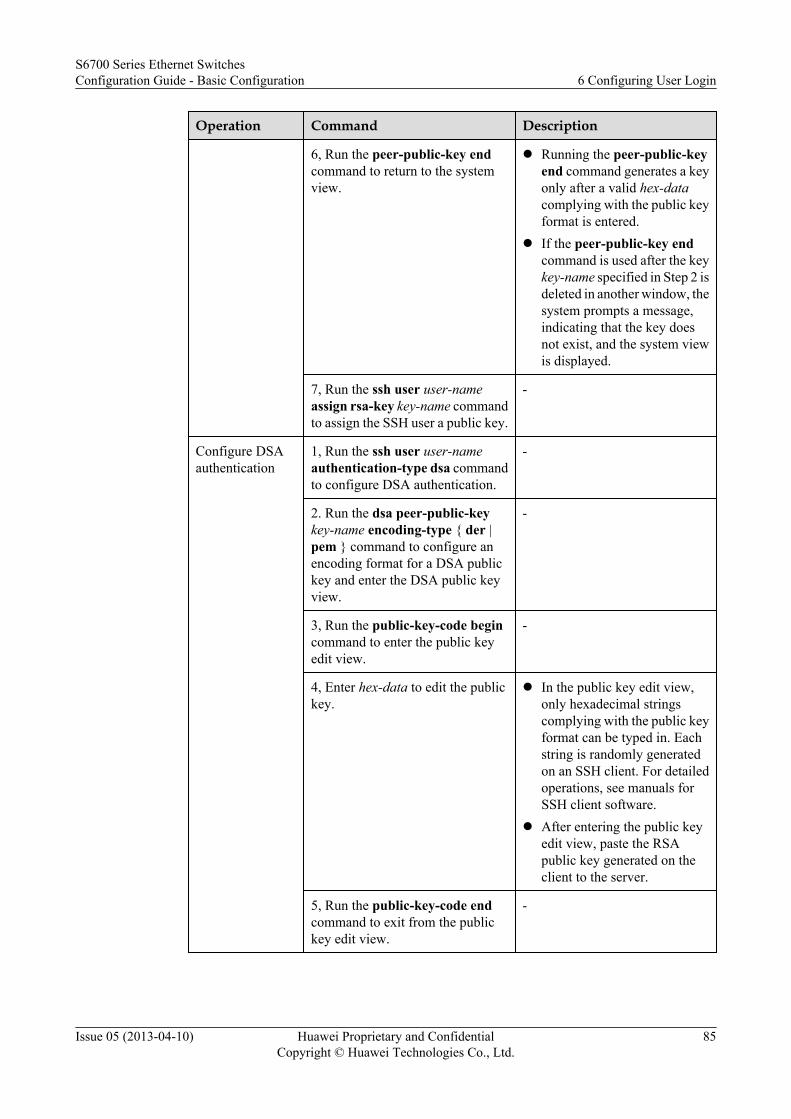
Operation Command Description
6, Run the peer-public-key endcommand to return to the systemview.
l Running the peer-public-keyend command generates a keyonly after a valid hex-datacomplying with the public keyformat is entered.
l If the peer-public-key endcommand is used after the keykey-name specified in Step 2 isdeleted in another window, thesystem prompts a message,indicating that the key doesnot exist, and the system viewis displayed.
7, Run the ssh user user-nameassign rsa-key key-name commandto assign the SSH user a public key.
-
Configure DSAauthentication
1, Run the ssh user user-nameauthentication-type dsa commandto configure DSA authentication.
-
2. Run the dsa peer-public-keykey-name encoding-type { der |pem } command to configure anencoding format for a DSA publickey and enter the DSA public keyview.
-
3, Run the public-key-code begincommand to enter the public keyedit view.
-
4, Enter hex-data to edit the publickey.
l In the public key edit view,only hexadecimal stringscomplying with the public keyformat can be typed in. Eachstring is randomly generatedon an SSH client. For detailedoperations, see manuals forSSH client software.
l After entering the public keyedit view, paste the RSApublic key generated on theclient to the server.
5, Run the public-key-code endcommand to exit from the publickey edit view.
-
S6700 Series Ethernet SwitchesConfiguration Guide - Basic Configuration 6 Configuring User Login
Issue 05 (2013-04-10) Huawei Proprietary and ConfidentialCopyright © Huawei Technologies Co., Ltd.
85
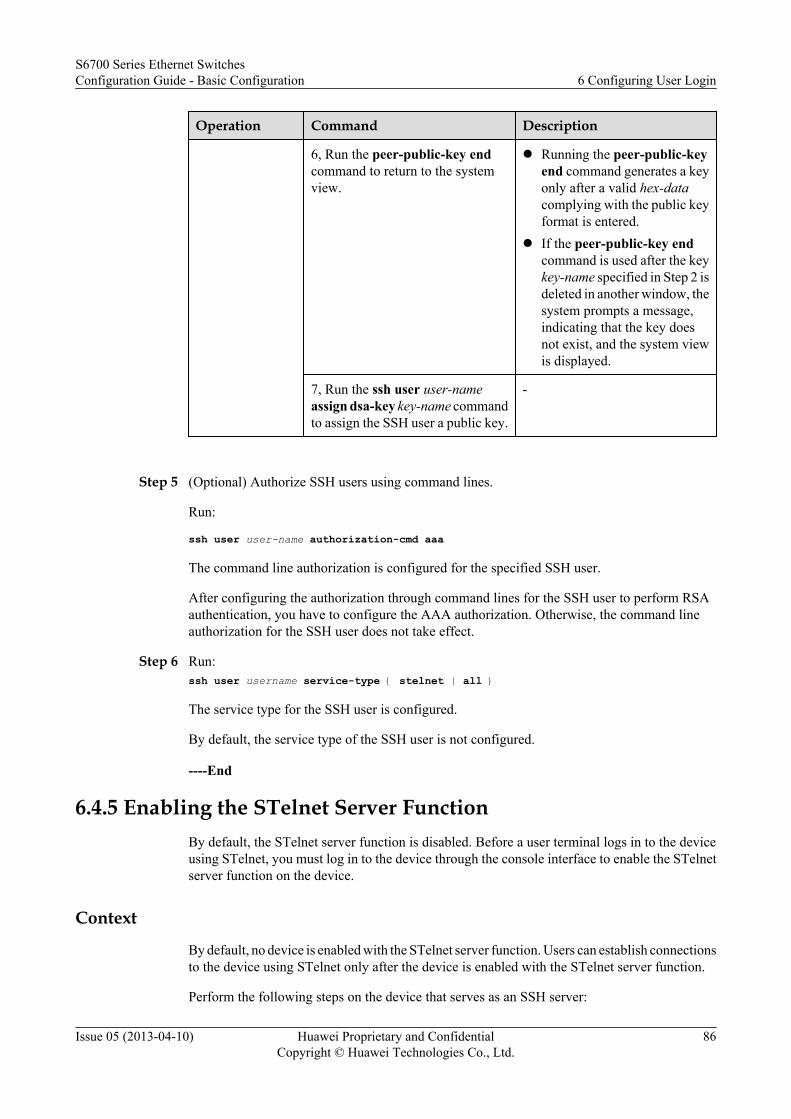
Operation Command Description
6, Run the peer-public-key endcommand to return to the systemview.
l Running the peer-public-keyend command generates a keyonly after a valid hex-datacomplying with the public keyformat is entered.
l If the peer-public-key endcommand is used after the keykey-name specified in Step 2 isdeleted in another window, thesystem prompts a message,indicating that the key doesnot exist, and the system viewis displayed.
7, Run the ssh user user-nameassign dsa-key key-name commandto assign the SSH user a public key.
-
Step 5 (Optional) Authorize SSH users using command lines.
Run:
ssh user user-name authorization-cmd aaa
The command line authorization is configured for the specified SSH user.
After configuring the authorization through command lines for the SSH user to perform RSAauthentication, you have to configure the AAA authorization. Otherwise, the command lineauthorization for the SSH user does not take effect.
Step 6 Run:ssh user username service-type { stelnet | all }
The service type for the SSH user is configured.
By default, the service type of the SSH user is not configured.
----End
6.4.5 Enabling the STelnet Server FunctionBy default, the STelnet server function is disabled. Before a user terminal logs in to the deviceusing STelnet, you must log in to the device through the console interface to enable the STelnetserver function on the device.
Context
By default, no device is enabled with the STelnet server function. Users can establish connectionsto the device using STelnet only after the device is enabled with the STelnet server function.
Perform the following steps on the device that serves as an SSH server:
S6700 Series Ethernet SwitchesConfiguration Guide - Basic Configuration 6 Configuring User Login
Issue 05 (2013-04-10) Huawei Proprietary and ConfidentialCopyright © Huawei Technologies Co., Ltd.
86
Procedure
Step 1 Run:system-view
The system view is displayed.
Step 2 Run:stelnet server enable
The STelnet server function is enabled.
By default, the STelnet server function is disabled.
----End
6.4.6 Logging in to the Device Using STelnetAfter you log in to the device through the console interface to complete relevant configurations,users can remotely log in to the device using the Secure Shell (SSH) protocol from remote userterminals to remotely maintain the device.
ContextThird-party software can be used on a terminal for STelnet login. This section describes the useof third-party software OpenSSH and the Windows CLI.
After installing OpenSSH on the user terminal, do as follows on the user terminal:
NOTE
For details on how to install OpenSSH, refer to the software installation guide.
For details about how to use OpenSSH commands to log in to the system, see the help document of thesoftware.
Procedure
Step 1 Open the Windows CLI.
Step 2 Run relevant OpenSSH commands to log in to the switch in STelnet mode.
S6700 Series Ethernet SwitchesConfiguration Guide - Basic Configuration 6 Configuring User Login
Issue 05 (2013-04-10) Huawei Proprietary and ConfidentialCopyright © Huawei Technologies Co., Ltd.
87
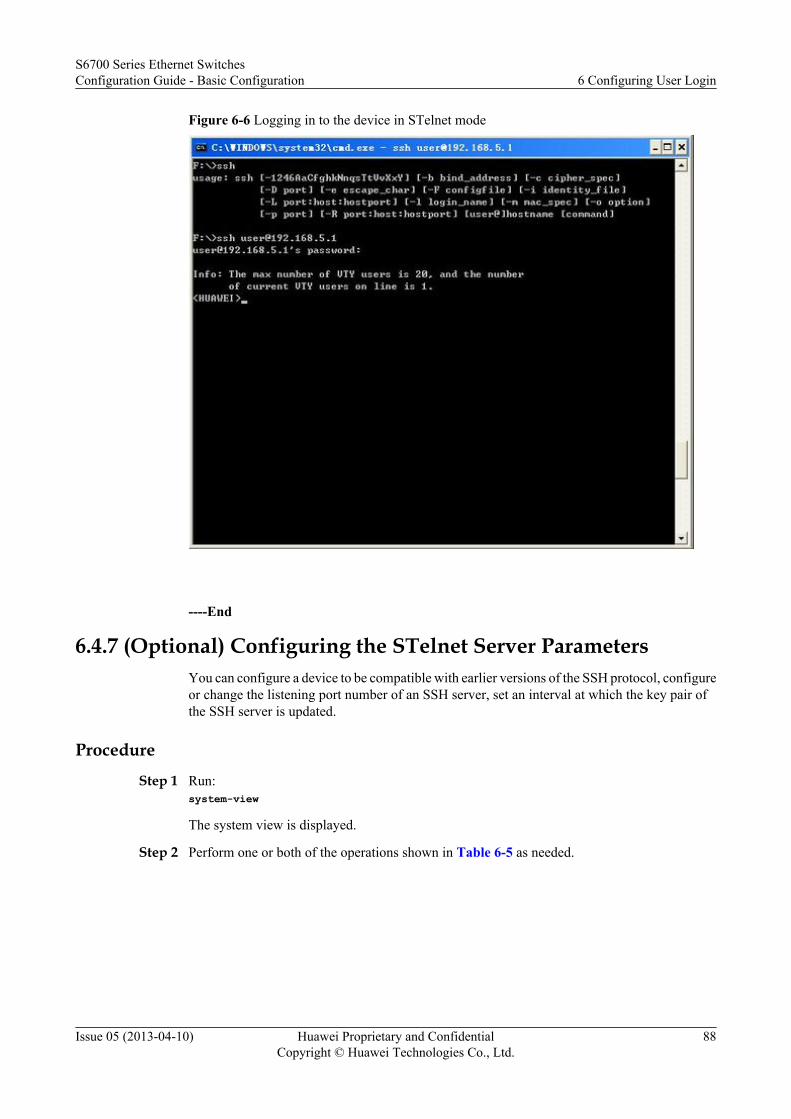
Figure 6-6 Logging in to the device in STelnet mode
----End
6.4.7 (Optional) Configuring the STelnet Server ParametersYou can configure a device to be compatible with earlier versions of the SSH protocol, configureor change the listening port number of an SSH server, set an interval at which the key pair ofthe SSH server is updated.
Procedure
Step 1 Run:system-view
The system view is displayed.
Step 2 Perform one or both of the operations shown in Table 6-5 as needed.
S6700 Series Ethernet SwitchesConfiguration Guide - Basic Configuration 6 Configuring User Login
Issue 05 (2013-04-10) Huawei Proprietary and ConfidentialCopyright © Huawei Technologies Co., Ltd.
88
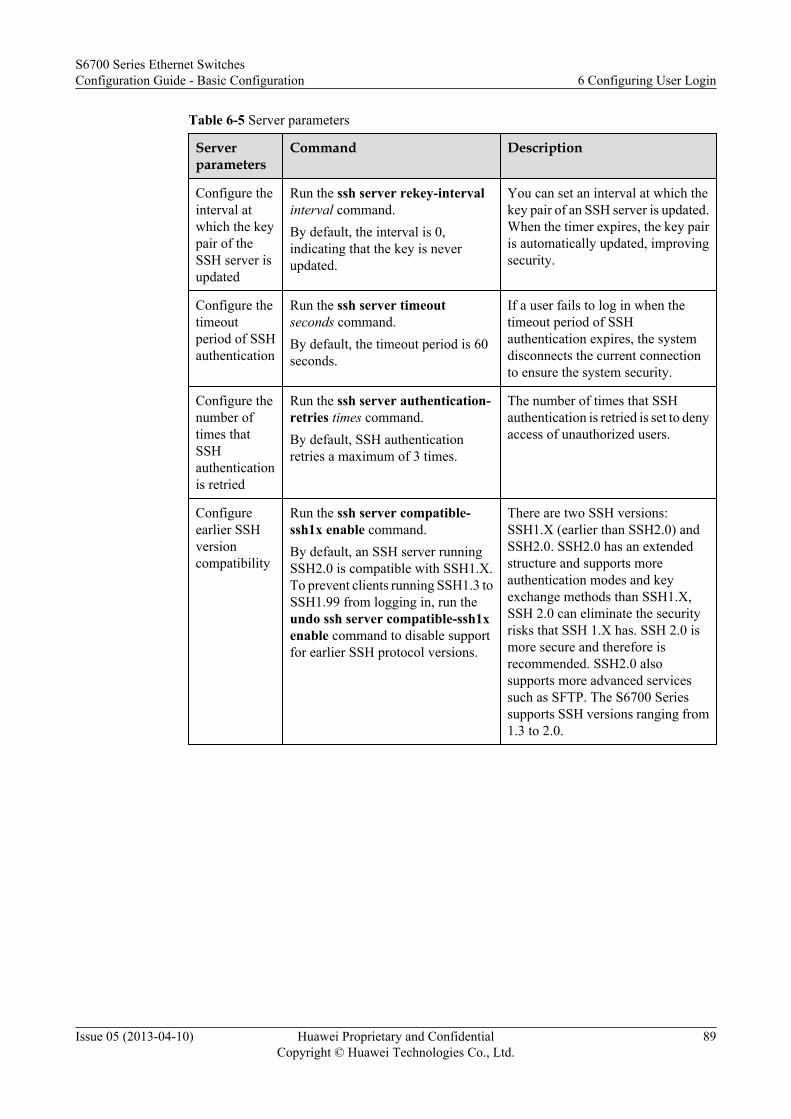
Table 6-5 Server parameters
Serverparameters
Command Description
Configure theinterval atwhich the keypair of theSSH server isupdated
Run the ssh server rekey-intervalinterval command.By default, the interval is 0,indicating that the key is neverupdated.
You can set an interval at which thekey pair of an SSH server is updated.When the timer expires, the key pairis automatically updated, improvingsecurity.
Configure thetimeoutperiod of SSHauthentication
Run the ssh server timeoutseconds command.By default, the timeout period is 60seconds.
If a user fails to log in when thetimeout period of SSHauthentication expires, the systemdisconnects the current connectionto ensure the system security.
Configure thenumber oftimes thatSSHauthenticationis retried
Run the ssh server authentication-retries times command.By default, SSH authenticationretries a maximum of 3 times.
The number of times that SSHauthentication is retried is set to denyaccess of unauthorized users.
Configureearlier SSHversioncompatibility
Run the ssh server compatible-ssh1x enable command.By default, an SSH server runningSSH2.0 is compatible with SSH1.X.To prevent clients running SSH1.3 toSSH1.99 from logging in, run theundo ssh server compatible-ssh1xenable command to disable supportfor earlier SSH protocol versions.
There are two SSH versions:SSH1.X (earlier than SSH2.0) andSSH2.0. SSH2.0 has an extendedstructure and supports moreauthentication modes and keyexchange methods than SSH1.X,SSH 2.0 can eliminate the securityrisks that SSH 1.X has. SSH 2.0 ismore secure and therefore isrecommended. SSH2.0 alsosupports more advanced servicessuch as SFTP. The S6700 Seriessupports SSH versions ranging from1.3 to 2.0.
S6700 Series Ethernet SwitchesConfiguration Guide - Basic Configuration 6 Configuring User Login
Issue 05 (2013-04-10) Huawei Proprietary and ConfidentialCopyright © Huawei Technologies Co., Ltd.
89
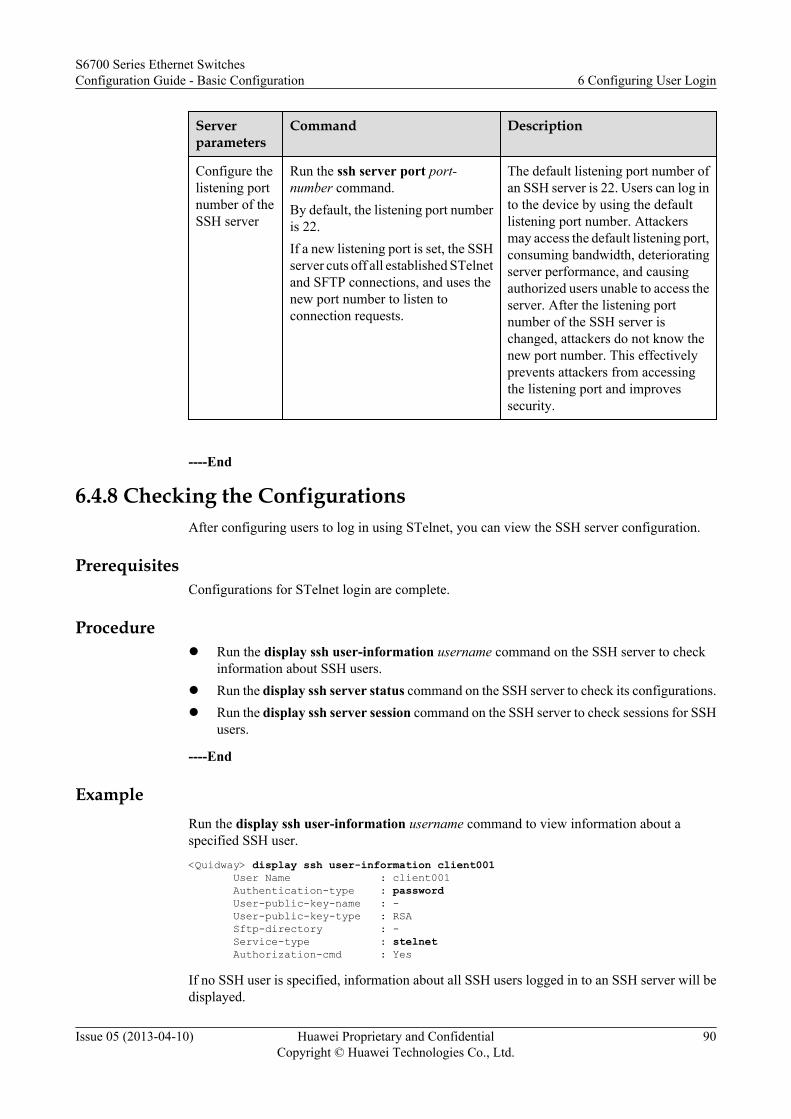
Serverparameters
Command Description
Configure thelistening portnumber of theSSH server
Run the ssh server port port-number command.By default, the listening port numberis 22.If a new listening port is set, the SSHserver cuts off all established STelnetand SFTP connections, and uses thenew port number to listen toconnection requests.
The default listening port number ofan SSH server is 22. Users can log into the device by using the defaultlistening port number. Attackersmay access the default listening port,consuming bandwidth, deterioratingserver performance, and causingauthorized users unable to access theserver. After the listening portnumber of the SSH server ischanged, attackers do not know thenew port number. This effectivelyprevents attackers from accessingthe listening port and improvessecurity.
----End
6.4.8 Checking the ConfigurationsAfter configuring users to log in using STelnet, you can view the SSH server configuration.
PrerequisitesConfigurations for STelnet login are complete.
Procedurel Run the display ssh user-information username command on the SSH server to check
information about SSH users.l Run the display ssh server status command on the SSH server to check its configurations.l Run the display ssh server session command on the SSH server to check sessions for SSH
users.
----End
ExampleRun the display ssh user-information username command to view information about aspecified SSH user.
<Quidway> display ssh user-information client001 User Name : client001 Authentication-type : password User-public-key-name : - User-public-key-type : RSA Sftp-directory : - Service-type : stelnet Authorization-cmd : Yes
If no SSH user is specified, information about all SSH users logged in to an SSH server will bedisplayed.
S6700 Series Ethernet SwitchesConfiguration Guide - Basic Configuration 6 Configuring User Login
Issue 05 (2013-04-10) Huawei Proprietary and ConfidentialCopyright © Huawei Technologies Co., Ltd.
90
Run the display ssh server status command to view configurations of an SSH server.
<Quidway> display ssh server status SSH version :1.99 SSH connection timeout :60 seconds SSH server key generating interval :0 hours SSH authentication retries :3 times SFTP server :Disable Stelnet server :Enable Scp server : Enable
Run the display ssh server session command. The command output shows information abouta session between the SSH server and client.
<Quidway> display ssh server sessionSession 1: Conn : VTY 3 Version : 2.0 State : started Username : client001 Retry : 1 CTOS Cipher : aes128-cbc STOC Cipher : aes128-cbc CTOS Hmac : hmac-md5 STOC Hmac : hmac-md5 Kex : diffie-hellman-group-exchange-sha1 Service Type : stelnet Authentication Type : password
6.5 Logging in to the Devices by Using Secure Web NetworkManagement (HTTPS Mode)
An SSL policy is configured on and a digital certificate is loaded to an HTTP server. The digitalcertificate is used by a client to verify the identity of the server.
6.5.1 Establishing the Configuration TaskBefore configuring users to log in using secure web network management (HTTPS Mode),familiarize yourself with the usage scenario, complete the pre-configuration tasks, and obtainthe data required for the configuration. This will help you complete the configuration task quicklyand efficiently.
Applicable Environment
After a device that supports web network management is enabled with the HTTP function, thedevice can function as a web server. Users can log in to the device using HTTP and use webpages to access and control the device. HTTP does not provide a mechanism that allows usersto authenticate a web server or protects privacy of data transmission. To address this problem,you can configure HTTPS on the device. HTTPS that adds support for SSL is an extension tothe commonly used HTTP. SSL allows the client and server to authenticate each other andencrypts data to be transmitted.
As shown in Figure 6-7, an SSL policy is configured on the device that functions as an HTTPserver. After a digital certificate is loaded to and the HTTPS server function is enabled on theserver, users can log in to the server to remotely manage the server using web pages.
S6700 Series Ethernet SwitchesConfiguration Guide - Basic Configuration 6 Configuring User Login
Issue 05 (2013-04-10) Huawei Proprietary and ConfidentialCopyright © Huawei Technologies Co., Ltd.
91
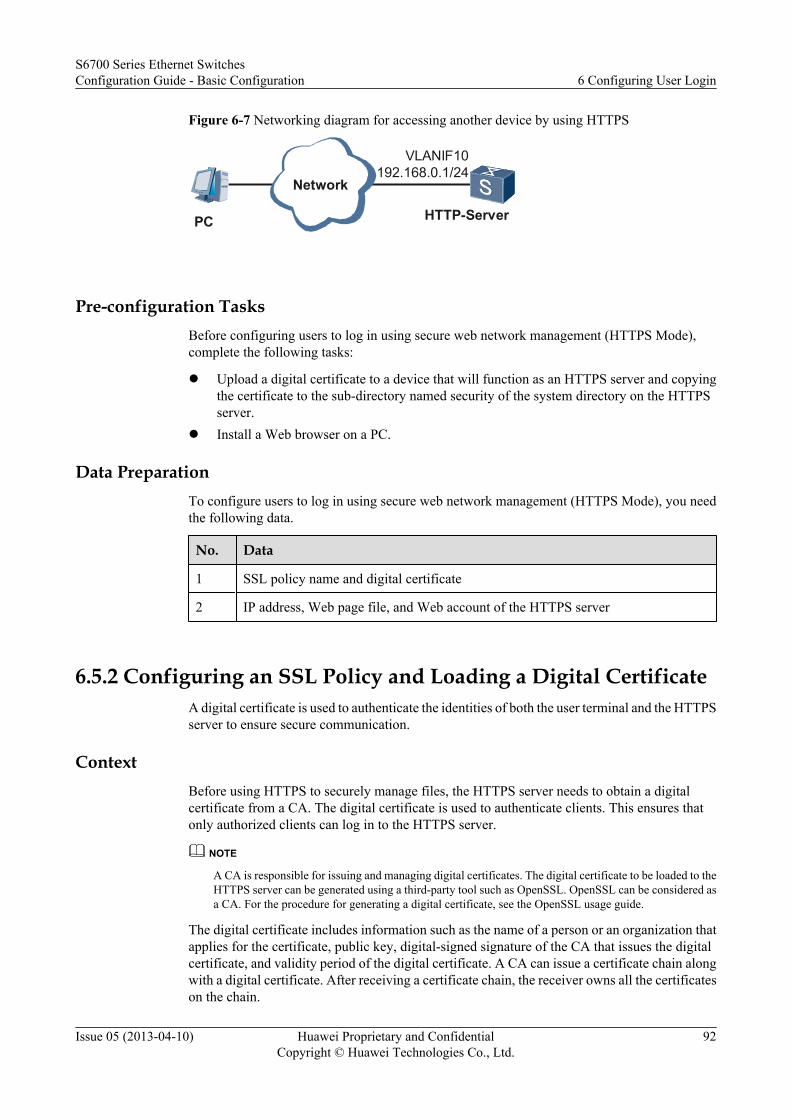
Figure 6-7 Networking diagram for accessing another device by using HTTPS
Network
PC HTTP-Server
VLANIF10192.168.0.1/24
Pre-configuration TasksBefore configuring users to log in using secure web network management (HTTPS Mode),complete the following tasks:
l Upload a digital certificate to a device that will function as an HTTPS server and copyingthe certificate to the sub-directory named security of the system directory on the HTTPSserver.
l Install a Web browser on a PC.
Data PreparationTo configure users to log in using secure web network management (HTTPS Mode), you needthe following data.
No. Data
1 SSL policy name and digital certificate
2 IP address, Web page file, and Web account of the HTTPS server
6.5.2 Configuring an SSL Policy and Loading a Digital CertificateA digital certificate is used to authenticate the identities of both the user terminal and the HTTPSserver to ensure secure communication.
ContextBefore using HTTPS to securely manage files, the HTTPS server needs to obtain a digitalcertificate from a CA. The digital certificate is used to authenticate clients. This ensures thatonly authorized clients can log in to the HTTPS server.
NOTE
A CA is responsible for issuing and managing digital certificates. The digital certificate to be loaded to theHTTPS server can be generated using a third-party tool such as OpenSSL. OpenSSL can be considered asa CA. For the procedure for generating a digital certificate, see the OpenSSL usage guide.
The digital certificate includes information such as the name of a person or an organization thatapplies for the certificate, public key, digital-signed signature of the CA that issues the digitalcertificate, and validity period of the digital certificate. A CA can issue a certificate chain alongwith a digital certificate. After receiving a certificate chain, the receiver owns all the certificateson the chain.
S6700 Series Ethernet SwitchesConfiguration Guide - Basic Configuration 6 Configuring User Login
Issue 05 (2013-04-10) Huawei Proprietary and ConfidentialCopyright © Huawei Technologies Co., Ltd.
92
Upload the server digital certificate and private key file to the security directory on the devicein FTP, SFTP, or SCP mode. If no security directory exists on the device, run the mkdirsecurity command to create one.
A digital certificate can be in the PEM, ASN1, or PFX format. Details are as follows:
l The PEM format is most commonly used. The file name extension of a PEM digitalcertificate is .pem. A PEM certificate contains only a public key but not a private key, andthe public key is usually encrypted.
The PEM format is applicable to text transmission between systems.
l The ASN1 format is a universal digital certificate format. The file name extension of anASN1 digital certificate is .der. An ANS1 certificate contains only a public key but not aprivate key, and the public key is not encrypted.
The ASN1 format is the default format for most browsers.
l The PFX format is a universal digital certificate format. The file name extension of a PFXdigital certificate is .pfx. A PFX certificate can contain a private key, and the key is usuallyencrypted.
The PFX format is a binary format that can be converted into the PEM or ASN1 format.
Procedure
Step 1 Run:system-view
The system view is displayed.
Step 2 Run:ssl policy policy-name
An SSL policy is configured.
Step 3 Load a digital certificate.
Run one of the following commands as required:
l Run:certificate load pem-cert cert-filename key-pair { dsa | rsa } key-file key-filename auth-code auth-code
A PEM digital certificate is loaded.
l Run:certificate load asn1-cert cert-filename key-pair { dsa | rsa } key-file key-filename
An ASN1 digital certificate is loaded.
l Run:certificate load pfx-cert cert-filename key-pair { dsa | rsa } { mac mac-code | key-file key-filename } auth-code auth-code
A PFX digital certificate is loaded.
l Run:certificate load pem-chain cert-filename key-pair { dsa | rsa } key-file key-filename auth-code auth-code
A PEM digital certificate chain is loaded.
S6700 Series Ethernet SwitchesConfiguration Guide - Basic Configuration 6 Configuring User Login
Issue 05 (2013-04-10) Huawei Proprietary and ConfidentialCopyright © Huawei Technologies Co., Ltd.
93
NOTE
Only one certificate or certificate chain can be loaded to an SSL policy. If a certificate or certificate chainhas been loaded, unload the certificate or certificate chain before loading a new certificate or certificatechain.
----End
6.5.3 Loading a Web Page FileTo manage and maintain a device on a graphical user interface (GUI), you can configure theWeb network management function. Before using the Web network management function, loadthe related Web page file.
Procedure
Step 1 Run:system-view
The system view is displayed.
Step 2 Run:http server load file-name
A Web page file is loaded.
----End
6.5.4 Enabling the HTTPS FunctionAfter a device is configured with an SSL policy and enabled with the HTTPS function, the devicefunctions as an HTTPS server to provide SSL-based HTTP services.
ContextNOTE
Before enabling the HTTPS server function, disable the HTTP server function.
Procedure
Step 1 Run:system-view policy-name
The system view is displayed.
Step 2 Run:http secure-server ssl-policy policy-name
An SSL policy is configured for a device.
Step 3 Run:http secure-server enable
The HTTPS server function is enabled.
By default, the HTTPS server function is disabled.
Step 4 (Optional) Run:
S6700 Series Ethernet SwitchesConfiguration Guide - Basic Configuration 6 Configuring User Login
Issue 05 (2013-04-10) Huawei Proprietary and ConfidentialCopyright © Huawei Technologies Co., Ltd.
94
http secure-server port port-number
The listening port number is configured for the HTTPS server.
The default listening port number of the HTTPS server is 443. When using the default listeningport number to access and control the HTTPS server, you do not need to specify the port numberin commands. Attackers may access the default listening port, consuming bandwidth, affectingperformance of the server, and causing authorized users unable to access the server. To improvesecurity, run this command to change the listening port number of the HTTPS server. After that,attackers are deprived of information about the newly configured listening port number, and theHTTPS server is therefore well protected.
----End
6.5.5 Creating a Web AccountSetting the HTTP user name and password is recommended for secure login to a web server.
Procedure
Step 1 Run:system-view
The system view is displayed.
Step 2 Run:aaa
The AAA view is displayed.
Step 3 Run:local-user user-name password cipher password
The HTTP user name and password are set.
Step 4 Run:local-user user-name service-type http
HTTP is configured as the service type.
Step 5 Run:local-user user-name privilege level level
The HTTP user level is set.
NOTE
Setting the HTTP user level to 3 or higher is recommended so that the HTTP user can have management-level rights. Users at levels 0, 1 and 2 have only visit-level rights.
----End
6.5.6 Logging In to the Web SystemAfter logging in to the Web system, you can manage and maintain a device on a GUI.
Open the Web browser on the PC. Enter the IP address of the HTTPS server in the address bar.Press Enter and the dialog box shown in Figure 6-8 is displayed.
S6700 Series Ethernet SwitchesConfiguration Guide - Basic Configuration 6 Configuring User Login
Issue 05 (2013-04-10) Huawei Proprietary and ConfidentialCopyright © Huawei Technologies Co., Ltd.
95
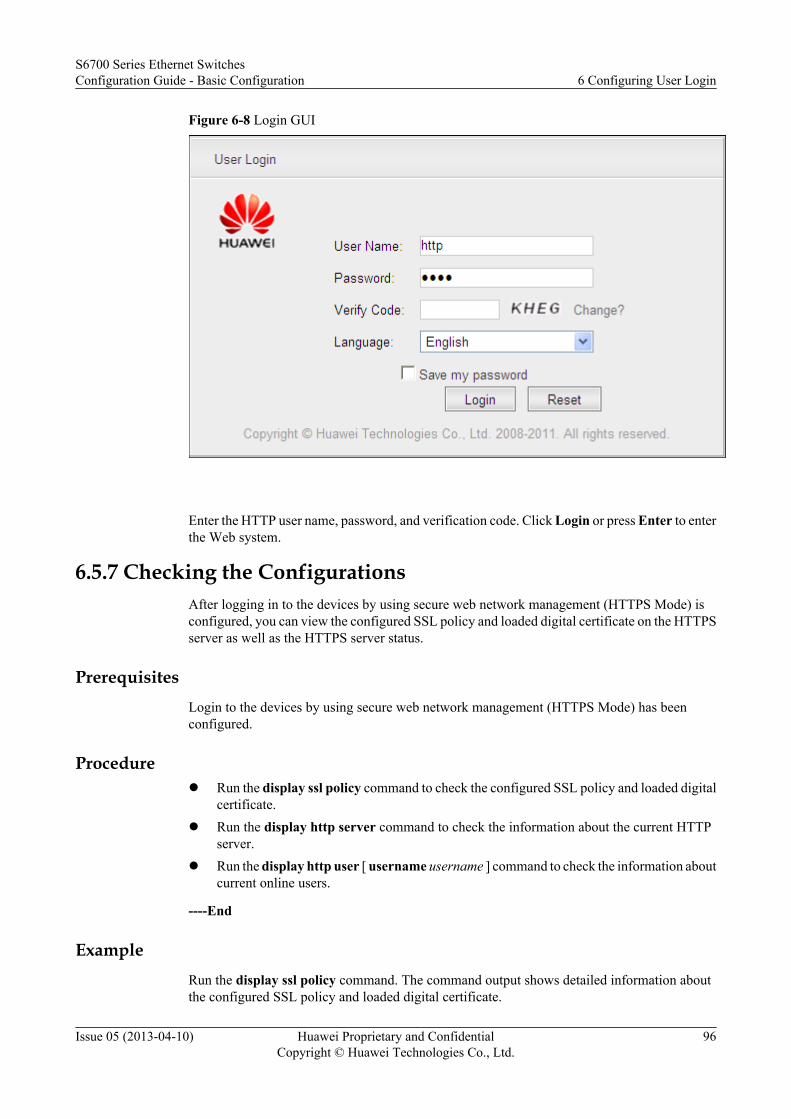
Figure 6-8 Login GUI
Enter the HTTP user name, password, and verification code. Click Login or press Enter to enterthe Web system.
6.5.7 Checking the ConfigurationsAfter logging in to the devices by using secure web network management (HTTPS Mode) isconfigured, you can view the configured SSL policy and loaded digital certificate on the HTTPSserver as well as the HTTPS server status.
PrerequisitesLogin to the devices by using secure web network management (HTTPS Mode) has beenconfigured.
Procedurel Run the display ssl policy command to check the configured SSL policy and loaded digital
certificate.l Run the display http server command to check the information about the current HTTP
server.l Run the display http user [ username username ] command to check the information about
current online users.
----End
ExampleRun the display ssl policy command. The command output shows detailed information aboutthe configured SSL policy and loaded digital certificate.
S6700 Series Ethernet SwitchesConfiguration Guide - Basic Configuration 6 Configuring User Login
Issue 05 (2013-04-10) Huawei Proprietary and ConfidentialCopyright © Huawei Technologies Co., Ltd.
96
<Quidway> display ssl policy SSL Policy Name: http_server Policy Applicants: WEB secure-server Key-pair Type: RSA Certificate File Type: PEM Certificate Type: certificate Certificate Filename: 1_servercert_pem_rsa.pem Key-file Filename: 1_serverkey_pem_rsa.pem Auth-code: 123456 MAC: CRL File: Trusted-CA File:
Run the display http server command to view information about the current HTTP server.<Quidway> display http server HTTP Server Status : enabled HTTP Server Port : 80(80) HTTP Timeout Interval : 20 Current Online Users : 3 Maximum Users Allowed : 5 HTTP Secure-server Status : enabled HTTP Secure-server Port : 443(443) HTTP SSL Policy : http_server
Run the display http user command to view information about current online users.<Quidway> display http userTotal online users: 1------------------------------------------------------User name Client IP Address Login Date------------------------------------------------------admin 192.168.0.1 2012-03-23 15:30:55+00:00
6.6 Common Operations After LoginAfter logging in to the switch, you can perform user priority switching, terminal window locking,and other operations as needed.
6.6.1 Establishing the Configuration TaskBefore performing operations after login, familiarize yourself with the usage scenario, completethe pre-configuration tasks, and obtain any data required for the configuration.
Applicable EnvironmentConfigure user level switching and enable messaging between user interfaces to ensure thatoperators can manage switchs safely.
Pre-configuration TasksBefore performing operations after login, connect the terminal to the switch.
Data PreparationsBefore performing operations after login, you need the following data:
No. Data
1 Password used for switching user levels
S6700 Series Ethernet SwitchesConfiguration Guide - Basic Configuration 6 Configuring User Login
Issue 05 (2013-04-10) Huawei Proprietary and ConfidentialCopyright © Huawei Technologies Co., Ltd.
97
No. Data
2 Type and number of the user interface
3 Contents of the message to be sent
6.6.2 Switching User LevelsA user who wants to upgrade from a lower to a higher level after logging in to the switch musthave a password already configured.
Context
A password is required to increase user level. This prevents unauthorized users from gainingaccess to high-level commands.
Procedure
Step 1 Run:system-view
The system view is displayed.
Step 2 Run:super password [ level user-level ] [ cipher password ]
The password for switching user levels is configured.
By default, the password for the user is set to Level 3.
Step 3 Run:quit
Return to the user view.
Step 4 Run:super [ level ]
User levels are switched.
By default, the level is 3.
Step 5 Follow the prompt and enter a password.
If the password entered is correct, the user can switch to a higher level. If an incorrect passwordis entered three times in a row, the user is returned to the user view at the original level.
NOTE
When the super command is used to switch a user from a lower to a higher level, the system automaticallysends trap messages and records the switchover in a log. When a user is switched from a higher to a lowerlevel, the system only records the switchover in a log.
----End
S6700 Series Ethernet SwitchesConfiguration Guide - Basic Configuration 6 Configuring User Login
Issue 05 (2013-04-10) Huawei Proprietary and ConfidentialCopyright © Huawei Technologies Co., Ltd.
98
6.6.3 Locking User InterfacesIf you must be away from your work area, you can lock the user interface on a terminal to preventunauthorized access.
ContextThe user interface can be a console user interface or a VTY user interface.
Procedure
Step 1 Run:lock
The user interface is locked.
Step 2 Follow the system prompts and input a password to unlock the user interface.<Quidway> lockEnter Password:Confirm Password:
If the locking is successful, the system prompts that the user interface is locked.
You must enter the password previously set to unlock the user interface.
----End
6.6.4 Sending Messages to Other User InterfacesUsers logged in to different interfaces can send messages to each other.
ContextUsers logged in to the switch can send messages from their user interface to users on other userinterfaces.
Procedure
Step 1 Run:send { all | ui-type ui-number | ui-number1 }
You can enable message sending between user interfaces.
Step 2 Follow the prompt to view the message to be sent. You can press Ctrl_Z or Enter to end thedisplay, and press Ctrl_C to abort the display.
----End
6.6.5 Displaying Login UsersYou can query information about login users.
ContextUser name, address, and authentication and authorization information can be queried.
S6700 Series Ethernet SwitchesConfiguration Guide - Basic Configuration 6 Configuring User Login
Issue 05 (2013-04-10) Huawei Proprietary and ConfidentialCopyright © Huawei Technologies Co., Ltd.
99
Procedurel Run the display users [ all ] command to view information about logged-in users.
If all is configured, information about users logged in to all user interfaces is displayed.
----End
6.6.6 Clearing Logged-in UsersIf you want to force a logged-in user to log out of the switch, you can tear down the connectionbetween the switch and the user.
ContextYou can run the display users command to view users logging in to the switch.
Procedure
Step 1 Run:kill user-interface { ui-number | ui-type ui-number1 }
Online users are cleared.
Step 2 Based on displayed information, you can confirm whether specified logged-in users have beencleared.
----End
6.6.7 Configuring Configuration LockingWhen multiple users log in to the switch to configure the device, configuration conflict mayoccur. To prevent configuration conflict from affecting services, you can enable the function ofconfiguration locking. This allows only one user to configure the device at a time.
ContextBefore configuring configuration locking, check whether the configuration set is locked byanother user. If no user locks the configuration set, you can exclusively lock the configuration.
Procedure
Step 1 Run:configuration exclusive
The user obtains exclusive configuration access.
After enabling the configuration locking function, you can exclusively enjoy the configurationauthority in an explicit manner.
NOTE
This command can be run in any view.
You can run the display configuration-occupied user command to check information about the user wholocks the configuration set at the moment.
If the configuration set is already locked, a prompt message is displayed after this command is run.
S6700 Series Ethernet SwitchesConfiguration Guide - Basic Configuration 6 Configuring User Login
Issue 05 (2013-04-10) Huawei Proprietary and ConfidentialCopyright © Huawei Technologies Co., Ltd.
100
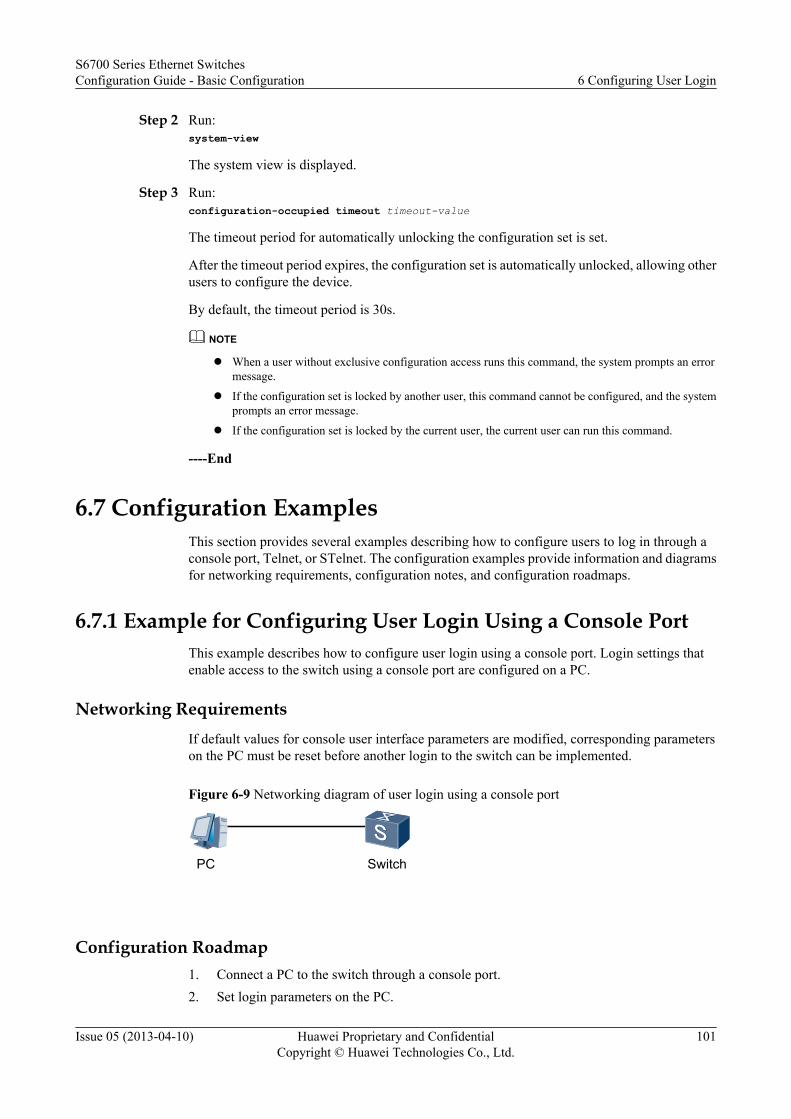
Step 2 Run:system-view
The system view is displayed.
Step 3 Run:configuration-occupied timeout timeout-value
The timeout period for automatically unlocking the configuration set is set.
After the timeout period expires, the configuration set is automatically unlocked, allowing otherusers to configure the device.
By default, the timeout period is 30s.
NOTE
l When a user without exclusive configuration access runs this command, the system prompts an errormessage.
l If the configuration set is locked by another user, this command cannot be configured, and the systemprompts an error message.
l If the configuration set is locked by the current user, the current user can run this command.
----End
6.7 Configuration ExamplesThis section provides several examples describing how to configure users to log in through aconsole port, Telnet, or STelnet. The configuration examples provide information and diagramsfor networking requirements, configuration notes, and configuration roadmaps.
6.7.1 Example for Configuring User Login Using a Console PortThis example describes how to configure user login using a console port. Login settings thatenable access to the switch using a console port are configured on a PC.
Networking RequirementsIf default values for console user interface parameters are modified, corresponding parameterson the PC must be reset before another login to the switch can be implemented.
Figure 6-9 Networking diagram of user login using a console port
PC Switch
Configuration Roadmap1. Connect a PC to the switch through a console port.2. Set login parameters on the PC.
S6700 Series Ethernet SwitchesConfiguration Guide - Basic Configuration 6 Configuring User Login
Issue 05 (2013-04-10) Huawei Proprietary and ConfidentialCopyright © Huawei Technologies Co., Ltd.
101
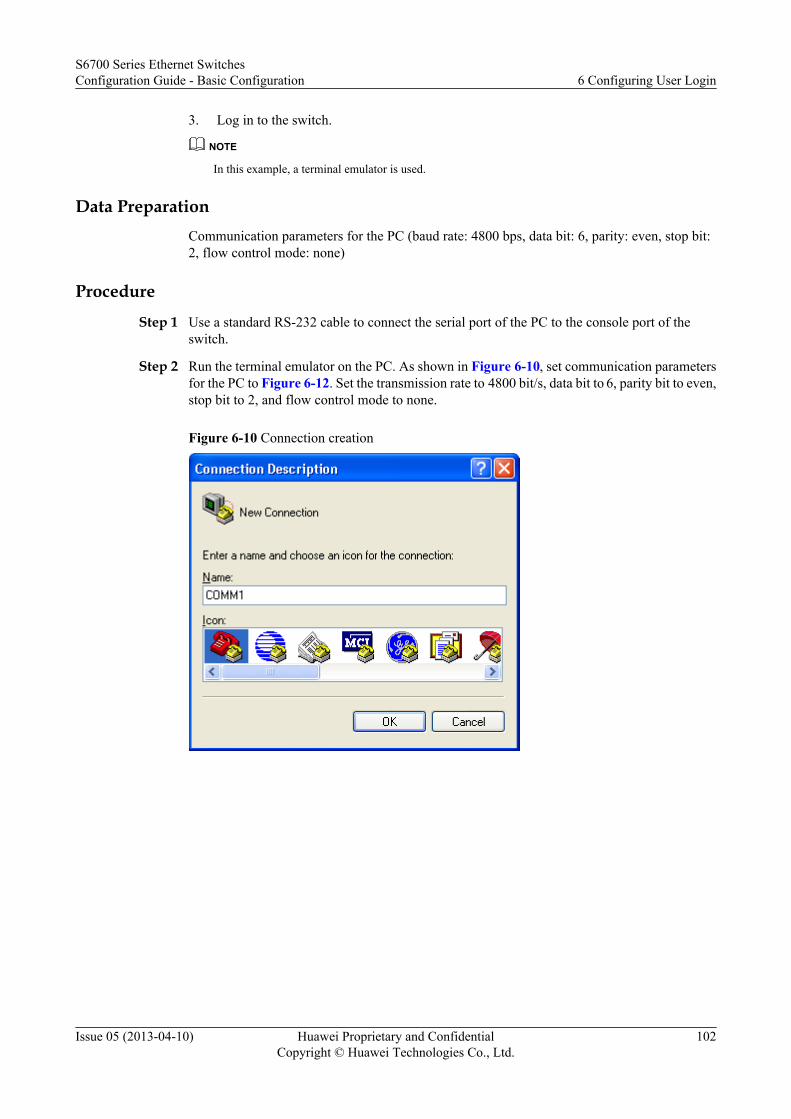
3. Log in to the switch.
NOTE
In this example, a terminal emulator is used.
Data PreparationCommunication parameters for the PC (baud rate: 4800 bps, data bit: 6, parity: even, stop bit:2, flow control mode: none)
Procedure
Step 1 Use a standard RS-232 cable to connect the serial port of the PC to the console port of theswitch.
Step 2 Run the terminal emulator on the PC. As shown in Figure 6-10, set communication parametersfor the PC to Figure 6-12. Set the transmission rate to 4800 bit/s, data bit to 6, parity bit to even,stop bit to 2, and flow control mode to none.
Figure 6-10 Connection creation
S6700 Series Ethernet SwitchesConfiguration Guide - Basic Configuration 6 Configuring User Login
Issue 05 (2013-04-10) Huawei Proprietary and ConfidentialCopyright © Huawei Technologies Co., Ltd.
102
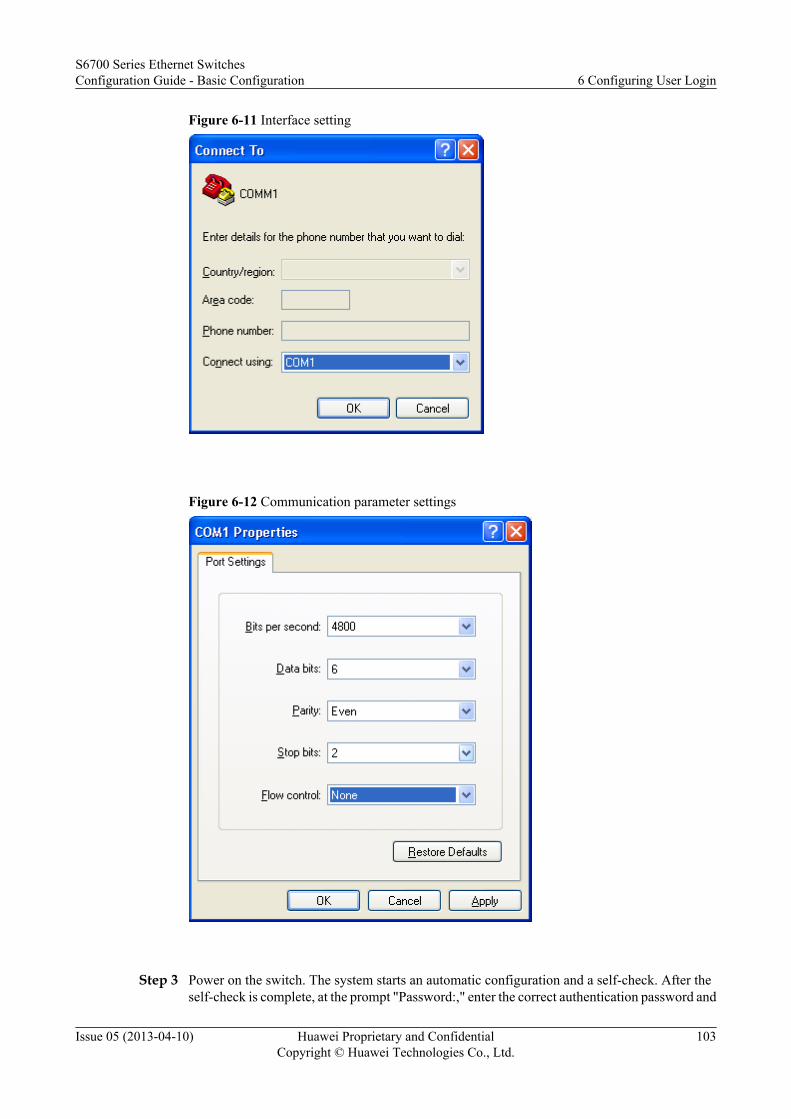
Figure 6-11 Interface setting
Figure 6-12 Communication parameter settings
Step 3 Power on the switch. The system starts an automatic configuration and a self-check. After theself-check is complete, at the prompt "Password:," enter the correct authentication password and
S6700 Series Ethernet SwitchesConfiguration Guide - Basic Configuration 6 Configuring User Login
Issue 05 (2013-04-10) Huawei Proprietary and ConfidentialCopyright © Huawei Technologies Co., Ltd.
103
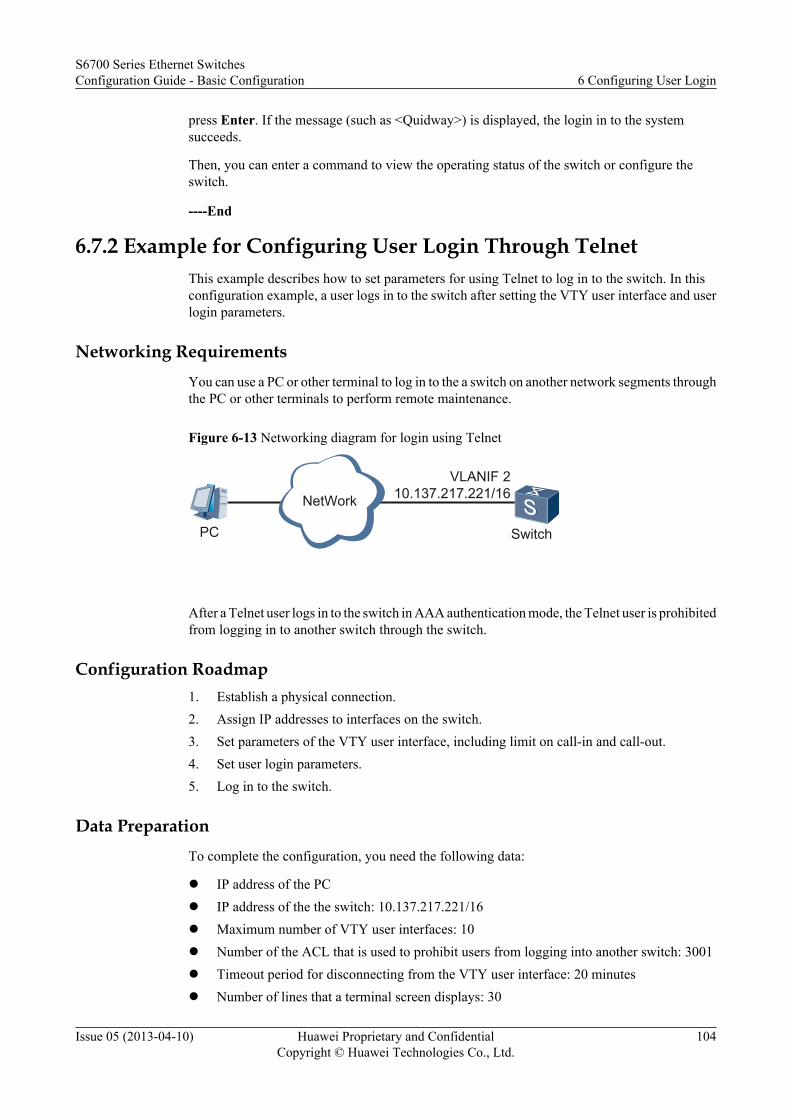
press Enter. If the message (such as <Quidway>) is displayed, the login in to the systemsucceeds.
Then, you can enter a command to view the operating status of the switch or configure theswitch.
----End
6.7.2 Example for Configuring User Login Through TelnetThis example describes how to set parameters for using Telnet to log in to the switch. In thisconfiguration example, a user logs in to the switch after setting the VTY user interface and userlogin parameters.
Networking RequirementsYou can use a PC or other terminal to log in to the a switch on another network segments throughthe PC or other terminals to perform remote maintenance.
Figure 6-13 Networking diagram for login using Telnet
NetWork
PC Switch
VLANIF 210.137.217.221/16
After a Telnet user logs in to the switch in AAA authentication mode, the Telnet user is prohibitedfrom logging in to another switch through the switch.
Configuration Roadmap1. Establish a physical connection.2. Assign IP addresses to interfaces on the switch.3. Set parameters of the VTY user interface, including limit on call-in and call-out.4. Set user login parameters.5. Log in to the switch.
Data PreparationTo complete the configuration, you need the following data:
l IP address of the PCl IP address of the the switch: 10.137.217.221/16l Maximum number of VTY user interfaces: 10l Number of the ACL that is used to prohibit users from logging into another switch: 3001l Timeout period for disconnecting from the VTY user interface: 20 minutesl Number of lines that a terminal screen displays: 30
S6700 Series Ethernet SwitchesConfiguration Guide - Basic Configuration 6 Configuring User Login
Issue 05 (2013-04-10) Huawei Proprietary and ConfidentialCopyright © Huawei Technologies Co., Ltd.
104
l Size of the history command buffer: 20
l Telnet user information (authentication mode: AAA, username: huawei, password: hello)
Procedure
Step 1 Respectively connect the PC and the switch to the network.
Step 2 Configure a login address.<Quidway> system-view[Quidway] vlan 2[Quidway-vlan2] quit[Quidway] interface xgigabitethernet 0/0/1[Quidway-XGigabitEthernet0/0/1] port hybrid pvid vlan 2[Quidway-XGigabitEthernet0/0/1] port hybrid untagged vlan 2[Quidway-XGigabitEthernet0/0/1] quit[Quidway] interface vlanif 2[Quidway-Vlanif2] ip address 10.137.217.221 255.255.0.0[Quidway-Vlanif2] quit[Quidway]
Step 3 Configure the VTY user interface on the switch.
# Set the maximum number of VTY user interfaces.
[Quidway] user-interface maximum-vty 10
# Configure an ACL that is used to prohibit users from logging into another switch.
[Quidway]acl 3001[Quidway-acl-adv-3001]rule deny tcp source any destination-port eq telnet[Quidway-acl-adv-3001]quit[Quidway] user-interface vty 0 9[Quidway-ui-vty0-9] acl 3001 outbound
# Set terminal attributes of the VTY user interface.
[Quidway-ui-vty0-9] shell[Quidway-ui-vty0-9] idle-timeout 20[Quidway-ui-vty0-9] screen-length 30[Quidway-ui-vty0-9] history-command max-size 20
# Set the user authentication mode of the VTY user interface.
[Quidway-ui-vty0-9] authentication-mode aaa[Quidway-ui-vty0-9] quit
Step 4 Set user login parameters on the switch.
# Specify the user authentication mode.
[Quidway] aaa[Quidway-aaa] local-user huawei password cipher hello[Quidway-aaa] local-user huawei service-type telnet[Quidway-aaa] local-user huawei privilege level 3[Quidway-aaa] quit
Step 5 # Configure user login.
Use the windows command line to telnet the switch. The Telnet login window is shown in thefollowing figure.
S6700 Series Ethernet SwitchesConfiguration Guide - Basic Configuration 6 Configuring User Login
Issue 05 (2013-04-10) Huawei Proprietary and ConfidentialCopyright © Huawei Technologies Co., Ltd.
105
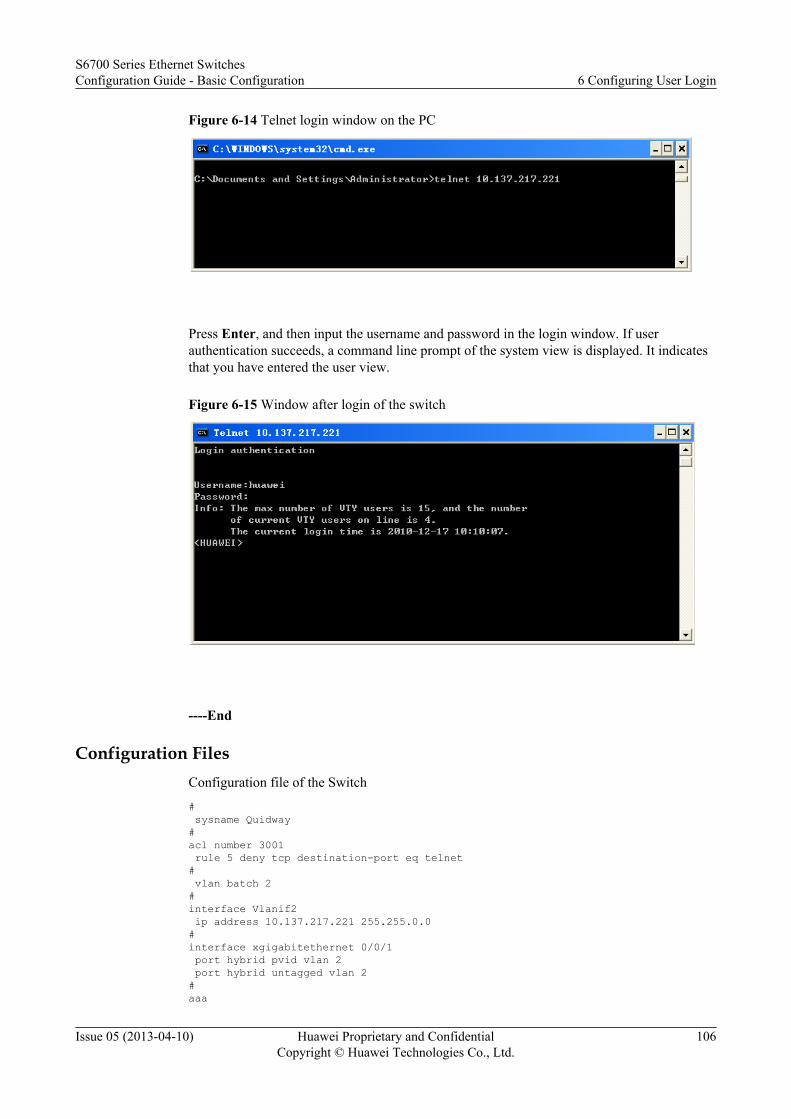
Figure 6-14 Telnet login window on the PC
Press Enter, and then input the username and password in the login window. If userauthentication succeeds, a command line prompt of the system view is displayed. It indicatesthat you have entered the user view.
Figure 6-15 Window after login of the switch
----End
Configuration FilesConfiguration file of the Switch
# sysname Quidway#acl number 3001 rule 5 deny tcp destination-port eq telnet# vlan batch 2#interface Vlanif2 ip address 10.137.217.221 255.255.0.0#interface xgigabitethernet 0/0/1 port hybrid pvid vlan 2 port hybrid untagged vlan 2#aaa
S6700 Series Ethernet SwitchesConfiguration Guide - Basic Configuration 6 Configuring User Login
Issue 05 (2013-04-10) Huawei Proprietary and ConfidentialCopyright © Huawei Technologies Co., Ltd.
106
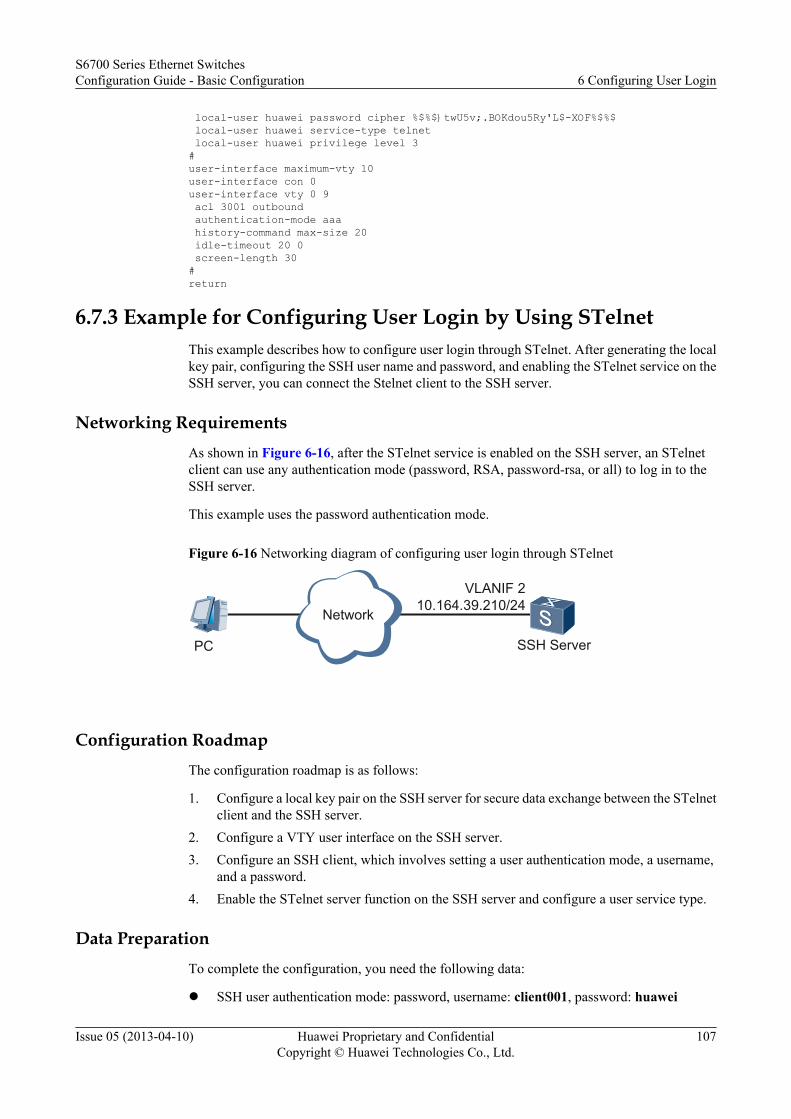
local-user huawei password cipher %$%$}twU5v;.BOKdou5Ry'L$-XOF%$%$ local-user huawei service-type telnet local-user huawei privilege level 3#user-interface maximum-vty 10 user-interface con 0user-interface vty 0 9 acl 3001 outbound authentication-mode aaa history-command max-size 20 idle-timeout 20 0 screen-length 30#return
6.7.3 Example for Configuring User Login by Using STelnetThis example describes how to configure user login through STelnet. After generating the localkey pair, configuring the SSH user name and password, and enabling the STelnet service on theSSH server, you can connect the Stelnet client to the SSH server.
Networking RequirementsAs shown in Figure 6-16, after the STelnet service is enabled on the SSH server, an STelnetclient can use any authentication mode (password, RSA, password-rsa, or all) to log in to theSSH server.
This example uses the password authentication mode.
Figure 6-16 Networking diagram of configuring user login through STelnet
Network
PC SSH Server
VLANIF 210.164.39.210/24
Configuration RoadmapThe configuration roadmap is as follows:
1. Configure a local key pair on the SSH server for secure data exchange between the STelnetclient and the SSH server.
2. Configure a VTY user interface on the SSH server.3. Configure an SSH client, which involves setting a user authentication mode, a username,
and a password.4. Enable the STelnet server function on the SSH server and configure a user service type.
Data PreparationTo complete the configuration, you need the following data:
l SSH user authentication mode: password, username: client001, password: huawei
S6700 Series Ethernet SwitchesConfiguration Guide - Basic Configuration 6 Configuring User Login
Issue 05 (2013-04-10) Huawei Proprietary and ConfidentialCopyright © Huawei Technologies Co., Ltd.
107
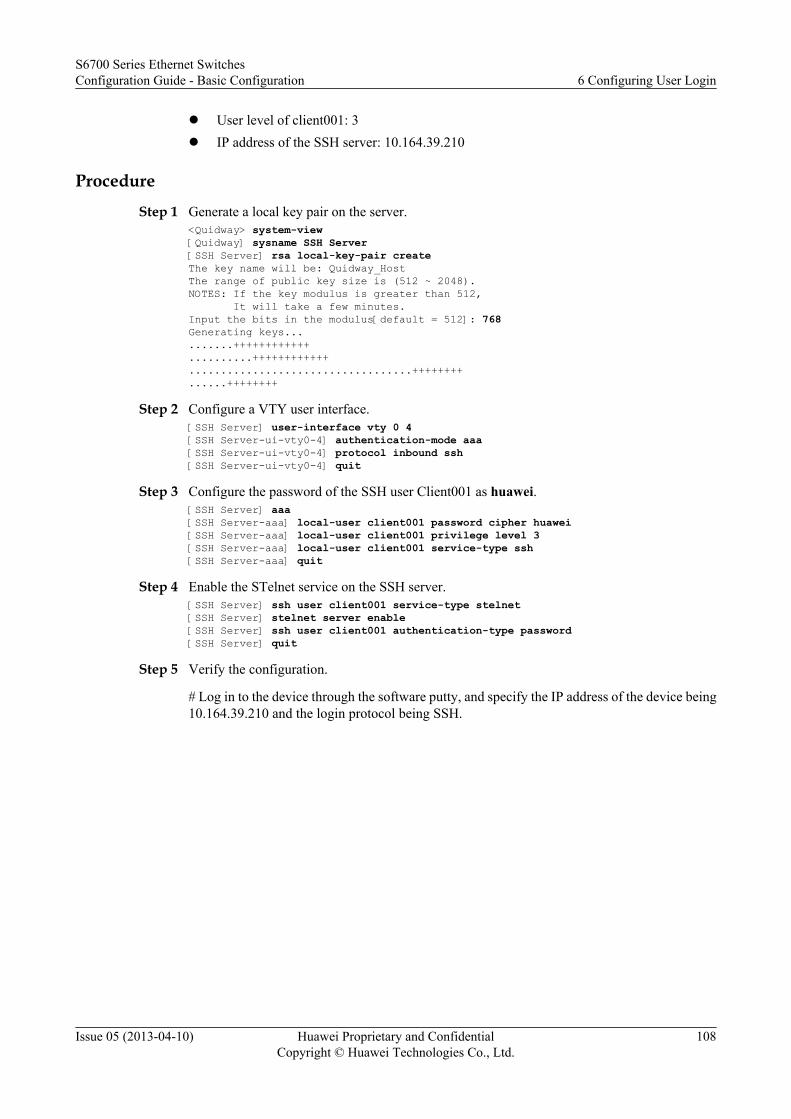
l User level of client001: 3l IP address of the SSH server: 10.164.39.210
Procedure
Step 1 Generate a local key pair on the server.<Quidway> system-view[Quidway] sysname SSH Server[SSH Server] rsa local-key-pair createThe key name will be: Quidway_HostThe range of public key size is (512 ~ 2048).NOTES: If the key modulus is greater than 512, It will take a few minutes.Input the bits in the modulus[default = 512]: 768Generating keys..........++++++++++++..........++++++++++++...................................++++++++......++++++++
Step 2 Configure a VTY user interface.[SSH Server] user-interface vty 0 4[SSH Server-ui-vty0-4] authentication-mode aaa[SSH Server-ui-vty0-4] protocol inbound ssh[SSH Server-ui-vty0-4] quit
Step 3 Configure the password of the SSH user Client001 as huawei.[SSH Server] aaa[SSH Server-aaa] local-user client001 password cipher huawei[SSH Server-aaa] local-user client001 privilege level 3[SSH Server-aaa] local-user client001 service-type ssh[SSH Server-aaa] quit
Step 4 Enable the STelnet service on the SSH server.[SSH Server] ssh user client001 service-type stelnet[SSH Server] stelnet server enable[SSH Server] ssh user client001 authentication-type password[SSH Server] quit
Step 5 Verify the configuration.
# Log in to the device through the software putty, and specify the IP address of the device being10.164.39.210 and the login protocol being SSH.
S6700 Series Ethernet SwitchesConfiguration Guide - Basic Configuration 6 Configuring User Login
Issue 05 (2013-04-10) Huawei Proprietary and ConfidentialCopyright © Huawei Technologies Co., Ltd.
108

Figure 6-17 Putty configuration
# Log in to the device through the software putty, and enter the username client001 and thepassword huawei.
Figure 6-18 Log in to the device through the software putty
----End
Configuration Filesl SSH server configuration file
# sysname SSH Server
S6700 Series Ethernet SwitchesConfiguration Guide - Basic Configuration 6 Configuring User Login
Issue 05 (2013-04-10) Huawei Proprietary and ConfidentialCopyright © Huawei Technologies Co., Ltd.
109
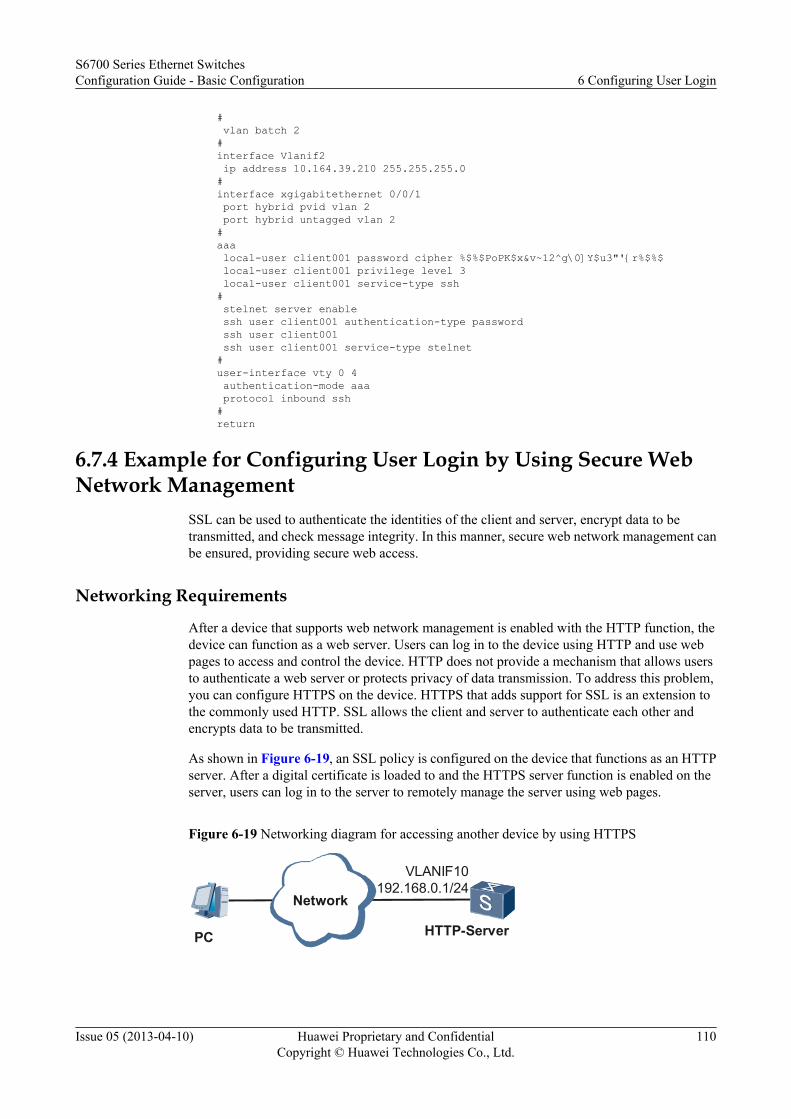
# vlan batch 2#interface Vlanif2 ip address 10.164.39.210 255.255.255.0#interface xgigabitethernet 0/0/1 port hybrid pvid vlan 2 port hybrid untagged vlan 2#aaa local-user client001 password cipher %$%$PoPK$x&v~12^g\0]Y$u3"'{r%$%$ local-user client001 privilege level 3 local-user client001 service-type ssh# stelnet server enable ssh user client001 authentication-type password ssh user client001 ssh user client001 service-type stelnet #user-interface vty 0 4 authentication-mode aaa protocol inbound ssh#return
6.7.4 Example for Configuring User Login by Using Secure WebNetwork Management
SSL can be used to authenticate the identities of the client and server, encrypt data to betransmitted, and check message integrity. In this manner, secure web network management canbe ensured, providing secure web access.
Networking Requirements
After a device that supports web network management is enabled with the HTTP function, thedevice can function as a web server. Users can log in to the device using HTTP and use webpages to access and control the device. HTTP does not provide a mechanism that allows usersto authenticate a web server or protects privacy of data transmission. To address this problem,you can configure HTTPS on the device. HTTPS that adds support for SSL is an extension tothe commonly used HTTP. SSL allows the client and server to authenticate each other andencrypts data to be transmitted.
As shown in Figure 6-19, an SSL policy is configured on the device that functions as an HTTPserver. After a digital certificate is loaded to and the HTTPS server function is enabled on theserver, users can log in to the server to remotely manage the server using web pages.
Figure 6-19 Networking diagram for accessing another device by using HTTPS
Network
PC HTTP-Server
VLANIF10192.168.0.1/24
S6700 Series Ethernet SwitchesConfiguration Guide - Basic Configuration 6 Configuring User Login
Issue 05 (2013-04-10) Huawei Proprietary and ConfidentialCopyright © Huawei Technologies Co., Ltd.
110

Configuration RoadmapThe configuration roadmap is as follows:
1. Upload a digital certificate and a web page file.Upload the digital certificate and web page file saved on the PC to the device that functionsas an HTTP server.
2. Load the digital certificate.Copy the digital certificate from the system directory of the HTTP server to the securitysub-directory, configure an SSL policy, and load the digital certificate.
3. Load the web page file.4. Create a web account.5. Log in to the web system.
Data PreparationTo complete the configuration, you need the following data:
l IP addresses of the HTTP serverl HTTP user name and passwordl SSL digital certificatel Web accountl Web page file
Procedure
Step 1 Upload the digital certificate and web page file.
# Configure an IP address for the device that functions as an HTTP server so that the PC andHTTP server are reachable.<Quidway> system-view[Quidway] sysname HTTP-Server[HTTP-Server] interface xgigabitethernet0/0/1[HTTP-Server-XGigabitEthernet0/0/1] port link-type access[HTTP-Server-XGigabitEthernet0/0/1] quit[HTTP-Server] vlan 10[HTTP-Server-vlan10] port xgigabitethernet0/0/1[HTTP-Server-vlan10] quit[HTTP-Server] interface vlanif 10[HTTP-Server-Vlanif10] ip address 192.168.0.1 24[HTTP-Server-Vlanif10] quit
# Enable the FTP server function.[HTTP-Server] ftp server enable
# Configure the authentication information, authorization mode, and authorized directory forFTP users.[HTTP-Server] aaa[HTTP-Server-aaa] local-user huawei password cipher huawei[HTTP-Server-aaa] local-user huawei service-type ftp[HTTP-Server-aaa] local-user huawei privilege level 15[HTTP-Server-aaa] local-user huawei ftp-directory flash:[HTTP-Server-aaa] quit[HTTP-Server] quit
# Upload the digital certificate and web page file from the PC to the HTTP server, as shown inFigure 6-20.
S6700 Series Ethernet SwitchesConfiguration Guide - Basic Configuration 6 Configuring User Login
Issue 05 (2013-04-10) Huawei Proprietary and ConfidentialCopyright © Huawei Technologies Co., Ltd.
111
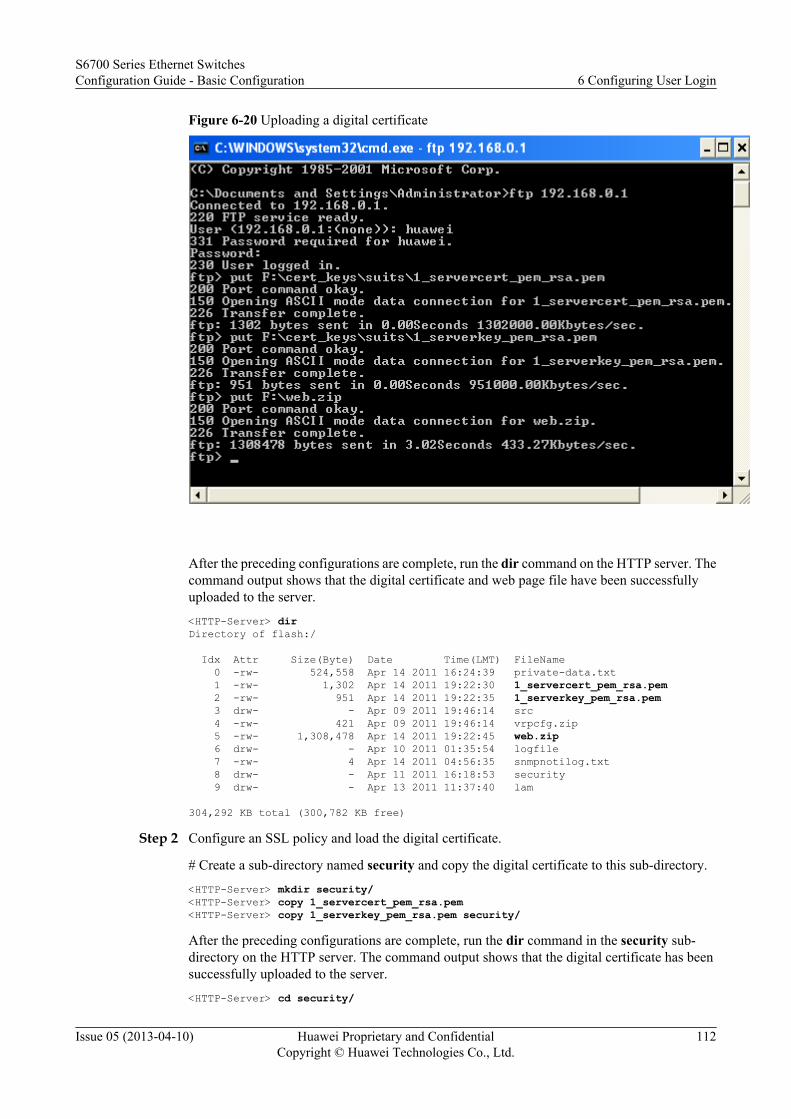
Figure 6-20 Uploading a digital certificate
After the preceding configurations are complete, run the dir command on the HTTP server. Thecommand output shows that the digital certificate and web page file have been successfullyuploaded to the server.
<HTTP-Server> dirDirectory of flash:/
Idx Attr Size(Byte) Date Time(LMT) FileName 0 -rw- 524,558 Apr 14 2011 16:24:39 private-data.txt 1 -rw- 1,302 Apr 14 2011 19:22:30 1_servercert_pem_rsa.pem 2 -rw- 951 Apr 14 2011 19:22:35 1_serverkey_pem_rsa.pem 3 drw- - Apr 09 2011 19:46:14 src 4 -rw- 421 Apr 09 2011 19:46:14 vrpcfg.zip 5 -rw- 1,308,478 Apr 14 2011 19:22:45 web.zip 6 drw- - Apr 10 2011 01:35:54 logfile 7 -rw- 4 Apr 14 2011 04:56:35 snmpnotilog.txt 8 drw- - Apr 11 2011 16:18:53 security 9 drw- - Apr 13 2011 11:37:40 lam
304,292 KB total (300,782 KB free)
Step 2 Configure an SSL policy and load the digital certificate.
# Create a sub-directory named security and copy the digital certificate to this sub-directory.
<HTTP-Server> mkdir security/<HTTP-Server> copy 1_servercert_pem_rsa.pem<HTTP-Server> copy 1_serverkey_pem_rsa.pem security/
After the preceding configurations are complete, run the dir command in the security sub-directory on the HTTP server. The command output shows that the digital certificate has beensuccessfully uploaded to the server.
<HTTP-Server> cd security/
S6700 Series Ethernet SwitchesConfiguration Guide - Basic Configuration 6 Configuring User Login
Issue 05 (2013-04-10) Huawei Proprietary and ConfidentialCopyright © Huawei Technologies Co., Ltd.
112
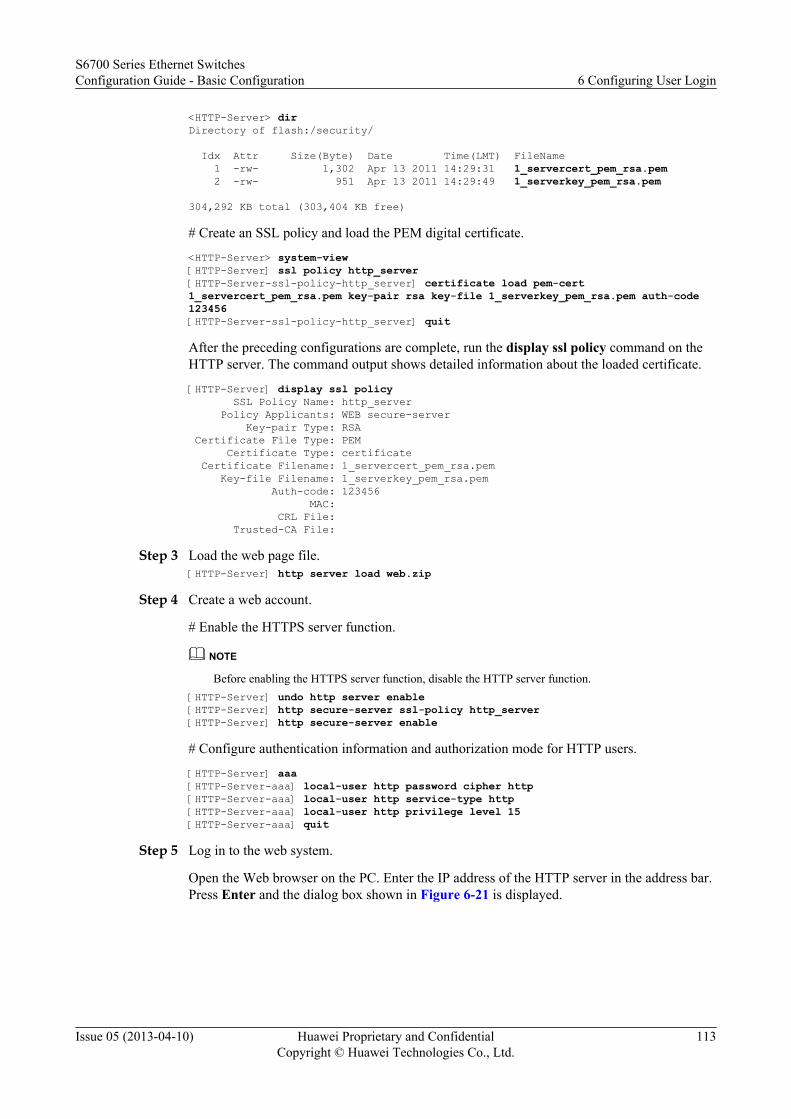
<HTTP-Server> dirDirectory of flash:/security/
Idx Attr Size(Byte) Date Time(LMT) FileName 1 -rw- 1,302 Apr 13 2011 14:29:31 1_servercert_pem_rsa.pem 2 -rw- 951 Apr 13 2011 14:29:49 1_serverkey_pem_rsa.pem
304,292 KB total (303,404 KB free)
# Create an SSL policy and load the PEM digital certificate.
<HTTP-Server> system-view[HTTP-Server] ssl policy http_server[HTTP-Server-ssl-policy-http_server] certificate load pem-cert 1_servercert_pem_rsa.pem key-pair rsa key-file 1_serverkey_pem_rsa.pem auth-code 123456[HTTP-Server-ssl-policy-http_server] quit
After the preceding configurations are complete, run the display ssl policy command on theHTTP server. The command output shows detailed information about the loaded certificate.
[HTTP-Server] display ssl policy SSL Policy Name: http_server Policy Applicants: WEB secure-server Key-pair Type: RSA Certificate File Type: PEM Certificate Type: certificate Certificate Filename: 1_servercert_pem_rsa.pem Key-file Filename: 1_serverkey_pem_rsa.pem Auth-code: 123456 MAC: CRL File: Trusted-CA File:
Step 3 Load the web page file.[HTTP-Server] http server load web.zip
Step 4 Create a web account.
# Enable the HTTPS server function.
NOTE
Before enabling the HTTPS server function, disable the HTTP server function.[HTTP-Server] undo http server enable[HTTP-Server] http secure-server ssl-policy http_server[HTTP-Server] http secure-server enable
# Configure authentication information and authorization mode for HTTP users.
[HTTP-Server] aaa[HTTP-Server-aaa] local-user http password cipher http[HTTP-Server-aaa] local-user http service-type http[HTTP-Server-aaa] local-user http privilege level 15[HTTP-Server-aaa] quit
Step 5 Log in to the web system.
Open the Web browser on the PC. Enter the IP address of the HTTP server in the address bar.Press Enter and the dialog box shown in Figure 6-21 is displayed.
S6700 Series Ethernet SwitchesConfiguration Guide - Basic Configuration 6 Configuring User Login
Issue 05 (2013-04-10) Huawei Proprietary and ConfidentialCopyright © Huawei Technologies Co., Ltd.
113
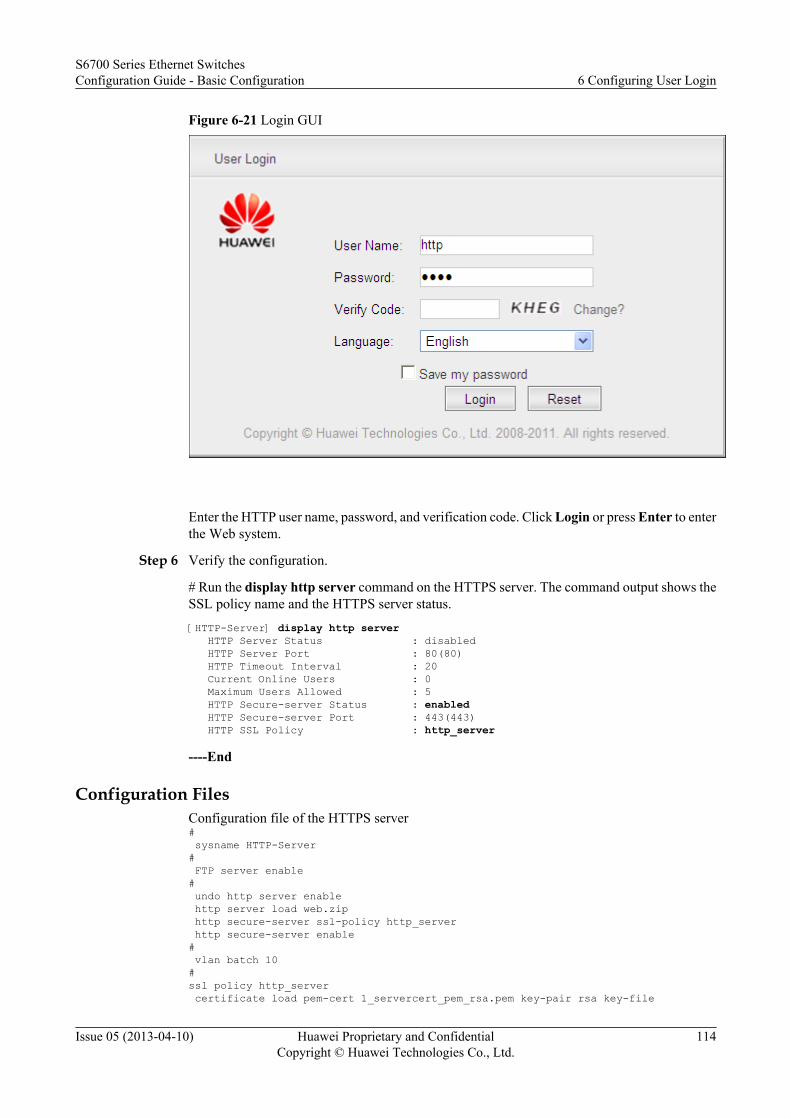
Figure 6-21 Login GUI
Enter the HTTP user name, password, and verification code. Click Login or press Enter to enterthe Web system.
Step 6 Verify the configuration.
# Run the display http server command on the HTTPS server. The command output shows theSSL policy name and the HTTPS server status.[HTTP-Server] display http server HTTP Server Status : disabled HTTP Server Port : 80(80) HTTP Timeout Interval : 20 Current Online Users : 0 Maximum Users Allowed : 5 HTTP Secure-server Status : enabled HTTP Secure-server Port : 443(443) HTTP SSL Policy : http_server
----End
Configuration FilesConfiguration file of the HTTPS server# sysname HTTP-Server# FTP server enable# undo http server enable http server load web.zip http secure-server ssl-policy http_server http secure-server enable# vlan batch 10#ssl policy http_server certificate load pem-cert 1_servercert_pem_rsa.pem key-pair rsa key-file
S6700 Series Ethernet SwitchesConfiguration Guide - Basic Configuration 6 Configuring User Login
Issue 05 (2013-04-10) Huawei Proprietary and ConfidentialCopyright © Huawei Technologies Co., Ltd.
114

1_serverkey_pem_rsa.pem auth-code 123456#aaa authentication-scheme default authorization-scheme default accounting-scheme default local-user http password cipher %$%$D/[nJdkW1WDY6^Ek83G;-\SJ%$%$ local-user http service-type http local-user http privilege level 15 local-user huawei password cipher %$%$6\ZH#;zYJ*HXE["UyioO-vmd%$%$ local-user huawei service-type ftp local-user huawei privilege level 15 local-user huawei ftp-directory flash:
#interface Vlanif10 ip address 192.168.0.1 255.255.255.0 #interface XGigabitEthernet0/0/1 port link-type access port default vlan 10#return
S6700 Series Ethernet SwitchesConfiguration Guide - Basic Configuration 6 Configuring User Login
Issue 05 (2013-04-10) Huawei Proprietary and ConfidentialCopyright © Huawei Technologies Co., Ltd.
115

7 Managing the File System
About This Chapter
The file system manages the files and directories on the storage devices of the switch. It canmove or delete a file or directory, or display the contents of a file.
7.1 File System OverviewThe switch uses the file system to manage all files.
7.2 Managing Files Using the File SystemYou can use the file system to manage storage devices, directories, and files.
7.3 Managing Files Using FTPFTP can transmit files between local and remote hosts. It is widely used for version upgrade,log downloading, file transmission, and configuration saving.
7.4 Managing Files Using SFTPSFTP allows you to log in to the switch securely from a remote device to manage files. Thismakes transmission of data to the remote end more secure.
7.5 Performing File Operations by Means of FTPSFTPS that adds support for SSL is an extension to the commonly used FTP. Using SSL toauthenticate the identities of the client and server and encrypt data to be transmitted, FTPSimplements security management of devices.
7.6 Configuration ExamplesThe examples in this section show how to use FTP, SFTP or FTPS to access the system andmanage files. These configuration examples explain networking requirements and provideconfiguration roadmaps and configuration notes.
S6700 Series Ethernet SwitchesConfiguration Guide - Basic Configuration 7 Managing the File System
Issue 05 (2013-04-10) Huawei Proprietary and ConfidentialCopyright © Huawei Technologies Co., Ltd.
116

7.1 File System OverviewThe switch uses the file system to manage all files.
7.1.1 File SystemThe file system manages files and directories on the storage devices. It can create, delete, modify,or rename a file or directory, or display the contents of a file.
The file system has two functions: managing storage devices and managing the files that arestored on those devices.
Managing Files Using the File System
After logging in to the switch by using the console port, Telnet, or STelnet, you can managestorage devices, directories, and files.
l Storage devices
Storage devices are hardware devices for storing data.
Different products support different storage devices. Currently, the S6700 supports the flashmemory.
l Files
A file is resources for storing and managing data.
l Directories
A directory is a logical container that the system uses to organize files.
7.1.2 Methods of File ManagementYou can use the FTP, SFTP or FTPS to manage files.
Managing Files Using FTP
FTP is a standard application protocol based on the TCP/IP protocol suite. It is used to transferfiles between local clients and remote servers. FTP uses two TCP connections to copy a filefrom one system to another. The TCP connections are usually established in client-server mode,one for control (the server port number is 21) and the other for data transmission (the server portnumber is 20).
l Control connection: issues commands from the client to the server and transmits repliesfrom the server to the client, minimizing the transmission delay.
l Data connection: transmits data between the client and server, maximizing the throughput.
FTP has two file transfer modes:
l Binary mode: is used to transfer program files, such as .app, .bin, and .btm files.
l ASCII mode: is used to transfer text files, such as .txt, .bat, and .cfg files.
The device provides the following FTP functions:
S6700 Series Ethernet SwitchesConfiguration Guide - Basic Configuration 7 Managing the File System
Issue 05 (2013-04-10) Huawei Proprietary and ConfidentialCopyright © Huawei Technologies Co., Ltd.
117
l FTP client: Users can use the terminal emulator or the Telnet program to connect PCs tothe device, and run the ftp command to establish a connection between the device and aremote FTP server to access and operate files on the server.
l FTP server: Users can use the FTP client program to log in to the device and operate fileson the device.Before users log in, the network administrator must configure an IP address for the FTPserver.
Managing Files Using SFTPSFTP uses SSH to ensure secure file transfer. On one hand, SFTP allows remote users to securelylog in to the device to manage and transfer files. On the other hand, users can use the devicefunctioning as a client to log in to a remote server and transfer files securely.
When the SFTP server or the connection between the server and the client fails, the client needsto detect the fault in time and removes the connection proactively. To help the client detect sucha fault in time, configure an interval at which Keepalive packets are sent if no packet is receivedand the maximum number of times that the server does not respond for the client:l If the client does not receive any packet within the specified period, the client sends a
Keepalive packet to the server.l If the maximum number of times that the server does not respond exceeds the specified
value, the client proactively releases the connection.
Managing Files Using FTPSFTPS that adds support for SSL is an extension to the commonly used FTP. Using SSL toauthenticate the identities of the client and server and encrypt data to be transmitted, FTPSimplements security management of devices.
Traditional FTP does not have a security mechanism. It transmits data in plain text. If the FTPserver is configured with login user names and passwords, the FTP server can authenticateclients, but the clients cannot authenticate the server. Transmitted data is easy to be tampered,bringing security threats. An SSL policy can be configured on the FTP server to improve security.SSL allows data encryption, identity authentication, and message integrity verification,improving data transmission security. In addition, SSL provides secure connections for the FTPserver, greatly improving security of the FTP server.
By default, a user cannot log in to the device using FTPS. To log into the device using FTPS,perform the following steps:l Logging in to the device through the console port and loading a digital certificate to the
sub-directory named security of the system directory on the FTPS serverl Installing the FTP client software that supports SSL on the PC
7.2 Managing Files Using the File SystemYou can use the file system to manage storage devices, directories, and files.
S6700 Series Ethernet SwitchesConfiguration Guide - Basic Configuration 7 Managing the File System
Issue 05 (2013-04-10) Huawei Proprietary and ConfidentialCopyright © Huawei Technologies Co., Ltd.
118
7.2.1 Establishing the Configuration TaskBefore using the file system to manage files, familiarize yourself with the usage scenario,complete the pre-configuration tasks, and obtain any data required for the configuration. Thiswill help you complete the configuration tasks quickly and correctly.
Applicable EnvironmentUse the file system to manage files or directories on the switch. If the switch is unable to saveor obtain data, log in to the file system to repair the faulty storage devices.
Pre-configuration TasksBefore logging in to the file system to manage files, connect the client with the server correctly.
Data PreparationTo manage files by logging in to the file system, you need the following data:
No. Data
1 Storage device name
2 Directory name
3 File name
7.2.2 Managing Storage DevicesWhen a storage device file system on the switch does not function properly, you must repair andformat the file system before managing the storage device.
ContextWhen the file system on a storage device fails, the terminal of the switch prompts you to rectifythe fault.
You can format a storage device if you are unable to repair the file system or do not need anydata saved on the storage device. After Formatting the storage devices, the files and directoriesin the specified storage device are cleared and cannot be restored.
CAUTIONFormatting storage devices can lead to data loss. Exercise caution when performing thisoperation.
Procedurel Run:
fixdisk device-name
S6700 Series Ethernet SwitchesConfiguration Guide - Basic Configuration 7 Managing the File System
Issue 05 (2013-04-10) Huawei Proprietary and ConfidentialCopyright © Huawei Technologies Co., Ltd.
119
A storage device with file system problems is repaired.
NOTE
If, after running this command, the prompt still says the system should be repaired, there may bedamage to the physical storage medium.
l Run:format device-name
The storage device is formatted.
NOTE
If the storage device does not work after you run this command, there may be a hardware fault.
----End
7.2.3 Managing DirectoriesYou can manage directories to store files in logical hierarchy.
ContextYou can manage directories by changing or displaying directories, displaying files in directoriesor sub-directories, and creating or deleting directories.
Procedurel Run:
cd directory
A directory is specified.l Run:
pwd
The current directory is displayed.l Run:
dir [ /all ] [ filename | flash: ]
A list of files and sub-directories in the directory is displayed..
Either the absolute path or relative path is applicable.l Run:
mkdir directory
The directory is created.l Run:
rmdir directory
The directory is deleted.
----End
7.2.4 Managing FilesYou can log in to the file system to view, delete, or rename files on the switch.
S6700 Series Ethernet SwitchesConfiguration Guide - Basic Configuration 7 Managing the File System
Issue 05 (2013-04-10) Huawei Proprietary and ConfidentialCopyright © Huawei Technologies Co., Ltd.
120

Contextl Managing files includes: displaying contents, copying, moving, renaming, compressing,
deleting, undeleting, deleting files in the recycle bin, running files in batch and configuringprompt modes.
l You can run the cd directory command to enter the directory you want from the currentdirectory.
Procedurel Run:
more file-name [ offset ] [ all ]
The content of a file is displayed.
Specify parameters in the more command for file viewing options:– Running the more file-name command to view the file named file-name. Contents of a
text file are displayed screen by screen. Hold and press the spacebar on the currentterminal to display all contents of the current file.Two preconditions must be set to display the contents of a text file screen by screen:– The value configured by screen-length screen-length temporary command must
be larger than 0.– The total number of lines in the file must be greater than the value configured by
screen-length command.– Running the more file-name offset command to view the file named file-name. Contents
of a text file are displayed screen by screen beginning with the line specified by offset.Hold and press the spacebar on the current terminal to display all contents of the currentfile.Two preconditions must be met to display the contents of a text file screen by screen:– The value configured by screen-length screen-length command must be greater than
0.– The result difference between the number of file characters subtracted and the value
of offset must be greater than the value configured by the screen-length command.– Running the more file-name all command to view the file named file-name. Contents
of a text file are completely displayed without pausing after each screen of information.l Run:
copy source-filename destination-filename
The file is copied.l Run:
move source-filename destination-filename
The file is moved.l Run:
rename source-filename destination-filename
The file is renamed.l Run:
zip source-filename destination-filename
The file is compressed.
S6700 Series Ethernet SwitchesConfiguration Guide - Basic Configuration 7 Managing the File System
Issue 05 (2013-04-10) Huawei Proprietary and ConfidentialCopyright © Huawei Technologies Co., Ltd.
121
l Run:delete [ /unreserved ] [ /quiet ] { filename | device-name }
The file is deleted.
CAUTIONIf you use the parameter [ /unreserved ] in the delete command, the file cannot be restoredafter being deleted.
l Run:undelete filename
The deleted file is recovered.
l Run:reset recycle-bin [ filename ]
The file is deleted.
You can use this command to permanently delete files in the recycle bin.
l Running Files in Batches
You can process uploaded files in batches. The edited batch files need to be saved to astorage device on the switch.
You can create and run a batch file to implement routine tasks.
1. Run:system-view
The system view is displayed.
2. Run:execute filename
The batched file is executed.
l Configuring Prompt Modes
The system displays prompts or warning messages when you operate the device (especiallyif these operations lead to data loss). If you need to change the prompt mode for fileoperations, you can configure the file system prompt mode.
1. Run:system-view
The system view is displayed.
2. Run:file prompt { alert | quiet }
The file system prompt mode is configured.
The default prompt mode is alert.
S6700 Series Ethernet SwitchesConfiguration Guide - Basic Configuration 7 Managing the File System
Issue 05 (2013-04-10) Huawei Proprietary and ConfidentialCopyright © Huawei Technologies Co., Ltd.
122
CAUTIONIf the prompt mode is set to quiet, no prompt appears when data is lost due toinappropriate operating procedures.
----End
7.3 Managing Files Using FTPFTP can transmit files between local and remote hosts. It is widely used for version upgrade,log downloading, file transmission, and configuration saving.
7.3.1 Establishing the Configuration TaskBefore using FTP to manage files, familiarize yourself with the usage scenario, complete thepre-configuration tasks, and obtain any data required for the configuration.
Applicable Environment
When an FTP client logs in to a switch serving as an FTP server, the user can transfer filesbetween the client and the server.
Pre-configuration Tasks
Before using FTP to manage files, connect the FTP client to the server.
Data Preparation
To use FTP to manage files, you need the following data:
No. Data
1 FTP username and password, and authorized FTP file directory name
2 (Optional) Listening port number specified on the FTP server
3 (Optional) Source IP address or source interface of the FTP server(Optional) Timeout period for disconnection from the FTP server
4 IP address or host name of the FTP server
7.3.2 Configuring a Local FTP UserYou can configure a user authorization mode and an authorized directory for FTP users to access.Unauthorized users cannot access the specified directory, reducing security risks.
S6700 Series Ethernet SwitchesConfiguration Guide - Basic Configuration 7 Managing the File System
Issue 05 (2013-04-10) Huawei Proprietary and ConfidentialCopyright © Huawei Technologies Co., Ltd.
123
Context
To use FTP to manage files, you must configure a local username and a password on theswitch and specify a service type and the directories that can be accessed.
Perform the following operations on the switch that functions as the FTP server:
Procedure
Step 1 Run:system-view
The system view is displayed.
Step 2 Run:set default ftp-directory directory
The default FTP working directory is configured.
NOTE
The configuration in this step takes effect only with TACACS users.
Step 3 Run:aaa
The AAA view is displayed.
Step 4 Run:local-user user-name password cipher password
The local user name and password are configured.
Step 5 Run:local-user user-name service-type ftp
The FTP service type is configured.
Step 6 Run:local-user user-name privilege level level
The local user level is set.
NOTE
The local user level must be set to 3 or higher.
Step 7 Run:local-user user-name ftp-directory directory
The authorized directory for the FTP user is configured.
----End
7.3.3 (Optional) Specifying a Port Number for the FTP ServerYou can configure or change the listening port number for an FTP server. After the port numberis changed, only the user knows the current port number and this protects system security.
S6700 Series Ethernet SwitchesConfiguration Guide - Basic Configuration 7 Managing the File System
Issue 05 (2013-04-10) Huawei Proprietary and ConfidentialCopyright © Huawei Technologies Co., Ltd.
124
Context
The default listening port number for an FTP server is 21. Users can log in to the switch directlyby using the default listening port number. Attackers can also access the default listening portto launch attacks that reduce available bandwidth and affect server performance, preventingvalid users from accessing the server. Changing the FTP server listening port number effectivelyprevents attackers from accessing the server through the listening port.
NOTE
If FTP is not enabled, change the FTP port as required.
If FTP is enabled, run the undo ftp server command to disable FTP, and then change the FTP port.
Perform the following steps on the switch that serves as the FTP server:
Procedure
Step 1 Run:system-view
The system view is displayed.
Step 2 Run:ftp [ ipv6 ] server port port-number
The port number of the FTP server is configured.
Once a new listening port number is configured, the FTP server interrupts all existing FTPconnections and begins to use the new listening port.
----End
7.3.4 Enabling the FTP ServerYou must enable an FTP server on the switch before using FTP to manage files.
Context
The FTP server is disabled by default on the switch. It must be enabled before FTP can be used.
Perform the following steps on the switch that serves as the FTP server:
Procedure
Step 1 Run:system-view
The system view is displayed.
Step 2 Run:ftp [ ipv6 ] server enable
The FTP server is enabled.
S6700 Series Ethernet SwitchesConfiguration Guide - Basic Configuration 7 Managing the File System
Issue 05 (2013-04-10) Huawei Proprietary and ConfidentialCopyright © Huawei Technologies Co., Ltd.
125
NOTE
When file operations between clients and the switch are complete, run the undo ftp [ ipv6 ] server commandto disable the FTP server function. This protects switch security.
----End
7.3.5 (Optional) Configuring the FTP Server ParametersFTP server parameters include the FTP server source address and the timeout period for FTPconnections.
Contextl You can configure a source IP address for the FTP server. The FTP client can only access
this address and this protects system security.l You can configure the timeout period for FTP connections on the FTP server. When the
timeout period for an FTP connection expires, the system terminates the connection torelease resources.
Perform the following steps on the switch that serves as the FTP server:
ProcedureStep 1 Run:
system-view
The system view is displayed.
Step 2 Run:ftp server-source { -a ip-address | -iinterface-type interface-number }
The source IP address and source interface of an FTP server is configured.
To log in to the FTP server, you must specify the source IP address for the server in the ftpcommand, or you cannot log in to the FTP server.
Step 3 Run:ftp [ ipv6 ] timeout minutes
The timeout period for the FTP server is configured.
If the client is idle for the configured time, the connection to the FTP server is terminated.
By default, the timeout value is 30 minutes.
----End
7.3.6 (Optional) Configuring an FTP ACLAfter an FTP ACL is configured, only specified clients can access the deviceswitch.
ContextWhen the switchfunctions as an FTP server, you can configure an ACL to allow the clients thatmeet matching rules to access the FTP server.
Perform the following steps on the switch that serves as the FTP server:
S6700 Series Ethernet SwitchesConfiguration Guide - Basic Configuration 7 Managing the File System
Issue 05 (2013-04-10) Huawei Proprietary and ConfidentialCopyright © Huawei Technologies Co., Ltd.
126
Procedure
Step 1 Run:system-view
The system view is displayed.
Step 2 Run:acl acl-number
The ACL view is displayed.
Step 3 Run:rule [ rule-id ] { deny | permit } [ fragment | logging | source { source-address source-wildcard | any } | time-range time-name ] *
The ACL rule is configured.
NOTE
FTP supports only the basic ACL.
Step 4 Run:quit
The system view is displayed.
Step 5 Run:ftp [ ipv6 ] acl acl-number
The basic FTP ACL is configured.
----End
7.3.7 Accessing the System by Using FTPAfter the FTP server is configured, you can use FTP to access the switch from a PC and managethe files on the switch.
Context
You can use either the Windows command line prompt or third-party software to log in to theswitch. The example here uses the Windows command line prompt as an example.
Perform the following steps on the PC:
Procedure
Step 1 Open the Windows CLI.
Step 2 Run the ftp ip-address command to log in to the switch using FTP.
Enter a username and password at the prompt, and press Enter. When the Windows commandline prompt are displayed in the FTP client view, such as ftp>, you have entered the workingdirectory of the FTP server.
S6700 Series Ethernet SwitchesConfiguration Guide - Basic Configuration 7 Managing the File System
Issue 05 (2013-04-10) Huawei Proprietary and ConfidentialCopyright © Huawei Technologies Co., Ltd.
127
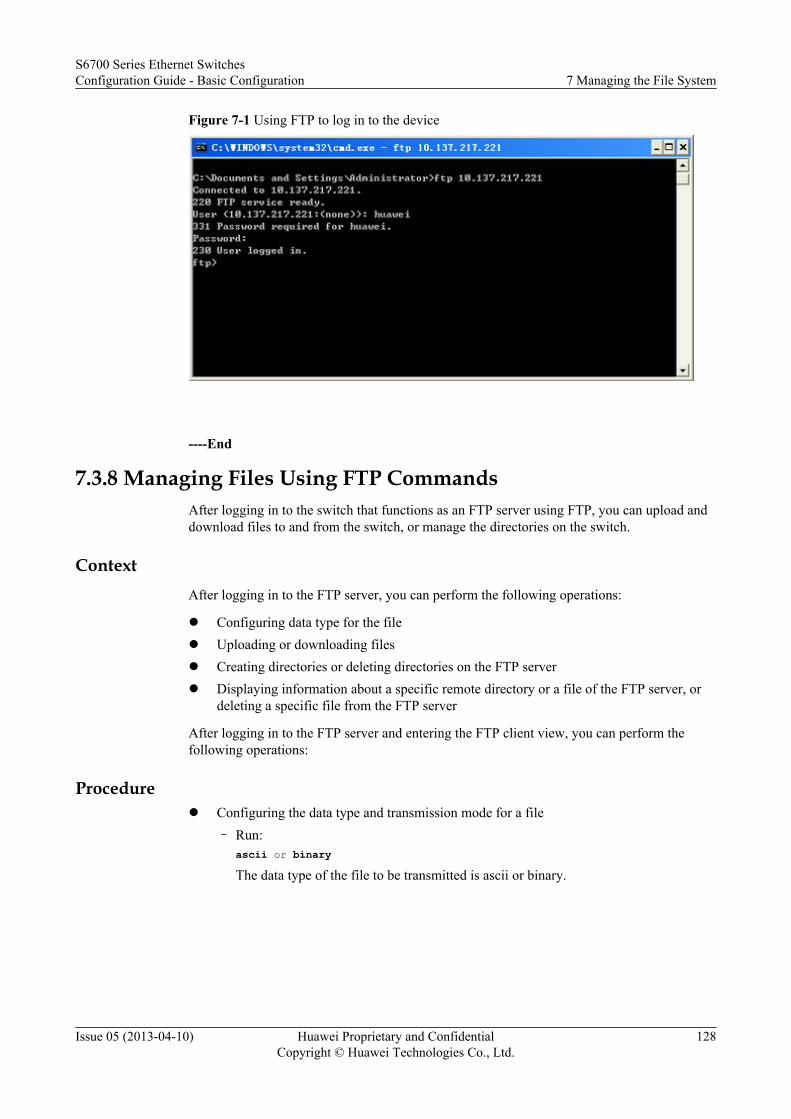
Figure 7-1 Using FTP to log in to the device
----End
7.3.8 Managing Files Using FTP CommandsAfter logging in to the switch that functions as an FTP server using FTP, you can upload anddownload files to and from the switch, or manage the directories on the switch.
ContextAfter logging in to the FTP server, you can perform the following operations:
l Configuring data type for the filel Uploading or downloading filesl Creating directories or deleting directories on the FTP serverl Displaying information about a specific remote directory or a file of the FTP server, or
deleting a specific file from the FTP server
After logging in to the FTP server and entering the FTP client view, you can perform thefollowing operations:
Procedurel Configuring the data type and transmission mode for a file
– Run:ascii or binaryThe data type of the file to be transmitted is ascii or binary.
S6700 Series Ethernet SwitchesConfiguration Guide - Basic Configuration 7 Managing the File System
Issue 05 (2013-04-10) Huawei Proprietary and ConfidentialCopyright © Huawei Technologies Co., Ltd.
128
NOTE
FTP supports ASCII and the binary files. The difference the two is:
l In ASCII transmission mode, ASCII characters are used to separate carriage returned fromline feeds.
l In binary transmission mode, characters can be transferred without format conversion orformatting.
An FTP transmission mode can be set for each client. The system uses ASCII transmission modeby default, but a mode switch command can switch a client between ASCII and binary modes.The ASCII mode is used to transmit .txt files and the binary mode is used to transmit binary files.
l Uploading or downloading files– Upload or download a file.
– Run:put local-filename [ remote-filename ]The local file is uploaded to the remote FTP server.
– Run:get remote-filename [ local-filename ]The FTP file is downloaded from the FTP server and saved to the local file.
– Upload or download multiple files.– Run the mput local-filenames command to upload multiple local files
synchronously to the remote FTP server.– Run the mget remote-filenames command to download multiple files from the FTP
server and save them locally.
NOTE
l When you are uploading or downloading files, and the prompt command is run in the FTP clientview to enable the file transmission prompt function, the system will prompt you to confirm theuploading or downloading operation.
l If the prompt command is run again in the FTP client view, the file transmission prompt functionwill be disabled.
l Running one or more of the following commands to manage directories– Run:
cd pathnameThe working path of the remote FTP server is specified.
– Run:pwdThe specified directory of the FTP server is displayed.
– Run:lcd [ local-directory ]The directory of the FTP client is displayed or changed.
– Run:mkdir remote-directoryA directory is created on the FTP server.
– Run:rmdir remote-directoryA directory is removed from the FTP server.
l Running one or more of the following commands to manage files
S6700 Series Ethernet SwitchesConfiguration Guide - Basic Configuration 7 Managing the File System
Issue 05 (2013-04-10) Huawei Proprietary and ConfidentialCopyright © Huawei Technologies Co., Ltd.
129
– Run:ls [ remote-filename ] [ local-filename ]
The specified directory or file on the remote FTP server is displayed.If the directory name is not specified when a specific remote file is selected, the systemsearches the working directory for the specific file.
– Run:dir [ remote-filename ] [ local-filename ]
The specified directory or file on the local FTP server is displayed.If the directory name is not specified when a specific remote file is selected, the systemsearches the working directory for the specific file.
– Run:delete remote-filename
The specified file on the FTP server is deleted.If the directory name is not specified when a specific remote file is selected, the systemsearches the working directory for the specific file.
When local-filename is set, related information about the file can be downloaded locally.
NOTE
If you need more information about FTP operations, run the help [ command ] command in theWindows CLI.
----End
7.3.9 Checking the ConfigurationsAfter the configuration is complete, you can view the configuration and status of the FTP serveras well as login information about FTP users.
PrerequisitesManaging files using FTP has been configured.
Procedurel Run the display [ ipv6 ] ftp-server command to check the configuration of the FTP server.l Run the display ftp-users command to check how many users are currently logged in FTP
server.
----End
ExampleRun the display [ ipv6 ] ftp-server to view the status of the FTP server.<Quidway> display ftp-server FTP server is running Max user number 5 User count 1 Timeout value(in minute) 30 Listening Port 1080 Acl number 0 FTP SSL policy FTP Secure-server is stopped
S6700 Series Ethernet SwitchesConfiguration Guide - Basic Configuration 7 Managing the File System
Issue 05 (2013-04-10) Huawei Proprietary and ConfidentialCopyright © Huawei Technologies Co., Ltd.
130
Run the display ftp-users command to view the username, port number, authorization directoryof the FTP user configured.<Quidway> display ftp-users username host port idle topdir zll 100.2.150.226 1383 3 flash:
7.4 Managing Files Using SFTPSFTP allows you to log in to the switch securely from a remote device to manage files. Thismakes transmission of data to the remote end more secure.
7.4.1 Establishing the Configuration TaskBefore using SFTP to manage files, familiarize yourself with the usage scenario, complete thepre-configuration tasks, and obtain any data required for the configuration.
Applicable Environment
SSH authenticates clients and encrypts data in both directions to guarantee secure datatransmission on conventional networks. SSH supports SFTP.
SFTP is a secure FTP service that enables users to log in to the FTP server for data transmission.
Pre-configuration Tasks
Before using SFTP to manage files, configure reachable routes between the terminal and thedevice.
Data Preparation
Before using SFTP to manage files, you need the following data.
No. Data
1 Maximum number of VTY user interfaces, (optional) ACL for restricting incomingand outgoing calls on VTY user interfaces, connection timeout period of terminalusers, number of rows displayed in a terminal screen, size of the history commandbuffer, user authentication mode, username, and password
2 Username, password, authentication mode, and service type of an SSH user, remotepublic RSA or DSA key pair allocated to the SSH user, and SFTP working directoryof the SSH user
3 (Option) Number of the port monitored by the SSH server(Option) The interval for updating the key pair on the SSH server
4 Name of the SSH server, number of the port monitored by the SSH server, preferredencryption algorithm from the SFTP client to the SSH server, preferred encryptionalgorithm from the SSH server to the SFTP client, preferred HMAC algorithm fromthe SFTP client to the SSH server, preferred HMAC algorithm from the SSH serverto the SFTP client, preferred algorithm of key exchange, name of the outgoinginterface, source address
S6700 Series Ethernet SwitchesConfiguration Guide - Basic Configuration 7 Managing the File System
Issue 05 (2013-04-10) Huawei Proprietary and ConfidentialCopyright © Huawei Technologies Co., Ltd.
131
No. Data
5 Directory name and File name
7.4.2 Configuring VTY User InterfaceTo allow a user to log in to the device by using SFTP, you need to configure attributes of theVTY user interface.
Context
Before a user logs in to the device by using SFTP, the user authentication mode in the VTY userinterface must be set. Otherwise, the user cannot log in to the device.
In general, the default values of other VTY user interface attributes do not need to be modified.These attributes can be changed if necessary. For details, see Configuring the VTY UserInterface.
7.4.3 Configuring SSH for the VTY User InterfaceBefore users can log in to the switch using SFTP, you must configure VTY user interfaces tosupport SSH.
Context
By default, user interfaces support Telnet. If no user interface is configured to support SSH, youcannot log in to the switch using SFTP.
Procedure
Step 1 Run:system-view
The system view is displayed.
Step 2 Run:user-interface [ vty ] first-ui-number [ last-ui-number ]
The VTY user interface is displayed.
Step 3 Run:authentication-mode aaa
The AAA authentication mode is configured.
Step 4 Run:protocol inbound ssh
The VTY user interface is configured to support SSH.
----End
S6700 Series Ethernet SwitchesConfiguration Guide - Basic Configuration 7 Managing the File System
Issue 05 (2013-04-10) Huawei Proprietary and ConfidentialCopyright © Huawei Technologies Co., Ltd.
132
7.4.4 Configuring an SSH User and Specifying SFTP as One ofService Types
Before logging in to the switch using SFTP, you must configure an SSH user, configure theswitch to generate a local RSA or DSA key pair, configure a user authentication mode, andspecify a service type and authorized directory for the SSH user.
Contextl There are six SSH user authentication modes: RSA, DSA, password, password-RSA,
password-DSA, and all. Password authentication depends on Authentication,Authorization and Accounting (AAA). Before a user logs in to the device in password,password-RSA, or password-DSA authentication mode, you must create a local user withthe specified username in the AAA view.– Password-RSA authentication depends on both password authentication and RSA
authentication.– Password-DSA authentication depends on both password authentication and DSA
authentication.– All authentication depends on either of the following authentications: password
authentication, or DSA authentication and RSA authentication.l The device must be configured to generate local RSA or DSA key pairs, which are a key
part of the SSH login process. If an SSH user logs in to an SSH server in passwordauthentication mode, configure the server to generate a local RSA or DSA key pair. If anSSH user logs in to an SSH server in RSA or DSA authentication mode, configure both theserver and the client to generate local RSA or DSA key pairs.RSA key and DSA key are an algorithm for user authentication in SSH, respectively.Compared with RSA authentication, DSA authentication adopts the DSA encryption modeand is widely used. In many cases, SSH only supports DSA to authenticate the server andthe client. When the RSA or DSA authentication mode is used, the priority of users dependson the priority of the VTY user interfaces used for login.
Perform the following operations on the switch that functions as an SSH server:
Procedure
Step 1 Run:system-view
The system view is displayed.
Step 2 Run:ssh user user-name
An SSH user is created.
If password or password-RSA authentication, or password-DSA is configured for the SSH user,create the same SSH user in the AAA view and set the local user access type to SSH.
1. Run the aaa command to enter the AAA view.2. Run the local-user user-name password cipher password command to set the local user
access type to SSH.
Step 3 Run:
S6700 Series Ethernet SwitchesConfiguration Guide - Basic Configuration 7 Managing the File System
Issue 05 (2013-04-10) Huawei Proprietary and ConfidentialCopyright © Huawei Technologies Co., Ltd.
133
local-user user-name privilege level level
The SSH user level is set.
NOTE
The SSH user level must be set to 3 or higher.
Step 4 Create an RSA or DSA key pair.l Run the rsa local-key-pair create command to create a local RSA key pair.
NOTE
l You must configure the rsa local-key-pair create command to generate a local key pair beforecompleting other SSH configurations. The minimum length of the server key pair and the host keypair is 512 bits, and the maximum length is 2048 bits.
l After a local key pair is generated, you can run the display rsa local-key-pair public commandto view the public key in the local key pair.
l To clear the local RSA key pair, run the rsa local-key-pair destroy command to destroy all localRSA key-pairs, including the local key-pair and server key-pair.
Check whether all local RSA key pairs are destroyed after running the rsa local-key-pairdestroy command. The rsa local-key-pair destroy command configuration takes effect only onceand therefore will not be saved in the configuration file.
l Run the dsa local-key-pair create command to generate the RSA local-key-pair.
NOTE
l You must configure the dsa local-key-pair create command to generate a local key pair beforecompleting other SSH configurations. The length of the server key pair and the host key pair canbe 512 bits, 1,024 bits and 2,048 bits. By default, the length of the key pair is 512 bits.
l After a local key pair is generated, you can run the display dsa local-key-pair public commandto view the public key in the local key pair.
l To clear the local DSA key pair, run the dsa local-key-pair destroy command to destroy all localDSA key-pairs, including the local key-pair and server key-pair.
Check whether all local DSA key pairs are destroyed after running the dsa local-key-pairdestroy command. The dsa local-key-pair destroy command configuration takes effect only onceand therefore will not be saved in the configuration file.
Step 5 Perform the operations as described in Table 7-1 based on the configured SSH userauthentication mode.
Table 7-1 Configuring an authentication mode for the SSH user
Operation Command Description
ConfigurePasswordAuthentication
Run the ssh user user-nameauthentication-type passwordcommand
If local or HWTACACSauthentication is used and thereare only a few users, use passwordauthentication.
S6700 Series Ethernet SwitchesConfiguration Guide - Basic Configuration 7 Managing the File System
Issue 05 (2013-04-10) Huawei Proprietary and ConfidentialCopyright © Huawei Technologies Co., Ltd.
134

Operation Command Description
Configure theDefault PasswordAuthentication
Run the ssh authentication-typedefault password command
When you log in using SSH anduse a TACACS server forauthentication, the networkadministrator needs to specify theinformation about an SSH user onthe TACACS server. In mostcases, however, the SSH servercannot obtain the userinformation from the TACACSserver. To resolve this problem,you can run the sshauthentication-type defaultpassword command to set theauthentication mode as passwordauthentication. Then, you can login to the device on the SSH serversafely.
Configure RSAauthentication
1, Run the ssh user user-nameauthentication-type rsa commandto configure RSA authentication.
-
2, Run the rsa peer-public-key key-name command to enter the publickey view.
-
3, Run the public-key-code begincommand to enter the public keyedit view.
-
4, Enter hex-data to edit the publickey.
l In the public key edit view,only hexadecimal stringscomplying with the public keyformat can be typed in. Eachstring is randomly generatedon an SSH client. For detailedoperations, see manuals forSSH client software.
l After entering the public keyedit view, paste the RSApublic key generated on theclient to the server.
5, Run the public-key-code endcommand to exit from the publickey edit view.
-
S6700 Series Ethernet SwitchesConfiguration Guide - Basic Configuration 7 Managing the File System
Issue 05 (2013-04-10) Huawei Proprietary and ConfidentialCopyright © Huawei Technologies Co., Ltd.
135
Operation Command Description
6, Run the peer-public-key endcommand to return to the systemview.
l Running the peer-public-keyend command generates a keyonly after a valid hex-datacomplying with the public keyformat is entered.
l If the peer-public-key endcommand is used after the keykey-name specified in Step 2 isdeleted in another window, thesystem prompts a message,indicating that the key doesnot exist, and the system viewis displayed.
7, Run the ssh user user-nameassign rsa-key key-name commandto assign the SSH user a public key.
-
Configure DSAauthentication
1, Run the ssh user user-nameauthentication-type dsa commandto configure DSA authentication.
-
2. Run the dsa peer-public-keykey-name encoding-type { der |pem } command to configure anencoding format for a DSA publickey and enter the DSA public keyview.
-
3, Run the public-key-code begincommand to enter the public keyedit view.
-
4, Enter hex-data to edit the publickey.
l In the public key edit view,only hexadecimal stringscomplying with the public keyformat can be typed in. Eachstring is randomly generatedon an SSH client. For detailedoperations, see manuals forSSH client software.
l After entering the public keyedit view, paste the RSApublic key generated on theclient to the server.
5, Run the public-key-code endcommand to exit from the publickey edit view.
-
S6700 Series Ethernet SwitchesConfiguration Guide - Basic Configuration 7 Managing the File System
Issue 05 (2013-04-10) Huawei Proprietary and ConfidentialCopyright © Huawei Technologies Co., Ltd.
136
Operation Command Description
6, Run the peer-public-key endcommand to return to the systemview.
l Running the peer-public-keyend command generates a keyonly after a valid hex-datacomplying with the public keyformat is entered.
l If the peer-public-key endcommand is used after the keykey-name specified in Step 2 isdeleted in another window, thesystem prompts a message,indicating that the key doesnot exist, and the system viewis displayed.
7, Run the ssh user user-nameassign dsa-key key-name commandto assign the SSH user a public key.
-
Step 6 (Optional) Authorize SSH users using command lines.
Run:
ssh user user-name authorization-cmd aaa
The command line authorization is configured for the specified SSH user.
After configuring the authorization through command lines for the SSH user to perform RSAauthentication, you have to configure the AAA authorization. Otherwise, the command lineauthorization for the SSH user does not take effect.
Step 7 Run:ssh user username service-type { SFTP | all }
The service type of an SSH user is set to SFTP or all.
By default, the service type of the SSH user is not configured.
Step 8 Run:ssh user username sftp-directory directoryname
The authorized directory of the SFTP service for the SSH user is configured.
By default, the authorized directory of the SFTP service for the SSH user is flash:.
----End
7.4.5 Enabling the SFTP ServiceThe STelnet service must be enabled before it can be used.
ContextBy default, the SFTP server function is not enabled on the switch. You can use SFTP to establishconnections with the router only after the SFTP server function is enabled on the switch.
S6700 Series Ethernet SwitchesConfiguration Guide - Basic Configuration 7 Managing the File System
Issue 05 (2013-04-10) Huawei Proprietary and ConfidentialCopyright © Huawei Technologies Co., Ltd.
137
Perform the following steps on the switch that serves as an SSH server:
Procedure
Step 1 Run:system-view
The system view is displayed.
Step 2 Run:sftp server enable
The SFTP service is enabled.
By default, the SFTP service is disabled.
----End
7.4.6 (Optional) Configuring the SFTP Server ParametersYou can configure a device to be compatible with earlier versions of the SSH protocol, configureor change the listening port number of an SSH server, set an interval at which the key pair ofthe SSH server is updated.
Procedure
Step 1 Run:system-view
The system view is displayed.
Step 2 Perform one or both of the operations shown in Table 7-2 as needed.
Table 7-2 Server parameters
Serverparameters
Command Description
Configure theinterval atwhich the keypair of theSSH server isupdated
Run the ssh server rekey-intervalinterval command.By default, the interval is 0,indicating that the key is neverupdated.
You can set an interval at which thekey pair of an SSH server is updated.When the timer expires, the key pairis automatically updated, improvingsecurity.
Configure thetimeoutperiod of SSHauthentication
Run the ssh server timeoutseconds command.By default, the timeout period is 60seconds.
If a user fails to log in when thetimeout period of SSHauthentication expires, the systemdisconnects the current connectionto ensure the system security.
S6700 Series Ethernet SwitchesConfiguration Guide - Basic Configuration 7 Managing the File System
Issue 05 (2013-04-10) Huawei Proprietary and ConfidentialCopyright © Huawei Technologies Co., Ltd.
138
Serverparameters
Command Description
Configure thenumber oftimes thatSSHauthenticationis retried
Run the ssh server authentication-retries times command.By default, SSH authenticationretries a maximum of 3 times.
The number of times that SSHauthentication is retried is set to denyaccess of unauthorized users.
Configureearlier SSHversioncompatibility
Run the ssh server compatible-ssh1x enable command.By default, an SSH server runningSSH2.0 is compatible with SSH1.X.To prevent clients running SSH1.3 toSSH1.99 from logging in, run theundo ssh server compatible-ssh1xenable command to disable supportfor earlier SSH protocol versions.
There are two SSH versions:SSH1.X (earlier than SSH2.0) andSSH2.0. SSH2.0 has an extendedstructure and supports moreauthentication modes and keyexchange methods than SSH1.X,SSH 2.0 can eliminate the securityrisks that SSH 1.X has. SSH 2.0 ismore secure and therefore isrecommended. SSH2.0 alsosupports more advanced servicessuch as SFTP. The S6700 Seriessupports SSH versions ranging from1.3 to 2.0.
Configure thelistening portnumber of theSSH server
Run the ssh server port port-number command.By default, the listening port numberis 22.If a new listening port is set, the SSHserver cuts off all established STelnetand SFTP connections, and uses thenew port number to listen toconnection requests.
The default listening port number ofan SSH server is 22. Users can log into the device by using the defaultlistening port number. Attackersmay access the default listening port,consuming bandwidth, deterioratingserver performance, and causingauthorized users unable to access theserver. After the listening portnumber of the SSH server ischanged, attackers do not know thenew port number. This effectivelyprevents attackers from accessingthe listening port and improvessecurity.
----End
7.4.7 Accessing the System Using SFTPAfter the configuration is complete, you can use SFTP to log in to the switch from a user terminaland manage files on the switch.
Context
Third-party software can be used to access the switch from the user terminal using SFTP. Theexample here uses third-party software OpenSSH and the Windows CLI.
S6700 Series Ethernet SwitchesConfiguration Guide - Basic Configuration 7 Managing the File System
Issue 05 (2013-04-10) Huawei Proprietary and ConfidentialCopyright © Huawei Technologies Co., Ltd.
139
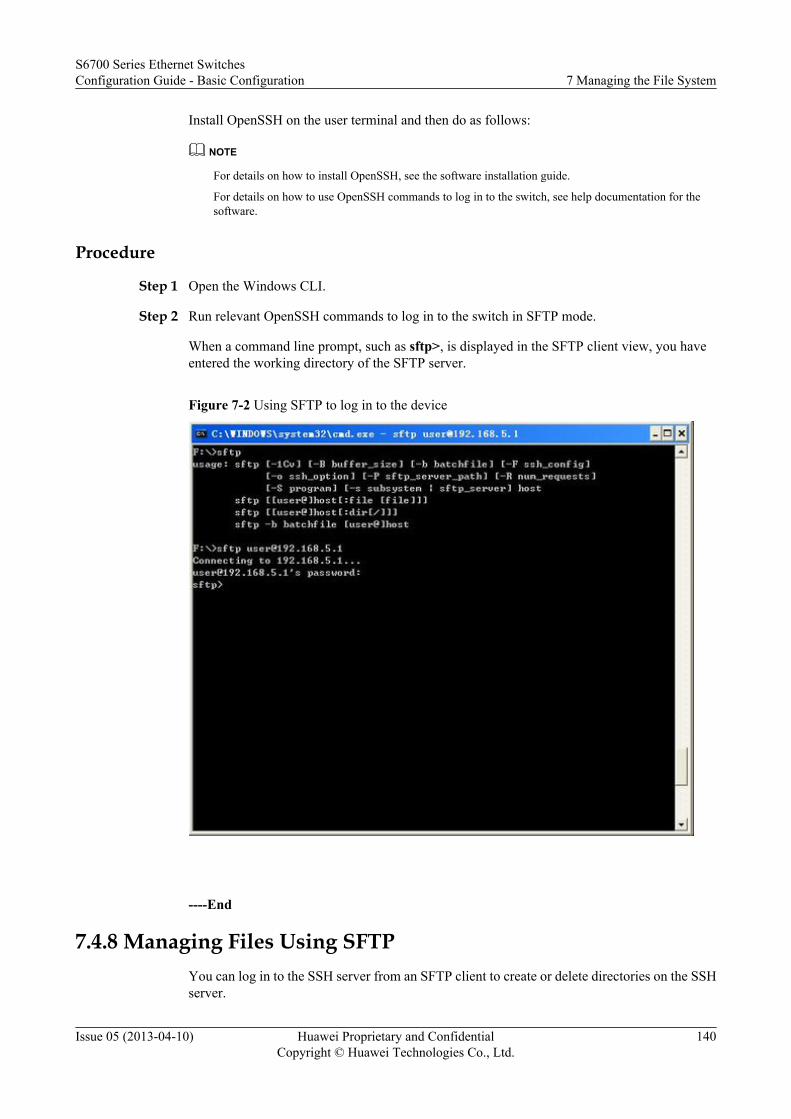
Install OpenSSH on the user terminal and then do as follows:
NOTE
For details on how to install OpenSSH, see the software installation guide.
For details on how to use OpenSSH commands to log in to the switch, see help documentation for thesoftware.
Procedure
Step 1 Open the Windows CLI.
Step 2 Run relevant OpenSSH commands to log in to the switch in SFTP mode.
When a command line prompt, such as sftp>, is displayed in the SFTP client view, you haveentered the working directory of the SFTP server.
Figure 7-2 Using SFTP to log in to the device
----End
7.4.8 Managing Files Using SFTPYou can log in to the SSH server from an SFTP client to create or delete directories on the SSHserver.
S6700 Series Ethernet SwitchesConfiguration Guide - Basic Configuration 7 Managing the File System
Issue 05 (2013-04-10) Huawei Proprietary and ConfidentialCopyright © Huawei Technologies Co., Ltd.
140
ContextAfter logging in to the SFTP server, you can perform the following operations:
l Displaying the SFTP client command helpl Managing directories on the SFTP serverl Managing files on the SFTP server
After logging in to the SFTP server and entering the SFTP client view, you can perform one ormore of the following operations.
Procedurel Run:
help [ all | command-name ]
The SFTP client command help is displayed.l Perform one or multiple of the following operations as required.
– Run:cd [ remote-directory ]The current operating directory of users is changed.
– Run:pwdThe current operating directory of users is displayed.
– Run:dir/ls [ path ]A list of files in the specified directory is displayed.
– Run:rmdir remote-directory &<1-10>The directory on the server is deleted.
– Run:mkdir remote-directoryA directory is created on the server.
l Perform one or multiple of the following operations as required.– Run:
rename old-name new-nameThe name of the specified file on the server is changed.
– Run:get remote-filename [ local-filename ]The file on the remote server is downloaded.
– Run:put local-filename [ remote-filename ]The local file is uploaded to the remote server.
– Run:rmdir remote-directory &<1-10>The file on the server is removed.
----End
S6700 Series Ethernet SwitchesConfiguration Guide - Basic Configuration 7 Managing the File System
Issue 05 (2013-04-10) Huawei Proprietary and ConfidentialCopyright © Huawei Technologies Co., Ltd.
141
7.4.9 Checking the ConfigurationsAfter using SFTP to manage files, you can view SSH user information and global configurationsfor the SSH server.
PrerequisitesSSH users have been configured.
Procedurel Run the display ssh user-information username command on the SSH server to check
information about the SSH client.l Run the display ssh server status command on the SSH server to check its global
configurations.l Run the display ssh server session command on the SSH server to check information about
connection sessions with SSH clients.
----End
ExampleRun the display ssh user-information username command. It shows that the SSH user namedclinet001 is authenticated by password.
[Quidway] display ssh user-information client001 User Name : client001 Authentication-type : password User-public-key-name : - User-public-key-type : RSA Sftp-directory : - Service-type : sftp Authorization-cmd : Yes
If no SSH user is specified, information about all SSH users logged in to an SSH server will bedisplayed.
Run the display ssh server status command to view global configurations of an SSH server.
<Quidway> display ssh server status<Quidway> display ssh server status SSH version : 1.99 SSH connection timeout : 60 seconds SSH server key generating interval : 2 hours SSH Authentication retries : 5 times SFTP server : Enable Stelnet server : Enable Scp server : Enable SSH server port : 55535
NOTE
If the default interception port is in use, information about the current interception port is not displayed.
Run the display ssh server session command to view information about sessions between theSSH server and SSH clients.
<Quidway> display ssh server sessionSession 2: Conn : VTY 4 Version : 2.0 State : started
S6700 Series Ethernet SwitchesConfiguration Guide - Basic Configuration 7 Managing the File System
Issue 05 (2013-04-10) Huawei Proprietary and ConfidentialCopyright © Huawei Technologies Co., Ltd.
142
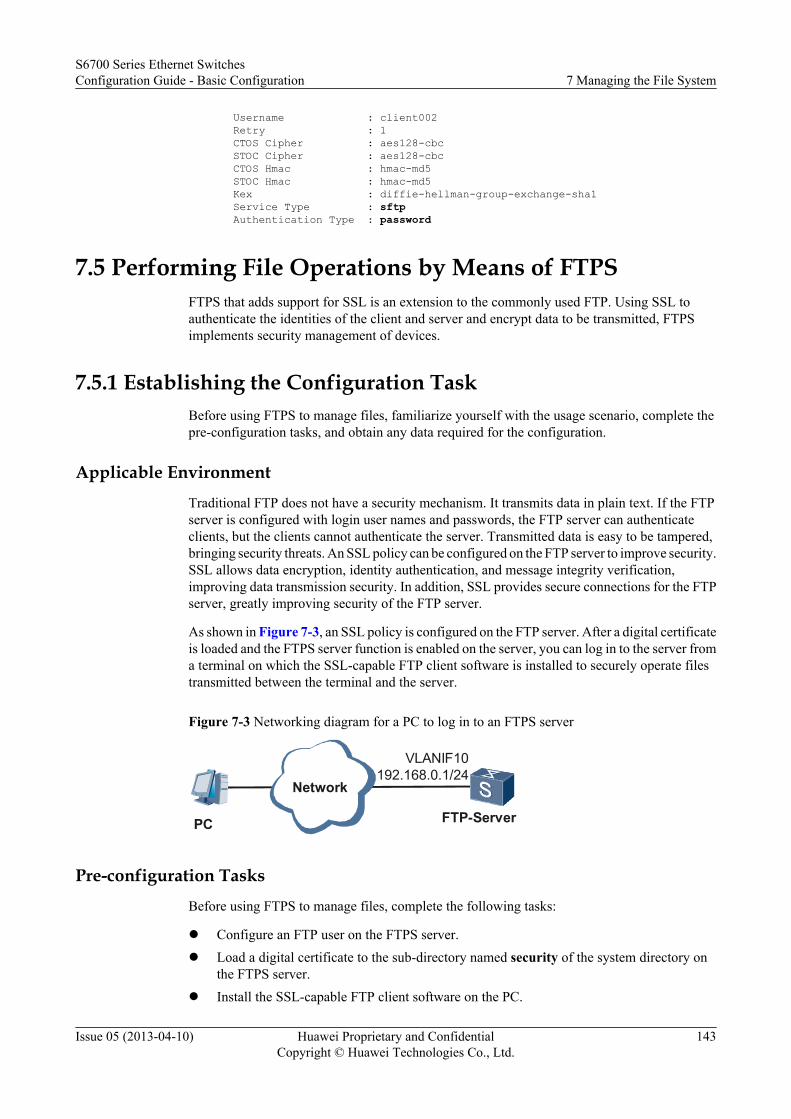
Username : client002 Retry : 1 CTOS Cipher : aes128-cbc STOC Cipher : aes128-cbc CTOS Hmac : hmac-md5 STOC Hmac : hmac-md5 Kex : diffie-hellman-group-exchange-sha1 Service Type : sftp Authentication Type : password
7.5 Performing File Operations by Means of FTPSFTPS that adds support for SSL is an extension to the commonly used FTP. Using SSL toauthenticate the identities of the client and server and encrypt data to be transmitted, FTPSimplements security management of devices.
7.5.1 Establishing the Configuration TaskBefore using FTPS to manage files, familiarize yourself with the usage scenario, complete thepre-configuration tasks, and obtain any data required for the configuration.
Applicable Environment
Traditional FTP does not have a security mechanism. It transmits data in plain text. If the FTPserver is configured with login user names and passwords, the FTP server can authenticateclients, but the clients cannot authenticate the server. Transmitted data is easy to be tampered,bringing security threats. An SSL policy can be configured on the FTP server to improve security.SSL allows data encryption, identity authentication, and message integrity verification,improving data transmission security. In addition, SSL provides secure connections for the FTPserver, greatly improving security of the FTP server.
As shown in Figure 7-3, an SSL policy is configured on the FTP server. After a digital certificateis loaded and the FTPS server function is enabled on the server, you can log in to the server froma terminal on which the SSL-capable FTP client software is installed to securely operate filestransmitted between the terminal and the server.
Figure 7-3 Networking diagram for a PC to log in to an FTPS server
Network
PC FTP-Server
VLANIF10192.168.0.1/24
Pre-configuration Tasks
Before using FTPS to manage files, complete the following tasks:
l Configure an FTP user on the FTPS server.l Load a digital certificate to the sub-directory named security of the system directory on
the FTPS server.l Install the SSL-capable FTP client software on the PC.
S6700 Series Ethernet SwitchesConfiguration Guide - Basic Configuration 7 Managing the File System
Issue 05 (2013-04-10) Huawei Proprietary and ConfidentialCopyright © Huawei Technologies Co., Ltd.
143
Data PreparationBefore using FTPS to manage files, you need the following data.
No. Data
1 SSL policy name and digital certificate
2 IP address of the FTPS server
7.5.2 Configuring an SSL Policy and Loading a Digital CertificateA client uses a digital certificate to authenticate the identity of a server for secure communication.
ContextThe FTPS server needs to obtain a digital certificate from a CA. The client that will access theserver needs the CA certificate from the CA to verify the validity of the digital certificate of theserver.
NOTE
A CA is responsible for issuing and managing digital certificates. The digital certificate to be loaded to theFTPS server must be obtained from a corresponding CA.
A digital certificate can be in the PEM, ASN1, or PFX format. Details are as follows:l The PEM format is most commonly used. The file name extension of a PEM digital
certificate is .pem.The PEM format is applicable to text transmission between systems.
l The ASN1 format is a universal digital certificate format. The file name extension of anASN1 digital certificate is .der.The ASN1 format is the default format for most browsers.
l The PFX format is a universal digital certificate format. The file name extension of a PFXdigital certificate is .pfx.The PFX format is a binary format that can be converted into the PEM or ASN1 format.
Perform the following steps on the device that functions as an FTPS server:
Procedure
Step 1 Run:system-view
The system view is displayed.
Step 2 Run:ssl policy policy-name
An SSL policy is configured and the SSL policy view is displayed.
Step 3 Load a digital certificate.
Run one of the following commands as required:
S6700 Series Ethernet SwitchesConfiguration Guide - Basic Configuration 7 Managing the File System
Issue 05 (2013-04-10) Huawei Proprietary and ConfidentialCopyright © Huawei Technologies Co., Ltd.
144
l Run:certificate load pem-cert cert-filename key-pair { dsa | rsa } key-file key-filename auth-code auth-codeA PEM digital certificate is loaded.
l Run:certificate load asn1-cert cert-filename key-pair { dsa | rsa } key-file key-filename
An ASN1 digital certificate is loaded.l Run:
certificate load pfx-cert cert-filename key-pair { dsa | rsa } { mac mac-code | key-file key-filename } auth-code auth-codeA PFX digital certificate is loaded.
l Run:certificate load pem-chain cert-filename key-pair { dsa | rsa } key-file key-filename auth-code auth-codeA PEM digital certificate chain is loaded.NOTE
Only one certificate or certificate chain can be loaded to an SSL policy. If a certificate or certificate chainhas been loaded, unload the certificate or certificate chain before loading a new certificate or certificatechain.
----End
7.5.3 Enabling the FTPS FunctionAfter a device is configured with an SSL policy and enabled with the FTPS server function, thedevice functions as an FTPS server to provide SSL-based FTP services.
ContextNOTE
Before enabling the FTPS server function, disable the FTP server function.
Perform the following steps on the device that functions as an FTPS server:
ProcedureStep 1 Run:
system-view
The system view is displayed.
Step 2 Run:ftp secure-server ssl-policy policy-name
An SSL policy is configured for the device.
Step 3 Run:ftp secure-server enable
The FTPS server function is enabled.
By default, the FTPS server function is disabled.
----End
S6700 Series Ethernet SwitchesConfiguration Guide - Basic Configuration 7 Managing the File System
Issue 05 (2013-04-10) Huawei Proprietary and ConfidentialCopyright © Huawei Technologies Co., Ltd.
145
7.5.4 Accessing an FTPS ServerYou can use a PC with the SSL-capable FTP client software or an FTPS client to access an FTPSserver for secure management of files on the FTPS server.
Before accessing an FTPS server, install the SSL-capable FTP client software on a PC, and thenuse a third-party software to log in to the FTPS server from the PC to securely manage files onthe FTPS server.
7.5.5 Checking the ConfigurationsAfter the configuration of login to an FTPS server from a user terminal is complete, you canview the SSL policy, digital certificate, and status of the FTPS server.
Prerequisites
Login to the devices by using FTPS has been configured.
Procedurel Run the display ssl policy command to check the configured SSL policy and loaded digital
certificate.
l Run the display ftp-server command to check the SSL policy name and the FTPS serverstatus.
----End
Example
Run the display ssl policy command on the FTPS server. The command output shows detailedinformation about the configured SSL policy and loaded digital certificate.<Quidway> display ssl policy SSL Policy Name: ftp_server Policy Applicants: FTP secure-server Key-pair Type: RSA Certificate File Type: PEM Certificate Type: certificate Certificate Filename: 1_servercert_pem_rsa.pem Key-file Filename: 1_serverkey_pem_rsa.pem Auth-code: 123456 MAC: CRL File: Trusted-CA File:
Run the display ftp-server command on the FTP server. The command output shows that theSSL policy name is ftp_server and the FTPS server is running.<Quidway> display ftp-server FTP server is stopped Max user number 5 User count 1 Timeout value(in minute) 30 Listening port 21 Acl number 0 FTP server's source address 0.0.0.0 FTP SSL policy ftp_server FTP Secure-server is running
S6700 Series Ethernet SwitchesConfiguration Guide - Basic Configuration 7 Managing the File System
Issue 05 (2013-04-10) Huawei Proprietary and ConfidentialCopyright © Huawei Technologies Co., Ltd.
146
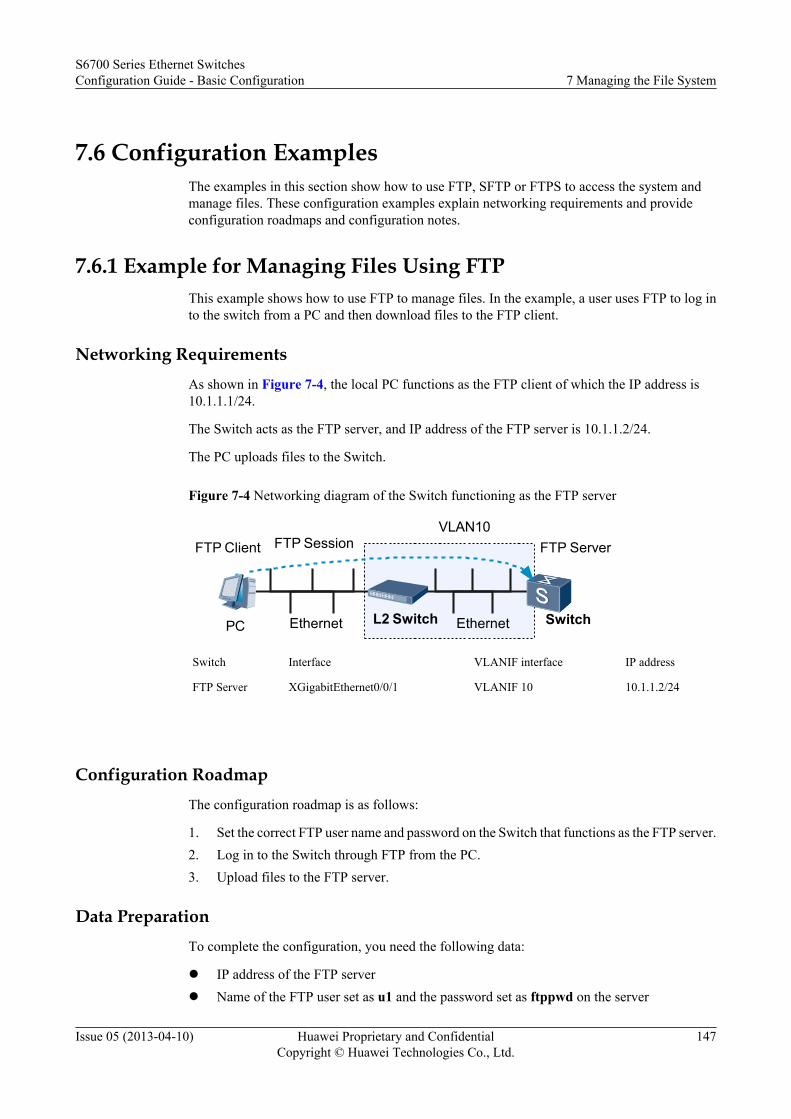
7.6 Configuration ExamplesThe examples in this section show how to use FTP, SFTP or FTPS to access the system andmanage files. These configuration examples explain networking requirements and provideconfiguration roadmaps and configuration notes.
7.6.1 Example for Managing Files Using FTPThis example shows how to use FTP to manage files. In the example, a user uses FTP to log into the switch from a PC and then download files to the FTP client.
Networking RequirementsAs shown in Figure 7-4, the local PC functions as the FTP client of which the IP address is10.1.1.1/24.
The Switch acts as the FTP server, and IP address of the FTP server is 10.1.1.2/24.
The PC uploads files to the Switch.
Figure 7-4 Networking diagram of the Switch functioning as the FTP server
VLAN10
PC
FTP Client FTP Server
L2 Switch Switch
FTP Session
Ethernet Ethernet
Switch Interface VLANIF interface IP address
FTP Server XGigabitEthernet0/0/1 VLANIF 10 10.1.1.2/24
Configuration RoadmapThe configuration roadmap is as follows:
1. Set the correct FTP user name and password on the Switch that functions as the FTP server.2. Log in to the Switch through FTP from the PC.3. Upload files to the FTP server.
Data PreparationTo complete the configuration, you need the following data:
l IP address of the FTP serverl Name of the FTP user set as u1 and the password set as ftppwd on the server
S6700 Series Ethernet SwitchesConfiguration Guide - Basic Configuration 7 Managing the File System
Issue 05 (2013-04-10) Huawei Proprietary and ConfidentialCopyright © Huawei Technologies Co., Ltd.
147
l Correct path of the source file on the PCl Name of the destination file and position where the destination files are located on the
Switch
Procedure
Step 1 Create VLAN 10 on the Switch and assign the IP address 10.1.1.2/24 to VLANIF 10.<Quidway> system-view[Quidway] vlan 10[Quidway-vlan10] quit[Quidway] interface xgigabitethernet 0/0/1[Quidway-XGigabitEthernet0/0/1] port hybrid pvid vlan 10[Quidway-XGigabitEthernet0/0/1] port hybrid untagged vlan 10[Quidway-XGigabitEthernet0/0/1] quit[Quidway] interface vlanif 10[Quidway-Vlanif10] ip address 10.1.1.2 24
Step 2 Start the FTP server on the Switch, and set the FTP user name to u1 and password to ftpwd.[Quidway] ftp server enable[Quidway] aaa[Quidway-aaa] local-user u1 password cipher ftppwd[Quidway-aaa] local-user u1 service-type ftp[Quidway-aaa] local-user u1 privilege level 15[Quidway-aaa] local-user u1 ftp-directory flash:/[Quidway-aaa] return
Step 3 On the PC, initiate a connection to the Switch with the user name u1 and the passwordftppwd.
Use Windows XP on the FTP client to illustrate the preceding operations.
C:\WINDOWS\Desktop> ftp 10.1.1.2Connected to 10.1.1.2.220 FTP service ready. User (10.1.1.1:(none)): u1331 Password required for u1Password:230 User logged in.ftp>
Step 4 Set the mode of transferring files to binary and the local directory on the PC.ftp> binary200 Type set to I.ftp> lcd c:\tempLocal directory now C:\temp.
Step 5 Upload d006.cc and vrpcfg.cfg to the Switch on the PC.ftp> put d006.cc d006.cc200 Port command okay.150 Opening BINARY mode data connection for d006.cc.ftp> put vrpcfg.cfg vrpcfg.cfg200 Port command okay.150 Opening BINARY mode data connection for vrpcfg.cfg.ftp> quitC:\WINDOWS\Desktop>
----End
Configuration Files# sysname Quidway# FTP server enable
S6700 Series Ethernet SwitchesConfiguration Guide - Basic Configuration 7 Managing the File System
Issue 05 (2013-04-10) Huawei Proprietary and ConfidentialCopyright © Huawei Technologies Co., Ltd.
148
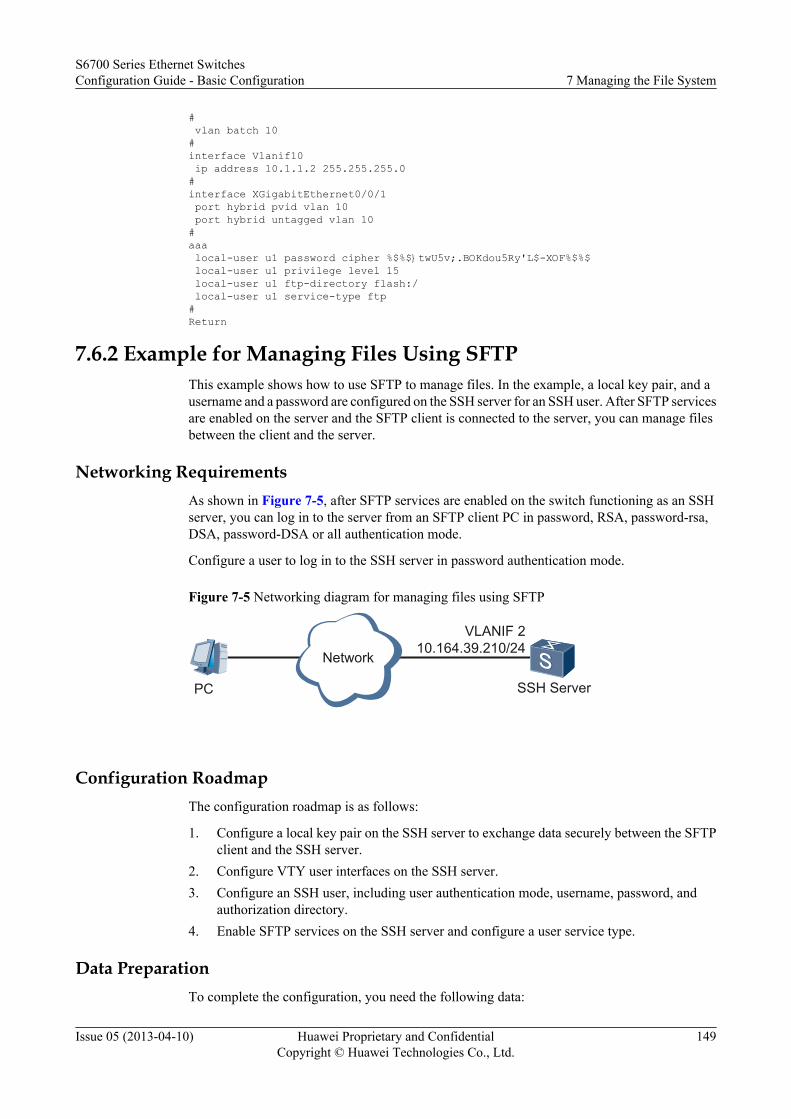
# vlan batch 10#interface Vlanif10 ip address 10.1.1.2 255.255.255.0#interface XGigabitEthernet0/0/1 port hybrid pvid vlan 10 port hybrid untagged vlan 10#aaa local-user u1 password cipher %$%$}twU5v;.BOKdou5Ry'L$-XOF%$%$ local-user u1 privilege level 15 local-user u1 ftp-directory flash:/ local-user u1 service-type ftp#Return
7.6.2 Example for Managing Files Using SFTPThis example shows how to use SFTP to manage files. In the example, a local key pair, and ausername and a password are configured on the SSH server for an SSH user. After SFTP servicesare enabled on the server and the SFTP client is connected to the server, you can manage filesbetween the client and the server.
Networking RequirementsAs shown in Figure 7-5, after SFTP services are enabled on the switch functioning as an SSHserver, you can log in to the server from an SFTP client PC in password, RSA, password-rsa,DSA, password-DSA or all authentication mode.
Configure a user to log in to the SSH server in password authentication mode.
Figure 7-5 Networking diagram for managing files using SFTP
Network
PC SSH Server
VLANIF 210.164.39.210/24
Configuration RoadmapThe configuration roadmap is as follows:
1. Configure a local key pair on the SSH server to exchange data securely between the SFTPclient and the SSH server.
2. Configure VTY user interfaces on the SSH server.3. Configure an SSH user, including user authentication mode, username, password, and
authorization directory.4. Enable SFTP services on the SSH server and configure a user service type.
Data PreparationTo complete the configuration, you need the following data:
S6700 Series Ethernet SwitchesConfiguration Guide - Basic Configuration 7 Managing the File System
Issue 05 (2013-04-10) Huawei Proprietary and ConfidentialCopyright © Huawei Technologies Co., Ltd.
149
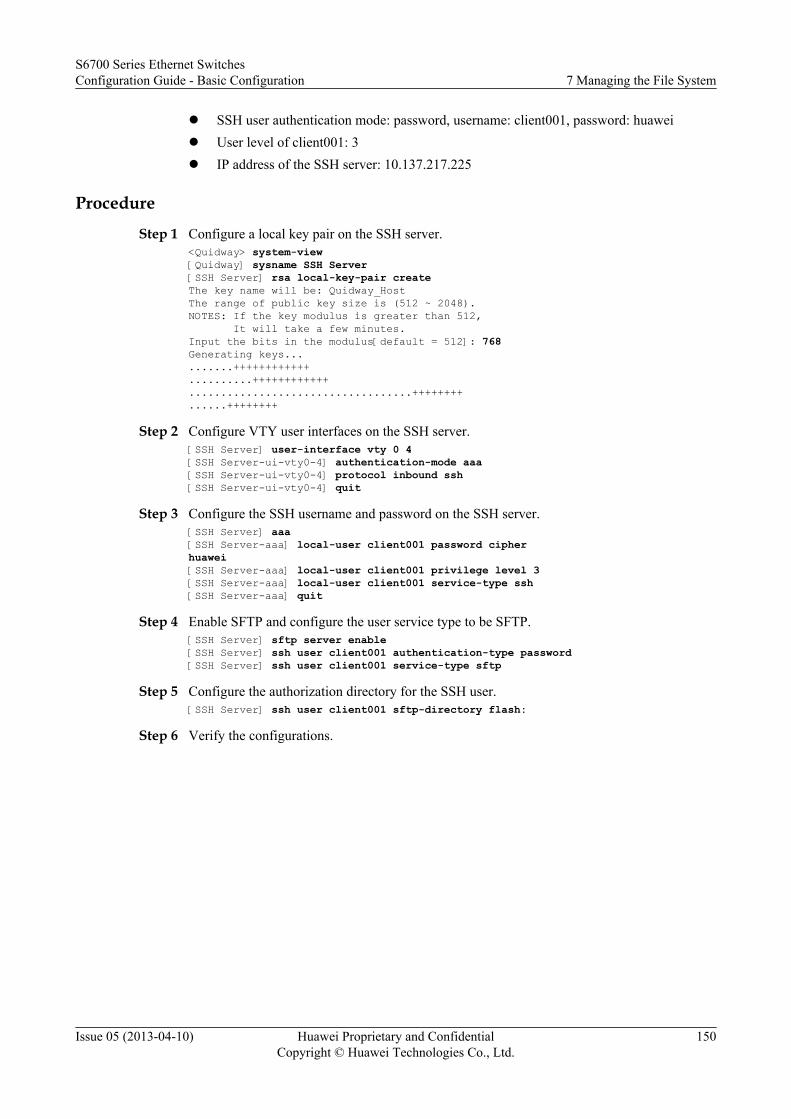
l SSH user authentication mode: password, username: client001, password: huaweil User level of client001: 3l IP address of the SSH server: 10.137.217.225
Procedure
Step 1 Configure a local key pair on the SSH server.<Quidway> system-view[Quidway] sysname SSH Server[SSH Server] rsa local-key-pair createThe key name will be: Quidway_HostThe range of public key size is (512 ~ 2048).NOTES: If the key modulus is greater than 512, It will take a few minutes.Input the bits in the modulus[default = 512]: 768Generating keys..........++++++++++++..........++++++++++++...................................++++++++......++++++++
Step 2 Configure VTY user interfaces on the SSH server.[SSH Server] user-interface vty 0 4[SSH Server-ui-vty0-4] authentication-mode aaa[SSH Server-ui-vty0-4] protocol inbound ssh[SSH Server-ui-vty0-4] quit
Step 3 Configure the SSH username and password on the SSH server.[SSH Server] aaa[SSH Server-aaa] local-user client001 password cipher huawei[SSH Server-aaa] local-user client001 privilege level 3[SSH Server-aaa] local-user client001 service-type ssh[SSH Server-aaa] quit
Step 4 Enable SFTP and configure the user service type to be SFTP.[SSH Server] sftp server enable[SSH Server] ssh user client001 authentication-type password [SSH Server] ssh user client001 service-type sftp
Step 5 Configure the authorization directory for the SSH user.[SSH Server] ssh user client001 sftp-directory flash:
Step 6 Verify the configurations.
S6700 Series Ethernet SwitchesConfiguration Guide - Basic Configuration 7 Managing the File System
Issue 05 (2013-04-10) Huawei Proprietary and ConfidentialCopyright © Huawei Technologies Co., Ltd.
150
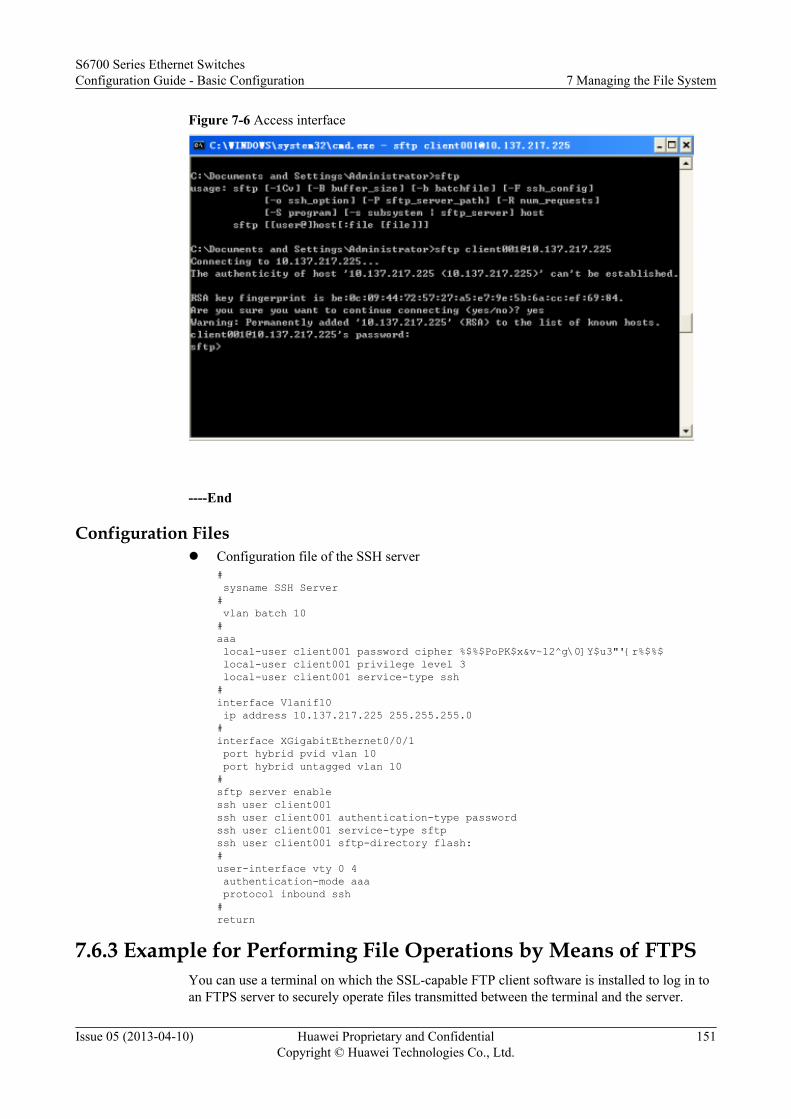
Figure 7-6 Access interface
----End
Configuration Filesl Configuration file of the SSH server
# sysname SSH Server# vlan batch 10#aaa local-user client001 password cipher %$%$PoPK$x&v~12^g\0]Y$u3"'{r%$%$ local-user client001 privilege level 3 local-user client001 service-type ssh#interface Vlanif10 ip address 10.137.217.225 255.255.255.0#interface XGigabitEthernet0/0/1 port hybrid pvid vlan 10 port hybrid untagged vlan 10#sftp server enablessh user client001ssh user client001 authentication-type passwordssh user client001 service-type sftpssh user client001 sftp-directory flash:#user-interface vty 0 4 authentication-mode aaa protocol inbound ssh#return
7.6.3 Example for Performing File Operations by Means of FTPSYou can use a terminal on which the SSL-capable FTP client software is installed to log in toan FTPS server to securely operate files transmitted between the terminal and the server.
S6700 Series Ethernet SwitchesConfiguration Guide - Basic Configuration 7 Managing the File System
Issue 05 (2013-04-10) Huawei Proprietary and ConfidentialCopyright © Huawei Technologies Co., Ltd.
151
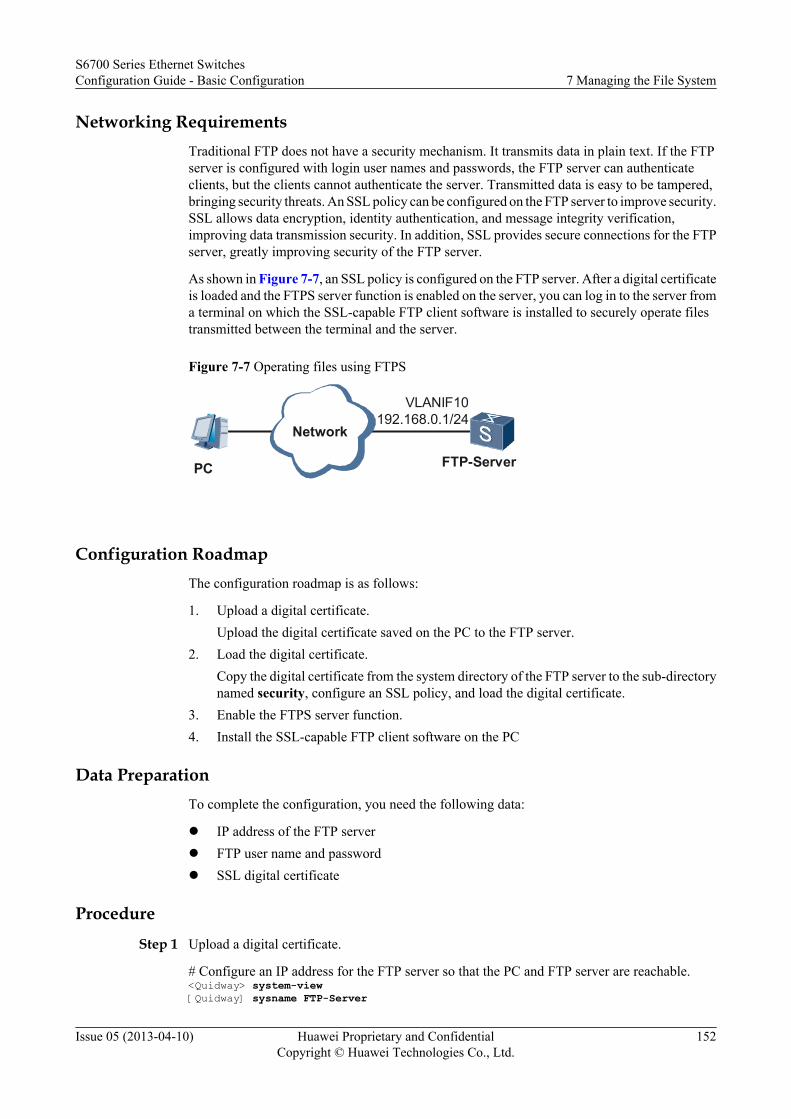
Networking RequirementsTraditional FTP does not have a security mechanism. It transmits data in plain text. If the FTPserver is configured with login user names and passwords, the FTP server can authenticateclients, but the clients cannot authenticate the server. Transmitted data is easy to be tampered,bringing security threats. An SSL policy can be configured on the FTP server to improve security.SSL allows data encryption, identity authentication, and message integrity verification,improving data transmission security. In addition, SSL provides secure connections for the FTPserver, greatly improving security of the FTP server.
As shown in Figure 7-7, an SSL policy is configured on the FTP server. After a digital certificateis loaded and the FTPS server function is enabled on the server, you can log in to the server froma terminal on which the SSL-capable FTP client software is installed to securely operate filestransmitted between the terminal and the server.
Figure 7-7 Operating files using FTPS
Network
PC FTP-Server
VLANIF10192.168.0.1/24
Configuration RoadmapThe configuration roadmap is as follows:
1. Upload a digital certificate.Upload the digital certificate saved on the PC to the FTP server.
2. Load the digital certificate.Copy the digital certificate from the system directory of the FTP server to the sub-directorynamed security, configure an SSL policy, and load the digital certificate.
3. Enable the FTPS server function.4. Install the SSL-capable FTP client software on the PC
Data PreparationTo complete the configuration, you need the following data:
l IP address of the FTP serverl FTP user name and passwordl SSL digital certificate
Procedure
Step 1 Upload a digital certificate.
# Configure an IP address for the FTP server so that the PC and FTP server are reachable.<Quidway> system-view[Quidway] sysname FTP-Server
S6700 Series Ethernet SwitchesConfiguration Guide - Basic Configuration 7 Managing the File System
Issue 05 (2013-04-10) Huawei Proprietary and ConfidentialCopyright © Huawei Technologies Co., Ltd.
152
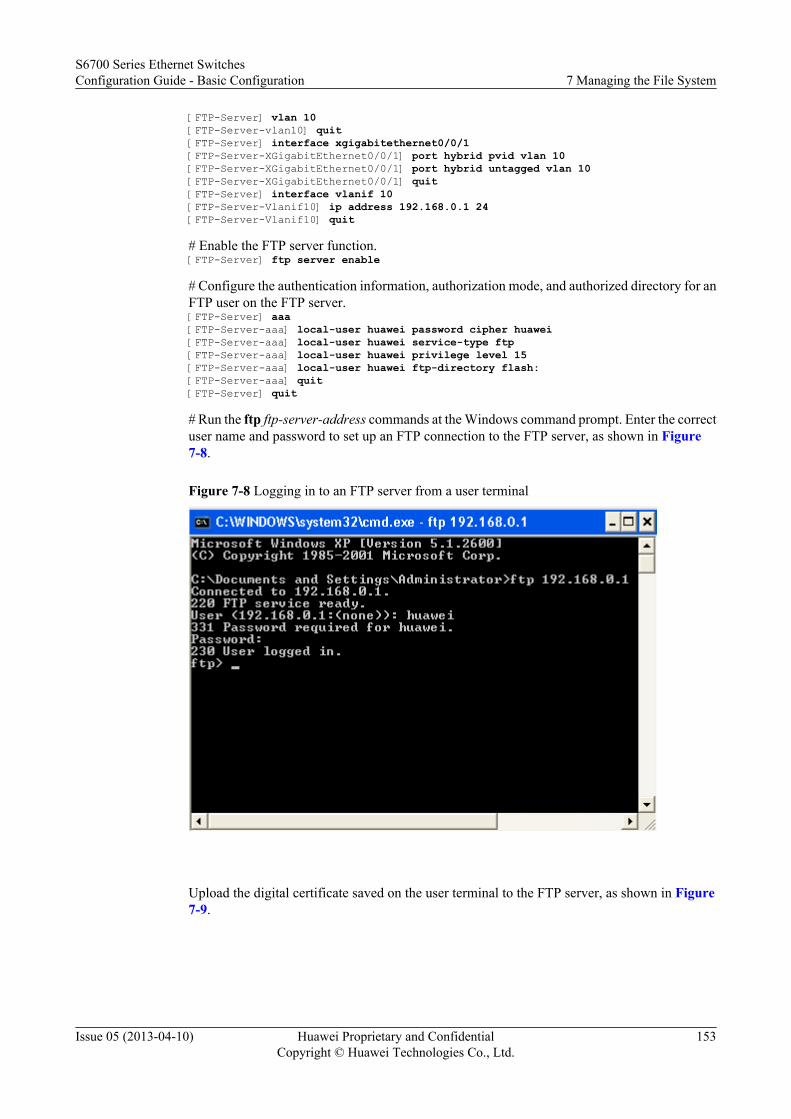
[FTP-Server] vlan 10[FTP-Server-vlan10] quit[FTP-Server] interface xgigabitethernet0/0/1[FTP-Server-XGigabitEthernet0/0/1] port hybrid pvid vlan 10[FTP-Server-XGigabitEthernet0/0/1] port hybrid untagged vlan 10[FTP-Server-XGigabitEthernet0/0/1] quit[FTP-Server] interface vlanif 10[FTP-Server-Vlanif10] ip address 192.168.0.1 24[FTP-Server-Vlanif10] quit
# Enable the FTP server function.[FTP-Server] ftp server enable
# Configure the authentication information, authorization mode, and authorized directory for anFTP user on the FTP server.[FTP-Server] aaa[FTP-Server-aaa] local-user huawei password cipher huawei[FTP-Server-aaa] local-user huawei service-type ftp[FTP-Server-aaa] local-user huawei privilege level 15[FTP-Server-aaa] local-user huawei ftp-directory flash:[FTP-Server-aaa] quit[FTP-Server] quit
# Run the ftp ftp-server-address commands at the Windows command prompt. Enter the correctuser name and password to set up an FTP connection to the FTP server, as shown in Figure7-8.
Figure 7-8 Logging in to an FTP server from a user terminal
Upload the digital certificate saved on the user terminal to the FTP server, as shown in Figure7-9.
S6700 Series Ethernet SwitchesConfiguration Guide - Basic Configuration 7 Managing the File System
Issue 05 (2013-04-10) Huawei Proprietary and ConfidentialCopyright © Huawei Technologies Co., Ltd.
153
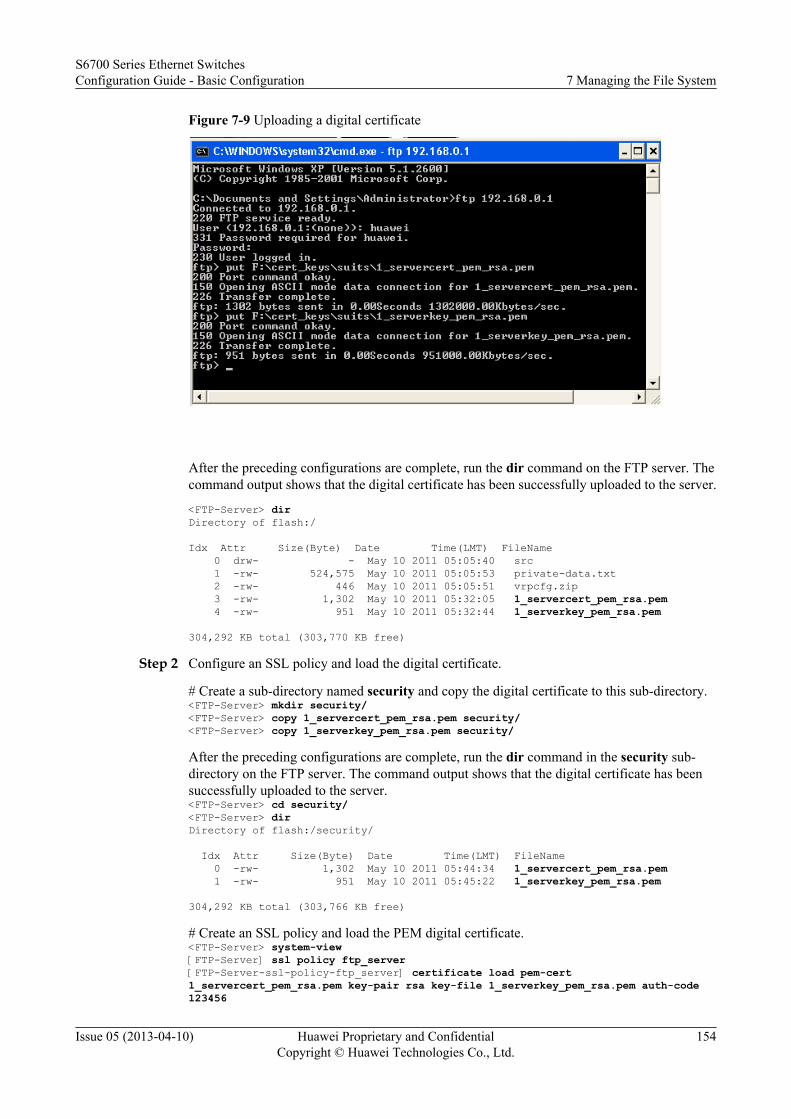
Figure 7-9 Uploading a digital certificate
After the preceding configurations are complete, run the dir command on the FTP server. Thecommand output shows that the digital certificate has been successfully uploaded to the server.
<FTP-Server> dirDirectory of flash:/
Idx Attr Size(Byte) Date Time(LMT) FileName 0 drw- - May 10 2011 05:05:40 src 1 -rw- 524,575 May 10 2011 05:05:53 private-data.txt 2 -rw- 446 May 10 2011 05:05:51 vrpcfg.zip 3 -rw- 1,302 May 10 2011 05:32:05 1_servercert_pem_rsa.pem 4 -rw- 951 May 10 2011 05:32:44 1_serverkey_pem_rsa.pem
304,292 KB total (303,770 KB free)
Step 2 Configure an SSL policy and load the digital certificate.
# Create a sub-directory named security and copy the digital certificate to this sub-directory.<FTP-Server> mkdir security/<FTP-Server> copy 1_servercert_pem_rsa.pem security/<FTP-Server> copy 1_serverkey_pem_rsa.pem security/
After the preceding configurations are complete, run the dir command in the security sub-directory on the FTP server. The command output shows that the digital certificate has beensuccessfully uploaded to the server.<FTP-Server> cd security/<FTP-Server> dirDirectory of flash:/security/
Idx Attr Size(Byte) Date Time(LMT) FileName 0 -rw- 1,302 May 10 2011 05:44:34 1_servercert_pem_rsa.pem 1 -rw- 951 May 10 2011 05:45:22 1_serverkey_pem_rsa.pem
304,292 KB total (303,766 KB free)
# Create an SSL policy and load the PEM digital certificate.<FTP-Server> system-view[FTP-Server] ssl policy ftp_server[FTP-Server-ssl-policy-ftp_server] certificate load pem-cert 1_servercert_pem_rsa.pem key-pair rsa key-file 1_serverkey_pem_rsa.pem auth-code 123456
S6700 Series Ethernet SwitchesConfiguration Guide - Basic Configuration 7 Managing the File System
Issue 05 (2013-04-10) Huawei Proprietary and ConfidentialCopyright © Huawei Technologies Co., Ltd.
154
[FTP-Server-ssl-policy-ftp_server] quit
Step 3 Enable the FTPS server function.NOTE
Before enabling the FTPS server function, disable the FTP server function.[FTP-Server] undo ftp server[FTP-Server] ftp secure-server ssl-policy ftp_server[FTP-Server] ftp secure-server enable
Step 4 Install the SSL-capable FTP client software on the PC.For details about the operation procedure, see the help document about the third-party software.
Step 5 Verify the configuration.
# Run the display ssl policy command on the FTPS server. The command output shows detailedinformation about the loaded certificate.
[FTP-Server] display ssl policy SSL Policy Name: ftp_server Policy Applicants: FTP secure-server Key-pair Type: RSA Certificate File Type: PEM Certificate Type: certificate Certificate Filename: 1_servercert_pem_rsa.pem Key-file Filename: 1_serverkey_pem_rsa.pem Auth-code: 123456 MAC: CRL File: Trusted-CA File:
# Run the display ftp-server command on the FTPS server. The command output shows thatthe configured SSL policy name is ftp_server and the FTPS server is running.
[FTP-Server] display ftp-server FTP server is stopped Max user number 5 User count 1 Timeout value(in minute) 30 Listening port 21 Acl number 0 FTP server's source address 0.0.0.0 FTP SSL policy ftp_server FTP Secure-server is running
You can establish a connection with the FTPS server using the SSL-capable FTP client softwareand upload files to and download files from the server.
----End
Configuration FilesConfiguration file of the FTPS server# sysname FTP-Server# FTP secure-server enable ftp secure-server ssl-policy ftp_server# vlan batch 10#ssl policy ftp_server certificate load pem-cert 1_servercert_pem_rsa.pem key-pair rsa key-file 1_serverkey_pem_rsa.pem auth-code 123456#aaa
S6700 Series Ethernet SwitchesConfiguration Guide - Basic Configuration 7 Managing the File System
Issue 05 (2013-04-10) Huawei Proprietary and ConfidentialCopyright © Huawei Technologies Co., Ltd.
155

authentication-scheme default authorization-scheme default accounting-scheme default local-user huawei password cipher %$%$}twU5v;.BOKdou5Ry'L$-XOF%$%$ local-user huawei service-type ftp local-user huawei privilege level 15 local-user huawei ftp-directory flash:/#interface Vlanif10 ip address 192.168.0.1 255.255.255.0 #interface XGigabitEthernet0/0/1 port hybrid pvid vlan 10 port hybrid untagged vlan 10#return
S6700 Series Ethernet SwitchesConfiguration Guide - Basic Configuration 7 Managing the File System
Issue 05 (2013-04-10) Huawei Proprietary and ConfidentialCopyright © Huawei Technologies Co., Ltd.
156
8 Configuring System Startup
About This Chapter
When the switch is powered on, system software starts and configuration files are loaded. Toensure smooth running of the switch, you need to manage system software and configurationfiles efficiently.
8.1 System Startup OverviewWhen the switch is powered on, system software starts and configuration files are loaded.
8.2 Managing Configuration FilesYou can manage the configuration files for the current and next startup operations on theswitch.
8.3 Specifying a File for System StartupYou can specify a file to be used for system startup by specifying the system software andconfiguration file for the next startup of the switch.
8.4 Configuration ExamplesThe example in this section shows how to configure system startup. The example explainsnetworking requirements, and provides a configuration roadmap and configuration notes.
S6700 Series Ethernet SwitchesConfiguration Guide - Basic Configuration 8 Configuring System Startup
Issue 05 (2013-04-10) Huawei Proprietary and ConfidentialCopyright © Huawei Technologies Co., Ltd.
157
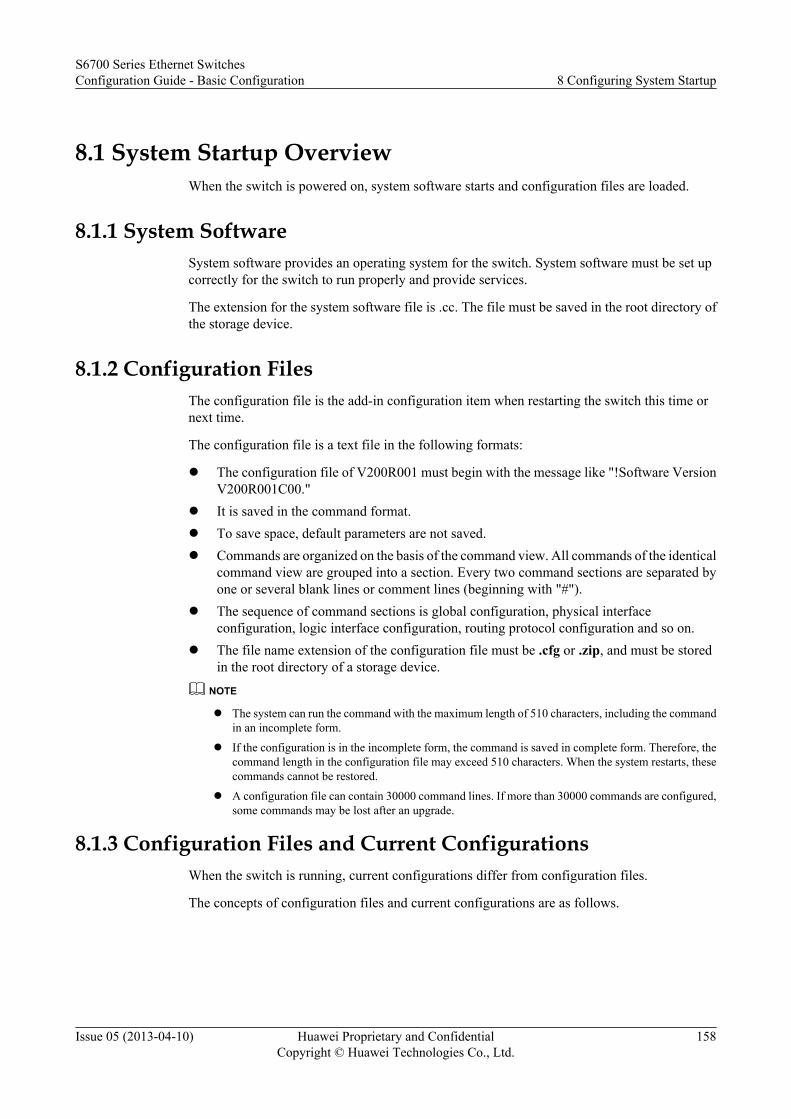
8.1 System Startup OverviewWhen the switch is powered on, system software starts and configuration files are loaded.
8.1.1 System SoftwareSystem software provides an operating system for the switch. System software must be set upcorrectly for the switch to run properly and provide services.
The extension for the system software file is .cc. The file must be saved in the root directory ofthe storage device.
8.1.2 Configuration FilesThe configuration file is the add-in configuration item when restarting the switch this time ornext time.
The configuration file is a text file in the following formats:
l The configuration file of V200R001 must begin with the message like "!Software VersionV200R001C00."
l It is saved in the command format.l To save space, default parameters are not saved.l Commands are organized on the basis of the command view. All commands of the identical
command view are grouped into a section. Every two command sections are separated byone or several blank lines or comment lines (beginning with "#").
l The sequence of command sections is global configuration, physical interfaceconfiguration, logic interface configuration, routing protocol configuration and so on.
l The file name extension of the configuration file must be .cfg or .zip, and must be storedin the root directory of a storage device.
NOTE
l The system can run the command with the maximum length of 510 characters, including the commandin an incomplete form.
l If the configuration is in the incomplete form, the command is saved in complete form. Therefore, thecommand length in the configuration file may exceed 510 characters. When the system restarts, thesecommands cannot be restored.
l A configuration file can contain 30000 command lines. If more than 30000 commands are configured,some commands may be lost after an upgrade.
8.1.3 Configuration Files and Current ConfigurationsWhen the switch is running, current configurations differ from configuration files.
The concepts of configuration files and current configurations are as follows.
S6700 Series Ethernet SwitchesConfiguration Guide - Basic Configuration 8 Configuring System Startup
Issue 05 (2013-04-10) Huawei Proprietary and ConfidentialCopyright © Huawei Technologies Co., Ltd.
158
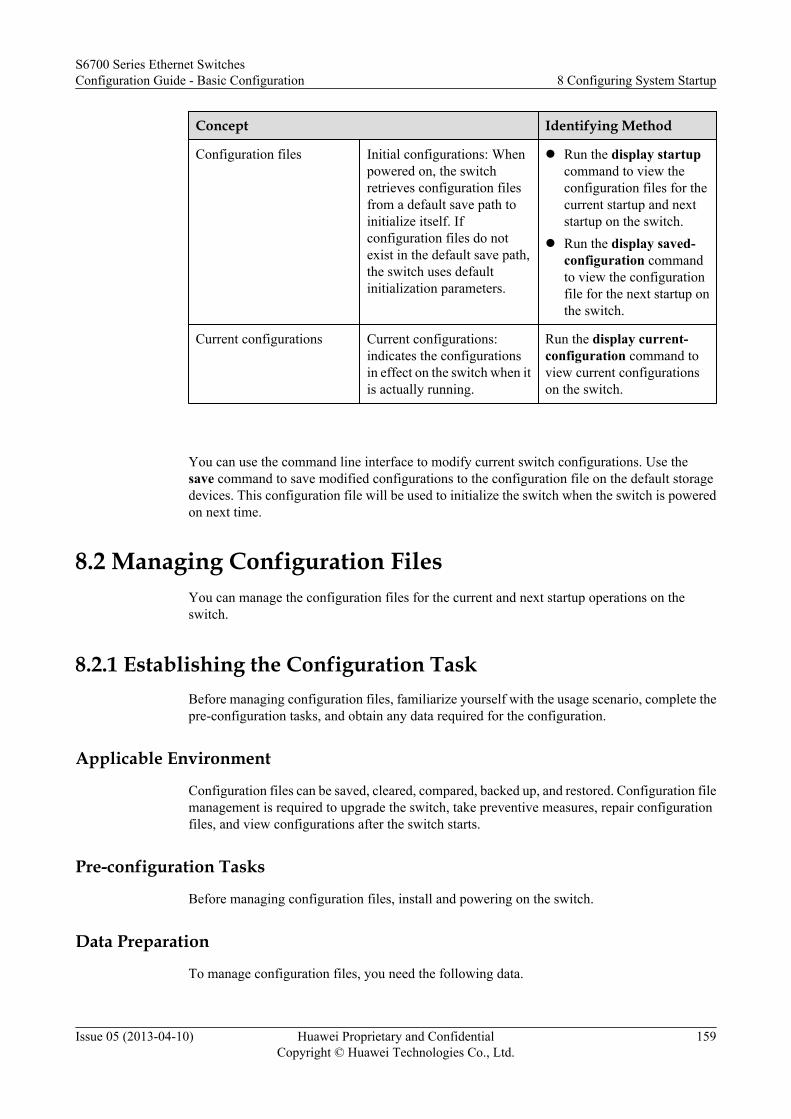
Concept Identifying Method
Configuration files Initial configurations: Whenpowered on, the switchretrieves configuration filesfrom a default save path toinitialize itself. Ifconfiguration files do notexist in the default save path,the switch uses defaultinitialization parameters.
l Run the display startupcommand to view theconfiguration files for thecurrent startup and nextstartup on the switch.
l Run the display saved-configuration commandto view the configurationfile for the next startup onthe switch.
Current configurations Current configurations:indicates the configurationsin effect on the switch when itis actually running.
Run the display current-configuration command toview current configurationson the switch.
You can use the command line interface to modify current switch configurations. Use thesave command to save modified configurations to the configuration file on the default storagedevices. This configuration file will be used to initialize the switch when the switch is poweredon next time.
8.2 Managing Configuration FilesYou can manage the configuration files for the current and next startup operations on theswitch.
8.2.1 Establishing the Configuration TaskBefore managing configuration files, familiarize yourself with the usage scenario, complete thepre-configuration tasks, and obtain any data required for the configuration.
Applicable Environment
Configuration files can be saved, cleared, compared, backed up, and restored. Configuration filemanagement is required to upgrade the switch, take preventive measures, repair configurationfiles, and view configurations after the switch starts.
Pre-configuration Tasks
Before managing configuration files, install and powering on the switch.
Data Preparation
To manage configuration files, you need the following data.
S6700 Series Ethernet SwitchesConfiguration Guide - Basic Configuration 8 Configuring System Startup
Issue 05 (2013-04-10) Huawei Proprietary and ConfidentialCopyright © Huawei Technologies Co., Ltd.
159
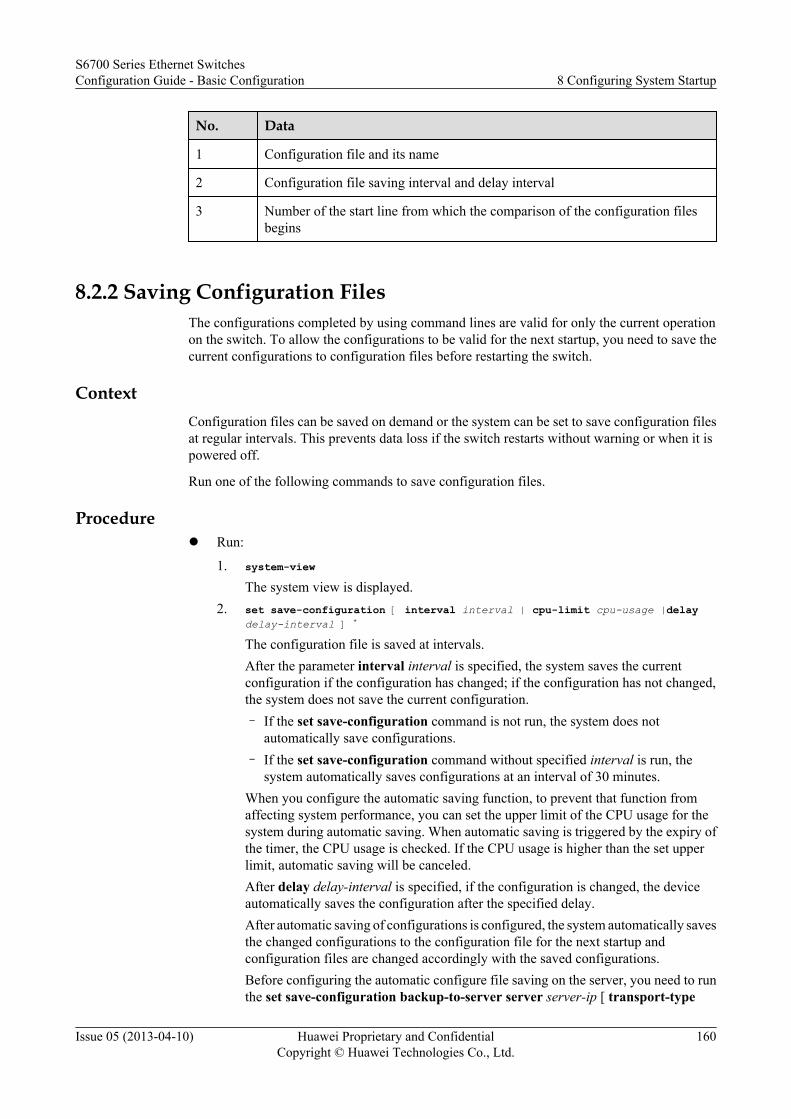
No. Data
1 Configuration file and its name
2 Configuration file saving interval and delay interval
3 Number of the start line from which the comparison of the configuration filesbegins
8.2.2 Saving Configuration FilesThe configurations completed by using command lines are valid for only the current operationon the switch. To allow the configurations to be valid for the next startup, you need to save thecurrent configurations to configuration files before restarting the switch.
ContextConfiguration files can be saved on demand or the system can be set to save configuration filesat regular intervals. This prevents data loss if the switch restarts without warning or when it ispowered off.
Run one of the following commands to save configuration files.
Procedurel Run:
1. system-viewThe system view is displayed.
2. set save-configuration [ interval interval | cpu-limit cpu-usage |delay delay-interval ] *
The configuration file is saved at intervals.After the parameter interval interval is specified, the system saves the currentconfiguration if the configuration has changed; if the configuration has not changed,the system does not save the current configuration.– If the set save-configuration command is not run, the system does not
automatically save configurations.– If the set save-configuration command without specified interval is run, the
system automatically saves configurations at an interval of 30 minutes.When you configure the automatic saving function, to prevent that function fromaffecting system performance, you can set the upper limit of the CPU usage for thesystem during automatic saving. When automatic saving is triggered by the expiry ofthe timer, the CPU usage is checked. If the CPU usage is higher than the set upperlimit, automatic saving will be canceled.After delay delay-interval is specified, if the configuration is changed, the deviceautomatically saves the configuration after the specified delay.After automatic saving of configurations is configured, the system automatically savesthe changed configurations to the configuration file for the next startup andconfiguration files are changed accordingly with the saved configurations.Before configuring the automatic configure file saving on the server, you need to runthe set save-configuration backup-to-server server server-ip [ transport-type
S6700 Series Ethernet SwitchesConfiguration Guide - Basic Configuration 8 Configuring System Startup
Issue 05 (2013-04-10) Huawei Proprietary and ConfidentialCopyright © Huawei Technologies Co., Ltd.
160
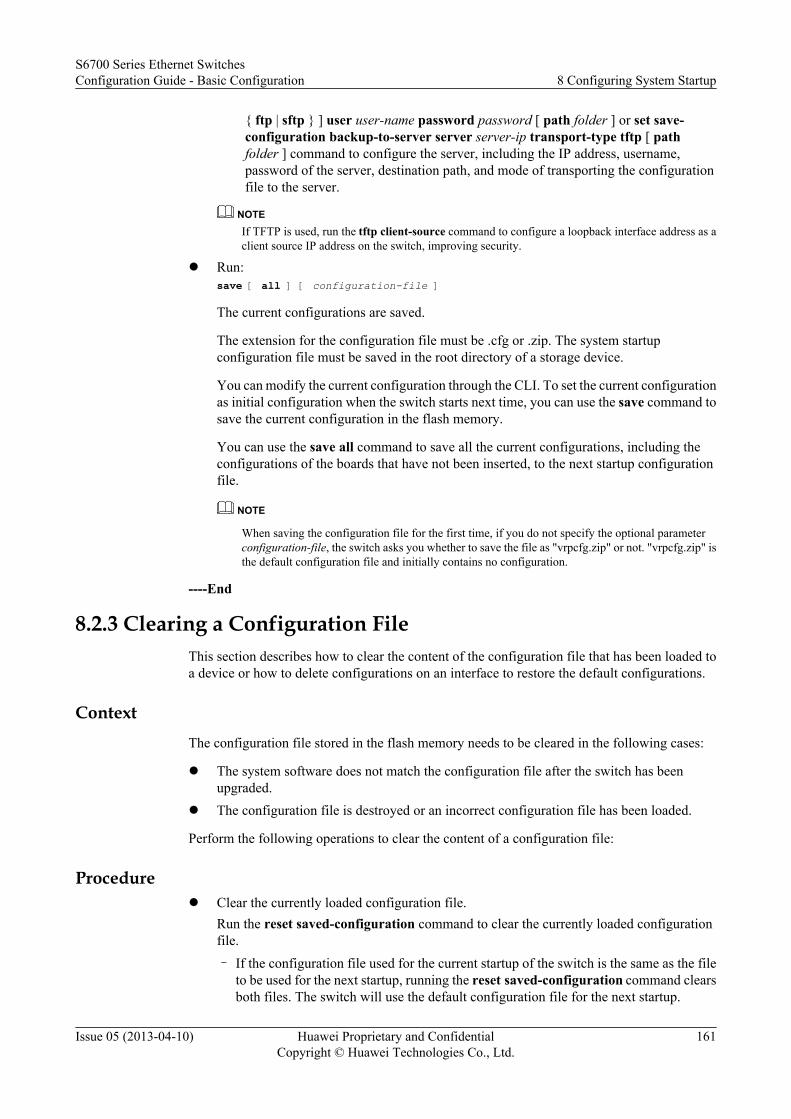
{ ftp | sftp } ] user user-name password password [ path folder ] or set save-configuration backup-to-server server server-ip transport-type tftp [ pathfolder ] command to configure the server, including the IP address, username,password of the server, destination path, and mode of transporting the configurationfile to the server.
NOTEIf TFTP is used, run the tftp client-source command to configure a loopback interface address as aclient source IP address on the switch, improving security.
l Run:save [ all ] [ configuration-file ]
The current configurations are saved.
The extension for the configuration file must be .cfg or .zip. The system startupconfiguration file must be saved in the root directory of a storage device.
You can modify the current configuration through the CLI. To set the current configurationas initial configuration when the switch starts next time, you can use the save command tosave the current configuration in the flash memory.
You can use the save all command to save all the current configurations, including theconfigurations of the boards that have not been inserted, to the next startup configurationfile.
NOTE
When saving the configuration file for the first time, if you do not specify the optional parameterconfiguration-file, the switch asks you whether to save the file as "vrpcfg.zip" or not. "vrpcfg.zip" isthe default configuration file and initially contains no configuration.
----End
8.2.3 Clearing a Configuration FileThis section describes how to clear the content of the configuration file that has been loaded toa device or how to delete configurations on an interface to restore the default configurations.
ContextThe configuration file stored in the flash memory needs to be cleared in the following cases:
l The system software does not match the configuration file after the switch has beenupgraded.
l The configuration file is destroyed or an incorrect configuration file has been loaded.
Perform the following operations to clear the content of a configuration file:
Procedurel Clear the currently loaded configuration file.
Run the reset saved-configuration command to clear the currently loaded configurationfile.– If the configuration file used for the current startup of the switch is the same as the file
to be used for the next startup, running the reset saved-configuration command clearsboth files. The switch will use the default configuration file for the next startup.
S6700 Series Ethernet SwitchesConfiguration Guide - Basic Configuration 8 Configuring System Startup
Issue 05 (2013-04-10) Huawei Proprietary and ConfidentialCopyright © Huawei Technologies Co., Ltd.
161
– If the configuration file used for the current startup of the switch is different from thefile to be used for the next startup, running the reset saved-configuration commandclears the configuration file used for the current startup.
– If you run the reset saved-configuration command and the configuration file used forthe current startup of the switch is empty, the system will prompt that the configurationfile does not exist.
CAUTIONl Exercise caution when running this command. If necessary, do it under the guidance of
Huawei technical support personnel.l After the contents of a configuration file are cleared, the empty configuration file with
the original file name is left.l After the configuration file is cleared, if you do not run the startup saved-
configuration configuration-file command to specify a new configuration file, or donot run the save command to save the configuration file, the switch will use the defaultconfiguration file at the next startup.
l Clear the configurations of a specified interface.
1. Run the system-view command to enter the system view.2. Run the clear configuration interface interface-type interface-number command to
clear the configurations of the specified interface.
----End
8.2.4 Comparing Configuration FilesYou can determine whether the current configuration file is the same as the one for the nextstartup or a specified one on the switch by comparing them.
ContextYou can determine whether to specify the current configuration file as the one for the next startupby comparing the current configuration file with the one for the next startup.
Procedurel Run:
compare configuration [ configuration-file ] [ current-line-number save-line-number ]
The current configuration is compared with the configuration file for next startup.
– If configuration-file is configured, the system checks whether the current configurationfile is the same as the specified configuration file.
– If no parameter is set, the comparison begins with the first lines of configuration files.If values for current-line-number and save-line-number are set, the comparisoncontinues by ignoring differences between the configuration files.
The system begins to display the content of a current and a saved configuration file fromthe first line of the two files that is different. Beginning with this line, 150 characters are
S6700 Series Ethernet SwitchesConfiguration Guide - Basic Configuration 8 Configuring System Startup
Issue 05 (2013-04-10) Huawei Proprietary and ConfidentialCopyright © Huawei Technologies Co., Ltd.
162
displayed by default for each of the files. If there are fewer than 150 characters remainingafter the first line with a difference, all remaining content in the files is displayed.
NOTE
When trying to compare configuration files, if the configuration file for next startup is unavailableor its content is empty, the system prompts that reading files fails.
----End
8.2.5 Backing Up the Configuration Files
ContextYou can back up the configuration files by using the following ways:
Procedurel Copying the screen directly
In the CLI, run the display current-configuration command. Copy all the display to txtdocuments, then back up the configuration files to the hard disk of the maintenance terminal.
l Backing up the configuration files through TFTP1. Copy the configuration files in the Flash directly.
This action is to back up the current configuration files that are stored in the Flash ofthe device.
After startup of the device, use the following commands to back up the configurationfiles in the Flash of the device.
<Quidway> save flash:/config.cfgThe current configuration will be written to the device.Are you sure to continue?[Y/N]:yNow saving the current configuration to the slot 0.Info: Save the configuration successfully. <Quidway> copy config.cfg flash:/backup.cfgCopy flash:/config.cfg to flash:/backup.cfg?[Y/N]:y100% complete/Info: Copied file flash:/config.cfg to flash:/backup.cfg...Done.
2. Assign an IP address for the device.
The device acts as the TFTP client.
Connect the device to the maintenance terminal. Establish the Telnet environment andassign an IP addresses for the interface. A reachable route must exist between theTFTP client and the TFTP server.
3. Start the TFTP server application program.
Start the TFTP server application in the PC. Set the path, the IP address, and the portnumber of the TFTP server to download the configuration files.
4. Transfer the configuration files.
In the user view, run the tftp command.
<Quidway> tftp 10.110.24.209 put config.cfgInfo: Transfer file in binary mode.Uploading the file to the remote TFTP server. Please wait.../TFTP: Uploading the file successfully. 3501 bytes send in 1 second.
S6700 Series Ethernet SwitchesConfiguration Guide - Basic Configuration 8 Configuring System Startup
Issue 05 (2013-04-10) Huawei Proprietary and ConfidentialCopyright © Huawei Technologies Co., Ltd.
163
l Backing up the configuration files through FTP1. Connect the device to the maintenance terminal, establish the Telnet environment and
assign an IP address for the interface.2. Start the FTP service.
The device acts as the FTP server.
Start the FTP server on the device. Create an FTP user whose username is huawei andpassword is huawei.The user level must be set to 3 or higher. Authorize the user tovisit flash:\.
<Quidway> system-view[Quidway] ftp server enable[Quidway] aaa[Quidway-aaa] local-user huawei password cipher huawei[Quidway-aaa] local-user huawei privilege level 3[Quidway-aaa] local-user huawei ftp-directory flash:/[Quidway-aaa] local-user huawei service-type ftp
3. Initiate an FTP connection to the device from the maintenance terminal.
On the PC, establish an FTP connection with the device through the FTP client. Forexample, the IP address of the device is 10.110.24.254.
C:\Documents and Setting\Administrator> ftp 10.110.24.254Connected to 10.110.24.254.220 FTP service ready.User (10.110.24.254:(none)): huawei331 Password required for huawei.Password:230 User logged in.
4. Set the parameters.
After the FTP user passes authentication, the FTP client prompts "ftp>". Enterbinary and specify the directory for storing the configuration files on the FTP client.
ftp> binary200 Type set to I.ftp> lcd c:\tempLocal directory now C:\temp.
5. Transfer the configuration files.
Run the get command on the PC to download the configuration files to the localspecified directory and save them as backup.cfg.
ftp> get config.cfg backup.cfg200 Port command okay.150 Opening ASCII mode data connection for config.cfg.226 Transfer complete.ftp: 1021 bytes received in 0.06Seconds 60.02Kbytes/sec.ftp>
6. Check whether the config.cfg and backup.cfg files are of the same size. If they areof the same size, the backup is successful.
----End
8.2.6 Restoring the Configuration Files
ContextYou can restore the configuration files through the following ways:
S6700 Series Ethernet SwitchesConfiguration Guide - Basic Configuration 8 Configuring System Startup
Issue 05 (2013-04-10) Huawei Proprietary and ConfidentialCopyright © Huawei Technologies Co., Ltd.
164
NOTE
After restoring the configuration files, restart the device to make the configuration files take effect. Runthe startup saved-configuration command to specify the configuration file for next startup. If theconfiguration file name is unchanged, you do not need to run this command. Then run the reboot commandto restart the device.
Procedurel Restoring the configuration files saved in the Flash
This operation is to restore the configuration files saved in the Flash of the device as theconfiguration files of the current system.
Run the following commands when the device works normally.
<Quidway> copy flash:/backup.cfg flash:/vrpcfg.zipCopy flash:/backup.cfg to flash:/vrpcfg.zip?[Y/N]:y100% complete/Info: Copied file flash:/backup.cfg to flash:/vrpcfg.zip...Done.
l Restoring the configuration files saved in the PC through TFTP
The device works as the TFTP client. The restoration procedure is similar to that of backingup the configuration files through TFTP. Run the tftp get command to download theconfiguration files saved in the PC to the Flash of the device.
l Restoring the configuration files saved in the PC through FTP
The device acts as the FTP server. The restoration procedure is similar to that of backingup the configuration files through FTP. Run the put command to upload theconfiguration files saved in the PC to the Flash of the device.
----End
8.2.7 Checking the ConfigurationsAfter managing configuration files, you can view the current configuration files and files in thestorage device.
PrerequisitesManaging configuration files has been configured.
Procedurel Run the display current-configuration [ configuration [ configuration-type
[ configuration-instance ] ] | controller | interface [ interface-type [ interface-number ] ] ][ feature feature-name [ filter filter-expression ] | filter filter-expression ] or displaycurrent-configuration [ all | inactive ]command to check current configurations.
l Run the display startup command to check files for startup.
l Run the dir [ /all ] [ filename ] command to check files saved in the storage device.
l Run the display saved-configuration configuration command to view configurations ofthe autosave function, including the status of the autosave function, time for autosave check,threshold for the CPU usage, and period during which configurations are unchanged (whenthe period expires, configurations are automatically saved).
S6700 Series Ethernet SwitchesConfiguration Guide - Basic Configuration 8 Configuring System Startup
Issue 05 (2013-04-10) Huawei Proprietary and ConfidentialCopyright © Huawei Technologies Co., Ltd.
165
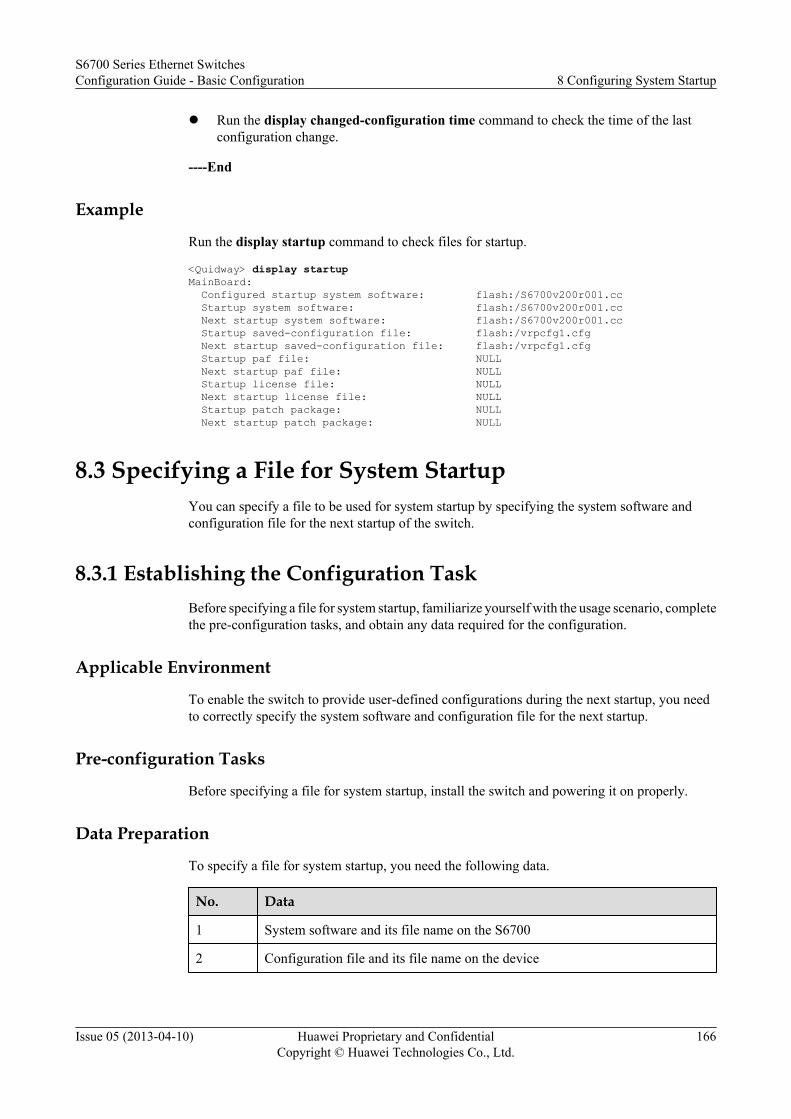
l Run the display changed-configuration time command to check the time of the lastconfiguration change.
----End
Example
Run the display startup command to check files for startup.
<Quidway> display startupMainBoard: Configured startup system software: flash:/S6700v200r001.cc Startup system software: flash:/S6700v200r001.cc Next startup system software: flash:/S6700v200r001.cc Startup saved-configuration file: flash:/vrpcfg1.cfg Next startup saved-configuration file: flash:/vrpcfg1.cfg Startup paf file: NULL Next startup paf file: NULL Startup license file: NULL Next startup license file: NULL Startup patch package: NULL Next startup patch package: NULL
8.3 Specifying a File for System StartupYou can specify a file to be used for system startup by specifying the system software andconfiguration file for the next startup of the switch.
8.3.1 Establishing the Configuration TaskBefore specifying a file for system startup, familiarize yourself with the usage scenario, completethe pre-configuration tasks, and obtain any data required for the configuration.
Applicable Environment
To enable the switch to provide user-defined configurations during the next startup, you needto correctly specify the system software and configuration file for the next startup.
Pre-configuration Tasks
Before specifying a file for system startup, install the switch and powering it on properly.
Data Preparation
To specify a file for system startup, you need the following data.
No. Data
1 System software and its file name on the S6700
2 Configuration file and its file name on the device
S6700 Series Ethernet SwitchesConfiguration Guide - Basic Configuration 8 Configuring System Startup
Issue 05 (2013-04-10) Huawei Proprietary and ConfidentialCopyright © Huawei Technologies Co., Ltd.
166
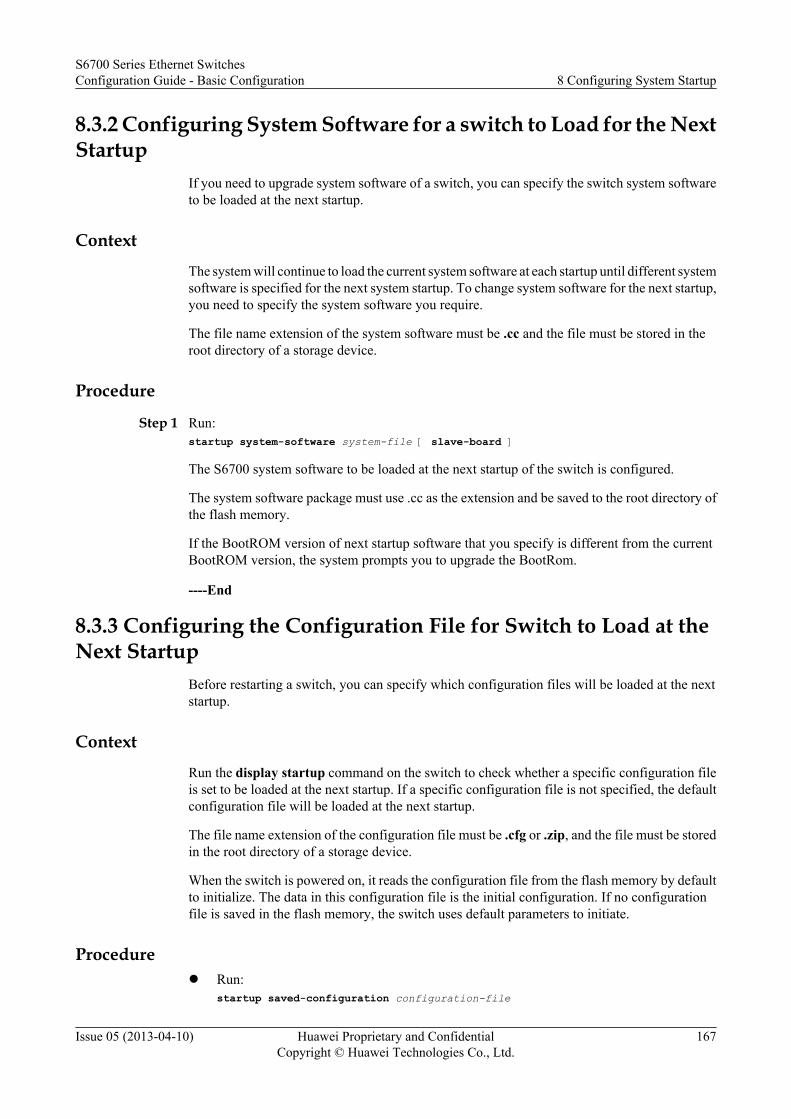
8.3.2 Configuring System Software for a switch to Load for the NextStartup
If you need to upgrade system software of a switch, you can specify the switch system softwareto be loaded at the next startup.
Context
The system will continue to load the current system software at each startup until different systemsoftware is specified for the next system startup. To change system software for the next startup,you need to specify the system software you require.
The file name extension of the system software must be .cc and the file must be stored in theroot directory of a storage device.
Procedure
Step 1 Run:startup system-software system-file [ slave-board ]
The S6700 system software to be loaded at the next startup of the switch is configured.
The system software package must use .cc as the extension and be saved to the root directory ofthe flash memory.
If the BootROM version of next startup software that you specify is different from the currentBootROM version, the system prompts you to upgrade the BootRom.
----End
8.3.3 Configuring the Configuration File for Switch to Load at theNext Startup
Before restarting a switch, you can specify which configuration files will be loaded at the nextstartup.
Context
Run the display startup command on the switch to check whether a specific configuration fileis set to be loaded at the next startup. If a specific configuration file is not specified, the defaultconfiguration file will be loaded at the next startup.
The file name extension of the configuration file must be .cfg or .zip, and the file must be storedin the root directory of a storage device.
When the switch is powered on, it reads the configuration file from the flash memory by defaultto initialize. The data in this configuration file is the initial configuration. If no configurationfile is saved in the flash memory, the switch uses default parameters to initiate.
Procedurel Run:
startup saved-configuration configuration-file
S6700 Series Ethernet SwitchesConfiguration Guide - Basic Configuration 8 Configuring System Startup
Issue 05 (2013-04-10) Huawei Proprietary and ConfidentialCopyright © Huawei Technologies Co., Ltd.
167
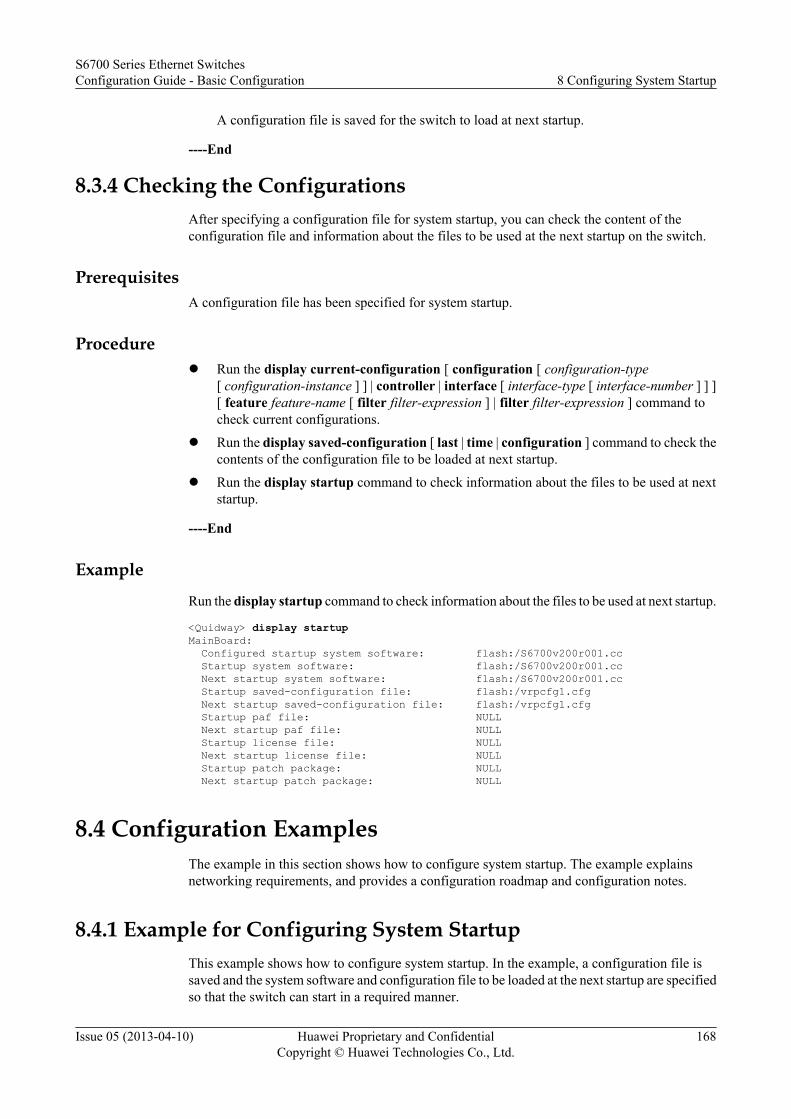
A configuration file is saved for the switch to load at next startup.
----End
8.3.4 Checking the ConfigurationsAfter specifying a configuration file for system startup, you can check the content of theconfiguration file and information about the files to be used at the next startup on the switch.
PrerequisitesA configuration file has been specified for system startup.
Procedurel Run the display current-configuration [ configuration [ configuration-type
[ configuration-instance ] ] | controller | interface [ interface-type [ interface-number ] ] ][ feature feature-name [ filter filter-expression ] | filter filter-expression ] command tocheck current configurations.
l Run the display saved-configuration [ last | time | configuration ] command to check thecontents of the configuration file to be loaded at next startup.
l Run the display startup command to check information about the files to be used at nextstartup.
----End
Example
Run the display startup command to check information about the files to be used at next startup.
<Quidway> display startupMainBoard: Configured startup system software: flash:/S6700v200r001.cc Startup system software: flash:/S6700v200r001.cc Next startup system software: flash:/S6700v200r001.cc Startup saved-configuration file: flash:/vrpcfg1.cfg Next startup saved-configuration file: flash:/vrpcfg1.cfg Startup paf file: NULL Next startup paf file: NULL Startup license file: NULL Next startup license file: NULL Startup patch package: NULL Next startup patch package: NULL
8.4 Configuration ExamplesThe example in this section shows how to configure system startup. The example explainsnetworking requirements, and provides a configuration roadmap and configuration notes.
8.4.1 Example for Configuring System StartupThis example shows how to configure system startup. In the example, a configuration file issaved and the system software and configuration file to be loaded at the next startup are specifiedso that the switch can start in a required manner.
S6700 Series Ethernet SwitchesConfiguration Guide - Basic Configuration 8 Configuring System Startup
Issue 05 (2013-04-10) Huawei Proprietary and ConfidentialCopyright © Huawei Technologies Co., Ltd.
168
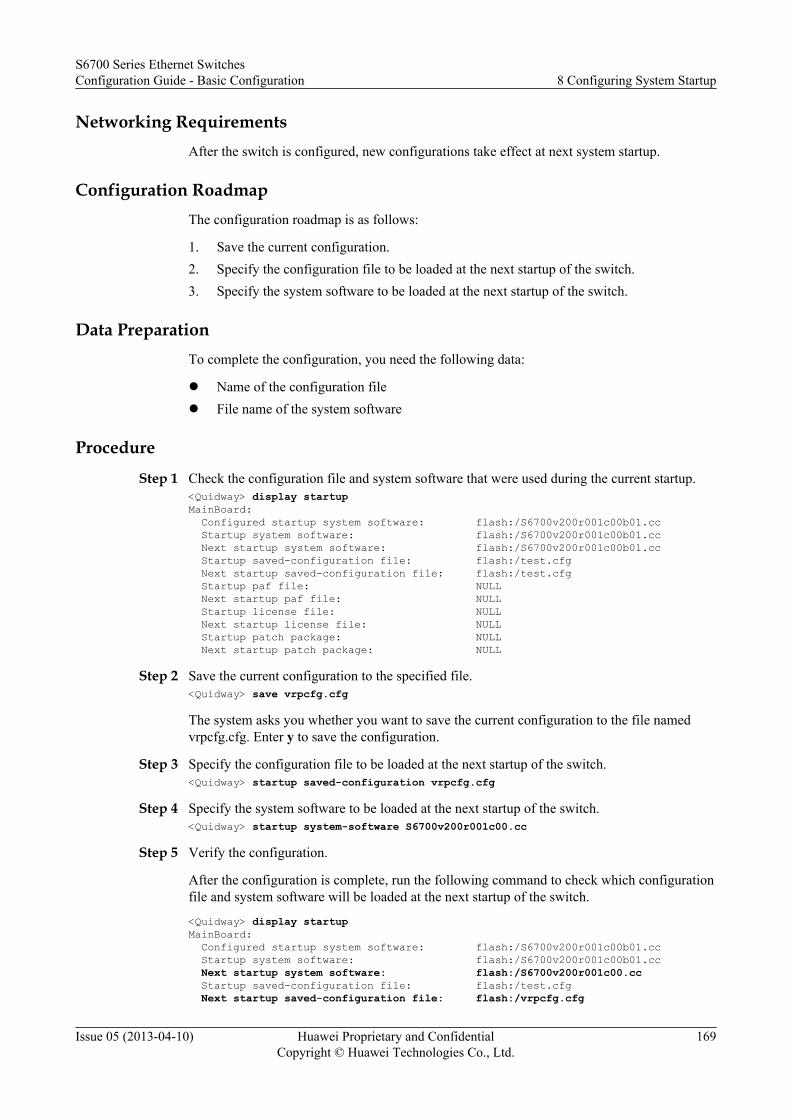
Networking RequirementsAfter the switch is configured, new configurations take effect at next system startup.
Configuration RoadmapThe configuration roadmap is as follows:
1. Save the current configuration.2. Specify the configuration file to be loaded at the next startup of the switch.3. Specify the system software to be loaded at the next startup of the switch.
Data PreparationTo complete the configuration, you need the following data:
l Name of the configuration filel File name of the system software
Procedure
Step 1 Check the configuration file and system software that were used during the current startup.<Quidway> display startupMainBoard: Configured startup system software: flash:/S6700v200r001c00b01.cc Startup system software: flash:/S6700v200r001c00b01.cc Next startup system software: flash:/S6700v200r001c00b01.cc Startup saved-configuration file: flash:/test.cfg Next startup saved-configuration file: flash:/test.cfg Startup paf file: NULL Next startup paf file: NULL Startup license file: NULL Next startup license file: NULL Startup patch package: NULL Next startup patch package: NULL
Step 2 Save the current configuration to the specified file.<Quidway> save vrpcfg.cfg
The system asks you whether you want to save the current configuration to the file namedvrpcfg.cfg. Enter y to save the configuration.
Step 3 Specify the configuration file to be loaded at the next startup of the switch.<Quidway> startup saved-configuration vrpcfg.cfg
Step 4 Specify the system software to be loaded at the next startup of the switch.<Quidway> startup system-software S6700v200r001c00.cc
Step 5 Verify the configuration.
After the configuration is complete, run the following command to check which configurationfile and system software will be loaded at the next startup of the switch.
<Quidway> display startupMainBoard: Configured startup system software: flash:/S6700v200r001c00b01.cc Startup system software: flash:/S6700v200r001c00b01.cc Next startup system software: flash:/S6700v200r001c00.cc Startup saved-configuration file: flash:/test.cfg Next startup saved-configuration file: flash:/vrpcfg.cfg
S6700 Series Ethernet SwitchesConfiguration Guide - Basic Configuration 8 Configuring System Startup
Issue 05 (2013-04-10) Huawei Proprietary and ConfidentialCopyright © Huawei Technologies Co., Ltd.
169

Startup paf file: NULL Next startup paf file: NULL Startup license file: NULL Next startup license file: NULL Startup patch package: NULL Next startup patch package: NULL
----End
Configuration FilesNone.
S6700 Series Ethernet SwitchesConfiguration Guide - Basic Configuration 8 Configuring System Startup
Issue 05 (2013-04-10) Huawei Proprietary and ConfidentialCopyright © Huawei Technologies Co., Ltd.
170
9 Accessing Another Device
About This Chapter
To manage configurations or operate files of another device, you can access the device by usingTelnet, STelnet, TFTP, FTP, or SFTP from the device that you have logged in to.
9.1 Accessing Another DeviceTo manage configurations or use files on a device other than the device you are logged in to,you can use Telnet, FTP, TFTP, or SSH to access that device.
9.2 Logging in to Other Devices Using TelnetOn most networks, multiple switchs need to be managed and maintained, but it may beimpossible to connect some of these switchs to a PC terminal. In other cases, there may be noreachable route between a router and a PC terminal. You can log in to a local switch and thenuse Telnet to log in to remote switchs to complete management and maintenance tasks.
9.3 Logging in to Another Device Using STelnetSTelnet provides secure Telnet services. You can use STelnet to log in to another switch fromthe switch that you have logged in to and manage the device remotely.
9.4 Accessing Files on Another Device Using TFTPYou can configure the switch as a TFTP client, and log in to the TFTP server to upload anddownload files.
9.5 Accessing Files on Another Device Using FTPThis section describes how to configure a switch as an FTP client to log in to a FTP server, andto upload files to or download files from the server.
9.6 Accessing Files on Another Device Using SFTPSFTP is a secure FTP service. After the switch is configured as an SFTP client, the SFTP serverauthenticates the client and encrypts data in both directions to provide secure data transmission.
9.7 Accessing Files on Another Device by Using FTPSThe FTPS client and FTPS server authenticate each other's identities to ensure that onlyauthorized users can access the FTPS server, improving access security.
9.8 Accessing Files on Another Device by Using SCPThe SCP client sets up a secure connection with the SCP server so that the client can uploadfiles to the server or download files from the server.
S6700 Series Ethernet SwitchesConfiguration Guide - Basic Configuration 9 Accessing Another Device
Issue 05 (2013-04-10) Huawei Proprietary and ConfidentialCopyright © Huawei Technologies Co., Ltd.
171

9.9 Configuration ExamplesThis section describes examples for access another device. The examples explain networkingrequirements, configuration notes, and configuration roadmap.
S6700 Series Ethernet SwitchesConfiguration Guide - Basic Configuration 9 Accessing Another Device
Issue 05 (2013-04-10) Huawei Proprietary and ConfidentialCopyright © Huawei Technologies Co., Ltd.
172

9.1 Accessing Another DeviceTo manage configurations or use files on a device other than the device you are logged in to,you can use Telnet, FTP, TFTP, or SSH to access that device.
Figure 9-1 Networking diagram for accessing another device from the switch
Network Network
PC Client
Server
As shown in Figure 9-1, when you run a terminal emulation or Telnet program on a PC toconnect to the switch, the switch can still function as a client to access another device on thenetwork. There are several ways to accomplish this.
9.1.1 Telnet MethodTo configure and manage a remote device on the network, you can use the switch that you havelogged in to as a client to log in to that device.
Telnet is an application layer protocol in the TCP/IP protocol suite. It provides remote login anda virtual terminal service.
The S6700 provides the following Telnet services:
l Telnet server: You can run the Telnet client program on a PC to log in to a switch to completeconfiguration and management tasks. The switch acts as a Telnet server.
l Telnet client: You can run the terminal emulation program or the Telnet client program ona PC to connect with the switch. You can then run the telnet command to log in to otherswitchs to configure and manage them. As shown in Figure 9-2,Switch A serves as botha Telnet server and a Telnet client.
Figure 9-2 Telnet client services
SwitchAPC SwitchB
Telnet Session 1 Telnet Session2
Telnet Server
l Interruption of Telnet services
In Telnet connection, two shortcut key combinations can terminate the connection.
S6700 Series Ethernet SwitchesConfiguration Guide - Basic Configuration 9 Accessing Another Device
Issue 05 (2013-04-10) Huawei Proprietary and ConfidentialCopyright © Huawei Technologies Co., Ltd.
173
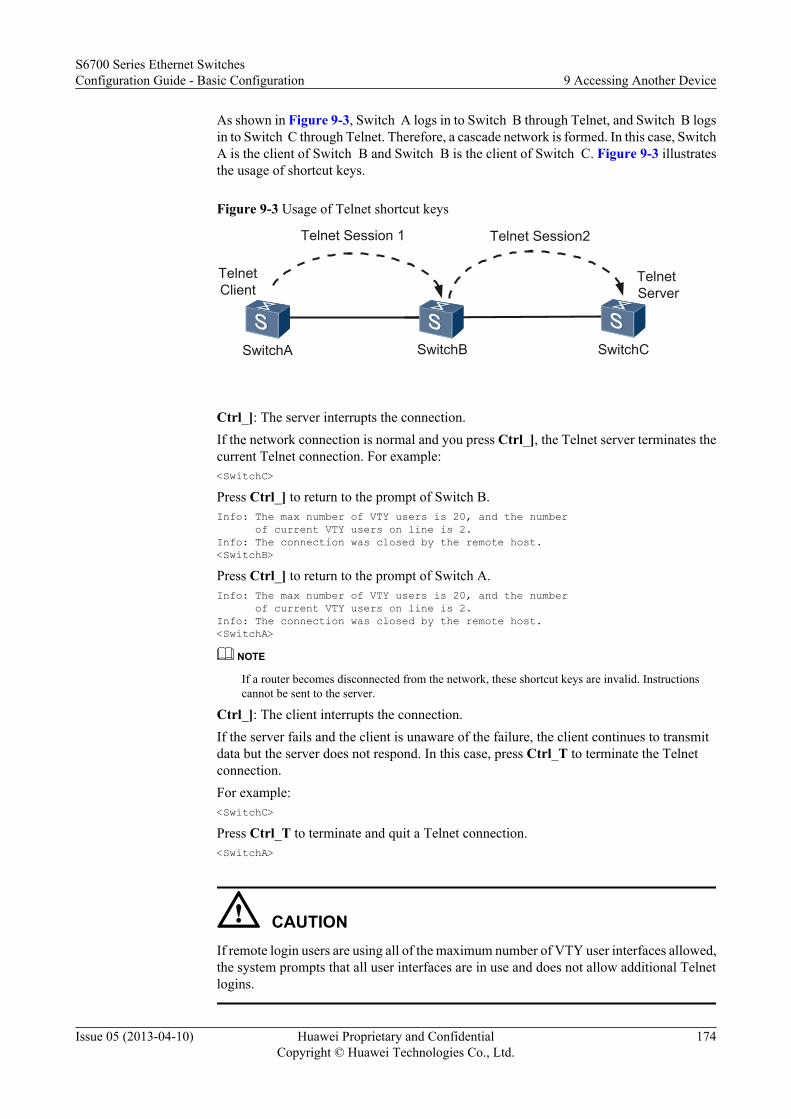
As shown in Figure 9-3, Switch A logs in to Switch B through Telnet, and Switch B logsin to Switch C through Telnet. Therefore, a cascade network is formed. In this case, SwitchA is the client of Switch B and Switch B is the client of Switch C. Figure 9-3 illustratesthe usage of shortcut keys.
Figure 9-3 Usage of Telnet shortcut keys
SwitchB SwitchC
Telnet Session 1 Telnet Session2
TelnetServer
SwitchA
TelnetClient
Ctrl_]: The server interrupts the connection.If the network connection is normal and you press Ctrl_], the Telnet server terminates thecurrent Telnet connection. For example:<SwitchC>
Press Ctrl_] to return to the prompt of Switch B.Info: The max number of VTY users is 20, and the number of current VTY users on line is 2.Info: The connection was closed by the remote host.<SwitchB>
Press Ctrl_] to return to the prompt of Switch A.Info: The max number of VTY users is 20, and the number of current VTY users on line is 2.Info: The connection was closed by the remote host.<SwitchA>
NOTE
If a router becomes disconnected from the network, these shortcut keys are invalid. Instructionscannot be sent to the server.
Ctrl_]: The client interrupts the connection.If the server fails and the client is unaware of the failure, the client continues to transmitdata but the server does not respond. In this case, press Ctrl_T to terminate the Telnetconnection.For example:<SwitchC>
Press Ctrl_T to terminate and quit a Telnet connection.<SwitchA>
CAUTIONIf remote login users are using all of the maximum number of VTY user interfaces allowed,the system prompts that all user interfaces are in use and does not allow additional Telnetlogins.
S6700 Series Ethernet SwitchesConfiguration Guide - Basic Configuration 9 Accessing Another Device
Issue 05 (2013-04-10) Huawei Proprietary and ConfidentialCopyright © Huawei Technologies Co., Ltd.
174
9.1.2 FTP MethodTo access files on a remote FTP server, you can use FTP to establish a connection between theswitch that you have logged in to and the remote FTP server.
FTP can transmit files between hosts and it provides users with common FTP commands for filesystem management. That is, using an FTP client program not residing on the switch, you canupload or download the files and access the directories on the router; using an FTP client programresiding on the switch, you can transfer files to the FTP servers of other devices.
FTP can transmit files between local and remote hosts, and is widely used for version upgrade,log downloading, file transmission, and configuration saving.
9.1.3 TFTP MethodIf network client/server interaction requirements are relatively simple, you can enable the TFTPservice on the switch that functions as a TFTP client to access files on a TFTP server.
Trivial File Transfer Protocol (TFTP) is a simple file transfer protocol.
Unlike FTP, TFTP does not have a complex interactive access interface and authenticationcontrol. TFTP is for use in environments where there is no complex interaction between theclient and the server. For example, TFTP is used to obtain a memory image of the system whenthe system starts up.
Implementation of TFTP is based on the User Datagram Protocol (UDP).
The client initiates a TFTP transfer. To download files, the client sends a read request packet tothe TFTP server, receives packets from the server, and returns an acknowledgement to the server.To upload files, the client sends a write request packet to the TFTP server, sends packets to theserver, and receives acknowledgement from the server.
TFTP uses two formats for file transfer:
l Binary format: transfers program files.l ASCII format: transfers text files.
At present, the S6700 can only serve as a TFTP client and can only transfer files in binary format.
9.1.4 SSH MethodLogging in to a remote device using SSH (including STelnet, SFTP and SCP) provides securecommunications between the remote device and the switch you are logged in to.
SSH OverviewWhen users on an insecure network use Telnet to log in to the switch, the Secure Shell (SSH)feature provides authentication and keeps data secure. SSH defends the switch from IP addressspoofing and other such attacks, and protects the switch against the interception of plain textpasswords.
The SSH client function allows users to establish SSH connections with switchs serving as SSHservers or with UNIX hosts.
SSH Client FunctionThe S6700 supports the STelnet client function, SCP client function, and SFTP client function.
S6700 Series Ethernet SwitchesConfiguration Guide - Basic Configuration 9 Accessing Another Device
Issue 05 (2013-04-10) Huawei Proprietary and ConfidentialCopyright © Huawei Technologies Co., Ltd.
175
l STelnet clientSTelnet is short for Secure Telnet.Telnet does not provide secure authentication and TCP transmits data in plain text. Thiscreates security vulnerabilities. Denial of service (DOS) attacks, host IP address spoofing,and route spoofing also threaten system security. Telnet services are vulnerable to networkattacks.SSH implements secure remote access on insecure networks and has the followingadvantages compared with Telnet:– SSH supports Remote Subscriber Access (RSA) authentication and Digital Signature
Algorithm authentication (DSA). SSH uses RSA authentication or DSA authenticationto generate and exchange public and private keys compliant with an asymmetricencryption system that protects session security.
– SSH supports Data Encryption Standard (DES), 3DES, and AES authentications.– SSH usernames and the passwords are encrypted in communication between an SSH
client and server. This prevents password interception.– SSH encrypts transmitted data.If the STelnet server or the connection between the server and a client is faulty, the clientmust detect the fault and release the connection. A fault detection function must beconfigured on the client to accomplish this. The client sends keepalive packets to the serverat a configured time interval. If there is no reply from the server to a configured number ofkeepalive packets, the client determines that there is a fault and releases the connection.
l SFTP clientSFTP is short for Secure FTP. You can log in to a device from a secure remote end tomanage files. This improves data transmission security when the remote system is updated.The client function allows you to use SFTP to log in to the remote device for secure filetransmission.If the SFTP server or the connection between the server and a client is faulty, the clientmust detect the fault and release the connection. A fault detection function must beconfigured on the client to accomplish this. The client sends keepalive packets to the serverat a configured time interval. If there is no reply from the server to a configured number ofkeepalive packets, the client determines that there is a fault and releases the connection.
l SCP clientSCP allows you to log in to the device securely from a remote device to upload or downloadfiles. Data transfer in this mode is much safer for remote system update. In addition, SCPprovides the client function so that a local device can log in to a remote device for securedata transfer.Unlike SFTP, SCP simplifies the file transfer process by combing user authentication andfile transfer, therefore improving configuration efficiency.
9.1.5 SSL ModeLogging in to a remote device using SSL provides secure communications between the remoteFTPS server and the local device you are logged in to.
OverviewSSL is a cryptographic protocol that provides communication security over the Internet. It allowsa client and a server to communicate across a network in a way designed to preventeavesdropping by authenticating the server or the client. SSL has the following advantages:
S6700 Series Ethernet SwitchesConfiguration Guide - Basic Configuration 9 Accessing Another Device
Issue 05 (2013-04-10) Huawei Proprietary and ConfidentialCopyright © Huawei Technologies Co., Ltd.
176
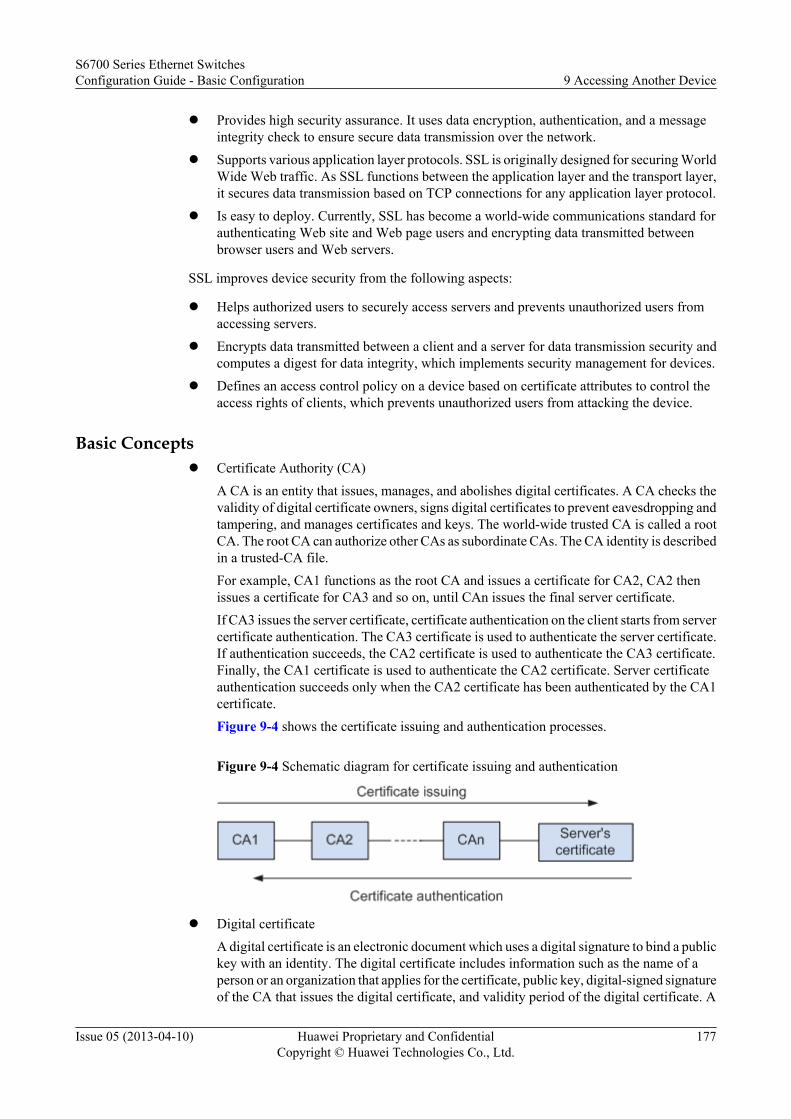
l Provides high security assurance. It uses data encryption, authentication, and a messageintegrity check to ensure secure data transmission over the network.
l Supports various application layer protocols. SSL is originally designed for securing WorldWide Web traffic. As SSL functions between the application layer and the transport layer,it secures data transmission based on TCP connections for any application layer protocol.
l Is easy to deploy. Currently, SSL has become a world-wide communications standard forauthenticating Web site and Web page users and encrypting data transmitted betweenbrowser users and Web servers.
SSL improves device security from the following aspects:
l Helps authorized users to securely access servers and prevents unauthorized users fromaccessing servers.
l Encrypts data transmitted between a client and a server for data transmission security andcomputes a digest for data integrity, which implements security management for devices.
l Defines an access control policy on a device based on certificate attributes to control theaccess rights of clients, which prevents unauthorized users from attacking the device.
Basic Conceptsl Certificate Authority (CA)
A CA is an entity that issues, manages, and abolishes digital certificates. A CA checks thevalidity of digital certificate owners, signs digital certificates to prevent eavesdropping andtampering, and manages certificates and keys. The world-wide trusted CA is called a rootCA. The root CA can authorize other CAs as subordinate CAs. The CA identity is describedin a trusted-CA file.For example, CA1 functions as the root CA and issues a certificate for CA2, CA2 thenissues a certificate for CA3 and so on, until CAn issues the final server certificate.If CA3 issues the server certificate, certificate authentication on the client starts from servercertificate authentication. The CA3 certificate is used to authenticate the server certificate.If authentication succeeds, the CA2 certificate is used to authenticate the CA3 certificate.Finally, the CA1 certificate is used to authenticate the CA2 certificate. Server certificateauthentication succeeds only when the CA2 certificate has been authenticated by the CA1certificate.Figure 9-4 shows the certificate issuing and authentication processes.
Figure 9-4 Schematic diagram for certificate issuing and authentication
l Digital certificateA digital certificate is an electronic document which uses a digital signature to bind a publickey with an identity. The digital certificate includes information such as the name of aperson or an organization that applies for the certificate, public key, digital-signed signatureof the CA that issues the digital certificate, and validity period of the digital certificate. A
S6700 Series Ethernet SwitchesConfiguration Guide - Basic Configuration 9 Accessing Another Device
Issue 05 (2013-04-10) Huawei Proprietary and ConfidentialCopyright © Huawei Technologies Co., Ltd.
177
digital certificate validates the identities of two communicating parties, improvingcommunication reliability.
A user must obtain the public key certificate of the information sender in advance to decryptand authenticate information in the certificate. In addition, the user also needs the CAcertificate of the information sender to verify the identity of the information sender.
l Certificate Revocation List (CRL)
A CRL is a list of certificates that have been revoked, and therefore should not be reliedupon. The CRL is issued by a CA.
The lifetime of a digital certificate is limited. A CA can revoke a digital certificate to shortenits lifetime. The lifetime of a CRL is usually shorter than the lifetime of certificates in theCRL. If a CA revokes a digital certificate, the key pair defined in the certificate can nolonger be used even if the digital certificate does not expire. After a certificate in a CRLexpires, the certificate is deleted from the CRL to shorten the CRL.
Before using a digital certificate, the client checks the CRL. If the digital certificate is inthe CRL, the corresponding CA marks the digital certificate as expired, and adds acertificate expiration list (CEL) when issuing a new CRL. After the CEL expires, it isautomatically deleted from the CRL.
Application
Currently, SSL is only used for FTPS and HTTPS applications (secure Web networkmanagement is an HTTPS application).
l FTPS
FTPS that adds support for SSL is an extension to the commonly used FTP.
Using SSL to authenticate the identities of the client and server, encrypt data to betransmitted, and check message integrity, FTPS provides a secure FTP server access.
– Login to an FTPS server from a user terminal
an SSL policy is configured on the FTP server. After a digital certificate is loaded andthe FTPS server function is enabled on the server, you can log in to the server from aterminal on which the SSL-capable FTP client software is installed to securely operatefiles transmitted between the terminal and the server.
– Login to an FTPS server from an FTPS client
– An SSL policy needs to be configured and a trusted-CA file needs to be loaded toan FTP client to verify the identity of the certificate owner, sign a digital certificateto prevent eavesdropping and tampering, and manage the certificate and key.
– An SSL policy needs to be configured on and a digital certificate needs to be loadedto an FTP server to verify the validity of the trusted-CA file. This ensures that onlyauthorized clients can log in to the server.
l HTTPS
HTTPS that adds support for SSL is an extension to the commonly used HTTP.
Using SSL to authenticate the identities of the client and server, encrypt data to betransmitted, and check message integrity, HTTPS provides a secure Web access.
an SSL policy is configured on the device that functions as an HTTP server. After a digitalcertificate is loaded to and the HTTPS server function is enabled on the server, users canlog in to the server to remotely manage the server using web pages.
S6700 Series Ethernet SwitchesConfiguration Guide - Basic Configuration 9 Accessing Another Device
Issue 05 (2013-04-10) Huawei Proprietary and ConfidentialCopyright © Huawei Technologies Co., Ltd.
178
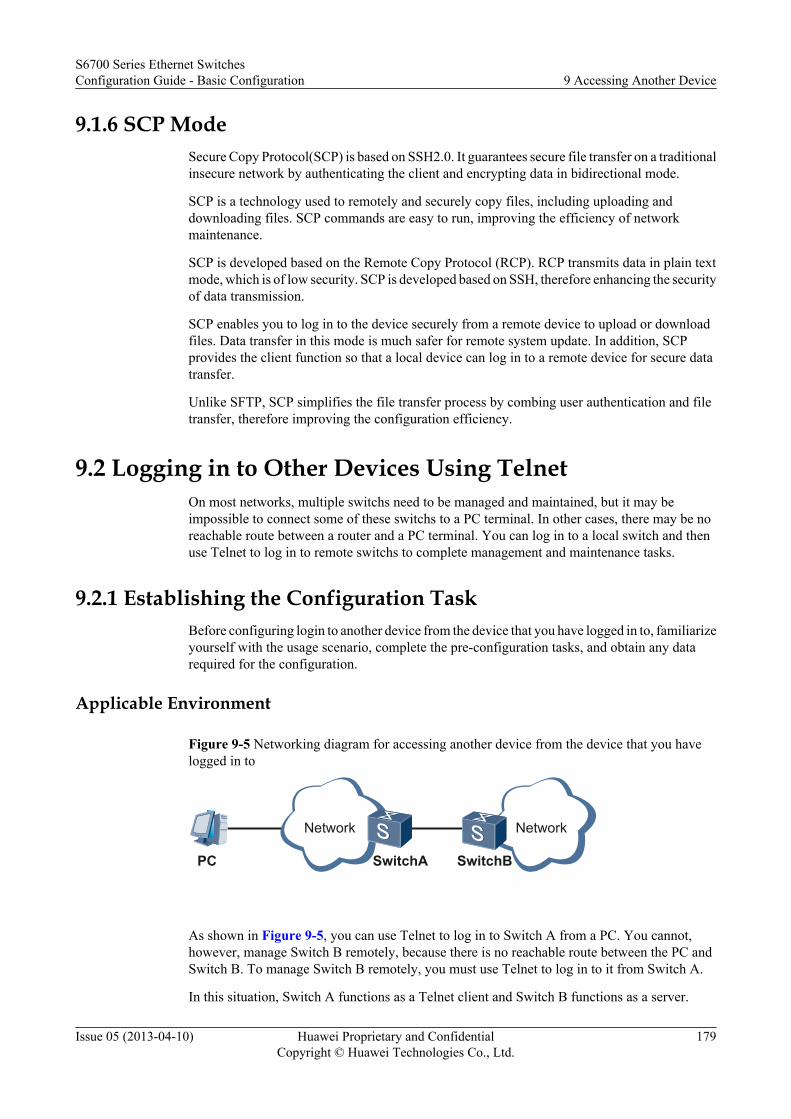
9.1.6 SCP ModeSecure Copy Protocol(SCP) is based on SSH2.0. It guarantees secure file transfer on a traditionalinsecure network by authenticating the client and encrypting data in bidirectional mode.
SCP is a technology used to remotely and securely copy files, including uploading anddownloading files. SCP commands are easy to run, improving the efficiency of networkmaintenance.
SCP is developed based on the Remote Copy Protocol (RCP). RCP transmits data in plain textmode, which is of low security. SCP is developed based on SSH, therefore enhancing the securityof data transmission.
SCP enables you to log in to the device securely from a remote device to upload or downloadfiles. Data transfer in this mode is much safer for remote system update. In addition, SCPprovides the client function so that a local device can log in to a remote device for secure datatransfer.
Unlike SFTP, SCP simplifies the file transfer process by combing user authentication and filetransfer, therefore improving the configuration efficiency.
9.2 Logging in to Other Devices Using TelnetOn most networks, multiple switchs need to be managed and maintained, but it may beimpossible to connect some of these switchs to a PC terminal. In other cases, there may be noreachable route between a router and a PC terminal. You can log in to a local switch and thenuse Telnet to log in to remote switchs to complete management and maintenance tasks.
9.2.1 Establishing the Configuration TaskBefore configuring login to another device from the device that you have logged in to, familiarizeyourself with the usage scenario, complete the pre-configuration tasks, and obtain any datarequired for the configuration.
Applicable Environment
Figure 9-5 Networking diagram for accessing another device from the device that you havelogged in to
Network Network
PC SwitchA SwitchB
As shown in Figure 9-5, you can use Telnet to log in to Switch A from a PC. You cannot,however, manage Switch B remotely, because there is no reachable route between the PC andSwitch B. To manage Switch B remotely, you must use Telnet to log in to it from Switch A.
In this situation, Switch A functions as a Telnet client and Switch B functions as a server.
S6700 Series Ethernet SwitchesConfiguration Guide - Basic Configuration 9 Accessing Another Device
Issue 05 (2013-04-10) Huawei Proprietary and ConfidentialCopyright © Huawei Technologies Co., Ltd.
179
Pre-configuration Tasks
Before using Telnet to log in to another device on the network, complete the following tasks:
l 6.3 Logging in to Devices Using Telnet.
l Configure a reachable route between the client and Telnet server.
Data Preparation
To log in to another device by using Telnet, you need the following data:
No. Data
1 IP address or host name of SwitchB
2 Number of the TCP port used by the SwitchB to provide Telnet services
9.2.2 (Optional) Configuring a Source IP Address for a Telnet ClientYou can configure a source IP address for a Telnet client and then use this address to set up aTelnet connection from the client to server along a specific route.
Context
An IP address is configured for an interface on the switch and functions as the source IP addressof a Telnet connection. This allows for implementation of security checks.
The source of a client can be a source interface or a source IP address.
Perform the following steps on a switch that functions as a Telnet client.
Procedure
Step 1 Run:system-view
The system view is displayed.
Step 2 Run:telnet client-source { -a source-ip-address | -i interface-type interface-number }
A source IP address of a Telnet client is configured.
After the configuration, the source IP address of the Telnet client displayed on the Telnet servermust be the same as the configured one.
----End
9.2.3 Logging in to Another Device by Using TelnetYou can use Telnet to log in to and manage another switch.
S6700 Series Ethernet SwitchesConfiguration Guide - Basic Configuration 9 Accessing Another Device
Issue 05 (2013-04-10) Huawei Proprietary and ConfidentialCopyright © Huawei Technologies Co., Ltd.
180
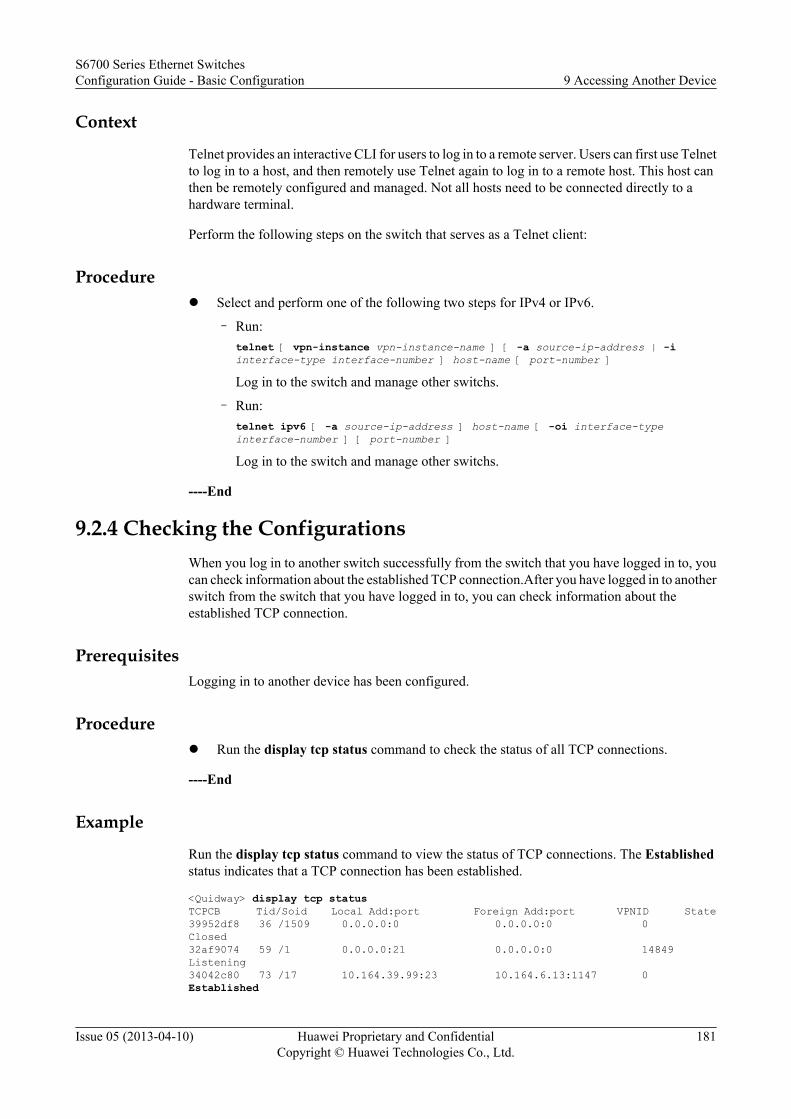
Context
Telnet provides an interactive CLI for users to log in to a remote server. Users can first use Telnetto log in to a host, and then remotely use Telnet again to log in to a remote host. This host canthen be remotely configured and managed. Not all hosts need to be connected directly to ahardware terminal.
Perform the following steps on the switch that serves as a Telnet client:
Procedurel Select and perform one of the following two steps for IPv4 or IPv6.
– Run:telnet [ vpn-instance vpn-instance-name ] [ -a source-ip-address | -i interface-type interface-number ] host-name [ port-number ]
Log in to the switch and manage other switchs.
– Run:telnet ipv6 [ -a source-ip-address ] host-name [ -oi interface-type interface-number ] [ port-number ]
Log in to the switch and manage other switchs.
----End
9.2.4 Checking the ConfigurationsWhen you log in to another switch successfully from the switch that you have logged in to, youcan check information about the established TCP connection.After you have logged in to anotherswitch from the switch that you have logged in to, you can check information about theestablished TCP connection.
PrerequisitesLogging in to another device has been configured.
Procedurel Run the display tcp status command to check the status of all TCP connections.
----End
Example
Run the display tcp status command to view the status of TCP connections. The Establishedstatus indicates that a TCP connection has been established.
<Quidway> display tcp statusTCPCB Tid/Soid Local Add:port Foreign Add:port VPNID State39952df8 36 /1509 0.0.0.0:0 0.0.0.0:0 0 Closed32af9074 59 /1 0.0.0.0:21 0.0.0.0:0 14849 Listening34042c80 73 /17 10.164.39.99:23 10.164.6.13:1147 0 Established
S6700 Series Ethernet SwitchesConfiguration Guide - Basic Configuration 9 Accessing Another Device
Issue 05 (2013-04-10) Huawei Proprietary and ConfidentialCopyright © Huawei Technologies Co., Ltd.
181
9.3 Logging in to Another Device Using STelnetSTelnet provides secure Telnet services. You can use STelnet to log in to another switch fromthe switch that you have logged in to and manage the device remotely.
9.3.1 Establishing the Configuration TaskBefore configuring login to another device using Stelnet, familiarize yourself with the usagescenario, complete the pre-configuration tasks, and obtain any date required for theconfiguration.
Applicable EnvironmentTelnet logins are insecure because no secure authentication mechanism is available and data istransmitted over TCP connections in plain text mode.
STelnet is a secure Telnet protocol. STelnet is based on SSH. SSH users can use STelnet servicesin place of ordinary Telnet services.
In this configuration, the device that you have logged in to functions as a Telnet client, and thedevice that you want to log in to functions as an SSH server.
Pre-configuration TasksBefore logging in to another device by using STelnet, complete the following tasks:
l 6.4 Logging in to Devices Using STelnet.l Configure a reachable route between the client and SSH server.
Data PreparationTo log in to another device using STelnet, you need the following data.
No. Data
1 Name of the SSH server, and public key that is assigned by the client to the SSH server
2 IPv4 or IPv6 address or host name of the SSH server, number of the port monitoredby the SSH server, preferred encryption algorithm for data from the SFTP client tothe SSH server, preferred encryption algorithm for data from the SSH server to theSFTP client, preferred HMAC algorithm for data from the SFTP client to the SSHserver, preferred HMAC algorithm for data from the SSH server to the SFTP client,preferred algorithm of key exchangeThe user information for logging in to the SSH server
S6700 Series Ethernet SwitchesConfiguration Guide - Basic Configuration 9 Accessing Another Device
Issue 05 (2013-04-10) Huawei Proprietary and ConfidentialCopyright © Huawei Technologies Co., Ltd.
182
9.3.2 Configuring the First Successful Login to Another Device(Enabling the First-Time Authentication on the SSH Client)
After first-time authentication on the SSH client is enabled, the STelnet client does not checkthe validity of the RSA or DSA public key when logging in to the SSH server for the first time.
ContextIf first-time authentication on the SSH client is enabled, the STelnet client does not check thevalidity of the RSA or DSA public key when logging in to the SSH server for the first time.After the login, the system automatically allocates the RSA or DSA public key and saves it forauthentication at next login.
Perform the following steps on the switch that serves as an SSH client:
Procedure
Step 1 Run:system-view
The system view is displayed.
Step 2 Run:ssh client first-time enable
First-time authentication on the SSH client is enabled.
By default, first-time authentication on the SSH client is disabled.
NOTE
l The purpose of enabling first-time authentication on the SSH client is to skip checking the validity ofthe RSA or DSA public key on the SSH server when an STelnet client logs in to the SSH server forthe first time. The check is skipped because the STelnet server has not saved the RSA or DSA publickey of the SSH server.
l If an STelnet client logs in to the SSH server for the first time and first-time authentication is not enabledon the SSH client, the STelnet client fails to pass the check of the RSA or DSA public key validity andcannot log in to the server.
TIP
To ensure that an STelnet client can log in to an SSH server at the first attempt, you can assign an RSA orDSA public key in advance to the SSH server on the SSH client in addition to enabling first-timeauthentication on the SSH client.
----End
9.3.3 Configuring the First Successful Login to Another Device(Allocating a Public Key to the SSH Server)
To configure the first successful login to another device on an SSH client, you must allocate anRSA or DSA public key to the SSH server before the login.
ContextIf first-time authentication is not enabled on the SSH client, when the STelnet client logs in tothe SSH server for the first time, the STelnet client fails to pass the RSA or DSA public key
S6700 Series Ethernet SwitchesConfiguration Guide - Basic Configuration 9 Accessing Another Device
Issue 05 (2013-04-10) Huawei Proprietary and ConfidentialCopyright © Huawei Technologies Co., Ltd.
183
validity check and cannot log in to the server. You must allocate an RSA or DSA public key tothe SSH server before the STelnet client logs in to the SSH server.
Perform the following steps on the switch that serves as an SSH client:
Procedure
Step 1 Run:system-view
The system view is displayed.
Step 2 Run:rsa peer-public-key key-name or dsa peer-public-key key-name encoding-type { der | pem }
The public key view is displayed.
Step 3 Run:public-key-code begin
The public key editing view is displayed.
Step 4 Run:hex-data
The public key is edited.
The public key is a string of hexadecimal alphanumeric characters automatically generated byan SSH client.
NOTE
l The RSA or DSA public key assigned to the SSH server must be generated on the server. Otherwise,the validity check for the RSA or DSA public key on the STelnet client will fail.
l After entering the public key edit view, paste the RSA or DSA public key generated on the server tothe switch that functions as the client.
Step 5 Run:public-key-code end
Quit the public key editing view.
l If the specified hex-data is invalid, the public key cannot be generated after the peer-public-key end command is run.
l If the specified key-name is deleted in other views, the system prompts that the key does notexist after the peer-public-key end command is run and the system view is displayed.
Step 6 Run:peer-public-key end
Return to the system view from the public key view.
Step 7 Run:ssh client servername assign { rsa-key | dsa-key } keyname
The RSA or DSA public key is assigned to the SSH server
S6700 Series Ethernet SwitchesConfiguration Guide - Basic Configuration 9 Accessing Another Device
Issue 05 (2013-04-10) Huawei Proprietary and ConfidentialCopyright © Huawei Technologies Co., Ltd.
184
NOTE
If the RSA public key stored on the SSH client becomes invalid, run the undo ssh client servernameassign { rsa-key | dsa-key } command to cancel the association between the SSH client and the SSH server.Then, run the ssh client servername assign { rsa-key | dsa-key } keyname command to allocate a newRSA or DSA public key to the SSH server.
----End
9.3.4 Logging in to Another Device Using STelnetYou can use STelnet to log in to an SSH server from an SSH client.
ContextWhen accessing an SSH server, an STelnet client can carry the source address and the VPNinstance name, can choose the key exchange algorithm, encryption algorithm, or HMACalgorithm, and can configure the keepalive function.
Perform the following steps on the switch that serves as an SSH client:
Procedure
Step 1 Run:system-view
The system view is displayed.
Step 2 According to the address type of the SSH server, select and run one of the following twocommands.
For IPv4 addresses,
Run the stelnet host-ipv4 [ port ] [ [ -vpn-instance vpn-instance-name ] | [ identity-key { dsa| rsa } ] | [ prefer_kex { dh_group1 | dh_exchange_group } ] | [ prefer_ctos_cipher { des |3des | aes128 } ] | [ prefer_stoc_cipher { des | 3des | aes128 } ] | [ prefer_ctos_hmac { sha1| sha1_96 | md5 | md5_96 } ] | [ prefer_stoc_hmac { sha1 | sha1_96 | md5 | md5_96 } ] | [ -ki aliveinterval ] | [ -kc alivecountmax ] ] * command. You can log in to the SSH server throughSTelnet.
For IPv6 addresses,
Run the stelnet ipv6 host-ipv6 [ -oi interface-type interface-number ] [ port ] [ [ identity-key{ dsa | rsa } ] | [ prefer_kex { dh_group1 | dh_exchange_group } ] | [ prefer_ctos_cipher{ des | 3des | aes128 } ] | [ prefer_stoc_cipher { des | 3des | aes128 } ] | [ prefer_ctos_hmac{ sha1 | sha1_96 | md5 | md5_96 } ] | [ prefer_stoc_hmac { sha1 | sha1_96 | md5 |md5_96 } ] | [ -ki aliveinterval ] | [ -kc alivecountmax ] ] * command. You can log in to the SSHserver through STelnet.
----End
9.3.5 Checking the ConfigurationsAfter configuring login to another device using STelnet, you can check the mappings betweenall SSH servers of the STelnet client and the RSA or DSA public keys on the client, the globalconfigurations of the SSH servers, and information about sessions between the SSH servers andthe STelnet client.
S6700 Series Ethernet SwitchesConfiguration Guide - Basic Configuration 9 Accessing Another Device
Issue 05 (2013-04-10) Huawei Proprietary and ConfidentialCopyright © Huawei Technologies Co., Ltd.
185
PrerequisitesLogging in to another device by using STelnet has been configured.
Procedurel Run the display ssh server-info command to check the mappings between all SSH servers
of the SSH client and the RSA or DSA public keys on the client.
----End
Example
Run the display ssh server-info to view the mappings between all servers of the SSH client andthe RSA or DSA public keys on the SSH client.
<Quidway> display ssh server-infoServer Name(IP) Server Public Key Type Server public key name______________________________________________________________________________
10.137.128.216 RSA 10.137.128.21610.137.128.217 RSA 10.137.128.21710.137.128.217 DSA sdfasdfasdfasdfasdfasdfadfasdf127.0.0.1 RSA 127.0.0.1127.0.0.1 DSA 10.137.128.2171fff:00ffff:00ffff:0ffff:ffff:ffff:ffff:fff1 RSA 1fff:00ffff:00ffff:0ffff:ffff:1fff:00ffff:ffff:00ffff:000ffff:ffff:ffff:fff1 RSA 1fff:00ffff:ffff:00ffff:000fff1fff:ffff:ffff:00ffff:000ffff:ffff:ffff:fff1 RSA 1fff:ffff:ffff:00ffff:000ffff:1fff:ffff:ffff:ffff:ffff:ffff:00ffff:00000fff1 RSA 1fff:ffff:ffff:ffff:ffff:ffff:8.1.1.2 RSA 8.1.1.2
9.4 Accessing Files on Another Device Using TFTPYou can configure the switch as a TFTP client, and log in to the TFTP server to upload anddownload files.
9.4.1 Establishing the Configuration TaskBefore configuring access to another device using TFTP, familiarize yourself with the usagescenario, complete the pre-configuration tasks, and obtain any data required for theconfiguration.
Applicable Environment
You can use TFTP to in a simple interaction environment to transfer files between a server anda client.
The current Switch functions as a TFTP client, and theSwitch to be accessed functions as a TFTPserver.
S6700 Series Ethernet SwitchesConfiguration Guide - Basic Configuration 9 Accessing Another Device
Issue 05 (2013-04-10) Huawei Proprietary and ConfidentialCopyright © Huawei Technologies Co., Ltd.
186
Pre-configuration TasksBefore configuring access to another device using TFTP, configure a reachable route betweenthe client and TFTP server.
Data PreparationTo access another device using TFTP, you need the following data.
No. Data
1 (Optional) Source address or source interface of the switch that functions as a TFTPclient
2 IP address or host name of the TFTP server
3 Name of the specific file in the TFTP server and the file directory
9.4.2 (Optional) Configuring a Source IP Address for a TFTP ClientYou can configure a source IP address for a TFTP client and then use the source IP address toset up a TFTP connection from the TFTP client to the server along a specific route.
ContextAn IP address is configured for an interface on the switch and functions as the source IP addressof a TFTP connection. This allows implementation of security checks.
The source address of a client can be configured as a source interface or a source IP address.
Perform the following steps on a switch that functions as a TFTP client.
Procedure
Step 1 Run:system-view
The system view is displayed.
Step 2 Run:tftp client-source { -a source-ip-address | -i interface-type interface-number }
A source IP address of a TFTP client is configured.
After the configuration, the source IP address of the TFTP client displayed on the TFTP servermust be the same as the configured one.
----End
9.4.3 (Optional) Configuring TFTP Access AuthorityThis section describes how to use an ACL rule to specify which TFTP servers can be accessedby using TFTP from the switch that you have logged in to.
S6700 Series Ethernet SwitchesConfiguration Guide - Basic Configuration 9 Accessing Another Device
Issue 05 (2013-04-10) Huawei Proprietary and ConfidentialCopyright © Huawei Technologies Co., Ltd.
187
Context
An Access Control List (ACL) is a set of sequential rules. Rule descriptions are based on thesource addresses, destination addresses, and port numbers of packets. Switchs use ACL rules tofilter packets. When a rule is applied to an interface on a switch, the switch permits or deniespackets based on the rule.
An ACL can define multiple rules. ACL rules are classified into the interface ACL, basic ACL,and advanced ACL based on the functions of ACL rules.
NOTE
TFTP supports only the basic ACL (whose number ranges from 2000 to 2999).
Perform the following steps on the switch that serves as the TFTP client:
Procedure
Step 1 Run:system-view
The system view is displayed.
Step 2 Run:acl acl-number
The ACL view is displayed.
Step 3 Run:rule [ rule-id ] { deny | permit } [ fragment | logging | source { source-address source-wildcard | any } | time-range time-name ] *
The ACL rule is configured.
Step 4 Run:quit
The system view is displayed.
Step 5 According to the address type of the TFTP server, select and run one of the following twocommands.
l For IPv4 addresses,
Run the tftp-server acl acl-number command. You can use the ACL to limit the access tothe TFTP server.
l For IPv6 addresses,
Run the tftp-server ipv6 acl acl6-number command. You can use the ACL to limit the accessto the TFTP server.
----End
9.4.4 Downloading Files Using TFTPYou can download files from a TFTP server to a TFTP client.
Perform the following steps on the switch that serves as the TFTP client:
S6700 Series Ethernet SwitchesConfiguration Guide - Basic Configuration 9 Accessing Another Device
Issue 05 (2013-04-10) Huawei Proprietary and ConfidentialCopyright © Huawei Technologies Co., Ltd.
188
Procedurel Run the following commands according to the type of the server IP addresses.
– The IP address of the server is IPv4 address, run:tftp [ -a source-ip-address | -i interface-type interface-number ] tftp-server [ public-net | vpn-instance vpn-instance-name ] get source-filename [ destination-filename ]
The switch is configured to download files through TFTP.– The IP address of the server is IPv6 address, run:
tftp ipv6 [ -a source-ip-address ] tftp-server-ipv6 [ interface-type interface-number ] get source-filename [ destination-filename ]
The switch is configured to download files using TFTP.
----End
9.4.5 Uploading Files Using TFTPYou can upload files from a TFTP client to a TFTP server.
Perform the following steps on the switch that serves as the TFTP client:
Procedurel Run the following commands according to the type of the server IP addresses.
– The IP address of the server is IPv4 address, run:tftp [ -a source-ip-address | -i interface-type interface-number ] tftp-server [ public-net | vpn-instance vpn-instance-name ] put source-filename [ destination-filename ]
The switch is configured to upload files using TFTP.– The IP address of the server is IPv6 address, run:
tftp ipv6 [ -a source-ip-address ] tftp-server-ipv6 [ -oi interface-type interface-number ] put source-filename [ destination-filename ]
The switch is configured to upload files using TFTP.
----End
9.4.6 Checking the ConfigurationsWhen a device is configured as a TFTP client, you can check the source address of the clientand the configured ACL rule.
PrerequisitesConfigurations for using the device as a TFTP client are complete.
Procedurel Run the display tftp-client command to check the device address that is set to the source
address of the TFTP client.l Run the display acl { name acl-name | acl-number | all } command to check the ACL rule
that is configured on the TFTP client.
----End
S6700 Series Ethernet SwitchesConfiguration Guide - Basic Configuration 9 Accessing Another Device
Issue 05 (2013-04-10) Huawei Proprietary and ConfidentialCopyright © Huawei Technologies Co., Ltd.
189
ExampleRun the display tftp-client command to view the source address of the TFTP client.
<Quidway> display tftp-clientThe source address of TFTP client is 1.1.1.1.
Run the display acl{ name acl-name | acl-number | all } to view the ACL rule that is configuredon the TFTP client.
<Quidway> display acl 2001Basic ACL 2001, 2 rules,Acl's step is 5 rule 5 permit rule 10 permit source 2.2.2.2 0
9.5 Accessing Files on Another Device Using FTPThis section describes how to configure a switch as an FTP client to log in to a FTP server, andto upload files to or download files from the server.
9.5.1 Establishing the Configuration TaskBefore configuring the use of FTP to access files on another device, familiarize yourself withthe usage scenario, complete the pre-configuration tasks, and obtain any data required for theconfiguration.
Applicable EnvironmentBefore transmitting files between a client and a remote FTP server or managing directories onthe server, you can configure the switch that you have logged in to as an FTP client. You canthen use FTP to access the FTP server for file transmission or directory management.
Pre-configuration TasksBefore configuring the use of FTP to access files on another device, configure a reachable routebetween the switch and the FTP server.
Data PreparationTo configure the use of FTP to access files on another device, you need the following data:
No. Data
1 (Optional) Source IP address or source interface of the switch functioning as an FTPclient
2 Host name or IP address of the FTP server, port number of connecting FTP, loginusername and password
3 Local file names and file names on the remote FTP server, name of the workingdirectory on the remote FTP server, name of the working directory on the local FTPclient, or directory name of the remote FTP server
S6700 Series Ethernet SwitchesConfiguration Guide - Basic Configuration 9 Accessing Another Device
Issue 05 (2013-04-10) Huawei Proprietary and ConfidentialCopyright © Huawei Technologies Co., Ltd.
190
9.5.2 (Optional) Configuring the Source IP Address and Interfaceof the FTP Client
This section describes how to configure the source IP address and interface of an FTP client toconnect to an FTP server.
PrerequisitesAn IP address is configured for an interface on the switch and functions as the source IP addressfor an FTP connection. This allows implementation of security checks.
The source of a client can be a source interface or a source IP address.
Configuring a source interface as the source for a client is possible only if the system has aloopback interface.
Procedure
Step 1 Run:system-view
The system view is displayed.
Step 2 Run:ftp client-source { -a source-ip-address | -i interface-type interface-number }
The source address of the FTP client is configured.
After the source address of the FTP client is configured, you can run the display ftp-userscommand on the FTP server to check that the displayed source address of the FTP client is thesame as the configured one.
----End
9.5.3 Connecting to Other Devices Using FTP CommandsYou can run FTP commands to log in to other devices from the switch that functions as the FTPclient.
ContextYou can log in to the FTP server in the user view or the FTP view.
Perform the following steps on the switch that serves as the client:
Procedure
Step 1 Run the following commands according to types of the server IP address.l If the IP address of the server is an IPv4 address, do as follows:
– In the user view, establish a connection to the FTP server.Run:ftp [ -a source-ip-address | -i interface-type interface-number ] host [ port-number ] [ public-net | vpn-instance vpn-instance-name ]The switch is connected to the FTP server.
S6700 Series Ethernet SwitchesConfiguration Guide - Basic Configuration 9 Accessing Another Device
Issue 05 (2013-04-10) Huawei Proprietary and ConfidentialCopyright © Huawei Technologies Co., Ltd.
191
– In the FTP view, establish a connection to the FTP server.
1. In the user view,Run:ftp
The FTP view is displayed.2. Run:
open [ -a source-ip-address | -i interface-type interface-number ] host [ port-number ] [ public-net | vpn-instance vpn-instance-name ]
The switch is connected to the FTP server.
NOTE
Before logging in to the FTP server, you can run the set net-manager vpn-instancecommand to configure a default VPN instance. After a default VPN instance is configured,it will be used for FTP operations.
l If the IP address of the server is an IPv6 address, do as follows:– In the user view, establish a connection to the FTP server.
Run:ftp ipv6 host [ port-number ]
The switch is connected to the FTP server.– In the FTP view, establish a connection to the FTP server.
1. In the user view,Run:ftp
The FTP view is displayed.2. Run:
open ipv6 host-ipv6-address [ port-number ]
The switch is connected to the FTP server.
----End
9.5.4 Managing Files Using FTP CommandsAfter logging in to an FTP server, you can use FTP commands to manage files. File operationsinclude configuring a file transmission method, checking online help about FTP commands,uploading or downloading files, and managing directories and files.
ContextAfter logging in to an FTP server, you can perform the following operations:
l Configure a data type for transmission files and a file transmission method.l Check the online help about FTP commands in the FTP client view.l Upload local files to the remote FTP server, or download files from the FTP server and
save them locally.l Create directories on or delete directories from the FTP server.l Display information about a specified remote directory or a file of the FTP server, or delete
a specified file from the FTP server.
After logging in to the switch that functions as a client and entering the FTP client view, youcan perform the following steps:
S6700 Series Ethernet SwitchesConfiguration Guide - Basic Configuration 9 Accessing Another Device
Issue 05 (2013-04-10) Huawei Proprietary and ConfidentialCopyright © Huawei Technologies Co., Ltd.
192
Procedurel Configuring data type and transmission mode for the file.
– Run:ascii | binaryThe data type of the file to be transmitted is ascii or binary mode.
NOTE
FTP supports both ASCII and binary files. Their differences are as follows:
l In ASCII transmission mode, ASCII characters are used to separate carriage returned fromline feeds.
l In binary transmission mode, characters can be transferred without format conversion orformatting.
Clients can select an FTP transmission mode ad required. The system defaults to the ASCIItransmission mode. The client can use a mode switch command to switch between the ASCIImode and the binary mode. The ASCII mode is used to transmit .txt files and the binary mode isused to transmit binary files.
– Run:passiveThe passive file transfer mode is configured.
– Run:verboseThe verbose mode for FTP is enabled.When verbose is enabled, all FTP responses are displayed. After file transmissionefficiency statistics will be displayed.
l View online help for FTP commands.remotehelp [ command ]
The online help of the FTP command is displayed.l Upload or download files.
– Upload or download a file.– Run:
put local-filename [ remote-filename ]The local file is uploaded to the remote FTP server.
– Run:get remote-filename [ local-filename ]The FTP file is downloaded from the FTP server and saved to the local file.
– Upload or download multiple files.– Run the mput local-filenames command to upload multiple local files
synchronously to the remote FTP server.– Run the mget remote-filenames command to download multiple files from the FTP
server and save them locally.
NOTE
l When you are uploading or downloading files, and the prompt command is run in the FTP clientview to enable the file transmission prompt function, the system will prompt you to confirm theuploading or downloading operation.
l If the prompt command is run again in the FTP client view, the file transmission prompt functionwill be disabled.
S6700 Series Ethernet SwitchesConfiguration Guide - Basic Configuration 9 Accessing Another Device
Issue 05 (2013-04-10) Huawei Proprietary and ConfidentialCopyright © Huawei Technologies Co., Ltd.
193
l Run one or more of the following commands order to manage directories.
– Run:cd pathname
The working path of the remote FTP server is specified.
– Run:cdup
The working path of the FTP server is switched to the upper-level directory.
– Run:pwd
The specified directory of the FTP server is displayed.
– Run:lcd [ local-directory ]
The directory of the FTP client is displayed or changed.
– Run:mkdir remote-directory
A directory is created on the FTP server.
– Run:rmdir remote-directory
A directory is removed from the FTP server.
NOTE
l A directory name can use letters and digits, but not special characters such as <, >, ?, \ and :.
l When running the mkdir /abc command, you create a sub-directory named "abc".
l Run one or more of the following commands to manage files.
– Run:ls [ remote-filename ] [ local-filename ]
The specified directory or file on the remote FTP server is displayed.
If the directory name is not specified when a specific remote file is selected, the systemsearches the working directory for the specific file.
If local-filename is configured, the remote file can be saved in another local file.
– Run:dir [ remote-filename ] [ local-filename ]
The specified directory or file on the local FTP server is displayed.
If the directory name is not specified when a specific remote file is selected, the systemsearches the working directory for the specific file.
If local-filename is configured, the remote file can be saved in another local file.
– Run:delete remote-filename
The specified file on the FTP server is deleted.
If the directory name is not specified when a specific remote file is selected, the systemsearches the working directory for the specific file.
----End
S6700 Series Ethernet SwitchesConfiguration Guide - Basic Configuration 9 Accessing Another Device
Issue 05 (2013-04-10) Huawei Proprietary and ConfidentialCopyright © Huawei Technologies Co., Ltd.
194
9.5.5 Changing Login UsersAfter logging in to an FTP server, you can change the username on the client and re-log in tothe server with the new username.
Context
If you are logged in to the S6700 functioning as an FTP client, you can switch to a differentusername and log in to the FTP server without logging out of the FTP client view. The FTPconnection established in this way is identical to that established by running the ftp command.
Perform the following steps on the switch that functions as a client:
Procedurel Run:
user user-name [ password ]
The user that logged in to the FTP server earlier is changed and the new user logs in to theserver.
When the username that is used to log in to the FTP server is changed, the originalconnection between the user and the FTP server is interrupted.
----End
9.5.6 Disconnecting from the FTP ServerYou can terminate the connection with an FTP server and return to the user view or FTP view.
Context
Various commands can be used from the FTP client view to terminate a connection with an FTPserver.
Perform the following steps on the switch that serves as the client.
Procedurel Run one of the following commands depending on your system configurations.
– Run:bye
Or,quit
The client switch is disconnected from the FTP server.Return to the user view.
– Run:close
Or,disconnect
The client switch is disconnected from the FTP server.
S6700 Series Ethernet SwitchesConfiguration Guide - Basic Configuration 9 Accessing Another Device
Issue 05 (2013-04-10) Huawei Proprietary and ConfidentialCopyright © Huawei Technologies Co., Ltd.
195

Return to the FTP view.
----End
9.5.7 Checking the ConfigurationsAfter the configurations for accessing other devices using FTP are complete, you can view thesource parameters configured on the FTP client.
Prerequisites
Accessing other devices using FTP has been configured.
Procedurel Run the display ftp-client command to view the source parameters of the FTP client.
----End
Example
Run the display ftp-client command to view the source parameters of the FTP client.
<Quidway> display ftp-clientThe source address of FTP client is 1.1.1.1.
9.6 Accessing Files on Another Device Using SFTPSFTP is a secure FTP service. After the switch is configured as an SFTP client, the SFTP serverauthenticates the client and encrypts data in both directions to provide secure data transmission.
9.6.1 Establishing the Configuration TaskBefore configuring the use of SFTP to access files on another device, familiarize yourself withthe usage scenario, complete the pre-configuration tasks, and obtain any data required for theconfiguration.
Applicable Environment
SFTP is a secure FTP protocol. SFTP is based on SSH. It allows users to log in to a remotedevice and transmit or manage files securely. You can log in to a remote SSH server from theswitch that functions as an SFTP client.
Pre-configuration Tasks
Before configuring the use of SFTP to access files on another device, configure a reachable routebetween the client and SSH server.
Data Preparation
To use SFTP to access files on another device, you need the following data:
S6700 Series Ethernet SwitchesConfiguration Guide - Basic Configuration 9 Accessing Another Device
Issue 05 (2013-04-10) Huawei Proprietary and ConfidentialCopyright © Huawei Technologies Co., Ltd.
196
No. Data
1 (Optional) Name of the SSH server
2 (Optional) Public key that is assigned by the client to the SSH server
3 IPv4 or IPv6 address or host name of the SSH server
4 Number of the port monitored by the SSH server, preferred encryption algorithm fordata from the SFTP client to the SSH server, preferred encryption algorithm for datafrom the SSH server to the SFTP client, preferred HMAC algorithm for data from theSFTP client to the SSH server, preferred HMAC algorithm for data from the SSHserver to the SFTP client, preferred algorithm of key exchange, name of the outgoinginterface, source addressUser information for logging in to the SSH server
5 Name and directory of a specified file on the SSH server
9.6.2 Configuring the First Successful Login to Another Device(Enabling the First-Time Authentication on the SSH Client)
After first-time authentication on the SSH client is enabled, the SFTP client does not check thevalidity of the RSA or DSA public key when logging in to the SSH server for the first time.
ContextIf first-time authentication on the SSH client is enabled, the SFTP client does not check thevalidity of the RSA or DSA public key when logging in to the SSH server for the first time.After the login, the system automatically allocates the RSA or DSA public key and saves it forauthentication at next login.
Perform the following steps on the switch that serves as an SSH client:
Procedure
Step 1 Run:system-view
The system view is displayed.
Step 2 Run:ssh client first-time enable
First-time authentication on the SSH client is enabled.
By default, first-time authentication on the SSH client is disabled.
S6700 Series Ethernet SwitchesConfiguration Guide - Basic Configuration 9 Accessing Another Device
Issue 05 (2013-04-10) Huawei Proprietary and ConfidentialCopyright © Huawei Technologies Co., Ltd.
197
NOTE
l The purpose of enabling first-time authentication on the SSH client is to skip checking the validity ofthe RSA or DSA public key on the SSH server when an STelnet client logs in to the SSH server forthe first time. The check is skipped because the STelnet server has not saved the RSA or DSA publickey of the SSH server.
l If an STelnet client logs in to the SSH server for the first time and first-time authentication is not enabledon the SSH client, the STelnet client fails to pass the check of the RSA or DSA public key validity andcannot log in to the server.
TIP
To ensure that an STelnet client can log in to an SSH server at the first attempt, you can assign an RSA orDSA public key in advance to the SSH server on the SSH client in addition to enabling first-timeauthentication on the SSH client.
----End
9.6.3 Configuring the First Successful Login to Another Device(Allocating a Public Key to the SSH Server)
To configure the first successful login to another device on an SSH client, you must allocate anRSA or DSA public key to the SSH server before the login.
Context
If first-time authentication is not enabled on an SSH client, when the SFTP client logs in to anSSH server for the first time, the SFTP client fails to pass the RSA or DSA public key validitycheck and cannot log in to the server.
Perform the following steps on the switch functioning as an SSH client:
Procedure
Step 1 Run:system-view
The system view is displayed.
Step 2 Run:rsa peer-public-key key-name or dsa peer-public-key key-name encoding-type { der | pem }
The public key view is displayed.
Step 3 Run:public-key-code begin
The public key editing view is displayed.
Step 4 Run:hex-data
The public key is edited.
The public key is a string of hexadecimal alphanumeric characters automatically generated byan SSH client.
S6700 Series Ethernet SwitchesConfiguration Guide - Basic Configuration 9 Accessing Another Device
Issue 05 (2013-04-10) Huawei Proprietary and ConfidentialCopyright © Huawei Technologies Co., Ltd.
198
NOTE
l The RSA or DSA public key assigned to the SSH server must be generated on the server. Otherwise,the validity check for the RSA or DSA public key on the STelnet client will fail.
l After entering the public key edit view, paste the RSA or DSA public key generated on the server tothe switch that functions as the client.
Step 5 Run:public-key-code end
Quit the public key editing view.
l If the specified hex-data is invalid, the public key cannot be generated after the peer-public-key end command is run.
l If the specified key-name is deleted in other views, the system prompts that the key does notexist after the peer-public-key end command is run and the system view is displayed.
Step 6 Run:peer-public-key end
Return to the system view from the public key view.
Step 7 Run:ssh client servername assign { rsa-key | dsa-key } keyname
The RSA or DSA public key is assigned to the SSH server
NOTE
If the RSA public key stored on the SSH client becomes invalid, run the undo ssh client servernameassign { rsa-key | dsa-key } command to cancel the association between the SSH client and the SSH server.Then, run the ssh client servername assign { rsa-key | dsa-key } keyname command to allocate a newRSA or DSA public key to the SSH server.
----End
9.6.4 Connecting to Other Devices by Using SFTPYou can use SFTP to log in to an SSH server from an SSH client.
ContextThe command for enabling an SFTP client is similar to that of STelnet. When accessing an SSHserver, SFTP can carry the source address and the name of the VPN instance and choose the keyexchange algorithm, encryption algorithm, and HMAC algorithm, and configure the keepalivefunction.
Perform the following steps on the switch that serves as an SSH client.
Procedure
Step 1 Run:system-view
The system view is displayed.
Step 2 According to the address type of the SSH server, select and perform one of the two configurationsbelow.
S6700 Series Ethernet SwitchesConfiguration Guide - Basic Configuration 9 Accessing Another Device
Issue 05 (2013-04-10) Huawei Proprietary and ConfidentialCopyright © Huawei Technologies Co., Ltd.
199
l For IPv4 addresses,Run:sftp [ -a source-address | -i interface-type interface-number ] host-ipv4 [ port ] [ [ public-net | -vpn-instance vpn-instance-name ] | [ prefer_kex { dh_group1 | dh_exchange_group } ] | [ prefer_ctos_cipher { des | 3des | aes128 } ] | [ prefer_stoc_cipher { des | 3des | aes128 } ] | [ prefer_ctos_hmac { sha1 | sha1_96 | md5 | md5_96 } ] | [ prefer_stoc_hmac { sha1 | sha1_96 | md5 | md5_96 } ] | [ -ki aliveinterval ] | [ -kc alivecountmax ] | [ identity-key { dsa | rsa } ] ] *
You can log in to the SSH server through SFTP.l For IPv6 addresses,
Run:sftp ipv6 [[ -a source-address | -oi interface-type interface-number ] | [ prefer_kex { dh_group1 | dh_exchange_group } ] | [ prefer_ctos_cipher { des | 3des | aes128 } ] | [ prefer_stoc_cipher { des | 3des | aes128 } ] | [ prefer_ctos_hmac { sha1 | sha1_96 | md5 | md5_96 } ] | [ prefer_stoc_hmac { sha1 | sha1_96 | md5 | md5_96 } ] | [ -ki aliveinterval] |[ -kc alivecountmax ] | [ identity-key { dsa | rsa } ] ]* host-ipv6 [ port ]
----End
9.6.5 Managing Files Using SFTP CommandsYou can use an SFTP client to manage directories and files on the SSH server, and check thecommand help on the SFTP client.
ContextAfter logging in to an SSH server from an SFTP client, you can use the SFTP client to performthe following operations:
l Create or delete directories on the SSH server, display the current working directory, ordisplay the specified directory and information about the file in the specified directory.
l Change file names, delete files, display a file list, and upload or download files.l Display the SFTP client command help.
After logging in to the switch that functions as an SSH client and entering the SFTP client view,you can perform the following steps:
Procedurel Manage directories.
Perform the following steps as required:
– Run:cd [ remote-directory ]
The current operating directory of users is changed.– Run:
cdup
The view is switched to a directory one level up.– Run:
pwd
S6700 Series Ethernet SwitchesConfiguration Guide - Basic Configuration 9 Accessing Another Device
Issue 05 (2013-04-10) Huawei Proprietary and ConfidentialCopyright © Huawei Technologies Co., Ltd.
200
The current operating directory of users is displayed.– Run:
dir / ls [ remote-directory ]
A list of files in the specified directory is displayed.– Run:
rmdir remote-directory & <1-10>
– The directory on the server is deleted.– Run:
mkdir remote-directory
A directory is created on the server.l Manage files.
Perform the following steps as required:
– Run:rename old-name new-name
The name of the specified file on the server is changed.– Run:
get remote-filename [local-filename]
The file on the remote server is downloaded.– Run:
put local-filename [remote-filename]
The local file is uploaded to the remote server.– Run:
remove remote-filename
The file on the server is removed.l Display the SFTP client command help.
help [all | command-name ]
The SFTP client command help is displayed.
----End
9.6.6 Checking the ConfigurationsAfter using SFTP to log in to another device, you can view the source address of the SSH client,mappings between all SSH servers and the RSA, or DSA public keys on the client, globalconfigurations of the SSH servers, and sessions between the SSH servers and the client.
PrerequisitesThe configuration for using SFTP to access files on another device is complete.
Procedurel Run the display ssh server-info command to check the mapping between the SSH server
and the RSA or DSA public key on the SSH client.
----End
S6700 Series Ethernet SwitchesConfiguration Guide - Basic Configuration 9 Accessing Another Device
Issue 05 (2013-04-10) Huawei Proprietary and ConfidentialCopyright © Huawei Technologies Co., Ltd.
201
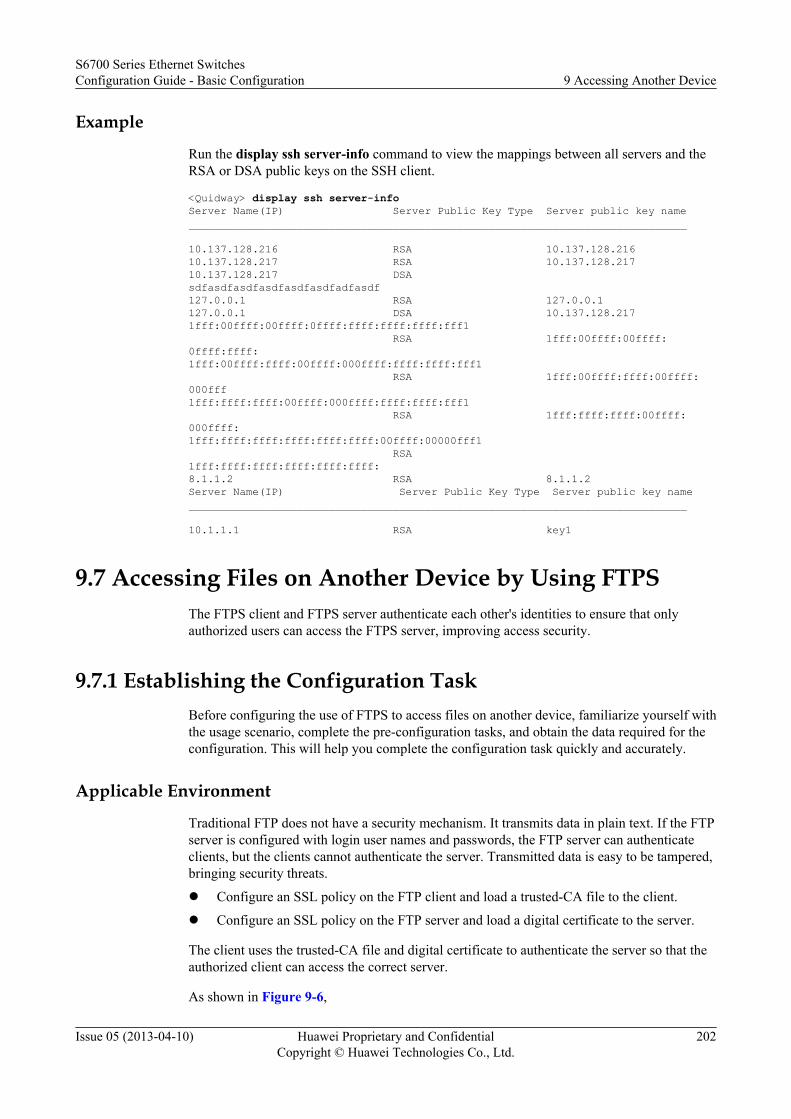
Example
Run the display ssh server-info command to view the mappings between all servers and theRSA or DSA public keys on the SSH client.
<Quidway> display ssh server-infoServer Name(IP) Server Public Key Type Server public key name______________________________________________________________________________
10.137.128.216 RSA 10.137.128.21610.137.128.217 RSA 10.137.128.21710.137.128.217 DSA sdfasdfasdfasdfasdfasdfadfasdf127.0.0.1 RSA 127.0.0.1127.0.0.1 DSA 10.137.128.2171fff:00ffff:00ffff:0ffff:ffff:ffff:ffff:fff1 RSA 1fff:00ffff:00ffff:0ffff:ffff:1fff:00ffff:ffff:00ffff:000ffff:ffff:ffff:fff1 RSA 1fff:00ffff:ffff:00ffff:000fff1fff:ffff:ffff:00ffff:000ffff:ffff:ffff:fff1 RSA 1fff:ffff:ffff:00ffff:000ffff:1fff:ffff:ffff:ffff:ffff:ffff:00ffff:00000fff1 RSA 1fff:ffff:ffff:ffff:ffff:ffff:8.1.1.2 RSA 8.1.1.2Server Name(IP) Server Public Key Type Server public key name______________________________________________________________________________
10.1.1.1 RSA key1
9.7 Accessing Files on Another Device by Using FTPSThe FTPS client and FTPS server authenticate each other's identities to ensure that onlyauthorized users can access the FTPS server, improving access security.
9.7.1 Establishing the Configuration TaskBefore configuring the use of FTPS to access files on another device, familiarize yourself withthe usage scenario, complete the pre-configuration tasks, and obtain the data required for theconfiguration. This will help you complete the configuration task quickly and accurately.
Applicable Environment
Traditional FTP does not have a security mechanism. It transmits data in plain text. If the FTPserver is configured with login user names and passwords, the FTP server can authenticateclients, but the clients cannot authenticate the server. Transmitted data is easy to be tampered,bringing security threats.
l Configure an SSL policy on the FTP client and load a trusted-CA file to the client.
l Configure an SSL policy on the FTP server and load a digital certificate to the server.
The client uses the trusted-CA file and digital certificate to authenticate the server so that theauthorized client can access the correct server.
As shown in Figure 9-6,
S6700 Series Ethernet SwitchesConfiguration Guide - Basic Configuration 9 Accessing Another Device
Issue 05 (2013-04-10) Huawei Proprietary and ConfidentialCopyright © Huawei Technologies Co., Ltd.
202
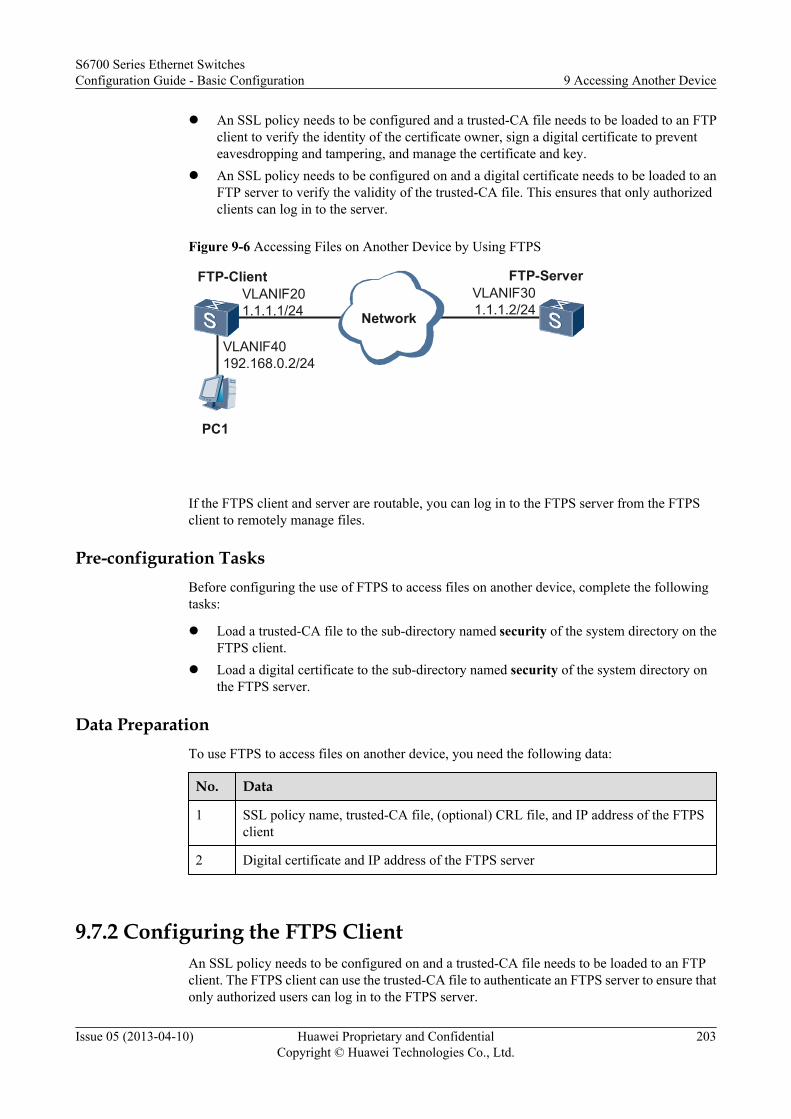
l An SSL policy needs to be configured and a trusted-CA file needs to be loaded to an FTPclient to verify the identity of the certificate owner, sign a digital certificate to preventeavesdropping and tampering, and manage the certificate and key.
l An SSL policy needs to be configured on and a digital certificate needs to be loaded to anFTP server to verify the validity of the trusted-CA file. This ensures that only authorizedclients can log in to the server.
Figure 9-6 Accessing Files on Another Device by Using FTPS
Network
PC1
VLANIF301.1.1.2/24
FTP-Client
VLANIF40192.168.0.2/24
FTP-ServerVLANIF201.1.1.1/24
If the FTPS client and server are routable, you can log in to the FTPS server from the FTPSclient to remotely manage files.
Pre-configuration TasksBefore configuring the use of FTPS to access files on another device, complete the followingtasks:
l Load a trusted-CA file to the sub-directory named security of the system directory on theFTPS client.
l Load a digital certificate to the sub-directory named security of the system directory onthe FTPS server.
Data PreparationTo use FTPS to access files on another device, you need the following data:
No. Data
1 SSL policy name, trusted-CA file, (optional) CRL file, and IP address of the FTPSclient
2 Digital certificate and IP address of the FTPS server
9.7.2 Configuring the FTPS ClientAn SSL policy needs to be configured on and a trusted-CA file needs to be loaded to an FTPclient. The FTPS client can use the trusted-CA file to authenticate an FTPS server to ensure thatonly authorized users can log in to the FTPS server.
S6700 Series Ethernet SwitchesConfiguration Guide - Basic Configuration 9 Accessing Another Device
Issue 05 (2013-04-10) Huawei Proprietary and ConfidentialCopyright © Huawei Technologies Co., Ltd.
203
Context
A trusted-CA file can be in the PEM, ASN1, or PFX format. Details are as follows:
l The PEM format is most commonly used. The file name extension of a PEM digitalcertificate is .pem.
l The ASN1 format is a universal digital certificate format. The file name extension of anASN1 digital certificate is .der.
l The PFX format is a universal digital certificate format. The file name extension of a PFXdigital certificate is .pfx.
A CRL file can be in either the ASN1 or PEM format. These two formats represent the samecontents.
Procedure
Step 1 Run:system-view
The system view is displayed.
Step 2 Run:ssl policy policy-name
An SSL policy is configured and the SSL policy view is displayed.
Step 3 Load a trusted-CA file.
Run one of the following commands as required:
l Run:trusted-ca load pem-ca ca-filename
A PEM trusted-CA file is loaded.
l Run:trusted-ca load asn1-ca ca-filename
An ASN1 trusted-CA file is loaded.
l Run:trusted-ca load pfx-ca ca-filename auth-code auth-code
A PFX trusted-CA file is loaded.
A maximum of four trusted-CA files can be loaded to an SSL policy. If multiple trusted-CAfiles are loaded, these files will be added to the existing trusted-CA file list.
NOTE
l If the trusted-CA file configured on the FTPS server contains only one certificate, configure all thetrusted-CA certificates of upper levels to the root CA certificate on the client.
l If a certificate chain is configured on the FTPS server, configure only the root CA certificate on theclient.
Step 4 (Optional) Run:crl load { pem-crl | asn1-crl } crl-filename
A CRL is loaded.
S6700 Series Ethernet SwitchesConfiguration Guide - Basic Configuration 9 Accessing Another Device
Issue 05 (2013-04-10) Huawei Proprietary and ConfidentialCopyright © Huawei Technologies Co., Ltd.
204
A maximum of two CRL files can be loaded to an SSL policy. If multiple CRL files are loaded,these files will be added to the existing CRL file list.
----End
9.7.3 Configuring the FTPS ServerFTPS that adds support for SSL is an extension to the commonly used FTP. Using SSL toauthenticate the identities of the client and server and encrypt data to be transmitted, FTPSimplements security management of devices.
ContextThe FTPS server needs to obtain a digital certificate from a CA. The client that will access theserver needs the CA certificate from the CA to verify the validity of the digital certificate of theserver.
NOTE
A CA is responsible for issuing and managing digital certificates. The digital certificate to be loaded to theFTPS server must be obtained from a corresponding CA.
A digital certificate can be in the PEM, ASN1, or PFX format. Details are as follows:l The PEM format is most commonly used. The file name extension of a PEM digital
certificate is .pem.The PEM format is applicable to text transmission between systems.
l The ASN1 format is a universal digital certificate format. The file name extension of anASN1 digital certificate is .der.The ASN1 format is the default format for most browsers.
l The PFX format is a universal digital certificate format. The file name extension of a PFXdigital certificate is .pfx.The PFX format is a binary format that can be converted into the PEM or ASN1 format.
Perform the following steps on the device that functions as an FTPS server:
Procedure
Step 1 Run:system-view
The system view is displayed.
Step 2 Run:ssl policy policy-name
An SSL policy is configured and the SSL policy view is displayed.
Step 3 Load a digital certificate.
Run one of the following commands as required:l Run:
certificate load pem-cert cert-filename key-pair { dsa | rsa } key-file key-filename auth-code auth-code
A PEM digital certificate is loaded.
S6700 Series Ethernet SwitchesConfiguration Guide - Basic Configuration 9 Accessing Another Device
Issue 05 (2013-04-10) Huawei Proprietary and ConfidentialCopyright © Huawei Technologies Co., Ltd.
205
l Run:certificate load asn1-cert cert-filename key-pair { dsa | rsa } key-file key-filename
An ASN1 digital certificate is loaded.l Run:
certificate load pfx-cert cert-filename key-pair { dsa | rsa } { mac mac-code | key-file key-filename } auth-code auth-code
A PFX digital certificate is loaded.l Run:
certificate load pem-chain cert-filename key-pair { dsa | rsa } key-file key-filename auth-code auth-code
A PEM digital certificate chain is loaded.
NOTE
Only one certificate or certificate chain can be loaded to an SSL policy. If a certificate or certificate chainhas been loaded, unload the certificate or certificate chain before loading a new certificate or certificatechain.
Step 4 Run:quit
Return to the system view.
Step 5 Run:ftp secure-server ssl-policy policy-name
An SSL policy is configured for the device.
Step 6 Run:ftp secure-server enable
The FTPS server function is enabled.
By default, the FTPS server function is disabled.
NOTE
Before enabling the FTPS server function, disable the FTP server function.
----End
9.7.4 Accessing an FTPS ServerYou can use specified commands to log in to an FTPS server from an FTPS client to remotelymanage the FTPS server.
Procedurel On an IPv4 network:
In the user view, run:
ftp ssl-policy policy-name [ [ -a source-ip-address | -i interface-type interface-number ] host [ port-number ] [ public-net | vpn-instance vpn-instance-name ] ]
A control connection is established with a remote FTPS server and the FTP client view isdisplayed.
S6700 Series Ethernet SwitchesConfiguration Guide - Basic Configuration 9 Accessing Another Device
Issue 05 (2013-04-10) Huawei Proprietary and ConfidentialCopyright © Huawei Technologies Co., Ltd.
206
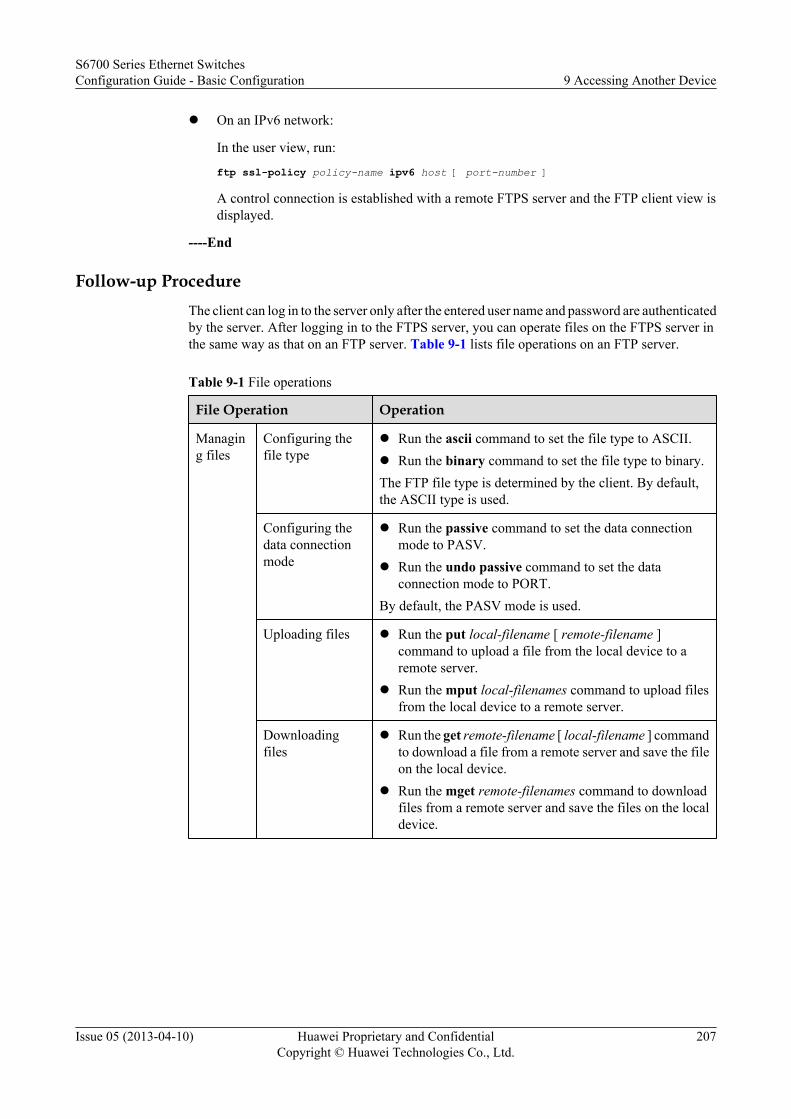
l On an IPv6 network:
In the user view, run:
ftp ssl-policy policy-name ipv6 host [ port-number ]
A control connection is established with a remote FTPS server and the FTP client view isdisplayed.
----End
Follow-up ProcedureThe client can log in to the server only after the entered user name and password are authenticatedby the server. After logging in to the FTPS server, you can operate files on the FTPS server inthe same way as that on an FTP server. Table 9-1 lists file operations on an FTP server.
Table 9-1 File operations
File Operation Operation
Managing files
Configuring thefile type
l Run the ascii command to set the file type to ASCII.l Run the binary command to set the file type to binary.The FTP file type is determined by the client. By default,the ASCII type is used.
Configuring thedata connectionmode
l Run the passive command to set the data connectionmode to PASV.
l Run the undo passive command to set the dataconnection mode to PORT.
By default, the PASV mode is used.
Uploading files l Run the put local-filename [ remote-filename ]command to upload a file from the local device to aremote server.
l Run the mput local-filenames command to upload filesfrom the local device to a remote server.
Downloadingfiles
l Run the get remote-filename [ local-filename ] commandto download a file from a remote server and save the fileon the local device.
l Run the mget remote-filenames command to downloadfiles from a remote server and save the files on the localdevice.
S6700 Series Ethernet SwitchesConfiguration Guide - Basic Configuration 9 Accessing Another Device
Issue 05 (2013-04-10) Huawei Proprietary and ConfidentialCopyright © Huawei Technologies Co., Ltd.
207
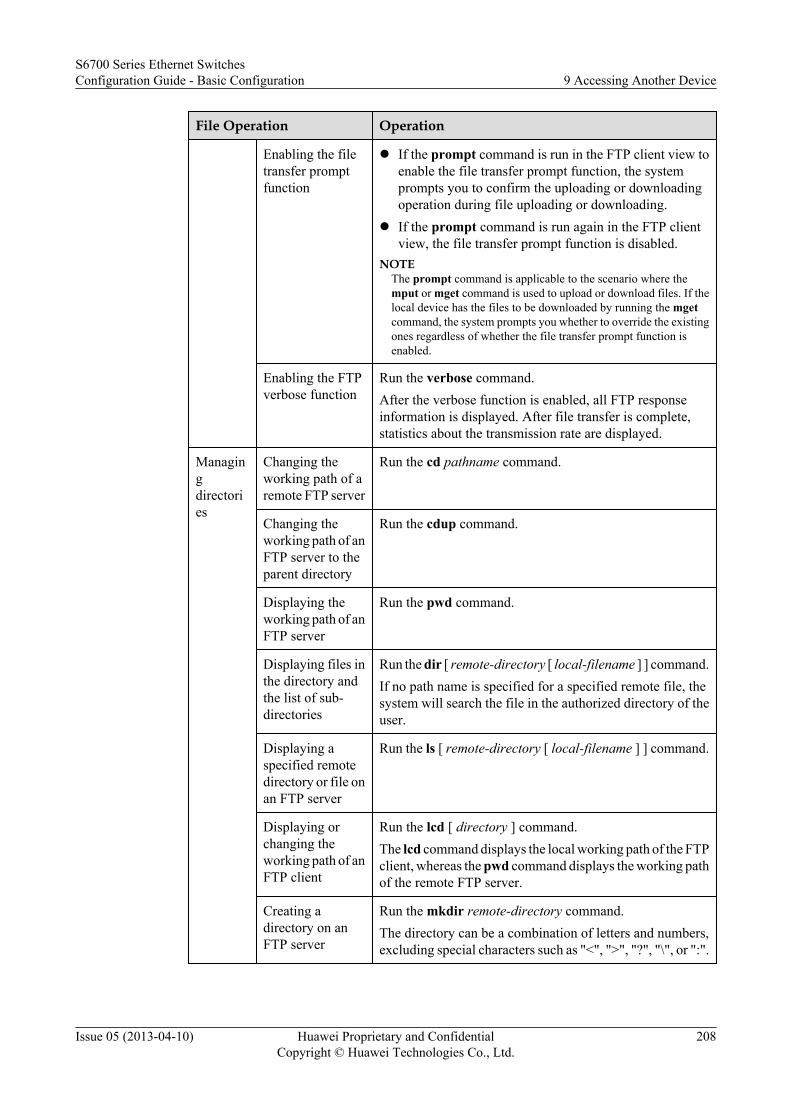
File Operation Operation
Enabling the filetransfer promptfunction
l If the prompt command is run in the FTP client view toenable the file transfer prompt function, the systemprompts you to confirm the uploading or downloadingoperation during file uploading or downloading.
l If the prompt command is run again in the FTP clientview, the file transfer prompt function is disabled.
NOTEThe prompt command is applicable to the scenario where themput or mget command is used to upload or download files. If thelocal device has the files to be downloaded by running the mgetcommand, the system prompts you whether to override the existingones regardless of whether the file transfer prompt function isenabled.
Enabling the FTPverbose function
Run the verbose command.After the verbose function is enabled, all FTP responseinformation is displayed. After file transfer is complete,statistics about the transmission rate are displayed.
Managingdirectories
Changing theworking path of aremote FTP server
Run the cd pathname command.
Changing theworking path of anFTP server to theparent directory
Run the cdup command.
Displaying theworking path of anFTP server
Run the pwd command.
Displaying files inthe directory andthe list of sub-directories
Run the dir [ remote-directory [ local-filename ] ] command.If no path name is specified for a specified remote file, thesystem will search the file in the authorized directory of theuser.
Displaying aspecified remotedirectory or file onan FTP server
Run the ls [ remote-directory [ local-filename ] ] command.
Displaying orchanging theworking path of anFTP client
Run the lcd [ directory ] command.The lcd command displays the local working path of the FTPclient, whereas the pwd command displays the working pathof the remote FTP server.
Creating adirectory on anFTP server
Run the mkdir remote-directory command.The directory can be a combination of letters and numbers,excluding special characters such as "<", ">", "?", "\", or ":".
S6700 Series Ethernet SwitchesConfiguration Guide - Basic Configuration 9 Accessing Another Device
Issue 05 (2013-04-10) Huawei Proprietary and ConfidentialCopyright © Huawei Technologies Co., Ltd.
208
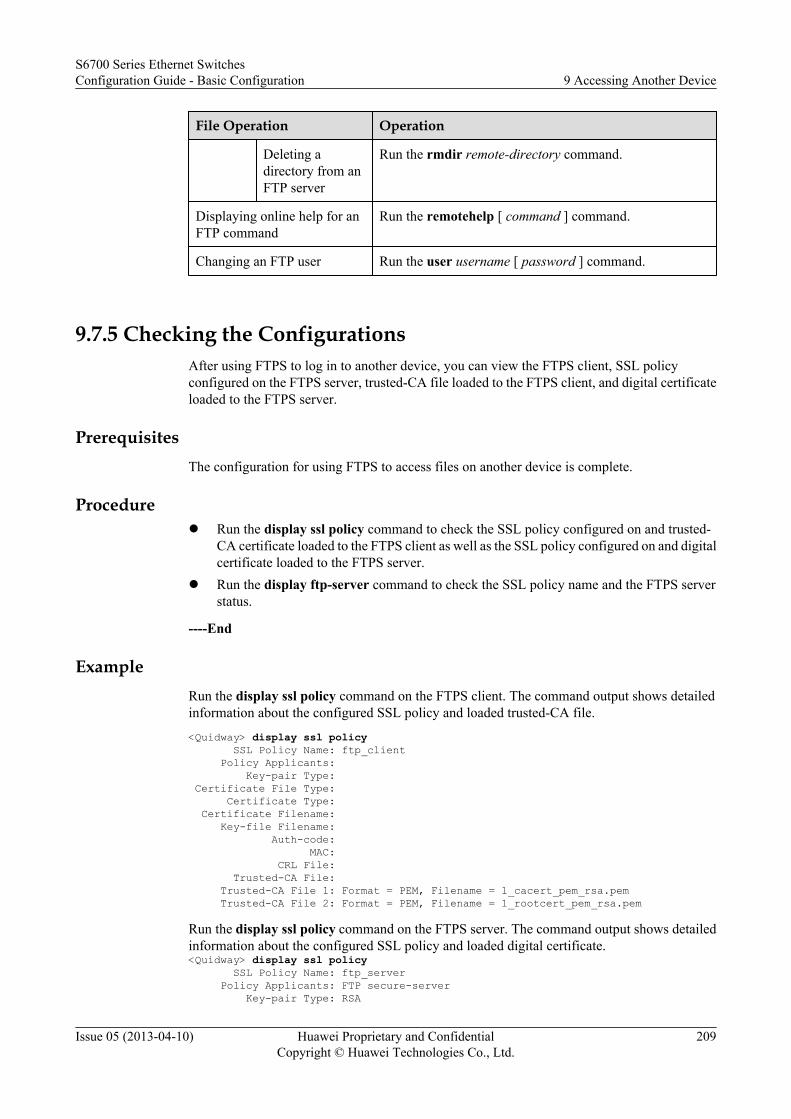
File Operation Operation
Deleting adirectory from anFTP server
Run the rmdir remote-directory command.
Displaying online help for anFTP command
Run the remotehelp [ command ] command.
Changing an FTP user Run the user username [ password ] command.
9.7.5 Checking the ConfigurationsAfter using FTPS to log in to another device, you can view the FTPS client, SSL policyconfigured on the FTPS server, trusted-CA file loaded to the FTPS client, and digital certificateloaded to the FTPS server.
PrerequisitesThe configuration for using FTPS to access files on another device is complete.
Procedurel Run the display ssl policy command to check the SSL policy configured on and trusted-
CA certificate loaded to the FTPS client as well as the SSL policy configured on and digitalcertificate loaded to the FTPS server.
l Run the display ftp-server command to check the SSL policy name and the FTPS serverstatus.
----End
ExampleRun the display ssl policy command on the FTPS client. The command output shows detailedinformation about the configured SSL policy and loaded trusted-CA file.
<Quidway> display ssl policy SSL Policy Name: ftp_client Policy Applicants: Key-pair Type: Certificate File Type: Certificate Type: Certificate Filename: Key-file Filename: Auth-code: MAC: CRL File: Trusted-CA File: Trusted-CA File 1: Format = PEM, Filename = 1_cacert_pem_rsa.pem Trusted-CA File 2: Format = PEM, Filename = 1_rootcert_pem_rsa.pem
Run the display ssl policy command on the FTPS server. The command output shows detailedinformation about the configured SSL policy and loaded digital certificate.<Quidway> display ssl policy SSL Policy Name: ftp_server Policy Applicants: FTP secure-server Key-pair Type: RSA
S6700 Series Ethernet SwitchesConfiguration Guide - Basic Configuration 9 Accessing Another Device
Issue 05 (2013-04-10) Huawei Proprietary and ConfidentialCopyright © Huawei Technologies Co., Ltd.
209
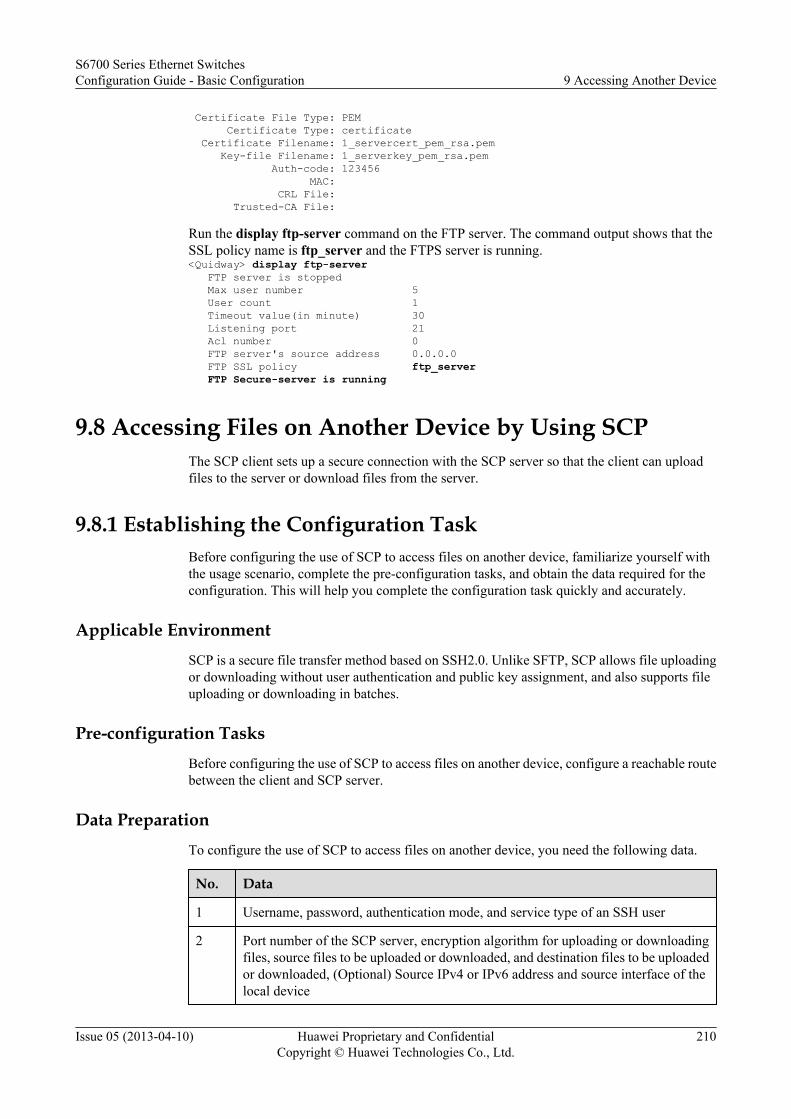
Certificate File Type: PEM Certificate Type: certificate Certificate Filename: 1_servercert_pem_rsa.pem Key-file Filename: 1_serverkey_pem_rsa.pem Auth-code: 123456 MAC: CRL File: Trusted-CA File:
Run the display ftp-server command on the FTP server. The command output shows that theSSL policy name is ftp_server and the FTPS server is running.<Quidway> display ftp-server FTP server is stopped Max user number 5 User count 1 Timeout value(in minute) 30 Listening port 21 Acl number 0 FTP server's source address 0.0.0.0 FTP SSL policy ftp_server FTP Secure-server is running
9.8 Accessing Files on Another Device by Using SCPThe SCP client sets up a secure connection with the SCP server so that the client can uploadfiles to the server or download files from the server.
9.8.1 Establishing the Configuration TaskBefore configuring the use of SCP to access files on another device, familiarize yourself withthe usage scenario, complete the pre-configuration tasks, and obtain the data required for theconfiguration. This will help you complete the configuration task quickly and accurately.
Applicable EnvironmentSCP is a secure file transfer method based on SSH2.0. Unlike SFTP, SCP allows file uploadingor downloading without user authentication and public key assignment, and also supports fileuploading or downloading in batches.
Pre-configuration TasksBefore configuring the use of SCP to access files on another device, configure a reachable routebetween the client and SCP server.
Data PreparationTo configure the use of SCP to access files on another device, you need the following data.
No. Data
1 Username, password, authentication mode, and service type of an SSH user
2 Port number of the SCP server, encryption algorithm for uploading or downloadingfiles, source files to be uploaded or downloaded, and destination files to be uploadedor downloaded, (Optional) Source IPv4 or IPv6 address and source interface of thelocal device
S6700 Series Ethernet SwitchesConfiguration Guide - Basic Configuration 9 Accessing Another Device
Issue 05 (2013-04-10) Huawei Proprietary and ConfidentialCopyright © Huawei Technologies Co., Ltd.
210
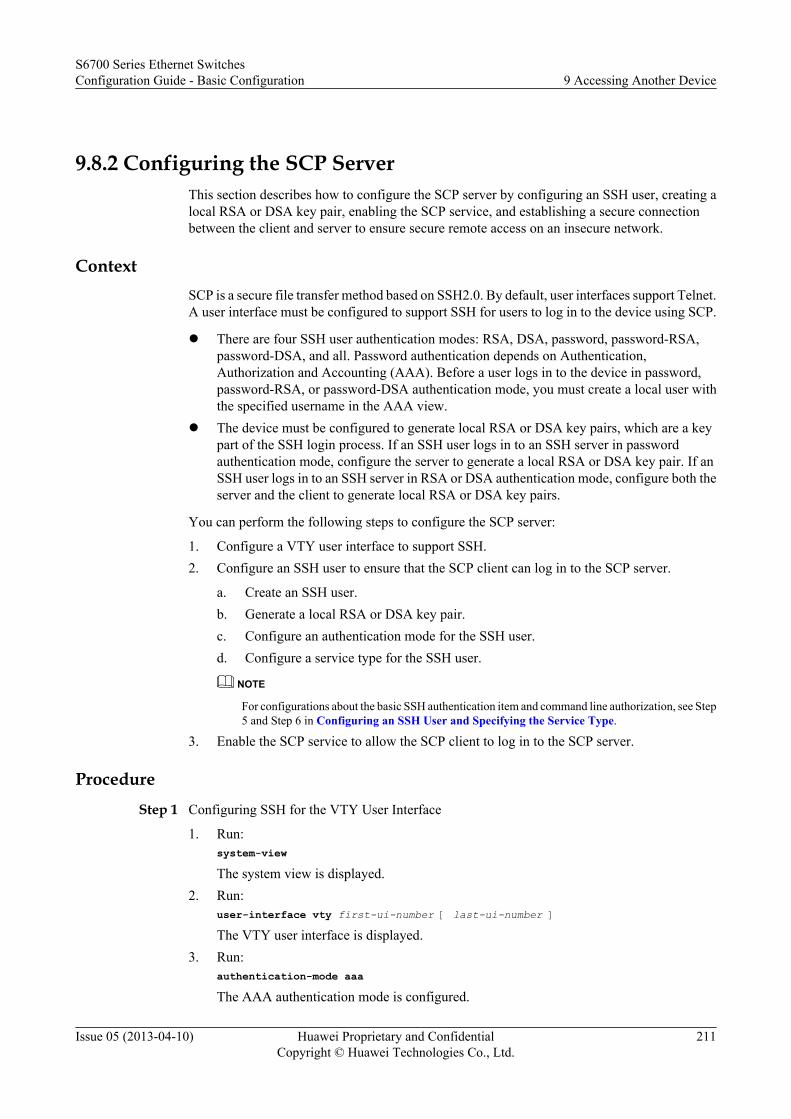
9.8.2 Configuring the SCP ServerThis section describes how to configure the SCP server by configuring an SSH user, creating alocal RSA or DSA key pair, enabling the SCP service, and establishing a secure connectionbetween the client and server to ensure secure remote access on an insecure network.
ContextSCP is a secure file transfer method based on SSH2.0. By default, user interfaces support Telnet.A user interface must be configured to support SSH for users to log in to the device using SCP.
l There are four SSH user authentication modes: RSA, DSA, password, password-RSA,password-DSA, and all. Password authentication depends on Authentication,Authorization and Accounting (AAA). Before a user logs in to the device in password,password-RSA, or password-DSA authentication mode, you must create a local user withthe specified username in the AAA view.
l The device must be configured to generate local RSA or DSA key pairs, which are a keypart of the SSH login process. If an SSH user logs in to an SSH server in passwordauthentication mode, configure the server to generate a local RSA or DSA key pair. If anSSH user logs in to an SSH server in RSA or DSA authentication mode, configure both theserver and the client to generate local RSA or DSA key pairs.
You can perform the following steps to configure the SCP server:
1. Configure a VTY user interface to support SSH.2. Configure an SSH user to ensure that the SCP client can log in to the SCP server.
a. Create an SSH user.b. Generate a local RSA or DSA key pair.c. Configure an authentication mode for the SSH user.d. Configure a service type for the SSH user.
NOTE
For configurations about the basic SSH authentication item and command line authorization, see Step5 and Step 6 in Configuring an SSH User and Specifying the Service Type.
3. Enable the SCP service to allow the SCP client to log in to the SCP server.
ProcedureStep 1 Configuring SSH for the VTY User Interface
1. Run:system-viewThe system view is displayed.
2. Run:user-interface vty first-ui-number [ last-ui-number ]The VTY user interface is displayed.
3. Run:authentication-mode aaaThe AAA authentication mode is configured.
S6700 Series Ethernet SwitchesConfiguration Guide - Basic Configuration 9 Accessing Another Device
Issue 05 (2013-04-10) Huawei Proprietary and ConfidentialCopyright © Huawei Technologies Co., Ltd.
211
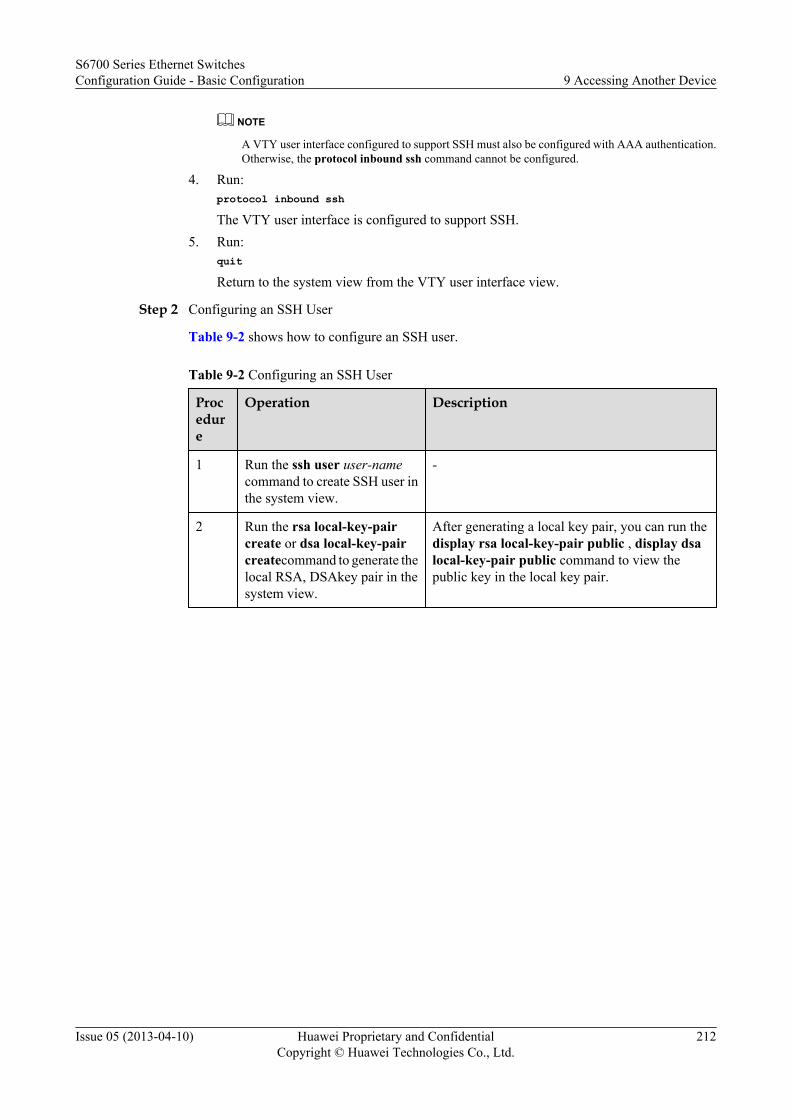
NOTE
A VTY user interface configured to support SSH must also be configured with AAA authentication.Otherwise, the protocol inbound ssh command cannot be configured.
4. Run:protocol inbound sshThe VTY user interface is configured to support SSH.
5. Run:quitReturn to the system view from the VTY user interface view.
Step 2 Configuring an SSH User
Table 9-2 shows how to configure an SSH user.
Table 9-2 Configuring an SSH User
Procedure
Operation Description
1 Run the ssh user user-namecommand to create SSH user inthe system view.
-
2 Run the rsa local-key-paircreate or dsa local-key-paircreatecommand to generate thelocal RSA, DSAkey pair in thesystem view.
After generating a local key pair, you can run thedisplay rsa local-key-pair public , display dsalocal-key-pair public command to view thepublic key in the local key pair.
S6700 Series Ethernet SwitchesConfiguration Guide - Basic Configuration 9 Accessing Another Device
Issue 05 (2013-04-10) Huawei Proprietary and ConfidentialCopyright © Huawei Technologies Co., Ltd.
212
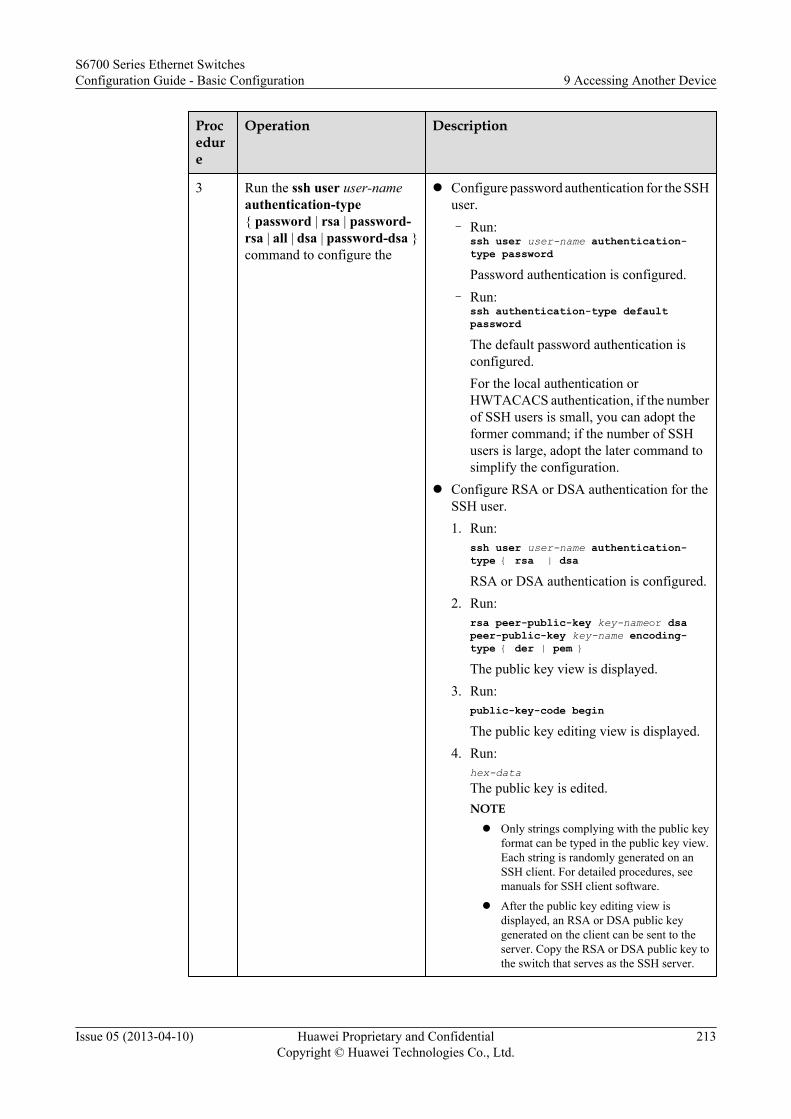
Procedure
Operation Description
3 Run the ssh user user-nameauthentication-type{ password | rsa | password-rsa | all | dsa | password-dsa }command to configure the
l Configure password authentication for the SSHuser.– Run:
ssh user user-name authentication-type passwordPassword authentication is configured.
– Run:ssh authentication-type default passwordThe default password authentication isconfigured.For the local authentication orHWTACACS authentication, if the numberof SSH users is small, you can adopt theformer command; if the number of SSHusers is large, adopt the later command tosimplify the configuration.
l Configure RSA or DSA authentication for theSSH user.1. Run:
ssh user user-name authentication-type { rsa | dsaRSA or DSA authentication is configured.
2. Run:rsa peer-public-key key-nameor dsa peer-public-key key-name encoding-type { der | pem }The public key view is displayed.
3. Run:public-key-code beginThe public key editing view is displayed.
4. Run:hex-dataThe public key is edited.NOTEl Only strings complying with the public key
format can be typed in the public key view.Each string is randomly generated on anSSH client. For detailed procedures, seemanuals for SSH client software.
l After the public key editing view isdisplayed, an RSA or DSA public keygenerated on the client can be sent to theserver. Copy the RSA or DSA public key tothe switch that serves as the SSH server.
S6700 Series Ethernet SwitchesConfiguration Guide - Basic Configuration 9 Accessing Another Device
Issue 05 (2013-04-10) Huawei Proprietary and ConfidentialCopyright © Huawei Technologies Co., Ltd.
213

Procedure
Operation Description
authentication mode for SSHusers.
5. Run:public-key-code endQuit the public key editing view.– If the specified hex-data is invalid, the
public key cannot be generated after thepeer-public-key end command is run.
– If the specified key-name is deleted inother views and the peer-public-keyend command is then run and the systemview is displayed, the system promptsthat the key does not exist.
6. Run:peer-public-key endReturn to the system view from the publickey view.
7. Run:ssh user user-name assign { rsa-key | dsa-key } key-nameThe public key is assigned to the SSH user.
NOTEAn SSH user is created. If password, password-DSA orpassword-RSA authentication is configured for the SSHuser, create the same SSH user in the AAA view and setthe local user access type to SSH.
1. Run the aaa command to enter the AAA view.
2. Run the local-user user-name password cipherpassword command to configure a local usernameand a password.
3. Run the local-user user-name service-type sshcommand to set the local user access type to SSH.
By default, a local user can use any access type. You canspecify an access type to allow only users configuredwith the specified access type to log in to the device.
4 Run the ssh user usernameservice-type { sftp | all }command to configure theservice type for the SSH user.
By default, the service type of the SSH user is notconfigured.
Step 3 Run:scp server enable
SCP services are enabled.
By default, SCP services are disabled.
----End
S6700 Series Ethernet SwitchesConfiguration Guide - Basic Configuration 9 Accessing Another Device
Issue 05 (2013-04-10) Huawei Proprietary and ConfidentialCopyright © Huawei Technologies Co., Ltd.
214
9.8.3 Configuring the SCP ClientThe SCP client sets up a secure connection with the SCP server so that the client can uploadfiles to the server or download files from the server.
Procedure
Step 1 Run:system-view
The system view is displayed.
Step 2 (Optional) Run:scp client-source { -a source-ip-address | -i interface-type interface-number }
A source IP address or a source interface is configured for the SCP client.
It is more secure to configure a source IP address for the SCP client, and use the specified sourceIP address to set up an SCP connection between the client and server.At present, the availablesource interface must be a loobpack interface.
Step 3 Files are uploaded from the SCP client to the remote SCP server or downloaded from the remoteSCP server to the SCP client.l Basing on IPv4 address
scp [ -port port-number | { public-net | vpn-instance vpn-instance-name } | { -a source-ip-address | -i interface-type interface-number } | -r | identity-key { dsa | rsa } | -cipher{ des | 3des | aes128 } | -c ] * source-filename destination-filename
l Basing on IPv6 addressscp ipv6 [ -port port-number | { public-net | vpn-instance vpn-instance-name } | -a source-ip-address | -r | identity-key { dsa | rsa } | -cipher { des | 3des | aes128 } | -c ]* source-filename destination-filename [ -oi interface-type interface-number ]
----End
9.8.4 Checking the ConfigurationsAfter using SCP to log in to another device, you can view the source IP address of the SCP client.
PrerequisitesThe configuration for using SCP to access files on another device is complete.
Procedurel Run the display scp-client command to view the source IP address or source interface of
the SCP client.
----End
ExampleRun the display scp-client command, and you can view the source IP address of the SCP client.
<Quidway> display scp-client The source of SCP ipv4 client: 1.1.1.1
S6700 Series Ethernet SwitchesConfiguration Guide - Basic Configuration 9 Accessing Another Device
Issue 05 (2013-04-10) Huawei Proprietary and ConfidentialCopyright © Huawei Technologies Co., Ltd.
215
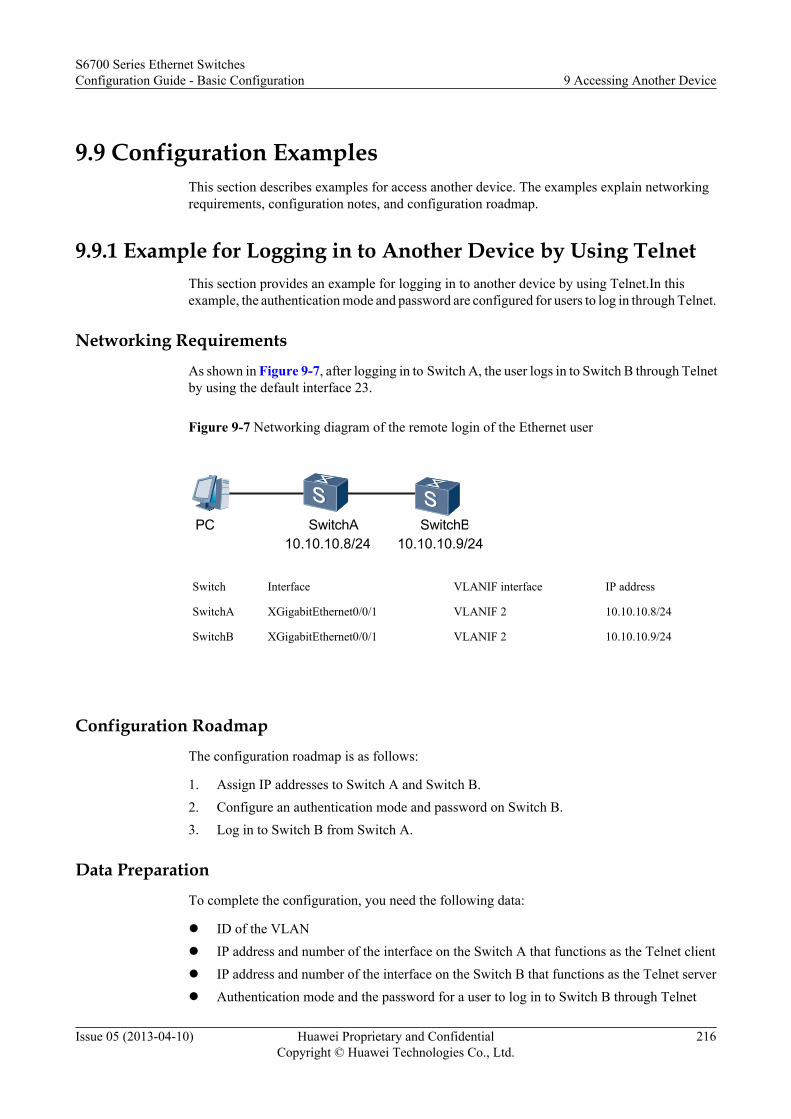
9.9 Configuration ExamplesThis section describes examples for access another device. The examples explain networkingrequirements, configuration notes, and configuration roadmap.
9.9.1 Example for Logging in to Another Device by Using TelnetThis section provides an example for logging in to another device by using Telnet.In thisexample, the authentication mode and password are configured for users to log in through Telnet.
Networking Requirements
As shown in Figure 9-7, after logging in to Switch A, the user logs in to Switch B through Telnetby using the default interface 23.
Figure 9-7 Networking diagram of the remote login of the Ethernet user
SwitchA SwitchBPC10.10.10.9/2410.10.10.8/24
Switch Interface VLANIF interface IP address
SwitchA XGigabitEthernet0/0/1 VLANIF 2 10.10.10.8/24
SwitchB XGigabitEthernet0/0/1 VLANIF 2 10.10.10.9/24
Configuration Roadmap
The configuration roadmap is as follows:
1. Assign IP addresses to Switch A and Switch B.2. Configure an authentication mode and password on Switch B.3. Log in to Switch B from Switch A.
Data Preparation
To complete the configuration, you need the following data:
l ID of the VLANl IP address and number of the interface on the Switch A that functions as the Telnet clientl IP address and number of the interface on the Switch B that functions as the Telnet serverl Authentication mode and the password for a user to log in to Switch B through Telnet
S6700 Series Ethernet SwitchesConfiguration Guide - Basic Configuration 9 Accessing Another Device
Issue 05 (2013-04-10) Huawei Proprietary and ConfidentialCopyright © Huawei Technologies Co., Ltd.
216
Procedure
Step 1 Assign IP addresses.
# Assign IP address to Switch A that functions as the Telnet client.
<SwitchA> system-view[SwitchA] vlan 2[SwitchA-vlan2] quit[SwitchA] interface xgigabitethernet 0/0/1[SwitchA-XGigabitEthernet0/0/1] port hybrid pvid vlan 2[SwitchA-XGigabitEthernet0/0/1] port hybrid untagged vlan 2[SwitchA-XGigabitEthernet0/0/1] quit[SwitchA] interface vlanif 2[SwitchA-Vlanif2] ip address 10.10.10.8 255.255.255.0[SwitchA-Vlanif2] quit[SwitchA]
# Assign an IP address to Switch B that functions as the Telnet server.
<SwitchB> system-view[SwitchB] vlan 2[SwitchB-vlan2] quit[SwitchB] interface xgigabitethernet 0/0/1[SwitchB-XGigabitEthernet0/0/1] port hybrid pvid vlan 2[SwitchB-XGigabitEthernet0/0/1] port hybrid untagged vlan 2[SwitchB-XGigabitEthernet0/0/1] quit[SwitchB] interface vlanif 2[SwitchB-Vlanif2] ip address 10.10.10.9 255.255.255.0[SwitchB-Vlanif2] quit[SwitchB]
Step 2 Configure the authentication mode and password for Switch B.[SwitchB] user-interface vty 0 4[SwitchB-ui-vty0-4] authentication-mode password[SwitchB-ui-vty0-4] set authentication password cipher huawei[SwitchB-ui-vty0-4] quit[SwitchB]
Step 3 Verify the configuration.
# Log in to Switch B on Switch A through Telnet.
<SwitchA> telnet 10.10.10.9Trying 10.10.10.9 ...Press CTRL+K to abortConnected to 10.10.10.9 ...
Login authentication
Password:Info: The max number of VTY users is 20, and the number of current VTY users on line is 2. The current login time is 2012-03-20 11:04:45.<SwitchB>
----End
Configuration Filesl Configuration file of Switch A
# sysname SwitchA# vlan batch 2#
S6700 Series Ethernet SwitchesConfiguration Guide - Basic Configuration 9 Accessing Another Device
Issue 05 (2013-04-10) Huawei Proprietary and ConfidentialCopyright © Huawei Technologies Co., Ltd.
217
interface Vlanif2 ip address 10.10.10.8 255.255.255.0#interface XGigabitEthernet0/0/1 port hybrid pvid vlan 2 port hybrid untagged vlan 2 #return
l Configuration file of Switch B# sysname SwitchB# vlan batch 2#interface Vlanif2 ip address 10.10.10.9 255.255.255.0#interface XGigabitEthernet0/0/1 port hybrid pvid vlan 2 port hybrid untagged vlan 2 #user-interface vty 0 4authentication-mode passwordset authentication password cipher %$%$axs[$3*Q;+hUY:0YxNS;X.%y]:elTpar].gl2eHPIZEDE4+&%$%$#return
9.9.2 Example for Configuring the Device as the STelnet Client toConnect to the SSH Server
This section provides an example for logging in to another device by using STelnet.In thisexample, the local key pairs are generated on the STelnet client and the SSH server; the publicRSA key is generated on the SSH server and then bound to the STelnet client. In this manner,the STelnet client can connect to the SSH server.
Networking RequirementsAs shown in Figure 9-8, after the STelnet service is enabled on the SSH server, the STelnetclient can log in to the SSH server with the password, RSA, password-rsa, or all authenticationmode. In this example, the Huawei switch functions as an SSH server.
The following login users need to be configured.
l Client001, with the password as huawei and the authentication mode as passwordl Client002, with the password as rsakey001 and the authentication mode as RSA
The user interface supports only the SSH protocol.
S6700 Series Ethernet SwitchesConfiguration Guide - Basic Configuration 9 Accessing Another Device
Issue 05 (2013-04-10) Huawei Proprietary and ConfidentialCopyright © Huawei Technologies Co., Ltd.
218
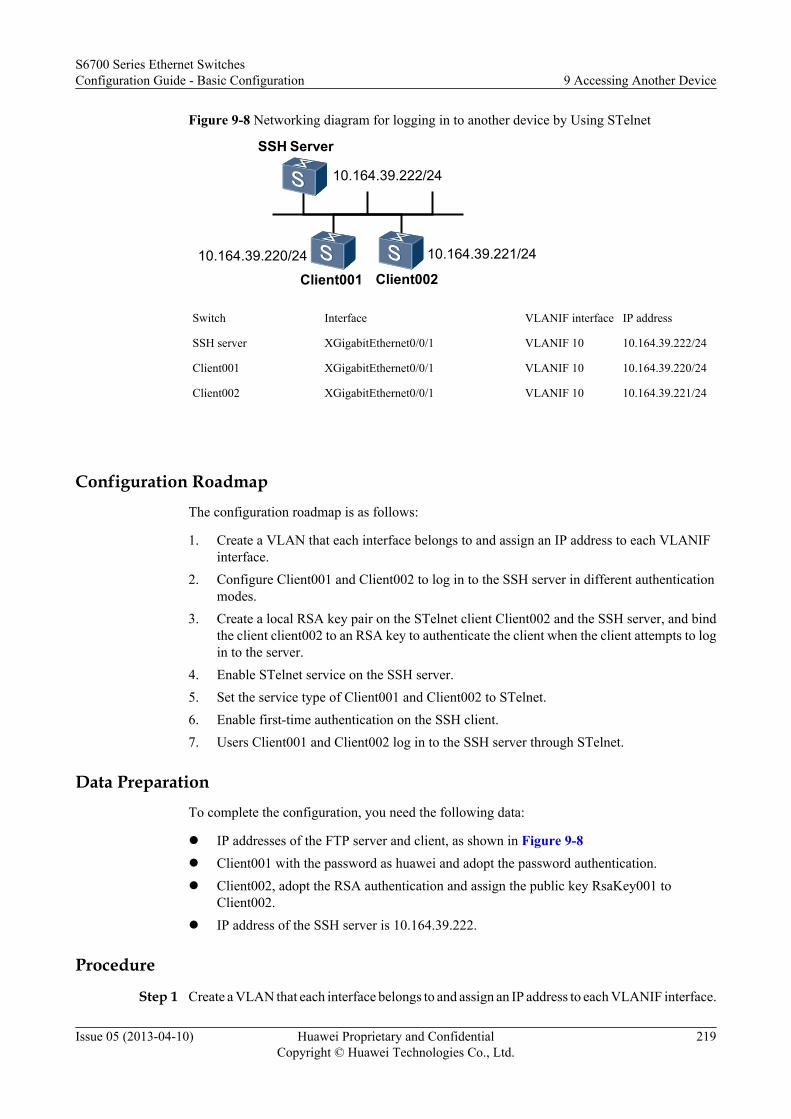
Figure 9-8 Networking diagram for logging in to another device by Using STelnet
Client00110.164.39.220/24
SSH Server
10.164.39.222/24
Client002
10.164.39.221/24
Switch Interface VLANIF interface IP address
SSH server XGigabitEthernet0/0/1 VLANIF 10 10.164.39.222/24
Client001 XGigabitEthernet0/0/1 VLANIF 10 10.164.39.220/24
Client002 XGigabitEthernet0/0/1 VLANIF 10 10.164.39.221/24
Configuration RoadmapThe configuration roadmap is as follows:
1. Create a VLAN that each interface belongs to and assign an IP address to each VLANIFinterface.
2. Configure Client001 and Client002 to log in to the SSH server in different authenticationmodes.
3. Create a local RSA key pair on the STelnet client Client002 and the SSH server, and bindthe client client002 to an RSA key to authenticate the client when the client attempts to login to the server.
4. Enable STelnet service on the SSH server.5. Set the service type of Client001 and Client002 to STelnet.6. Enable first-time authentication on the SSH client.7. Users Client001 and Client002 log in to the SSH server through STelnet.
Data PreparationTo complete the configuration, you need the following data:
l IP addresses of the FTP server and client, as shown in Figure 9-8l Client001 with the password as huawei and adopt the password authentication.l Client002, adopt the RSA authentication and assign the public key RsaKey001 to
Client002.l IP address of the SSH server is 10.164.39.222.
Procedure
Step 1 Create a VLAN that each interface belongs to and assign an IP address to each VLANIF interface.
S6700 Series Ethernet SwitchesConfiguration Guide - Basic Configuration 9 Accessing Another Device
Issue 05 (2013-04-10) Huawei Proprietary and ConfidentialCopyright © Huawei Technologies Co., Ltd.
219
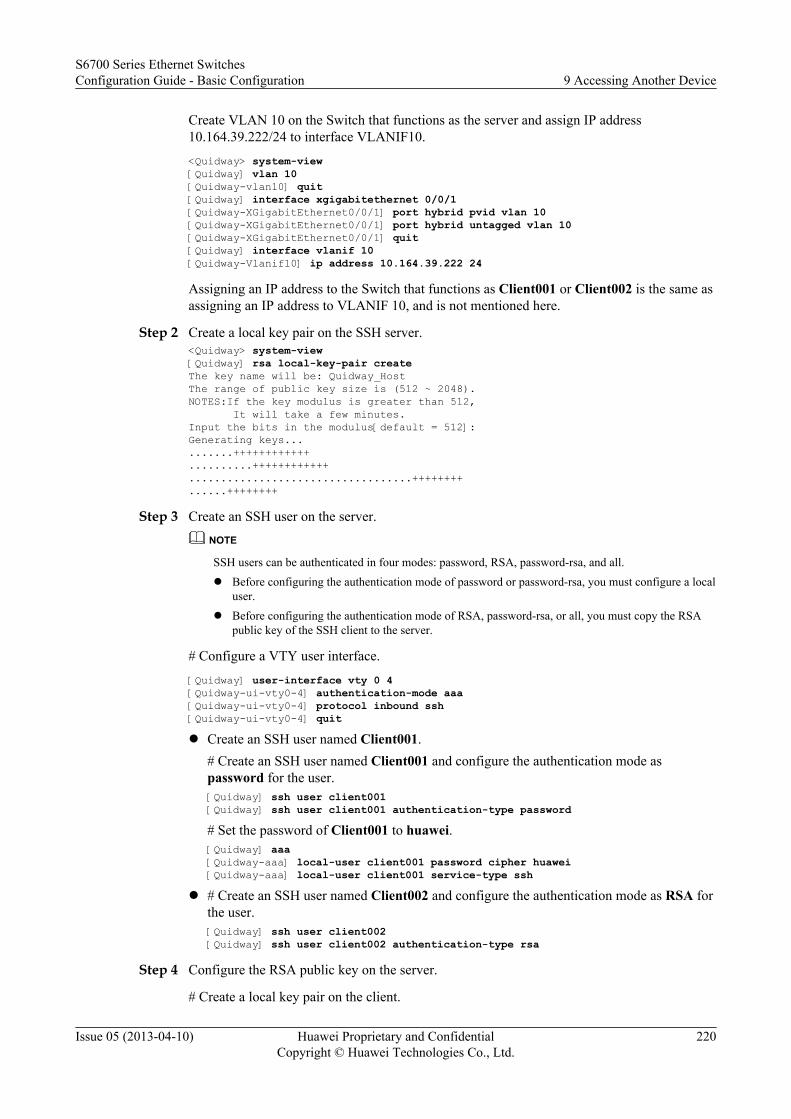
Create VLAN 10 on the Switch that functions as the server and assign IP address10.164.39.222/24 to interface VLANIF10.
<Quidway> system-view[Quidway] vlan 10[Quidway-vlan10] quit[Quidway] interface xgigabitethernet 0/0/1[Quidway-XGigabitEthernet0/0/1] port hybrid pvid vlan 10[Quidway-XGigabitEthernet0/0/1] port hybrid untagged vlan 10[Quidway-XGigabitEthernet0/0/1] quit[Quidway] interface vlanif 10[Quidway-Vlanif10] ip address 10.164.39.222 24
Assigning an IP address to the Switch that functions as Client001 or Client002 is the same asassigning an IP address to VLANIF 10, and is not mentioned here.
Step 2 Create a local key pair on the SSH server.<Quidway> system-view [Quidway] rsa local-key-pair createThe key name will be: Quidway_HostThe range of public key size is (512 ~ 2048).NOTES:If the key modulus is greater than 512, It will take a few minutes.Input the bits in the modulus[default = 512]:Generating keys..........++++++++++++..........++++++++++++...................................++++++++......++++++++
Step 3 Create an SSH user on the server.NOTE
SSH users can be authenticated in four modes: password, RSA, password-rsa, and all.l Before configuring the authentication mode of password or password-rsa, you must configure a local
user.l Before configuring the authentication mode of RSA, password-rsa, or all, you must copy the RSA
public key of the SSH client to the server.
# Configure a VTY user interface.
[Quidway] user-interface vty 0 4[Quidway-ui-vty0-4] authentication-mode aaa[Quidway-ui-vty0-4] protocol inbound ssh[Quidway-ui-vty0-4] quitl Create an SSH user named Client001.
# Create an SSH user named Client001 and configure the authentication mode aspassword for the user.[Quidway] ssh user client001[Quidway] ssh user client001 authentication-type password# Set the password of Client001 to huawei.[Quidway] aaa[Quidway-aaa] local-user client001 password cipher huawei[Quidway-aaa] local-user client001 service-type ssh
l # Create an SSH user named Client002 and configure the authentication mode as RSA forthe user.[Quidway] ssh user client002[Quidway] ssh user client002 authentication-type rsa
Step 4 Configure the RSA public key on the server.
# Create a local key pair on the client.
S6700 Series Ethernet SwitchesConfiguration Guide - Basic Configuration 9 Accessing Another Device
Issue 05 (2013-04-10) Huawei Proprietary and ConfidentialCopyright © Huawei Technologies Co., Ltd.
220

<Quidway> system-view[Quidway] sysname client002[client002] rsa local-key-pair create
# Check the RSA public key generated on the client.
[client002] display rsa local-key-pair public=====================================================Time of Key pair created: 16:38:51 2007/5/25Key name: client002_HostKey type: RSA encryption Key=====================================================Key code:3047 0240 BFF35E4B C61BD786 F907B5DE 7D6770C3 E5FD17AB 203C8FCB BBC8FDF2 F7CB674E 519E8419 0F6B97A8 EA91FC4B B9E18836 5E74BFD5 4C687767 A89C6B43 1D7E3E1B 0203 010001
Host public key for PEM format code:---- BEGIN SSH2 PUBLIC KEY ----AAAAB3NzaC1yc2EAAAADAQABAAAAQQC/815LxhvXhvkHtd59Z3DD5f0XqyA8j8u7yP3y98tnTlGehBkPa5eo6pH8S7nhiDZedL/VTGh3Z6ica0Mdfj4b---- END SSH2 PUBLIC KEY ----
Public key code for pasting into OpenSSH authorized_keys file :ssh-rsa AAAAB3NzaC1yc2EAAAADAQABAAAAQQC/815LxhvXhvkHtd59Z3DD5f0XqyA8j8u7yP3y98tnTlGehBkPa5eo6pH8S7nhiDZedL/VTGh3Z6ica0Mdfj4b rsa-key=====================================================Time of Key pair created: 16:38:51 2007/5/25Key name: client002_ServerKey type: RSA encryption Key=====================================================Key code:3067 0260 BCFAC085 49A2E70E 1284F901 937D7B63 D7A077AB D2797280 4BCA86C0 4CD18B70 5DFAC9D3 9A3F3E74 9B2AF4CB 69FA6483 E87DA590 7B47721A 16391E27 1C76ABAB 743C568B 1B35EC7A 8572A096 BCA9DF0E BC89D3DB 5A83698C 9063DB39 A279DD89 0203 010001[client002]
# Send the RSA public key generated on the client to the server.
[Quidway] rsa peer-public-key RsaKey001Enter "RSA public key" view, return system view with "peer-public-key end".[Quidway-rsa-public-key] public-key-code beginEnter "RSA key code" view, return last view with "public-key-code end".[Quidway-rsa-key-code] 3047[Quidway-rsa-key-code] 0240[Quidway-rsa-key-code] BFF35E4B C61BD786 F907B5DE 7D6770C3 E5FD17AB[Quidway-rsa-key-code] 203C8FCB BBC8FDF2 F7CB674E 519E8419 0F6B97A8[Quidway-rsa-key-code] EA91FC4B B9E18836 5E74BFD5 4C687767 A89C6B43[Quidway-rsa-key-code] 1D7E3E1B[Quidway-rsa-key-code] 0203[Quidway-rsa-key-code] 010001[Quidway-rsa-key-code] public-key-code end[Quidway-rsa-public-key] peer-public-key end
Step 5 Bind the RSA public key of the SSH client to Client002.[Quidway] ssh user client002 assign rsa-key RsaKey001
Step 6 Enable the STelnet service on the SSH server.
S6700 Series Ethernet SwitchesConfiguration Guide - Basic Configuration 9 Accessing Another Device
Issue 05 (2013-04-10) Huawei Proprietary and ConfidentialCopyright © Huawei Technologies Co., Ltd.
221
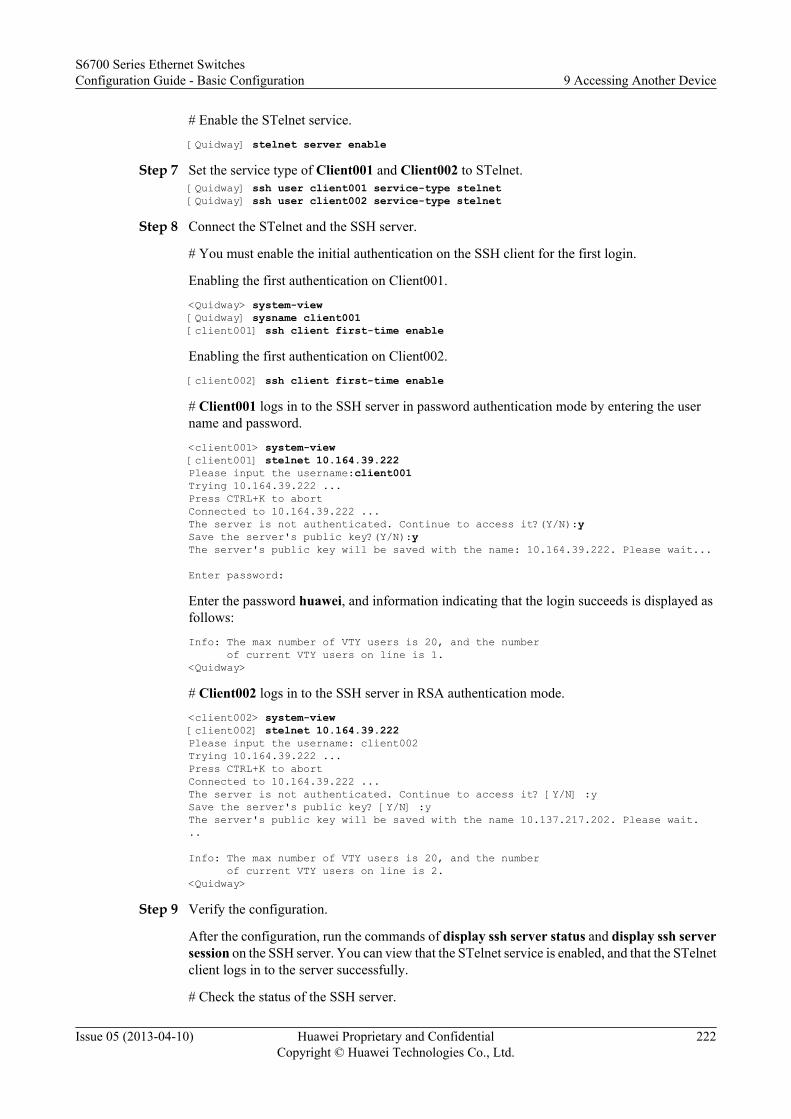
# Enable the STelnet service.
[Quidway] stelnet server enable
Step 7 Set the service type of Client001 and Client002 to STelnet.[Quidway] ssh user client001 service-type stelnet[Quidway] ssh user client002 service-type stelnet
Step 8 Connect the STelnet and the SSH server.
# You must enable the initial authentication on the SSH client for the first login.
Enabling the first authentication on Client001.
<Quidway> system-view[Quidway] sysname client001[client001] ssh client first-time enable
Enabling the first authentication on Client002.
[client002] ssh client first-time enable
# Client001 logs in to the SSH server in password authentication mode by entering the username and password.
<client001> system-view[client001] stelnet 10.164.39.222 Please input the username:client001Trying 10.164.39.222 ...Press CTRL+K to abortConnected to 10.164.39.222 ...The server is not authenticated. Continue to access it?(Y/N):ySave the server's public key?(Y/N):yThe server's public key will be saved with the name: 10.164.39.222. Please wait...
Enter password:
Enter the password huawei, and information indicating that the login succeeds is displayed asfollows:
Info: The max number of VTY users is 20, and the number of current VTY users on line is 1. <Quidway>
# Client002 logs in to the SSH server in RSA authentication mode.
<client002> system-view[client002] stelnet 10.164.39.222Please input the username: client002Trying 10.164.39.222 ...Press CTRL+K to abortConnected to 10.164.39.222 ... The server is not authenticated. Continue to access it? [Y/N] :ySave the server's public key? [Y/N] :yThe server's public key will be saved with the name 10.137.217.202. Please wait...
Info: The max number of VTY users is 20, and the number of current VTY users on line is 2.<Quidway>
Step 9 Verify the configuration.
After the configuration, run the commands of display ssh server status and display ssh serversession on the SSH server. You can view that the STelnet service is enabled, and that the STelnetclient logs in to the server successfully.
# Check the status of the SSH server.
S6700 Series Ethernet SwitchesConfiguration Guide - Basic Configuration 9 Accessing Another Device
Issue 05 (2013-04-10) Huawei Proprietary and ConfidentialCopyright © Huawei Technologies Co., Ltd.
222
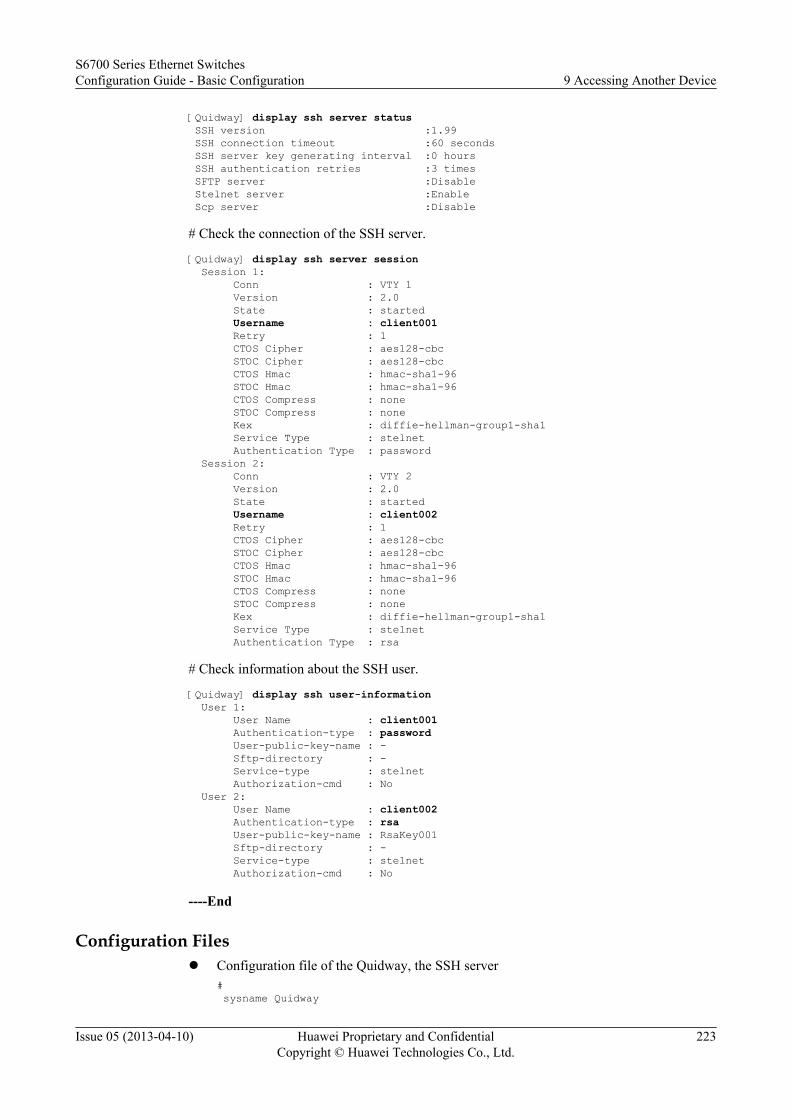
[Quidway] display ssh server status SSH version :1.99 SSH connection timeout :60 seconds SSH server key generating interval :0 hours SSH authentication retries :3 times SFTP server :Disable Stelnet server :Enable Scp server :Disable
# Check the connection of the SSH server.
[Quidway] display ssh server session Session 1: Conn : VTY 1 Version : 2.0 State : started Username : client001 Retry : 1 CTOS Cipher : aes128-cbc STOC Cipher : aes128-cbc CTOS Hmac : hmac-sha1-96 STOC Hmac : hmac-sha1-96 CTOS Compress : none STOC Compress : none Kex : diffie-hellman-group1-sha1 Service Type : stelnet Authentication Type : password Session 2: Conn : VTY 2 Version : 2.0 State : started Username : client002 Retry : 1 CTOS Cipher : aes128-cbc STOC Cipher : aes128-cbc CTOS Hmac : hmac-sha1-96 STOC Hmac : hmac-sha1-96 CTOS Compress : none STOC Compress : none Kex : diffie-hellman-group1-sha1 Service Type : stelnet Authentication Type : rsa
# Check information about the SSH user.
[Quidway] display ssh user-information User 1: User Name : client001 Authentication-type : password User-public-key-name : - Sftp-directory : - Service-type : stelnet Authorization-cmd : No User 2: User Name : client002 Authentication-type : rsa User-public-key-name : RsaKey001 Sftp-directory : - Service-type : stelnet Authorization-cmd : No
----End
Configuration Filesl Configuration file of the Quidway, the SSH server
# sysname Quidway
S6700 Series Ethernet SwitchesConfiguration Guide - Basic Configuration 9 Accessing Another Device
Issue 05 (2013-04-10) Huawei Proprietary and ConfidentialCopyright © Huawei Technologies Co., Ltd.
223
# vlan batch 10#interface Vlanif10 ip address 10.164.39.222 255.255.255.0# rsa peer-public-key rsakey001 public-key-code begin 3047 0240BFF35E4B C61BD786 F907B5DE 7D6770C3 E5FD17AB 203C8FCB BBC8FDF2 F7CB674E 519E8419 0F6B97A8 EA91FC4B B9E18836 5E74BFD5 4C687767 A89C6B43 1D7E3E1B 0203 010001 public-key-code end peer-public-key end#aaa local-user client001 password cipher %$%$6\ZH#;zYJ*HXE["UyioO-vmd%$%$ local-user client001 service-type ssh#stelnet server enable ssh user client001 ssh user client002 ssh user client001 authentication-type password ssh user client002 authentication-type rsa ssh user client002 assign rsa-key RsaKey001 ssh user client001 service-type stelnet ssh user client002 service-type stelnet #interface XGigabitEthernet0/0/1 port hybrid pvid vlan 10 port hybrid untagged vlan 10#user-interface vty 0 4 authentication-mode aaa protocol inbound ssh#return
l Configuration file of Client001, the SSH client# sysname client001# vlan batch 10#interface Vlanif10 ip address 10.164.39.220 255.255.255.0#ssh client first-time enable#interface XGigabitEthernet0/0/1 port hybrid pvid vlan 10 port hybrid untagged vlan 10#return
l Configuration file of Client002, the SSH client# sysname client002# vlan batch 10#interface Vlanif10 ip address 10.164.39.221 255.255.255.0#ssh client first-time enable#interface XGigabitEthernet0/0/1 port hybrid pvid vlan 10
S6700 Series Ethernet SwitchesConfiguration Guide - Basic Configuration 9 Accessing Another Device
Issue 05 (2013-04-10) Huawei Proprietary and ConfidentialCopyright © Huawei Technologies Co., Ltd.
224
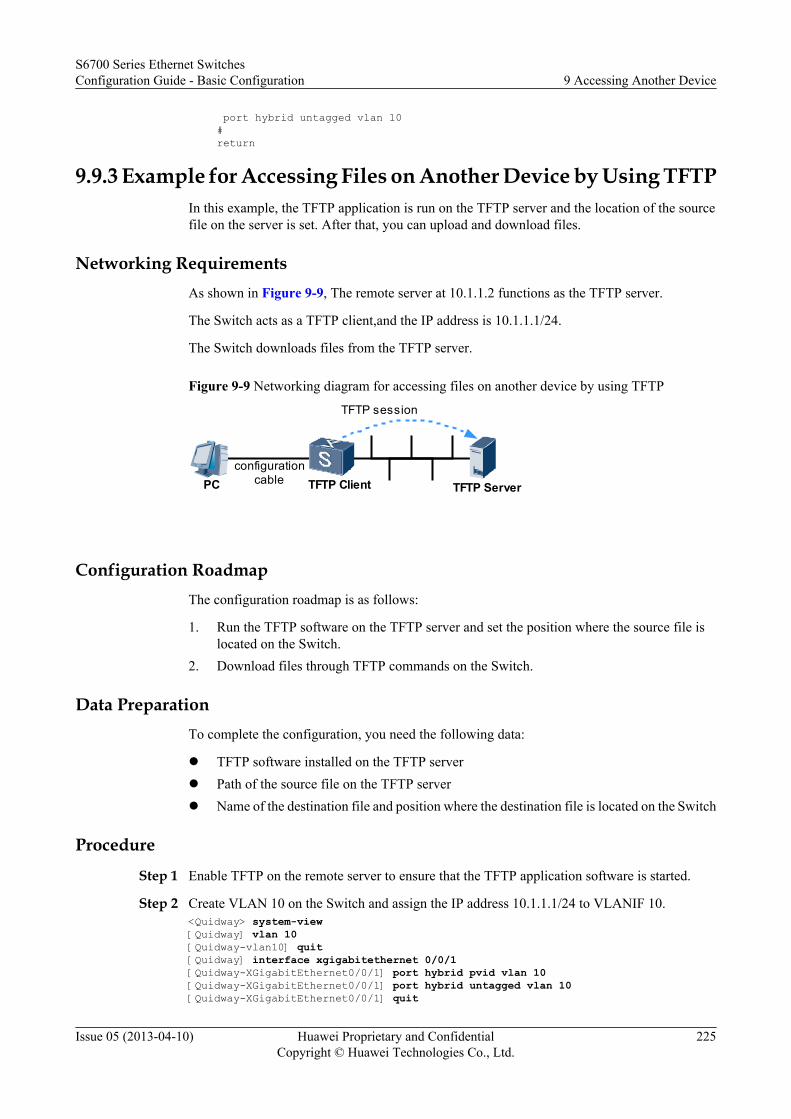
port hybrid untagged vlan 10#return
9.9.3 Example for Accessing Files on Another Device by Using TFTPIn this example, the TFTP application is run on the TFTP server and the location of the sourcefile on the server is set. After that, you can upload and download files.
Networking RequirementsAs shown in Figure 9-9, The remote server at 10.1.1.2 functions as the TFTP server.
The Switch acts as a TFTP client,and the IP address is 10.1.1.1/24.
The Switch downloads files from the TFTP server.
Figure 9-9 Networking diagram for accessing files on another device by using TFTP
PCconfiguration
cable TFTP Server
TFTP session
TFTP Client
Configuration RoadmapThe configuration roadmap is as follows:
1. Run the TFTP software on the TFTP server and set the position where the source file islocated on the Switch.
2. Download files through TFTP commands on the Switch.
Data PreparationTo complete the configuration, you need the following data:
l TFTP software installed on the TFTP serverl Path of the source file on the TFTP serverl Name of the destination file and position where the destination file is located on the Switch
Procedure
Step 1 Enable TFTP on the remote server to ensure that the TFTP application software is started.
Step 2 Create VLAN 10 on the Switch and assign the IP address 10.1.1.1/24 to VLANIF 10.<Quidway> system-view[Quidway] vlan 10[Quidway-vlan10] quit[Quidway] interface xgigabitethernet 0/0/1[Quidway-XGigabitEthernet0/0/1] port hybrid pvid vlan 10[Quidway-XGigabitEthernet0/0/1] port hybrid untagged vlan 10[Quidway-XGigabitEthernet0/0/1] quit
S6700 Series Ethernet SwitchesConfiguration Guide - Basic Configuration 9 Accessing Another Device
Issue 05 (2013-04-10) Huawei Proprietary and ConfidentialCopyright © Huawei Technologies Co., Ltd.
225
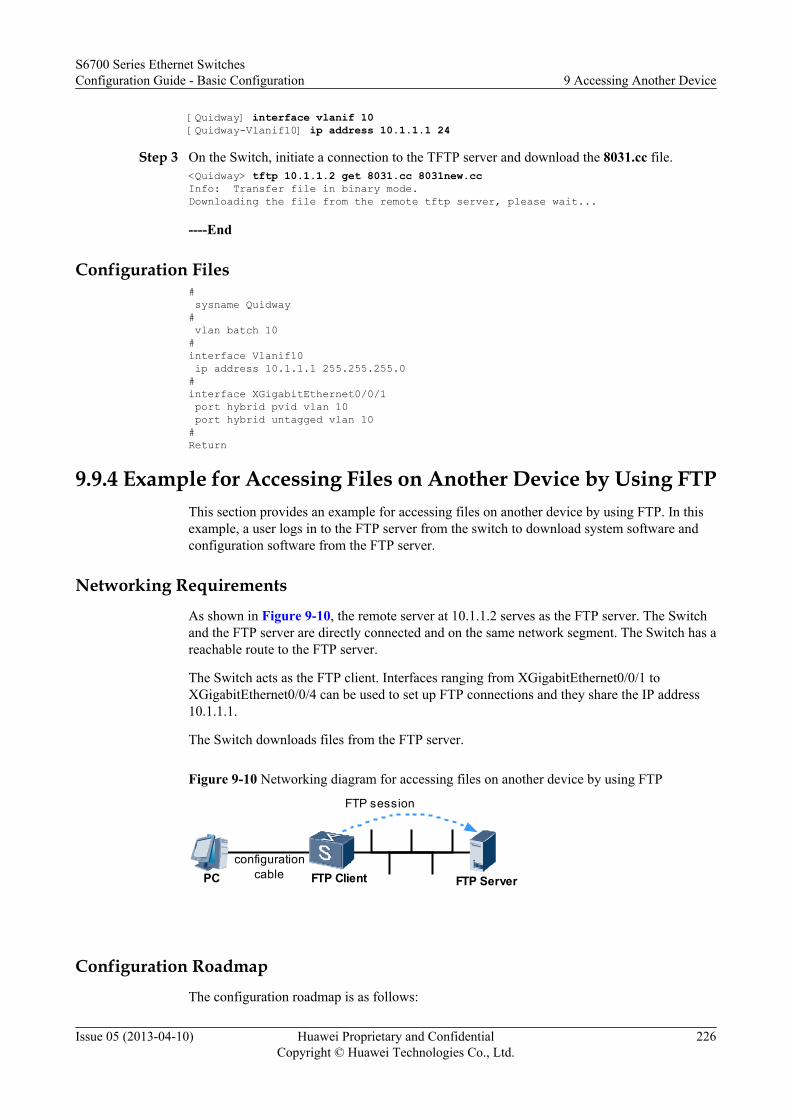
[Quidway] interface vlanif 10[Quidway-Vlanif10] ip address 10.1.1.1 24
Step 3 On the Switch, initiate a connection to the TFTP server and download the 8031.cc file.<Quidway> tftp 10.1.1.2 get 8031.cc 8031new.ccInfo: Transfer file in binary mode.Downloading the file from the remote tftp server, please wait...
----End
Configuration Files# sysname Quidway# vlan batch 10#interface Vlanif10 ip address 10.1.1.1 255.255.255.0#interface XGigabitEthernet0/0/1 port hybrid pvid vlan 10 port hybrid untagged vlan 10#Return
9.9.4 Example for Accessing Files on Another Device by Using FTPThis section provides an example for accessing files on another device by using FTP. In thisexample, a user logs in to the FTP server from the switch to download system software andconfiguration software from the FTP server.
Networking RequirementsAs shown in Figure 9-10, the remote server at 10.1.1.2 serves as the FTP server. The Switchand the FTP server are directly connected and on the same network segment. The Switch has areachable route to the FTP server.
The Switch acts as the FTP client. Interfaces ranging from XGigabitEthernet0/0/1 toXGigabitEthernet0/0/4 can be used to set up FTP connections and they share the IP address10.1.1.1.
The Switch downloads files from the FTP server.
Figure 9-10 Networking diagram for accessing files on another device by using FTP
PCconfiguration
cable FTP Server
FTP session
FTP Client
Configuration RoadmapThe configuration roadmap is as follows:
S6700 Series Ethernet SwitchesConfiguration Guide - Basic Configuration 9 Accessing Another Device
Issue 05 (2013-04-10) Huawei Proprietary and ConfidentialCopyright © Huawei Technologies Co., Ltd.
226
1. Log in to the FTP server from the FTP client.2. Download files from the server to the storage device of the client.
Data Preparation
To complete the configuration, you need the following data:
l IP address of the FTP serverl Name of the destination file and position where the destination files are located on the
Switchl Name of the FTP user set as u1 and the password set as ftppwd on the client
Procedure
Step 1 Enable FTP on the remote FTP server. Add an FTP user named u1 and set the password toftppwd.
Step 2 Create VLAN 10 on the Switch and assign the IP address 10.1.1.1 to VLANIF10.<Quidway> system-view[Quidway] vlan 10[Quidway-vlan10] quit[Quidway] interface xgigabitethernet 0/0/1[Quidway-XGigabitEthernet0/0/1] port hybrid pvid vlan 10[Quidway-XGigabitEthernet0/0/1] port hybrid untagged vlan 10[Quidway-XGigabitEthernet0/0/1] quit[Quidway] interface xgigabitethernet 0/0/2[Quidway-XGigabitEthernet0/0/2] port hybrid pvid vlan 10[Quidway-XGigabitEthernet0/0/2] port hybrid untagged vlan 10[Quidway-XGigabitEthernet0/0/2] quit[Quidway] interface xgigabitethernet 0/0/3[Quidway-XGigabitEthernet0/0/3] port hybrid pvid vlan 10[Quidway-XGigabitEthernet0/0/3] port hybrid untagged vlan 10[Quidway-XGigabitEthernet0/0/3] quit[Quidway] interface xgigabitethernet 0/0/4[Quidway-XGigabitEthernet0/0/4] port hybrid pvid vlan 10[Quidway-XGigabitEthernet0/0/4] port hybrid untagged vlan 10[Quidway-XGigabitEthernet0/0/4] quit[Quidway] interface vlanif 10[Quidway-Vlanif10] ip address 10.1.1.3 24
Step 3 On the Switch, initiate a connection to the FTP server with the user name tpuser and the passwordftppwd.<Quidway> ftp 10.1.1.2Trying 10.1.1.2 ...Press CTRL+K to abortConnected to 10.1.1.2.220 FTP service ready.User(10.1.1.2:(none)):u1331 Password required for u1.Enter password:230 User logged in.
[ftp]
Step 4 On the Switch, set the mode of transferring files to binary and the flash directory.[ftp] binary200 Type set to I.[ftp] lcd flash:/The current local directory is flash:.
Step 5 Download the vrpcfg.cfg file from the remote FTP server on the Switch.
S6700 Series Ethernet SwitchesConfiguration Guide - Basic Configuration 9 Accessing Another Device
Issue 05 (2013-04-10) Huawei Proprietary and ConfidentialCopyright © Huawei Technologies Co., Ltd.
227
[ftp] get vrpcfg.cfg vrpcfg.cfg200 Port command okay.150 Opening BINARY mode data connection for vrpcfg.cfg.
226 Transfer complete.FTP: 9124 byte(s) received in 3.100 second(s) 2.94Kbyte(s)/sec. [ftp] quit<Quidway>
----End
Configuration Files# sysname Quidway# vlan batch 10#interface Vlanif10 ip address 10.1.1.3 255.255.255.0#interface XGigabitEthernet0/0/1 port hybrid pvid vlan 10 port hybrid untagged vlan 10#interface XGigabitEthernet0/0/2 port hybrid pvid vlan 10 port hybrid untagged vlan 10#interface XGigabitEthernet0/0/3 port hybrid pvid vlan 10 port hybrid untagged vlan 10#interface XGigabitEthernet0/0/4 port hybrid pvid vlan 10 port hybrid untagged vlan 10#return
9.9.5 Example for Accessing Files on Another Device by Using SFTPIn this example, the local key pairs are generated on the SFTP client and the SSH serverrespectively; the public RSA key is generated on the SSH server and bind the RSA public keyto the SFTP client. In this manner, the SFTP client can connect to the SSH server.
Networking RequirementsAs shown in Figure 9-11, after the SFTP service is enabled on the SSH server, the SFTP Clientcan log in to the SSH server with the password, RSA, password-rsa, or all authentication. In thisexample, the Huawei switch functions as an SSH server.
Two users client001 and client002 are configured to log in to the SSH server in the authenticationmode of password and RSA respectively.
S6700 Series Ethernet SwitchesConfiguration Guide - Basic Configuration 9 Accessing Another Device
Issue 05 (2013-04-10) Huawei Proprietary and ConfidentialCopyright © Huawei Technologies Co., Ltd.
228
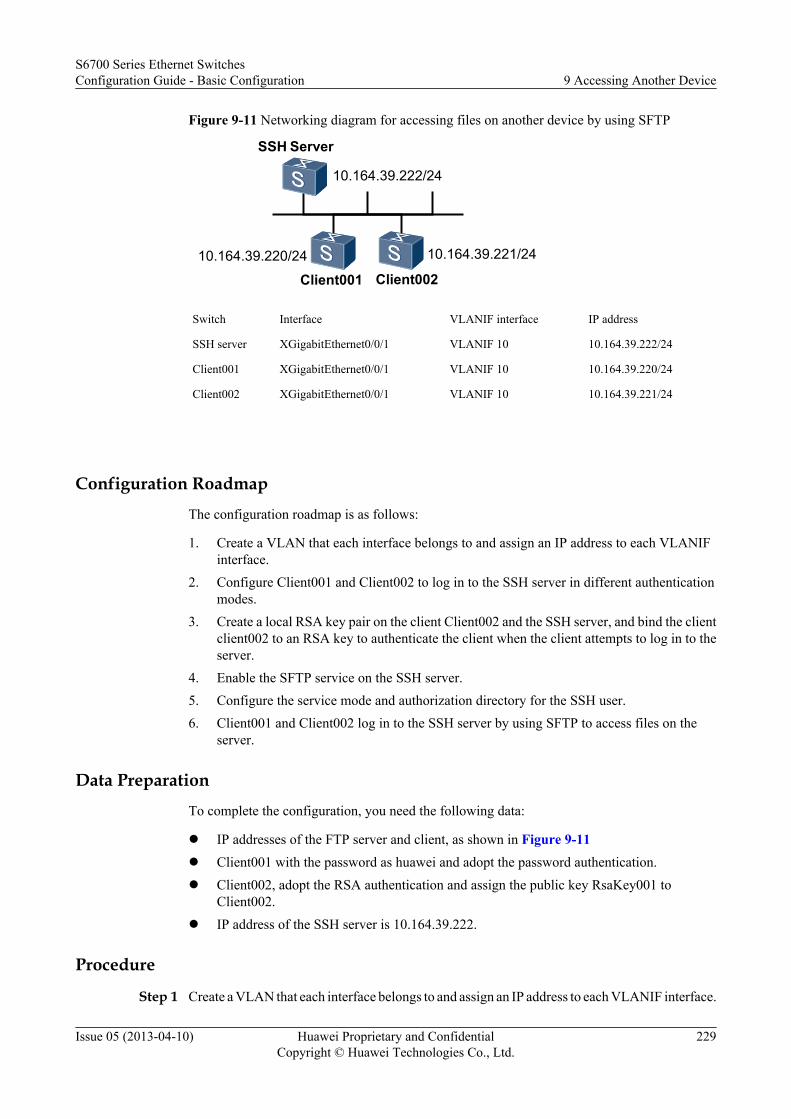
Figure 9-11 Networking diagram for accessing files on another device by using SFTP
Client00110.164.39.220/24
SSH Server
10.164.39.222/24
Client002
10.164.39.221/24
Switch Interface VLANIF interface IP address
SSH server XGigabitEthernet0/0/1 VLANIF 10 10.164.39.222/24
Client001 XGigabitEthernet0/0/1 VLANIF 10 10.164.39.220/24
Client002 XGigabitEthernet0/0/1 VLANIF 10 10.164.39.221/24
Configuration Roadmap
The configuration roadmap is as follows:
1. Create a VLAN that each interface belongs to and assign an IP address to each VLANIFinterface.
2. Configure Client001 and Client002 to log in to the SSH server in different authenticationmodes.
3. Create a local RSA key pair on the client Client002 and the SSH server, and bind the clientclient002 to an RSA key to authenticate the client when the client attempts to log in to theserver.
4. Enable the SFTP service on the SSH server.5. Configure the service mode and authorization directory for the SSH user.6. Client001 and Client002 log in to the SSH server by using SFTP to access files on the
server.
Data Preparation
To complete the configuration, you need the following data:
l IP addresses of the FTP server and client, as shown in Figure 9-11l Client001 with the password as huawei and adopt the password authentication.l Client002, adopt the RSA authentication and assign the public key RsaKey001 to
Client002.l IP address of the SSH server is 10.164.39.222.
Procedure
Step 1 Create a VLAN that each interface belongs to and assign an IP address to each VLANIF interface.
S6700 Series Ethernet SwitchesConfiguration Guide - Basic Configuration 9 Accessing Another Device
Issue 05 (2013-04-10) Huawei Proprietary and ConfidentialCopyright © Huawei Technologies Co., Ltd.
229
Create VLAN 10 on the S6700 that functions as the server and assign IP address10.164.39.222/24 to VLANIF 10.
<Quidway> system-view[Quidway] vlan 10[Quidway] quit[Quidway] interface xgigabitethernet 0/0/1[Quidway-XGigabitEthernet0/0/1] port hybrid pvid vlan 10[Quidway-XGigabitEthernet0/0/1] port hybrid untagged vlan 10[Quidway-XGigabitEthernet0/0/1] quit[Quidway] interface vlanif 10[Quidway-Vlanif10] ip address 10.164.39.222 24
Assigning an IP address to the S6700 that functions as Client001 or Client002 is the same asassigning an IP address to VLANIF 10, and is not mentioned here.
Step 2 Create a local key pair on the SSH server.<Quidway> system-view [Quidway] rsa local-key-pair createThe key name will be: Quidway_HostThe range of public key size is (512 ~ 2048).NOTES: If the key modulus is greater than 512, It will take a few minutes.Input the bits in the modulus[default = 512]:Generating keys..............++++++++++++..................++++++++++++...++++++++...........++++++++
Step 3 Create an SSH user on the server.
NOTE
SSH users can be authenticated in four modes: password, RSA, password-rsa, and all.
l In password ,password-rsa or password-dsa authentication mode, you must configure a local user.
l In RSA,DSA,password-rsa,password-dsa or all authentication mode, you must copy the RSA or DSApublic key of the SSH client to the server.
# Configure a VTY user interface.
[Quidway] user-interface vty 0 4[Quidway-ui-vty0-4] authentication-mode aaa[Quidway-ui-vty0-4] protocol inbound ssh[Quidway-ui-vty0-4] user privilege level 3[Quidway-ui-vty0-4] quit
l Create an SSH user named Client001.# Create an SSH user named Client001 and configure the authentication mode aspassword for the user.[Quidway] ssh user client001[Quidway] ssh user client001 authentication-type password
# Set the password of Client001 to huawei.[Quidway] aaa[Quidway-aaa] local-user client001 password cipher huawei[Quidway-aaa] local-user client001 privilege level 3[Quidway-aaa] local-user client001 service-type ssh
l # Create an SSH user named Client002 and configure the authentication mode as RSA forthe user.[Quidway] ssh user client002[Quidway] ssh user client002 authentication-type rsa
Step 4 Configure the RSA public key on the server.
S6700 Series Ethernet SwitchesConfiguration Guide - Basic Configuration 9 Accessing Another Device
Issue 05 (2013-04-10) Huawei Proprietary and ConfidentialCopyright © Huawei Technologies Co., Ltd.
230
# Create a local key pair on the client.
<Quidway> system-view[Quidway] sysname client002[client002] rsa local-key-pair create
# Check the RSA public key created on the client.
[client002] display rsa local-key-pair public=====================================================Time of Key pair created: 16:38:51 2007/5/25Key name: client002_HostKey type: RSA encryption Key=====================================================Key code:3047 0240 BFF35E4B C61BD786 F907B5DE 7D6770C3 E5FD17AB 203C8FCB BBC8FDF2 F7CB674E 519E8419 0F6B97A8 EA91FC4B B9E18836 5E74BFD5 4C687767 A89C6B43 1D7E3E1B 0203 010001Host public key for PEM format code:---- BEGIN SSH2 PUBLIC KEY ----AAAAB3NzaC1yc2EAAAADAQABAAAAQQC/815LxhvXhvkHtd59Z3DD5f0XqyA8j8u7yP3y98tnTlGehBkPa5eo6pH8S7nhiDZedL/VTGh3Z6ica0Mdfj4b---- END SSH2 PUBLIC KEY ----Public key code for pasting into OpenSSH authorized_keys file :ssh-rsa AAAAB3NzaC1yc2EAAAADAQABAAAAQQC/815LxhvXhvkHtd59Z3DD5f0XqyA8j8u7yP3y98tnTlGehBkPa5eo6pH8S7nhiDZedL/VTGh3Z6ica0Mdfj4b rsa-key=====================================================Time of Key pair created: 16:38:51 2007/5/25Key name: client002_ServerKey type: RSA encryption Key=====================================================Key code:3067 0260 BCFAC085 49A2E70E 1284F901 937D7B63 D7A077AB D2797280 4BCA86C0 4CD18B70 5DFAC9D3 9A3F3E74 9B2AF4CB 69FA6483 E87DA590 7B47721A 16391E27 1C76ABAB 743C568B 1B35EC7A 8572A096 BCA9DF0E BC89D3DB 5A83698C 9063DB39 A279DD89 0203 010001[client]
# Send the RSA public key created on the client to the server.
[Quidway] rsa peer-public-key RsaKey001Enter "RSA public key" view, return system view with "peer-public-key end".[Quidway-rsa-public-key] public-key-code beginEnter "RSA key code" view, return last view with "public-key-code end".[Quidway-rsa-key-code] 3047[Quidway-rsa-key-code] 0240[Quidway-rsa-key-code] BFF35E4B C61BD786 F907B5DE 7D6770C3 E5FD17AB[Quidway-rsa-key-code] 203C8FCB BBC8FDF2 F7CB674E 519E8419 0F6B97A8[Quidway-rsa-key-code] EA91FC4B B9E18836 5E74BFD5 4C687767 A89C6B43[Quidway-rsa-key-code] 1D7E3E1B[Quidway-rsa-key-code] 0203[Quidway-rsa-key-code] 010001[Quidway-rsa-key-code] public-key-code end[Quidway-rsa-public-key] peer-public-key end
Step 5 Bind the RSA public key of the SSH client to Client002.[Quidway] ssh user client002 assign rsa-key RsaKey001
Step 6 Enable the SFTP service on the SSH server.
S6700 Series Ethernet SwitchesConfiguration Guide - Basic Configuration 9 Accessing Another Device
Issue 05 (2013-04-10) Huawei Proprietary and ConfidentialCopyright © Huawei Technologies Co., Ltd.
231
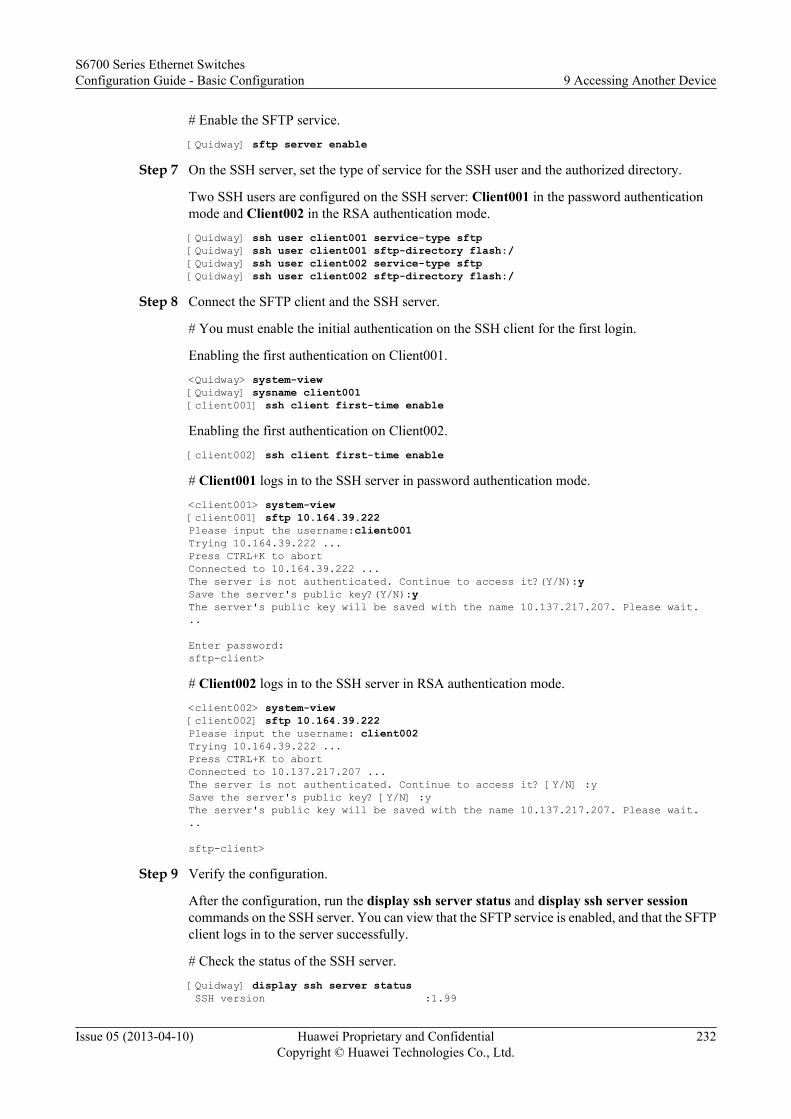
# Enable the SFTP service.
[Quidway] sftp server enable
Step 7 On the SSH server, set the type of service for the SSH user and the authorized directory.
Two SSH users are configured on the SSH server: Client001 in the password authenticationmode and Client002 in the RSA authentication mode.
[Quidway] ssh user client001 service-type sftp[Quidway] ssh user client001 sftp-directory flash:/[Quidway] ssh user client002 service-type sftp[Quidway] ssh user client002 sftp-directory flash:/
Step 8 Connect the SFTP client and the SSH server.
# You must enable the initial authentication on the SSH client for the first login.
Enabling the first authentication on Client001.
<Quidway> system-view[Quidway] sysname client001[client001] ssh client first-time enable
Enabling the first authentication on Client002.
[client002] ssh client first-time enable
# Client001 logs in to the SSH server in password authentication mode.
<client001> system-view[client001] sftp 10.164.39.222 Please input the username:client001Trying 10.164.39.222 ...Press CTRL+K to abortConnected to 10.164.39.222 ...The server is not authenticated. Continue to access it?(Y/N):ySave the server's public key?(Y/N):yThe server's public key will be saved with the name 10.137.217.207. Please wait...
Enter password:sftp-client>
# Client002 logs in to the SSH server in RSA authentication mode.
<client002> system-view[client002] sftp 10.164.39.222Please input the username: client002Trying 10.164.39.222 ...Press CTRL+K to abortConnected to 10.137.217.207 ...The server is not authenticated. Continue to access it? [Y/N] :ySave the server's public key? [Y/N] :yThe server's public key will be saved with the name 10.137.217.207. Please wait...
sftp-client>
Step 9 Verify the configuration.
After the configuration, run the display ssh server status and display ssh server sessioncommands on the SSH server. You can view that the SFTP service is enabled, and that the SFTPclient logs in to the server successfully.
# Check the status of the SSH server.
[Quidway] display ssh server status SSH version :1.99
S6700 Series Ethernet SwitchesConfiguration Guide - Basic Configuration 9 Accessing Another Device
Issue 05 (2013-04-10) Huawei Proprietary and ConfidentialCopyright © Huawei Technologies Co., Ltd.
232
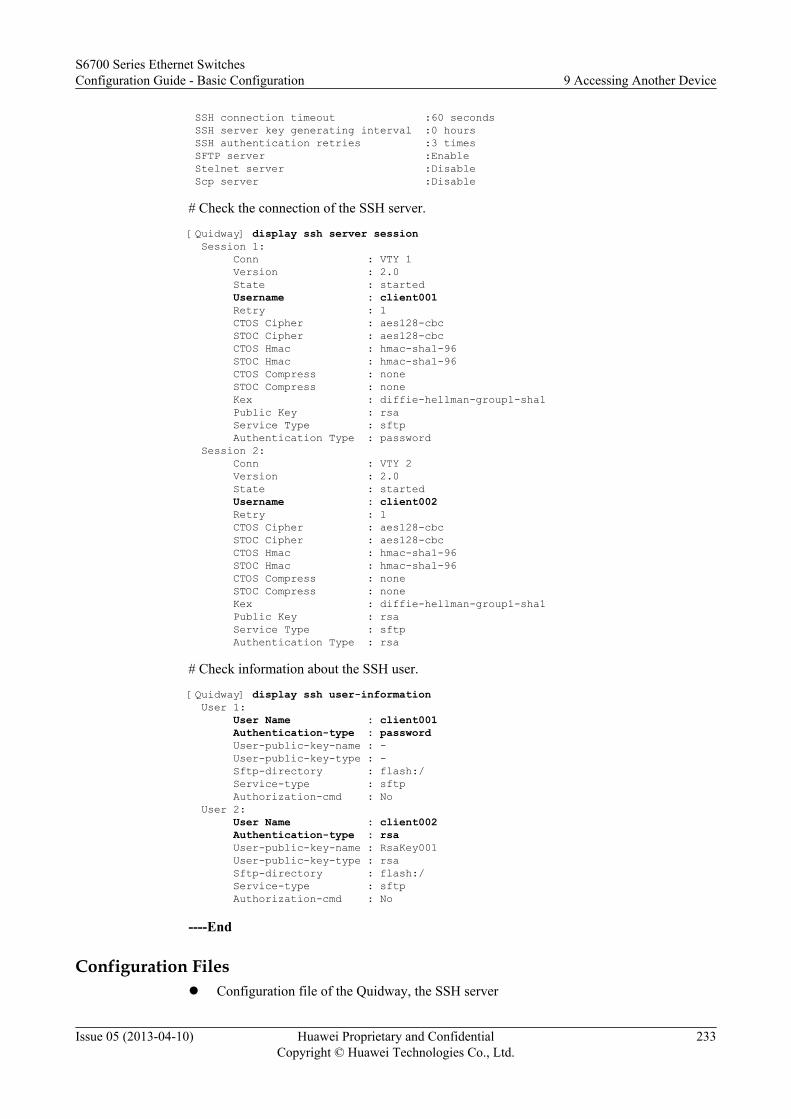
SSH connection timeout :60 seconds SSH server key generating interval :0 hours SSH authentication retries :3 times SFTP server :Enable Stelnet server :Disable Scp server :Disable
# Check the connection of the SSH server.
[Quidway] display ssh server session Session 1: Conn : VTY 1 Version : 2.0 State : started Username : client001 Retry : 1 CTOS Cipher : aes128-cbc STOC Cipher : aes128-cbc CTOS Hmac : hmac-sha1-96 STOC Hmac : hmac-sha1-96 CTOS Compress : none STOC Compress : none Kex : diffie-hellman-group1-sha1 Public Key : rsa Service Type : sftp Authentication Type : password Session 2: Conn : VTY 2 Version : 2.0 State : started Username : client002 Retry : 1 CTOS Cipher : aes128-cbc STOC Cipher : aes128-cbc CTOS Hmac : hmac-sha1-96 STOC Hmac : hmac-sha1-96 CTOS Compress : none STOC Compress : none Kex : diffie-hellman-group1-sha1 Public Key : rsa Service Type : sftp Authentication Type : rsa
# Check information about the SSH user.
[Quidway] display ssh user-information User 1: User Name : client001 Authentication-type : password User-public-key-name : - User-public-key-type : - Sftp-directory : flash:/ Service-type : sftp Authorization-cmd : No User 2: User Name : client002 Authentication-type : rsa User-public-key-name : RsaKey001 User-public-key-type : rsa Sftp-directory : flash:/ Service-type : sftp Authorization-cmd : No
----End
Configuration Filesl Configuration file of the Quidway, the SSH server
S6700 Series Ethernet SwitchesConfiguration Guide - Basic Configuration 9 Accessing Another Device
Issue 05 (2013-04-10) Huawei Proprietary and ConfidentialCopyright © Huawei Technologies Co., Ltd.
233
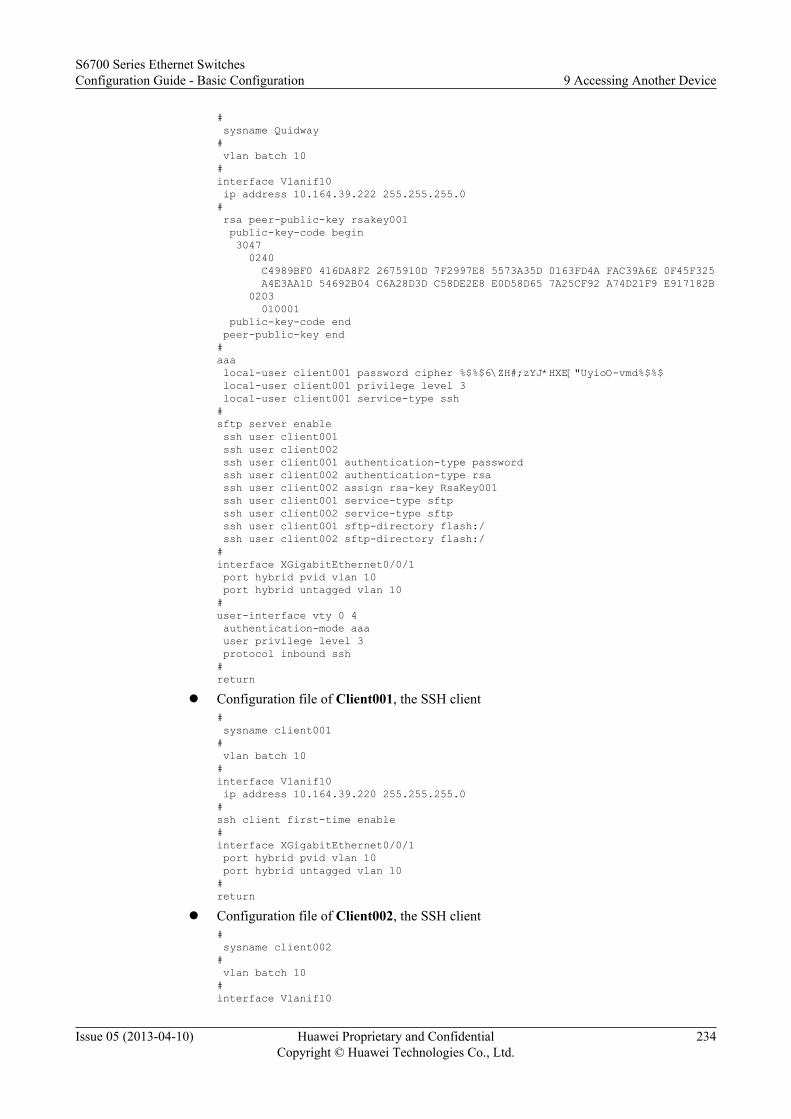
# sysname Quidway# vlan batch 10#interface Vlanif10 ip address 10.164.39.222 255.255.255.0# rsa peer-public-key rsakey001 public-key-code begin 3047 0240 C4989BF0 416DA8F2 2675910D 7F2997E8 5573A35D 0163FD4A FAC39A6E 0F45F325 A4E3AA1D 54692B04 C6A28D3D C58DE2E8 E0D58D65 7A25CF92 A74D21F9 E917182B 0203 010001 public-key-code end peer-public-key end#aaa local-user client001 password cipher %$%$6\ZH#;zYJ*HXE["UyioO-vmd%$%$ local-user client001 privilege level 3 local-user client001 service-type ssh#sftp server enable ssh user client001 ssh user client002 ssh user client001 authentication-type password ssh user client002 authentication-type rsa ssh user client002 assign rsa-key RsaKey001 ssh user client001 service-type sftp ssh user client002 service-type sftp ssh user client001 sftp-directory flash:/ ssh user client002 sftp-directory flash:/#interface XGigabitEthernet0/0/1 port hybrid pvid vlan 10 port hybrid untagged vlan 10#user-interface vty 0 4 authentication-mode aaa user privilege level 3 protocol inbound ssh#return
l Configuration file of Client001, the SSH client# sysname client001# vlan batch 10#interface Vlanif10 ip address 10.164.39.220 255.255.255.0#ssh client first-time enable#interface XGigabitEthernet0/0/1 port hybrid pvid vlan 10 port hybrid untagged vlan 10#return
l Configuration file of Client002, the SSH client# sysname client002# vlan batch 10#interface Vlanif10
S6700 Series Ethernet SwitchesConfiguration Guide - Basic Configuration 9 Accessing Another Device
Issue 05 (2013-04-10) Huawei Proprietary and ConfidentialCopyright © Huawei Technologies Co., Ltd.
234
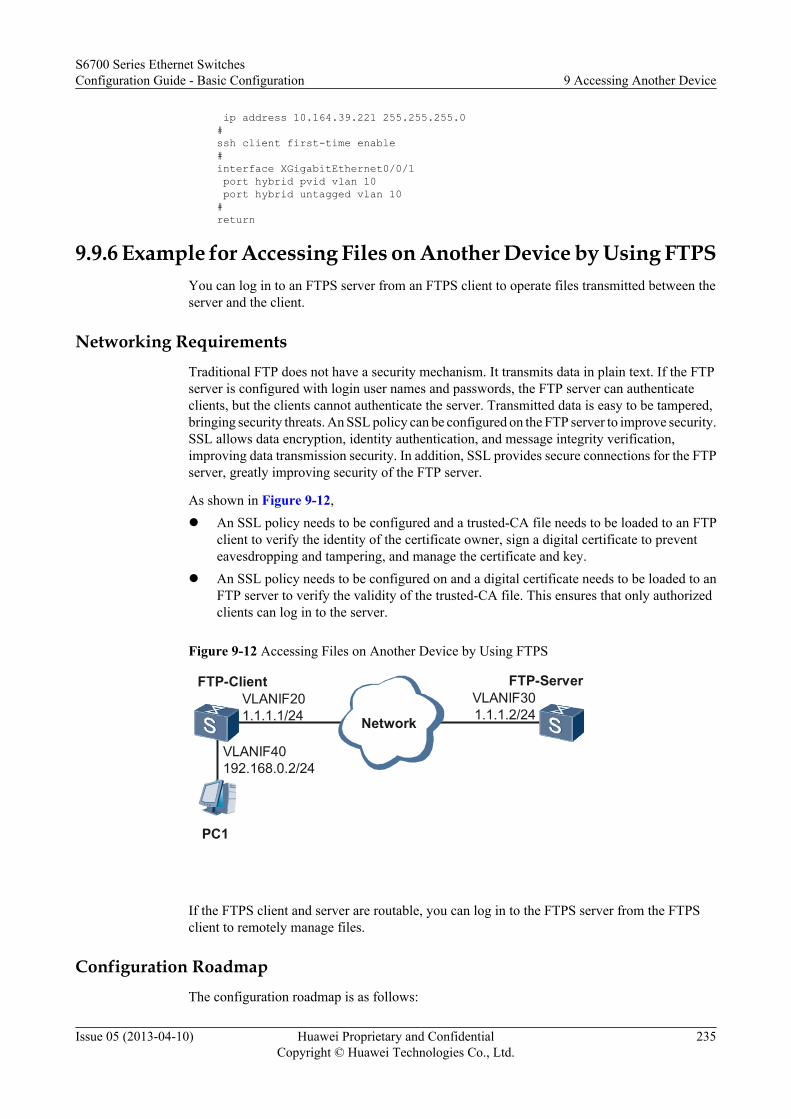
ip address 10.164.39.221 255.255.255.0#ssh client first-time enable#interface XGigabitEthernet0/0/1 port hybrid pvid vlan 10 port hybrid untagged vlan 10#return
9.9.6 Example for Accessing Files on Another Device by Using FTPSYou can log in to an FTPS server from an FTPS client to operate files transmitted between theserver and the client.
Networking RequirementsTraditional FTP does not have a security mechanism. It transmits data in plain text. If the FTPserver is configured with login user names and passwords, the FTP server can authenticateclients, but the clients cannot authenticate the server. Transmitted data is easy to be tampered,bringing security threats. An SSL policy can be configured on the FTP server to improve security.SSL allows data encryption, identity authentication, and message integrity verification,improving data transmission security. In addition, SSL provides secure connections for the FTPserver, greatly improving security of the FTP server.
As shown in Figure 9-12,l An SSL policy needs to be configured and a trusted-CA file needs to be loaded to an FTP
client to verify the identity of the certificate owner, sign a digital certificate to preventeavesdropping and tampering, and manage the certificate and key.
l An SSL policy needs to be configured on and a digital certificate needs to be loaded to anFTP server to verify the validity of the trusted-CA file. This ensures that only authorizedclients can log in to the server.
Figure 9-12 Accessing Files on Another Device by Using FTPS
Network
PC1
VLANIF301.1.1.2/24
FTP-Client
VLANIF40192.168.0.2/24
FTP-ServerVLANIF201.1.1.1/24
If the FTPS client and server are routable, you can log in to the FTPS server from the FTPSclient to remotely manage files.
Configuration RoadmapThe configuration roadmap is as follows:
S6700 Series Ethernet SwitchesConfiguration Guide - Basic Configuration 9 Accessing Another Device
Issue 05 (2013-04-10) Huawei Proprietary and ConfidentialCopyright © Huawei Technologies Co., Ltd.
235
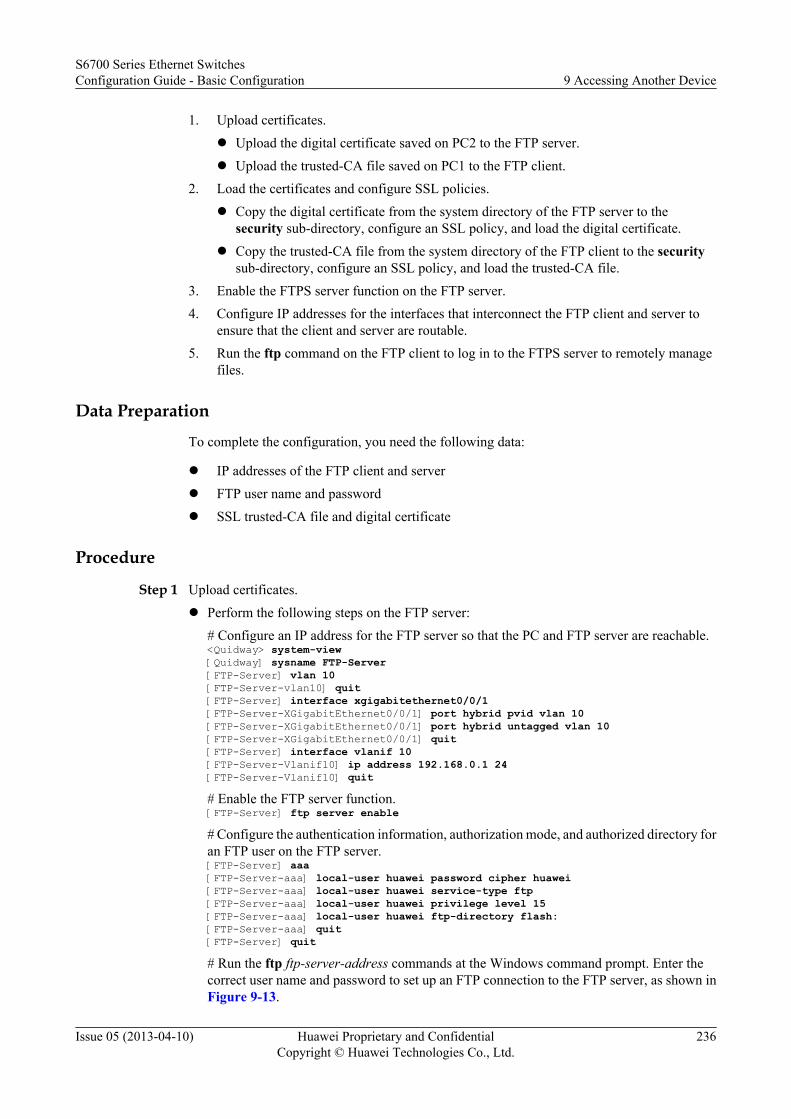
1. Upload certificates.l Upload the digital certificate saved on PC2 to the FTP server.l Upload the trusted-CA file saved on PC1 to the FTP client.
2. Load the certificates and configure SSL policies.l Copy the digital certificate from the system directory of the FTP server to the
security sub-directory, configure an SSL policy, and load the digital certificate.l Copy the trusted-CA file from the system directory of the FTP client to the security
sub-directory, configure an SSL policy, and load the trusted-CA file.3. Enable the FTPS server function on the FTP server.4. Configure IP addresses for the interfaces that interconnect the FTP client and server to
ensure that the client and server are routable.5. Run the ftp command on the FTP client to log in to the FTPS server to remotely manage
files.
Data Preparation
To complete the configuration, you need the following data:
l IP addresses of the FTP client and serverl FTP user name and passwordl SSL trusted-CA file and digital certificate
Procedure
Step 1 Upload certificates.l Perform the following steps on the FTP server:
# Configure an IP address for the FTP server so that the PC and FTP server are reachable.<Quidway> system-view[Quidway] sysname FTP-Server[FTP-Server] vlan 10[FTP-Server-vlan10] quit[FTP-Server] interface xgigabitethernet0/0/1[FTP-Server-XGigabitEthernet0/0/1] port hybrid pvid vlan 10[FTP-Server-XGigabitEthernet0/0/1] port hybrid untagged vlan 10[FTP-Server-XGigabitEthernet0/0/1] quit[FTP-Server] interface vlanif 10[FTP-Server-Vlanif10] ip address 192.168.0.1 24[FTP-Server-Vlanif10] quit
# Enable the FTP server function.[FTP-Server] ftp server enable
# Configure the authentication information, authorization mode, and authorized directory foran FTP user on the FTP server.[FTP-Server] aaa[FTP-Server-aaa] local-user huawei password cipher huawei[FTP-Server-aaa] local-user huawei service-type ftp[FTP-Server-aaa] local-user huawei privilege level 15[FTP-Server-aaa] local-user huawei ftp-directory flash:[FTP-Server-aaa] quit[FTP-Server] quit
# Run the ftp ftp-server-address commands at the Windows command prompt. Enter thecorrect user name and password to set up an FTP connection to the FTP server, as shown inFigure 9-13.
S6700 Series Ethernet SwitchesConfiguration Guide - Basic Configuration 9 Accessing Another Device
Issue 05 (2013-04-10) Huawei Proprietary and ConfidentialCopyright © Huawei Technologies Co., Ltd.
236
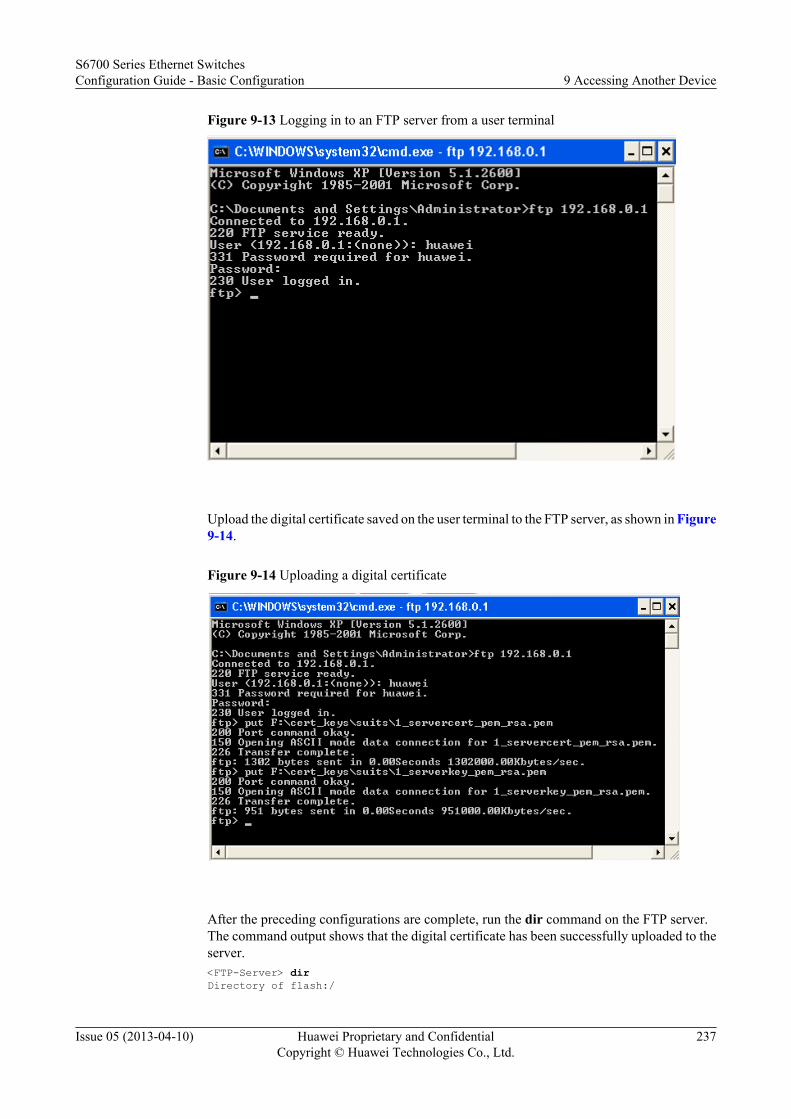
Figure 9-13 Logging in to an FTP server from a user terminal
Upload the digital certificate saved on the user terminal to the FTP server, as shown in Figure9-14.
Figure 9-14 Uploading a digital certificate
After the preceding configurations are complete, run the dir command on the FTP server.The command output shows that the digital certificate has been successfully uploaded to theserver.<FTP-Server> dirDirectory of flash:/
S6700 Series Ethernet SwitchesConfiguration Guide - Basic Configuration 9 Accessing Another Device
Issue 05 (2013-04-10) Huawei Proprietary and ConfidentialCopyright © Huawei Technologies Co., Ltd.
237

Idx Attr Size(Byte) Date Time(LMT) FileName 0 drw- - May 10 2011 05:05:40 src 1 -rw- 524,575 May 10 2011 05:05:53 private-data.txt 2 -rw- 446 May 10 2011 05:05:51 vrpcfg.zip 3 -rw- 1,302 May 10 2011 05:32:05 1_servercert_pem_rsa.pem 4 -rw- 951 May 10 2011 05:32:44 1_serverkey_pem_rsa.pem 5 drw- - May 10 2011 05:43:39 security
304,292 KB total (303,766 KB free) l Perform the following steps on the FTP client:
The procedure for uploading the trusted-CA file to the FTP client is similar to the procedurefor uploading the digital certificate to the FTP server. For detailed configurations, see theconfiguration file of the FTP client in this example.After the trusted-CA file is uploaded to the FTP client, run the dir command on the FTPclient. The command output shows that the trusted-CA file has been successfully uploadedto the FTP client.<FTP-Client> dirDirectory of flash:/
Idx Attr Size(Byte) Date Time(LMT) FileName 0 -rw- 524,558 May 10 2011 04:50:39 private-data.txt 1 -rw- 1,237 May 10 2011 05:55:33 1_cacert_pem_rsa.pem 2 -rw- 1,241 May 10 2011 05:55:44 1_rootcert_pem_rsa.pem 3 drw- - Apr 09 2011 19:46:14 src 4 -rw- 421 Apr 09 2011 19:46:14 vrpcfg.zip 5 -rw- 1,308,478 Apr 14 2011 19:22:45 web.zip 6 drw- - Apr 10 2011 01:35:54 logfile 7 -rw- 4 Apr 19 2011 04:24:28 snmpnotilog.txt 8 drw- - Apr 11 2011 16:18:53 security 9 drw- - Apr 13 2011 11:37:40 lam
304,292 KB total (300,270 KB free)
Step 2 Load the certificates and configure SSL policies.l Perform the following steps on the FTP server:
# Create a sub-directory named security and copy the digital certificate to this sub-directory.<FTP-Server> mkdir security/<FTP-Server> copy 1_servercert_pem_rsa.pem security/<FTP-Server> copy 1_serverkey_pem_rsa.pem security/After the preceding configurations are complete, run the dir command in the security sub-directory on the FTP server. The command output shows that the digital certificate has beensuccessfully uploaded to the server.<FTP-Server> cd security/<FTP-Server> dirDirectory of flash:/security/
Idx Attr Size(Byte) Date Time(LMT) FileName 0 -rw- 1,302 May 10 2011 05:44:34 1_servercert_pem_rsa.pem 1 -rw- 951 May 10 2011 05:45:22 1_serverkey_pem_rsa.pem
304,292 KB total (303,766 KB free)# Create an SSL policy and load the PEM digital certificate.<FTP-Server> system-view[FTP-Server] ssl policy ftp_server[FTP-Server-ssl-policy-ftp_server] certificate load pem-cert 1_servercert_pem_rsa.pem key-pair rsa key-file 1_serverkey_pem_rsa.pem auth-code 123456[FTP-Server-ssl-policy-ftp_server] quitAfter the preceding configurations are complete, run the display ssl policy command on theFTP server. The command output shows detailed information about the loaded certificate.[FTP-Server] display ssl policy
S6700 Series Ethernet SwitchesConfiguration Guide - Basic Configuration 9 Accessing Another Device
Issue 05 (2013-04-10) Huawei Proprietary and ConfidentialCopyright © Huawei Technologies Co., Ltd.
238
SSL Policy Name: ftp_server Policy Applicants: FTP secure-server Key-pair Type: RSA Certificate File Type: PEM Certificate Type: certificate Certificate Filename: 1_servercert_pem_rsa.pem Key-file Filename: 1_serverkey_pem_rsa.pem Auth-code: 123456 MAC: CRL File: Trusted-CA File:
l Configure the FTP client.# Create a sub-directory named security and copy the trusted-CA file to this sub-directory.The configuration procedure is similar to that on the FTP server. For detailed configurations,see the configuration file of the FTP client in this example.After the trusted-CA file is copied to the security sub-directory, run the dir command in thissub-directory. The command output shows that the trusted-CA file has been successfullycopied to this sub-directory.<FTP-Client> cd security/<FTP-Client> dirDirectory of flash:/security/
Idx Attr Size(Byte) Date Time(LMT) FileName 0 -rw- 1,237 May 10 2011 05:57:15 1_cacert_pem_rsa.pem 1 -rw- 1,241 May 10 2011 05:57:29 1_rootcert_pem_rsa.pem
304,292 KB total (300,266 KB free)
# Create an SSL policy and load the trusted-CA file.<FTP-Client> system-view[FTP-Client] ssl policy ftp_client[FTP-Client-ssl-policy-ftp_client] trusted-ca load pem-ca 1_cacert_pem_rsa.pem[FTP-Client-ssl-policy-ftp_client] trusted-ca load pem-ca 1_rootcert_pem_rsa.pem[FTP-Client-ssl-policy-ftp_client] quit
After the preceding configurations are complete, run the display ssl policy command on theFTP client. The command output shows detailed information about the trusted-CA file.[FTP-Client] display ssl policy SSL Policy Name: ftp_client Policy Applicants: Key-pair Type: Certificate File Type: Certificate Type: Certificate Filename: Key-file Filename: Auth-code: MAC: CRL File: Trusted-CA File: Trusted-CA File 1: Format = PEM, Filename = 1_cacert_pem_rsa.pem Trusted-CA File 2: Format = PEM, Filename = 1_rootcert_pem_rsa.pem
Step 3 Enable the FTPS server function.
NOTE
Before enabling the FTPS server function, disable the FTP server function.[FTP-Server] undo ftp server[FTP-Server] ftp secure-server ssl-policy ftp_server[FTP-Server] ftp secure-server enable
Step 4 Configure IP addresses for the interfaces that interconnect the FTP client and server.
# Configure the FTP server.
S6700 Series Ethernet SwitchesConfiguration Guide - Basic Configuration 9 Accessing Another Device
Issue 05 (2013-04-10) Huawei Proprietary and ConfidentialCopyright © Huawei Technologies Co., Ltd.
239
[FTP-Server] vlan 30[FTP-Server-vlan30] quit[FTP-Server] interface xgigabitethernet 0/0/2[FTP-Server-XGigabitEthernet0/0/2] port hybrid pvid vlan 30[FTP-Server-XGigabitEthernet0/0/2] port hybrid untagged vlan 30[FTP-Server-XGigabitEthernet0/0/2] quit[FTP-Server] interface vlanif 30[FTP-Server-Vlanif30] ip address 1.1.1.2 24[FTP-Server-Vlanif30] quit
# Configure the FTP client.
[FTP-Client] vlan 20[FTP-Client-vlan20] quit[FTP-Client] interface xgigabitethernet 0/0/2[FTP-Client-XGigabitEthernet0/0/2] port hybrid pvid vlan 20[FTP-Client-XGigabitEthernet0/0/2] port hybrid untagged vlan 20[FTP-Client-XGigabitEthernet0/0/2] quit[FTP-Client] interface vlanif 20[FTP-Client-Vlanif20] ip address 1.1.1.1 24[FTP-Client-Vlanif20] quit[FTP-Client] quit
Step 5 Run the ftp command on the FTP client to log in to the FTPS server to remotely manage files.<FTP-Client> ftp ssl-policy ftp_client 1.1.1.2Trying 1.1.1.2 ...Press CTRL+K to abortConnected to 1.1.1.2.220 FTP service ready.234 AUTH command successfully, Security mechanism accepted.200 PBSZ is ok.200 Data channel security level is changed to private.User(1.1.1.2:(none)):huawei331 Password required for huawei.Enter password:230 User logged in.
[ftp]
The client can log in to the FTP server only after the correct user name and password are entered.
Step 6 Verify the configuration.
# Run the display ftp-server command on the FTPS server. The command output shows thatthe configured SSL policy name is ftp_server and the FTPS server is running.
[FTP-Server] display ftp-server FTP server is stopped Max user number 5 User count 1 Timeout value(in minute) 30 Listening port 21 Acl number 0 FTP server's source address 0.0.0.0 FTP SSL policy ftp_server FTP Secure-server is running
You can use the FTP client to remotely manage files on the FTPS server.
----End
Configuration Filesl Configuration file of the FTP server
# sysname FTP-Server#
S6700 Series Ethernet SwitchesConfiguration Guide - Basic Configuration 9 Accessing Another Device
Issue 05 (2013-04-10) Huawei Proprietary and ConfidentialCopyright © Huawei Technologies Co., Ltd.
240
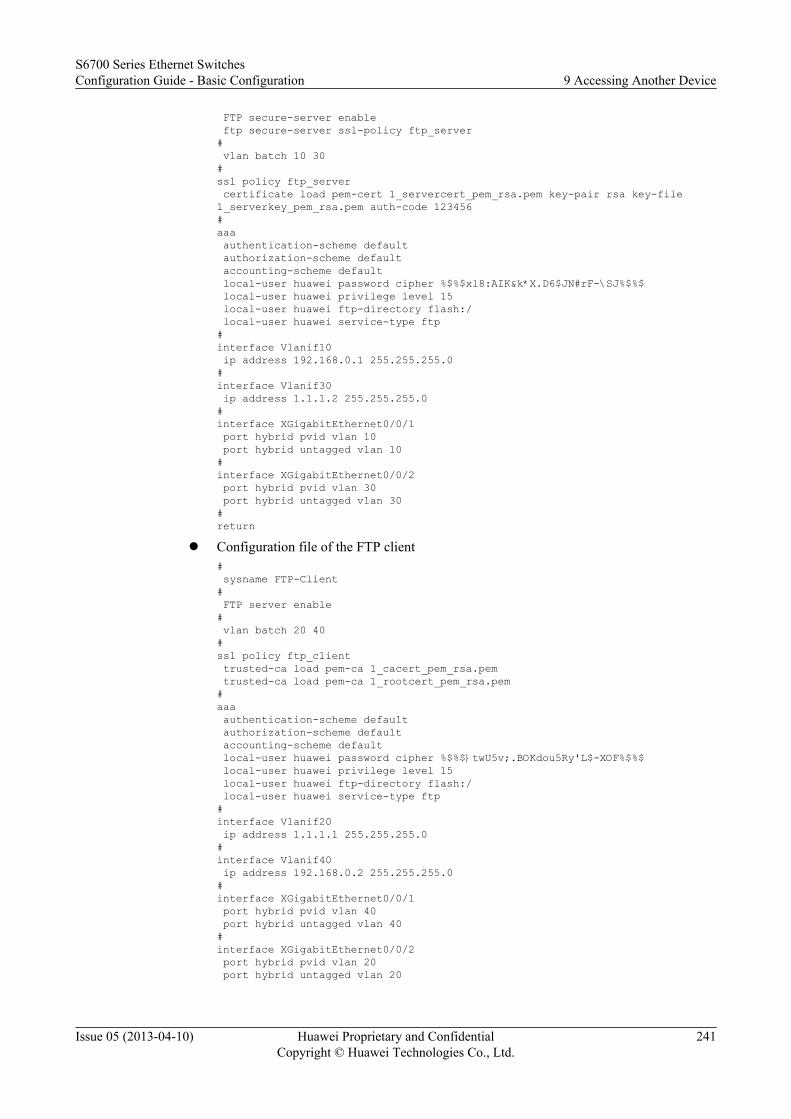
FTP secure-server enable ftp secure-server ssl-policy ftp_server# vlan batch 10 30 #ssl policy ftp_server certificate load pem-cert 1_servercert_pem_rsa.pem key-pair rsa key-file 1_serverkey_pem_rsa.pem auth-code 123456#aaa authentication-scheme default authorization-scheme default accounting-scheme default local-user huawei password cipher %$%$xl8:AIK&k*X.D6$JN#rF-\SJ%$%$ local-user huawei privilege level 15 local-user huawei ftp-directory flash:/ local-user huawei service-type ftp#interface Vlanif10 ip address 192.168.0.1 255.255.255.0 #interface Vlanif30 ip address 1.1.1.2 255.255.255.0 #interface XGigabitEthernet0/0/1 port hybrid pvid vlan 10 port hybrid untagged vlan 10#interface XGigabitEthernet0/0/2 port hybrid pvid vlan 30 port hybrid untagged vlan 30#return
l Configuration file of the FTP client# sysname FTP-Client# FTP server enable# vlan batch 20 40#ssl policy ftp_client trusted-ca load pem-ca 1_cacert_pem_rsa.pem trusted-ca load pem-ca 1_rootcert_pem_rsa.pem#aaa authentication-scheme default authorization-scheme default accounting-scheme default local-user huawei password cipher %$%$}twU5v;.BOKdou5Ry'L$-XOF%$%$ local-user huawei privilege level 15 local-user huawei ftp-directory flash:/ local-user huawei service-type ftp#interface Vlanif20 ip address 1.1.1.1 255.255.255.0 #interface Vlanif40 ip address 192.168.0.2 255.255.255.0 #interface XGigabitEthernet0/0/1 port hybrid pvid vlan 40 port hybrid untagged vlan 40#interface XGigabitEthernet0/0/2 port hybrid pvid vlan 20 port hybrid untagged vlan 20
S6700 Series Ethernet SwitchesConfiguration Guide - Basic Configuration 9 Accessing Another Device
Issue 05 (2013-04-10) Huawei Proprietary and ConfidentialCopyright © Huawei Technologies Co., Ltd.
241
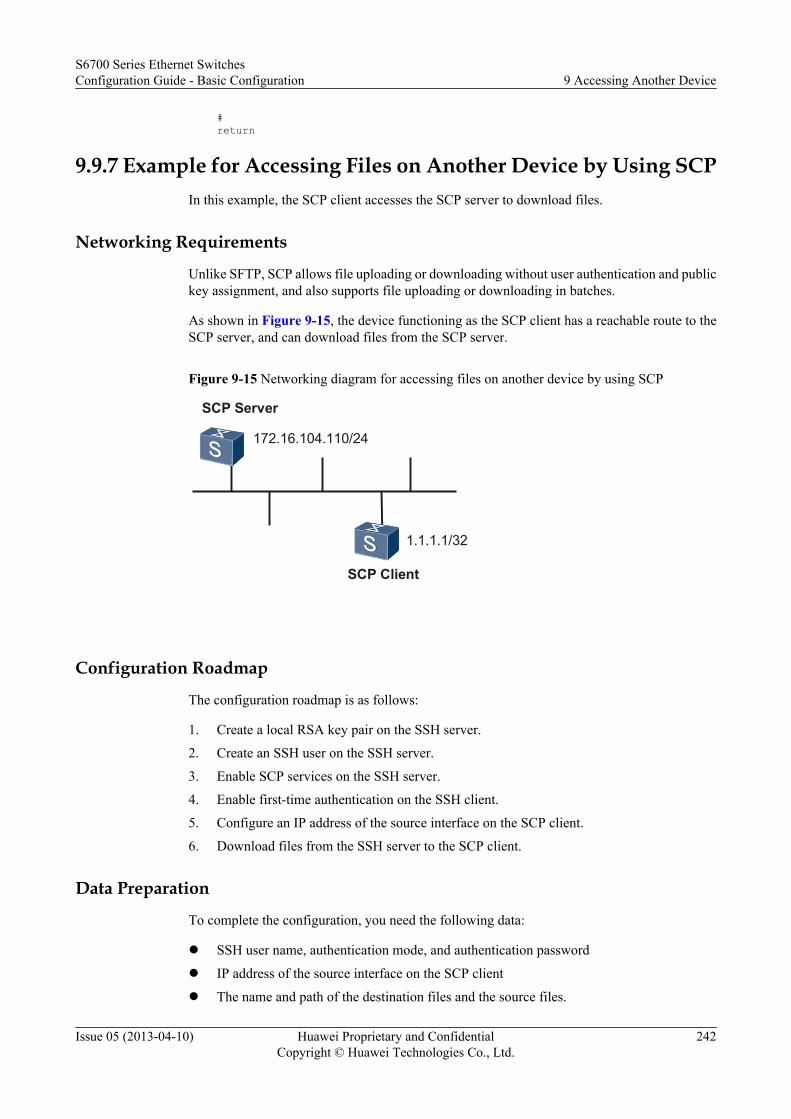
#return
9.9.7 Example for Accessing Files on Another Device by Using SCPIn this example, the SCP client accesses the SCP server to download files.
Networking Requirements
Unlike SFTP, SCP allows file uploading or downloading without user authentication and publickey assignment, and also supports file uploading or downloading in batches.
As shown in Figure 9-15, the device functioning as the SCP client has a reachable route to theSCP server, and can download files from the SCP server.
Figure 9-15 Networking diagram for accessing files on another device by using SCP
SCP Client
1.1.1.1/32
SCP Server
172.16.104.110/24
Configuration Roadmap
The configuration roadmap is as follows:
1. Create a local RSA key pair on the SSH server.
2. Create an SSH user on the SSH server.
3. Enable SCP services on the SSH server.
4. Enable first-time authentication on the SSH client.
5. Configure an IP address of the source interface on the SCP client.
6. Download files from the SSH server to the SCP client.
Data Preparation
To complete the configuration, you need the following data:
l SSH user name, authentication mode, and authentication password
l IP address of the source interface on the SCP client
l The name and path of the destination files and the source files.
S6700 Series Ethernet SwitchesConfiguration Guide - Basic Configuration 9 Accessing Another Device
Issue 05 (2013-04-10) Huawei Proprietary and ConfidentialCopyright © Huawei Technologies Co., Ltd.
242
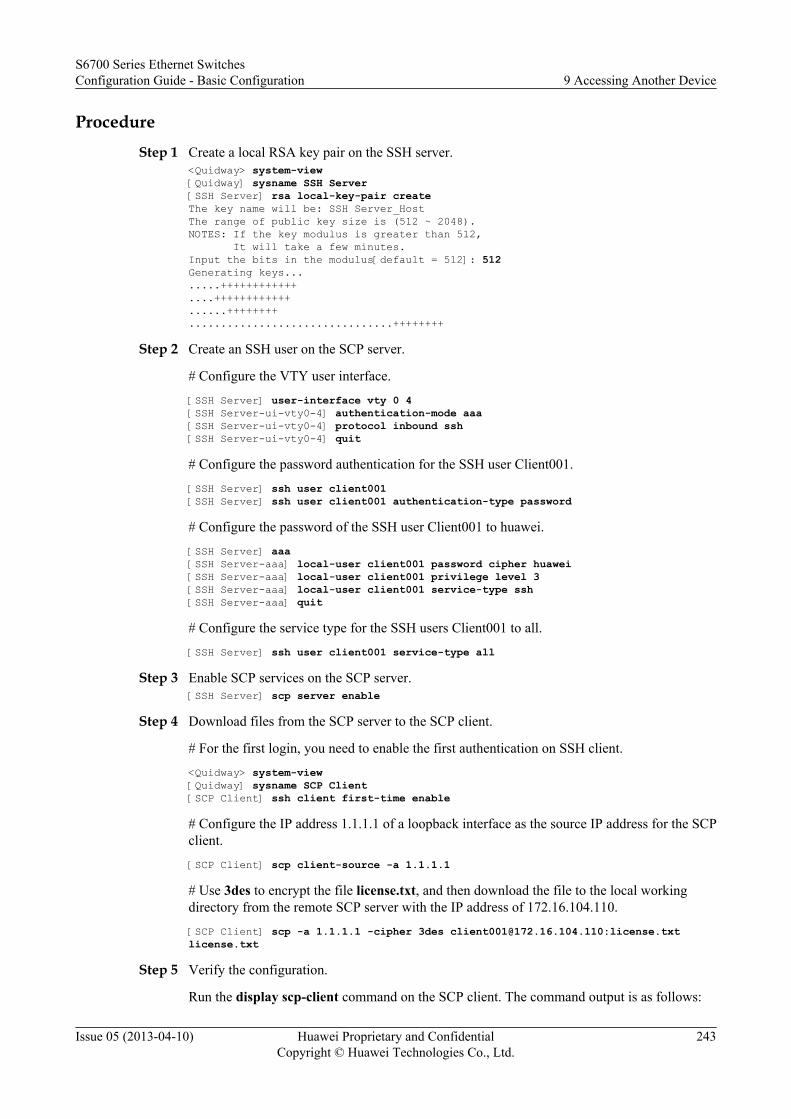
ProcedureStep 1 Create a local RSA key pair on the SSH server.
<Quidway> system-view[Quidway] sysname SSH Server[SSH Server] rsa local-key-pair createThe key name will be: SSH Server_HostThe range of public key size is (512 ~ 2048).NOTES: If the key modulus is greater than 512, It will take a few minutes.Input the bits in the modulus[default = 512]: 512Generating keys........++++++++++++....++++++++++++......++++++++................................++++++++
Step 2 Create an SSH user on the SCP server.
# Configure the VTY user interface.
[SSH Server] user-interface vty 0 4[SSH Server-ui-vty0-4] authentication-mode aaa[SSH Server-ui-vty0-4] protocol inbound ssh[SSH Server-ui-vty0-4] quit
# Configure the password authentication for the SSH user Client001.
[SSH Server] ssh user client001[SSH Server] ssh user client001 authentication-type password
# Configure the password of the SSH user Client001 to huawei.
[SSH Server] aaa[SSH Server-aaa] local-user client001 password cipher huawei[SSH Server-aaa] local-user client001 privilege level 3[SSH Server-aaa] local-user client001 service-type ssh[SSH Server-aaa] quit
# Configure the service type for the SSH users Client001 to all.
[SSH Server] ssh user client001 service-type all
Step 3 Enable SCP services on the SCP server.[SSH Server] scp server enable
Step 4 Download files from the SCP server to the SCP client.
# For the first login, you need to enable the first authentication on SSH client.
<Quidway> system-view[Quidway] sysname SCP Client[SCP Client] ssh client first-time enable
# Configure the IP address 1.1.1.1 of a loopback interface as the source IP address for the SCPclient.
[SCP Client] scp client-source -a 1.1.1.1
# Use 3des to encrypt the file license.txt, and then download the file to the local workingdirectory from the remote SCP server with the IP address of 172.16.104.110.
[SCP Client] scp -a 1.1.1.1 -cipher 3des [email protected]:license.txt license.txt
Step 5 Verify the configuration.
Run the display scp-client command on the SCP client. The command output is as follows:
S6700 Series Ethernet SwitchesConfiguration Guide - Basic Configuration 9 Accessing Another Device
Issue 05 (2013-04-10) Huawei Proprietary and ConfidentialCopyright © Huawei Technologies Co., Ltd.
243
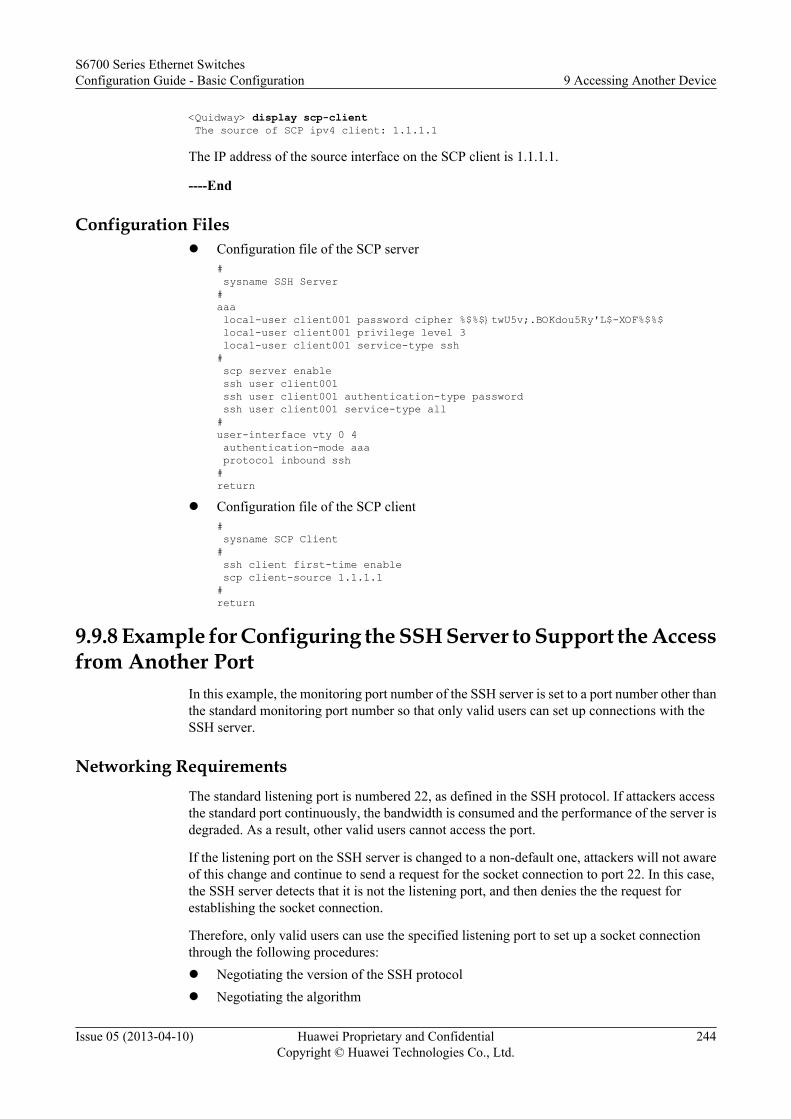
<Quidway> display scp-client The source of SCP ipv4 client: 1.1.1.1
The IP address of the source interface on the SCP client is 1.1.1.1.
----End
Configuration Filesl Configuration file of the SCP server
# sysname SSH Server#aaa local-user client001 password cipher %$%$}twU5v;.BOKdou5Ry'L$-XOF%$%$ local-user client001 privilege level 3 local-user client001 service-type ssh# scp server enable ssh user client001 ssh user client001 authentication-type password ssh user client001 service-type all #user-interface vty 0 4 authentication-mode aaa protocol inbound ssh #return
l Configuration file of the SCP client# sysname SCP Client# ssh client first-time enable scp client-source 1.1.1.1#return
9.9.8 Example for Configuring the SSH Server to Support the Accessfrom Another Port
In this example, the monitoring port number of the SSH server is set to a port number other thanthe standard monitoring port number so that only valid users can set up connections with theSSH server.
Networking RequirementsThe standard listening port is numbered 22, as defined in the SSH protocol. If attackers accessthe standard port continuously, the bandwidth is consumed and the performance of the server isdegraded. As a result, other valid users cannot access the port.
If the listening port on the SSH server is changed to a non-default one, attackers will not awareof this change and continue to send a request for the socket connection to port 22. In this case,the SSH server detects that it is not the listening port, and then denies the the request forestablishing the socket connection.
Therefore, only valid users can use the specified listening port to set up a socket connectionthrough the following procedures:l Negotiating the version of the SSH protocoll Negotiating the algorithm
S6700 Series Ethernet SwitchesConfiguration Guide - Basic Configuration 9 Accessing Another Device
Issue 05 (2013-04-10) Huawei Proprietary and ConfidentialCopyright © Huawei Technologies Co., Ltd.
244
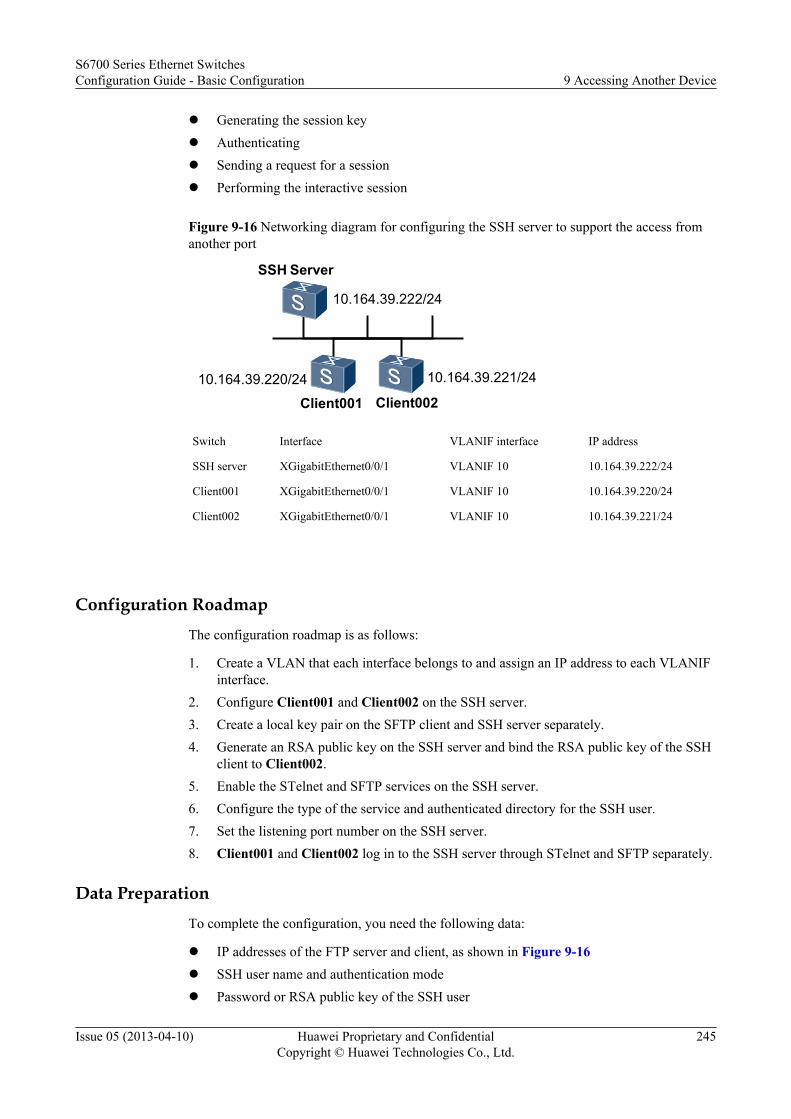
l Generating the session keyl Authenticatingl Sending a request for a sessionl Performing the interactive session
Figure 9-16 Networking diagram for configuring the SSH server to support the access fromanother port
Client00110.164.39.220/24
SSH Server
10.164.39.222/24
Client002
10.164.39.221/24
Switch Interface VLANIF interface IP address
SSH server XGigabitEthernet0/0/1 VLANIF 10 10.164.39.222/24
Client001 XGigabitEthernet0/0/1 VLANIF 10 10.164.39.220/24
Client002 XGigabitEthernet0/0/1 VLANIF 10 10.164.39.221/24
Configuration RoadmapThe configuration roadmap is as follows:
1. Create a VLAN that each interface belongs to and assign an IP address to each VLANIFinterface.
2. Configure Client001 and Client002 on the SSH server.3. Create a local key pair on the SFTP client and SSH server separately.4. Generate an RSA public key on the SSH server and bind the RSA public key of the SSH
client to Client002.5. Enable the STelnet and SFTP services on the SSH server.6. Configure the type of the service and authenticated directory for the SSH user.7. Set the listening port number on the SSH server.8. Client001 and Client002 log in to the SSH server through STelnet and SFTP separately.
Data PreparationTo complete the configuration, you need the following data:
l IP addresses of the FTP server and client, as shown in Figure 9-16l SSH user name and authentication model Password or RSA public key of the SSH user
S6700 Series Ethernet SwitchesConfiguration Guide - Basic Configuration 9 Accessing Another Device
Issue 05 (2013-04-10) Huawei Proprietary and ConfidentialCopyright © Huawei Technologies Co., Ltd.
245
l Server namel Listening port number on the SSH server
Procedure
Step 1 Create a VLAN that each interface belongs to and assign an IP address to each VLANIF interface.
Create VLAN 10 on the Switch that functions as the server and assign IP address10.164.39.222/24 to VLANIF 10.
<Quidway> system-view[Quidway] vlan 10[Quidway-vlan10] quit[Quidway] interface xgigabitethernet 0/0/1[Quidway-XGigabitEthernet0/0/1] port hybrid pvid vlan 10[Quidway-XGigabitEthernet0/0/1] port hybrid untagged vlan 10[Quidway-XGigabitEthernet0/0/1] quit[Quidway] interface vlanif 10[Quidway-Vlanif10] ip address 10.164.39.222 24
Assigning an IP address to theSwitch that functions as Client001 or Client002 is the same asassigning an IP address to VLANIF 10, and is not mentioned here.
Step 2 A local key pair generated on the SSH server<Quidway> system-view [Quidway] rsa local-key-pair createThe key name will be: Quidway_HostThe range of public key size is (512 ~ 2048).NOTES: If the key modulus is greater than 512, It will take a few minutes.Input the bits in the modulus[default = 512]:Generating keys..............++++++++++++..................++++++++++++...++++++++...........++++++++
Step 3 Configure the RSA public key on the server.
# Create a local key pair on the client.
<Quidway> system-view[Quidway] sysname client002[client002] rsa local-key-pair create
# Check the RSA public key generated on the client.
[client002] display rsa local-key-pair public=====================================================Time of Key pair created: 16:38:51 2007/5/25Key name: client002_HostKey type: RSA encryption Key=====================================================Key code:3047 0240 BFF35E4B C61BD786 F907B5DE 7D6770C3 E5FD17AB 203C8FCB BBC8FDF2 F7CB674E 519E8419 0F6B97A8 EA91FC4B B9E18836 5E74BFD5 4C687767 A89C6B43 1D7E3E1B 0203 010001
Host public key for PEM format code:---- BEGIN SSH2 PUBLIC KEY ----AAAAB3NzaC1yc2EAAAADAQABAAAAQQC/815LxhvXhvkHtd59Z3DD5f0XqyA8j8u7
S6700 Series Ethernet SwitchesConfiguration Guide - Basic Configuration 9 Accessing Another Device
Issue 05 (2013-04-10) Huawei Proprietary and ConfidentialCopyright © Huawei Technologies Co., Ltd.
246
yP3y98tnTlGehBkPa5eo6pH8S7nhiDZedL/VTGh3Z6ica0Mdfj4b---- END SSH2 PUBLIC KEY ----
Public key code for pasting into OpenSSH authorized_keys file :ssh-rsa AAAAB3NzaC1yc2EAAAADAQABAAAAQQC/815LxhvXhvkHtd59Z3DD5f0XqyA8j8u7yP3y98tnTlGehBkPa5eo6pH8S7nhiDZedL/VTGh3Z6ica0Mdfj4b rsa-key=====================================================Time of Key pair created: 16:38:51 2007/5/25Key name: client002_ServerKey type: RSA encryption Key=====================================================Key code:3067 0260 BCFAC085 49A2E70E 1284F901 937D7B63 D7A077AB D2797280 4BCA86C0 4CD18B70 5DFAC9D3 9A3F3E74 9B2AF4CB 69FA6483 E87DA590 7B47721A 16391E27 1C76ABAB 743C568B 1B35EC7A 8572A096 BCA9DF0E BC89D3DB 5A83698C 9063DB39 A279DD89 0203 010001[client002]
# Send the RSA public key generated on the client to the server.
[Quidway] rsa peer-public-key RsaKey001Enter "RSA public key" view, return system view with "peer-public-key end".[Quidway-rsa-public-key] public-key-code beginEnter "RSA key code" view, return last view with "public-key-code end".[Quidway-rsa-key-code] 3047[Quidway-rsa-key-code] 0240[Quidway-rsa-key-code] BFF35E4B C61BD786 F907B5DE 7D6770C3 E5FD17AB[Quidway-rsa-key-code] 203C8FCB BBC8FDF2 F7CB674E 519E8419 0F6B97A8[Quidway-rsa-key-code] EA91FC4B B9E18836 5E74BFD5 4C687767 A89C6B43[Quidway-rsa-key-code] 1D7E3E1B[Quidway-rsa-key-code] 0203[Quidway-rsa-key-code] 010001[Quidway-rsa-key-code] public-key-code end[Quidway-rsa-public-key] peer-public-key end
Step 4 Create an SSH user on the server.
NOTE
SSH users can be authenticated in four modes: password, RSA, password-rsa, and all.
l Before configuring the authentication mode of password or password-rsa, you must configure a localuser.
l Before configuring the authentication mode of RSA, password-rsa, or all, you must copy the RSApublic key of the SSH client to the server.
# Configure a VTY user interface.
[Quidway] user-interface vty 0 4[Quidway-ui-vty0-4] authentication-mode aaa[Quidway-ui-vty0-4] protocol inbound ssh[Quidway-ui-vty0-4] user privilege level 3[Quidway-ui-vty0-4] quit
# Create an SSH user named Client001, and configure the authentication mode as passwordfor the user.
[Quidway] ssh user client001[Quidway] ssh user client001 authentication-type password
# Set the password of Client001 to huawei.
[Quidway] aaa[Quidway-aaa] local-user client001 password cipher huawei
S6700 Series Ethernet SwitchesConfiguration Guide - Basic Configuration 9 Accessing Another Device
Issue 05 (2013-04-10) Huawei Proprietary and ConfidentialCopyright © Huawei Technologies Co., Ltd.
247
[Quidway-aaa] local-user client001 service-type ssh[Quidway-aaa] quit
# Set the type of service of Client001 to STelnet.
[Quidway] ssh user client001 service-type stelnet
# Create an SSH user named Client002, and configure the authentication mode as RSA for theuser. Bind the RSA public key of the SSH client to Client002.
[Quidway] ssh user client002[Quidway] ssh user client002 authentication-type rsa[Quidway] ssh user client002 assign rsa-key RsaKey001
# Set the type of service of Client002 to SFTP and the authorized directory as flash:/.
[Quidway] ssh user client002 service-type sftp[Quidway] ssh user client002 sftp-directory flash:/
Step 5 Enable the STelnet and SFTP services on the SSH server.[Quidway] stelnet server enable[Quidway] sftp server enable
Step 6 Configure the new listening port number on the SSH server.[Quidway] ssh server port 1025
Step 7 Connect the SSH client and the SSH server.
# You must enable the initial authentication on the SSH client for the first login.
Enabling the first authentication on Client001.
<Quidway> system-view[Quidway] sysname client001[client001] ssh client first-time enable
Enabling the first authentication on Client002.
[client002] ssh client first-time enable
# The STelnet client logs in to the SSH server by using the new listening port.
[client001] stelnet 10.164.39.222 1025Please input the username:client001Trying 10.164.39.222 ...Press CTRL+K to abortConnected to 10.164.39.222 ...The server is not authenticated. Continue to access it? [Y/N] :ySave the server's public key? [Y/N] :yThe server's public key will be saved with the name 10.164.39.222. Please wait...
Enter password:
Enter the password huawei, and information indicating that the login succeeds is displayed asfollows:
Info: The max number of VTY users is 20, and the number of current VTY users on line is 1.<Quidway>
# The SFTP client logs in to the SSH server by using the new listening port.
[client002]sftp 10.164.39.222 1025Please input the username:client002Trying 10.164.39.222 ...Press CTRL+K to abort
S6700 Series Ethernet SwitchesConfiguration Guide - Basic Configuration 9 Accessing Another Device
Issue 05 (2013-04-10) Huawei Proprietary and ConfidentialCopyright © Huawei Technologies Co., Ltd.
248
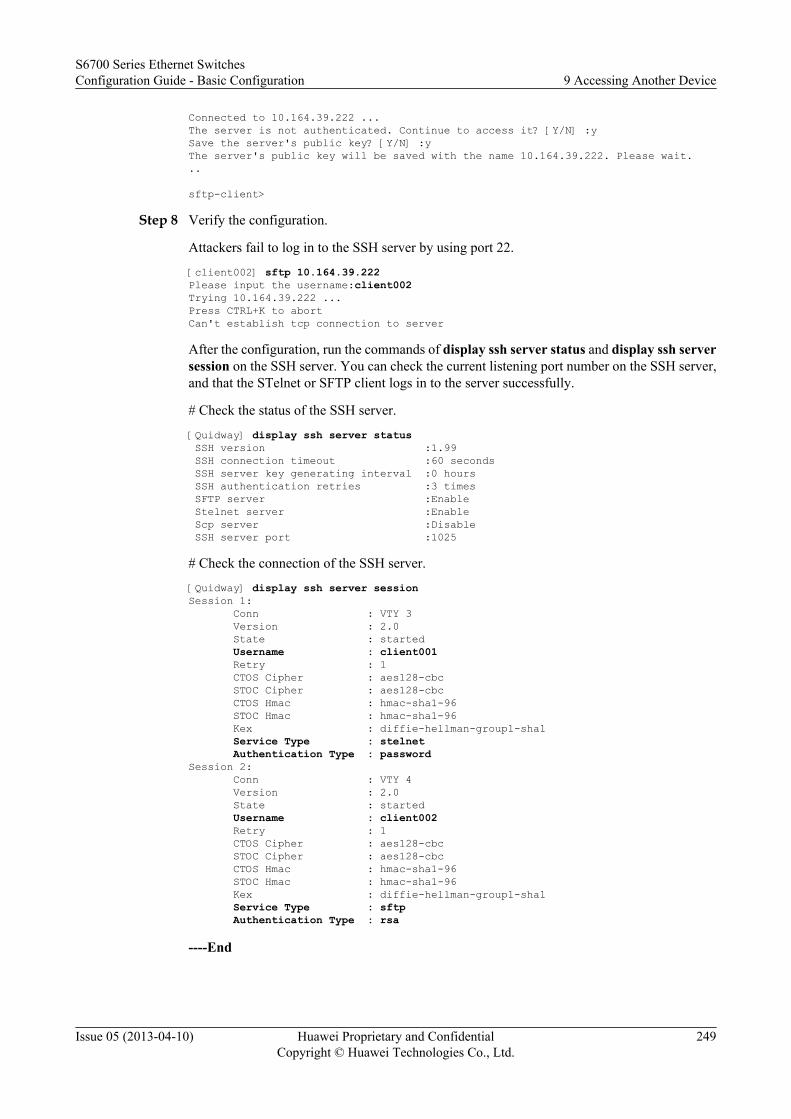
Connected to 10.164.39.222 ...The server is not authenticated. Continue to access it? [Y/N] :ySave the server's public key? [Y/N] :yThe server's public key will be saved with the name 10.164.39.222. Please wait...
sftp-client>
Step 8 Verify the configuration.
Attackers fail to log in to the SSH server by using port 22.
[client002] sftp 10.164.39.222Please input the username:client002Trying 10.164.39.222 ...Press CTRL+K to abortCan't establish tcp connection to server
After the configuration, run the commands of display ssh server status and display ssh serversession on the SSH server. You can check the current listening port number on the SSH server,and that the STelnet or SFTP client logs in to the server successfully.
# Check the status of the SSH server.
[Quidway] display ssh server status SSH version :1.99 SSH connection timeout :60 seconds SSH server key generating interval :0 hours SSH authentication retries :3 times SFTP server :Enable Stelnet server :Enable Scp server :Disable SSH server port :1025
# Check the connection of the SSH server.
[Quidway] display ssh server sessionSession 1: Conn : VTY 3 Version : 2.0 State : started Username : client001 Retry : 1 CTOS Cipher : aes128-cbc STOC Cipher : aes128-cbc CTOS Hmac : hmac-sha1-96 STOC Hmac : hmac-sha1-96 Kex : diffie-hellman-group1-sha1 Service Type : stelnet Authentication Type : password Session 2: Conn : VTY 4 Version : 2.0 State : started Username : client002 Retry : 1 CTOS Cipher : aes128-cbc STOC Cipher : aes128-cbc CTOS Hmac : hmac-sha1-96 STOC Hmac : hmac-sha1-96 Kex : diffie-hellman-group1-sha1 Service Type : sftp Authentication Type : rsa
----End
S6700 Series Ethernet SwitchesConfiguration Guide - Basic Configuration 9 Accessing Another Device
Issue 05 (2013-04-10) Huawei Proprietary and ConfidentialCopyright © Huawei Technologies Co., Ltd.
249
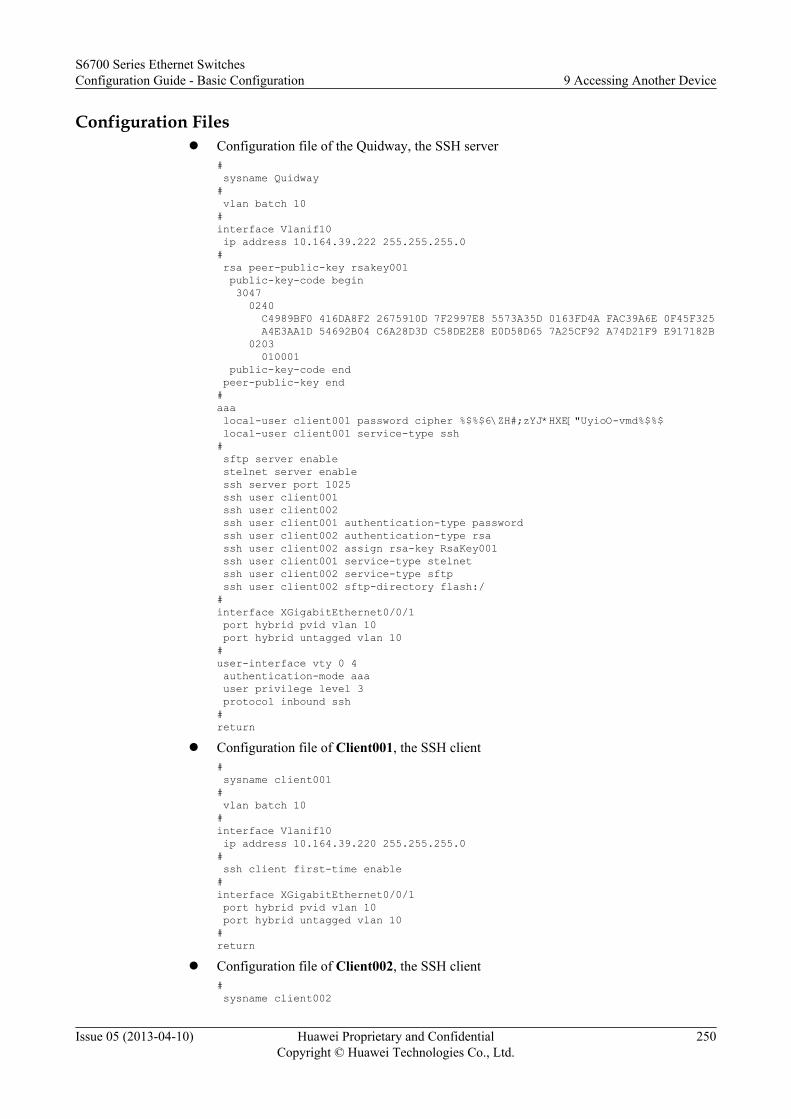
Configuration Filesl Configuration file of the Quidway, the SSH server
# sysname Quidway# vlan batch 10#interface Vlanif10 ip address 10.164.39.222 255.255.255.0# rsa peer-public-key rsakey001 public-key-code begin 3047 0240 C4989BF0 416DA8F2 2675910D 7F2997E8 5573A35D 0163FD4A FAC39A6E 0F45F325 A4E3AA1D 54692B04 C6A28D3D C58DE2E8 E0D58D65 7A25CF92 A74D21F9 E917182B 0203 010001 public-key-code end peer-public-key end#aaa local-user client001 password cipher %$%$6\ZH#;zYJ*HXE["UyioO-vmd%$%$ local-user client001 service-type ssh# sftp server enable stelnet server enable ssh server port 1025 ssh user client001 ssh user client002 ssh user client001 authentication-type password ssh user client002 authentication-type rsa ssh user client002 assign rsa-key RsaKey001 ssh user client001 service-type stelnet ssh user client002 service-type sftp ssh user client002 sftp-directory flash:/ #interface XGigabitEthernet0/0/1 port hybrid pvid vlan 10 port hybrid untagged vlan 10#user-interface vty 0 4 authentication-mode aaa user privilege level 3 protocol inbound ssh#return
l Configuration file of Client001, the SSH client# sysname client001# vlan batch 10#interface Vlanif10 ip address 10.164.39.220 255.255.255.0# ssh client first-time enable#interface XGigabitEthernet0/0/1 port hybrid pvid vlan 10 port hybrid untagged vlan 10#return
l Configuration file of Client002, the SSH client# sysname client002
S6700 Series Ethernet SwitchesConfiguration Guide - Basic Configuration 9 Accessing Another Device
Issue 05 (2013-04-10) Huawei Proprietary and ConfidentialCopyright © Huawei Technologies Co., Ltd.
250
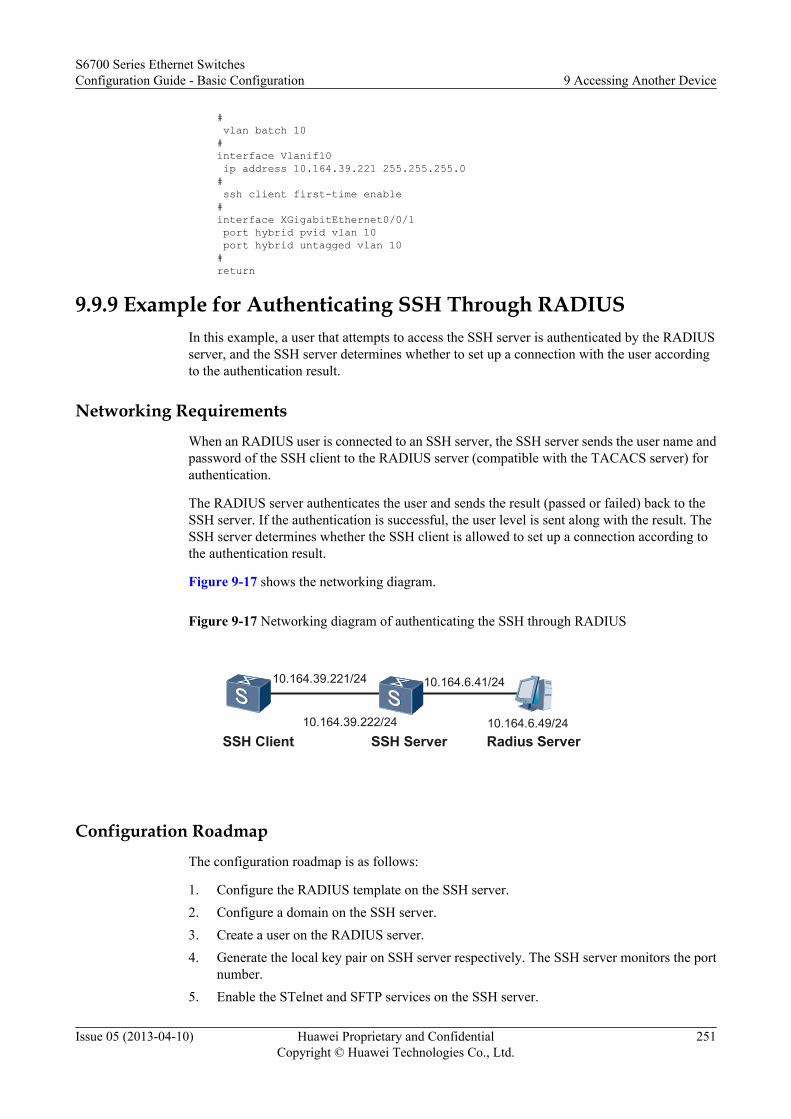
# vlan batch 10#interface Vlanif10 ip address 10.164.39.221 255.255.255.0# ssh client first-time enable#interface XGigabitEthernet0/0/1 port hybrid pvid vlan 10 port hybrid untagged vlan 10#return
9.9.9 Example for Authenticating SSH Through RADIUSIn this example, a user that attempts to access the SSH server is authenticated by the RADIUSserver, and the SSH server determines whether to set up a connection with the user accordingto the authentication result.
Networking RequirementsWhen an RADIUS user is connected to an SSH server, the SSH server sends the user name andpassword of the SSH client to the RADIUS server (compatible with the TACACS server) forauthentication.
The RADIUS server authenticates the user and sends the result (passed or failed) back to theSSH server. If the authentication is successful, the user level is sent along with the result. TheSSH server determines whether the SSH client is allowed to set up a connection according tothe authentication result.
Figure 9-17 shows the networking diagram.
Figure 9-17 Networking diagram of authenticating the SSH through RADIUS
SSH Client SSH Server Radius Server10.164.39.222/24
10.164.39.221/24
10.164.6.49/24
10.164.6.41/24
Configuration RoadmapThe configuration roadmap is as follows:
1. Configure the RADIUS template on the SSH server.2. Configure a domain on the SSH server.3. Create a user on the RADIUS server.4. Generate the local key pair on SSH server respectively. The SSH server monitors the port
number.5. Enable the STelnet and SFTP services on the SSH server.
S6700 Series Ethernet SwitchesConfiguration Guide - Basic Configuration 9 Accessing Another Device
Issue 05 (2013-04-10) Huawei Proprietary and ConfidentialCopyright © Huawei Technologies Co., Ltd.
251
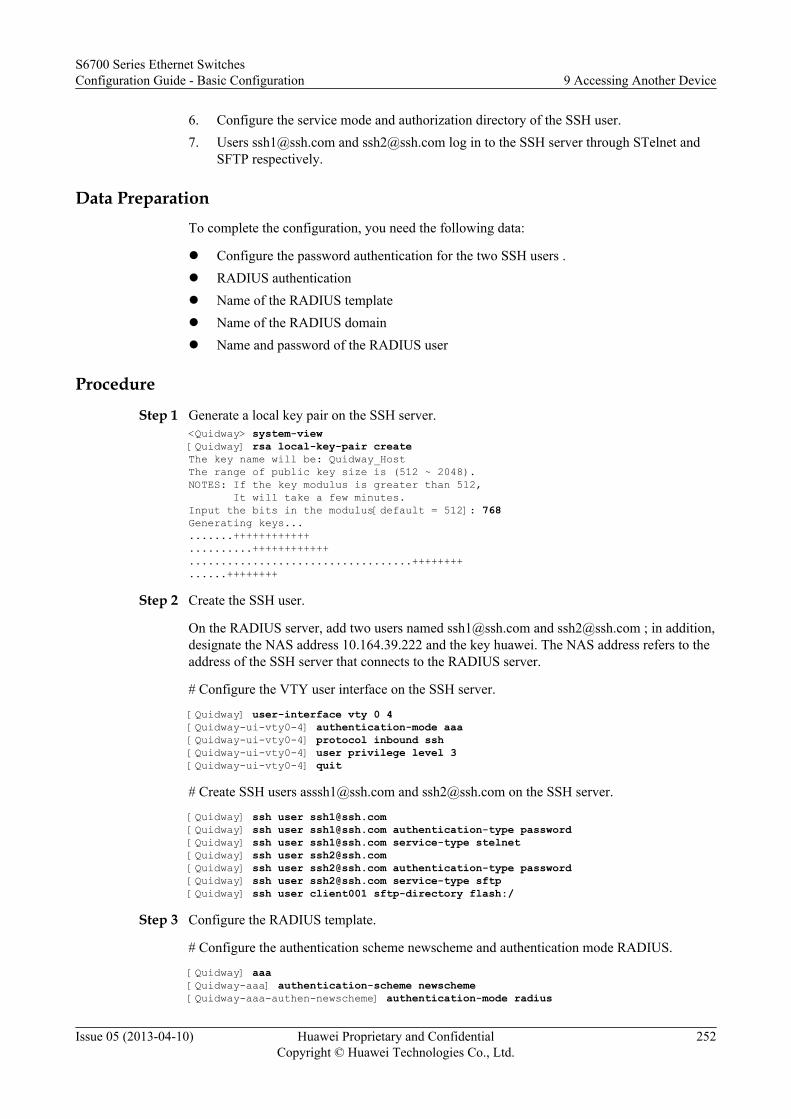
6. Configure the service mode and authorization directory of the SSH user.7. Users [email protected] and [email protected] log in to the SSH server through STelnet and
SFTP respectively.
Data PreparationTo complete the configuration, you need the following data:
l Configure the password authentication for the two SSH users .l RADIUS authenticationl Name of the RADIUS templatel Name of the RADIUS domainl Name and password of the RADIUS user
Procedure
Step 1 Generate a local key pair on the SSH server.<Quidway> system-view [Quidway] rsa local-key-pair createThe key name will be: Quidway_HostThe range of public key size is (512 ~ 2048).NOTES: If the key modulus is greater than 512, It will take a few minutes.Input the bits in the modulus[default = 512]: 768Generating keys..........++++++++++++..........++++++++++++...................................++++++++......++++++++
Step 2 Create the SSH user.
On the RADIUS server, add two users named [email protected] and [email protected] ; in addition,designate the NAS address 10.164.39.222 and the key huawei. The NAS address refers to theaddress of the SSH server that connects to the RADIUS server.
# Configure the VTY user interface on the SSH server.
[Quidway] user-interface vty 0 4[Quidway-ui-vty0-4] authentication-mode aaa[Quidway-ui-vty0-4] protocol inbound ssh[Quidway-ui-vty0-4] user privilege level 3[Quidway-ui-vty0-4] quit
# Create SSH users [email protected] and [email protected] on the SSH server.
[Quidway] ssh user [email protected][Quidway] ssh user [email protected] authentication-type password [Quidway] ssh user [email protected] service-type stelnet[Quidway] ssh user [email protected][Quidway] ssh user [email protected] authentication-type password[Quidway] ssh user [email protected] service-type sftp[Quidway] ssh user client001 sftp-directory flash:/
Step 3 Configure the RADIUS template.
# Configure the authentication scheme newscheme and authentication mode RADIUS.
[Quidway] aaa[Quidway-aaa] authentication-scheme newscheme[Quidway-aaa-authen-newscheme] authentication-mode radius
S6700 Series Ethernet SwitchesConfiguration Guide - Basic Configuration 9 Accessing Another Device
Issue 05 (2013-04-10) Huawei Proprietary and ConfidentialCopyright © Huawei Technologies Co., Ltd.
252
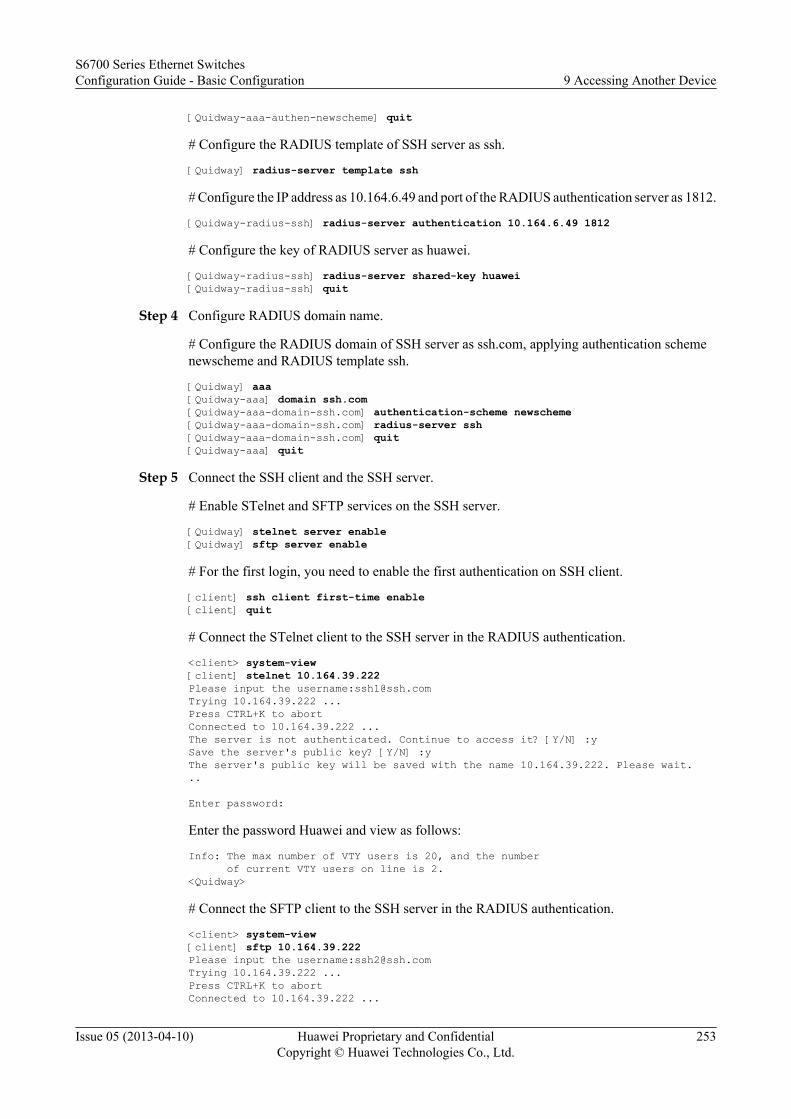
[Quidway-aaa-authen-newscheme] quit
# Configure the RADIUS template of SSH server as ssh.
[Quidway] radius-server template ssh
# Configure the IP address as 10.164.6.49 and port of the RADIUS authentication server as 1812.
[Quidway-radius-ssh] radius-server authentication 10.164.6.49 1812
# Configure the key of RADIUS server as huawei.
[Quidway-radius-ssh] radius-server shared-key huawei[Quidway-radius-ssh] quit
Step 4 Configure RADIUS domain name.
# Configure the RADIUS domain of SSH server as ssh.com, applying authentication schemenewscheme and RADIUS template ssh.
[Quidway] aaa[Quidway-aaa] domain ssh.com[Quidway-aaa-domain-ssh.com] authentication-scheme newscheme [Quidway-aaa-domain-ssh.com] radius-server ssh [Quidway-aaa-domain-ssh.com] quit[Quidway-aaa] quit
Step 5 Connect the SSH client and the SSH server.
# Enable STelnet and SFTP services on the SSH server.
[Quidway] stelnet server enable[Quidway] sftp server enable
# For the first login, you need to enable the first authentication on SSH client.
[client] ssh client first-time enable[client] quit
# Connect the STelnet client to the SSH server in the RADIUS authentication.
<client> system-view[client] stelnet 10.164.39.222Please input the username:[email protected] 10.164.39.222 ...Press CTRL+K to abortConnected to 10.164.39.222 ...The server is not authenticated. Continue to access it? [Y/N] :ySave the server's public key? [Y/N] :yThe server's public key will be saved with the name 10.164.39.222. Please wait...
Enter password:
Enter the password Huawei and view as follows:
Info: The max number of VTY users is 20, and the number of current VTY users on line is 2. <Quidway>
# Connect the SFTP client to the SSH server in the RADIUS authentication.
<client> system-view[client] sftp 10.164.39.222 Please input the username:[email protected] 10.164.39.222 ...Press CTRL+K to abortConnected to 10.164.39.222 ...
S6700 Series Ethernet SwitchesConfiguration Guide - Basic Configuration 9 Accessing Another Device
Issue 05 (2013-04-10) Huawei Proprietary and ConfidentialCopyright © Huawei Technologies Co., Ltd.
253
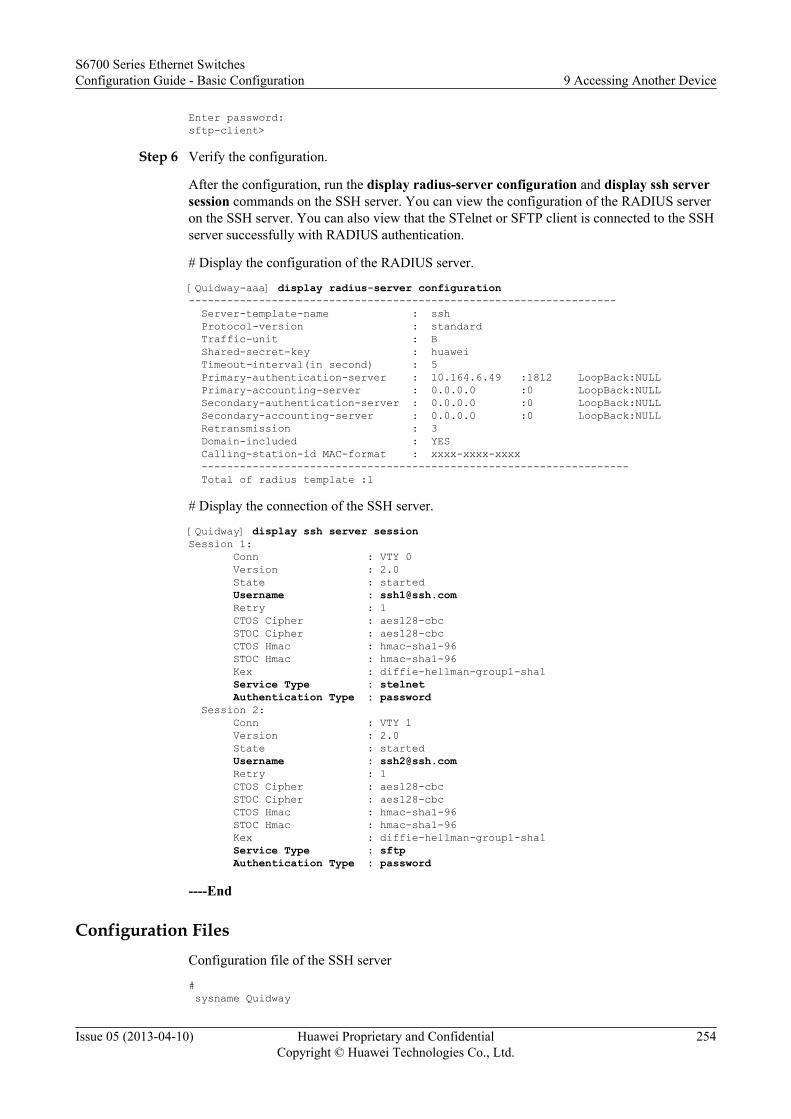
Enter password:sftp-client>
Step 6 Verify the configuration.
After the configuration, run the display radius-server configuration and display ssh serversession commands on the SSH server. You can view the configuration of the RADIUS serveron the SSH server. You can also view that the STelnet or SFTP client is connected to the SSHserver successfully with RADIUS authentication.
# Display the configuration of the RADIUS server.
[Quidway-aaa] display radius-server configuration------------------------------------------------------------------- Server-template-name : ssh Protocol-version : standard Traffic-unit : B Shared-secret-key : huawei Timeout-interval(in second) : 5 Primary-authentication-server : 10.164.6.49 :1812 LoopBack:NULL Primary-accounting-server : 0.0.0.0 :0 LoopBack:NULL Secondary-authentication-server : 0.0.0.0 :0 LoopBack:NULL Secondary-accounting-server : 0.0.0.0 :0 LoopBack:NULL Retransmission : 3 Domain-included : YES Calling-station-id MAC-format : xxxx-xxxx-xxxx ------------------------------------------------------------------- Total of radius template :1
# Display the connection of the SSH server.
[Quidway] display ssh server sessionSession 1: Conn : VTY 0 Version : 2.0 State : started Username : [email protected] Retry : 1 CTOS Cipher : aes128-cbc STOC Cipher : aes128-cbc CTOS Hmac : hmac-sha1-96 STOC Hmac : hmac-sha1-96 Kex : diffie-hellman-group1-sha1 Service Type : stelnet Authentication Type : password Session 2: Conn : VTY 1 Version : 2.0 State : started Username : [email protected] Retry : 1 CTOS Cipher : aes128-cbc STOC Cipher : aes128-cbc CTOS Hmac : hmac-sha1-96 STOC Hmac : hmac-sha1-96 Kex : diffie-hellman-group1-sha1 Service Type : sftp Authentication Type : password
----End
Configuration FilesConfiguration file of the SSH server
# sysname Quidway
S6700 Series Ethernet SwitchesConfiguration Guide - Basic Configuration 9 Accessing Another Device
Issue 05 (2013-04-10) Huawei Proprietary and ConfidentialCopyright © Huawei Technologies Co., Ltd.
254
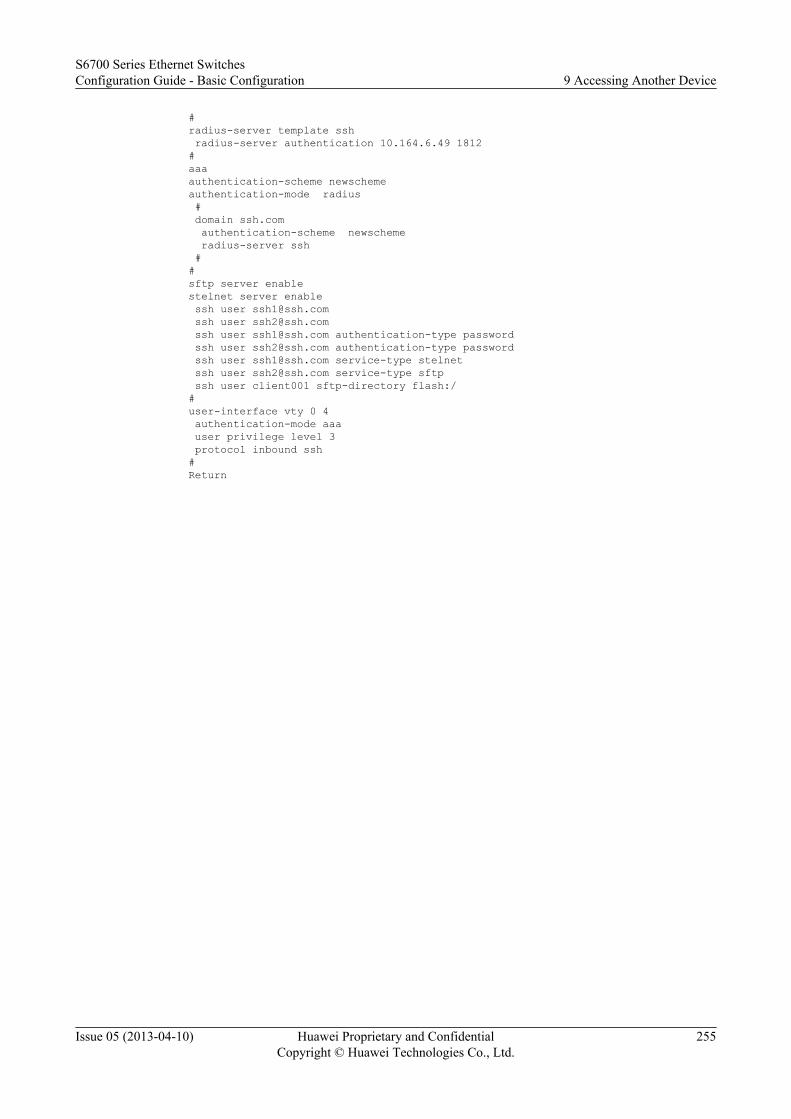
#radius-server template ssh radius-server authentication 10.164.6.49 1812#aaaauthentication-scheme newschemeauthentication-mode radius # domain ssh.com authentication-scheme newscheme radius-server ssh ##sftp server enablestelnet server enable ssh user [email protected] ssh user [email protected] ssh user [email protected] authentication-type password ssh user [email protected] authentication-type password ssh user [email protected] service-type stelnet ssh user [email protected] service-type sftp ssh user client001 sftp-directory flash:/#user-interface vty 0 4 authentication-mode aaa user privilege level 3 protocol inbound ssh#Return
S6700 Series Ethernet SwitchesConfiguration Guide - Basic Configuration 9 Accessing Another Device
Issue 05 (2013-04-10) Huawei Proprietary and ConfidentialCopyright © Huawei Technologies Co., Ltd.
255

10 Web System Configuration
About This Chapter
Before configuring the device in Web mode, you need to configure the device as the Web server.
10.1 Overview of Web SystemThrough the Web system, users can manage and maintain the device in the graphical userinterface (GUI).
10.2 Starting Web SystemThis topic describes how to load the Web system and create an account of the Web system.
S6700 Series Ethernet SwitchesConfiguration Guide - Basic Configuration 10 Web System Configuration
Issue 05 (2013-04-10) Huawei Proprietary and ConfidentialCopyright © Huawei Technologies Co., Ltd.
256
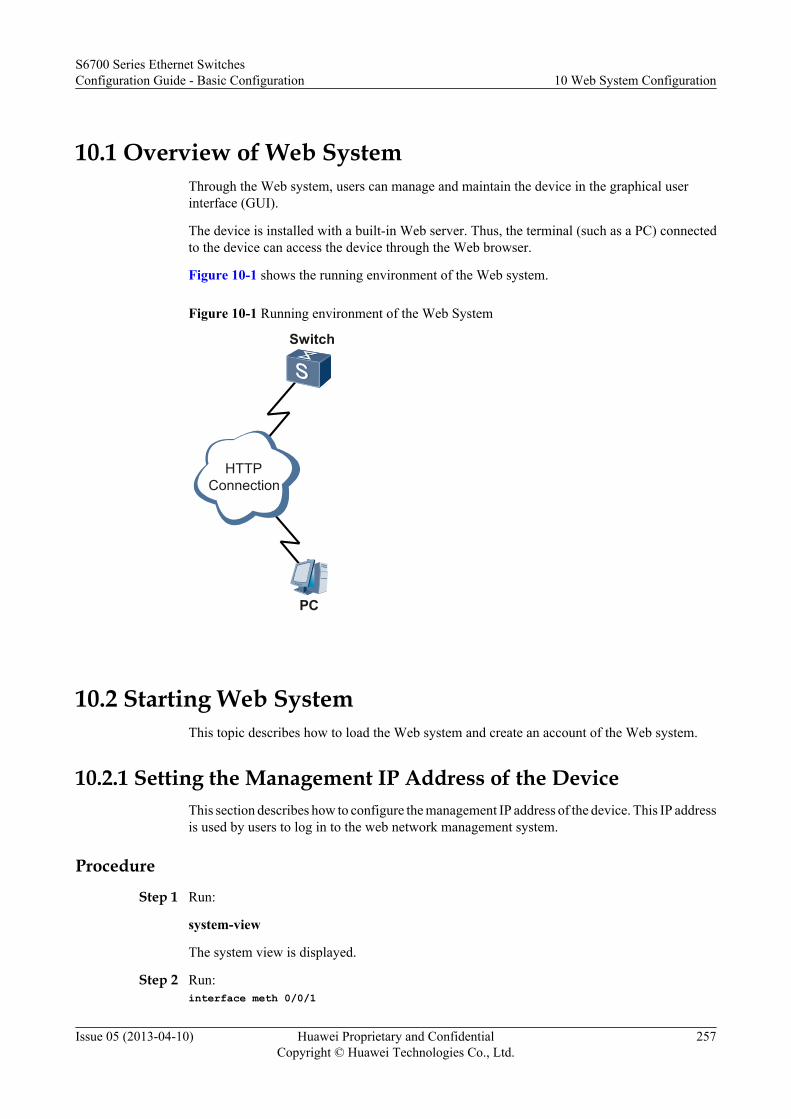
10.1 Overview of Web SystemThrough the Web system, users can manage and maintain the device in the graphical userinterface (GUI).
The device is installed with a built-in Web server. Thus, the terminal (such as a PC) connectedto the device can access the device through the Web browser.
Figure 10-1 shows the running environment of the Web system.
Figure 10-1 Running environment of the Web System
HTTPConnection
Switch
PC
10.2 Starting Web SystemThis topic describes how to load the Web system and create an account of the Web system.
10.2.1 Setting the Management IP Address of the DeviceThis section describes how to configure the management IP address of the device. This IP addressis used by users to log in to the web network management system.
Procedure
Step 1 Run:
system-view
The system view is displayed.
Step 2 Run:interface meth 0/0/1
S6700 Series Ethernet SwitchesConfiguration Guide - Basic Configuration 10 Web System Configuration
Issue 05 (2013-04-10) Huawei Proprietary and ConfidentialCopyright © Huawei Technologies Co., Ltd.
257

The MEth interface view is displayed.
Step 3 Run:ip address ip-address { mask | mask-length } [ sub ]
The IP address of the interface is configured.
----End
10.2.2 Uploading Web Page FilesThis section describes how to obtain the Web page files and upload them to the device throughFTP.
PrerequisitesThe web page file has been saved on the S6700 before delivery, so you do not need to uploadthis file when using the S6700 for the first time. (You still need to load the file). When theS6700 is upgraded, upload the web page file to the S6700 again.
To obtain the Web page file of the device, log in to http://support.huawei.com/enterprise, andthen choose Software > Product Software > Enterprise Networking > Datacom Network >Campus Switch. Download the software package based on the product name and version. TheWeb page file is contained in the software package. The file name is Product Name - theVersion of Software.the Version of Web page file.web.zip.
Before uploading the Web page file, copy the Web page file to the client from which you log into the device.
ContextNOTEYou can also download Web files through TFTP. In this case, the device functions as the TFTP client, andthe terminal that stores the Web files functions as the TFTP server. For details, see 9.4.4 DownloadingFiles Using TFTP.
Procedure
Step 1 Run:system-view
The system view is displayed.
Step 2 Run:ftp server enable
The FTP server is enabled.
Step 3 Run:aaa
The AAA view is displayed.
Step 4 Run:local-user user-name password cipher password
An FTP client is configured and the password is set to huawei.
S6700 Series Ethernet SwitchesConfiguration Guide - Basic Configuration 10 Web System Configuration
Issue 05 (2013-04-10) Huawei Proprietary and ConfidentialCopyright © Huawei Technologies Co., Ltd.
258
Step 5 Run:local-user user-name privilege level level
The local user level is set.
NOTE
The local user level must be set to 3 or higher.
Step 6 Run:local-user user-name ftp-directory directory
The directory is set for the FTP client.
Step 7 Run:local-user user-name service-type ftp
The service type of an FTP login user is set.
Step 8 Run the following command in the cmd view of the PC:ftp ip-address
The user name and password are displayed. The PC can log in to the device.
C:\>ftp 10.1.1.132 Connected to 10.1.1.132.220 FTP service ready.User (10.1.1.132:(none)): client331 Password required for client.Password:230 User logged in.ftp>
Step 9 Run the following command in the FTP view:put local-filename
The web.zip file is uploaded from the PC to the device.
ftp> put web.zip200 Port command okay.150 Opening ASCII mode data connection for web.zip.226 Transfer complete.ftp: 251047 bytes sent in 3.36Seconds 74.74Kbytes/sec.ftp>
----End
10.2.3 Loading a Web Page FileThis section describes how to load a Web file.
ContextBefore loading the Web page file, upload it to the device.
Procedure
Step 1 Run:system-view
The system view is displayed.
S6700 Series Ethernet SwitchesConfiguration Guide - Basic Configuration 10 Web System Configuration
Issue 05 (2013-04-10) Huawei Proprietary and ConfidentialCopyright © Huawei Technologies Co., Ltd.
259
Step 2 Run:http server load file-name
The Web page file is loaded to the device.
----End
10.2.4 Creating a Web AccountBefore logging in to the device in Web mode, you need to create a Web account on the device.
Context
Before enabling the HTTP server,load the Web Page File to device.
The device provides a default user account for logging in to the web network managementsystem, with the user name admin and password admin. You can use the default account to login to the web network management system.
Procedure
Step 1 Run:system-view
The system view is displayed.
Step 2 Run:http server enable
The HTTP server is enabled.
NOTEThe HTTP server function can be enabled only when the Web page loaded exists.
Step 3 (Optional) Run:http server port port-number
The monitoring port number of the HTTP server is set.
Step 4 Run:aaa
The AAA view is displayed.
Step 5 Run:local-user user-name password cipher password
An HTTP client is configured and the password of the client is set.
Step 6 Run:local-user user-name privilege level level
The HTTP user level is set.
NOTE
Set the HTTP user level to 3 or higher so that the HTTP user can have management-level rights. Users atlevels 0, 1 and 2 have only visit-level rights.
S6700 Series Ethernet SwitchesConfiguration Guide - Basic Configuration 10 Web System Configuration
Issue 05 (2013-04-10) Huawei Proprietary and ConfidentialCopyright © Huawei Technologies Co., Ltd.
260
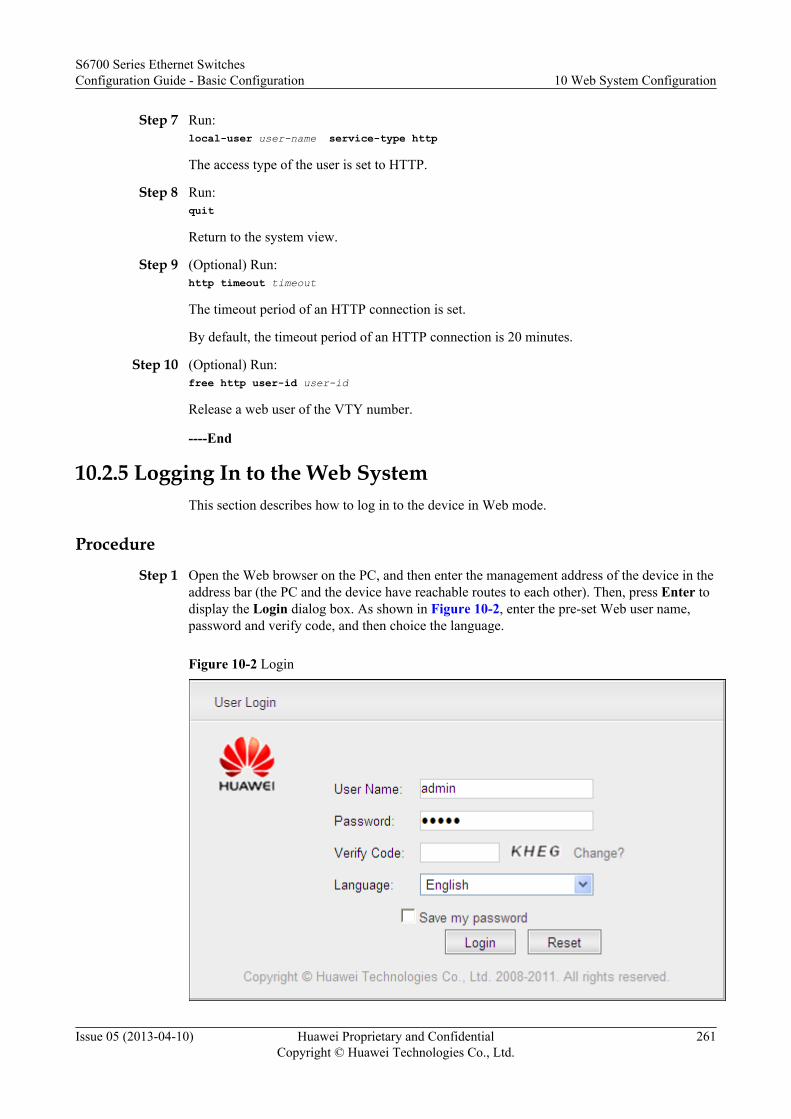
Step 7 Run:local-user user-name service-type http
The access type of the user is set to HTTP.
Step 8 Run:quit
Return to the system view.
Step 9 (Optional) Run:http timeout timeout
The timeout period of an HTTP connection is set.
By default, the timeout period of an HTTP connection is 20 minutes.
Step 10 (Optional) Run:free http user-id user-id
Release a web user of the VTY number.
----End
10.2.5 Logging In to the Web SystemThis section describes how to log in to the device in Web mode.
Procedure
Step 1 Open the Web browser on the PC, and then enter the management address of the device in theaddress bar (the PC and the device have reachable routes to each other). Then, press Enter todisplay the Login dialog box. As shown in Figure 10-2, enter the pre-set Web user name,password and verify code, and then choice the language.
Figure 10-2 Login
S6700 Series Ethernet SwitchesConfiguration Guide - Basic Configuration 10 Web System Configuration
Issue 05 (2013-04-10) Huawei Proprietary and ConfidentialCopyright © Huawei Technologies Co., Ltd.
261

NOTE
If you select Save my password before clicking Login, you do not need to enter the password at nextlogin.
Step 2 Click Login or press enter to display the homepage of the Web system.You can configure the device after logging in to the Web system. For details on how to configurethe device on the Web system, see the S6700 Series Ethernet Switches Web System Guide.
----End
S6700 Series Ethernet SwitchesConfiguration Guide - Basic Configuration 10 Web System Configuration
Issue 05 (2013-04-10) Huawei Proprietary and ConfidentialCopyright © Huawei Technologies Co., Ltd.
262