Embed Size (px)
Citation preview
Dell EMC Unity™ FamilyVersion 4.4
Configuring and managing LUNsH16814
02

Copyright © 2018 Dell Inc. or its subsidiaries. All rights reserved.
Published June 2018
Dell believes the information in this publication is accurate as of its publication date. The information is subject to change without notice.
THE INFORMATION IN THIS PUBLICATION IS PROVIDED “AS-IS.“ DELL MAKES NO REPRESENTATIONS OR WARRANTIES OF ANY KIND
WITH RESPECT TO THE INFORMATION IN THIS PUBLICATION, AND SPECIFICALLY DISCLAIMS IMPLIED WARRANTIES OF
MERCHANTABILITY OR FITNESS FOR A PARTICULAR PURPOSE. USE, COPYING, AND DISTRIBUTION OF ANY DELL SOFTWARE DESCRIBED
IN THIS PUBLICATION REQUIRES AN APPLICABLE SOFTWARE LICENSE.
Dell, EMC, and other trademarks are trademarks of Dell Inc. or its subsidiaries. Other trademarks may be the property of their respective owners.
Published in the USA.
Dell EMCHopkinton, Massachusetts 01748-91031-508-435-1000 In North America 1-866-464-7381www.DellEMC.com
2 Unity Family 4.4 Configuring and managing LUNs

Configuring LUNs and consistency groups 5About LUN storage.......................................................................................6Create a LUN................................................................................................7Change LUN or LUN thin clone properties....................................................8Delete a LUN................................................................................................ 9About iSCSI interfaces................................................................................10Create a consistency group......................................................................... 11Add a LUN to a consistency group............................................................... 11Change consistency group or consistency group thin clone properties....... 12Delete a consistency group......................................................................... 13
Configuring LUN move 15About LUN Move sessions.......................................................................... 16LUN move session restrictions and limitations............................................ 16Create a LUN move session.........................................................................17Cancel a LUN move session.........................................................................17Best practices for LUN move sessions........................................................ 17Troubleshooting LUN move session issues.................................................. 18
Configuring block thin clones 19About thin clones........................................................................................20Thin clone terminology and hierarchy......................................................... 20Create a thin clone..................................................................................... 23Change thin clone properties......................................................................23Refresh a thin clone....................................................................................23
Chapter 1
Chapter 2
Chapter 3
CONTENTS
Unity Family 4.4 Configuring and managing LUNs 3

CONTENTS
4 Unity Family 4.4 Configuring and managing LUNs

CHAPTER 1
Configuring LUNs and consistency groups
l About LUN storage.............................................................................................. 6l Create a LUN....................................................................................................... 7l Change LUN or LUN thin clone properties........................................................... 8l Delete a LUN........................................................................................................9l About iSCSI interfaces....................................................................................... 10l Create a consistency group................................................................................. 11l Add a LUN to a consistency group...................................................................... 11l Change consistency group or consistency group thin clone properties...............12l Delete a consistency group.................................................................................13
Configuring LUNs and consistency groups 5

About LUN storageLUN storage resources provide hosts with access to general purpose block-levelstorage through network-based iSCSI or Fibre Channel (FC) connections. With LUNstorage you can manage addressable partitions of block storage resources so thathost systems can mount and use these resources (LUNs) over FC or IP connections.After a host connects to the LUN, it can use the LUN like a local storage drive.
Figure 1 LUN storage overview
Each interface has a unique VLAN ID (checked locally for the port) and an IP address(checked locally for the storage system) for iSCSI connections and a World WideName (WWN) for FC connections.
Note
Different physical network ports can have the same VLAN ID.
The following table lists the components of LUN storage:
Table 1 Components of LUN storage
Component Description
LUN A block of storage that can stand alone or may be associated with aconsistency group. Allocated from a pool, you can use a LUN for one ormore hosts. A LUN represents a quantity of storage allocated for a
Configuring LUNs and consistency groups
6 Unity Family 4.4 Configuring and managing LUNs
Table 1 Components of LUN storage (continued)
Component Description
host. For thin LUNs in All-Flash pools, data reduction is allowed to savespace. You can allocate a LUN to more than one host, if you coordinatethe access by using a set of clustered hosts. After a LUN is createdindividually or as part of a consistency group, individual hosts can mapto the LUN based on the settings and permissions configured throughUnisphere.
Consistency group An addressable instance of LUN storage that can contain one or moreLUNs (up to 50) and is associated with one or more attached hosts.Consistency groups help organize the storage allocated for a particularhost or hosts. Snapshots taken of a consistency group apply to allLUNs associated with the group.
Storage hosts (Initiators)Storage hosts are systems that use storage system LUN resources. Before a host canaccess storage resources, you must define a configuration for it through Unispherewith the Host wizard. A host configuration specifies the host name and one or moreinitiators (FC WWN or iSCSI IQN). After defining the host configuration, you can alsospecify the type of access that the host has to the LUN or consistency group. Thehost can then map from the host-side to any LUNs associated with a consistencygroup. Refer to the host documentation for more information.
Create a LUNBefore you begin
Before you create a LUN, at least one pool must exist on the storage system. Obtainthe following information:
l Storage size you want to allocate for the LUN.
l Information about the host that will use the LUN (if a host configuration does notexist), including the host's iSCSI address or WWN, CHAP secret (if applicable),and type of access (storage, snapshot, or both) to allow.
l Protection schedule including the frequency with which to perform automaticsnapshots and the length of time to retain individual snapshots.
Procedure
1. Under Storage, select Block > LUNs.
2. Select the Add icon.
Note
You can also create LUNs when you create a new consistency group.
3. Specify the relevant information, while noting the following:
l You can specify a Host LUN ID of your choosing. If one is not specified, thesystem will assign one by default.
l If you are adding LUNs from the Host Properties window, you can specifyHost LUN IDs when creating new LUNs by using the Assign Host LUN IDs
Configuring LUNs and consistency groups
Create a LUN 7

button. You cannot specify Host LUN IDs when adding existing or multipleLUNs to the host, but you can modify them after they are added to the host.
l After you create the LUN, you can increase its size but not decrease it.
l You can create multiple LUNs at once with a maximum limit of 100 LUNs.The system appends the LUN name with a number when creating multipleLUNs.
l The Size value displays the quantity of storage subscribed for the LUN.
l If you want to limit I/O throughput and bandwidth to provide morepredictable performance, select an existing host I/O limit policy to enforceon this LUN or create a new policy.
l The Thin checkbox is selected by default. If you do not want to create a thinLUN, remove the checkmark from the Thin checkbox. Removing thecheckmark also disables the Data Reduction option.
l The Data Reduction checkbox is available for thin LUNs in All-Flash poolsonly. It allows a thin LUN to have data reduction applied to save space.
Change LUN or LUN thin clone propertiesProcedure
1. Under Storage, select Block > LUNs.
2. Select the relevant LUN or thin clone, and then select the Edit icon.
3. On the General tab, change the LUN or thin clone name, description, and size,and view space usage and capacity information. You can change the default SPowner for a LUN, but not a thin clone. If you change the default SP owner for abase LUN, the default SP changes automatically for its derivative thin clones.
If this is a thin LUN or a file system in an All-Flash pool, you can choose to applydata reduction to all incoming writes by selecting the Data reduction checkbox.
Note
To apply data reduction to both incoming LUN writes and existing LUN data,you must use the LUN Move session feature to move the LUN's data to adestination LUN that has data reduction enabled. It is recommended that youperform a LUN Move operation only on a single LUN for an SP at a time, andnot perform multiple move operations on an SP simultaneously. Refer to AboutLUN Move sessions on page 16 for additional LUN Move information.
l If the LUN already has data reduction applied, you can view the capacity:how much space is allocated after data reduction was applied, and the spacesaved due to applying data reduction to this LUN, including its snapshots.Data reduction savings are shown in multiple formats, including actual spacesaved (GB/TB), ratio, and percentage.
l You can also choose to disable data reduction by removing the checkmarkfrom the Data Reduction checkbox and clicking the Apply button. Existingdata remains as is until overwritten. Any newly-written data does not havedata reduction applied.
l A thin clone cannot have data reduction applied independently of its baseLUN. However, if you apply data reduction to the base LUN, the thin clonealso has data reduction applied.
Configuring LUNs and consistency groups
8 Unity Family 4.4 Configuring and managing LUNs

l If a LUN is in the process of being moved, you can view the status andchange the move session's priority setting. If the move is completed, youcan view the move status for up to three days after the operationcompleted.
Note
A thin clone or a LUN that has a thin clone cannot be moved.
4. On the Host Access tab, modify the list of hosts that have access to the LUNor thin clone, modify the Host LUN ID for a specific host, or change the type ofaccess.
5. On the FAST VP tab, change the tiering policy and view the data distributionper tier.
Note
You cannot change the tiering policy for a thin clone independently of its baseLUN. However, if you change the tiering policy of the base LUN, the thin cloneinherits the changed tiering policy.
6. On the Snapshots tab, manage the LUN or thin clone's snapshots or configurea snapshot schedule for the LUN.
7. On the Replication tab, configure replication settings. Select ConfigureReplication to get started.
Note
When you replicate a thin clone, it becomes a standard LUN on the destinationstorage system, with no ties to the original base LUN.
8. On the Host I/O Limit tab, view the bandwidth and throughput performance ofthe LUN or thin clone with the current policy, select a different policy andpreview the performance impact of that policy, or apply a new policy.
Delete a LUNBefore you begin
You should delete a LUN only if:
l The LUN was used for testing purposes and the tests have completed.
l The LUN has been replicated to a different destination and the source LUN is nolonger needed.
l You are trying to save space by deleting the LUN and the data on that LUN is nolonger needed.
Note
LUN deletion is an irreversible operation.
Ensure the following conditions are met before attempting to delete a LUN:
l The LUN does not have any attached snapshots.
l The LUN does not have any active replication sessions.
Configuring LUNs and consistency groups
Delete a LUN 9

l The LUN is not currently attached to hosts.
Note
LUNs cannot be deleted if hosts are currently attached. Remove host accessbefore deleting any LUNs. Plan host downtime where needed, or ensure the hostsno longer need the LUN before removing access. If you are migrating hosts fromone LUN to another, ensure the hosts have access to the new LUN beforeremoving them from the LUN that will be deleted.
Procedure
1. Under Storage, select Block > LUNs.
2. Select the relevant LUN, and click the Delete icon.
If the Delete icon is not available, the LUN currently has hosts attached.Remove access from the LUNs and retry the deletion.
a. Select the LUN you want to delete.
b. Ensure any currently attached hosts no longer need the LUN. Under MoreActions, click Remove Host Access.
c. Review the list of attached hosts. Click Remove Host Access to confirm.
When the job completes, the Delete icon will become available for theselected LUN.
Results
If the job fails, check the job details on the Jobs page for more information. The LUNdeletion may be prevented due to one of the scenarios listed above.
About iSCSI interfacesiSCSI interfaces enable hosts using the iSCSI protocol to access block storage (LUNs,consistency groups, and VMware VMFS datastores) on the storage system. The iSCSIinterfaces provide continuous access to data when a Storage Processor (SP)becomes unavailable because of a system software upgrade or component failure.When you add an iSCSI interface on the storage system, you associate it with one orboth Storage Processors (SPs). So, at a given point, there will be multiple iSCSIinterfaces on each SP. These become the available paths hosts, with relevant accessprivileges, can use to access the relevant storage resources.
Note
Fibre Channel interfaces are created automatically on the storage system.
To ensure continuous access to the storage in an event of a failover, set up iSCSIinterfaces on the same port of each SP, and then leverage host-based multipathingsoftware to manage multiple connections to the storage system.
Add or edit iSCSI interfacesWhen you log on to Unisphere for the first time, the Initial Configuration Wizardincludes a step that enables you to add iSCSI interfaces. To add or manage iSCSIinterfaces at a later time, under Storage, select Block > iSCSI Interfaces.
Configuring LUNs and consistency groups
10 Unity Family 4.4 Configuring and managing LUNs

Note
iSCSI interfaces can only be created on an Ethernet port that is not participating in alink aggregation.
Before you begin creating or updating an iSCSI interface, ensure that you have thefollowing information:
l The Ethernet port you will use for the iSCSI interface.
l For each Storage Processor (SP), the following address information:
n IP address associated with the iSCSI interface. Although you can specify anIPv4 or IPv6-based address, ensure that you specify the same type of addressfor both SPs.
n IP address mask or prefix length that identifies the subnet where the iSCSIinterface resides.
n Gateway IP address associated with the iSCSI interface.
n Alias name associated with the IQN. The IQN and the IQN alias are associatedwith the port, and not the iSCSI interface. When you change the IQN alias foran iSCSI interface, the alias changes for all interfaces on that port.
l If applicable, the VLAN ID (between 1 and 4904) you want to associate the iSCSIinterface with.
Note
For the network to continue functioning properly, ensure that you set the VLAN IDonly when you have configured the network switch port to support VLAN taggingof multiple VLAN IDs.
Create a consistency groupProcedure
1. Under Storage, select Block > Consistency Groups.
2. Select the Add icon.
3. Specify the relevant information.
Note
During the process of creating the consistency group, you can create new LUNswith which to populate the consistency group. You cannot specify existingLUNs to populate the new group. Once the consistency group is created, youcan add existing LUNs.
Add a LUN to a consistency groupProcedure
1. Under Storage, select Block > Consistency Groups.
2. Select a consistency group from the list.
3. Select Add LUNs.
Configuring LUNs and consistency groups
Create a consistency group 11

4. Specify the relevant information, while noting the following:
l You can create one or more new LUNs and add them to the consistencygroup.
l Or you can move existing LUNs that are not already assigned to aconsistency group to a consistency group.
Change consistency group or consistency group thin cloneproperties
Procedure
1. Under Storage, select Block > Consistency Groups.
2. Select the relevant consistency group or thin clone, and then select the Editicon.
3. On the General tab, change a consistency group or thin clone name anddescription. and view space usage and capacity information.
4. On the LUNs tab, add or remove LUNs from the consistency group or thinclone. You can change the default SP owner for a LUN, but not a thin clone. Ifyou change the default SP owner for a base LUN, the default SP changesautomatically for its derivative thin clones.
If this is a thin LUN in an All-Flash pool, you can choose to apply data reductionto all incoming writes by selecting the Data Reduction checkbox.
Note
To apply data reduction to both incoming LUN writes and existing LUN data,you must use the LUN Move session feature to move the LUN's data to adestination LUN that has data reduction enabled. It is recommended that youperform a LUN Move operation only on a single LUN for an SP at a time, andnot perform multiple move operations on an SP simultaneously. Refer to AboutLUN Move sessions on page 16 for additional LUN Move information.
l If the LUN already has data reduction applied, you can view the capacity:how much space is allocated after data reduction was applied, how muchspace is not allocated, and the space saved for the entire system after datareduction.
l You can also choose to disable data reduction by removing the checkmarkfrom the Data Reduction checkbox and clicking the Apply button. Existingdata remains as is. Any newly-written data does not have data reductionapplied.
l If a LUN is in the process of being moved, you can view the status andchange the move session's priority setting. If the move is completed, youcan view the move status for up to three days after the operationcompleted.
l A thin clone cannot have data reduction applied independently of its baseLUN. However, if you apply data reduction to the base LUN, the thin clonealso has data reduction applied.
5. On the Access tab, modify the list of hosts that have access to the LUNs in theconsistency group or thin clone, or change the type of access.
Configuring LUNs and consistency groups
12 Unity Family 4.4 Configuring and managing LUNs

6. On the FAST VP tab, change the tiering policy and view the data distributionper tier.
Note
You cannot change the tiering policy for a thin clone independently of its baseLUN in the consistency group. However, if you change the tiering policy of thebase LUN, the thin clone inherits the changed tiering policy.
7. On the Snapshots tab, manage the consistency group's or thin clone'ssnapshots or configure a snapshot schedule for the LUN or thin clone.
8. On the Replication tab, configure replication settings. Select ConfigureReplication to get started.
Note
When you replicate a thin clone, it becomes a standard LUN on the destinationstorage system, with no ties to the original base LUN.
Delete a consistency groupBefore you begin
Note
Deleting a consistency group will also delete any of its snapshots, as well as all of theLUNs in that group. If the consistency group contains LUNs with attached hosts, youcannot delete the consistency group.
Procedure
1. Under Storage, select Block > Consistency Groups.
2. Select the relevant consistency group, and then select the Delete icon.
If the Delete icon is not available, one or more of the LUNs in the consistencygroup currently has hosts attached. Remove access from the group LUNs andretry the deletion.
a. Select the consistency group you want to delete.
b. Ensure any currently attached hosts no longer need the LUNs in theconsistency group. Under More Actions, click Remove Host Access.
c. Review the list of attached hosts for each LUN in the consistency group.Click Remove Host Access to confirm.
When the job completes, the Delete icon will become available for theselected consistency group.
Results
If the job fails, check the job details on the Jobs page for more information. Theconsistency group deletion may have been prevented if any LUNs within it haveattached hosts.
Configuring LUNs and consistency groups
Delete a consistency group 13

Configuring LUNs and consistency groups
14 Unity Family 4.4 Configuring and managing LUNs

CHAPTER 2
Configuring LUN move
l About LUN Move sessions.................................................................................. 16l LUN move session restrictions and limitations.................................................... 16l Create a LUN move session................................................................................ 17l Cancel a LUN move session................................................................................ 17l Best practices for LUN move sessions................................................................ 17l Troubleshooting LUN move session issues..........................................................18
Configuring LUN move 15

About LUN Move sessionsThe LUN Move feature lets you move block storage resources:
l To a pool with faster drives.
l Between pools for load balancing.
l To take advantage of newly purchased spindles.
l To convert a thin LUN to a thick LUN, or a thick LUN to a thin LUN.
l To enable data reduction (for either newly-written data or both newly-written dataand existing data) on a thin LUN in an All-Flash pool. If you choose to apply datareduction to existing data, choose the pool where you want to move the LUN data.
You can move LUNs, member LUNs in a consistency group, and VMware VMFS LUNs.However, you cannot move thin clones or storage resources that have derived thinclones.
Note
If LUNs have associated snapshots, the snapshots are deleted once the movecompletes successfully.
While a storage resource is being moved, you can view the status from the storageresource's summary and properties pages. Once completed, the move status can beviewed for up to three days from the same two pages.
LUN move session restrictions and limitationsA LUN move session cannot start if:
l A storage system NDU is in progress.
l The destination pool does not have enough space.
l A LUN expand or shrink operation is in progress.
l The source LUN is being restored from a snapshot.
l An import from a VNX LUN to the source LUN is in progress.
l The source LUN is flagged as requiring recovery.
l The source LUN is offline.
l Replication is enabled, and the LUN is a replication source or destination. Turn offreplication prior to starting a move session.
During a LUN move session, you cannot:
l Delete the source LUN.
l Create a snapshot of the source LUN.
l Restore the source LUN from a snapshot.
l Add or remove the source LUN from a consistency group.
l Start an import from a VNX LUN to the source LUN.
l Perform an expand or shrink operation on the source LUN.
l Start an NDU of the storage system.
Configuring LUN move
16 Unity Family 4.4 Configuring and managing LUNs

l Start a recovery operation on the source LUN.
l Configure a LUN for replication.
Create a LUN move sessionBefore you begin
Be aware that a LUN move session cannot start if:
l A storage system NDU is in progress.
l The destination pool does not have enough space.
l A LUN expand or shrink operation is in progress.
l The source LUN is being restored from a snapshot.
l An import from a VNX LUN to the source LUN is in progress.
l The source LUN is flagged as requiring recovery.
l The source LUN is offline.
l Replication is enabled, and the LUN is a replication source or destination. Turn offreplication prior to starting a move session.
See LUN move session restrictions and limitations for additional details.
Procedure
1. Under Storage, select Block > LUNs.
2. Select More Actions > Move.
3. On the Move LUN window, specify the relevant information.
4. Click OK.
Note
If the source LUN contains snapshots, a warning is issued, and the movecontinues. Once the move completes successfully, the system deletes thesnapshots. You can then create snapshots on the new LUN.
Cancel a LUN move sessionBefore you begin
A LUN move session must be in progress to be cancelled.
Procedure
1. Under Storage, select Block > LUNs.
2. Select More Actions > Cancel Move.
3. Click Yes.
Best practices for LUN move sessionsThe following describes best practices to be aware of when moving LUNs in a system:
Configuring LUN move
Create a LUN move session 17

1. You should properly plan the migration before the move. For example, determinethe new storage requirements, locate the destination storage pool, and determineif the pool is suitable (for example, that there is enough space available).
2. Be aware that no manual cut over is required. Once the move operation starts, thesystem will cutover to the new storage automatically at the completion of asuccessful move.
3. Be aware of the move session priority option. The priority of a session indicatesthe amount of resources devoted to that session compared to other movesessions. It does not pertain to the throttle of a session.
Troubleshooting LUN move session issuesThe following table describes common issues that can occur during a LUN moveoperation, and how to resolve them.
Table 2 LUN move troubleshooting information
Issue Resolution
Destination pool does not have sufficient space to start themove operation, or the pool exhausted the space availableduring a move operation.
To resolve this issue:
1. Delete the move session.
2. Add more space to the destination pool.
3. Recreate the move session.
This issue may occur:
l When you first attempt to create a move session.
l While the move operation is running.
It is possible that the destination pool had enough space whenthe move operation first started, but more space wasconsumed on the destination while the move was in progress.
Destination pool is in the process of being destroyed. Choose a different destination pool.
A prior NDU has not been committed. Commit the NDU.
The move session maximum limit of 100 has been reached. Wait until a move session completes, or cancel a lower prioritymove session, before adding another move session.
Snapshots disappeared after the move operation completed. Expected behavior. You are allowed to create a LUN movesession if the LUN has snapshots, but the snapshots aredeleted after the move operation completes. You need torecreate the snapshots.
Cannot create a new snapshot after the move operationbegins.
Expected behavior. Recreate snapshots after the moveoperation completes.
Cannot start a LUN expansion or shrink during a moveoperation.
Expected behavior. Start a LUN expansion or shrink operationafter the move operation completes.
Cannot start a move operation while a LUN expansion orshrink is in progress.
Expected behavior. Wait for the LUN expansion or shrinkoperation to complete before starting a move session.
Configuring LUN move
18 Unity Family 4.4 Configuring and managing LUNs

CHAPTER 3
Configuring block thin clones
l About thin clones............................................................................................... 20l Thin clone terminology and hierarchy.................................................................20l Create a thin clone............................................................................................. 23l Change thin clone properties............................................................................. 23l Refresh a thin clone........................................................................................... 23
Configuring block thin clones 19

About thin clonesA thin clone is a read-write copy of a thin block storage resource (LUN, consistencygroup, or VMFS datastore) that shares blocks with the parent resource. Data availableon the source snapshot at the moment of the thin clone creation is immediatelyavailable to the thin clone. The thin clone references the source snapshot for thisdata. However, data resulting from changes to the thin clone after its creation isstored on the thin clone. Changes to the thin clone do not affect the source snapshot,because the source snapshot is read-only.
Advantages of using thin clonesThin clones allow you to create and manage space-efficient copies of productionenvironments, which is beneficial for the following types of activities:
l Development and test environments - Thin clones allow development and testpersonnel to work with real workloads and use all data services associated withproduction storage resources without interfering with production. They also allowdevelopment personnel to promote a test thin clone to production.
l Parallel processing - Parallel processing applications that span multiple servers canuse multiple thin clones of a single production data set to achieve results morequickly.
l Online backup - You can use thin clones to maintain hot backup copies ofproduction systems. If there is corruption in the production data set, you canimmediately resume the read-write workload by using the thin clones.
l System deployment - You can use thin clones to build and deploy templates foridentical or near-identical environments. For example, you can create a testtemplate that is cloned as needed for predictable testing.
Thin clone restrictionsThe following restrictions apply to thin clones:
l Thin clones are not supported for snapshots of thick LUNs.
l When you create a thin clone, the source snapshot for the clone must be read-only, and it cannot have automatic snapshot deletion or a snapshot expirationpolicy enabled.
l After you create a thin clone, the source snapshot can be deleted.
l You cannot create a thin clone of a thin clone without first creating anintermediate snapshot.
l A thin clone becomes a full clone on the destination storage system when it isreplicated.
l You cannot delete a base storage resource (production resource) when it has thinclones.
l You cannot move a thin clone.
Thin clone terminology and hierarchyThe snapshots and thin clones for a LUN, consistency group, or VMware VMFSdatastore form a hierarchy. This document uses the following terms to describe thishierarchy:
Configuring block thin clones
20 Unity Family 4.4 Configuring and managing LUNs

Source snapshot
A snapshot of a LUN, consistency group, or VMFS datastore used as the sourcefor thin clone create and refresh operations.
Base LUN, base consistency group, base VMFS datastore
The founding (production) LUN, LUN group, or VMFS datastore for a set ofderivative snapshots and thin clones.
Base LUN family, base consistency group family, base VMFS datastore family
A LUN, consistency group, or base VMFS datastore and all of its derivative thinclones and snapshots. This includes snapshots and thin clones based on childsnapshots of the storage resource or its thin clones, and so forth.
Original parent resource
The original parent datastore or thin clone for the snapshot on which the thinclone is based. This resource does not change when a thin clone is refreshed to adifferent source snapshot, because the new source snapshot must be in the samebase LUN, consistency group, or VMFS datastore family.
For example, suppose the following hierarchy of snapshots and thin clones exists forLUN 1:
Configuring block thin clones
Thin clone terminology and hierarchy 21
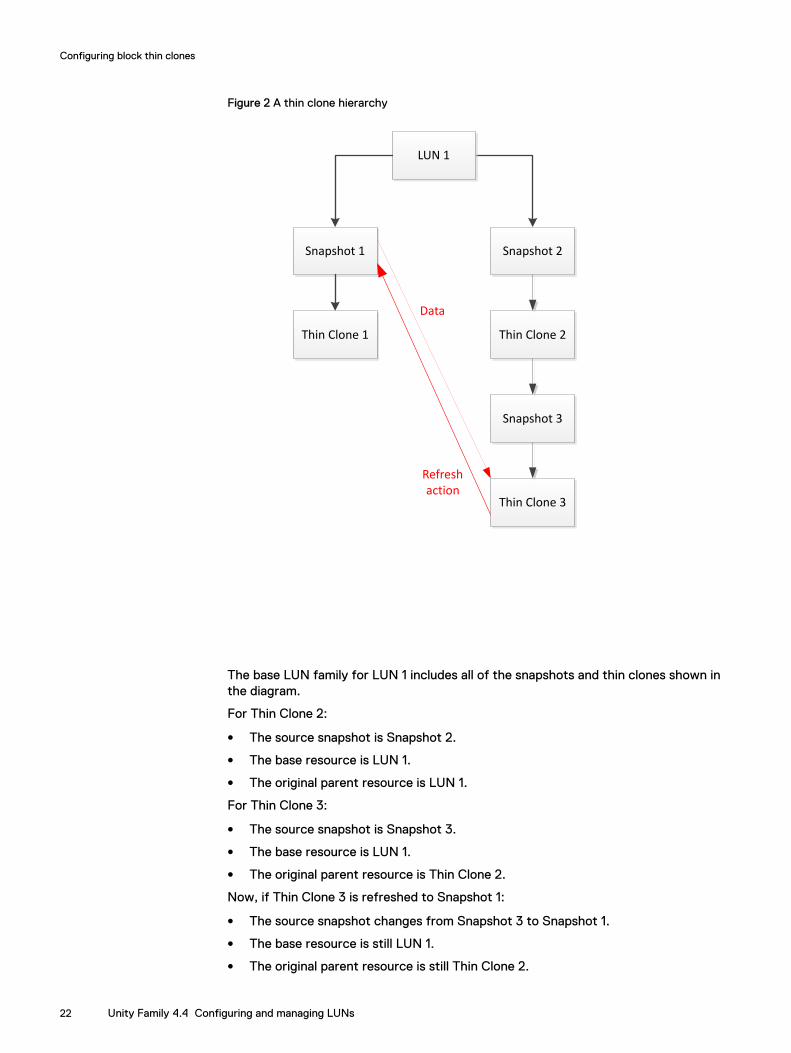
Figure 2 A thin clone hierarchy
Thin Clone 3
Snapshot 3
LUN 1
Snapshot 1 Snapshot 2
Thin Clone 1 Thin Clone 2
Refresh action
Data
The base LUN family for LUN 1 includes all of the snapshots and thin clones shown inthe diagram.
For Thin Clone 2:
l The source snapshot is Snapshot 2.
l The base resource is LUN 1.
l The original parent resource is LUN 1.
For Thin Clone 3:
l The source snapshot is Snapshot 3.
l The base resource is LUN 1.
l The original parent resource is Thin Clone 2.
Now, if Thin Clone 3 is refreshed to Snapshot 1:
l The source snapshot changes from Snapshot 3 to Snapshot 1.
l The base resource is still LUN 1.
l The original parent resource is still Thin Clone 2.
Configuring block thin clones
22 Unity Family 4.4 Configuring and managing LUNs

If Thin Clone 2 is deleted after Thin Clone 3 is refreshed, the original parent resourceshows as empty.
Create a thin cloneYou can create thin clones for LUNs, consistency groups, and VMware VMFSdatstores.
Procedure
1. Locate the summary page for the storage resource you want to clone.
2. Select the storage resource, and then select More Actions > Clone.
3. Select whether you want to create the thin clone from an existing or newly-created snapshot. To create the thin clone from an existing snapshot, select thesnapshot.
4. On the Configure page, specify the relevant information, and optionally selectCreate I/O Limit to create a new I/O limit policy for the thin clone.
5. Continue following the steps in the wizard to optionally configure host access, asnapshot schedule, and replication for the thin clone. You can configure thesefeatures now or at a later time.
Change thin clone propertiesProcedure
1. Locate the summary page for the storage resource associated with the thinclone you want to modify.
2. Select the relevant thin clone, and then select the Edit icon.
3. On the General tab, change the name, description, and size of the thin clone.
4. On the Host Access tab, modify the list of hosts that have access to the thinclone, or change the type of access.
5. On the FAST VP tab, view the data distribution per tier.
6. On the Snapshots tab, manage the thin clone's snapshots or configure asnapshot schedule for the thin clone.
7. On the Replication tab, configure replication settings. Select ConfigureReplication to get started.
8. On the Host I/O Limit tab, view the bandwidth and throughput performance ofthe thin clone with the current policy, select a different policy and preview theperformance impact of that policy, or apply a new policy.
Refresh a thin cloneRefreshing a thin clone updates the thin clone's data with data from a different sourcesnapshot. The new source snapshot must belong to the thin clone family; that is, itmust be related to the base LUN, base consistency group, or base VMware VMFSdatastore for the existing thin clone. In addition, it must be read-only, and it cannothave automatic snapshot deletion or a snapshot expiration policy enabled.
When you refresh a thin clone, the existing data is removed from the thin clone andthe data from the new source snapshot is copied to it. If the thin clone has derivativesnapshots, they remain unchanged, and the family hierarchy stays intact.
Configuring block thin clones
Create a thin clone 23

Note
You can promote a test thin clone to production by refreshing the base storageresource with the thin clone's snapshot. This provides the ability to refresh productionenvironments based on factors such as performance tuning, query optimization, andbug fixes. It is strongly recommended to disable base the base LUN's host accessbefore this performing this operation.
Procedure
1. Locate the summary page for the source storage resource whose thin clone youwant to refresh.
2. Select the relevant thin clone, and then select More Actions > Refresh Clone.
3. Select whether you wan create a snapshot of thin clone before it refreshes.
Note
It is recommended that you leave the default, which is to have the systemcreate a copy of the thin clone before refreshing.
4. Select the source snapshot for the refresh.
Configuring block thin clones
24 Unity Family 4.4 Configuring and managing LUNs


![HOME []...ORARIO CLASSE - LUN s .15 13.15 LUN 9.15](https://img.pdfslide.net/doc/110x75/60d9952eb5962f17fe6e757a/-home-orario-classe-lun-s-15-1315-lun-915.jpg)