Embed Size (px)
Citation preview
© Global Knowledge Training LLC B-1
B
Configuring and Using the Network Interface on the Lab Windows 8 PCs
Appendix B: Configuring and Using the Network Interface on the Lab Windows 8 PCs
B-2 ©Global Knowledge Training LLC
Objectives In this appendix you will learn how to configure and use the network interface on the lab environment's Windows 8 PCs.
Important Refer to “Lab 0: Introduction, and Connecting to and Using the Remote Lab Environment” for details of connecting to the remote lab environment and accessing the PC1 and PC2 devices.
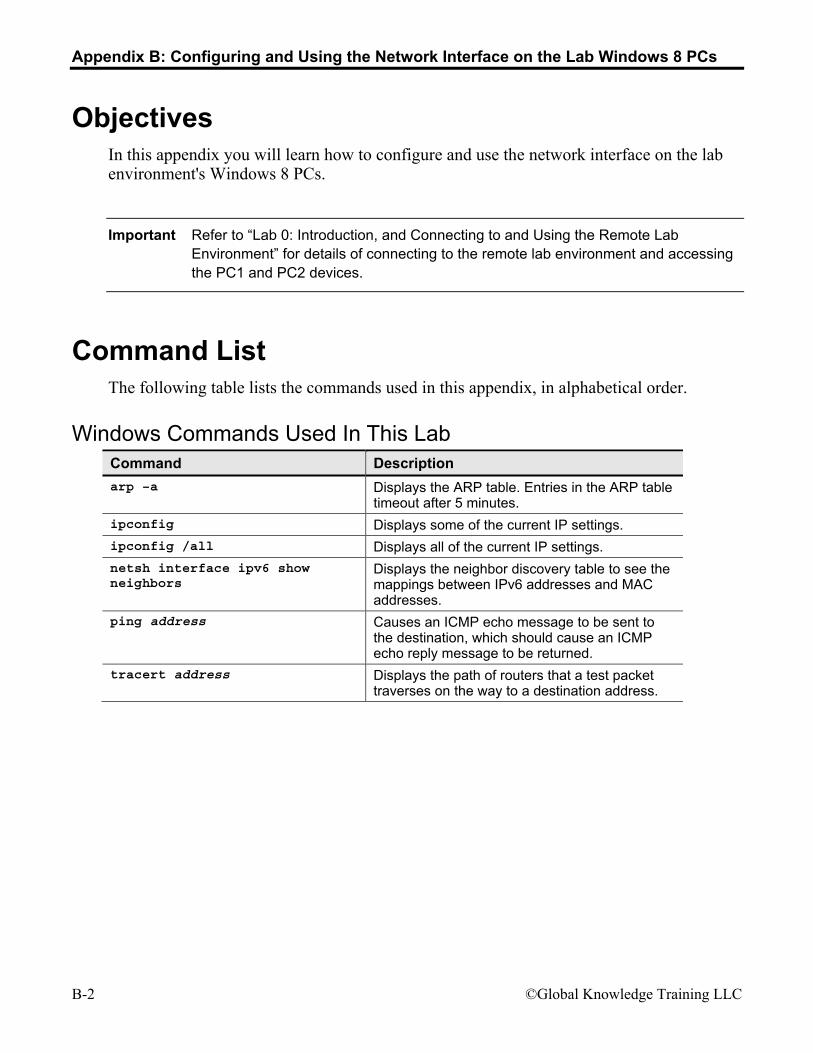
Command List The following table lists the commands used in this appendix, in alphabetical order.
Windows Commands Used In This Lab Command Description arp –a Displays the ARP table. Entries in the ARP table
timeout after 5 minutes.
ipconfig Displays some of the current IP settings.
ipconfig /all Displays all of the current IP settings.
netsh interface ipv6 show neighbors
Displays the neighbor discovery table to see the mappings between IPv6 addresses and MAC addresses.
ping address Causes an ICMP echo message to be sent to the destination, which should cause an ICMP echo reply message to be returned.
tracert address Displays the path of routers that a test packet traverses on the way to a destination address.
Appendix B: Configuring and Using the Network Interface on the Lab Windows 8 PCs
© Global Knowledge Training LLC B-3
Procedure In this appendix you will learn how to configure and use the network interface on the lab environment's Windows 8 PCs.
1. Connect to the PC. In the examples in this appendix, PC1 in Pod 6 is used.
Important The addresses used in the examples in this appendix are for example purposes only. Depending on the pod you are using and the lab you are doing, your addresses may differ.
Examine the current network settings 2. The task bar is along the lower portion of the screen; the Start button is on the far left side.
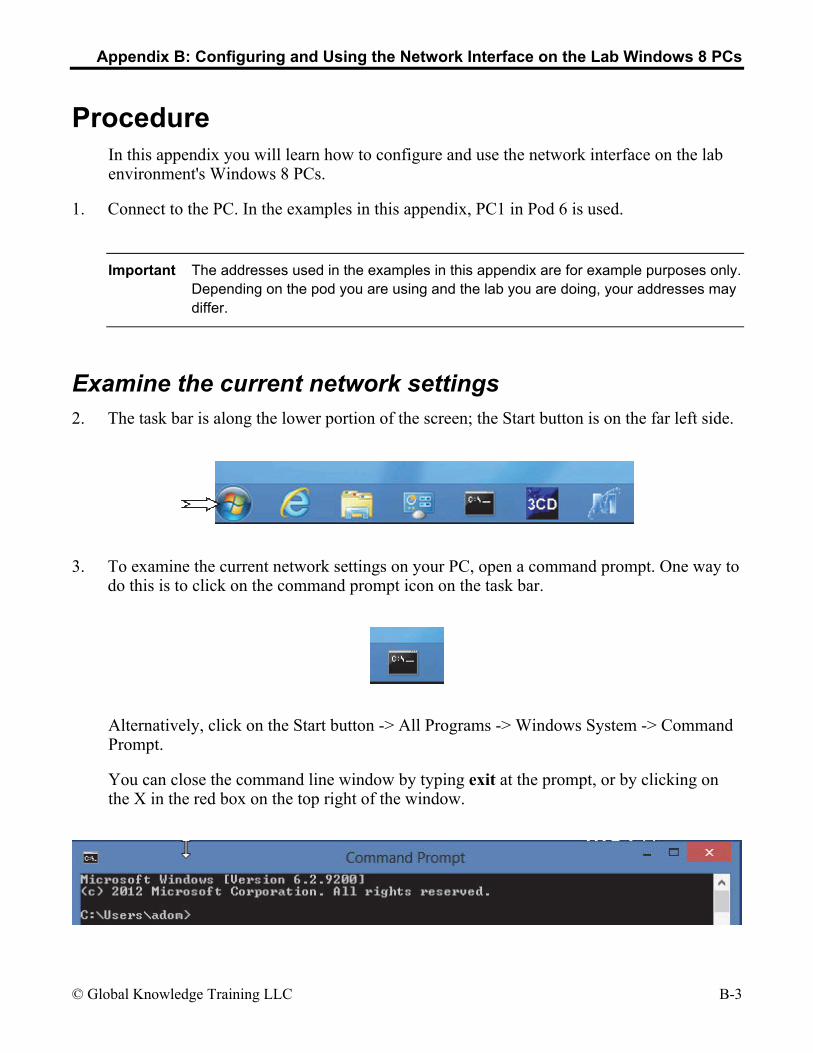
3. To examine the current network settings on your PC, open a command prompt. One way to do this is to click on the command prompt icon on the task bar.
Alternatively, click on the Start button -> All Programs -> Windows System -> Command Prompt.
You can close the command line window by typing exit at the prompt, or by clicking on the X in the red box on the top right of the window.
Appendix B: Configuring and Using the Network Interface on the Lab Windows 8 PCs
B-4 ©Global Knowledge Training LLC
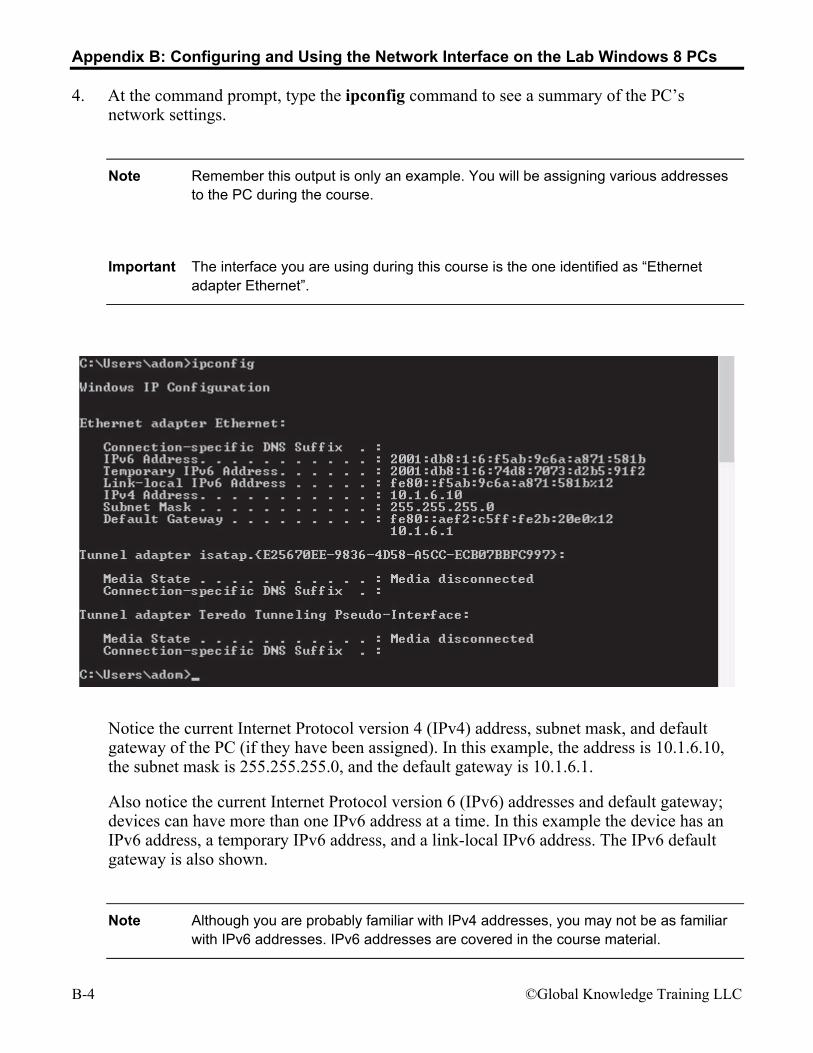
4. At the command prompt, type the ipconfig command to see a summary of the PC’s network settings.
Note Remember this output is only an example. You will be assigning various addresses to the PC during the course.
Important The interface you are using during this course is the one identified as “Ethernet adapter Ethernet”.
Notice the current Internet Protocol version 4 (IPv4) address, subnet mask, and default gateway of the PC (if they have been assigned). In this example, the address is 10.1.6.10, the subnet mask is 255.255.255.0, and the default gateway is 10.1.6.1.
Also notice the current Internet Protocol version 6 (IPv6) addresses and default gateway; devices can have more than one IPv6 address at a time. In this example the device has an IPv6 address, a temporary IPv6 address, and a link-local IPv6 address. The IPv6 default gateway is also shown.
Note Although you are probably familiar with IPv4 addresses, you may not be as familiar with IPv6 addresses. IPv6 addresses are covered in the course material.
Appendix B: Configuring and Using the Network Interface on the Lab Windows 8 PCs
© Global Knowledge Training LLC B-5
Note The %12 at the end of the address is the interface index on the PC; it is not part of the address.
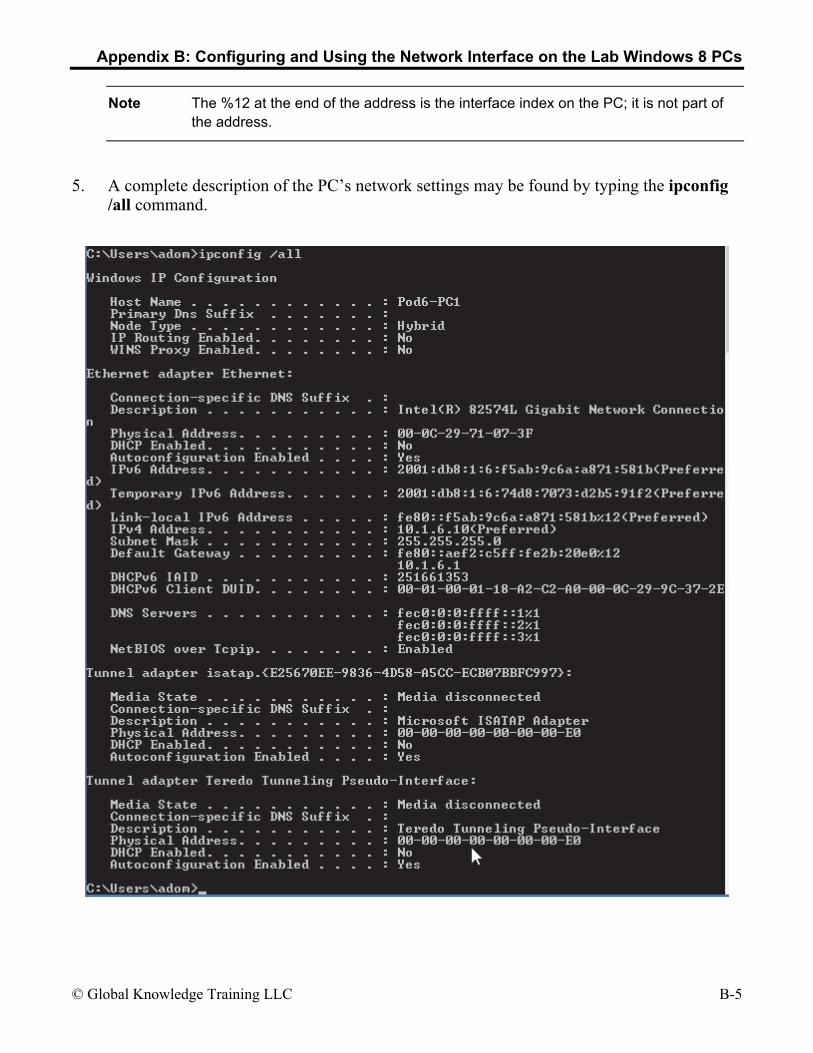
5. A complete description of the PC’s network settings may be found by typing the ipconfig /all command.
Appendix B: Configuring and Using the Network Interface on the Lab Windows 8 PCs
B-6 ©Global Knowledge Training LLC
Additional information available in this output includes the device’s name (Pod6-PC1 in the example) and the physical address of the PC. The physical address is the media access control (MAC) address; in this example it is 00-0C-29-71-07-3F. (Note that the MAC address is written in hexadecimal, and that the letters are case-insensitive.)
This output may also include addresses for servers, such as the domain name system (DNS) servers. If using the dynamic host configuration protocol (DHCP), the lease time will also be displayed.
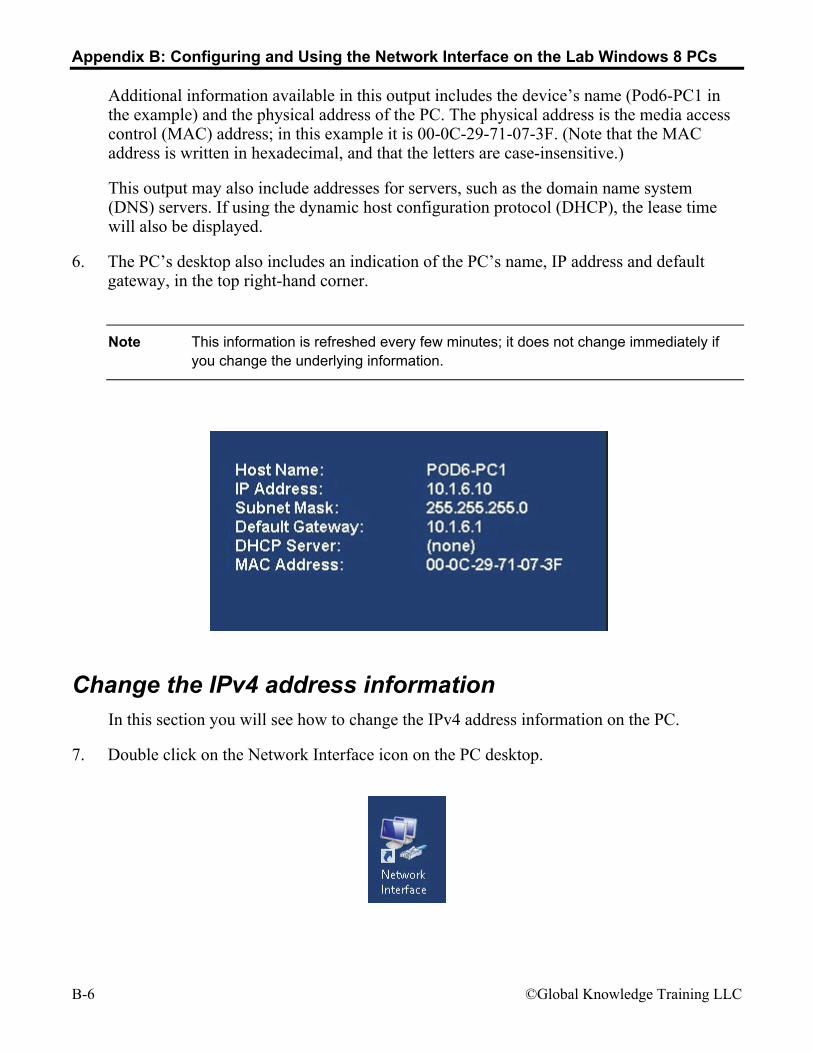
6. The PC’s desktop also includes an indication of the PC’s name, IP address and default gateway, in the top right-hand corner.
Note This information is refreshed every few minutes; it does not change immediately if you change the underlying information.
Change the IPv4 address information In this section you will see how to change the IPv4 address information on the PC.
7. Double click on the Network Interface icon on the PC desktop.
Appendix B: Configuring and Using the Network Interface on the Lab Windows 8 PCs
© Global Knowledge Training LLC B-7
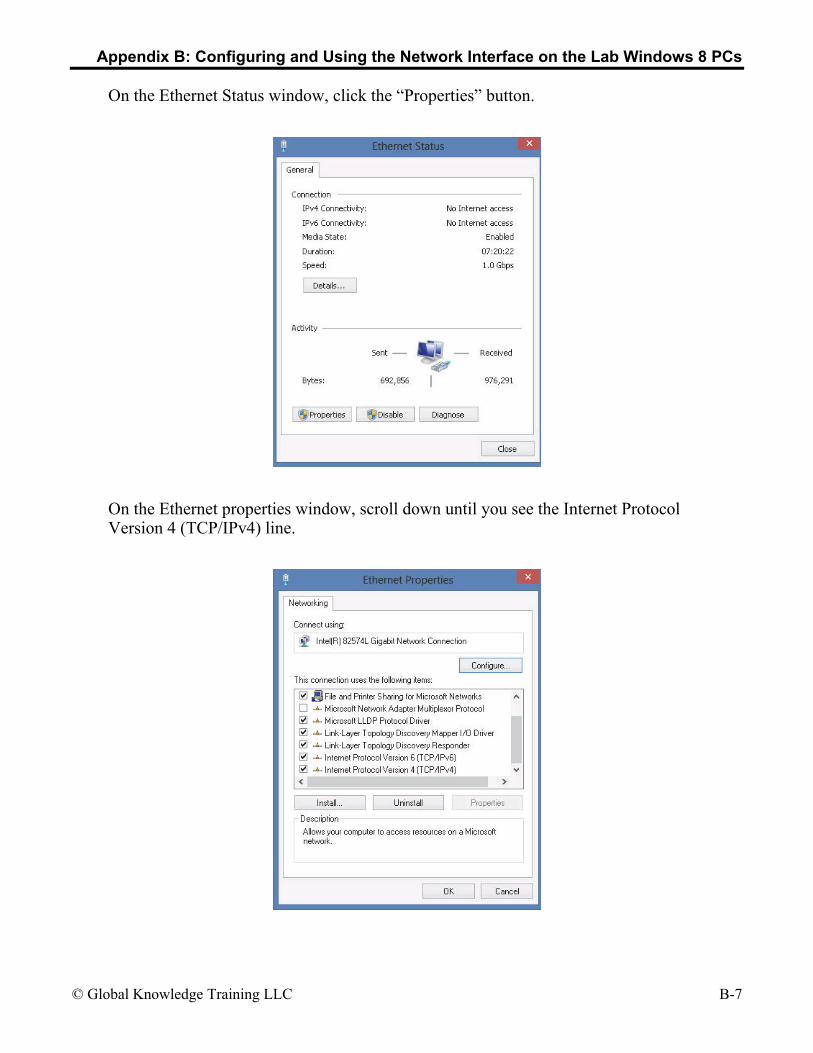
On the Ethernet Status window, click the “Properties” button.
On the Ethernet properties window, scroll down until you see the Internet Protocol Version 4 (TCP/IPv4) line.
Appendix B: Configuring and Using the Network Interface on the Lab Windows 8 PCs
B-8 ©Global Knowledge Training LLC
Note There may be many choices in the Ethernet Properties list. For example, the Client for Microsoft Networks allows this PC to access resources on other Windows PCs. The File and Printer Sharing for Microsoft Network component allows other clients to access resources on this PC.
You can get to this same place the long way: click on the Start button -> Control Panel -> Network and Internet -> View network status and tasks. On the left side, click on Change adapter settings. Right-click on the Ethernet connection, and click Properties.
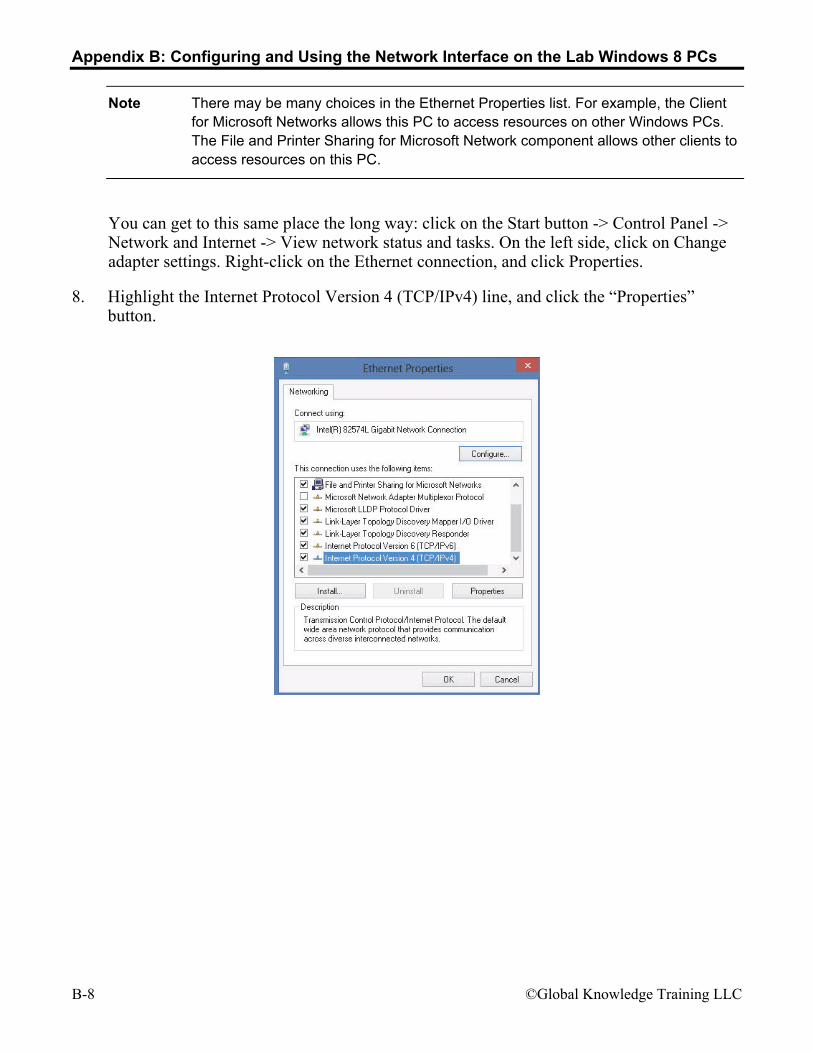
8. Highlight the Internet Protocol Version 4 (TCP/IPv4) line, and click the “Properties” button.
Appendix B: Configuring and Using the Network Interface on the Lab Windows 8 PCs
© Global Knowledge Training LLC B-9
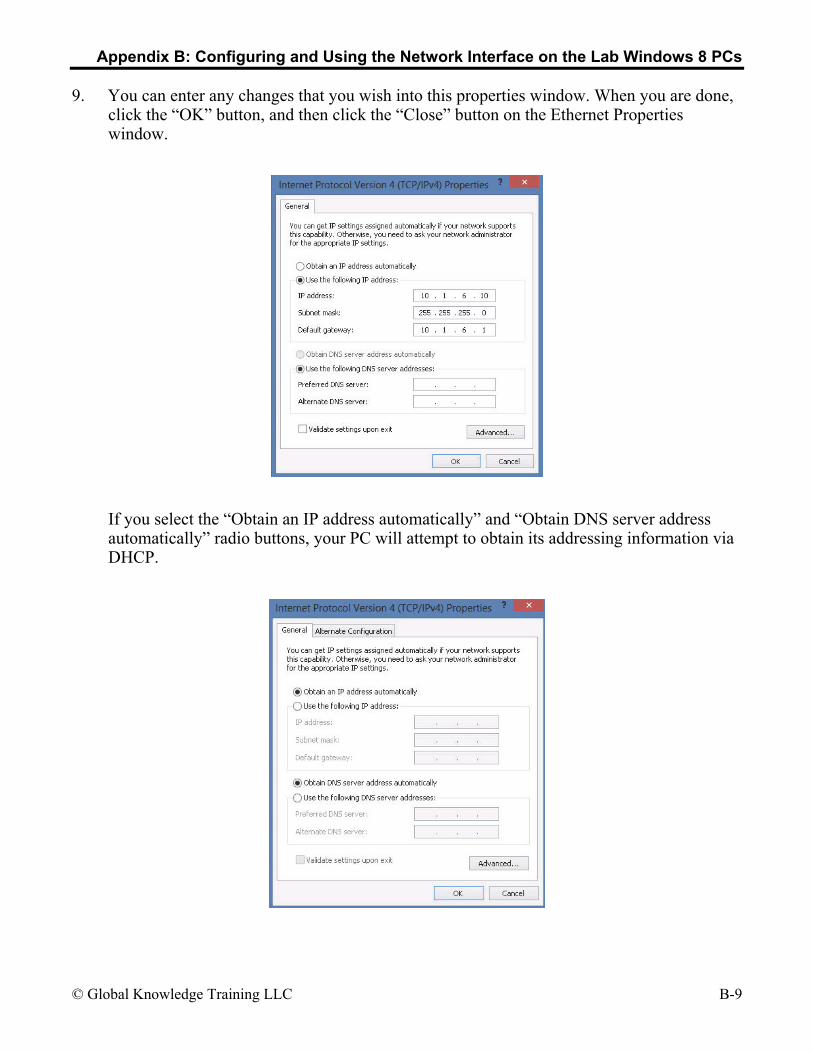
9. You can enter any changes that you wish into this properties window. When you are done, click the “OK” button, and then click the “Close” button on the Ethernet Properties window.
If you select the “Obtain an IP address automatically” and “Obtain DNS server address automatically” radio buttons, your PC will attempt to obtain its addressing information via DHCP.

Appendix B: Configuring and Using the Network Interface on the Lab Windows 8 PCs
B-10 ©Global Knowledge Training LLC
Important On the PCs, you must close both the “Internet Protocol Version 4 (TCP/IPv4) Properties” window and the “Ethernet Properties” window for the address change to take effect.
Change the IPv6 address information In this section you will see how to change the IPv4 address information on the PC. The first part is the same as changing IPv4 address information.
10. Double click on the Network Interface icon on the PC desktop. On the Ethernet Status window, click on Properties.
On the Ethernet properties window, scroll down until you see the Internet Protocol Version 6 (TCP/IPv6) line.
Again, you can get to this same place the long way: click on the Start button -> Control Panel -> Network and Internet -> View network status and tasks. On the left side, click on Change adapter settings. Right-click on the Ethernet connection, and click Properties.
Appendix B: Configuring and Using the Network Interface on the Lab Windows 8 PCs
© Global Knowledge Training LLC B-11
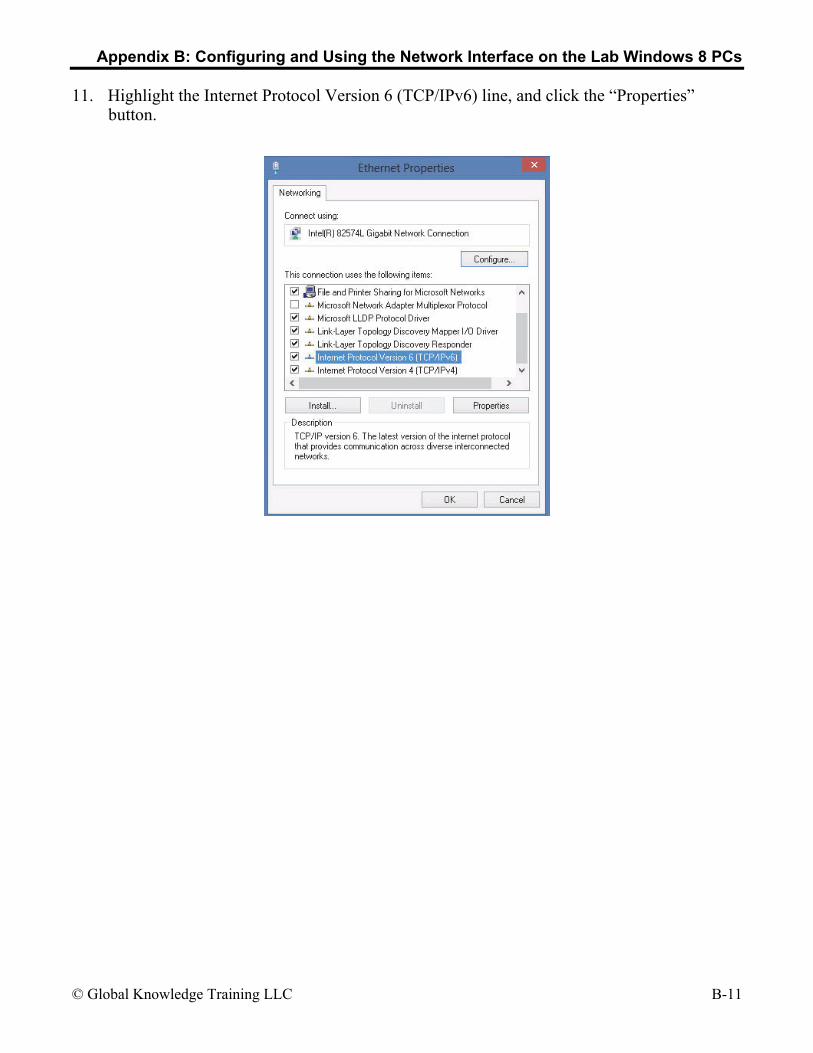
11. Highlight the Internet Protocol Version 6 (TCP/IPv6) line, and click the “Properties” button.
Appendix B: Configuring and Using the Network Interface on the Lab Windows 8 PCs
B-12 ©Global Knowledge Training LLC
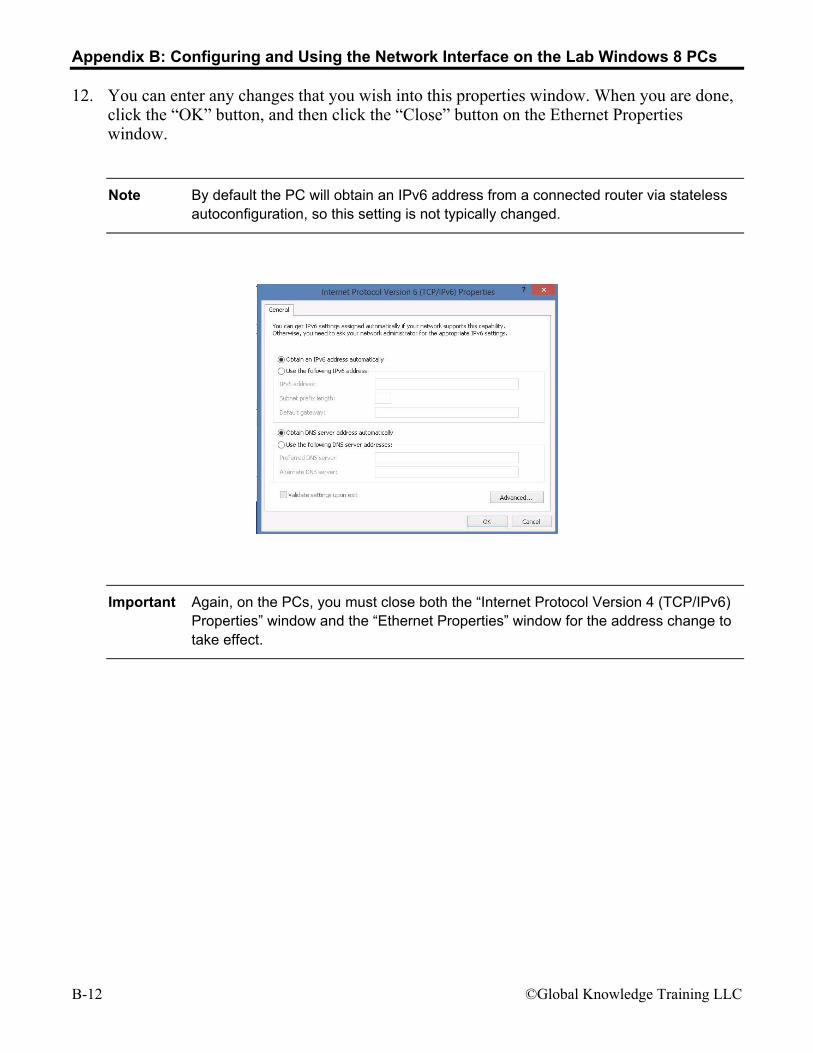
12. You can enter any changes that you wish into this properties window. When you are done, click the “OK” button, and then click the “Close” button on the Ethernet Properties window.
Note By default the PC will obtain an IPv6 address from a connected router via stateless autoconfiguration, so this setting is not typically changed.
Important Again, on the PCs, you must close both the “Internet Protocol Version 4 (TCP/IPv6) Properties” window and the “Ethernet Properties” window for the address change to take effect.
Appendix B: Configuring and Using the Network Interface on the Lab Windows 8 PCs
© Global Knowledge Training LLC B-13
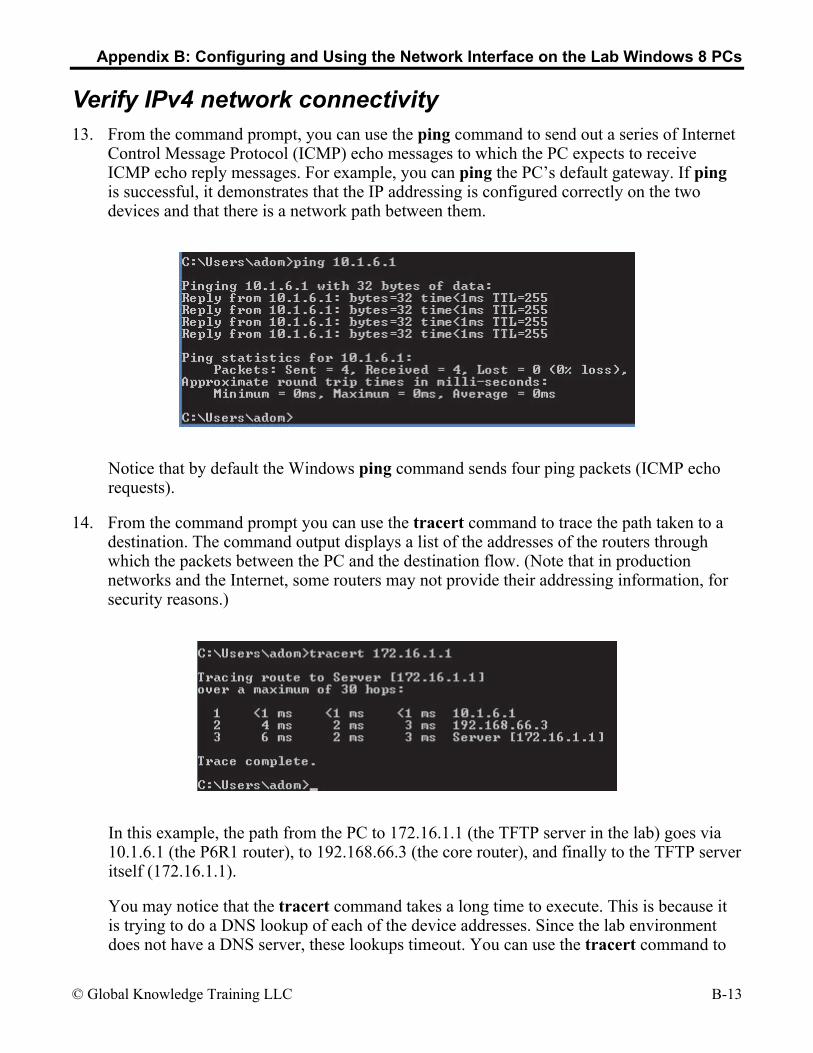
Verify IPv4 network connectivity 13. From the command prompt, you can use the ping command to send out a series of Internet
Control Message Protocol (ICMP) echo messages to which the PC expects to receive ICMP echo reply messages. For example, you can ping the PC’s default gateway. If ping is successful, it demonstrates that the IP addressing is configured correctly on the two devices and that there is a network path between them.
Notice that by default the Windows ping command sends four ping packets (ICMP echo requests).
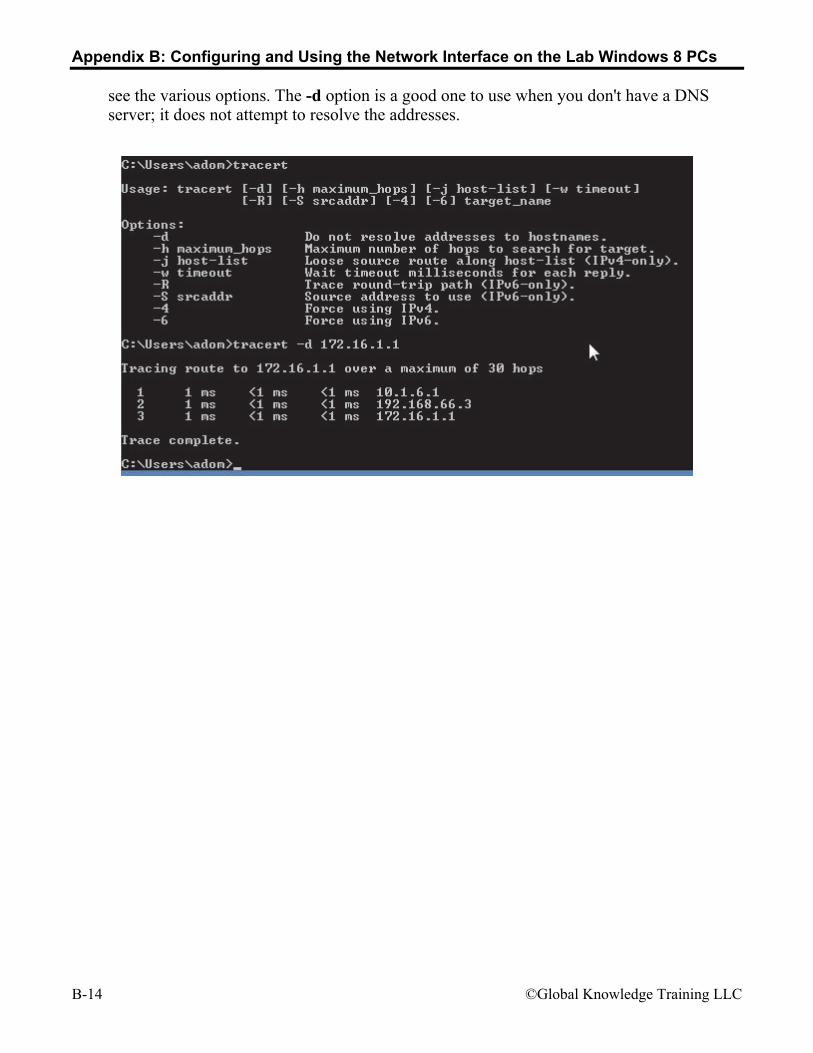
14. From the command prompt you can use the tracert command to trace the path taken to a destination. The command output displays a list of the addresses of the routers through which the packets between the PC and the destination flow. (Note that in production networks and the Internet, some routers may not provide their addressing information, for security reasons.)
In this example, the path from the PC to 172.16.1.1 (the TFTP server in the lab) goes via 10.1.6.1 (the P6R1 router), to 192.168.66.3 (the core router), and finally to the TFTP server itself (172.16.1.1).
You may notice that the tracert command takes a long time to execute. This is because it is trying to do a DNS lookup of each of the device addresses. Since the lab environment does not have a DNS server, these lookups timeout. You can use the tracert command to
Appendix B: Configuring and Using the Network Interface on the Lab Windows 8 PCs
B-14 ©Global Knowledge Training LLC
see the various options. The -d option is a good one to use when you don't have a DNS server; it does not attempt to resolve the addresses.
Appendix B: Configuring and Using the Network Interface on the Lab Windows 8 PCs
© Global Knowledge Training LLC B-15
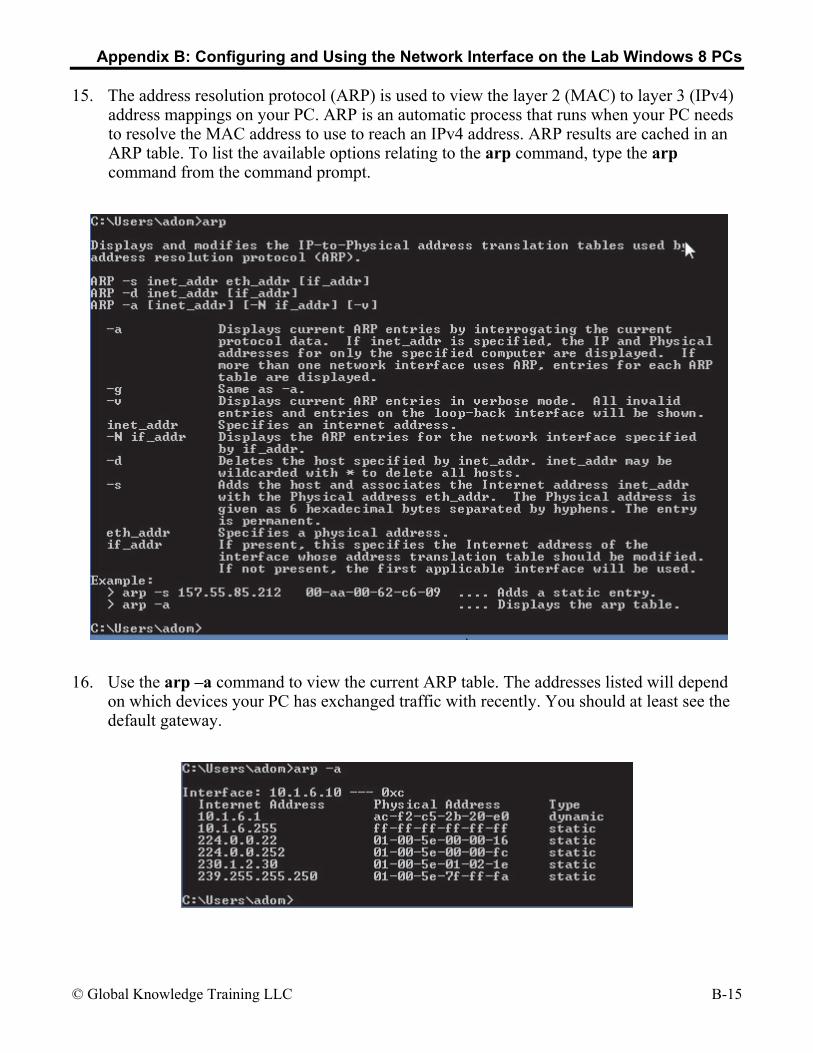
15. The address resolution protocol (ARP) is used to view the layer 2 (MAC) to layer 3 (IPv4) address mappings on your PC. ARP is an automatic process that runs when your PC needs to resolve the MAC address to use to reach an IPv4 address. ARP results are cached in an ARP table. To list the available options relating to the arp command, type the arp command from the command prompt.
16. Use the arp –a command to view the current ARP table. The addresses listed will depend on which devices your PC has exchanged traffic with recently. You should at least see the default gateway.

Appendix B: Configuring and Using the Network Interface on the Lab Windows 8 PCs
B-16 ©Global Knowledge Training LLC
17. If you do not see any values in the ARP table it may be because the ARP entries have timed out. In this case, send some traffic (for example, do a ping), and then view the ARP table again.
Verify IPv6 network connectivity 18. The command prompt ping command also works for IPv6.
Note If the ping doesn’t work, check that you put the address in right; many people mistype IPv6 addresses. Especially watch if the address contains a double colon!
19. And the command prompt tracert command, including the -d option, also works for IPv6.
In this example, the path from the PC to 2001:db8:16:1::1 (the TFTP server in the lab) goes via 2001:db8:1:6::1 (the P6R1 router), to 2001:db8:168:66::3 (the core router), and finally to the TFTP server itself (2001:db8:16:1::1).
Appendix B: Configuring and Using the Network Interface on the Lab Windows 8 PCs
© Global Knowledge Training LLC B-17
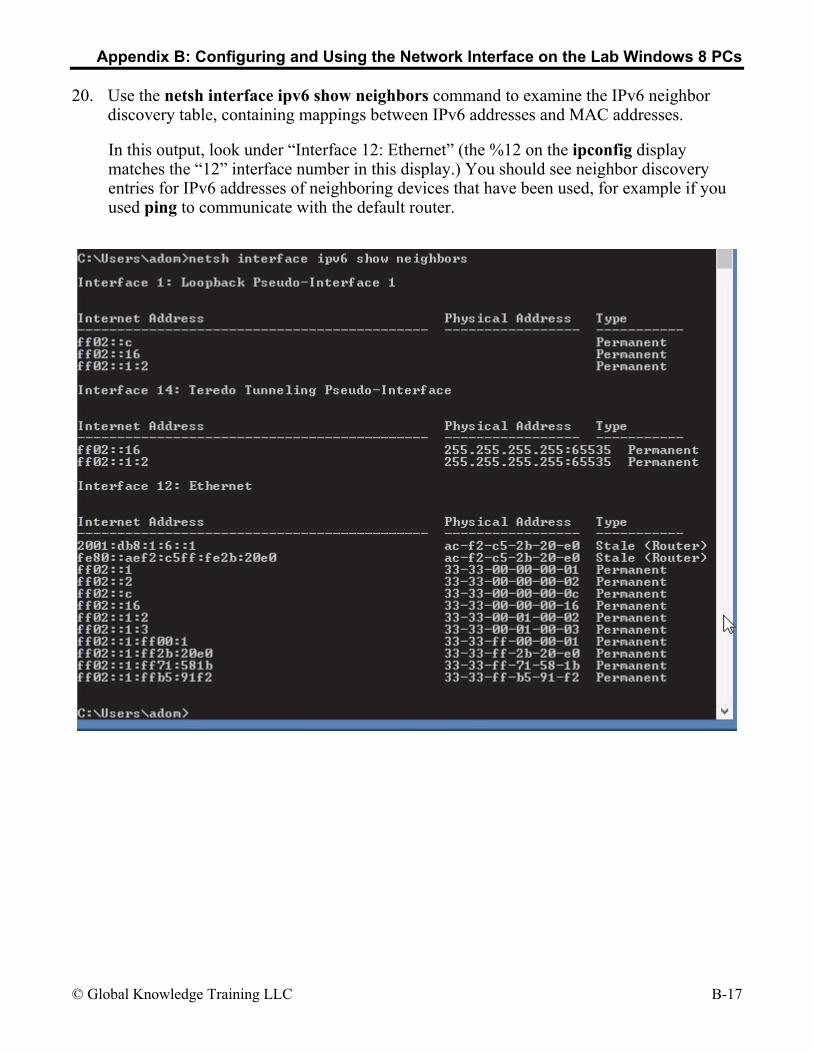
20. Use the netsh interface ipv6 show neighbors command to examine the IPv6 neighbor discovery table, containing mappings between IPv6 addresses and MAC addresses.
In this output, look under “Interface 12: Ethernet” (the %12 on the ipconfig display matches the “12” interface number in this display.) You should see neighbor discovery entries for IPv6 addresses of neighboring devices that have been used, for example if you used ping to communicate with the default router.
Appendix B: Configuring and Using the Network Interface on the Lab Windows 8 PCs
B-18 ©Global Knowledge Training LLC
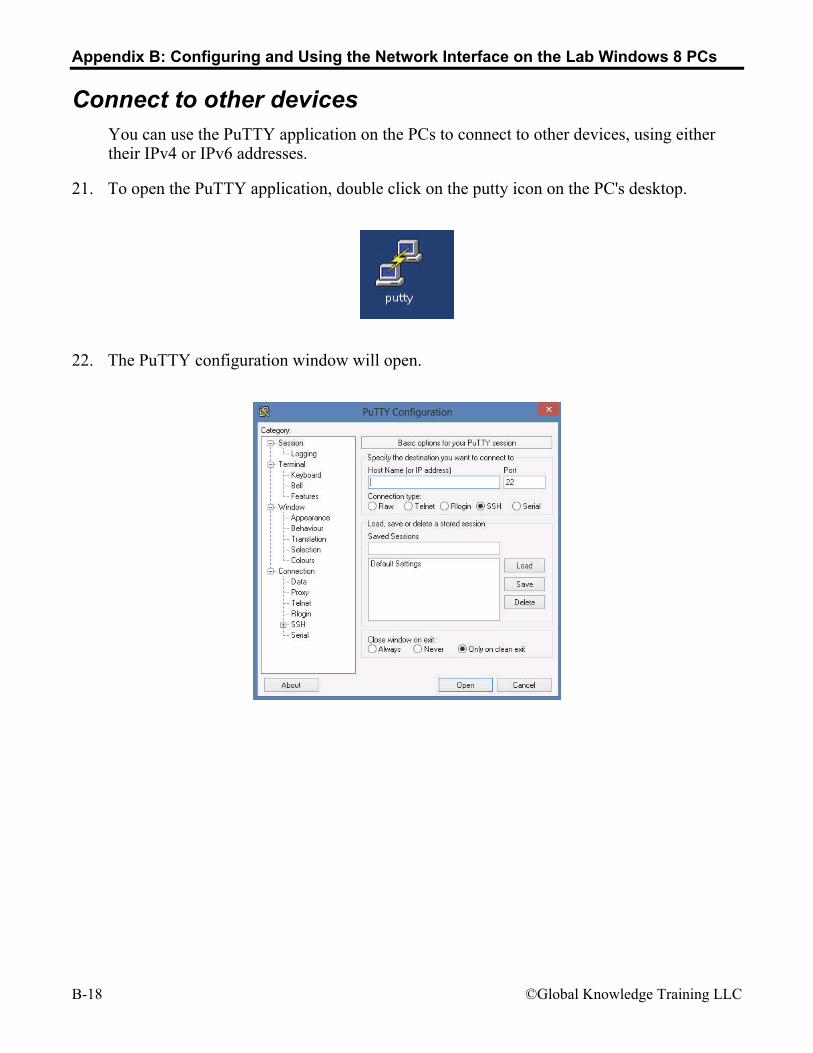
Connect to other devices You can use the PuTTY application on the PCs to connect to other devices, using either their IPv4 or IPv6 addresses.
21. To open the PuTTY application, double click on the putty icon on the PC's desktop.
22. The PuTTY configuration window will open.

Appendix B: Configuring and Using the Network Interface on the Lab Windows 8 PCs
© Global Knowledge Training LLC B-19
23. Fill in the address of the device you wish to connect to and the connection type. By default the connection type is secure shell (SSH). When you click the “Open” button, the PC will attempt to connect to the device using SSH.
Note The target device, 10.1.6.1 in this example, must be configured to allow SSH connections.

Appendix B: Configuring and Using the Network Interface on the Lab Windows 8 PCs
B-20 ©Global Knowledge Training LLC
24. If a device is configured to accept Telnet sessions, fill in its address and choose “Telnet” as the connection type. When you click the “Open” button, the PC will attempt to connect to the device using Telnet.
25. The PuTTY application also works for IPv6 addresses.