Embed Size (px)
Citation preview
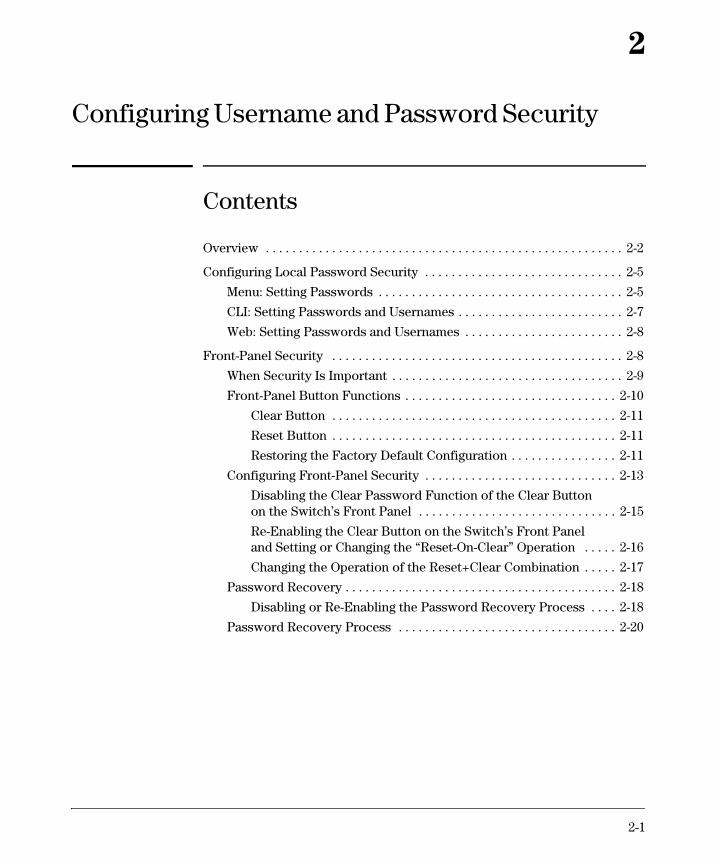
2
Configuring Username and Password Security
Contents
Overview . . . . . . . . . . . . . . . . . . . . . . . . . . . . . . . . . . . . . . . . . . . . . . . . . . . . . . 2-2
Configuring Local Password Security . . . . . . . . . . . . . . . . . . . . . . . . . . . . . . 2-5
Menu: Setting Passwords . . . . . . . . . . . . . . . . . . . . . . . . . . . . . . . . . . . . . 2-5
CLI: Setting Passwords and Usernames . . . . . . . . . . . . . . . . . . . . . . . . . 2-7
Disabling the Clear Password Function of the Clear Button
Re-Enabling the Clear Button on the Switch’s Front Panel
Web: Setting Passwords and Usernames . . . . . . . . . . . . . . . . . . . . . . . . 2-8
Front-Panel Security . . . . . . . . . . . . . . . . . . . . . . . . . . . . . . . . . . . . . . . . . . . . 2-8
When Security Is Important . . . . . . . . . . . . . . . . . . . . . . . . . . . . . . . . . . . 2-9
Front-Panel Button Functions . . . . . . . . . . . . . . . . . . . . . . . . . . . . . . . . 2-10
Clear Button . . . . . . . . . . . . . . . . . . . . . . . . . . . . . . . . . . . . . . . . . . . 2-11
Reset Button . . . . . . . . . . . . . . . . . . . . . . . . . . . . . . . . . . . . . . . . . . . 2-11
Restoring the Factory Default Configuration . . . . . . . . . . . . . . . . 2-11
Configuring Front-Panel Security . . . . . . . . . . . . . . . . . . . . . . . . . . . . . 2-13
on the Switch’s Front Panel . . . . . . . . . . . . . . . . . . . . . . . . . . . . . . 2-15
and Setting or Changing the “Reset-On-Clear” Operation . . . . . 2-16
Changing the Operation of the Reset+Clear Combination . . . . . 2-17
Password Recovery . . . . . . . . . . . . . . . . . . . . . . . . . . . . . . . . . . . . . . . . . 2-18
Disabling or Re-Enabling the Password Recovery Process . . . . 2-18
Password Recovery Process . . . . . . . . . . . . . . . . . . . . . . . . . . . . . . . . . 2-20
2-1

Configuring Username and Password Security Overview
Overview
Feature Default Menu CLI Web
Set Usernames none — — page 2-8
Set a Password none page 2-5 page 2-7 page 2-8
Delete Password Protection n/a page 2-6 page 2-7 page 2-8
show front-panel-security n/a — page 1-13 —
front-panel-security — page 1-13 —
password-clear enabled — page 1-13 —
reset-on-clear disabled — page 1-14 —
factory-reset enabled — page 1-15 —
password-recovery enabled — page 1-15 —
Console access includes both the menu interface and the CLI. There are two levels of console access: Manager and Operator. For security, you can set a password pair (username and password) on each of these levels.
N o t e Usernames are optional. Also, in the menu interface, you can configure passwords, but not usernames. To configure usernames, use the CLI or the web browser interface.
2-2
Configuring Username and Password Security Overview
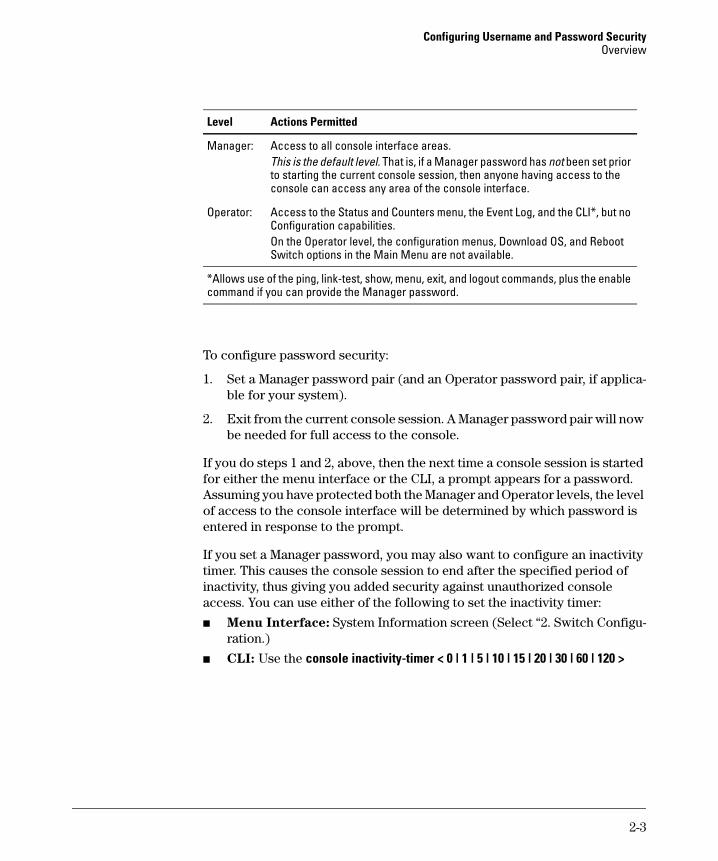
Level Actions Permitted
Manager: Access to all console interface areas. This is the default level. That is, if a Manager password has not been set prior to starting the current console session, then anyone having access to the console can access any area of the console interface.
Operator: Access to the Status and Counters menu, the Event Log, and the CLI*, but no Configuration capabilities.On the Operator level, the configuration menus, Download OS, and Reboot Switch options in the Main Menu are not available.
*Allows use of the ping, link-test, show, menu, exit, and logout commands, plus the enable command if you can provide the Manager password.
To configure password security:
1. Set a Manager password pair (and an Operator password pair, if applicable for your system).
2. Exit from the current console session. A Manager password pair will now be needed for full access to the console.
If you do steps 1 and 2, above, then the next time a console session is started for either the menu interface or the CLI, a prompt appears for a password. Assuming you have protected both the Manager and Operator levels, the level of access to the console interface will be determined by which password is entered in response to the prompt.
If you set a Manager password, you may also want to configure an inactivity timer. This causes the console session to end after the specified period of inactivity, thus giving you added security against unauthorized console access. You can use either of the following to set the inactivity timer:
■ Menu Interface: System Information screen (Select “2. Switch Configuration.)
■ CLI: Use the console inactivity-timer < 0 | 1 | 5 | 10 | 15 | 20 | 30 | 60 | 120 >
2-3
Configuring Username and Password Security Overview
N o t e The manager and operator passwords and (optional) usernames control access to the menu interface, CLI, and web browser interface.
If you configure only a Manager password (with no Operator password), and in a later session the Manager password is not entered correctly in response to a prompt from the switch, then the switch does not allow management access for that session.
If the switch has a password for both the Manager and Operator levels, and neither is entered correctly in response to the switch’s password prompt, then the switch does not allow management access for that session.
Passwords are case-sensitive.
C a u t i o n If the switch has neither a Manager nor an Operator password, anyone
having access to the switch through either Telnet, the serial port, or the web
browser interface can access the switch with full manager privileges. Also,
if you configure only an Operator password, entering the Operator pass
word enables full manager privileges.
The rest of this chapter covers how to:
■ Set passwords
■ Delete passwords
■ Recover from a lost password
■ Maintain front-panel security
2-4
Configuring Username and Password Security Configuring Local Password Security
Configuring Local Password Security
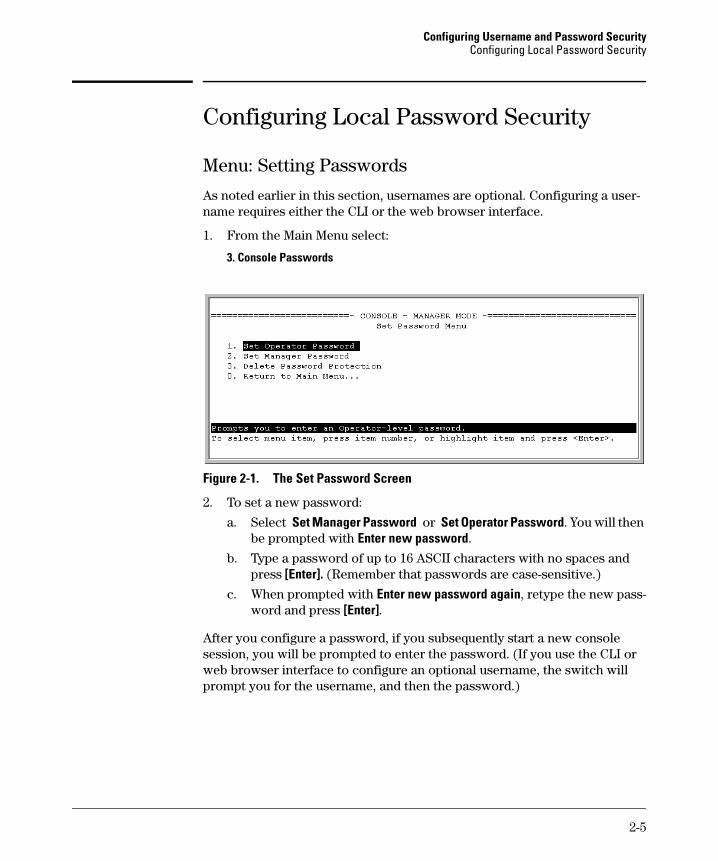
Menu: Setting Passwords
As noted earlier in this section, usernames are optional. Configuring a user-name requires either the CLI or the web browser interface.
1. From the Main Menu select:
3. Console Passwords
Figure 2-1. The Set Password Screen
2. To set a new password:
a. Select Set Manager Password or Set Operator Password. You will then be prompted with Enter new password.
b. Type a password of up to 16 ASCII characters with no spaces and press [Enter]. (Remember that passwords are case-sensitive.)
c. When prompted with Enter new password again, retype the new password and press [Enter].
After you configure a password, if you subsequently start a new console session, you will be prompted to enter the password. (If you use the CLI or web browser interface to configure an optional username, the switch will prompt you for the username, and then the password.)
2-5
Configuring Username and Password Security Configuring Local Password Security
To Delete Password Protection (Including Recovery from a Lost
Password): This procedure deletes all usernames (if configured) and passwords (Manager and Operator).
If you have physical access to the switch, press and hold the Clear button (on the front of the switch) for a minimum of one second to clear all password protection, then enter new passwords as described earlier in this chapter.
If you do not have physical access to the switch, you will need Manager-Level access:
1. Enter the console at the Manager level.
2. Go to the Set Passwords screen as described above.
3. Select Delete Password Protection. You will then see the following prompt:
Continue Deletion of password protection? No
4. Press the Space bar to select Yes, then press [Enter].
5. Press [Enter] to clear the Password Protection message.
To Recover from a Lost Manager Password: If you cannot start a console session at the Manager level because of a lost Manager password, you can clear the password by getting physical access to the switch and pressing and holding the Clear button for a minimum of one second. This action deletes all passwords and usernames (Manager and Operator) used by both the console and the web browser interface.
2-6

Configuring Username and Password Security Configuring Local Password Security
CLI: Setting Passwords and Usernames
Commands Used in This Section
password See below.
Configuring Manager and Operator Passwords.
Syntax: [ no ] password <manager | operator > [ user-name ASCII-STR ][ no ] password < all >
• Password entries appear as asterisks.
• You must type the password entry twice.
Figure 2-2. Example of Configuring Manager and Operator Passwords
To Remove Password Protection. Removing password protection means to eliminate password security. This command prompts you to verify that you want to remove one or both passwords, then clears the indicated password(s). (This command also clears the username associated with a password you are removing.) For example, to remove the Operator password (and username, if assigned) from the switch, you would do the following:
Press [Y] (for yes) and press [Enter].
Figure 2-3. Removing a Password and Associated Username from the Switch
The effect of executing the command in figure 2-3 is to remove password protection from the Operator level. (This means that anyone who can access the switch console can gain Operator access without having to enter a user-name or password.)
2-7
Configuring Username and Password Security Front-Panel Security
Web: Setting Passwords and Usernames
In the web browser interface you can enter passwords and (optional) user-names.
To Configure (or Remove) Usernames and Passwords in the web
browser interface.
1. Click on the Security tab.
Click on [Device Passwords].
2. Do one of the following:
• To set username and password protection, enter the usernames and passwords you want in the appropriate fields.
• To remove username and password protection, leave the fields blank.
3. Implement the usernames and passwords by clicking on [Apply Changes].
Front-Panel Security
The front-panel security features provide the ability to independently enable or disable some of the functions of the two buttons located on the front of the switch for clearing the password (Clear button) or restoring the switch to its factory default configuration (Reset+Clear buttons together). The ability to disable Password Recovery is also provided for situations which require a higher level of switch security.
The front-panel Security features are designed to prevent malicious users from:
■ Resetting the password(s) by pressing the Clear button
■ Restoring the factory default configuration by using the Reset+Clear button combination.
■ Gaining management access to the switch by having physical access to the switch itself
2-8
Configuring Username and Password Security Front-Panel Security
When Security Is Important
Some customers require a high level of security for information. Also, the Health Insurance Portability and Accountability Act (HIPAA) of 1996 requires that systems handling and transmitting confidential medical records must be secure.
It used to be assumed that only system and network administrators would be able to get access to a network switch because switches were typically placed in secure locations under lock and key. For some customers this is no longer true. Others simply want the added assurance that even if someone did manage to get to the switch that data would still remain secure.
If you do not invoke front-panel security on the switch, user-defined passwords can be deleted by pushing the Clear button on the front panel. This function exists so that if customers forget the defined passwords they can still get back into the switch and reset the passwords. This does, however, leave the switch vulnerable when it is located in an area where non-authorized people have access to it. Passwords could easily be cleared by pressing the Clear button. Someone who has physical access to the switch may be able to erase the passwords (and possibly configure new passwords) and take control of the switch.
As a result of increased security concerns, customers now have the ability to stop someone from removing passwords by disabling the Clear and/or Reset buttons on the front of the switch.
2-9
Configuring Username and Password Security Front-Panel Security
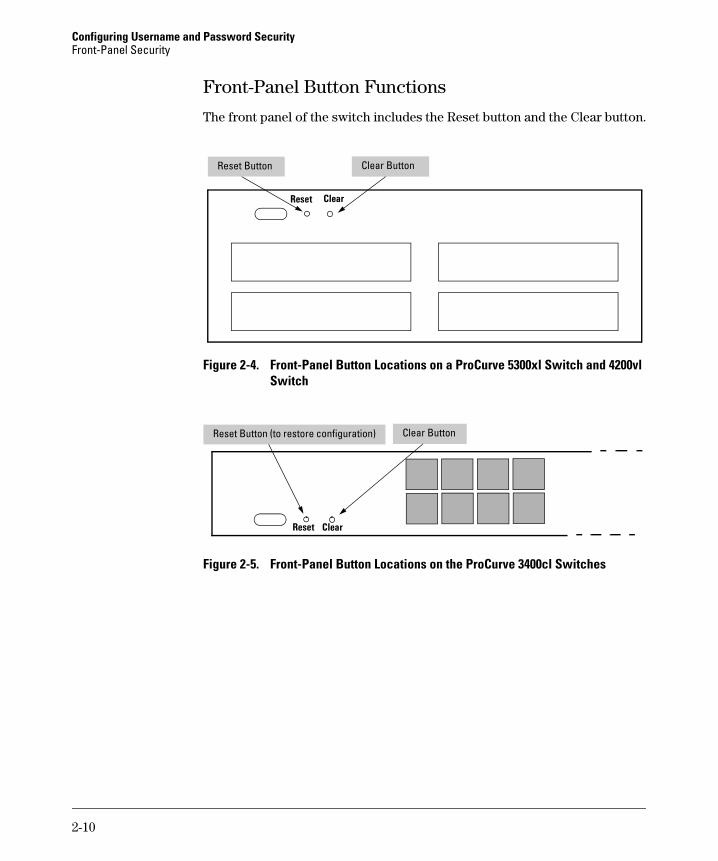
Front-Panel Button Functions
The front panel of the switch includes the Reset button and the Clear button.
Reset Clear
Clear ButtonReset Button
Figure 2-4. Front-Panel Button Locations on a ProCurve 5300xl Switch and 4200vl Switch
Clear ButtonReset Button (to restore configuration)
Reset Clear
Figure 2-5. Front-Panel Button Locations on the ProCurve 3400cl Switches
2-10
Configuring Username and Password Security Front-Panel Security
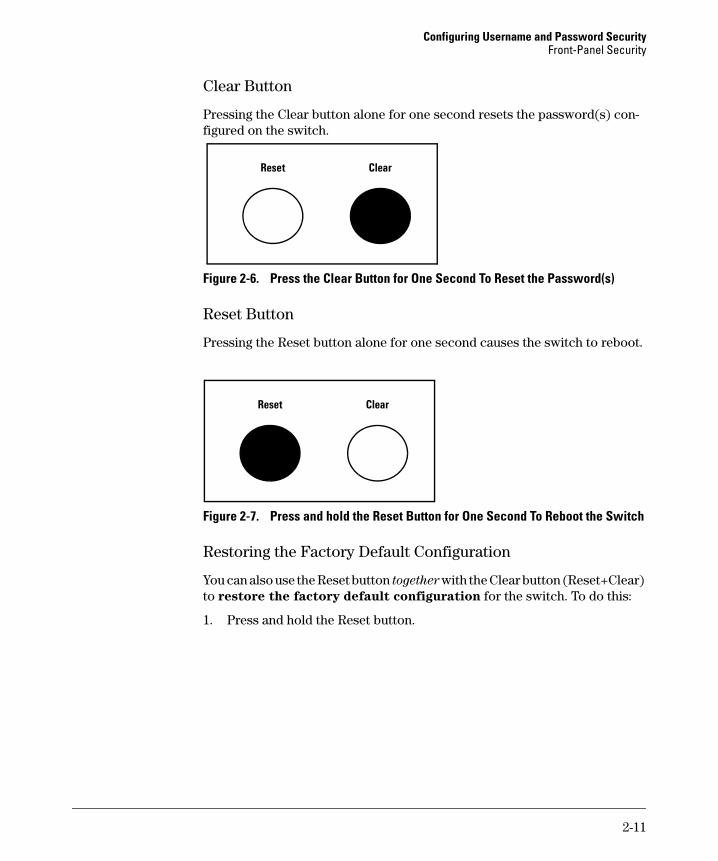
Clear Button
Pressing the Clear button alone for one second resets the password(s) configured on the switch.
Reset Clear
Figure 2-6. Press the Clear Button for One Second To Reset the Password(s)
Reset Button
Pressing the Reset button alone for one second causes the switch to reboot.
Reset Clear
Figure 2-7. Press and hold the Reset Button for One Second To Reboot the Switch
Restoring the Factory Default Configuration
You can also use the Reset button together with the Clear button (Reset+Clear) to restore the factory default configuration for the switch. To do this:
1. Press and hold the Reset button.
2-11
Configuring Username and Password Security Front-Panel Security
Reset Clear
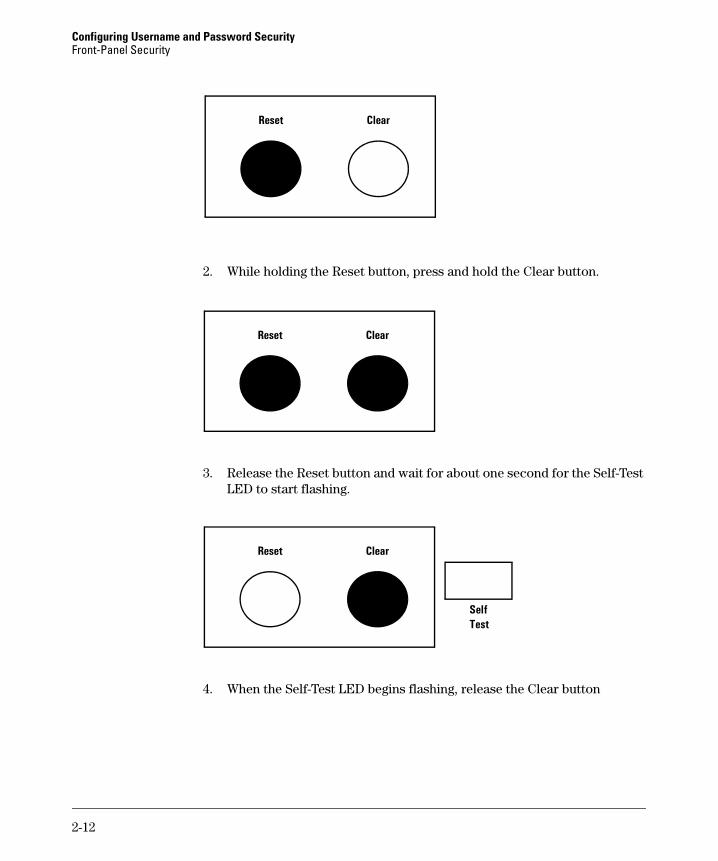
2. While holding the Reset button, press and hold the Clear button.
Reset Clear
3. Release the Reset button and wait for about one second for the Self-Test LED to start flashing.
Reset Clear
SelfTest
4. When the Self-Test LED begins flashing, release the Clear button
2-12
Configuring Username and Password Security Front-Panel Security
.
Reset Clear
Self Test
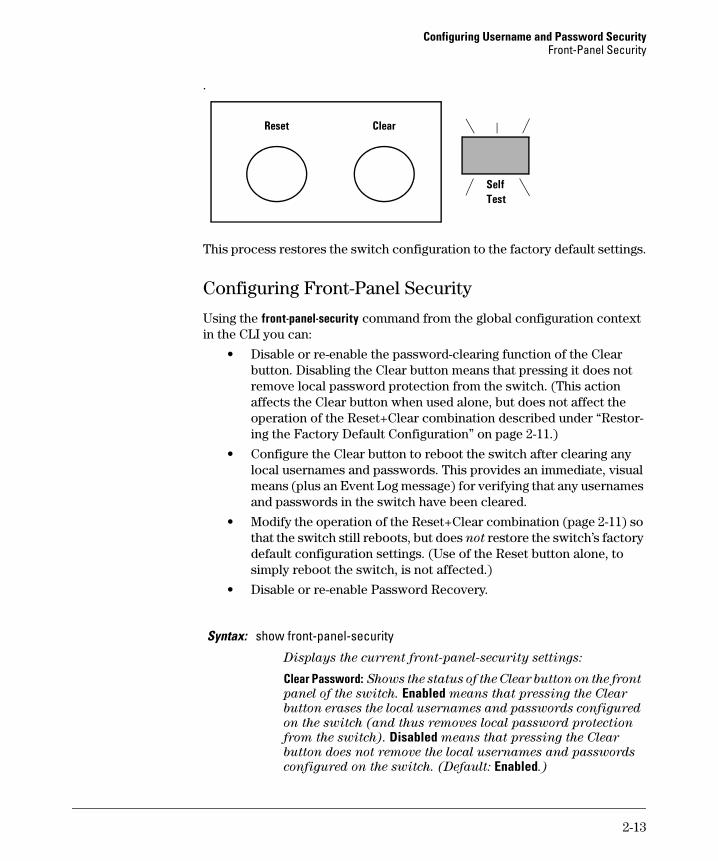
This process restores the switch configuration to the factory default settings.
Configuring Front-Panel Security
Using the front-panel-security command from the global configuration context in the CLI you can:
• Disable or re-enable the password-clearing function of the Clear button. Disabling the Clear button means that pressing it does not remove local password protection from the switch. (This action affects the Clear button when used alone, but does not affect the operation of the Reset+Clear combination described under “Restoring the Factory Default Configuration” on page 2-11.)
• Configure the Clear button to reboot the switch after clearing any local usernames and passwords. This provides an immediate, visual means (plus an Event Log message) for verifying that any usernames and passwords in the switch have been cleared.
• Modify the operation of the Reset+Clear combination (page 2-11) so that the switch still reboots, but does not restore the switch’s factory default configuration settings. (Use of the Reset button alone, to simply reboot the switch, is not affected.)
• Disable or re-enable Password Recovery.
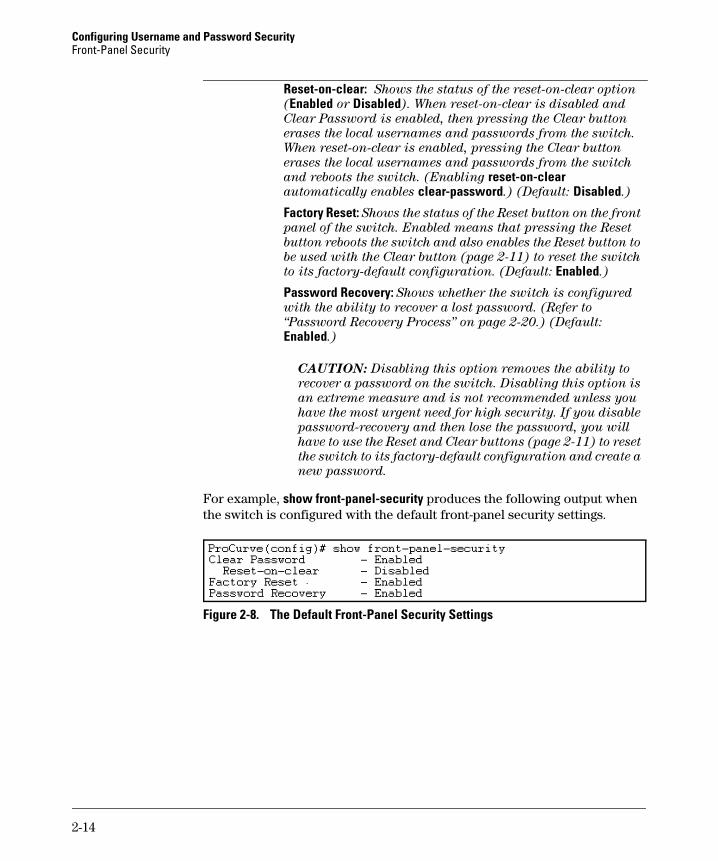
Syntax: show front-panel-security
Displays the current front-panel-security settings:
Clear Password: Shows the status of the Clear button on the front
panel of the switch. Enabled means that pressing the Clear
button erases the local usernames and passwords configured
on the switch (and thus removes local password protection
from the switch). Disabled means that pressing the Clear
button does not remove the local usernames and passwords
configured on the switch. (Default: Enabled.)
2-13
Configuring Username and Password Security Front-Panel Security
Reset-on-clear: Shows the status of the reset-on-clear option
(Enabled or Disabled). When reset-on-clear is disabled and
Clear Password is enabled, then pressing the Clear button
erases the local usernames and passwords from the switch.
When reset-on-clear is enabled, pressing the Clear button
erases the local usernames and passwords from the switch
and reboots the switch. (Enabling reset-on-clear automatically enables clear-password.) (Default: Disabled.)
Factory Reset: Shows the status of the Reset button on the front
panel of the switch. Enabled means that pressing the Reset
button reboots the switch and also enables the Reset button to
be used with the Clear button (page 2-11) to reset the switch
to its factory-default configuration. (Default: Enabled.)
Password Recovery: Shows whether the switch is configured
with the ability to recover a lost password. (Refer to
“Password Recovery Process” on page 2-20.) (Default:
Enabled.)
CAUTION: Disabling this option removes the ability to
recover a password on the switch. Disabling this option is
an extreme measure and is not recommended unless you
have the most urgent need for high security. If you disable
password-recovery and then lose the password, you will
have to use the Reset and Clear buttons (page 2-11) to reset
the switch to its factory-default configuration and create a
new password.
For example, show front-panel-security produces the following output when the switch is configured with the default front-panel security settings.
Figure 2-8. The Default Front-Panel Security Settings
2-14
Configuring Username and Password Security Front-Panel Security
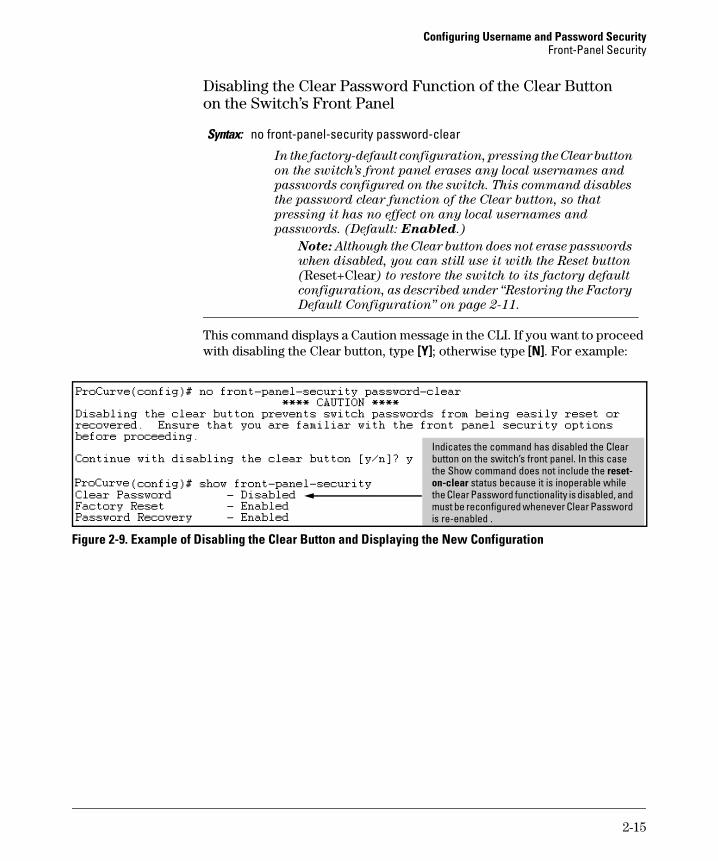
Disabling the Clear Password Function of the Clear Button on the Switch’s Front Panel
Syntax: no front-panel-security password-clear
In the factory-default configuration, pressing the Clear button
on the switch’s front panel erases any local usernames and
passwords configured on the switch. This command disables
the password clear function of the Clear button, so that
pressing it has no effect on any local usernames and
passwords. (Default: Enabled.)
Note: Although the Clear button does not erase passwords
when disabled, you can still use it with the Reset button
(Reset+Clear) to restore the switch to its factory default
configuration, as described under “Restoring the Factory
Default Configuration” on page 2-11.
This command displays a Caution message in the CLI. If you want to proceed with disabling the Clear button, type [Y]; otherwise type [N]. For example:
Indicates the command has disabled the Clear button on the switch’s front panel. In this case the Show command does not include the reset-on-clear status because it is inoperable while the Clear Password functionality is disabled, and must be reconfigured whenever Clear Password is re-enabled .
Figure 2-9. Example of Disabling the Clear Button and Displaying the New Configuration
2-15
Configuring Username and Password Security Front-Panel Security
Re-Enabling the Clear Button on the Switch’s Front Panel and Setting or Changing the “Reset-On-Clear” Operation
Syntax: [no] front-panel-security password-clear reset-on-clear
This command does both of the following:
• Re-enables the password-clearing function of the Clear
button on the switch’s front panel.
• Specifies whether the switch reboots if the Clear button is
pressed.
To re-enable password-clear, you must also specify whether to
enable or disable the reset-on-clear option.
Defaults:
– password-clear: Enabled.
– reset-on-clear: Disabled.
Thus:
• To enable password-clear with reset-on-clear disabled, use
this syntax:
no front-panel-security password-clear reset-on-clear • To enable password-clear with reset-on-clear also enabled,
use this syntax:
front-panel-security password-clear reset-on-clear (Either form of the command enables password-clear.)
Note: If you disable password-clear and also disable the
password-recovery option, you can still recover from a lost
password by using the Reset+Clear button combination at
reboot as described on page 2-11. Although the Clear button
does not erase passwords when disabled, you can still use
it with the Reset button (Reset+Clear) to restore the switch
to its factory default configuration. You can then get access
to the switch to set a new password.
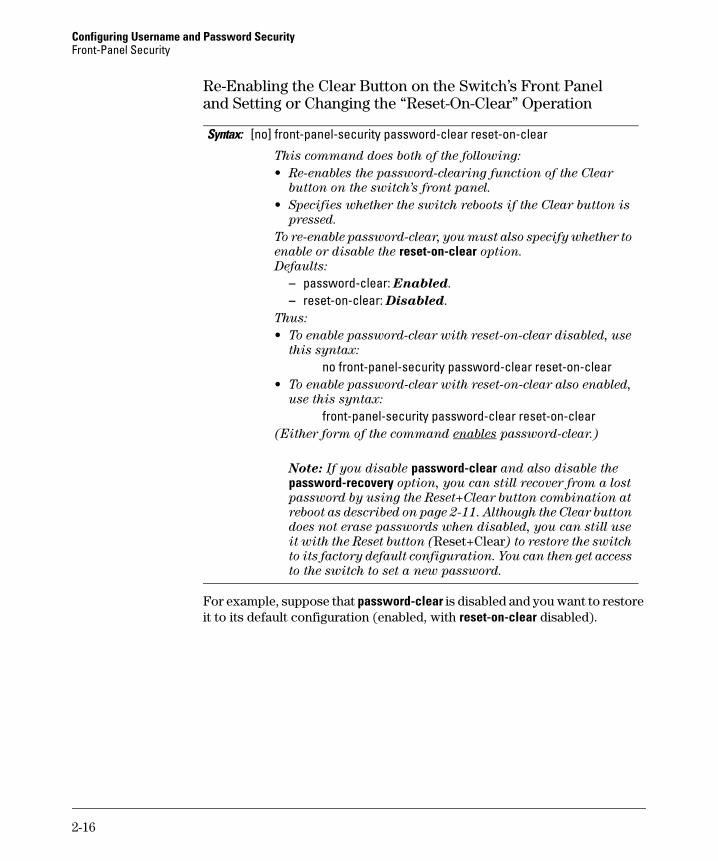
For example, suppose that password-clear is disabled and you want to restore it to its default configuration (enabled, with reset-on-clear disabled).
2-16
Configuring Username and Password Security Front-Panel Security
Shows password-clear disabled.
Enables password-clear, with reset-onclear disabled by the “no” statement at the beginning of the command.
Shows password-clear enabled, with reset-on-clear disabled.
Figure 2-10. Example of Re-Enabling the Clear Button’s Default Operation
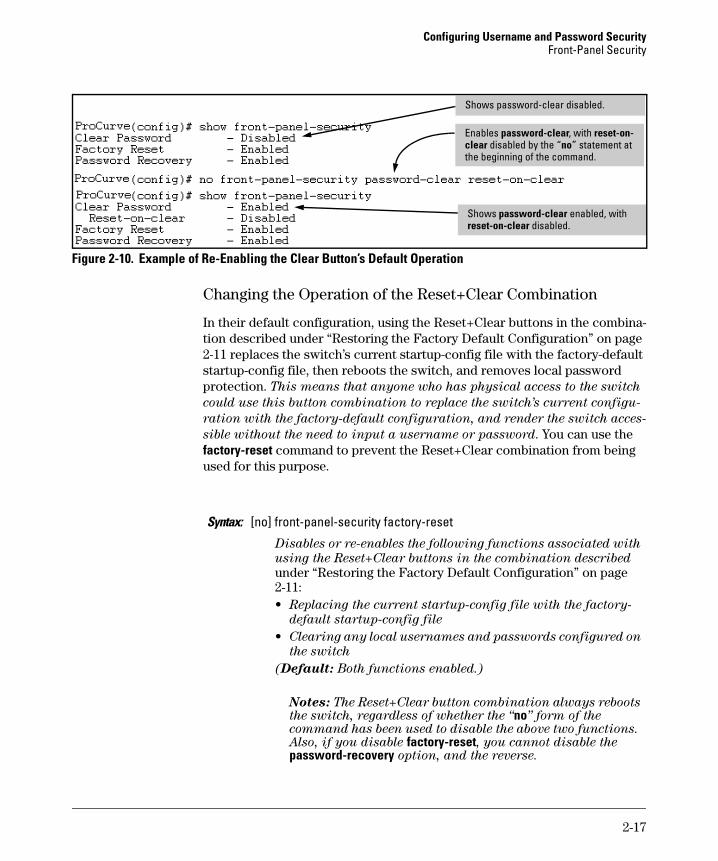
Changing the Operation of the Reset+Clear Combination
In their default configuration, using the Reset+Clear buttons in the combination described under “Restoring the Factory Default Configuration” on page 2-11 replaces the switch’s current startup-config file with the factory-default startup-config file, then reboots the switch, and removes local password protection. This means that anyone who has physical access to the switch
could use this button combination to replace the switch’s current configu
ration with the factory-default configuration, and render the switch acces
sible without the need to input a username or password. You can use the factory-reset command to prevent the Reset+Clear combination from being used for this purpose.
Syntax: [no] front-panel-security factory-reset
Disables or re-enables the following functions associated with
using the Reset+Clear buttons in the combination described
under “Restoring the Factory Default Configuration” on page 2-11: • Replacing the current startup-config file with the factory-
default startup-config file
• Clearing any local usernames and passwords configured on
the switch
(Default: Both functions enabled.)
Notes: The Reset+Clear button combination always reboots the switch, regardless of whether the “no” form of the command has been used to disable the above two functions. Also, if you disable factory-reset, you cannot disable the password-recovery option, and the reverse.
2-17
Configuring Username and Password Security Front-Panel Security
The command to disable the factory-reset operation produces this caution. To complete the command, press [Y]. To abort the command, press [N].
Displays the current front-panel-security configuration, with Factory Reset disabled.
Completes the command to disable the factory reset option.
Figure 2-11. Example of Disabling the Factory Reset Option
Password Recovery The password recovery feature is enabled by default and provides a method for regaining management access to the switch (without resetting the switch to its factory default configuration) in the event that the system administrator loses the local manager username (if configured) or password. Using Password Recovery requires:
■ password-recovery enabled (the default) on the switch prior to an attempt to recover from a lost username/password situation
■ Contacting your ProCurve Customer Care Center to acquire a one-timeuse password
Disabling or Re-Enabling the Password Recovery Process
Disabling the password recovery process means that the only method for recovering from a lost manager username (if configured) and password is to reset the switch to its factory-default configuration, which removes any non-default configuration settings.
C a u t i o n Disabling password-recovery requires that factory-reset be enabled, and locks out the ability to recover a lost manager username (if configured) and password on the switch. In this event, there is no way to recover from a lost manager username/password situation without resetting the switch to its factory-default configuration. This can disrupt network operation and make it necessary to temporarily disconnect the switch from the network to prevent unauthorized access and other problems while it is being reconfigured. Also, with factory-reset enabled, unauthorized users can use the Reset+Clear button combination to reset the switch to factory-default configuration and gain management access to the switch.
2-18
Configuring Username and Password Security Front-Panel Security
Syntax: [no] front-panel-security password-recovery
Enables or (using the “no” form of the command) disables the
ability to recover a lost password.
When this feature is enabled, the switch allows management
access through the password recovery process described below.
This provides a method for recovering from a lost manager
username (if configured) and password. When this feature is
disabled, the password recovery process is disabled and the
only way to regain management access to the switch is to use
the Reset+Clear button combination (page 2-11) to restore the
switch to its factory default configuration.
Note: To disable password-recovery: – You must have physical access to the front panel of the switch. – The factory-reset parameter must be enabled (the default).
(Default: Enabled.)
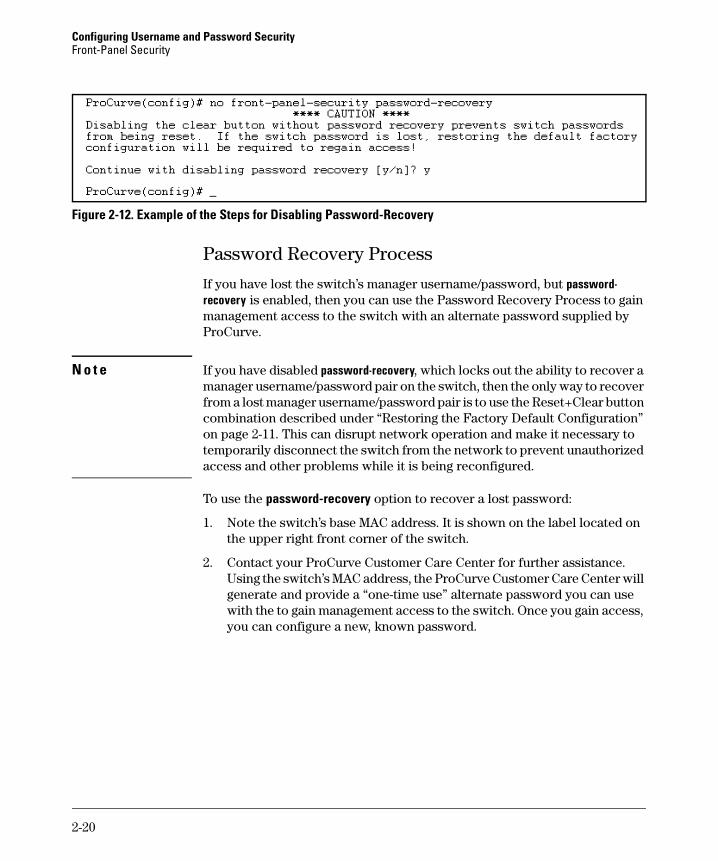
Steps for Disabling Password-Recovery.
1. Set the CLI to the global interface context.
2. Use show front-panel-security to determine whether the factory-reset parameter is enabled. If it is disabled, use the front-panel-security factory-reset command to enable it.
3. Press and release the Clear button on the front panel of the switch.
4. Within 60-seconds of pressing the Clear button, enter the following command:
no front-panel-security password-recovery
5. Do one of the following after the “CAUTION” message appears:
• If you want to complete the command, press [Y] (for “Yes”).
• If you want to abort the command, press [N] (for “No”)
Figure 2-12 shows an example of disabling the password-recovery parameter.
2-19
Configuring Username and Password Security Front-Panel Security
Figure 2-12. Example of the Steps for Disabling Password-Recovery
Password Recovery Process
If you have lost the switch’s manager username/password, but password-recovery is enabled, then you can use the Password Recovery Process to gain management access to the switch with an alternate password supplied by ProCurve.
N o t e If you have disabled password-recovery, which locks out the ability to recover a manager username/password pair on the switch, then the only way to recover from a lost manager username/password pair is to use the Reset+Clear button combination described under “Restoring the Factory Default Configuration” on page 2-11. This can disrupt network operation and make it necessary to temporarily disconnect the switch from the network to prevent unauthorized access and other problems while it is being reconfigured.
To use the password-recovery option to recover a lost password:
1. Note the switch’s base MAC address. It is shown on the label located on the upper right front corner of the switch.
2. Contact your ProCurve Customer Care Center for further assistance. Using the switch’s MAC address, the ProCurve Customer Care Center will generate and provide a “one-time use” alternate password you can use with the to gain management access to the switch. Once you gain access, you can configure a new, known password.
2-20
Configuring Username and Password Security Front-Panel Security
N o t e The alternate password provided by the ProCurve Customer Care Center is valid only for a single login attempt.
You cannot use the same “one-time-use” password if you lose the password a second time. Because the password algorithm is randomized based upon your switch's MAC address, the password will change as soon as you use the “one-time-use” password provided to you by the ProCurve Customer Care Center.
2-21

Configuring Username and Password Security Front-Panel Security
—This page is intentionally unused—
2-22