Embed Size (px)
Citation preview

Congratulations for purchasing this LabKit!Please follow the steps below to get started
In this quick guide you will findA. Assembling your LabKitB. Accessing your LabKitC. LabKit GSM configurationD. Making your first callE. LabKit LTE configurationF. Starting your first data session
Note: The LTE functionalities presented in this document only applies for the LTE LabKit. You can upgrade any time from GSM to LTE by contacting us at [email protected]
© Copyright 2017 SS7ware, Inc. All rights reserved 1
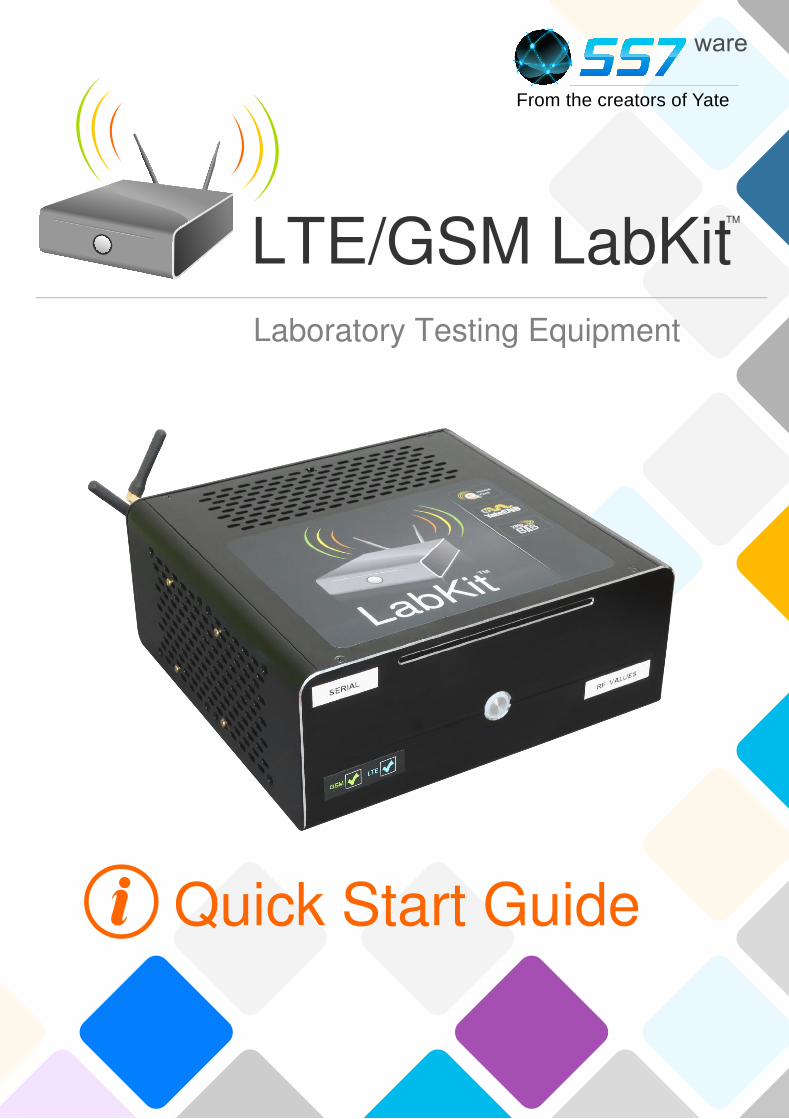
What you get1. LabKit2. LabKit power adapter3. two antennas4. two filters, one for use in the Americas (red) and one for the rest of the world (black)5. two smartphones and chargers6. ten pre-written SIM (two of them are already inserted in each of the two phones)7. USB WiFi adapter
Important! Your LabKit is also pre-configured to provide access to the Hosted Core, a free service that allows users to experiment with a fully-functional GSM/GPRS or LTE/IMS network. The 10 SIM cards you receive are already associated to your Hosted Core account. You will receive the Hosted Core credentials on the e-mail you used to place the order.
Note: default PIN for every SIM we sent with our equipment is 0000
For the video guide regarding the LabKit setup, access this link: https://youtu.be/XklRrzBoaVY
2 © Copyright 2017 SS7ware, Inc. All rights reserved
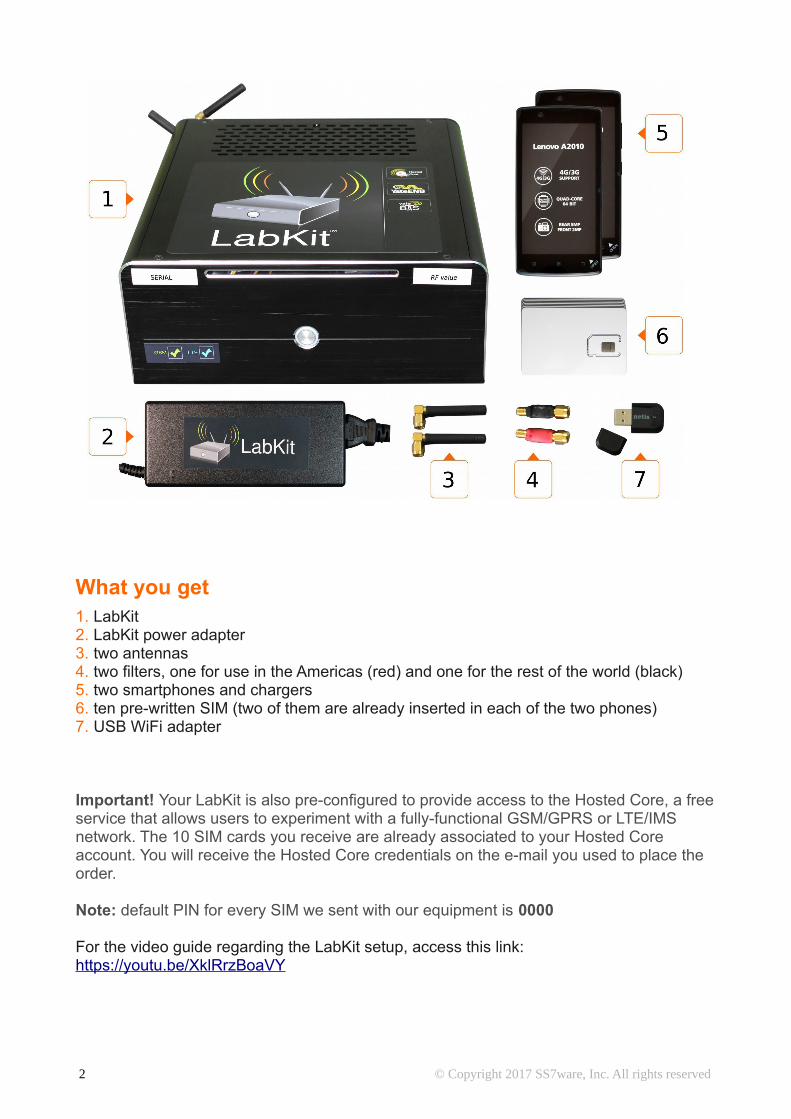
A. Assembling your LabKit1. Connect one antenna to the TX socket.
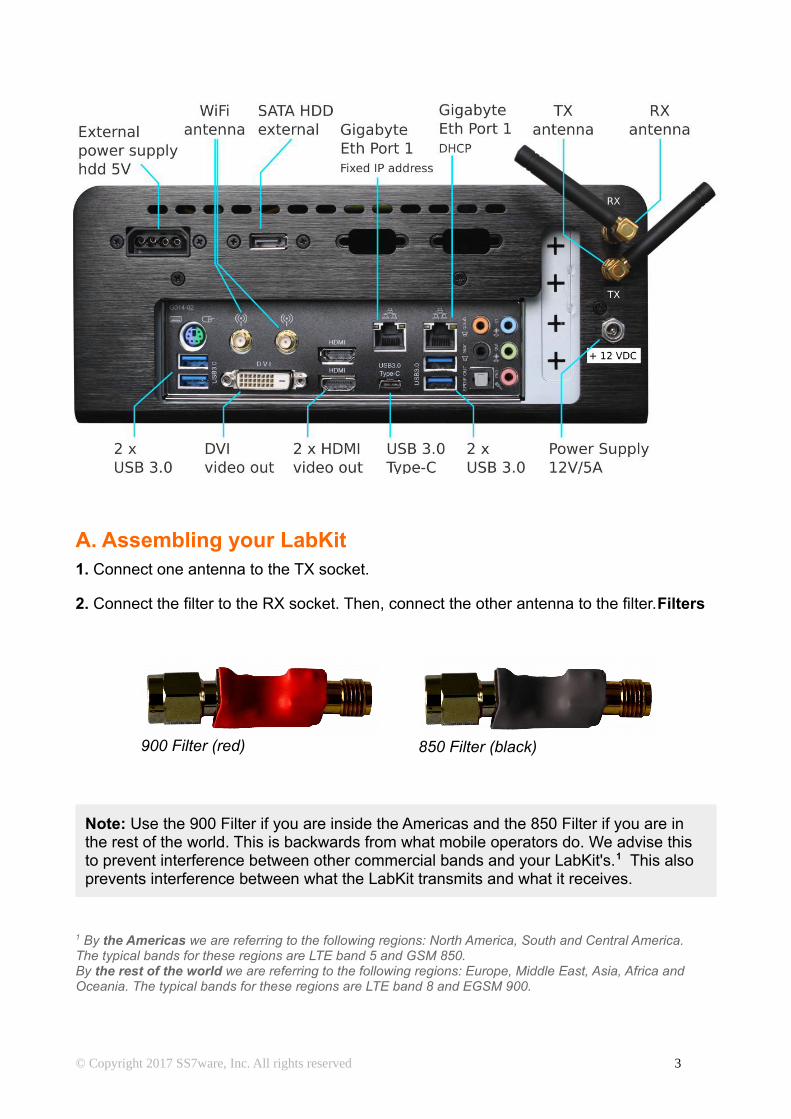
2. Connect the filter to the RX socket. Then, connect the other antenna to the filter.Filters
Note: Use the 900 Filter if you are inside the Americas and the 850 Filter if you are in the rest of the world. This is backwards from what mobile operators do. We advise this to prevent interference between other commercial bands and your LabKit's.1 This also prevents interference between what the LabKit transmits and what it receives.
1 By the Americas we are referring to the following regions: North America, South and Central America. The typical bands for these regions are LTE band 5 and GSM 850. By the rest of the world we are referring to the following regions: Europe, Middle East, Asia, Africa and Oceania. The typical bands for these regions are LTE band 8 and EGSM 900.
© Copyright 2017 SS7ware, Inc. All rights reserved 3
850 Filter (black)900 Filter (red)
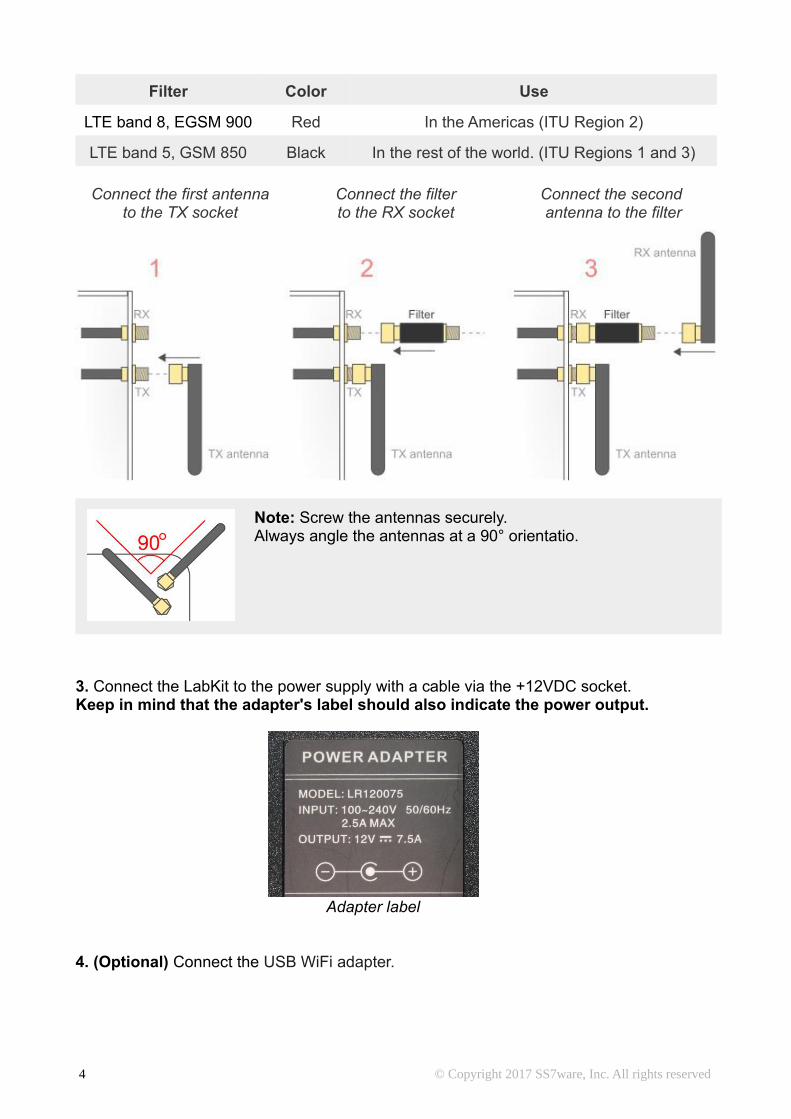
Filter Color Use
LTE band 8, EGSM 900 Red In the Americas (ITU Region 2)
LTE band 5, GSM 850 Black In the rest of the world. (ITU Regions 1 and 3)
Connect the first antenna to the TX socket
Connect the filter to the RX socket
Connect the second antenna to the filter
Note: Screw the antennas securely. Always angle the antennas at a 90° orientatio.
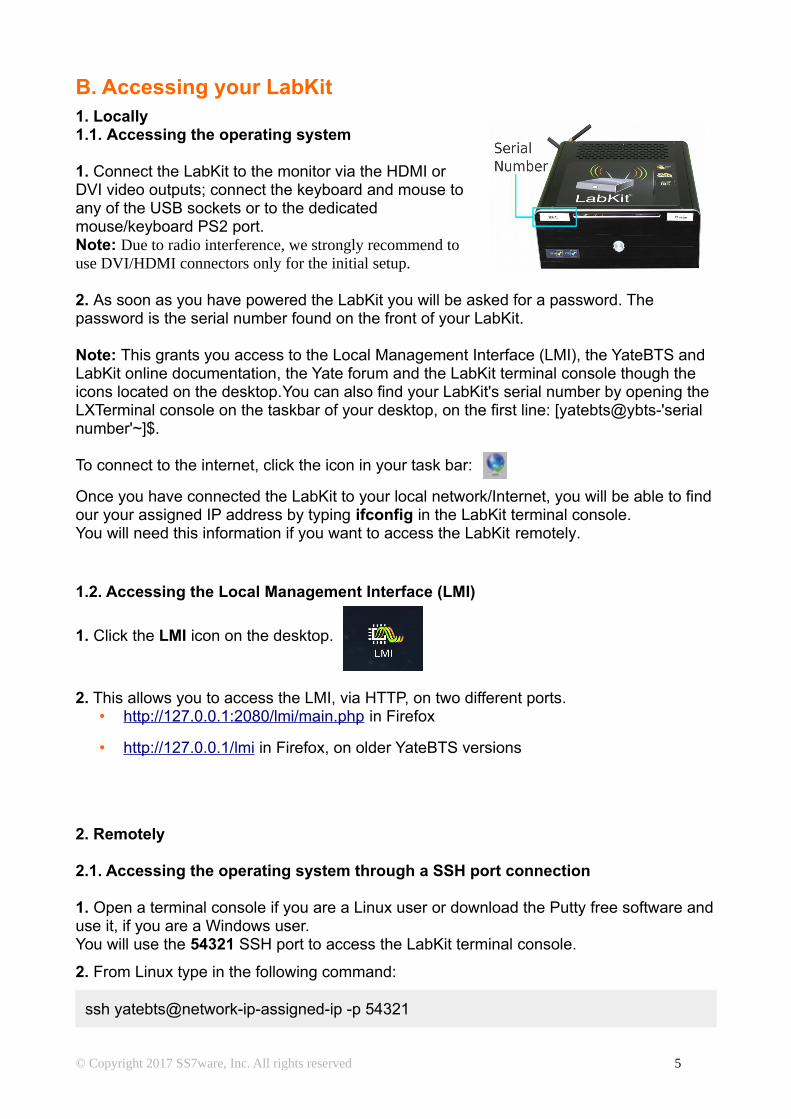
3. Connect the LabKit to the power supply with a cable via the +12VDC socket.Keep in mind that the adapter's label should also indicate the power output.
4. (Optional) Connect the USB WiFi adapter.
4 © Copyright 2017 SS7ware, Inc. All rights reserved
Adapter label
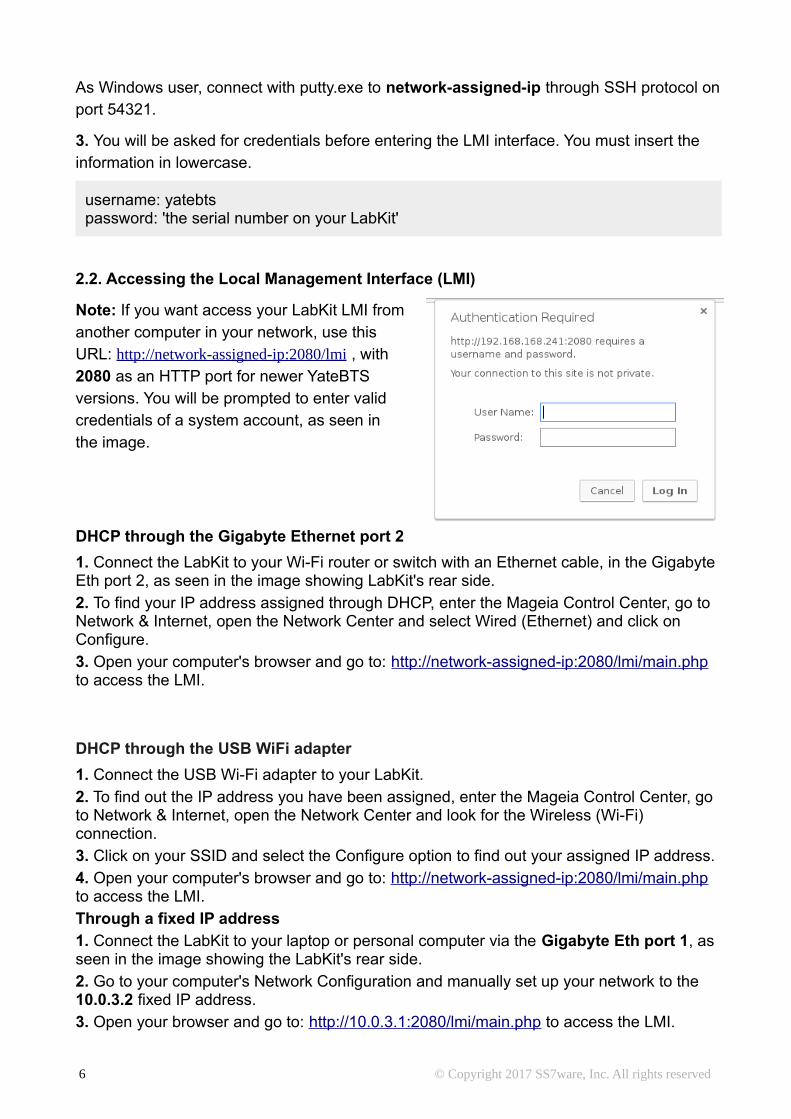
B. Accessing your LabKit1. Locally1.1. Accessing the operating system
1. Connect the LabKit to the monitor via the HDMI orDVI video outputs; connect the keyboard and mouse toany of the USB sockets or to the dedicatedmouse/keyboard PS2 port.Note: Due to radio interference, we strongly recommend touse DVI/HDMI connectors only for the initial setup.
2. As soon as you have powered the LabKit you will be asked for a password. The password is the serial number found on the front of your LabKit.
Note: This grants you access to the Local Management Interface (LMI), the YateBTS and LabKit online documentation, the Yate forum and the LabKit terminal console though the icons located on the desktop.You can also find your LabKit's serial number by opening the LXTerminal console on the taskbar of your desktop, on the first line: [yatebts@ybts-'serial number'~]$.
To connect to the internet, click the icon in your task bar:
Once you have connected the LabKit to your local network/Internet, you will be able to findour your assigned IP address by typing ifconfig in the LabKit terminal console. You will need this information if you want to access the LabKit remotely.
1.2. Accessing the Local Management Interface (LMI)
1. Click the LMI icon on the desktop.
2. This allows you to access the LMI, via HTTP, on two different ports.• http://127.0.0.1:2080/lmi/main.php in Firefox
• http://127.0.0.1/ lmi in Firefox, on older YateBTS versions
2. Remotely
2.1. Accessing the operating system through a SSH port connection
1. Open a terminal console if you are a Linux user or download the Putty free software anduse it, if you are a Windows user.You will use the 54321 SSH port to access the LabKit terminal console.
2. From Linux type in the following command:
ssh yatebts@network-ip-assigned-ip -p 54321
© Copyright 2017 SS7ware, Inc. All rights reserved 5
As Windows user, connect with putty.exe to network-assigned-ip through SSH protocol onport 54321.
3. You will be asked for credentials before entering the LMI interface. You must insert the information in lowercase.
username: yatebtspassword: 'the serial number on your LabKit'
2.2. Accessing the Local Management Interface (LMI)
Note: If you want access your LabKit LMI fromanother computer in your network, use thisURL: http://network-assigned-ip:2080/lmi , with 2080 as an HTTP port for newer YateBTSversions. You will be prompted to enter validcredentials of a system account, as seen inthe image.
DHCP through the Gigabyte Ethernet port 2
1. Connect the LabKit to your Wi-Fi router or switch with an Ethernet cable, in the Gigabyte Eth port 2, as seen in the image showing LabKit's rear side.2. To find your IP address assigned through DHCP, enter the Mageia Control Center, go to Network & Internet, open the Network Center and select Wired (Ethernet) and click on Configure.3. Open your computer's browser and go to: http://network-assigned-ip:2080/lmi/main.php to access the LMI.
DHCP through the USB WiFi adapter
1. Connect the USB Wi-Fi adapter to your LabKit.2. To find out the IP address you have been assigned, enter the Mageia Control Center, go to Network & Internet, open the Network Center and look for the Wireless (Wi-Fi) connection. 3. Click on your SSID and select the Configure option to find out your assigned IP address.4. Open your computer's browser and go to: http://network-assigned-ip:2080/lmi/main.php to access the LMI.Through a fixed IP address1. Connect the LabKit to your laptop or personal computer via the Gigabyte Eth port 1, as seen in the image showing the LabKit's rear side.2. Go to your computer's Network Configuration and manually set up your network to the 10.0.3.2 fixed IP address.3. Open your browser and go to: http://10.0.3.1:2080/lmi/main.php to access the LMI.
6 © Copyright 2017 SS7ware, Inc. All rights reserved
C. LabKit GSM configuration
If you are operating your LabKit in the Americas, skip the next step, as your machine is already set up to function in these areas.
GSM NiPC mode
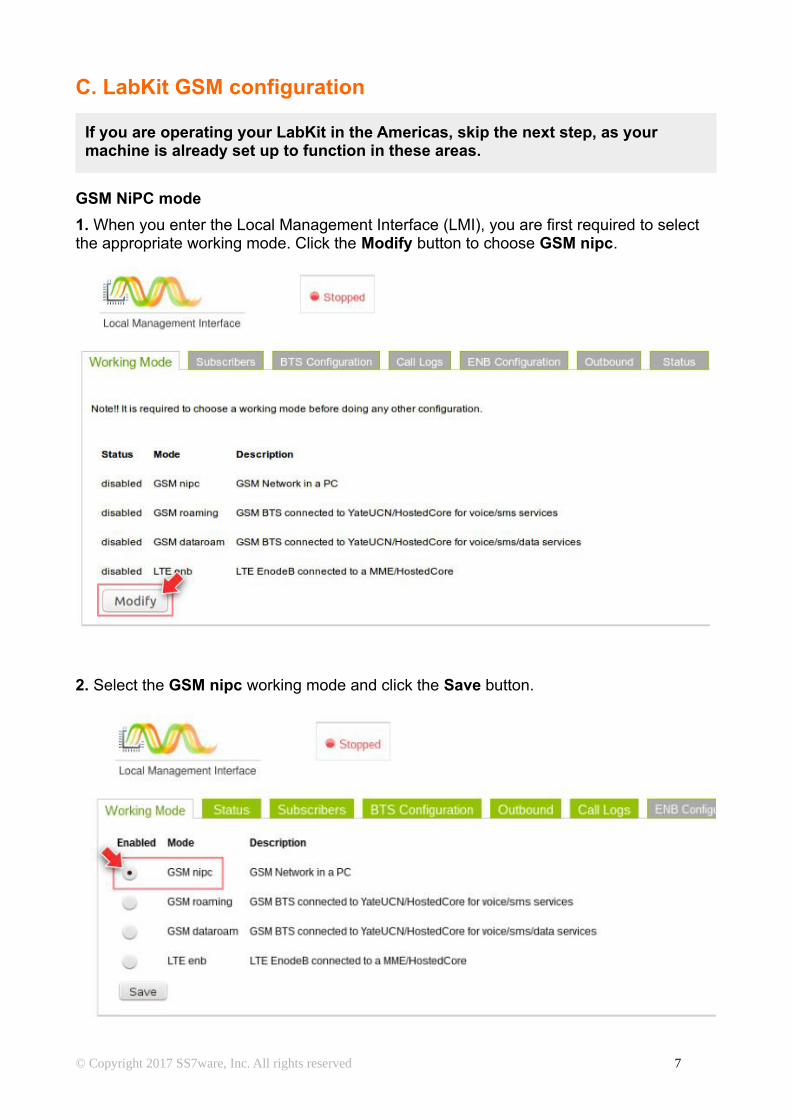
1. When you enter the Local Management Interface (LMI), you are first required to select the appropriate working mode. Click the Modify button to choose GSM nipc.
2. Select the GSM nipc working mode and click the Save button.
© Copyright 2017 SS7ware, Inc. All rights reserved 7
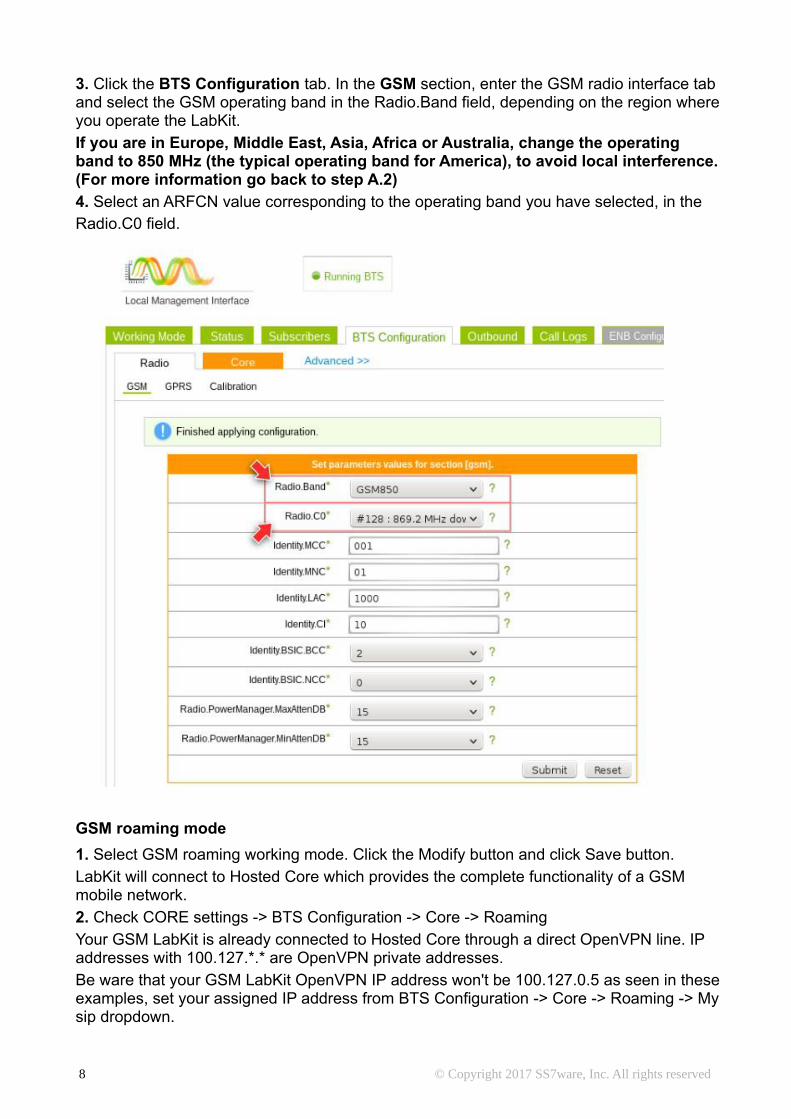
3. Click the BTS Configuration tab. In the GSM section, enter the GSM radio interface tab and select the GSM operating band in the Radio.Band field, depending on the region whereyou operate the LabKit.If you are in Europe, Middle East, Asia, Africa or Australia, change the operating band to 850 MHz (the typical operating band for America), to avoid local interference.(For more information go back to step A.2)4. Select an ARFCN value corresponding to the operating band you have selected, in the Radio.C0 field.
GSM roaming mode
1. Select GSM roaming working mode. Click the Modify button and click Save button.LabKit will connect to Hosted Core which provides the complete functionality of a GSM mobile network.2. Check CORE settings -> BTS Configuration -> Core -> RoamingYour GSM LabKit is already connected to Hosted Core through a direct OpenVPN line. IP addresses with 100.127.*.* are OpenVPN private addresses.Be ware that your GSM LabKit OpenVPN IP address won't be 100.127.0.5 as seen in theseexamples, set your assigned IP address from BTS Configuration -> Core -> Roaming -> Mysip dropdown.
8 © Copyright 2017 SS7ware, Inc. All rights reserved
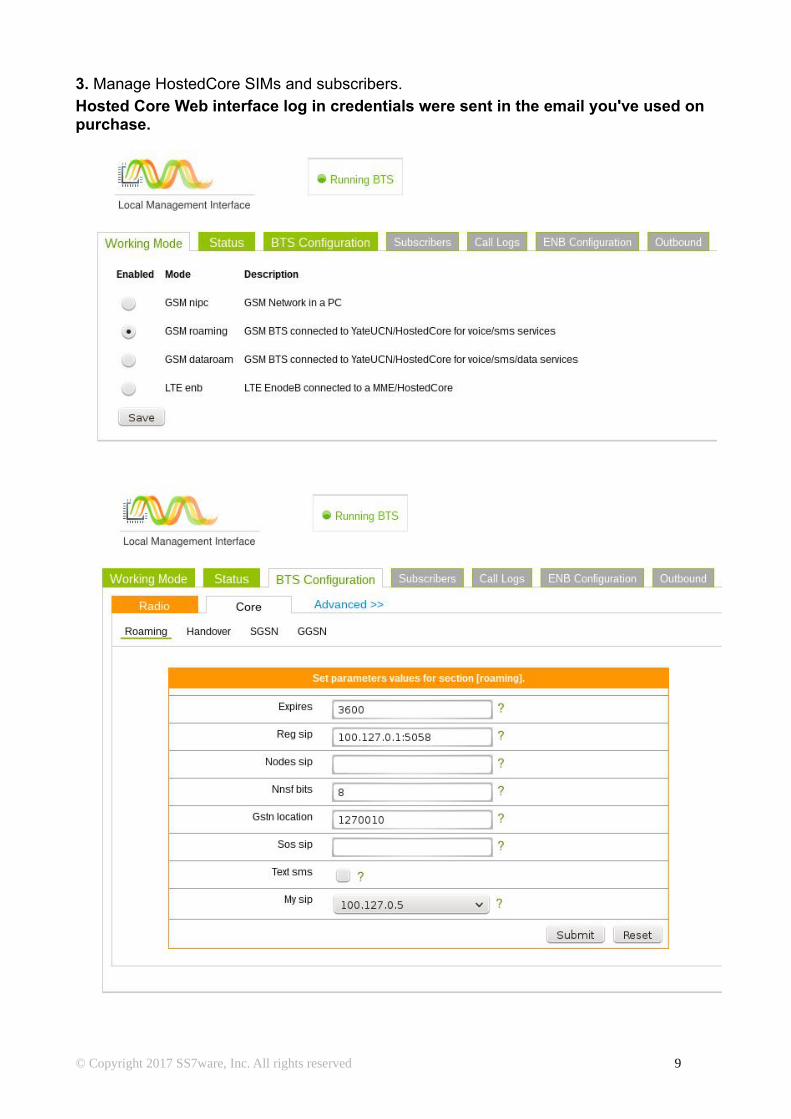
3. Manage HostedCore SIMs and subscribers.Hosted Core Web interface log in credentials were sent in the email you've used on purchase.
© Copyright 2017 SS7ware, Inc. All rights reserved 9
D. Making your first callOnce you configured your LabKit for GSM use, get ready to make your first call.
1. Turn on the phones. They should now register to the 00101 test network if all the steps above have been correctly performed. If the network hasn't been selected automatically, select the 00101 network manually.
At this point you should receive the following automatic SMS: "Your allocated phone no. is ..... Thank you for installing YateBTS. Call David at david(32843).", to find out the phone number allocated to the SIM card and to confirm that the phone has connected to the network.
2.To test your GSM network, register the two phones to the network and then dial each other using the allocated phone numbers received by SMS
3. You can also use GPRS with Local breakout in YateBTS and start your GSM data session through your LabKit Internet connection.
Alternatively,4. Call the number 32843. When you call the number, a "Welcome" IVR function will play a prompt and offer three options:
• press 1 to start EchoTest;• press 2 to be sent to conference;
5. You can have SMS conversations with the Eliza chat robot by sending text messages to the number 35492.
LabKit GSM roaming / GSM dataroam configuration
Your LabKit is also pre-configured to provide access to the Hosted Core, your credentials were sent on the e-mail you used to make the order.
For more information, log into HostedCore web interface page and see the "How to" sectionfrom the top menu.
Making a call through Hosted CoreIn order to use Hosted Core's roaming service, select Working Mode as GSM roaming andgo to
BTS Configuration -> Core -> Roaming and set Reg SIP to 100.127.0.1:5058 and My SIP from drop down to your associated IP address starting with 100.127.X.X
Please restart the phones and check assigned MSISDNs in HostedCore web interface page to make a test call. (The 10 SIM cards you receive are already associated to your Hosted Core account)
You can call a public subscriber, Public Subscribers tab will list online public subscribers or you can call one of your own subscribers.
10 © Copyright 2017 SS7ware, Inc. All rights reserved

Starting your data session through Hosted CoreSet up LabKit on GSM dataroam working mode and get ready to start your data session through Hosted Core's Internet connection.
Keep same BTS Configuration -> Core -> Roaming configurations as described earlier in this document, regarding connections.
Restart the smart phones and after they register to the 00101 test network, be free to navigate on the web.
E. LabKit LTE configuration
If you are operating your LabKit in the Americas, skip the next step, as your machine is already set up to function in these areas.
1. When you enter the Local Management Interface (LMI) for the first time, you are required to select the appropriate working mode. Click the Modify button to choose LTE enb.
© Copyright 2017 SS7ware, Inc. All rights reserved 11
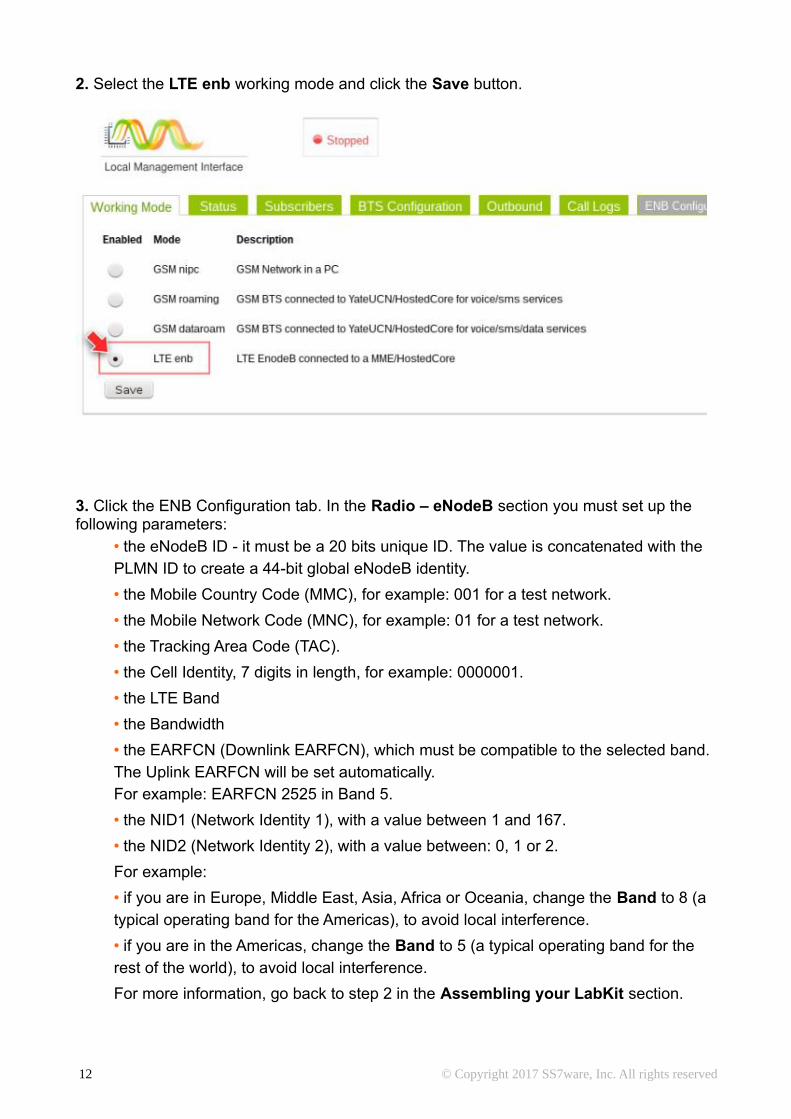
2. Select the LTE enb working mode and click the Save button.
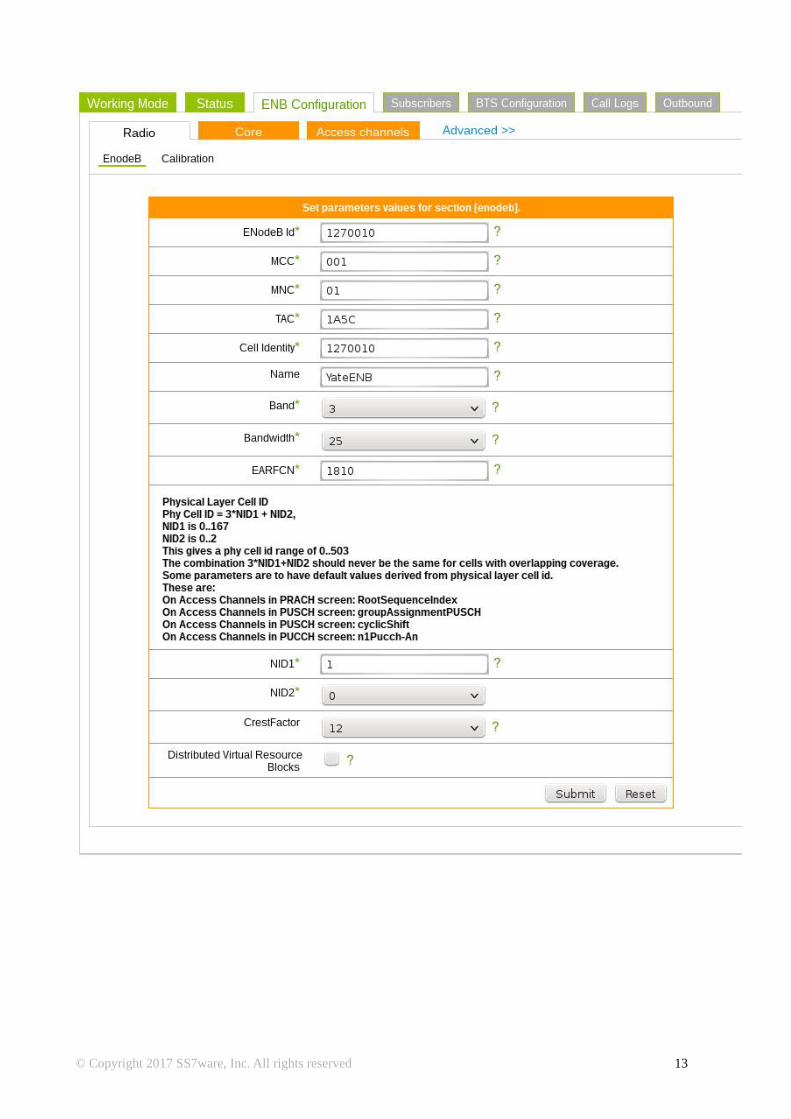
3. Click the ENB Configuration tab. In the Radio – eNodeB section you must set up the following parameters:
• the eNodeB ID - it must be a 20 bits unique ID. The value is concatenated with the PLMN ID to create a 44-bit global eNodeB identity.
• the Mobile Country Code (MMC), for example: 001 for a test network.
• the Mobile Network Code (MNC), for example: 01 for a test network.
• the Tracking Area Code (TAC).
• the Cell Identity, 7 digits in length, for example: 0000001.
• the LTE Band
• the Bandwidth
• the EARFCN (Downlink EARFCN), which must be compatible to the selected band.The Uplink EARFCN will be set automatically. For example: EARFCN 2525 in Band 5.
• the NID1 (Network Identity 1), with a value between 1 and 167.
• the NID2 (Network Identity 2), with a value between: 0, 1 or 2.
For example:
• if you are in Europe, Middle East, Asia, Africa or Oceania, change the Band to 8 (a typical operating band for the Americas), to avoid local interference.
• if you are in the Americas, change the Band to 5 (a typical operating band for the rest of the world), to avoid local interference.
For more information, go back to step 2 in the Assembling your LabKit section.
12 © Copyright 2017 SS7ware, Inc. All rights reserved
© Copyright 2017 SS7ware, Inc. All rights reserved 13
F. Starting your first data sessionOnce you configured your LabKit for LTE use, get ready to start your first data session.
Turn on the smartphone. It should register to the 00101 (YateENB) test network if all the steps above have been correctly performed.
If the network registration did not automatically function, select the 00101 (YateENB) test network manually.
At this point, you should be able to browse through your favorite website.
You have now successfully configured your LabKit.
For more information please check the YateBTS Wiki at http s ://wiki.yatebts.com with an emphasis on the Network in a PC and LabKit section at: https://wiki.yatebts.com/index.php/Network_in_a_PC
Tell us about your experience using the LabKit:
• send an email to the following address: [email protected]
• start a conversation on our forum: http://forum.yate.ro/
14 © Copyright 2017 SS7ware, Inc. All rights reserved