Embed Size (px)
Citation preview


Congratulat ions on your choice of a Whites Drysuit
Your suit has been designed to provide you with the highest degree of comfort andconvenience. Since 1956 we have been constructing suits with the fi nest quality materials and design and production excellence; we are certain that your suit will be eve ry thing you hoped for and more.
Each Whites Drysuit is individually inspected and tank tested before it leaves our factory to ensure the highest quality.
From time to time your suit, including its valves, zippers and seals, may require professional service. If, for any reason, you suspect that service is required, or your suit and/or its components do not perform as they should, then you should im me di ate lydiscontinue its use and have it evaluated and/orserviced at your authorizedWhites dealer.
A little effort goes a long way to keep-ing your suit in top form. Please take a moment to familiarizeyourself with the care, m a i n t e n a n c e a n d warranty information.If you have any questions about your suit, please do not hesitate to contact your authorized Whites dealer to assist you.

1
Table of Contents
Crit ical Safety Precautions
Warning
Warranty
Donning a Back Entry Drysuit
Donning a Self Entry Drysuit
Tuck Neoprene Neck Seal
Tuck Neck Dam
Tuck Neoprene Wrist Seals
Push-Through Neoprene Wrist Seals
Ankle Straps
Latex Neck and Wrist Seal Care
Fitt ing Latex Seals
T ighten Neoprene Seals
Loosen Neoprene Seals
Exhaust Valves
Intake Valves & Low Pressure Inf late Hose
Folding Suit for Storage
Drysuit Z ipper Care
Instal l ing Inf late and Exhaust Valves
Finding a Leak
Fix ing a Hole in a Mult iLaminate Shel l Drysuit
Patching Ripped Self-Repair Latex Neck or Wrist Seals
Changing Latex Wrist, Ankle or Neck Seals on a Mult iLaminate Shel l Drysuit
Table of Contents
1
2
3
3
4-5
6-7
8
9
9
10
10
11
11
12
12
13
13
14
14
15
16
17
18-19
20-21

Critical Safety Precautions
1 Complete a drysuit diving course from an instructor and stay current.2 Always use a buoyancy compensation device
when diving with a drysuit.3 Know your equipment and emergency procedures.4 Practice your drysuit diving skills under controlled
conditions until they become second nature.5 Dive with a buddy who understands your drysuit system.6 Use the correct amount of insulation for the water
temperature you are diving in and your exercise rate.7 Don't weight yourself heavier than neutral buoyancy with
an empty tank. Your weighting should allow you to makea safety stop at fi fteen feet upon completion of your divewith a tank containing 500 psi of air or less.
8 Inspect your valves, zipper and seals for properperformance before each dive.
9 Perform preventative maintenance and repairs on your suit and valves regularly, or have them serviced by a qualifi ed individual.
10 Know your limitations and do not exceed them.
IMPORTANT NOTICE
This is not a diving instruction manual, nor does it eliminate the necessity for ob tain ing professional instruction in the operation of a Whites drysuit and diving cer ti fi ca tion.The user is therefore advised to obtain such instruction as well as familiarizing him or herself with the information contained in this manual prior to operation of any drysuit.Complete instruction may be obtained at any authorized Whites drysuit dealer.

3
WHITES LIMITED LIFETIME WARRANTY
All standard Whites drysuits are covered by a Two Year Warranty offered to the originalpurchaser on workmanship with a One Year Warranty on materials. Whites offers a Three Year seam Warranty to the original purchaser of drysuits that have Whites Seam Fusion Technologyor Whites welded tape seams built into their drysuits. Warranty is limited to the repair or replacement of Whites products at our option. Drysuits purchased for rental carry a One YearWarranty on materials and workmanship. All above warranties do not cover damage caused byexcessive or abusive wear and tear, fading, misuse or negligence. This warranty is invalid if unauthor-ized repairs have been carried out. Tailor made drysuits and wet suits are covered for 30 days on fi t.Drysuits used for professional or commercial use are covered under warranty for 30 days. Repairs or alterations not covered by warranty will be billed to the customer. Factory seconds and clearance suits sold at a discount carry no warranty. Drysuit zippers and seals are exempt from warranty.
WARNING
Improper use or misuse of this drysuit could result in the loss of buoyancy control, including uncontrolled descents and uncontrolled rapid ascents, resulting in drown ing, de com pres sion sickness, or air embolism.
Improper use or misuse of this drysuit could result in exposure to thermal hazards, including rapid body overheating or cooling, resulting in stroke or seizure.
Do not use the drysuit as a lift bag. If you use the drysuit as a lift bag and lose the grip on the object, you may become excessively buoyant. This may result in rapid ascent.
Rapid ascent is dangerous and may cause air embolism or de com pres sion sickness, either of which can result in serious injury or death.
Warning & Warranty

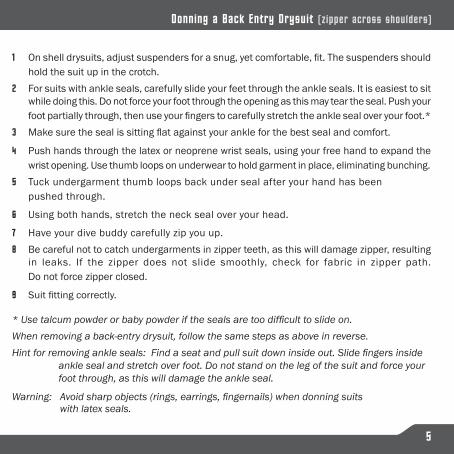
Donning a Back Entry Drysuit (zipper across shoulders)
1
2
3
4
5
6
7
8 9
Note: For shell suits with neoprene tuck seals see pages 8-9
5
1 On shell drysuits, adjust suspenders for a snug, yet comfortable, fi t. The sus pend ers should hold the suit up in the crotch.
2 For suits with ankle seals, carefully slide your feet through the ankle seals. It is easiest to sit while doing this. Do not force your foot through the opening as this may tear the seal. Push your foot partially through, then use your fi ngers to carefully stretch the ankle seal over your foot.*
3 Make sure the seal is sitting fl at against your ankle for the best seal and comfort.
4 Push hands through the latex or neoprene wrist seals, using your free hand to expand the wrist opening. Use thumb loops on un der wear to hold garment in place, elim i nat ing bunch ing.
5 Tuck un der gar ment thumb loops back under seal after your hand has beenpushed through.
6 Using both hands, stretch the neck seal over your head.
7 Have your dive buddy carefully zip you up.8 Be careful not to catch undergarments in zipper teeth, as this will damage zipper, resulting
in leaks. If the zipper does not slide smoothly, check for fabric in zipper path.Do not force zipper closed.
9 Suit fi tting correctly.
* Use talcum powder or baby powder if the seals are too diffi cult to slide on.When removing a back-entry drysuit, follow the same steps as above in reverse. Hint for removing ankle seals: Find a seat and pull suit down inside out. Slide fi ngers inside
ankle seal and stretch over foot. Do not stand on the leg of the suit and force your foot through, as this will damage the ankle seal.
Warning: Avoid sharp objects (rings, earrings, fi ngernails) when donning suitswith latex seals.
Donning a Back Entry Drysuit (zipper across shoulders)

Donning a Self Entry Drysuit
1 2 3 4
5
6
7
8 9 10 11
Note: For shell suits with neoprene tuck seals see pages 8-9
7
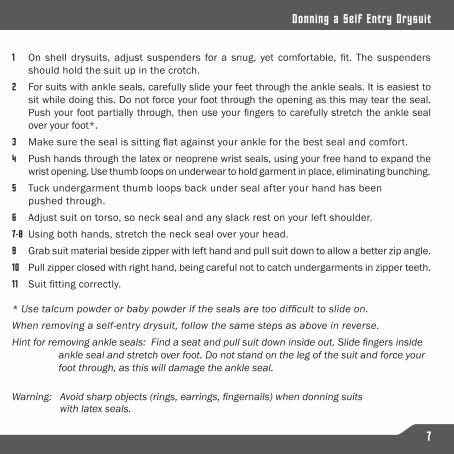
1 On shell drysuits, adjust suspenders for a snug, yet comfortable, fi t. The suspendersshould hold the suit up in the crotch.
2 For suits with ankle seals, carefully slide your feet through the ankle seals. It is easiest to sit while doing this. Do not force your foot through the opening as this may tear the seal. Push your foot partially through, then use your fi ngers to carefully stretch the ankle seal over your foot*.
3 Make sure the seal is sitting fl at against your ankle for the best seal and comfort.4 Push hands through the latex or neoprene wrist seals, using your free hand to expand the
wrist opening. Use thumb loops on un der wear to hold garment in place, elim i nat ing bunch ing. 5 Tuck undergarment thumb loops back under seal after your hand has been
pushed through.6 Adjust suit on torso, so neck seal and any slack rest on your left shoulder. 7-8 Using both hands, stretch the neck seal over your head. 9 Grab suit material beside zipper with left hand and pull suit down to allow a better zip angle. 10 Pull zipper closed with right hand, being careful not to catch un der gar ments in zipper teeth.11 Suit fi tting correctly.
* Use talcum powder or baby powder if the seals are too diffi cult to slide on.When removing a self-entry drysuit, follow the same steps as above in reverse.Hint for removing ankle seals: Find a seat and pull suit down inside out. Slide fi ngers inside
ankle seal and stretch over foot. Do not stand on the leg of the suit and force your foot through, as this will damage the ankle seal.
Warning: Avoid sharp objects (rings, earrings, fi ngernails) when donning suitswith latex seals.
Donning a Self Entry Drysuit

Tuck Neoprene Neck Seal
1-2 Stretch neoprene over head, using both hands to expand seal.3-4 Grab top 11⁄2" to 2" of seal and fold under all the way around neck seal to create a smooth
rubber seal against your skin.5 A properly fi tted neoprene tuck seal must be snug, to keep water out. However, a seal that
is too tight can be dangerous. Have your dealer check the fi t on your neoprene neck seal before your fi rst dive.
When removing a suit with neoprene seals, be sure to roll the seal out fi rst so the nylon is against your skin. The nylon surface will slide much easier against your skin and hair than the rubber surface.
1
2
3
4
5

9
Some models of Whites drysuits come fi tted with a hood dam. Simply tuck your drysuit hood inside the dam before your dive to minimize water fl ushing between the hood and neck seal.
Warning: Neck seals that are too tight may restrict bloodfl ow to the brain resulting in serious injury.
Tuck Neck Dam
Tuck Neoprene Wrist Seals
1-2 Push hand through neoprene tuck seal.3 Take 11⁄2" to 2" (4-5 cm) of seal and fold under all the way
around wrist seal to create a smooth rubber seal against your skin.4 A properly fi tted ne o prene tuck seal must be snug to keep water out.When removing a suit with neoprene seals, be sure to roll the seal out so the nylon is against your skin. The nylon surface will slide much easier against your skin than the rubber surface.
1
2
3
4

Push-Through Neoprene Wrist Seals
1-3 Most commonly used in commercial neoprene diving drysuits, push-through wrist seals are diffi cult to don. They must fi t snugly to obtain a good seal. It is advisable to use babypowder, talcum powder or cornstarch when at tempt ing to push your hand through a push-through neoprene wrist seal.
4-6 Some models of Whites drysuits come with adjustable ankle straps. Ankle straps help slow air fl ow into the boots. It is easiest to adjust your ankle straps before donning your tanks and weight belt. Ankle straps should be snug, but not so tight that theyare un com fort a ble.
Ankle Straps
1 2 3
4 5 6

11
Fitting Latex Seals
1-2 You may want to fi ne-tune the fi t of your latex seals. If your latex seals seem too tight, they can be trimmed to create a comfortable fi t. Using scissors, carefully trim off 1/4 inch (0.6 cm) at a time, checking the fi t each time. You do not have to wear your suit during this process, just slide one foot, wrist or your neck into the seals to test the fi t as you go along. The seals should be snug but not tight. You may want your dealer to assist you in fi tting your seals.
Warning: Neck seals that are too tight may restrict blood fl ow to the brain resulting in serious injury.
Latex Neck and Wrist Seal Care
Latex seals offer a superb seal, however they can be fragile. Avoid contact with pe tro le um based products such as lotions, and petroleum based silicone lubricants, as they will deterioratelatex rubber. For lubrication use a food-grade vegetable based silicone spray in a pump bottle (avoid aerosol). Baby powder, talcum powder or cornstarch are great alternatives. Avoid sharp objects (rings, earrings, and fi ngernails) as they may tear the latex. Extended exposure to sunlight will damage latex seals. Extreme cold may stiffen latex seals; make sure your seals are warmed up to room temperature before at tempt ing to stretch into them.
1 2

1 To tighten your neoprene wrist or neck seal, cut the appropriate wedge out from the wrist or neck seal seam(cut out the existing seam).
2 Use neoprene glue to close the seam (3 coats: Let 1st and 2nd coatdry for 10 minutes. Let 3rd coat just dry to touch, 1 to 2 minutes).
3-4 Push the neoprene together fi rmly. Apply re in forc ing heat tape againstthe nylon side using an iron. Be careful not to scorch the nylon material.
We advise that an authorized Whites dealer perform this alteration.
If your neoprene neck or wrist seal is too tight, you can stretch your seal over a scuba tank (neck) or pop bottle (wrists) and leave it over night. This stretching process may loosen the seal enough for an improved fi t. If this is still not enough the suit will have to go back to your Whites dealer for alterations.
Tighten Neoprene Seals
Loosen Neoprene Seals
Warning: Do not trim neoprene seals as this will weaken seams by removing edge stitching.
1
2
3
4

13
Exhaust Valves
1 Your Whites drysuit is equipped with an adjustable auto-exhaust valve, soft touch inflate valve and a low pres-sure inflate hose to allow the highest degree of hands-off buoyancy control.
2 Rotate faceplate clockwise for decreased venting and counter-clock wise for more venting. Pushing down on the faceplate will allow manual air release.
Check that your exhaust valve body is screwed hand-tight into the suit before each dive. Check the exhaust valve faceplate setting before each dive. If your valve is not working correctly abandon your dive and have the valve inspected by an authorized technician.
21
1 Screw the low pressure infl ate hose into the low-pressure port on your fi rst stage. Do not use high-pressure port!
2 Slide hose connector back to lock hoseinto place over infl ate valve nipple.
Pushing the button center on the infl ate valve will add air to your suit.
Important: Check that your infl ate valve body is screwed hand-tight into the suit before each dive. If your valve is not working correctly abandon your dive and have the valve inspected by your dealer.
21
Inflate Valves & Low Pressure Inflate Hose

Keep your zipper free of sand and debris by spray ing with clean fresh water after every use. Store suit with zipper in the open position. Stub born de bris lodged in the zipper can be removed with a soft tooth brush and mild hand or dish soap.
When open ing or closing a zipper, avoid catching un der gar ment material in the dry zipper teeth. If zipper slider becomes jammed, do not continue pulling. Back zipper up and clear debris or clothing. Do not force your zipper.
Keep your zipper lu bri cat ed. Paraffi n wax is ideal. Do not use oil-based lu bri cants or silicone spray as they can damage the zipper ma te ri al. Be sure when storing your suit not to fold the zipper back on itself (see "Folding" above). For prolonged storage, it is best to hang your suit from the legs, with the zipper in the open position. Hang it in a cool, dry place, out of direct sunlight.
Drysuit Zipper Care
1 Back-entry suit: with the zipper open, roll the suit starting at the boots working for ward toward the neck seal.
2 Legs and torso rolled up.3 Loosely fold the arms together over the body
of the suit. Do not stuff your suit in a bag that is too small, as the zipper may get bent.
4 Self-entry suit: same as above, except fold suit with back facing upwards.
The emphasis is on keeping the zipper from bending or kinking. For prolonged storage, it is best to hang your suit boots up, with the zipper in the open position. Hang in a cool dry place, out of direct sunlight and away from electric motors or fumes (i.e.: chlorine, diesel or gas).
2
Folding Suit for Storage
4
1
3

15
Installing Inflate and Exhaust Valves
We suggest havingyour authorized Whites dealer maintain your drysuit valves.
1 Using silicone sealant run a bead along the groove as shown.
2 Insert the male part of the valve into the suit valve hole.
3 Screw the valve backing plateinto position.
4-5 The valves must be screwed in hand-tight.
A valve tool, as shown, can assist ingripping the valve.
Allow to cure for 24 hours.
1 2 3
4 5

We advise taking your suit to your Whites dealer for repairs. However, there are times in the fi eld when some basic repairs can save a day in the water.
1 What you need: mild soap, pop cans, water container, tank, regulator, twine, and chalk.
2 Place pop cans in wrist and ankle seals and tie snug with twine.
3 Gather neck seal and tie snug with twine. Rotate exhaust valve faceplate to closed position.
4 Insert infl ate hose into infl ate valve and infl ate suit fully.
5 With suit inflated, pour soapy water over suspected leak. Mark areas where bubbles appear with chalk.
Finding a Leak
3b
4
21
5
3a
If you detect a leak on a neoprene drysuit, we advise having the suit repaired profes-sionally, by an authorized Whites dealer or by the Whites factory. Please avoid the use of substances such as Aquaseal for quick fi xes as this will void any warranty.
17
Fixing a Hole in a MultiLaminate Shell Drysuit
3
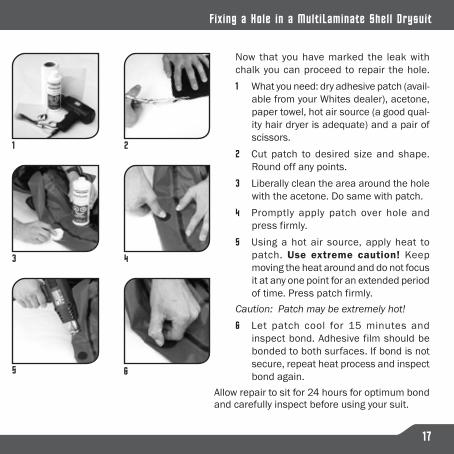
Now that you have marked the leak with chalk you can proceed to repair the hole.1 What you need: dry adhesive patch (avail-
able from your Whites dealer), acetone, paper towel, hot air source (a good qual-ity hair dryer is adequate) and a pair of scissors.
2 Cut patch to desired size and shape. Round off any points.
3 Liberally clean the area around the hole with the acetone. Do same with patch.
4 Promptly apply patch over hole and press firmly.
5 Using a hot air source, apply heat to patch. Use extreme caution! Keepmoving the heat around and do not focus it at any one point for an extended period of time. Press patch firmly.
Caution: Patch may be extremely hot!6 Let patch cool for 15 minutes and
inspect bond. Adhesive film should be bonded to both surfaces. If bond is not secure, repeat heat process and inspectbond again.
Allow repair to sit for 24 hours for optimum bondand carefully inspect before using your suit.
1 2
4
5 6

Patching Ripped Self-Repair Latex Neck or Wrist Seals
5 6
321
4
7 8

19
1 You will need a Whites Self-Adhesive Latex Patch, scissors, masking tape, acetone, roller (optional), heat gun or hot hair dryer.
2-3 Realign edges of rip and secure with masking tape on the inside of the seal.
4 On the outside, clean the surrounding area using acetone.
6 Cut latex strip to extend one inch above and below rip and remove paper backing. Clean adhesive side with acetone and position over rip.
6 Heat the patch well with a heat gun or hair dryer. Use extreme caution! Keep moving the heat around and do not focus it at any one point for an extended period of time.
7 Using a small roller or your thumbs, press patch firmly to ensure a solid bond.
Caution - latex will be hot!
8 Wait 15 minutes and inspect thoroughly. If bond is not secure, repeat heat process and inspect bond again.
Let set for 24 hours to ensure the best bond.
Note: If rip is no more than 1⁄4” simply cut away with sharp scissors. Do not cut all the way around the seal as this may make the seal too large and may cause leakage.
Patching Ripped Self-Repair Latex Neck or Wrist Seals
Changing Latex Wrist, Ankle or Neck Sealson a MultiLaminate Shell Drysuit
1 3
4 5 6
7 8
2
9 10

21
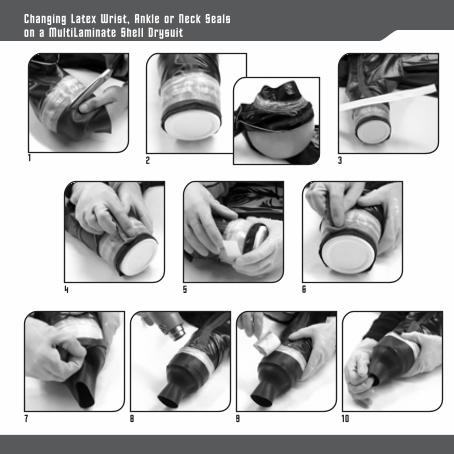
Obtain a latex seal kit from your Whites Dealer. What you need: Whites Latex Seal Kit, sharp scissors, acetone (or similar product), clean cloth, plastic container (with the same circumference as wrist or ankle opening of suit), hot air source (heat gun or hair dryer), small roller.1 Turn sleeve/ankle/neck inside out and carefully cut off damaged seal (cut just below seam
created when latex seal was originally sewn to the suit).2 With suit inside out, insert plastic container into wrist or ankle so a portion of the
container is exposed past the cuff edge (must be a snug fit). For necks, lay the opening over a large ball.
3 Take a strip of the dry adhesive tape and remove the paper from one side.4 Take your cloth, wet with acetone, and wipe clean the suit surface around the cuff perimeter.
Immediately after this, wipe the exposed adhesive on the tape strip.5 Now wrap tape around edge of cuff. As you make the full wrap, peel off final layer of release
paper, and overlap adhesive film so there is no exposed suit material on the cuff edge.6 Wipe acetone over the exposed adhesive film.7 Now carefully lift and stretch latex seal over plastic tub and cover/overlap the adhesive film.
Have at least 1" (2.5 cm) overlap between seal and suit cuff.8 Apply heat to seal at adhesive point. Use extreme caution! Keep moving the heat around
and do not focus it at any one point for an extended period of time. Don't melt a hole inyour suit!
Tip: Exposed adhesive fi lm will go clear around top edge of seal when suffi ciently heated.9 Using a small roller or your thumbs, press the seal around the new connection to ensure a
solid bond. Don't burn your fingers!10 Allow to cool for 15 minutes and inspect your bond with a good "tug". Adhesive bond
should be holding to both surfaces. If bond is not secure, repeat heat process and inspectbond again. Let set for 24 hours to ensure the best bond.
Changing Latex Wrist, Ankle or Neck Seals

Whites Manufacturing Limited6 8 2 0 K i r k p a t r i c k C r e s c e n tSaanichton, British Columbia V 8 M 1 Z 9 C a n a d at: 250. 652.8554 f: 250. 652.8553e: i n f o @ w h i t e s d i v i n g . c o mw w w . w h i t e s d i v i n g . c o m