Embed Size (px)
Citation preview

1
THANK YOU Congratulations on your recent purchase! We at Stryker know that you have a choice when it comes to your archery equipment, and we want to thank you for choosing us as your hunting partner. Your feedback is important to us, as it is our desire to provide you with the absolute finest products and customer service in the industry. Please take the time to go online and register your new Stryker crossbow. It is equally important to read through this owner’s manual as there are valuable tips to help keep your Stryker trouble free for many seasons.
We encourage you to contact and utilize your local Authorized Stryker Dealers as they can assist you with purchases, services and accessories. To locate the dealer nearest you, visit strykerxbow.com and click on the Dealer Locator button.
BEFORE USING YOUR NEW STRYKER CROSSBOW, READ AND UNDERSTAND THE FOLLOWING MATERIAL OUTLINED IN THIS MANUAL. FAILURE TO FOLLOW ANY OF THESE WARNINGS AND INSTRUCTIONS CAN DAMAGE THE CROSSBOW AND MAY CAUSE SERIOUS INJURY TO YOURSELF AND/OR OTHERS.
DISCLAIMER OF LIABILITY: By accepting a Stryker product, the buyer agrees to hold harmless Stryker and all associated parties from liability for any damage to persons or property, which may result, for any reason, from the use of this product.
QUALITY
Every Stryker crossbow has undergone a comprehensive quality control process and is built from the highest quality components available. All have been individually shot, tested and measured to ensure compliance with our strict performance standards.
TABLE OF CONTENTS
LIMITATIONS OF WARRANTY
LIMITATIONS OF WARRANTY CONT.
Warranty . . . . . . . . . . . . . . . . . . . . . . . . . . . . . . 1-2 Limitations . . . . . . . . . . . . . . . . . . . . . . . . . . . 1 Warranty Service . . . . . . . . . . . . . . . . . . . . 2
Crossbow Maintenance . . . . . . . . . . . . . . . . . . . 2
Strings & Cables. . . . . . . . . . . . . . . . . . . . . . . . . 2
Safety & General Information. . . . . . . . . . . . . . . . . . . . 3-4
Assembling YourSolution Crossbow . . . . . . . . . . . . . . . . . . . . . . . 4
Assembling Your Katana orOffspring Crossbow . . . . . . . . . . . . . . . . . . . . . . 5
How To Properly Cock the Crossbow . . . . . . . . . . . . . . . . . . . . . . . . . 6-7
How To Properly Load a Bolt . . . . . . . . . . . . . . . 7
Shooting the Crossbow . . . . . . . . . . . . . . . . . . . 8
Purchase Record . . . . . . . . . . . . . . . . . . . . . . . . 8
Stryker Crossbows guarantees its crossbows against defects in materials and workmanship that adversely affect the operation of the crossbow for a 5 year limited warranty from the date of purchase. This warranty covers the stock, trigger mechanism and limb assembly. It does not include strings, cables, arrows, or accessories.
For the warranty to be enforceable the original purchaser must complete and submit the online registration form within 30 days of purchase.
LIMITATIONSThe warranty will be void if any of the following occur:
• The instructions in the owner’s manual are not followed.
• The crossbow or any of its parts or accessories are modified from their original condition.
• Damage is caused by abuse or neglect.
• Damage is caused by dry-firing or by using underweight arrows- lighter than recommended in the Owners Manual.
WARRANTY SERVICECrossbows deemed for coverage under the five year warranty will be repaired and shipped at no charge. You will be responsible for the shipping charges into the service center, and possibly labor charges for repairs completed at a non factory authorized ser-vice center. All repairs or replacements are at the sole discretion of Stryker Crossbows
NON-WARRANTED ITEMSSome Stryker Crossbows accessories may not be covered under warranty unless the failure was deemed a manufacturing defect as determined by Stryker Crossbows. Any products shot out of the crossbow or categorized as normal wear items will not be covered under warranty.
97207_Owner Manual_STR16_V2.indd 1 2/17/17 9:40 AM
2
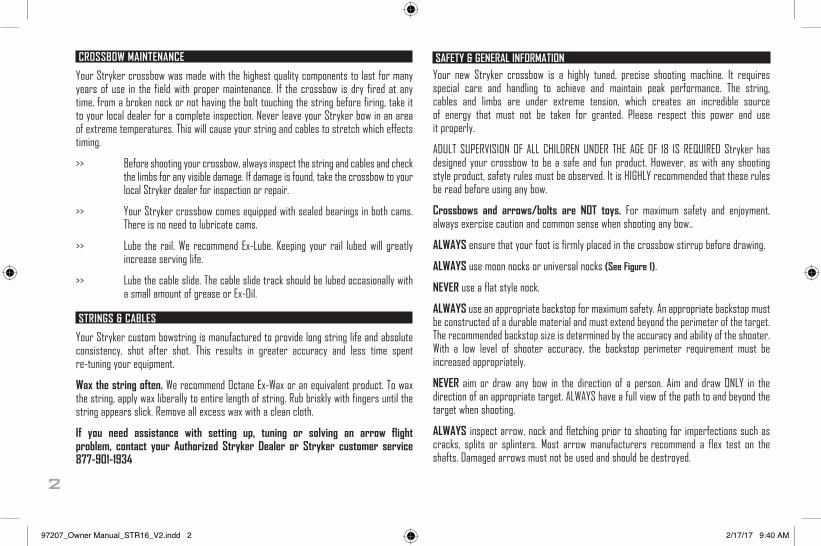
Your Stryker crossbow was made with the highest quality components to last for many years of use in the field with proper maintenance. If the crossbow is dry fired at any time, from a broken nock or not having the bolt touching the string before firing, take it to your local dealer for a complete inspection. Never leave your Stryker bow in an area of extreme temperatures. This will cause your string and cables to stretch which effects timing.
>> Before shooting your crossbow, always inspect the string and cables and check the limbs for any visible damage. If damage is found, take the crossbow to your local Stryker dealer for inspection or repair.
>> Your Stryker crossbow comes equipped with sealed bearings in both cams. There is no need to lubricate cams.
>> Lube the rail. We recommend Ex-Lube. Keeping your rail lubed will greatly increase serving life.
>> Lube the cable slide. The cable slide track should be lubed occasionally with a small amount of grease or Ex-Oil.
CROSSBOW MAINTENANCE
STRINGS & CABLES
Your Stryker custom bowstring is manufactured to provide long string life and absolute consistency, shot after shot. This results in greater accuracy and less time spent re-tuning your equipment.
Wax the string often. We recommend Octane Ex-Wax or an equivalent product. To wax the string, apply wax liberally to entire length of string. Rub briskly with fingers until the string appears slick. Remove all excess wax with a clean cloth.
If you need assistance with setting up, tuning or solving an arrow flight problem, contact your Authorized Stryker Dealer or Stryker customer service 877-901-1934
SAFETY & GENERAL INFORMATION
Your new Stryker crossbow is a highly tuned, precise shooting machine. It requires special care and handling to achieve and maintain peak performance. The string, cables and limbs are under extreme tension, which creates an incredible source of energy that must not be taken for granted. Please respect this power and use it properly.
ADULT SUPERVISION OF ALL CHILDREN UNDER THE AGE OF 18 IS REQUIRED Stryker has designed your crossbow to be a safe and fun product. However, as with any shooting style product, safety rules must be observed. It is HIGHLY recommended that these rules be read before using any bow.
Crossbows and arrows/bolts are NOT toys. For maximum safety and enjoyment, always exercise caution and common sense when shooting any bow..
ALWAYS ensure that your foot is firmly placed in the crossbow stirrup before drawing.
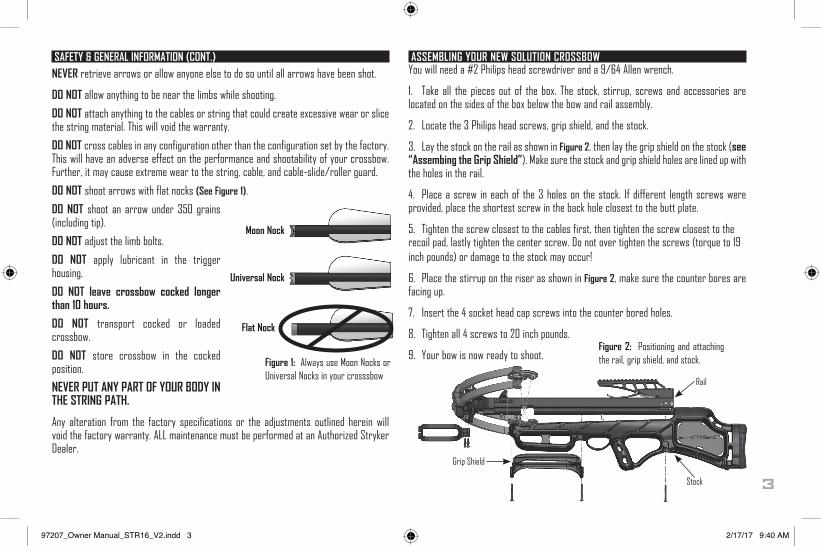
ALWAYS use moon nocks or universal nocks (See Figure 1).
NEVER use a flat style nock.
ALWAYS use an appropriate backstop for maximum safety. An appropriate backstop must be constructed of a durable material and must extend beyond the perimeter of the target. The recommended backstop size is determined by the accuracy and ability of the shooter. With a low level of shooter accuracy, the backstop perimeter requirement must be increased appropriately.
NEVER aim or draw any bow in the direction of a person. Aim and draw ONLY in the direction of an appropriate target. ALWAYS have a full view of the path to and beyond the target when shooting.
ALWAYS inspect arrow, nock and fletching prior to shooting for imperfections such as cracks, splits or splinters. Most arrow manufacturers recommend a flex test on the shafts. Damaged arrows must not be used and should be destroyed.
97207_Owner Manual_STR16_V2.indd 2 2/17/17 9:40 AM
3
SAFETY & GENERAL INFORMATION (CONT.)
NEVER retrieve arrows or allow anyone else to do so until all arrows have been shot.
DO NOT allow anything to be near the limbs while shooting.
DO NOT attach anything to the cables or string that could create excessive wear or slice the string material. This will void the warranty.
DO NOT cross cables in any configuration other than the configuration set by the factory. This will have an adverse effect on the performance and shootability of your crossbow. Further, it may cause extreme wear to the string, cable, and cable-slide/roller guard.
DO NOT shoot arrows with flat nocks (See Figure 1).
DO NOT shoot an arrow under 350 grains (including tip).
DO NOT adjust the limb bolts.
DO NOT apply lubricant in the trigger housing.
DO NOT leave crossbow cocked longer than 10 hours.
DO NOT transport cocked or loaded crossbow.
DO NOT store crossbow in the cocked position.
NEVER PUT ANY PART OF YOUR BODY IN THE STRING PATH.
Any alteration from the factory specifications or the adjustments outlined herein will void the factory warranty. ALL maintenance must be performed at an Authorized Stryker Dealer.
ASSEMBLING YOUR NEW SOLUTION CROSSBOWYou will need a #2 Philips head screwdriver and a 9/64 Allen wrench.
1. Take all the pieces out of the box. The stock, stirrup, screws and accessories are located on the sides of the box below the bow and rail assembly.
2. Locate the 3 Philips head screws, grip shield, and the stock.
3. Lay the stock on the rail as shown in Figure 2, then lay the grip shield on the stock (see “Assembing the Grip Shield”). Make sure the stock and grip shield holes are lined up with the holes in the rail.
4. Place a screw in each of the 3 holes on the stock. If different length screws were provided, place the shortest screw in the back hole closest to the butt plate.
5. Tighten the screw closest to the cables first, then tighten the screw closest to therecoil pad, lastly tighten the center screw. Do not over tighten the screws (torque to 19inch pounds) or damage to the stock may occur!
6. Place the stirrup on the riser as shown in Figure 2, make sure the counter bores are facing up.
7. Insert the 4 socket head cap screws into the counter bored holes.
8. Tighten all 4 screws to 20 inch pounds.
9. Your bow is now ready to shoot.Figure 1: Always use Moon Nocks or Universal Nocks in your crosssbow
Flat Nock
Moon Nock
Universal Nock
Figure 2: Positioning and attaching the rail, grip shield, and stock.
Rail
Stock
Grip Shield
97207_Owner Manual_STR16_V2.indd 3 2/17/17 9:40 AM

4
ASSEMBLING YOUR NEW OFFSPRING OR KATANA CROSSBOWYou will need 3/16”, 5/32” and 9/64” Allen wrenches.
1. Take all the pieces out of the box. The stock assembly, riser assembly, stirrup, and cable slide.
2. Install the two 1/4-20 x 3/4” button head screws through the foot stirrup and onto the front of the riser assembly (see Figure 6).
3. Install the cable slide onto the cables. The location dot on the cable slide should be toward the rear of the bow and the cables should create an “X” shape on the right side of the bow (see Figure 3).
4. Assemble the riser assembly onto the front end of the stock assembly by first sliding the cable slide into the cable slide track with the string positioned on top of the stock assembly. Position the riser assembly onto the stock assembly.
5. Install the two 5/16-18 x 1 3/4” flat head screws and aluminum washers from the bottom of the stock assembly into the riser assembly. (see Figure 4)
6. Install the two 8-32 x 5/16” screws into each side of the stock assembly (see Figure 5).
7. Your bow is now ready to shoot.
Figure 3: Positioning the cable side. Figure 4: Attaching the stock assembly to the riser assembly Figure 5: Attaching stock assembly to top side of riser
Figure 6: Attaching stirrup POSITIONING THE GRIP SHIELDON SOLUTION LS AND SOLUTION ONLY
Ensure that the short end of the grip shield (see Figure 7) faces the front (limbs) of the crossbow. If different length screws were provided, place the two longer screws in the grip shield sockets.
97207_Owner Manual_STR16_V2.indd 4 2/17/17 9:40 AM
5
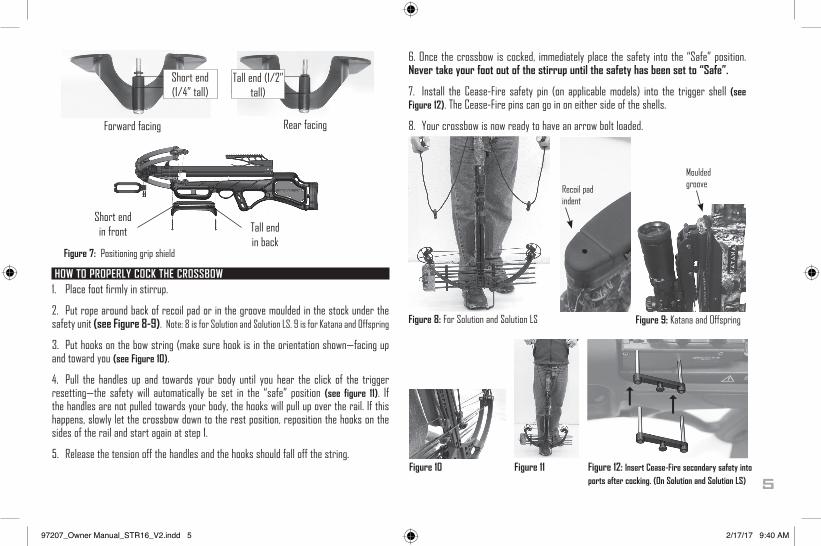
HOW TO PROPERLY COCK THE CROSSBOW1. Place foot firmly in stirrup.
2. Put rope around back of recoil pad or in the groove moulded in the stock under the safety unit (see Figure 8-9). Note: 8 is for Solution and Solution LS. 9 is for Katana and Offspring
3. Put hooks on the bow string (make sure hook is in the orientation shown—facing up and toward you (see Figure 10).
4. Pull the handles up and towards your body until you hear the click of the trigger resetting—the safety will automatically be set in the “safe” position (see figure 11). If the handles are not pulled towards your body, the hooks will pull up over the rail. If this happens, slowly let the crossbow down to the rest position, reposition the hooks on the sides of the rail and start again at step 1.
5. Release the tension off the handles and the hooks should fall off the string.
6. Once the crossbow is cocked, immediately place the safety into the “Safe” position. Never take your foot out of the stirrup until the safety has been set to “Safe”.
7. Install the Cease-Fire safety pin (on applicable models) into the trigger shell (see Figure 12). The Cease-Fire pins can go in on either side of the shells.
8. Your crossbow is now ready to have an arrow bolt loaded.
Figure 9: Katana and Offspring
Tall end (1/2” tall)
Short end (1/4” tall)
Short end in front Tall end
in back
Forward facing Rear facing
Figure 7: Positioning grip shield
Figure 8: For Solution and Solution LS
Figure 10
Recoil pad indent
Moulded groove
Figure 11 Figure 12: Insert Cease-Fire secondary safety into
ports after cocking. (On Solution and Solution LS)
97207_Owner Manual_STR16_V2.indd 5 2/17/17 9:40 AM
6
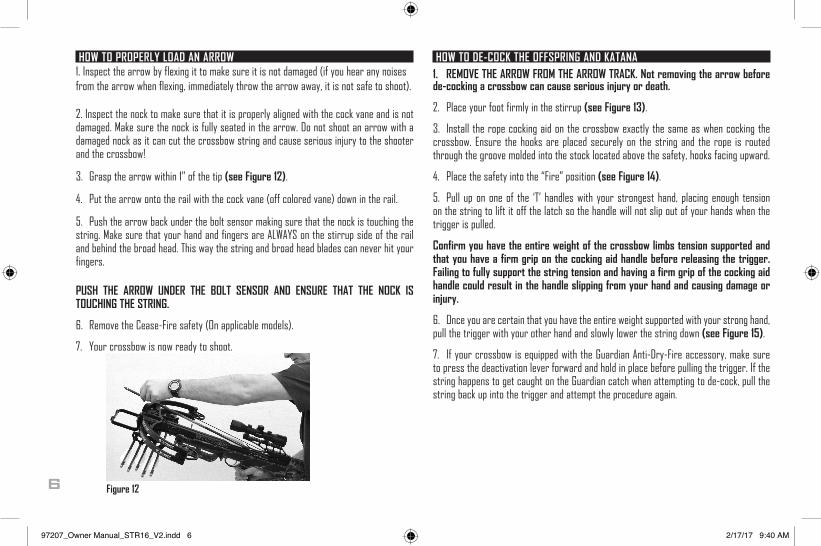
HOW TO PROPERLY LOAD AN ARROW 1. Inspect the arrow by flexing it to make sure it is not damaged (if you hear any noises from the arrow when flexing, immediately throw the arrow away, it is not safe to shoot).
2. Inspect the nock to make sure that it is properly aligned with the cock vane and is not damaged. Make sure the nock is fully seated in the arrow. Do not shoot an arrow with a damaged nock as it can cut the crossbow string and cause serious injury to the shooter and the crossbow!
3. Grasp the arrow within 1” of the tip (see Figure 12).
4. Put the arrow onto the rail with the cock vane (off colored vane) down in the rail.
5. Push the arrow back under the bolt sensor making sure that the nock is touching the string. Make sure that your hand and fingers are ALWAYS on the stirrup side of the rail and behind the broad head. This way the string and broad head blades can never hit your fingers. PUSH THE ARROW UNDER THE BOLT SENSOR AND ENSURE THAT THE NOCK IS TOUCHING THE STRING.
6. Remove the Cease-Fire safety (On applicable models).
7. Your crossbow is now ready to shoot.
Figure 12
HOW TO DE-COCK THE OFFSPRING AND KATANA1. REMOVE THE ARROW FROM THE ARROW TRACK. Not removing the arrow before de-cocking a crossbow can cause serious injury or death.
2. Place your foot firmly in the stirrup (see Figure 13).
3. Install the rope cocking aid on the crossbow exactly the same as when cocking the crossbow. Ensure the hooks are placed securely on the string and the rope is routed through the groove molded into the stock located above the safety, hooks facing upward.
4. Place the safety into the “Fire” position (see Figure 14).
5. Pull up on one of the ‘T’ handles with your strongest hand, placing enough tension on the string to lift it off the latch so the handle will not slip out of your hands when the trigger is pulled.
Confirm you have the entire weight of the crossbow limbs tension supported and that you have a firm grip on the cocking aid handle before releasing the trigger. Failing to fully support the string tension and having a firm grip of the cocking aid handle could result in the handle slipping from your hand and causing damage or injury.
6. Once you are certain that you have the entire weight supported with your strong hand, pull the trigger with your other hand and slowly lower the string down (see Figure 15).
7. If your crossbow is equipped with the Guardian Anti-Dry-Fire accessory, make sure to press the deactivation lever forward and hold in place before pulling the trigger. If the string happens to get caught on the Guardian catch when attempting to de-cock, pull the string back up into the trigger and attempt the procedure again.
97207_Owner Manual_STR16_V2.indd 6 2/17/17 9:40 AM

7
Figure 14 Figure 15
Figure 13: Never put any part of your body in the string path. Doing so will result in serious injury.
CORRECT WRONG
SHOOTING THE CROSSBOW1. Make sure that you have a clear path to the target and a safe backstop behind the target.
2. Grasp the forearm with your forward hand and make sure your fingers are below the string path (see Figure 13), and under the grip shield.
3. Move the safety forward to the fire position with your trigger hand.
4. Firmly grasp the grip with your trigger hand and slowly squeeze the trigger. This crossbow has a competition grade trigger and has a pull of less than 3 pounds, so do not touch the trigger until you are on the target and ready to fire.Figure 13
97207_Owner Manual_STR16_V2.indd 7 2/17/17 9:40 AM
8
SERIAL NUMBER:
DATE PURCHASED:
AUTHORIZED DEALER:
90554 HWY 99 NEUGENE, OR 97402
541-284-4711
NOTES
97207_Owner Manual_STR16_V2.indd 8 2/17/17 9:40 AM