Embed Size (px)
Citation preview

Contents 1. Overview............................................................................................1
1.1 Product introduction .....................................................................1 1.2 Parameters ..................................................................................3 1.3 Features.......................................................................................3 1.4 Accessories..................................................................................3
2. Structure............................................................................................3
2.1 iPad protective casing..................................................................4 2.2 DBScar adapter ...........................................................................5
3. Connection and Installation ............................................................6
3.1 iPad installation............................................................................6 3.2 DBScar adapter connection .........................................................6 3.3 Software download and install .....................................................7 3.4 Bluetooth setting ..........................................................................8
4. How to use ........................................................................................9
4.1 Initial use......................................................................................9 4.2 DBSCar adapter registration......................................................13 4.3 Acquire software ........................................................................14 4.4 maintenance database...............................................................24 4.5 My space....................................................................................24 4.6 Real-time information.................................................................24 4.7 Circle..........................................................................................25 4.8 Management ..............................................................................26
4.8.1 DBSCar Registration ..........................................................27 4.8.2 Change password ..............................................................27 4.8.3 Type Password Hint............................................................27 4.8.4 Forgot password.................................................................28 4.8.5 Only display available models ............................................28
4.9 More...........................................................................................29 4.9.1 Quick Guide........................................................................29 4.9.2 User’s Guide.......................................................................29

4.9.3 Instruction for diagnostic Software Purchase .....................29 4.8.6 About ..................................................................................29
5. Auto Diagnosis ...............................................................................29
5.1 Preparation ................................................................................29 5.2 Diagnosis ...................................................................................29

1. Overview
1.1 Product introduction x431 iDiag is a new vehicle diagnostic equipment developed by Launch with over 20 years diagnostic R&D experience in vehicle diagnosis for mobile terminals and internet. It features vehicle diagnosis, automobile diagnostic community functions.
INSTRUCTION: 1. This product is NOT including iPad/iPad mini/Samsung tablet PC.
2. This product is NOT including smart phone. 3. This product work under iOS, or Android system.
LAUNCH Co. Ltd reserves all the right for the final explanation. x431 iDiag, based on iOS/Android operation system design, research and development, is an internet vehicle trouble diagnosis tester customized for mobile intelligent terminals. After being connected with mobile terminal through Bluetooth, it achieves for x-431 serial product the full diagnostic functions, which include reading DTCs(diagnosis trouble code), clearing DTCs, reading data stream, action test and special functions. Performance:
DBSCAR samples the vehicle diagnosis data as a
connector, and connect to terminal through
Bluetooth.
Support any smart phone and tablet PC which is
IOS or Android system.
Connect to SMART OBDⅡ-16、SMART OBDⅡ-16C、CAN
BUSⅠ、CAN BUSⅡ、Zhonghua-16、TOYOTA-16、BMW-16、
AUDI K-L CONVETER、CITROEN-16、SUPER-16,16Pin
connector. NOT 16pin connection needs converters.
Support communication protocol, and adhere to
x431 vehicle diagnostic functions.
Online download diagnostic software (single
vehicle model or combined software models). Many
ways to pay, and many ways to combine, reduces
your one-shot investment.
Online share and communicate diagnostic
technology with core of community concept and
service.
Support abundant application and service.

1.2 Parameters DBScar adapter:
Working voltage: 9~15V Working average current: about 35mA Static current: about 25mA Working temperature: -20 to 55℃(-4 to 131°F) Storage temperature: -30 to 70℃(-22 to 158°F) Storage humidity: <80% Working humidity: <60% Net weight: about 26g
1.3 Features Most of the electronic system of vehicle, including Europe,
Asia, America and domestic models, can be detected; Diagnostic community, includes online maintenance database
support, riders circle friends interactive, and so on Applies to iOS and Android system, simple interface, elegant
and easy to operate; Bluetooth communication; Panel computer protective casing
1.4 Accessories DBScar adapter Auxiliary connector Password envelope Protective casing(optional)
2. Structure In this series, it has different types of products, such x431 iDiag for tablet PC, including IPAD, IPAD MINI, Samsung N8000. And x431 iDiag design for smart phone, including iOS and Android operation

system. In the following pages, it would use x431 iDiag for IPAD as an example, in order to better familiar with our products.
2.1 iPad protective casing
Fig2.1
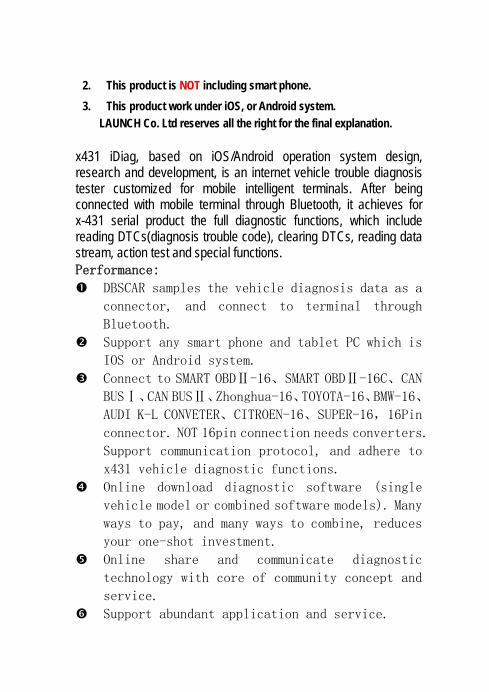
2.2 DBScar adapter
1
2
4
3
Fig2.2
① OBD-16 diagnostic connector
To connect vehicle’s OBD2 diagnostic socket
② Power indicator It will light up once DBScar adapter is plugged into OBD2 diagnostic socket.
③ Communication indicator
It will flash when DBScar adapter is communicating with mobile terminal or DBScar adapter is resetting.
④ Micro USB port To connect PC for data transmission or upgrade via USB cable
Place the connector in its place on the back of the protective casing when it is no in use. See the process as shown below.
Fig2.3
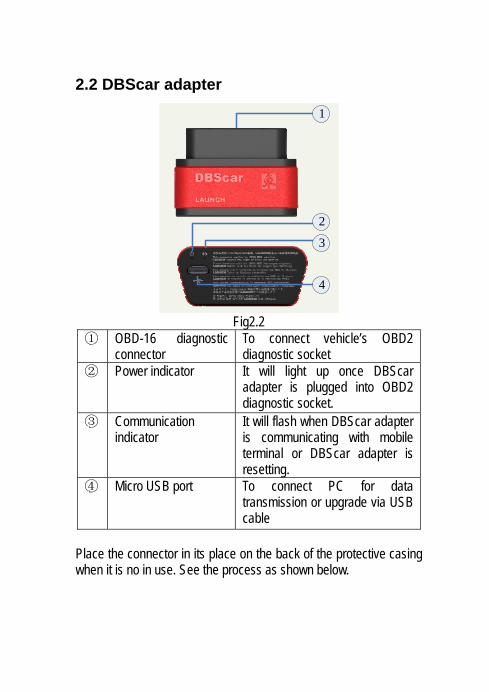
3. Connection and Installation
3.1 iPad installation Put the iPad into protective casing. Follow the process shown in Fig3.1 to complete the installation:
Fig3.1
3.2 DBScar adapter connection Find out the vehicle’s DLC socket, plug DBScar adapter into DLC
socket and the DBScar adapter power indicator will light up.
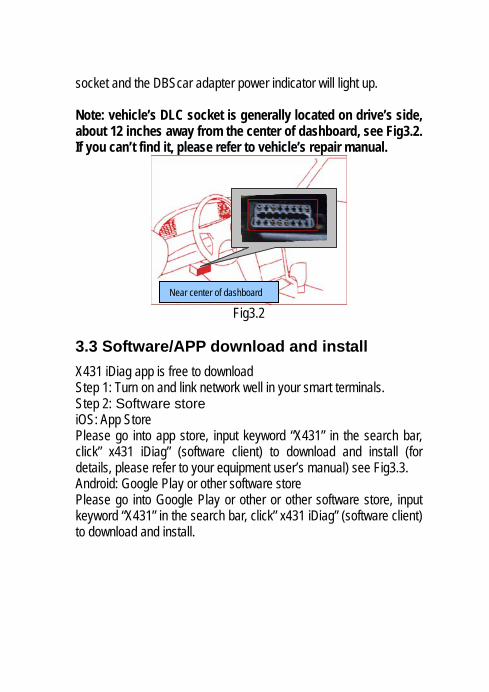
Note: vehicle’s DLC socket is generally located on drive’s side, about 12 inches away from the center of dashboard, see Fig3.2. If you can’t find it, please refer to vehicle’s repair manual.
Fig3.2 Near center of dashboard
3.3 Software/APP download and install X431 iDiag app is free to download Step 1: Turn on and link network well in your smart terminals. Step 2: Software store iOS: App Store Please go into app store, input keyword “X431” in the search bar, click” x431 iDiag” (software client) to download and install (for details, please refer to your equipment user’s manual) see Fig3.3. Android: Google Play or other software store Please go into Google Play or other or other software store, input keyword “X431” in the search bar, click” x431 iDiag” (software client) to download and install.

x431 iDiag
Fig3.3
3.4 Bluetooth setting Enter Bluetooth setting interface to set “ON”, see Fig3.4, and select the serial number to pair. Default name (product serial number):
iOS: 96529xxxxxxx Android: 96579xxxxxxx
Fig3.4
Note:Bluetooth setting operation should be done before operating software client.

4. How to use Click “x431 iDiag”
4.1 Initial use Note: before operating, you need to log in software first. When open the software, the screen will pop up disclaimer, see Fig4.1.
Fig4.1

Click “Agree” to enter login inte ee Fig4.2.
rface, sChoose “next”, the disclaimer will not appear next time.
Fig4.2
If you have already registered ser’s name and password to
e not registered, click”
, input ulogin
If you hav ” to register follow the screen displays, see Fig4.3.
Fig4.3
After login, the screen will displ terface as shown in Fig4.4. ay the in
Fig4.4

Click “reading” to open quick s e. ext time.
tart guidChoose “next”, the prompt will not appear nThe software initial interface, see Fig4.5.
Fig4.5
:Function selection list, :Vehicle area selection, including China, Asia, Europe and
America :User’s name display area :Search bar :Theme,for the replacement of the display style. :SN selection bar :Car model selection area, the icon means this car’s
dia u gnostic software have not download, if yo want to diagnose it, click it to acquire the software.
: Partial display area : Full screen display switch button
ector, you can use DEMO If you don’t have a DBScar connfunction as free

STEP 1. Click DEMO icon
Fig4.6
STEP 2. Get into the demo fu nterface, and experience he nction i tvehicle diagnosis function
Fig4.7
If you have already got r connector, please contin e a DBSca uthe registration.

4.2 DBSCar adapter registration n in Fig4.8。 Click “management” to enter the interface as show
Fig4.8
Click “DBScar Register”, the screen will display registration interface, see Fig4.9
Fig4.9
Input product SN and password, then click “Register” to complete registration. Note: the product SN and password are available in the

password envelope. See Fig4.10.
Product SN Product SN
Product code
Fig4.10
4.3 Acquire software complete software acquisition
Before software download, pleaseThe icon means the diagnostic software has not download, you want to diagnose this car, please click it to acquire th
if e
sofdiagnostic tware. Before you purchase, you should select a product serial number, like Fig4.11.

Fig4.11
In the X431 iDiag app, click the brand icon software which you want. Take “HONDA” as an example, click “HONDA” icon, the screen will display the software message, see Fig4.12.
Fig4.12
If you want to purchase this software only, click “pay”;
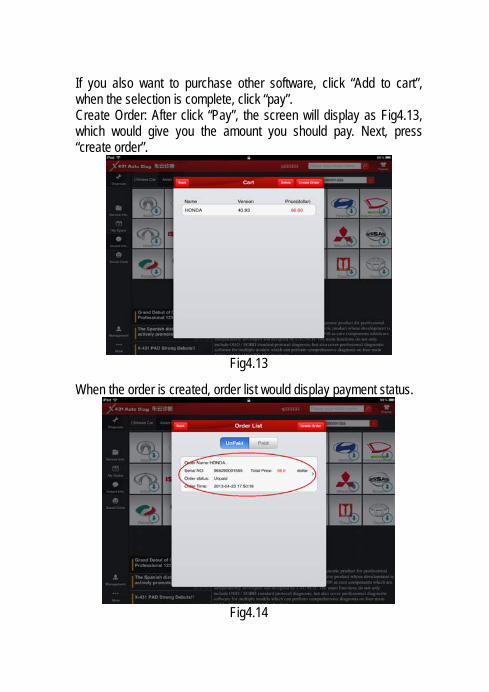
If you also want to purchase other software, click “Add to cart”, when the selection is complete, click “pay”. Create Order: After click “Pay”, the screen will display as Fig4.13, which would give you the amount you should pay. Next, press “create order”.
Fig4.13
When the order is created, order list would display payment status.
Fig4.14
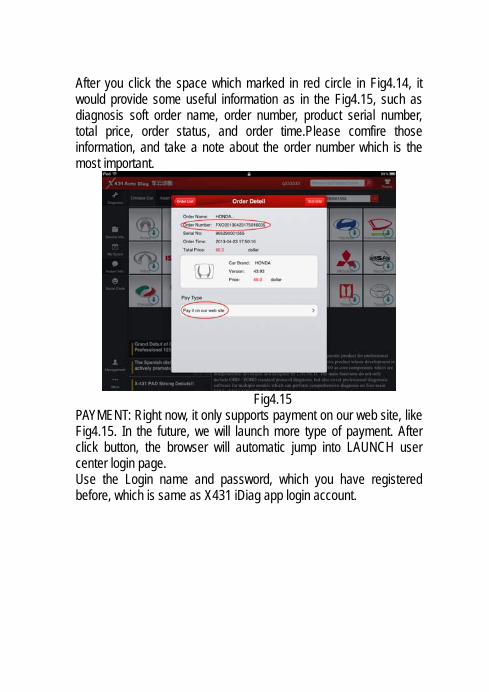
After you click the space which marked in red circle in Fig4.14, it would provide some useful information as in the Fig4.15, such as diagnosis soft order name, order number, product serial number, total price, order status, and order time.Please comfire those information, and take a note about the order number which is the most important.
Fig4.15
PAYMENT: Right now, it only supports payment on our web site, like Fig4.15. In the future, we will launch more type of payment. After click button, the browser will automatic jump into LAUNCH user center login page. Use the Login name and password, which you have registered before, which is same as X431 iDiag app login account.

Fig 4.16
WARM TIPS: Payment done with RMB can only access Chinese diagnostic software. Subsequent purchase with this serial number must be paid in RMB only. Payment done with USD can access diagnostic software of all developed languages. Subsequent purchase with this serial number must be paid in USD only. After login successfully, the web page will include order information. Please confirm the order information, espcially for the order number.

Fig4.17
Click “PAY”, and conform purchasing the diagnosis software you ordered.
Fig4.18
In the Fig4.19, there are two options, one is called “支付宝”,which is use for Chinese currency. The other one is PayPal, which for USD. When you select Paypal, it Please select PayPal.
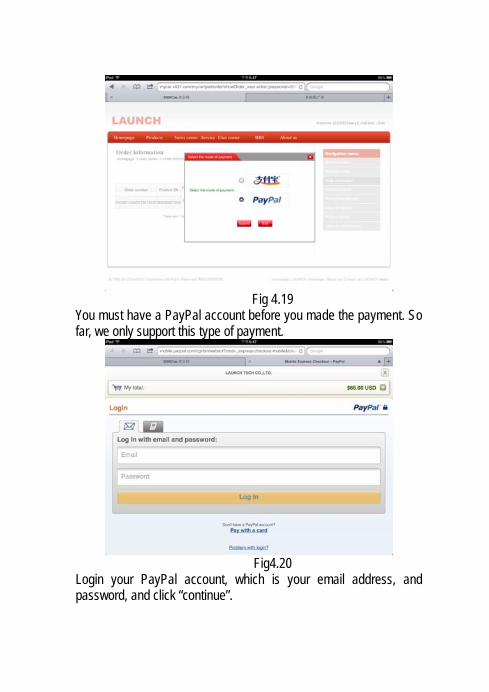
Fig 4.19
You must have a PayPal account before you made the payment. So far, we only support this type of payment.
Fig4.20
Login your PayPal account, which is your email address, and password, and click “continue”.
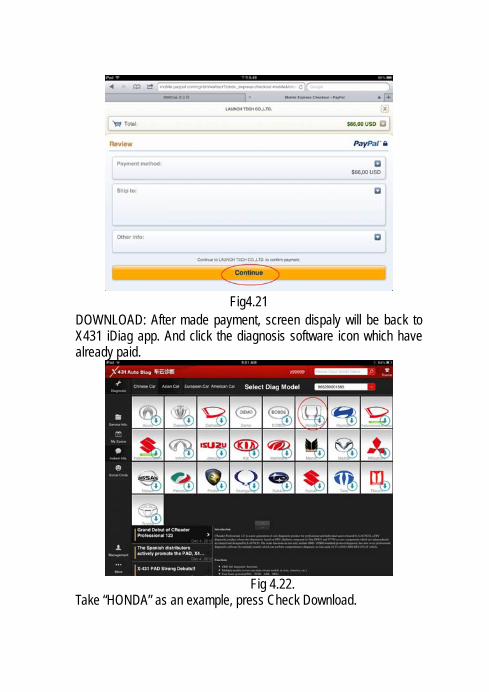
Fig4.21
DOWNLOAD: After made payment, screen dispaly will be back to X431 iDiag app. And click the diagnosis software icon which have already paid.
Fig 4.22.
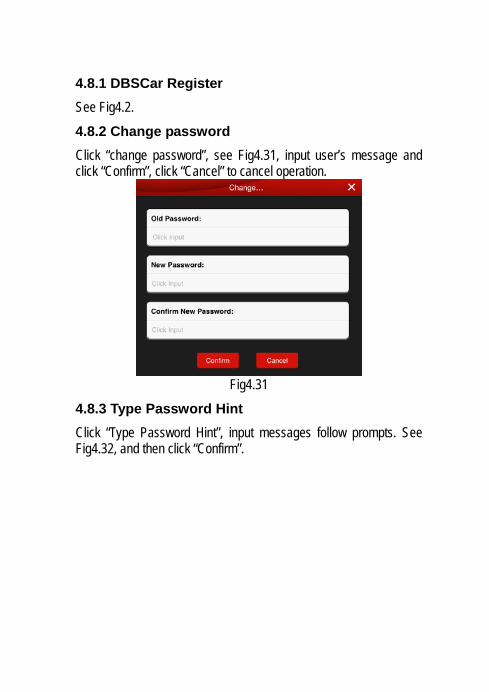
Take “HONDA” as an example, press Check Download.
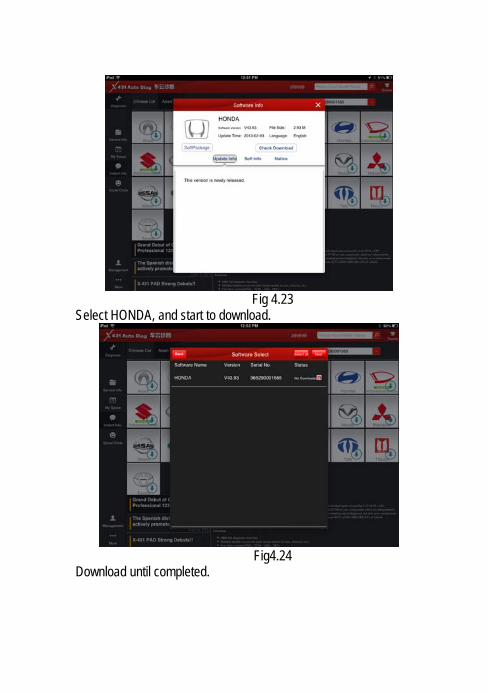
Fig 4.23
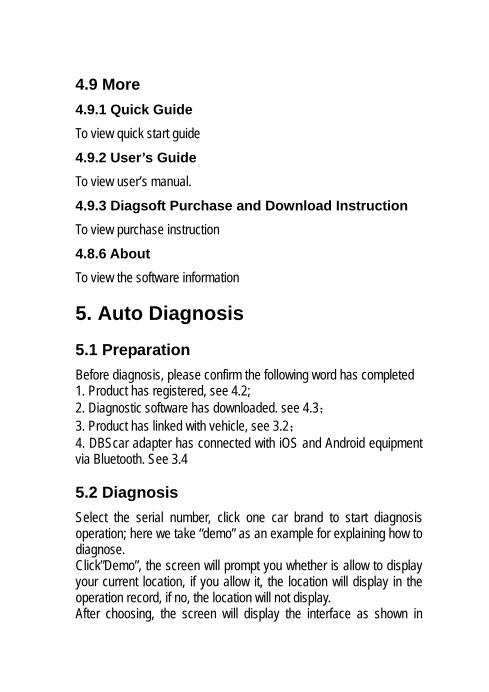
Select HONDA, and start to download.
Fig4.24
Download until completed.

Fig4.25
When diagnosis software download is completed, the icon on the right bottom will disappear.
Fig4.26

4.4 Service Info. For online query maintenance database
4.5 My space “My space” is used to view reports, operating records and purchase records. Click “my space”, the screen will enter the default interface; see Fig4.27, to view others, followed by click.
Fig4.27
4.6 Instant info. For view the latest news in the mobile internet industry

Fig4.28
4.7 Social Circle See Fig4.29, “Public circle” is used to looking for a rider circle with a common interest and joining it to share ideas. “Private circle”, to view your rider circle Pull-down the circle list and release can refresh the circle For interactive discussion, you can click one circle and input the message in the input frame and then click “sent” button.

Fig4.29
4.8 Management For registration management, see Fig4.30
Fig4.30
4.8.1 DBSCar Register See Fig4.2. 4.8.2 Change password Click “change password”, see Fig4.31, input user’s message and click “Confirm”, click “Cancel” to cancel operation.
Fig4.31
4.8.3 Type Password Hint Click “Type Password Hint”, input messages follow prompts. See Fig4.32, and then click “Confirm”.

Fig4.32
Note: please record this hints well in order to get back the password.
4.8.4 Forgot password Click “Forgot password”, input messages follow prompts, see Fig4.33, if the message input is correct, the screen will display a new password.
Fig4.33
4.8.5 Only display available models When the switch is set to ON, the initial interface will display the icon of the vehicle which had download diagnostic software.
4.9 More 4.9.1 Quick Guide To view quick start guide 4.9.2 User’s Guide To view user’s manual. 4.9.3 Diagsoft Purchase and Download Instruction To view purchase instruction 4.8.6 About To view the software information
5. Auto Diagnosis
5.1 Preparation Before diagnosis, please confirm the following word has completed 1. Product has registered, see 4.2; 2. Diagnostic software has downloaded. see 4.3; 3. Product has linked with vehicle, see 3.2; 4. DBScar adapter has connected with iOS and Android equipment via Bluetooth. See 3.4
5.2 Diagnosis Select the serial number, click one car brand to start diagnosis operation; here we take “demo” as an example for explaining how to diagnose. Click”Demo”, the screen will prompt you whether is allow to display your current location, if you allow it, the location will display in the operation record, if no, the location will not display. After choosing, the screen will display the interface as shown in

Fig5.1.
Fig5.1
Click”Demo”, the screen will display system selection interface, see Fig5.2.
Fig5.3
Take engine system as an example.

Click” Engine”, when the system initialize is completed, the screen will display diagnostic function selection interface, see Fig5.4.
Fig5.4
A. Read trouble code Click” Read trouble code”, the screen will display diagnostic results, see Fig5.5 Click “ ”, return to function selection interface.

Fig5.5
Generate word report: save the current diagnostic results in text form, see Fig5.6.
Fig5.6
Generate screenshot report: save the current diagnostic results in
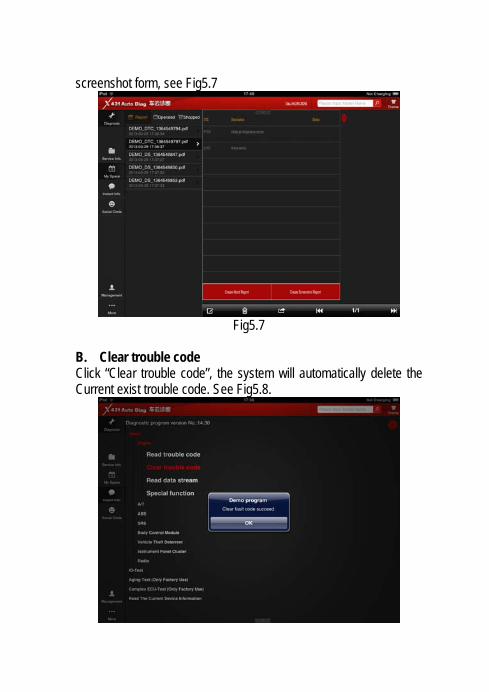
screenshot form, see Fig5.7
Fig5.7
B. Clear trouble code Click “Clear trouble code”, the system will automatically delete the Current exist trouble code. See Fig5.8.

Fig5.8 Note: the trouble code will not disappear until the trouble was ruled out. C. Read data stream Click “Read data stream”, the screen will display DataStream item, see Fig5.9; click the circle before the item you desired to select it. If you want to select all, Click “ ”, after choosing, click” ”, click “ ” to return to function selection interface
Fig5.9
When communication is completed, the system will display real-time data of the selected item, see Fig5.10

Fig5.10
Click one item, the system will display data changes in wave form, see Fig 5.11, if you want to stop to read, click “ ” can suspend to read data stream, click “ ” , continue the reading operation, click “ ” ,return to function selection interface.
Fig5.11

Start record: the system will record data in real-time and generates a text report; Create Word Report: save the current time data in text form; Create Screenshot Report: save the current time data in screenshot form; D. Special function This function is mainly used to test the electrical component’s work normal or not, includes injector action test, fuel pump test, and so on. Click”Special function”, see Fig5.12.
Fig5.12
Take “1#injector” as an example. Click “1#injector”, the system will automatically test 1#injector, see Fig5.13.

Fig5.13

![LAUNCHlaunch.sk/files/pp1[1].pdf · LAUNCH 1,tablet with high configuration ... shooting、multi-media、other software applications LAUNCH. ... X431‐IV Diagun III X431‐3G 3500](https://img.pdfslide.net/doc/110x75/5ac671f17f8b9af91c8e2fc3/1pdflaunch-1tablet-with-high-configuration-shootingmulti-mediaother.jpg)