Embed Size (px)
Citation preview

ConveyorMaintenanceand
TroubleshootingFebruary20,2015

BELTMAINTENANCE+REPAIR
� BeltTension/Tracking– InspectDailywhencleaningoutseed/fertilizer� Adjust tension of 2” cleated belt inconveyor tube to 20-23 ft-lbs torqueon idler roller adjustment bolts.Adjust both sides evenly.
� Adjust tension of crescent belt inhopper to 50 inch-lbs torque on idlerroller adjustment bolts or until centerof belt rises off the supportunderneath it. Adjust both sidesevenly.
� Check/adjust belt tracking alignmenton idler rollers.
� Recommended tools for belt splicing,tension and tracking adjustment.

TrackingtheCleatedBelt
� 1. Rollers must be square with thehousing and parallel to each other toinsure proper belt tracking.
� 2. Belt Tension must be great enough toprevent slippage. Check tension of thebelts before running the conveyor. SeeSlide 2.
� 3. Run the conveyor. Check to see thatthe belt runs centered on the driveroller. Turn off the conveyor. Adjustdrive roller to be square with thehousing if necessary. Normally, oncethe drive roller is tracked at the factoryit rarely needs adjustment.
� 4. To adjust drive roller, loosen the fournuts on the bearing holder plate, andthe jam nut on the threaded adjuster.Retighten after adjusting is complete.
TrackingtheCleatedBelt
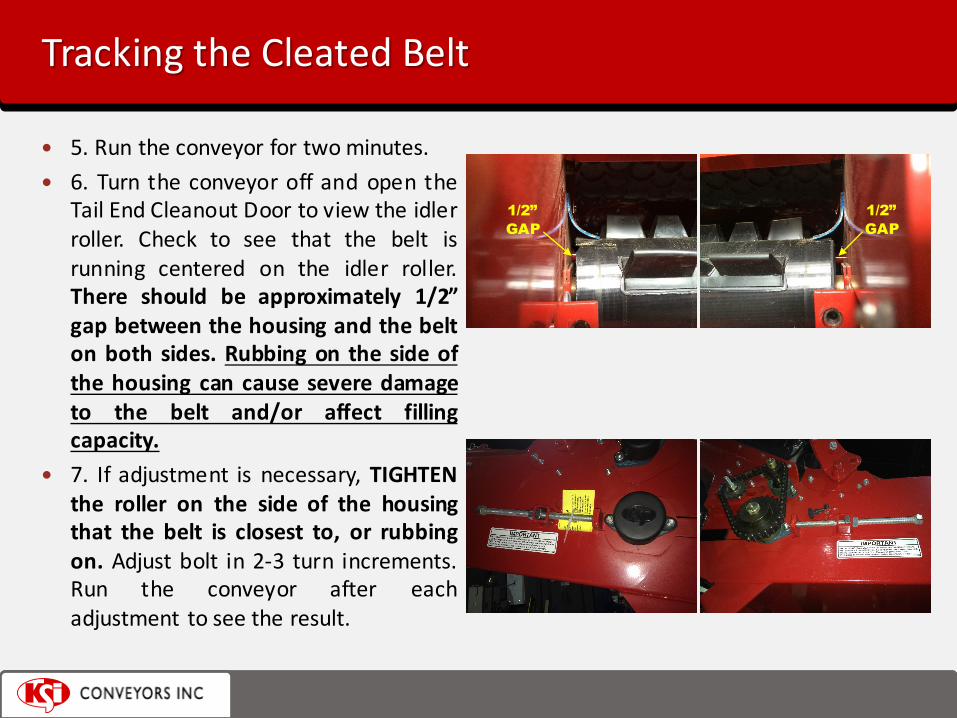
� 5. Run the conveyor for twominutes.� 6. Turn the conveyor off and open the
Tail End Cleanout Door to view the idlerroller. Check to see that the belt isrunning centered on the idler roller.There should be approximately 1/2”gap between the housing and the belton both sides. Rubbing on the side ofthe housing can cause severe damageto the belt and/or affect fillingcapacity.
� 7. If adjustment is necessary, TIGHTENthe roller on the side of the housingthat the belt is closest to, or rubbingon. Adjust bolt in 2-3 turn increments.Run the conveyor after eachadjustment to see the result.
1/2” GAP
1/2” GAP

TrackingtheCleatedBelt
� 8. Once the belt is centered, run theconveyor for at least two more minutesto insure the belt remains in position.
� 9. Lock adjustment bolt jam-nuts andreinstall the clean out door.
� NOTE: Adjust the tracking on thehopper crescent belt in a similarfashion.
CrownedPulley/FlatBeltSystemBasics
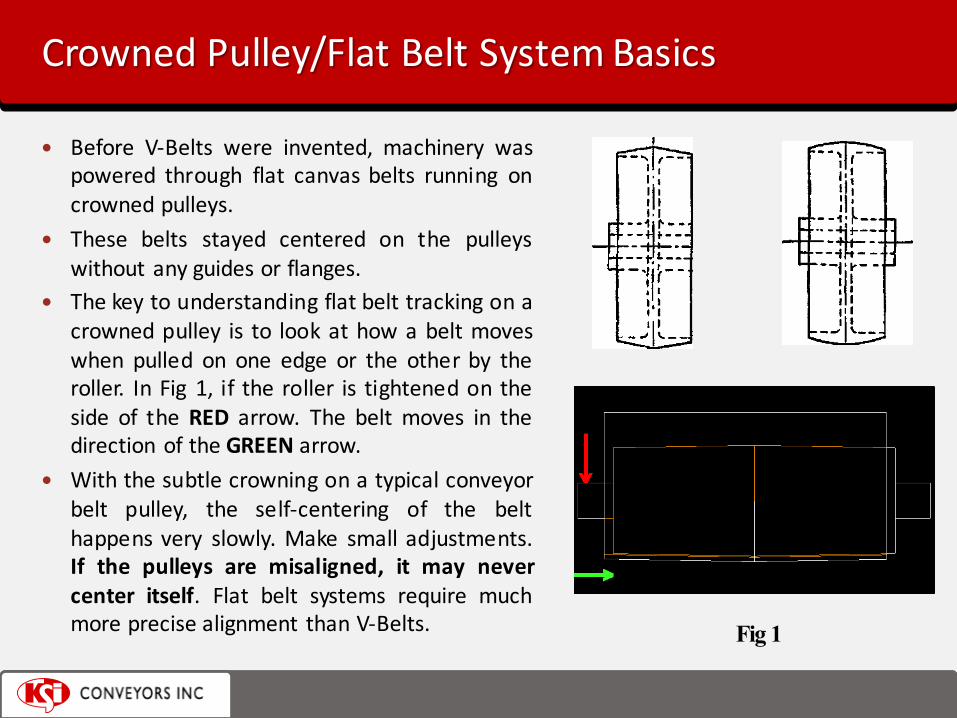
� Before V-Belts were invented, machinery waspowered through flat canvas belts running oncrowned pulleys.
� These belts stayed centered on the pulleyswithout any guides or flanges.
� The key to understanding flat belt tracking on acrowned pulley is to look at how a belt moveswhen pulled on one edge or the other by theroller. In Fig 1, if the roller is tightened on theside of the RED arrow. The belt moves in thedirection of the GREEN arrow.
� With the subtle crowning on a typical conveyorbelt pulley, the self-centering of the belthappens very slowly. Make small adjustments.If the pulleys are misaligned, it may nevercenter itself. Flat belt systems require muchmore precise alignment than V-Belts. Fig 1
Cleaning/InspectingtheConveyor– 8hrsordaily
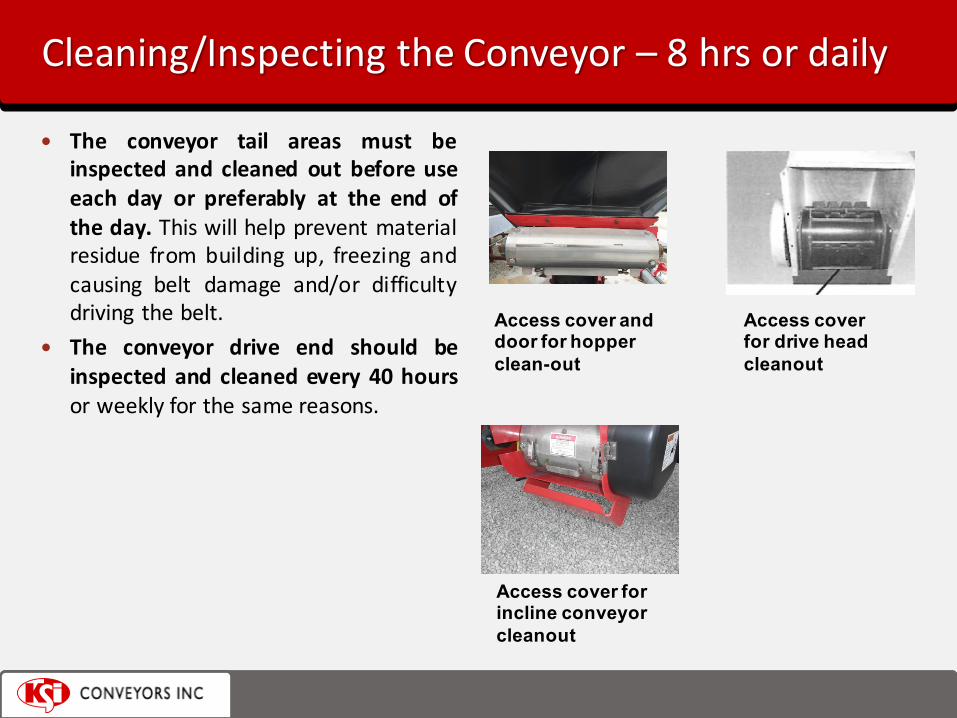
� The conveyor tail areas must beinspected and cleaned out before useeach day or preferably at the end ofthe day. This will help prevent materialresidue from building up, freezing andcausing belt damage and/or difficultydriving the belt.
� The conveyor drive end should beinspected and cleaned every 40 hoursor weekly for the same reasons.
Access cover and door for hopper clean-out
Access cover for drive head cleanout
Access cover for incline conveyor cleanout
SeasonalMaintenance
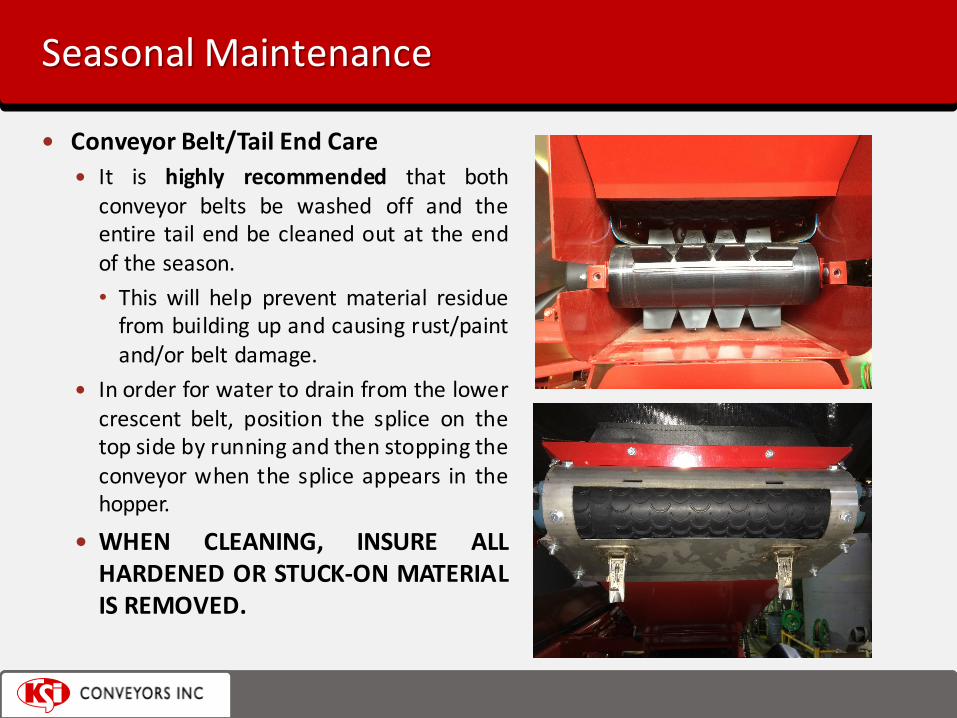
� ConveyorBelt/TailEndCare� It is highly recommended that bothconveyor belts be washed off and theentire tail end be cleaned out at the endof the season.• This will help prevent material residuefrom building up and causing rust/paintand/or belt damage.
� In order for water to drain from the lowercrescent belt, position the splice on thetop side by running and then stopping theconveyor when the splice appears in thehopper.
� WHEN CLEANING, INSURE ALLHARDENED OR STUCK-ON MATERIALIS REMOVED.
ConveyorBeltSplicing– BeltLacingInstallation
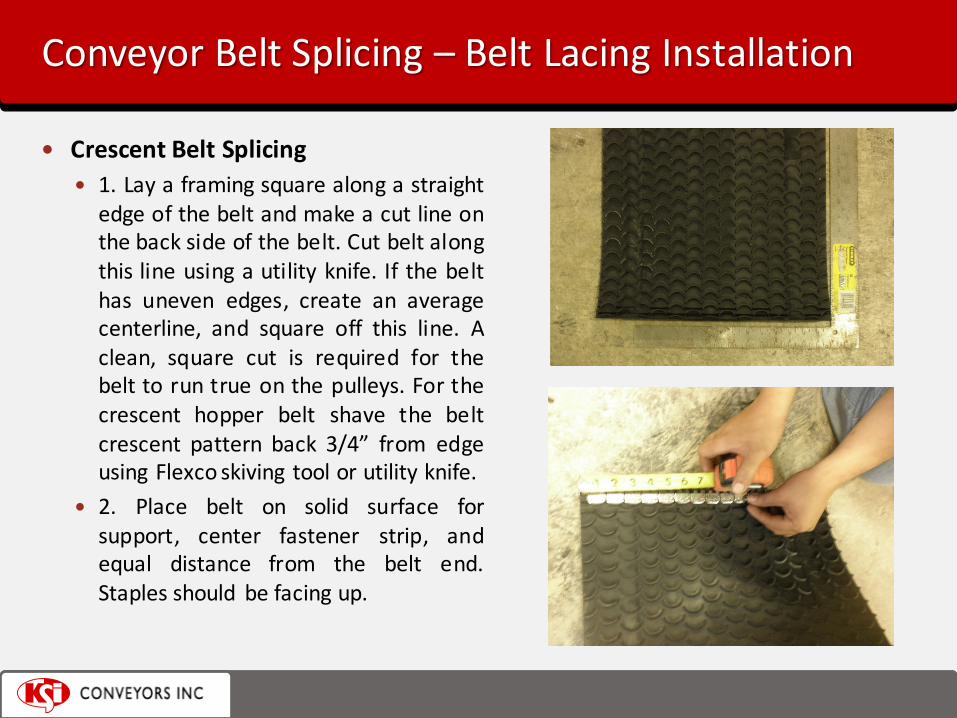
� CrescentBeltSplicing� 1. Lay a framing square along a straightedge of the belt and make a cut line onthe back side of the belt. Cut belt alongthis line using a utility knife. If the belthas uneven edges, create an averagecenterline, and square off this line. Aclean, square cut is required for thebelt to run true on the pulleys. For thecrescent hopper belt shave the beltcrescent pattern back 3/4” from edgeusing Flexco skiving tool or utility knife.
� 2. Place belt on solid surface forsupport, center fastener strip, andequal distance from the belt end.Staples should be facing up.
ConveyorBeltSplicing– BeltLacingInstallation
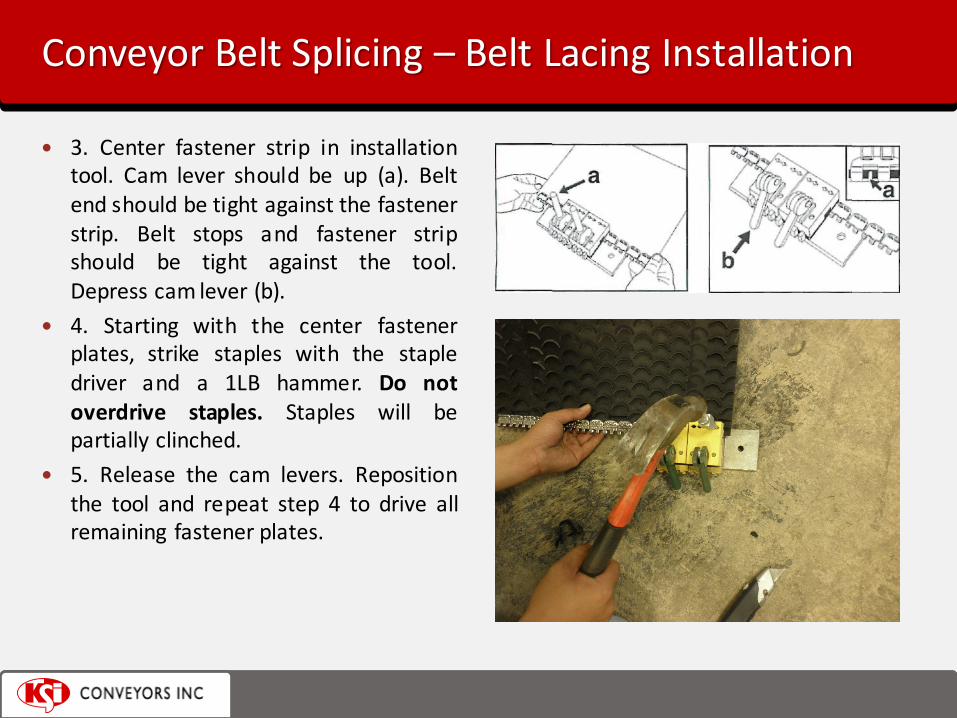
� 3. Center fastener strip in installationtool. Cam lever should be up (a). Beltend should be tight against the fastenerstrip. Belt stops and fastener stripshould be tight against the tool.Depress cam lever (b).
� 4. Starting with the center fastenerplates, strike staples with the stapledriver and a 1LB hammer. Do notoverdrive staples. Staples will bepartially clinched.
� 5. Release the cam levers. Repositionthe tool and repeat step 4 to drive allremaining fastener plates.
ConveyorBeltSplicing– BeltLacingInstallation
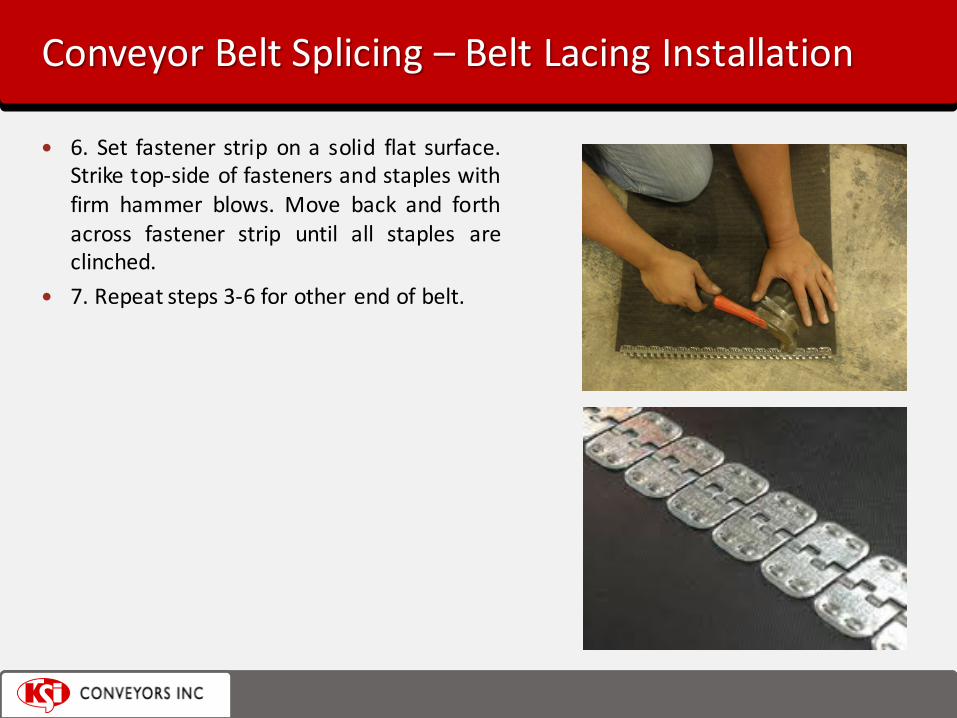
� 6. Set fastener strip on a solid flat surface.Strike top-side of fasteners and staples withfirm hammer blows. Move back and forthacross fastener strip until all staples areclinched.
� 7. Repeat steps 3-6 for other end of belt.

ConveyorBeltInstallation
� InstallingBeltintotheConveyor� 1. Remove Discharge Spout, Tail End Paneland Door. Remove the old belt.
� 2. Slide a fish tape from the discharge endto the tail end of the conveyor. Pull a ropewith a belt splice back through theconveyor. Fasten the conveyor belt to therope splice as per previous instructions,and pull the belt into the top of theconveyor with the rope.
� 3. Using the fish tape, pull the bottomside of the belt through the conveyor.Make sure the belt is free of extra twistsbefore pulling it in.
� 4. Check to see that the idler pulley is allthe way forward.
ConveyorBeltInstallation
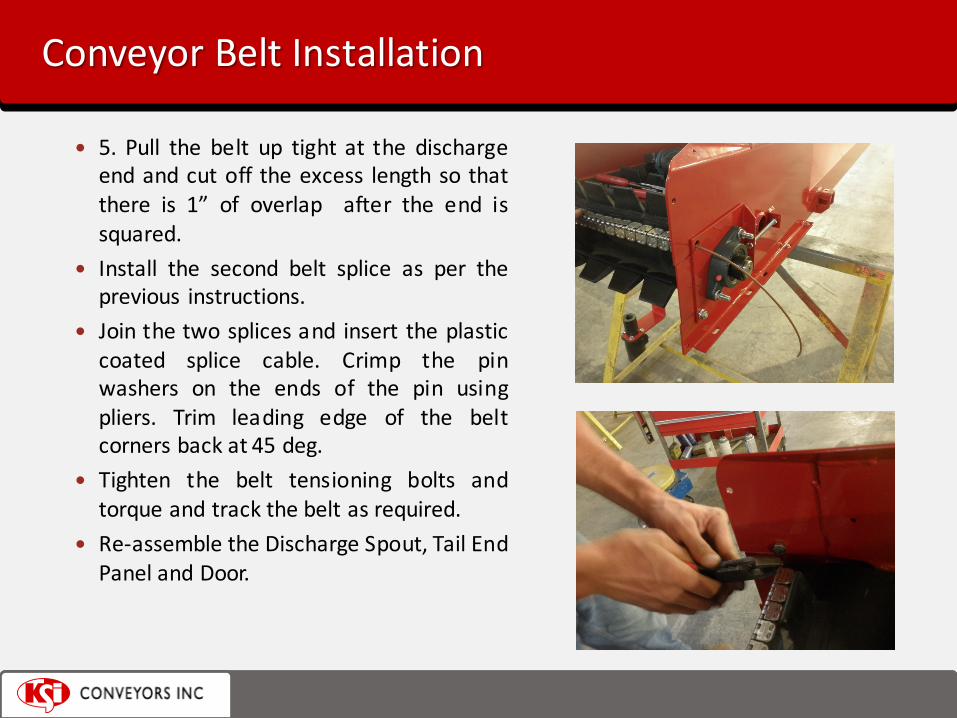
� 5. Pull the belt up tight at the dischargeend and cut off the excess length so thatthere is 1” of overlap after the end issquared.
� Install the second belt splice as per theprevious instructions.
� Join the two splices and insert the plasticcoated splice cable. Crimp the pinwashers on the ends of the pin usingpliers. Trim leading edge of the beltcorners back at 45 deg.
� Tighten the belt tensioning bolts andtorque and track the belt as required.
� Re-assemble the Discharge Spout, Tail EndPanel and Door.

Bearings+ChainLubrication
� BearingLubrication- 25hour� Lubricate bearings on the beltdrive/idler rollers using a good qualitylithium soap base E.P. grease meetingthe N.L.G.I. #2 specifications andcontaining no more than 1%molybdenum disulfide.
� ChainLubrication– 40hoursorweekly� Lubricate the drive chain between thecleated belt and the hopper crescentbelt using SAE 30 oil or similar.
TroubleshootingProblem PossibleCause Solution
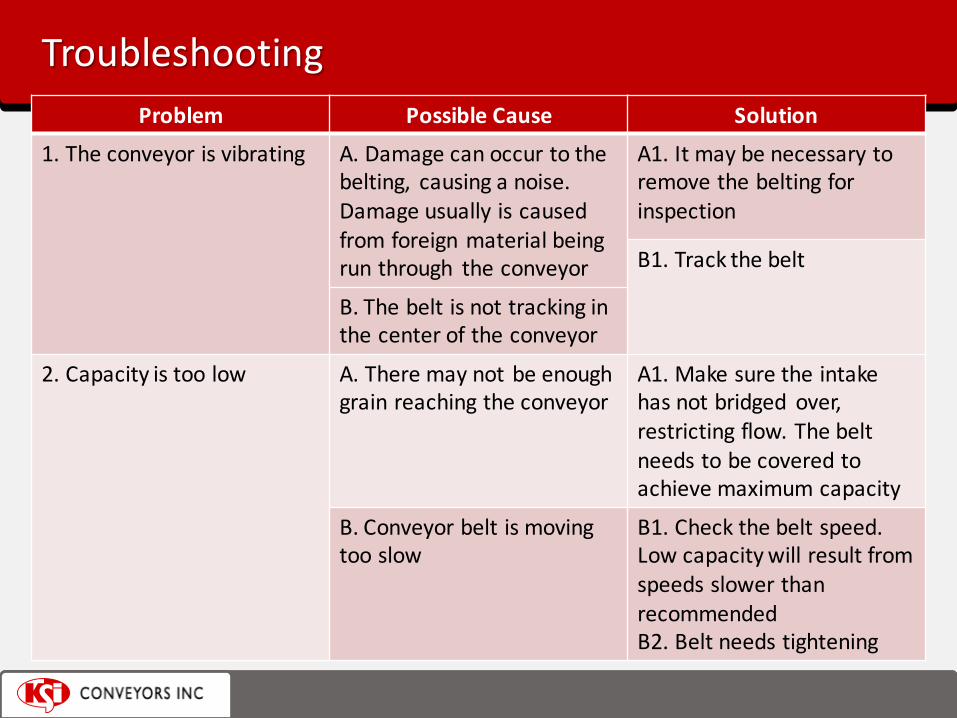
1. Theconveyorisvibrating A.Damagecanoccurtothebelting, causinganoise.Damageusuallyiscausedfromforeignmaterialbeingrunthrough theconveyor
A1.Itmaybenecessarytoremovethebeltingforinspection
B1.Trackthebelt
B.Thebeltisnottrackinginthecenter oftheconveyor
2.Capacityistoo low A.Theremaynotbeenoughgrainreaching theconveyor
A1. Makesuretheintakehasnotbridged over,restrictingflow.Thebeltneedstobecoveredtoachievemaximumcapacity
B.Conveyorbeltismovingtooslow
B1.Checkthebelt speed.LowcapacitywillresultfromspeedsslowerthanrecommendedB2.Beltneedstightening
TroubleshootingProblem Possible Cause Solution
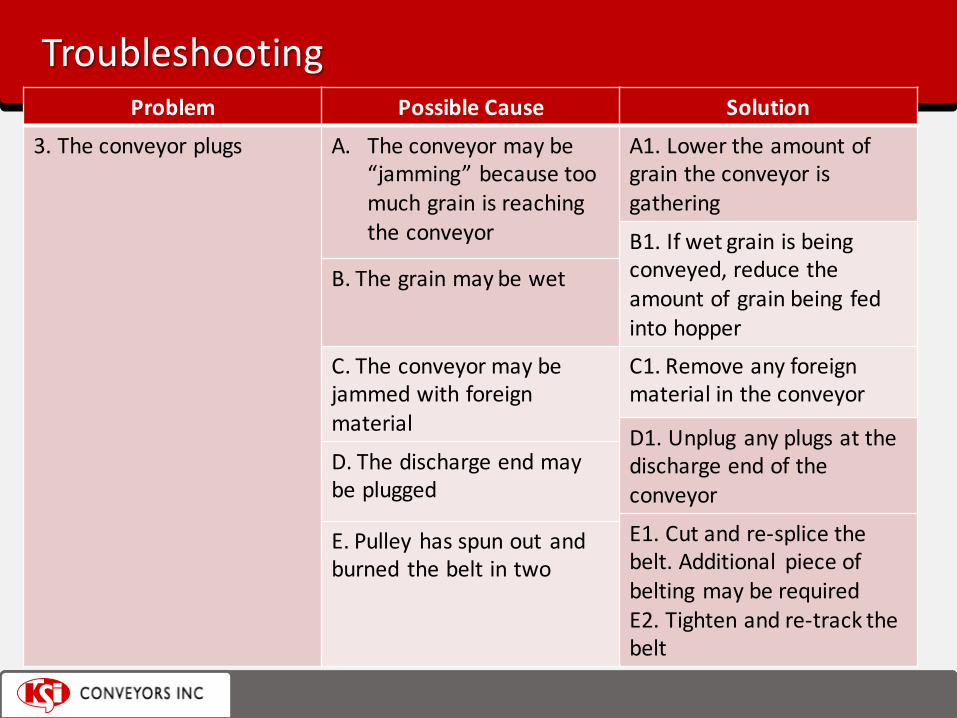
3.Theconveyorplugs A. Theconveyormaybe“jamming”becausetoomuchgrain isreachingtheconveyor
A1.Lowertheamountofgraintheconveyorisgathering
B1.Ifwetgrain isbeingconveyed,reducetheamountofgrainbeing fedintohopper
B.Thegrainmay bewet
C.The conveyormaybejammedwithforeignmaterial
C1.Remove anyforeignmaterialintheconveyor
D1.Unpluganyplugsatthedischargeendoftheconveyor
D.Thedischargeendmaybeplugged
E1.Cutand re-splicethebelt.Additional pieceofbeltingmayberequiredE2.Tightenandre-trackthebelt
E.Pulley hasspunoutandburned thebeltintwo

TroubleshootingProblem PossibleCause Solution
4.Cleatedbeltisslipping orloose.
A.Belt tension toolow A1.Tensioncleatedbeltto23ft-lbs ontheadjustmentbolts.Tensionhopperbeltto80in-lbs oruntilcenterofthebeltrisesoffthesupportpanunderneath.
B.Beltisextremely dirty B1.Cleantraction sideofbelt
5.Cleatedbeltisrubbingsideofhousing orcleats arecoming looseorwearing
A.Beltmisaligned A1.Alignbeltsoitstrackscenterofidleanddriverollers.Tightenthesideofthebeltthatistrackedofftheroller