Embed Size (px)
Citation preview

Ricoh MPC 4503 / 5503
Copier
Printer
Fax
Scanner
Terri BrandTechnology Application Specialist
RICOH USA, INC.
3030 NW Expressway Suite 1404
Oklahoma City, OK 73112
Phone 405-917-3856
Cell 405-537-2365
www.ricoh-usa.com

1. Insert the SD Card or USB into appropriate slot on the left
end of the Control/Display Panel.
2. Select Printer on the Home Screen or Function Keys.
3. Select Print from Memory Storage Device
4. Select the Device
5. Select the file. There are two ways to view the files on the
memory device. List and Thumbnail Views. You can
Preview the file before it prints.
6. Choose Detailed Settings to select color and the desired
paper tray. Under Editing you will find 2-sided printing.
Select Finishing to choose the Staple and Sort features if
equipment has these options. Enter quantity to print.
7. Press OK and Start Printing
List View
Thumbnail View
Media Slots Printing From Memory Device

1. Insert the SD Card or USB into appropriate slot on the left
end of the Control/Display Panel.
2. Select Scanner on the Home Screen or Function Keys.
3. Select Store File
4. Select Store to Memory Device
5. Press OK
6. Select Scan Settings to change from the defaults. You
can choose to scan in color or change resolution. Set
scan size or reduce or enlarge in Edit.
7. Select Original Feed Type 2 Sided Original if document
is 2 sided so it will scan both sides
8. Select Send File Type/Name to choose PDF or
JPEG/TIFF and to name the document you are scanning.
9. Press OK and Start
Media Slots Scan to Memory Device
Copy
4
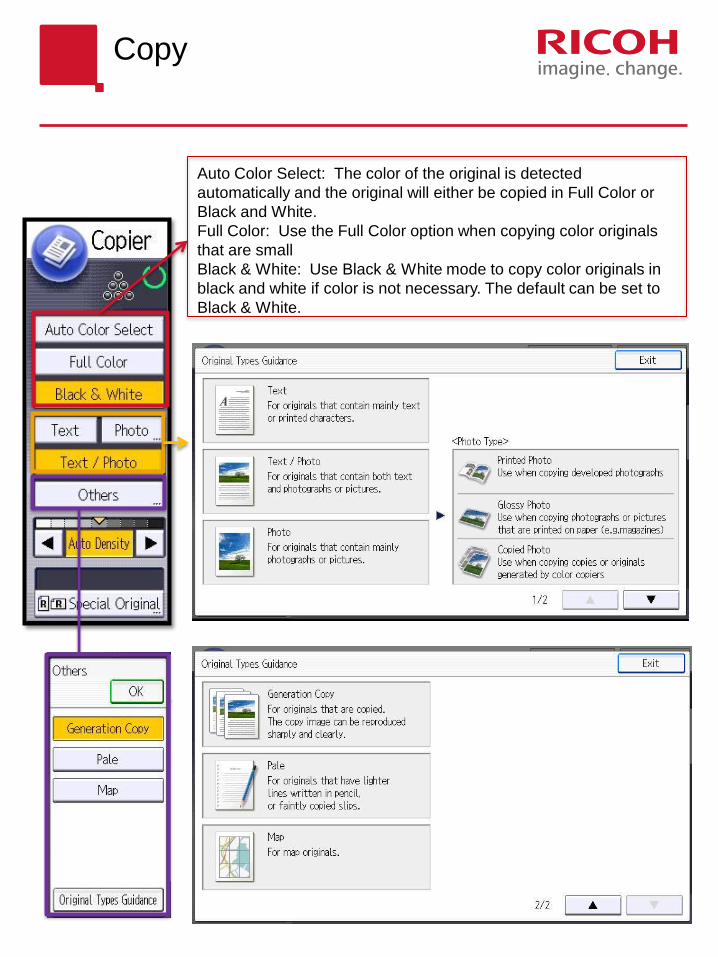
Auto Color Select: The color of the original is detected
automatically and the original will either be copied in Full Color or
Black and White.
Full Color: Use the Full Color option when copying color originals
that are small
Black & White: Use Black & White mode to copy color originals in
black and white if color is not necessary. The default can be set to
Black & White.

Copy
5
Special Original
Batch : Using Batch mode, you can copy an original that
is too large to place in the ADF all at once by placing it
in the ADF in sections (batches). The original will be
scanned and stored as a single document.
Mixed Sizes : You can place originals of different sizes
together in the ADF. The machine will automatically
detect the size of each original and copy it accordingly.
Original Size : Select the Regular size or enter a
Custom Size.
Original Orientation
Readable orientation: Select this mode when the
original orientation is the same as the copy paper
orientation.
Unreadable orientation: Select this mode when you
want to copy A3, B4 JIS, or 11 × 17 size originals. The
machine rotates the copy image by 90 degrees and you
can make copies as you want.
Auto Density: The appropriate density setting for the original is
automatically selected. Pressing the will lighten the image and
the will darken the image.

Auto Paper Select : The
machine selects the suitable
paper size based on the
original size detected. You
can force the machine to
pull from a certain tray by
selecting that tray on the
display. The on the display
means that paper tray is
empty.
To use the Bypass select
the Bypass. Select the size
and paper type if necessary.
Load paper in Bypass, the
side you want to copy onto
goes down (face down).
Place originals and press
the Start key.
See list of paper thickness
and weights on last page.
Copy
Full Size : Copy and original will be the same size
Auto Reduce/Enlarge : The machine automatically
detects the original size and then selects an
appropriate reproduction ratio based on the paper size
you select. This is useful to copy different size originals
to the same size paper.
The next three buttons are shortcuts and can be
changed to a copy ratio (reduce/enlarge percentage)
that you use most often. The last thing on this row
shows what percentage the current setting is. In this
case Full Size is selected so the copy ratio is 100% .
6
Duplex/Combine Shortcuts : Each button on this row has two pictures, the first is the
original and the second is the copy. First button is one sided original to a two sided copy
(top to top), next is two sided original to two sided copy (top to top). The third and fourth
buttons will shrink two full sized originals so that two will fit on one page or four originals
reduced to fit onto one page.
Create Margin : Reduces the image to 93% of its original size and places the reduced
image at the center of the page. This gives you a wider margin for binding or hole
punching.
This row can also be customized to shortcuts that you use the most

Copy
Finishing : This row of shortcuts for
the finishing options can also be
customized to the most frequently
used ones. This could be different for
each machine since they may not all
have the same finisher. This one has
a booklet finisher and hole punch unit
so the shortcuts show these options.
The first button is Sort which collates
or keeps them in 1-2-3 order, if you
staple the Sort automatically comes
on, it will not staple all your page
ones together.
The second button is Stack this will
put all the page ones then page twos
and so on. If you don’t choose Sort or
Stack the machine automatically
Stacks. The default can be set to
Sort.
Finishing: In the Finishing options tab you will see all the finishing options available.
Anything that is not on the row of shortcuts can be found here.
Sort : Copies are assembled as sets in sequential order.
Rotate Sort : Every other copy set is rotated by 90 degrees ( ) and delivered to the
copy tray.
Staple : The staple options vary depending on the type of finisher you have.
Staple top left or bottom left, double staples or saddle stitch if it has booklet finisher.
7
ID Card Copy : Copy
the front and back
sides of an ID card, or
other small original,
onto one side of a
sheet of paper

Cover / Slip Sheet
Dedicating the Paper Tray
You can use this function to create cover sheets
by adding additional pages of different paper, or
copying existing pages onto different paper.
Before using this function, select the trays for
covers under Tray Paper Settings in User Tools.
1. Press the User Tools / Counter Button
2. Select Tray Paper Settings
3. Press the at the bottom right corner of
the display panel twice.
4. Select Cover Sheet Tray
5. Select the tray you want to put the cover in.
6. Press Yes under Apply Duplex
7. Display Time
At Mode Selected means it will only
show Covers in the Paper display
when you select Covers/Slip Sheets.
Full Time means that paper display
will always show Covers under the
paper size.
8. Press OK
9. Press Exit until you are back at the Copier
screen or Press the User Tools / Counter
Button.
8
Follow the same steps for Slip Sheets but in Step 4, choose Slip Sheet Tray.

Cover / Slip Sheet
To insert covers into the document
1. Select Cover / Slip Sheet
2. Select what type of cover you need
Front Cover or Front / Back Cover
Select Copy to use the first page of your original
as the cover
Select Blank if your cover is preprinted or you do
not want the first page of the originals to be the
cover
3. Press OK
4. Select any other settings that you need…duplex,
staple…etc.
To insert different color sheets of paper into your
document
1. Select Designate / Chapter
2. To copy onto the colored paper, press Designate
Copy
To insert a blank sheet, press Designate Blank
3. Designate where the sheet will be inserted
4. Select the first sheet “001”. Then using the
number pad select the page number where you
want the sheet to be inserted
For example: If you want the 5th page to be the
colored paper press 5 on the number pad and
press the # button. When you press the # button
it will go to the next sheet “002”. Enter the
number for sheet 2 on the key pad and press the
# key. Keep doing this until you have all the
designate sheets entered that you want.
9
CHAPTER: The page locations you
specify with this function will appear on
the front of copy sheets, like a book.

Edit / Color – Convert Color
Convert Color - Copies by changing a certain
color in the original to another color. Up to
four colors can be converted at the same
time.
1. Press Full Color
2. Press Edit / Color
3. Press Convert Color
4. Press Conversion 1
5. Press Current color, choose the color to
be converted
6. Select the New color press OK
7. Place originals and press Start
10
Red converted to Purple
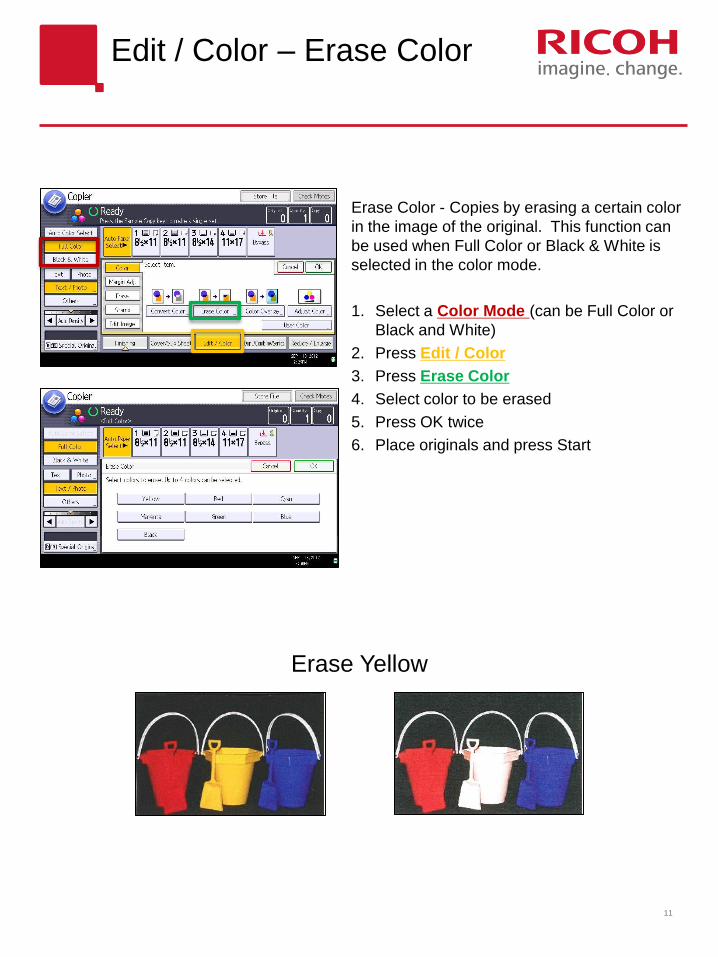
Edit / Color – Erase Color
Erase Color - Copies by erasing a certain color
in the image of the original. This function can
be used when Full Color or Black & White is
selected in the color mode.
1. Select a Color Mode (can be Full Color or
Black and White)
2. Press Edit / Color
3. Press Erase Color
4. Select color to be erased
5. Press OK twice
6. Place originals and press Start
11
Erase Yellow

Edit / Color – Color Overlay
Copies by adding a color to the whole page.
This function can be used when Full Color or
Black & White is selected in the color mode.
12
1. Select a color mode (can be Full Color or
Black and White)
2. Press Edit / Color
3. Press Color
4. Press Color Overlay
5. Select overlay color. Lighten or darken if
needed
6. Press OK twice
7. Place originals and press Start
Since the Color Overlay function overprints the entire original, the color of the
image may change.

Edit / Color – Adjust Color
Color Balance: Adjusts the overall color tone
when the copy is reddish or bluish.
Adjust Color: Adjusts the specific colors (yellow,
red, magenta, blue, cyan, and green) by mixing
them with adjacent colors in the color circle. You
can adjust up to three colors
13
1. Select Color Balance
2. Press lighter or darker
by the color you want
to adjust.
1. Select Adjust Color
2. Select Adjust Color again
3. Select color to adjust
4. Press the or to set the color where you want it
Color Balance
Adjust Color
Once the yellow reset button is pressed or the machine goes back to default settings
the color adjustments will reset to the defaults.

Edit / Color – Margin Adjust
Margin adjust copies originals leaving a binding margin.
1. Select Edit / Color
2. Select Margin Adjust
3. Specify a margin for the front side of the page
4. Specify a margin for the back side of the page. Margin on the back side of the
page is valid when 1 Sided to 2 Sided or Combine 2 Sides is selected. If you do
not need to specify the margins for the back side page, press OK.
The image is not reduced so you have to be careful not to move it to far or it will fall
off the edge
14

Edit / Color – Erase
15
Erase Center / Border
This function erases the center and/or all four sides
of the original image.
Erase Border
Same Width – When you want to erase the same
width border all the way around the page. Press
the + or – buttons to set the width of the border to
erase
Different Width – When you want to set different
widths for any of the 4 sides.
1. Select the side you want to erase: top,
bottom, right or left
2. Press the + or – buttons to set the width to
erase
Erase Center - Erase the center margin of the
original. Press the + or – to adjust the border.
Erase Center/Border - This function erases the
center and/or all four sides of the original
image. Press the + or – to adjust the borders.

Background Numbering: Use this function to
have numbers printed on the background of
copies. If this function is used in conjunction with
Sort, the same numbers are printed on each set of
copies, helping you keep track of confidential
documents.
16
Preset Stamps : The following eight messages are available for Preset Stamp: "COPY",
"URGENT", "PRIORITY", "For Your Info.", "PRELIMINARY", "For Internal Use Only",
"CONFIDENTIAL", "DRAFT
1. Press Edit / Color
2. Press “Stamp”
3. Press “Preset Stamp”
4. Select desired stamp
5. Select whether to print on all pages or just the
first page
6. Select the color of the stamp. Default is black
7. Press Change
8. Select where on the page you want the stamp
9. Select the size 1X (2 inches long) or 2X (5
inches long)
10. Select the density Normal (same as rest of
document) Lighter or Lightest.
11. Press OK, Place originals and press Start
Edit / Color - Stamp

Edit / Color – Stamp continued
17
Date Stamp : Use this to put the date on your copies
1. Press Edit / Color
2. Press Stamp
3. Press Date Stamp
4. Select Change Format next to the current
date and select the format you want the date
to be in
5. Press Change select where on the page you
want the stamp
6. Select whether to print on all pages or just
the first page
7. Select the color of the stamp. Default is black
8. Press OK, Place originals and press StartPage Numbering : Use this function to add
page numbers to your copies
1. Press Edit / Color
2. Press Stamp
3. Press Page Numbering
4. Select desired format
5. Press Change under Stamp Position select
position, press OK
6. Select Change Numbering to set first
printing page and numbers if it is not 1.
7. Select Stamp Color to change color (the
default is black)
8. Press OK, place originals and press Start

Edit / Color – Stamp continued
18
Stamp Text – You can enter text to use
as a stamp
1. Press Edit / Color
2. Press Stamp
3. Press Stamp Text
4. Select Change Text, a keyboard will
appear
5. Enter the text you want for the stamp
(up to 64 characters)
6. Press OK
7. Select whether to print on all pages or
just the first page
8. Select the color of the stamp. Default
is black
9. Press OK, Place originals and press
Start

19
Edit / Color
Unauthorized Copy Prevention
The Unauthorized Copy Prevention function includes the following two functions:
"Unauthorized Copy Prevention for Pattern" and "Data Security for Copying".
These two functions embed text and a pattern in a document.
If a machine scans a document in which text and a pattern are embedded by using the
Unauthorized Copy Prevention for Pattern function, the text and pattern appear on
the copy, so that other users cannot copy the document without permission.
When using the Data Security for Copying function, the copy differs depending on
whether Copy Data Security unit is installed on the machine or not. If the document is
scanned by a machine that has the Copy Data Security unit, the content of the
document is shaded and the document cannot be copied without permission. If the
document is scanned by a machine that does not have the Copy Data Security unit, the
text and pattern appear on the copy.
You can embed text and patterns
under printed text to prevent
unauthorized copying of the
document.

Edit / Color – Edit Image continued
Image Repeat – the original image is
copied repeatedly over the page. There are
two ways to specify and image to be
repeated…..
Whole Area Repeat - Repeatedly copies the
entire image. The number of times it can be
repeated depends on the percentage you
reduce the image.
Specified Area Repeat - Repeatedly copies
a specified area of the image.
20
Whole Area Repeat
1. Press Edit / Color
2. Press Edit Image
3. Press Image Repeat
4. Select Whole Area, press OK
5. Press Reduce / Enlarge, select the percentage
to reduce the image….
25% will repeat image 16 times
33% will repeat image 9 times
50% will repeat image 4 times
6. Press OK
7. Place original and press Start
8.5 x 11 50%
33% 25%

Edit / Color – Edit Image continued
Specified Area Repeat – Repeatedly copies a specified portion of the image.
To specify the area you want to repeat, you have to define the value of X1, Y1, X2, and Y2 on the
original. Measure the area you want to specify before entering the area settings.
21
1. Press Edit / Color
2. Press Edit Image
3. Press Image Repeat
4. Press Specified Area
5. Enter the length of X1 with number keys,
and press #
6. Enter the length of Y1 with the number
keys, and press #
7. Enter the length of X2 with the number
keys, and press #
8. Enter the length of Y2 with the number
keys, and press #
9. Press OK twice
10. Select the size of paper and the
reproduction ratio
11. Place your originals and press Start
Double Copies - One original image is
copied twice on one sheet.
1. Press Edit / Color
2. Press Edit Image
3. Press Double Copies
4. Press OK
5. Select paper size
6. Place original and press Start

Edit / Color – Edit Image continued
Centering - Will move the image to
the center of the page. For example if
you reduce an image or copy an image
onto a larger piece of paper. Centering
will center the image on the page.
1. Press Edit / Color
2. Edit Image
3. Centering
22
Mirror Image
Positive Negative - If your original is black and white, copy images are inverted. If your original
is color, the density, darkness and brightness of each color will be reversed and inverted to
complimentary colors.
1. Press Edit / Color
2. Edit Image
3. Positive Negative
Mirror Image - Copies by reversing the image
from left to right, as reflected in a mirror.
1. Press Edit / Color
2. Edit Image
3. Mirror Image

Dup. / Combine / Series
Duplex - has 1 sided to 2 sided and
2 sided to 2 sided, both of these
options are on the main copy screen
as shortcut keys
Orientation – Select Top to Top
(like a book) or Top to Bottom (like a
calendar)
The shortcuts on the main copy
screen are both Top to Top
23
1. Select if Originals are 1 or 2 sided
2. Select if the Copy will be 1 or 2 sided
3. Select if you want to combine 2, 4 or 8 originals onto the page.
4. Select OK
5. Place originals and press Start
Series – 2 Sided
to 1 sided: make
1 sided copy from
a 2 sided original
and Series to 1
Sided: copy two
facing pages of a
bound original
onto two sheets.
Spread Duplex – Spread to 2 sided: You can make a two-page
spread original onto both sides of the paper.
Spread to 2 Sided (Spread) - Copies each two-page spread original
as it is onto both sides of a sheet.
Combine - will let
you combine 2, 4
or 8 originals
onto one page.
Spread 2 sided Spread 2 sided (Spread)

Dup. / Combine / Series continued
24
Booklet - Copies four 1-sided originals or one 2-
sided original in page order for a folded booklet. The
machine selects reproduction ratios of between 25
and 400% according to the size of the original and
the paper. If the orientation of originals is different
from that of the copy paper, the machine will
automatically rotate the image by 90 degrees to
make copies properly. To make booklets that are in
page order, fold each sheet in half, and then stack
the folded sheets.
Magazine - Copies two or more originals or two-
sided originals to make copies in page order when
they are folded and stacked. The machine selects
reproduction ratios of between 25 and 400%
according to the size of the original and the paper. If
the orientation of originals is different from that of
the copy paper, the machine will automatically
rotate the image by 90 degrees to make copies
properly. To make magazines that are in page
order, fold sheets in half.
1. Select Dupl./Combine/Series
2. Select Book
3. Select if Original is 1 Sided or 2 Sided
4. Select Booklet or Magazine
5. Select option for combining originals on one page.
If you just want one original per page leave it on
Do not Combine. Press OK
6. If you have a Booklet finisher go to the Finishing
tab or the main copy screen and select the 2 at
Center staple option. This will put 2 staples down
the middle of the page and fold the
booklet/magazine in half.
7. Select the Paper Tray for the size of paper you
want to copy onto.
8. Place your originals and press Start.
NOTE: When making a booklet or magazine the
paper should be in the tray Landscape.
Booklet
Magazine
Booklet / Combine
Magazine / Combine

Reduce / Enlarge
25
There are two rows of preset reduce and enlarge
percentages. If you choose to reduce something
to 65% 11x17 to 8.5x11, the original does not
have to be 11x17 and you do not have to put it
on 8.5x11 paper. You can reduce or enlarge and
image and copy it onto the size of paper that you
choose. Just keep in mind if you enlarge it to
much the whole image may not fit on the page.
You can also use the + or – buttons to change
the percentage one number at a time or select
Number keys and use the keypad to enter the
percentage you want to use.
Size Magnification - Use this
function to calculate a reproduction
ratio based on the lengths of the
original and copy. Specify the lengths
of the original and copy. The
machine selects an enlargement or
reduction ratio so that manual
calculation is not required.
Direct Mag. % - Specify the
horizontal and vertical lengths of
the original and copy image.
Copies can be reduced or
enlarged at different reproduction
ratios horizontally and vertically.
Dir. Size Mag % - Specify the
horizontal and vertical reproduction
ratios, individually. Copies can be
reduced or enlarged at different
reproduction ratios horizontally and
vertically.

Document Server
26
The document server allows you to store documents in the
MFDs memory and then print them as needed. You can print
from your computer directly to the Document Server or scan
hard copies into the document server to store.
When you select multiple documents the system will merge
the documents together and print them as one document.
Scanning an original into the document server:
1. Select Document Server
2. Press to Scanning Screen
3. To select a folder to scan the document to press Target
Fldr. to Scan, choose the folder from the list the pops up.
If you don’t select a folder it will go into the Shared Folder
by default.
4. Select if you would like to scan in color or black & white
5. Select your original type. You have the same options
available as when you make a copy. Text, Photo,
Text/Photo and Others (Generation, Pale and Map)
6. Select Special Original if you want to choose Batch or
Mixed Sizes.
7. If your originals are 2 sided, select 2 sided original.
8. You can put a user name and a password on the
document. If you put a password on it you will have to
know the password to print or delete it.
9. To name the file Press File name – a keyboard will
appear, Press Delete All to clear the auto populated
name and then enter the correct document name. Press
OK.
10. Place Originals and Press Start.
11. The original is scanned and the document is saved in
the document server. After scanning a list of folders
will be displayed. If the list does not appear press
Finish Scanning.

Printing a document stored in the document server
1. Select Document Server
2. You can view a List of documents or a Thumbnail of the documents
3. Select the document you would like to print. If you select multiple documents,
they will print in the order you selected them, and will be merged together into one document.
4. You can preview the document before you print it.
5. If it is a single page, you can enter the quantity and press Start.
5. You can select Print Specified Page to print the first page,
a specific page or a range of pages.
6. To select settings like duplex or staple press To Printing Screen
7. Make your selections, enter quantity to print and press Start
Document Server
27
List ViewThumbnail View Preview
To Printing Screen
Select the duplex/2 sided option you want to use, booklet or magazine mode if needed. Select
finishing options like sort or staple.
You can add front and back covers You can adjust the margins The stamp options are also
available. Preset Stamps, Date
Stamps, Page Numbering.

Document Server File Management
Details – Will have the date the document was stored, how
many pages the document is and what size the pages are and a
user name if one was entered.
Preview – Allows you to see the document that is stored. You
can look at each page move the displayed area and zoom in or
out.
Change File Info. - You can change or add a User Name, File
Name or password if you did not when you scanned or printed
the document into the document server.
Delete File – When you don’t need the file stored in the
document server any more you can delete it, you will be asked
if you are sure you want to delete, answer yes or no.
Print Specified Page – Allows you to print the first page, a
specific page or a range of pages.
28

Scanner
Documents can be scanned to an email address
or to a folder on a desktop or server. Either
destination can be entered manually or saved in
the address book.
What is in the red box is the default scan settings
To change the default setting press Scan Settings
and select the options you would like, press OK in
the top right corner when you are done to get back
to the main screen. Details on page 30
29
To Scan to Email
1. Select Scanner
2. Select Email
3. If you need to change the default settings, press scan
settings, make the necessary changes and press OK
4. Choose a destination from the address book or press
Manual Entry to enter the destination. You can send
to multiple destinations at one time by selecting or
entering them. You can Cc and Bcc, enter a small
message and add a subject line. If you select yourself
to be the sender you can turn on the receipt notice
and be notified when it was received.
5. When all the settings are the way you want them
place originals face up in the document feeder or face
down on the glass and press Start.
To Scan to Folder
1. Select Scanner and then Folder
2. Use the default settings or press Scan Settings to
change them
3. Choose the folder to scan to or press manual entry
4. Place your originals and press start.

Scanner – detailed Scanner Settings
Original Type – Select what type of
document you are scanning and if you
would like it to scan in color or black and
white. Auto Color Select will scan color
documents in color and Black and White in
back and white.
30
Original Feed Type
Send File Type / Name
Original Orientation: To send the original so that its front and back sides
can be printed in the same orientation, configure the Original Orientation
and Page Opening Orientation settings according to the orientation of
the original.
Original Settings: select 2 sided original to scan the front and
back of a page.
Last Page – When two sided is selected you can select if the
last page is blank so you won’t scan a blank page.
Stamp – when using the document feeder a small circle will be
placed on the original so you know that it has been scanned.
Batch – allows you to scan a large number of originals and
send them as one file, press start after each original has been
placed.
SADF – starts scanning when original is placed without
pressing start.
Divide – set the number of pages you would like in each file /
attachment.
Select Page
Single Page – each page will be sent
as a separate file.
Multi Page – all pages in one file
File Type: Tiff / Jpeg or PDF
PDF File Setting: You can give a PDF
file a password so if the person
receiving the file does not know it they
can not open the file.
File Name: When selected it will open a keyboard and you can name your file so
the MFD doesn’t name it for you.
Resolution – Select the dpi to
scan the document in. The
higher the dpi the larger the
file is you are sending. (Like
Pixels on a camera)
Scan Size – If your original is something
other than 5.5x8.5, 8.5x11, 8.5x14 or
11x17 you can select the correct size from
a list or enter the size using the number
keys under Custom Size. You can also
select Mixed Original Sizes so that the
scanned documents match the original
document size.

Fax
Sending a fax
1. Select Facsimile
2. Select the Original Feed Type and
choose 2 sided original if
necessary.
3. Enter the fax number using the key
pad or choose a destination from
the address book. To enter multiple
destinations press the Add button
and enter the next number using
the keypad or choose it from the
address book.
4. After all the destinations have been
entered place the originals and
press the Start button.
Programming a Speed Dial
1. Select Prg.Dest
2. Select Change using the number
pad enter the fax number and press
OK.
3. Press the Names a keyboard will
appear, enter the name associated
with the fax number. The
destination will be on the Frequent
list unless you select to put it in the
alphabet where it belongs. To take
it off the frequent list you have to
deselect Frequent after you select
the appropriate place in the
alphabet or you can store them in
both places.
4. Press OK until you get back to the
Main Fax screen
31
4057197185
To enter and email address, select Email, use the keyboard to enter the email address and press ok

Paper Thickness *1 Paper weight
Thin Paper *2 52–60 g/m2 (14–16 lb. Bond)
Plain Paper 1 61–80 g/m2 (16–20 lb. Bond)
Plain Paper 2 81–90 g/m2 (20–24 lb. Bond)
Middle Thick 91–105 g/m2 (24–28 lb. Bond)
Thick Paper 1 106–130 g/m2 (28–35 lb. Bond)
Thick Paper 2 131–163 g/m2 (35 lb. Bond–90 lb. Index)
Thick Paper 3 164–220 g/m2 (90 lb. Index–80 lb. Cover)
Thick Paper 4 221–256 g/m2 (80 lb. Cover–140 lb. Index)
Paper Thickness
*1 Print quality will decrease if the paper you are using is close to the minimum
or maximum weight. Change the paper weight setting to thinner or thicker.
*2 Depending on the type of thin paper, the edges may crease or the paper may
be misfed.
Paper Thickness & Weightcanner –
detailed Scanner Settings continued

How-to videosGo to www.ricoh-usa.com, select Support &
Downloads
Select
How-to
videos
Select the model of
your Ricoh from
the drop down list.