Embed Size (px)
Citation preview

Copyright © 2002 Heathkit Company, Inc. All rights reserved.
Unit 8
Hard Drive Technologies
2
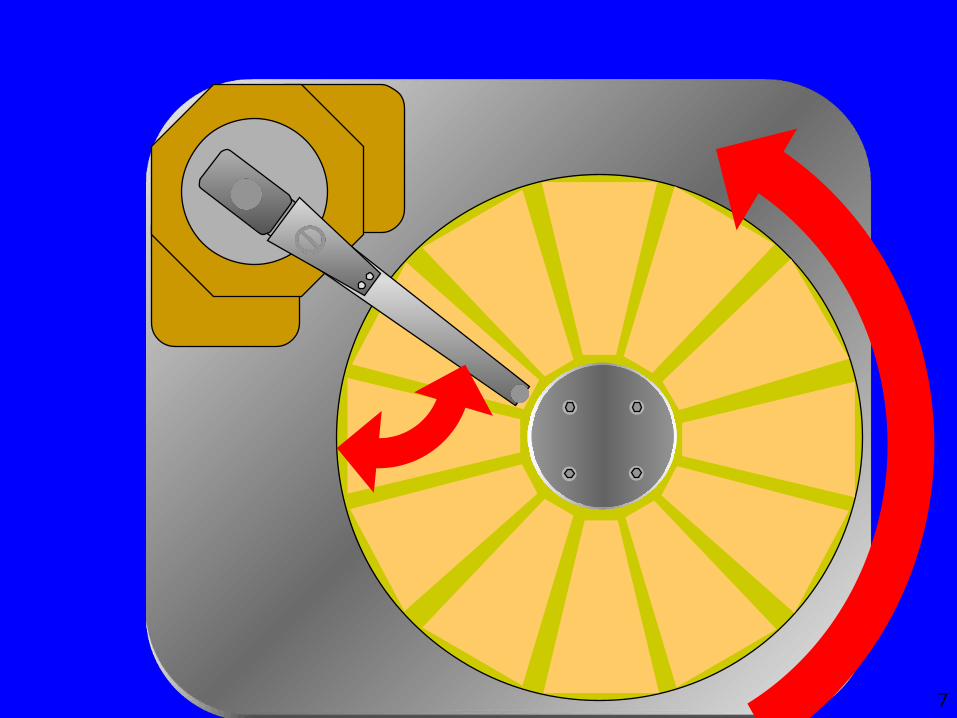
The disk surface is divided into tracks.
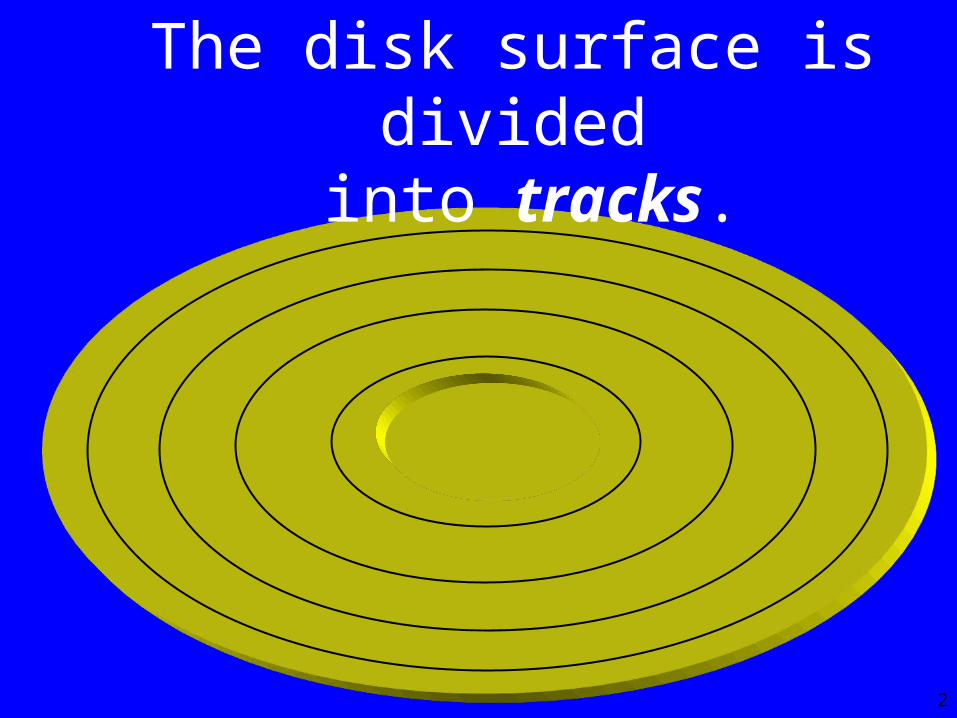
3
Platter1, Track1
Platter2, Track1
Platter3, Track1
Platter4, Track1
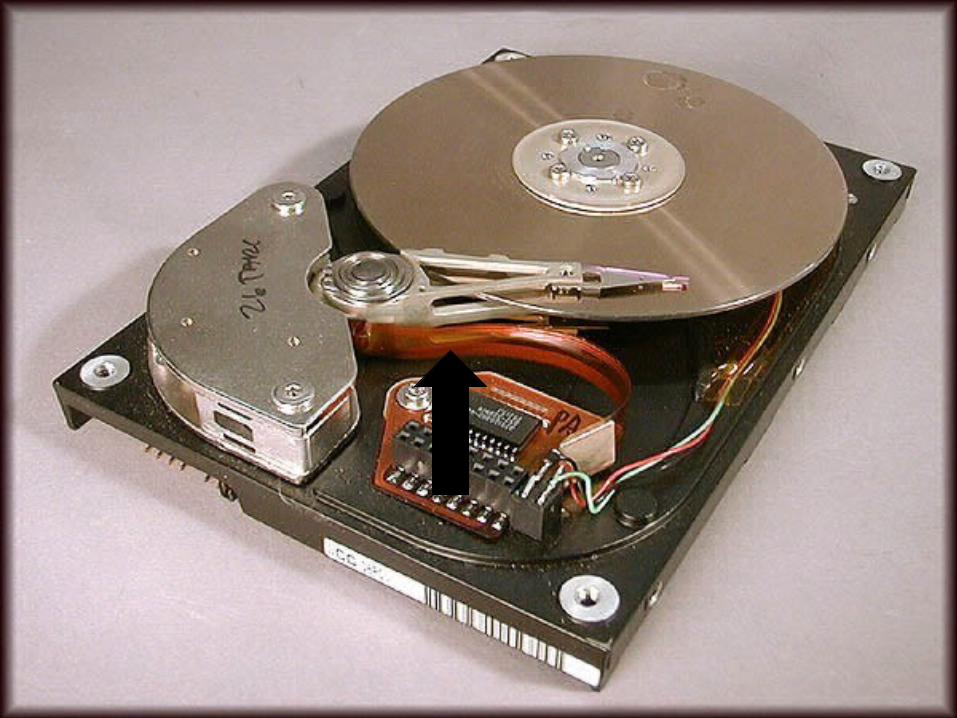
Most Hard Drives Have Multiple Platters
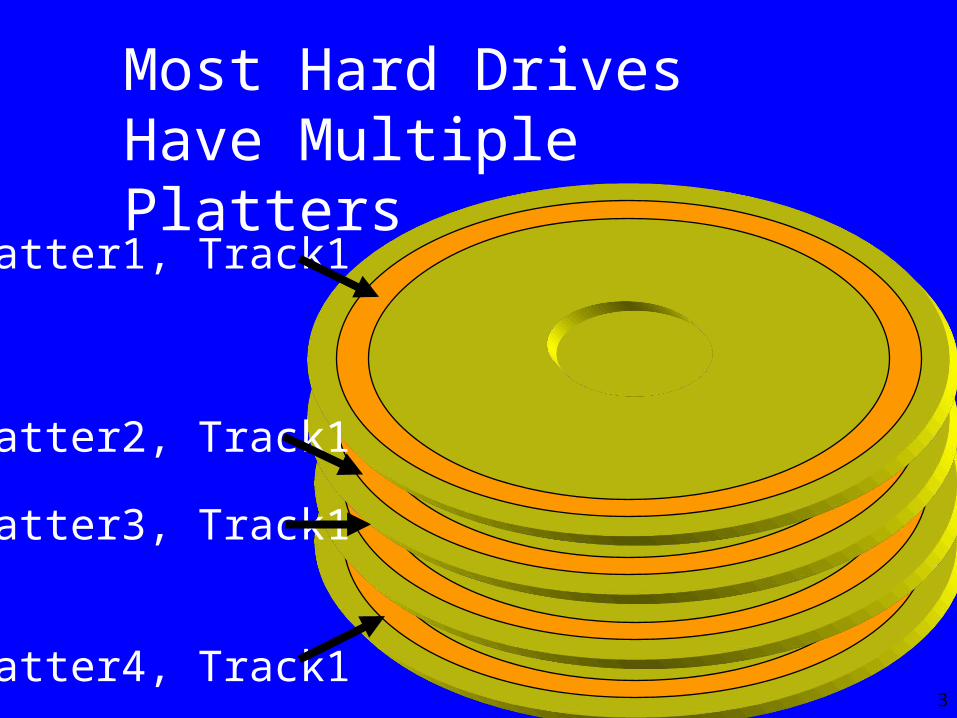
4
The eight track 1’s are referred to collectively as “Cylinder 1.”
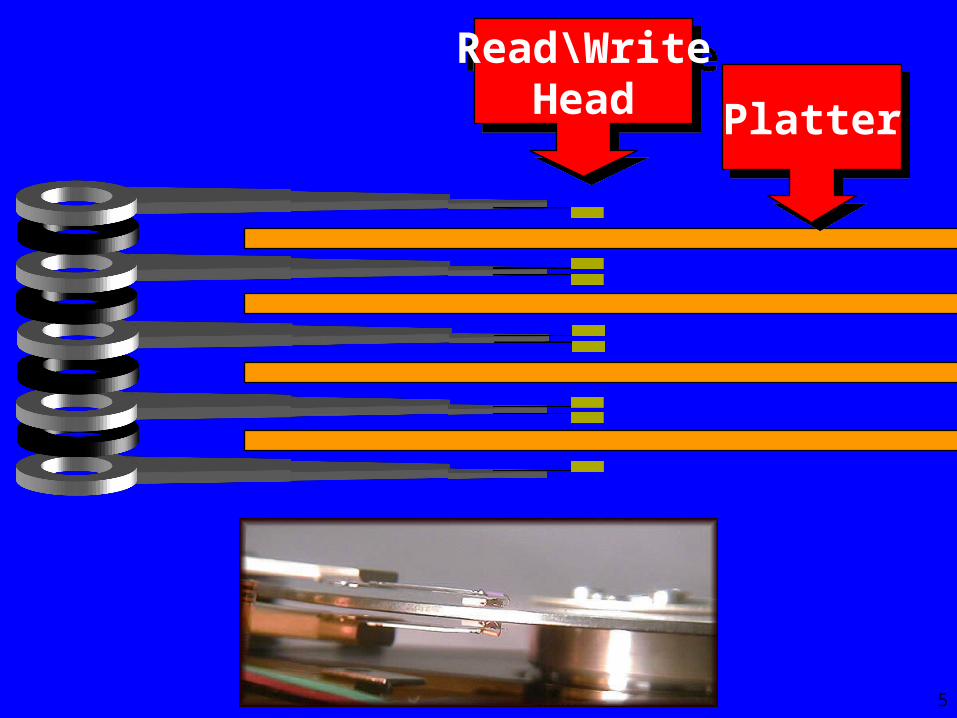
5
Read\WriteHead
Read\WriteHead
PlatterPlatter
6
7
8
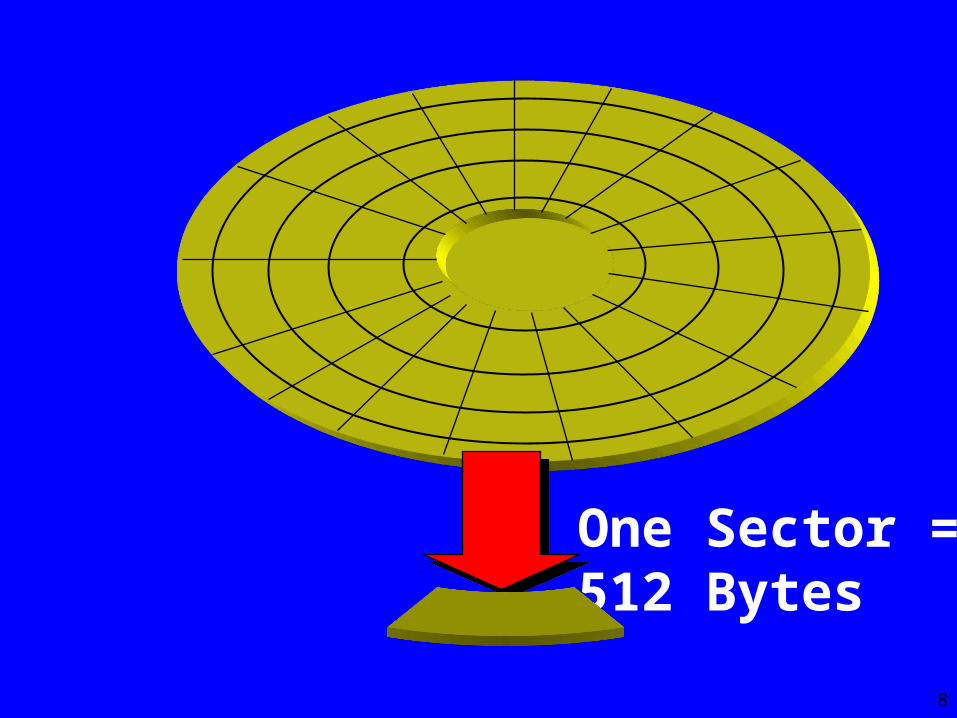
One Sector =512 Bytes
9
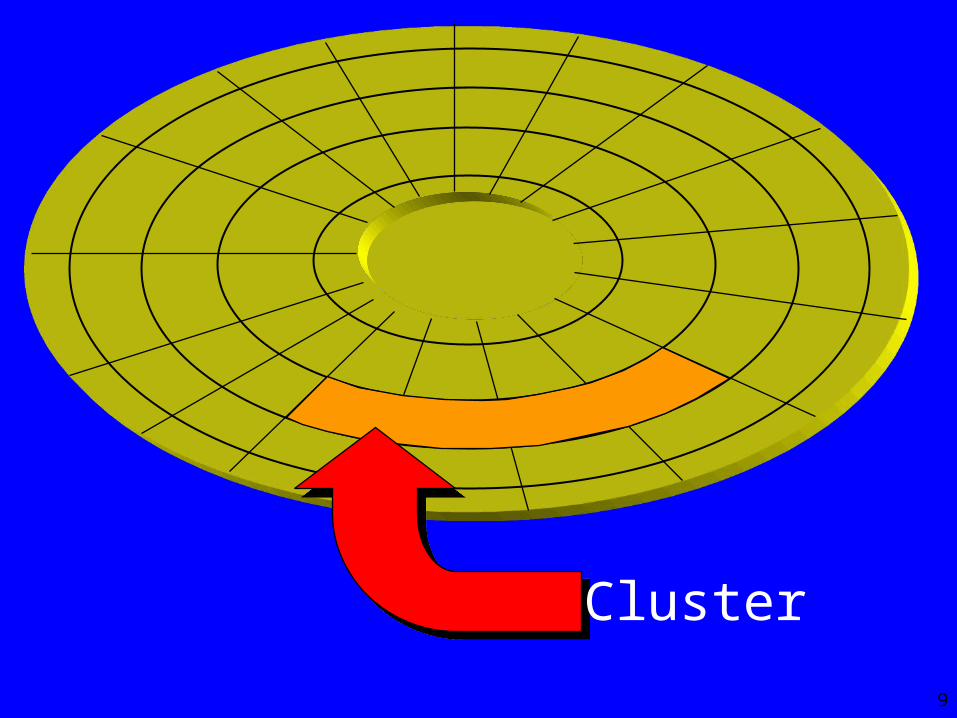
Cluster
10
Cluster
• The smallest unit of disk space that the OS can allocate to a file.
• It consists of one or more sectors.
• Generally, the larger the disk drive, the more sectors per cluster.
Copyright © 2002 Heathkit Company, Inc. All rights reserved.
Hard Drive Interfaces
12
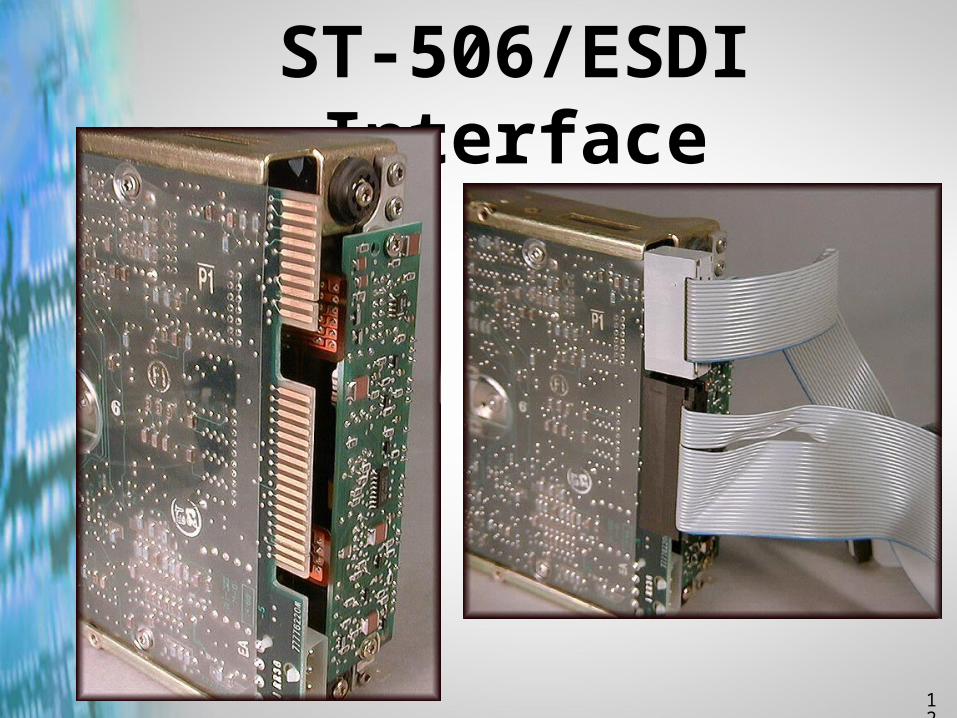
ST-506/ESDI Interface
13
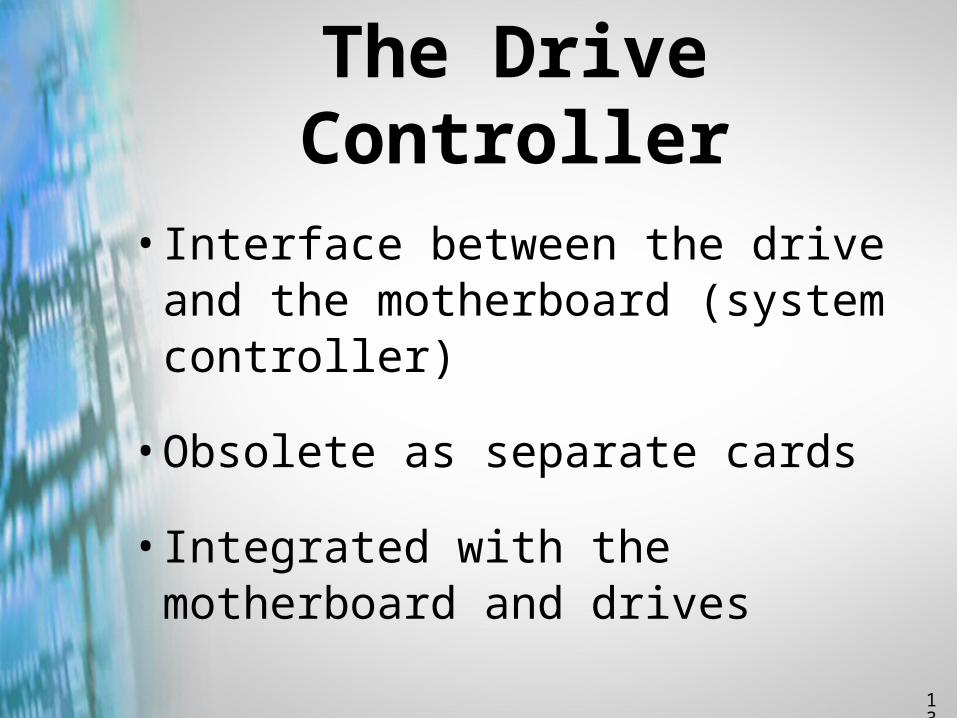
The Drive Controller
• Interface between the drive and the motherboard (system controller)
• Obsolete as separate cards
• Integrated with the motherboard and drives
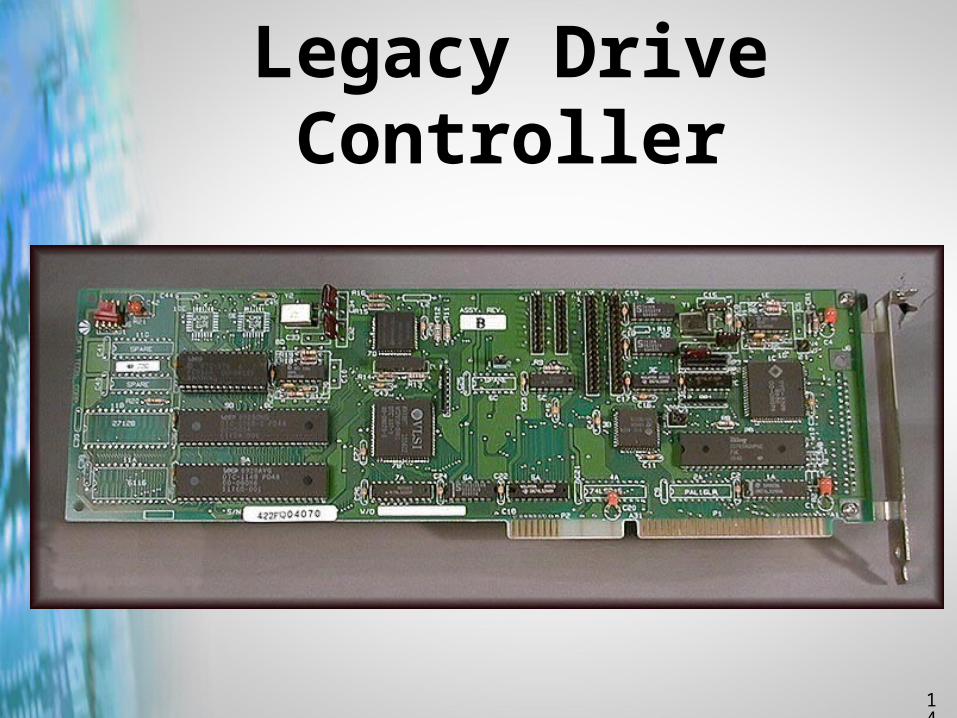
14
Legacy Drive Controller
15
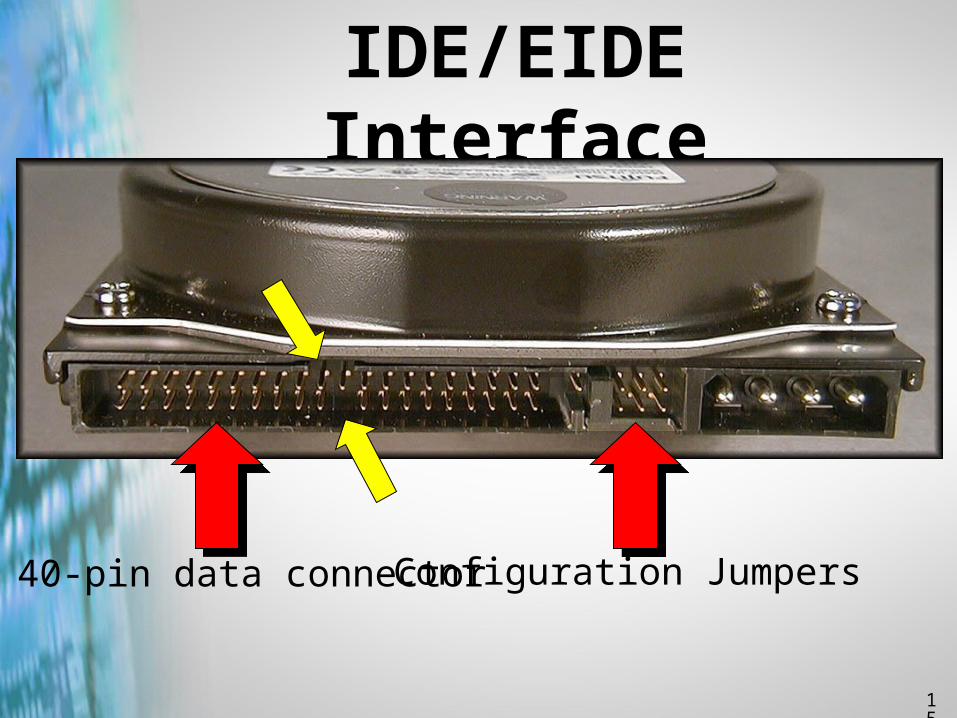
IDE/EIDE Interface
40-pin data connector Configuration Jumpers
16
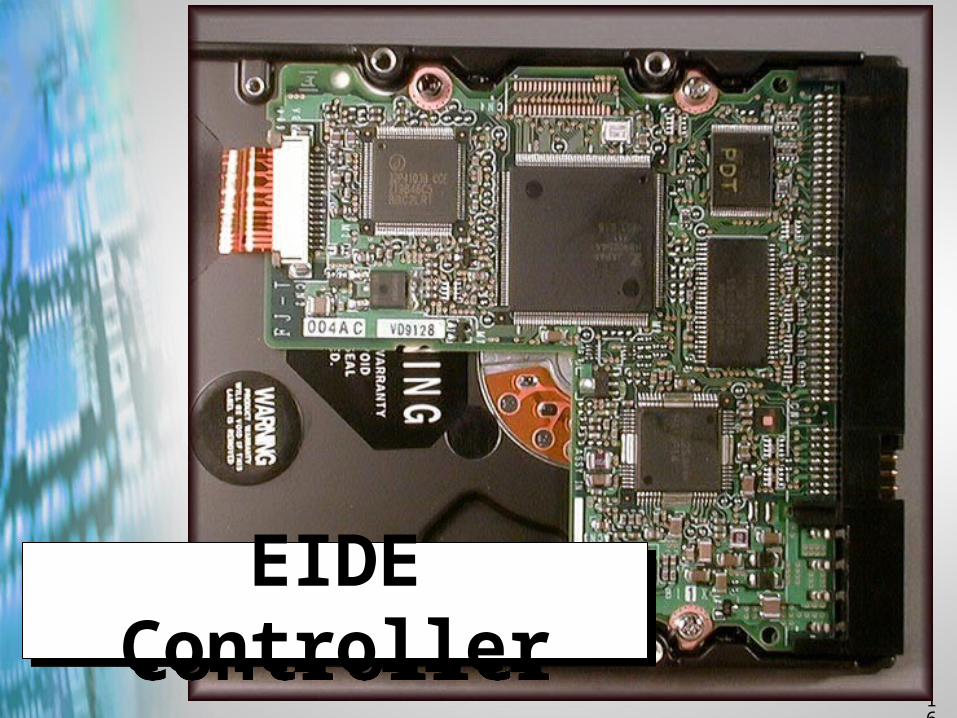
EIDE ControllerEIDE Controller
17
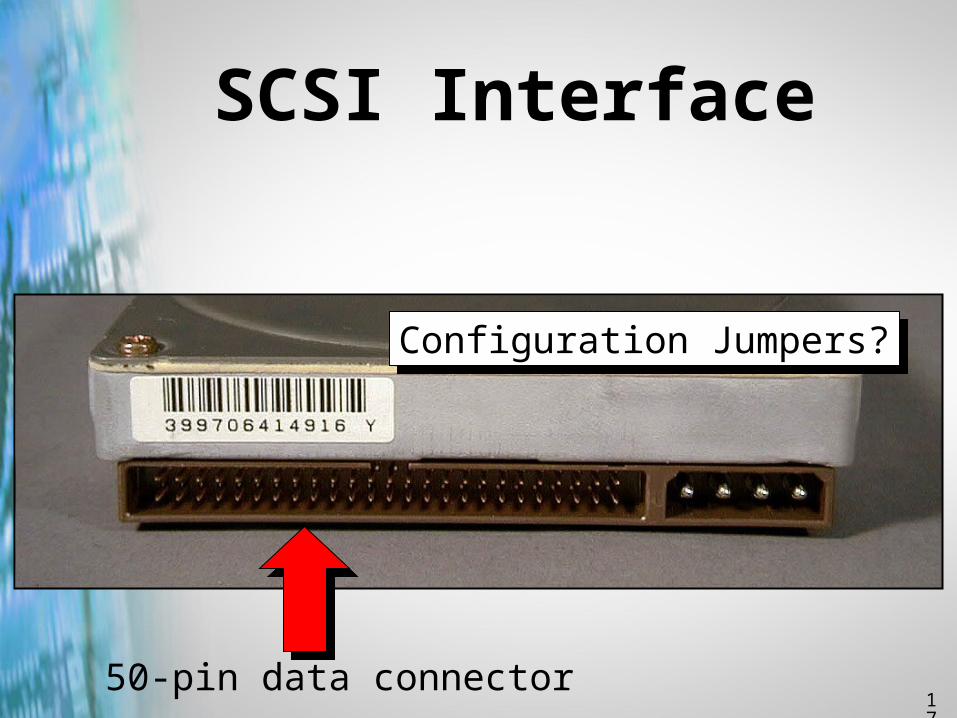
SCSI Interface
50-pin data connector
Configuration Jumpers?Configuration Jumpers?
18
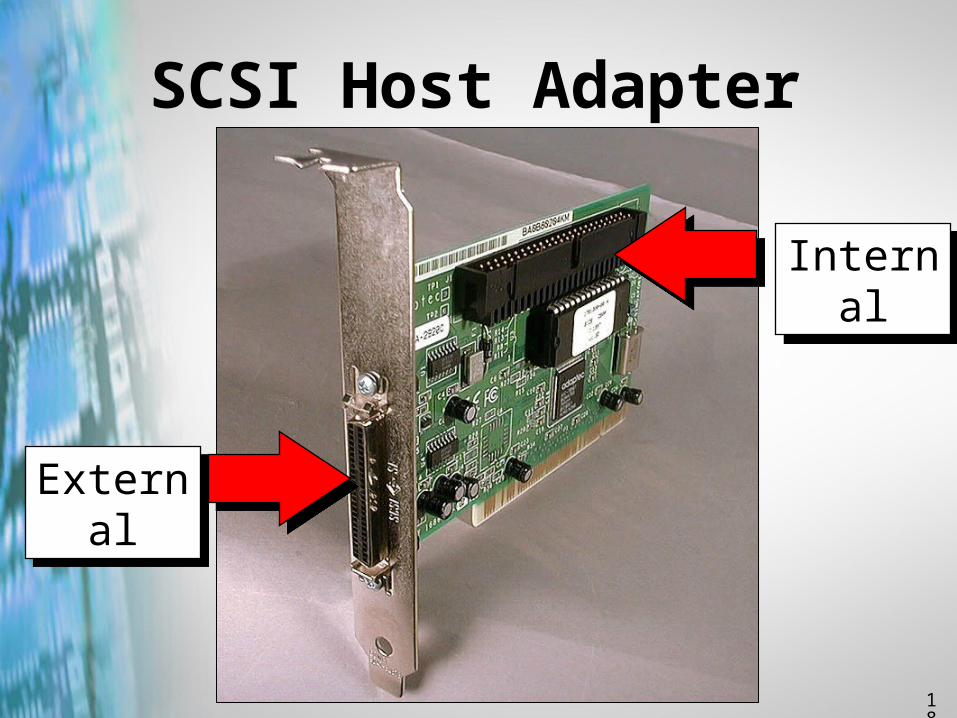
SCSI Host Adapter
ExternalExternal
InternalInternal
19
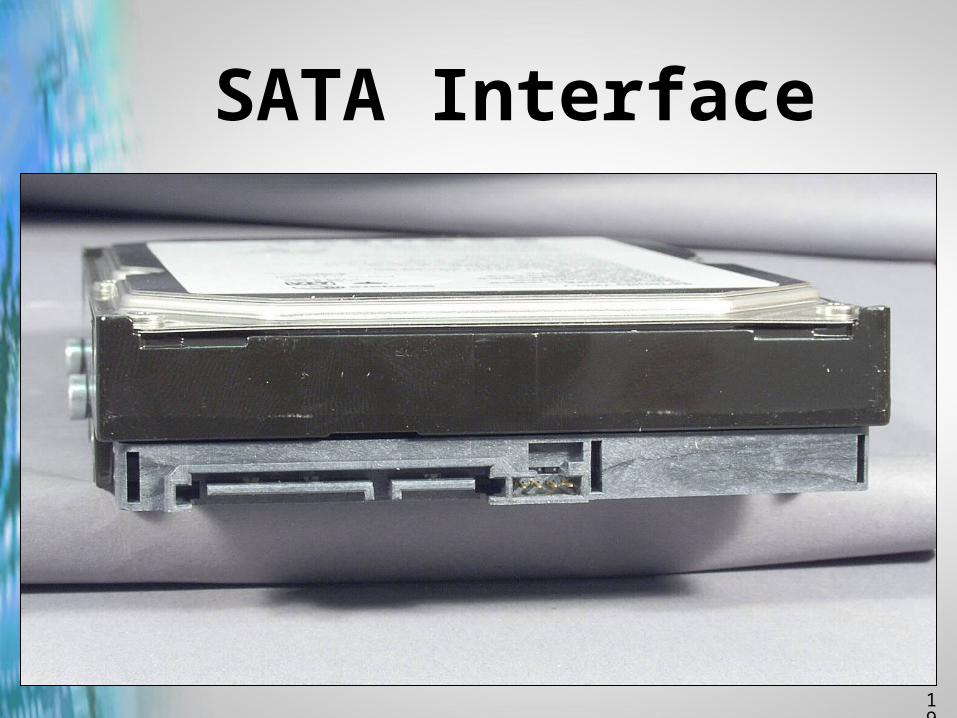
SATA Interface

Copyright © 2002 Heathkit Company, Inc. All rights reserved.
Hard Drive Installation and
Setup
21
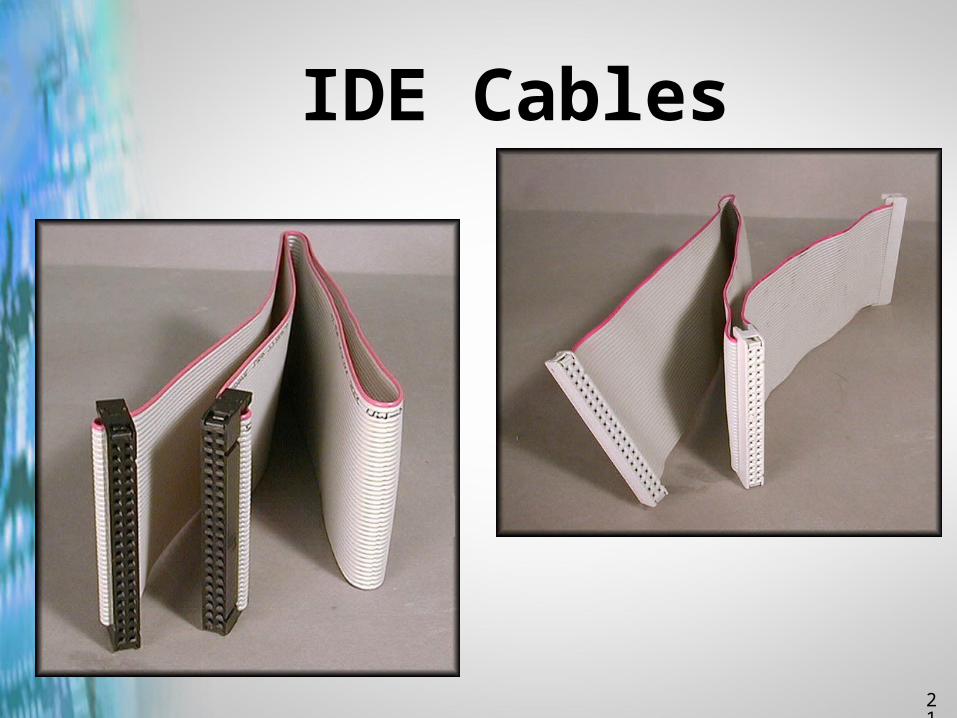
IDE Cables
22
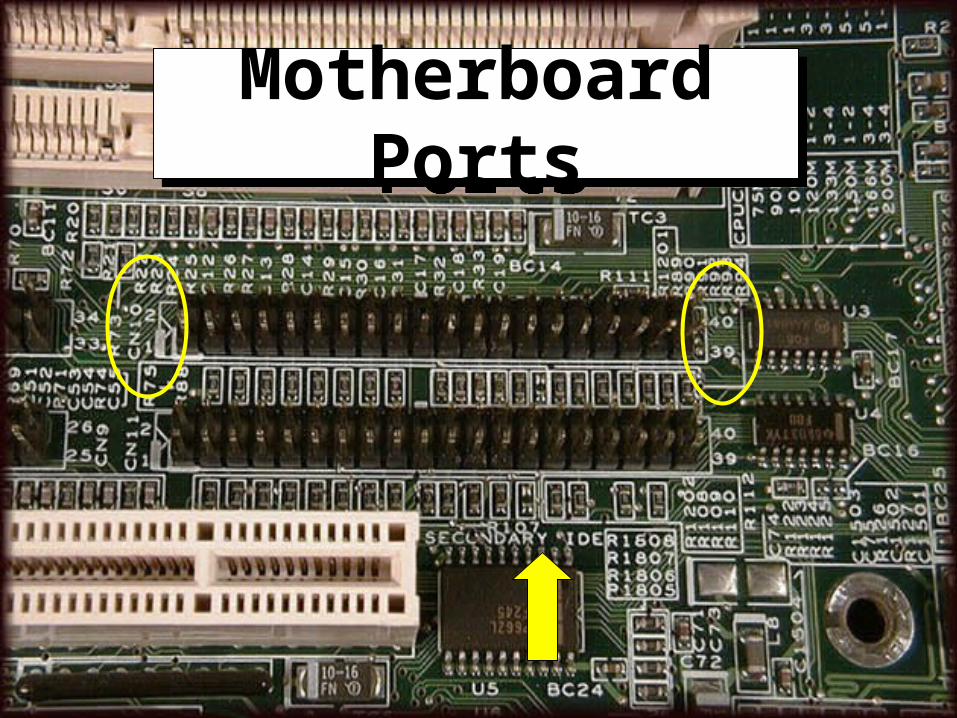
Motherboard PortsMotherboard Ports
23
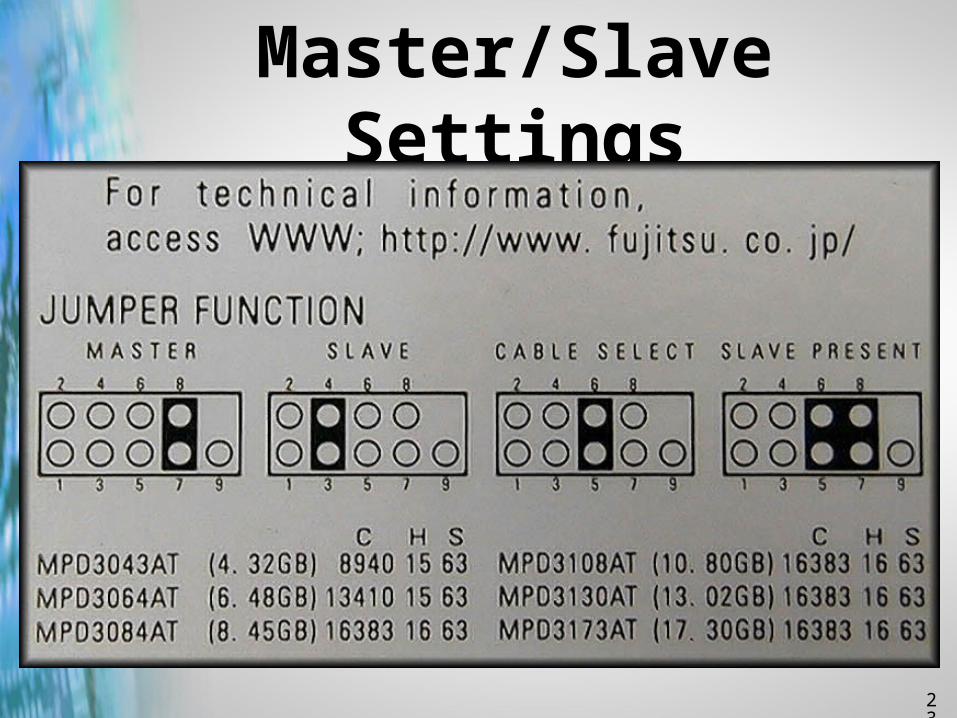
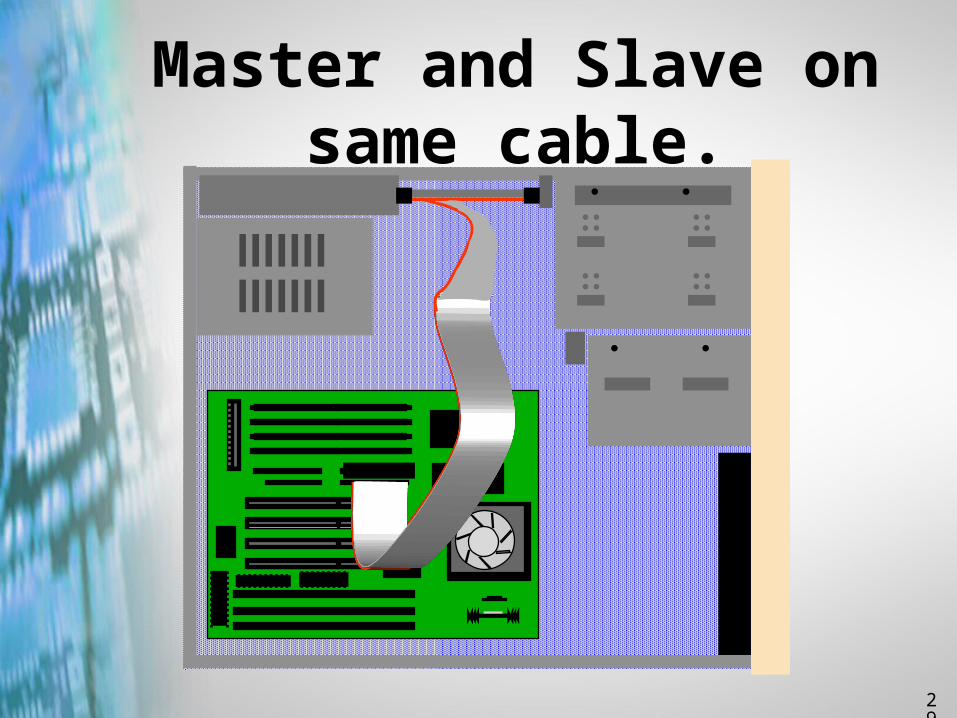
Master/Slave Settings
24
EIDE
• Enhanced IDE
• Larger Drive Capacity
• Faster Transfers
• Two ports, and two devices on each port
• ATAPI
25
25
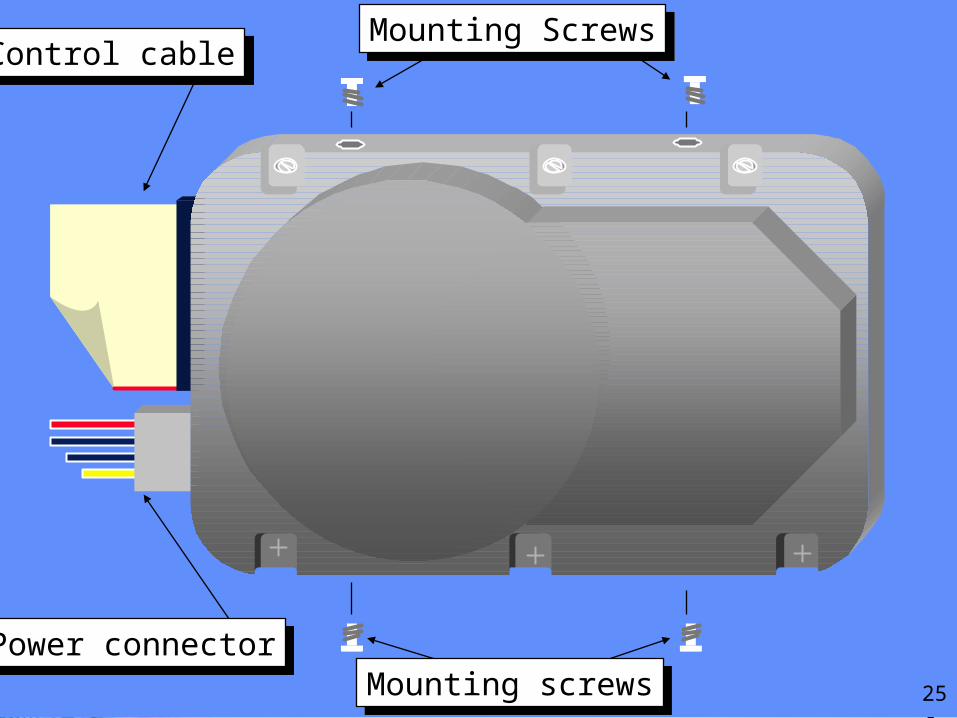
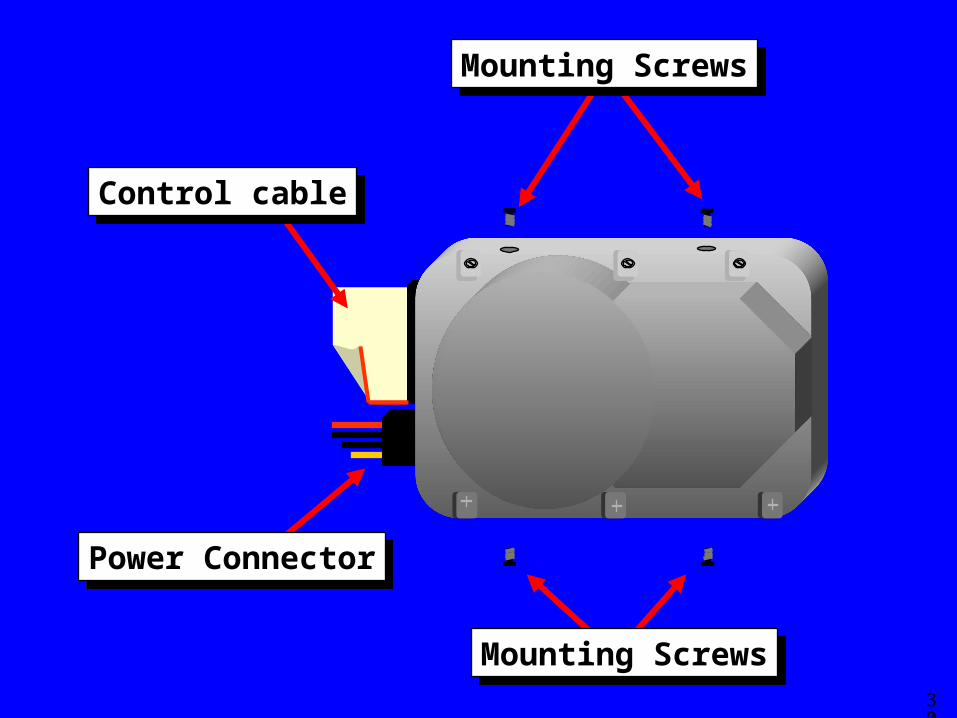
Mounting ScrewsMounting Screws
Mounting screwsMounting screwsPower connectorPower connector
Control cableControl cable
26
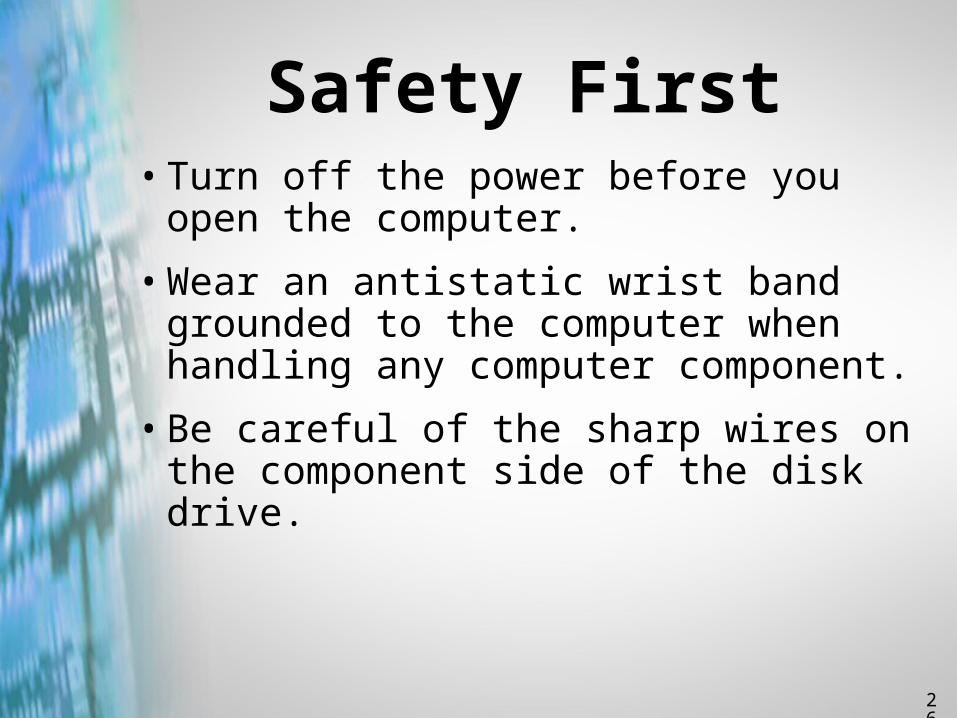
Safety First• Turn off the power before you open
the computer.
• Wear an antistatic wrist band grounded to the computer when handling any computer component.
• Be careful of the sharp wires on the component side of the disk drive.
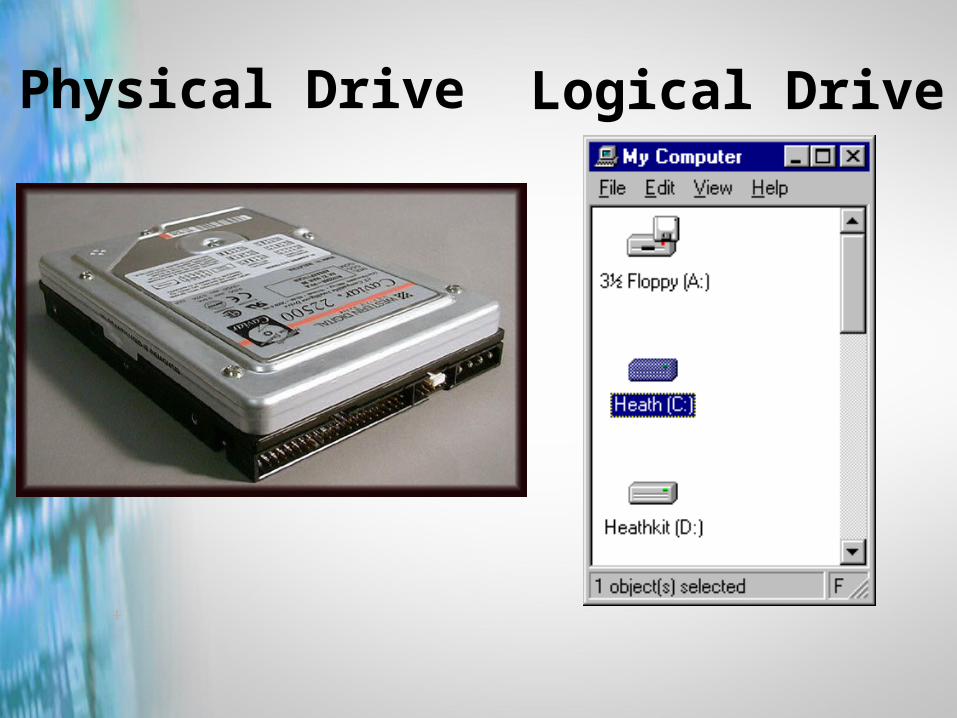
Physical Drive Logical Drive
28
17
Setup
Standard
PCI/PnP
ChipsetAdvanced
P e r i p h e r a lP o w e r M g m tStandard Setup
Pri Master Pri Slave Sec Master Sec Slave
Floppy A Floppy B
17
Date/Time
29
Master and Slave on same cable.
30
Mounting ScrewsMounting Screws
Mounting ScrewsMounting Screws
Power ConnectorPower Connector
Control cableControl cable
31
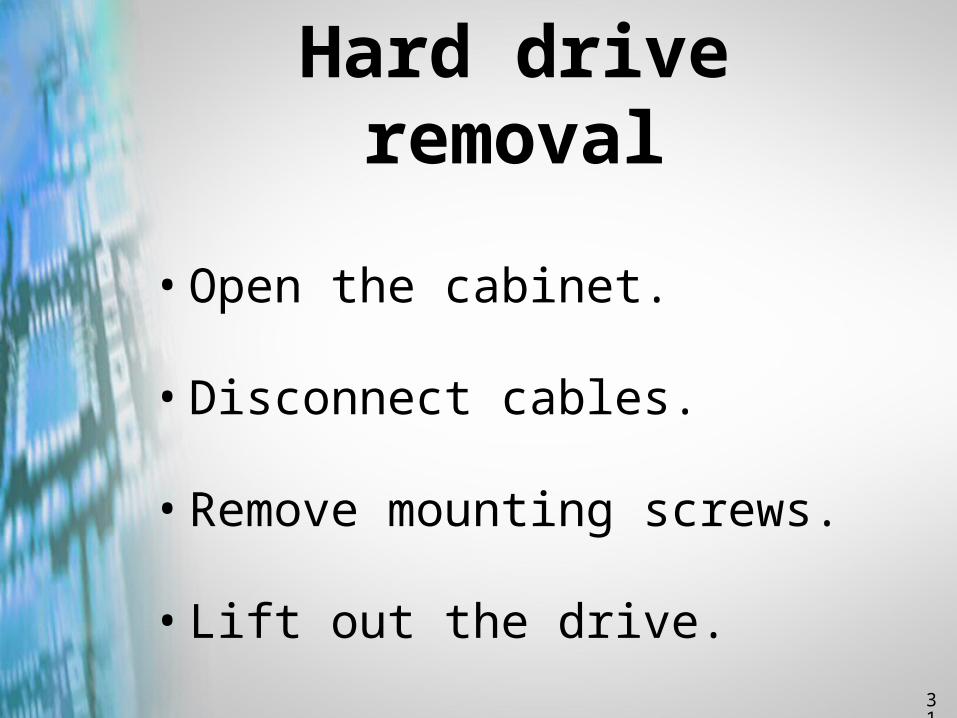
Hard drive removal
• Open the cabinet.
• Disconnect cables.
• Remove mounting screws.
• Lift out the drive.
32
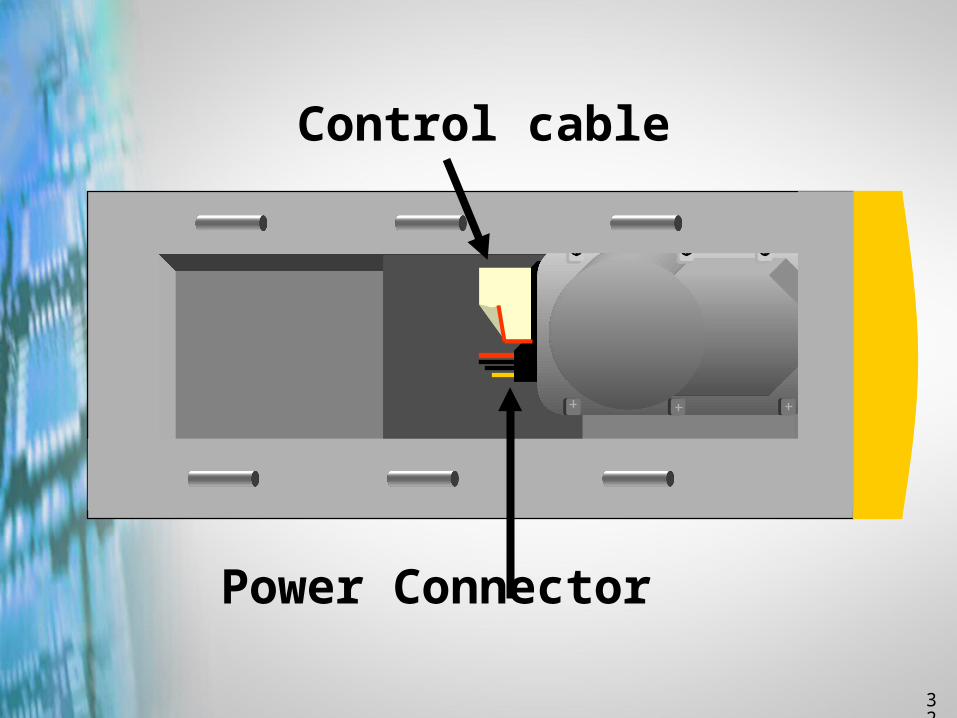
Power Connector
Control cable
33
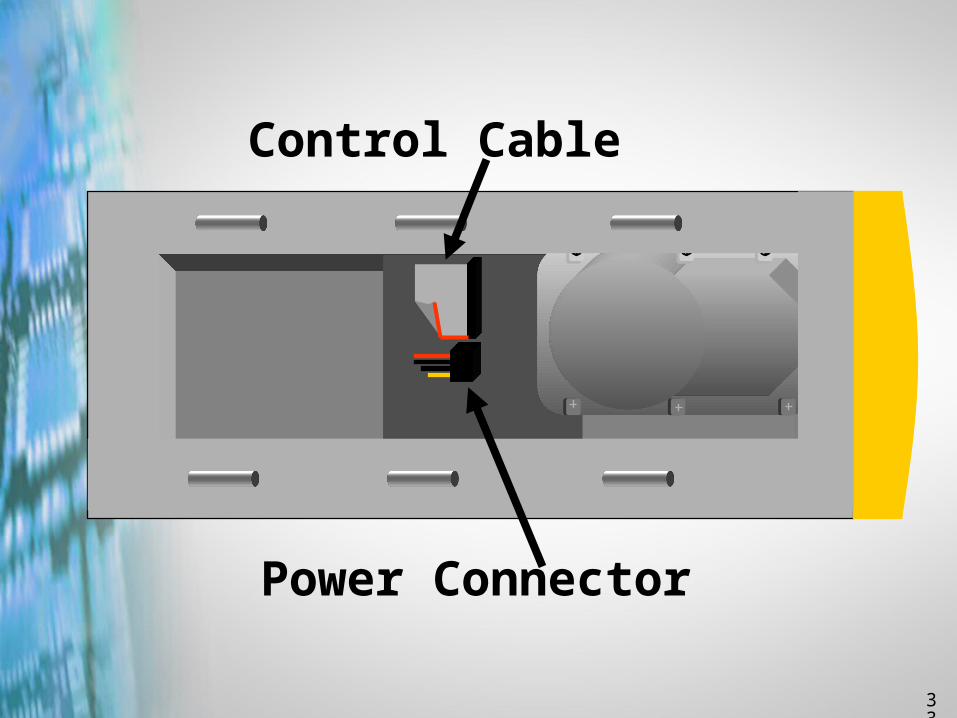
Power Connector
Control Cable
34
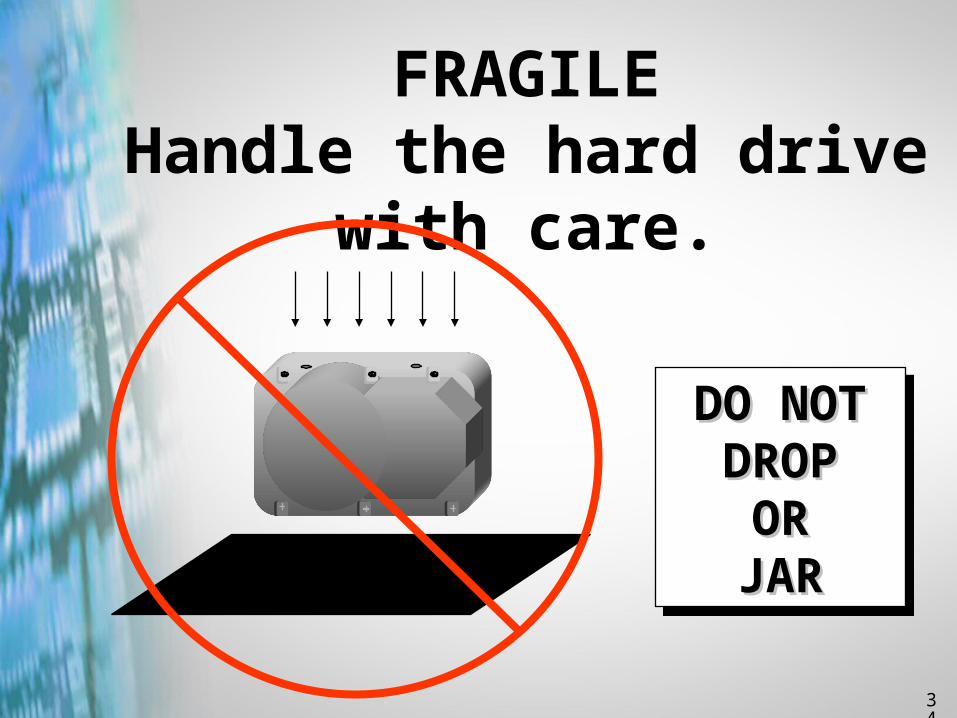
FRAGILEHandle the hard drive with
care.
DO NOT DO NOT DROPDROP
ORORJARJAR
DO NOT DO NOT DROPDROP
ORORJARJAR
35
36
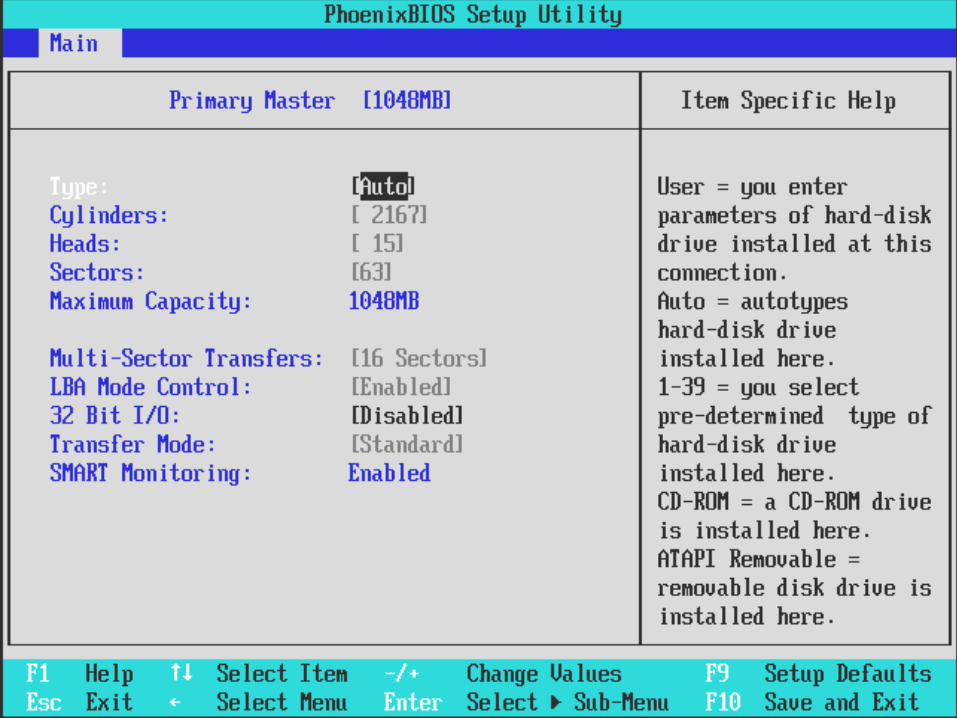
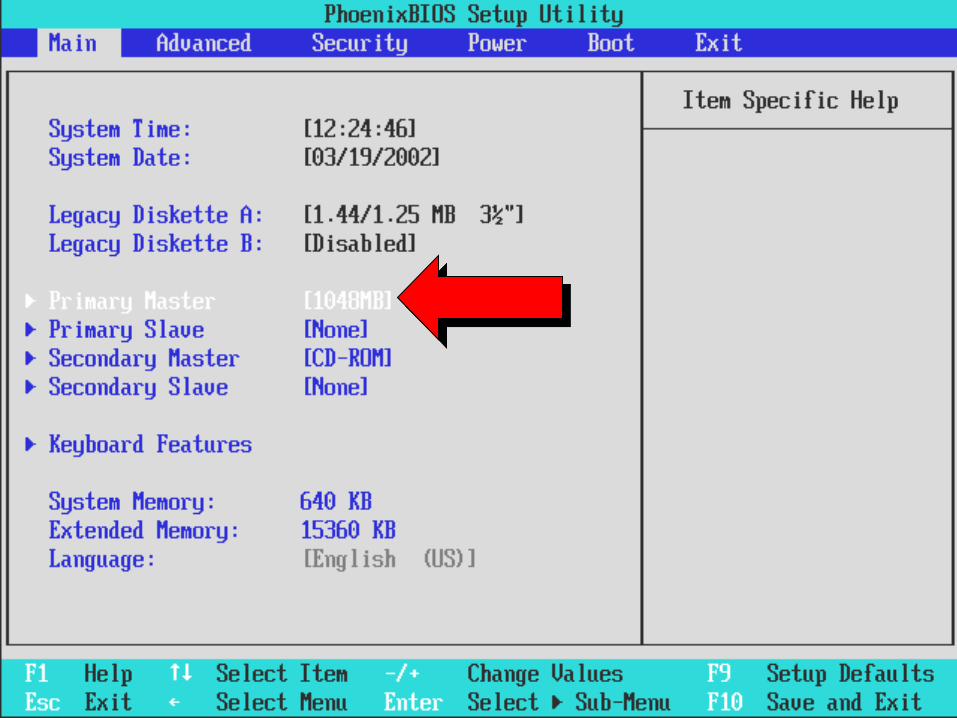
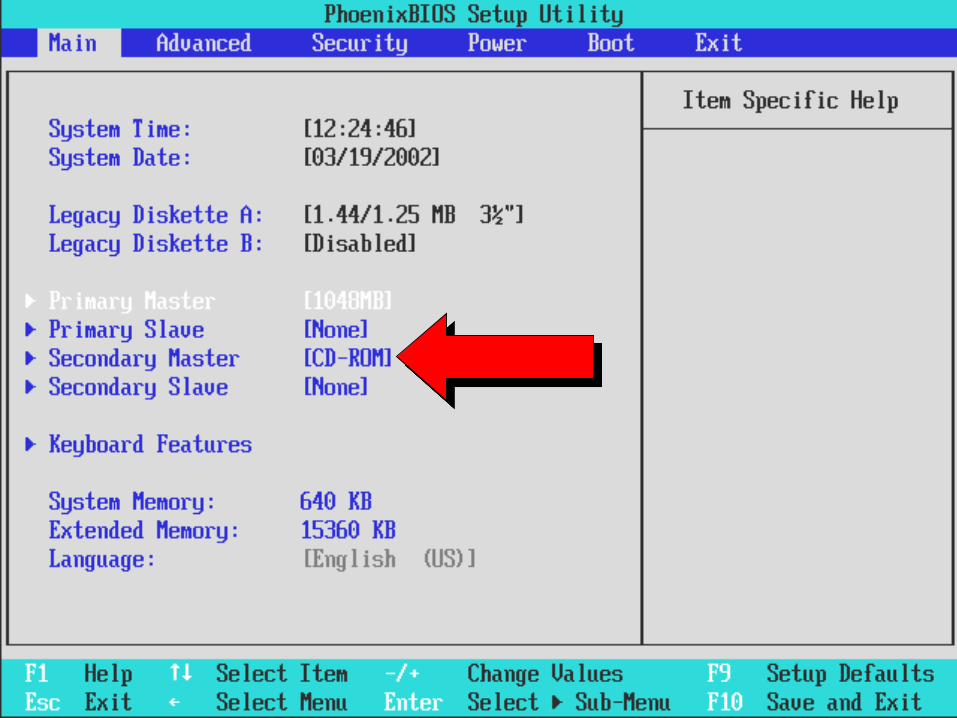
Primary Slave Hard Disk
Type : Auto
LBA/Large Mode : Off
Block Mode : Off
32Bit Mode : Off
PIO Mode : Auto
37
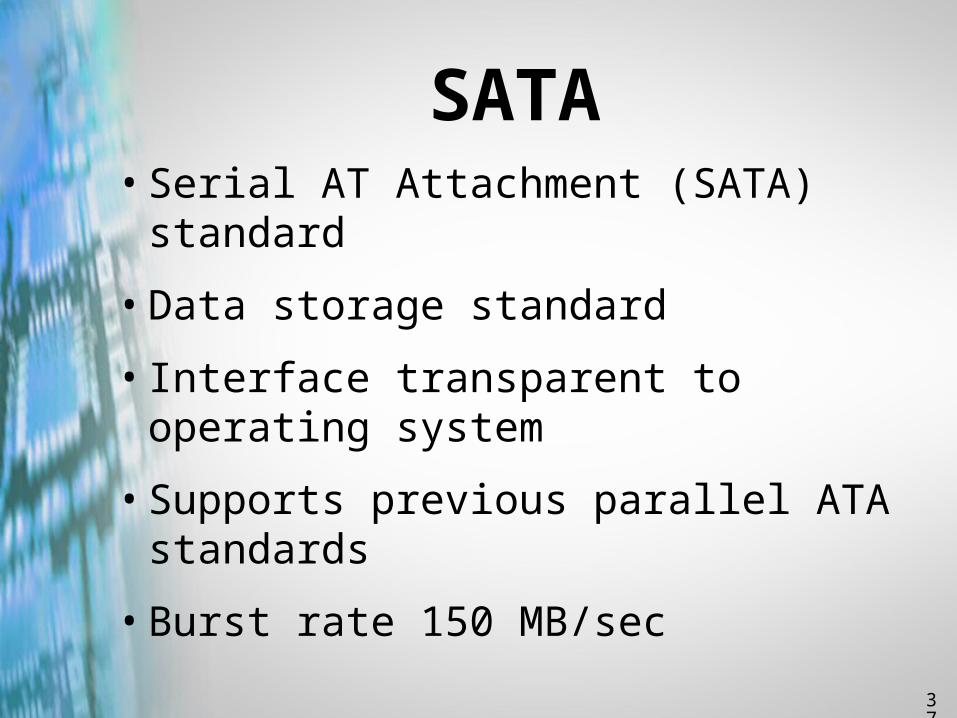
SATA• Serial AT Attachment (SATA) standard
• Data storage standard
• Interface transparent to operating system
• Supports previous parallel ATA standards
• Burst rate 150 MB/sec
38
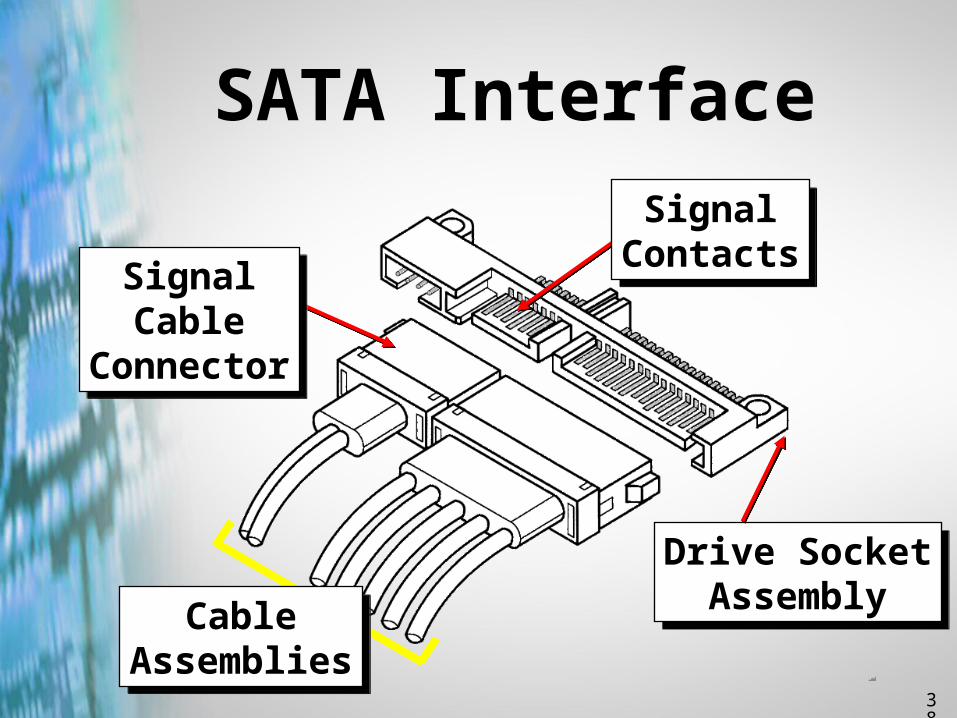
SATA Interface
SignalContacts
SignalContacts
SignalCable
Connector
SignalCable
Connector
Drive SocketAssembly
Drive SocketAssembly
CableAssemblies
CableAssemblies
39
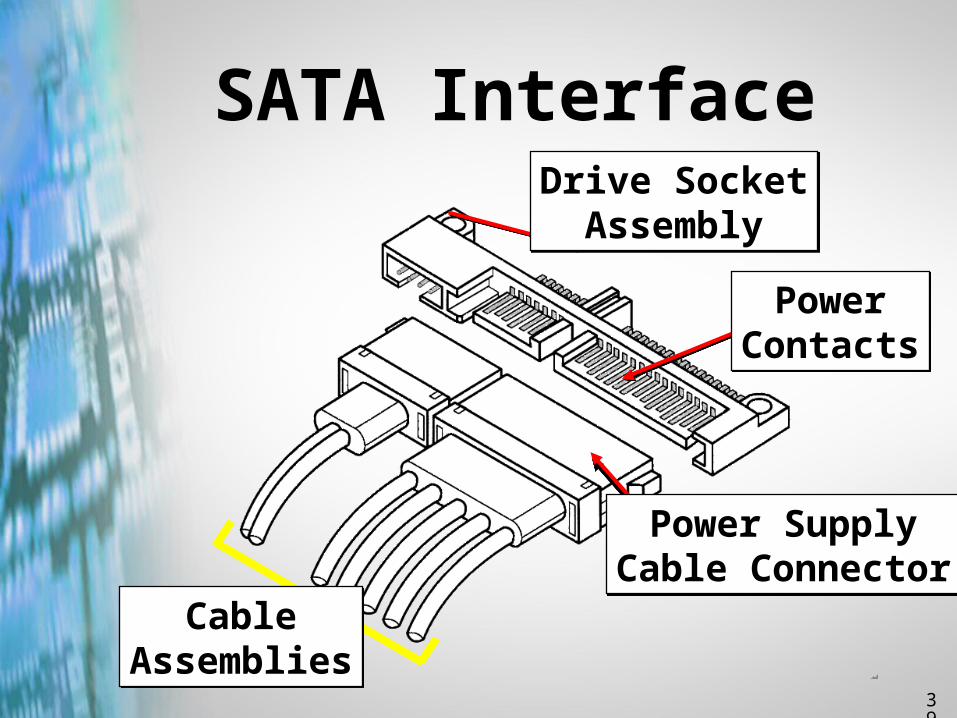
SATA Interface
PowerContactsPower
Contacts
Power SupplyCable Connector
Power SupplyCable Connector
CableAssemblies
CableAssemblies
Drive SocketAssembly
Drive SocketAssembly
40
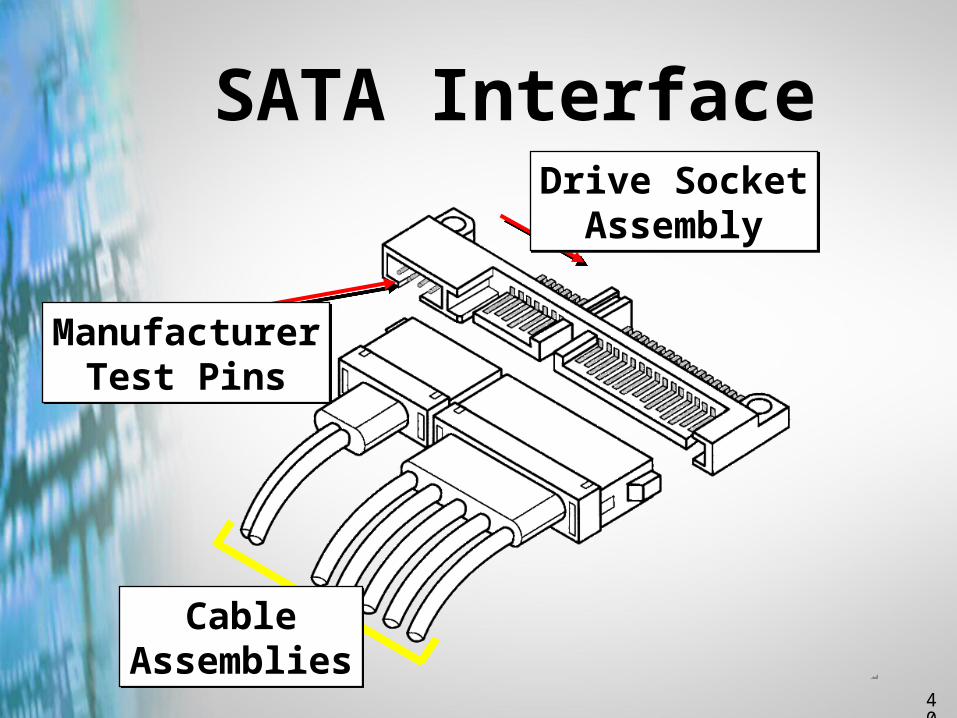
SATA Interface
ManufacturerTest Pins
ManufacturerTest Pins
CableAssemblies
CableAssemblies
Drive SocketAssembly
Drive SocketAssembly
41
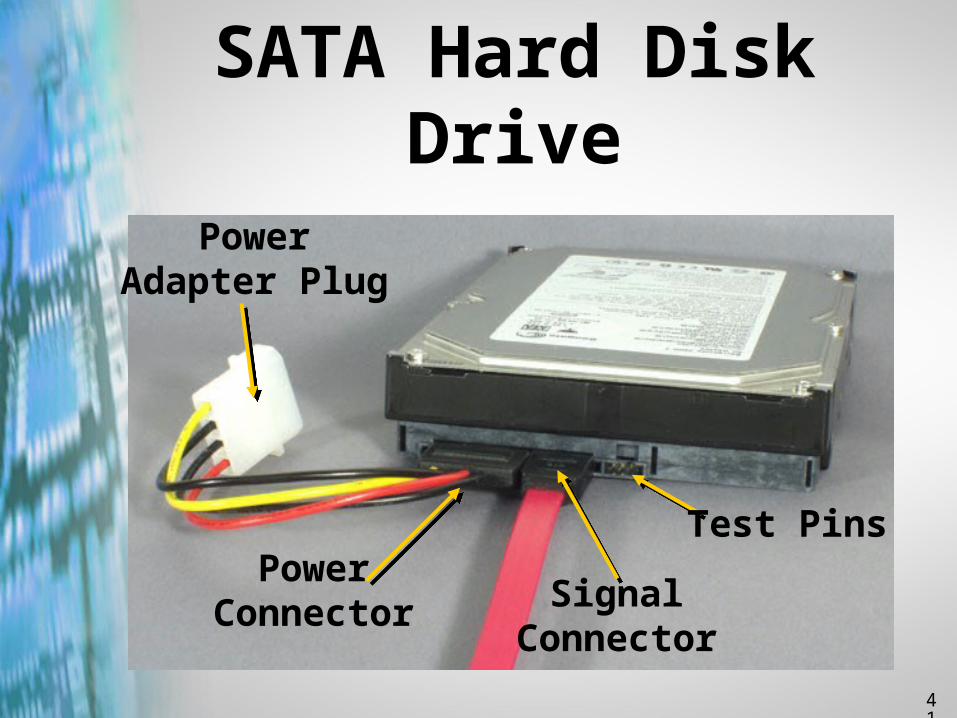
SATA Hard Disk Drive
Test Pins
PowerAdapter Plug
SignalConnector
PowerConnector
Copyright © 2002 Heathkit Company, Inc. All rights reserved.
Hard Drive Partitions
43
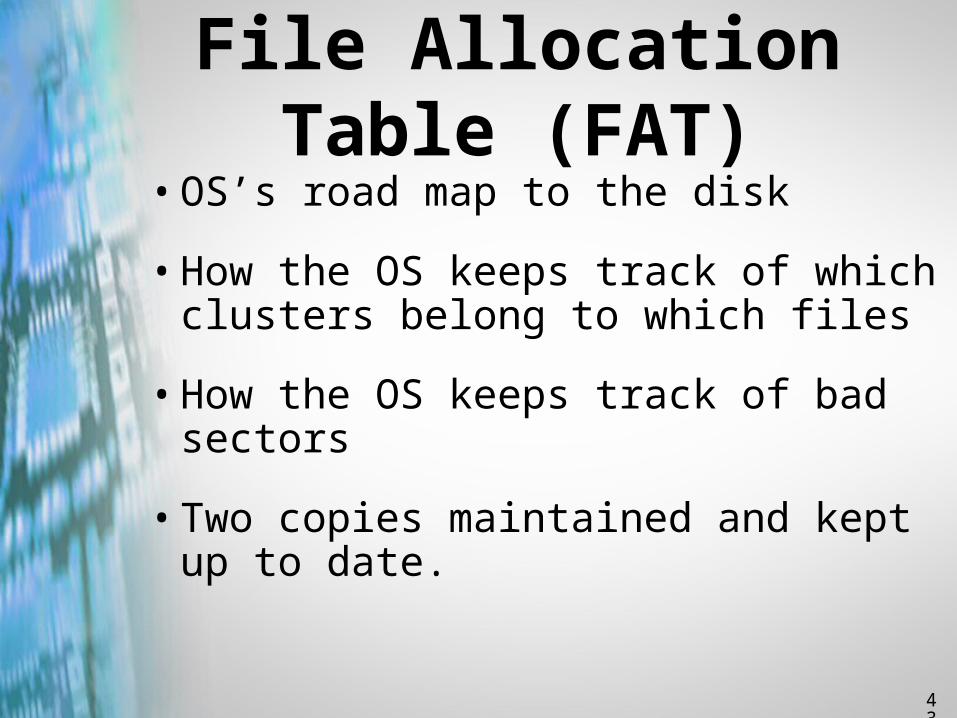
File Allocation Table (FAT)• OS’s road map to the disk
• How the OS keeps track of which clusters belong to which files
• How the OS keeps track of bad sectors
• Two copies maintained and kept up to date.
44
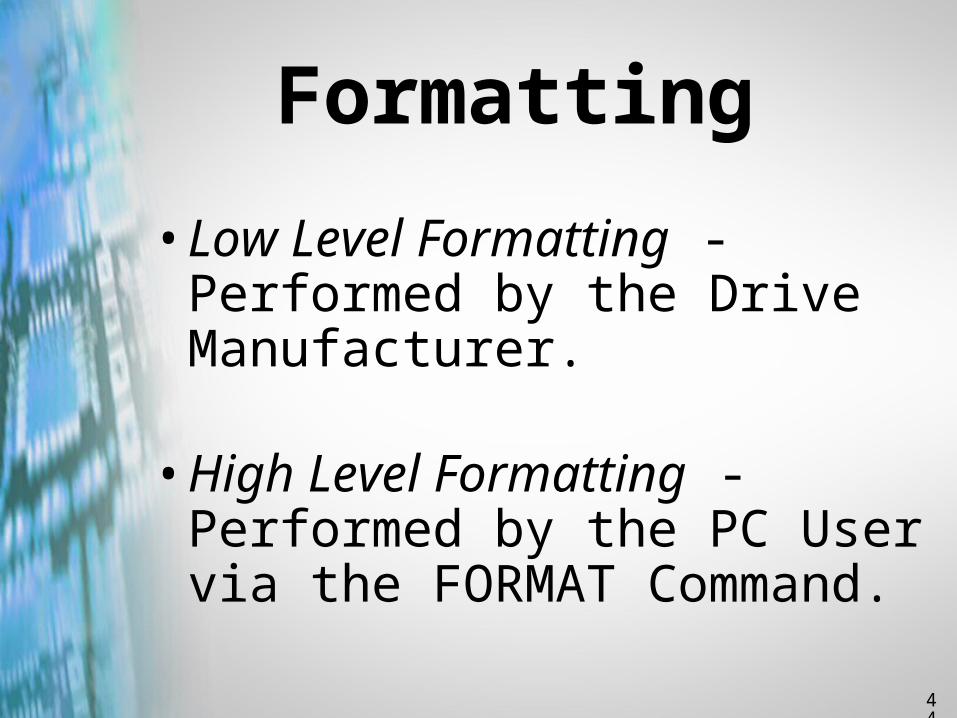
Formatting
• Low Level Formatting - Performed by the Drive Manufacturer.
• High Level Formatting - Performed by the PC User via the FORMAT Command.
45
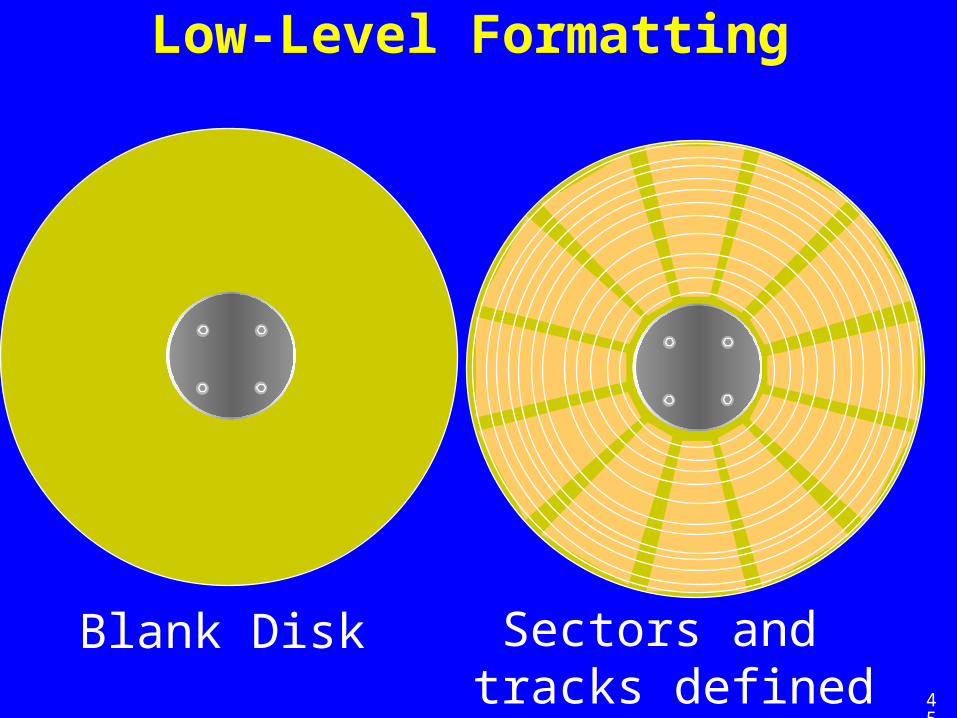
Blank Disk Sectors and tracks defined
Low-Level Formatting
46
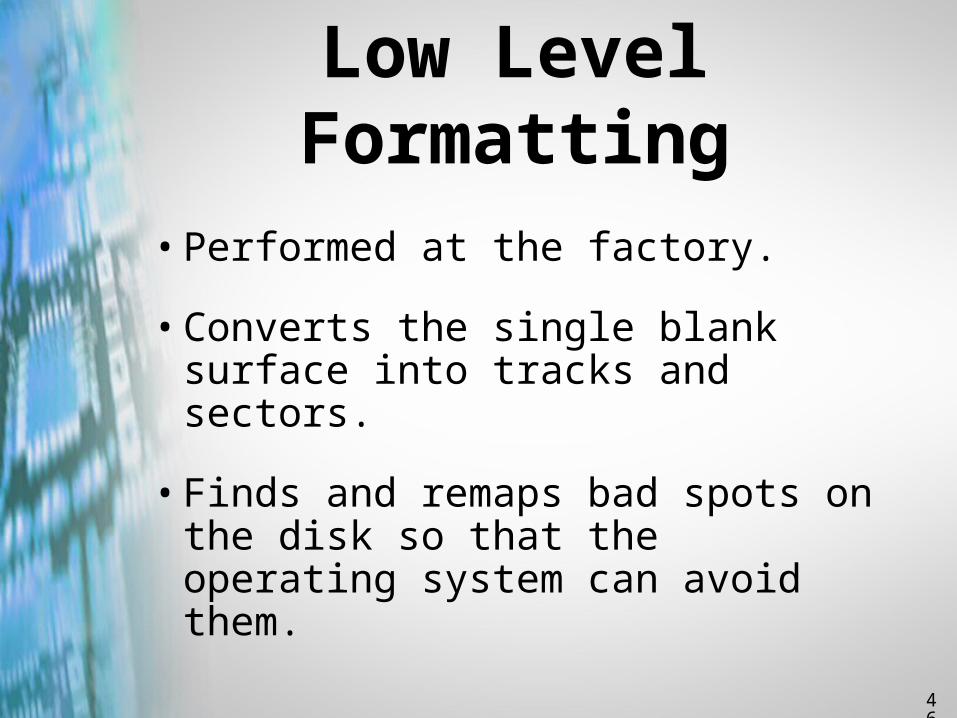
Low Level Formatting
• Performed at the factory.
• Converts the single blank surface into tracks and sectors.
• Finds and remaps bad spots on the disk so that the operating system can avoid them.
47
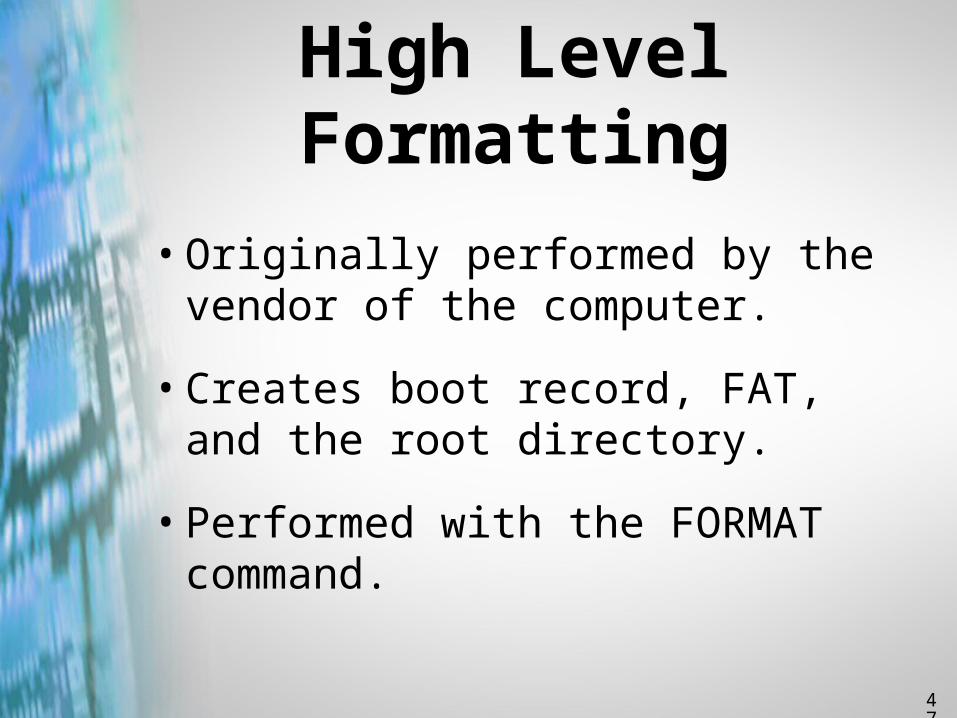
High Level Formatting
• Originally performed by the vendor of the computer.
• Creates boot record, FAT, and the root directory.
• Performed with the FORMAT command.
48
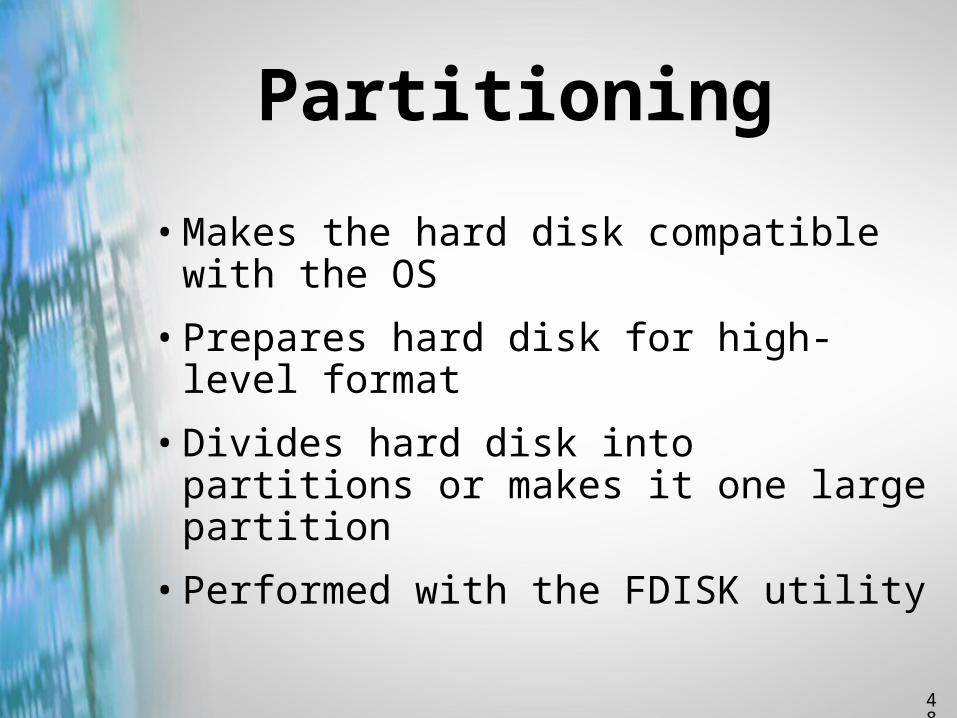
Partitioning
• Makes the hard disk compatible with the OS
• Prepares hard disk for high-level format
• Divides hard disk into partitions or makes it one large partition
• Performed with the FDISK utility
49
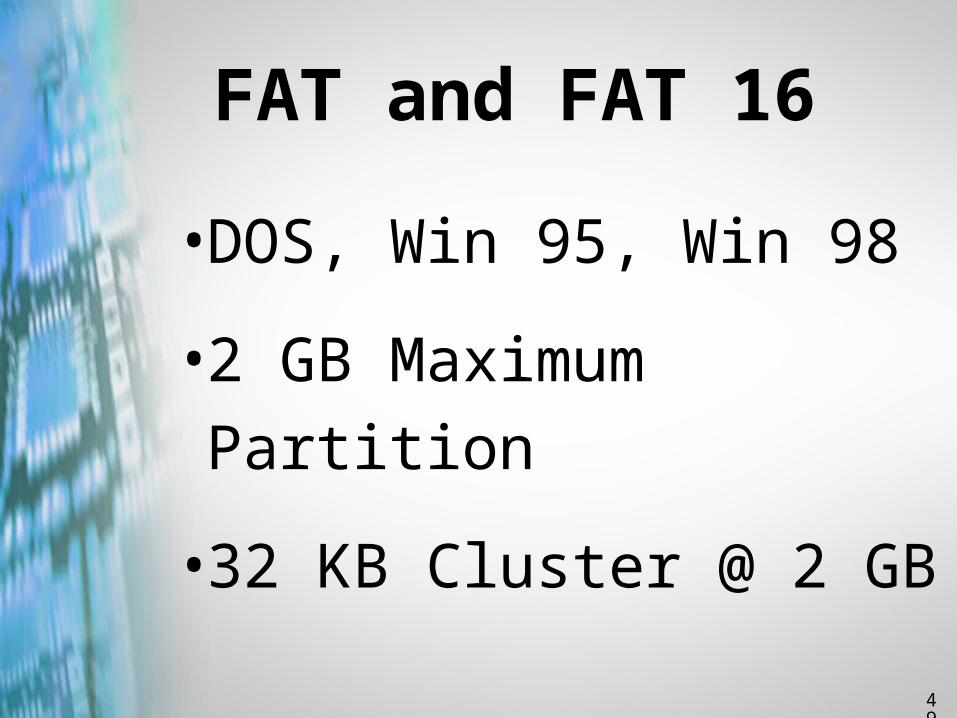
FAT and FAT 16
• DOS, Win 95, Win 98
• 2 GB Maximum Partition
• 32 KB Cluster @ 2 GB
50
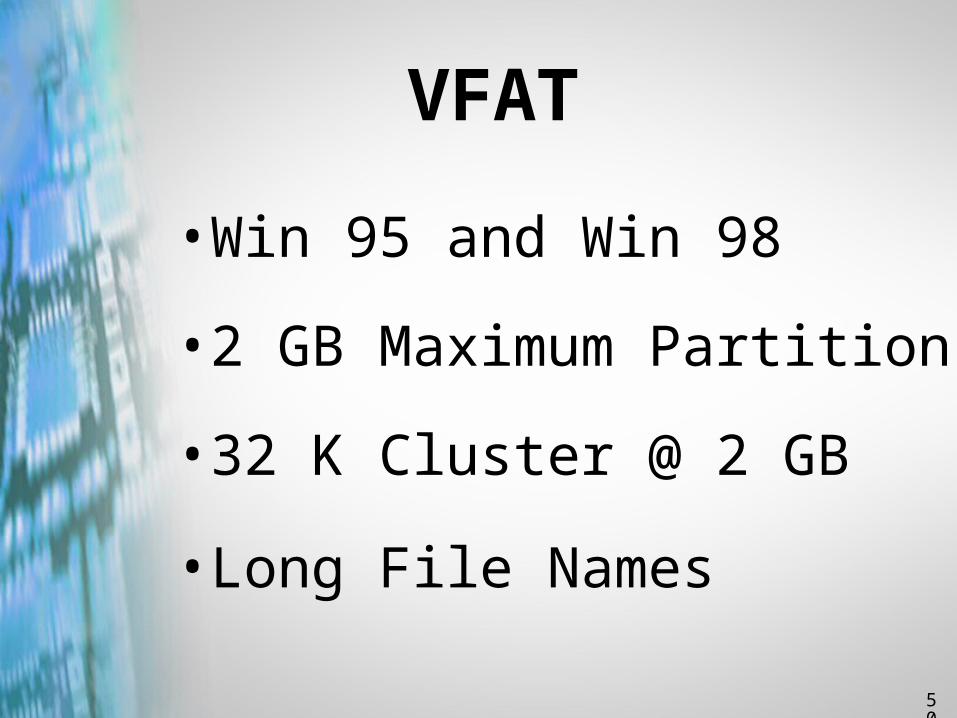
VFAT
• Win 95 and Win 98
• 2 GB Maximum Partition
• 32 K Cluster @ 2 GB
• Long File Names
51
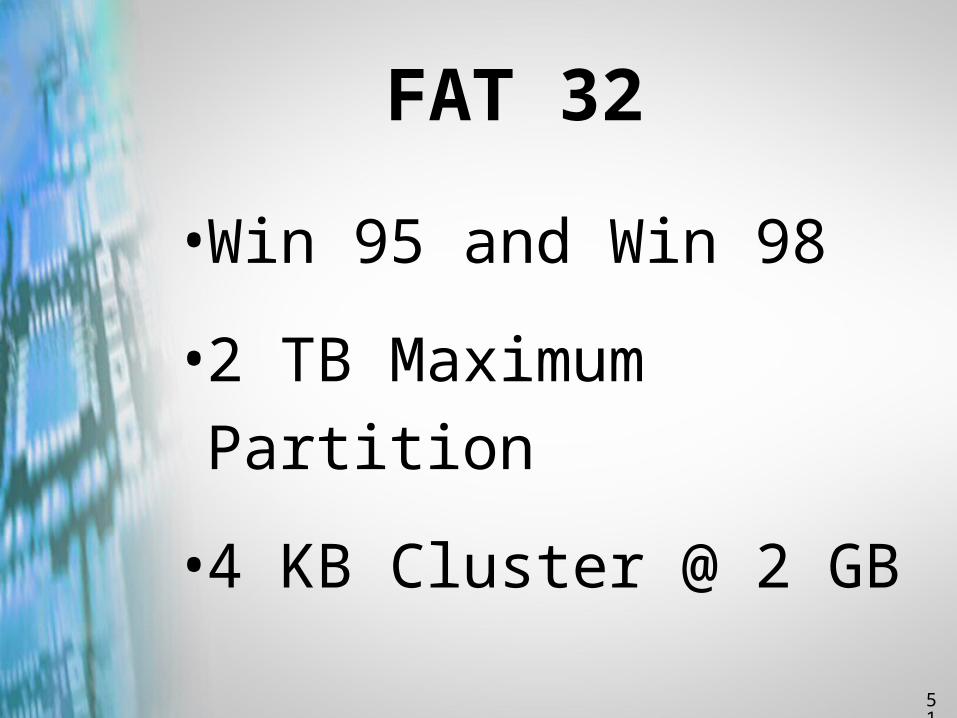
FAT 32
• Win 95 and Win 98
• 2 TB Maximum Partition
• 4 KB Cluster @ 2 GB
52
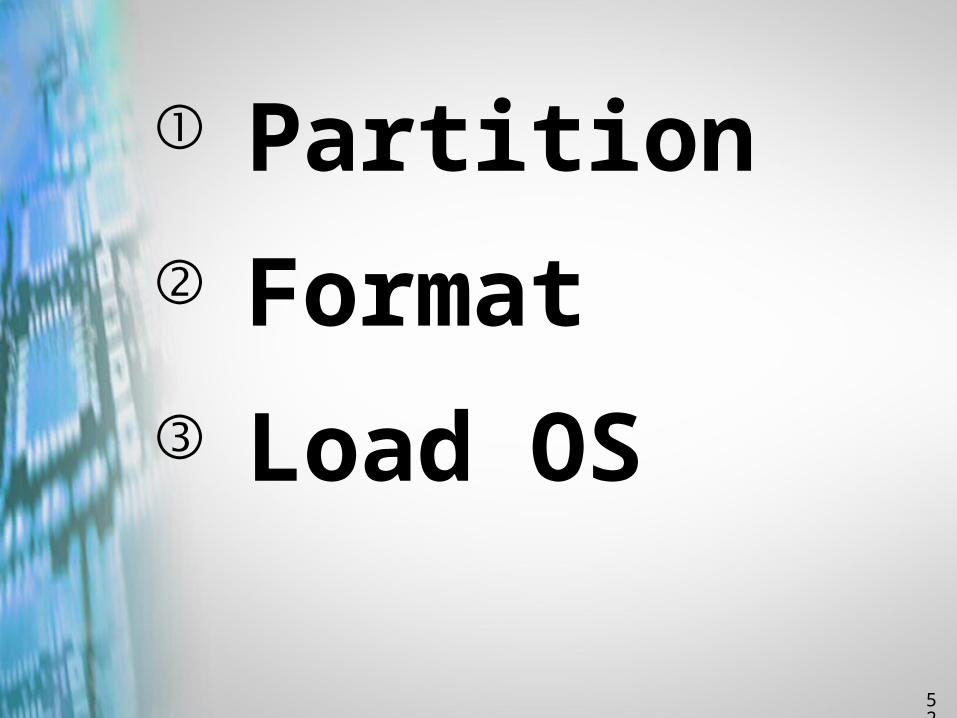
Partition
Format
Load OS
53
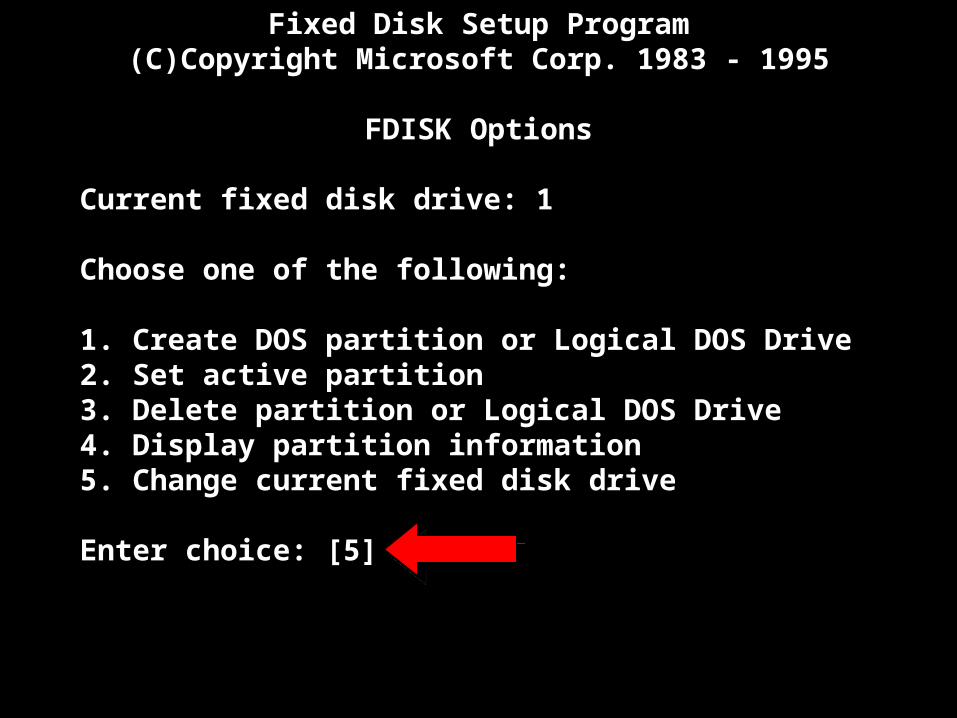
Fixed Disk Setup Program(C)Copyright Microsoft Corp. 1983 - 1995
FDISK Options
Current fixed disk drive: 1
Choose one of the following:
1. Create DOS partition or Logical DOS Drive 2. Set active partition 3. Delete partition or Logical DOS Drive 4. Display partition information 5. Change current fixed disk drive
Enter choice: [5]
54
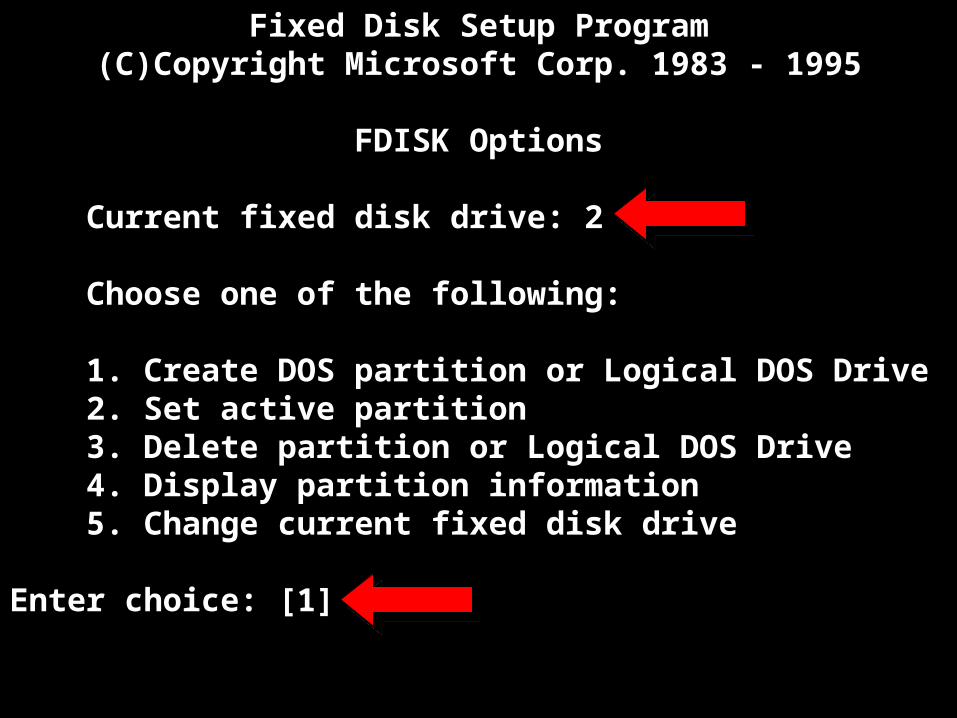
Fixed Disk Setup Program(C)Copyright Microsoft Corp. 1983 - 1995
FDISK Options
Current fixed disk drive: 2
Choose one of the following:
1. Create DOS partition or Logical DOS Drive 2. Set active partition 3. Delete partition or Logical DOS Drive 4. Display partition information 5. Change current fixed disk drive
Enter choice: [1]
55
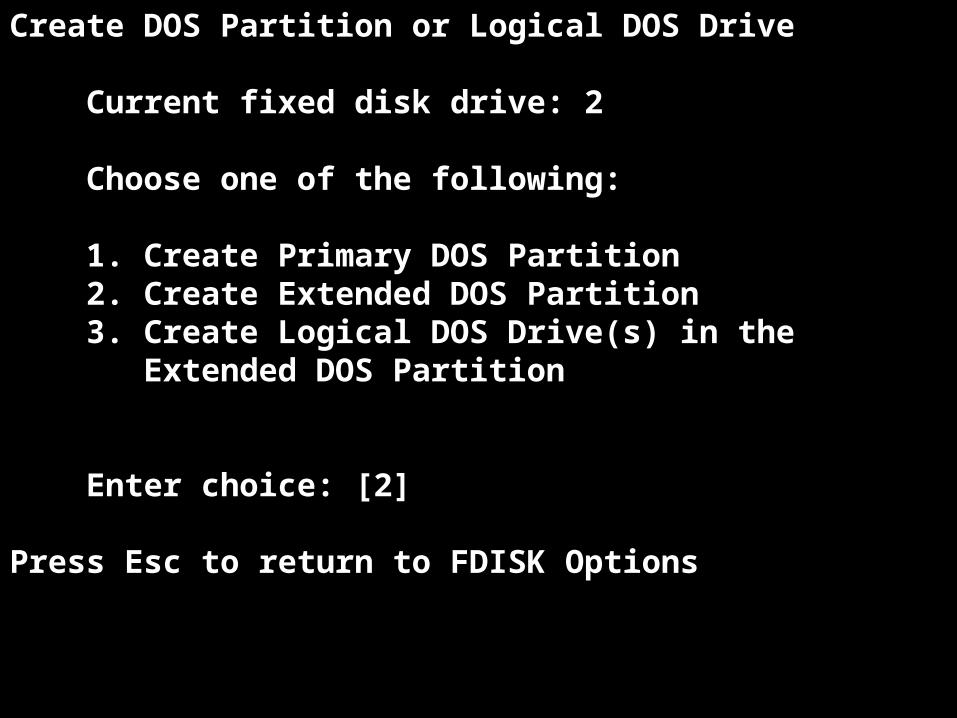
Create DOS Partition or Logical DOS Drive
Current fixed disk drive: 2
Choose one of the following:
1. Create Primary DOS Partition 2. Create Extended DOS Partition 3. Create Logical DOS Drive(s) in the Extended DOS Partition
Enter choice: [2]
Press Esc to return to FDISK Options
56
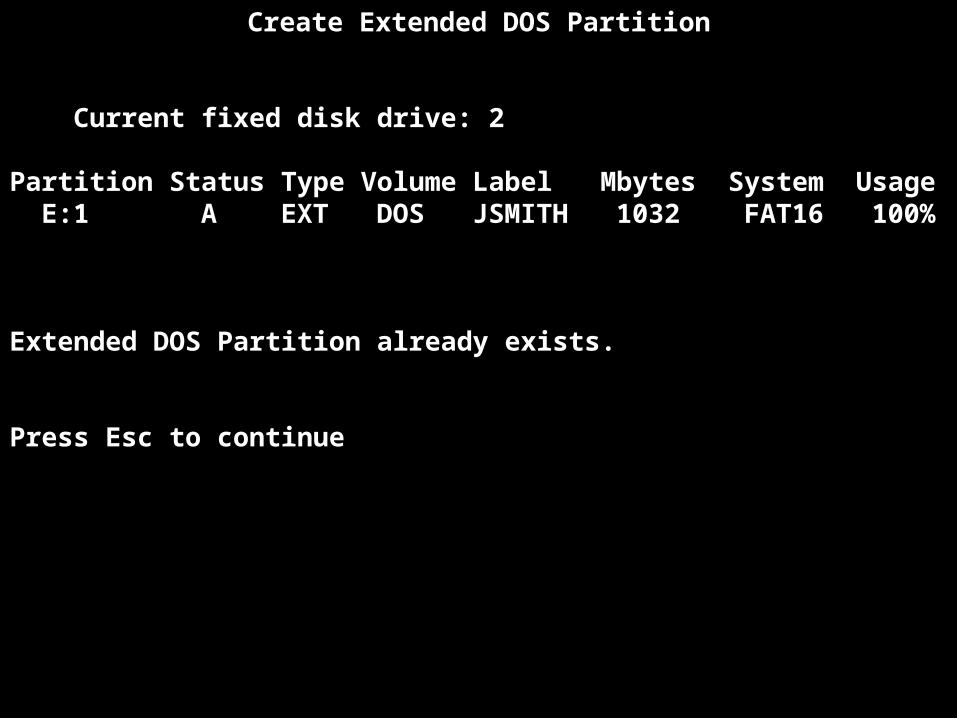
Create Extended DOS Partition
Current fixed disk drive: 2
Partition Status Type Volume Label Mbytes System Usage E:1 A EXT DOS JSMITH 1032 FAT16 100%
Extended DOS Partition already exists.
Press Esc to continue
57
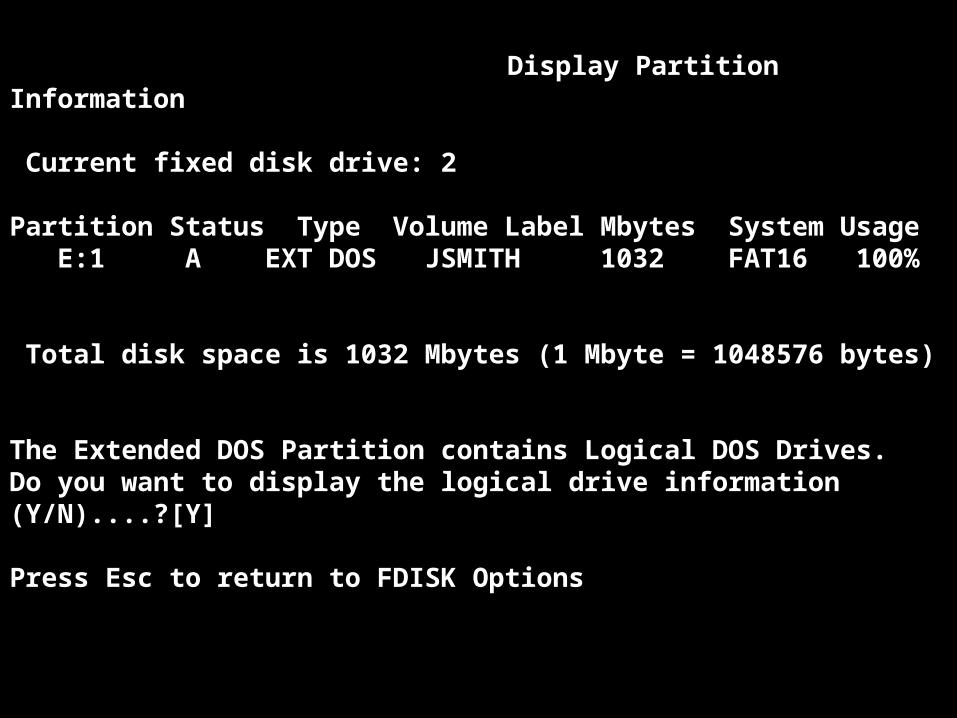
Display Partition Information
Current fixed disk drive: 2
Partition Status Type Volume Label Mbytes System Usage E:1 A EXT DOS JSMITH 1032 FAT16 100%
Total disk space is 1032 Mbytes (1 Mbyte = 1048576 bytes)
The Extended DOS Partition contains Logical DOS Drives.Do you want to display the logical drive information (Y/N)....?[Y]
Press Esc to return to FDISK Options
58
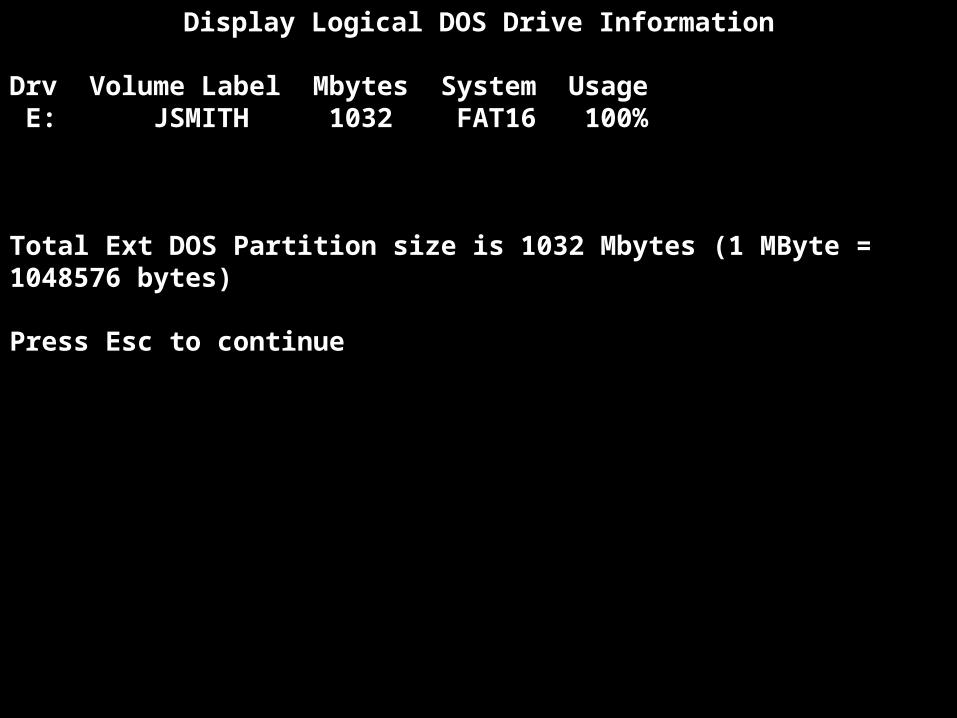
Display Logical DOS Drive Information
Drv Volume Label Mbytes System Usage E: JSMITH 1032 FAT16 100%
Total Ext DOS Partition size is 1032 Mbytes (1 MByte = 1048576 bytes)
Press Esc to continue

59
You must FORMAT
ALL new
Logical Drives.
You must FORMAT
ALL new
Logical Drives.
60
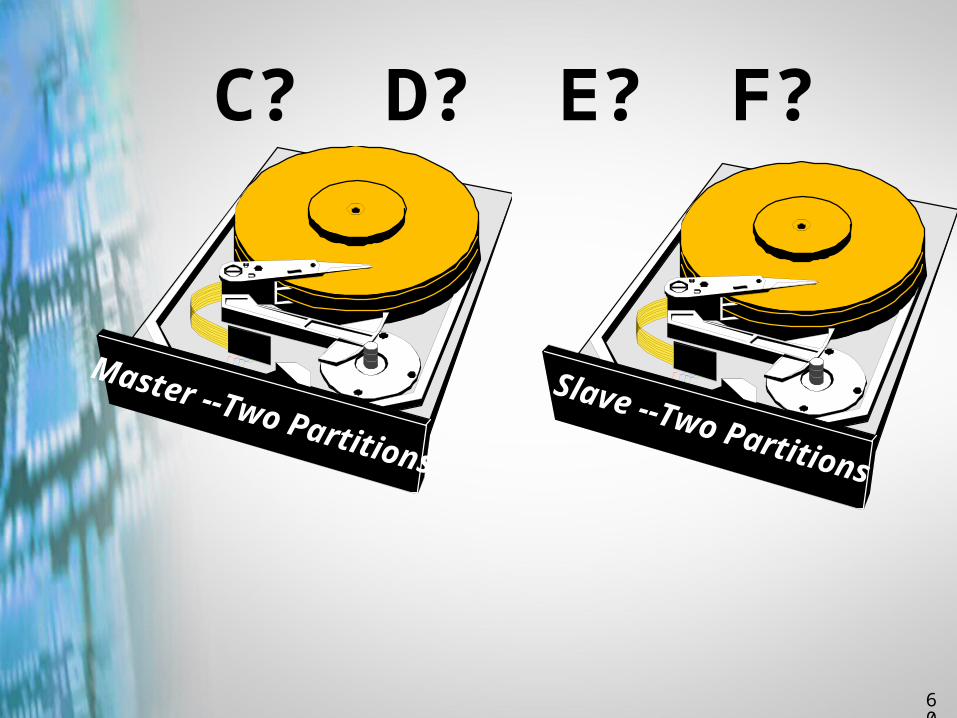
C? D? E? F?
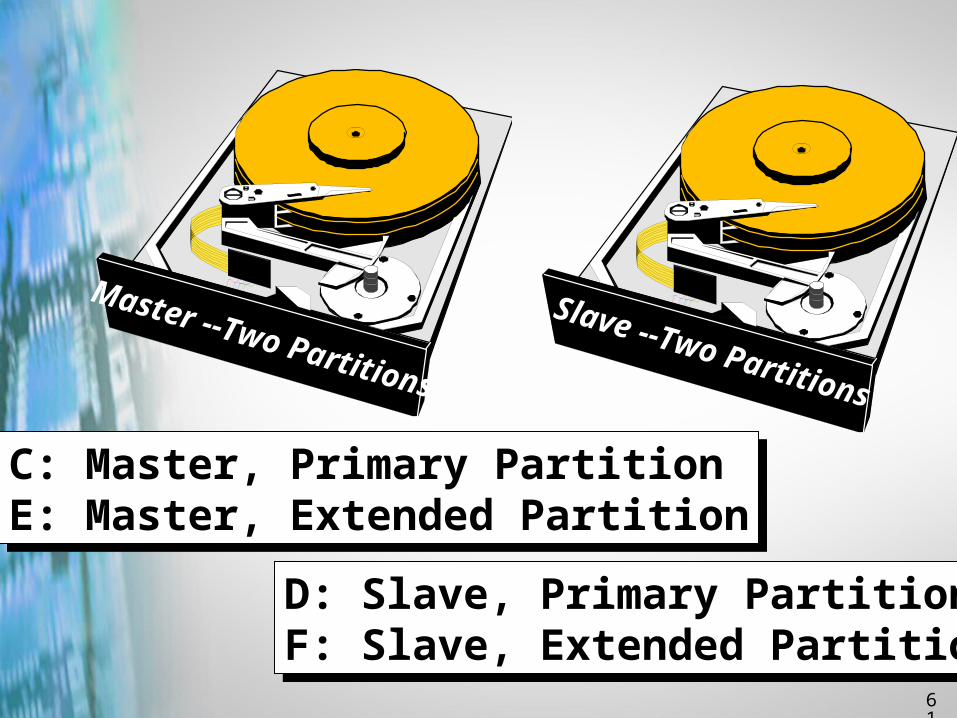
Master --Two Partitions
Slave --Two Partitions
61
Master --Two Partitions
Slave --Two Partitions
C: Master, Primary PartitionE: Master, Extended Partition
C: Master, Primary PartitionE: Master, Extended Partition
D: Slave, Primary PartitionF: Slave, Extended Partition
D: Slave, Primary PartitionF: Slave, Extended Partition

Copyright © 2002 Heathkit Company, Inc. All rights reserved.
Maintaining a Hard Drive

63
Symptom
Hard drive performance has been slowing down over time.
64
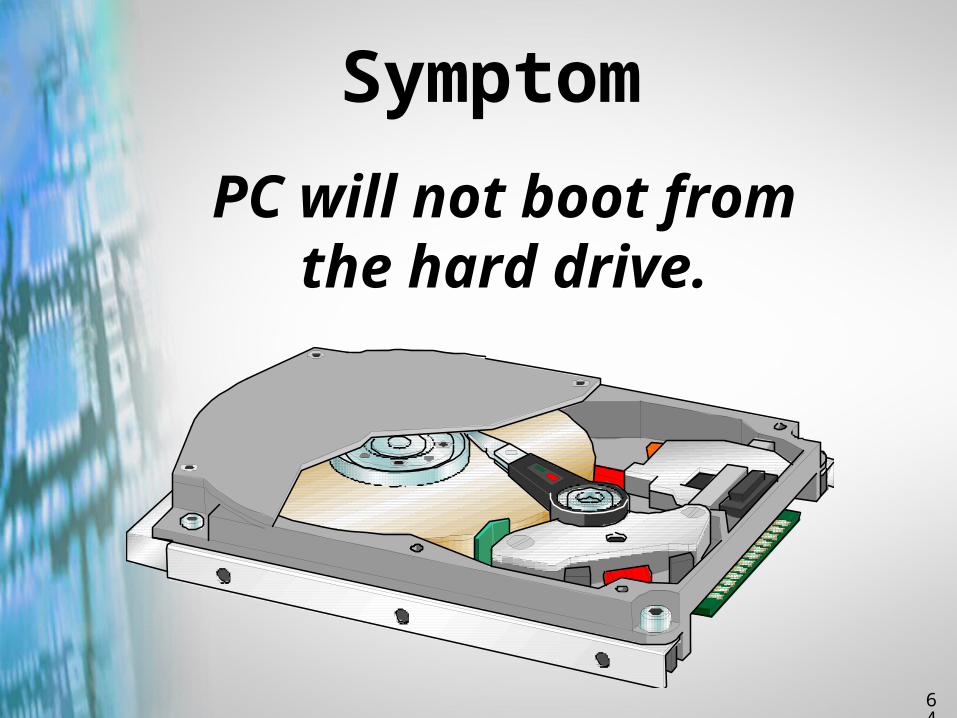
Symptom
PC will not boot from the hard drive.
65
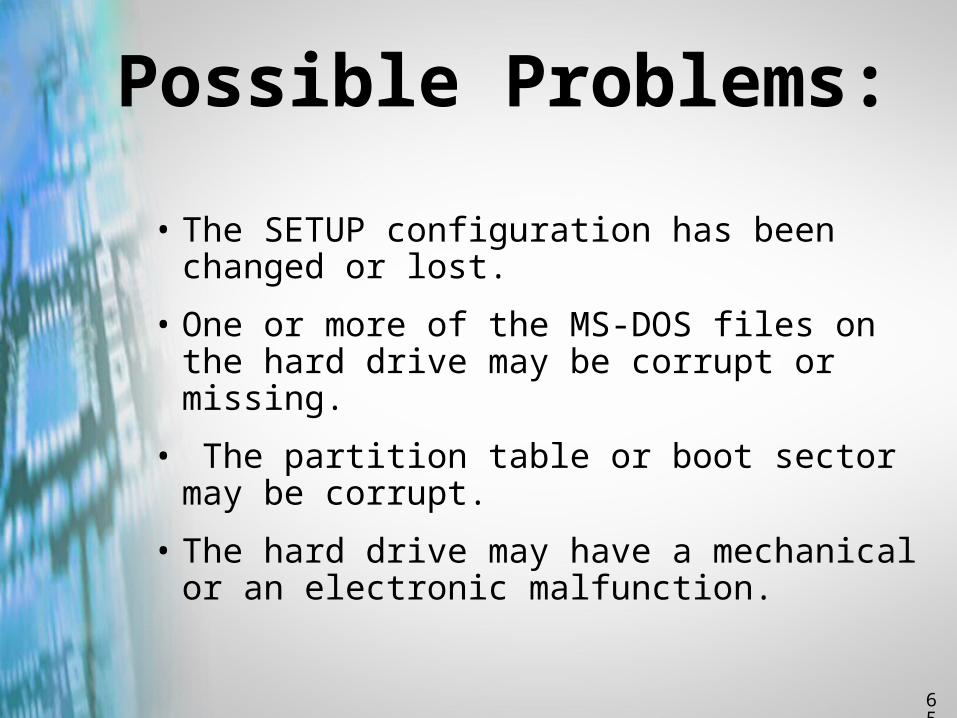
Possible Problems:
• The SETUP configuration has been changed or lost.
• One or more of the MS-DOS files on the hard drive may be corrupt or missing.
• The partition table or boot sector may be corrupt.
• The hard drive may have a mechanical or an electronic malfunction.
66
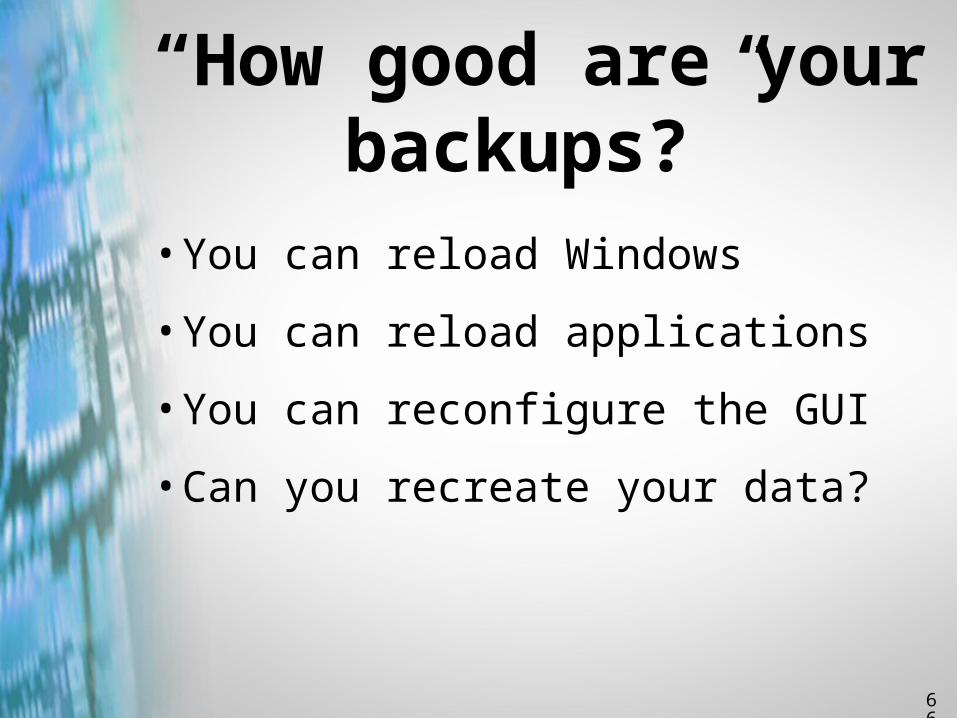
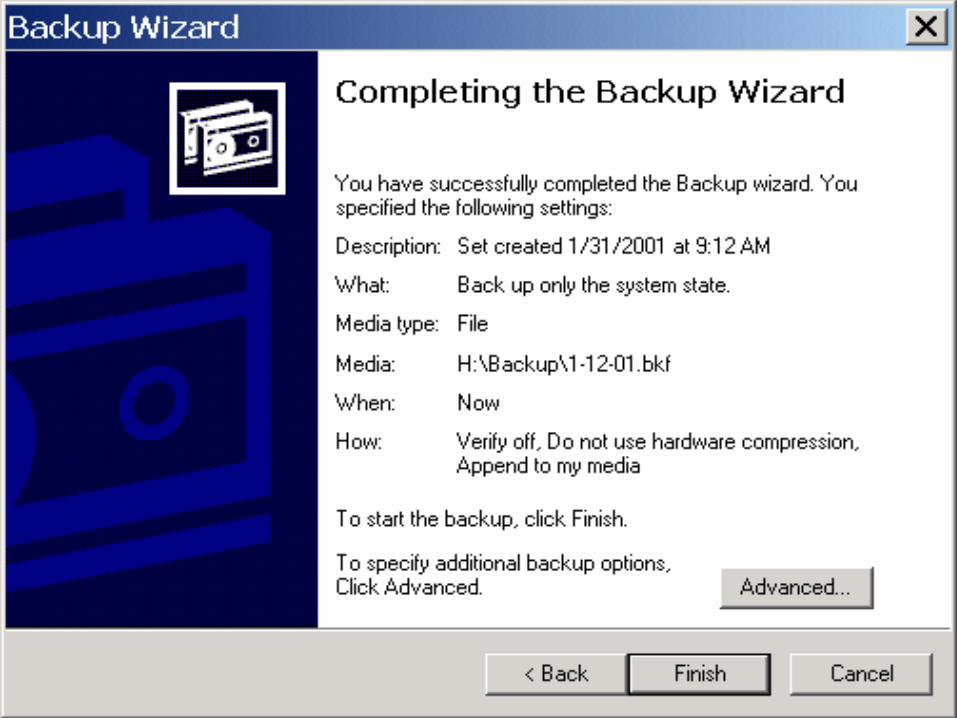
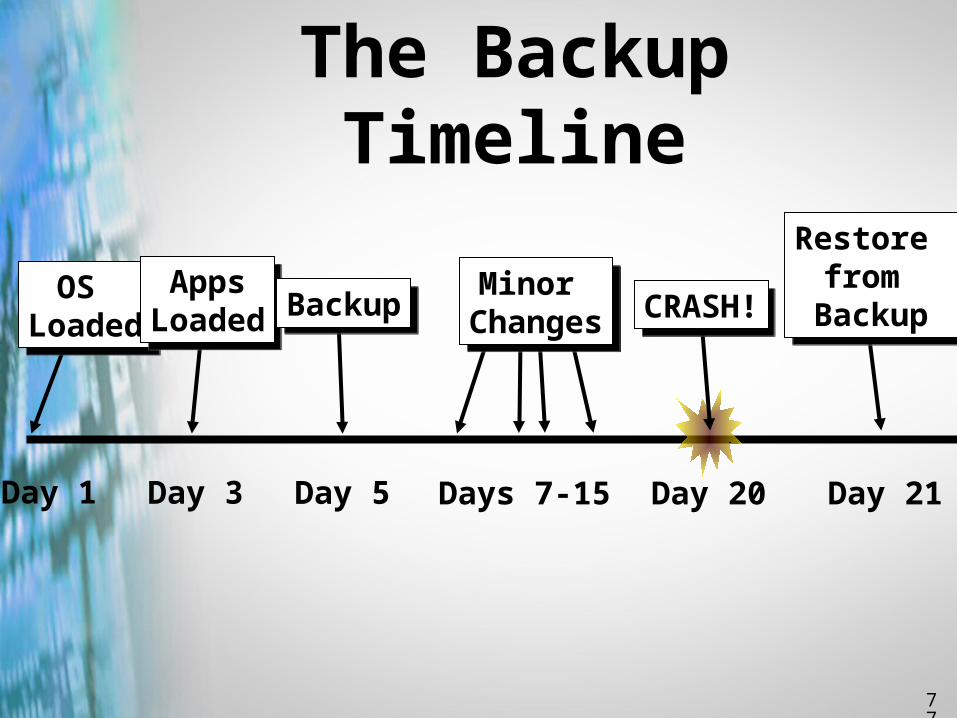
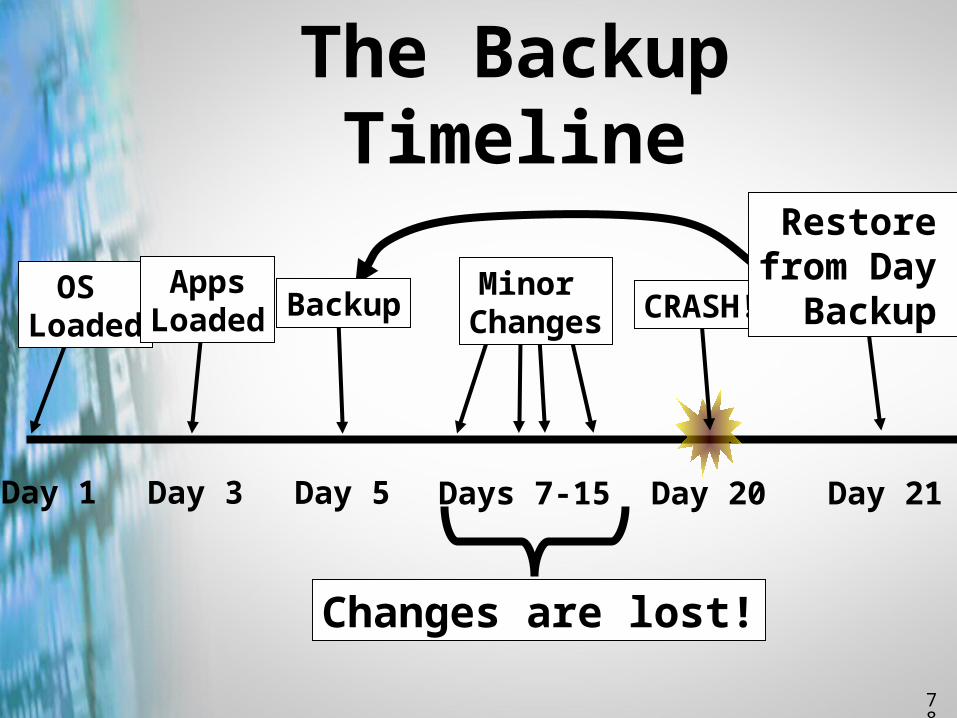
“How good are your backups?”
• You can reload Windows
• You can reload applications
• You can reconfigure the GUI
• Can you recreate your data?
67
68
69
70
71
72
73
74
75
76
77
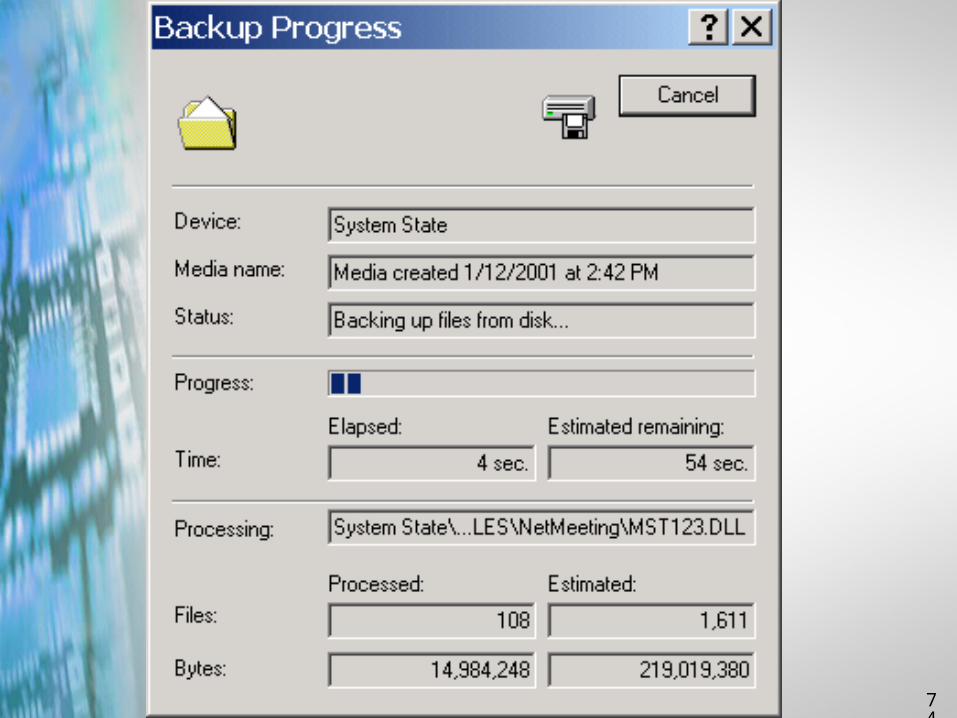
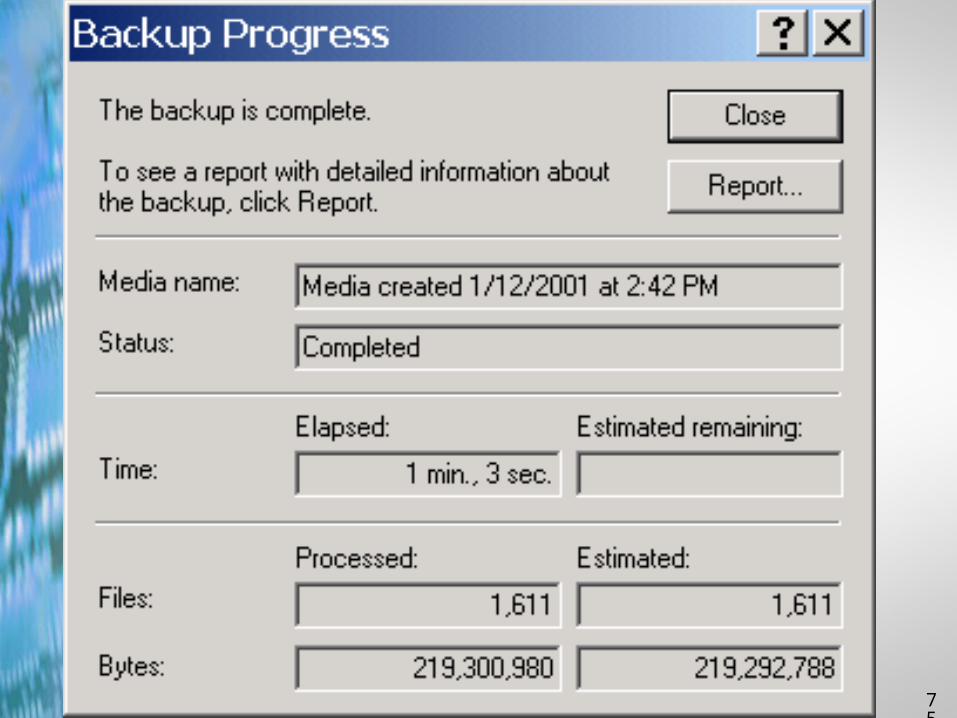
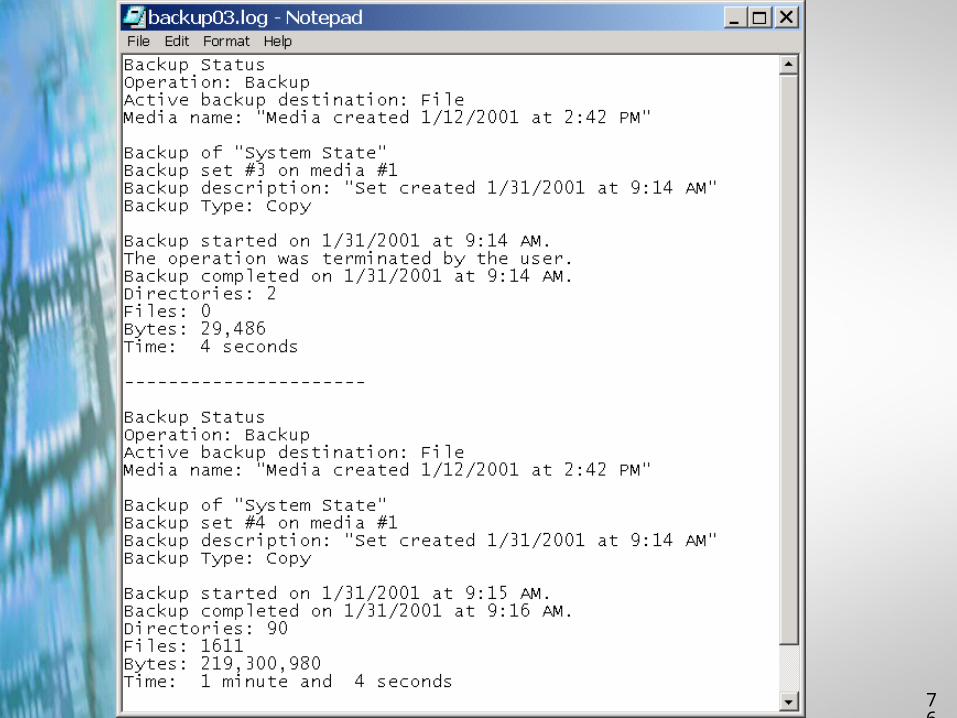
The Backup Timeline
Day 1 Day 3 Day 5 Days 7-15 Day 20 Day 21
OS Loaded
OS Loaded
AppsLoaded
AppsLoaded BackupBackup Minor
Changes
Minor Changes CRASH!CRASH!
Restore from
Backup
Restore from
Backup
78
The Backup Timeline
OS Loaded
Day 1 Day 3 Day 5 Days 7-15 Day 20 Day 21
Changes are lost!
AppsLoaded Backup
Minor Changes CRASH!
Restore from Day 5
Backup
79
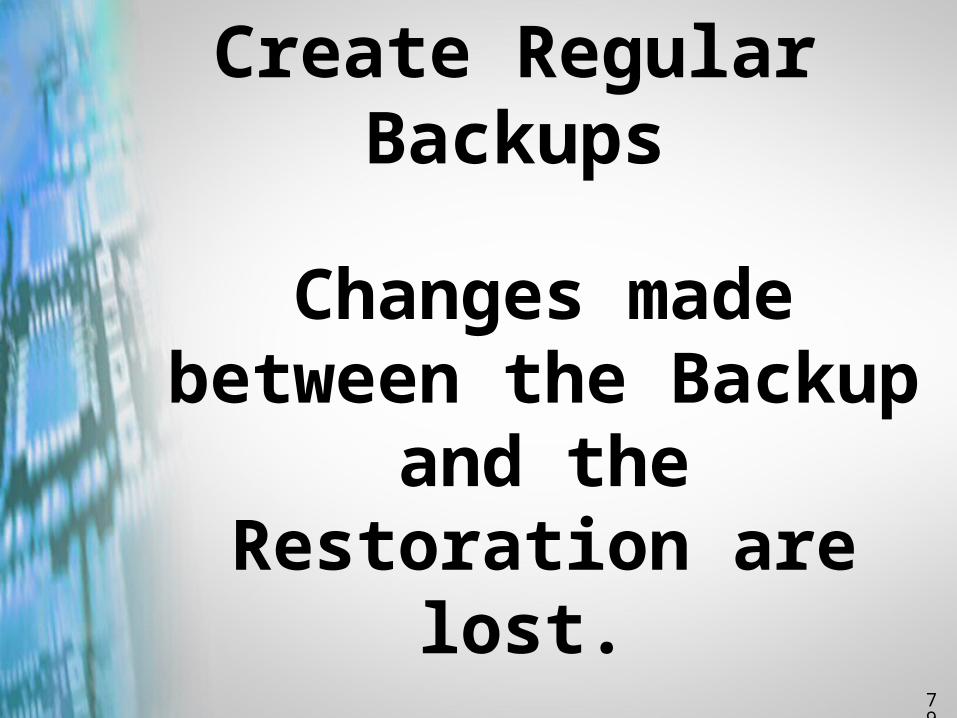
Create Regular Backups
Changes made between the Backup and the
Restoration are lost.

Copyright © 2002 Heathkit Company, Inc. All rights reserved.
Optical Drives
81
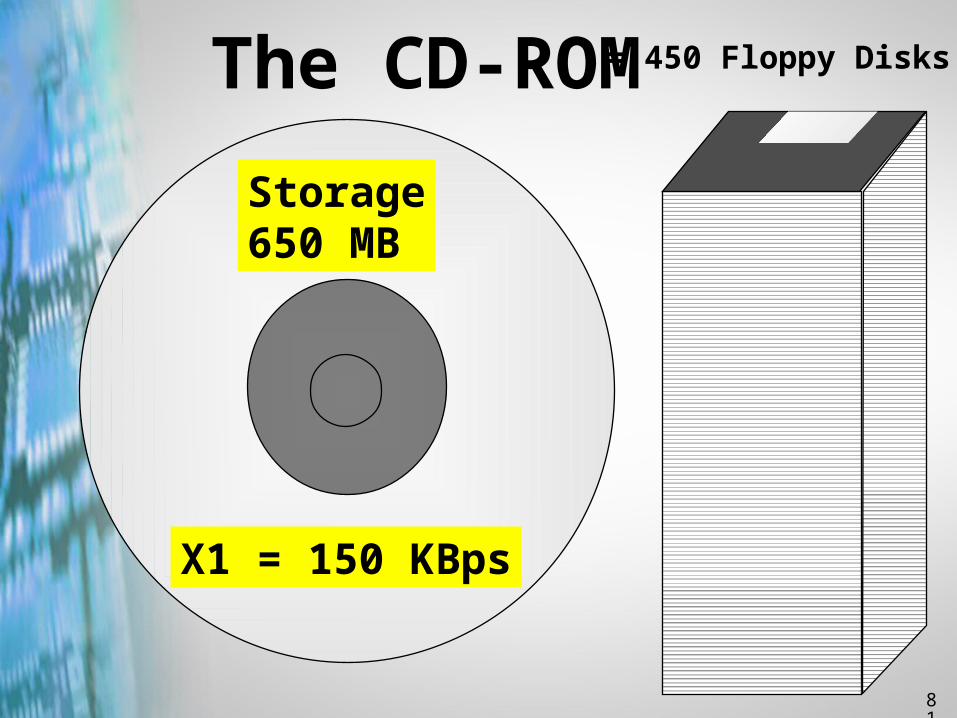
The CD-ROM
X1 = 150 KBps
Storage650 MB
= 450 Floppy Disks
82
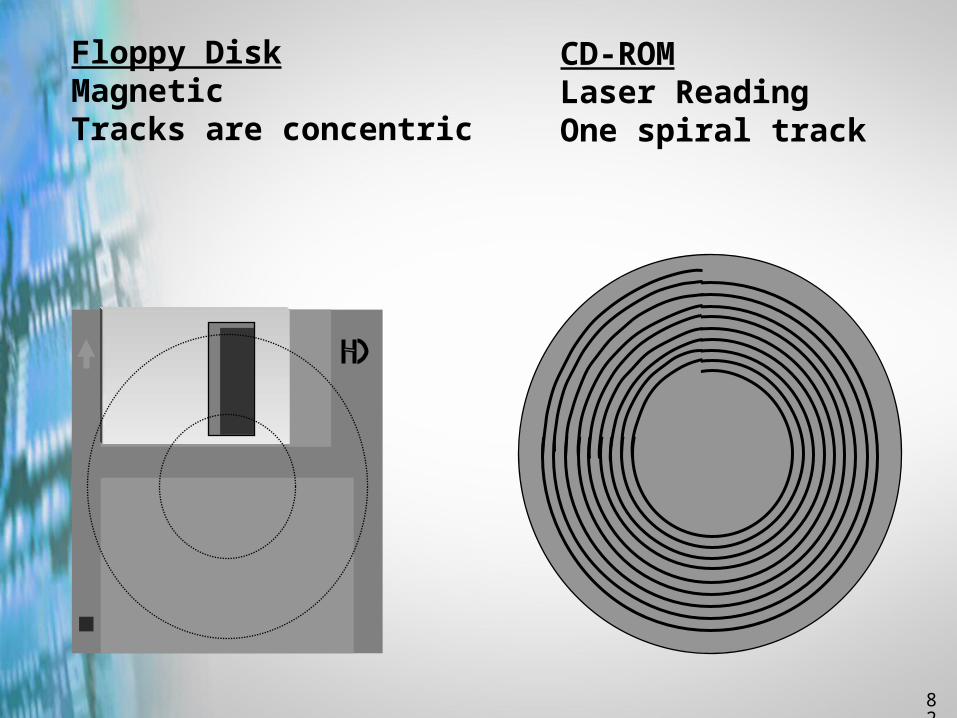
Floppy DiskMagneticTracks are concentric
CD-ROMLaser ReadingOne spiral track
83
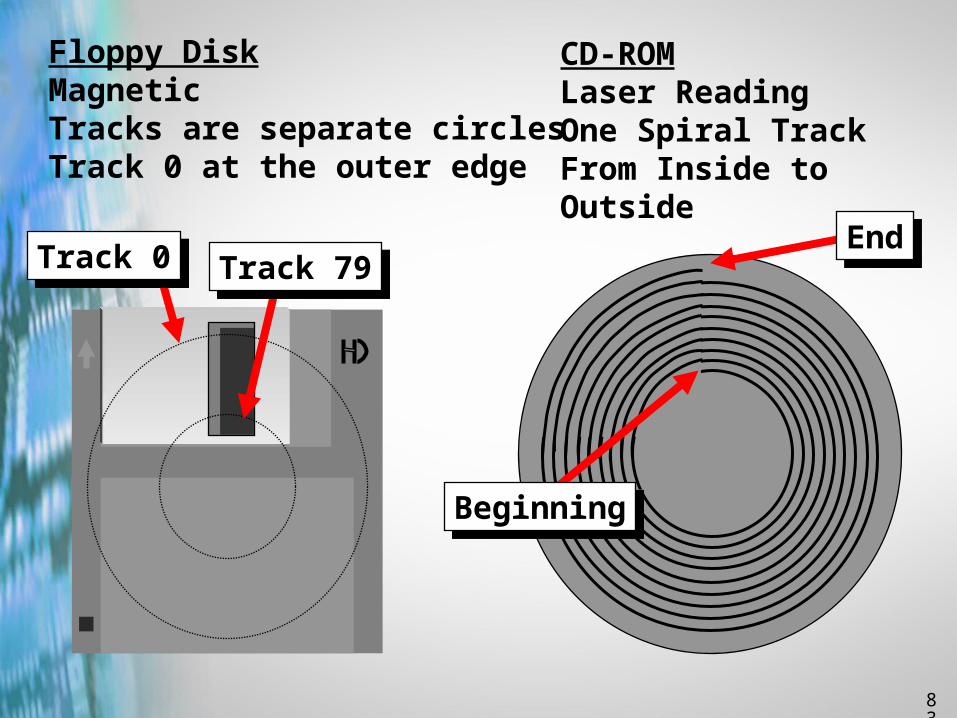
Floppy DiskMagneticTracks are separate circlesTrack 0 at the outer edge
CD-ROMLaser ReadingOne Spiral TrackFrom Inside to Outside
EndEnd
BeginningBeginning
Track 79Track 79Track 0Track 0
84
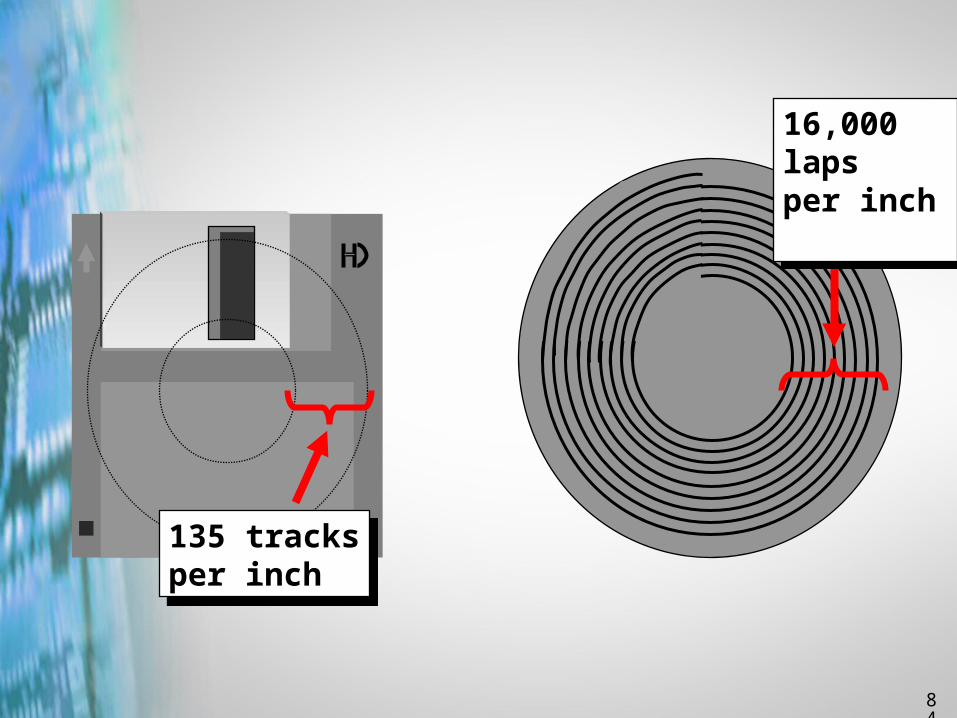
16,000 lapsper inch
16,000 lapsper inch
135 tracksper inch
135 tracksper inch
85
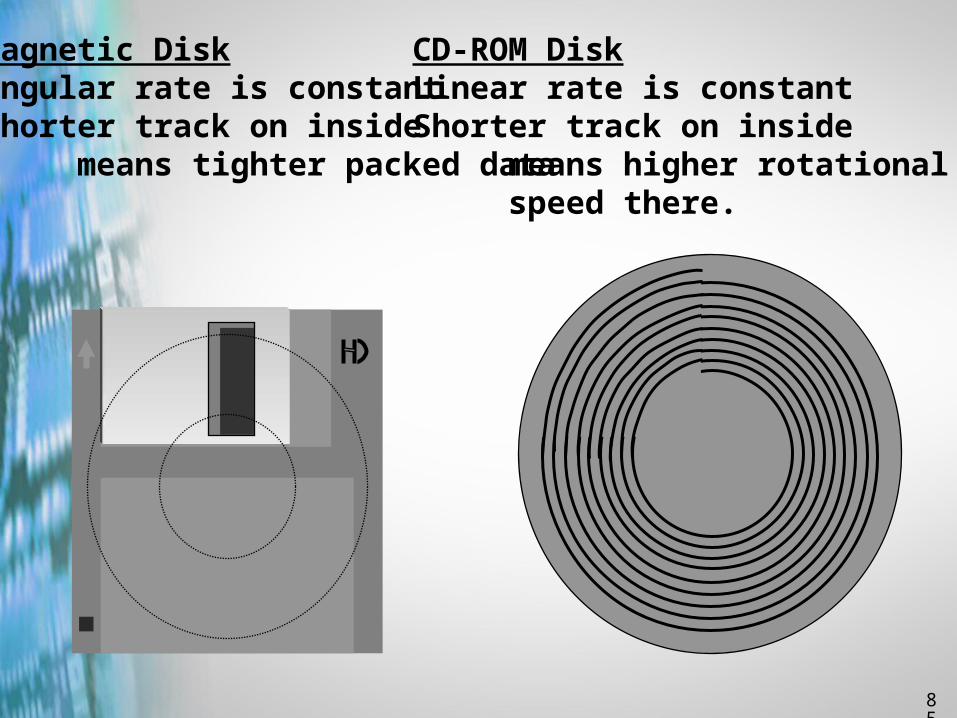
Magnetic DiskAngular rate is constantShorter track on inside means tighter packed data
CD-ROM DiskLinear rate is constantShorter track on inside means higher rotational speed there.
86
Track 0Track 0
Track 1Track 1
87
In addition to data, each sector also containsError Detection Codes (EDC) and Error Correcting Codes (ECC).
In addition to data, each sector also containsError Detection Codes (EDC) and Error Correcting Codes (ECC).
SectorSector
88
Never wipe in line with the Sector!Never wipe in line with the Sector!
OKOK
89
Top or Label SideTop or Label Side
Clear Protective CoatingClear Protective Coating
ReflectiveMetalLayer
ReflectiveMetalLayer
90
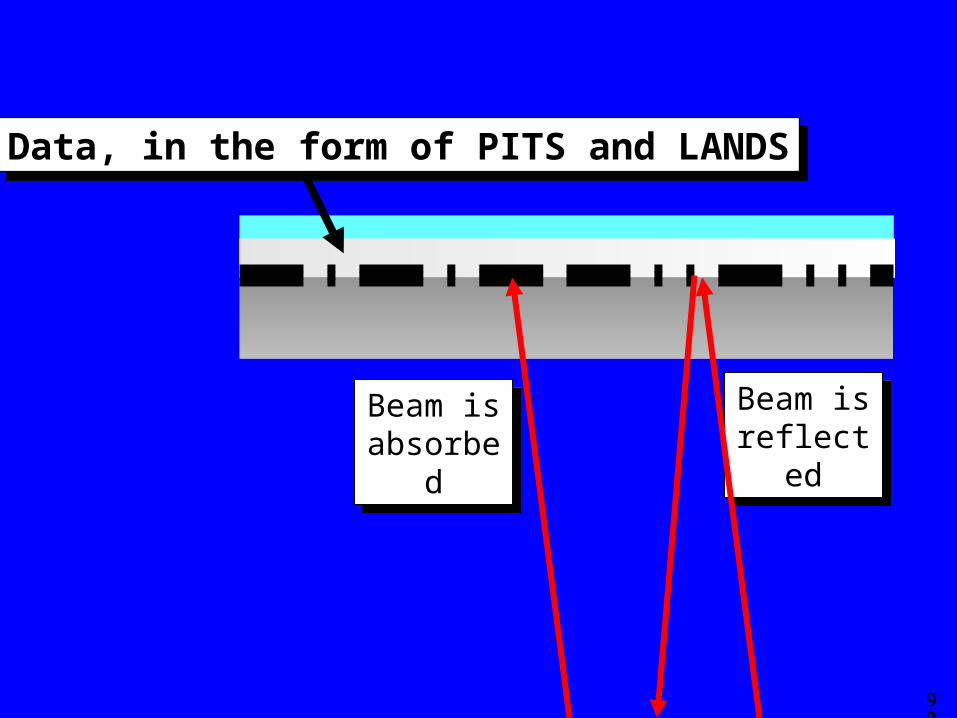
Data, in the form of PITS and LANDSData, in the form of PITS and LANDS
Beam is reflected
Beam is reflected
Beam is absorbed
Beam is absorbed
91
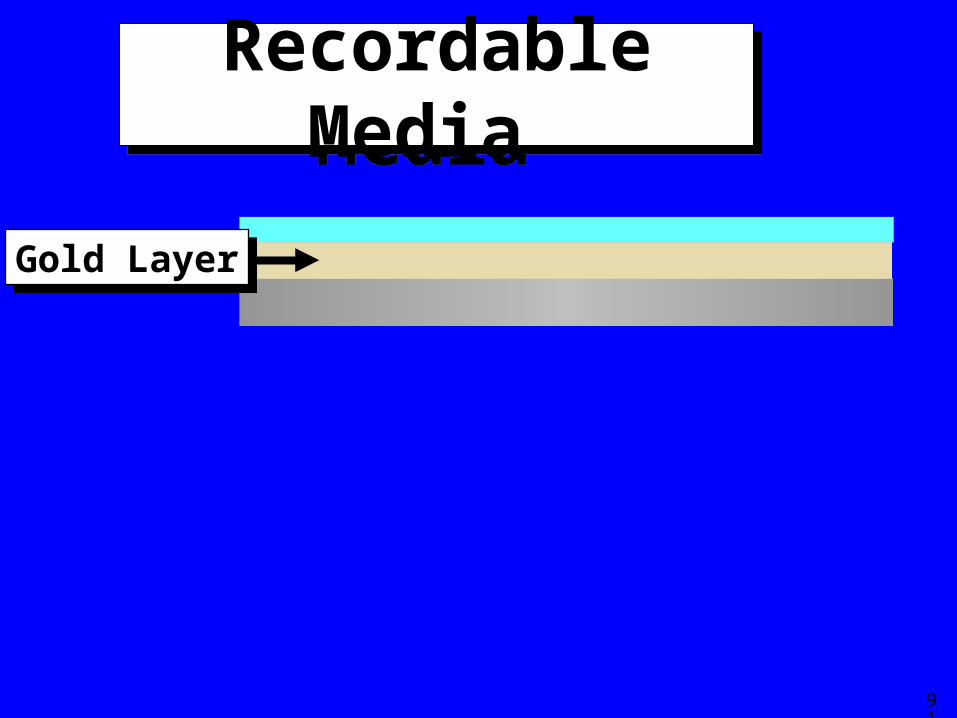
Recordable Media Recordable Media
Gold LayerGold Layer
92
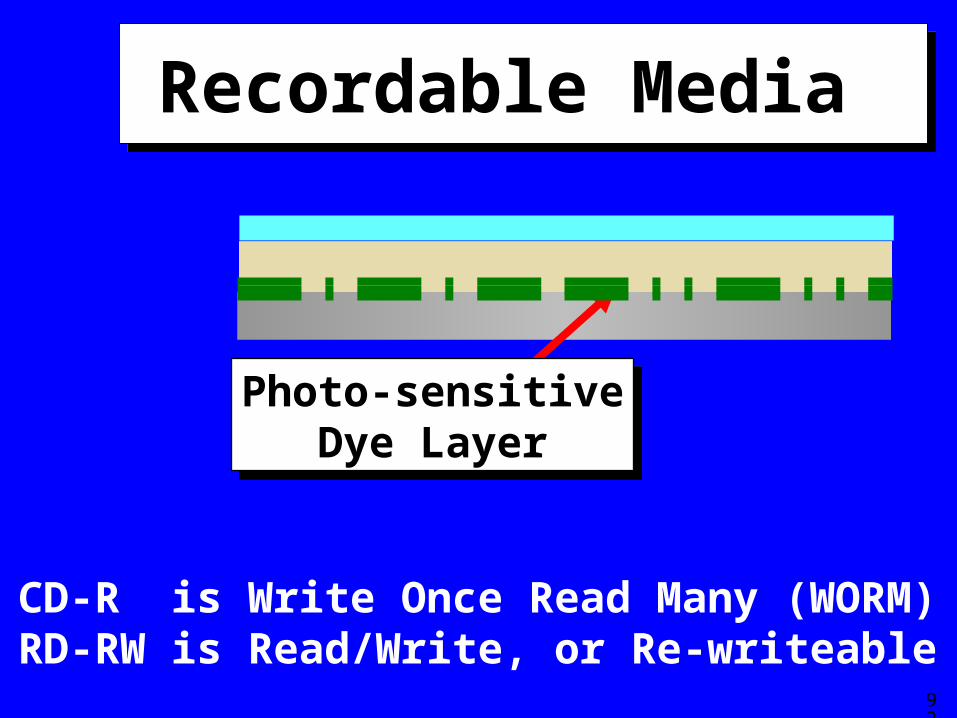
Recordable Media Recordable Media
CD-R is Write Once Read Many (WORM)RD-RW is Read/Write, or Re-writeable
Photo-sensitiveDye Layer
Photo-sensitiveDye Layer

Copyright © 2002 Heathkit Company, Inc. All rights reserved.
Connections and Specifications
94
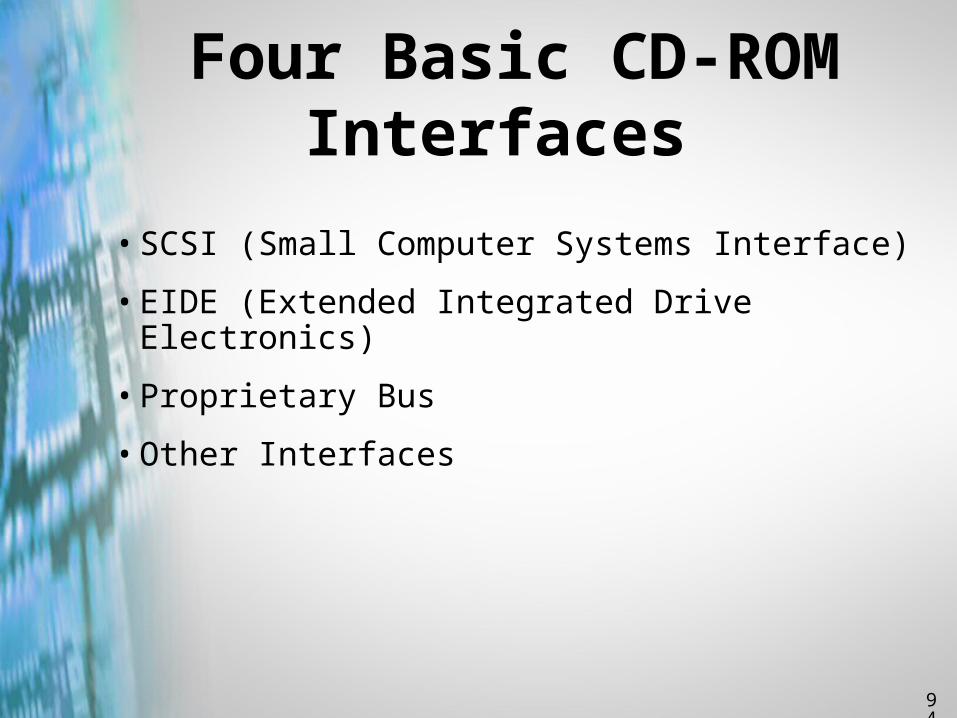
Four Basic CD-ROM Interfaces
• SCSI (Small Computer Systems Interface)
• EIDE (Extended Integrated Drive Electronics)
• Proprietary Bus
• Other Interfaces
95
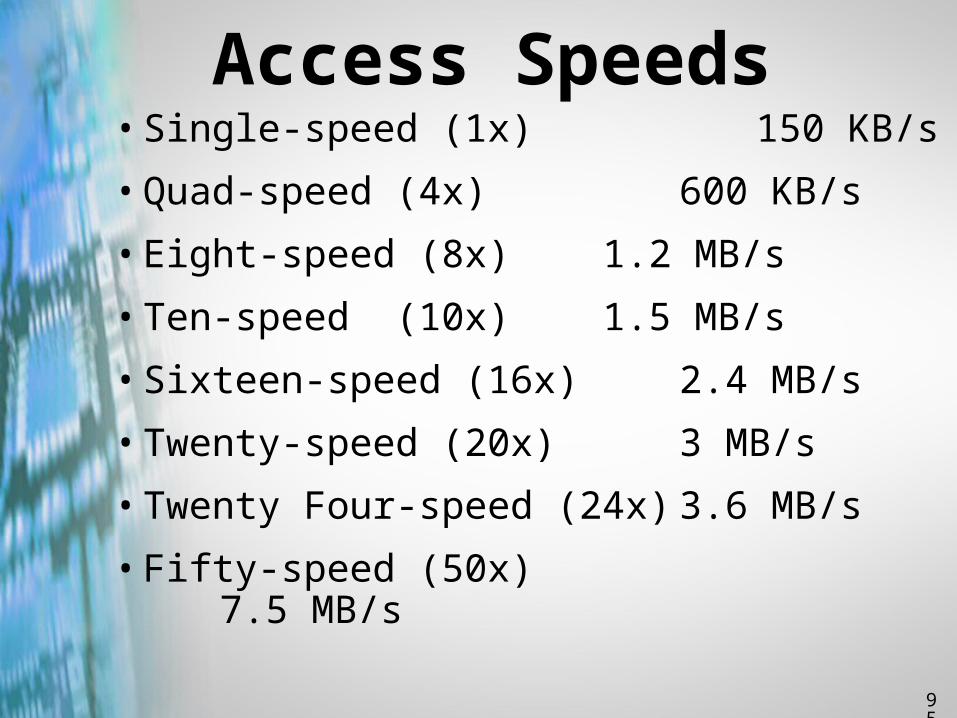
Access Speeds• Single-speed (1x) 150 KB/s
• Quad-speed (4x) 600 KB/s
• Eight-speed (8x) 1.2 MB/s
• Ten-speed (10x) 1.5 MB/s
• Sixteen-speed (16x) 2.4 MB/s
• Twenty-speed (20x) 3 MB/s
• Twenty Four-speed (24x) 3.6 MB/s
• Fifty-speed (50x) 7.5 MB/s
Copyright © 2002 Heathkit Company, Inc. All rights reserved.
Installing and Maintaining a
CD-ROM
97
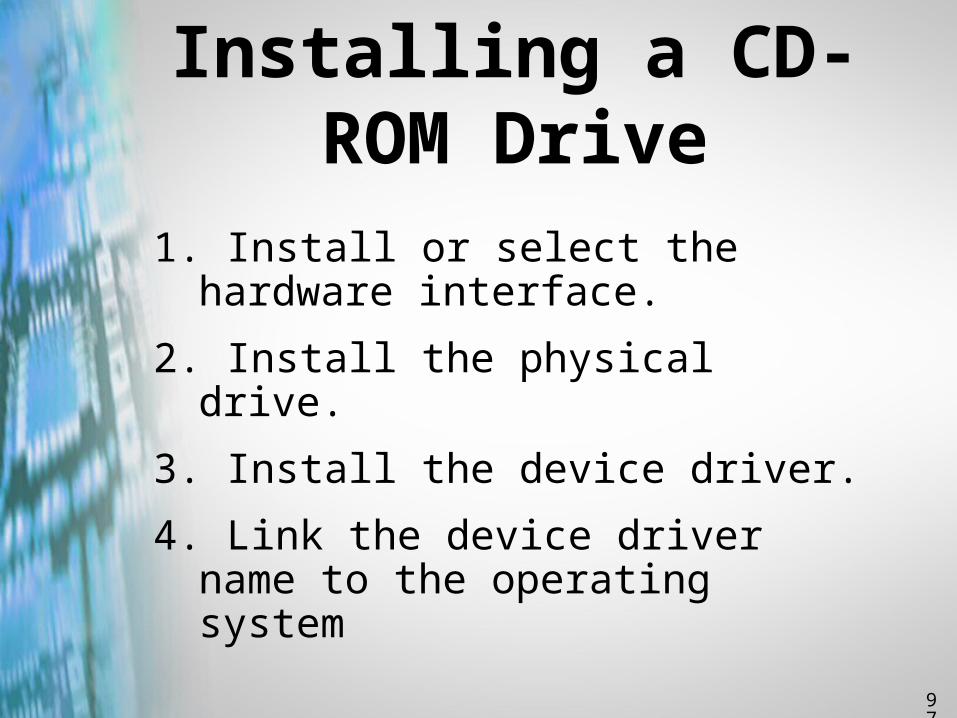
Installing a CD-ROM Drive
1. Install or select the hardware interface.
2. Install the physical drive.
3. Install the device driver.
4. Link the device driver name to the operating system
98
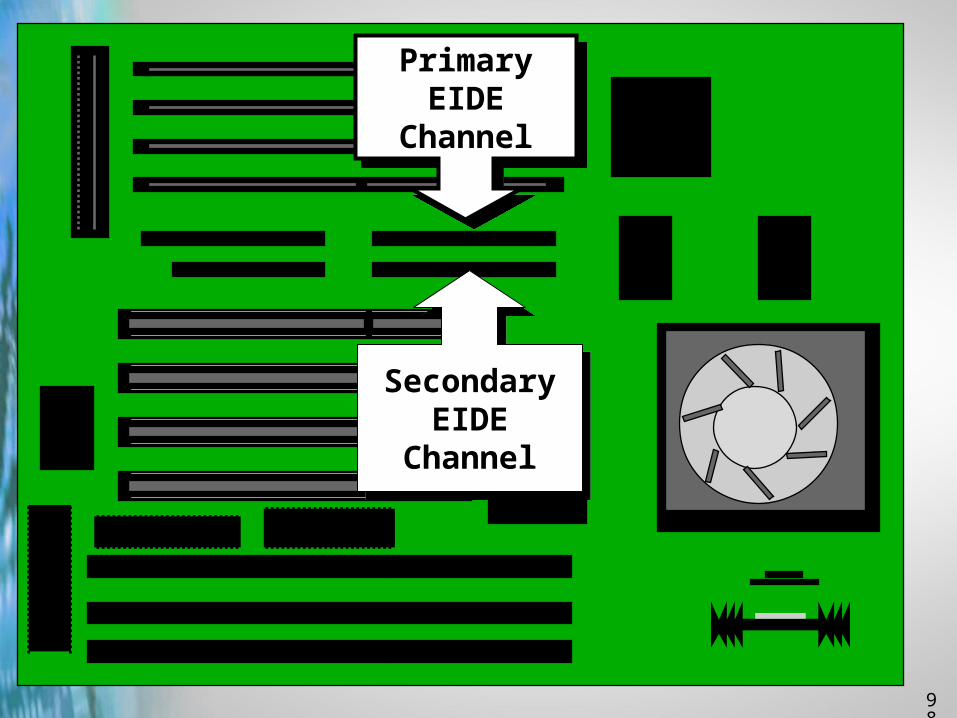
PrimaryEIDE
Channel
PrimaryEIDE
Channel
SecondaryEIDE
Channel
SecondaryEIDE
Channel
99
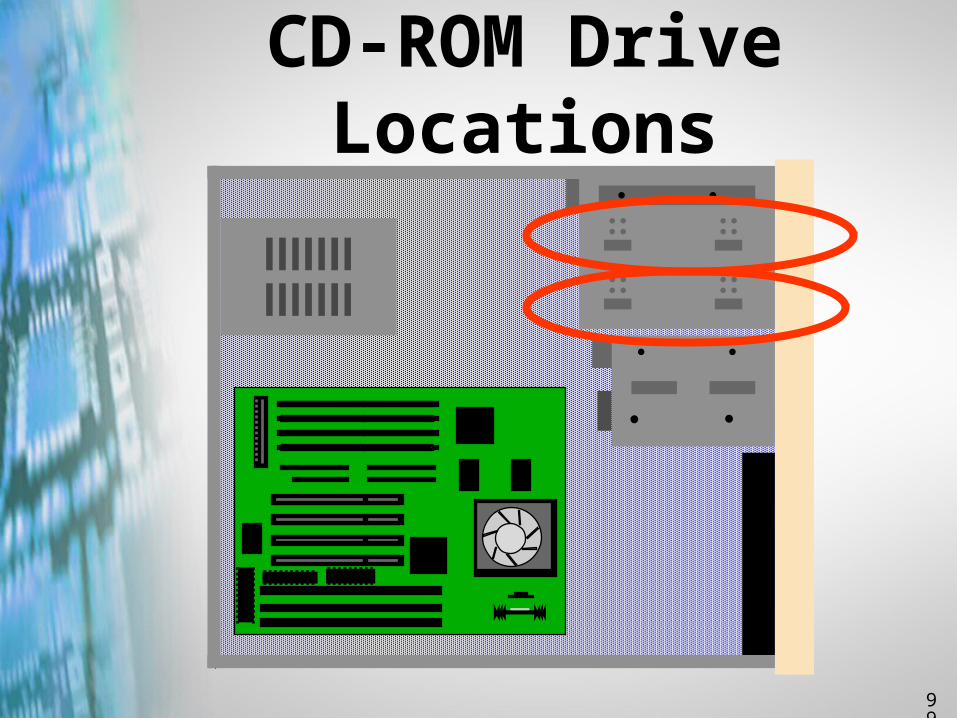
CD-ROM Drive Locations
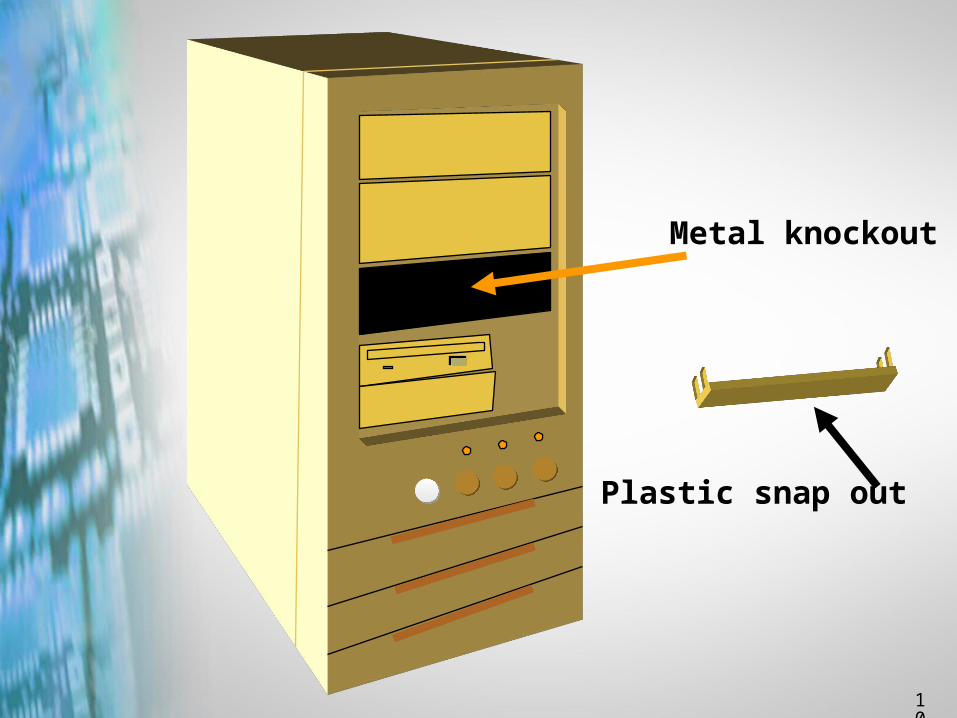
100
Metal knockout
Plastic snap out
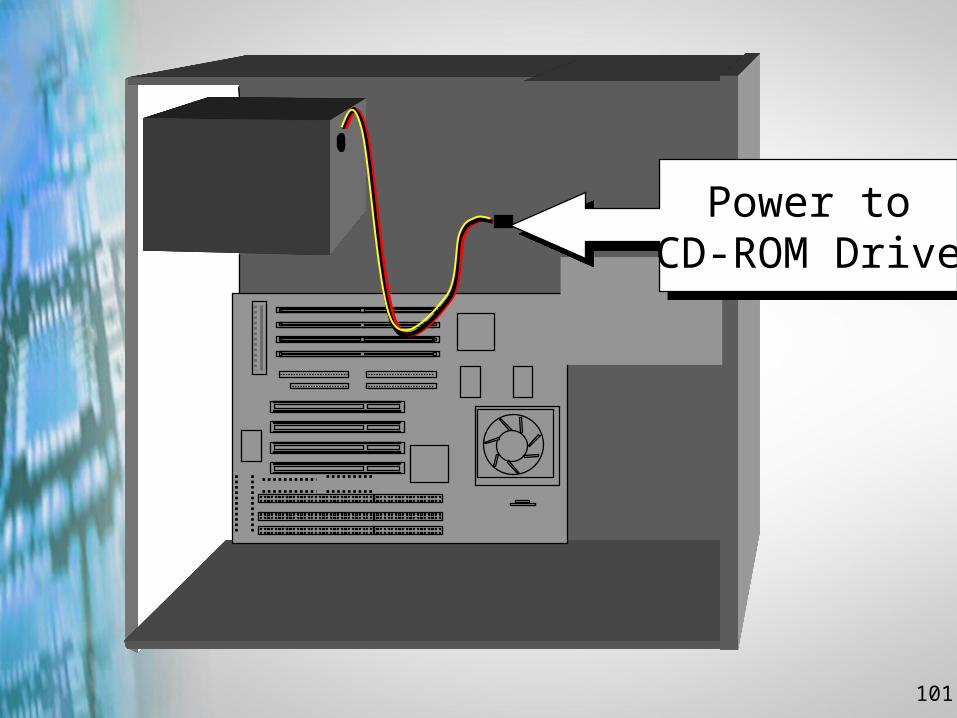
Power toCD-ROM Drive
Power toCD-ROM Drive
101
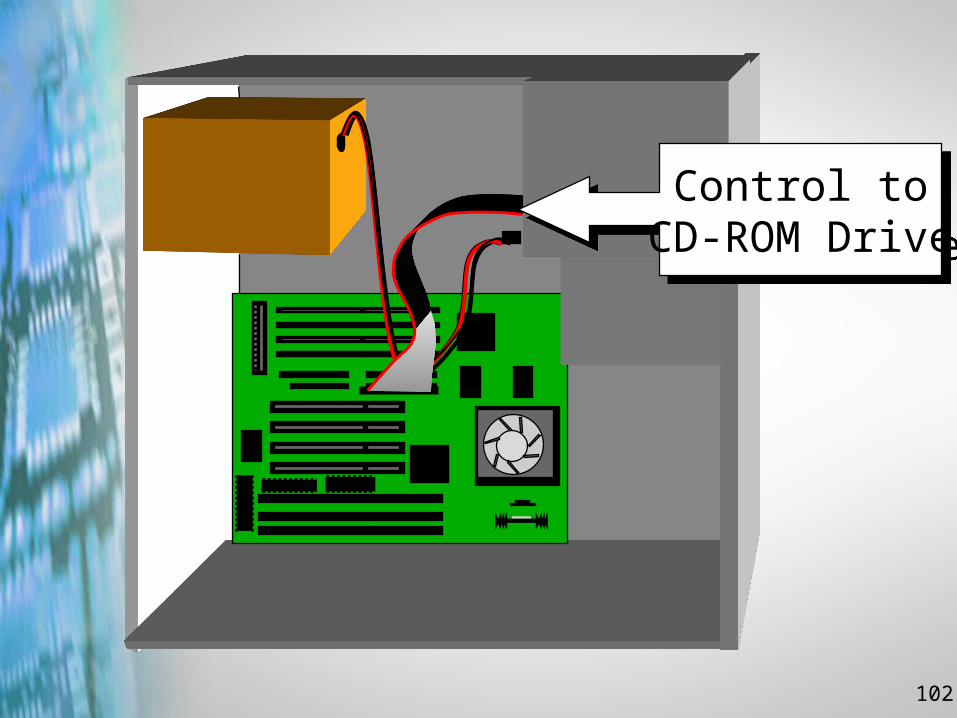
Control toCD-ROM Drive
Control toCD-ROM Drive
102
103
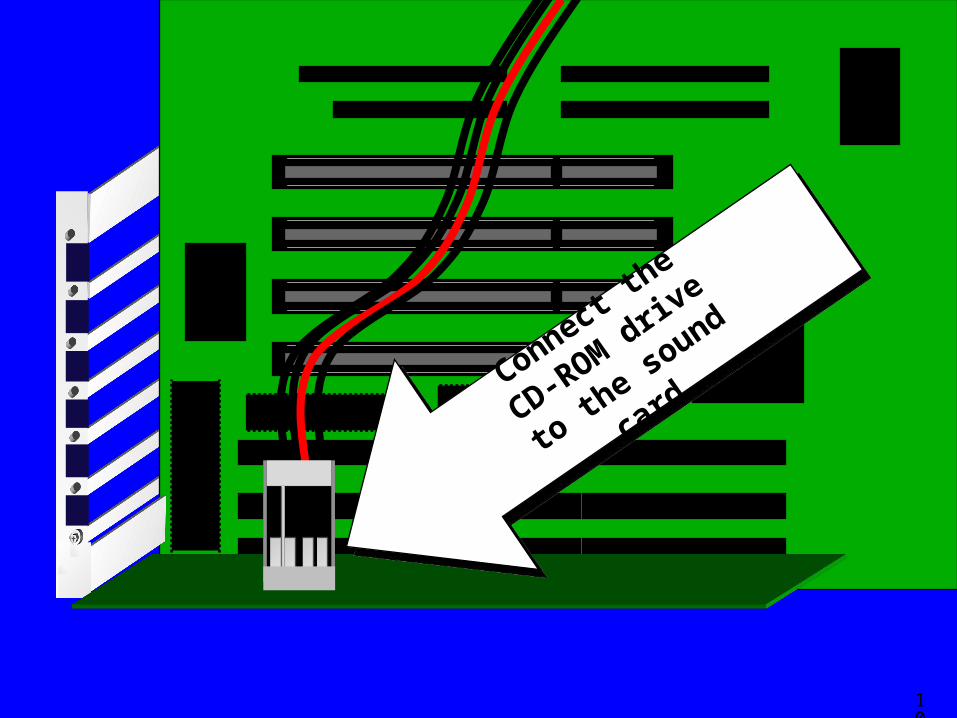
Connect th
e
CD-ROM driv
e
to the s
ound card
104