Embed Size (px)
Citation preview

1
Presented by Maureen Hagan
BScPT (Physiotherapist), BA PE ACE, Can-Fit-Pro Certified
2006 IDEA Fitness Instructor & 1998 Program Director of the Year
1. Overview the most common age-related risk factors that lead to back pain and injury.
2. Review 4 postural types and issues (faults) that occur.
3. Learn “Top 10” core-conditioning exercises.
4. Program Design. 5. Identify ‘Do’s and Do Nots’ for a healthy
back.

2
} Aging itself! } Inactivity/sedentary
living } Postural habits } Biomechanics of
Movement } Body composition } Workspace } Poor Movement
Technique } Overuse
} Your core - act like that of a corset. } The core “corset” also functions: to move the
trunk. } Core muscles function together. } To build a functionally strong back for life you
need to build a better core and ‘core-habits’.
*A Good Place to Start3 A’s: } Assess Postural types: } Static Postural Assessment } Dynamic Postural Assessment } Gait analysis } Flexibility assessment } Muscle testing } Analyze what is “weak” and what is “tight” to identify priorities in training. } Activity plan –select and integrate the exercises necessary to correct posture and build core strength and stamina and manage overall health.

3
The neutral position for the spine from which all movement originates… or the keyboard on which your brain orchestrates movement.
} Cervical spine gives your
head freedom of movement.
} Thoracic allows rotation. } Lumbar spines provides
stability. } Sacroiliac joints act as a
pivotal axes allowing movement between your legs, pelvis and spine.
} Sacrum provides the base for your spine to sit on.
} ‘Core’ muscles (Inner & outer unit) act to stabilize and move the spine.

4

5

6
} The abdominal brace has been proven to enhance stability. The brace produces a true muscular girdle around the spine- both the abdominals and extensors are active. ◦ In Standing or Seated:
◦ In Supine Lying:
} Minimize spinal load and compression and helps to ensure stable patterns of muscle activity.
} Begin on all fours with wrists under shoulders and knees under hips.
} Brace the abdominals and hold. } Lift one arm and the opposite leg parallel to the
ground for 8-10 seconds on each side. } Progression to or from a prone plank.

7
} Ideal for stabilization. Ideal for curl up/crunch free workout option.
} Utilizes all layers of the abdominal musculature to optimize performance while spine loads are minimized as one side of the torso musculature has much lower activation.
} Important stabilizers are trained including the quadratus lumborum.
} Bent knees (with hips slightly flexed) progressed to straight legs (with top leg in front) offers various degrees of muscle recruitment and challenge.
} With lumbar spine remaining in neutral squeeze the buttocks, not by extending the hips.
} Lift off the floor. } Progress to one leg hip bridging by crossing one
foot over the top of the support knee.
} Introduces dynamic limb motion into an abdominal curl up. } Involves a pre-bracing of the abdominal wall with a neutral
spine and the opposite arm and leg flexed at the shoulder and hip to mimic the motion of a bug on its back.
} Beginners (and those with poor body awareness) can stabilize their lumbar spine by placing their hands underneath-to ensure no lumbar motion occurs.

8
} Perform from a standing position a supported hip hinge (short stop position) with hand resting on the thighs, sending the hips back.
} Tip forward from the hips, sending hips back while maintaining a neutral spine.
} Perform from a supine lying position with arms bent and hands positioned just outside shoulders (palms down); in position to perform a triceps push-up.
} Relax buttocks and legs. } As you exhale press up by pushing through the arms to
perform a “sloppy push-up” or a passive spinal extension. } Pause to inhale and as you exhale return to starting position. } Perform 5-10 repetitions for 1 set and repeat 3 sets.
} Begin in a sitting position with one or both legs extended out in front.
} Bend one leg and cross the foot over to the outside of the other leg. The foundation leg can be extended or bent (as shown, if flexibility is lacking).
} With the opposite arm to the top knee, lift and reach to cross over, turning from the thoracic spine. The other arm can help support correct sitting posture.
} Keep the spine in a erect, neutral position. } Hold stretch and breath deep for 15 seconds and switch
sides.
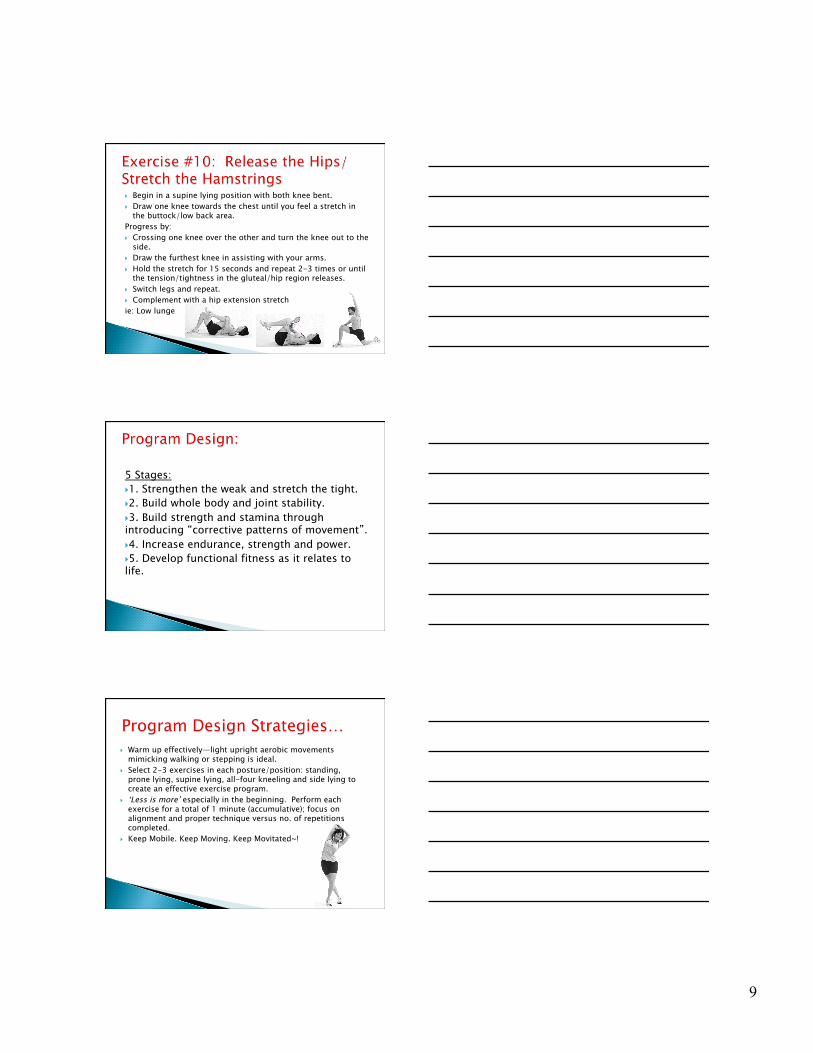
9
} Begin in a supine lying position with both knee bent. } Draw one knee towards the chest until you feel a stretch in
the buttock/low back area. Progress by: } Crossing one knee over the other and turn the knee out to the
side. } Draw the furthest knee in assisting with your arms. } Hold the stretch for 15 seconds and repeat 2-3 times or until
the tension/tightness in the gluteal/hip region releases. } Switch legs and repeat. } Complement with a hip extension stretch ie: Low lunge
5 Stages: } 1. Strengthen the weak and stretch the tight. } 2. Build whole body and joint stability. } 3. Build strength and stamina through introducing “corrective patterns of movement”. } 4. Increase endurance, strength and power. } 5. Develop functional fitness as it relates to life.
} Warm up effectively—light upright aerobic movements mimicking walking or stepping is ideal.
} Select 2-3 exercises in each posture/position: standing, prone lying, supine lying, all-four kneeling and side lying to create an effective exercise program.
} ‘Less is more’ especially in the beginning. Perform each exercise for a total of 1 minute (accumulative); focus on alignment and proper technique versus no. of repetitions completed.
} Keep Mobile. Keep Moving. Keep Movitated~!

10
} Maintain and, or return to neutral spine with ‘active’ abdominal brace.
} Stretch the tighten core/spinal muscles established from your postural assessment.
} Strengthen core muscles for a better back 3-4 times per week and stretch daily. Perform daily aerobic activity to manage bodyweight and overall fitness.
Do Not: } Impose high loads (of resistance) in an attempt to gain strength. } Avoid traditional curl ups that encourage flattening the lower
spine (lumbar region) by modifying the exercise or selecting alternative ways to target abdominals.
} Exercise into positions or with loads that produce or increase pain.
} Perform range of motion exercises early morning if you suffer low back pain because disk hydration is at its greatest and compressive forces on the disks will be increased.
} Exceed the capacity or tolerance of the individual: reduce the number of sessions to 2-3 brief sessions per day vs longer sessions at a time.
} Stop exercising altogether but instead modify activity. } Diagnose or prescribe therapeutic or rehabilitative exercise.
Do } Encourage daily exercise! } Include cardiovascular training into back exercise
programs— significant in reducing, managing and management back pain incidence and severity.
} Carefully evaluate and select exercise dosage— “less is more” and focus on form/technique versus repetition. Strength and power follows form and function.
} Increase range of motion to achieve and maintain neutral spine or ideal posture. Daily stretching and ‘self care’.
} “Brace” vs. “Hollowing” technique.

11
} Florence Peterson Kendall “Muscle Testing and Function” 4th Edition- Williams & Wilkins 1993
} McGill, Stuart, “Low Back Disorders-Evidence Based Prevention and Rehabilitation, Human Kinetics
} McGill, Stuart, “Ultimate Back Fitness and Performance”, 3rd Edition, Human Kinetics
} www.nasm.org for BodyMap to assist postural/body assessments
} Hagan, Maureen, “FIT-iology- the Study of Fitness In Action”, Volumes I (Lessons 9 & 10) & I (Lesson 24) Volumes Publishing. Go to www.mohagan.com
Website:
www.mohagan.com Email: [email protected] [email protected]