Embed Size (px)
Citation preview
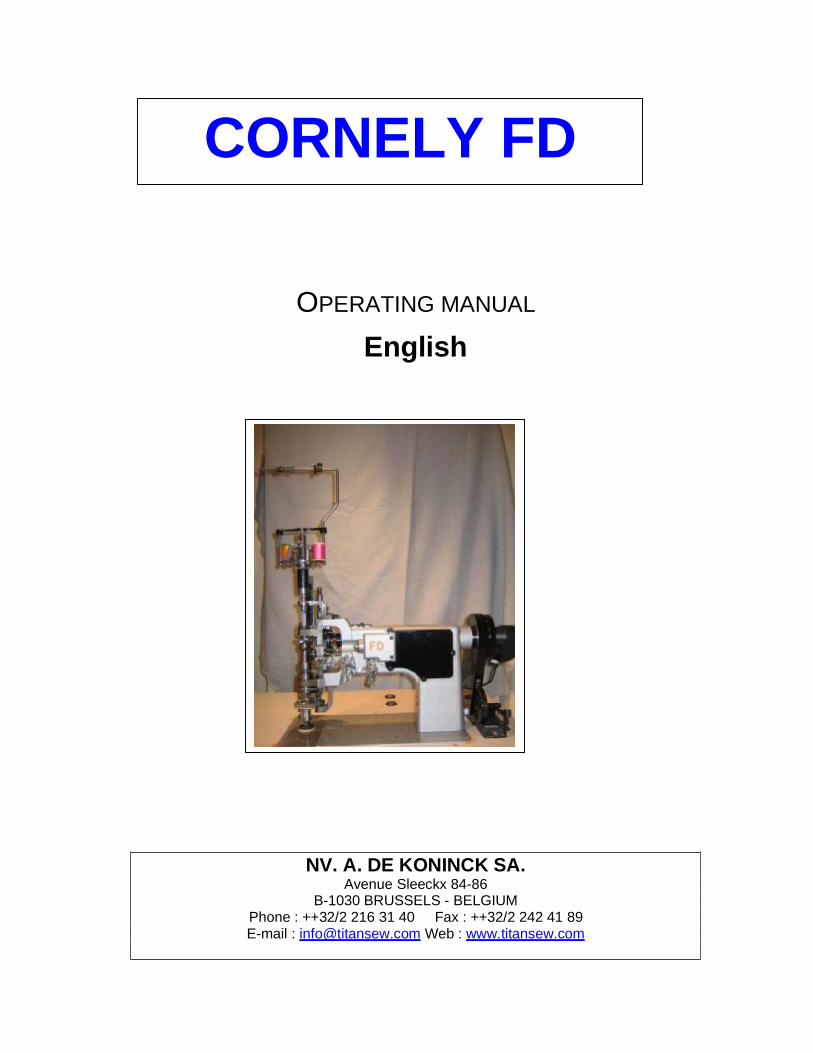
CORNELY FD
OPERATING MANUAL
English
NV. A. DE KONINCK SA. Avenue Sleeckx 84-86
B-1030 BRUSSELS - BELGIUMPhone : ++32/2 216 31 40 Fax : ++32/2 242 41 89 E-mail : [email protected] Web : www.titansew.com

C O N T E N T
CHAPTER 1. PRESENTATION 2 CHAPTER 2. INSTALLATION 2
CHAPTER 3. TRAINING 3
CHAPTER 4. OPERATING INSTRUCTION 4
1. One movable – zig-zag needle 4 2. One fixed needle 6 3. Two fixed needles 6
CHAPTER 5. THREADING 8
1. One Needle 8 - Supplies 8 - Needle Thread 9
2. Two Needles 9 3. Shuttle 11
CHAPTER 6. SETTING OF THE GUIDE 12
CHAPTER 7. SETTING OF THE STITCH 13
CHAPTER 8. SETTING OF THE TENSION 14
CHAPTER 9. LUBRICATION 15
CHAPTER 10. CHARACTERISTICS 17
1. Needle 2. Feeddog 3. Thread 4. Oil
CHAPTER 11. GUIDES 18
CHAPTER 12. INSTALLATION OF THE EURAMOT MOTOR 30
CHAPTER 13. SPARE PARTS LIST 31
CORNELY FD MANUAL 03/01/2006 1
CHAPTER 1 : PRESENTATION
The machine CORNELY FD is a lockstitch machine which can sew strings of sequins on fabrics and optionnally ribbons, braids, cords in various sizes for which special guides can be choosen in the spare parts catalogue.(See at the end of this manual). It also can sew strings of bead as well, thanks to its zig-zag device. The machine can work with :
a. 1 Fixed needle for sewing most application of the machine CORNELY FD b. Movable 1 needle for sewing the zig-zag stitch c. 2 Fixed needles for sewing the Nervure stitch
The famous CORNELY FD universal motion system enables the operator to embroider delicate designs by turning the crank located under the machine in the direction wished on the embroidery. It is unnecessary to hold or turn the fabric by hand as the pressure foot moves it for you in the right direction. The machine crank system is fitted with a clutch motor so that stopping at once is possible when one releases the crank.
CHAPTER 2 : INSTALLATION
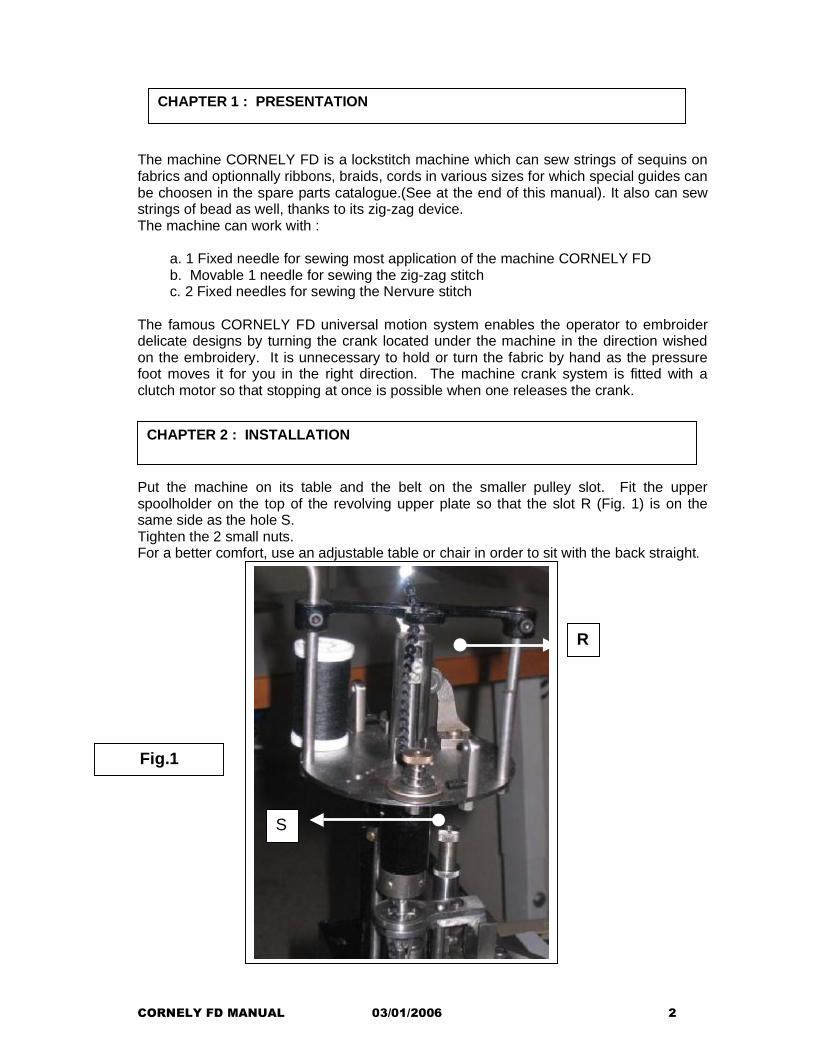
Put the machine on its table and the belt on the smaller pulley slot. Fit the upper spoolholder on the top of the revolving upper plate so that the slot R (Fig. 1) is on the same side as the hole S. Tighten the 2 small nuts. For a better comfort, use an adjustable table or chair in order to sit with the back straight.
S
R
Fig.1
CORNELY FD MANUAL 03/01/2006 2
CHAPTER 3 : TRAINING
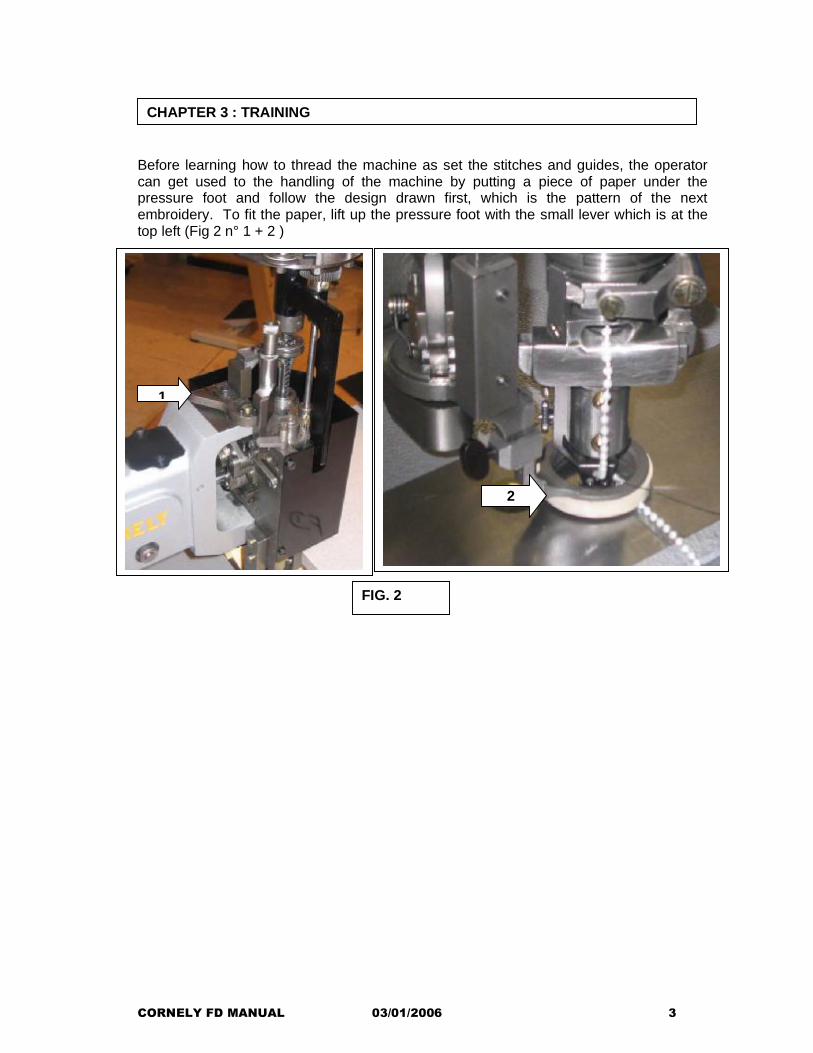
Before learning how to thread the machine as set the stitches and guides, the operator can get used to the handling of the machine by putting a piece of paper under the pressure foot and follow the design drawn first, which is the pattern of the next embroidery. To fit the paper, lift up the pressure foot with the small lever which is at the top left (Fig 2 n° 1 + 2 )
2
1
FIG. 2
CORNELY FD MANUAL 03/01/2006 3
CHAPTER 4 : OPERATING INSTRUCTION
This machine can work with :
1. One movable needle (zig-zag) : This means that you can sew different supplies at the same time. For example, Cords, Sequins, Pearls, Large Ribbons etc.
2. One fixed needle : This means that you can only sew straight on the Cord, Ribbon with a visible thread.
3. Two fixed needles : This means for sewing the Nervures.
1° WORKING WITH 1 MOVABLE NEEDLE (ZIG-ZAG).
If you are working with such a needle, you have to put your needle thread on bobbinholder A at the right side while the crank is place in forward position.You also can put this on the bobbinholder S. (Fig. 10)
If you are sewing the different supplies, the needle thread is put on bobbinholder A. If you are sewing Embroidery, the needle thread is put on bobbinholder S because you can adjust the pressure by the pressure screw.
As from bobbinholder A or S you have to follow the route as indicated in Chapter 5 « THREADIING » (Fig 6 & 7 & 11). The crank should always be placed in forward position.
Adjustment of the Zig-Zag.
For all the sewing with the movable needle you have to put the bobbinholder T in such a way that the bobbin is leftsided and the crank R is rightsided. (Fig. 3) For this formation you have to unscrew the screw S and turn the holder T into the right direction. When the bobbin is standing on the correct possition, you can fix the screw S again. (Fig. 3) The bobbin has to put into the correct position when using movable needles (zig-zag). Depending from the supplies you are using, the bobbin should be adapted to the supplies. This posibion can be adjusted by srewing or unscrewing the screw B. (Fig. 4) The more you put this screw downwards to the lever the more distance you can have between the zig-zag. The less you fix this screw upwards towards the lever, the less distance you have between the zig-zag. (Fig. 4) The amplitude of the zig-zag can be adjusted by the lever. To obtain a correct zig-zag, you have to combine both : the lever and the screw. You only have the correct zig-zag when by testing the movement of the needles manualy you can see that the needles will sew between each pearl and on each side of the pearl. You have to move slowly the flying wheel to observe this stitching. An incorrect regulation can cause the breakage of the needles.
CORNELY FD MANUAL 03/01/2006 4
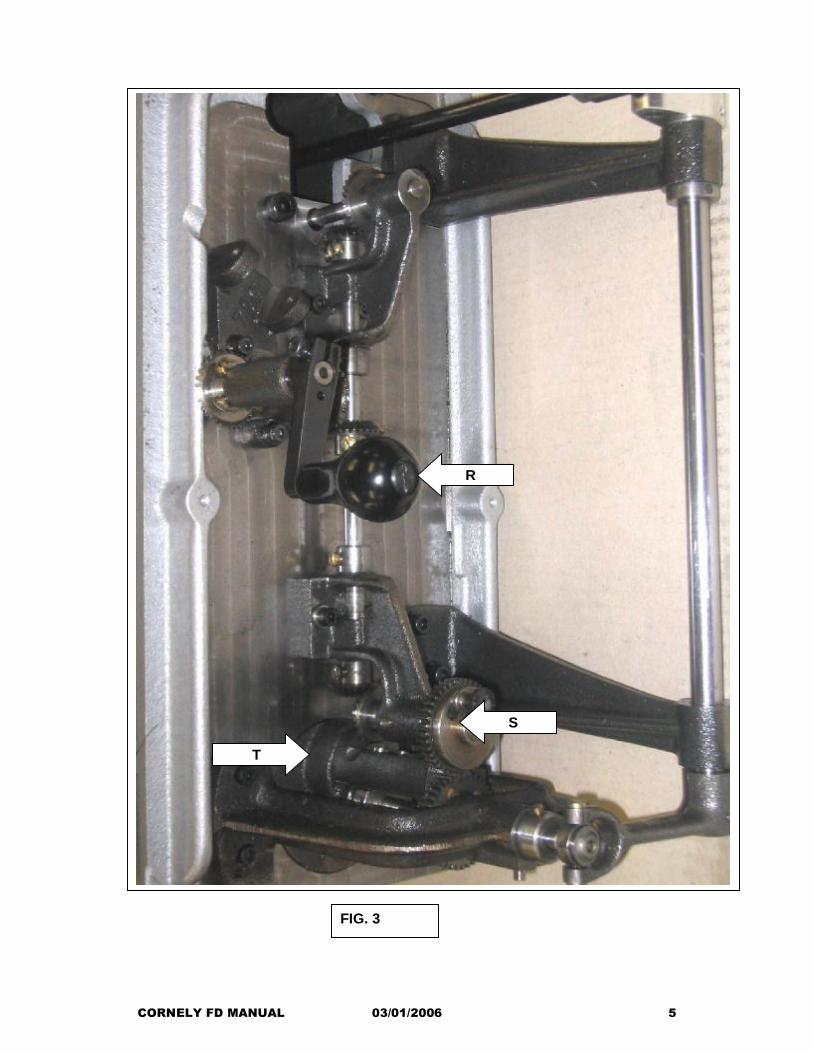
T
S
R
FIG. 3
CORNELY FD MANUAL 03/01/2006 5
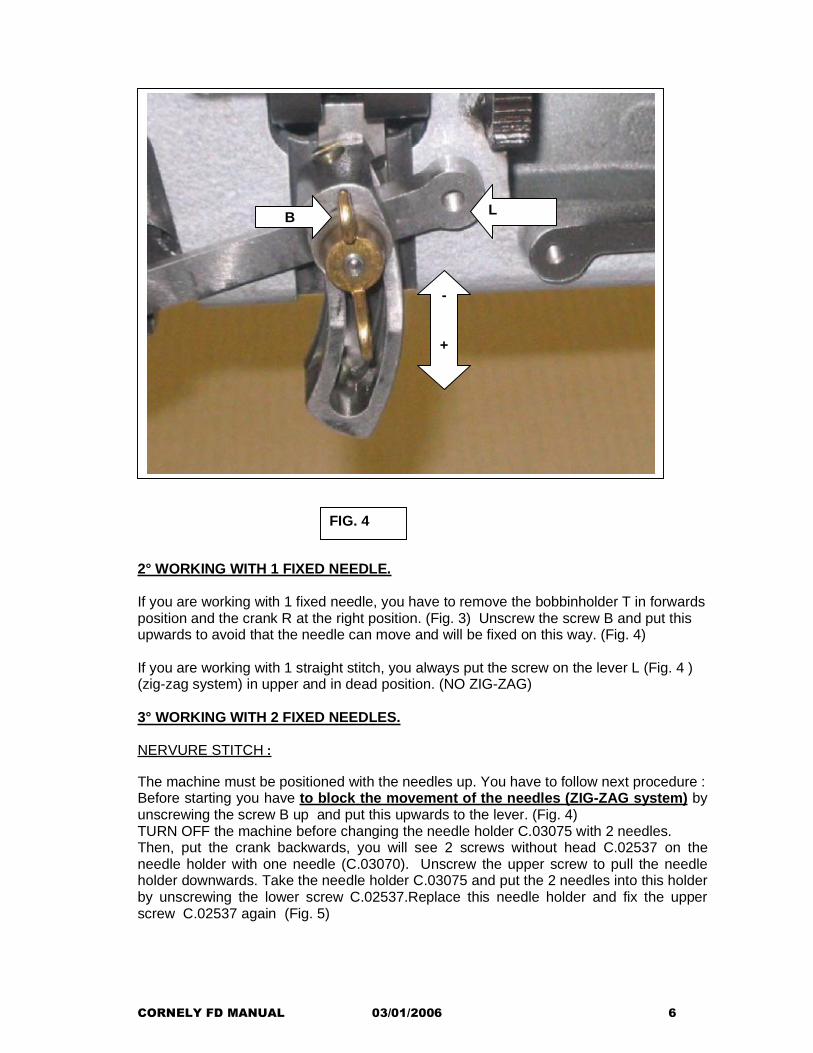
-
+
LB
FIG. 4
2° WORKING WITH 1 FIXED NEEDLE.
If you are working with 1 fixed needle, you have to remove the bobbinholder T in forwards position and the crank R at the right position. (Fig. 3) Unscrew the screw B and put this upwards to avoid that the needle can move and will be fixed on this way. (Fig. 4)
If you are working with 1 straight stitch, you always put the screw on the lever L (Fig. 4 ) (zig-zag system) in upper and in dead position. (NO ZIG-ZAG)
3° WORKING WITH 2 FIXED NEEDLES.
NERVURE STITCH :
The machine must be positioned with the needles up. You have to follow next procedure : Before starting you have to block the movement of the needles (ZIG-ZAG system) by unscrewing the screw B up and put this upwards to the lever. (Fig. 4) TURN OFF the machine before changing the needle holder C.03075 with 2 needles. Then, put the crank backwards, you will see 2 screws without head C.02537 on the needle holder with one needle (C.03070). Unscrew the upper screw to pull the needle holder downwards. Take the needle holder C.03075 and put the 2 needles into this holder by unscrewing the lower screw C.02537.Replace this needle holder and fix the upper screw C.02537 again (Fig. 5)
CORNELY FD MANUAL 03/01/2006 6
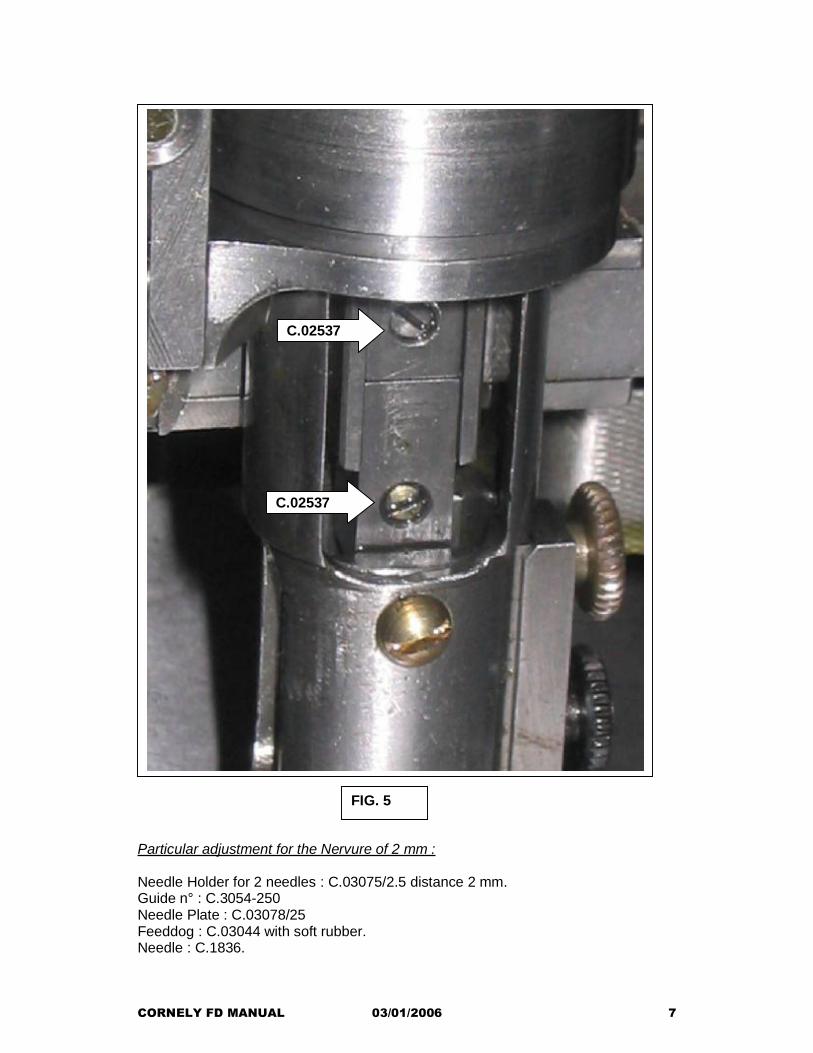
FIG.
C.02537
C.02537
FIG. 5
Particular adjustment for the Nervure of 2 mm :
Needle Holder for 2 needles : C.03075/2.5 distance 2 mm. Guide n° : C.3054-250 Needle Plate : C.03078/25 Feeddog : C.03044 with soft rubber. Needle : C.1836.
CORNELY FD MANUAL 03/01/2006 7

CHAPTER 5 : THREADING
1. THREADING OF ONE NEEDLE :
1° If you are working with one needle you have to do the following :Turn the crank opposite to the operator at twelve o’clock (compare the movement of the handle to a clock hand). The spool A on the upper revolving plate is on the right. (Fig 6) Put a spool of strong cotton and thread as shown through the holes M, O, H , B, W. (Fig 6 & Fig 11) Use the tweezers to thread the small holes and the twisted wire threader to take the thread down the small thread tube (W). Before pushing the threader down the tube, pull 30 cm between the tension K and the hole W so that the thread does not break during the threading down the tube. Also lower the pressure foot to take the threader out to the right more easily. Before this, tighten the thread into the threader wire so that it does not escape during the operation. Then thread the needle from 6 to noon. Check that no holes has been forgotten and that the thread is not twisted around the needle.
Fig.6 Fig.7 Fig.8
THREADING OF SUPPLIES : If you are working with different supplies, for example : sequins, you have to put those supplies on spool D (Fig. 10). From there those supplies will enter the central threading through the adapted guide to arrive finaly on the tissue.Turn the crank at noon so that the slot R is facing the operator. The sequin spool D is on the upper spool holder. (Fig 10) The sequins string goes down the slot R and the hole S. (Fig 9) Turn the handle at 6 o’clock, fit the sequins in the hole of the wire threader and get it down the hole H and I (Fig. 9), then in the guide. Set a slight tension on the spring of the spool holder.
CORNELY FD MANUAL 03/01/2006 8
FIG. 9
THREADING OF THE NEEDLE THREAD : The spool holders can have 2 bobbins A and S (Fig. 10), two tighteners : B, two tensions : K and the eye holes O-M-H-W. (Fig. 6 & Fig. 11)
2. THREADING OF 2 NEEDLES :
If you are using 2 needles, you have to use Bobbinholders A + S. (Fig 10)
A
S
D
FIG. 10
CORNELY FD MANUAL 03/01/2006 9
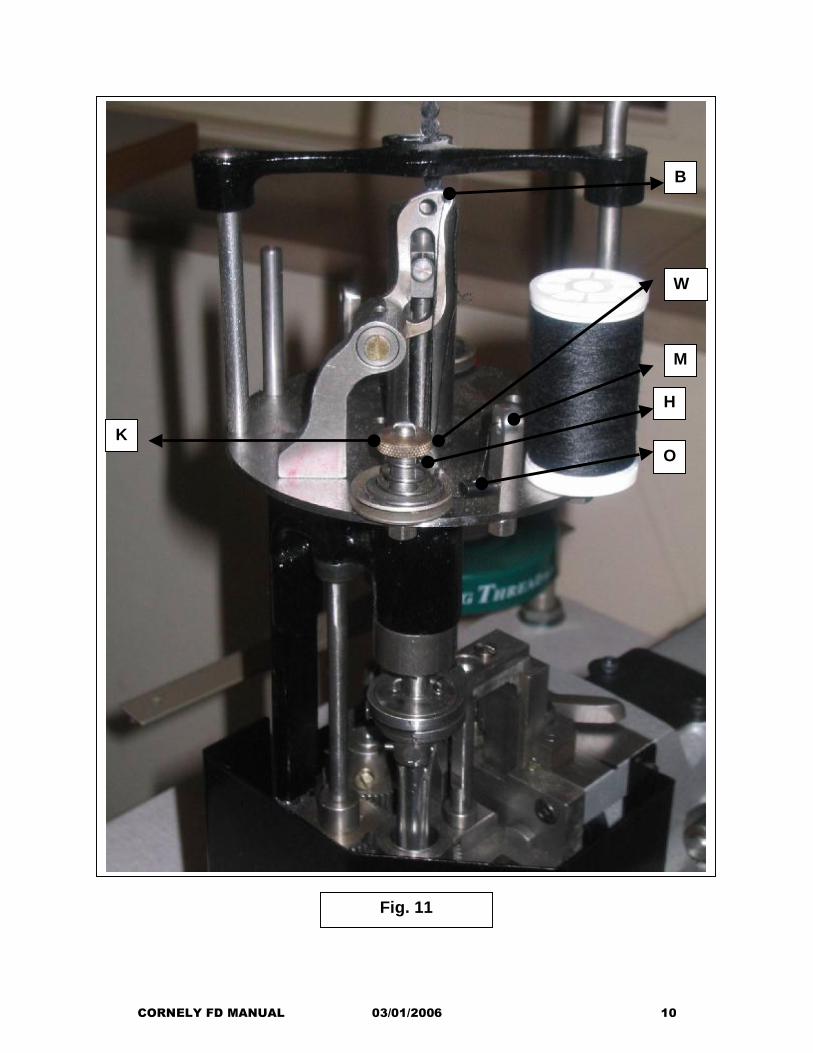
W
M
K
B
O
H
Fig. 11
CORNELY FD MANUAL 03/01/2006 10
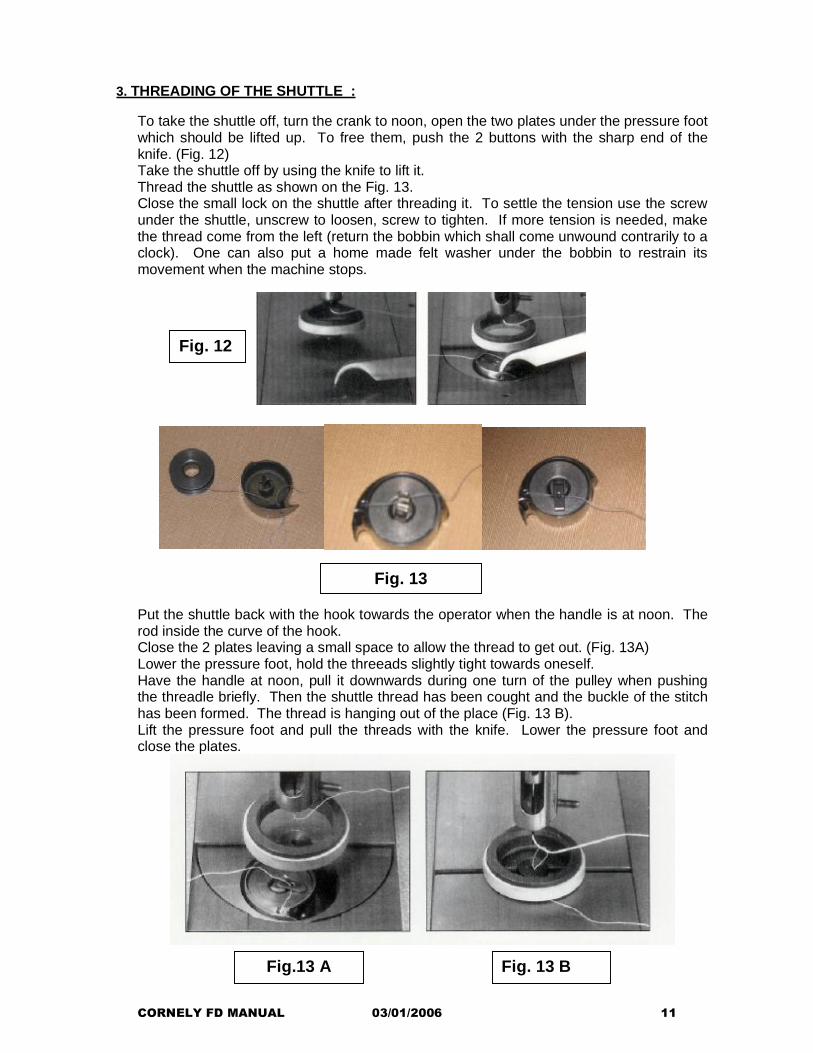
3. THREADING OF THE SHUTTLE :
To take the shuttle off, turn the crank to noon, open the two plates under the pressure foot which should be lifted up. To free them, push the 2 buttons with the sharp end of the knife. (Fig. 12) Take the shuttle off by using the knife to lift it. Thread the shuttle as shown on the Fig. 13. Close the small lock on the shuttle after threading it. To settle the tension use the screw under the shuttle, unscrew to loosen, screw to tighten. If more tension is needed, make the thread come from the left (return the bobbin which shall come unwound contrarily to a clock). One can also put a home made felt washer under the bobbin to restrain its movement when the machine stops.
Fig. 12
Fig. 13
Put the shuttle back with the hook towards the operator when the handle is at noon. The rod inside the curve of the hook. Close the 2 plates leaving a small space to allow the thread to get out. (Fig. 13A) Lower the pressure foot, hold the threeads slightly tight towards oneself. Have the handle at noon, pull it downwards during one turn of the pulley when pushing the threadle briefly. Then the shuttle thread has been cought and the buckle of the stitch has been formed. The thread is hanging out of the place (Fig. 13 B). Lift the pressure foot and pull the threads with the knife. Lower the pressure foot and close the plates.
Fig.13 A Fig. 13 B
CORNELY FD MANUAL 03/01/2006 11
CHAPTER 6 : SETTING OF THE GUIDE
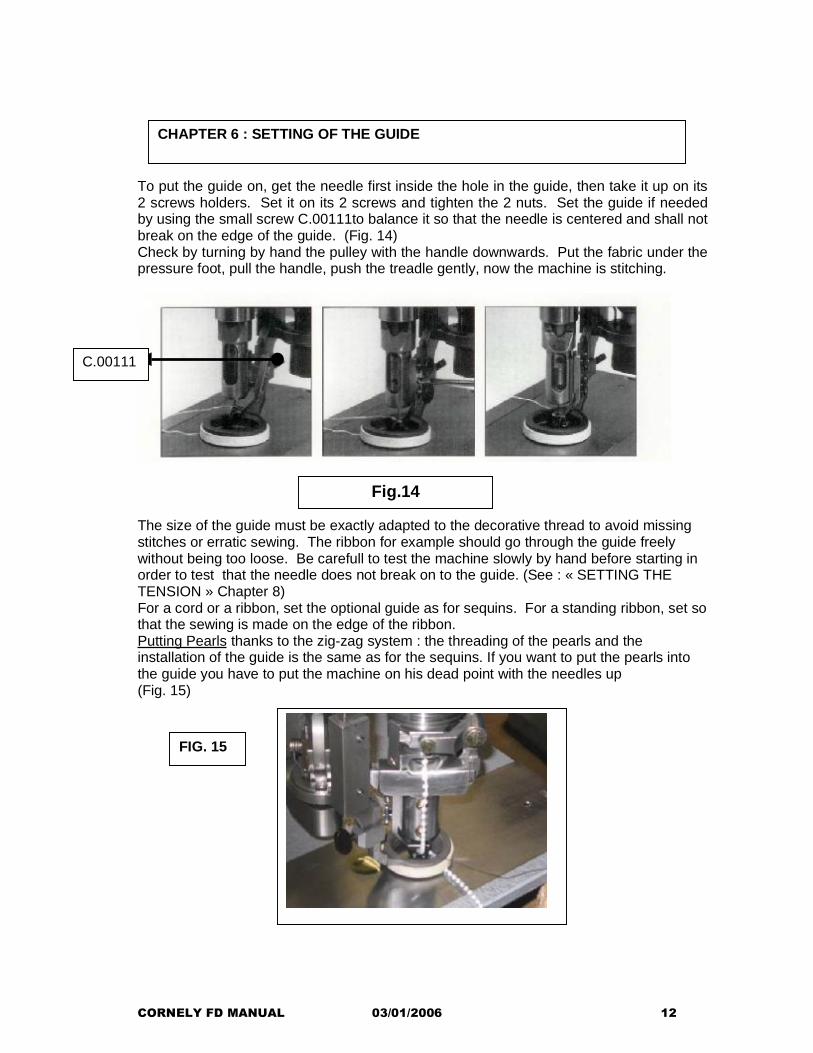
To put the guide on, get the needle first inside the hole in the guide, then take it up on its 2 screws holders. Set it on its 2 screws and tighten the 2 nuts. Set the guide if needed by using the small screw C.00111to balance it so that the needle is centered and shall not break on the edge of the guide. (Fig. 14) Check by turning by hand the pulley with the handle downwards. Put the fabric under the pressure foot, pull the handle, push the treadle gently, now the machine is stitching.
C.00111
Fig.14
The size of the guide must be exactly adapted to the decorative thread to avoid missing stitches or erratic sewing. The ribbon for example should go through the guide freely without being too loose. Be carefull to test the machine slowly by hand before starting in order to test that the needle does not break on to the guide. (See : « SETTING THE TENSION » Chapter 8) For a cord or a ribbon, set the optional guide as for sequins. For a standing ribbon, set so that the sewing is made on the edge of the ribbon. Putting Pearls thanks to the zig-zag system : the threading of the pearls and the installation of the guide is the same as for the sequins. If you want to put the pearls into the guide you have to put the machine on his dead point with the needles up(Fig. 15)
FIG. 15
CORNELY FD MANUAL 03/01/2006 12
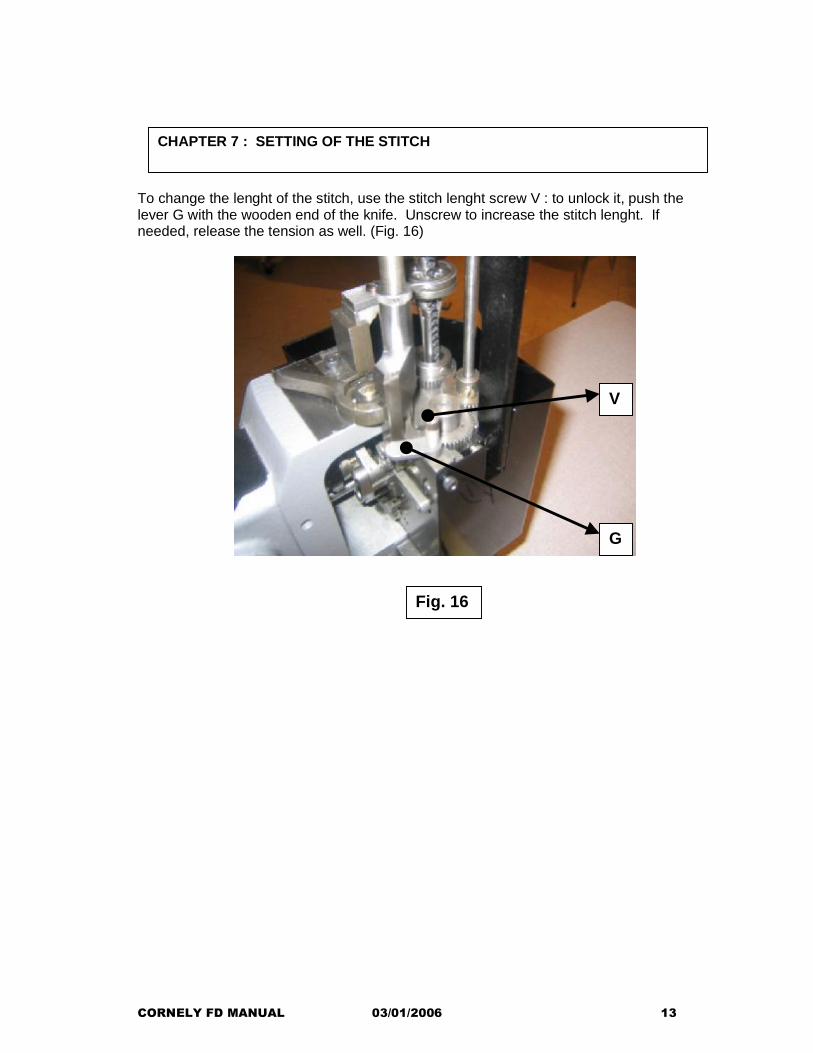
CHAPTER 7 : SETTING OF THE STITCHCHAPTER 7 : SETTING OF THE STITCH
To change the lenght of the stitch, use the stitch lenght screw V : to unlock it, push the lever G with the wooden end of the knife. Unscrew to increase the stitch lenght. If needed, release the tension as well. (Fig. 16)
V
G
Fig. 16
CORNELY FD MANUAL 03/01/2006 13
CHAPTER 8 : SETTING OF THE TENSION
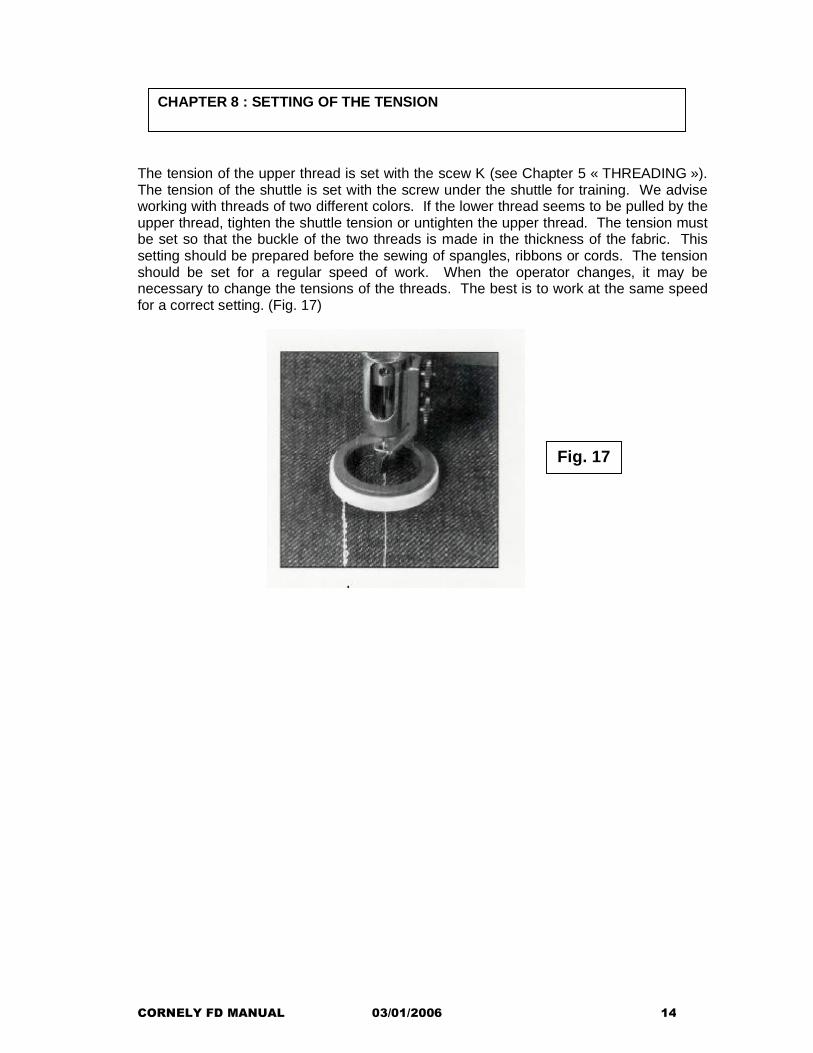
The tension of the upper thread is set with the scew K (see Chapter 5 « THREADING »). The tension of the shuttle is set with the screw under the shuttle for training. We advise working with threads of two different colors. If the lower thread seems to be pulled by the upper thread, tighten the shuttle tension or untighten the upper thread. The tension must be set so that the buckle of the two threads is made in the thickness of the fabric. This setting should be prepared before the sewing of spangles, ribbons or cords. The tension should be set for a regular speed of work. When the operator changes, it may be necessary to change the tensions of the threads. The best is to work at the same speed for a correct setting. (Fig. 17)
Fig. 17
CORNELY FD MANUAL 03/01/2006 14
CHAPTER 9 : LUBRICATION
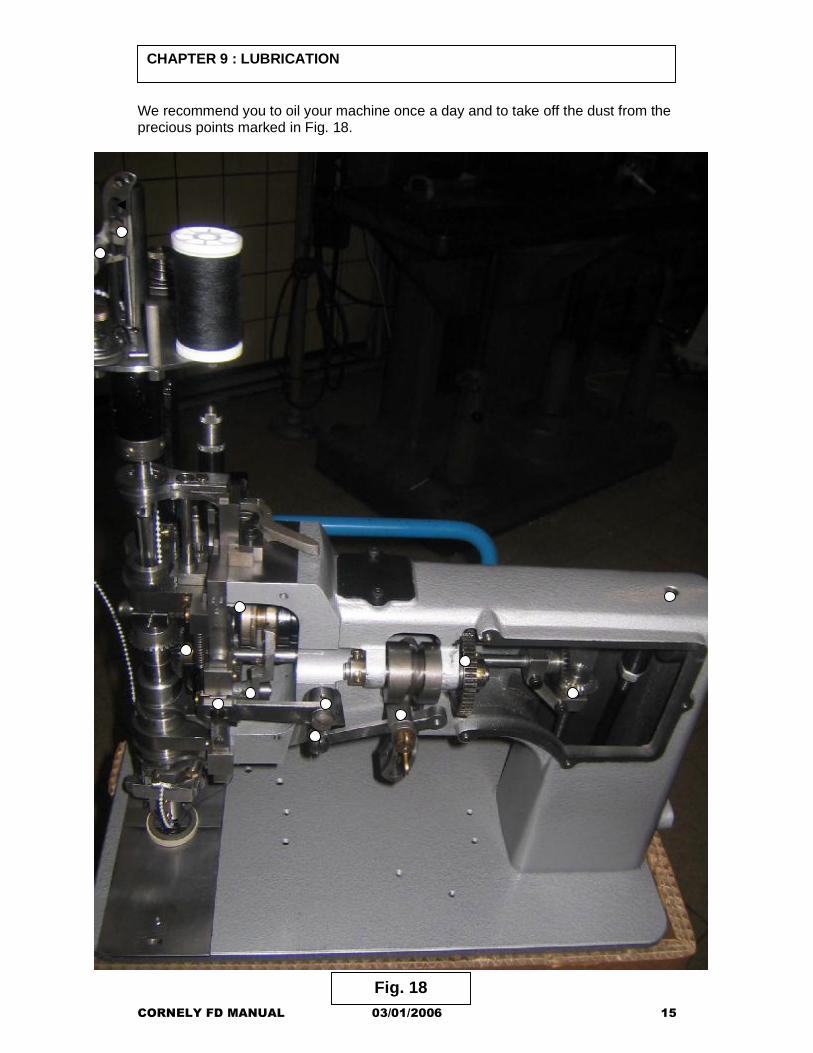
We recommend you to oil your machine once a day and to take off the dust from the precious points marked in Fig. 18.
Fig. 18CORNELY FD MANUAL 03/01/2006 15
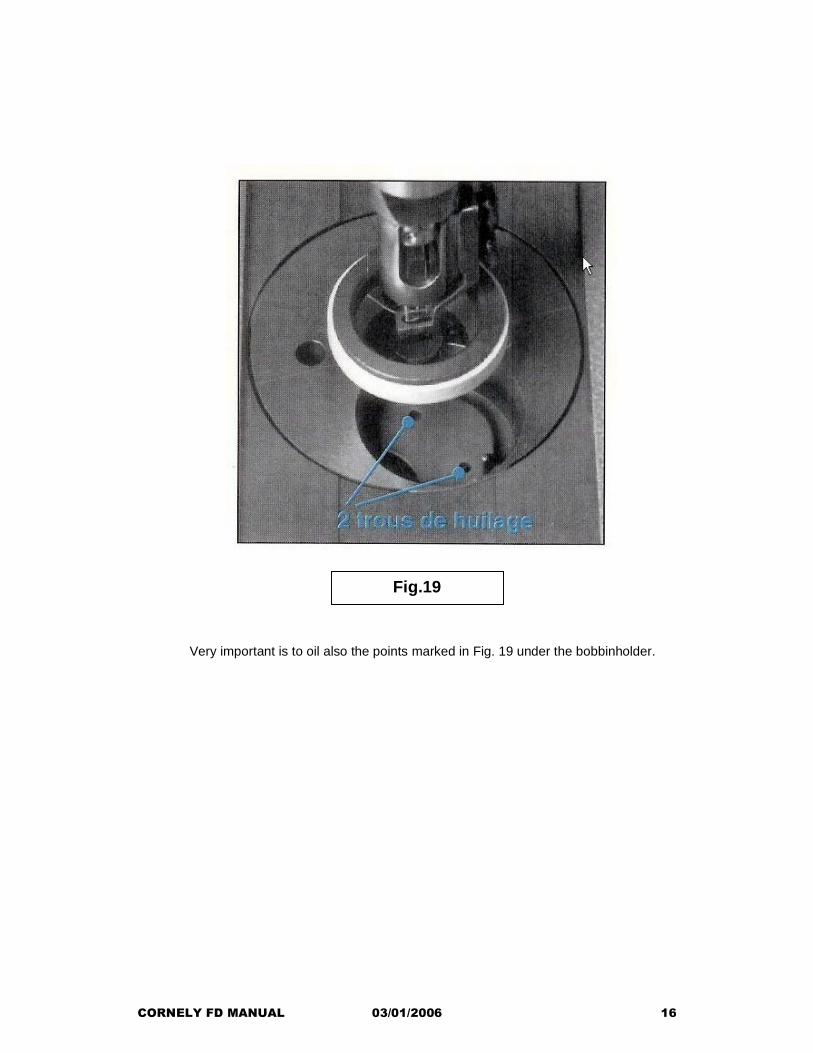
Fig.19
Very important is to oil also the points marked in Fig. 19 under the bobbinholder.
CORNELY FD MANUAL 03/01/2006 16
CHAPTER 10 : CHARACTERISTICS
Needle :
TYPE DescriptionC.1836/070 Needle Nr 1 (0,70mm) C.1836/080 Needle Nr 2 (0,80mm) C.1836/090 Needle Nr 3 (0,90mm) C.1836/100 Needle Nr 4 (1,00mm) C.1836/110 Needle Nr 5 (1,10mm)
Feeddog and correspondant rubbers ::
FEEDDOG RUBBERC.03042 C.CA-38
C.03042D C.CA-38C.03043 C.CA-26
C.03043D C.CA-26C.03044 C.CA-20
Thread
Needle Thread: Coats Kette 12
Bobbin Thread :Florida 100 de B.S.T.
Oil
ARAL VITAN G F 22 BP ENERGOL HLP 22 FINA HYDRAN 22 MOBIL D.T.E. 22 SHELL TELLUS C.22
CHAPTER 11 : GUIDES
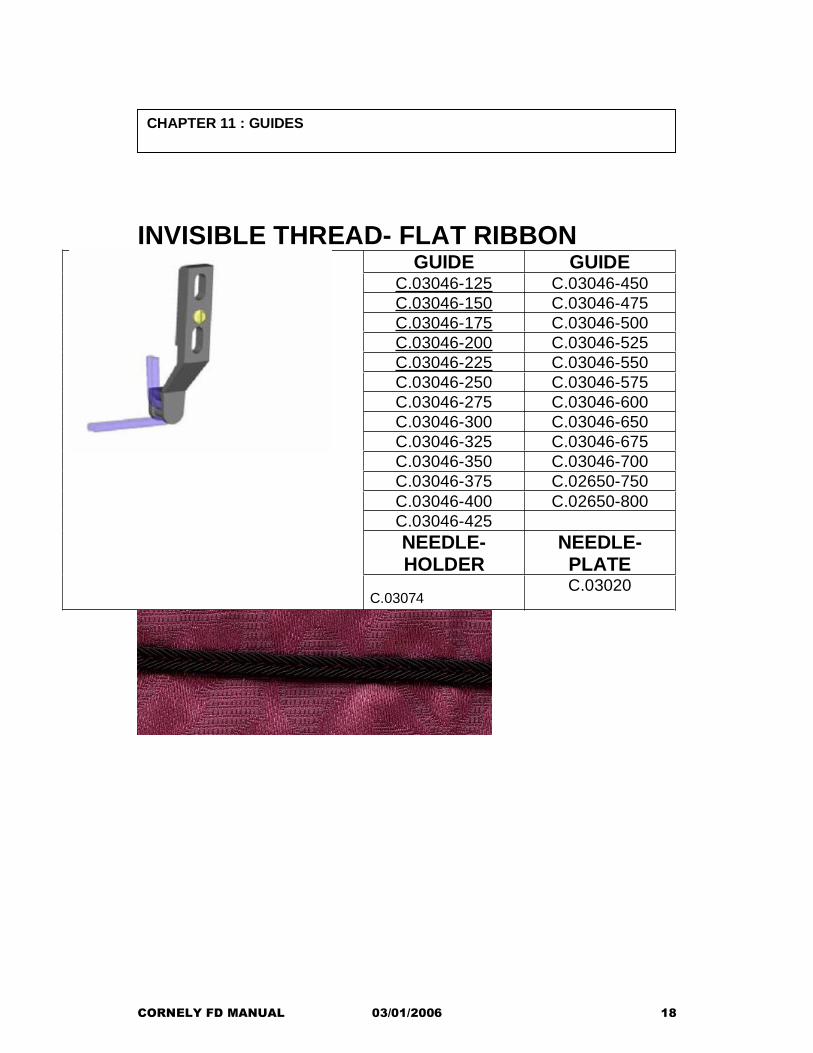
INVISIBLE THREAD- FLAT RIBBON GUIDE GUIDE
C.03046-125 C.03046-450C.03046-150 C.03046-475C.03046-175 C.03046-500C.03046-200 C.03046-525C.03046-225 C.03046-550C.03046-250 C.03046-575C.03046-275 C.03046-600C.03046-300 C.03046-650C.03046-325 C.03046-675C.03046-350 C.03046-700C.03046-375 C.02650-750C.03046-400 C.02650-800C.03046-425NEEDLE-HOLDER
NEEDLE-PLATE
C.03074C.03020
CORNELY FD MANUAL 03/01/2006 18
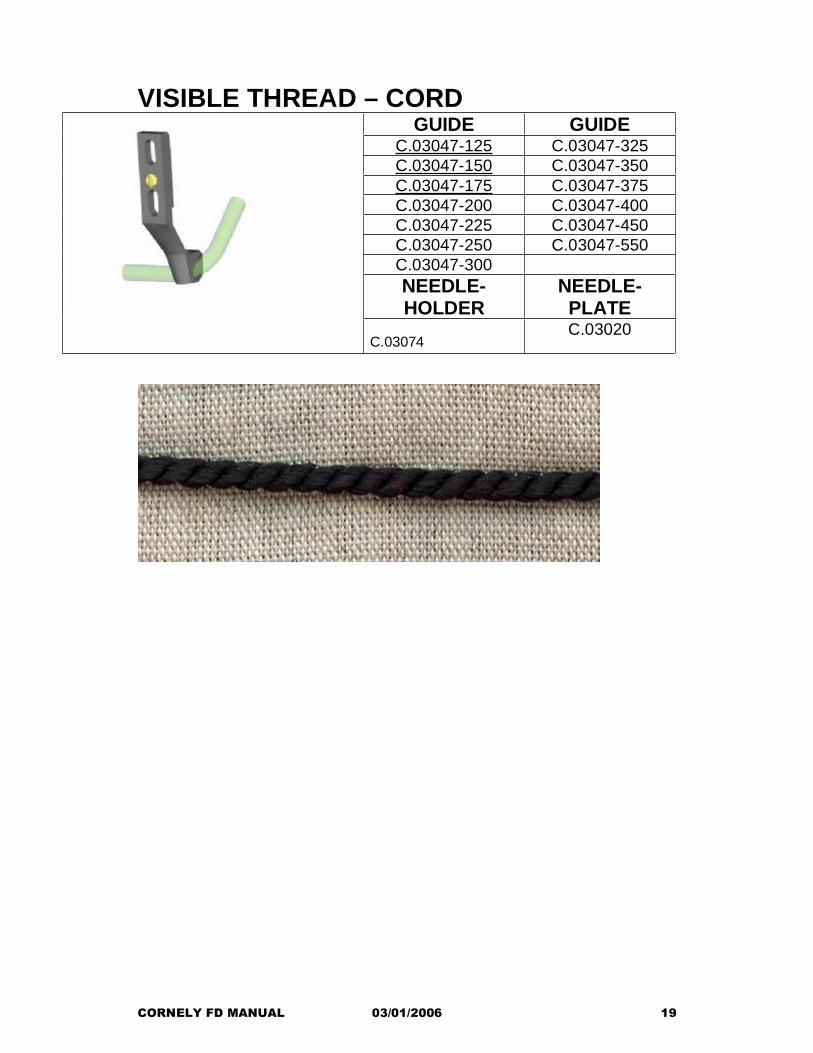
VISIBLE THREAD – CORD GUIDE GUIDE
C.03047-125 C.03047-325C.03047-150 C.03047-350C.03047-175 C.03047-375C.03047-200 C.03047-400C.03047-225 C.03047-450C.03047-250 C.03047-550C.03047-300NEEDLE-HOLDER
NEEDLE-PLATE
C.03074C.03020
CORNELY FD MANUAL 03/01/2006 19
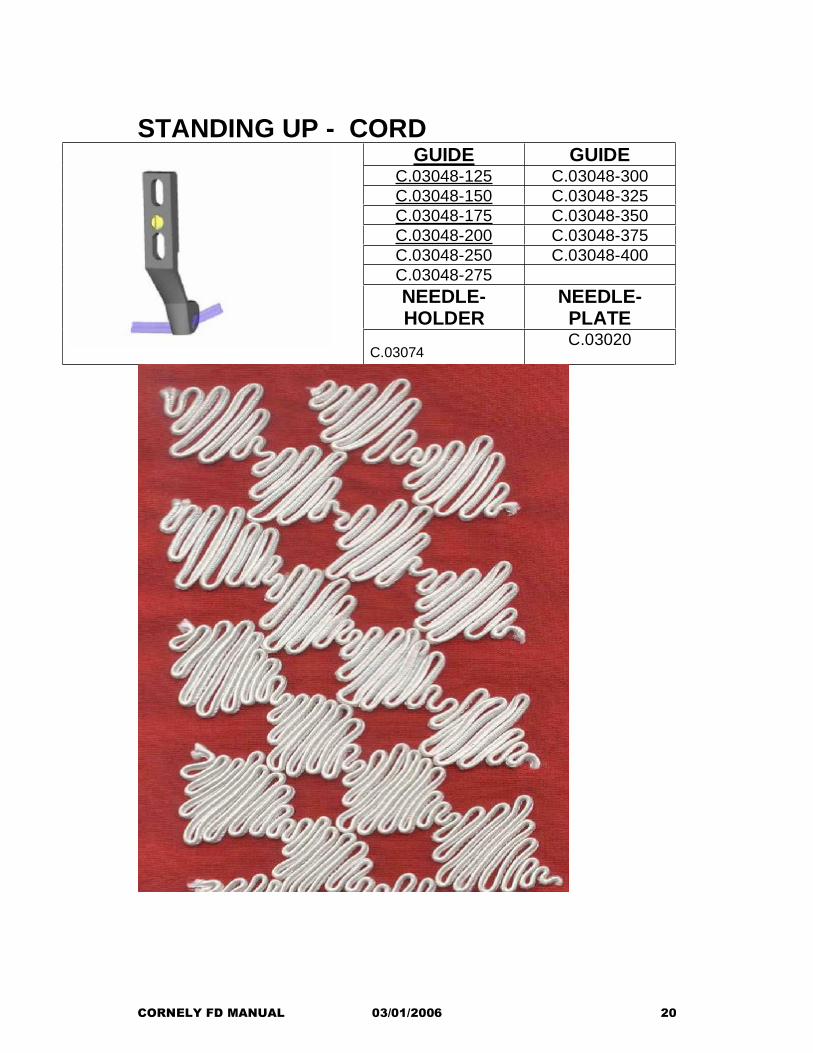
STANDING UP - CORD GUIDE GUIDE
C.03048-125 C.03048-300C.03048-150 C.03048-325C.03048-175 C.03048-350C.03048-200 C.03048-375C.03048-250 C.03048-400C.03048-275NEEDLE-HOLDER
NEEDLE-PLATE
C.03074C.03020
CORNELY FD MANUAL 03/01/2006 20
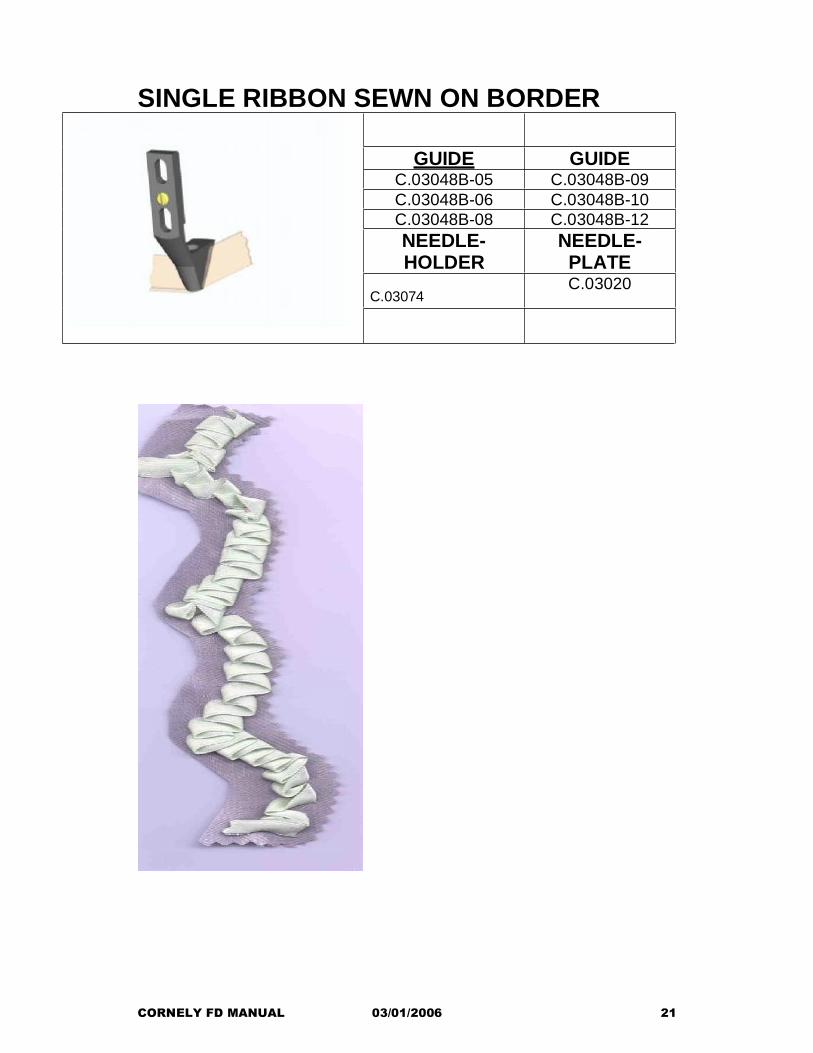
SINGLE RIBBON SEWN ON BORDER
GUIDE GUIDEC.03048B-05 C.03048B-09C.03048B-06 C.03048B-10C.03048B-08 C.03048B-12NEEDLE-HOLDER
NEEDLE-PLATE
C.03074C.03020
CORNELY FD MANUAL 03/01/2006 21

VISIBLE TRHEAD SEWN MIDDLE NOT FLAT RIBBON
GUIDE GUIDEC.03050-150 C.03050-500C.03050-200 C.03050-550C.03050-225 C.03050-600C.03050-250 C.03050-700C.03050-300 C.03050-800C.03050-400NEEDLE-HOLDER
NEEDLE-PLATE
C.03074C.03020
CORNELY FD MANUAL 03/01/2006 22
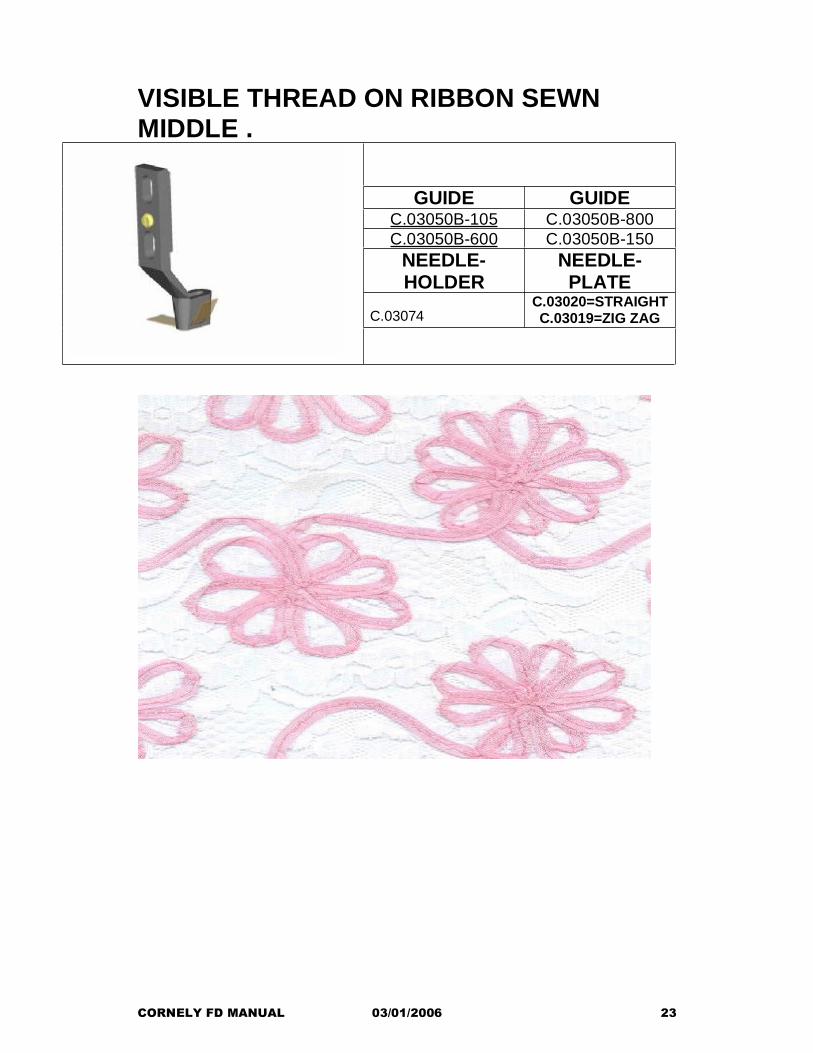
VISIBLE THREAD ON RIBBON SEWN MIDDLE .
GUIDE GUIDEC.03050B-105 C.03050B-800C.03050B-600 C.03050B-150
NEEDLE-HOLDER
NEEDLE-PLATE
C.03074C.03020=STRAIGHTC.03019=ZIG ZAG
CORNELY FD MANUAL 03/01/2006 23
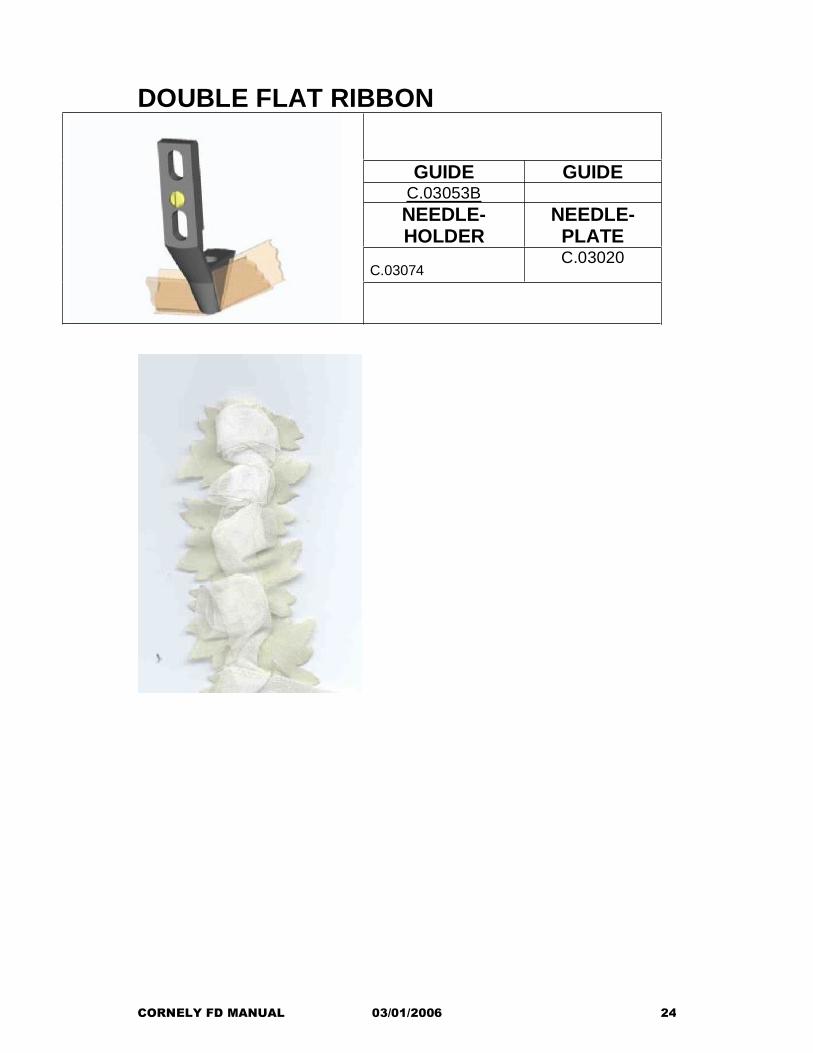
DOUBLE FLAT RIBBON
GUIDE GUIDEC.03053BNEEDLE-HOLDER
NEEDLE-PLATE
C.03074C.03020
CORNELY FD MANUAL 03/01/2006 24
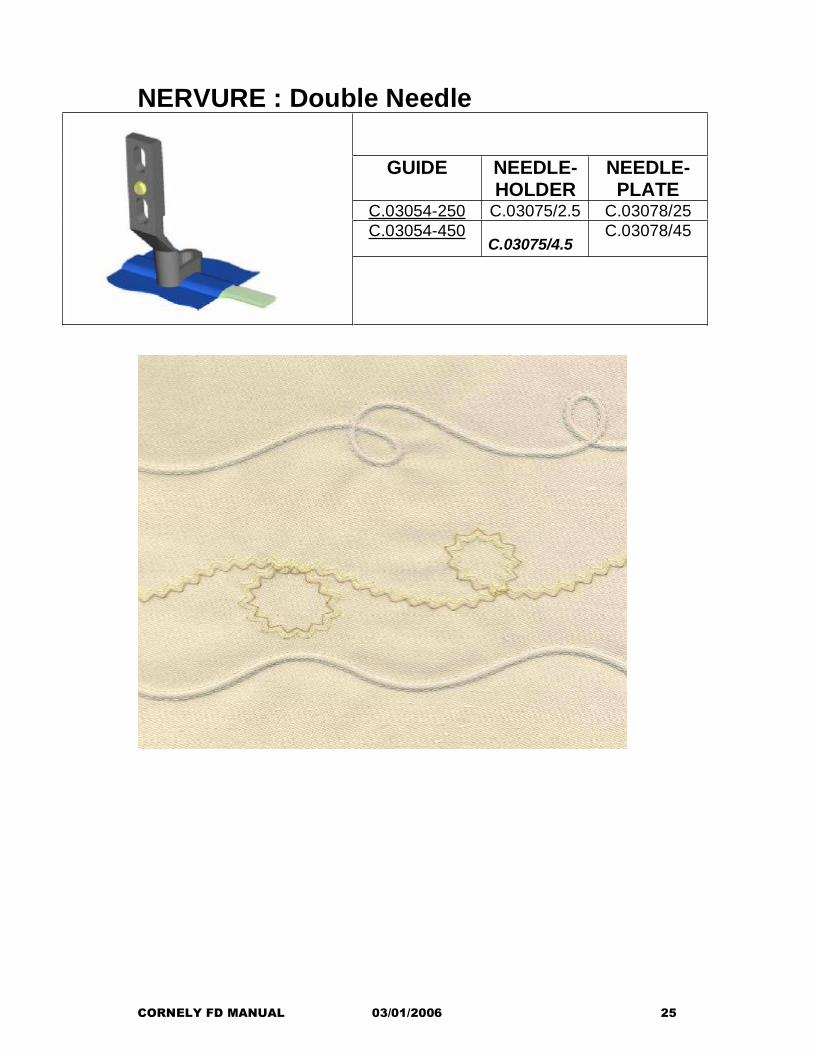
NERVURE : Double Needle
GUIDE NEEDLE-HOLDER
NEEDLE-PLATE
C.03054-250 C.03075/2.5 C.03078/25C.03054-450
C.03075/4.5C.03078/45
CORNELY FD MANUAL 03/01/2006 25
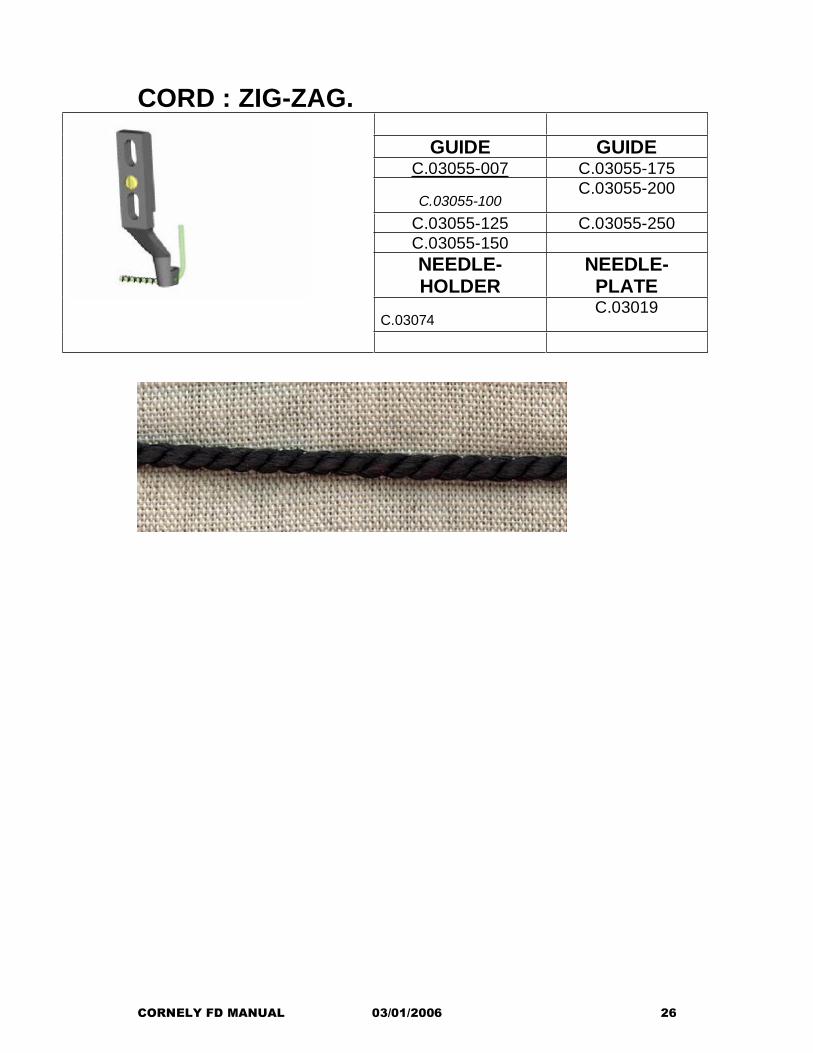
CORD : ZIG-ZAG.
GUIDE GUIDEC.03055-007 C.03055-175
C.03055-100C.03055-200
C.03055-125 C.03055-250C.03055-150NEEDLE-HOLDER
NEEDLE-PLATE
C.03074C.03019
CORNELY FD MANUAL 03/01/2006 26
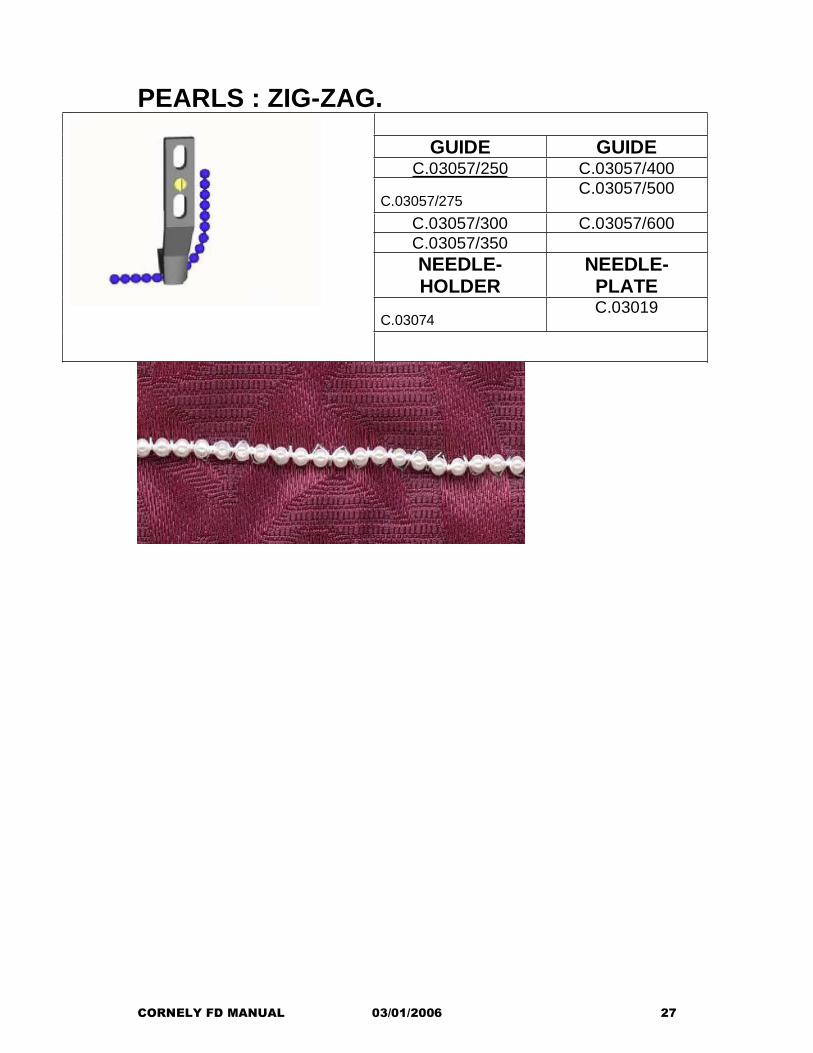
PEARLS : ZIG-ZAG.
GUIDE GUIDEC.03057/250 C.03057/400
C.03057/275C.03057/500
C.03057/300 C.03057/600C.03057/350NEEDLE-HOLDER
NEEDLE-PLATE
C.03074C.03019
CORNELY FD MANUAL 03/01/2006 27
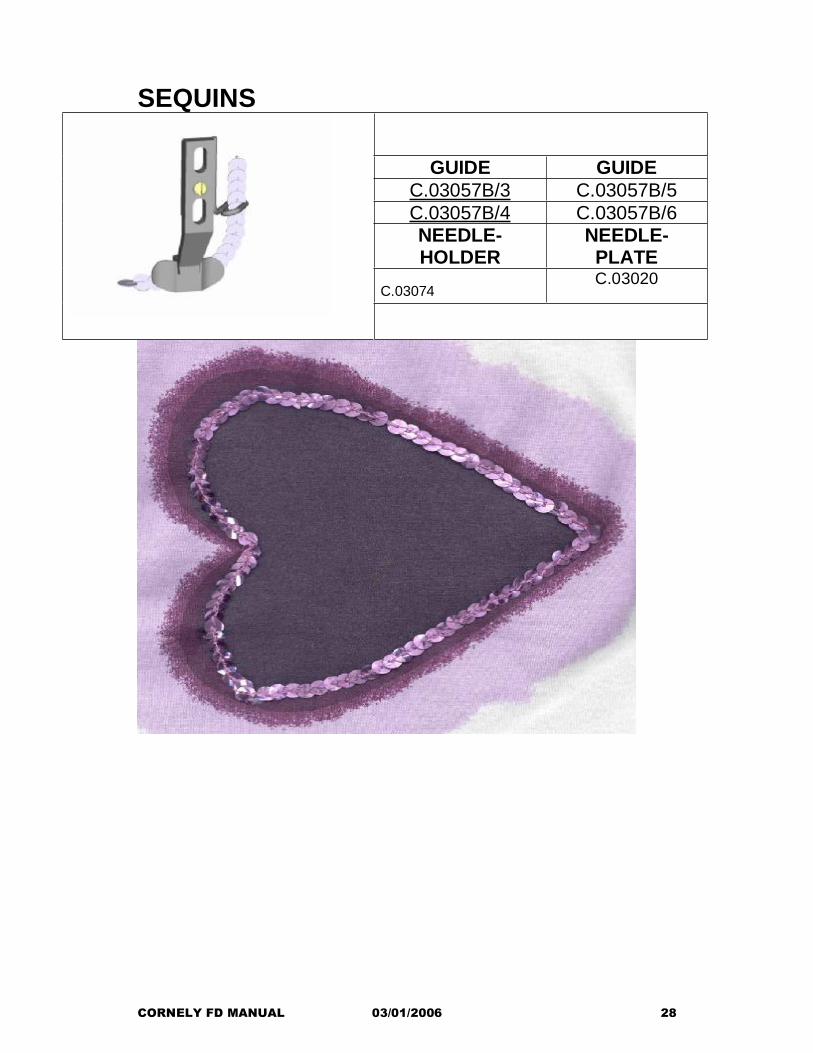
SEQUINS
GUIDE GUIDEC.03057B/3 C.03057B/5C.03057B/4 C.03057B/6NEEDLE-HOLDER
NEEDLE-PLATE
C.03074C.03020
CORNELY FD MANUAL 03/01/2006 28
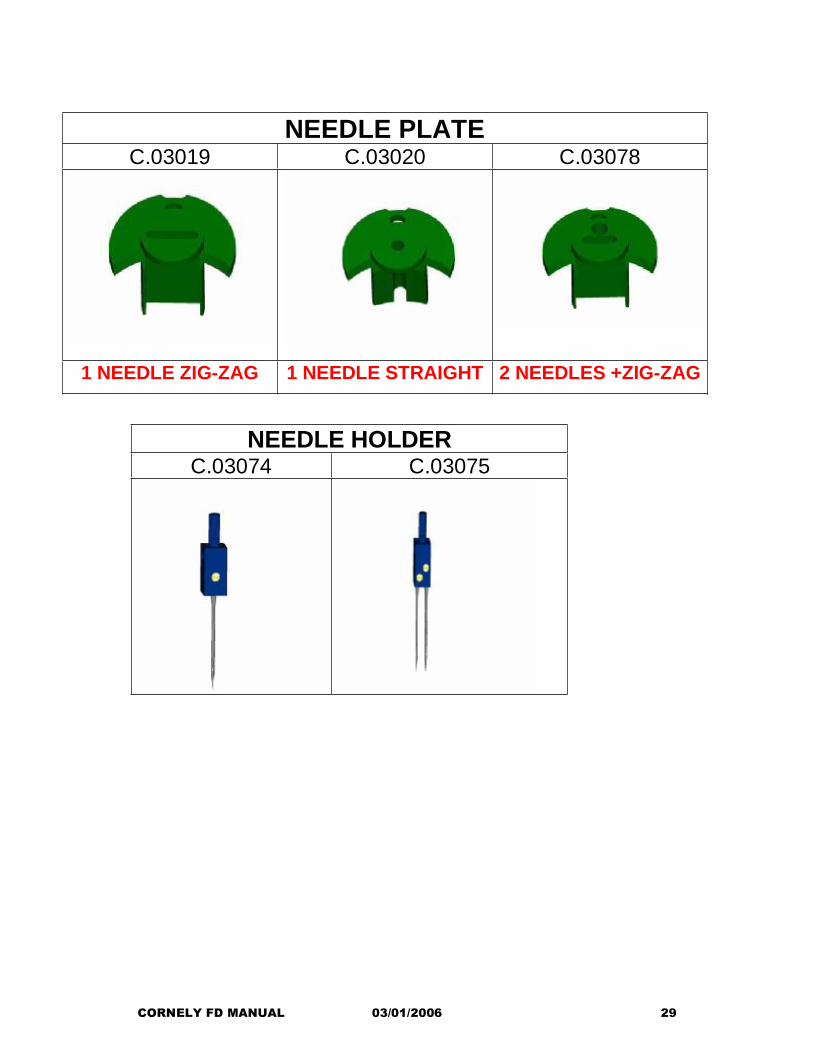
NEEDLE PLATE C.03019 C.03020 C.03078
1 NEEDLE ZIG-ZAG 1 NEEDLE STRAIGHT 2 NEEDLES +ZIG-ZAG
NEEDLE HOLDER
C.03074 C.03075
CORNELY FD MANUAL 03/01/2006 29
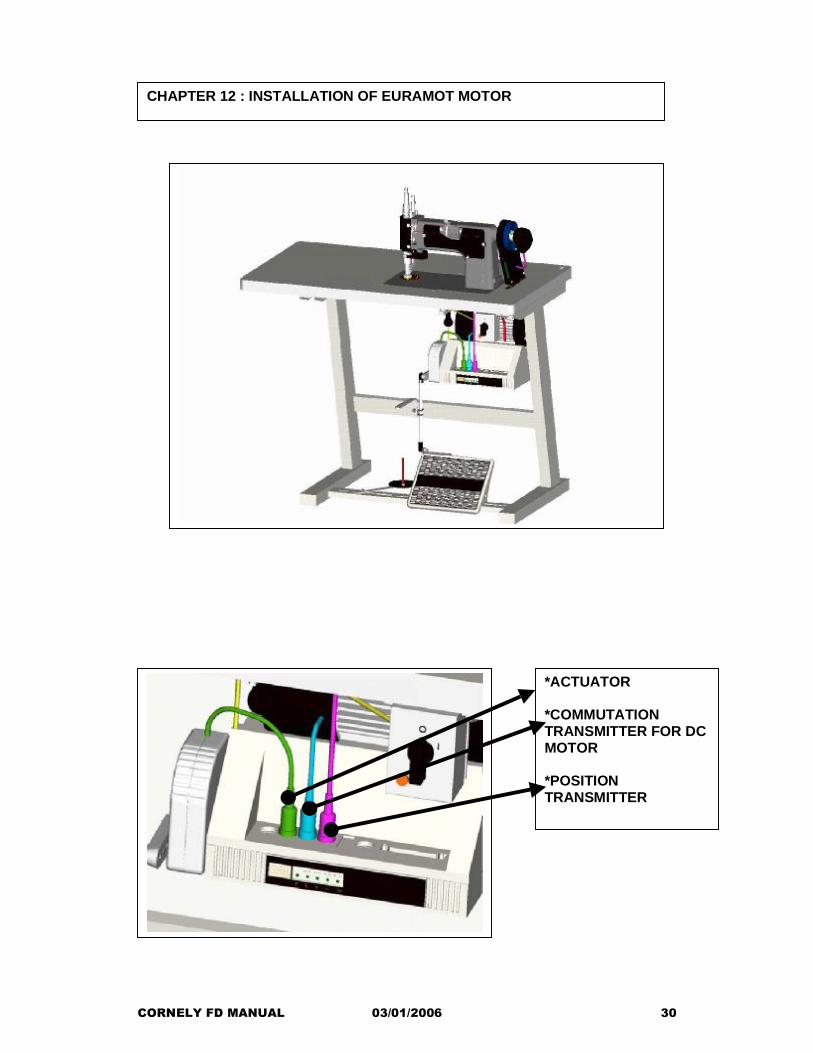
CHAPTER 12 : INSTALLATION OF EURAMOT MOTOR
*ACTUATOR
*COMMUTATIONTRANSMITTER FOR DC MOTOR
*POSITIONTRANSMITTER
CORNELY FD MANUAL 03/01/2006 30

CHAPTER 13 : PARAMETER SETTINGS EFKA MOTOR
1. Push on P and put the switch on I. On the screen of the motor will appear COD
2. Push on >> : 1st led flashes Push on + 1 : 1st led = 1
3. Push on >> : 2nd led flashes Push on –2 : 2nd led = 9
4. Push on >> : 3rd led flashes Push on E : = parameter 100
5. Push on >> : 1st led flashes
6. Push on >> : 2nd led flashes Push on + : = 1
7. Push on >> : 3rd led flashes Push on + : = 1 = parameter 111
8. Push on E : speed of the motor x 10 will appear on the screen For examples : 500 speed = 5000 rpm/min will appear 50 speed = 500 rpm will appear
9. If you want to change the speed, push on + or –
10. Once the correct speed is obtained, push on E and P. Push the pedal and the desired speed will appear on the screen and is registered now.