Embed Size (px)
Citation preview
CounterPoint SQL Integration Guide

020112
©2012 Blackbaud, Inc. This publication, or any part thereof, may not be reproduced or transmitted in any form or by any means, electronic, or mechanical, including photocopying, recording, storage in an information retrieval system, or otherwise, without the prior written permission of Blackbaud, Inc.
The information in this manual has been carefully checked and is believed to be accurate. Blackbaud, Inc., assumes no responsibility for any inaccuracies, errors, or omissions in this manual. In no event will Blackbaud, Inc., be liable for direct, indirect, special, incidental, or consequential damages resulting from any defect or omission in this manual, even if advised of the possibility of damages.
In the interest of continuing product development, Blackbaud, Inc., reserves the right to make improvements in this manual and the products it describes at any time, without notice or obligation.
All Blackbaud product names appearing herein are trademarks or registered trademarks of Blackbaud, Inc.
All other products and company names mentioned herein are trademarks of their respective holder.
RE7 -CounterPointSQL-020112

Contents
WHAT IS IN THIS GUIDE?. . . . . . . . . . . . . . . . . . . . . . . . . . . . . . . . . . . . . . . . . . . . . . V
THE RAISER’S EDGE AND COUNTERPOINT SQL INTEGRATION . . . . . . . . . . . . . . . . . . . . . 1
Benefits of Integration . . . . . . . . . . . . . . . . . . . . . . . . . . . . . . . . . . . . . . . . . . . . . . . . . . . . . . . . . . . . . . . . 3Requirements for Integration . . . . . . . . . . . . . . . . . . . . . . . . . . . . . . . . . . . . . . . . . . . . . . . . . . . . . . . . . . 4CounterPoint SQL Integration Page . . . . . . . . . . . . . . . . . . . . . . . . . . . . . . . . . . . . . . . . . . . . . . . . . . . . . . 4How Does Integration Work? . . . . . . . . . . . . . . . . . . . . . . . . . . . . . . . . . . . . . . . . . . . . . . . . . . . . . . . . . . . 6Step 1: Meet the Requirements for Integration . . . . . . . . . . . . . . . . . . . . . . . . . . . . . . . . . . . . . . . . . . . . 6Step 2: Set up The Raiser’s Edge and CounterPoint SQL Interface . . . . . . . . . . . . . . . . . . . . . . . . . . . . . 8Step 3: Manage Constituents and Memberships . . . . . . . . . . . . . . . . . . . . . . . . . . . . . . . . . . . . . . . . . . 16Step 4: Access Ticket Entry from The Raiser’s Edge . . . . . . . . . . . . . . . . . . . . . . . . . . . . . . . . . . . . . . . . 32Step 5: Download Donations from CounterPoint SQL . . . . . . . . . . . . . . . . . . . . . . . . . . . . . . . . . . . . . . 33Step 6: Download Membership Transactions from CounterPoint SQL . . . . . . . . . . . . . . . . . . . . . . . . . 38Step 7: Access CounterPoint SQL Reports from The Raiser’s Edge . . . . . . . . . . . . . . . . . . . . . . . . . . . . 44
INDEX . . . . . . . . . . . . . . . . . . . . . . . . . . . . . . . . . . . . . . . . . . . . . . . . . . . . . . . . . . . 45

iiichapter
What Is In This Guide?
In the CounterPoint SQL Integration Guide, you learn how to integrate CounterPoint SQL, an inventory management and graphical product sales system, with The Raiser’s Edge. You can also learn about the following:• “Benefits of Integration” on page 3• “Requirements for Integration” on page 4• “How Does Integration Work?” on page 6• “CounterPoint SQL Integration Security” on page 7• “Connect The Raiser’s Edge and CounterPoint SQL Databases” on page 8
How Do I Use These Guides?
The Raiser’s Edge user guides contain examples, scenarios, procedures, graphics, and conceptual information. To find help quickly and easily, you can access the Raiser’s Edge documentation from several places. User Guides. You can access PDF versions of the guides by selecting Help, User Guides from the shell menu bar
or by clicking Help on the Raiser’s Edge bar in the program. You can also access the guides on our Web site at www.blackbaud.com. From the menu bar, select Support, User Guides. In a PDF, page numbers in the Table of Contents, Index, and all cross-references are hyperlinks. For example, click the page number by any heading or procedure on a Table of Contents page to go directly to that page.
Help File. In addition to user guides, you can learn about The Raiser’s Edge by accessing the help file in the program. Select Help, The Raiser’s Edge Help Topics from the shell menu bar or press F1 on your keyboard from anywhere in the program. Narrow your search in the help file by enclosing your search in quotation marks on the Search tab. For example, instead of entering Load Defaults, enter “Load Defaults.” The help file searches for the complete phrase in quotes instead of individual words.
.

1chapter
The Raiser’s Edge and CounterPoint SQL Integration
Benefits of Integration. . . . . . . . . . . . . . . . . . . . . . . . . . . . . . . . . . . . . . . . . . . . . . . . . . . . . . . . . . . . . . . . . . . . . . . . . 3Requirements for Integration . . . . . . . . . . . . . . . . . . . . . . . . . . . . . . . . . . . . . . . . . . . . . . . . . . . . . . . . . . . . . . . . . . . 4CounterPoint SQL Integration Page . . . . . . . . . . . . . . . . . . . . . . . . . . . . . . . . . . . . . . . . . . . . . . . . . . . . . . . . . . . . . . 4How Does Integration Work? . . . . . . . . . . . . . . . . . . . . . . . . . . . . . . . . . . . . . . . . . . . . . . . . . . . . . . . . . . . . . . . . . . . 6Step 1: Meet the Requirements for Integration . . . . . . . . . . . . . . . . . . . . . . . . . . . . . . . . . . . . . . . . . . . . . . . . . . . . 6CounterPoint SQL Integration Security . . . . . . . . . . . . . . . . . . . . . . . . . . . . . . . . . . . . . . . . . . . . . . . . . . . . . . . . . . . . . . 7Step 2: Set up of The Raiser’s Edge and CounterPoint SQL Interface. . . . . . . . . . . . . . . . . . . . . . . . . . . . . . . . . . . . 8Connect The Raiser’s Edge and CounterPoint SQL Databases. . . . . . . . . . . . . . . . . . . . . . . . . . . . . . . . . . . . . . . . . . . . 8Field Mapping . . . . . . . . . . . . . . . . . . . . . . . . . . . . . . . . . . . . . . . . . . . . . . . . . . . . . . . . . . . . . . . . . . . . . . . . . . . . . . . . . 14
Transfer Constituents from The Raiser’s Edge to CounterPoint SQL . . . . . . . . . . . . . . . . . . . . . . . . . . . . . . . . . . 14Create New Constituents in The Raiser’s Edge from CounterPoint SQL . . . . . . . . . . . . . . . . . . . . . . . . . . . . . . . . 15
Step 3: Manage Constituents and Memberships. . . . . . . . . . . . . . . . . . . . . . . . . . . . . . . . . . . . . . . . . . . . . . . . . . . 16Transfer Constituent Data to CounterPoint SQL . . . . . . . . . . . . . . . . . . . . . . . . . . . . . . . . . . . . . . . . . . . . . . . . . . . . . . 16
General Tab . . . . . . . . . . . . . . . . . . . . . . . . . . . . . . . . . . . . . . . . . . . . . . . . . . . . . . . . . . . . . . . . . . . . . . . . . . . . . . . . 17Ind. Address Tab . . . . . . . . . . . . . . . . . . . . . . . . . . . . . . . . . . . . . . . . . . . . . . . . . . . . . . . . . . . . . . . . . . . . . . . . . . . . 18Org. Address Tab . . . . . . . . . . . . . . . . . . . . . . . . . . . . . . . . . . . . . . . . . . . . . . . . . . . . . . . . . . . . . . . . . . . . . . . . . . . . 21Additional Information Tab. . . . . . . . . . . . . . . . . . . . . . . . . . . . . . . . . . . . . . . . . . . . . . . . . . . . . . . . . . . . . . . . . . . . 24Membership Processing Tab. . . . . . . . . . . . . . . . . . . . . . . . . . . . . . . . . . . . . . . . . . . . . . . . . . . . . . . . . . . . . . . . . . . 25Summary Tab . . . . . . . . . . . . . . . . . . . . . . . . . . . . . . . . . . . . . . . . . . . . . . . . . . . . . . . . . . . . . . . . . . . . . . . . . . . . . . . 26
Transfer Constituents to CounterPoint SQL Procedure . . . . . . . . . . . . . . . . . . . . . . . . . . . . . . . . . . . . . . . . . . . . . . . . 26Update CounterPoint SQL Membership Information . . . . . . . . . . . . . . . . . . . . . . . . . . . . . . . . . . . . . . . . . . . . . . . . . . 28Update Constituent Information in CounterPoint SQL. . . . . . . . . . . . . . . . . . . . . . . . . . . . . . . . . . . . . . . . . . . . . . . . . 31Step 4: Access Ticket Entry from The Raiser’s Edge. . . . . . . . . . . . . . . . . . . . . . . . . . . . . . . . . . . . . . . . . . . . . . . . . 32Step 5: Download Donations from CounterPoint SQL. . . . . . . . . . . . . . . . . . . . . . . . . . . . . . . . . . . . . . . . . . . . . . . 33CounterPoint SQL Ticket Items . . . . . . . . . . . . . . . . . . . . . . . . . . . . . . . . . . . . . . . . . . . . . . . . . . . . . . . . . . . . . . . . . . . 36Step 6: Download Membership Transactions from CounterPoint SQL . . . . . . . . . . . . . . . . . . . . . . . . . . . . . . . . . 38CounterPoint SQL Ticket Items . . . . . . . . . . . . . . . . . . . . . . . . . . . . . . . . . . . . . . . . . . . . . . . . . . . . . . . . . . . . . . . . . . . 42Step 7: Access CounterPoint SQL Reports from The Raiser’s Edge. . . . . . . . . . . . . . . . . . . . . . . . . . . . . . . . . . . . . 44
Procedures
Assign CounterPoint SQL Integration security . . . . . . . . . . . . . . . . . . . . . . . . . . . . . . . . . . . . . . . . . . . . . . . . . . . . . . . . 7Connect The Raiser’s Edge and CounterPoint SQL databases. . . . . . . . . . . . . . . . . . . . . . . . . . . . . . . . . . . . . . . . . . . . 9

2 CH A PT E R
Map funds and memberships to product inventory . . . . . . . . . . . . . . . . . . . . . . . . . . . . . . . . . . . . . . . . . . . . . . . . . . 10Select constituent records to transfer. . . . . . . . . . . . . . . . . . . . . . . . . . . . . . . . . . . . . . . . . . . . . . . . . . . . . . . . . . . . . . 17Select individual constituent address data to transfer . . . . . . . . . . . . . . . . . . . . . . . . . . . . . . . . . . . . . . . . . . . . . . . . 19Select organization constituent address and contact information data to transfer . . . . . . . . . . . . . . . . . . . . . . . . . 21Set CounterPoint SQL information for transfer . . . . . . . . . . . . . . . . . . . . . . . . . . . . . . . . . . . . . . . . . . . . . . . . . . . . . . 24Select constituent membership data to transfer . . . . . . . . . . . . . . . . . . . . . . . . . . . . . . . . . . . . . . . . . . . . . . . . . . . . . 25Transfer constituents to CounterPoint SQL . . . . . . . . . . . . . . . . . . . . . . . . . . . . . . . . . . . . . . . . . . . . . . . . . . . . . . . . . 27Update CounterPoint SQL membership information. . . . . . . . . . . . . . . . . . . . . . . . . . . . . . . . . . . . . . . . . . . . . . . . . . 29Access Ticket Entry . . . . . . . . . . . . . . . . . . . . . . . . . . . . . . . . . . . . . . . . . . . . . . . . . . . . . . . . . . . . . . . . . . . . . . . . . . . . . 32Download donations. . . . . . . . . . . . . . . . . . . . . . . . . . . . . . . . . . . . . . . . . . . . . . . . . . . . . . . . . . . . . . . . . . . . . . . . . . . . 34Download membership transactions . . . . . . . . . . . . . . . . . . . . . . . . . . . . . . . . . . . . . . . . . . . . . . . . . . . . . . . . . . . . . . 38

TH E RA I S E R ’S ED GE A N D CO U N T E RPO I N T SQL 3
Using Radiant Systems CounterPoint SQL with The Raiser’s Edge enables you to integrate your product sales with your fundraising efforts. From within The Raiser’s Edge, you can access CounterPoint SQL’s ticket entry system, access media and sales tracking reports, and download donations from the product sales system. While increasing efficiency and accountability, this integration helps support your mission and develop your constituency. Also, if you have the optional module Membership Management, you can sell products based on membership status and upgrade, renew, downgrade, or sell a membership.This guide provides an overview of the benefits of using CounterPoint SQL with The Raiser’s Edge and a step-by-step approach to set up and use the integrated system. To plan the level of integration and accountability needed, set up the integrated system, and establish data entry procedures, key members of both the development and business offices should review this guide.
Benefits of Integration
Traditionally, product sales and fundraising efforts of nonprofit organizations are done separately. However, with the integration of The Raiser’s Edge for fundraising needs and CounterPoint SQL for product sales needs, your organization can achieve a new level of success, efficiency, and productivity.Improved efficiency. With integration, The Raiser’s Edge can transfer constituents and memberships to
CounterPoint SQL, eliminating the need for imports and extra data entry. After you initially transfer constituents, you can send new Raiser’s Edge constituents as needed. Also, when you download new donations from CounterPoint SQL, The Raiser’s Edge can determine if a new constituent record is required.Downloading donations, taken at the time of the product sale, can improve your efficiency in fundraising. Downloading donations eliminates the manual entry of donations, reduces the possibility of duplicate gifts, and increases the opportunities for constituents to give.If you have the optional module Membership Management, you can improve efficiency by selling products in CounterPoint SQL based on membership status. You can also upgrade, renew, or purchase new memberships for constituents in CounterPoint SQL. With the Download Membership Transactions function in The Raiser’s Edge, you can update membership information on constituent records.
Enhanced accessibility. Integrating CounterPoint SQL with The Raiser’s Edge enables you to access product sales in two different ways, depending on your organization’s needs.You can access CounterPoint SQL as a standalone program, or, after you integrate, you can access CounterPoint SQL’s Ticket Entry screen and Reports from The Raiser’s Edge. As an added convenience, all functions related to integration, except designating security rights, are in one location in The Raiser’s Edge.
Greater cccountability. Accountability is an important aspect of a nonprofit organization’s operation. With integration, you have export extensions available to export CounterPoint SQL data from The Raiser’s Edge and create new custom views.
Increased understanding and development of constituency. With the integration of fundraising and product sales, you can better understand your constituents and their needs. To track sales and the type of products that interest your constituents, you can create reports from CounterPoint SQL. Knowing the type of products that interest your constituents can help determine the type of fundraising efforts that may be successful in the future.
Warning: Involve key fundraising and sales representatives in planning the integration.
Note: For more information about Security rights, see the Configuration and Security Guide.

4 CH A PT E R
Requirements for Integration
To set up The Raiser’s Edge and CounterPoint SQL integration and perform integration tasks, you must meet the following requirements:• The Raiser’s Edge version 7.81 or higher must be installed.• CounterPoint SQL version 8.3.4 or higher must be installed.• The Raiser’s Edge and CounterPoint SQL must be installed on the same workstation for Ticket Entry and
CounterPoint SQL Reports.For all other tasks, the CounterPoint SQL database must be accessible by the server. For more information on connecting your CounterPoint SQL database to The Raiser’s Edge database, see “Step 2: Set up The Raiser’s Edge and CounterPoint SQL Interface” on page 8.
• To access CounterPoint SQL Integration in The Raiser’s Edge, you must set up security rights. For more information on accessing Security in Administration, see the Security chapter of the Configuration and Security Guide. For information on the security rights you need for setup, see “Step 1: Meet the Requirements for Integration” on page 6.
• For any tasks involving memberships, you must have the optional module Membership Management.
CounterPoint SQL Integration Page
Warning: Before you integrate with The Raiser’s Edge, we suggest you familiarize yourself with CounterPoint SQL. For more information about CounterPoint SQL, see the CounterPoint SQL Online Help. To access help, select Help, Contents and Index from the CounterPoint SQL menu bar.
Note: If you cannot see the CounterPoint SQL Integration button on the Raiser’s Edge bar, verify CounterPoint SQL is installed correctly and that you have security rights. For more information on security rights, see “Step 1: Meet the Requirements for Integration” on page 6.
TH E RA I S E R ’S ED GE A N D CO U N T E RPO I N T SQL 5
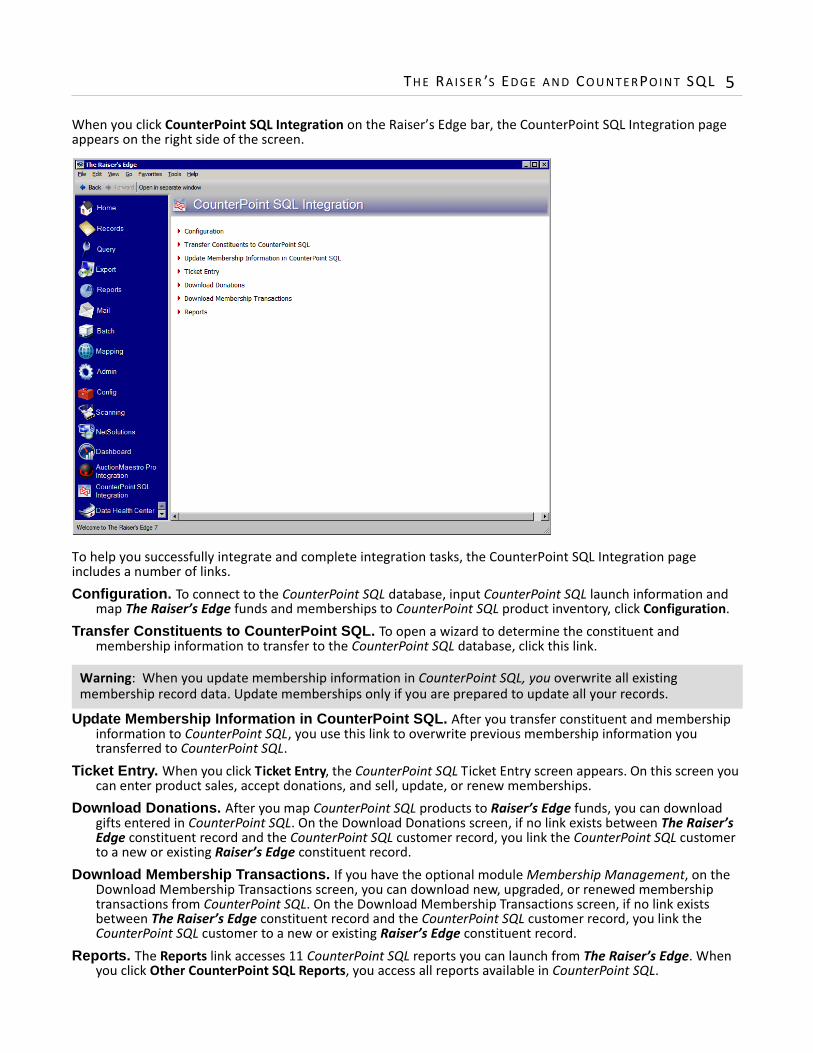
When you click CounterPoint SQL Integration on the Raiser’s Edge bar, the CounterPoint SQL Integration page appears on the right side of the screen.
To help you successfully integrate and complete integration tasks, the CounterPoint SQL Integration page includes a number of links.Configuration. To connect to the CounterPoint SQL database, input CounterPoint SQL launch information and
map The Raiser’s Edge funds and memberships to CounterPoint SQL product inventory, click Configuration.Transfer Constituents to CounterPoint SQL. To open a wizard to determine the constituent and
membership information to transfer to the CounterPoint SQL database, click this link.
Update Membership Information in CounterPoint SQL. After you transfer constituent and membership information to CounterPoint SQL, you use this link to overwrite previous membership information you transferred to CounterPoint SQL.
Ticket Entry. When you click Ticket Entry, the CounterPoint SQL Ticket Entry screen appears. On this screen you can enter product sales, accept donations, and sell, update, or renew memberships.
Download Donations. After you map CounterPoint SQL products to Raiser’s Edge funds, you can download gifts entered in CounterPoint SQL. On the Download Donations screen, if no link exists between The Raiser’s Edge constituent record and the CounterPoint SQL customer record, you link the CounterPoint SQL customer to a new or existing Raiser’s Edge constituent record.
Download Membership Transactions. If you have the optional module Membership Management, on the Download Membership Transactions screen, you can download new, upgraded, or renewed membership transactions from CounterPoint SQL. On the Download Membership Transactions screen, if no link exists between The Raiser’s Edge constituent record and the CounterPoint SQL customer record, you link the CounterPoint SQL customer to a new or existing Raiser’s Edge constituent record.
Reports. The Reports link accesses 11 CounterPoint SQL reports you can launch from The Raiser’s Edge. When you click Other CounterPoint SQL Reports, you access all reports available in CounterPoint SQL.
Warning: When you update membership information in CounterPoint SQL, you overwrite all existing membership record data. Update memberships only if you are prepared to update all your records.

6 CH A PT E R
How Does Integration Work?
The Raiser’s Edge and CounterPoint SQL integration involves a series of steps that help you set up integration, transfer constituent data to CounterPoint SQL to prepare for product sales, and become familiar with new integration procedures.Step 1: Meet the Requirements for Integration. In this step, you set up security rights and review the
requirements for integration.Step 2: Set up The Raiser’s Edge and CounterPoint SQL Interface. In this step, you configure
integration settings and map The Raiser’s Edge funds and memberships to CounterPoint SQL inventory.
Step 3: Manage Constituents and Memberships. In this step, you transfer Raiser’s Edge constituent records to CounterPoint SQL in preparation for product sales. You also learn how to transfer constituents and update memberships after the initial data transfer.
Step 4: Access CounterPoint SQL Ticket Entry from The Raiser’s Edge. In this step, you access the CounterPoint SQL product sales system Ticket Entry screen from The Raiser’s Edge.
Step 5: Download Donations from CounterPoint SQL. In this step, you download new donations entered in CounterPoint SQL.
Step 6: Download Membership Transactions from CounterPoint SQL. In this step, you download new, upgraded, or renewed memberships entered in CounterPoint SQL.
Step 7: Access CounterPoint SQL Reports from The Raiser’s Edge. In this step, you access CounterPoint SQL reports from within The Raiser’s Edge.
Step 1: Meet the Requirements for IntegrationBefore you set up the interface between The Raiser’s Edge and CounterPoint SQL, you must install The Raiser’s Edge 7.81 or higher. For information on how to install The Raiser’s Edge, see the Installation Guide. You also must install CounterPoint SQL 8.3.4 or higher. For information on how to install CounterPoint SQL, contact your Radiant Systems authorized dealer.Once you have The Raiser’s Edge and CounterPoint SQL installed, you must unlock the CounterPoint SQL Integration module. For information on unlocking optional modules, see the Program Basics chapter in the Program Basics Guide.After you unlock the module, you can set security rights for your security groups.
Note: This guide is specific to the integration between The Raiser’s Edge 7.81 or higher and CounterPoint SQL 8.3.4 or higher.
Warning: For any tasks involving memberships, you must have the optional module Membership Management.
Warning: For any tasks involving memberships, you must have the optional module Membership Management.

TH E RA I S E R ’S ED GE A N D CO U N T E RPO I N T SQL 7
CounterPoint SQL Integration Security
All CounterPoint SQL integration security options, except for Configuration, default to marked. This way, security groups can perform integration tasks while protecting configuration tasks to those in your organization with the ability to set up integration correctly. Before you assign CounterPoint SQL Integration security, consider the security groups you need. For more information on managing security and creating security groups, see the Security chapter of the Configuration and Security Guide.
Assign CounterPoint SQL Integration security1. On the Raiser’s Edge bar, click Admin. The Administration page appears.2. Click Security. The Security page appears.3. Select the group whose security rights you want to change.4. On the action bar, click Open . The Group screen appears.
5. In the Group Privileges box, select CounterPoint SQL Integration. The checkbox defaults to marked and the Options button is enabled. If you do not want a security group to have access to CounterPoint SQL Integration, unmark the checkbox.

8 CH A PT E R
6. Click Options. The Security Options screen appears.
7. Mark the checkboxes for the security rights to enable for the group. Unmark any checkboxes for rights you want to take away.
8. Click OK. You return to the Group screen.9. To save your CounterPoint SQL integration security settings, click Save and Close.
Step 2: Set up The Raiser’s Edge and CounterPoint SQL InterfaceIn the Configuration frame of the CounterPoint SQL Integration page, you establish settings for the interface between The Raiser’s Edge and CounterPoint SQL.
Connect The Raiser’s Edge and CounterPoint SQL Databases
You must establish a link to the CounterPoint SQL database. You can also specify how to authenticate the connection with Windows Authentication or SQL Server Authentication.
Warning: To establish connection settings, you must have CounterPoint SQL configuration security rights. For more information, see “CounterPoint SQL Integration Security” on page 7.

TH E RA I S E R ’S ED GE A N D CO U N T E RPO I N T SQL 9
Connect The Raiser’s Edge and CounterPoint SQL databases1. On the Raiser’s Edge bar, click CounterPoint SQL Integration. The CounterPoint SQL Integration page
appears.
2. Click Configuration. The Configuration frame appears.
3. In the Server field, enter the server on which your CounterPoint SQL SQL Server database resides.
Note: If you are unsure of your server name, your network administrator should supply you with it.
10 CH A PT E R
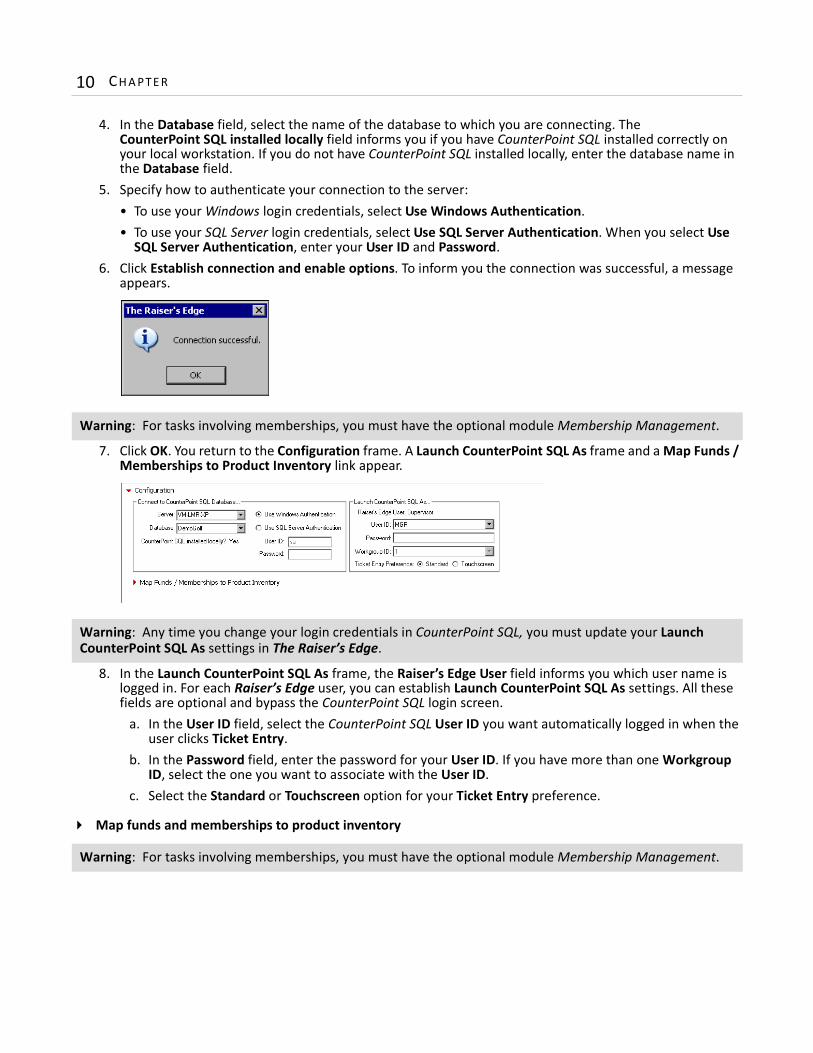
4. In the Database field, select the name of the database to which you are connecting. The CounterPoint SQL installed locally field informs you if you have CounterPoint SQL installed correctly on your local workstation. If you do not have CounterPoint SQL installed locally, enter the database name in the Database field.
5. Specify how to authenticate your connection to the server:• To use your Windows login credentials, select Use Windows Authentication. • To use your SQL Server login credentials, select Use SQL Server Authentication. When you select Use
SQL Server Authentication, enter your User ID and Password.6. Click Establish connection and enable options. To inform you the connection was successful, a message
appears.
7. Click OK. You return to the Configuration frame. A Launch CounterPoint SQL As frame and a Map Funds / Memberships to Product Inventory link appear.
8. In the Launch CounterPoint SQL As frame, the Raiser’s Edge User field informs you which user name is logged in. For each Raiser’s Edge user, you can establish Launch CounterPoint SQL As settings. All these fields are optional and bypass the CounterPoint SQL login screen.
a. In the User ID field, select the CounterPoint SQL User ID you want automatically logged in when the user clicks Ticket Entry.
b. In the Password field, enter the password for your User ID. If you have more than one Workgroup ID, select the one you want to associate with the User ID.
c. Select the Standard or Touchscreen option for your Ticket Entry preference.
Map funds and memberships to product inventory
Warning: For tasks involving memberships, you must have the optional module Membership Management.
Warning: Any time you change your login credentials in CounterPoint SQL, you must update your Launch CounterPoint SQL As settings in The Raiser’s Edge.
Warning: For tasks involving memberships, you must have the optional module Membership Management.

TH E RA I S E R ’S ED GE A N D CO U N T E RPO I N T SQL 11
With the Map Funds / Memberships to Product Inventory link, you map Raiser’s Edge funds to CounterPoint SQL product inventory donation items and Raiser’s Edge funds, programs, categories, and subcategories to CounterPoint SQL product inventory membership items. This enables you to download new donations and membership changes taken in CounterPoint SQL.
1. On the CounterPoint SQL Integration page, click Configuration. The Configuration frame appears.
2. Click Map Funds / Memberships to Product Inventory. The Map Funds / Memberships to Product Inventory screen appears.
3. To take donations in CounterPoint SQL, in the Fund column, select a Raiser’s Edge fund or click the binoculars to search for your fund.
Warning: Before you map Raiser’s Edge funds and memberships to CounterPoint SQL product inventory, set up all of your inventory and non-inventory items in CounterPoint SQL. For more information, see the CounterPoint SQL help file.
12 CH A PT E R
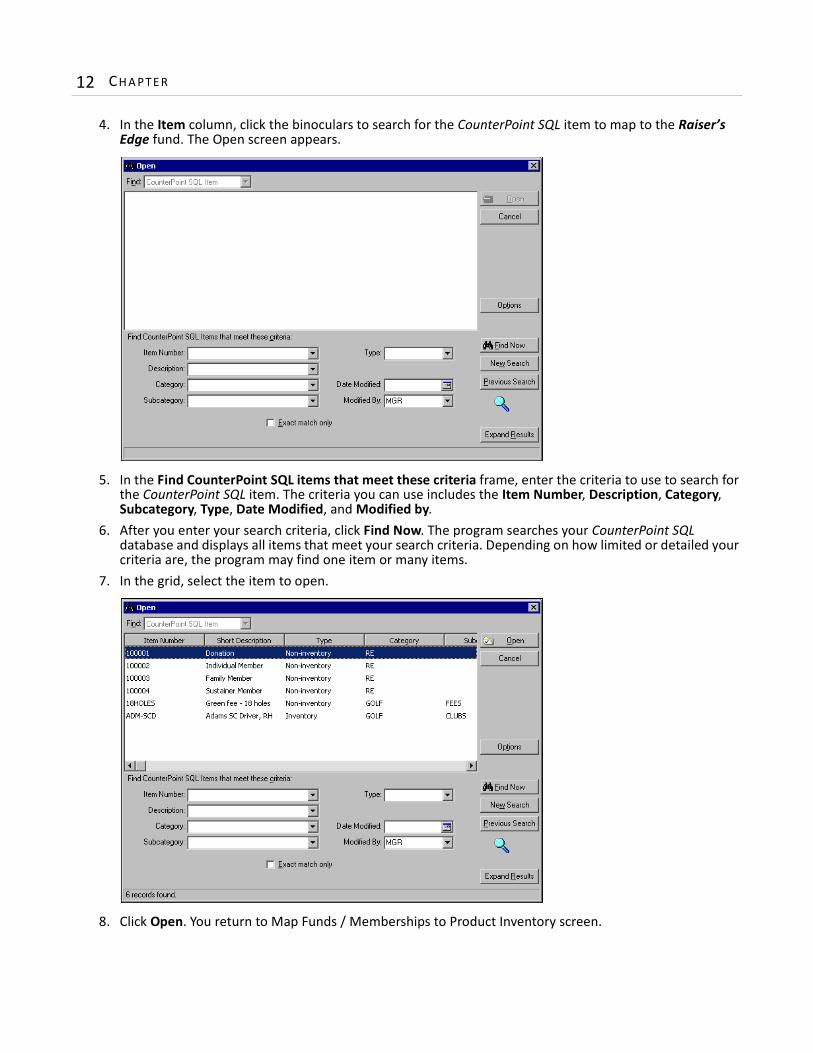
4. In the Item column, click the binoculars to search for the CounterPoint SQL item to map to the Raiser’s Edge fund. The Open screen appears.
5. In the Find CounterPoint SQL items that meet these criteria frame, enter the criteria to use to search for the CounterPoint SQL item. The criteria you can use includes the Item Number, Description, Category, Subcategory, Type, Date Modified, and Modified by.
6. After you enter your search criteria, click Find Now. The program searches your CounterPoint SQL database and displays all items that meet your search criteria. Depending on how limited or detailed your criteria are, the program may find one item or many items.
7. In the grid, select the item to open.
8. Click Open. You return to Map Funds / Memberships to Product Inventory screen.

TH E RA I S E R ’S ED GE A N D CO U N T E RPO I N T SQL 13
9. If you have Membership Management, you can map each membership you want available to amend in CounterPoint SQL.
a. In the Fund column, select a Raiser’s Edge fund or click the binoculars to search for your fund.b. In the Program column, Category column, and Subcategory column, select The Raiser’s Edge
membership to map to the CounterPoint SQL item.
c. In the Item column, select the CounterPoint SQL item to map to The Raiser’s Edge membership.
Warning: To ensure The Raiser’s Edge downloads membership transactions accurately, you must map every membership program category to a unique CounterPoint SQL item.

14 CH A PT E R
10. When you finish mapping funds and memberships to CounterPoint SQL items, click Save and Close on the toolbar.
Field Mapping
This section provides a general overview of the field mapping that occurs in the integration between The Raiser’s Edge and CounterPoint SQL.
Transfer Constituents from The Raiser’s Edge to CounterPoint SQL
This table shows the location of each field in The Raiser’s Edge and the corresponding field in CounterPoint SQL when you transfer records from The Raiser’s Edge into CounterPoint SQL. A Raiser’s Edge field with no corresponding CounterPoint SQL field indicates that a new field is added to the CounterPoint SQL database.
Warning: For tasks involving memberships, you must have the optional module Membership Management.
Raiser’s Edge Field CounterPoint SQL FieldSystem Record ID, Constituent ID, or Import ID
Customer #
First name First nameLast name Last nameName NameAddress lines Address 1Address lines Address 2Address lines Address 3City CityState StateZIP Zip codePhones Phone 1
TH E RA I S E R ’S ED GE A N D CO U N T E RPO I N T SQL 15
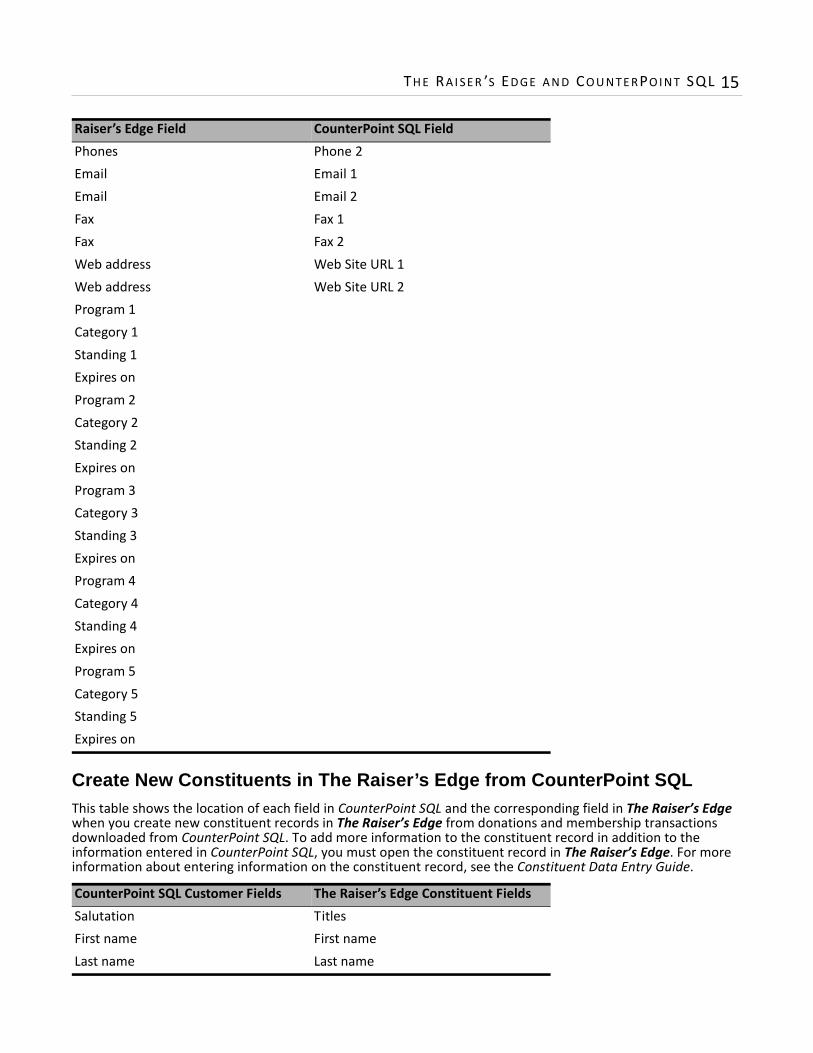
Create New Constituents in The Raiser’s Edge from CounterPoint SQLThis table shows the location of each field in CounterPoint SQL and the corresponding field in The Raiser’s Edge when you create new constituent records in The Raiser’s Edge from donations and membership transactions downloaded from CounterPoint SQL. To add more information to the constituent record in addition to the information entered in CounterPoint SQL, you must open the constituent record in The Raiser’s Edge. For more information about entering information on the constituent record, see the Constituent Data Entry Guide.
Phones Phone 2Email Email 1Email Email 2Fax Fax 1Fax Fax 2Web address Web Site URL 1Web address Web Site URL 2Program 1Category 1Standing 1Expires onProgram 2Category 2Standing 2Expires onProgram 3Category 3Standing 3Expires onProgram 4Category 4Standing 4Expires onProgram 5Category 5Standing 5Expires on
CounterPoint SQL Customer Fields The Raiser’s Edge Constituent FieldsSalutation TitlesFirst name First nameLast name Last name
Raiser’s Edge Field CounterPoint SQL Field

16 CH A PT E R
In Business Rules, if you selected to automatically generate Constituent IDs when adding records, The Raiser’s Edge assigns the Constituent ID. If you do not select this option, when you create a new Raiser’s Edge constituent from a CounterPoint SQL donation or membership transaction, The Raiser’s Edge uses the CounterPoint SQL customer number for the Constituent ID. If The Raiser’s Edge is unable to use the CounterPoint SQL customer number, you must resolve the error manually.
Step 3: Manage Constituents and Memberships
With CounterPoint SQL integration, you initially transfer constituents and memberships in The Raiser’s Edge to a customer database in CounterPoint SQL. As needed, you send more constituents and update the membership information. However, when you update membership information in CounterPoint SQL, you overwrite all existing membership data.Before you transfer constituent data and membership information, you must connect The Raiser’s Edge database to the CounterPoint SQL database and map your funds and memberships in The Raiser’s Edge to product inventory in CounterPoint SQL. For more information on configuring the integration, see “Step 2: Set up The Raiser’s Edge and CounterPoint SQL Interface” on page 8.To transfer constituent and membership data to CounterPoint SQL and to download donation and membership transactions in The Raiser’s Edge, you must select the constituent and membership information to transfer. For information on the options you can select when you transfer constituents to CounterPoint SQL, see “Transfer Constituent Data to CounterPoint SQL” on page 16. For information on how to transfer constituent and membership data to CounterPoint SQL, see the “Transfer Constituents to CounterPoint SQL Procedure” on page 26. For information on how to update membership and constituent information, see “Update CounterPoint SQL Membership Information” on page 28 and “Update Constituent Information in CounterPoint SQL” on page 31.
Transfer Constituent Data to CounterPoint SQL
To transfer constituent data to CounterPoint SQL, from the CounterPoint SQL Integration page, click Transfer Constituents to CounterPoint SQL. The Transfer Constituents to CounterPoint SQL screen opens to the General tab.On the Transfer Constituents to CounterPoint SQL screen, you select the records to consider for transfer, determine how constituent data transfers, and view a summary of your transfer criteria. The Transfer Constituents to CounterPoint SQL screen consists of six tabs.
Address 1 Address linesAddress 2 Address linesAddress 3 Address linesCity CityZip code ZIPPhone 1 Phones/Emails/LinksFax 1 Phones/Emails/LinksEmail 1 Phones/Emails/Links
Warning: For more information about Business Rules in The Raiser’s Edge, see the Configuration & Security Guide.
Warning: For tasks involving memberships, you must have the optional module Membership Management.
CounterPoint SQL Customer Fields The Raiser’s Edge Constituent Fields

TH E RA I S E R ’S ED GE A N D CO U N T E RPO I N T SQL 17
General TabOn the General tab, you determine the records to consider for data transfer from The Raiser’s Edge to CounterPoint SQL. You can choose to transfer data from all records in your database or from selected records using a query. On this tab, you also define other preferences for the data transfer, such as how to process constituents who are marked as Head of Household, are inactive, or have no valid address.
Select constituent records to transfer1. On the CounterPoint SQL Integration page, click Transfer Constituents to CounterPoint SQL. The Transfer
Constituents to CounterPoint SQL screen opens to the General tab.
2. To select the group of records to transfer, click Include. You can select All Records or Selected Records (with a query) from your database.
• To include all constituent records in your database, select All Records.

18 CH A PT E R
• To include only constituents in a selected query, select Selected Records. The Open Query screen appears.
Once you make your selection, only those records in the query are considered for transfer. For more information about Query, see the Query and Export Guide.
3. In the Head of Household Processing frame, select whether to Transfer only constituents marked ‘Head of Household’, Transfer first constituent found, or Transfer both constituents separately.
4. In the Transfer these Constituents frame, determine whether to include Inactive constituents and Constituents with no valid address.
5. Select whether to print or preview a control report, create an exception query, or create an output query. • To create a control report for the constituent transfer, mark Create control report. A control report
provides a list of which constituents transferred, the information transferred for each constituent, and any exceptions that occur when transferring information to CounterPoint SQL. If you mark Create control report, select whether to Preview or Print the report upon transfer.
• To create a query of all the records that are not able to transfer, mark Create exception query. • To create a query of all records that are transferred to CounterPoint SQL, mark Create output query.
6. Click Next. The Ind. Address tab appears. For information about the Ind. Address tab, see “Ind. Address Tab” on page 18.
Ind. Address TabOn the Ind. Address tab, you determine the address data to transfer from an individual constituent record. The Raiser’s Edge selects an address for each individual constituent using four steps and can consider seasonal addresses, address attributes, and specific address types. When the program is unable to find a valid address for a constituent, you can select an alternate address to use. It is important to indicate your preferences in each of the four steps so the program can choose the best address for each constituent.
TH E RA I S E R ’S ED GE A N D CO U N T E RPO I N T SQL 19
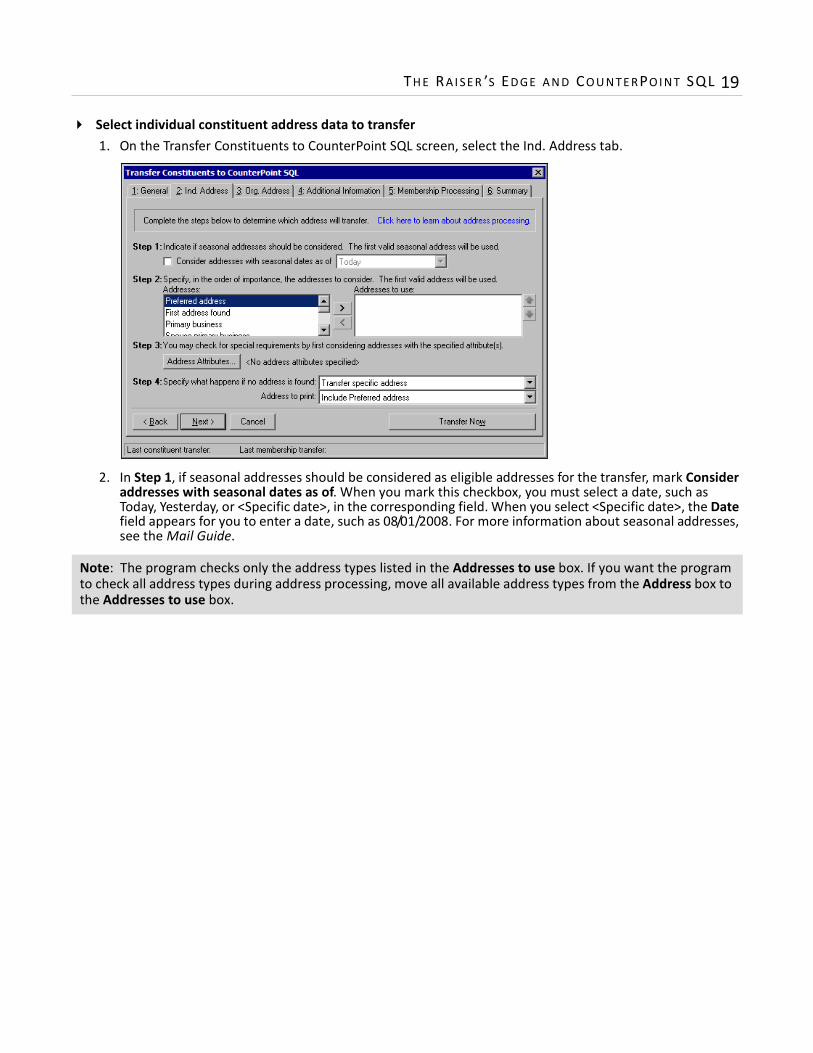
Select individual constituent address data to transfer1. On the Transfer Constituents to CounterPoint SQL screen, select the Ind. Address tab.
2. In Step 1, if seasonal addresses should be considered as eligible addresses for the transfer, mark Consider addresses with seasonal dates as of. When you mark this checkbox, you must select a date, such as Today, Yesterday, or <Specific date>, in the corresponding field. When you select <Specific date>, the Date field appears for you to enter a date, such as 08/01/2008. For more information about seasonal addresses, see the Mail Guide.
Note: The program checks only the address types listed in the Addresses to use box. If you want the program to check all address types during address processing, move all available address types from the Address box to the Addresses to use box.

20 CH A PT E R
3. In Step 2, specify the addresses to consider when a valid seasonal address is not found in Step 1 or if you did not consider seasonal addresses for the transfer. To select an address, select the address in the Addresses box and click the right arrow to move it to the Addresses to use box. If you list multiple addresses in the Addresses to use box, sort the addresses in order of their importance. To move an address within the Addresses to use box, select the address and click the up or down arrow.
4. In Step 3, you can use attributes to choose the address type to transfer. Click the Address Attributes button. The Address Attributes to Consider screen appears.
5. You can select an attribute category and description that, if present on an address, give it priority consideration to be used for the transfer. For example, to include addresses with the attribute Category of NCOA confirmed? and a Description of Yes, enter the information on this screen. For more information about entering address attributes, see the Biographical Information chapter of the Constituent Data Entry Guide.
6. After you enter the necessary address attributes, click OK. A label appears to the right of the Address Attributes button and lists the attributes you selected. When you do not specify any attributes, the label displays <No address attributes specified>.
TH E RA I S E R ’S ED GE A N D CO U N T E RPO I N T SQL 21
7. In Step 4, select the address type the program should use if it cannot find an address meeting your selections in steps 1 through 3. You can Transfer with no address, Remove record from run, or Transfer specific address. If you select “Transfer specific address,” the Address to transfer field appears so you can select the address type to transfer when no other valid address is found for the constituent. If no valid address has yet been found by this step in processing, the address type selected here prints regardless of selections made in previous steps. For example, the address selected here transfers even if the Send mail to this address checkbox is unmarked.
8. Click Next. The Org. Address tab opens. For information about the Org. Address tab, see “Org. Address Tab” on page 21.
Org. Address TabOn the Org. Address tab, you determine the address data to transfer from an organization constituent record. The Raiser’s Edge selects an address for each constituent using three steps and can consider contact information and address attributes. When the program is unable to find a valid contact for a constituent, you can select to remove the record from the transfer. It is important to indicate your preferences in each of the three steps so the program can choose the best address for each organization constituent.
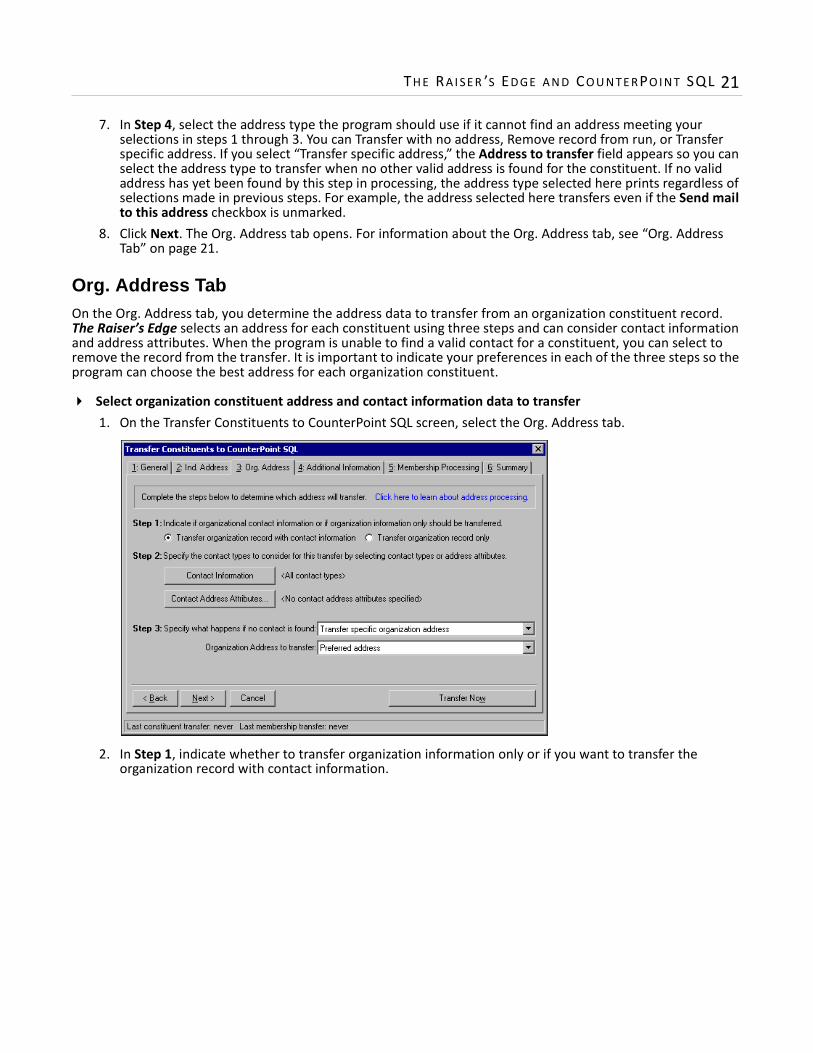
Select organization constituent address and contact information data to transfer1. On the Transfer Constituents to CounterPoint SQL screen, select the Org. Address tab.
2. In Step 1, indicate whether to transfer organization information only or if you want to transfer the organization record with contact information.
22 CH A PT E R
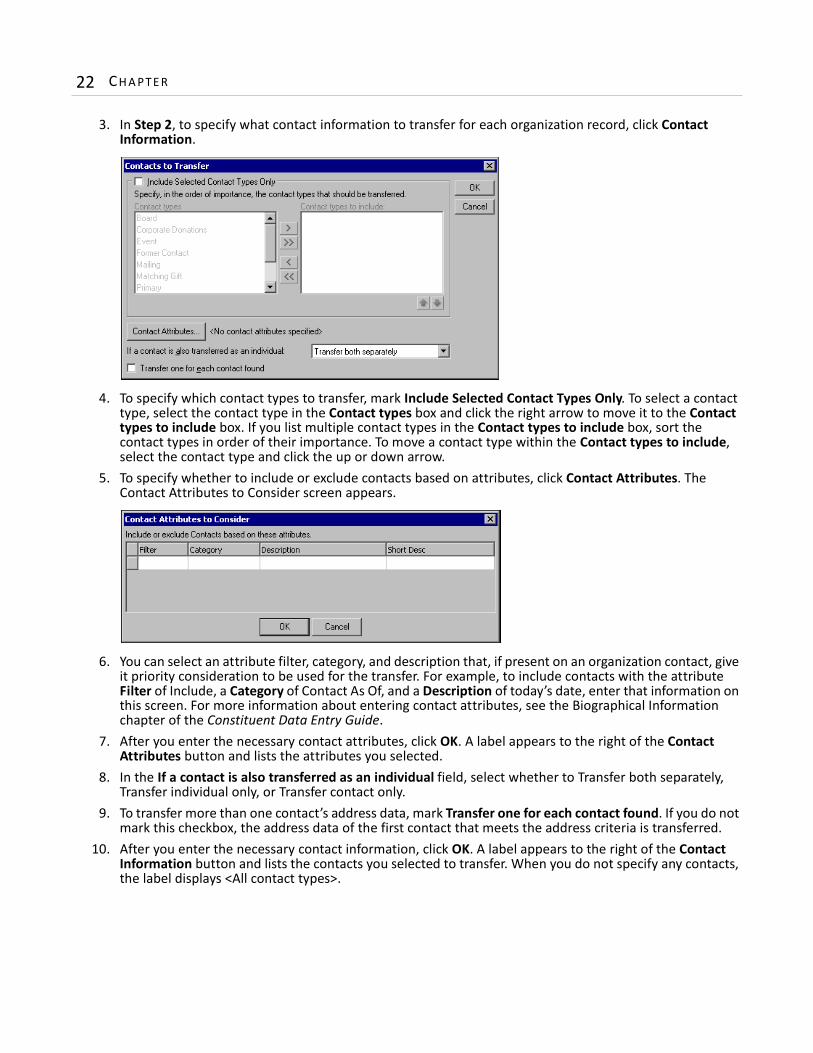
3. In Step 2, to specify what contact information to transfer for each organization record, click Contact Information.
4. To specify which contact types to transfer, mark Include Selected Contact Types Only. To select a contact type, select the contact type in the Contact types box and click the right arrow to move it to the Contact types to include box. If you list multiple contact types in the Contact types to include box, sort the contact types in order of their importance. To move a contact type within the Contact types to include, select the contact type and click the up or down arrow.
5. To specify whether to include or exclude contacts based on attributes, click Contact Attributes. The Contact Attributes to Consider screen appears.
6. You can select an attribute filter, category, and description that, if present on an organization contact, give it priority consideration to be used for the transfer. For example, to include contacts with the attribute Filter of Include, a Category of Contact As Of, and a Description of today’s date, enter that information on this screen. For more information about entering contact attributes, see the Biographical Information chapter of the Constituent Data Entry Guide.
7. After you enter the necessary contact attributes, click OK. A label appears to the right of the Contact Attributes button and lists the attributes you selected.
8. In the If a contact is also transferred as an individual field, select whether to Transfer both separately, Transfer individual only, or Transfer contact only.
9. To transfer more than one contact’s address data, mark Transfer one for each contact found. If you do not mark this checkbox, the address data of the first contact that meets the address criteria is transferred.
10. After you enter the necessary contact information, click OK. A label appears to the right of the Contact Information button and lists the contacts you selected to transfer. When you do not specify any contacts, the label displays <All contact types>.

TH E RA I S E R ’S ED GE A N D CO U N T E RPO I N T SQL 23
11. You can use attributes to choose the contact address type to transfer. Click the Contact Address Attributes button. The Contact Address Attributes to Consider screen appears.
12. On the Contact Address Attributes to Consider screen, you have various options to choose from to transfer an organization’s contacts. Decide how much emphasis to place on contact address attributes in the program’s selection of which records to include in the transfer.You can search for specific and additional address attributes, search only specific contact address attributes, or search for specific attributes. If no matches for the specified contact address attribute are found on a first pass, the program makes a second pass through the system searching for contacts with additional address attributes,. Your selection may depend on how you enter and use address attributes in your database.• If no contact address attributes are specified in the grid, the program uses the information you enter on
the Contacts to Transfer screen.• If you select an attribute category and description, the program uses it to give priority consideration to
be used for the transfer. For example, to include addresses with the attribute Category of NCOA confirmed? and a Description of Yes, enter the information on this screen. For more information about entering address attributes, see the Biographical Information chapter of the Constituent Data Entry Guide.
• If, on the Contact Address Attributes to Consider screen, you select the Include Contacts with one of these address attributes, no address attributes, or different address attribute categories option and enter an attribute, a contact’s address with no address attributes and a contact’s address contains address attributes of an entirely different category than those specified in the grid are considered for processing. An address contains attributes of the same category but with a different description than those specified in the grid is excluded from the transfer.
• If, on the Contact Address Attributes to Consider screen, you select the Only consider Contacts with one of these address attributes option and enter an attribute, the program only transfers contacts that meet the attribute criteria.
• If, on the Contact Address Attributes to Consider screen, you select the Only consider Contacts with one of these address attributes option, mark the If an Organization does not have a valid Contact with one of these address attributes, consider Contacts with no address attributes or different address attribute categories checkbox, and enter an attribute, the program considers contacts with no address attributes and those with different address attribute categories when determining which contacts to transfer.
13. After you enter the necessary address attributes, click OK. A label appears to the right of the Address Attributes button and lists the attributes you selected. When you do not specify any attributes, the label displays <No address attributes specified>.
24 CH A PT E R
14. In Step 3, select the address type the program should use if it cannot find an address meeting your selections in steps 1 through 3. You can Remove record from run or Transfer specific organization address. If you select “Transfer specific organization address,” the Organization Address to transfer field appears so you can select the address type to transfer when no other valid address is found for the constituent. If no valid address has yet been found by this step in processing, the address type selected here prints regardless of selections made in previous steps. For example, the address selected here transfers even if the Send mail to this address checkbox is unmarked.
15. Click Next. The Additional Information tab appears. For more information about the Additional Info tab, see “Additional Information Tab” on page 24.
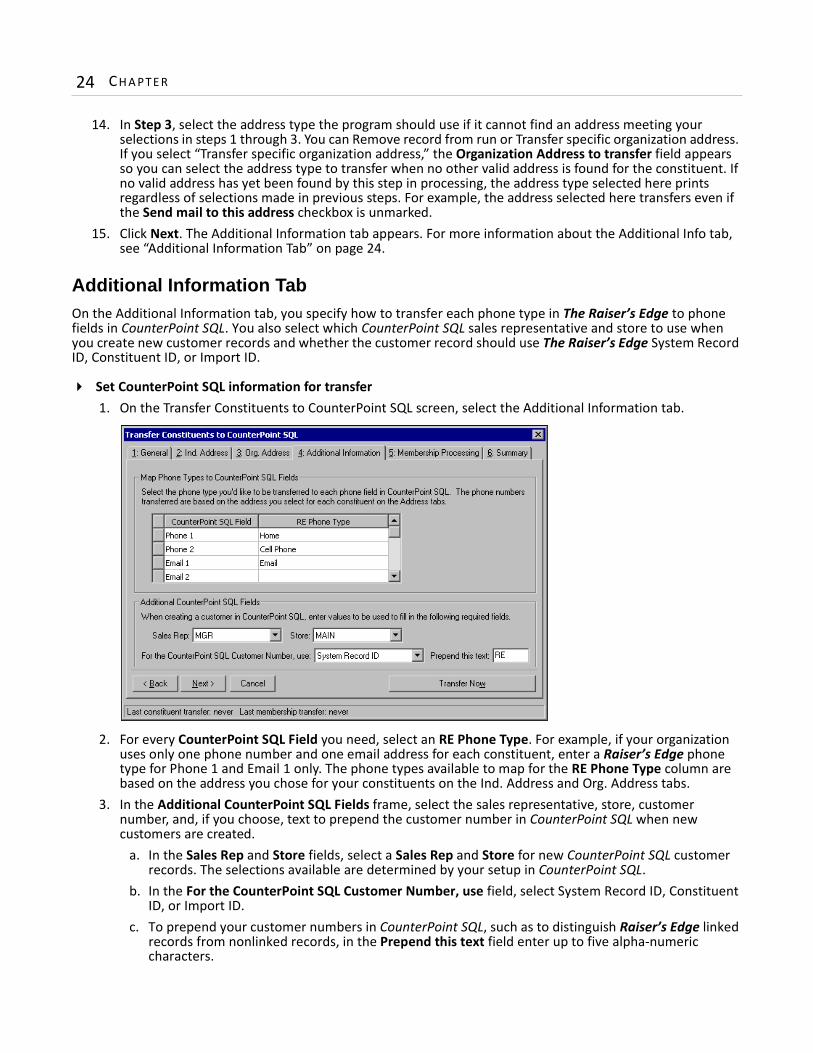
Additional Information TabOn the Additional Information tab, you specify how to transfer each phone type in The Raiser’s Edge to phone fields in CounterPoint SQL. You also select which CounterPoint SQL sales representative and store to use when you create new customer records and whether the customer record should use The Raiser’s Edge System Record ID, Constituent ID, or Import ID.
Set CounterPoint SQL information for transfer1. On the Transfer Constituents to CounterPoint SQL screen, select the Additional Information tab.
2. For every CounterPoint SQL Field you need, select an RE Phone Type. For example, if your organization uses only one phone number and one email address for each constituent, enter a Raiser’s Edge phone type for Phone 1 and Email 1 only. The phone types available to map for the RE Phone Type column are based on the address you chose for your constituents on the Ind. Address and Org. Address tabs.
3. In the Additional CounterPoint SQL Fields frame, select the sales representative, store, customer number, and, if you choose, text to prepend the customer number in CounterPoint SQL when new customers are created.
a. In the Sales Rep and Store fields, select a Sales Rep and Store for new CounterPoint SQL customer records. The selections available are determined by your setup in CounterPoint SQL.
b. In the For the CounterPoint SQL Customer Number, use field, select System Record ID, Constituent ID, or Import ID.
c. To prepend your customer numbers in CounterPoint SQL, such as to distinguish Raiser’s Edge linked records from nonlinked records, in the Prepend this text field enter up to five alpha-numeric characters.

TH E RA I S E R ’S ED GE A N D CO U N T E RPO I N T SQL 25
4. Click Next. The Membership Processing tab opens. For more information about the Membership Processing tab, see “Membership Processing Tab” on page 25.
Membership Processing Tab
On the Membership Processing tab, you determine how memberships are processed for constituents transferring to CounterPoint SQL. You select how many memberships to transfer for each constituent, which memberships to use, and whether to transfer lapsed and dropped memberships.
Select constituent membership data to transfer1. On the Transfer Constituents to CounterPoint SQL screen, select the Membership Processing tab.
2. In Step 1, select the number of memberships that transfer for each constituent You can select to transfer up to five memberships per constituent.
3. In Step 2, specify the memberships to consider when transferring constituents. If the constituent has any of the memberships selected in the Memberships to Use box, the membership information appears in the CounterPoint SQL customer record. If the constituent does not have any of the memberships selected, no membership information is transferred. To select a membership, select the membership in the Memberships box and click the right arrow to move it to the Memberships to use box.If you list multiple memberships in the Memberships to use box, you must sort the memberships in order of their importance. To move a membership within the Memberships to use box, select the membership and click the up or down arrow.
4. To include inactive memberships in the Memberships box, mark the Show inactive entries checkbox.5. In Step 3, to specify whether to transfer constituent memberships if they are lapsed or dropped, mark the
Lapsed Memberships or Dropped Memberships checkbox.
Warning: For tasks involving memberships, you must have the optional module Membership Management.
Warning: It is important to specify the order of importance for membership processing. You can include as many memberships as you need, but only the number specified in Step 1 transfer for each constituent. Therefore, if your constituent has five memberships and you select to transfer two, The Raiser’s Edge determines which two transfer based on the order of importance you specify in the Memberships to use box.

26 CH A PT E R
6. Click Next. The Summary tab opens. For more information on the summary tab, see “Summary Tab” on page 26.
Summary TabThe Summary tab displays all the options you chose on the tabs of the Transfer Constituents to CounterPoint SQL screen. To view the summary before you transfer Raiser’s Edge constituents to CounterPoint SQL, select the Summary tab.
When you are ready to transfer, click Transfer Now. A Transfer Constituents to CounterPoint SQL message appears displaying the transfer progress.
When the transfer finishes, you return to the CounterPoint SQL Integration page unless you chose to preview the control report on the General tab.
Transfer Constituents to CounterPoint SQL Procedure
On the CounterPoint SQL Integration page, you transfer constituent and membership information in The Raiser’s Edge to CounterPoint SQL to prepare for product sales. This enables you to take donations and sell memberships in CounterPoint SQL and then download these transactions back into The Raiser’s Edge.
Warning: For tasks involving memberships, you must have the optional module Membership Management.
TH E RA I S E R ’S ED GE A N D CO U N T E RPO I N T SQL 27
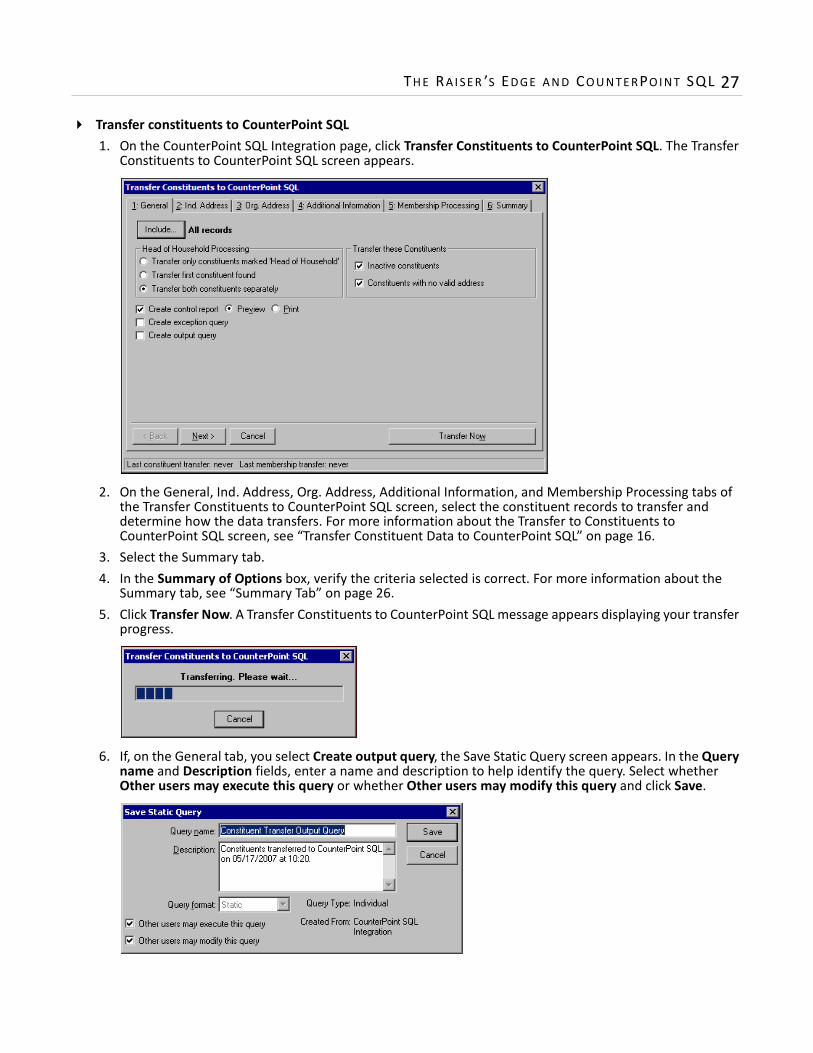
Transfer constituents to CounterPoint SQL1. On the CounterPoint SQL Integration page, click Transfer Constituents to CounterPoint SQL. The Transfer
Constituents to CounterPoint SQL screen appears.
2. On the General, Ind. Address, Org. Address, Additional Information, and Membership Processing tabs of the Transfer Constituents to CounterPoint SQL screen, select the constituent records to transfer and determine how the data transfers. For more information about the Transfer to Constituents to CounterPoint SQL screen, see “Transfer Constituent Data to CounterPoint SQL” on page 16.
3. Select the Summary tab.4. In the Summary of Options box, verify the criteria selected is correct. For more information about the
Summary tab, see “Summary Tab” on page 26.5. Click Transfer Now. A Transfer Constituents to CounterPoint SQL message appears displaying your transfer
progress.
6. If, on the General tab, you select Create output query, the Save Static Query screen appears. In the Query name and Description fields, enter a name and description to help identify the query. Select whether Other users may execute this query or whether Other users may modify this query and click Save.

28 CH A PT E R
7. If, on the General tab, you select Create control report, the control report appears and lists the constituent records transferred to CounterPoint SQL.
To close the control report and return to the CounterPoint SQL Integration page, click the red “X” in the upper left hand corner.Repeat this procedure each time you need to transfer constituents from The Raiser’s Edge to CounterPoint SQL.
Update CounterPoint SQL Membership Information
On the CounterPoint SQL Integration page, you can click the Update Membership Information in CounterPoint SQL link to update all Raiser’s Edge constituent memberships linked to CounterPoint SQL customer records. Updating membership information in CounterPoint SQL overwrites all existing membership record data. Update memberships only if you are prepared to update all of your records.
Warning: For tasks involving memberships, you must have the optional module Membership Management.

TH E RA I S E R ’S ED GE A N D CO U N T E RPO I N T SQL 29
Update CounterPoint SQL membership information 1. On the CounterPoint SQL Integration page, click Update Membership Information in CounterPoint SQL.
The Update Customer Membership Information screen appears.
2. On the General tab, you can print or preview a control report, create an exception query, and create an output query. • To create a control report for the constituent transfer, mark the Create control report checkbox. A
control report summarizes the transfer’s characteristics and field criteria. If you mark the Create control report checkbox, select whether to Preview or Print the report upon transfer.
• To create a query of all the records that are not able to transfer, mark the Create exception query checkbox.
• To create a query of all records that transfer to CounterPoint SQL, mark the Create output query checkbox.

30 CH A PT E R
3. Click Next. On the Membership Processing tab in Step 1, you can select to transfer up to five memberships for each constituent.
4. In Step 2, specify the memberships to consider when updating membership information. If the constituent has any memberships you select in the Memberships to Use box, the membership information appears in the CounterPoint SQL customer record. If the constituent does not have any membership information based on your selection in the Memberships to Use box, no membership information transfers. To select a membership, select it in the Memberships box and click the right arrow to move it to the Memberships to use box.If you list multiple memberships in the Memberships to use box, you must sort the memberships in order of importance. To move a membership within the Memberships to use box, select the membership and click the up or down arrow.
5. To include inactive memberships in the Memberships box, mark Show inactive entries.6. In Step 3, to specify whether to transfer constituent memberships if they are lapsed or dropped, mark the
Lapsed Memberships or Dropped Memberships checkbox.
Warning: It is important to specify the order of importance for membership processing. You can include as many memberships as you need, but only the number specified in Step 1 transfers for each constituent. Therefore, if your constituent has five memberships and you select to transfer two, The Raiser’s Edge determines which two to transfer based on the order of importance you specify in the Memberships to use box.
TH E RA I S E R ’S ED GE A N D CO U N T E RPO I N T SQL 31
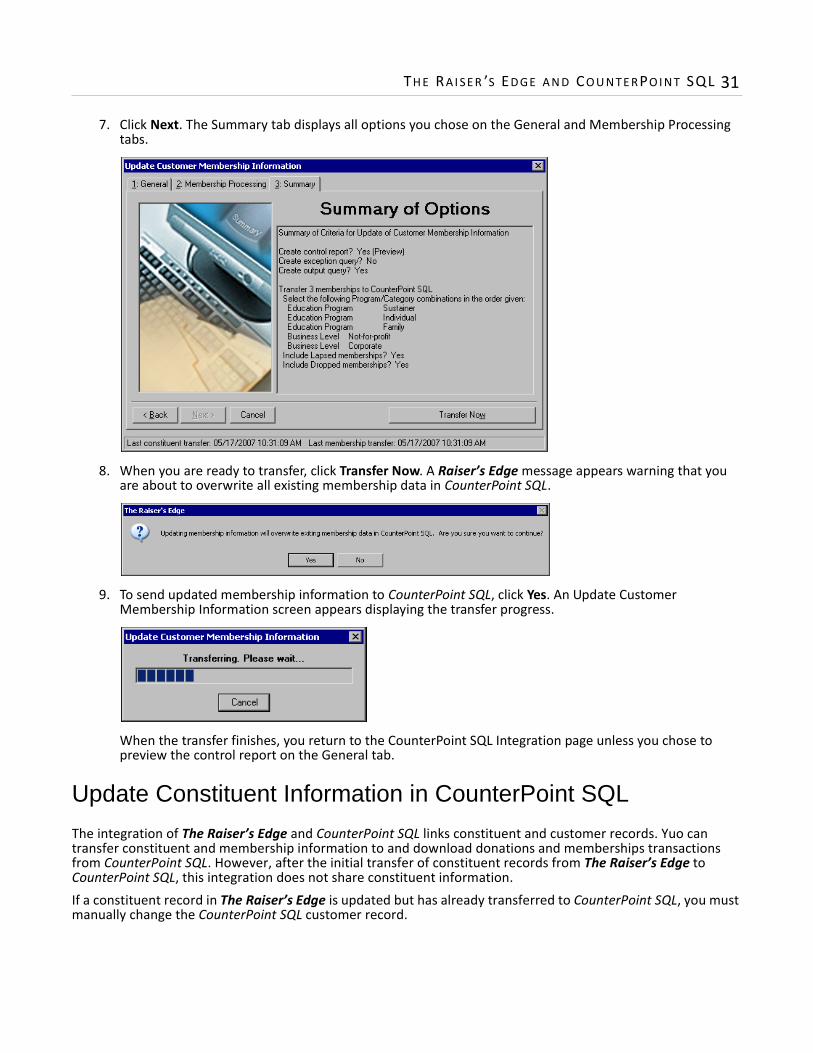
7. Click Next. The Summary tab displays all options you chose on the General and Membership Processing tabs.
8. When you are ready to transfer, click Transfer Now. A Raiser’s Edge message appears warning that you are about to overwrite all existing membership data in CounterPoint SQL.
9. To send updated membership information to CounterPoint SQL, click Yes. An Update Customer Membership Information screen appears displaying the transfer progress.
When the transfer finishes, you return to the CounterPoint SQL Integration page unless you chose to preview the control report on the General tab.
Update Constituent Information in CounterPoint SQL
The integration of The Raiser’s Edge and CounterPoint SQL links constituent and customer records. Yuo can transfer constituent and membership information to and download donations and memberships transactions from CounterPoint SQL. However, after the initial transfer of constituent records from The Raiser’s Edge to CounterPoint SQL, this integration does not share constituent information.If a constituent record in The Raiser’s Edge is updated but has already transferred to CounterPoint SQL, you must manually change the CounterPoint SQL customer record.

32 CH A PT E R
If the customer record in CounterPoint SQL is updated, the constituent record in The Raiser’s Edge is not updated when you download donations or membership transactions. We recommend setting up an internal procedure to manually change The Raiser’s Edge constituent record when the CounterPoint SQL customer is updated. When new constituents are created in The Raiser’s Edge from new donations or membership transactions, the constituent record contains constituent information entered in CounterPoint SQL.
Step 4: Access Ticket Entry from The Raiser’s EdgeIn The Raiser’s Edge, on the CounterPoint SQL Integration page, you can access CounterPoint SQL’s Ticket Entry screen. The Ticket Entry link enables greater accessibility for entering new products, donations, and membership sales from within The Raiser’s Edge.
Access Ticket Entry1. On the Raiser’s Edge bar, click CounterPoint SQL Integration. The CounterPoint SQL Integration page
appears.
Tip: If you have not entered login credentials in Configuration, you are asked to enter your CounterPoint SQL login information twice. For more information, see “Step 2: Set up The Raiser’s Edge and CounterPoint SQL Interface” on page 8.
TH E RA I S E R ’S ED GE A N D CO U N T E RPO I N T SQL 33
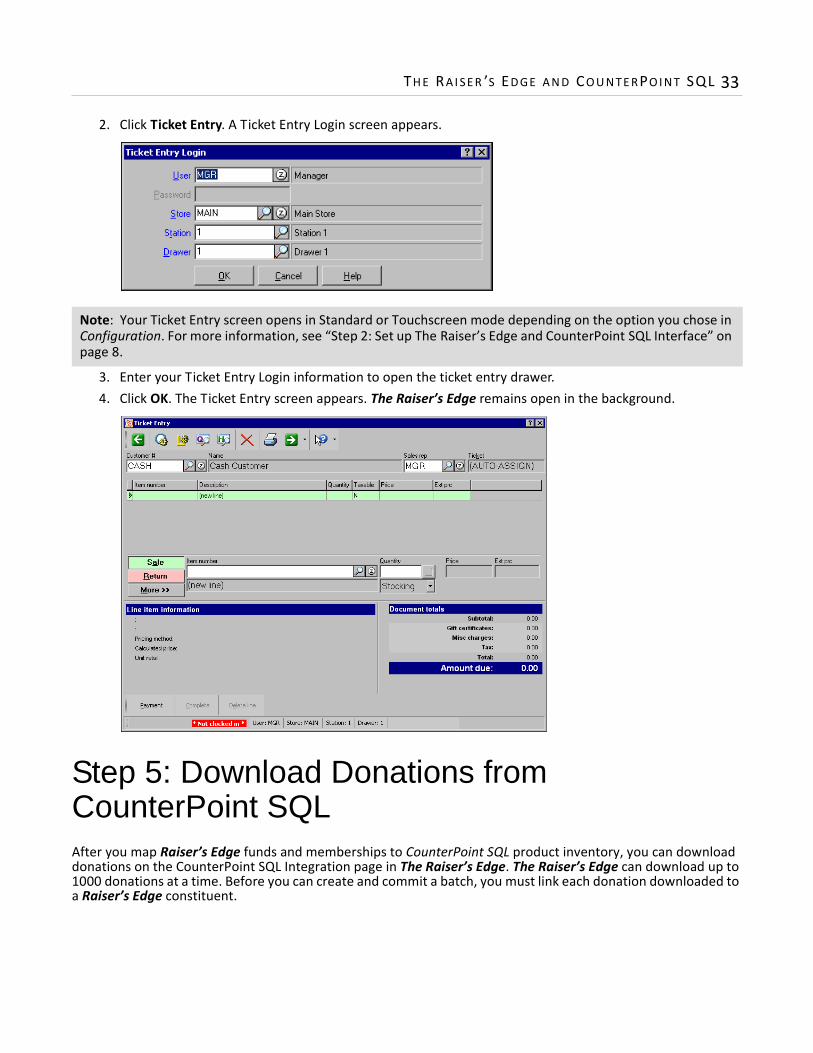
2. Click Ticket Entry. A Ticket Entry Login screen appears.
3. Enter your Ticket Entry Login information to open the ticket entry drawer.4. Click OK. The Ticket Entry screen appears. The Raiser’s Edge remains open in the background.
Step 5: Download Donations from CounterPoint SQLAfter you map Raiser’s Edge funds and memberships to CounterPoint SQL product inventory, you can download donations on the CounterPoint SQL Integration page in The Raiser’s Edge. The Raiser’s Edge can download up to 1000 donations at a time. Before you can create and commit a batch, you must link each donation downloaded to a Raiser’s Edge constituent.
Note: Your Ticket Entry screen opens in Standard or Touchscreen mode depending on the option you chose in Configuration. For more information, see “Step 2: Set up The Raiser’s Edge and CounterPoint SQL Interface” on page 8.

34 CH A PT E R
Download donations1. On the CounterPoint SQL Integration page, click Download Donations. The Download Donations screen
appears.
2. In the CPSQL Customer column, The Raiser’s Edge displays customer record information from CounterPoint SQL. The Raiser’s Edge uses information from this column to determine if the customer record is an organization or individual constituent.
3. If the constituent record in The Raiser’s Edge and the customer record in CounterPoint SQL are not linked, you can change the constituent record type in the RE Record Type column. To change the record type, click the record type of the CPSQL Customer to change. A drop-down menu appears for you to change the type.
4. In the RE Constituent column, Raiser’s Edge constituent information appears for records already linked to CounterPoint SQL customer records. For donations without constituent information in the RE Constituent column, link the donation to an existing Raiser’s Edge constituent record or create a new record.
• To link to an existing record in the RE Constituent column, press F7 on your keyboard. The Open screen appears. Select the constituent record to link to the donation and click Open. In the RE Constituent column, the constituent record’s information you selected appears.
Warning: If you do not see any donations to download, you may not have posted your ticket entries in CounterPoint SQL.
Note: For more information on the Open screen, see the Program Basics chapter of the Program Basics Guide.

TH E RA I S E R ’S ED GE A N D CO U N T E RPO I N T SQL 35
• To create a new Raiser’s Edge constituent record, press F8 on your keyboard. In the RE Constituent column, the constituent record information appears .
The Raiser’s Edge automatically creates a new constituent record. To add more information to the constituent record in addition to the information entered in CounterPoint SQL, open the constituent record.
5. In the RE Contact column, Raiser’s Edge contact information appears for organization records already linked to CounterPoint SQL customer records. For donations without contact information in the RE Contact column, link the donation to an existing Raiser’s Edge contact record or create a new record.
• To link to an existing record in the RE Contact column, press F7 on your keyboard. The Open screen appears. Select the contact record to link to the donation and click Open. In the RE Contact column, the contact record’s information you chose appears.To create a new Raiser’s Edge constituent record as a contact for the organization record, in the RE Contact column, press F8 on your keyboard. In the RE Contact column, the contact information appears. The Raiser’s Edge automatically creates a new constituent record. To add more information to the constituent record in addition to the information entered in CounterPoint SQL, open the constituent record.
6. In the Enter the batch number to use or leave blank to use the next available field, enter a batch number to assign to the donations. If you leave it blank, The Raiser’s Edge assigns the next available number.
Note: For more information about entering data on the constituent record, see the Constituent Data Entry Guide.
Note: For more information on the Open screen, see the Program Basics chapter of the Program Basics Guide.
Warning: If you are not ready to create the batch, click Cancel. You return to the CounterPoint SQL Integration page in The Raiser’s Edge.

36 CH A PT E R
7. Once you link all donations to Raiser’s Edge constituents and are ready to create the batch, click Create Batch. A Creating Batch message appears displaying the progress.
Once the batch is created, a Raiser’s Edge message appears displaying whether the batch was created successfully, the batch number, and the number of new gifts added.
Click OK. You return to the CounterPoint SQL Integration page. To complete the download of donations, you must commit the batch to your database. For more information about committing batches, see the Batch Guide.
CounterPoint SQL Ticket Items
Warning: To commit the gifts in Batch, you must have Batch security rights. For more information, see the Security chapter of the Configuration & Security Guide.
Warning: To ensure integration functions correctly, read this section carefully.
TH E RA I S E R ’S ED GE A N D CO U N T E RPO I N T SQL 37
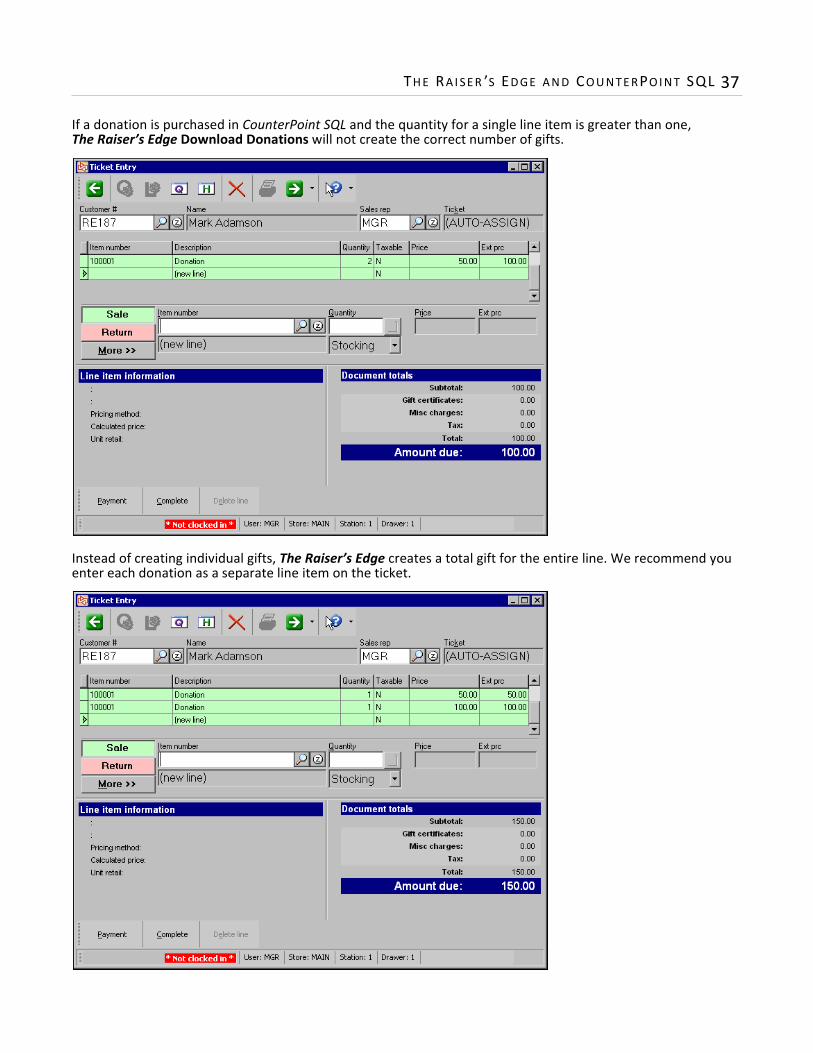
If a donation is purchased in CounterPoint SQL and the quantity for a single line item is greater than one, The Raiser’s Edge Download Donations will not create the correct number of gifts.
Instead of creating individual gifts, The Raiser’s Edge creates a total gift for the entire line. We recommend you enter each donation as a separate line item on the ticket.

38 CH A PT E R
Step 6: Download Membership Transactions from CounterPoint SQL
After you map Raiser’s Edge funds and memberships to CounterPoint SQL product inventory, you can download membership transactions on the CounterPoint SQL Integration page in The Raiser’s Edge. The Raiser’s Edge can download up to 1000 membership transactions at a time. Before you can create and commit a batch, you must link each membership transaction downloaded to a Raiser’s Edge constituent .
Download membership transactions1. On the CounterPoint SQL Integration page, click Download Membership Transactions. The Download
Membership Transactions screen appears.
2. In the RE Constituent column, Raiser’s Edge constituent information appears for records already linked to CounterPoint SQL customer records. For membership transactions without constituent information in the RE Constituent column, link the membership transaction to an existing Raiser’s Edge constituent record or create a new record.
• To link to an existing record in the RE Constituent column, press F7 on your keyboard. The Open screen appears. Select the constituent record to link to the membership transaction and click Open. In the RE Constituent column, the constituent record’s information you chose appears.
Warning: For tasks involving memberships, you must have the optional module Membership Management.
Note: For more information about the Open screen, see the Program Basics chapter of the Program Basics Guide.
Note: For more information about entering data on the constituent record, see the Constituent Data Entry Guide.
TH E RA I S E R ’S ED GE A N D CO U N T E RPO I N T SQL 39
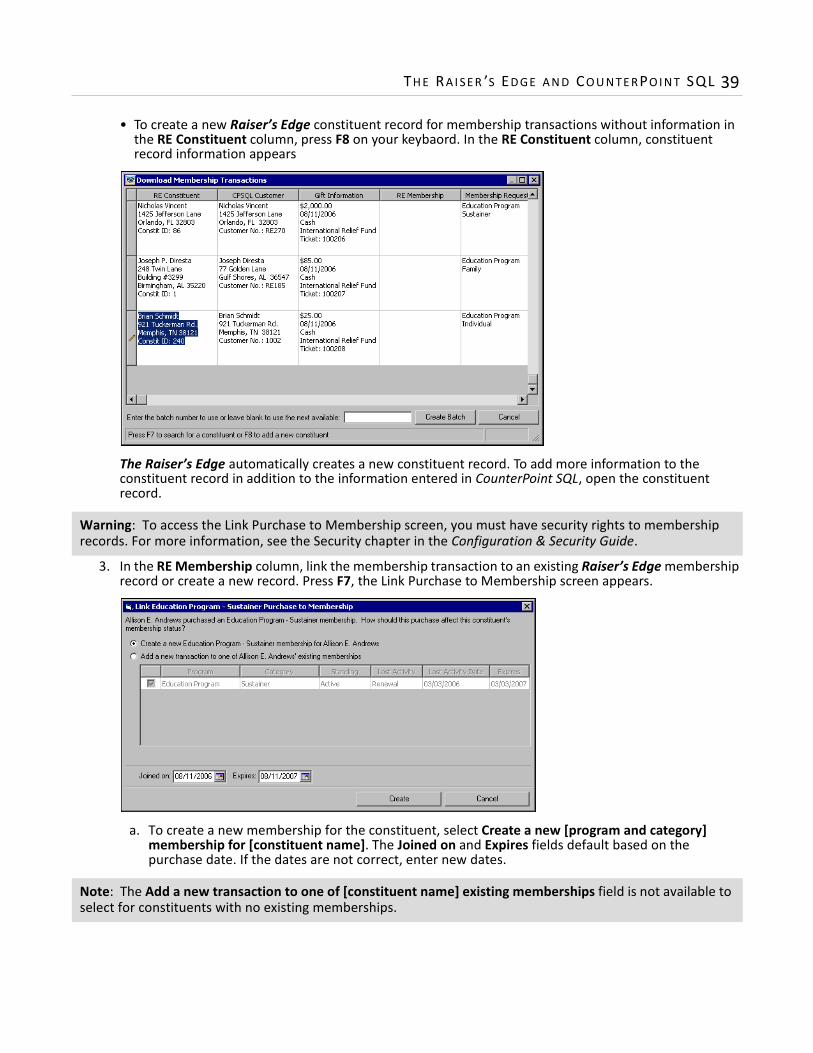
• To create a new Raiser’s Edge constituent record for membership transactions without information in the RE Constituent column, press F8 on your keybaord. In the RE Constituent column, constituent record information appears
The Raiser’s Edge automatically creates a new constituent record. To add more information to the constituent record in addition to the information entered in CounterPoint SQL, open the constituent record.
3. In the RE Membership column, link the membership transaction to an existing Raiser’s Edge membership record or create a new record. Press F7, the Link Purchase to Membership screen appears.
a. To create a new membership for the constituent, select Create a new [program and category] membership for [constituent name]. The Joined on and Expires fields default based on the purchase date. If the dates are not correct, enter new dates.
Warning: To access the Link Purchase to Membership screen, you must have security rights to membership records. For more information, see the Security chapter in the Configuration & Security Guide.
Note: The Add a new transaction to one of [constituent name] existing memberships field is not available to select for constituents with no existing memberships.
40 CH A PT E R
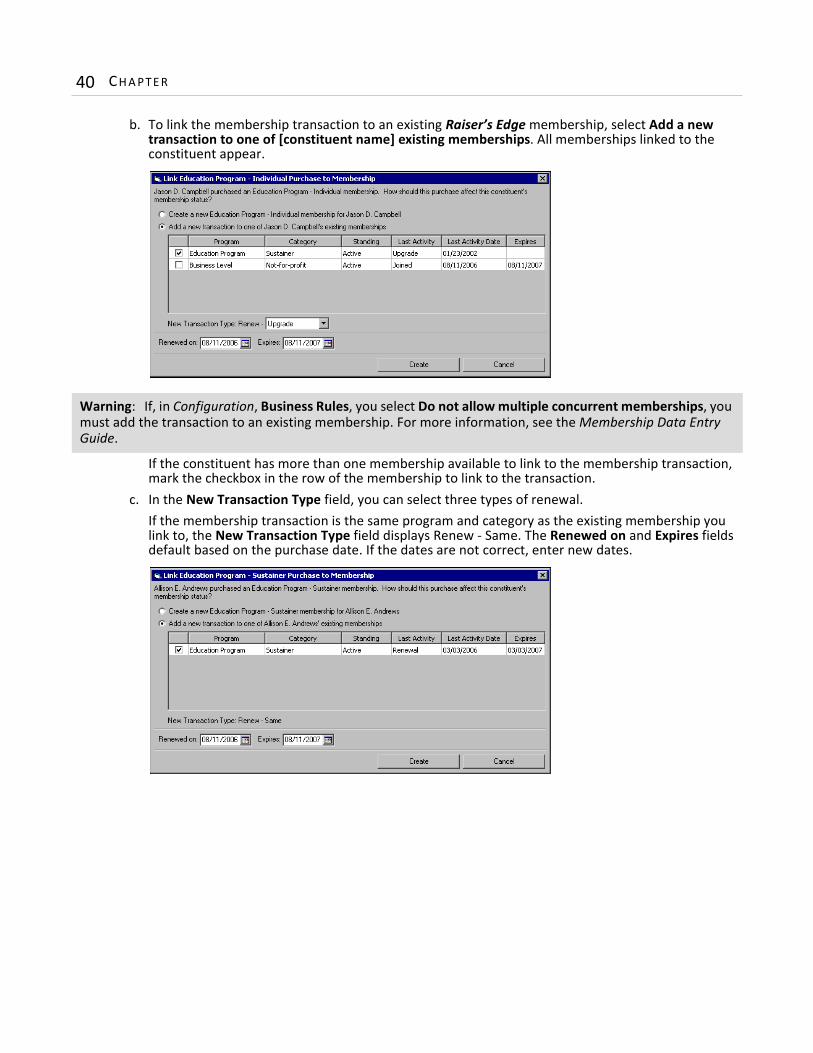
b. To link the membership transaction to an existing Raiser’s Edge membership, select Add a new transaction to one of [constituent name] existing memberships. All memberships linked to the constituent appear.
If the constituent has more than one membership available to link to the membership transaction, mark the checkbox in the row of the membership to link to the transaction.
c. In the New Transaction Type field, you can select three types of renewal.If the membership transaction is the same program and category as the existing membership you link to, the New Transaction Type field displays Renew - Same. The Renewed on and Expires fields default based on the purchase date. If the dates are not correct, enter new dates.
Warning: If, in Configuration, Business Rules, you select Do not allow multiple concurrent memberships, you must add the transaction to an existing membership. For more information, see the Membership Data Entry Guide.

TH E RA I S E R ’S ED GE A N D CO U N T E RPO I N T SQL 41
If the membership transaction is an upgrade on an existing membership, in the New Transaction Type field, select Upgrade. The Renewed on and Expires fields default to today’s date. If the dates are not correct, enter new dates.
If the membership transaction is a downgrade on an existing membership, in the New Transaction Type field, select Downgrade. The Renewed on and Expires fields default to today’s date. If the dates are not correct, enter new dates.
d. Click Create. The membership information now appears in the RE Membership column.

42 CH A PT E R
4. In the Enter the batch number to use or leave blank to use the next available field, enter a batch number to assign to the membership transactions. If you leave blank this field blank, The Raiser’s Edge automatically assigns the next available number.
5. To create the batch, click Create Batch. A Creating Batch message appears displaying the progress.
Once the batch is created, a Raiser’s Edge message appears displaying whether the batch created successfully, the batch number, and the number of new gifts added.
6. Click OK. You return to the CounterPoint SQL Integration page. 7. To complete the download of membership transactions, commit the gift batch to your database. For more
information on committing batches, see the Batch Guide.
CounterPoint SQL Ticket Items
Warning: If you are not ready to create the batch, click Cancel. You return to the CounterPoint SQL Integration page.
Warning: To commit the gifts in Batch, you must have Batch security rights. For more information, see the Security chapter of the Configuration & Security Guide.
Warning: To ensure integration functions correctly, read this section carefully.

TH E RA I S E R ’S ED GE A N D CO U N T E RPO I N T SQL 43
If a membership transaction is purchased in CounterPoint SQL and the quantity for a single line item is greater than one, The Raiser’s Edge Download Membership Transactions will not create the correct number of membership transactions.

44 CH A PT E R
Instead of creating individual membership transactions, The Raiser’s Edge creates one membership transaction for the total amount of the line. We recommend you enter each membership transaction as a separate line item on the ticket.
Step 7: Access CounterPoint SQL Reports from The Raiser’s Edge
In The Raiser’s Edge, you can directly access 11 CounterPoint SQL reports on the CounterPoint SQL Integration page. To open CounterPoint SQL for access to all CounterPoint SQL reports, click the Other CounterPoint SQL Reports link. The following reports are available from the CounterPoint SQL Integration page in The Raiser’s Edge:
Tip: You are asked to enter your CounterPoint SQL login information if you have not entered login credentials in Configuration. For more information, see “Step 2: Set up The Raiser’s Edge and CounterPoint SQL Interface” on page 8.
• Point of Sale : Orders • Customers : Customers
• Inventory : Items • Customers : Journals : Cash Receipts
• Inventory : Inventory History • Sales History : By Customer By Item
• Inventory : Six Week Item History • Sales History : By Item By Customer
• Inventory : Price Rules • Sales History : By Sales Rep
• Inventory : Customer Price List

Index
Cconstituent
field mapcreate new in The Raiser’s Edge 15transfer from The Raiser’s Edge 14
update 31
Ddatabase
connect 8donation
download from CounterPoint SQL 33enter 32
downloaddonations from CounterPoint SQL 33membership transactions from CounterPoint
SQL 38
Ffield mapping 14
constituentcreate new in The Raiser’s Edge 15transfer from The Raiser’s Edge 14
funds, map to product inventory 10
Iintegration
benefits 3constituents and memberships 16how it works 6meet the requirements 6overview 4requirements 4security 7
interface, setup 8inventory, see product inventory
Mmap
fields 14
funds to product inventory 10memberships to product inventory 10
membershipdownload transactions from CounterPoint SQL
38map to product inventory 10sales, enter 32ticket items 42update 28
Pproduct inventory, map funds and memberships 10product sales, entering 32
Rreports
access from The Raiser’s Edge 44
Ssales, enter 32security 7
Tticket entry
access from The Raiser’s Edge 32ticket items
donations 36membership 42
transferfield mapping 14
transfer constituent dataadditional information tab 24general tab 17ind. address tab 18membership processing tab 25org.address tab 21overview 16procedure 26summary tab 26

46