Embed Size (px)
Citation preview

Computerized Provider Order Entry (CPOE)Provider Training Manual
Updated 6/26/12
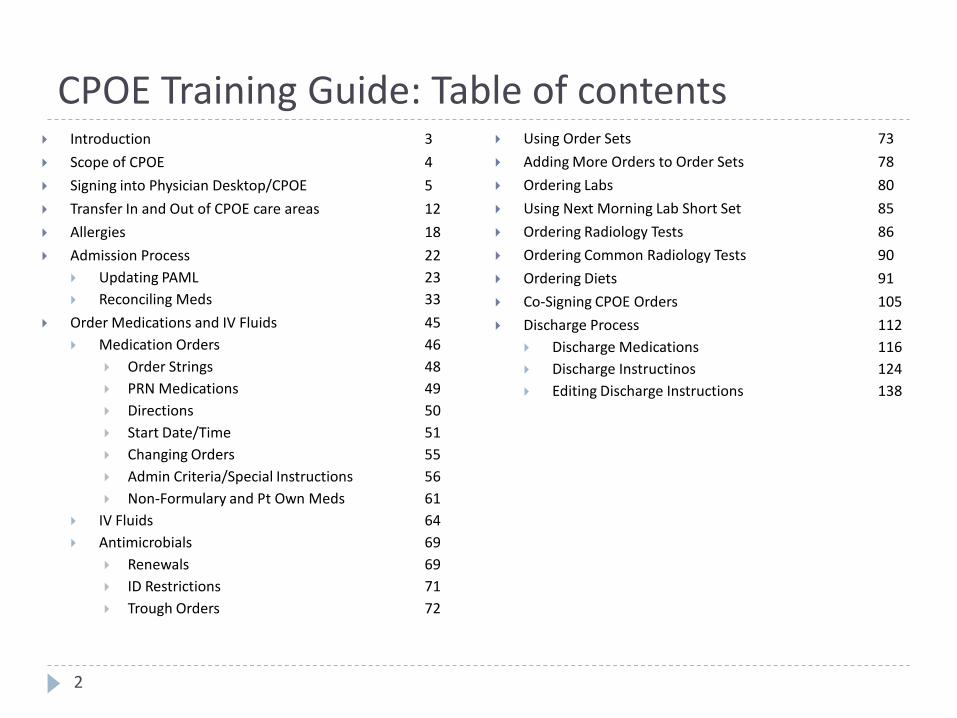
CPOE Training Guide: Table of contents
2
Introduction 3
Scope of CPOE 4
Signing into Physician Desktop/CPOE 5
Transfer In and Out of CPOE care areas 12
Allergies 18
Admission Process 22
Updating PAML 23
Reconciling Meds 33
Order Medications and IV Fluids 45
Medication Orders 46
Order Strings 48
PRN Medications 49
Directions 50
Start Date/Time 51
Changing Orders 55
Admin Criteria/Special Instructions 56
Non-Formulary and Pt Own Meds 61
IV Fluids 64
Antimicrobials 69
Renewals 69
ID Restrictions 71
Trough Orders 72
Using Order Sets 73
Adding More Orders to Order Sets 78
Ordering Labs 80
Using Next Morning Lab Short Set 85
Ordering Radiology Tests 86
Ordering Common Radiology Tests 90
Ordering Diets 91
Co-Signing CPOE Orders 105
Discharge Process 112
Discharge Medications 116
Discharge Instructinos 124
Editing Discharge Instructions 138

CPOE: Safer Order Entry
3
CPOE brings key safety functionality to the order entry process that is not possible on paper.
Key safety features include:
Legible orders.
Clear communication of ordering provider.
Drug-Drug Interaction checking.
Duplicate Drug checking.
Drug-Allergy checking.
Clinical Decision Support.
Medication triggered lab order entry.
Faster results for lab orders.

Scope of CPOE at SVH
4
Several care areas are out of scope for phase I of CPOE.
The care areas that are OUT of scope include: ICU/PCU Pre-Admitting Testing, Holding
Area, OR, PACU CWI, Pediatrics Psychiatry IR, Cath. Lab, Endoscopy ALL outpatient areas The ER will continue to use
MedHost for CPOE.
Bringing each of these units into electronic order entry is a goal of the organization, and a unit-specific plan will be developed over time to do so.
21S 22S 23S 24N 32S
33S 34N 35N 36N
In-Scope Units Include:
Because of the complexity of certain medications and therapies, certain orders will remain on paper indefinitely regardless of patient location.
These paper orders include:
Chemotherapy
Transfusion reaction
DNR/DNI/CMO (blue sheet)
Consult orders will be entered electronically, but consult form will still be placed in chart by ordering provider to allow specialist documentation

Signing into Physician Desktop and CPOE
Use the F9 Key to access drop down menus on open entries. Not sure if there is a drop down menu, just click F9 to check.
5
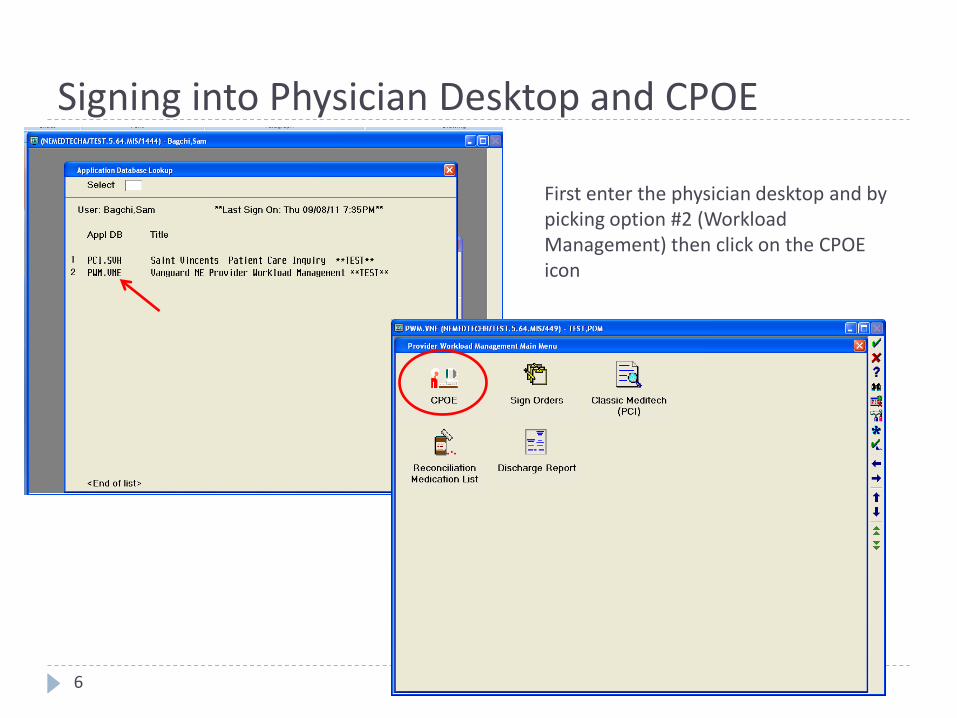
First enter the physician desktop and by picking option #2 (Workload Management) then click on the CPOE icon
6
Signing into Physician Desktop and CPOE
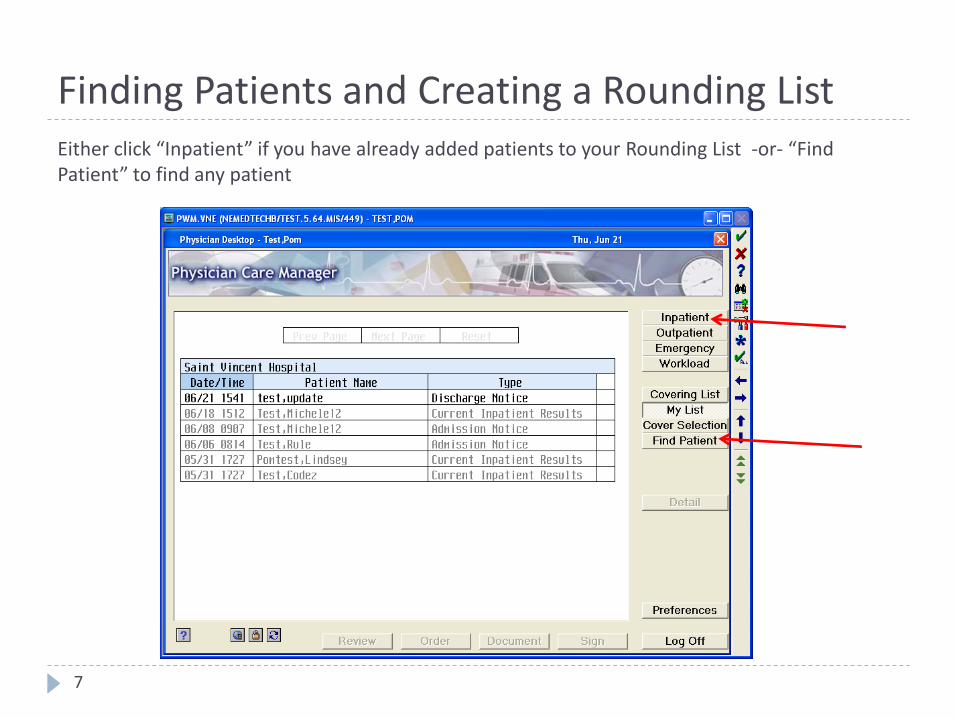
Either click “Inpatient” if you have already added patients to your Rounding List -or- “Find Patient” to find any patient
7
Finding Patients and Creating a Rounding List

Finding Patients and Creating a Rounding List
8
Patients may be added to your “Rounding List” by selecting the patient then clicking “Add To List”
Locate patients by any of the following:
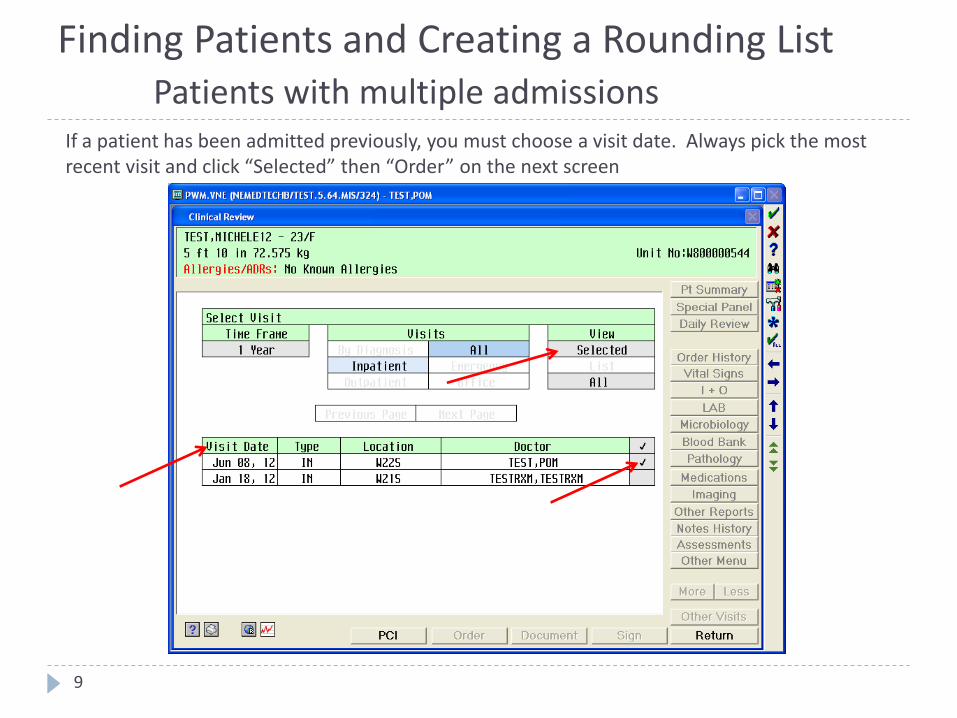
If a patient has been admitted previously, you must choose a visit date. Always pick the most recent visit and click “Selected” then “Order” on the next screen
9
Finding Patients and Creating a Rounding ListPatients with multiple admissions
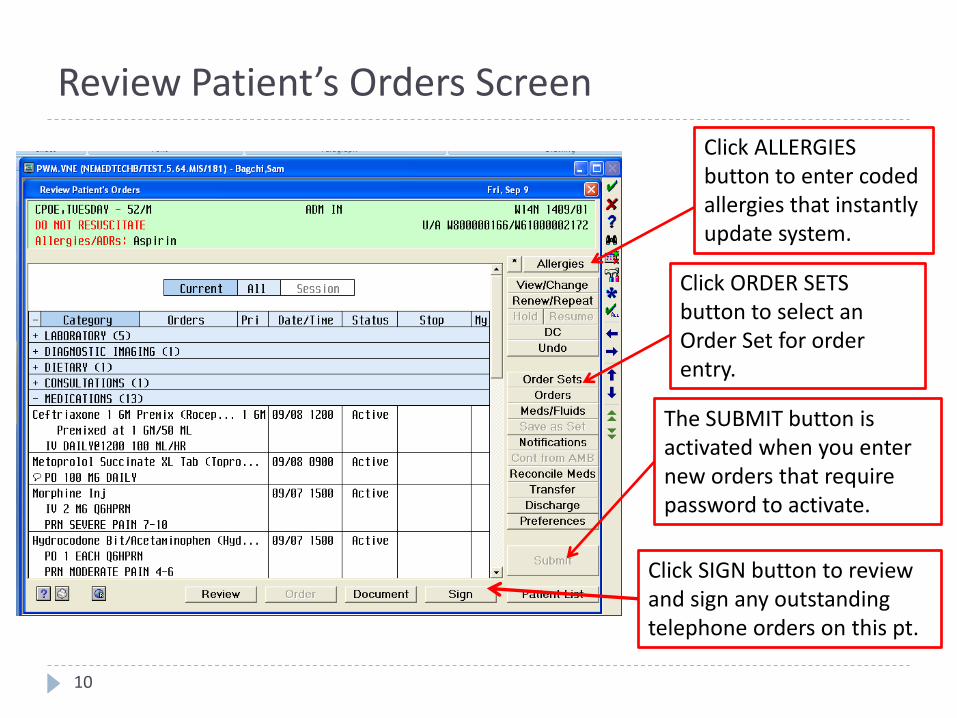
Review Patient’s Orders Screen
10
Click ALLERGIES button to enter coded allergies that instantly update system.
Click ORDER SETS button to select an Order Set for order entry.
Click SIGN button to review and sign any outstanding telephone orders on this pt.
The SUBMIT button is activated when you enter new orders that require password to activate.

11
Meditech banner is instantly updated when allergy, code status, and height/weight are entered.
Active Orders provides a snapshot of all of patient’s orders. When an active order is selected, it can then be viewed in more detail and changed as needed.
Click VIEW/CHANGE to edit active orders. This is preferred method to change orders rather than writing a new, redundant order.
Click ORDERS to enter individual non-med “a la carte” orders. These include nursing, lab and radiology orders.
Click MEDS/FLUIDS to enter medications and IV fluids.

Transferring patients in and out of CPOE care areas
Use the F9 Key to access drop down menus on open entries. Not sure if there is a drop down menu, just click F9 to check.
12
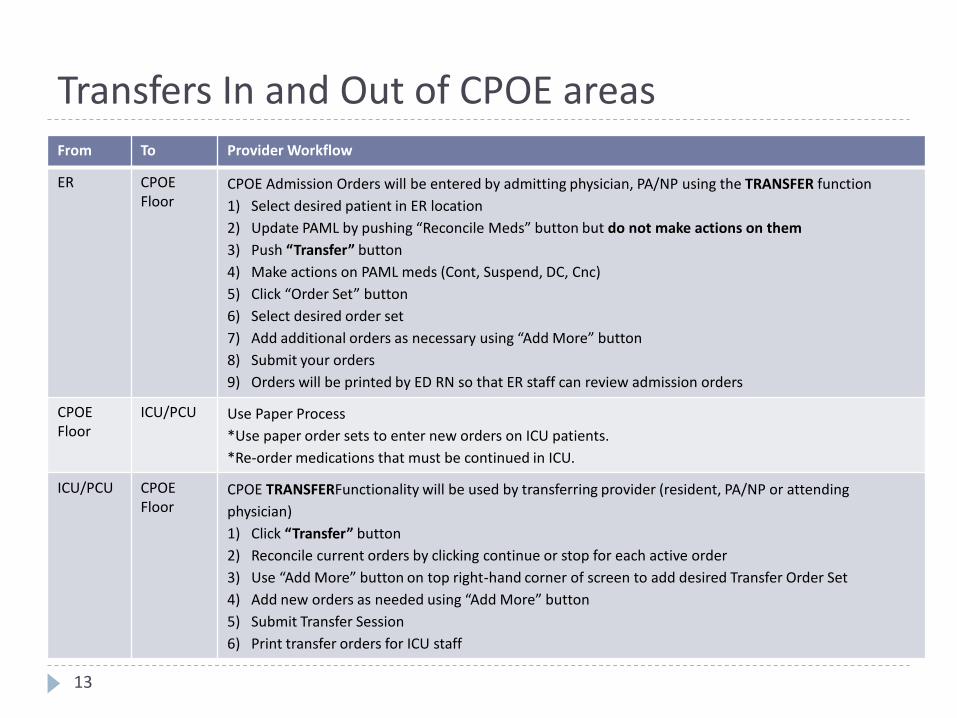
Transfers In and Out of CPOE areas
13
From To Provider Workflow
ER CPOE Floor
CPOE Admission Orders will be entered by admitting physician, PA/NP using the TRANSFER function
1) Select desired patient in ER location
2) Update PAML by pushing “Reconcile Meds” button but do not make actions on them
3) Push “Transfer” button
4) Make actions on PAML meds (Cont, Suspend, DC, Cnc)
5) Click “Order Set” button
6) Select desired order set
7) Add additional orders as necessary using “Add More” button
8) Submit your orders
9) Orders will be printed by ED RN so that ER staff can review admission orders
CPOE Floor
ICU/PCU Use Paper Process
*Use paper order sets to enter new orders on ICU patients.
*Re-order medications that must be continued in ICU.
ICU/PCU CPOE Floor
CPOE TRANSFERFunctionality will be used by transferring provider (resident, PA/NP or attending
physician)
1) Click “Transfer” button
2) Reconcile current orders by clicking continue or stop for each active order
3) Use “Add More” button on top right-hand corner of screen to add desired Transfer Order Set
4) Add new orders as needed using “Add More” button
5) Submit Transfer Session
6) Print transfer orders for ICU staff
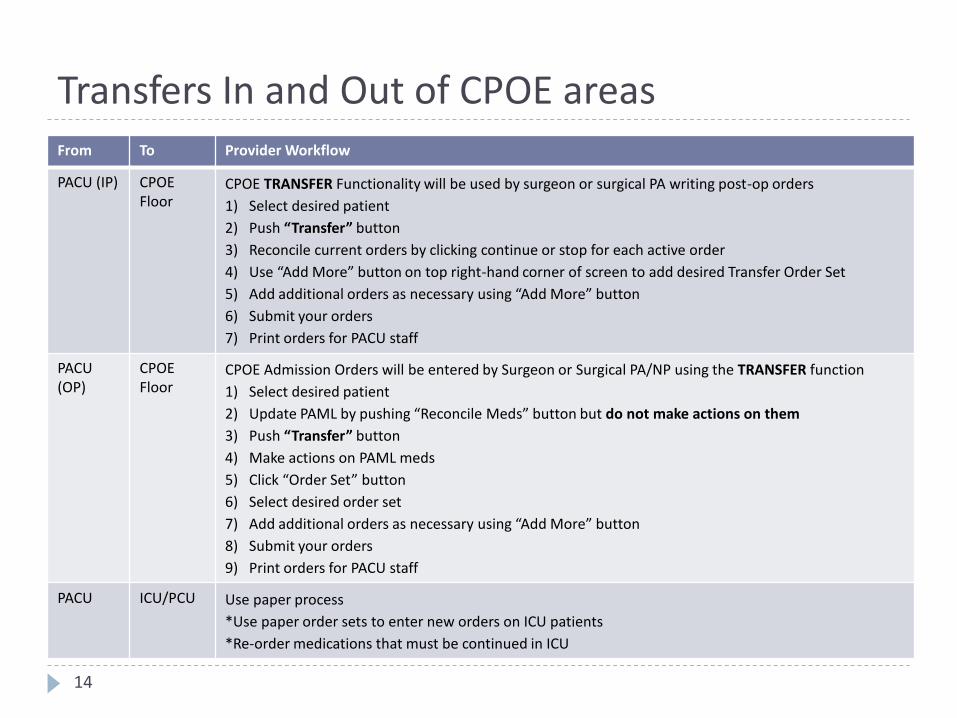
Transfers In and Out of CPOE areas
14
From To Provider Workflow
PACU (IP) CPOE Floor
CPOE TRANSFER Functionality will be used by surgeon or surgical PA writing post-op orders
1) Select desired patient
2) Push “Transfer” button
3) Reconcile current orders by clicking continue or stop for each active order
4) Use “Add More” button on top right-hand corner of screen to add desired Transfer Order Set
5) Add additional orders as necessary using “Add More” button
6) Submit your orders
7) Print orders for PACU staff
PACU (OP)
CPOE Floor
CPOE Admission Orders will be entered by Surgeon or Surgical PA/NP using the TRANSFER function
1) Select desired patient
2) Update PAML by pushing “Reconcile Meds” button but do not make actions on them
3) Push “Transfer” button
4) Make actions on PAML meds
5) Click “Order Set” button
6) Select desired order set
7) Add additional orders as necessary using “Add More” button
8) Submit your orders
9) Print orders for PACU staff
PACU ICU/PCU Use paper process
*Use paper order sets to enter new orders on ICU patients
*Re-order medications that must be continued in ICU
15
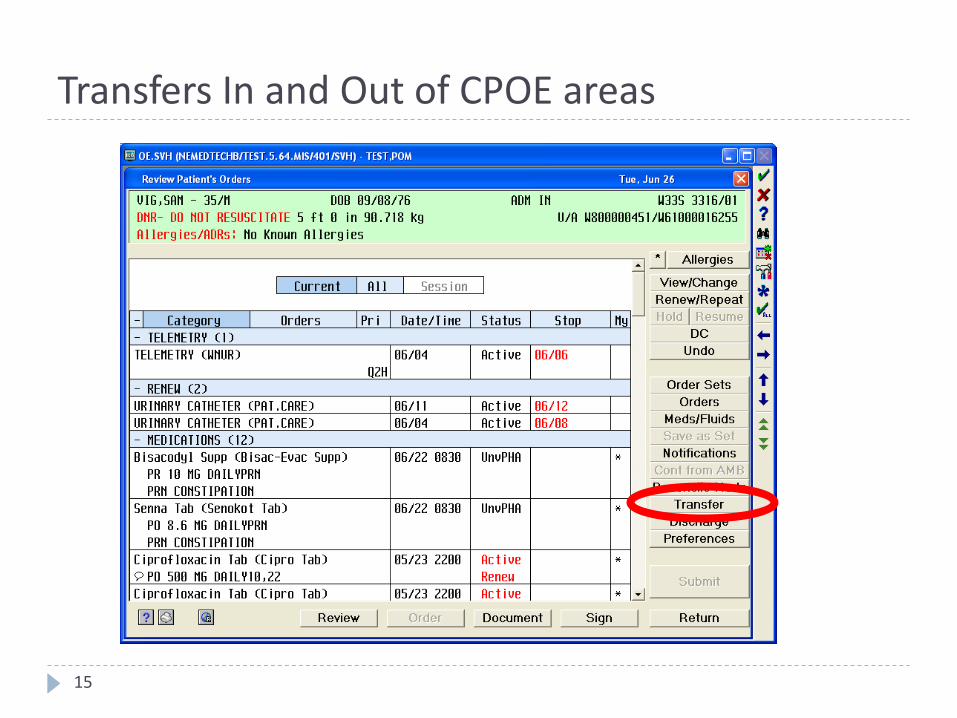
Transfers In and Out of CPOE areas

All active orders can be continued or stopped by clicking the appropriate
button.
16
Use the “Add More” button to add more single orders, sets or meds and link to transfer session.
Transfers In and Out of CPOE areasTransfer Screen
PAML meds appear at the top
Active Meds appear in the bottom
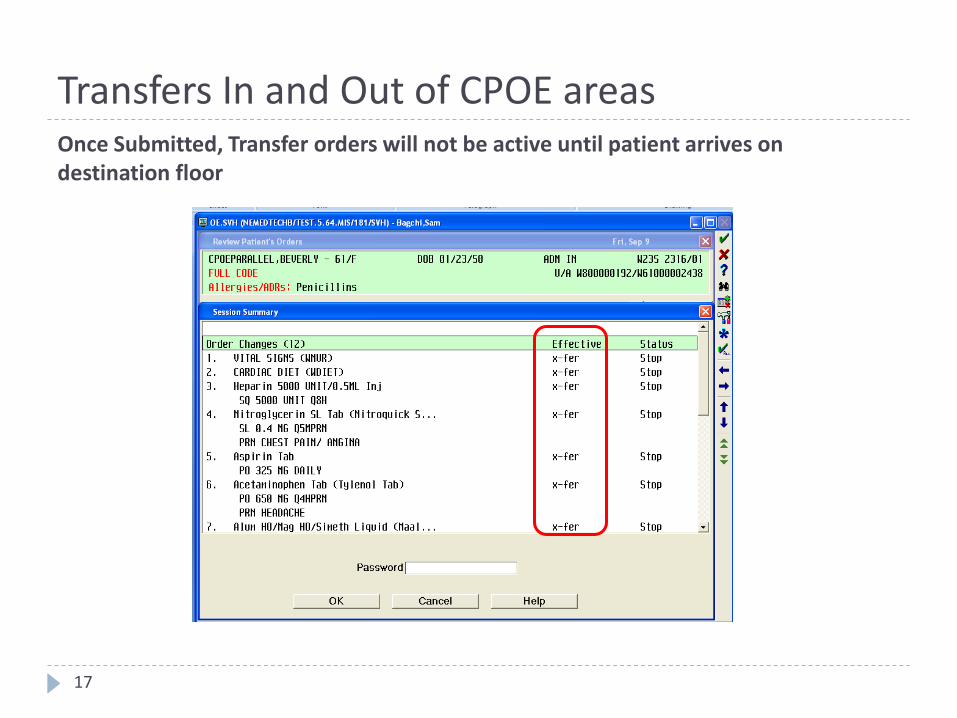
Once Submitted, Transfer orders will not be active until patient arrives on destination floor
17
Transfers In and Out of CPOE areas

Allergies
Use the F9 Key to access drop down menus on open entries. Not sure if there is a drop down menu, just click F9 to check.
18
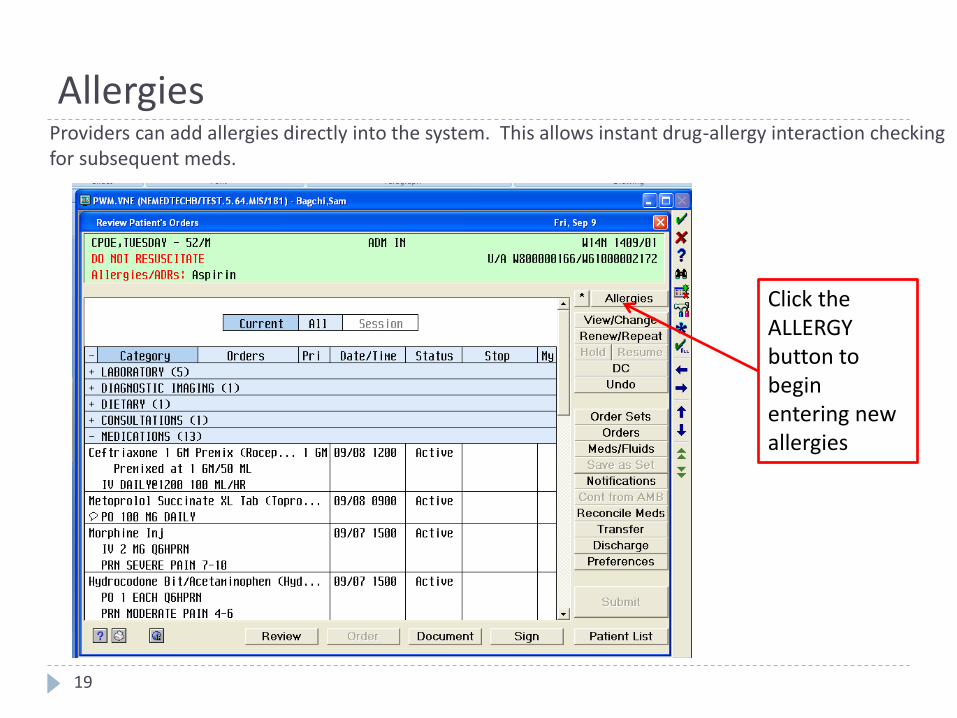
Providers can add allergies directly into the system. This allows instant drug-allergy interaction checking for subsequent meds.
19
Click the ALLERGY button to begin entering new allergies
Allergies
Allergy Management Screen
20
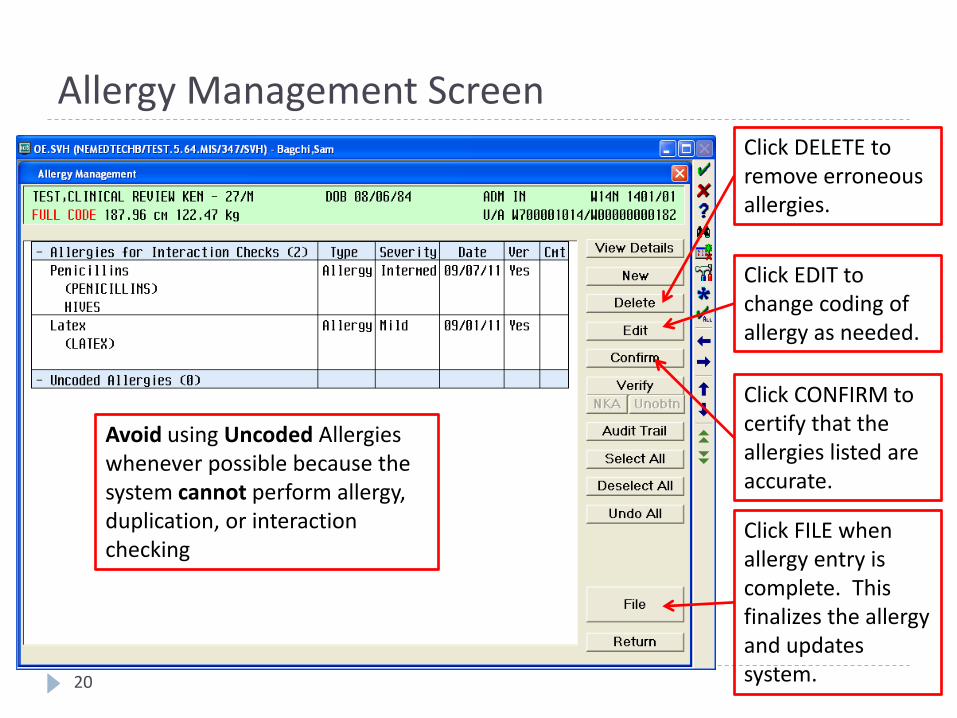
Click DELETE to remove erroneous allergies.
Click EDIT to change coding of allergy as needed.
Click CONFIRM to certify that the allergies listed are accurate.
Click FILE when allergy entry is complete. This finalizes the allergy and updates system.
Avoid using Uncoded Allergies whenever possible because the system cannot perform allergy, duplication, or interaction checking
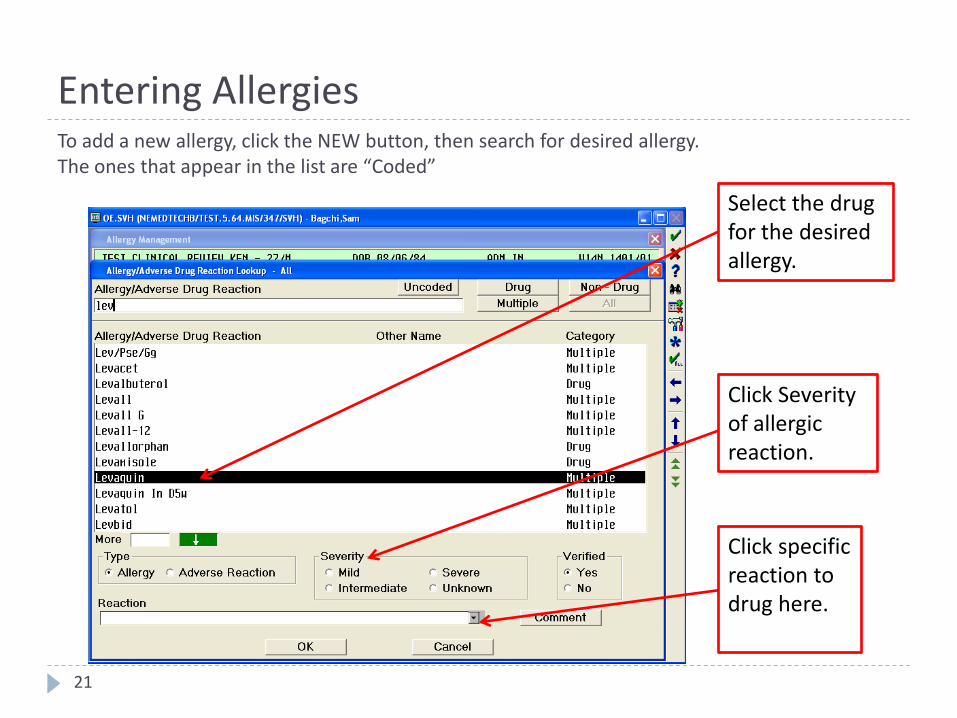
To add a new allergy, click the NEW button, then search for desired allergy. The ones that appear in the list are “Coded”
21
Select the drug for the desired allergy.
Click Severity of allergic reaction.
Click specific reaction to drug here.
Entering Allergies

Admission ProcessUpdating the Pre-Admission Med List
Use the F9 Key to access drop down menus on open entries. Not sure if there is a drop down menu, just click F9 to check.
22
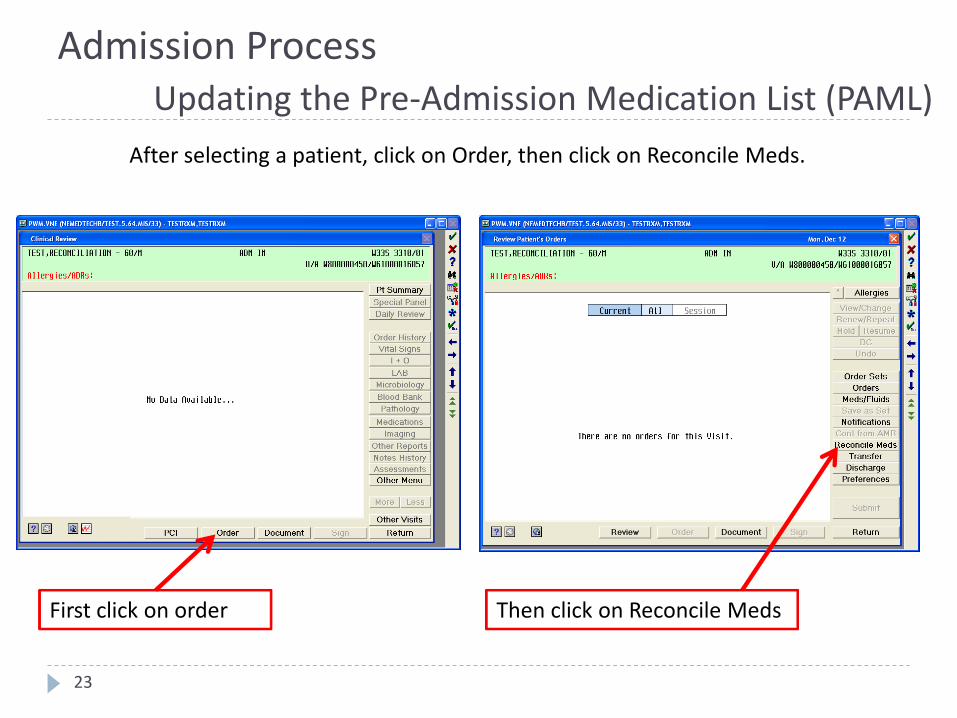
After selecting a patient, click on Order, then click on Reconcile Meds.
First click on order Then click on Reconcile Meds
23
Admission ProcessUpdating the Pre-Admission Medication List (PAML)

Updating the Pre-Admission Medication List (PAML)•Providers should make sure Allergies are updated first.
•This can be done from the Reconcile Meds Screen. •This screen will appear blank if patient has never had PAML entered electronically.•If there is already a PAML in the Medication Reconciliation screen the provider can add any additional missing medications by clicking Upd Med List
Update Allergies first
Click Upd Med List to begin entering patient’s PAML
24
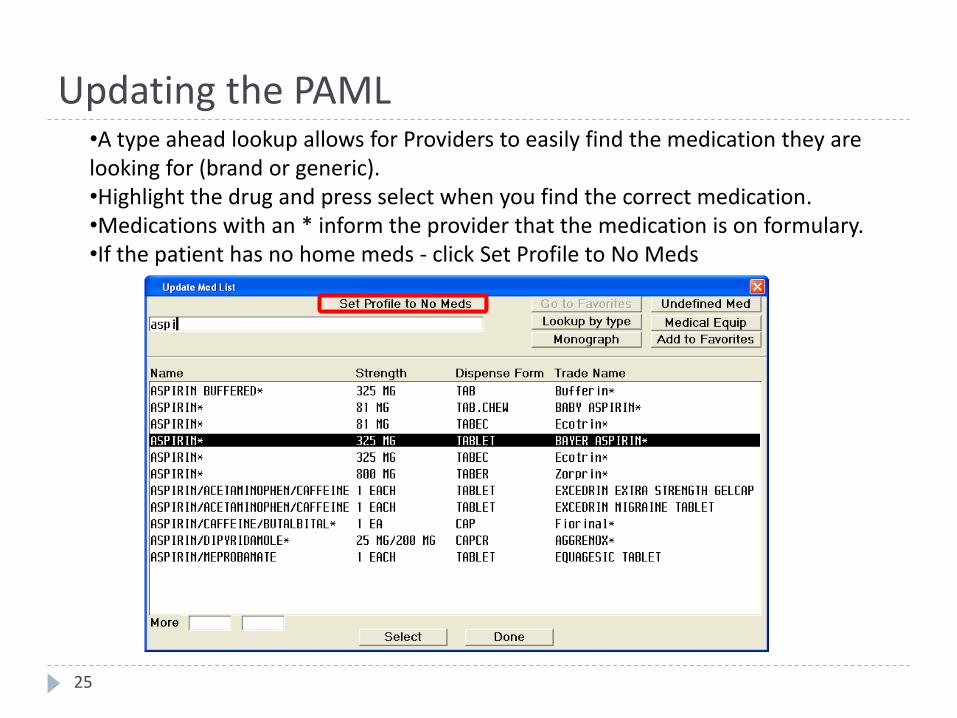
Updating the PAML•A type ahead lookup allows for Providers to easily find the medication they are looking for (brand or generic). •Highlight the drug and press select when you find the correct medication.•Medications with an * inform the provider that the medication is on formulary.•If the patient has no home meds - click Set Profile to No Meds
25
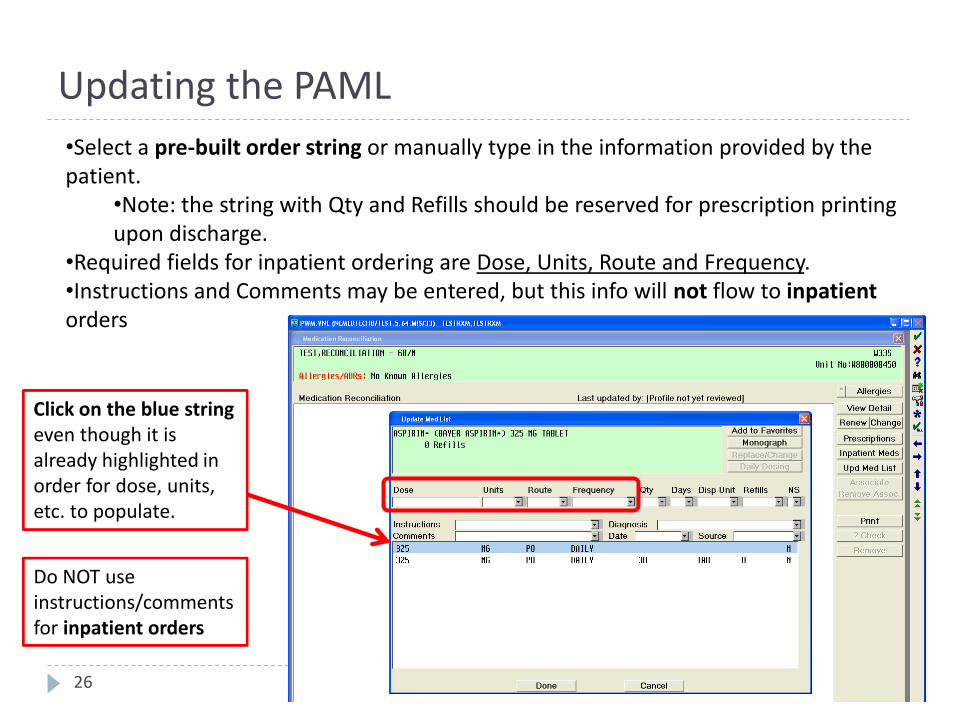
Updating the PAML
•Select a pre-built order string or manually type in the information provided by the patient.
•Note: the string with Qty and Refills should be reserved for prescription printing upon discharge.
•Required fields for inpatient ordering are Dose, Units, Route and Frequency. •Instructions and Comments may be entered, but this info will not flow to inpatientorders
Click on the blue string even though it is already highlighted in order for dose, units, etc. to populate.
Do NOT use instructions/comments for inpatient orders
26
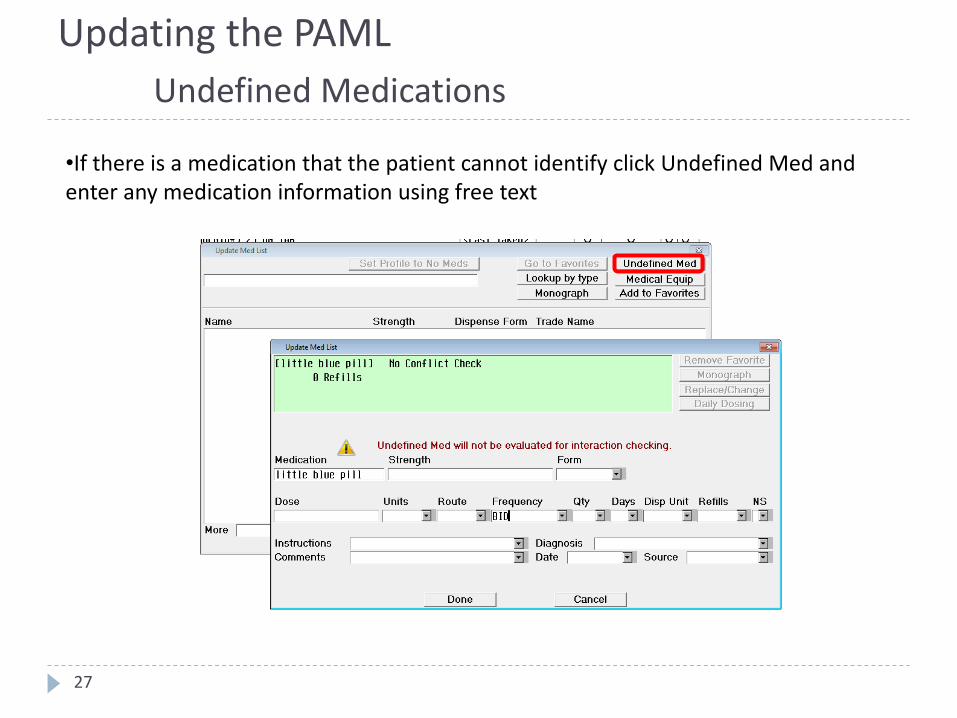
Updating the PAML
Undefined Medications
•If there is a medication that the patient cannot identify click Undefined Med and enter any medication information using free text
27

Updating the PAML
Changing Medications
•To change any medications in the PAML, highlight the med then click Change
28
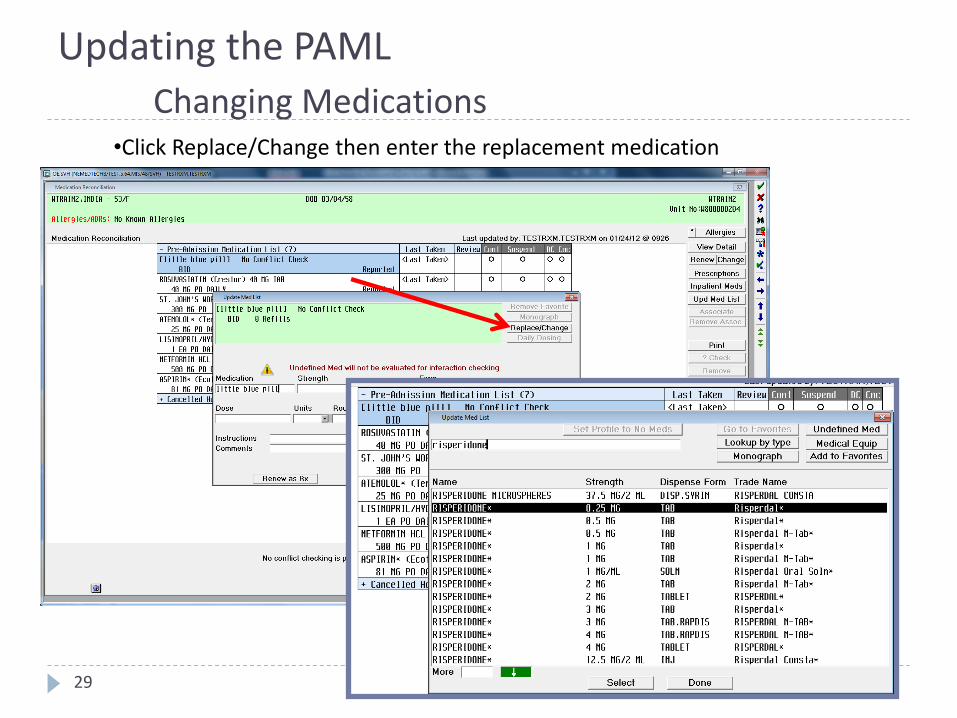
•Click Replace/Change then enter the replacement medication
29
Updating the PAML
Changing Medications
Updating the PAML
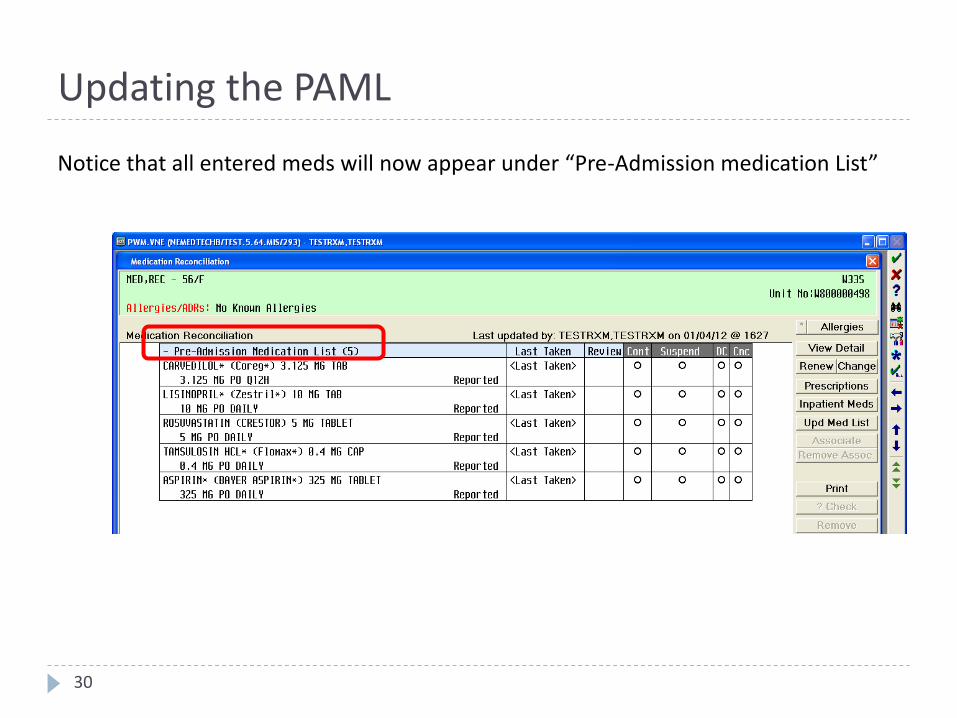
Notice that all entered meds will now appear under “Pre-Admission medication List”
30
Updating the PAMLLast Taken Information (optional)
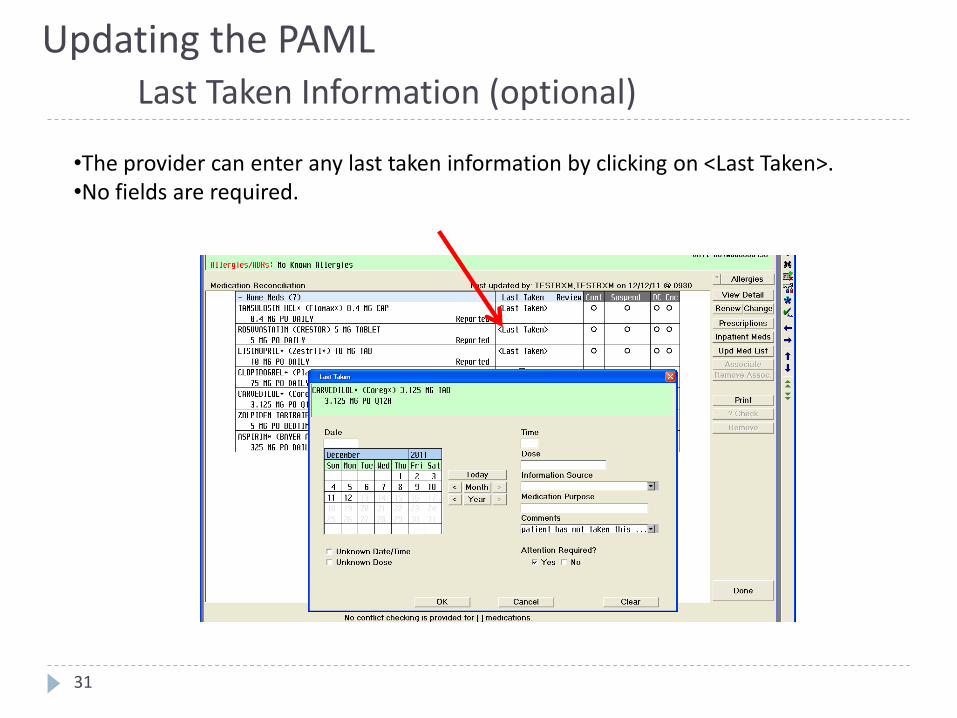
•The provider can enter any last taken information by clicking on <Last Taken>.•No fields are required.
31
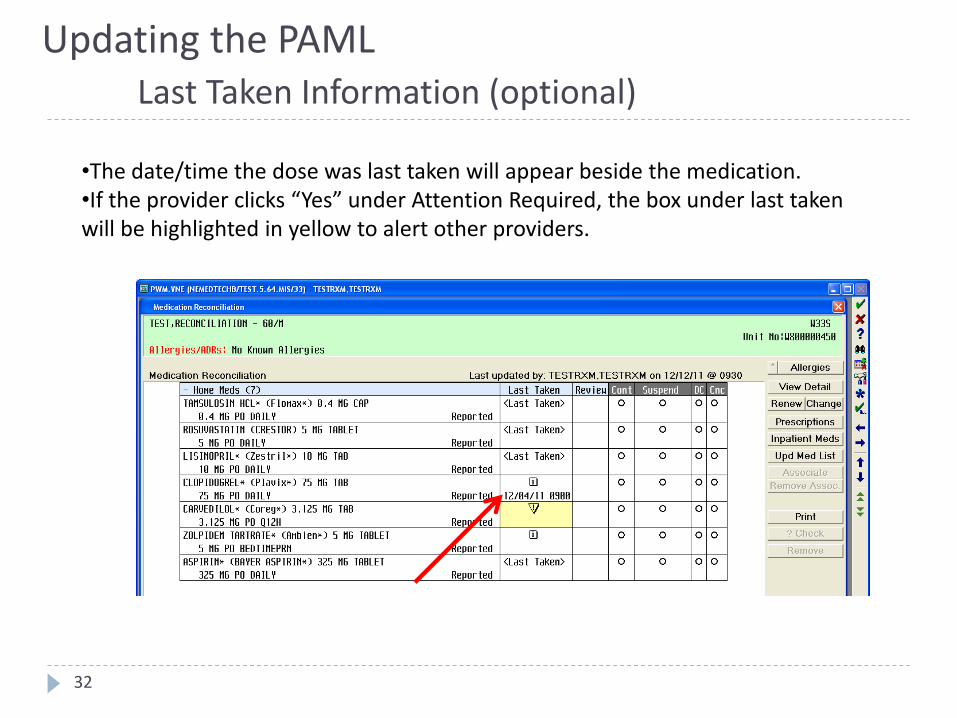
•The date/time the dose was last taken will appear beside the medication.•If the provider clicks “Yes” under Attention Required, the box under last taken will be highlighted in yellow to alert other providers.
32
Updating the PAMLLast Taken Information (optional)
Admission ProcessReconciling Medications
Use the F9 Key to access drop down menus on open entries. Not sure if there is a drop down menu, just click F9 to check.
33

Transfer Function- If the admission process will utilize the Transfer function (ED admission, OR, etc.) 1. Update the PAML in Reconcile Meds
2. Then address whether to continue, suspend, discontinue or cancel meds in the Transfer routine
3. Then click Add More to add any order sets, orders, or meds/fluids for admission orders
Reconcile Meds- If the admission process will bypass the Transfer function (direct admissions)1. Update the PAML in Reconcile Meds
2. Stay in the Reconcile Meds routine to continue, suspend, discontinue or cancel meds
3. Order additional order sets, orders, or meds/fluids from the main CPOE screen
Most of the time you will use Transferto Reconcile Meds
This will be less likely
34
Reconciling MedsTwo places to Reconcile Medications

Reconciling Meds from “Transfer”
•After all meds in the PAML have been entered, go to the Transfer routine to continue, suspend, discontinue or cancel medications.
After done updating the PAML, click on Return, then proceed with the Transfer process.
35

Reconciling Meds from “Transfer”
•Click Transfer
36
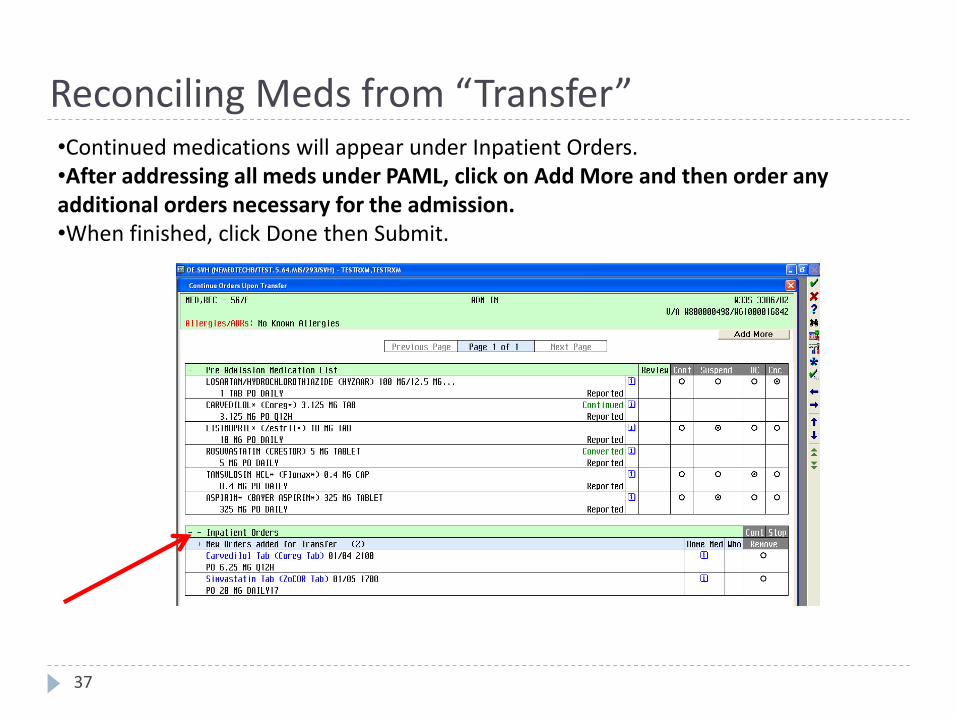
•Continued medications will appear under Inpatient Orders.•After addressing all meds under PAML, click on Add More and then order any additional orders necessary for the admission.•When finished, click Done then Submit.
Reconciling Meds from “Transfer”
37
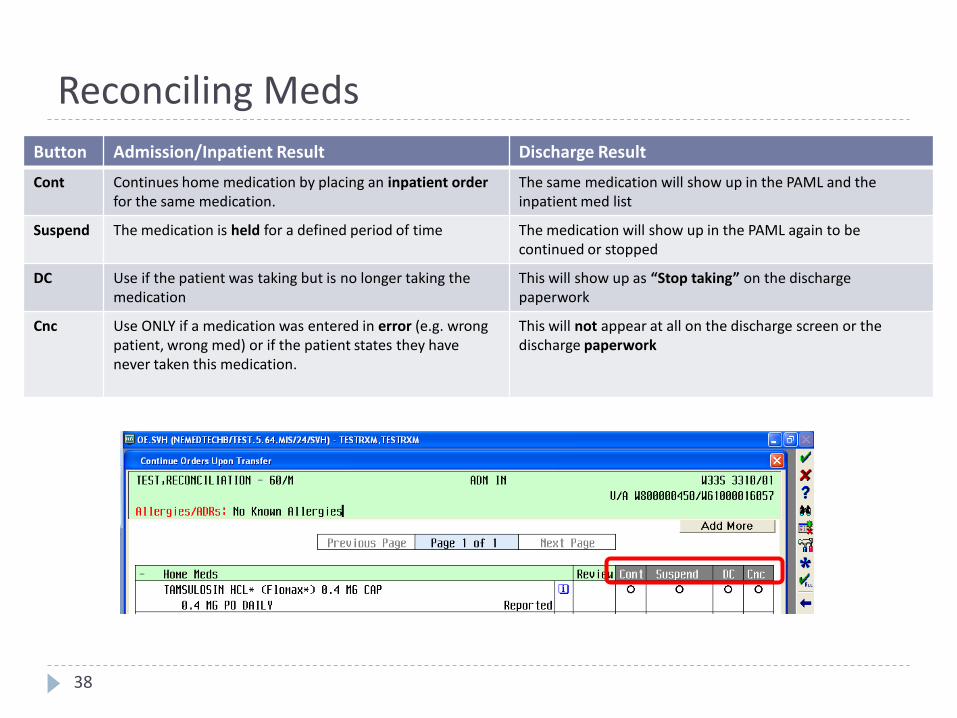
Reconciling Meds
38
Button Admission/Inpatient Result Discharge Result
Cont Continues home medication by placing an inpatient order for the same medication.
The same medication will show up in the PAML and the inpatient med list
Suspend The medication is held for a defined period of time The medication will show up in the PAML again to be continued or stopped
DC Use if the patient was taking but is no longer taking the medication
This will show up as “Stop taking” on the discharge paperwork
Cnc Use ONLY if a medication was entered in error (e.g. wrong patient, wrong med) or if the patient states they have never taken this medication.
This will not appear at all on the discharge screen or the discharge paperwork
Reconciling Meds
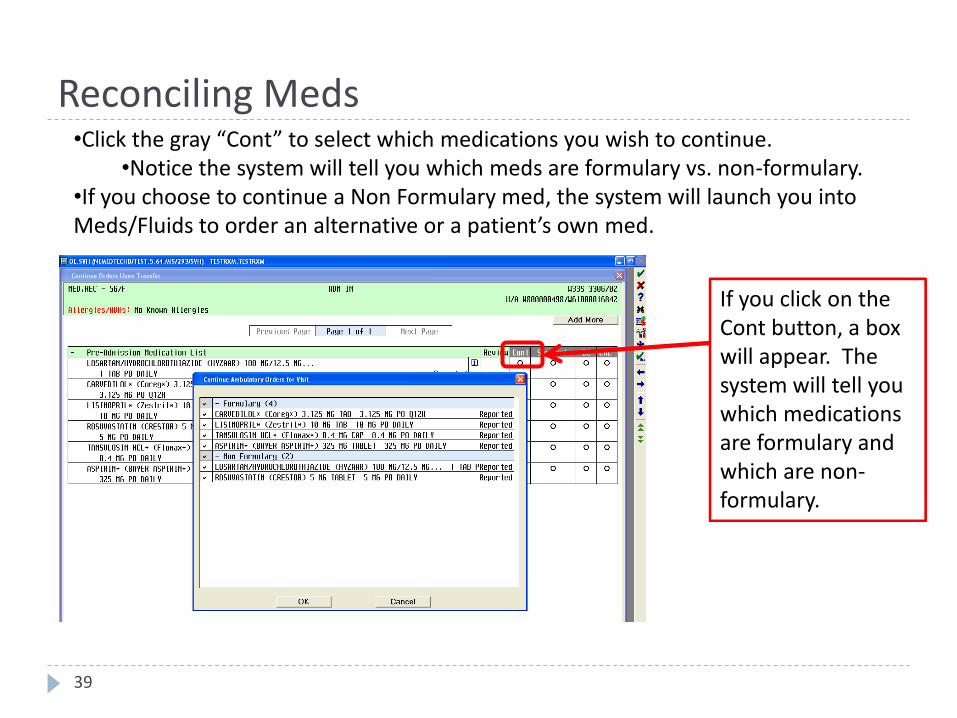
If you click on the Cont button, a box will appear. The system will tell you which medications are formulary and which are non-formulary.
•Click the gray “Cont” to select which medications you wish to continue.•Notice the system will tell you which meds are formulary vs. non-formulary.
•If you choose to continue a Non Formulary med, the system will launch you into Meds/Fluids to order an alternative or a patient’s own med.
39

Reconciling MedsNon Formulary
If you choose to continue a Non Formulary medication, you will be brought to the Meds/Fluids lookup.
40
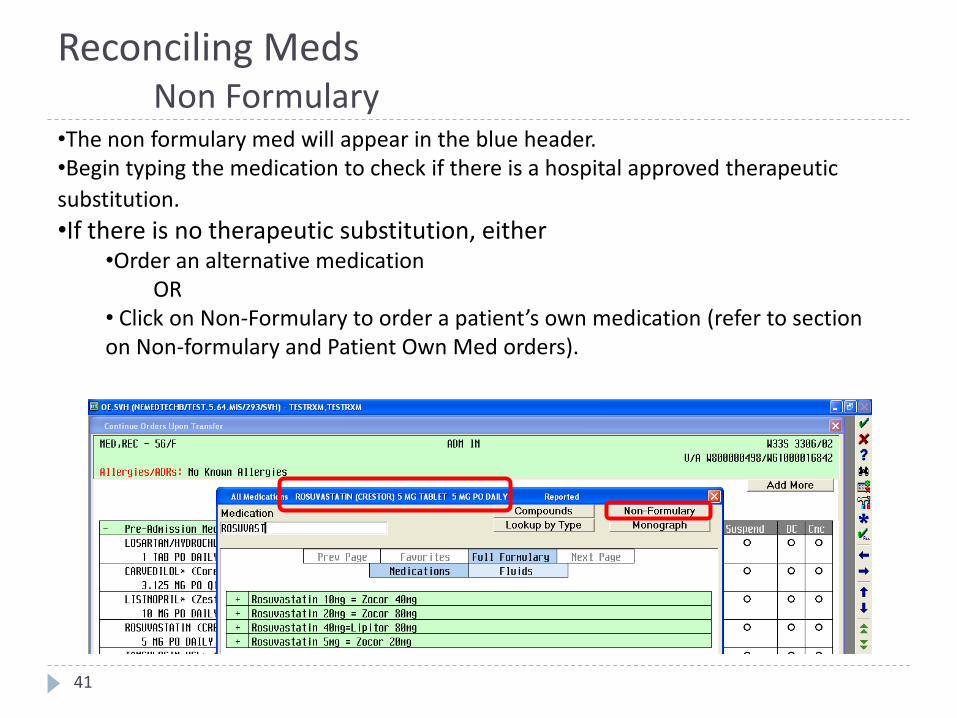
•The non formulary med will appear in the blue header.•Begin typing the medication to check if there is a hospital approved therapeutic
substitution.
•If there is no therapeutic substitution, either•Order an alternative medication
OR• Click on Non-Formulary to order a patient’s own medication (refer to section on Non-formulary and Patient Own Med orders).
Reconciling MedsNon Formulary
41
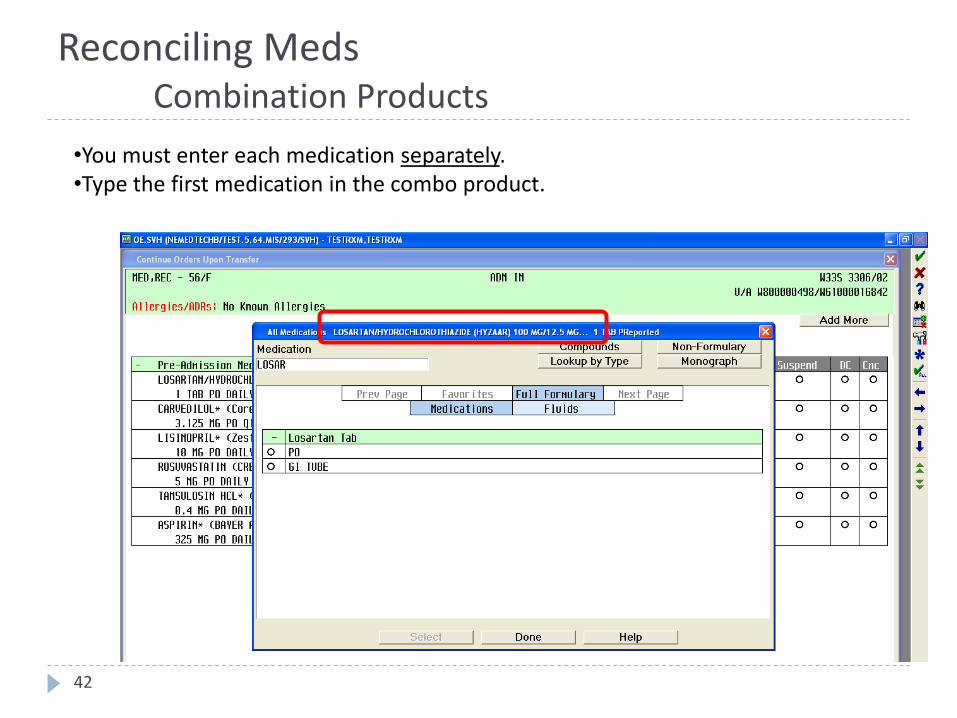
•You must enter each medication separately.•Type the first medication in the combo product.
Reconciling MedsCombination Products
42
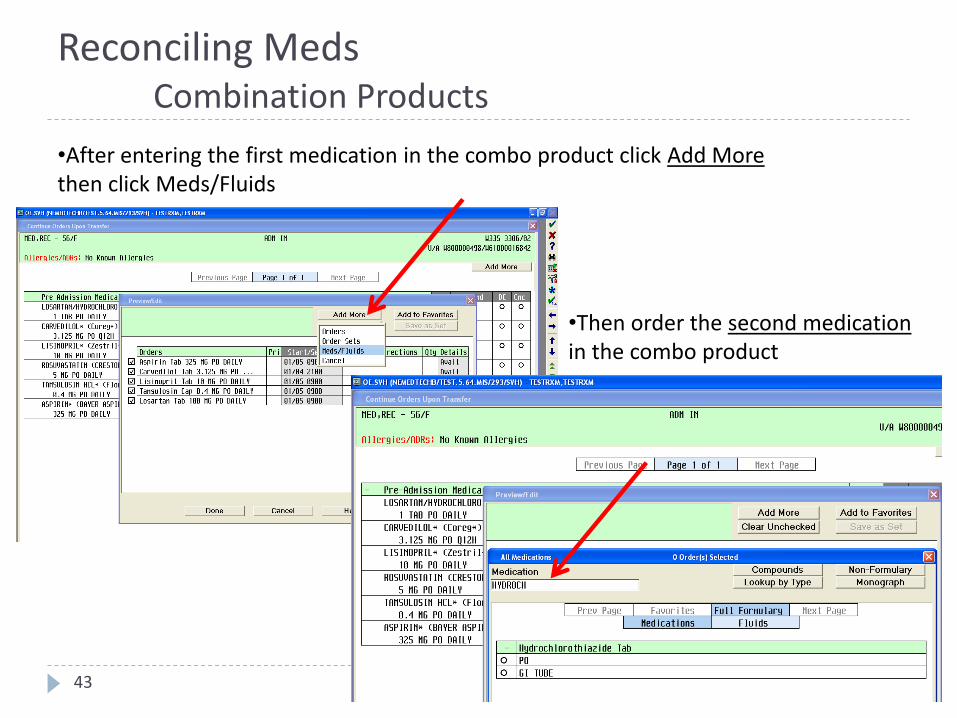
•After entering the first medication in the combo product click Add Morethen click Meds/Fluids
•Then order the second medicationin the combo product
Reconciling MedsCombination Products
43
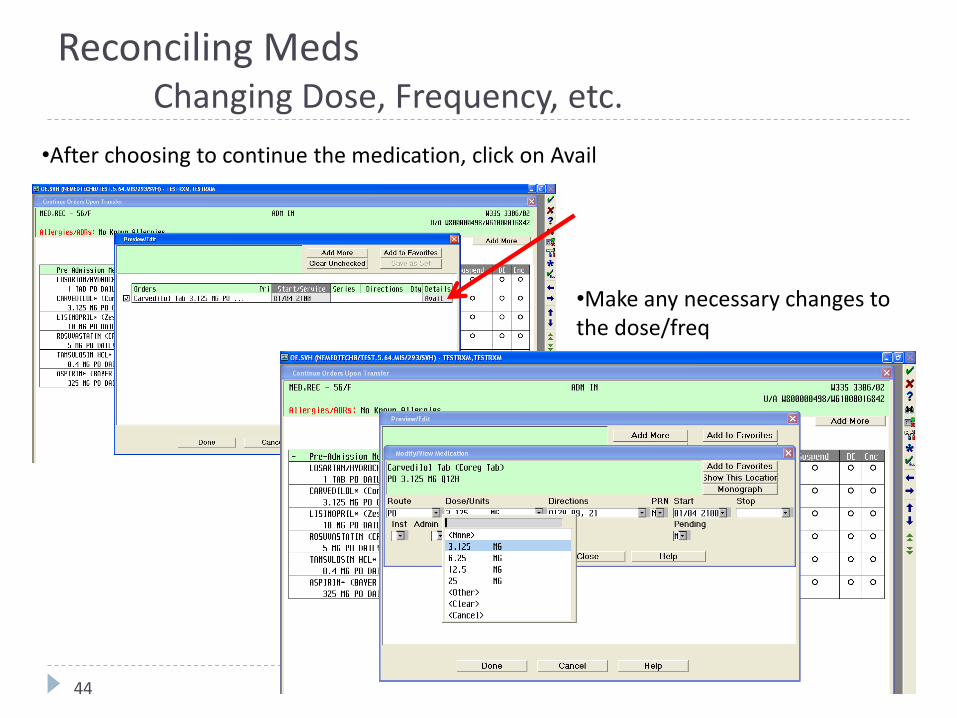
•After choosing to continue the medication, click on Avail
•Make any necessary changes to the dose/freq
Reconciling MedsChanging Dose, Frequency, etc.
44
Ordering Medications and IV Fluids
Use the F9 Key to access drop down menus on open entries. Not sure if there is a drop down menu, just click F9 to check.
45
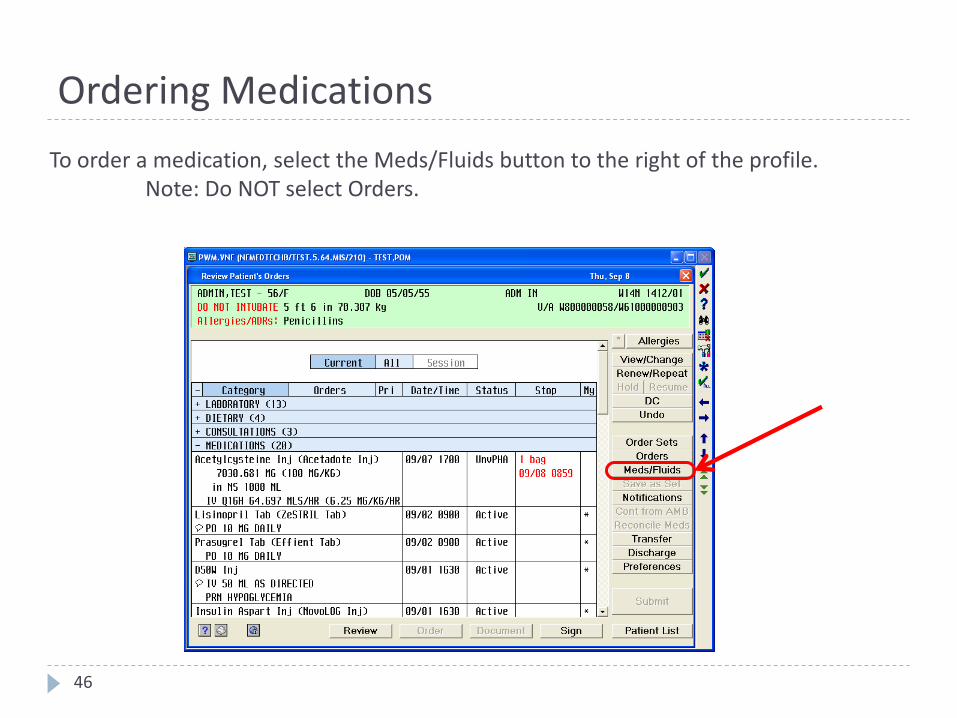
To order a medication, select the Meds/Fluids button to the right of the profile.Note: Do NOT select Orders.
46
Ordering Medications
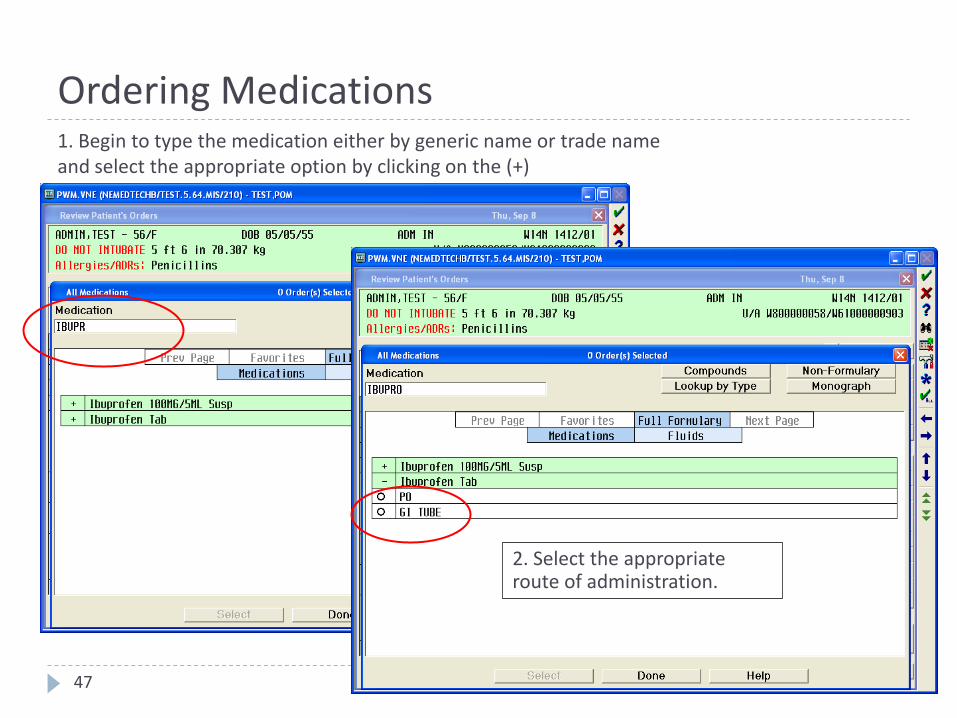
1. Begin to type the medication either by generic name or trade name and select the appropriate option by clicking on the (+)
47
Ordering Medications
2. Select the appropriate route of administration.
2. Look for order strings located in the lower portion of the screen.
48
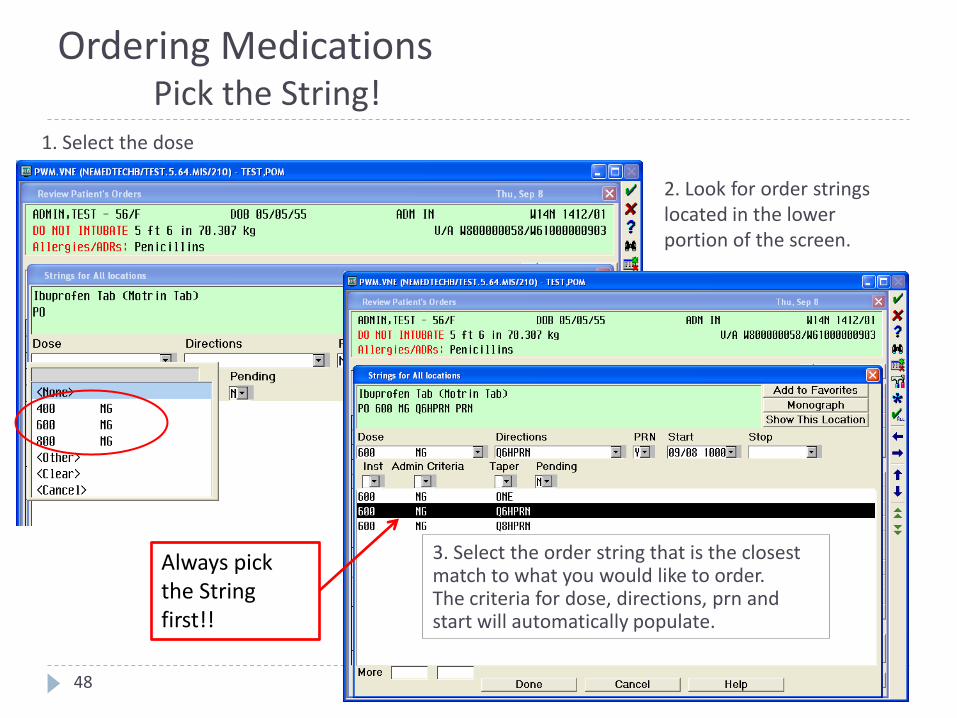
Always pick the String first!!
Ordering MedicationsPick the String!
1. Select the dose
3. Select the order string that is the closest match to what you would like to order.The criteria for dose, directions, prn and start will automatically populate.
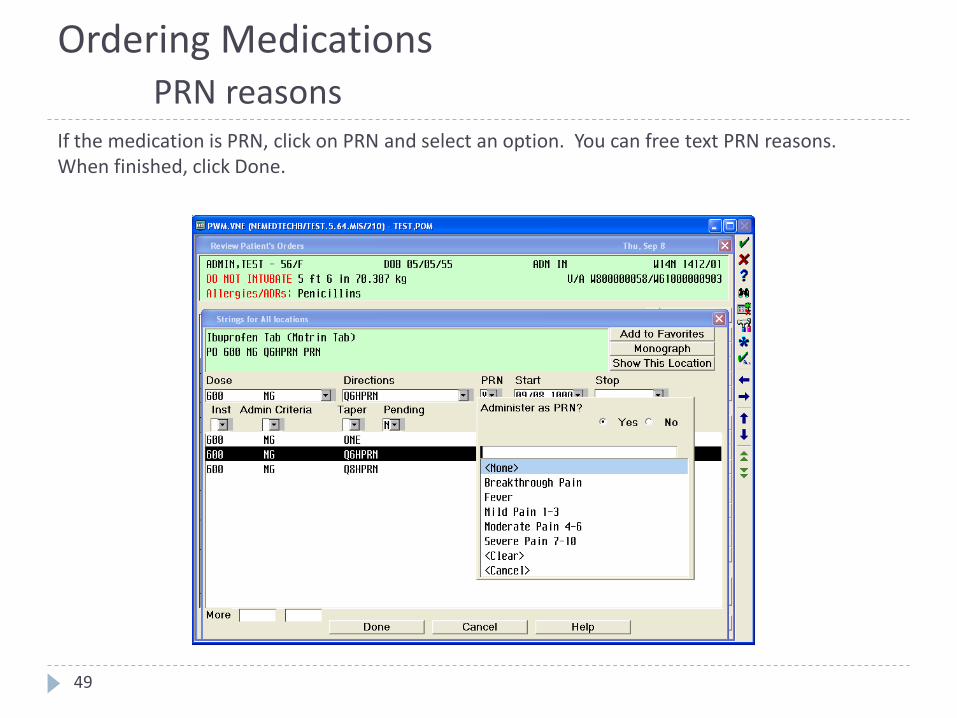
If the medication is PRN, click on PRN and select an option. You can free text PRN reasons. When finished, click Done.
49
Ordering MedicationsPRN reasons

If you wish to change the Directions, click on the box and either scroll or begin to type the new directions you would like.
50
Ordering MedicationsChanging directions

When ordering scheduled medications, ALWAYS look at the Directions, Start, and Stop fields.The start date and time will always default to the NEXT scheduled time.
51
Ordering MedicationsAdmin Time, Start/Stop Date & Time
Start Date/Time:In this example, if it is after 0900 when you place the order, the start date will default to tonight at 2100.
Admin Time:In this example, the 09, 21 after Q12H indicates that the medication is to be given at 0900 and 2100every day.
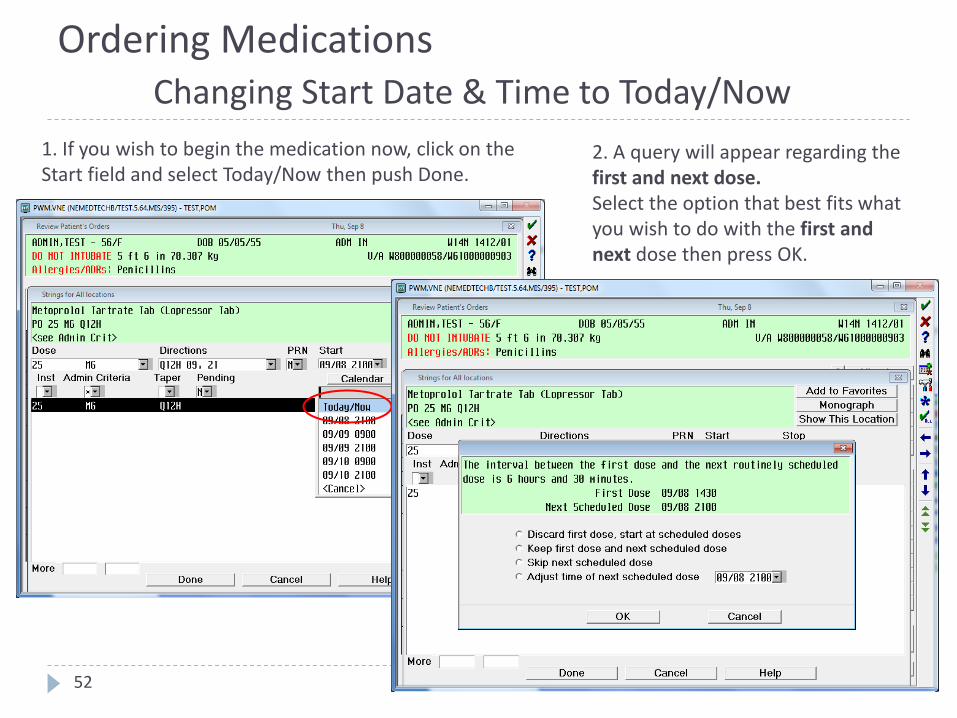
1. If you wish to begin the medication now, click on the Start field and select Today/Now then push Done.
52
Ordering MedicationsChanging Start Date & Time to Today/Now
2. A query will appear regarding the first and next dose.Select the option that best fits what you wish to do with the first and next dose then press OK.

53
Ordering MedicationsChanging Start Date & Time to a future time
2. You can select the date by the clicking on the calendar and the time by clicking on HH (hour) and MM (minute).
1. If you wish to start at a different date/time, choose one of the times or click on the Calendar button.
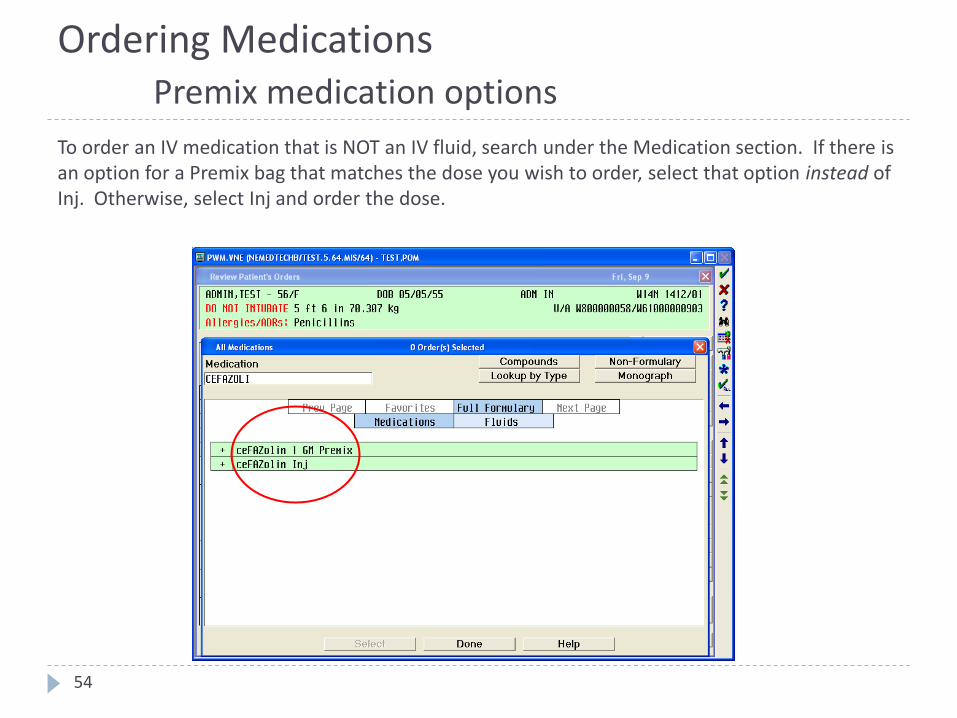
To order an IV medication that is NOT an IV fluid, search under the Medication section. If there is an option for a Premix bag that matches the dose you wish to order, select that option instead of Inj. Otherwise, select Inj and order the dose.
54
Ordering MedicationsPremix medication options
2. Click View/Change
55
Ordering MedicationsChanging an order
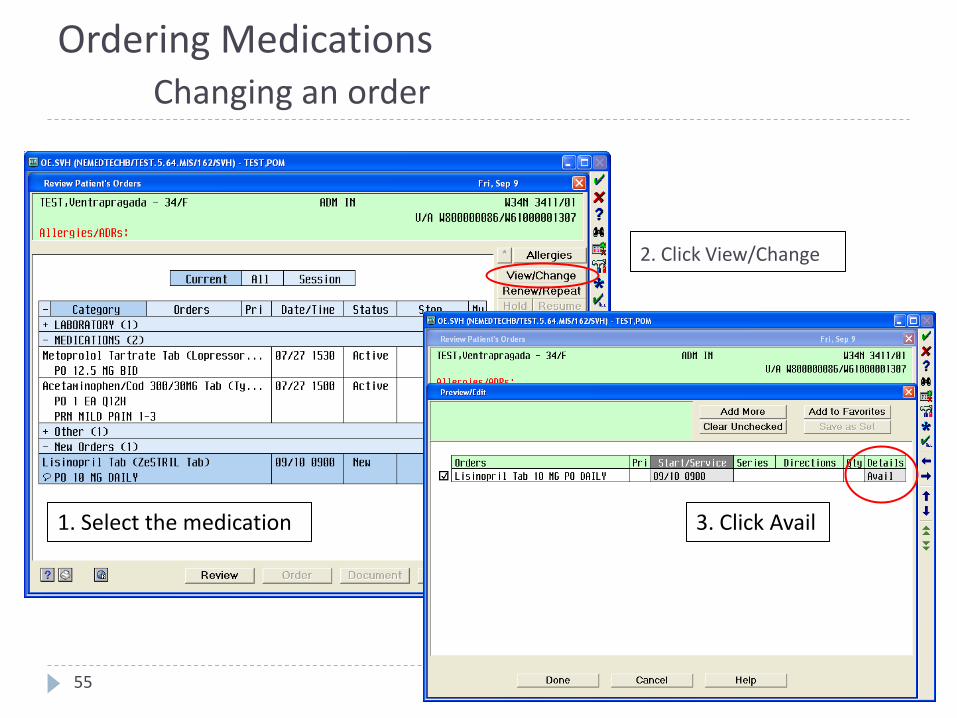
1. Select the medication 3. Click Avail
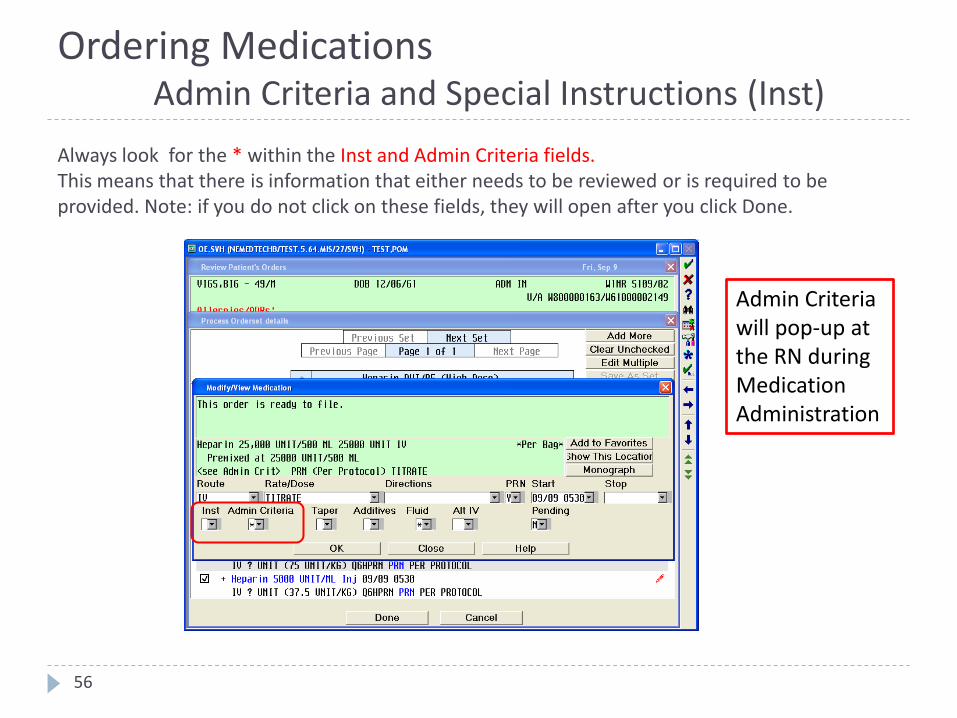
Always look for the * within the Inst and Admin Criteria fields.This means that there is information that either needs to be reviewed or is required to be provided. Note: if you do not click on these fields, they will open after you click Done.
56
Ordering Medications Admin Criteria and Special Instructions (Inst)
Admin Criteriawill pop-up at the RN during Medication Administration

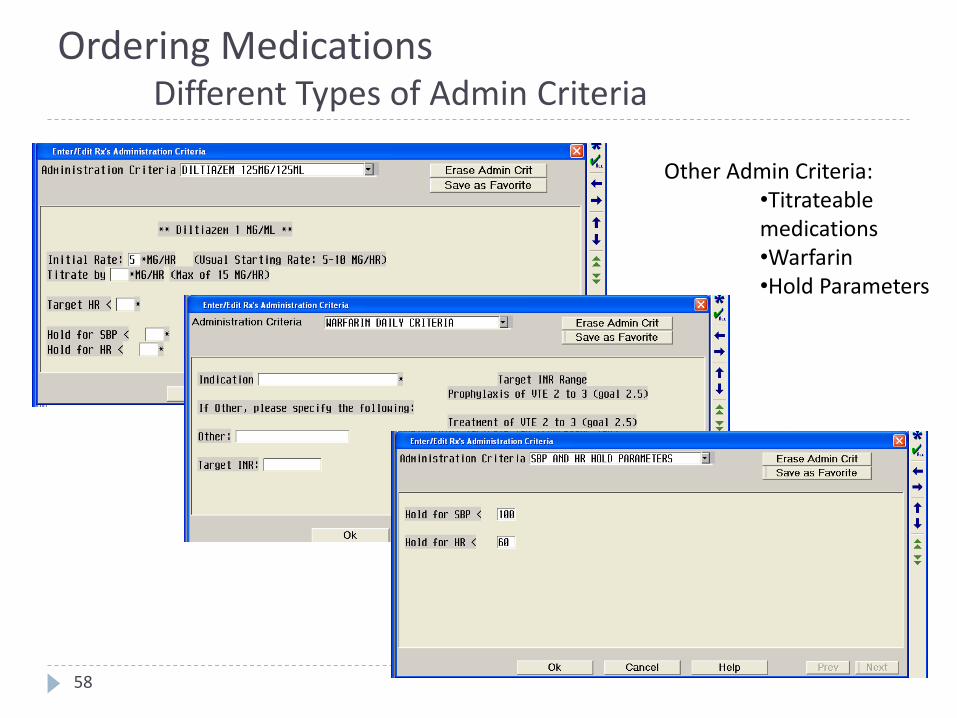
To access the information, click on the field with the *It is very important to thoroughly review this information, as you can make any changes you need.This example shows the actual protocol for the insulin sliding scale, and there is a place for the provider to indicate the dosages based on blood glucose level.
57
Ordering Medications Admin Criteria
58
Ordering Medications Different Types of Admin Criteria
Other Admin Criteria:•Titrateable medications•Warfarin•Hold Parameters
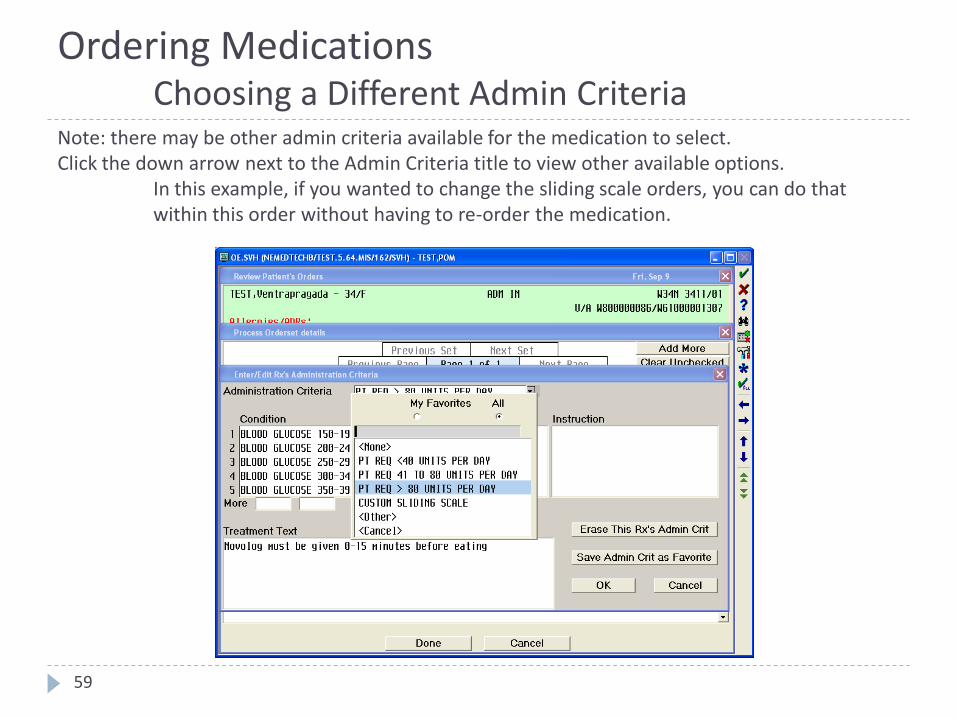
Note: there may be other admin criteria available for the medication to select. Click the down arrow next to the Admin Criteria title to view other available options.
In this example, if you wanted to change the sliding scale orders, you can do that within this order without having to re-order the medication.
59
Ordering Medications Choosing a Different Admin Criteria
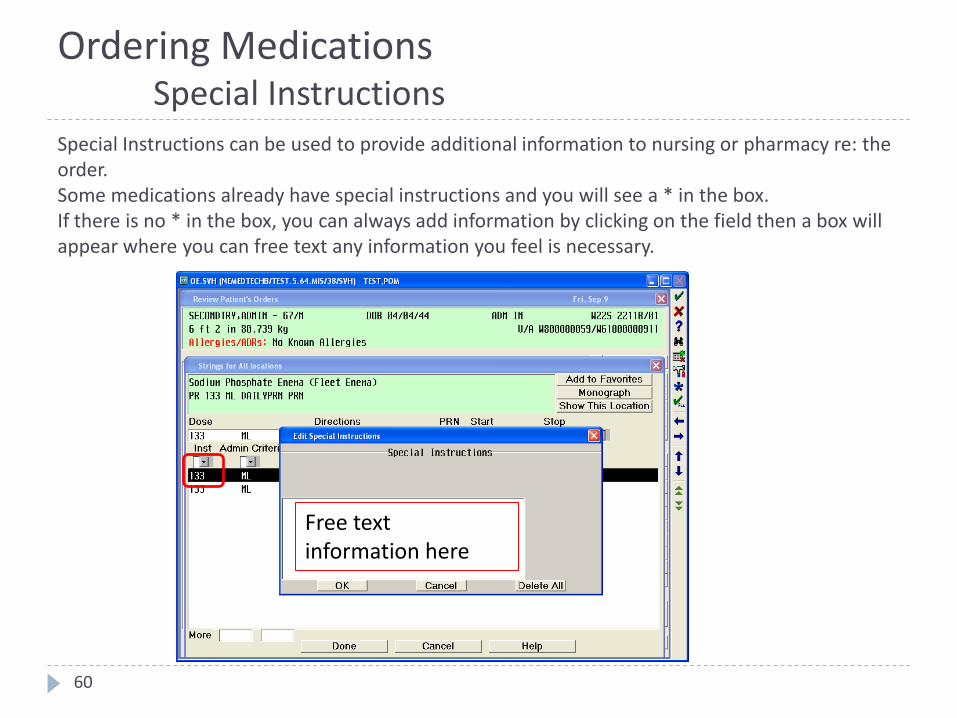
Special Instructions can be used to provide additional information to nursing or pharmacy re: the order. Some medications already have special instructions and you will see a * in the box.If there is no * in the box, you can always add information by clicking on the field then a box will appear where you can free text any information you feel is necessary.
60
Free text information here
Ordering Medications Special Instructions
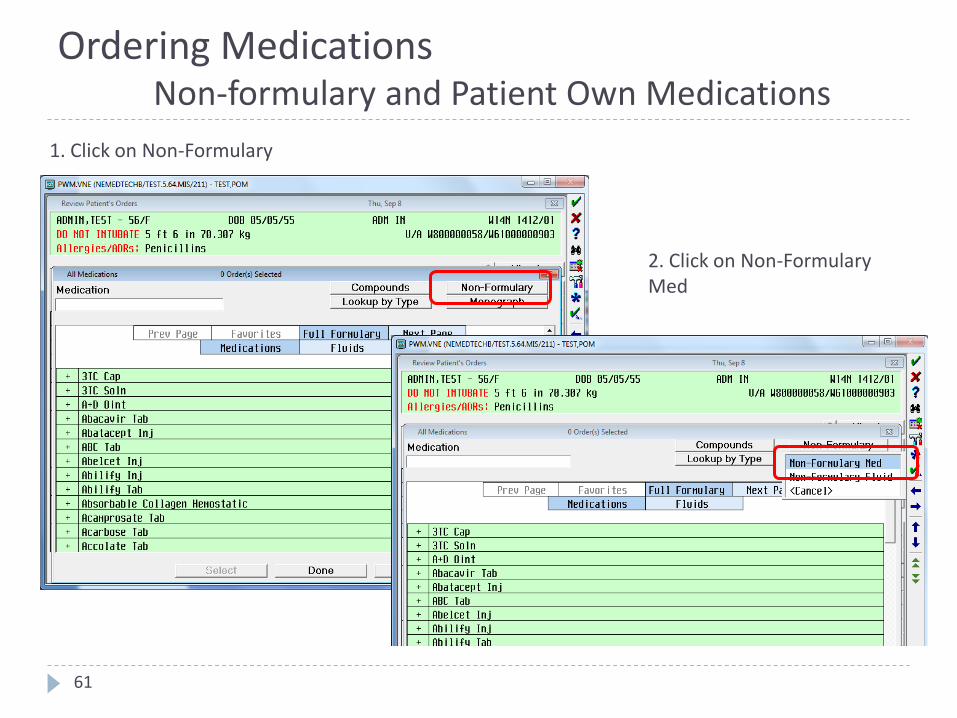
1. Click on Non-Formulary
61
Ordering Medications Non-formulary and Patient Own Medications
2. Click on Non-Formulary Med
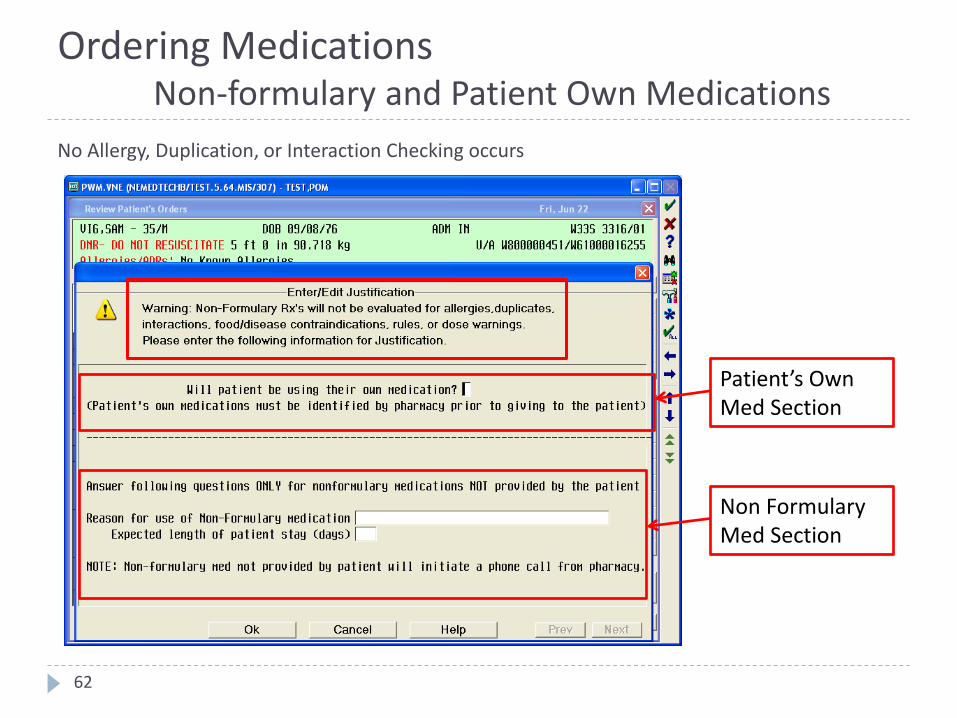
No Allergy, Duplication, or Interaction Checking occurs
62
Patient’s Own Med Section
Non Formulary Med Section
Ordering Medications Non-formulary and Patient Own Medications
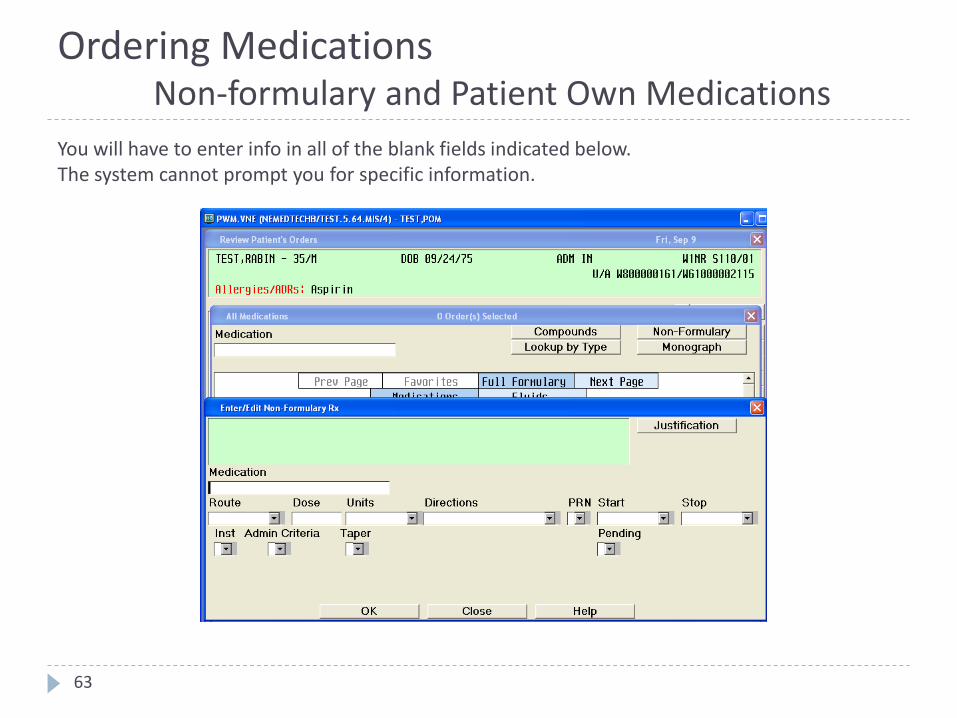
You will have to enter info in all of the blank fields indicated below. The system cannot prompt you for specific information.
63
Ordering Medications Non-formulary and Patient Own Medications

Click on the Fluids button (the color will change from light blue to dark blue), then begin to type the desired IV fluid.
64
Ordering IV Fluids

2. Look for order strings located in the lower portion of the screen.
65
Always pick the String!!
Ordering IV FluidsPick the String!
1. Select the rate.
3. Select the order string that is the closest match to what you would like to order. IV Fluids usually only have one string option.
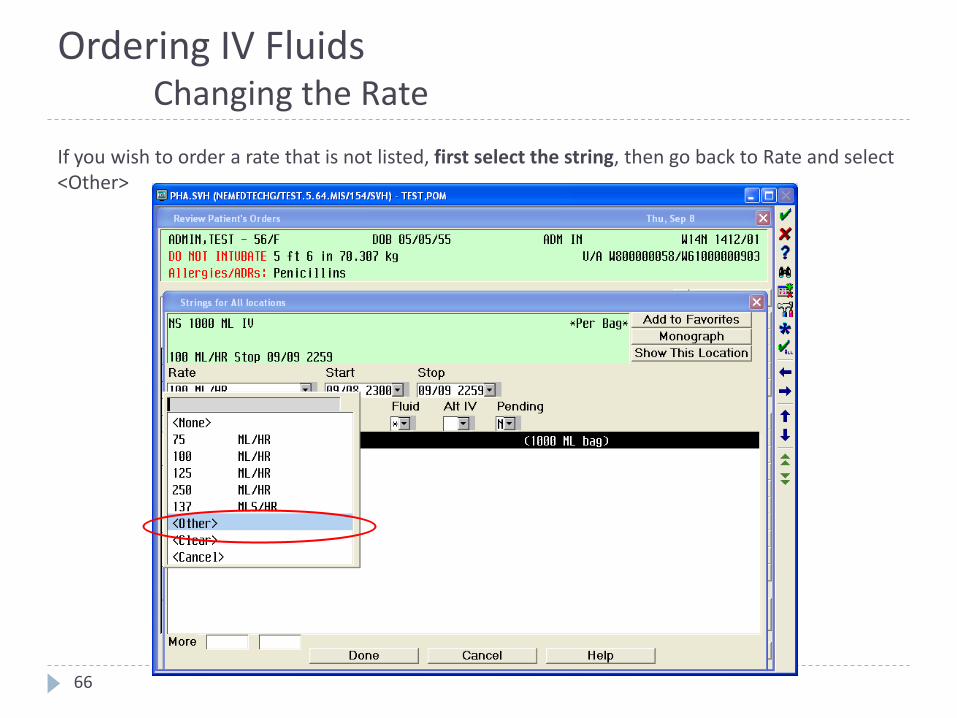
If you wish to order a rate that is not listed, first select the string, then go back to Rate and select <Other>
66
Ordering IV FluidsChanging the Rate
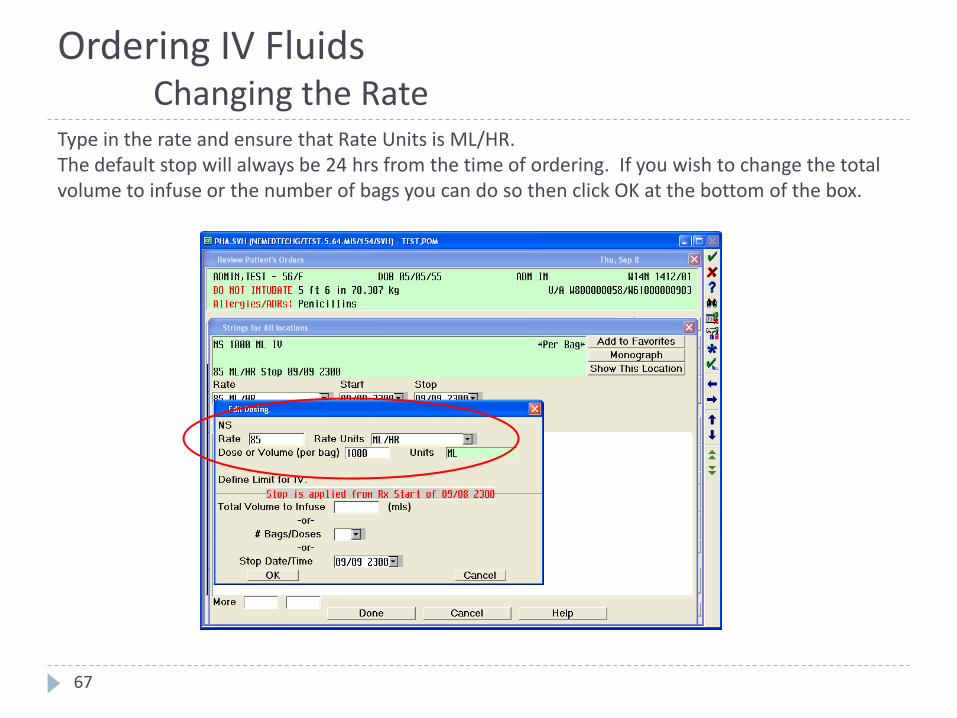
Type in the rate and ensure that Rate Units is ML/HR.The default stop will always be 24 hrs from the time of ordering. If you wish to change the total volume to infuse or the number of bags you can do so then click OK at the bottom of the box.
67
Ordering IV FluidsChanging the Rate
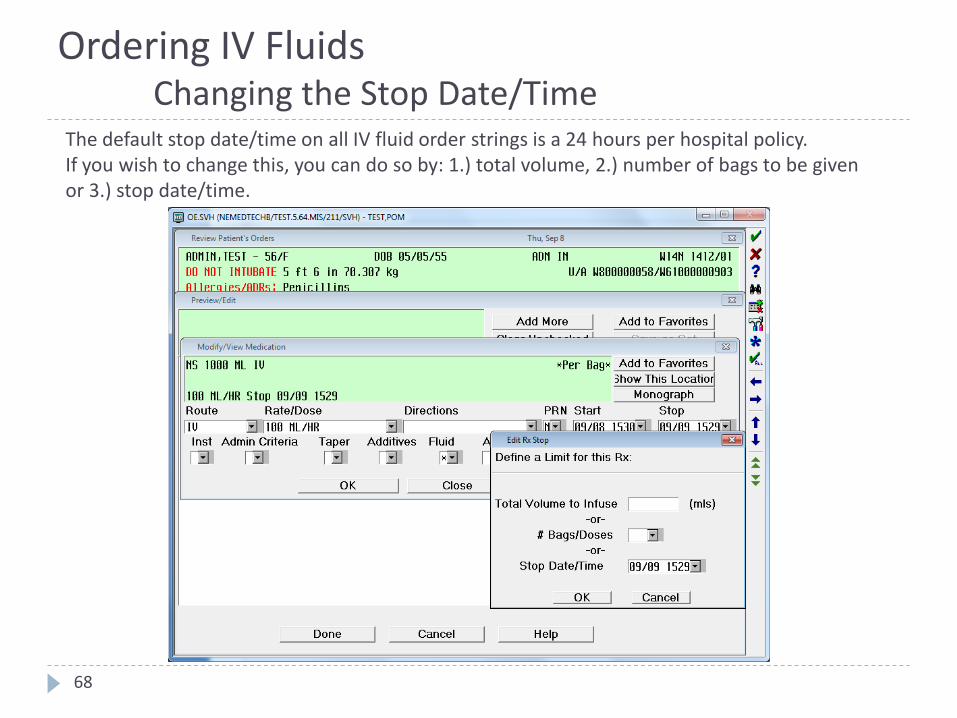
The default stop date/time on all IV fluid order strings is a 24 hours per hospital policy.If you wish to change this, you can do so by: 1.) total volume, 2.) number of bags to be given or 3.) stop date/time.
68
Ordering IV FluidsChanging the Stop Date/Time
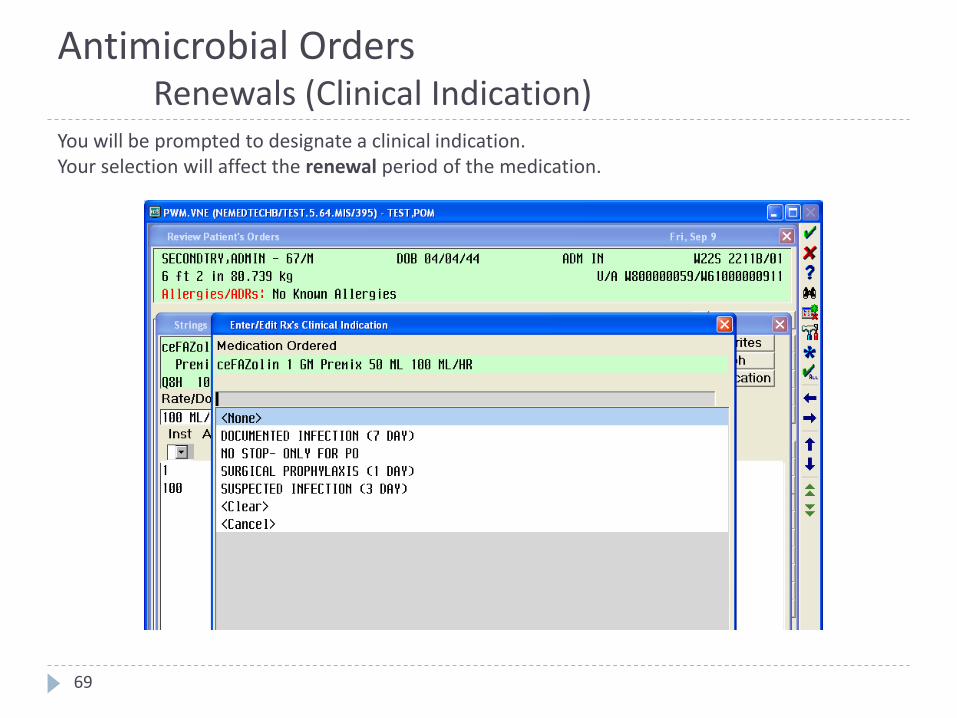
You will be prompted to designate a clinical indication.Your selection will affect the renewal period of the medication.
69
Antimicrobial OrdersRenewals (Clinical Indication)
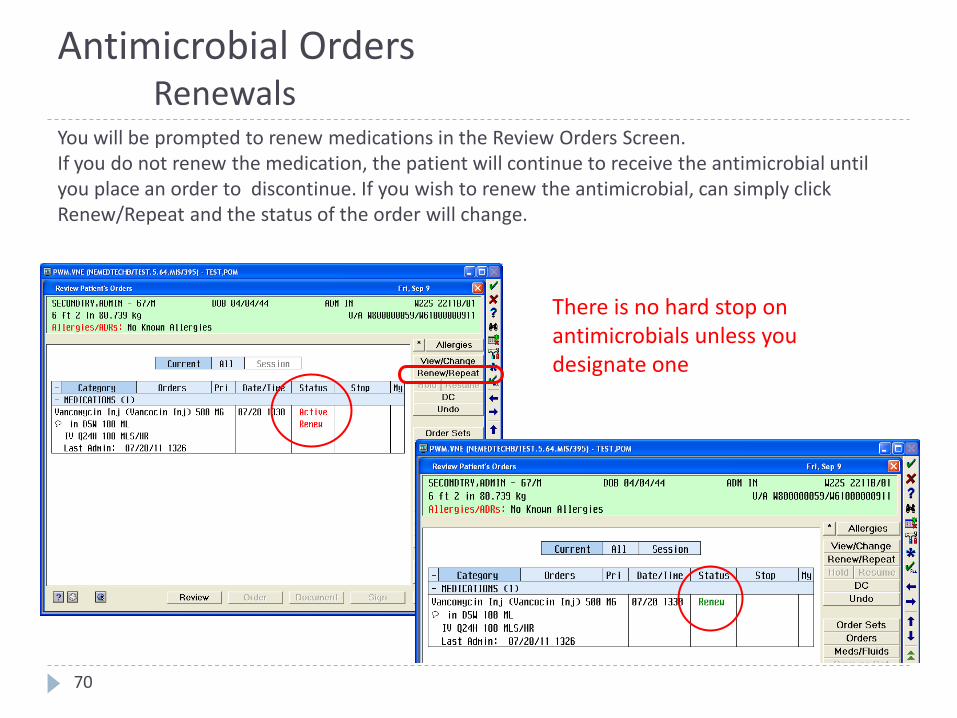
You will be prompted to renew medications in the Review Orders Screen.If you do not renew the medication, the patient will continue to receive the antimicrobial until you place an order to discontinue. If you wish to renew the antimicrobial, can simply click Renew/Repeat and the status of the order will change.
70
There is no hard stop on antimicrobials unless you designate one
Antimicrobial OrdersRenewals
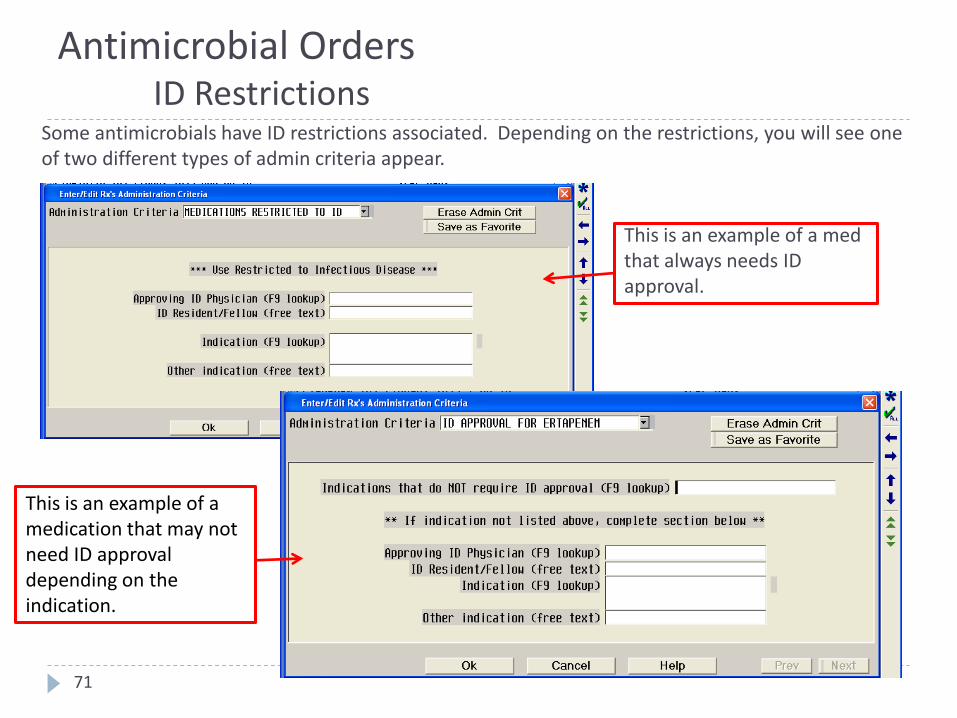
Some antimicrobials have ID restrictions associated. Depending on the restrictions, you will see one of two different types of admin criteria appear.
71
Antimicrobial OrdersID Restrictions
This is an example of a med that always needs ID approval.
This is an example of a medication that may not need ID approval depending on the indication.

When placing initial antimicrobial orders that require a trough, look in the Special Instructions field to review and/or place the trough instructions. Note: all subsequent trough orders will have to be ordered in the lab section.
72
Antimicrobial OrdersTrough Orders
Ex. All vancomcyin order strings already have a trough order in the Special Instructions. You can always change or remove this order.
Using Order Sets
Use the F9 Key to access drop down menus on open entries. Not sure if there is a drop down menu, just click F9 to check.
73
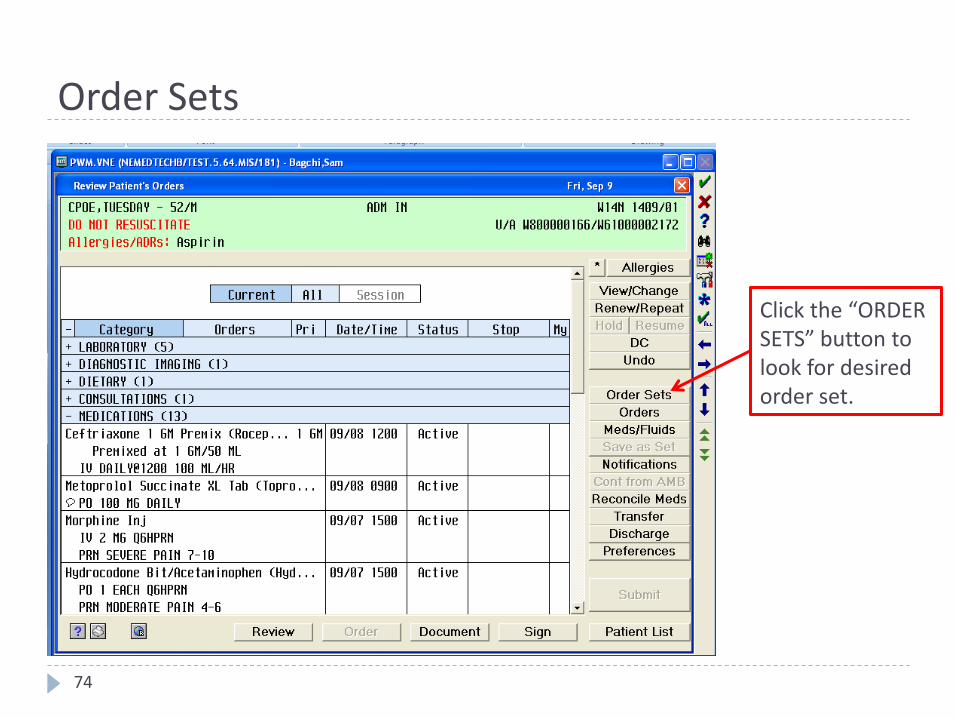
Click the “ORDER SETS” button to look for desired order set.
74
Order Sets
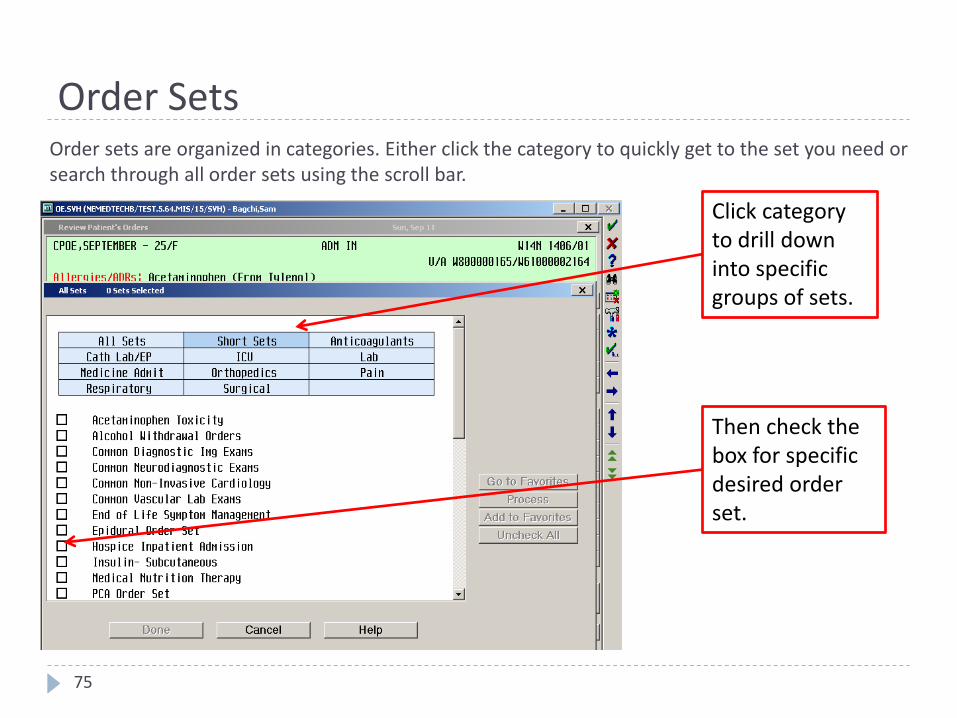
Order sets are organized in categories. Either click the category to quickly get to the set you need or search through all order sets using the scroll bar.
75
Click category to drill down into specific groups of sets.
Then check the box for specific desired order set.
Order Sets

Once selected, order set presents in collapsed format.
76
Click first “+” sign to expand ALL categories of the set.
Click “+” sign at the category level to only open the orders in a specific category.
Order Sets
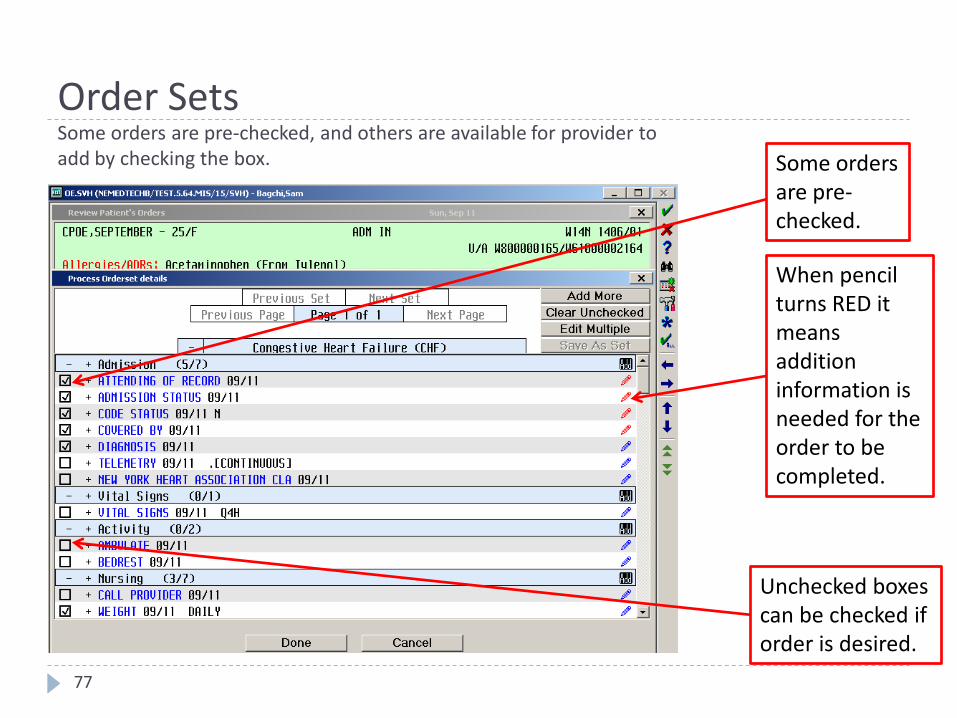
Some orders are pre-checked, and others are available for provider to add by checking the box.
77
Some orders are pre-checked.
When pencil turns RED it means addition information is needed for the order to be completed.
Unchecked boxes can be checked if order is desired.
Order Sets
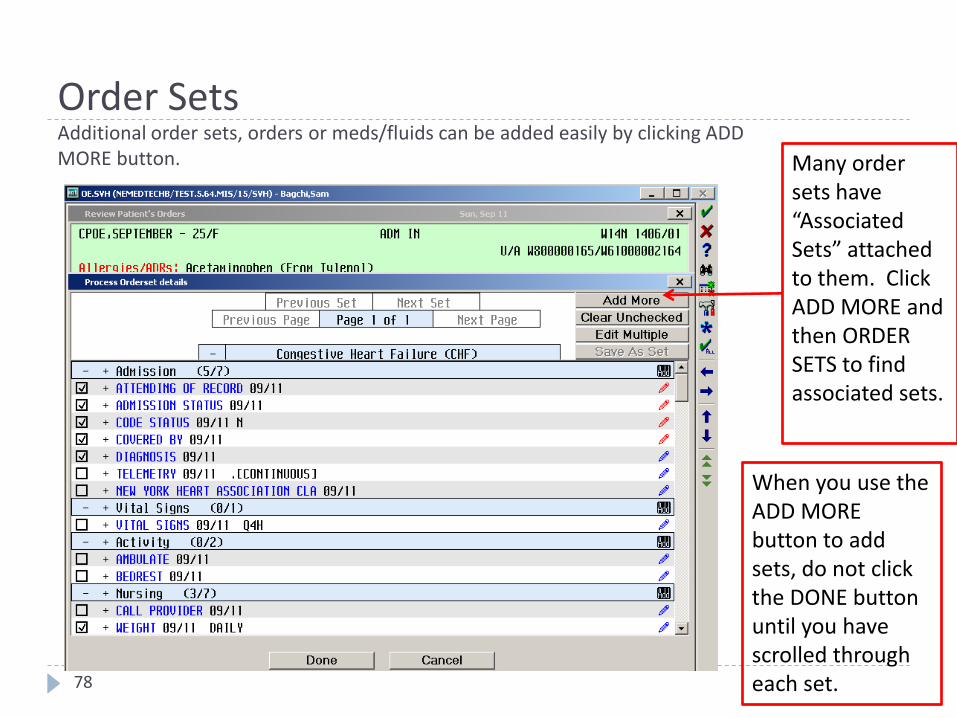
Additional order sets, orders or meds/fluids can be added easily by clicking ADD MORE button.
78
Many order sets have “Associated Sets” attached to them. Click ADD MORE and then ORDER SETS to find associated sets.
When you use the ADD MORE button to add sets, do not click the DONE button until you have scrolled through each set.
Order Sets

Provider must click NEXT SET button when a set has been added.
79
Click NEXT SET when done with current set.
Click DONE only when all sets have been completed.
Order Sets

Ordering Labs in CPOE
Use the F9 Key to access drop down menus on open entries. Not sure if there is a drop down menu, just click F9 to check.
80
Ordering Lab Tests
81
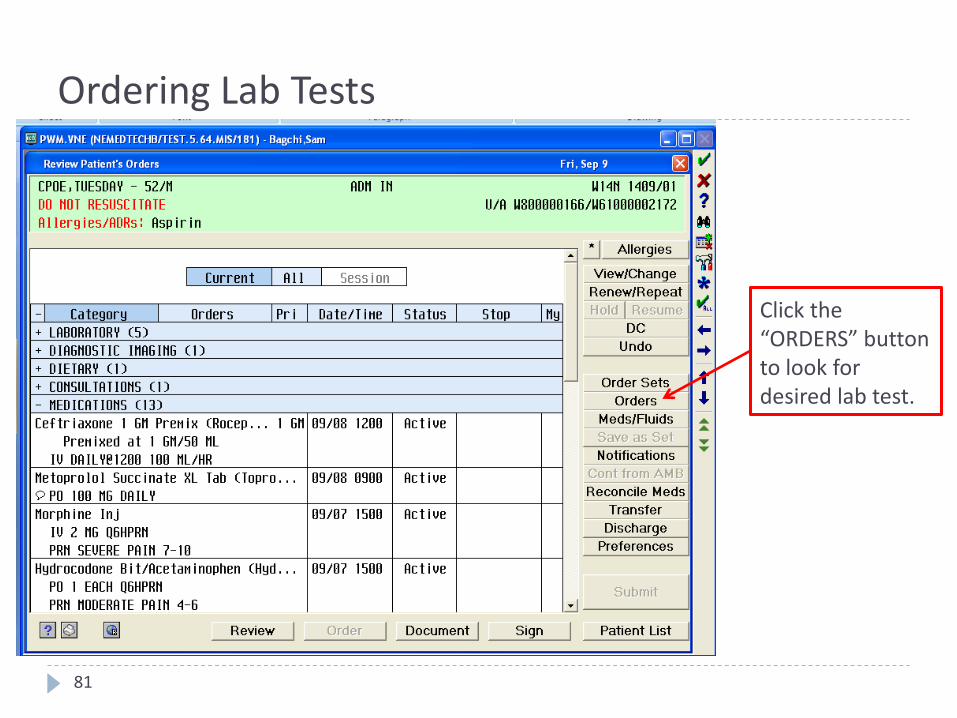
Click the “ORDERS” button to look for desired lab test.
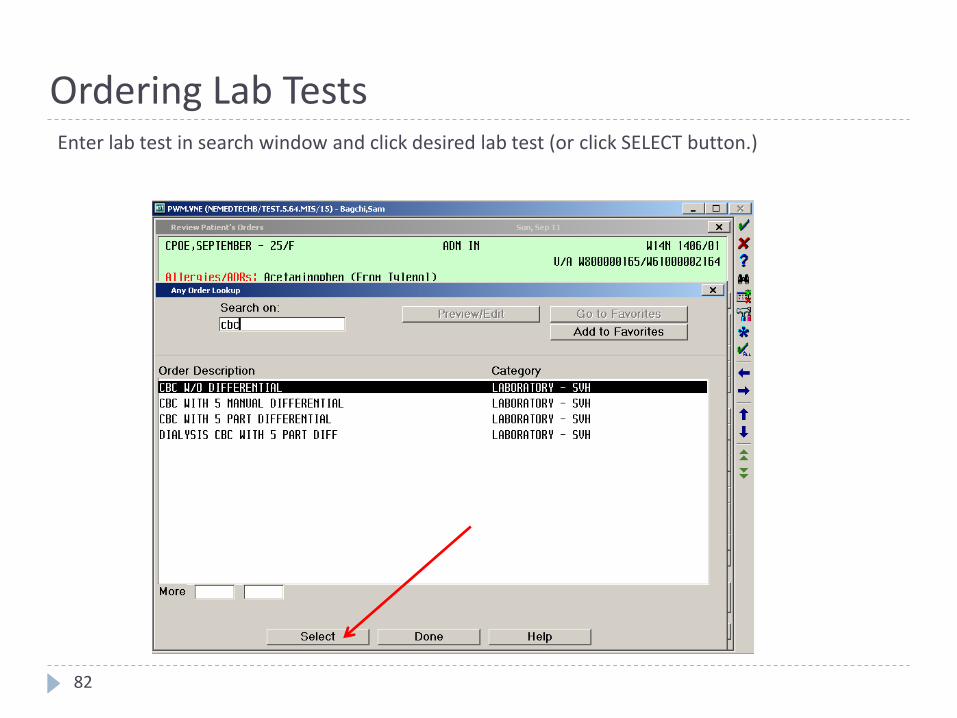
Enter lab test in search window and click desired lab test (or click SELECT button.)
82
Ordering Lab Tests
83
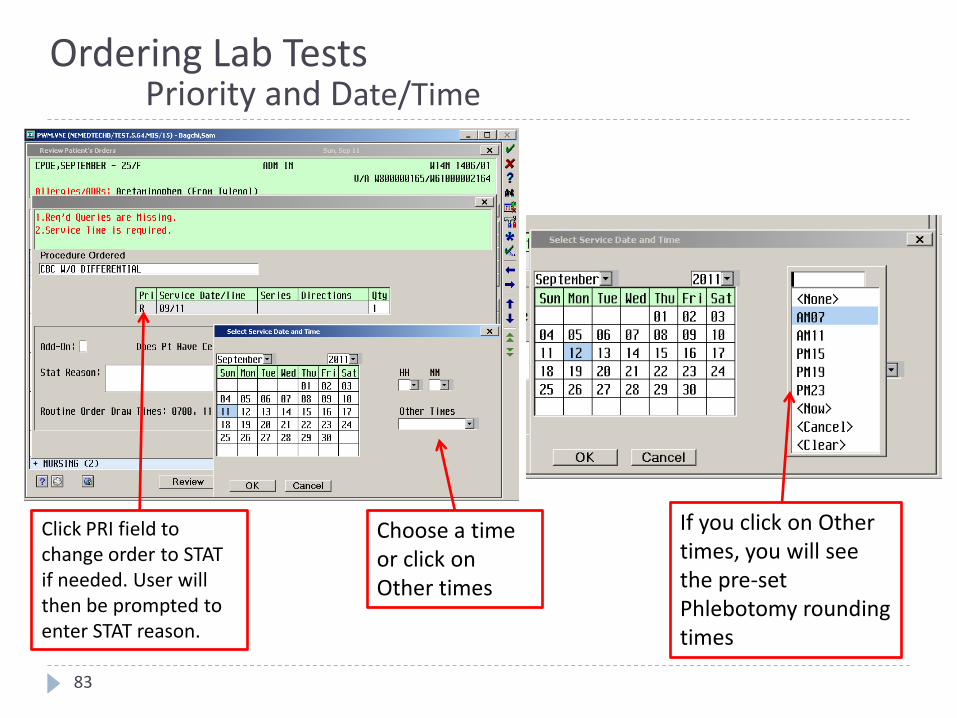
Click PRI field to change order to STAT if needed. User will then be prompted to enter STAT reason.
Choose a time or click on Other times
Ordering Lab TestsPriority and Date/Time
If you click on Other times, you will see the pre-set Phlebotomy rounding times
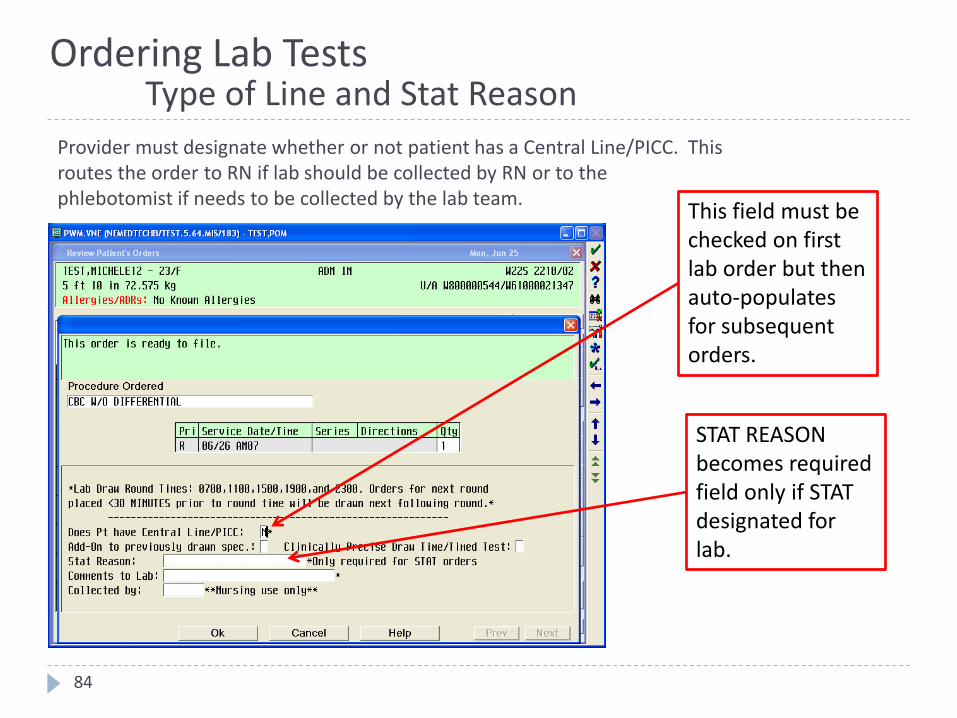
Provider must designate whether or not patient has a Central Line/PICC. This routes the order to RN if lab should be collected by RN or to the phlebotomist if needs to be collected by the lab team.
84
STAT REASON becomes required field only if STAT designated for lab.
This field must be checked on first lab order but then auto-populates for subsequent orders.
Ordering Lab TestsType of Line and Stat Reason
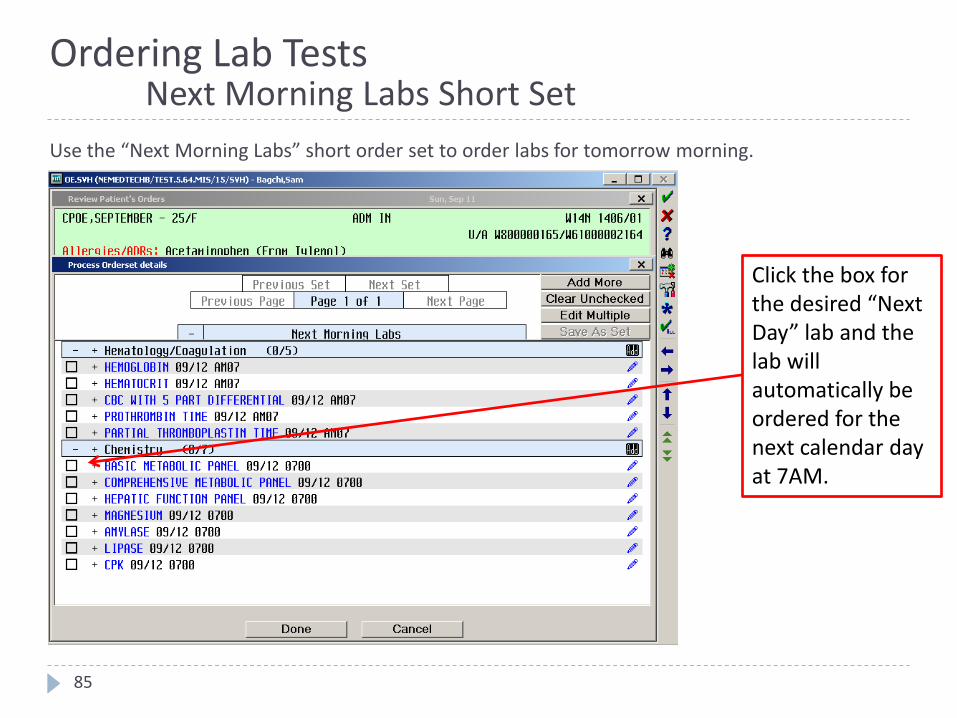
Use the “Next Morning Labs” short order set to order labs for tomorrow morning.
85
Click the box for the desired “Next Day” lab and the lab will automatically be ordered for the next calendar day at 7AM.
Ordering Lab TestsNext Morning Labs Short Set
Radiology Orders
Use the F9 Key to access drop down menus on open entries. Not sure if there is a drop down menu, just click F9 to check.
86
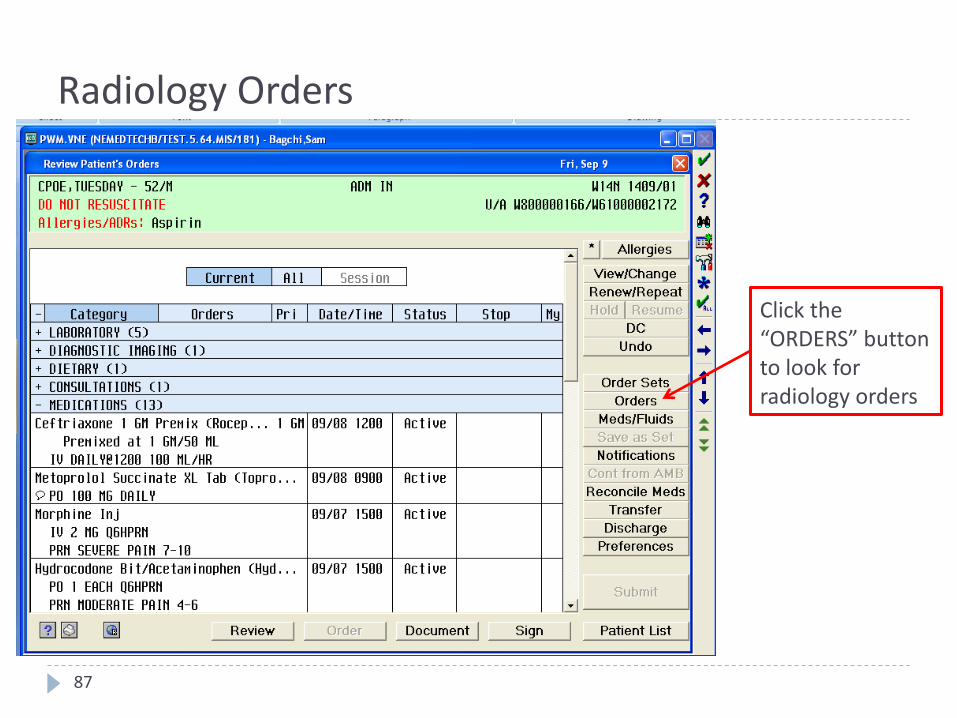
Radiology Orders
87
Click the “ORDERS” button to look for radiology orders
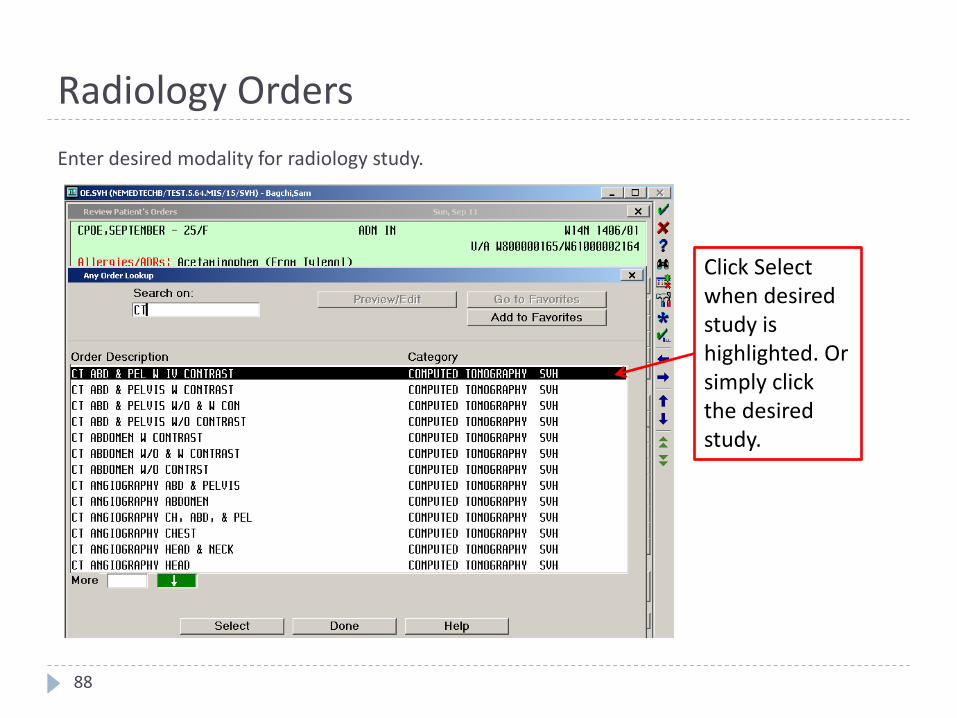
Enter desired modality for radiology study.
88
Click Select when desired study is highlighted. Or simply click the desired study.
Radiology Orders
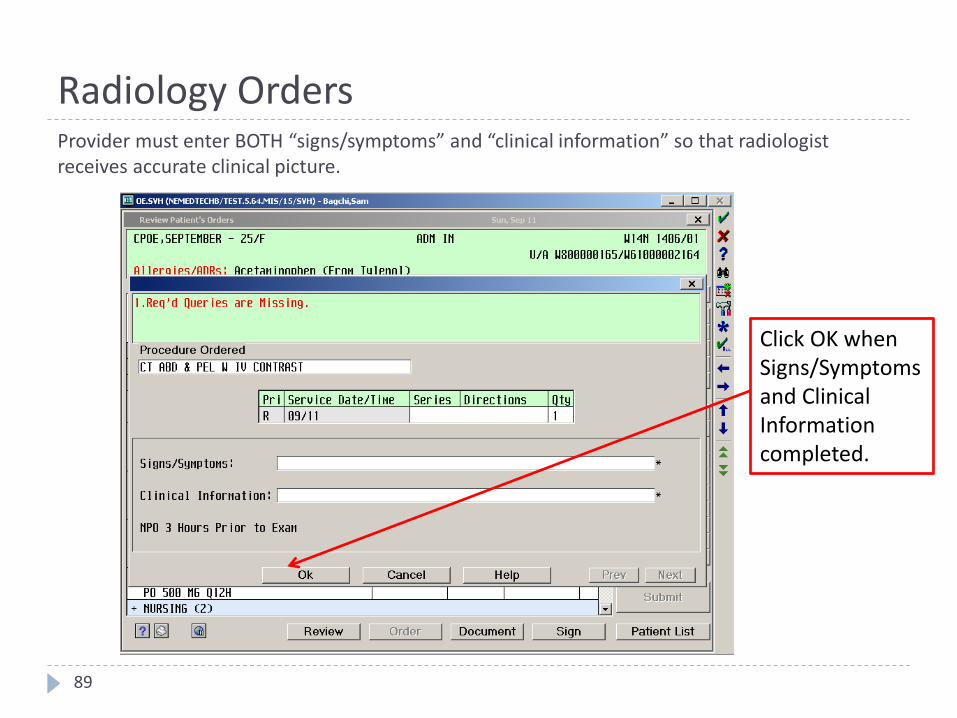
Provider must enter BOTH “signs/symptoms” and “clinical information” so that radiologist receives accurate clinical picture.
89
Click OK when Signs/Symptoms and Clinical Information completed.
Radiology Orders

Use “Common Diagnostic Img Exams” short order set to more easily find radiology exams.
90
Radiology OrdersCommon Diagnostic Img Exams Short Set
Diet Orders
Use the F9 Key to access drop down menus on open entries. Not sure if there is a drop down menu, just click F9 to check.
91
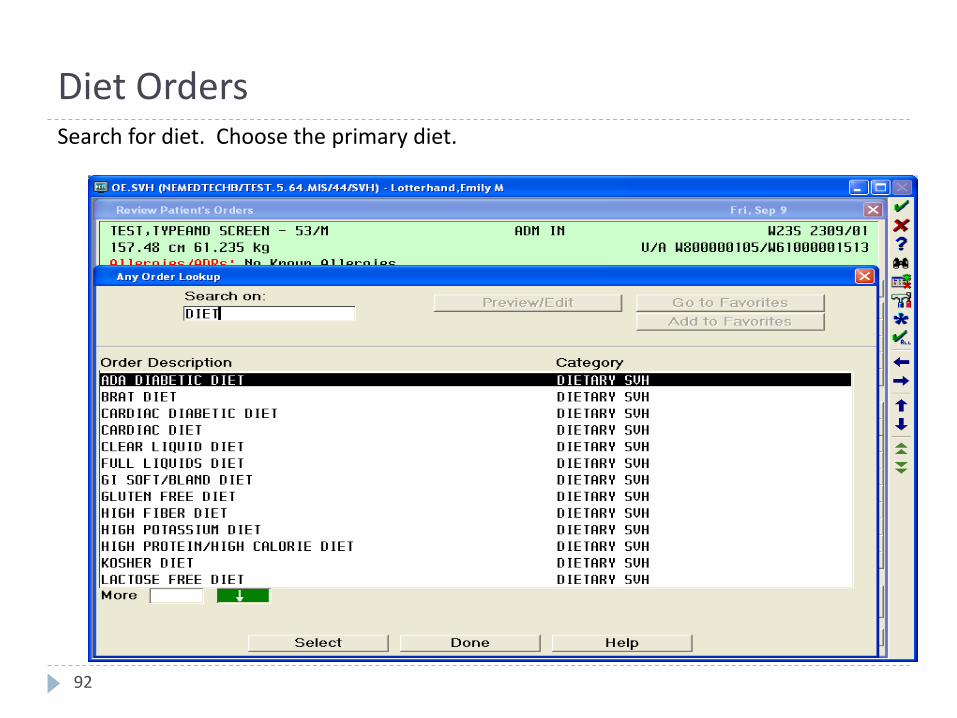
Search for diet. Choose the primary diet.
92
Diet Orders

Click on Req to add details to the diet
93
Diet Orders
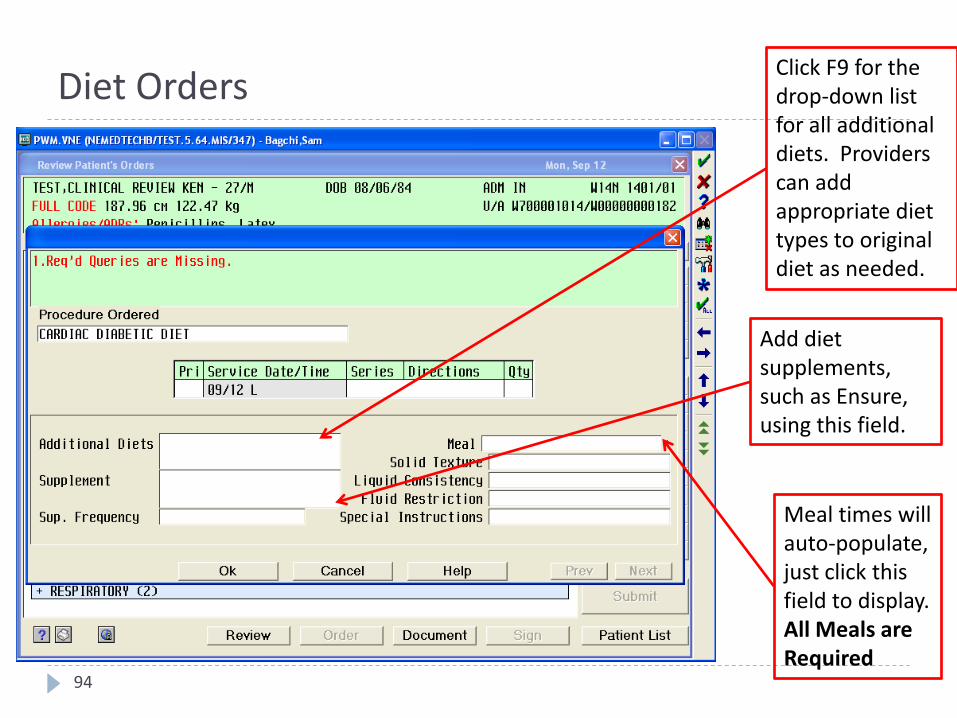
94
Click F9 for the drop-down list for all additional diets. Providers can add appropriate diet types to original diet as needed.
Add diet supplements, such as Ensure, using this field.
Meal times will auto-populate, just click this field to display.All Meals are Required
Diet Orders
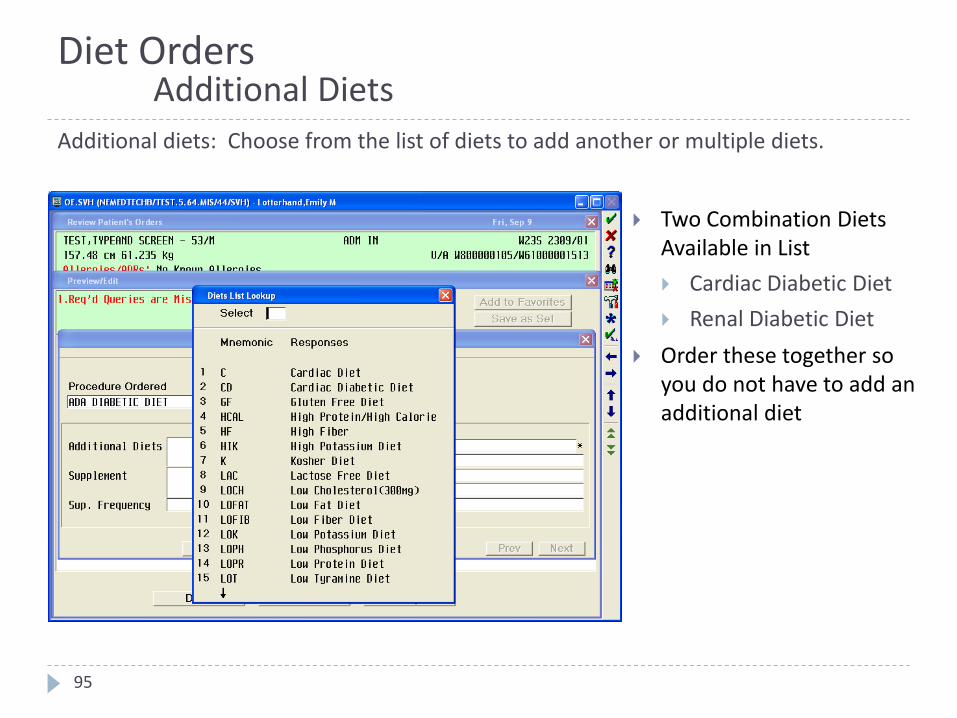
Additional diets: Choose from the list of diets to add another or multiple diets.
95
Diet OrdersAdditional Diets
Two Combination Diets Available in List
Cardiac Diabetic Diet
Renal Diabetic Diet
Order these together so you do not have to add an additional diet
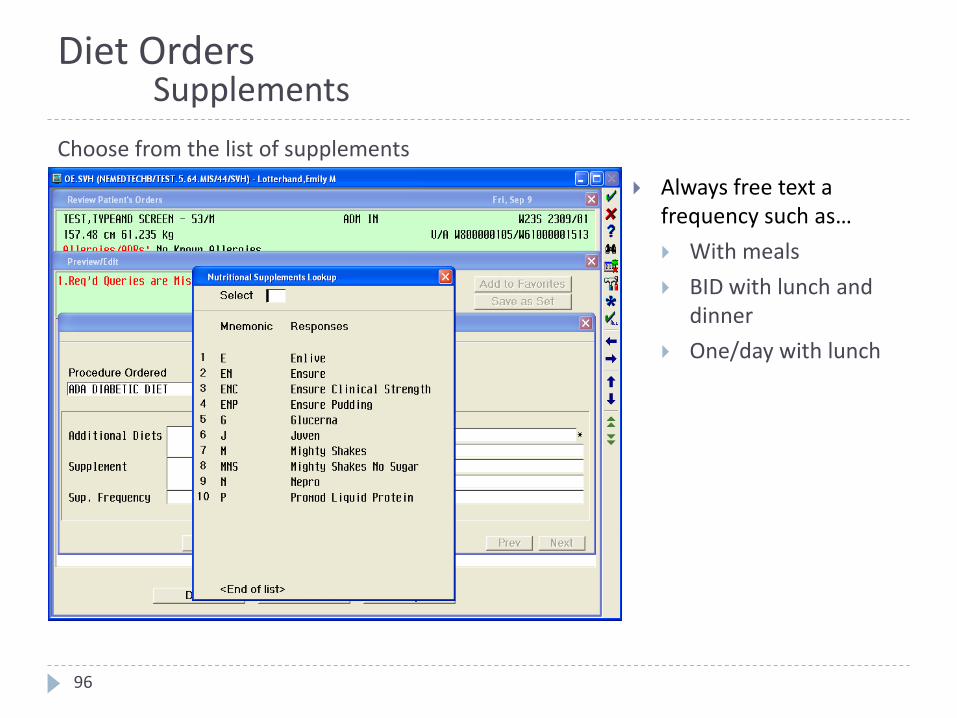
Choose from the list of supplements
96
Diet OrdersSupplements
Always free text a frequency such as…
With meals
BID with lunch and dinner
One/day with lunch

To order only a supplement--Search nutritional supplements; follow the supplement ordering instructions
97
Diet OrdersSupplements
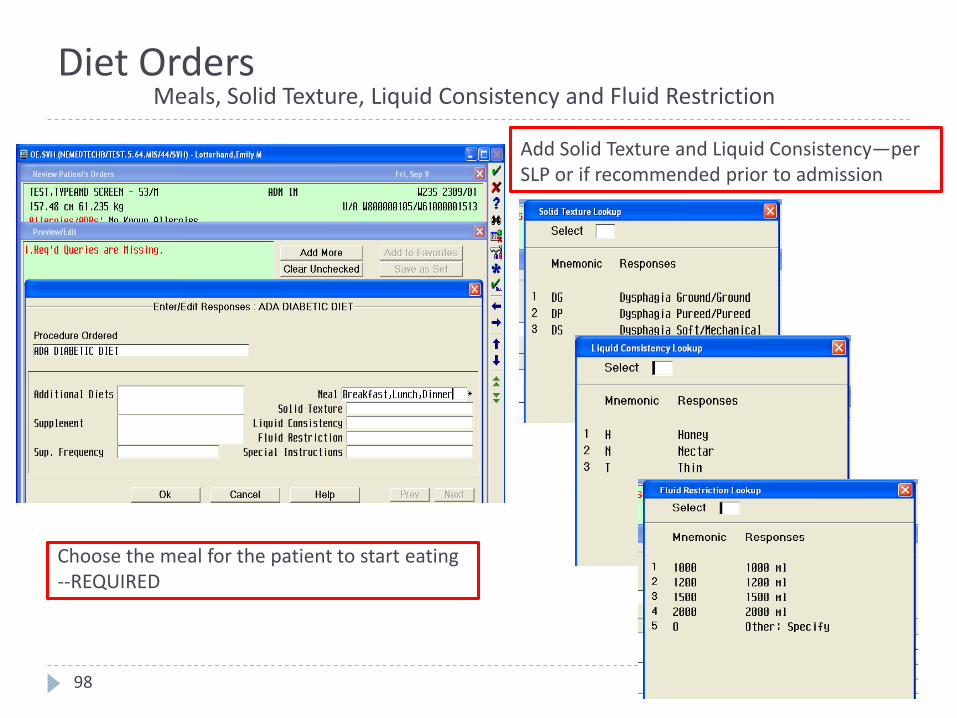
Choose the meal for the patient to start eating--REQUIRED
98
Diet OrdersMeals, Solid Texture, Liquid Consistency and Fluid Restriction
Add Solid Texture and Liquid Consistency—per SLP or if recommended prior to admission
Add any additional comments you have about the diet such as…. Advance as tolerated (for nursing to advance diet)
Speech recommendations
NOT for nutrition consults. They need to be order separately
Any new diet order overrides old diet orders
Always use the additional diet area for multiple diets
You can just add a supplement
You do not have to re-order the whole diet to add a supplement
99
Diet OrdersAdditional Info and Hints

100
Diet OrdersNPO
Always include date/start time
NPO for a test or surgery…
Add to additional diet
Include a stop time
Do not add a stop time if unsure how long the test will be
101
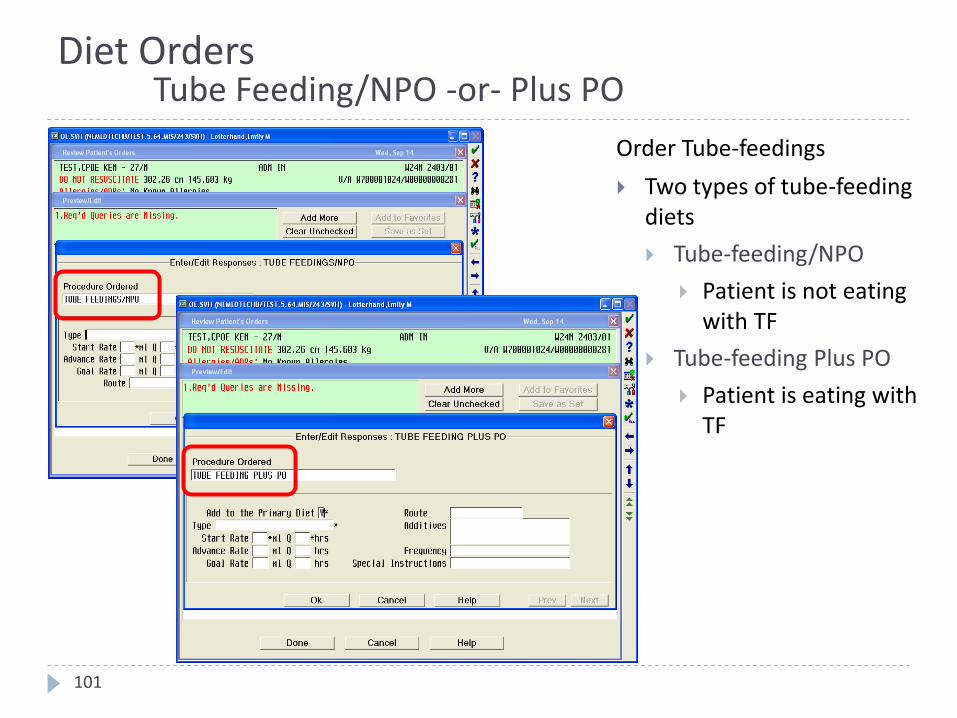
Diet OrdersTube Feeding/NPO -or- Plus PO
Order Tube-feedings
Two types of tube-feeding diets
Tube-feeding/NPO
Patient is not eating with TF
Tube-feeding Plus PO
Patient is eating with TF

Choose the correct formula under Type query
102
Diet OrdersTube Feeding/NPO
Free text: Start Rate, Advance Rate, Goal Rate and Route. Important information for nutrition and nursing.
Choose the correct additive if needed
Choose the correct frequency
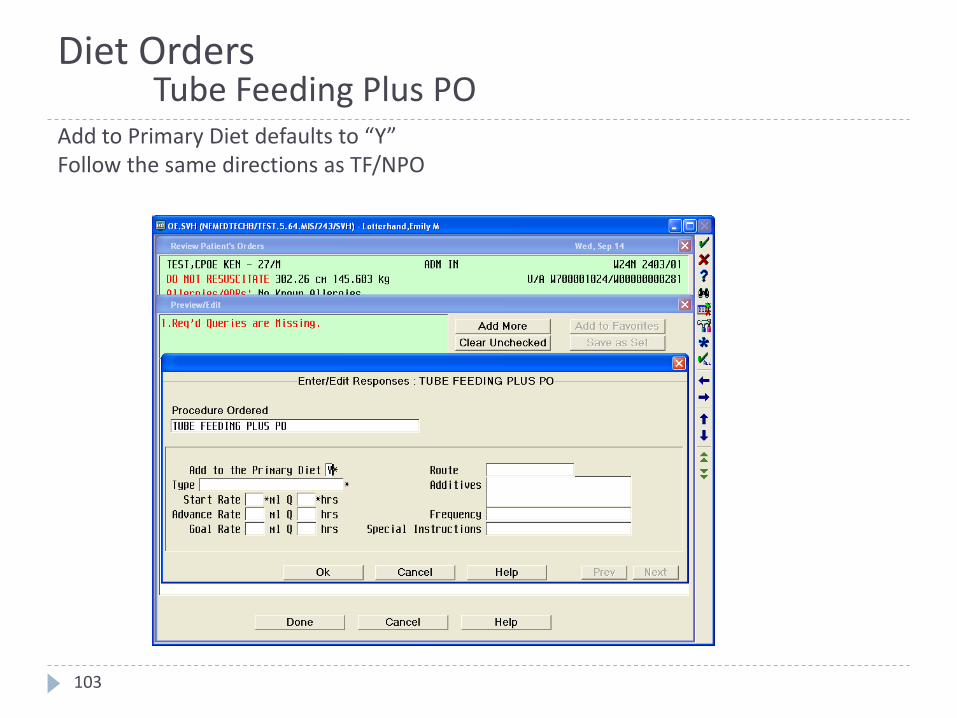
Add to Primary Diet defaults to “Y” Follow the same directions as TF/NPO
103
Diet OrdersTube Feeding Plus PO
Use Medical Nutrition Therapy Order Set
Call physician for telephone order Diet changes
Supplements
TF
Additional lab or vitamin recommendations
Order implemented
Order placed in queue for physician signature
104
Diet OrdersHow Dieticians Communicate Recommendations

Co-signing Orders
Use the F9 Key to access drop down menus on open entries. Not sure if there is a drop down menu, just click F9 to check.
105
Co-Signing OrdersTelephone and Verbal Orders
106
Telephone and verbal orders are allowed based on SVH hospital policy.
Verbal orders are restricted to rapid response and CODE BLUE scenarios. Please do not attempt to use verbal orders to avoid using CPOE.
Telephone and verbal orders will trigger an electronic co-signature requirement.
Co-signature expectations are within 24 hours of order per hospital policy.
107
RN will need to sign-in from provider perspective and enter orders.
This allows RN to get decision support and alerts that provider would typically see.
The ordering provider will need to stay on the phone during a telephone order while RN encounters each alert and query.
The ordering provider will give answers to queries and, potentially, change order based on decision support.
In some cases, the ordering provider may find it more convenient to enter an order directly in CPOE due to nature of telephone orders.
Expectation that at least 95% of all orders will be entered directly by provider into CPOE will help ensure that safety functionality of CPOE is realized.
Co-Signing OrdersTelephone and Verbal Orders Workflow
108
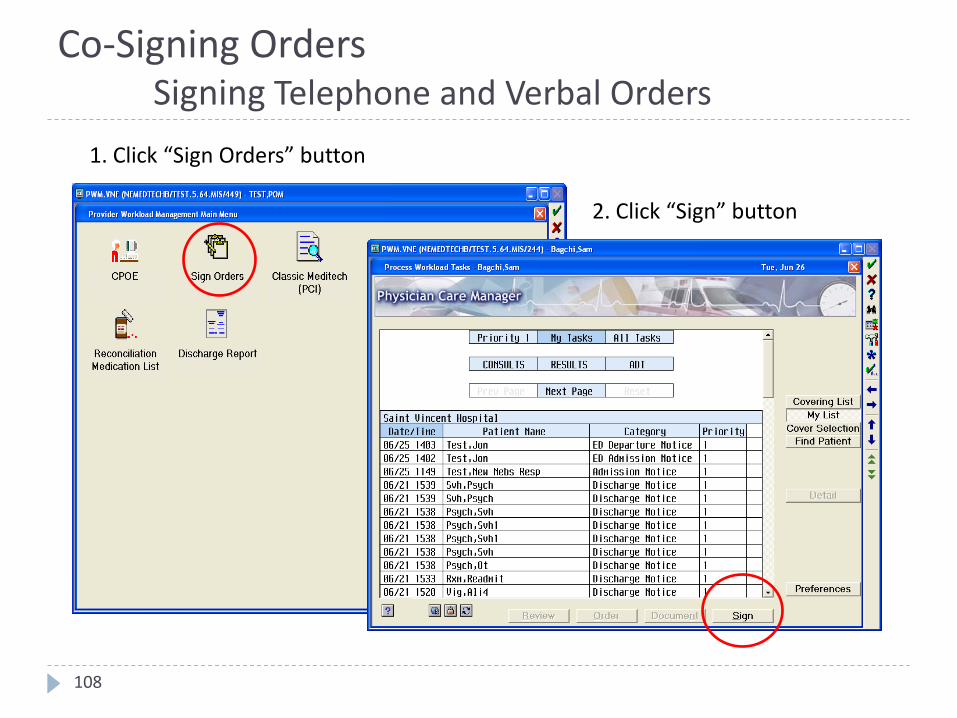
1. Click “Sign Orders” button
2. Click “Sign” button
Co-Signing OrdersSigning Telephone and Verbal Orders
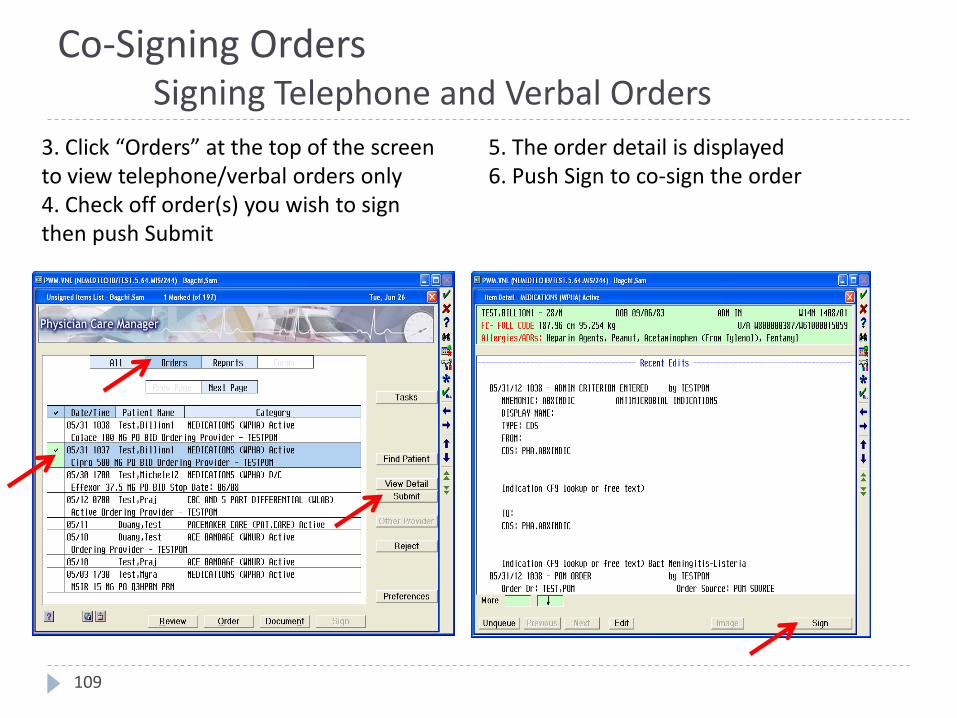
109
3. Click “Orders” at the top of the screen to view telephone/verbal orders only4. Check off order(s) you wish to sign then push Submit
5. The order detail is displayed6. Push Sign to co-sign the order
Co-Signing OrdersSigning Telephone and Verbal Orders
110
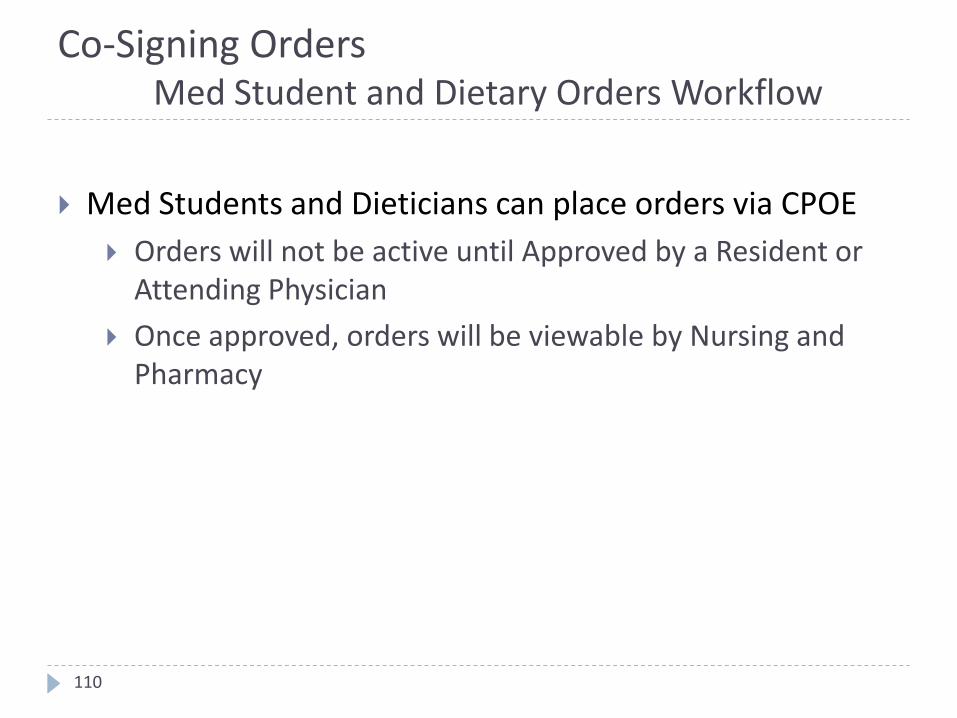
Med Students and Dieticians can place orders via CPOE
Orders will not be active until Approved by a Resident or Attending Physician
Once approved, orders will be viewable by Nursing and Pharmacy
Co-Signing OrdersMed Student and Dietary Orders Workflow

111
Approving Med Student/Dietary Orders
Orders awaiting approval will have the Status unvNEW
Select the order
Push the “Approve” button
Review the order
Submit the order
Discharge Process
Use the F9 Key to access drop down menus on open entries. Not sure if there is a drop down menu, just click F9 to check.
112
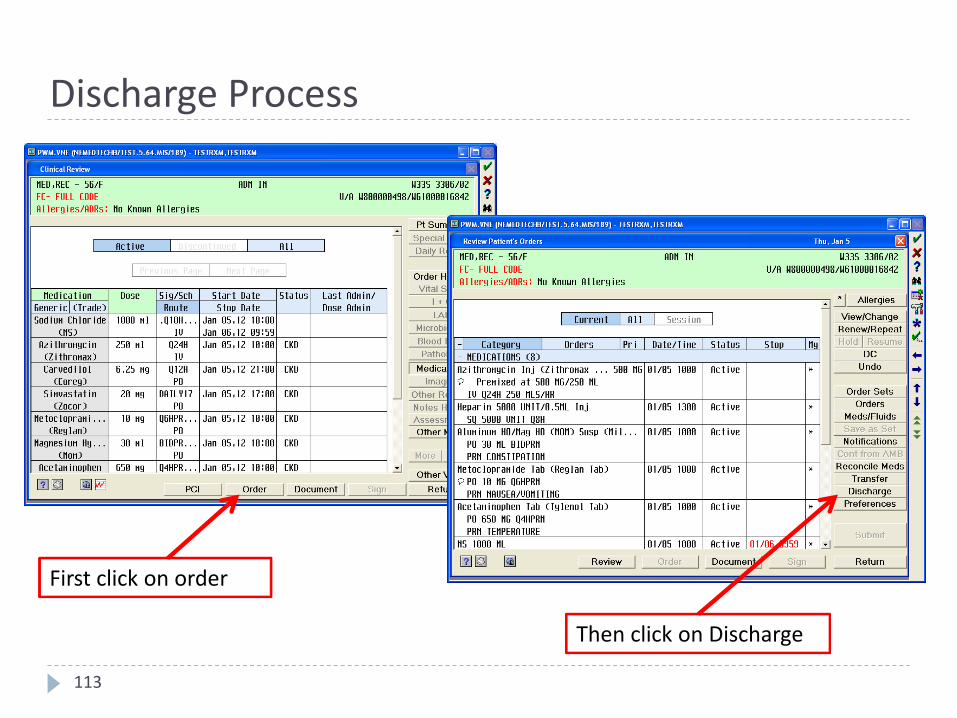
Discharge Process
First click on order
Then click on Discharge
113

Discharge ProcessSelect the expected Discharge Date then click OK/Next
114

Discharge Process
Select “Discharge Planning” then click OK/Next
115
Discharge processReconciling Medications
116
Use the F9 Key to access drop down menus on open entries. Not sure if there is a drop down menu, just click F9 to check.
Discharge Process
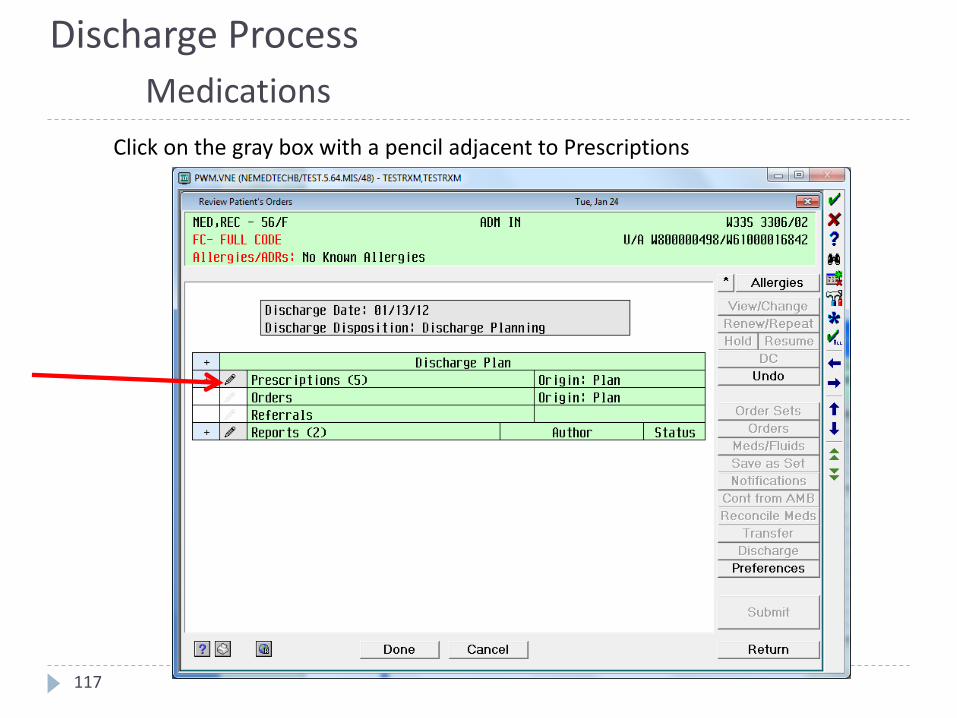
Medications
Click on the gray box with a pencil adjacent to Prescriptions
117
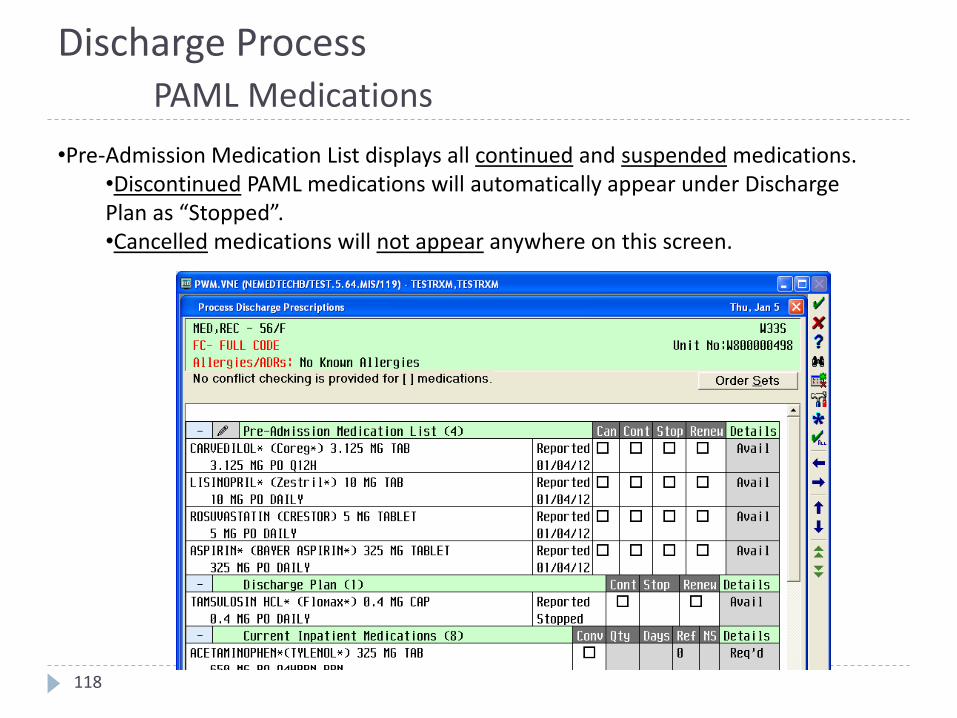
Discharge ProcessPAML Medications
•Pre-Admission Medication List displays all continued and suspended medications.•Discontinued PAML medications will automatically appear under Discharge Plan as “Stopped”.•Cancelled medications will not appear anywhere on this screen.
118

119
Button Discharge Result
Can Use ONLY if a medication was entered in error (e.g. wrong patient, wrong med) or if the patient states they have never taken this medication. The medication will not appear at all in the discharge paperwork
Cont This will show up as “Continue Taking” in the discharge paperwork
Stop This will show up as “Stop taking” in the discharge paperwork
Renew This will show up as “Continue Taking” in the discharge paperwork and a prescription will be generated
Discharge Process
PAML Medications
Discharge Process
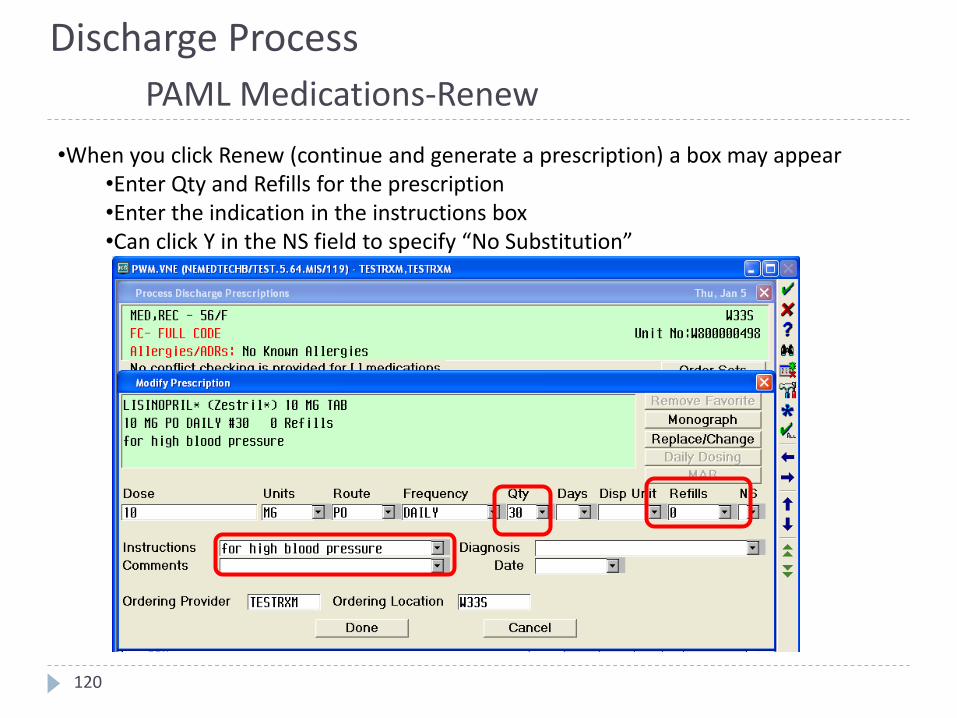
PAML Medications-Renew
•When you click Renew (continue and generate a prescription) a box may appear•Enter Qty and Refills for the prescription•Enter the indication in the instructions box•Can click Y in the NS field to specify “No Substitution”
120
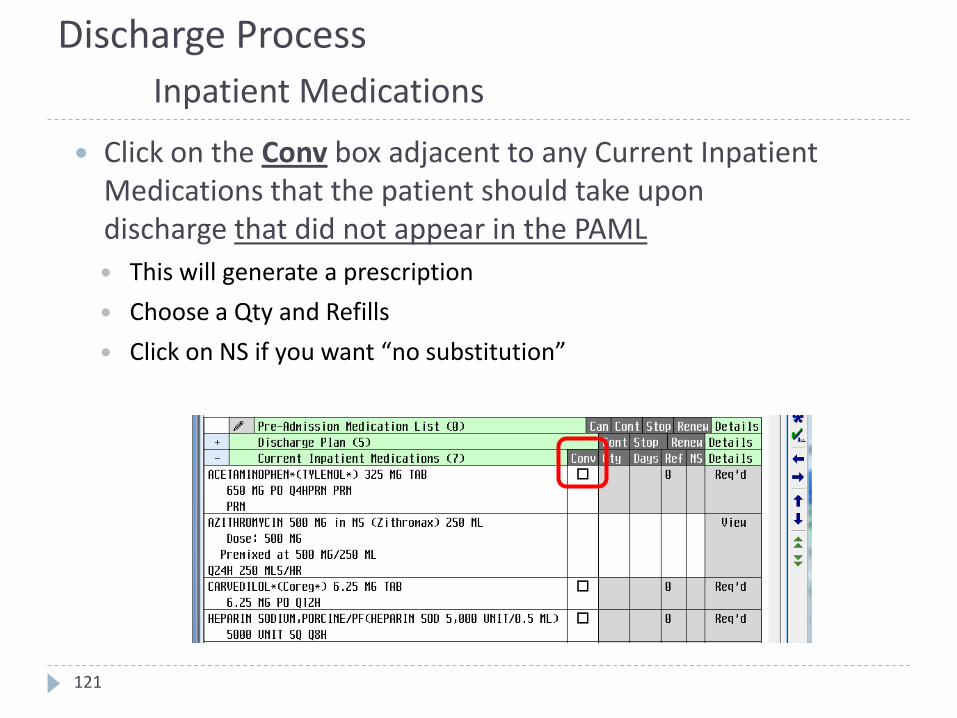
Click on the Conv box adjacent to any Current Inpatient Medications that the patient should take upon discharge that did not appear in the PAML
This will generate a prescription
Choose a Qty and Refills
Click on NS if you want “no substitution”
121
Discharge Process
Inpatient Medications
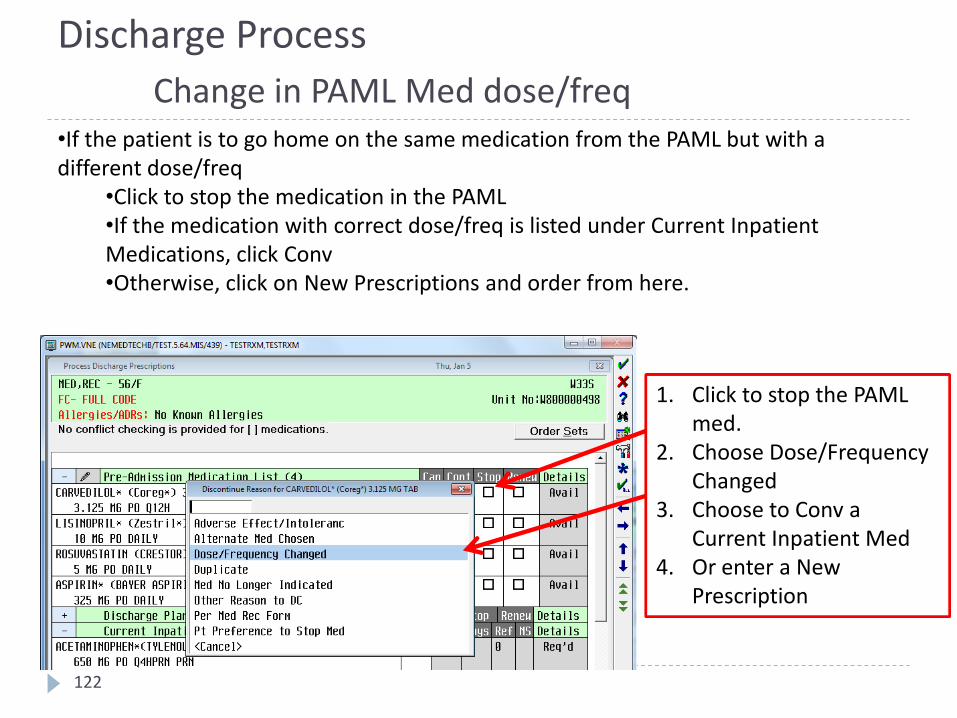
•If the patient is to go home on the same medication from the PAML but with a different dose/freq
•Click to stop the medication in the PAML•If the medication with correct dose/freq is listed under Current Inpatient Medications, click Conv•Otherwise, click on New Prescriptions and order from here.
1. Click to stop the PAML med.
2. Choose Dose/Frequency Changed
3. Choose to Conv a Current Inpatient Med
4. Or enter a New Prescription
122
Discharge Process
Change in PAML Med dose/freq
Discharge ProcessAdditional medications
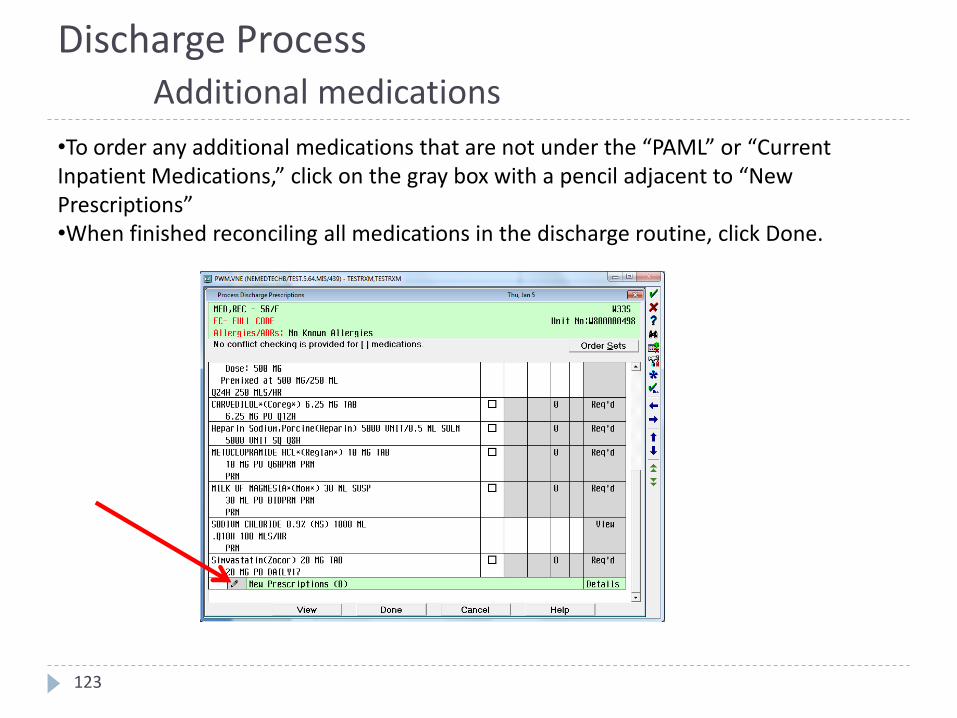
•To order any additional medications that are not under the “PAML” or “Current Inpatient Medications,” click on the gray box with a pencil adjacent to “New Prescriptions”•When finished reconciling all medications in the discharge routine, click Done.
123
Discharge processDischarge Instructions
124
Use the F9 Key to access drop down menus on open entries. Not sure if there is a drop down menu, just click F9 to check.
Discharge Process
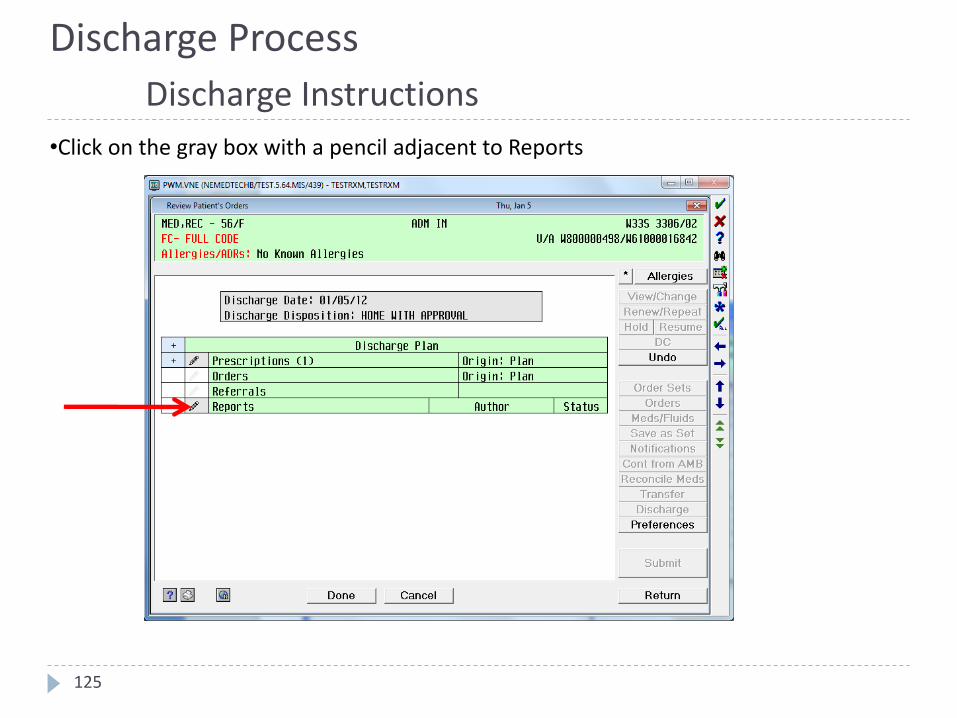
Discharge Instructions
•Click on the gray box with a pencil adjacent to Reports
125
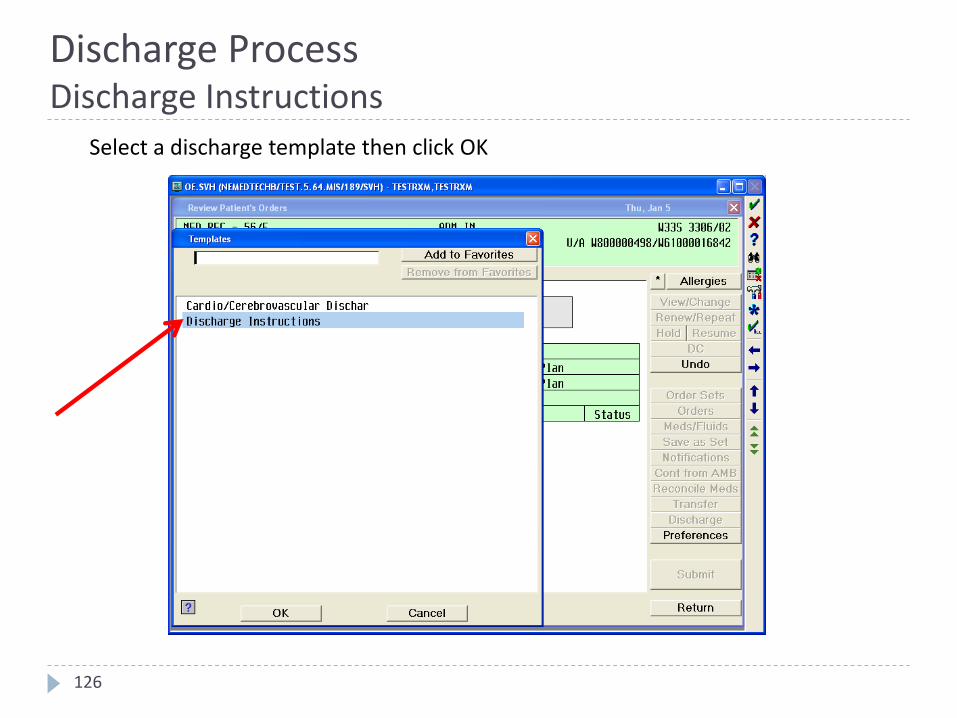
Discharge ProcessDischarge Instructions
Select a discharge template then click OK
126
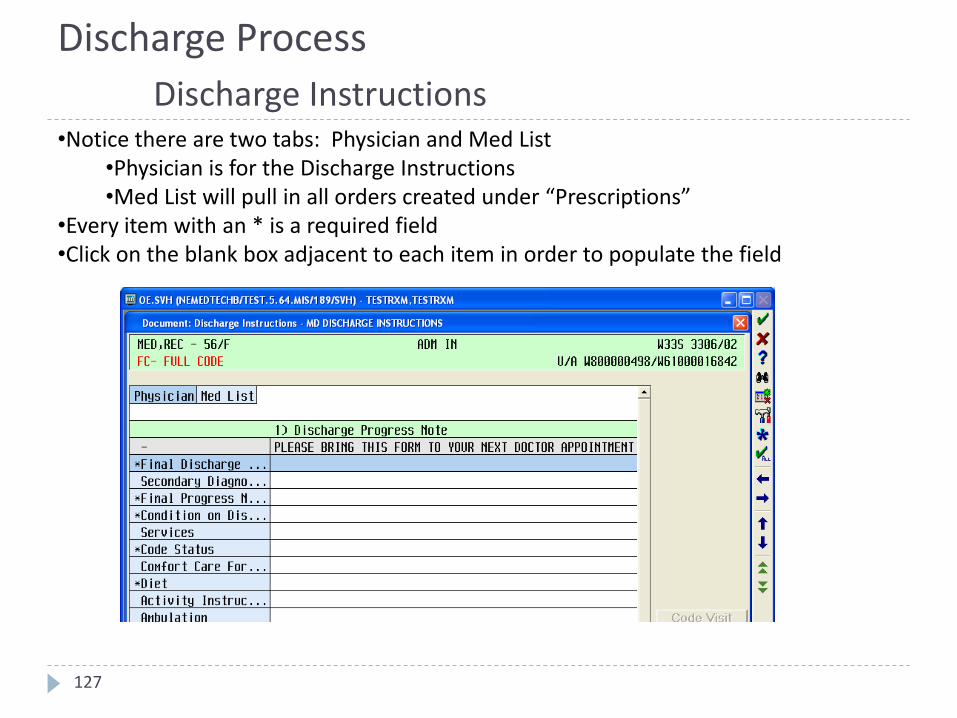
•Notice there are two tabs: Physician and Med List•Physician is for the Discharge Instructions•Med List will pull in all orders created under “Prescriptions”
•Every item with an * is a required field•Click on the blank box adjacent to each item in order to populate the field
Discharge Process
Discharge Instructions
127
Discharge Process
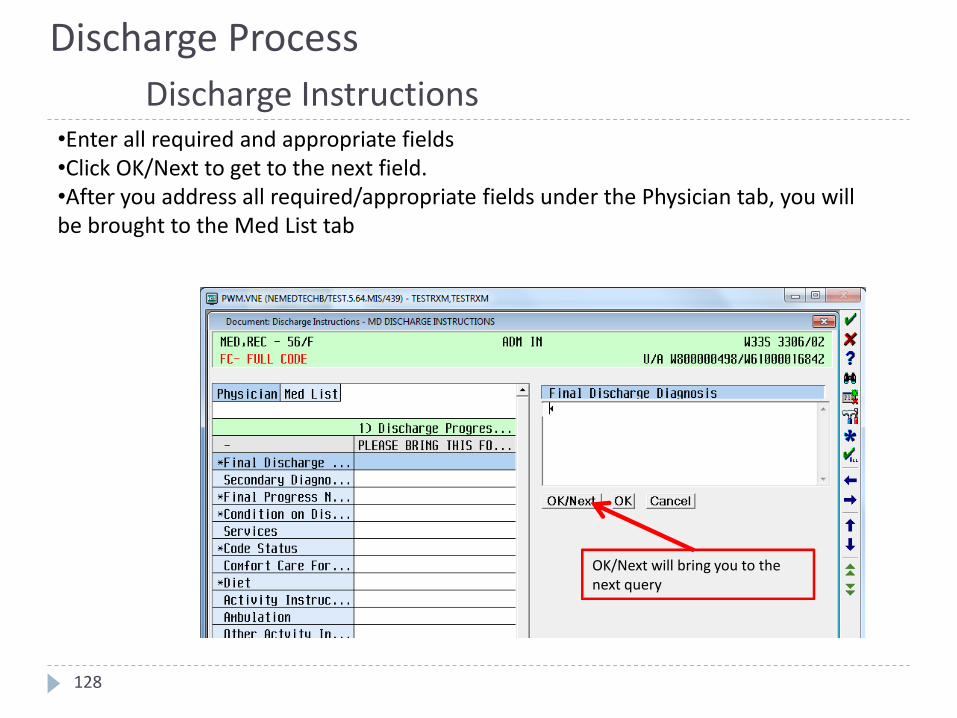
Discharge Instructions•Enter all required and appropriate fields•Click OK/Next to get to the next field.•After you address all required/appropriate fields under the Physician tab, you will be brought to the Med List tab
128
OK/Next will bring you to the next query
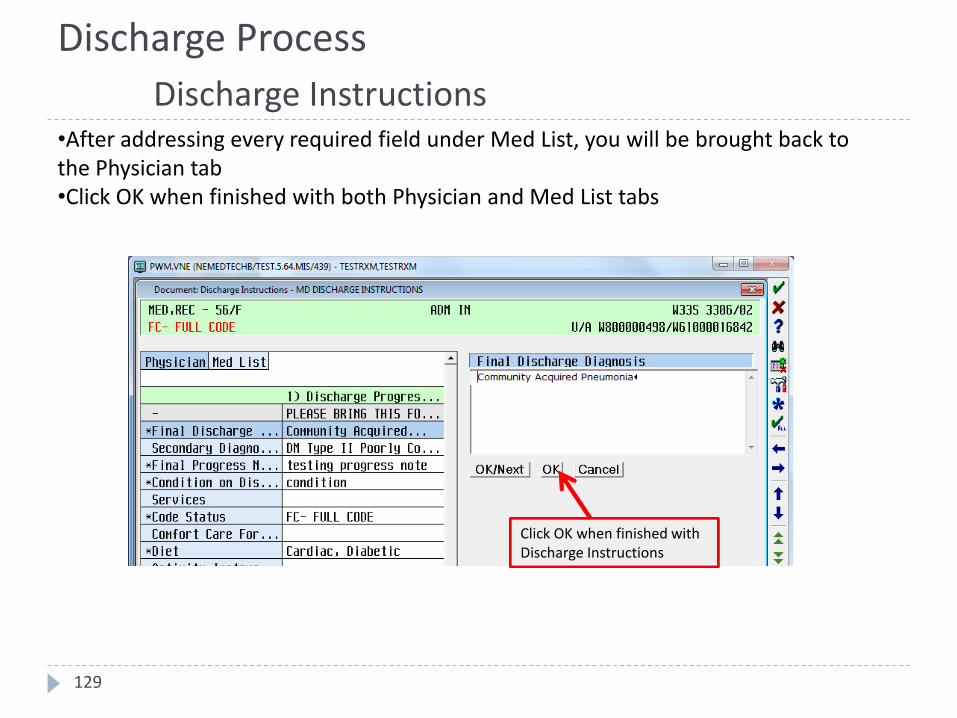
Discharge Process
Discharge Instructions•After addressing every required field under Med List, you will be brought back to the Physician tab•Click OK when finished with both Physician and Med List tabs
129
Click OK when finished with Discharge Instructions
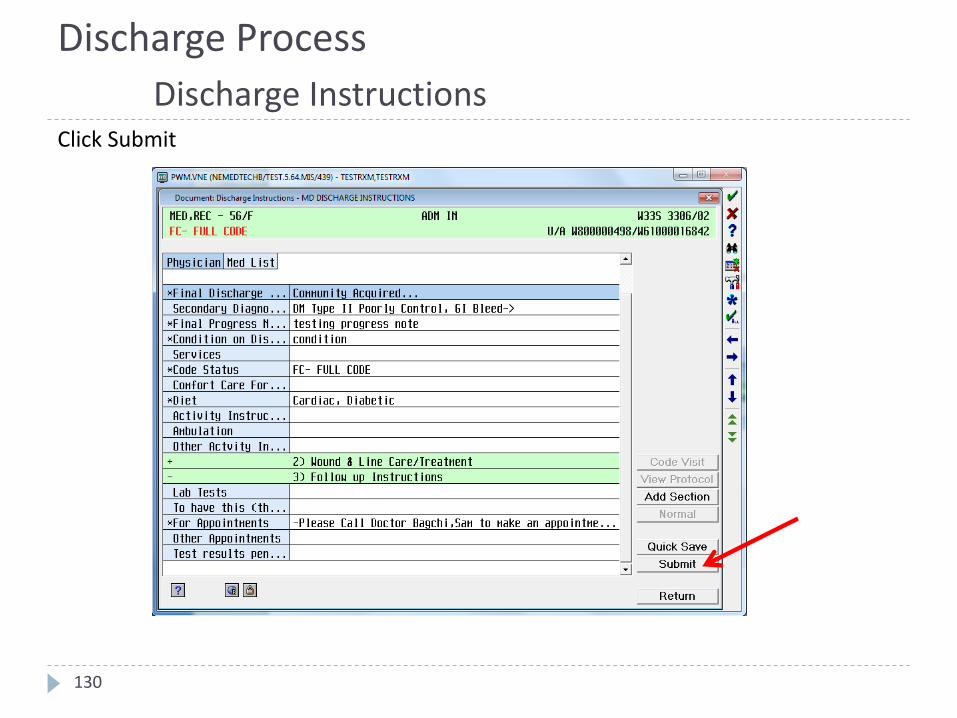
Discharge Process
Discharge InstructionsClick Submit
130

Discharge ProcessDischarge Instructions
•Click Draft or Signed•Signed button will only be available if all required* fields are populated•Choose Signed if the Discharge Instructions are final
Draft should be selected if: •The report is
incomplete•Edits are expected•Final signature is expected by resident or attending physician
131
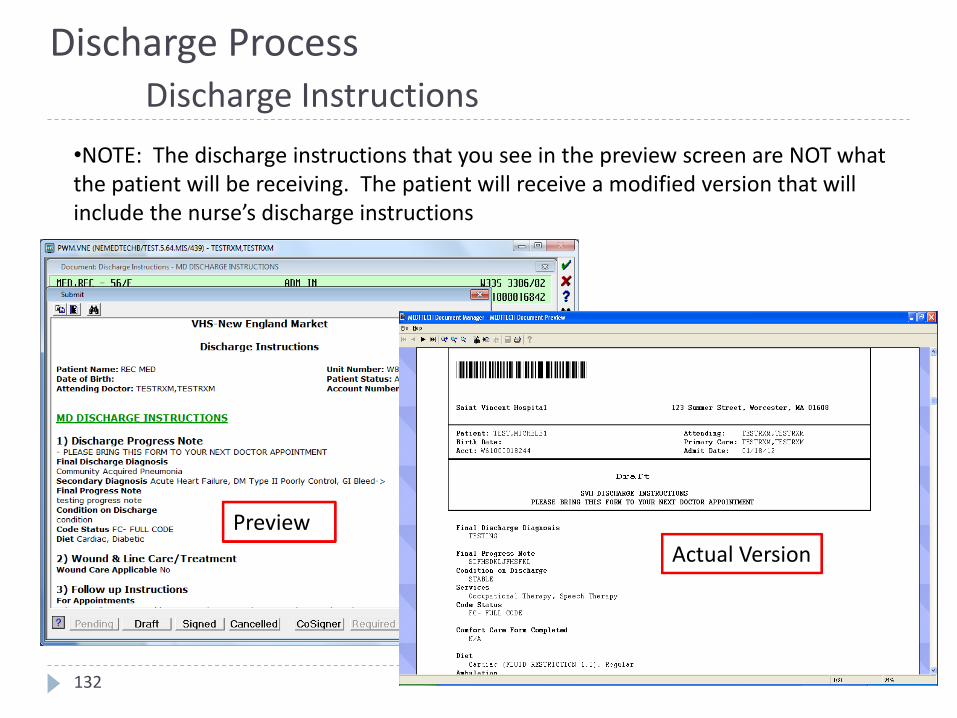
Discharge ProcessDischarge Instructions
•NOTE: The discharge instructions that you see in the preview screen are NOT what the patient will be receiving. The patient will receive a modified version that will include the nurse’s discharge instructions
132
Actual Version
Preview
Discharge Process
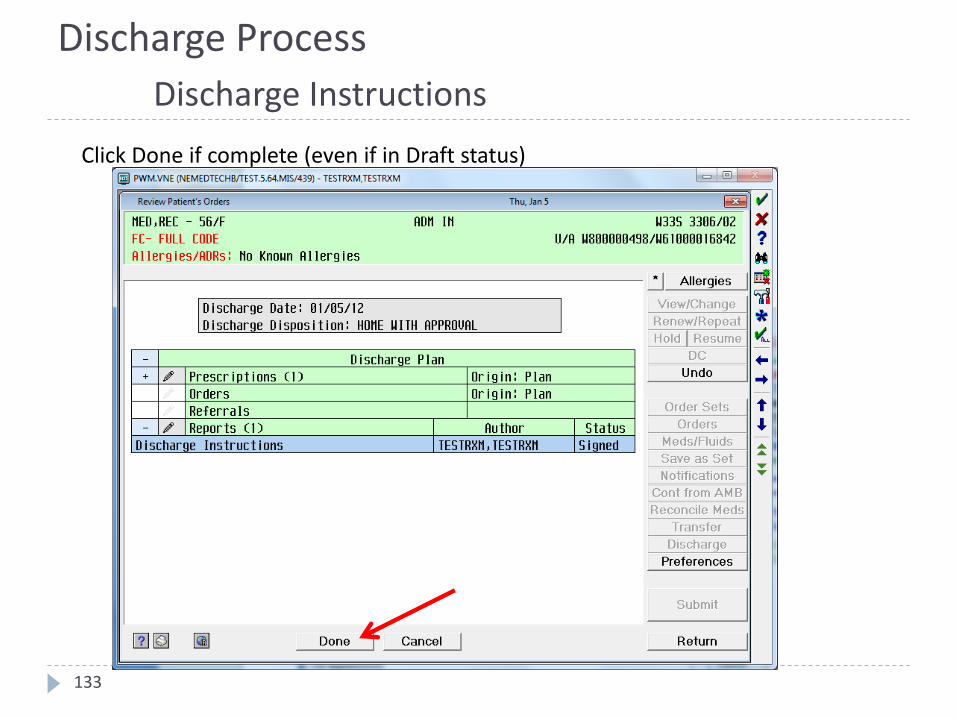
Discharge Instructions
Click Done if complete (even if in Draft status)
133
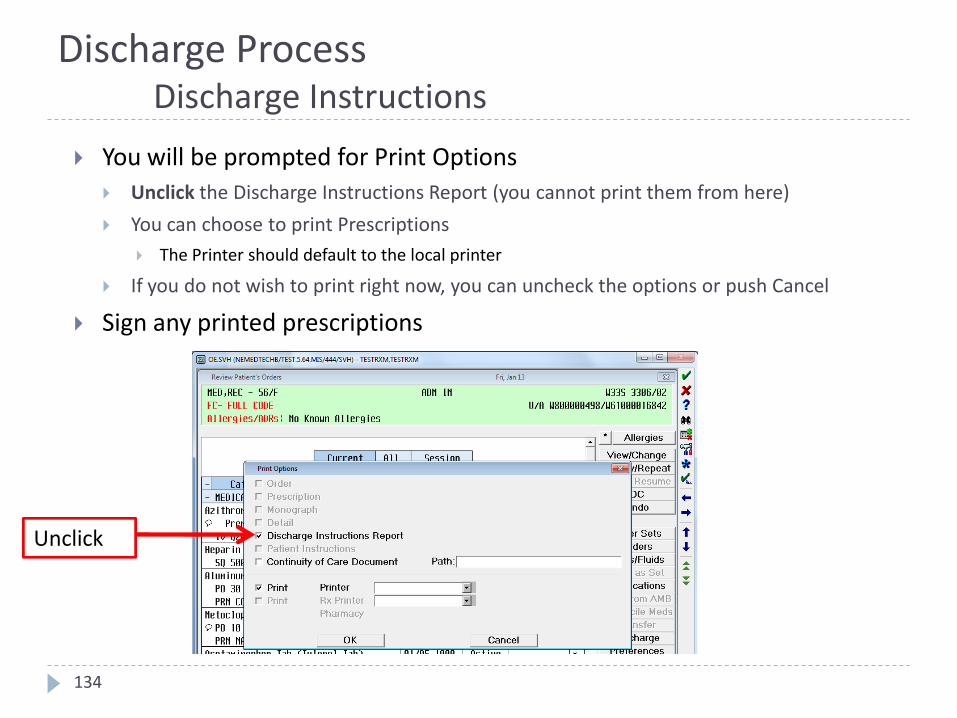
Discharge ProcessDischarge Instructions
You will be prompted for Print Options
Unclick the Discharge Instructions Report (you cannot print them from here)
You can choose to print Prescriptions
The Printer should default to the local printer
If you do not wish to print right now, you can uncheck the options or push Cancel
Sign any printed prescriptions
134
Unclick
135
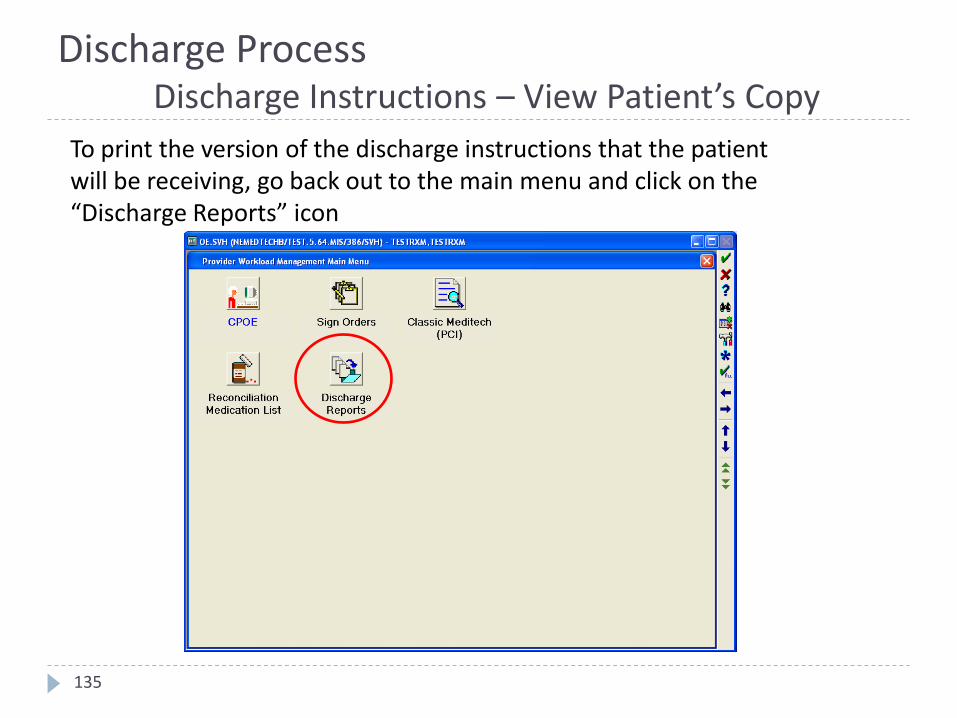
To print the version of the discharge instructions that the patient will be receiving, go back out to the main menu and click on the “Discharge Reports” icon
Discharge ProcessDischarge Instructions – View Patient’s Copy
136
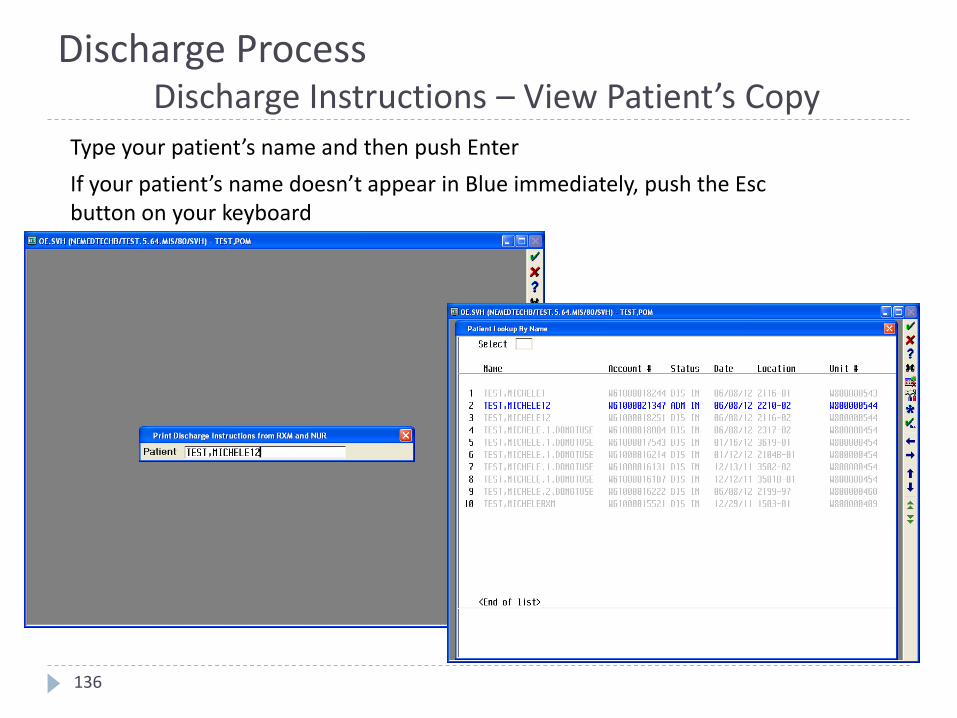
Type your patient’s name and then push Enter
If your patient’s name doesn’t appear in Blue immediately, push the Esc button on your keyboard
Discharge ProcessDischarge Instructions – View Patient’s Copy

137
Either Choose a printer to print the report or type “PREVIEW”
Discharge ProcessDischarge Instructions – View Patient’s Copy
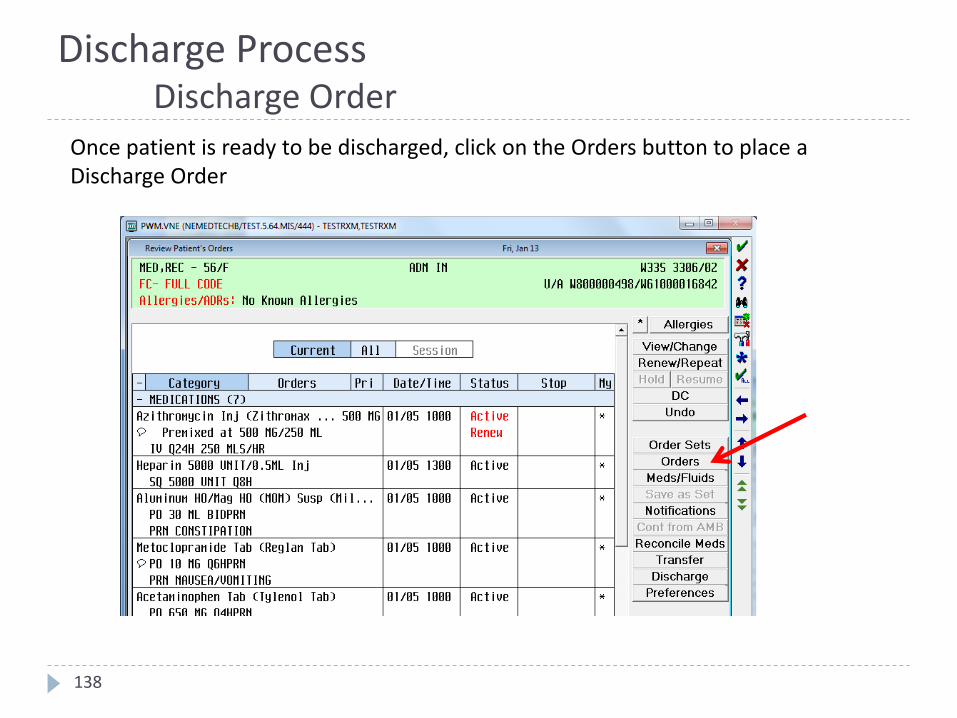
Once patient is ready to be discharged, click on the Orders button to place a Discharge Order
138
Discharge ProcessDischarge Order
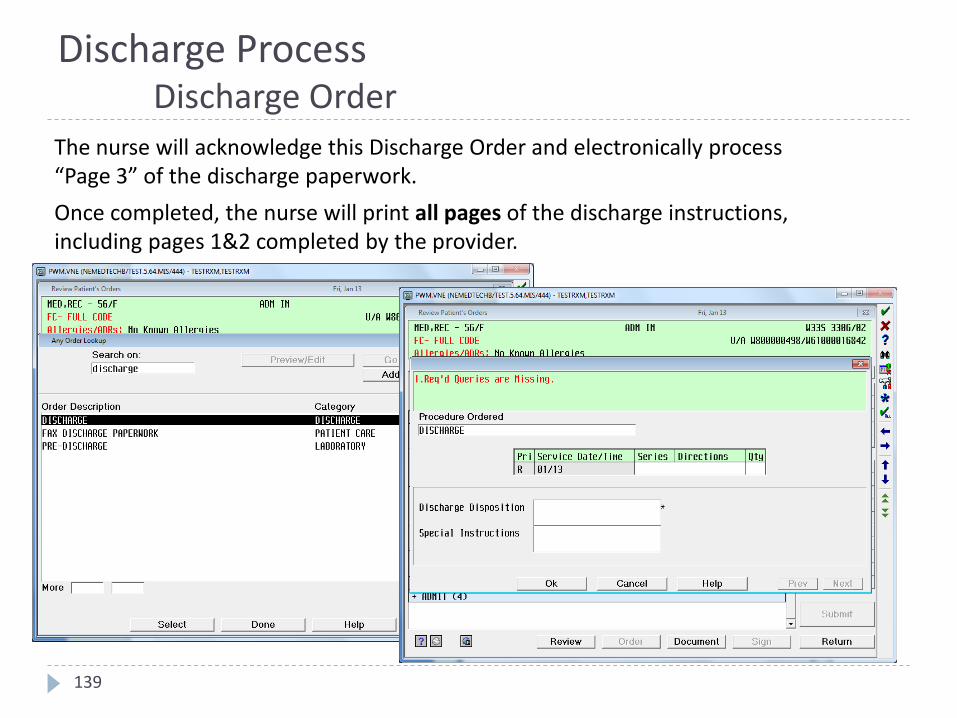
The nurse will acknowledge this Discharge Order and electronically process “Page 3” of the discharge paperwork.
Once completed, the nurse will print all pages of the discharge instructions, including pages 1&2 completed by the provider.
139
Discharge ProcessDischarge Order
Discharge processEditing Discharge Instructions in Draft Status
140
Use the F9 Key to access drop down menus on open entries. Not sure if there is a drop down menu, just click F9 to check.
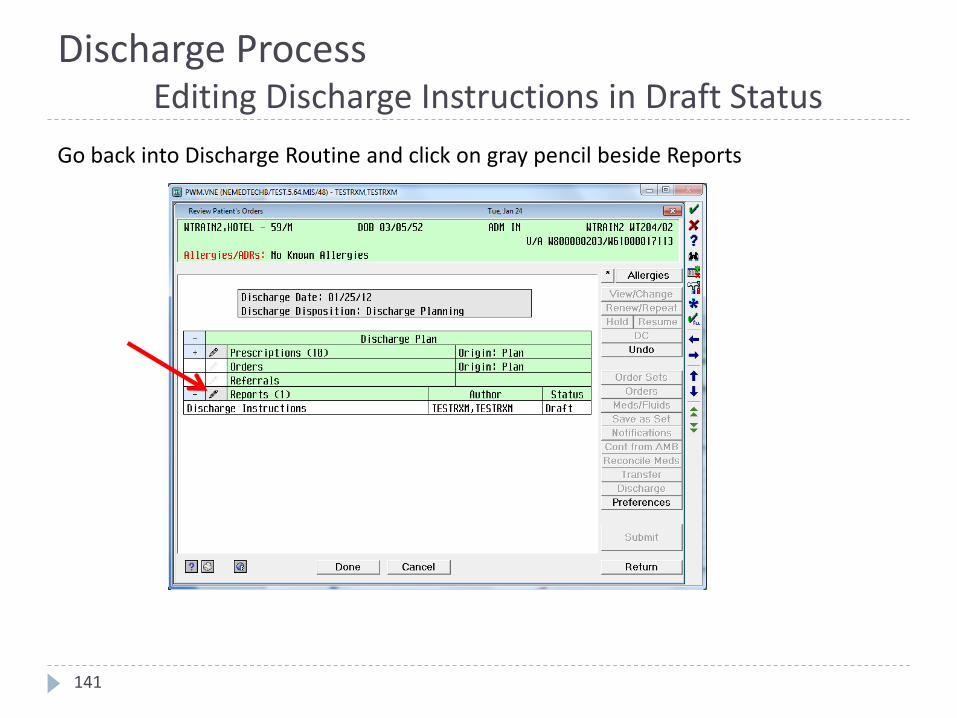
Go back into Discharge Routine and click on gray pencil beside Reports
141
Discharge ProcessEditing Discharge Instructions in Draft Status

If you were the author of the Draft, click Edit/Amend
If you were NOT the author of the Draft, click Enter New
142
Discharge ProcessEditing Discharge Instructions in Draft Status
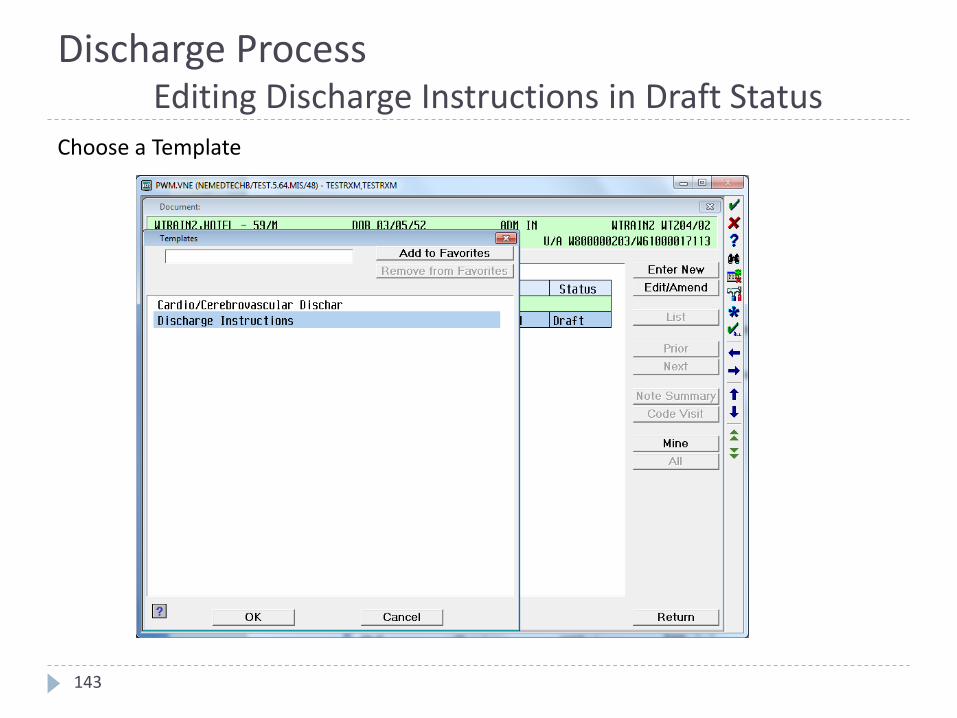
Choose a Template
143
Discharge ProcessEditing Discharge Instructions in Draft Status
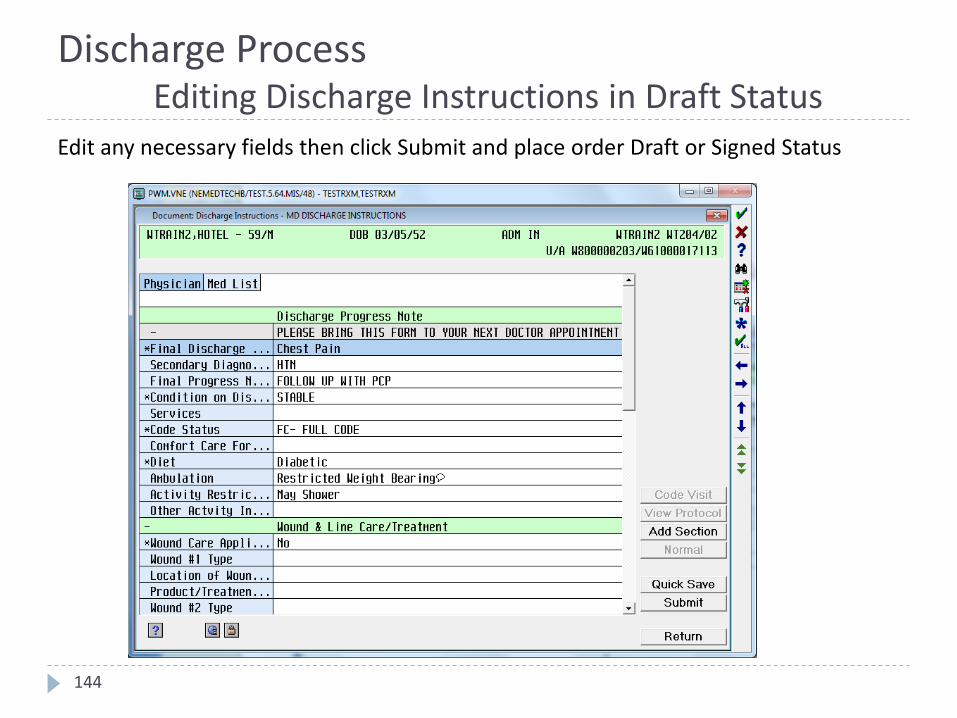
Edit any necessary fields then click Submit and place order Draft or Signed Status
144
Discharge ProcessEditing Discharge Instructions in Draft Status
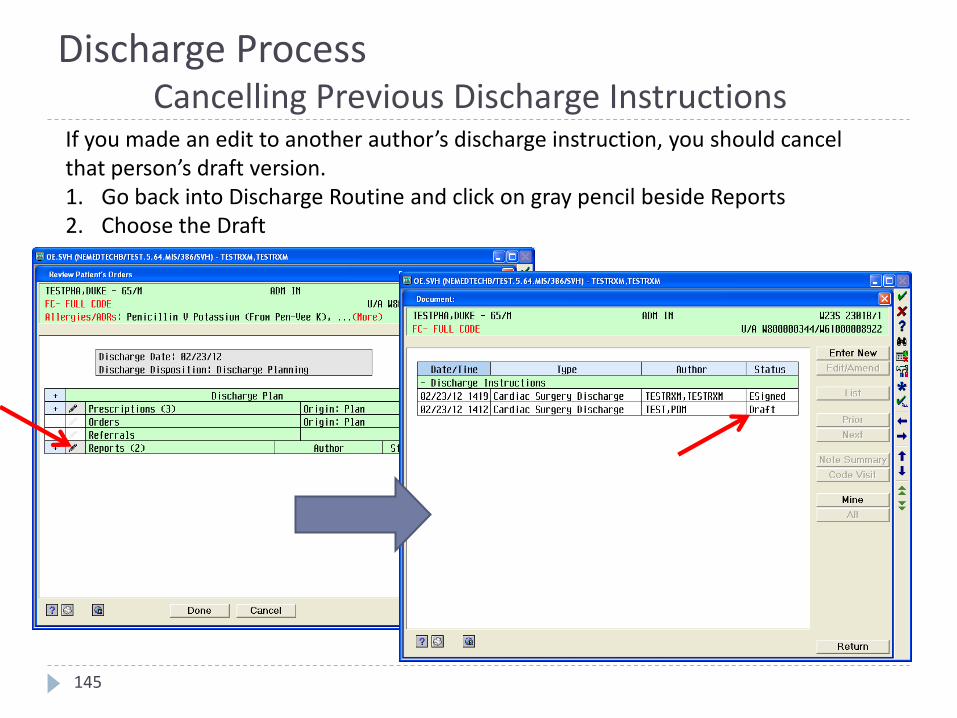
If you made an edit to another author’s discharge instruction, you should cancel that person’s draft version. 1. Go back into Discharge Routine and click on gray pencil beside Reports2. Choose the Draft
145
Discharge ProcessCancelling Previous Discharge Instructions
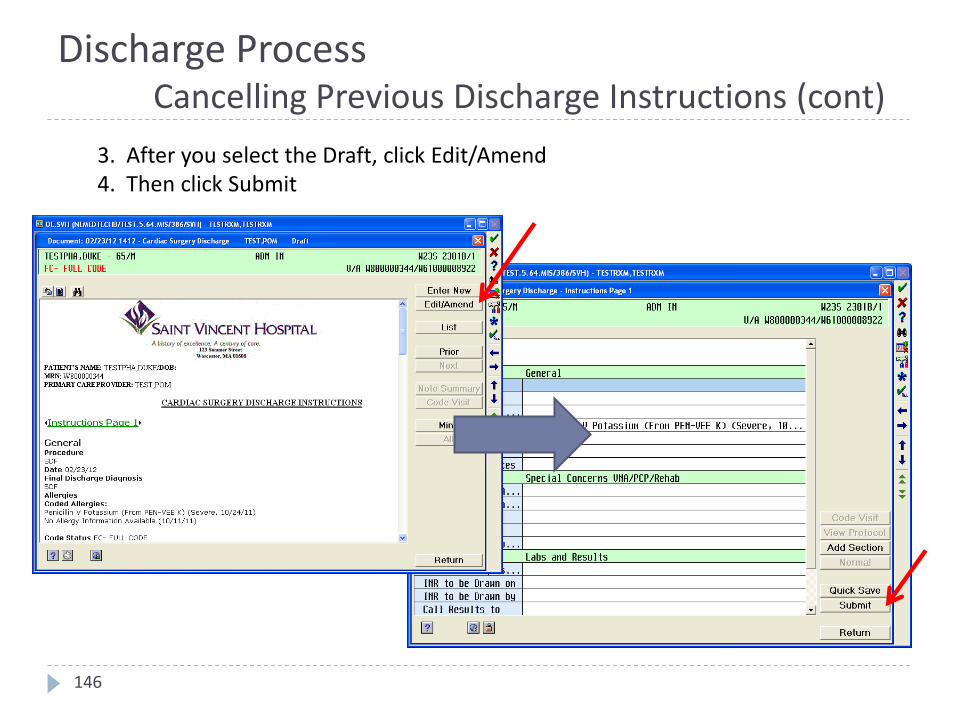
3. After you select the Draft, click Edit/Amend4. Then click Submit
146
Discharge ProcessCancelling Previous Discharge Instructions (cont)
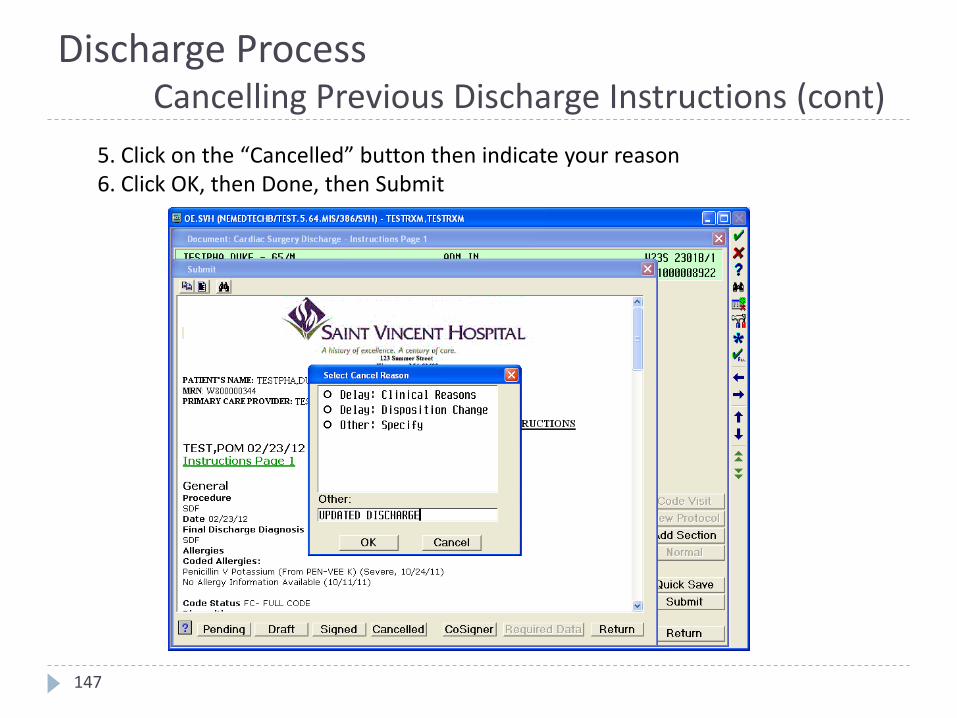
5. Click on the “Cancelled” button then indicate your reason6. Click OK, then Done, then Submit
147
Discharge ProcessCancelling Previous Discharge Instructions (cont)