Embed Size (px)
Citation preview

FILE=SQL Tutorial - part 1.docx by Greg Tisdell last updated on 7 October 2012 1
Create Basic Databases and Integrate with a Website – Lesson 1 Getting Started with Web (SQL) Databases In order to make a web database, you need three things to work in cooperation. You need a web server (usually Apache), you need a scripting language (PHP, ASPX, Perl, Python etc) and you need a database (MySQL, Postgresql, Oracle etc.). If any of the three components fails then life as we know it will end – well our scripts will. Apache The web server needs to be configured and running to accept your requests (i.e. get a page), and if the file is a script (PHP or Perl etc.) the web server can launch a process to handle the script. In other words the web server launches the PHP program. PHP If the script requires access to a database, it (PHP) needs to be configured to use that particular database. There are dozens of Relational Database Management Systems (RDBMS) including Oracle, Microsoft’s SQL Server, Postgresql etc. to choose from. But once the choice is made, it’s important for PHP to be configured correctly. Some scripts use ODBC drivers while others can interact more directly with the database engine provided the database has a process running to accept the requests. MySQL You can run MySQL directly from the command prompt (shell) – and we will. But a script needs to access the MySQL engine by making requests to a daemon or background process. Normally the database would also need to be configured with user accounts and privileges, which only adds to the complexity of configurations. Taking the Easy Option Fortunately there is a product available that takes the hard work (and many many hours) out of the configurations. Since most students run Windows for their operating system (though Mac user can too), there’s a free product known as WAMPSERVER which can be downloaded from http://www.wampserver.com/en/ The package contains all three components above and will automatically configure them all to work with each other. WAMP stands for Windows, Apache, Mysql and Php. Note that there are different versions to suit your specific Windows version e.g. 32bit vs. 64bit, plus different version of the specific components. This is a great option for the php/mysql developer, so what you need to do before anything else is to:
• Download and install the appropriate version on your pc • The default install directory is C:\wamp
After installation, you should notice the Wampserver Manager icon in the task list (hidden icons) If the service is not running, then choose Start All Services. Then choose the Localhost option, where it will launch your default browser (usually IE) and open the address http://localhost/ localhost is a name that each networked computer has. It maps to the ip address of 127.0.0.1 If the Apache server does not load (or throws an error) try the address http://127.0.0.1/
FILE=SQL Tutorial - part 1.docx by Greg Tisdell last updated on 7 October 2012 2
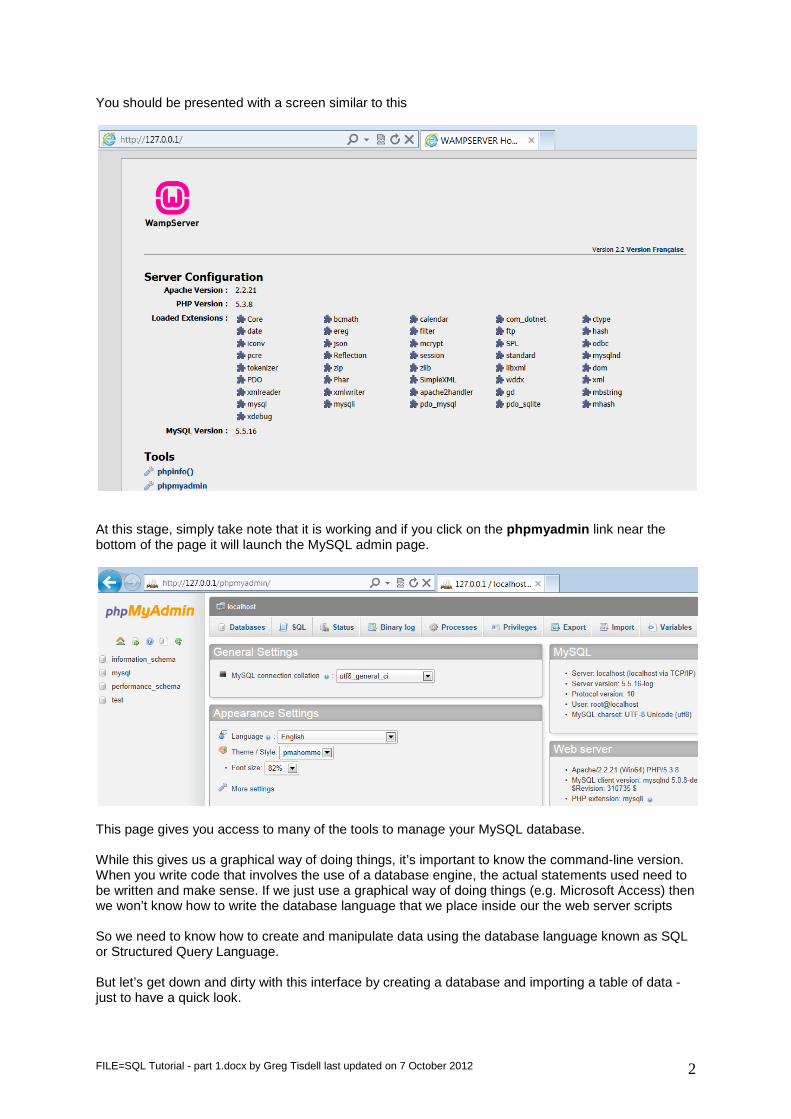
You should be presented with a screen similar to this
At this stage, simply take note that it is working and if you click on the phpmyadmin link near the bottom of the page it will launch the MySQL admin page.
This page gives you access to many of the tools to manage your MySQL database. While this gives us a graphical way of doing things, it’s important to know the command-line version. When you write code that involves the use of a database engine, the actual statements used need to be written and make sense. If we just use a graphical way of doing things (e.g. Microsoft Access) then we won’t know how to write the database language that we place inside our the web server scripts So we need to know how to create and manipulate data using the database language known as SQL or Structured Query Language. But let’s get down and dirty with this interface by creating a database and importing a table of data -just to have a quick look.
FILE=SQL Tutorial - part 1.docx by Greg Tisdell last updated on 7 October 2012 3
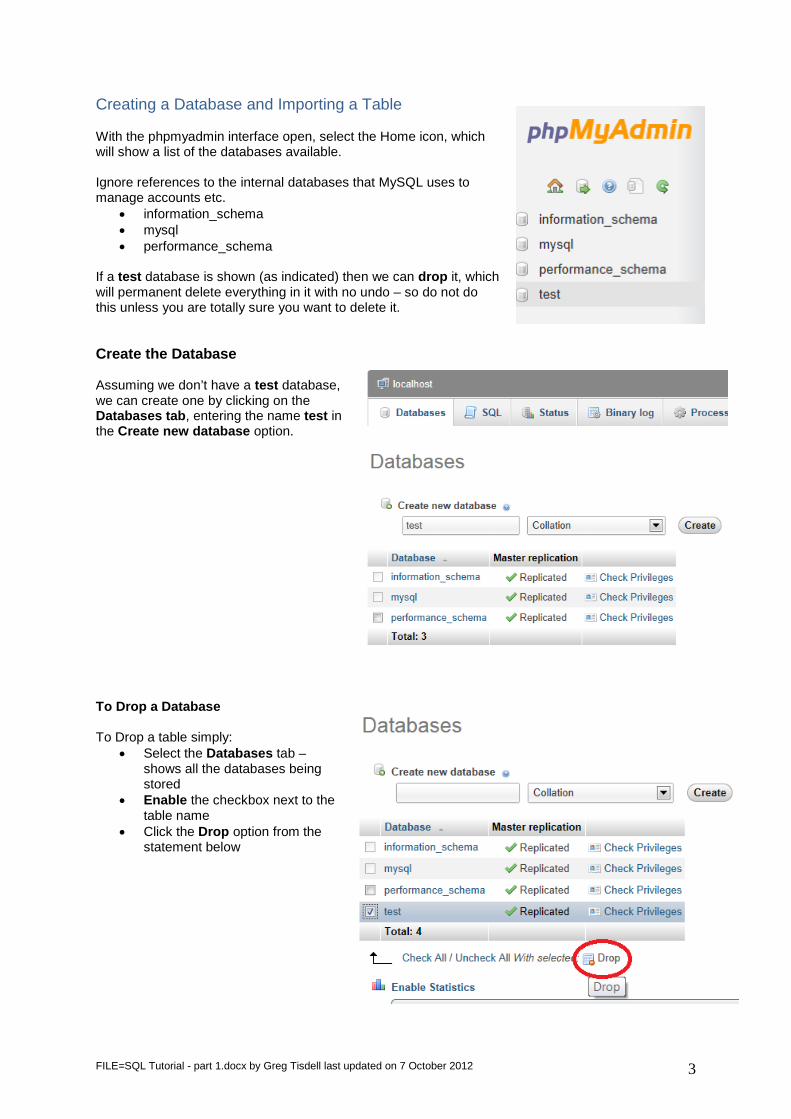
Creating a Database and Importing a Table With the phpmyadmin interface open, select the Home icon, which will show a list of the databases available.
Ignore references to the internal databases that MySQL uses to manage accounts etc.
• information_schema • mysql • performance_schema
If a test database is shown (as indicated) then we can drop it, which will permanent delete everything in it with no undo – so do not do this unless you are totally sure you want to delete it. Create the Database Assuming we don’t have a test database, we can create one by clicking on the Databases tab, entering the name test in the Create new database option. To Drop a Database To Drop a table simply:
• Select the Databases tab – shows all the databases being stored
• Enable the checkbox next to the table name
• Click the Drop option from the statement below
FILE=SQL Tutorial - part 1.docx by Greg Tisdell last updated on 7 October 2012 4
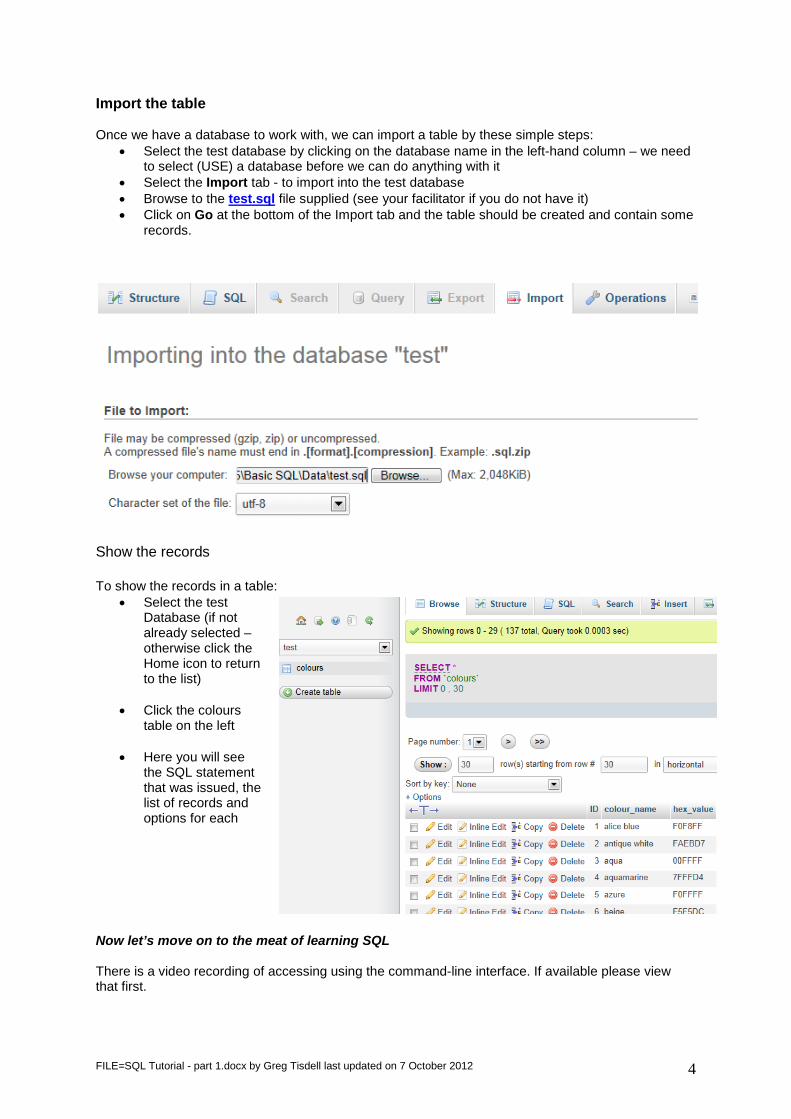
Import the table Once we have a database to work with, we can import a table by these simple steps:
• Select the test database by clicking on the database name in the left-hand column – we need to select (USE) a database before we can do anything with it
• Select the Import tab - to import into the test database • Browse to the test.sql file supplied (see your facilitator if you do not have it) • Click on Go at the bottom of the Import tab and the table should be created and contain some
records.
Show the records To show the records in a table:
• Select the test Database (if not already selected – otherwise click the Home icon to return to the list)
• Click the colours table on the left
• Here you will see the SQL statement that was issued, the list of records and options for each
Now let’s move on to the meat of learning SQL There is a video recording of accessing using the command-line interface. If available please view that first.
FILE=SQL Tutorial - part 1.docx by Greg Tisdell last updated on 7 October 2012 5
Using MySQL As mentioned above, there is little point in running a PHP script that opens a database, if we have no idea on how to issue database commands using the database’s language. We also need to ensure that MySQL actually works, before we concern ourselves with usernames, passwords and privileges. The following commands are a set that you should know in order to gain access (open) any particular database. We will deal with usernames and passwords later, so we will focus on the basic navigation inside MySQL. In other words, how do I know what databases and tables are available to manipulate data. Connecting to MySQL Assuming (always problematic), that all the wampserver components are installed correctly; the path to the MySQL program may not be set as an environment variable. So you may need to issue the full path and program name to execute the command-line program. For example the full path might be:
C:\WAMP\BIN\MYSQL\MYSQL5.5.16\BIN Note that the actual version number of MYSQL may vary from the install that I have – so you would need change the path to suit your installation. The BIN directory is the usual place to find BINary or executable files on a UNIX file system. Since wampserver is giving you a Windows version of what you might expect on a ‘real’ web server running Linux (known as a LAMP server) To connect to the server, you will usually need to provide a MySQL username when you invoke mysql and, most likely, a password. If the server runs on a machine other than the one where you log in, you will also need to specify a hostname. If there were username and passwords to include the command-line would have to include them:
C:\WAMP\BIN\MYSQL\MYSQL5.5.16\BIN\MYSQL –u username –p password
I’ll assume that you will include the full path when invoking the MySQL server, so I’ll leave it out. It is important to note that some MySQL installations allow users to connect as the anonymous (unnamed) user to the server running on the local host. This should be the case on your machine with wampserver, so you may be able to connect to that server by invoking mysql without any options: However, if you are accessing MySQL on a real hosted server you will need to contact your administrator (which will most likely be yours-truly) to find out what connection parameters you need to use to get connected. The connection parameters will usually include host, username, and password. Once you know the proper parameters, you should be able to connect like this:
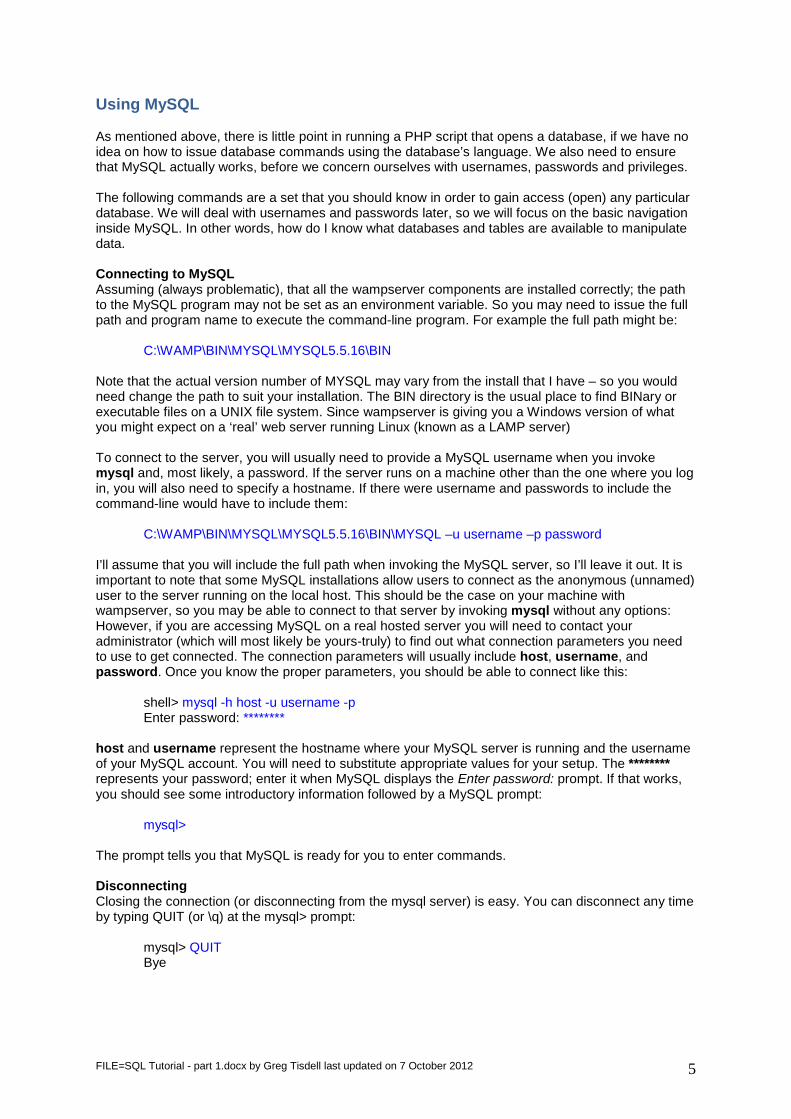
shell> mysql -h host -u username -p Enter password: ********
host and username represent the hostname where your MySQL server is running and the username of your MySQL account. You will need to substitute appropriate values for your setup. The ******** represents your password; enter it when MySQL displays the Enter password: prompt. If that works, you should see some introductory information followed by a MySQL prompt: mysql> The prompt tells you that MySQL is ready for you to enter commands. Disconnecting Closing the connection (or disconnecting from the mysql server) is easy. You can disconnect any time by typing QUIT (or \q) at the mysql> prompt:
mysql> QUIT Bye
FILE=SQL Tutorial - part 1.docx by Greg Tisdell last updated on 7 October 2012 6
Current Status After opening a connection to MySQL you may want to know the current status of the system. We might need to know the version, host, access times etc. The version of MySQL is relevant for some of the more obscure commands. The command is:
STATUS Showing Which Databases are Available There is a quick way of determining which databases already exist in MySQL. Each database is usually stored in a directory of the same name, in the mysql directory. So a TEST database would be stored in /parent directory structure/mysql/test. In the installation of phpdev the full path would be c:\phpdev5\mysql\test. The command that shows all the databases is:
SHOW DATABASES; If you are currently using a particular database then you can find out the tables it contains the same way: SHOW TABLES; This show command will display all the tables contained within the current active database. Using a Database Before you can perform any tasks with a database, you must first use it. To use a database called TEST the command would be:
USE TEST Finding the Details of a Table If after using a database, and possibly using SHOW to the tables within that database, you might want specific details on the database. The DESCRIBE command is useful for this. If we wanted to know all the column names and data types of a table called colours, the command would be:
DESCRIBE COLOURS; Exiting from MySQL To exit the MySQL interface anytime then just issue the command QUIT and you’re out of there!
FILE=SQL Tutorial - part 1.docx by Greg Tisdell last updated on 7 October 2012 7
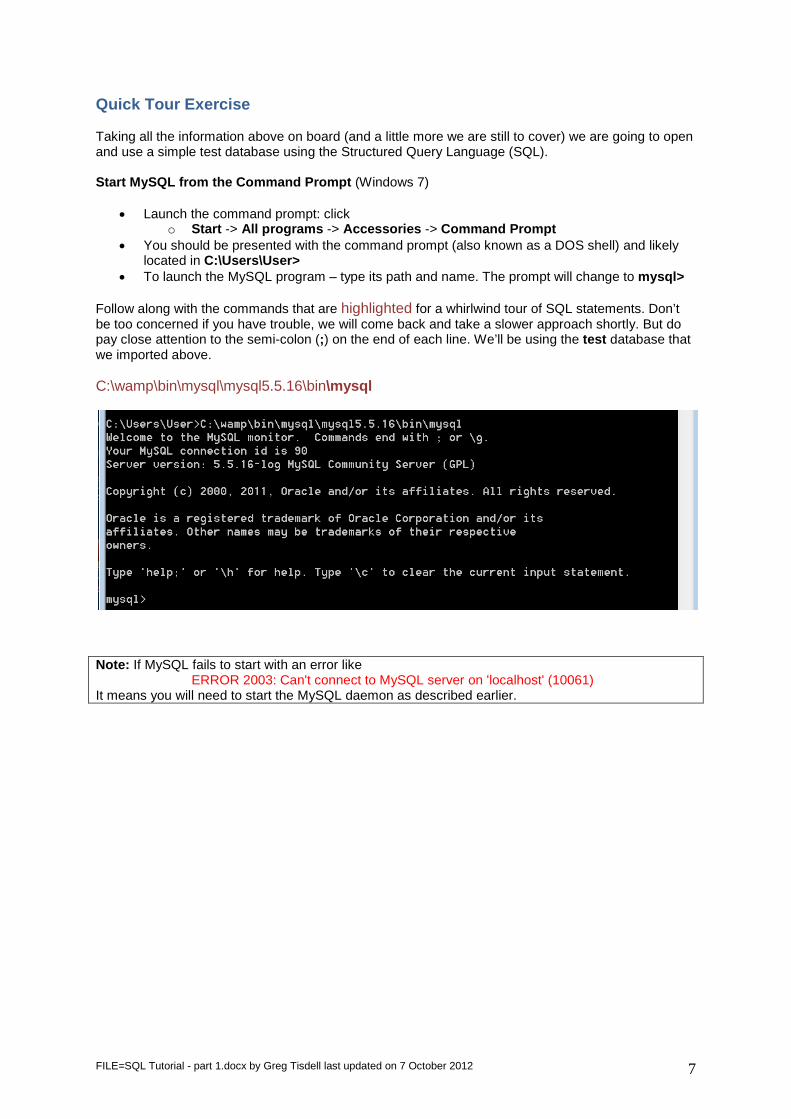
Quick Tour Exercise Taking all the information above on board (and a little more we are still to cover) we are going to open and use a simple test database using the Structured Query Language (SQL). Start MySQL from the Command Prompt (Windows 7)
• Launch the command prompt: click o Start -> All programs -> Accessories -> Command Prompt
• You should be presented with the command prompt (also known as a DOS shell) and likely located in C:\Users\User>
• To launch the MySQL program – type its path and name. The prompt will change to mysql> Follow along with the commands that are highlighted for a whirlwind tour of SQL statements. Don’t be too concerned if you have trouble, we will come back and take a slower approach shortly. But do pay close attention to the semi-colon (;) on the end of each line. We’ll be using the test database that we imported above. C:\wamp\bin\mysql\mysql5.5.16\bin\mysql
Note: If MySQL fails to start with an error like
ERROR 2003: Can't connect to MySQL server on 'localhost' (10061) It means you will need to start the MySQL daemon as described earlier.
FILE=SQL Tutorial - part 1.docx by Greg Tisdell last updated on 7 October 2012 8
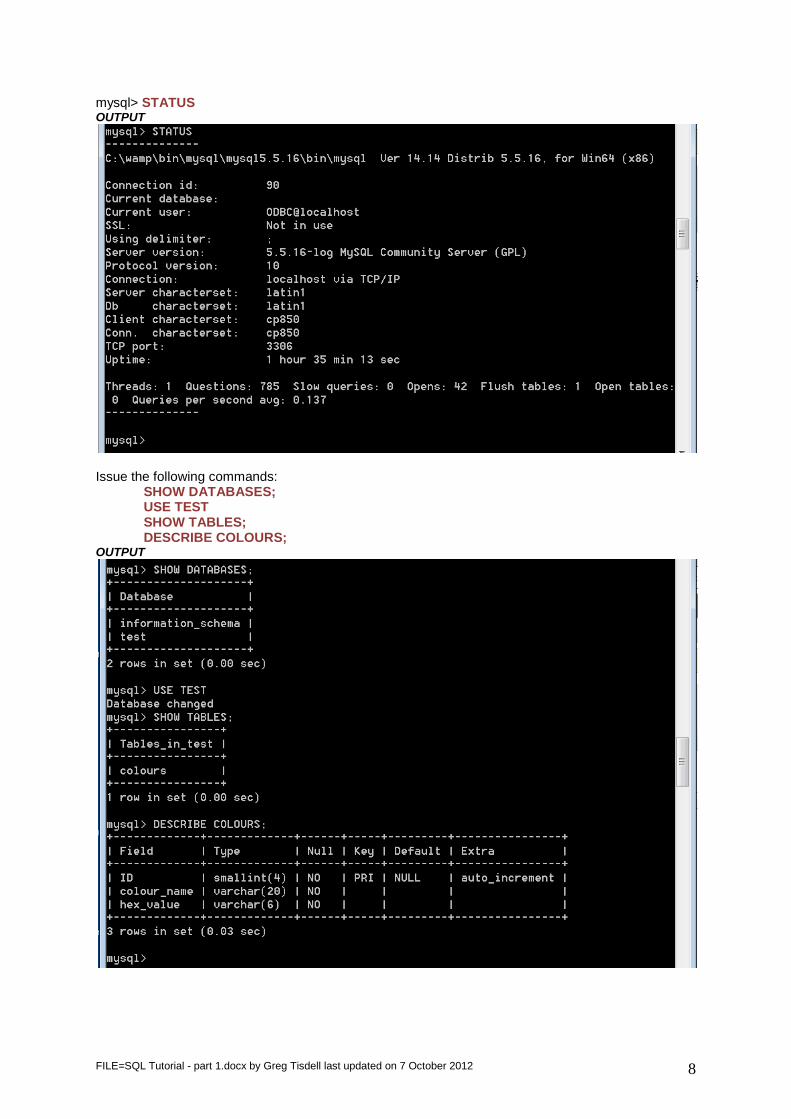
mysql> STATUS OUTPUT
Issue the following commands:
SHOW DATABASES; USE TEST SHOW TABLES; DESCRIBE COLOURS;
OUTPUT
FILE=SQL Tutorial - part 1.docx by Greg Tisdell last updated on 7 October 2012 9
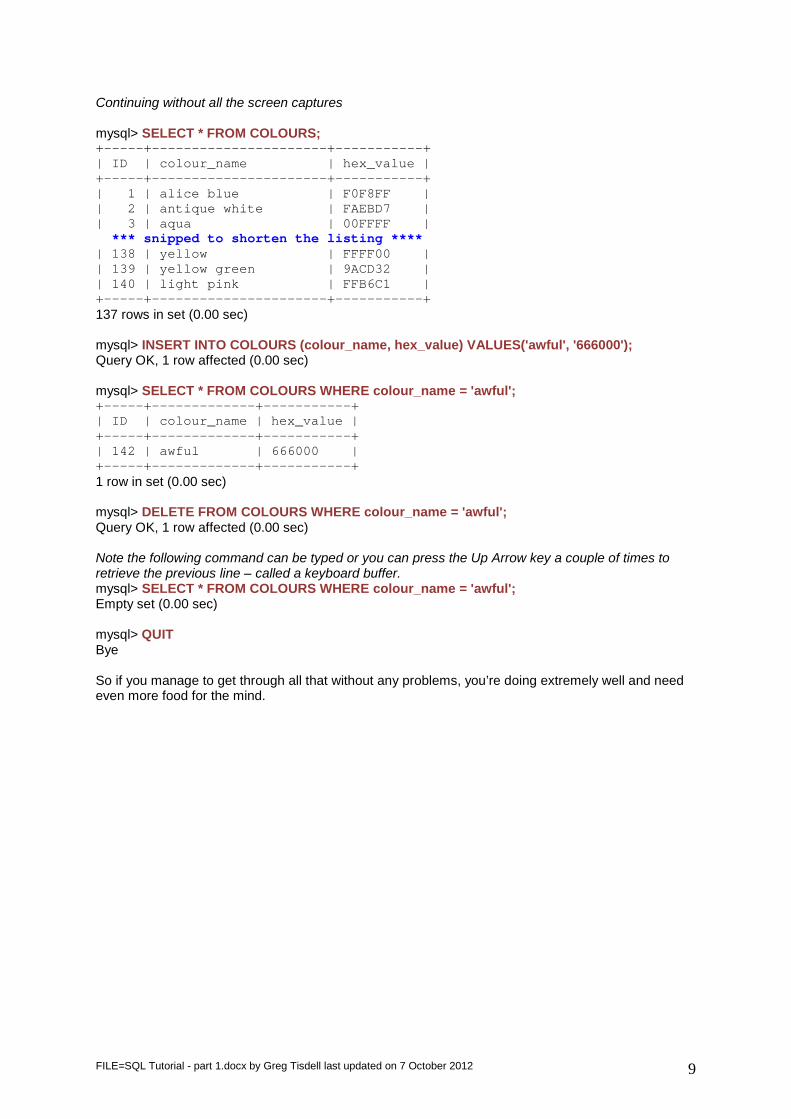
Continuing without all the screen captures mysql> SELECT * FROM COLOURS; +-----+----------------------+-----------+ | ID | colour_name | hex_value | +-----+----------------------+-----------+ | 1 | alice blue | F0F8FF | | 2 | antique white | FAEBD7 | | 3 | aqua | 00FFFF | *** snipped to shorten the listing **** | 138 | yellow | FFFF00 | | 139 | yellow green | 9ACD32 | | 140 | light pink | FFB6C1 | +-----+----------------------+-----------+ 137 rows in set (0.00 sec) mysql> INSERT INTO COLOURS (colour_name, hex_value) VALUES('awful', '666000'); Query OK, 1 row affected (0.00 sec) mysql> SELECT * FROM COLOURS WHERE colour_name = 'awful'; +-----+-------------+-----------+ | ID | colour_name | hex_value | +-----+-------------+-----------+ | 142 | awful | 666000 | +-----+-------------+-----------+ 1 row in set (0.00 sec) mysql> DELETE FROM COLOURS WHERE colour_name = 'awful'; Query OK, 1 row affected (0.00 sec) Note the following command can be typed or you can press the Up Arrow key a couple of times to retrieve the previous line – called a keyboard buffer. mysql> SELECT * FROM COLOURS WHERE colour_name = 'awful'; Empty set (0.00 sec) mysql> QUIT Bye So if you manage to get through all that without any problems, you’re doing extremely well and need even more food for the mind.
FILE=SQL Tutorial - part 1.docx by Greg Tisdell last updated on 7 October 2012 10
The Structured Query Language Most commercial database management systems use a Structured Query Language (SQL – sometimes pronounced ez q el). There is an ANSI standard for SQL and for the most part MySQL adheres to that standard. This makes it another good reason to use it as a learning platform. SQL allows users to access data in relational database management systems (RDBMS), such as Oracle, Sybase, Informix, Microsoft SQL Server, Access, and others, by allowing users to describe the data they wish to see. SQL also allows users to define and manipulate the data in a database.
Unfortunately, there are many different versions of the SQL language, but to be in compliance with the ANSI standard, they must support the same major keywords in a similar manner (such as SELECT, UPDATE, DELETE, INSERT, WHERE, and others).
Note: Most of the SQL database programs, mentioned above, also have their own proprietary extensions in addition to the SQL standard!
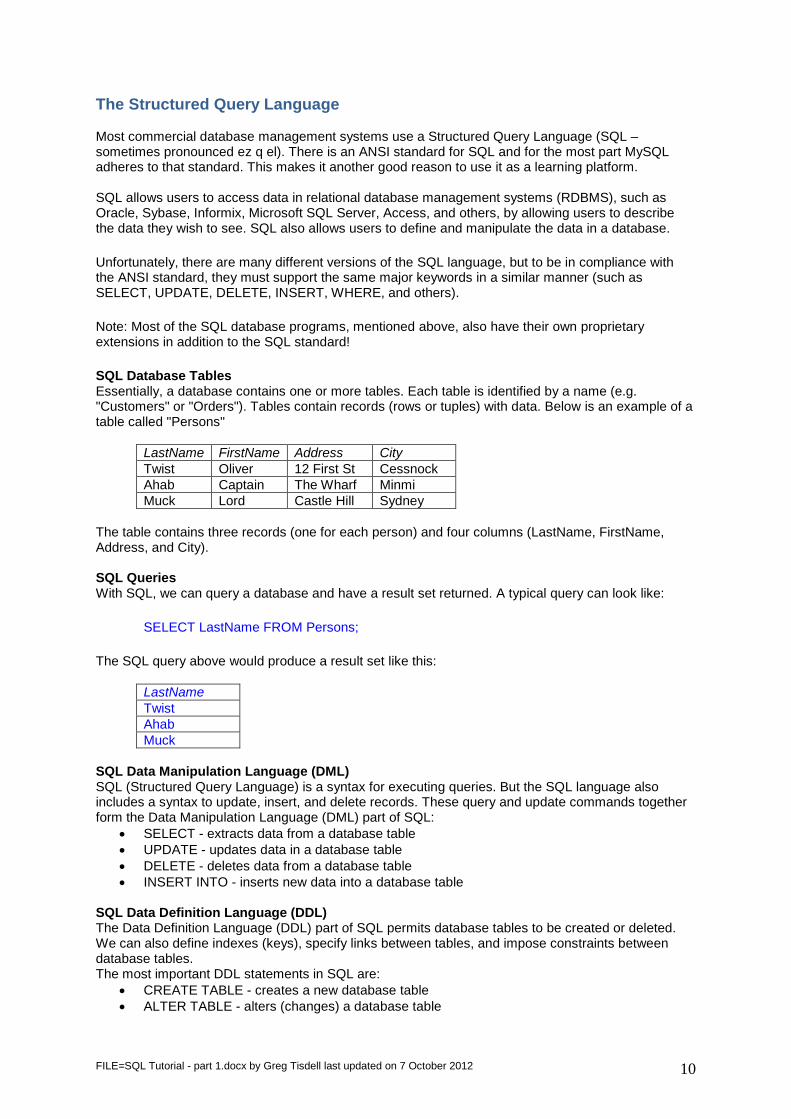
SQL Database Tables Essentially, a database contains one or more tables. Each table is identified by a name (e.g. "Customers" or "Orders"). Tables contain records (rows or tuples) with data. Below is an example of a table called "Persons"
LastName FirstName Address City Twist Oliver 12 First St Cessnock Ahab Captain The Wharf Minmi Muck Lord Castle Hill Sydney
The table contains three records (one for each person) and four columns (LastName, FirstName, Address, and City). SQL Queries With SQL, we can query a database and have a result set returned. A typical query can look like:
SELECT LastName FROM Persons;
The SQL query above would produce a result set like this:
LastName Twist Ahab Muck
SQL Data Manipulation Language (DML) SQL (Structured Query Language) is a syntax for executing queries. But the SQL language also includes a syntax to update, insert, and delete records. These query and update commands together form the Data Manipulation Language (DML) part of SQL:
• SELECT - extracts data from a database table • UPDATE - updates data in a database table • DELETE - deletes data from a database table • INSERT INTO - inserts new data into a database table
SQL Data Definition Language (DDL) The Data Definition Language (DDL) part of SQL permits database tables to be created or deleted. We can also define indexes (keys), specify links between tables, and impose constraints between database tables. The most important DDL statements in SQL are:
• CREATE TABLE - creates a new database table • ALTER TABLE - alters (changes) a database table
FILE=SQL Tutorial - part 1.docx by Greg Tisdell last updated on 7 October 2012 11
• DROP TABLE - deletes a database table • CREATE INDEX - creates an index (search key) • DROP INDEX - deletes an index
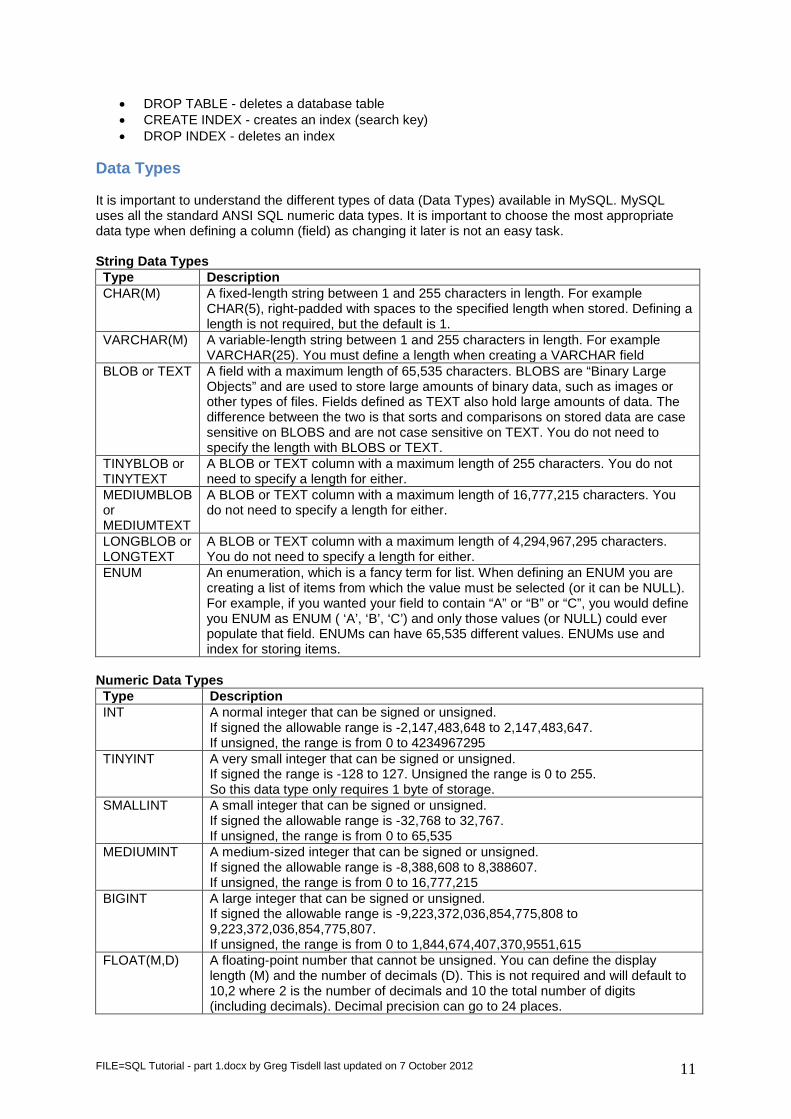
Data Types It is important to understand the different types of data (Data Types) available in MySQL. MySQL uses all the standard ANSI SQL numeric data types. It is important to choose the most appropriate data type when defining a column (field) as changing it later is not an easy task. String Data Types Type Description CHAR(M) A fixed-length string between 1 and 255 characters in length. For example
CHAR(5), right-padded with spaces to the specified length when stored. Defining a length is not required, but the default is 1.
VARCHAR(M) A variable-length string between 1 and 255 characters in length. For example VARCHAR(25). You must define a length when creating a VARCHAR field
BLOB or TEXT A field with a maximum length of 65,535 characters. BLOBS are “Binary Large Objects” and are used to store large amounts of binary data, such as images or other types of files. Fields defined as TEXT also hold large amounts of data. The difference between the two is that sorts and comparisons on stored data are case sensitive on BLOBS and are not case sensitive on TEXT. You do not need to specify the length with BLOBS or TEXT.
TINYBLOB or TINYTEXT
A BLOB or TEXT column with a maximum length of 255 characters. You do not need to specify a length for either.
MEDIUMBLOB or MEDIUMTEXT
A BLOB or TEXT column with a maximum length of 16,777,215 characters. You do not need to specify a length for either.
LONGBLOB or LONGTEXT
A BLOB or TEXT column with a maximum length of 4,294,967,295 characters. You do not need to specify a length for either.
ENUM An enumeration, which is a fancy term for list. When defining an ENUM you are creating a list of items from which the value must be selected (or it can be NULL). For example, if you wanted your field to contain “A” or “B” or “C”, you would define you ENUM as ENUM ( ‘A’, ‘B’, ‘C’) and only those values (or NULL) could ever populate that field. ENUMs can have 65,535 different values. ENUMs use and index for storing items.
Numeric Data Types Type Description INT A normal integer that can be signed or unsigned.
If signed the allowable range is -2,147,483,648 to 2,147,483,647. If unsigned, the range is from 0 to 4234967295
TINYINT A very small integer that can be signed or unsigned. If signed the range is -128 to 127. Unsigned the range is 0 to 255. So this data type only requires 1 byte of storage.
SMALLINT A small integer that can be signed or unsigned. If signed the allowable range is -32,768 to 32,767. If unsigned, the range is from 0 to 65,535
MEDIUMINT A medium-sized integer that can be signed or unsigned. If signed the allowable range is -8,388,608 to 8,388607. If unsigned, the range is from 0 to 16,777,215
BIGINT A large integer that can be signed or unsigned. If signed the allowable range is -9,223,372,036,854,775,808 to 9,223,372,036,854,775,807. If unsigned, the range is from 0 to 1,844,674,407,370,9551,615
FLOAT(M,D) A floating-point number that cannot be unsigned. You can define the display length (M) and the number of decimals (D). This is not required and will default to 10,2 where 2 is the number of decimals and 10 the total number of digits (including decimals). Decimal precision can go to 24 places.
FILE=SQL Tutorial - part 1.docx by Greg Tisdell last updated on 7 October 2012 12
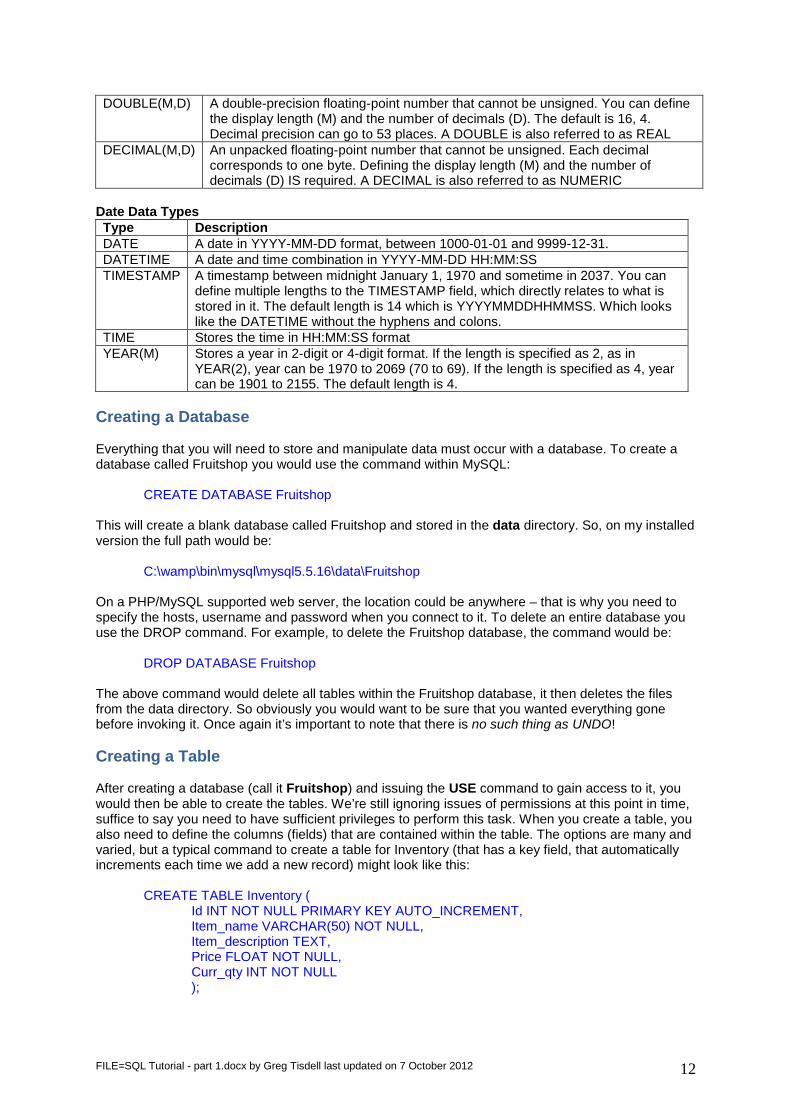
DOUBLE(M,D) A double-precision floating-point number that cannot be unsigned. You can define the display length (M) and the number of decimals (D). The default is 16, 4. Decimal precision can go to 53 places. A DOUBLE is also referred to as REAL
DECIMAL(M,D) An unpacked floating-point number that cannot be unsigned. Each decimal corresponds to one byte. Defining the display length (M) and the number of decimals (D) IS required. A DECIMAL is also referred to as NUMERIC
Date Data Types Type Description DATE A date in YYYY-MM-DD format, between 1000-01-01 and 9999-12-31. DATETIME A date and time combination in YYYY-MM-DD HH:MM:SS TIMESTAMP A timestamp between midnight January 1, 1970 and sometime in 2037. You can
define multiple lengths to the TIMESTAMP field, which directly relates to what is stored in it. The default length is 14 which is YYYYMMDDHHMMSS. Which looks like the DATETIME without the hyphens and colons.
TIME Stores the time in HH:MM:SS format YEAR(M) Stores a year in 2-digit or 4-digit format. If the length is specified as 2, as in
YEAR(2), year can be 1970 to 2069 (70 to 69). If the length is specified as 4, year can be 1901 to 2155. The default length is 4.
Creating a Database Everything that you will need to store and manipulate data must occur with a database. To create a database called Fruitshop you would use the command within MySQL: CREATE DATABASE Fruitshop This will create a blank database called Fruitshop and stored in the data directory. So, on my installed version the full path would be: C:\wamp\bin\mysql\mysql5.5.16\data\Fruitshop On a PHP/MySQL supported web server, the location could be anywhere – that is why you need to specify the hosts, username and password when you connect to it. To delete an entire database you use the DROP command. For example, to delete the Fruitshop database, the command would be: DROP DATABASE Fruitshop The above command would delete all tables within the Fruitshop database, it then deletes the files from the data directory. So obviously you would want to be sure that you wanted everything gone before invoking it. Once again it’s important to note that there is no such thing as UNDO! Creating a Table After creating a database (call it Fruitshop) and issuing the USE command to gain access to it, you would then be able to create the tables. We’re still ignoring issues of permissions at this point in time, suffice to say you need to have sufficient privileges to perform this task. When you create a table, you also need to define the columns (fields) that are contained within the table. The options are many and varied, but a typical command to create a table for Inventory (that has a key field, that automatically increments each time we add a new record) might look like this: CREATE TABLE Inventory ( Id INT NOT NULL PRIMARY KEY AUTO_INCREMENT, Item_name VARCHAR(50) NOT NULL, Item_description TEXT, Price FLOAT NOT NULL, Curr_qty INT NOT NULL );

FILE=SQL Tutorial - part 1.docx by Greg Tisdell last updated on 7 October 2012 13
Taking each line above we have: CREATE TABLE Inventory ( This command will create a new table called Inventory, the columns of the table are defined on the following lines. Id INT NOT NULL PRIMARY KEY AUTO_INCREMENT, The first column will be named Id of type INT. It will not be acceptable to have an empty (NULL) entry, hence the AUTO_INCREMENT to ensure this does not happen. The Id column will also form the PRIMARY KEY for the table. Item_name VARCHAR(50) NOT NULL, The second column (order is important when it comes to adding records) is named Item_name and will be a VARCHAR data type that can hold up to 50 characters. The field must not accept a NULL entry. In other words, you must have a value to put into a new record or the attempt to add a record will fail. Item_description TEXT, The third column is named Item_description and is a TEXT data type. This means you can have a very very long description of the product without the need to be concerned about going beyond a simple VARCHAR length. It’s like using MS Access’ Memo data type. Price FLOAT NOT NULL, The fourth column is named Price and is designed to hold a currency (floating decimal point) amount. It is also reasonable that an item must have a Price, hence the NOT NULL.
Curr_qty INT NOT NULL ); The current quantity on hand, named Curr_qty, will be stored as an INT and must contain a value, even if it’s zero. The SQL statement must also be finished with the closing parenthesis and the terminating semi-colon. The INSERT Statement One of the most likely actions that are likely to be performed on a Web database is to add a new record. The INSERT SQL statement serves this purpose. The general syntax for adding a record would be:
INSERT INTO TableName (Field1, Field2, Field3) VALUES (FieldValue1, FieldValue2, FieldValue3) ;
Where:
TableName is the name of the database table where data is inserted Field1… are the field names that are found in the table FieldValue1… are the values that are to be inserted in those fields
An example INSERT statement for the Inventory table we created earlier could look like this: INSERT INTO Inventory
(Id, Item_name, Item_description, Price, Curr_qty) VALUES
(‘1’, ‘Apples’, ‘Beautiful, ripe apples’ , ‘0.25’, 1000) ; Just picking the command to pieces we have:

FILE=SQL Tutorial - part 1.docx by Greg Tisdell last updated on 7 October 2012 14
INSERT INTO Inventory Insert the following data into a new record in the table named Inventory.
(Id, Item_name, Item_description, Price, Curr_qty) The columns that are to have data entered into them are enclosed within parentheses and contain the above names. Follow that by… VALUES (‘1’, ‘Apples’, ‘Beautiful, ripe apples’ , ‘0.25’, 1000) ; The values to be entered in the columns, in the same order as the columns stated above. Once again the statement must have the closing parenthesis and terminator (;). Since the order of the values is actually the same as the natural order (the order we used when we created the table), we could have omitted the column names and written the statement as:
INSERT INTO Inventory VALUES (‘1’, ‘Apples’, ‘Beautiful, ripe apples’ , ‘0.25’, 1000) ; But it is important to note that the values to be inserted must be in the same order as the table’s natural order of columns, for this shorter method to work. Note the use of the single quote mark around the values – you cannot use double quotes, they must be singles. The SELECT Statement The SELECT statement is used to select data from a table. The tabular result is stored in a visual table (called the result-set, or record-set, or dynaset).The syntax is:
SELECT column_name(s) FROM table_name Selecting All Columns To select all columns from the "Persons" table, use a * symbol (asterisk means ‘everything’) instead of column names, like this:
SELECT * FROM Persons; Result
LastName FirstName Address City Twist Oliver 12 First St Cessnock Ahab Captain The Wharf Minmi Muck Lord Castle Hill Sydney
Selecting Some Columns To select the columns named "LastName" and "FirstName", use a SELECT statement like this:
SELECT LastName, FirstName FROM Persons; Result
LastName FirstName Twist Oliver Ahab Captain Muck Lord
The Result Set The result from a SQL query is stored in a result-set, which is also known as a record-set. Most database software systems allow navigation of the result set with programming functions, like: Move-To-First-Record, Get-Record-Content, Move-To-Next-Record, etc.
FILE=SQL Tutorial - part 1.docx by Greg Tisdell last updated on 7 October 2012 15
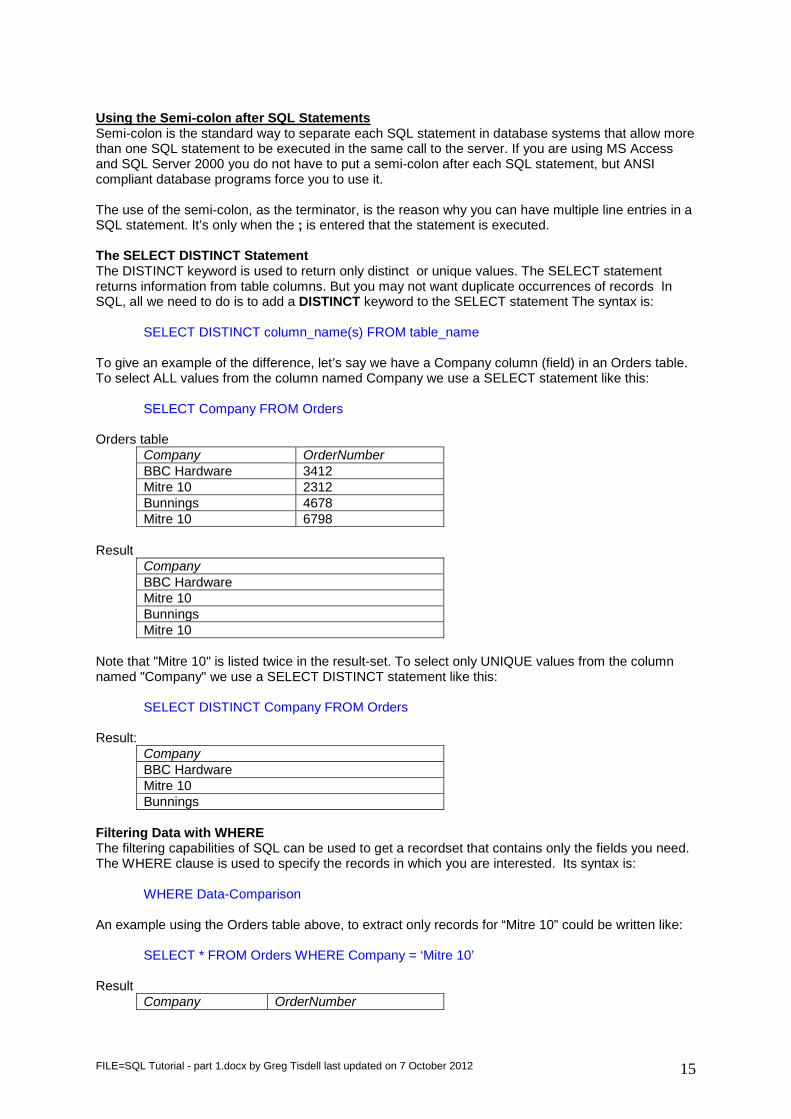
Using the Semi-colon after SQL Statements Semi-colon is the standard way to separate each SQL statement in database systems that allow more than one SQL statement to be executed in the same call to the server. If you are using MS Access and SQL Server 2000 you do not have to put a semi-colon after each SQL statement, but ANSI compliant database programs force you to use it. The use of the semi-colon, as the terminator, is the reason why you can have multiple line entries in a SQL statement. It’s only when the ; is entered that the statement is executed. The SELECT DISTINCT Statement The DISTINCT keyword is used to return only distinct or unique values. The SELECT statement returns information from table columns. But you may not want duplicate occurrences of records In SQL, all we need to do is to add a DISTINCT keyword to the SELECT statement The syntax is:
SELECT DISTINCT column_name(s) FROM table_name To give an example of the difference, let’s say we have a Company column (field) in an Orders table. To select ALL values from the column named Company we use a SELECT statement like this:
SELECT Company FROM Orders Orders table
Company OrderNumber BBC Hardware 3412 Mitre 10 2312 Bunnings 4678 Mitre 10 6798
Result Company BBC Hardware Mitre 10 Bunnings Mitre 10
Note that "Mitre 10" is listed twice in the result-set. To select only UNIQUE values from the column named "Company" we use a SELECT DISTINCT statement like this:
SELECT DISTINCT Company FROM Orders Result:
Company BBC Hardware Mitre 10 Bunnings
Filtering Data with WHERE The filtering capabilities of SQL can be used to get a recordset that contains only the fields you need. The WHERE clause is used to specify the records in which you are interested. Its syntax is:
WHERE Data-Comparison An example using the Orders table above, to extract only records for “Mitre 10” could be written like: SELECT * FROM Orders WHERE Company = ‘Mitre 10’ Result
Company OrderNumber
FILE=SQL Tutorial - part 1.docx by Greg Tisdell last updated on 7 October 2012 16
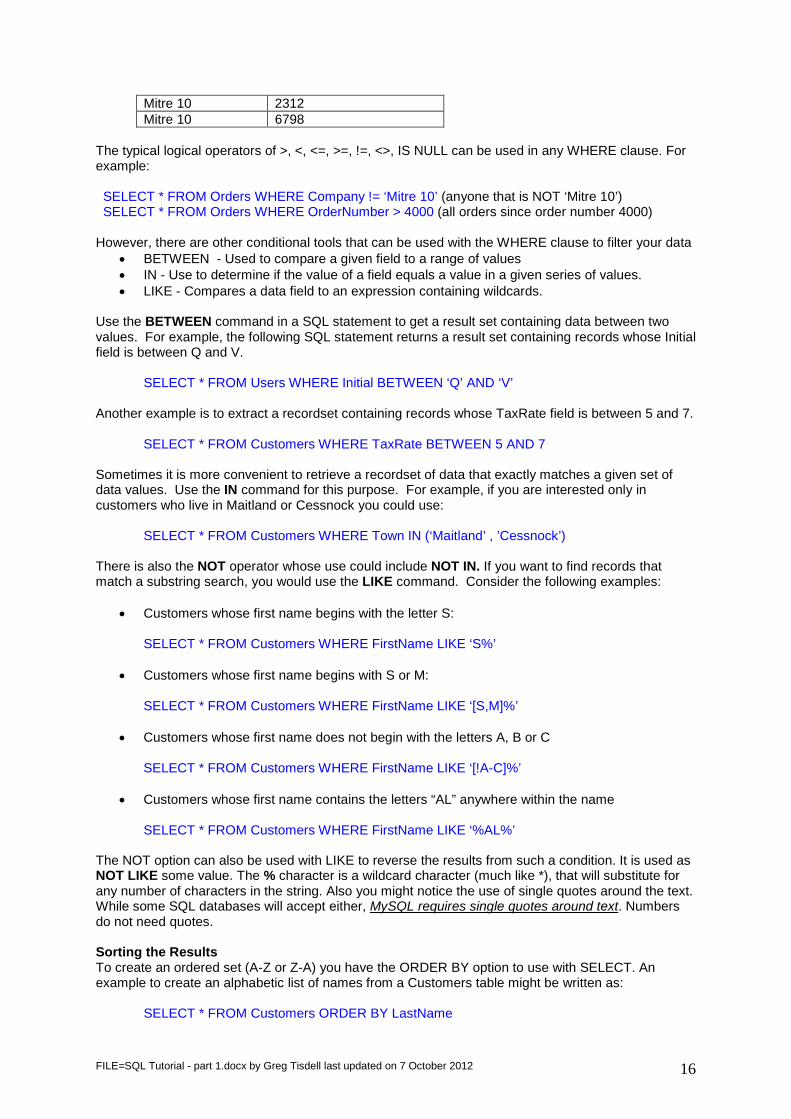
Mitre 10 2312 Mitre 10 6798
The typical logical operators of >, <, <=, >=, !=, <>, IS NULL can be used in any WHERE clause. For example: SELECT * FROM Orders WHERE Company != ‘Mitre 10’ (anyone that is NOT ‘Mitre 10’) SELECT * FROM Orders WHERE OrderNumber > 4000 (all orders since order number 4000) However, there are other conditional tools that can be used with the WHERE clause to filter your data
• BETWEEN - Used to compare a given field to a range of values • IN - Use to determine if the value of a field equals a value in a given series of values. • LIKE - Compares a data field to an expression containing wildcards.
Use the BETWEEN command in a SQL statement to get a result set containing data between two values. For example, the following SQL statement returns a result set containing records whose Initial field is between Q and V.
SELECT * FROM Users WHERE Initial BETWEEN ‘Q’ AND ‘V’ Another example is to extract a recordset containing records whose TaxRate field is between 5 and 7.
SELECT * FROM Customers WHERE TaxRate BETWEEN 5 AND 7 Sometimes it is more convenient to retrieve a recordset of data that exactly matches a given set of data values. Use the IN command for this purpose. For example, if you are interested only in customers who live in Maitland or Cessnock you could use:
SELECT * FROM Customers WHERE Town IN (‘Maitland’ , ’Cessnock’) There is also the NOT operator whose use could include NOT IN. If you want to find records that match a substring search, you would use the LIKE command. Consider the following examples:
• Customers whose first name begins with the letter S:
SELECT * FROM Customers WHERE FirstName LIKE ‘S%’
• Customers whose first name begins with S or M:
SELECT * FROM Customers WHERE FirstName LIKE ‘[S,M]%’
• Customers whose first name does not begin with the letters A, B or C
SELECT * FROM Customers WHERE FirstName LIKE ‘[!A-C]%’
• Customers whose first name contains the letters “AL” anywhere within the name
SELECT * FROM Customers WHERE FirstName LIKE ‘%AL%’
The NOT option can also be used with LIKE to reverse the results from such a condition. It is used as NOT LIKE some value. The % character is a wildcard character (much like *), that will substitute for any number of characters in the string. Also you might notice the use of single quotes around the text. While some SQL databases will accept either, MySQL requires single quotes around text. Numbers do not need quotes. Sorting the Results To create an ordered set (A-Z or Z-A) you have the ORDER BY option to use with SELECT. An example to create an alphabetic list of names from a Customers table might be written as: SELECT * FROM Customers ORDER BY LastName

FILE=SQL Tutorial - part 1.docx by Greg Tisdell last updated on 7 October 2012 17
To reverse the order, simply add DESC to the end. For example for a reverse listing of names: SELECT * FROM Customers ORDER BY LastName DESC Limiting the Results You can use the LIMIT clause to return only a certain number of records from your SELECT query result. There are two requirements when using the LIMIT clause, the offset and the number of rows. The offset is the starting position and the number of rows should be self-explanatory. LIMIT offset, rows Suppose you had a table that contained 100 records, but you only want to display 10 at a time. After view the first 10, you could then view the next 10 and so on till there are no more records. The following examples would be the order in which the calls would be made. SELECT * FROM Customers LIMIT 0, 10 SELECT * FROM Customers LIMIT 10, 10 SELECT * FROM Customers LIMIT 20, 10 SELECT * FROM Customers LIMIT 30, 10 If there are no records beyond the offset, then an empty record set will be returned. In Web-based applications, when lists of data are displayed with links such as “previous 10” and “next 10”, it’s a safe bet that a LIMIT clause is at work. Putting all the options together To put the options together, let’s have an example SQL statement that returns all the Customers whose last name is Smith and provide only the first 10 sorted records
SELECT * FROM Customers WHERE LastName = ‘Smith’ ORDER BY LastName LIMIT 0, 10 ;
The UPDATE Statement Once records exist in a database it is common for it to be updated. This is the purpose of the UPDATE statement. The syntax for the UPDATE statement is:
UPDATE TableName SET col_name1 = new_value1 [, col_name2= new_value2 ...] [WHERE where_definition] [ORDER BY ...] [LIMIT row_count]
Where part of the statement appears in [ square brackets ] it is considered as optional. Using the Inventory example earlier we could update the value for Apples. UPDATE Inventory SET Price = ‘0.55’ WHERE Item_name = ‘Apples’ ; While you can probably guess the meaning of the first line, update some record(s) in the Inventory table. The SET component is the one to focus on. Change the value, i.e. SET, of the column named Price to a new value. The new value for the column follows the = sign, namely ‘0.55’ The WHERE clause is used to limit the changes to only records where the Item_name value matches Apples. Consider some of the following example of using UPDATE.
FILE=SQL Tutorial - part 1.docx by Greg Tisdell last updated on 7 October 2012 18
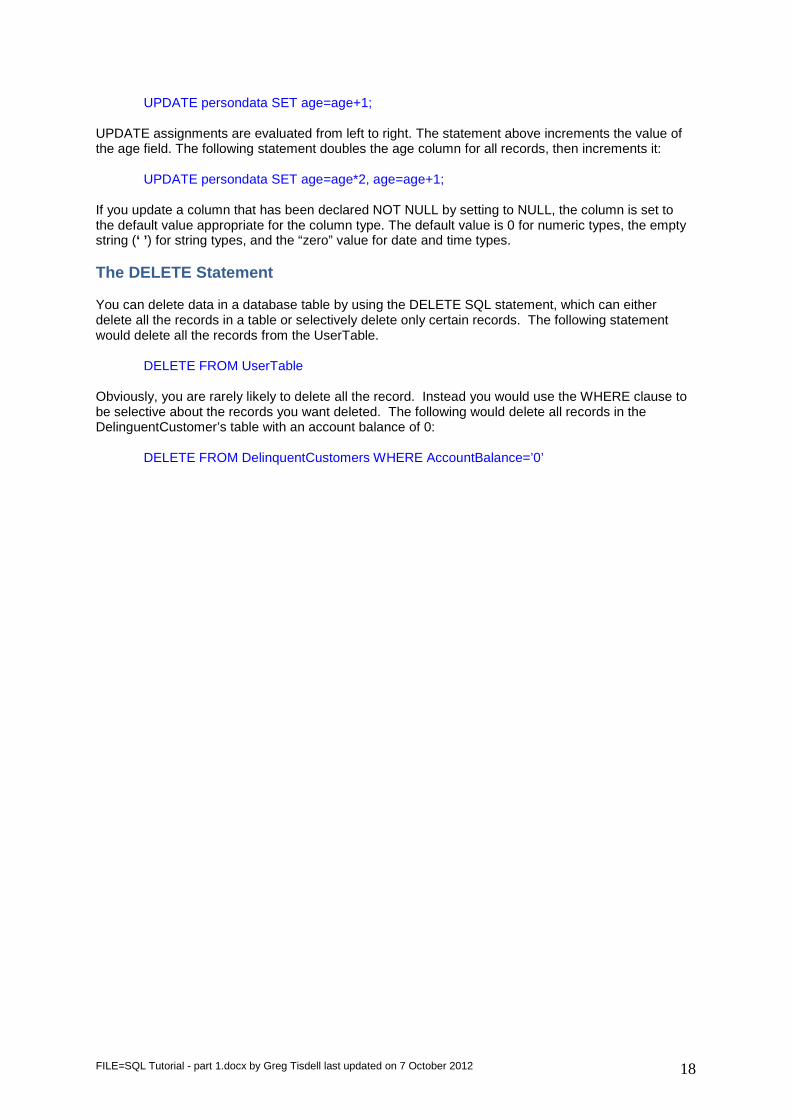
UPDATE persondata SET age=age+1;
UPDATE assignments are evaluated from left to right. The statement above increments the value of the age field. The following statement doubles the age column for all records, then increments it:
UPDATE persondata SET age=age*2, age=age+1; If you update a column that has been declared NOT NULL by setting to NULL, the column is set to the default value appropriate for the column type. The default value is 0 for numeric types, the empty string (‘ ’) for string types, and the “zero” value for date and time types. The DELETE Statement You can delete data in a database table by using the DELETE SQL statement, which can either delete all the records in a table or selectively delete only certain records. The following statement would delete all the records from the UserTable.
DELETE FROM UserTable Obviously, you are rarely likely to delete all the record. Instead you would use the WHERE clause to be selective about the records you want deleted. The following would delete all records in the DelinguentCustomer’s table with an account balance of 0:
DELETE FROM DelinquentCustomers WHERE AccountBalance=’0’

FILE=SQL Tutorial - part 1.docx by Greg Tisdell last updated on 7 October 2012 19
A Working Example Run a DOS Shell and start the MySQL interface. Enter the highlighted commands as they appear here. The output should be consistent with the content below (note I am specifying the username as root which should give permissions to do anything). C:\wamp\bin\mysql\mysql5.5.16\bin\mysql –uroot -p Welcome to the MySQL ... Type 'help;' or '\h' for help. Type '\c' to clear the buffer. mysql> help MySQL commands: Note that all text commands must be first on line and end with ';' help (\h) Display this help. ? (\?) Synonym for `help'. clear (\c) Clear command. connect (\r) Reconnect to the server. Optional arguments are db and host. ego (\G) Send command to mysql server, display result vertically. exit (\q) Exit mysql. Same as quit. go (\g) Send command to mysql server. notee (\t) Don't write into outfile. print (\p) Print current command. quit (\q) Quit mysql. rehash (\#) Rebuild completion hash. ... mysql> status; -------------- C:\wamp\bin\mysql\mysql5.5.16\bin\mysql Ver 14.14 Distrib 5.5.16 for Win64 (x86) Connection id: 5 Current user: root@localhost Server version: 5.5.16-log MySQL Community Server (GPL) Protocol version: 10 Connection: localhost via TCP/IP ... Uptime: 8 hours 8 min 53 sec Threads: 1 Questions: 799 Slow queries: 0 Opens: 43 Flush tables: 1 Open tables: 2 Queries per second avg: 0.103 -------------- mysql> create database gttest; Query OK, 1 row affected (0.00 sec) mysql> use gttest Database changed mysql> create table grocery_inventory ( -> id int not null primary key auto_increment, -> item_name varchar(50) not null, -> item_desc text, -> item_price float not null, -> curr_qty int not null -> ); Query OK, 0 rows affected (0.03 sec)
FILE=SQL Tutorial - part 1.docx by Greg Tisdell last updated on 7 October 2012 20
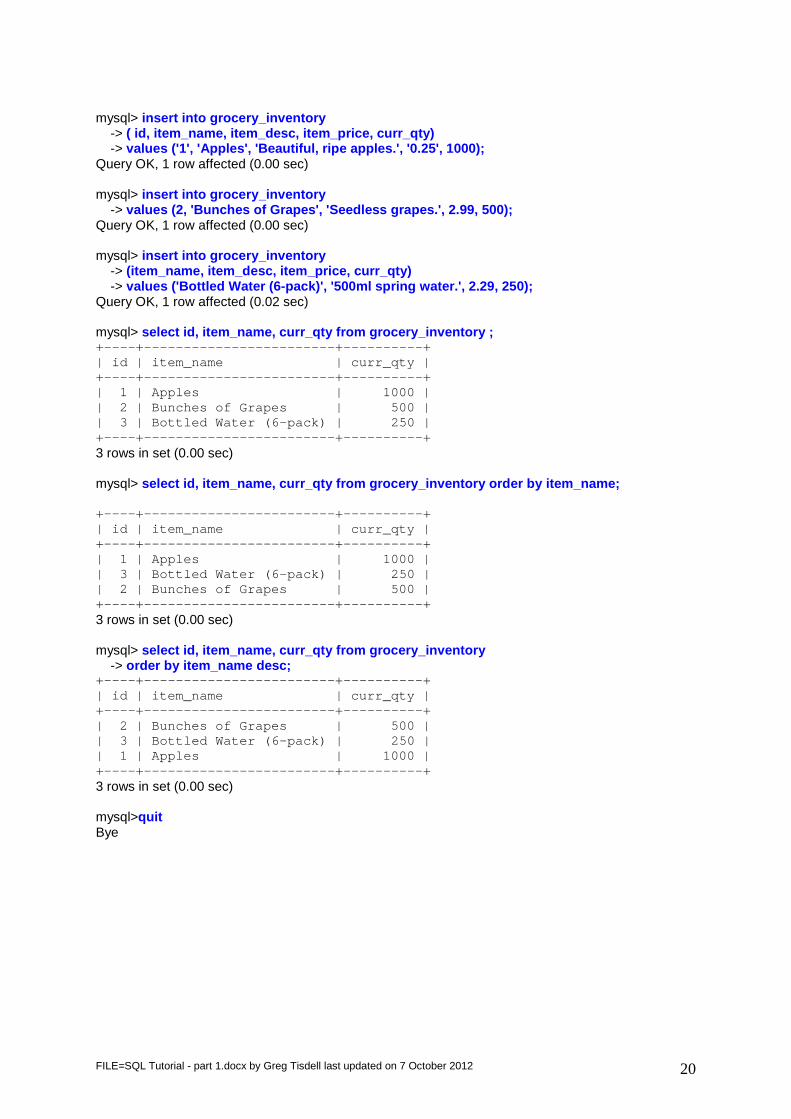
mysql> insert into grocery_inventory -> ( id, item_name, item_desc, item_price, curr_qty) -> values ('1', 'Apples', 'Beautiful, ripe apples.', '0.25', 1000); Query OK, 1 row affected (0.00 sec) mysql> insert into grocery_inventory -> values (2, 'Bunches of Grapes', 'Seedless grapes.', 2.99, 500); Query OK, 1 row affected (0.00 sec) mysql> insert into grocery_inventory -> (item_name, item_desc, item_price, curr_qty) -> values ('Bottled Water (6-pack)', '500ml spring water.', 2.29, 250); Query OK, 1 row affected (0.02 sec) mysql> select id, item_name, curr_qty from grocery_inventory ; +----+------------------------+----------+ | id | item_name | curr_qty | +----+------------------------+----------+ | 1 | Apples | 1000 | | 2 | Bunches of Grapes | 500 | | 3 | Bottled Water (6-pack) | 250 | +----+------------------------+----------+ 3 rows in set (0.00 sec) mysql> select id, item_name, curr_qty from grocery_inventory order by item_name; +----+------------------------+----------+ | id | item_name | curr_qty | +----+------------------------+----------+ | 1 | Apples | 1000 | | 3 | Bottled Water (6-pack) | 250 | | 2 | Bunches of Grapes | 500 | +----+------------------------+----------+ 3 rows in set (0.00 sec) mysql> select id, item_name, curr_qty from grocery_inventory -> order by item_name desc; +----+------------------------+----------+ | id | item_name | curr_qty | +----+------------------------+----------+ | 2 | Bunches of Grapes | 500 | | 3 | Bottled Water (6-pack) | 250 | | 1 | Apples | 1000 | +----+------------------------+----------+ 3 rows in set (0.00 sec) mysql>quit Bye
FILE=SQL Tutorial - part 1.docx by Greg Tisdell last updated on 7 October 2012 21
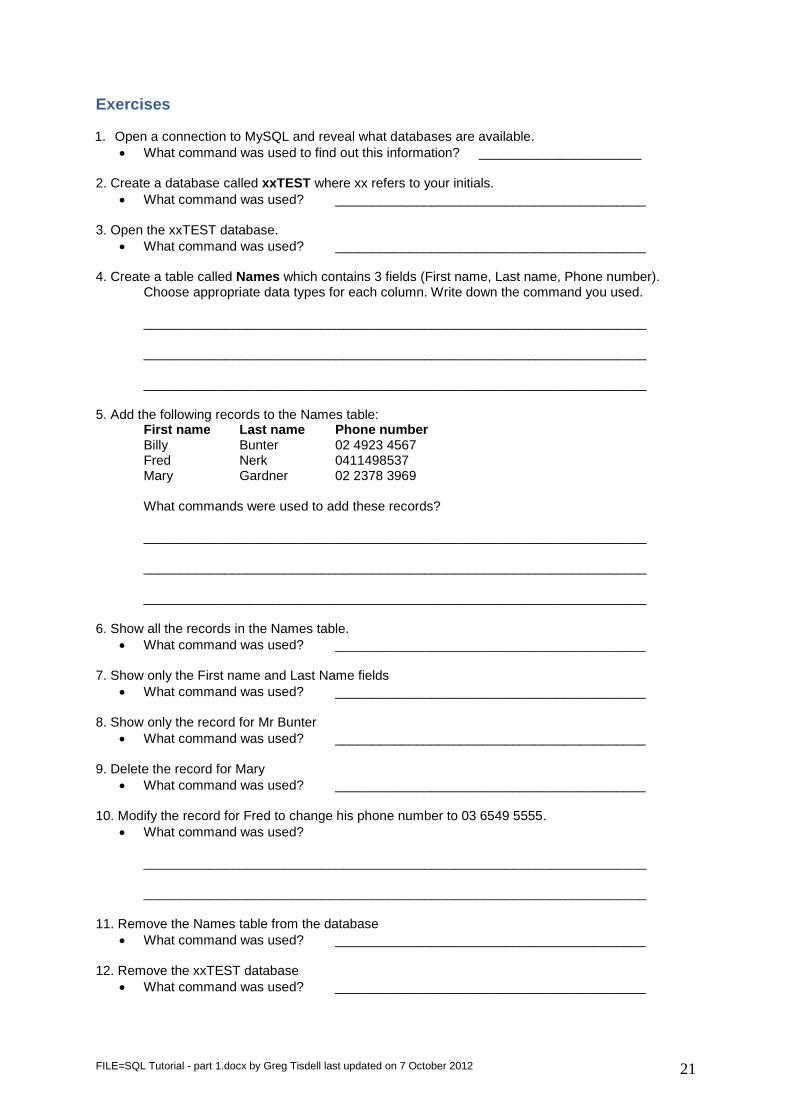
Exercises 1. Open a connection to MySQL and reveal what databases are available.
• What command was used to find out this information? ______________________ 2. Create a database called xxTEST where xx refers to your initials.
• What command was used? __________________________________________ 3. Open the xxTEST database.
• What command was used? __________________________________________ 4. Create a table called Names which contains 3 fields (First name, Last name, Phone number).
Choose appropriate data types for each column. Write down the command you used. ____________________________________________________________________ ____________________________________________________________________ ____________________________________________________________________ 5. Add the following records to the Names table: First name Last name Phone number Billy Bunter 02 4923 4567 Fred Nerk 0411498537 Mary Gardner 02 2378 3969 What commands were used to add these records? ____________________________________________________________________ ____________________________________________________________________ ____________________________________________________________________ 6. Show all the records in the Names table.
• What command was used? __________________________________________ 7. Show only the First name and Last Name fields
• What command was used? __________________________________________ 8. Show only the record for Mr Bunter
• What command was used? __________________________________________ 9. Delete the record for Mary
• What command was used? __________________________________________ 10. Modify the record for Fred to change his phone number to 03 6549 5555.
• What command was used? ____________________________________________________________________ ____________________________________________________________________ 11. Remove the Names table from the database
• What command was used? __________________________________________ 12. Remove the xxTEST database
• What command was used? __________________________________________