Embed Size (px)
Citation preview

WWW.CREATE-YOUR-STYLE.COM
CREATE YOUR STYLEMINI PROJECTS
SPRINg/SUMMER 2014InnOvATIOnS

Materials
SwAROvSkI ELEmEnTS
WWW.CREATE-YOUR-STYLE.COM
Product Group Article No. Amount Size Color Color Code
Beads 5328 150 pcs. 4 mm Light Silk 261
Beads 5328 51 pcs. 6 mm Crystal Rose Gold 001 ROGL
Pearl 5810 27 pcs. 12 mm Crystal Rose Gold Pearl 001 769
Supplies: 1 Classic Hook TierraCast® 94-6147-18 2 8 mm Round Jump Ring TierraCast® 01-0025-18 2 2 x 2 mm crimp Beads TierraCast® 01-0030-18 2 3 mm Crimp Bead Covers TierraCast® 01-0032-08 120” Beadalon 0.018 stringing wire Scotch tape
Instructions
STEP 1: Cut stringing wire into three equal pieces approximately 40” each. Slide all three pieces into one 8 mm round jump ring. Crimp all three pieces together using one crimp Bead. Attach one crimp Bead cover.
STEP 2: Working the three stringing wires as one, slide one Pearl (art. 5810, 12 mm, Crystal Rose gold Pearl) onto it.
STEP 3: Working two wires as one, slide on one Bead (art. 5328, 6 mm, Crystal Rose gold) 2X and one Pearl (art. 5810, 12 mm). On the remaining wire, slide on three Beads (art. 5328, 4 mm, Light Silk), one Bead (art. 5328, 6 mm, Crystal Rose gold) 2X, and three Beads (art. 5328, 4 mm, Light Silk).
STEP 4: Using the two wires exiting the 12 mm Pearl, on one wire slide on one Bead (art. 5328, 6 mm, Crystal Rose gold) 2x and on the second wire slide on three Beads (art. 5328, 4 mm, Light Silk), one Bead (art. 5328, 6 mm, Crystal Rose gold) 2X, and three Beads (art. 5328, 4 mm, Light Silk).
STEP 5: Using one wire exiting the 6 mm Bicone and one wire with the 4 mm Bicones on it (exiting the first Pearl), slide on one Pearl (art. 5810, 12 mm, Crystal Rose gold).
Continuation on next page
LOmBARdSTREET
mInI PROjECT InnOvATIOnS SPRInG/SUmmER 2014

WWW.CREATE-YOUR-STYLE.COM
“Lombard Street”, page 2
STEP 6: Using one wire exiting the 3rd Pearl add one Bead (art. 5328, 6 mm, Crystal Rose gold) 2X. On the second wire exiting the third Pearl add on three Beads (art. 5328, 4 mm, Light Silk), one Bead (art. 5328, 6 mm, Crystal Rose gold) 2X, and three Beads (art. 5328, 4 mm, Light Silk).
STEP 7: Using the wire with the 6 mm Bicone and the wire exiting the second Pearl with the 4 mm Bicones on it slide on one Pearl (art. 5810, 12 mm, Crystal Rose gold).
STEP 8: Continue weaving this pattern to desired length. Note: Wire and Bead supply list will make a 20” necklace.
STEP 9: Hint: If you work the piece flat on a table you will see each loop that you are forming. They should go to the right and then the left alternately.
STEP 10: To finish slide on one Pearl (art. 5810, 12 mm, Crystal Rose gold) onto the two wires exiting the 6 mm Bicone and the one wire exiting the 4 mm Bicones.
STEP 11: Slide on one crimp Bead and remaining jump ring. Crimp to close and add crimp cover. Add S Clasp to complete.
Materials
SwAROvSkI ELEmEnTS
WWW.CREATE-YOUR-STYLE.COM
Product Group Article No. Amount Size Color Color Code
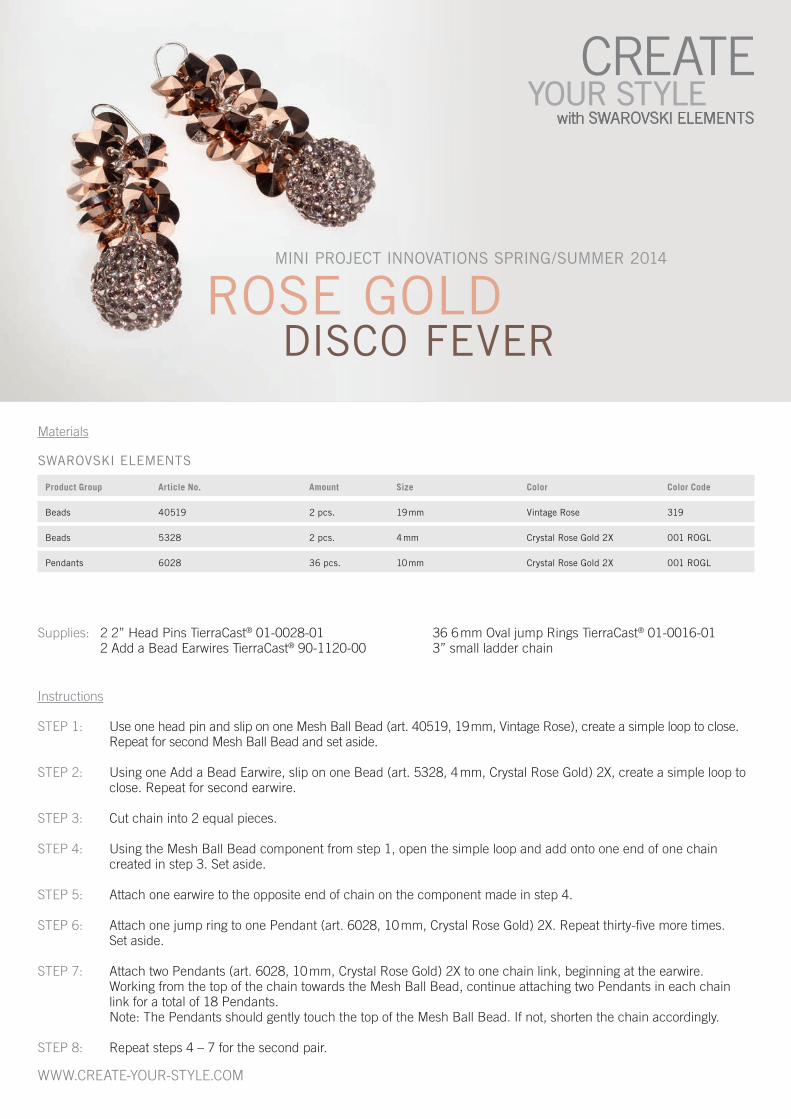
Beads 40519 2 pcs. 19 mm vintage Rose 319
Beads 5328 2 pcs. 4 mm Crystal Rose Gold 2X 001 ROGL
Pendants 6028 36 pcs. 10 mm Crystal Rose Gold 2X 001 ROGL
Supplies: 2 2” Head Pins TierraCast® 01-0028-01 36 6 mm Oval jump Rings TierraCast® 01-0016-01 2 Add a Bead Earwires TierraCast® 90-1120-00 3” small ladder chain
Instructions
STEP 1: Use one head pin and slip on one Mesh Ball Bead (art. 40519, 19 mm, Vintage Rose), create a simple loop to close. Repeat for second Mesh Ball Bead and set aside.
STEP 2: Using one Add a Bead Earwire, slip on one Bead (art. 5328, 4 mm, Crystal Rose gold) 2X, create a simple loop to close. Repeat for second earwire.
STEP 3: Cut chain into 2 equal pieces.
STEP 4: Using the Mesh Ball Bead component from step 1, open the simple loop and add onto one end of one chain created in step 3. Set aside.
STEP 5: Attach one earwire to the opposite end of chain on the component made in step 4.
STEP 6: Attach one jump ring to one Pendant (art. 6028, 10 mm, Crystal Rose gold) 2X. Repeat thirty-five more times. Set aside.
STEP 7: Attach two Pendants (art. 6028, 10 mm, Crystal Rose gold) 2X to one chain link, beginning at the earwire. Working from the top of the chain towards the Mesh Ball Bead, continue attaching two Pendants in each chain link for a total of 18 Pendants. Note: The Pendants should gently touch the top of the Mesh Ball Bead. If not, shorten the chain accordingly.
STEP 8: Repeat steps 4 – 7 for the second pair.
ROSE GOLd dISCO FEvER
mInI PROjECT InnOvATIOnS SPRInG/SUmmER 2014

Continuation on next page
Materials
SwAROvSkI ELEmEnTS
WWW.CREATE-YOUR-STYLE.COM
Product Group Article No. Amount Size Color Color Code
Beads 5000 8 pcs. 8 mm Crystal Rose Gold 001 ROGL
Beads 5040 8 pcs. 6 mm Crystal Silver night 001 SInI
Beads 5328 4 pcs. 6 mm Crystal Rose Gold 2x 001 ROGL
Beads 5328 8 pcs. 4 mm Crystal Rose Gold 2x 001 ROGL
Pearls 5810 4 pcs. 8 mm Crystal Grey Pearl 001 731
Pearls 5840 8 pcs. 6 mm Rose Gold 001 ROGL
Supplies: 7 large hammered discs TierraCast 94-3148-18 6 jump rings Tierra Cast 01-0020-08 1 magnetic clasp 2 oval jump rings TierraCast 01-0018-08 40 head pins TierraCast 01-0028-08
Instructions
STEP 1: Attach each of the seven hammered discs together using the large round jump rings to create the base of the bracelet.
STEP 2: Using one copper head pin, slip on one Bead (art. 5000, 8 mm, Crystal Rose gold) and create a simple loop. Repeat seven times more and set aside.
STEP 3: Using one copper head pin, slip on one Bead (art. 5328, 6 mm, Crystal Rose gold) 2x and create a simple loop. Repeat three times more and set aside.
STEP 4: Using one copper head pin, slip on one Bead (art. 5328, 4 mm, Crystal Rose gold) 2x and create a simple loop. Repeat seven times more and set aside.
STEP 5: Using one copper head pin, slip on one Bead (art. 5040, 6 mm, Crystal Silver Night) and create a simple loop. Repeat seven times more and set aside.
RInGS OFGOLd BRACELET
mInI PROjECT InnOvATIOnS SPRInG/SUmmER 2014
WWW.CREATE-YOUR-STYLE.COM
“Rings of gold Bracelet”, page 2
STEP 6: Using one copper head pin, slip on one Crystal Pearl (art. 5810, 8 mm, Crystal grey Pearl) and create a simple loop. Repeat three times more and set aside.
STEP 7: Using one copper head pin, slip on one Crystal Pearl (art. 5840, 6 mm, Crystal Rose gold) and create a simple loop. Repeat seven times more and set aside.
STEP 8: Lay the bracelet base flat and begin with the second jump ring from the left. Slightly open the jump ring (making sure it doesn’t slip out of the hammered discs). Add ten looped Beads and Crystal Pearls (created in steps 2 – 7) in any order desired. Carefully close the jump ring. Repeat this step three times more in the next three jump rings going from left to right. Note: The clusters of Crystals and Crystal Pearls should be attached to the jump rings between the 2nd – 6th hammered discs.
STEP 9: Attach one small jump ring to one half of the magnetic clasp and one end of the ha mmered disc. Repeat for the opposite side.

Continuation on next page
Materials
SwAROvSkI ELEmEnTS
WWW.CREATE-YOUR-STYLE.COM
Product Group Article No. Amount Size Color Color Code
Round Stones 1122 2 pcs. 12 mm Light Silk 261
Beads 5026 2 pcs. 10 mm Light Silk 261
Beads 5328 16 pcs. 4 mm Light Silk 261
Supplies: 2 Add a Bead Earwires TierraCast® 90-5128-00 2 12 mm Twisted Round 1-3 Links TierraCast® 94-3121-27 10” Brass Cable Chain 6x4 TierraCast® 20-0425-27 14 3 mm Disk Beads TierraCast® 93-0440-27 10” 24 guage Brass Wire 2 Part Epoxy
Instructions
STEP 1: glue in Rivoli Round Stone (art. 1122, 12 mm, Light Silk) onto Twisted Round link. Repeat one more time and set aside to cure.
STEP 2: Slide on one Bead (art. 5328, 4 mm, Light Silk) onto Add a Bead Earwire and make a simple loop. Repeat one more time and set aside.
STEP 3: Cut four pieces of chain to have nine links in each segment. Cut two pieces of chain to have seven links in each segment. Set aside.
STEP 4: Cut six 1” pieces of wire and two 2” pieces of wire. Set aside.
STEP 5: Using a 2” piece of wire make a 2 mm fold at one end to create an end.
STEP 6: Slide on one Bead (art. 5328, 4 mm, Light Silk), one disk Bead, and one Bead (art. 5026, 10 mm, Light Silk). Wire wrap to one end of seven link chain piece.
SmOOTh AS LIGhT SILk
mInI PROjECT InnOvATIOnS SPRInG/SUmmER 2014
WWW.CREATE-YOUR-STYLE.COM
“Smooth as Light Silk”, page 2
STEP 7: Using one 1” piece of wire turn a double loop, slide on one Bead (art. 5328, 4 mm, Light Silk), and from the drop end, slip into the second link of the chain, slide on one Bead (art. 5328, 4 mm, Light Silk) and turn a double loop to end wire.
STEP 8: Using one 1” piece of wire turn a double loop, slide on one Bead (art. 5328, 4 mm, Light Silk), and from the drop end, slip into the fourth link of the chain, slide on one Bead (art. 5328, 4 mm, Light Silk) and turn a double loop to end wire.
STEP 9: Using one 1” piece of wire turn a double loop, slide on one Bead (art. 5328, 4 mm, Light Silk), and from the drop end, slip into the sixth link of the chain, slide on one Bead (art. 5328, 4 mm, Light Silk) and turn a double loop to end wire.
STEP 10: Using a nine link piece of chain, open chain link and attach to an outside loop on the twisted round link, close chain link. Repeat this step for the opposite outside loop on the twisted round link. Note: Make sure the Rivoli Round Stone component is completely dry before manipulating it.
STEP 11: Using the seven link chain piece, open the end link from the opposite side of the drop and attach to the center loop on the Twisted Round link, close chain link.
STEP 12: Using one ear wire from step 2, open loop and attach to the single loop on top of the twisted round link. Close ear wire loop.
STEP 13: Repeat steps 5 – 12 for the second pair.

Materials
SwAROvSkI ELEmEnTS
WWW.CREATE-YOUR-STYLE.COM
Product Group Article No. Amount Size Color Color Code
Pendants 6026 80 pcs. 13 mm Black diamond 215
Pendants 6026 40 pcs. 20 mm Black diamond 215
Pendants 6026 11 pcs. 27 mm Black diamond 215
Supplies: 1 Heirloom Clasp TierraCast® 94-6070-13 2 Large Hammertone Rings TierraCast® 94-3087-13 3 6 mm Oval Jump Rings TierraCast® 01-0018-13 2 2x2 Crimp Beads TierraCast® 01-0030-13 2 3 mm Crimp Covers TierraCast® 01-0032-13 24” Beadalon 0.018 stringing wire
Instructions
STEP 1: Using one large Hammertone Ring crimp on one end of Beading wire. Attached crimp cover.
STEP 2: Slide on forty Pendants (art. 6026, 13 mm, Black Diamond), twenty Pendants (art. 6026, 20 mm, Black Diamond), eleven Pendants (art. 6026, 27 mm, Black Diamond), twenty Pendants (art. 6026, 20 mm, Black Diamond), and forty Pendants (art. 6026, 13 mm, Black Diamond). Slide on crimp Bead and crimp to second large hammertone ring. Attach crimp cover.
STEP 3: Using two oval jump rings attach bar end of Heirloom clasp to one end of necklace.
STEP 4: Using one oval jump ring attach round end of Heirloom clasp to other end of necklace.
AFRICAnwEddInG nECkLACE
mInI PROjECT InnOvATIOnS SPRInG/SUmmER 2014

Materials
SwAROvSkI ELEmEnTS
WWW.CREATE-YOUR-STYLE.COM
Product Group Article No. Amount Size Color Color Code
Beads 5000 2 pcs. 4 mm Black diamond 215
Pendants 6026 10 pcs. 13 mm Black diamond 215
Supplies: 2 1” Hammertone Rings TierraCast® 94-3095-13 12 6 mm Oval Jump Rings TierraCast® 01-0018-13 2 Add a Bead Earwires TierraCast® 90-5129-00
Instructions
STEP 1: Attach one jump ring to each of the ten Pendants (art. 6026, 13 mm, Black Diamond) and set aside.
STEP 2: Attach five of the Pendants from Step 1 to one Hammertone Ring and set aside.
STEP 3: Using ear wire slide on one Bead (art. 5000, 4 mm, Black Diamond) and turn a simple loop.
STEP 4: Using a jumpring attach the earwire to the center of the Hammertone Ring.
STEP 5: Repeat Steps 2-5 to make second earring.
CABOChETTEhOOP EARRInGS
mInI PROjECT InnOvATIOnS SPRInG/SUmmER 2014

Materials
SwAROvSkI ELEmEnTS
WWW.CREATE-YOUR-STYLE.COM
Product Group Article No. Amount Size Color Color Code
Beads 5026 22 pcs. 6 mm Crystal Bronze Shade 001 BRSh
Beads 5026 20 pcs. 8 mm Crystal Bronze Shade 001 BRSh
Beads 5026 19 pcs. 10 mm Crystal Bronze Shade 001 BRSh
Beads 5028/4 50 pcs. 6 mm Crystal Golden Shadow 001 GShA
Beads 5028/4 37 pcs. 8 mm Crystal Golden Shadow 001 GShA
Beads 5028/4 30 pcs. 10 mm Crystal Golden Shadow 001 GShA
Beads 40512 1 pc. 12 mm Crystal Golden Shadow 001 GShA
Beads 40515 1 pc. 15 mm Crystal Golden Shadow 001 GShA
Beads 40519 1 pc. 19 mm Crystal Golden Shadow 001 GShA
Supplies: 1 Beaded Hook & Eye TierraCast® 94-6085-26 2 Beaded 5-1 Links TierraCast® 94-3056-26 2 2” Eye Pins TierraCast® 01-0027-09 6 2x2 crimp Beads TierraCast® 01-0030-09 6 3 mm crimp covers TierraCast® 01-0032-09 63” Beadalon 0.018 stringing wire
Instructions
STEP 1: Cut Beading wire into three pieces (one 19”, one 21” and one 23”).
STEP 2: Using the 19” piece of wire crimp wire onto the first ring in the Beaded 5-1 link and attach crimp cover. Slide on twenty-three Beads (art. 5028/4, 6 mm, Crystal golden Shadow), one Mesh Ball Bead (art. 40512, 12 mm, Crystal golden Shadow), twenty-two Beads (art. 5026, 6 mm, Crystal Bronze Shade), and twenty-five Beads (art. 5028/4, 6 mm, Crystal golden Shadow). Slide on crimp Bead and crimp to first ring in the second Beaded 5-1 link and attach crimp cover.
GLOBES OFSATURn nECkLACE
mInI PROjECT InnOvATIOnS SPRInG/SUmmER 2014
Continuation on next page
WWW.CREATE-YOUR-STYLE.COM
“globes of Saturn Necklace”, page 2
STEP 3: Using the 21” piece of wire crimp wire onto the third (middle) ring in the beaded 5-1 link and attach crimp cover. Slide on eighteen Beads (art. 5028/4, 8 mm, Crystal golden Shadow), one Mesh Ball Bead (art. 40515, 15 mm, Crystal golden Shadow), twenty Beads (art. 5026, 8 mm, Crystal Bronze Shade), and nineteen Beads (art. 5028/4, 8 mm, Crystal golden Shadow). Slide on crimp Bead and crimp to third (middle) ring in the second beaded 5-1 link and attach crimp cover.
STEP 4: Using the 23” piece of wire crimp wire onto the fifth ring in the beaded 5-1 link and attach crimp cover. Slide on fifteen Beads (art. 5028/4, 10 mm, Crystal golden Shadow), one Mesh Ball Bead (art. 40519, 19 mm, Crystal golden Shadow), nineteen Beads (art. 5026, 10 mm, Crystal Bronze Shade), and fifteen Beads (art. 5028/4, 10 mm, Crystal golden Shadow). Slide on crimp Bead and crimp to fifth ring in the second beaded 5-1 link and attach crimp cover.
STEP 5: Using an eyepin slide on one Bead (art. 5028/4, 6 mm, Crystal golden Shadow) and make a simple loop. Repeat one more time and set aside.
STEP 6: Using the link made in step 5 attach one side of the hook and eye to the beaded bar link. Repeat for the other side of the necklace.
Materials
SwAROvSkI ELEmEnTS
WWW.CREATE-YOUR-STYLE.COM
Product Group Article No. Amount Size Color Color Code
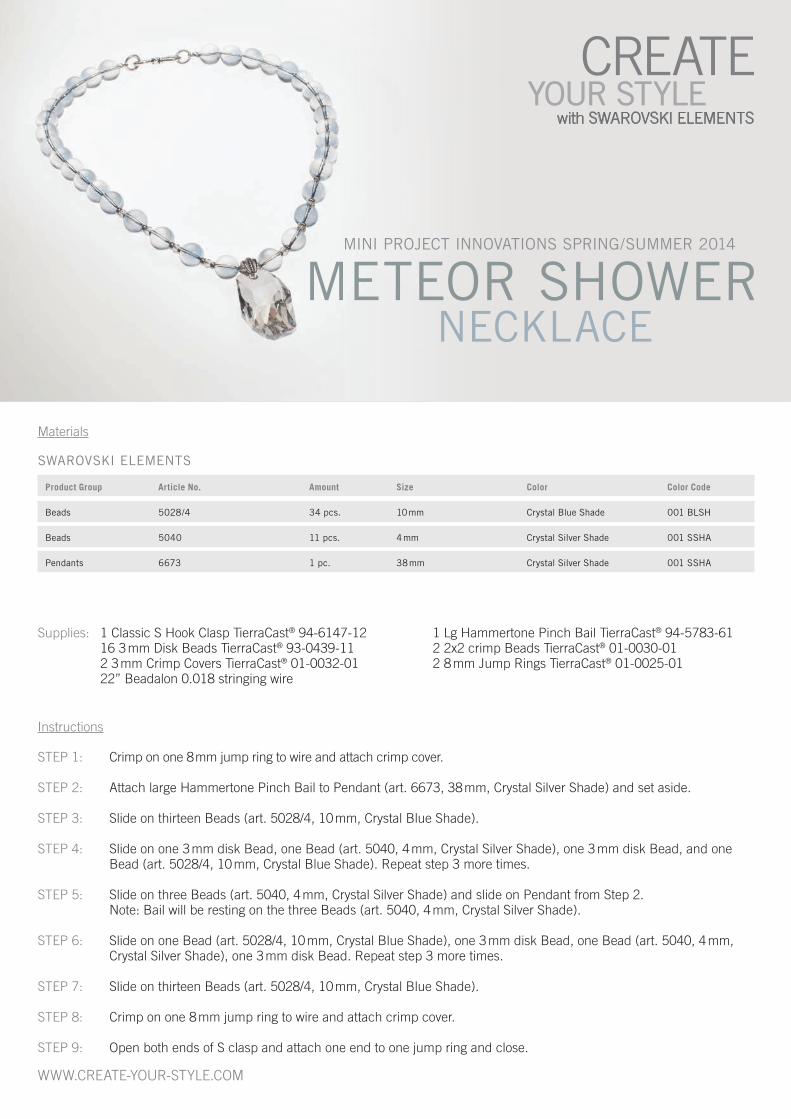
Beads 5028/4 34 pcs. 10 mm Crystal Blue Shade 001 BLSh
Beads 5040 11 pcs. 4 mm Crystal Silver Shade 001 SShA
Pendants 6673 1 pc. 38 mm Crystal Silver Shade 001 SShA
Supplies: 1 Classic S Hook Clasp TierraCast® 94-6147-12 1 Lg Hammertone Pinch Bail TierraCast® 94-5783-61 16 3 mm Disk Beads TierraCast® 93-0439-11 2 2x2 crimp Beads TierraCast® 01-0030-01 2 3 mm Crimp Covers TierraCast® 01-0032-01 2 8 mm Jump Rings TierraCast® 01-0025-01 22” Beadalon 0.018 stringing wire
Instructions
STEP 1: Crimp on one 8 mm jump ring to wire and attach crimp cover.
STEP 2: Attach large Hammertone Pinch Bail to Pendant (art. 6673, 38 mm, Crystal Silver Shade) and set aside.
STEP 3: Slide on thirteen Beads (art. 5028/4, 10 mm, Crystal Blue Shade).
STEP 4: Slide on one 3 mm disk Bead, one Bead (art. 5040, 4 mm, Crystal Silver Shade), one 3 mm disk Bead, and one Bead (art. 5028/4, 10 mm, Crystal Blue Shade). Repeat step 3 more times.
STEP 5: Slide on three Beads (art. 5040, 4 mm, Crystal Silver Shade) and slide on Pendant from Step 2. Note: Bail will be resting on the three Beads (art. 5040, 4 mm, Crystal Silver Shade).
STEP 6: Slide on one Bead (art. 5028/4, 10 mm, Crystal Blue Shade), one 3 mm disk Bead, one Bead (art. 5040, 4 mm, Crystal Silver Shade), one 3 mm disk Bead. Repeat step 3 more times.
STEP 7: Slide on thirteen Beads (art. 5028/4, 10 mm, Crystal Blue Shade).
STEP 8: Crimp on one 8 mm jump ring to wire and attach crimp cover.
STEP 9: Open both ends of S clasp and attach one end to one jump ring and close.
mETEOR ShOwERnECkLACE
mInI PROjECT InnOvATIOnS SPRInG/SUmmER 2014

Continuation on next page
Materials
SwAROvSkI ELEmEnTS
WWW.CREATE-YOUR-STYLE.COM
Product Group Article No. Amount Size Color Color Code
Beads 5028/4 12 pcs. 6 mm Crystal Blue Shade 001 BLSh
Beads 5040 10 pcs. 4 mm Crystal Silver Shade 001 SShA
Pendants 6673 2 pcs. 28 mm Crystal Silver Shade 001 SShA
Supplies: 2 Lg Hammertone Pinch Bail TierraCast® 94-5783-61 2 Add a Bead Earwires TierraCast® 90-1120-00 2 round jump rings TierraCast® 01-0024-01 4 2” head pins TierraCast® 01-0029-01 2 1” Bar Links TierraCast® 94-3106-61 4 8 mm grooved Spacer LH Beads TierraCast® 94-5505-12 12” 20 gauge Beadalon Artistic Wire
Instructions
STEP 1: Cut 12 1” pieces of 20 guage wire and set aside.
STEP 2: Slide on one Bead (art. 5040, 4 mm, Crystal Silver Shade) to one Add a Bead Earrwire and create a simple loop. Repeat one more time and set aside.
STEP 3: Attach large Hammertone Pinch Bail to one Pendant (art. 6673, 28 mm, Crystal Silver Shade). Repeat one more time and set aside.
STEP 4: Take one wire from step 1 and create a simple, slide on one Bead (art. 5028/4, 6 mm, Crystal Blue Shade), and turn a simple loop for opposite side. Repeat eleven more times and set aside.
STEP 5: Using three components from step 4 chain link together. Repeat three more times and set aside.
STEP 6: Using two sets of links from step 5 attach one end to jump ring.
mETEOR ShOwEREARRInGS
mInI PROjECT InnOvATIOnS SPRInG/SUmmER 2014

WWW.CREATE-YOUR-STYLE.COM
“Meteor Shower Earrings”, page 2
STEP 7: Using one head pin add one Bead (art. 5040, 4 mm, Crystal Silver Shade), slip headpin through hole on bar link, and add one Bead (art. 5040, 4 mm, Crystal Silver Shade). Close wire with simple loop.
STEP 8: Slide on one grooved spacer LH Bead to bar link, one Pendant from step 3, one grooved spacer LH Bead.
STEP 9: Using one head pin, add one Bead (art. 5040, 4 mm Crystal Silver Shade), slip headpin through 2nd hole on bar link, and add one Bead (art. 5040, 4 mm, Crystal Silver Shade). Close wire with simple loop.
STEP 10: Using one component made in step 6 attach each open end in the simple loops on the bar link component made in step 9.
STEP 11: Attach earwire from step 2 to the jump ring to complete earring.
STEP 12: Repeat steps 5 – 11 to make second earring.