Embed Size (px)
Citation preview

Creating PASSS Application Records in SACWIS
Page 1 of 15 Last Revised: 07/01/2013
To enter a PASSS Application, complete the following steps:
Important: A security user group assignment of Eligibility Specialist is required to enter a PASS Application. A security user group assignment of Agency Fiscal Worker is required to process PASSS payments.
Navigating to the Adoption Subsidy Program Screen
1. From the SACWIS Home screen, click the Financial tab.
2. Click the Eligibility tab.
3. Select the PASSS link. The PASSS Program screen appears.
4. In the Child Selection section, click the Person Search button to locate the appropriate child.
Note: If you know the child’s Person ID you can enter the number in the Person ID field.
5. Click the Go button.
The Child Selection section populates with the child’s demographic information as shown below.
Sacwis, Susie
1234567
Creating PASSS Application Records in SACWIS
Page 2 of 15 Last Revised: 07/01/2013
Adding a PASSS Application
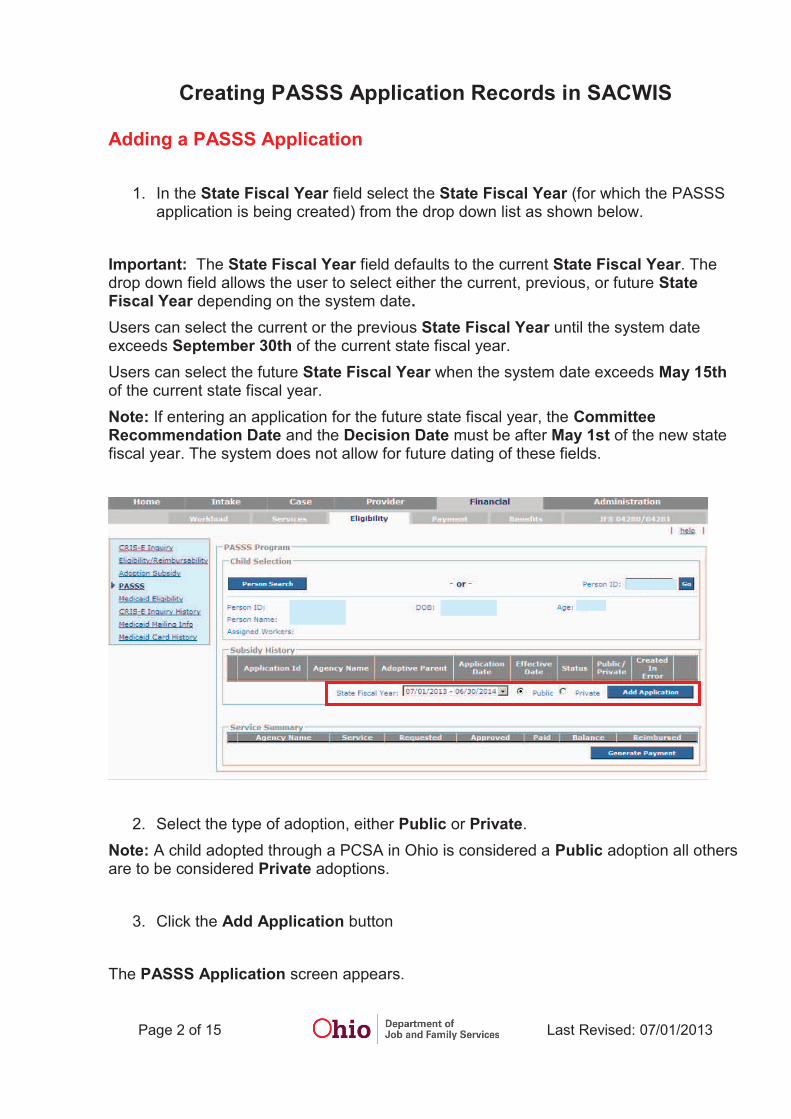
1. In the State Fiscal Year field select the State Fiscal Year (for which the PASSS application is being created) from the drop down list as shown below.
Important: The State Fiscal Year field defaults to the current State Fiscal Year. The drop down field allows the user to select either the current, previous, or future State Fiscal Year depending on the system date.
Users can select the current or the previous State Fiscal Year until the system date exceeds September 30th of the current state fiscal year.
Users can select the future State Fiscal Year when the system date exceeds May 15th of the current state fiscal year.
Note: If entering an application for the future state fiscal year, the Committee Recommendation Date and the Decision Date must be after May 1st of the new state fiscal year. The system does not allow for future dating of these fields.
2. Select the type of adoption, either Public or Private.
Note: A child adopted through a PCSA in Ohio is considered a Public adoption all others are to be considered Private adoptions.
3. Click the Add Application button
The PASSS Application screen appears.
Creating PASSS Application Records in SACWIS
Page 3 of 15 Last Revised: 07/01/2013
Completing the PASSS Application
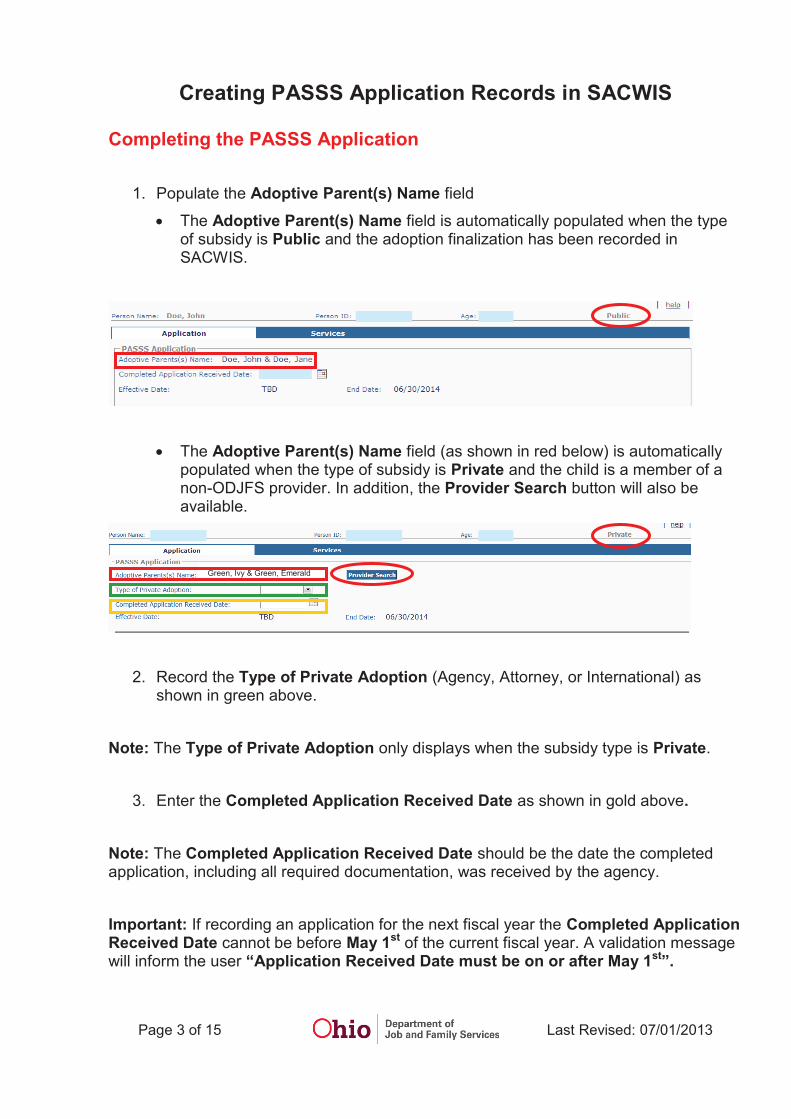
1. Populate the Adoptive Parent(s) Name field
· The Adoptive Parent(s) Name field is automatically populated when the type of subsidy is Public and the adoption finalization has been recorded in SACWIS.
· The Adoptive Parent(s) Name field (as shown in red below) is automatically populated when the type of subsidy is Private and the child is a member of a non-ODJFS provider. In addition, the Provider Search button will also be available.
2. Record the Type of Private Adoption (Agency, Attorney, or International) as shown in green above.
Note: The Type of Private Adoption only displays when the subsidy type is Private.
3. Enter the Completed Application Received Date as shown in gold above.
Note: The Completed Application Received Date should be the date the completed application, including all required documentation, was received by the agency.
Important: If recording an application for the next fiscal year the Completed Application Received Date cannot be before May 1st of the current fiscal year. A validation message will inform the user “Application Received Date must be on or after May 1st”.
Green, Ivy & Green, Emerald
Creating PASSS Application Records in SACWIS
Page 4 of 15 Last Revised: 07/01/2013
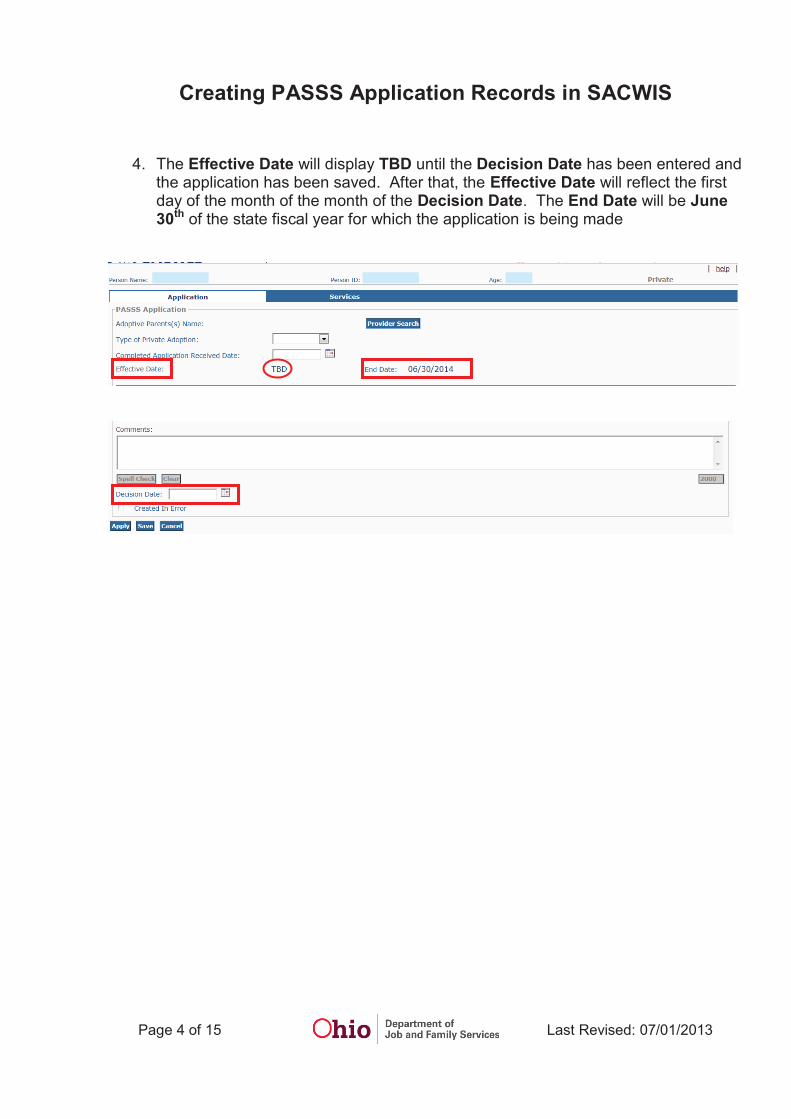
4. The Effective Date will display TBD until the Decision Date has been entered and the application has been saved. After that, the Effective Date will reflect the first day of the month of the month of the Decision Date. The End Date will be June 30th of the state fiscal year for which the application is being made
Creating PASSS Application Records in SACWIS
Page 5 of 15 Last Revised: 07/01/2013
Completing the Family Data Section of the PASSS Application
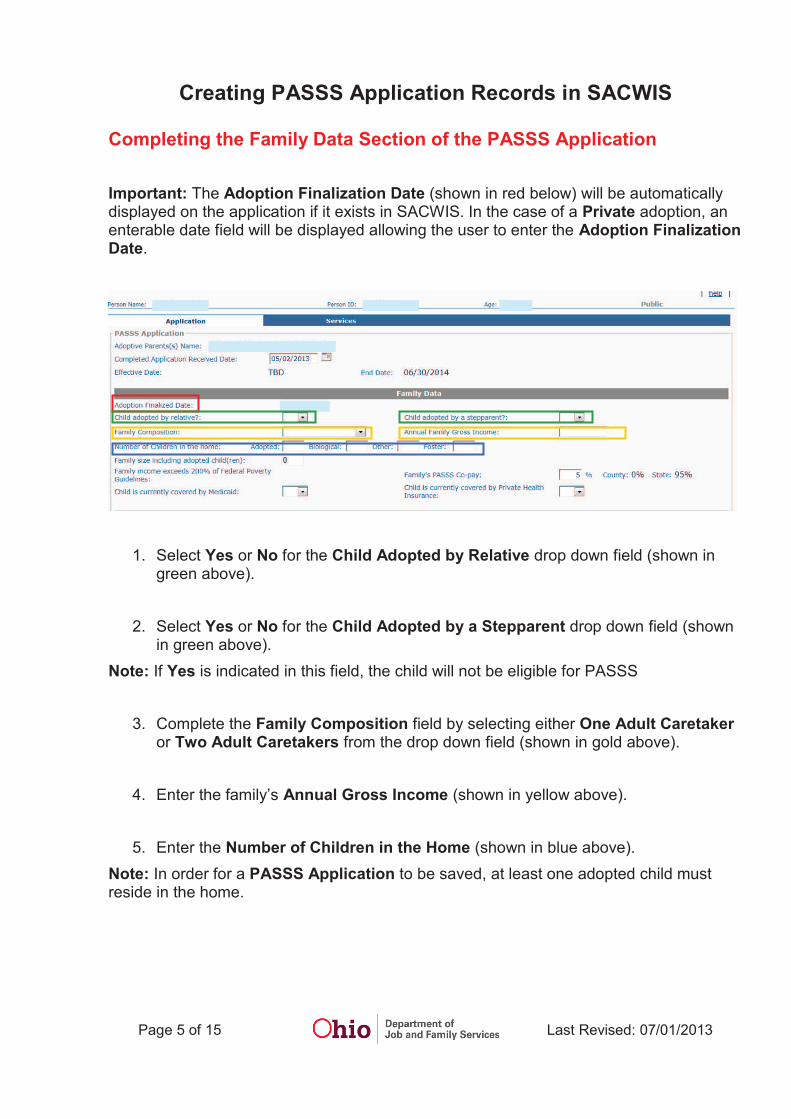
Important: The Adoption Finalization Date (shown in red below) will be automatically displayed on the application if it exists in SACWIS. In the case of a Private adoption, an enterable date field will be displayed allowing the user to enter the Adoption Finalization Date.
1. Select Yes or No for the Child Adopted by Relative drop down field (shown in green above).
2. Select Yes or No for the Child Adopted by a Stepparent drop down field (shown in green above).
Note: If Yes is indicated in this field, the child will not be eligible for PASSS
3. Complete the Family Composition field by selecting either One Adult Caretaker or Two Adult Caretakers from the drop down field (shown in gold above).
4. Enter the family’s Annual Gross Income (shown in yellow above).
5. Enter the Number of Children in the Home (shown in blue above).
Note: In order for a PASSS Application to be saved, at least one adopted child must reside in the home.
Creating PASSS Application Records in SACWIS
Page 6 of 15 Last Revised: 07/01/2013
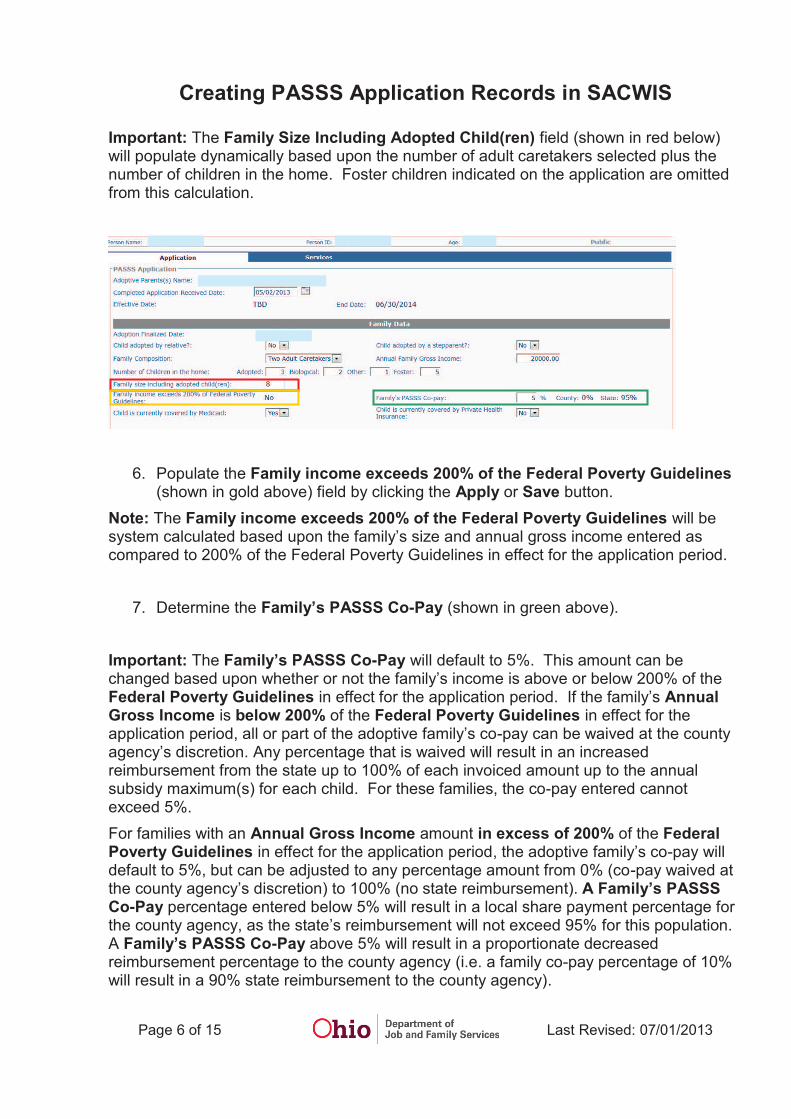
Important: The Family Size Including Adopted Child(ren) field (shown in red below) will populate dynamically based upon the number of adult caretakers selected plus the number of children in the home. Foster children indicated on the application are omitted from this calculation.
6. Populate the Family income exceeds 200% of the Federal Poverty Guidelines (shown in gold above) field by clicking the Apply or Save button.
Note: The Family income exceeds 200% of the Federal Poverty Guidelines will be system calculated based upon the family’s size and annual gross income entered as compared to 200% of the Federal Poverty Guidelines in effect for the application period.
7. Determine the Family’s PASSS Co-Pay (shown in green above).
Important: The Family’s PASSS Co-Pay will default to 5%. This amount can be changed based upon whether or not the family’s income is above or below 200% of the Federal Poverty Guidelines in effect for the application period. If the family’s Annual Gross Income is below 200% of the Federal Poverty Guidelines in effect for the application period, all or part of the adoptive family’s co-pay can be waived at the county agency’s discretion. Any percentage that is waived will result in an increased reimbursement from the state up to 100% of each invoiced amount up to the annual subsidy maximum(s) for each child. For these families, the co-pay entered cannot exceed 5%.
For families with an Annual Gross Income amount in excess of 200% of the Federal Poverty Guidelines in effect for the application period, the adoptive family’s co-pay will default to 5%, but can be adjusted to any percentage amount from 0% (co-pay waived at the county agency’s discretion) to 100% (no state reimbursement). A Family’s PASSS Co-Pay percentage entered below 5% will result in a local share payment percentage for the county agency, as the state’s reimbursement will not exceed 95% for this population. A Family’s PASSS Co-Pay above 5% will result in a proportionate decreased reimbursement percentage to the county agency (i.e. a family co-pay percentage of 10% will result in a 90% state reimbursement to the county agency).
Creating PASSS Application Records in SACWIS
Page 7 of 15 Last Revised: 07/01/2013
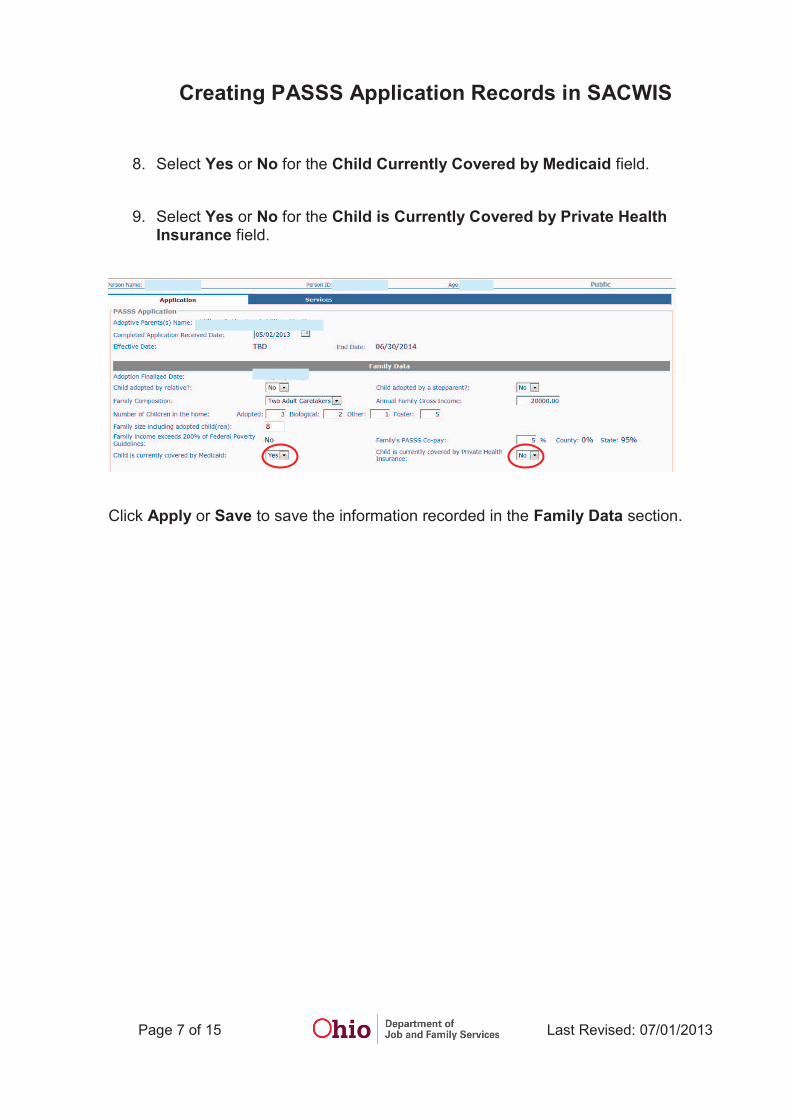
8. Select Yes or No for the Child Currently Covered by Medicaid field.
9. Select Yes or No for the Child is Currently Covered by Private Health Insurance field.
Click Apply or Save to save the information recorded in the Family Data section.
Creating PASSS Application Records in SACWIS
Page 8 of 15 Last Revised: 07/01/2013
Completing the Special Need Criteria Section of the PASSS Application
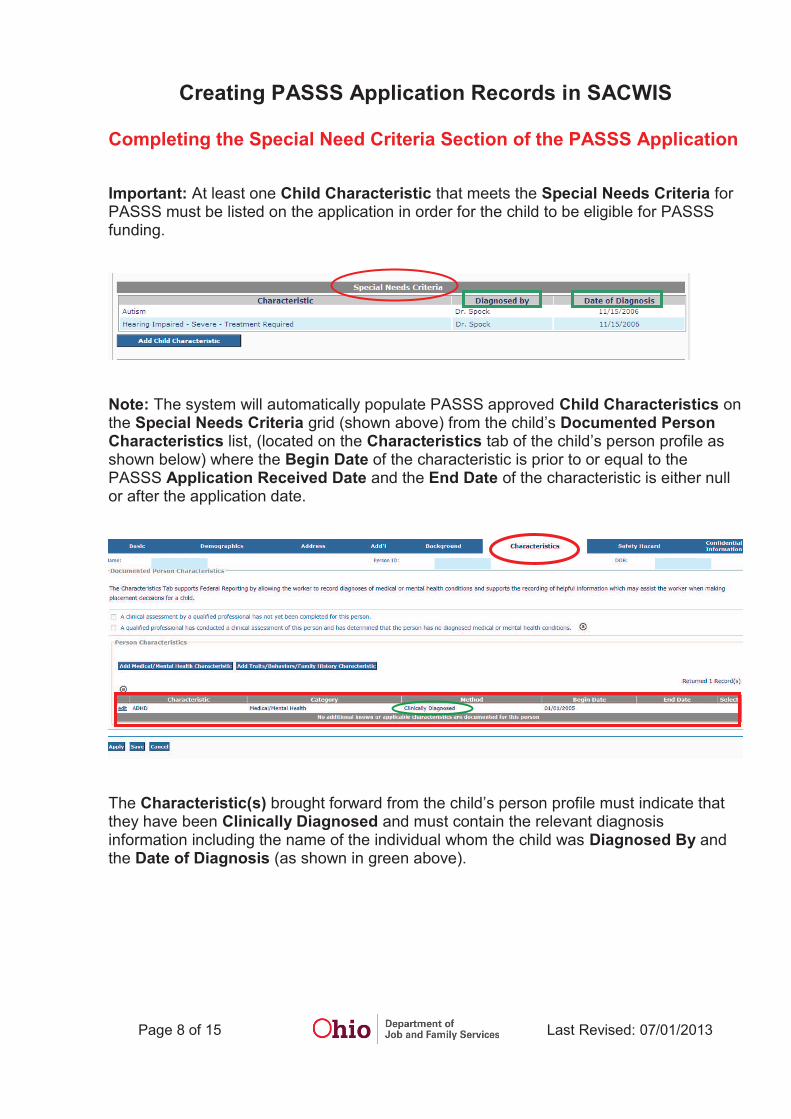
Important: At least one Child Characteristic that meets the Special Needs Criteria for PASSS must be listed on the application in order for the child to be eligible for PASSS funding.
Note: The system will automatically populate PASSS approved Child Characteristics on the Special Needs Criteria grid (shown above) from the child’s Documented Person Characteristics list, (located on the Characteristics tab of the child’s person profile as shown below) where the Begin Date of the characteristic is prior to or equal to the PASSS Application Received Date and the End Date of the characteristic is either null or after the application date.
The Characteristic(s) brought forward from the child’s person profile must indicate that they have been Clinically Diagnosed and must contain the relevant diagnosis information including the name of the individual whom the child was Diagnosed By and the Date of Diagnosis (as shown in green above).
Creating PASSS Application Records in SACWIS
Page 9 of 15 Last Revised: 07/01/2013
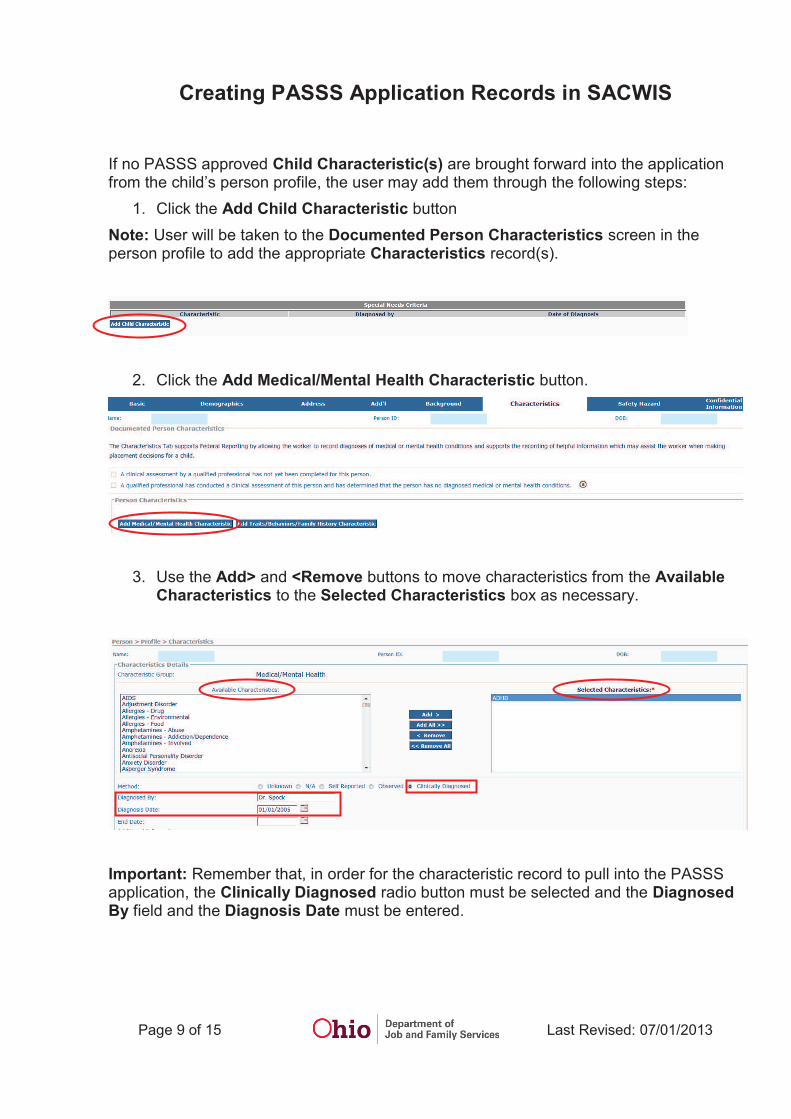
If no PASSS approved Child Characteristic(s) are brought forward into the application from the child’s person profile, the user may add them through the following steps:
1. Click the Add Child Characteristic button
Note: User will be taken to the Documented Person Characteristics screen in the person profile to add the appropriate Characteristics record(s).
2. Click the Add Medical/Mental Health Characteristic button.
3. Use the Add> and <Remove buttons to move characteristics from the Available Characteristics to the Selected Characteristics box as necessary.
Important: Remember that, in order for the characteristic record to pull into the PASSS application, the Clinically Diagnosed radio button must be selected and the Diagnosed By field and the Diagnosis Date must be entered.
Creating PASSS Application Records in SACWIS
Page 10 of 15 Last Revised: 07/01/2013
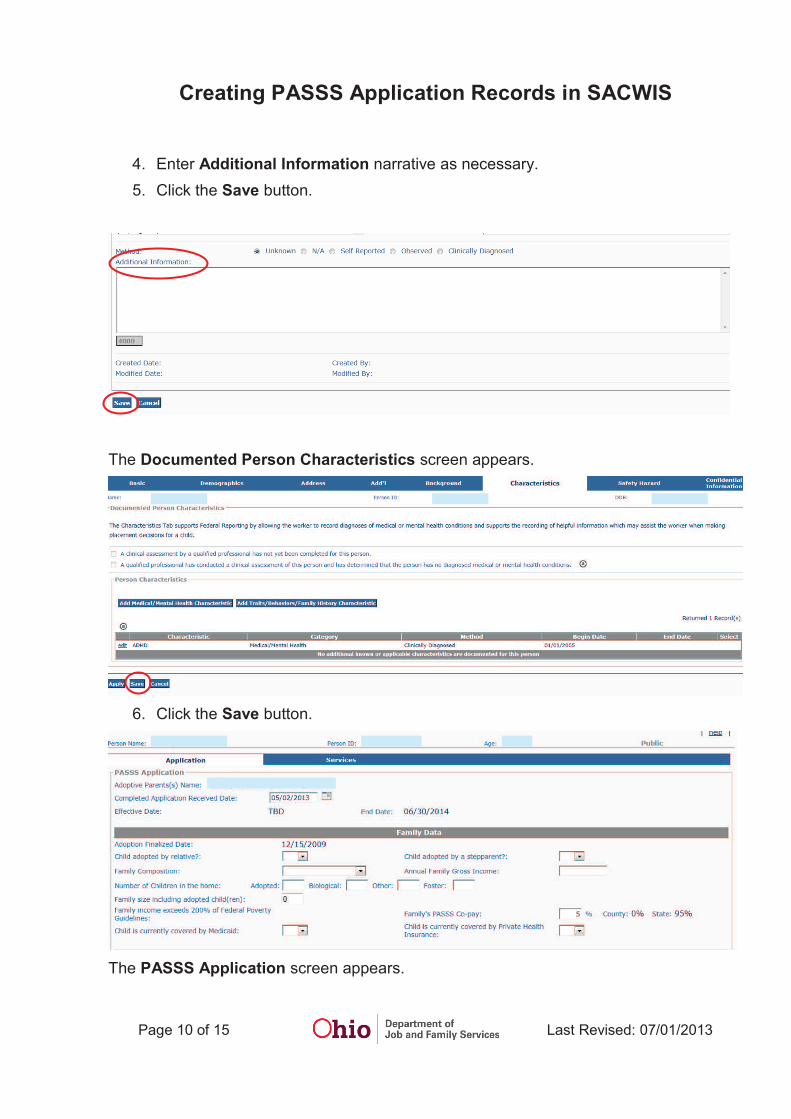
4. Enter Additional Information narrative as necessary.
5. Click the Save button.
The Documented Person Characteristics screen appears.
6. Click the Save button.
The PASSS Application screen appears.
Creating PASSS Application Records in SACWIS
Page 11 of 15 Last Revised: 07/01/2013
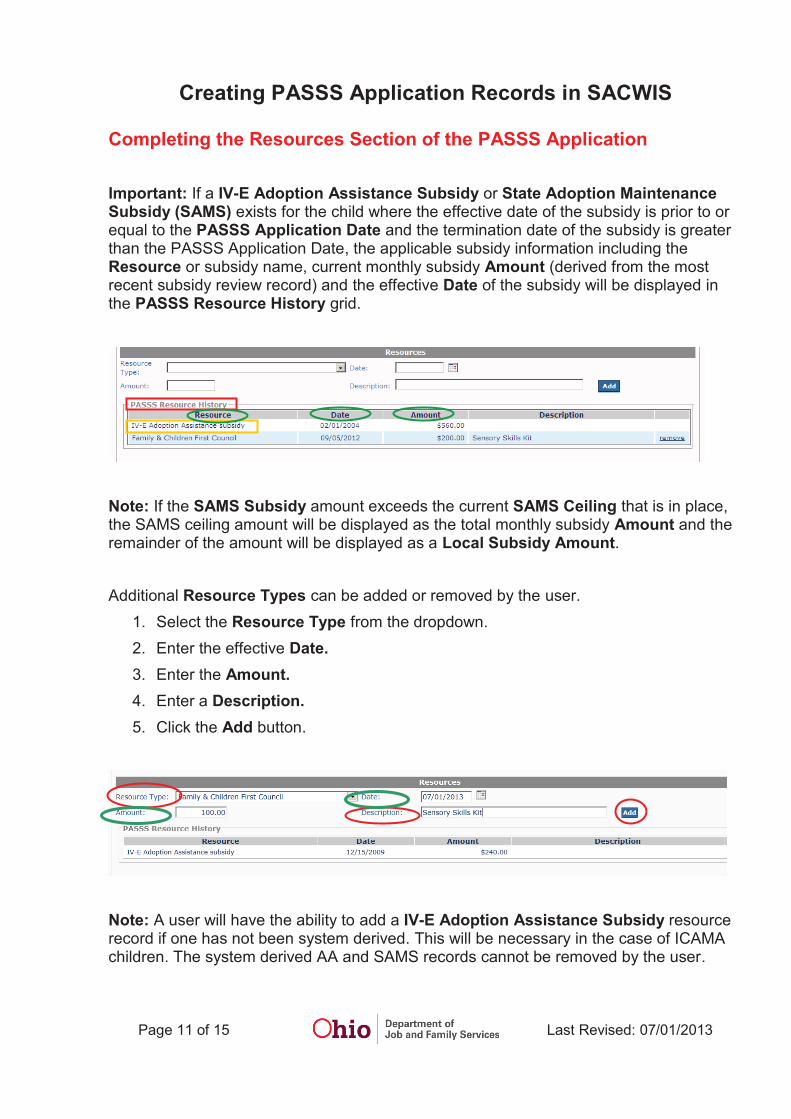
Completing the Resources Section of the PASSS Application
Important: If a IV-E Adoption Assistance Subsidy or State Adoption Maintenance Subsidy (SAMS) exists for the child where the effective date of the subsidy is prior to or equal to the PASSS Application Date and the termination date of the subsidy is greater than the PASSS Application Date, the applicable subsidy information including the Resource or subsidy name, current monthly subsidy Amount (derived from the most recent subsidy review record) and the effective Date of the subsidy will be displayed in the PASSS Resource History grid.
Note: If the SAMS Subsidy amount exceeds the current SAMS Ceiling that is in place, the SAMS ceiling amount will be displayed as the total monthly subsidy Amount and the remainder of the amount will be displayed as a Local Subsidy Amount.
Additional Resource Types can be added or removed by the user.
1. Select the Resource Type from the dropdown.
2. Enter the effective Date.
3. Enter the Amount.
4. Enter a Description.
5. Click the Add button.
Note: A user will have the ability to add a IV-E Adoption Assistance Subsidy resource record if one has not been system derived. This will be necessary in the case of ICAMA children. The system derived AA and SAMS records cannot be removed by the user.

Creating PASSS Application Records in SACWIS
Page 12 of 15 Last Revised: 07/01/2013
Completing the Extraordinary Circumstances for Additional Funding
If the adoptive parent has requested PASSS funding over the original PASSS ceiling amount (currently $10,000 per state fiscal year), complete the Extraordinary Circumstances for Additional Funding section of the application by completing the following steps.
1. Enter the amount of Additional Funding requested.
Important: The Additional Funding cannot exceed $5,000 for the current fiscal year.
2. Select the checkbox to indicate the applicable reason for the request.
3. Document the Additional Funding Reason in the narrative box.
Note: State Approval for the Extraordinary Circumstances request is no longer needed and can be approved at the local agency.
Note: The Approval of Services section is the last thing that needs completed for the application, so make sure the services requested are added first through the Services tab then come back to the Approval of Services section.
Creating PASSS Application Records in SACWIS
Page 13 of 15 Last Revised: 07/01/2013
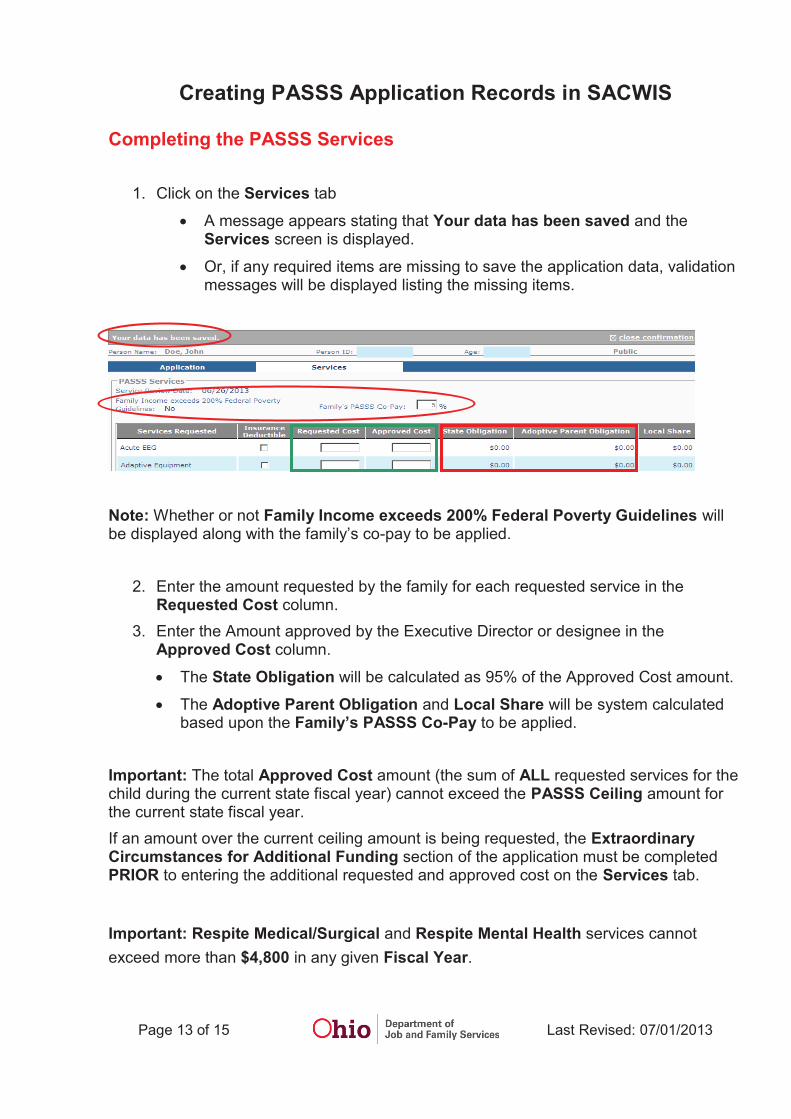
Completing the PASSS Services
1. Click on the Services tab
· A message appears stating that Your data has been saved and the Services screen is displayed.
· Or, if any required items are missing to save the application data, validation messages will be displayed listing the missing items.
Note: Whether or not Family Income exceeds 200% Federal Poverty Guidelines will be displayed along with the family’s co-pay to be applied.
2. Enter the amount requested by the family for each requested service in the Requested Cost column.
3. Enter the Amount approved by the Executive Director or designee in the Approved Cost column.
· The State Obligation will be calculated as 95% of the Approved Cost amount.
· The Adoptive Parent Obligation and Local Share will be system calculated based upon the Family’s PASSS Co-Pay to be applied.
Important: The total Approved Cost amount (the sum of ALL requested services for the child during the current state fiscal year) cannot exceed the PASSS Ceiling amount for the current state fiscal year.
If an amount over the current ceiling amount is being requested, the Extraordinary Circumstances for Additional Funding section of the application must be completed PRIOR to entering the additional requested and approved cost on the Services tab.
Important: Respite Medical/Surgical and Respite Mental Health services cannot
exceed more than $4,800 in any given Fiscal Year.
Creating PASSS Application Records in SACWIS
Page 14 of 15 Last Revised: 07/01/2013
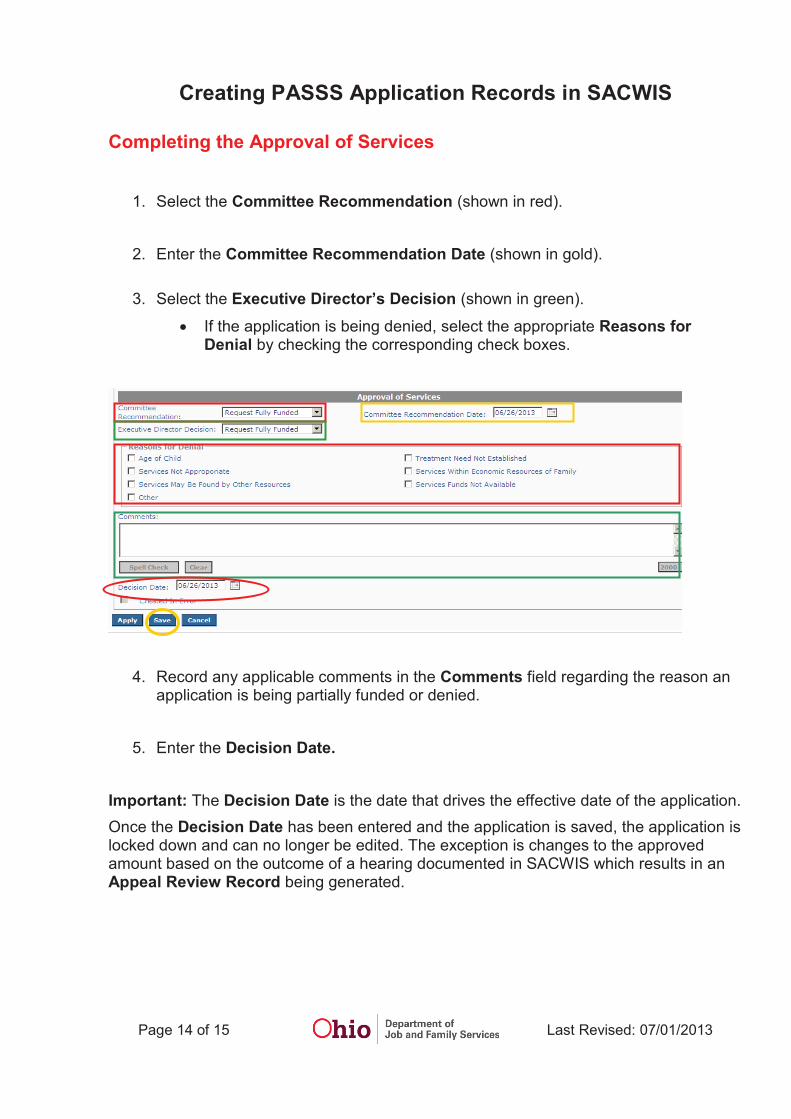
Completing the Approval of Services
1. Select the Committee Recommendation (shown in red).
2. Enter the Committee Recommendation Date (shown in gold).
3. Select the Executive Director’s Decision (shown in green).
· If the application is being denied, select the appropriate Reasons for Denial by checking the corresponding check boxes.
4. Record any applicable comments in the Comments field regarding the reason an application is being partially funded or denied.
5. Enter the Decision Date.
Important: The Decision Date is the date that drives the effective date of the application.
Once the Decision Date has been entered and the application is saved, the application is locked down and can no longer be edited. The exception is changes to the approved amount based on the outcome of a hearing documented in SACWIS which results in an Appeal Review Record being generated.
Creating PASSS Application Records in SACWIS
Page 15 of 15 Last Revised: 07/01/2013
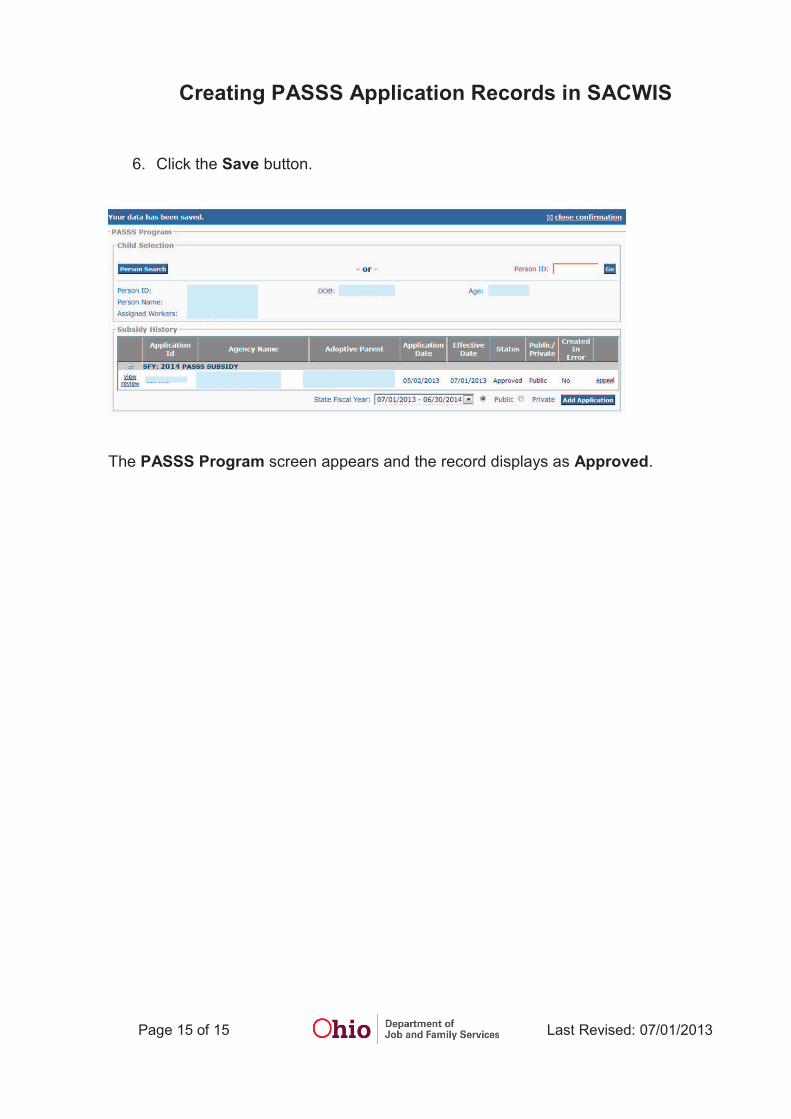
6. Click the Save button.
The PASSS Program screen appears and the record displays as Approved.