Embed Size (px)
Citation preview
Creating a PCS Weekly Service Plan - In-Home Providers
Updated Thu, 5 Mar. 2015 Page 1 of 22
Creating a PCS Service Plan – In-Home Providers
This guide describes how to complete the PCS Service Plan consistent with PCS policy guidelines and how to use various optional QiRePort service plan features. These features are designed to help enhance the utility of the service plan functionality for PCS service providers.
Overview
Key service planning requirements:
Each referral requires a PCS service plan that must be completed in QiRePort.
Prior approvals are based on a completed PCS service plan.
The on-line PCS service plan will ensure that:
IAE assessment findings are accurately reflected in the PCS service plan
The PCS service plan is accurately reflected in the aide task worksheets
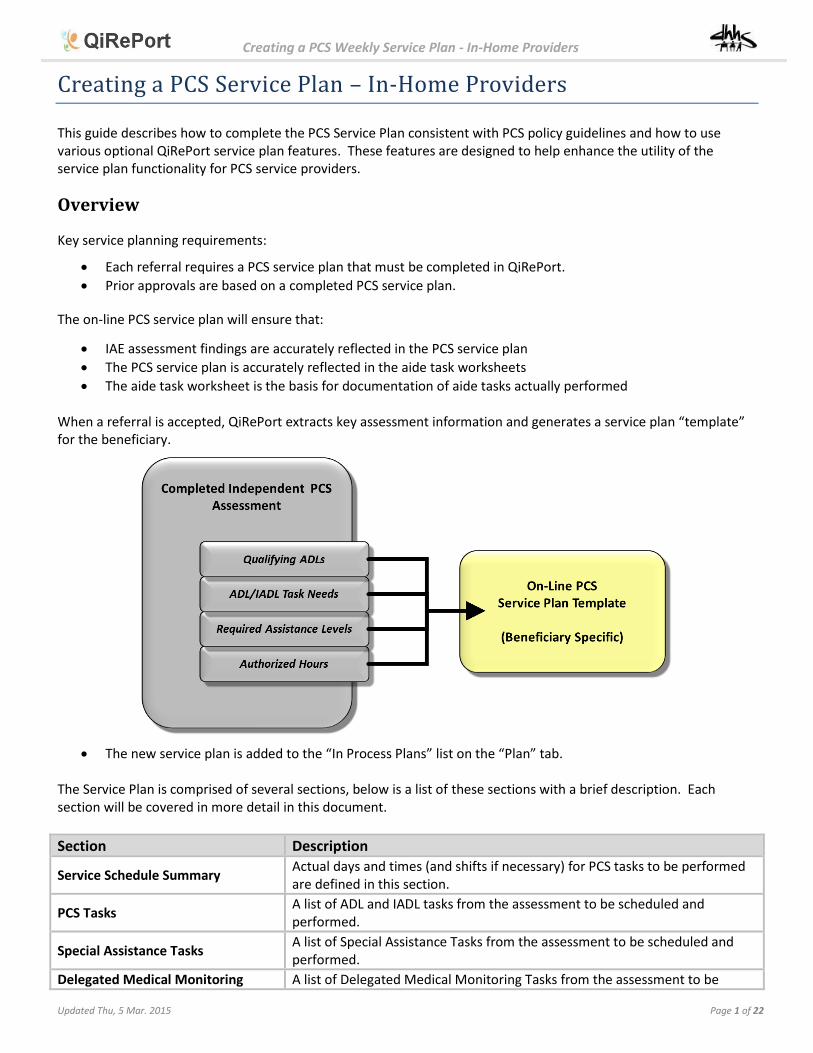
The aide task worksheet is the basis for documentation of aide tasks actually performed When a referral is accepted, QiRePort extracts key assessment information and generates a service plan “template” for the beneficiary.
The new service plan is added to the “In Process Plans” list on the “Plan” tab. The Service Plan is comprised of several sections, below is a list of these sections with a brief description. Each section will be covered in more detail in this document.
Section Description
Service Schedule Summary Actual days and times (and shifts if necessary) for PCS tasks to be performed are defined in this section.
PCS Tasks A list of ADL and IADL tasks from the assessment to be scheduled and performed.
Special Assistance Tasks A list of Special Assistance Tasks from the assessment to be scheduled and performed.
Delegated Medical Monitoring A list of Delegated Medical Monitoring Tasks from the assessment to be
Creating a PCS Weekly Service Plan - In-Home Providers
Updated Thu, 5 Mar. 2015 Page 2 of 22
Tasks scheduled and performed.
Service Outcomes Outcomes to be accomplished by PCS services. (Optional)
Assigned Aide/History Aide assignment (one or more) to a beneficiary. (Optional)
Aide Instructions Specific instructions for the Aide to follow when providing care.
Narrative A summary description of the beneficiary and the care to be provided.
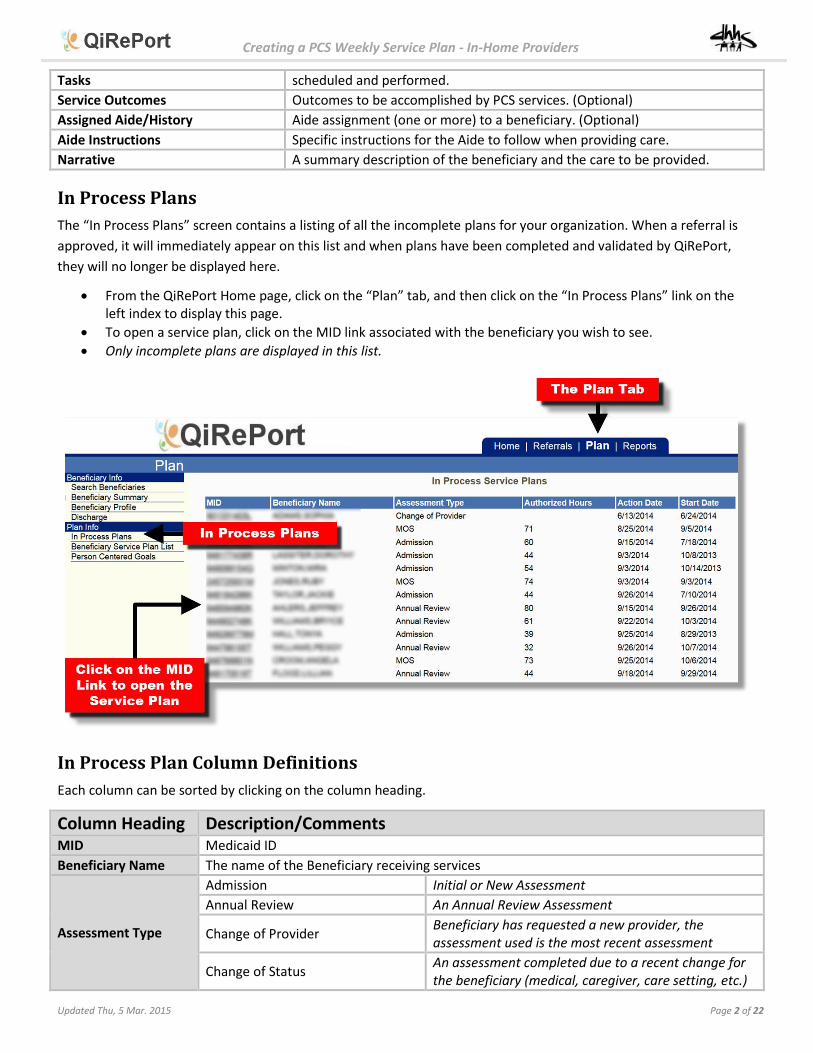
In Process Plans
The “In Process Plans” screen contains a listing of all the incomplete plans for your organization. When a referral is
approved, it will immediately appear on this list and when plans have been completed and validated by QiRePort,
they will no longer be displayed here.
From the QiRePort Home page, click on the “Plan” tab, and then click on the “In Process Plans” link on the left index to display this page.
To open a service plan, click on the MID link associated with the beneficiary you wish to see.
Only incomplete plans are displayed in this list.
In Process Plan Column Definitions
Each column can be sorted by clicking on the column heading.
Column Heading Description/Comments MID Medicaid ID
Beneficiary Name The name of the Beneficiary receiving services
Assessment Type
Admission Initial or New Assessment
Annual Review An Annual Review Assessment
Change of Provider Beneficiary has requested a new provider, the assessment used is the most recent assessment
Change of Status An assessment completed due to a recent change for the beneficiary (medical, caregiver, care setting, etc.)
Creating a PCS Weekly Service Plan - In-Home Providers
Updated Thu, 5 Mar. 2015 Page 3 of 22
MOS Maintenance of Service
Authorized Hours Hours authorized in the Assessment
Action Date The date that the service plan was created (the date that the provider accepted the referral)
Start Date The plan effective date for authorization of services.
The Service Plan Template
The service plan template is designed for service providers to develop a typical weekly schedule that translates the
monthly service authorization into a task specific plan based on tasks needs established by the PCS independent
assessment.
After clicking on the MID link, the Service Plan Template is displayed. The top portion of the plan is the
“Service Schedule Summary” where the planned hours are defined.
To view the current Assessment at any time, click on the “View Assessment” Link at the bottom of the Service
Schedule Summary section.
Service Schedule Summary
This is where the actual times for PCS tasks to be performed each day are defined. There are three columns listed for
shifts (if your organization uses shifts), if not then just use the 1st shift column to define times.
The approved Monthly Hours are populated from the assessment. The Weekly Hours Limit in the Running Totals
section is determined by dividing the Monthly Hours by 4.35.
Be sure to view the “Frequency/Weekend” fields in the PCS Tasks section before entering time in the schedule.
Check the number of days in the frequency and whether weekends are needed so the schedule matches the
requirements specified in the assessment.
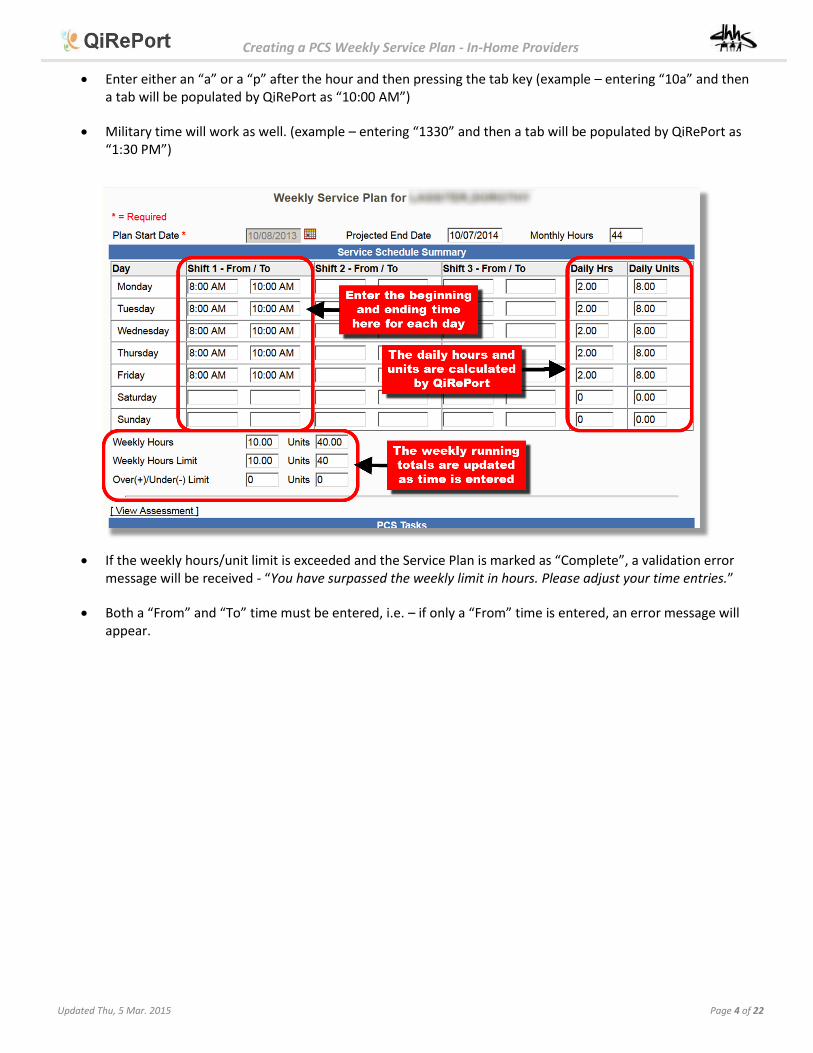
Enter the “From” and “To” times (for each shift, if needed) in the time fields as shown below in the example.
Time entry can be reduced by using these shortcuts:
Creating a PCS Weekly Service Plan - In-Home Providers
Updated Thu, 5 Mar. 2015 Page 4 of 22
Enter either an “a” or a “p” after the hour and then pressing the tab key (example – entering “10a” and then a tab will be populated by QiRePort as “10:00 AM”)
Military time will work as well. (example – entering “1330” and then a tab will be populated by QiRePort as “1:30 PM”)
If the weekly hours/unit limit is exceeded and the Service Plan is marked as “Complete”, a validation error message will be received - “You have surpassed the weekly limit in hours. Please adjust your time entries.”
Both a “From” and “To” time must be entered, i.e. – if only a “From” time is entered, an error message will appear.
Creating a PCS Weekly Service Plan - In-Home Providers
Updated Thu, 5 Mar. 2015 Page 5 of 22
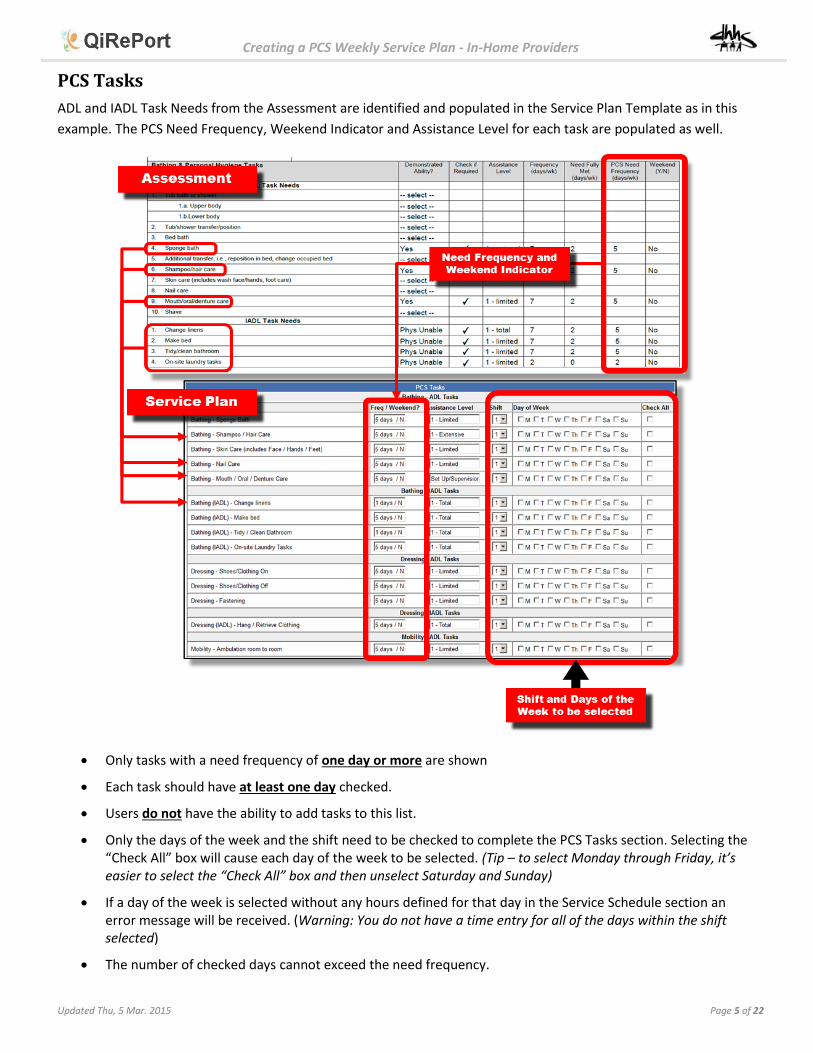
PCS Tasks
ADL and IADL Task Needs from the Assessment are identified and populated in the Service Plan Template as in this
example. The PCS Need Frequency, Weekend Indicator and Assistance Level for each task are populated as well.
Only tasks with a need frequency of one day or more are shown
Each task should have at least one day checked.
Users do not have the ability to add tasks to this list.
Only the days of the week and the shift need to be checked to complete the PCS Tasks section. Selecting the “Check All” box will cause each day of the week to be selected. (Tip – to select Monday through Friday, it’s easier to select the “Check All” box and then unselect Saturday and Sunday)
If a day of the week is selected without any hours defined for that day in the Service Schedule section an error message will be received. (Warning: You do not have a time entry for all of the days within the shift selected)
The number of checked days cannot exceed the need frequency.

Creating a PCS Weekly Service Plan - In-Home Providers
Updated Thu, 5 Mar. 2015 Page 6 of 22
At least half of the days indicated by the need frequency must be selected. If more than half are selected but not the full amount of days then a warning message will be displayed. The plan can be completed without the full amount of days by confirming the warning message.
Special Assistance Tasks
Just as ADLs/IADLs are extracted from the Assessment, Special Assistance Tasks are as well. The example below shows O2 Therapy in the Assessment and then how it appears in the Service Plan.
Delegated Medical Monitoring Tasks
The same process applies to the Delegated Medical Monitoring Tasks.

Creating a PCS Weekly Service Plan - In-Home Providers
Updated Thu, 5 Mar. 2015 Page 7 of 22
Service Outcomes
Service Outcomes are an optional feature that describes what will be accomplished by PCS services, relative to the beneficiary’s functioning capacity. More than one outcome can be selected for each plan. It’s highly recommended to use this feature and to select several applicable outcomes.
The Service Outcome pop up screen will then be displayed.
Select a Service Outcome from the drop down list.
Use the Comment section to describe the specifics of the PCS outcome. (Example – if “Increase mobility or ambulation” is selected as an outcome – then detail how this increased mobility will be accomplished)
Below is the full list of Service Outcomes for reference.
Promote greater ADL independence Reduce beneficiary isolation
Promote greater IADL independence Improve beneficiary/caregiver self-management
Increase mobility or ambulation Improve caregiver safety
Improve balance Enhance caregiver knowledge and skills
Improve endurance Enhance caregiver availability
Improve or maintain respiratory function Reduce caregiver isolation
Reduce pain or improve pain coping capacities Reduce the risk of caregiver burnout
Improve continence management Reduce caregiver fears and anxieties
Improve skin condition Increase coping skills associated with death
Improve nutritional status Improve service coordination and collaboration
Improve medications compliance Facilitate transitions
Improve hearing or vision capacities Enhance beneficiary status monitoring
Improve communication capacities Improve home environment
Promote rehabilitation Improve community services access (transportation)
Improve treatment compliance Reduce adverse events/crises

Creating a PCS Weekly Service Plan - In-Home Providers
Updated Thu, 5 Mar. 2015 Page 8 of 22
Comply w/ universal precautions Reduce unplanned hospitalizations
Improve beneficiary safety Reduce ER visits
Reduce dysfunctional behaviors Enhance use of medical home/physician oversight
Reduce depression/improve mood Increase coping skills related to disability
Reduce fears and anxieties for the beneficiary Improve finances / provide basic resources
Creating a PCS Weekly Service Plan - In-Home Providers
Updated Thu, 5 Mar. 2015 Page 9 of 22
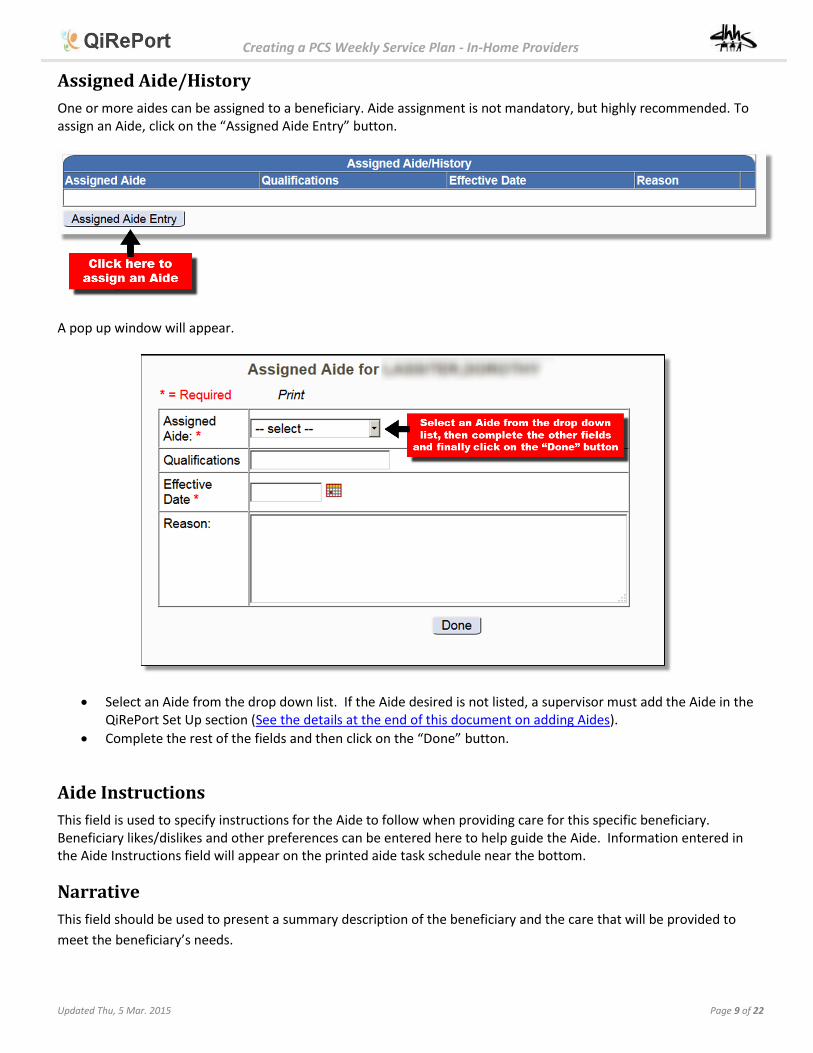
Assigned Aide/History
One or more aides can be assigned to a beneficiary. Aide assignment is not mandatory, but highly recommended. To assign an Aide, click on the “Assigned Aide Entry” button.
A pop up window will appear.
Select an Aide from the drop down list. If the Aide desired is not listed, a supervisor must add the Aide in the QiRePort Set Up section (See the details at the end of this document on adding Aides).
Complete the rest of the fields and then click on the “Done” button.
Aide Instructions
This field is used to specify instructions for the Aide to follow when providing care for this specific beneficiary. Beneficiary likes/dislikes and other preferences can be entered here to help guide the Aide. Information entered in the Aide Instructions field will appear on the printed aide task schedule near the bottom.
Narrative
This field should be used to present a summary description of the beneficiary and the care that will be provided to
meet the beneficiary’s needs.
Creating a PCS Weekly Service Plan - In-Home Providers
Updated Thu, 5 Mar. 2015 Page 10 of 22
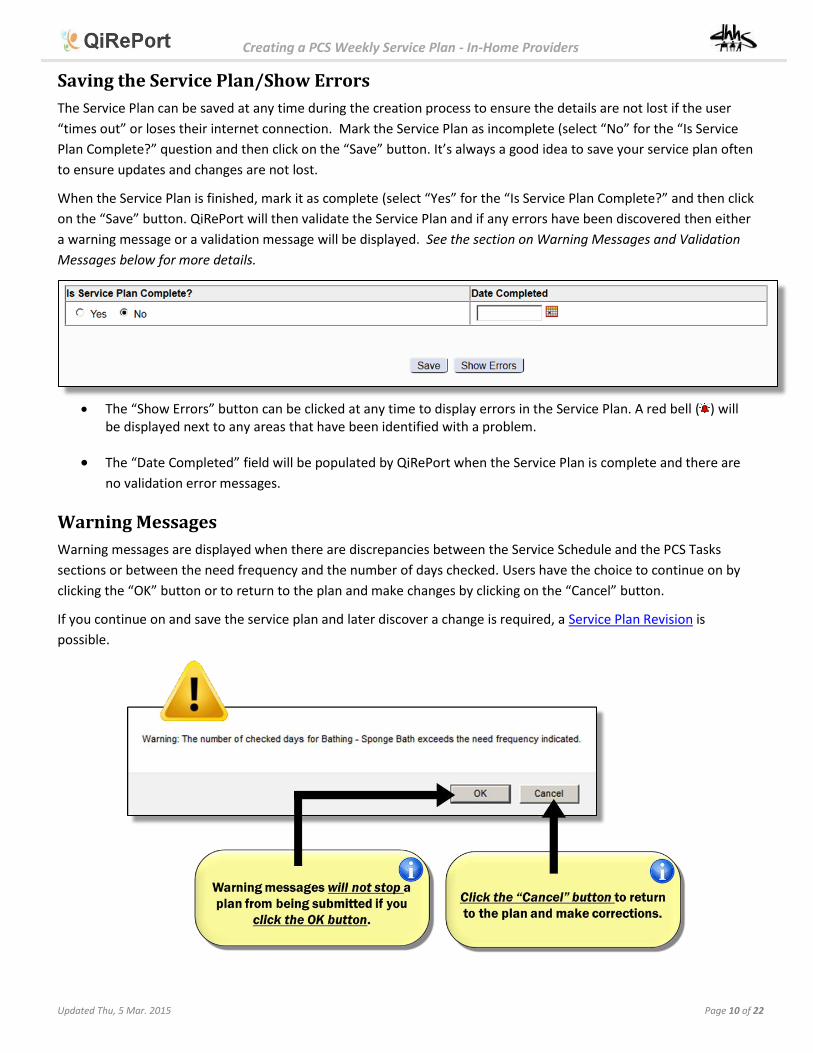
Saving the Service Plan/Show Errors
The Service Plan can be saved at any time during the creation process to ensure the details are not lost if the user
“times out” or loses their internet connection. Mark the Service Plan as incomplete (select “No” for the “Is Service
Plan Complete?” question and then click on the “Save” button. It’s always a good idea to save your service plan often
to ensure updates and changes are not lost.
When the Service Plan is finished, mark it as complete (select “Yes” for the “Is Service Plan Complete?” and then click
on the “Save” button. QiRePort will then validate the Service Plan and if any errors have been discovered then either
a warning message or a validation message will be displayed. See the section on Warning Messages and Validation
Messages below for more details.
The “Show Errors” button can be clicked at any time to display errors in the Service Plan. A red bell ( ) will
be displayed next to any areas that have been identified with a problem.
The “Date Completed” field will be populated by QiRePort when the Service Plan is complete and there are
no validation error messages.
Warning Messages
Warning messages are displayed when there are discrepancies between the Service Schedule and the PCS Tasks
sections or between the need frequency and the number of days checked. Users have the choice to continue on by
clicking the “OK” button or to return to the plan and make changes by clicking on the “Cancel” button.
If you continue on and save the service plan and later discover a change is required, a Service Plan Revision is
possible.
Creating a PCS Weekly Service Plan - In-Home Providers
Updated Thu, 5 Mar. 2015 Page 11 of 22
The following warning messages will appear when saving a Service Plan.
Warning Message Description/Comments
Warning: You do not have a time entry for all of the days within the shift selected for [ADL/IADL/Special Assist/DMM Task]
The user must have a From/To time entry for each of the days for the required frequency. (e.g., 7 day frequency must have From/To time for 7 days between all shifts)
Warning: The number of checked days for [ADL/IADL/Special Assist/DMM Task] exceeds the need frequency indicated.
The user gets this warning if they select more days than the required frequency listed, but they will be allowed to complete the service plan if they confirm this warning.
Warning: You have selected less days than the need frequency for [ADL/IADL/Special Assist/DMM Task]
As noted above, the user gets this warning if they select fewer days than the required frequency listed, but they will be allowed to complete the service plan if they confirm this warning.
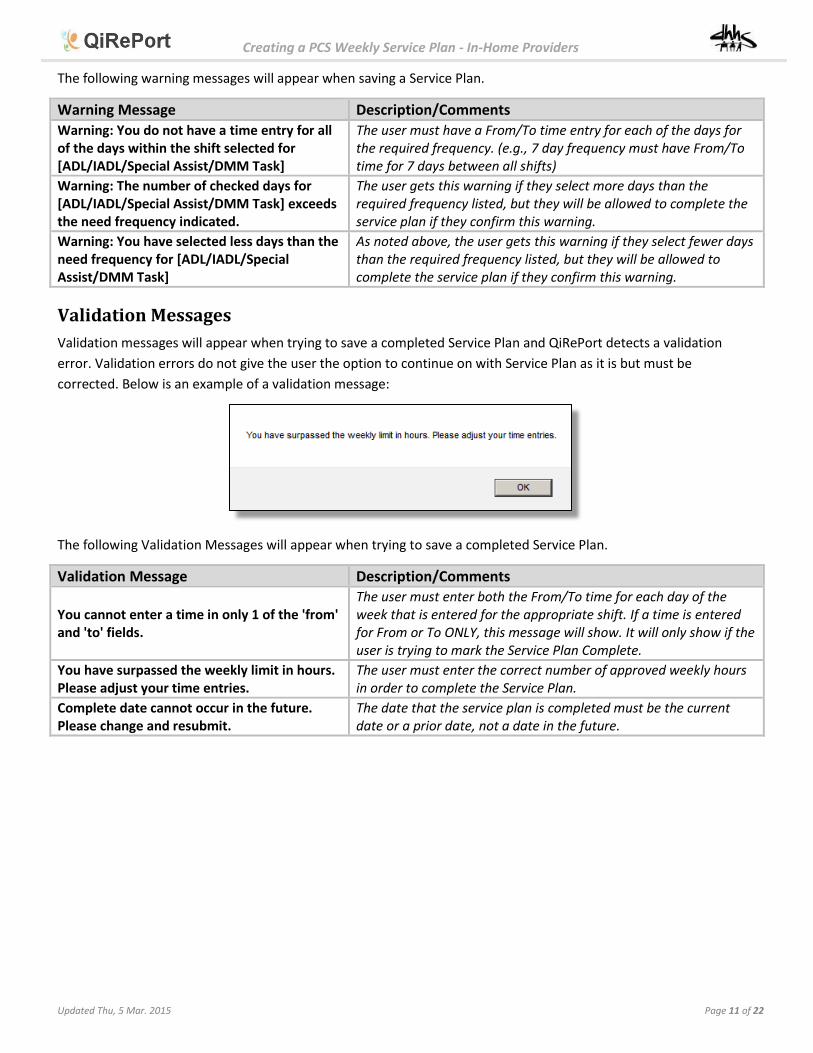
Validation Messages
Validation messages will appear when trying to save a completed Service Plan and QiRePort detects a validation
error. Validation errors do not give the user the option to continue on with Service Plan as it is but must be
corrected. Below is an example of a validation message:
The following Validation Messages will appear when trying to save a completed Service Plan.
Validation Message Description/Comments
You cannot enter a time in only 1 of the 'from' and 'to' fields.
The user must enter both the From/To time for each day of the week that is entered for the appropriate shift. If a time is entered for From or To ONLY, this message will show. It will only show if the user is trying to mark the Service Plan Complete.
You have surpassed the weekly limit in hours. Please adjust your time entries.
The user must enter the correct number of approved weekly hours in order to complete the Service Plan.
Complete date cannot occur in the future. Please change and resubmit.
The date that the service plan is completed must be the current date or a prior date, not a date in the future.
Creating a PCS Weekly Service Plan - In-Home Providers
Updated Thu, 5 Mar. 2015 Page 12 of 22
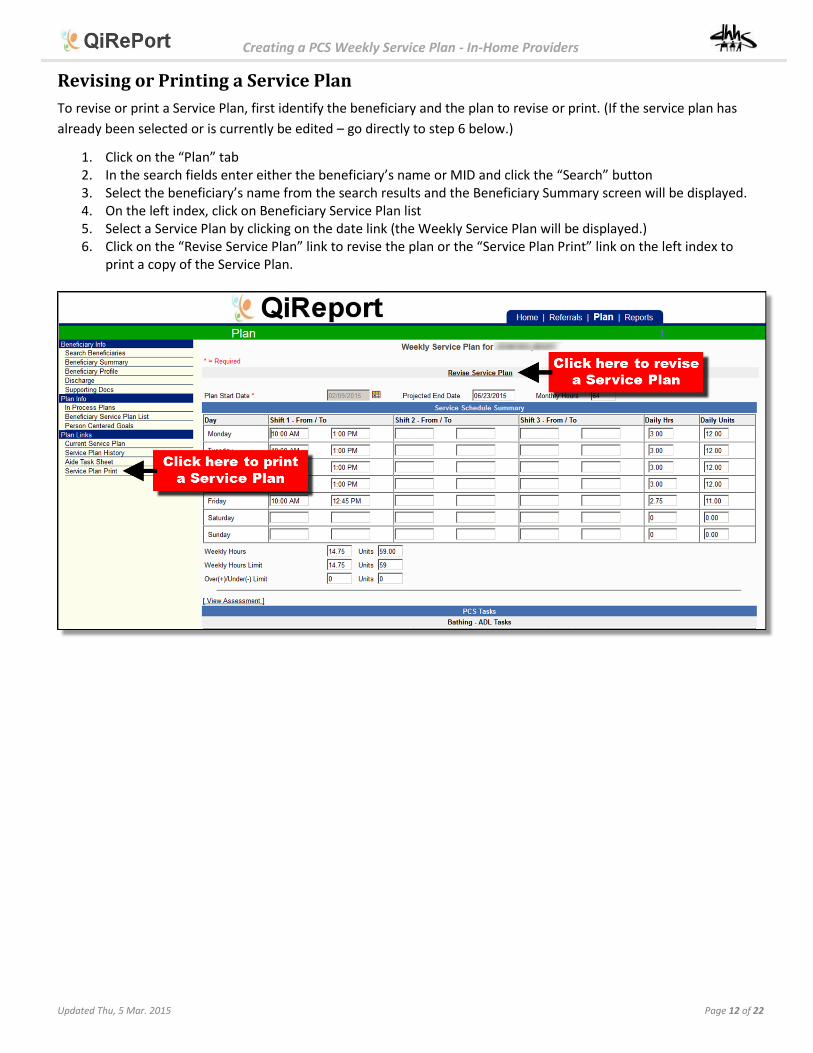
Revising or Printing a Service Plan
To revise or print a Service Plan, first identify the beneficiary and the plan to revise or print. (If the service plan has
already been selected or is currently be edited – go directly to step 6 below.)
1. Click on the “Plan” tab 2. In the search fields enter either the beneficiary’s name or MID and click the “Search” button 3. Select the beneficiary’s name from the search results and the Beneficiary Summary screen will be displayed. 4. On the left index, click on Beneficiary Service Plan list 5. Select a Service Plan by clicking on the date link (the Weekly Service Plan will be displayed.) 6. Click on the “Revise Service Plan” link to revise the plan or the “Service Plan Print” link on the left index to
print a copy of the Service Plan.
Creating a PCS Weekly Service Plan - In-Home Providers
Updated Thu, 5 Mar. 2015 Page 13 of 22
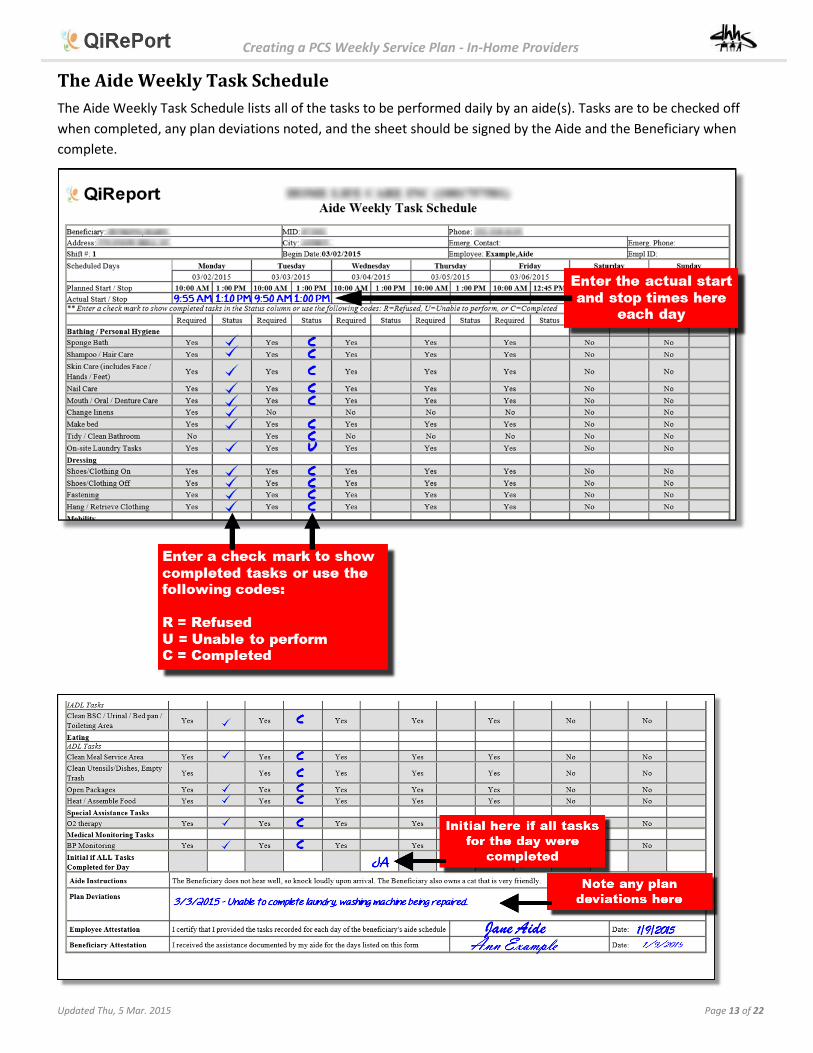
The Aide Weekly Task Schedule
The Aide Weekly Task Schedule lists all of the tasks to be performed daily by an aide(s). Tasks are to be checked off
when completed, any plan deviations noted, and the sheet should be signed by the Aide and the Beneficiary when
complete.
Creating a PCS Weekly Service Plan - In-Home Providers
Updated Thu, 5 Mar. 2015 Page 14 of 22
Printing the Aide Weekly Task Schedule
There are different methods to producing printed Aide Task Schedules in QiRePort. The most effective method will depend upon an organizations internal working processes and procedures. How this is accomplished is up to each organization.
QiRePort approached printing task sheets with the concept that Task Sheets would be printed weekly, possibly by an organization’s administrator or manager and distributed to the appropriate aide(s).
Aide Task Sheets can be printed with or without dates populated. Some organizations may find it easier to print several task sheets with blank dates to be filled in manually, so this option is available.
Aide Task Sheets printing options:
Print all beneficiary Task Sheets for all Aides at once
Print a single Aide’s task sheets for all assigned beneficiaries at once
Print a single Task Sheet for a single beneficiary
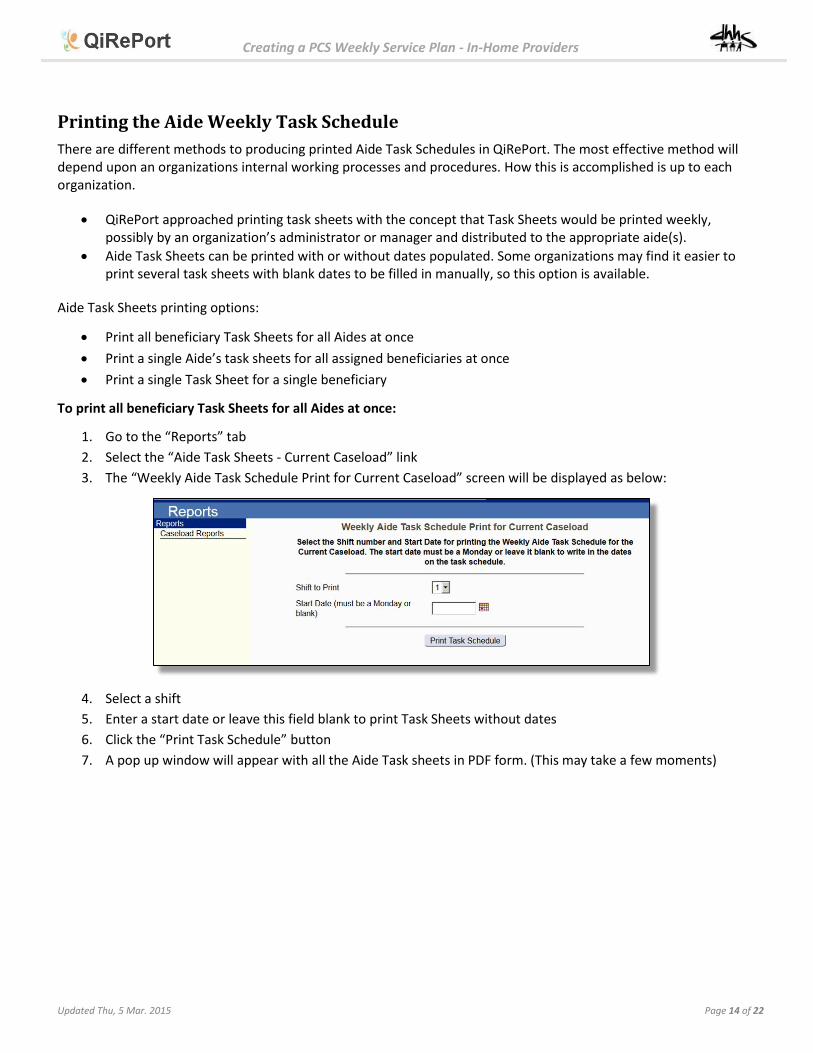
To print all beneficiary Task Sheets for all Aides at once:
1. Go to the “Reports” tab
2. Select the “Aide Task Sheets - Current Caseload” link
3. The “Weekly Aide Task Schedule Print for Current Caseload” screen will be displayed as below:
4. Select a shift
5. Enter a start date or leave this field blank to print Task Sheets without dates
6. Click the “Print Task Schedule” button
7. A pop up window will appear with all the Aide Task sheets in PDF form. (This may take a few moments)
Creating a PCS Weekly Service Plan - In-Home Providers
Updated Thu, 5 Mar. 2015 Page 15 of 22
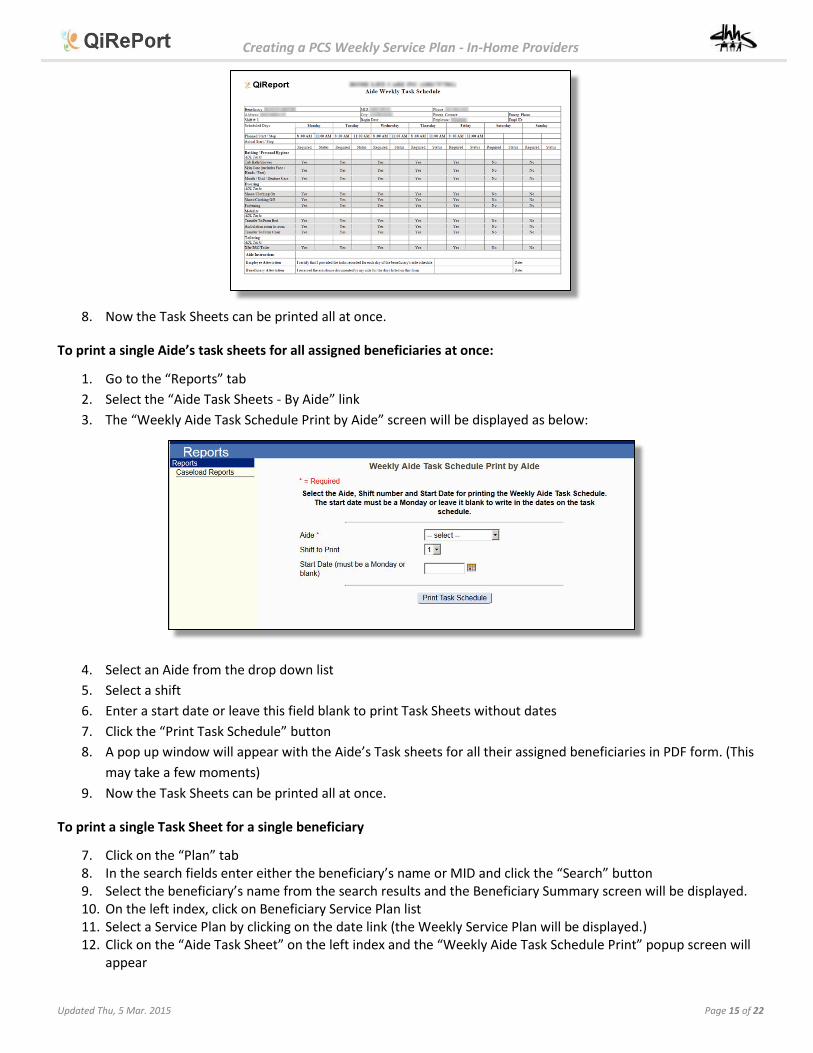
8. Now the Task Sheets can be printed all at once.
To print a single Aide’s task sheets for all assigned beneficiaries at once:
1. Go to the “Reports” tab
2. Select the “Aide Task Sheets - By Aide” link
3. The “Weekly Aide Task Schedule Print by Aide” screen will be displayed as below:
4. Select an Aide from the drop down list
5. Select a shift
6. Enter a start date or leave this field blank to print Task Sheets without dates
7. Click the “Print Task Schedule” button
8. A pop up window will appear with the Aide’s Task sheets for all their assigned beneficiaries in PDF form. (This
may take a few moments)
9. Now the Task Sheets can be printed all at once.
To print a single Task Sheet for a single beneficiary
7. Click on the “Plan” tab 8. In the search fields enter either the beneficiary’s name or MID and click the “Search” button 9. Select the beneficiary’s name from the search results and the Beneficiary Summary screen will be displayed. 10. On the left index, click on Beneficiary Service Plan list 11. Select a Service Plan by clicking on the date link (the Weekly Service Plan will be displayed.) 12. Click on the “Aide Task Sheet” on the left index and the “Weekly Aide Task Schedule Print” popup screen will
appear
Creating a PCS Weekly Service Plan - In-Home Providers
Updated Thu, 5 Mar. 2015 Page 16 of 22
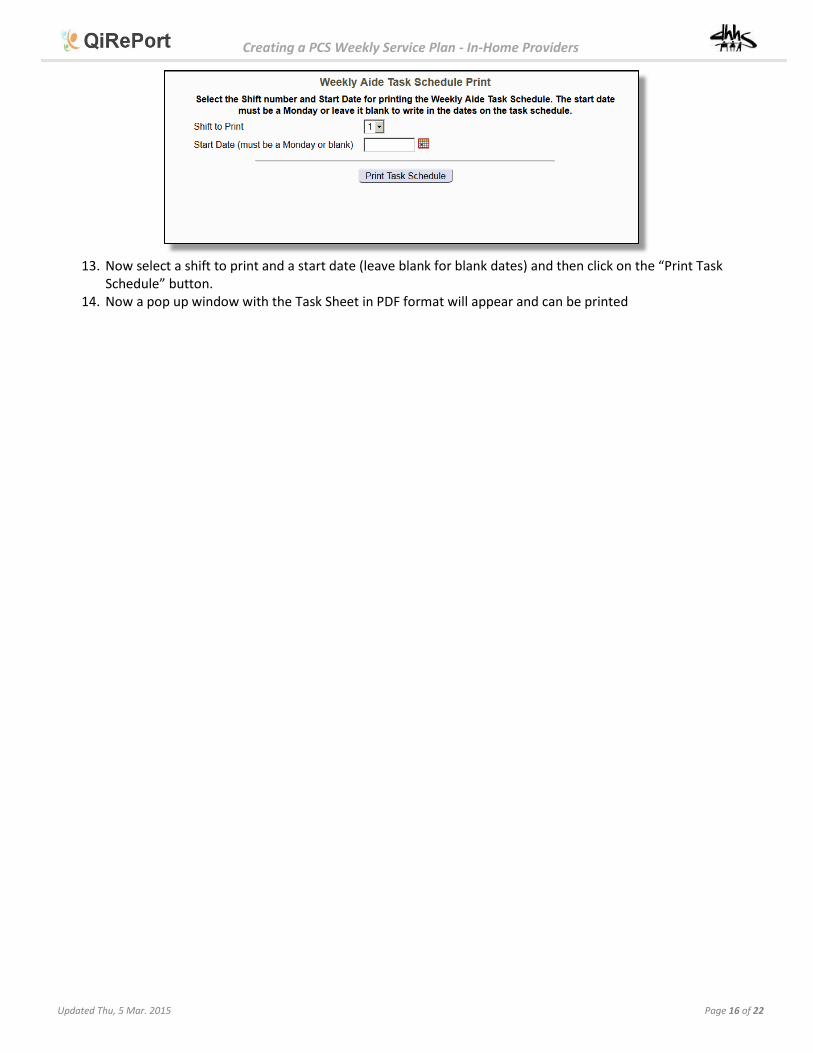
13. Now select a shift to print and a start date (leave blank for blank dates) and then click on the “Print Task
Schedule” button. 14. Now a pop up window with the Task Sheet in PDF format will appear and can be printed

Creating a PCS Weekly Service Plan - In-Home Providers
Updated Thu, 5 Mar. 2015 Page 17 of 22
Printing PDF Documents
There are several possible procedures for printing PDF documents that depend upon the web browser being used
(Internet Explorer, Mozilla Firefox, or Google Chrome), and how the browser is configured. If you currently print
Assessments from QiRePort then the procedure is the same.
Some browsers have “add on” utilities to handle PDF files while others will display the file directly in Adobe. (Tip –
look for the printer icon.)
Here are some examples:
Adobe
Mozilla Firefox
Creating a PCS Weekly Service Plan - In-Home Providers
Updated Thu, 5 Mar. 2015 Page 18 of 22
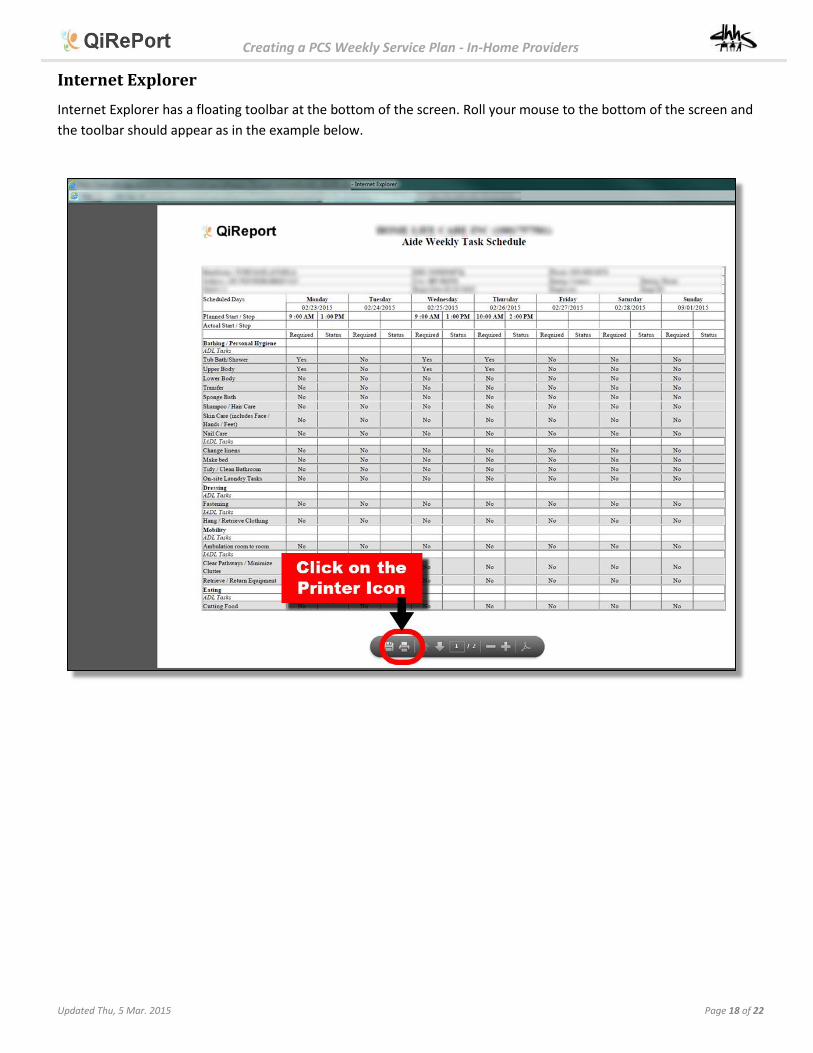
Internet Explorer
Internet Explorer has a floating toolbar at the bottom of the screen. Roll your mouse to the bottom of the screen and
the toolbar should appear as in the example below.
Creating a PCS Weekly Service Plan - In-Home Providers
Updated Thu, 5 Mar. 2015 Page 19 of 22
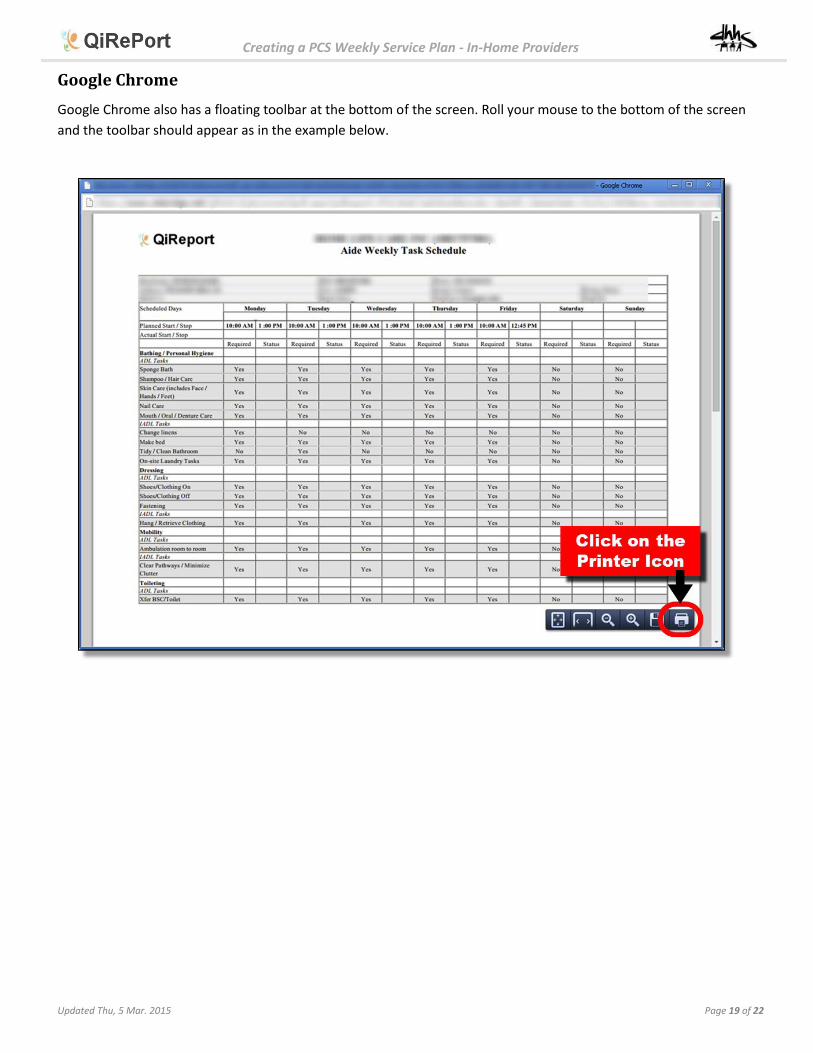
Google Chrome
Google Chrome also has a floating toolbar at the bottom of the screen. Roll your mouse to the bottom of the screen
and the toolbar should appear as in the example below.
Creating a PCS Weekly Service Plan - In-Home Providers
Updated Thu, 5 Mar. 2015 Page 20 of 22
Creating an Aide Profile
To assign an aide in the Service Plan, the aide requires an aide profile in QiRePort. The aide profile contains specific
information about each aide including basic contact information, job roles, qualifications, background checks,
training and competencies, and relevant documents.
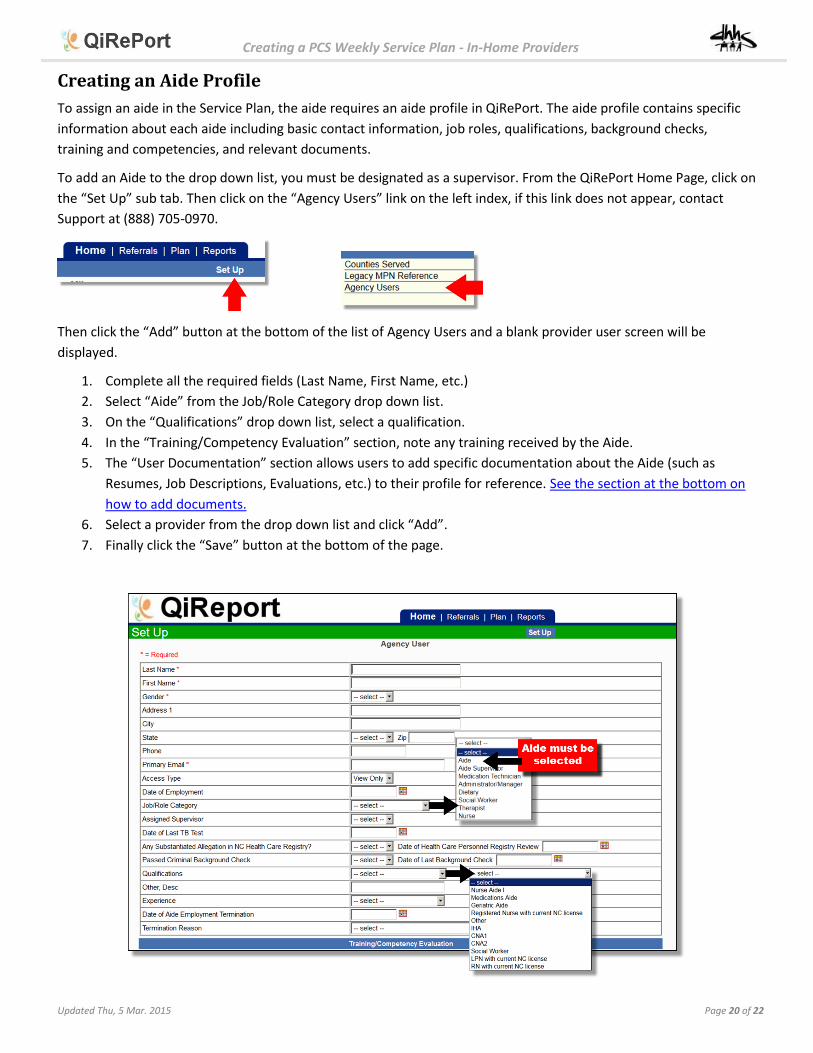
To add an Aide to the drop down list, you must be designated as a supervisor. From the QiRePort Home Page, click on
the “Set Up” sub tab. Then click on the “Agency Users” link on the left index, if this link does not appear, contact
Support at (888) 705-0970.
Then click the “Add” button at the bottom of the list of Agency Users and a blank provider user screen will be
displayed.
1. Complete all the required fields (Last Name, First Name, etc.)
2. Select “Aide” from the Job/Role Category drop down list.
3. On the “Qualifications” drop down list, select a qualification.
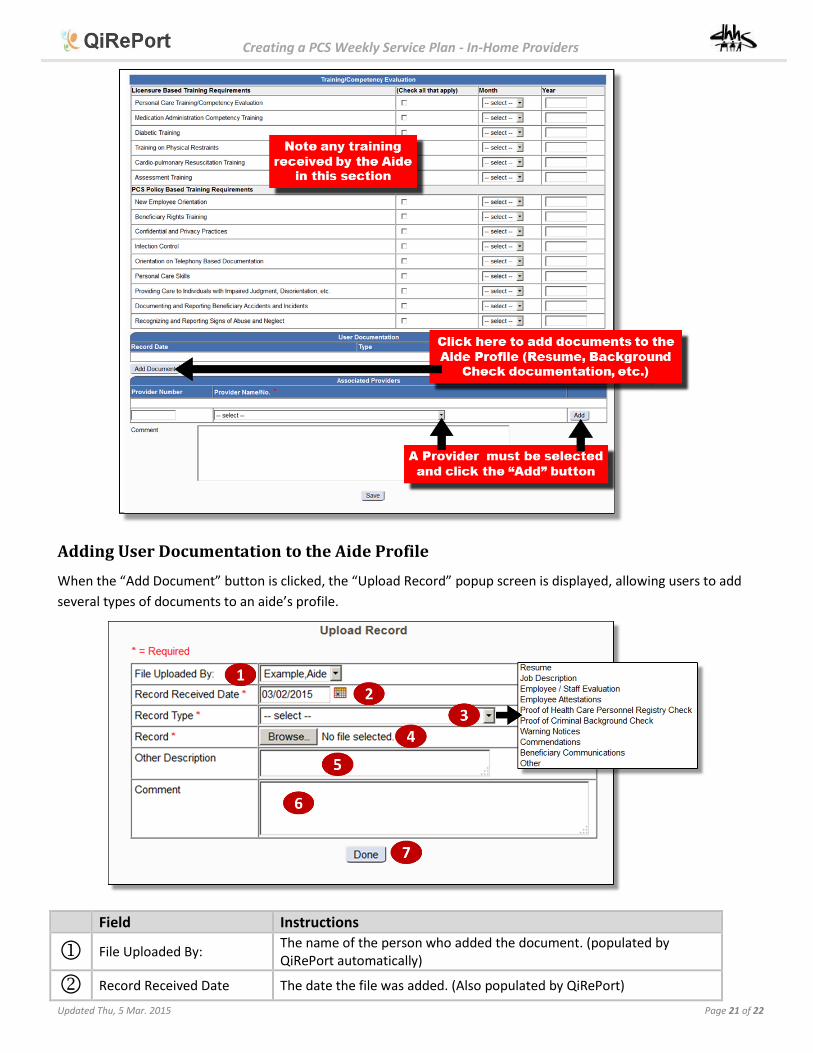
4. In the “Training/Competency Evaluation” section, note any training received by the Aide.
5. The “User Documentation” section allows users to add specific documentation about the Aide (such as
Resumes, Job Descriptions, Evaluations, etc.) to their profile for reference. See the section at the bottom on
how to add documents.
6. Select a provider from the drop down list and click “Add”.
7. Finally click the “Save” button at the bottom of the page.
Creating a PCS Weekly Service Plan - In-Home Providers
Updated Thu, 5 Mar. 2015 Page 21 of 22
Adding User Documentation to the Aide Profile
When the “Add Document” button is clicked, the “Upload Record” popup screen is displayed, allowing users to add
several types of documents to an aide’s profile.
Field Instructions
File Uploaded By: The name of the person who added the document. (populated by QiRePort automatically)
Record Received Date The date the file was added. (Also populated by QiRePort)

Creating a PCS Weekly Service Plan - In-Home Providers
Updated Thu, 5 Mar. 2015 Page 22 of 22
Record Type
Select a record type from the drop down list:
Resume
Job Description
Employee / Staff Evaluation
Employee Attestations
Proof of Health Care Personnel Registry Check
Proof of Criminal Background Check
Warning Notices
Commendations
Beneficiary Communications
Other
The record name and the “Browse” button
Click the “Browse” button to locate the file on your local computer using your systems file manager. After the file is added, the file name will be displayed here.
Other Description If the Record Type selected is “Other”, then a short description of the document is required here.
Comments Any comments relevant to the document can be entered here.
The “Save” button Click the “Save” button to add the document to QiRePort. If the “Save” button is not clicked, then the document will not be added.