Embed Size (px)
Citation preview
July 2016 Copyright (C) 2016 Light-O-Rama, Inc. 1
Creating a Pixel Editor Sequence
Matt BrownJuly 2016

July 2016 Copyright (C) 2016 Light-O-Rama, Inc. 2
Sequencer and Previewer
Sequencer
Previewer
July 2016 Copyright (C) 2016 Light-O-Rama, Inc. 3
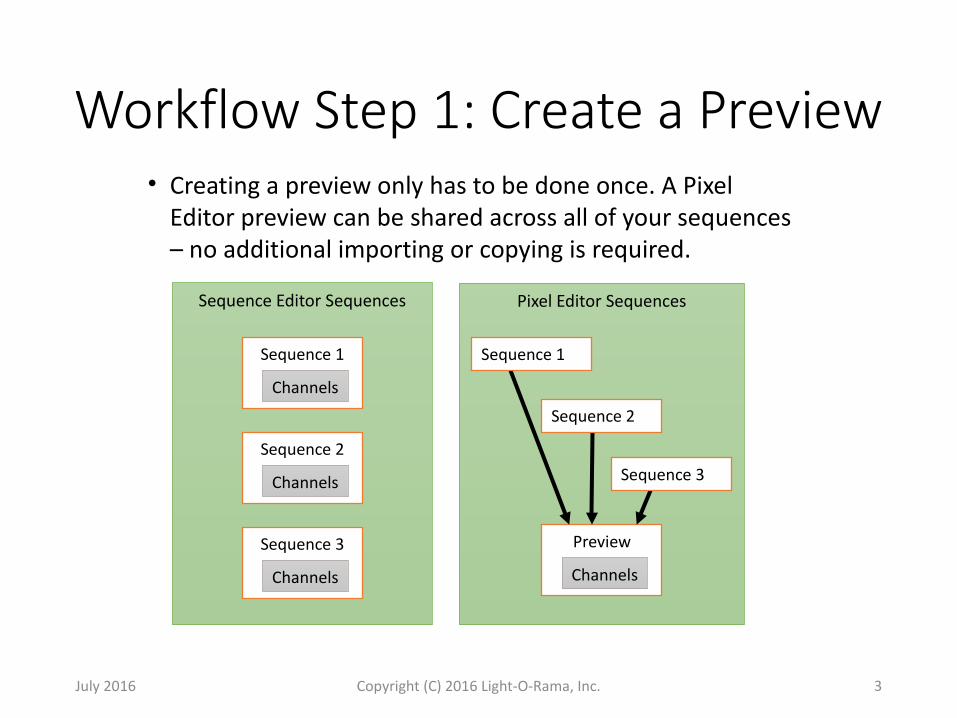
Workflow Step 1: Create a Preview• Creating a preview only has to be done once. A Pixel
Editor preview can be shared across all of your sequences – no additional importing or copying is required.
Sequence Editor Sequences
Sequence 1
Channels
Sequence 2
Channels
Sequence 3
Channels
Pixel Editor Sequences
Preview
Channels
Sequence 3
Sequence 2
Sequence 1

July 2016 Copyright (C) 2016 Light-O-Rama, Inc. 4
Workflow Step 2: Create a SequenceYou can create a new sequence using the Sequence Editor or the Pixel Editor (starting with version 4.3).
Sequence Editor• The sequence should only contain
the channels you will sequence with the Sequence Editor – leave out channels that will be sequenced with the Pixel Editor.
• Make sure timing grids are set up the way you want. Use the Beat Wizard or Tapper Wizard if desired to create beat channels. Beat channels can be viewed in the Pixel Editor to aid your sequencing.
• Save and close the sequence when you are done.
Pixel Editor v4.3 or later• Select File > New from the
menu• Select the preview associated
with this sequence• Make sure timing grids are
set up the way you want.

July 2016 Copyright (C) 2016 Light-O-Rama, Inc. 5
Workflow Step 3: Create RGB Effects
• If the sequence was created in the Sequence Editor, select File > Open from the Pixel Editor menu to open it. • Add effects to your RGB props as desired. • Save the sequence (this saves the effects for subsequent
editing). • Save the sequence as an Intensity Data file. The intensity
data file is required so that the Sequence Editor and Show Player can play back the Pixel Editor sequence.
July 2016 Copyright (C) 2016 Light-O-Rama, Inc. 6
Tutorial: Creating a Sequence
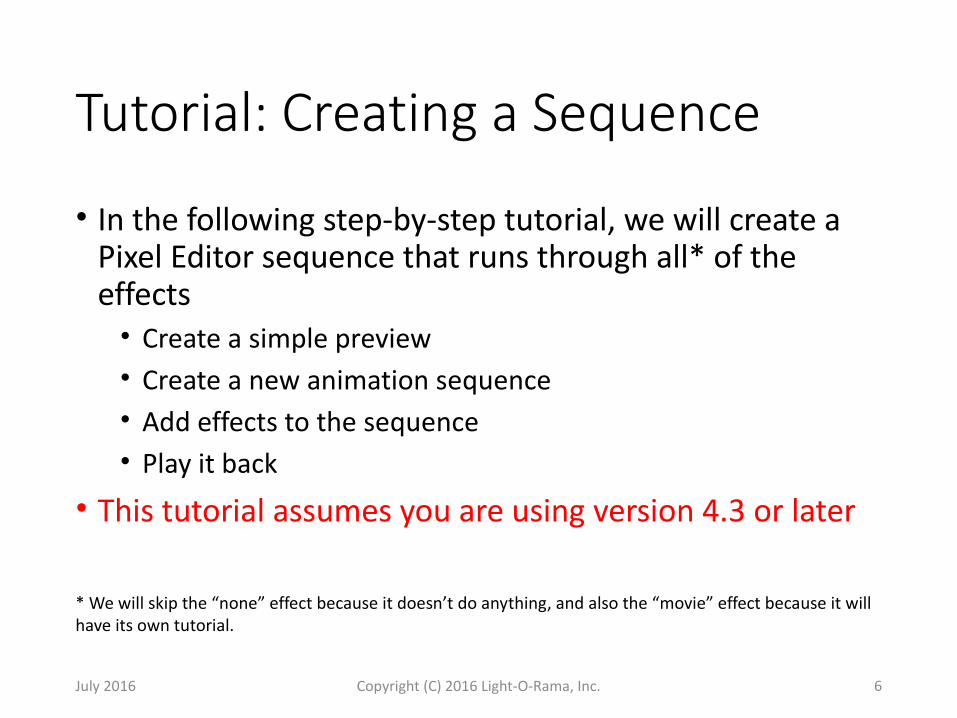
• In the following step-by-step tutorial, we will create a Pixel Editor sequence that runs through all* of the effects• Create a simple preview• Create a new animation sequence• Add effects to the sequence• Play it back
• This tutorial assumes you are using version 4.3 or later
* We will skip the “none” effect because it doesn’t do anything, and also the “movie” effect because it will have its own tutorial.
July 2016 Copyright (C) 2016 Light-O-Rama, Inc. 7
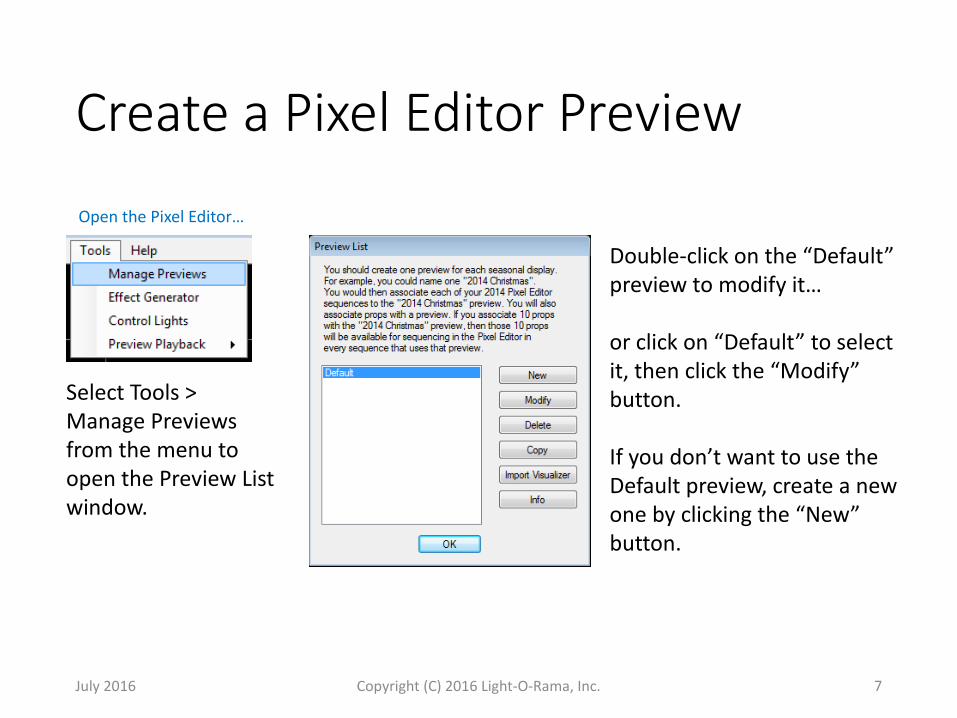
Create a Pixel Editor Preview
Double-click on the “Default” preview to modify it…
or click on “Default” to select it, then click the “Modify” button.
If you don’t want to use the Default preview, create a new one by clicking the “New” button.
Open the Pixel Editor…
Select Tools > Manage Previews from the menu to open the Preview List window.

July 2016 Copyright (C) 2016 Light-O-Rama, Inc. 8
Add a Prop to the Preview
• Select Prop > New from the preview window menu. This will open a Prop Definition window.

July 2016 Copyright (C) 2016 Light-O-Rama, Inc. 9
Define the Prop• Set the name to “Hmatrix”• Click the RGB tab and make
sure the “RGB Pixels” button is selected
• In the Shape section, select “Matrix-Horizontal” from the drop-down. We will use the default values for this shape – 16 strings of 50 pixels each.
• In the Channel section, select “Undetermined” from the drop-down. This means there is no physical prop, but we can still create effects for it.
July 2016 Copyright (C) 2016 Light-O-Rama, Inc. 10
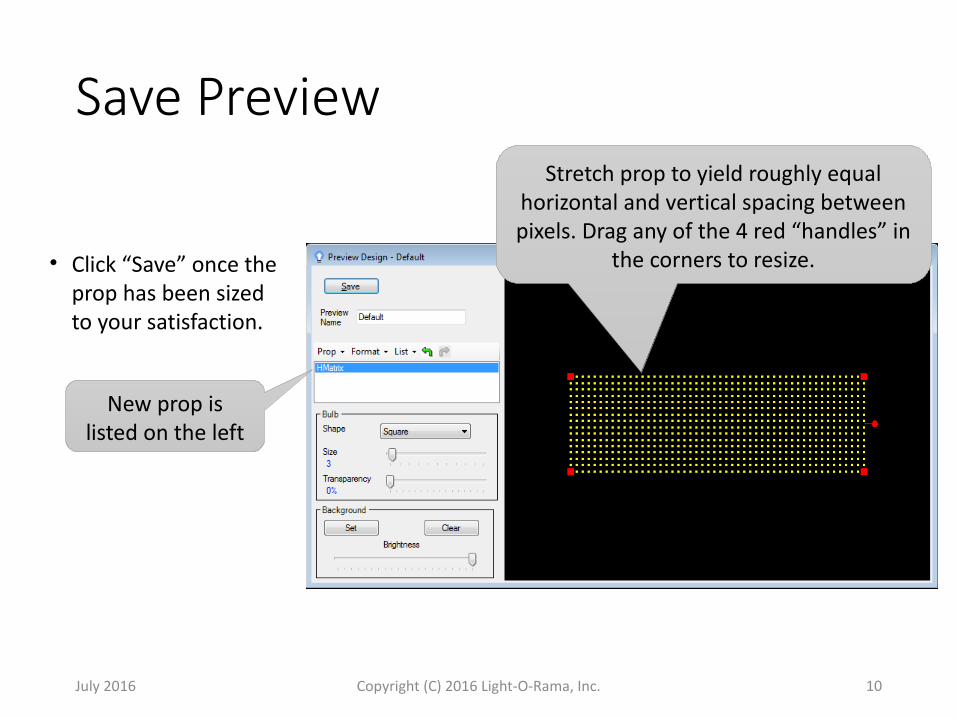
Save PreviewStretch prop to yield roughly equal
horizontal and vertical spacing between pixels. Drag any of the 4 red “handles” in
the corners to resize.
New prop is listed on the left
• Click “Save” once the prop has been sized to your satisfaction.

July 2016 Copyright (C) 2016 Light-O-Rama, Inc. 11
Create a New Animation Sequence
Select File > New > Animation Sequence from the menu to open the New Sequence window.
Leave at the 1 minute default length
Create a timing grid of fixed 1 second intervals
The preview you just created
File > New was added in version 4.3. In prior versions, a new sequence must be created using the Sequence Editor.

July 2016 Copyright (C) 2016 Light-O-Rama, Inc. 12
The Sequence Window
You can have multiple sequences open at a time. Each sequence
will have its own tabThe preview associated
with this sequence
List of props to sequence
Change the list of props that are displayed
“Current Effect”Undo & Redo
Next, we will look at the Effect Generator window, so click the “Effect Generator” button
Open the Effect Generator

July 2016 Copyright (C) 2016 Light-O-Rama, Inc. 13
Open the Effect Generator
Open the Effect Generator by clicking the “Effect Generator” button above the sequence grid; or use the “E” shortcut key
Left Effect Right EffectMixed Effect
Left Effectselection
Right Effectselection
MixerControls
FavoriteEffects

July 2016 Copyright (C) 2016 Light-O-Rama, Inc. 14
Select the “bars” Effect
• Select “bars” from the left drop-down box
• A bunch of controls will appear that allow you to control the bar effect. You can leave them at their default positions.
• Click “Show 3D”• Click “OK”. This
will close the window.

July 2016 Copyright (C) 2016 Light-O-Rama, Inc. 15
Add Bar Effect to the Sequence
“bars” is now the Current
Effect
Click the “On” tool. This will cause the current effect to be
placed in every cell you subsequently select.
After clicking the “On” tool, select the first 4 cells.
July 2016 Copyright (C) 2016 Light-O-Rama, Inc. 16
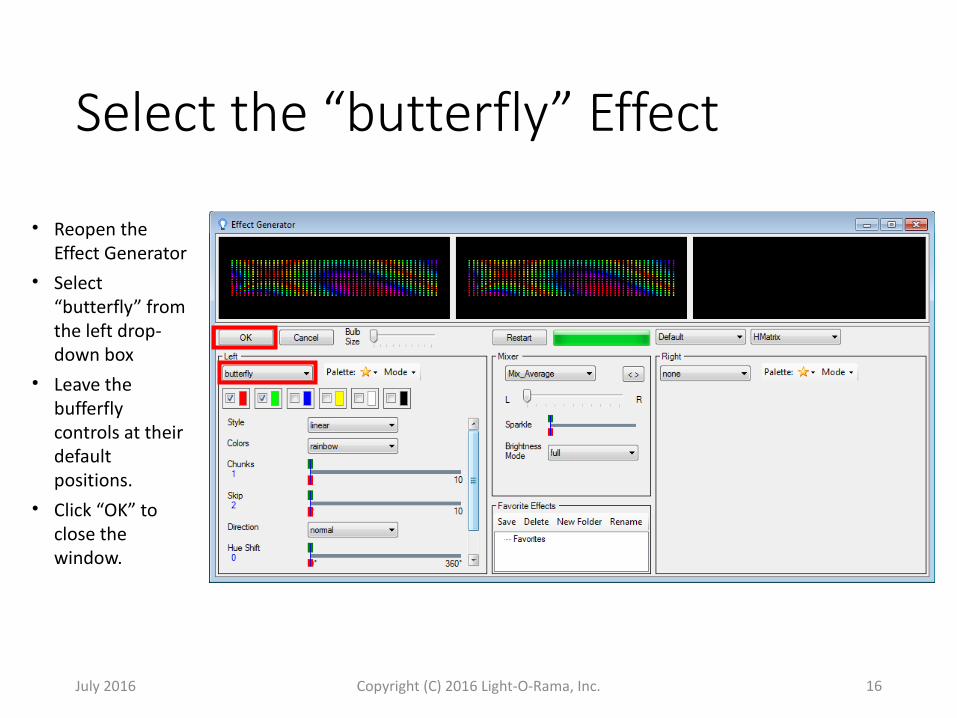
Select the “butterfly” Effect
• Reopen the Effect Generator
• Select “butterfly” from the left drop-down box
• Leave the bufferfly controls at their default positions.
• Click “OK” to close the window.
July 2016 Copyright (C) 2016 Light-O-Rama, Inc. 17
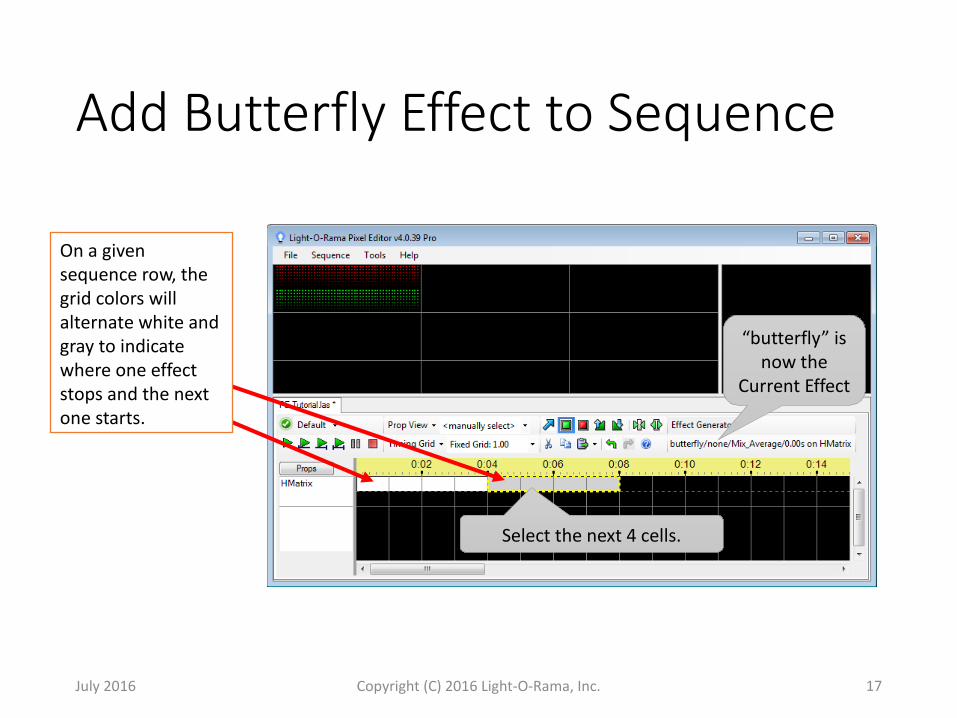
Add Butterfly Effect to Sequence
Select the next 4 cells.
“butterfly” is now the
Current Effect
On a given sequence row, the grid colors will alternate white and gray to indicate where one effect stops and the next one starts.

July 2016 Copyright (C) 2016 Light-O-Rama, Inc. 18
Select the “colorwash” Effect
• Select “colorwash” from the left drop-down box
• Set Horizontal Fade to “center on”.
• Set Mixer Brightness Mode to “fade in and out”.
• Move Fade Speed to about mid-position.
• Click “OK”

July 2016 Copyright (C) 2016 Light-O-Rama, Inc. 19
Add Colorwash Effect to Sequence
Select the next 4 cells.
“colorwash” is now the
Current EffectDouble-click on the prop name to play back the visible portion
of the sequence

July 2016 Copyright (C) 2016 Light-O-Rama, Inc. 20
Select the “countdown” Effect
• Select “countdown” from the left drop-down box
• Set Seconds To Count to “3”.
• Reset Mixer Brightness Mode to “full”.
• Click “OK”

July 2016 Copyright (C) 2016 Light-O-Rama, Inc. 21
Add Countdown Effect to Sequence
Select the next 4 cells. The grid will automatically scroll as your cursor
approaches the grid’s edge.
“countdown” is now the
Current Effect
Effects that you have used in the sequence
appear here as thumbnails
that you can click on to
make it the Current Effect, or drag onto a
grid cell.

July 2016 Copyright (C) 2016 Light-O-Rama, Inc. 22
Select the “curtain” Effect
• Select “curtain” from the left drop-down box
• Set Movement to “open then close”
• Set Repeat Mode to “repeat at speed”
• Select “butterfly” from the right drop-down box
• Set Mixer to “Mix Overlay”.
• Click “OK”
July 2016 Copyright (C) 2016 Light-O-Rama, Inc. 23
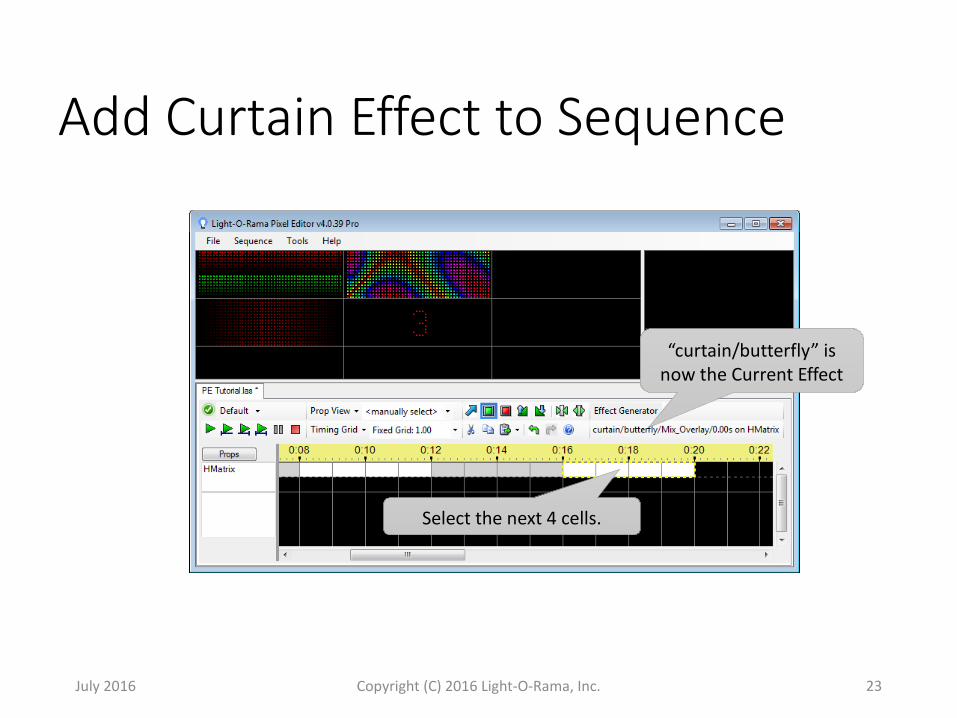
Add Curtain Effect to Sequence
Select the next 4 cells.
“curtain/butterfly” is now the Current Effect

July 2016 Copyright (C) 2016 Light-O-Rama, Inc. 24
Select the “fire” Effect
• Select “fire” from the left drop-down box
• Select “none” from the right drop-down box
• Click “OK”• Back in the grid,
select the next 4 cells. Then Ctrl-S to save the sequence.
July 2016 Copyright (C) 2016 Light-O-Rama, Inc. 25
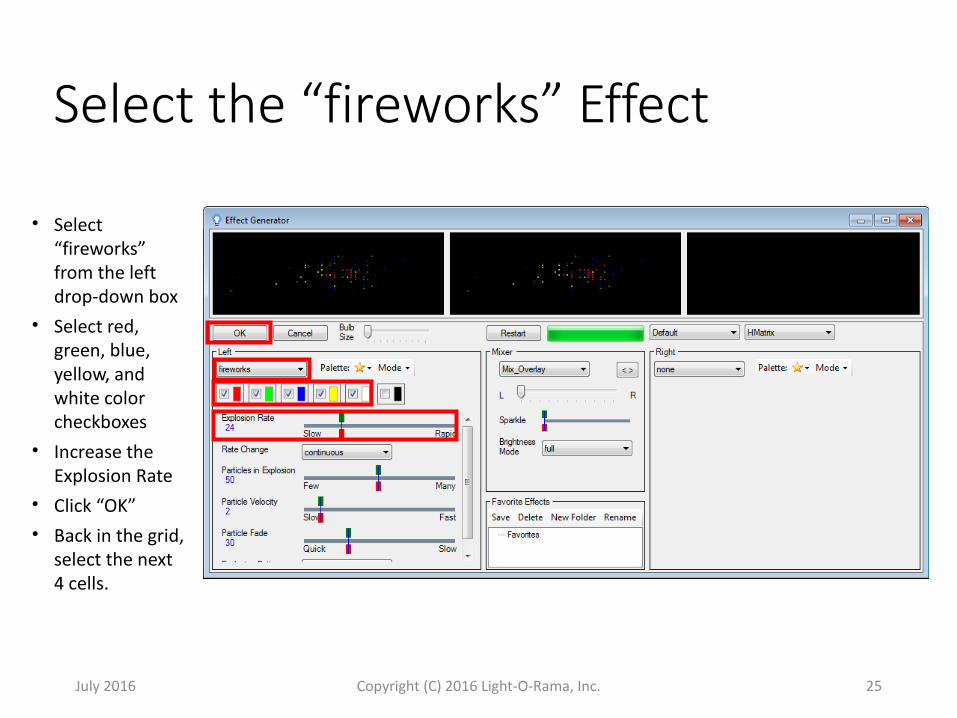
Select the “fireworks” Effect
• Select “fireworks” from the left drop-down box
• Select red, green, blue, yellow, and white color checkboxes
• Increase the Explosion Rate
• Click “OK”• Back in the grid,
select the next 4 cells.

July 2016 Copyright (C) 2016 Light-O-Rama, Inc. 26
Select the “garland” Effect
• Select “garland” from the left drop-down box
• Select blue & white colors
• Change Garland Fill to “left to right”
• Change Repeat Mode to “once fit to duration”
• Click “OK”• Back in the grid,
select the next 4 cells.
With Repeat Mode set to “once fit to duration”, the effect will only play once. Click the Restart button to
see it play again.

July 2016 Copyright (C) 2016 Light-O-Rama, Inc. 27
Select the “meteor” Effect
• Select “meteor” from the left drop-down box
• Colors don’t matter when Color Scheme is “rainbow”
• Double-click the Meteor Count slider to unlock start & end handles. Move start handle (green) all the way to the left. Move the end handle (red) all the way to the right.
• Click Restart to see how the number of meteors changes over time
• Click “OK”• Back in the grid, select the next
4 cells.
July 2016 Copyright (C) 2016 Light-O-Rama, Inc. 28
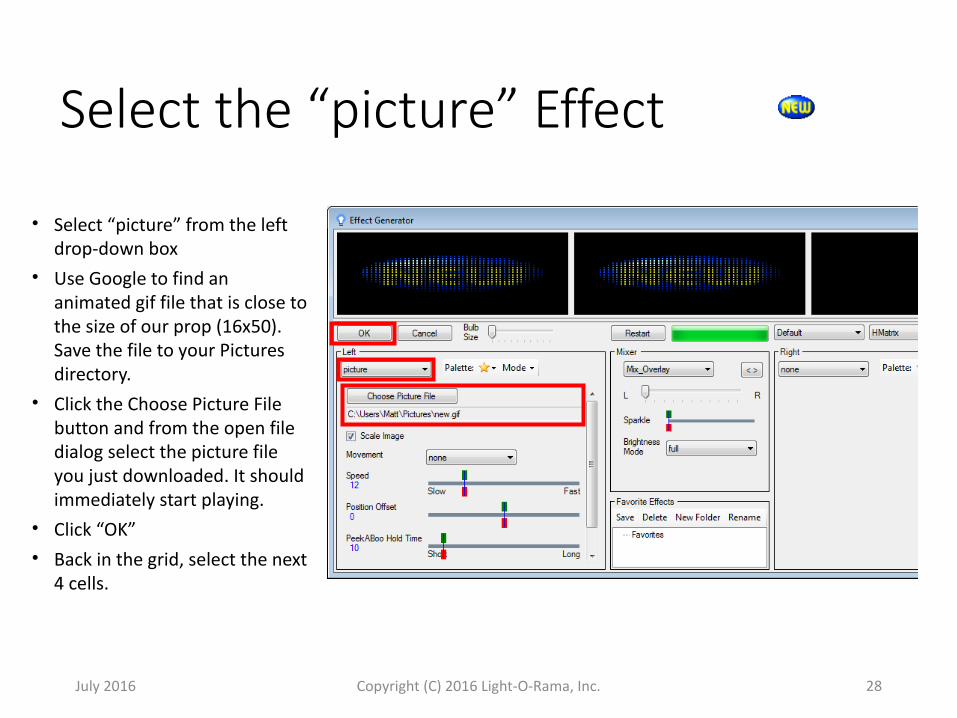
Select the “picture” Effect
• Select “picture” from the left drop-down box
• Use Google to find an animated gif file that is close to the size of our prop (16x50). Save the file to your Pictures directory.
• Click the Choose Picture File button and from the open file dialog select the picture file you just downloaded. It should immediately start playing.
• Click “OK”• Back in the grid, select the next
4 cells.

July 2016 Copyright (C) 2016 Light-O-Rama, Inc. 29
Select the “pinwheel” Effect
• Select “pinwheel” from the left drop-down box
• Select the red, green, and blue colors from the palette
• Increase Arm Width• Decrease Arm Length• Increase Arm Bend• In the Mixer section, set
Sparkle to the max value• Click “OK”• Back in the grid, select the
next 4 cells.
Numeric values allow you to match the setting exactly

July 2016 Copyright (C) 2016 Light-O-Rama, Inc. 30
Select the “snowflakes” Effect
• Select “snowflakes” from the left drop-down box
• Deselect all colors from the palette. Notice how it defaults to white.
• Change Snowflake Type to “1”
• In the Mixer section, reset Sparkle to the min value
• Click “OK”• Back in the grid, select the
next 4 cells. Then Ctrl-S to save the sequence.
There is no “snowstorm” effect in the Pixel Editor
because similar results can be achieved by adjusting
the direction and speed in the “snowflakes” effect.

July 2016 Copyright (C) 2016 Light-O-Rama, Inc. 31
Select the “spirals” Effect
• Select “spirals” from the left drop-down box
• Select red and white colors from the palette.
• Set Palette Repeat to “2”• Increase Rotation• Increase Thickness• Click the “Show 3D”
checkbox (you will need to scroll to the bottom of the parameter settings)
• Click “OK”• Back in the grid, select the
next 4 cells.

July 2016 Copyright (C) 2016 Light-O-Rama, Inc. 32
Select the “text” Effect
Left Side• Select “text” from the
drop-down box• Enter “Merry” in the
text box. Select the text and change the color to red. Change the font to “Calibri” or “Lucida Sans” if you have it.
• Set Font Size to about 86
• Set Movement to “left”
• Set Speed to about 5• Adjust Position so
that text is against the top edge
Right Side• Select “text” from
the drop-down box• Enter “Christmas” in
the text box. Select the text and change the color to white. Change the font to “Calibri” or “Lucida Sans” if you have it.
• Set Font Size to about 86
• Set Movement to “right”
• Set Speed to about 5• Adjust Position so
that text is against the bottom edge
Click “OK” when you are satisfied with the result
July 2016 Copyright (C) 2016 Light-O-Rama, Inc. 33
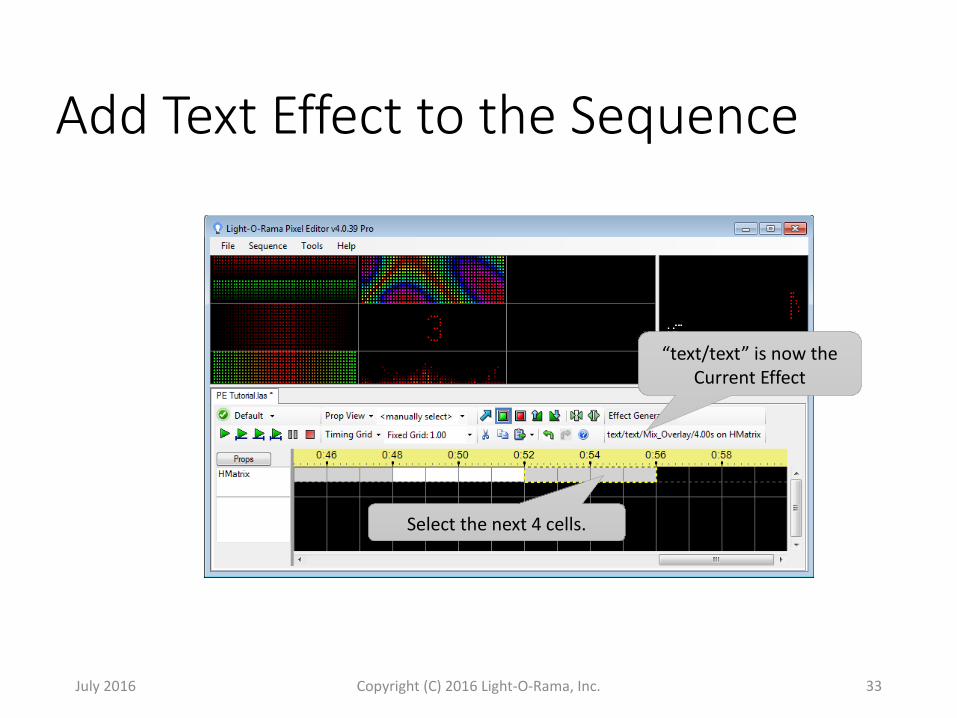
Add Text Effect to the Sequence
Select the next 4 cells.
“text/text” is now the Current Effect
July 2016 Copyright (C) 2016 Light-O-Rama, Inc. 34
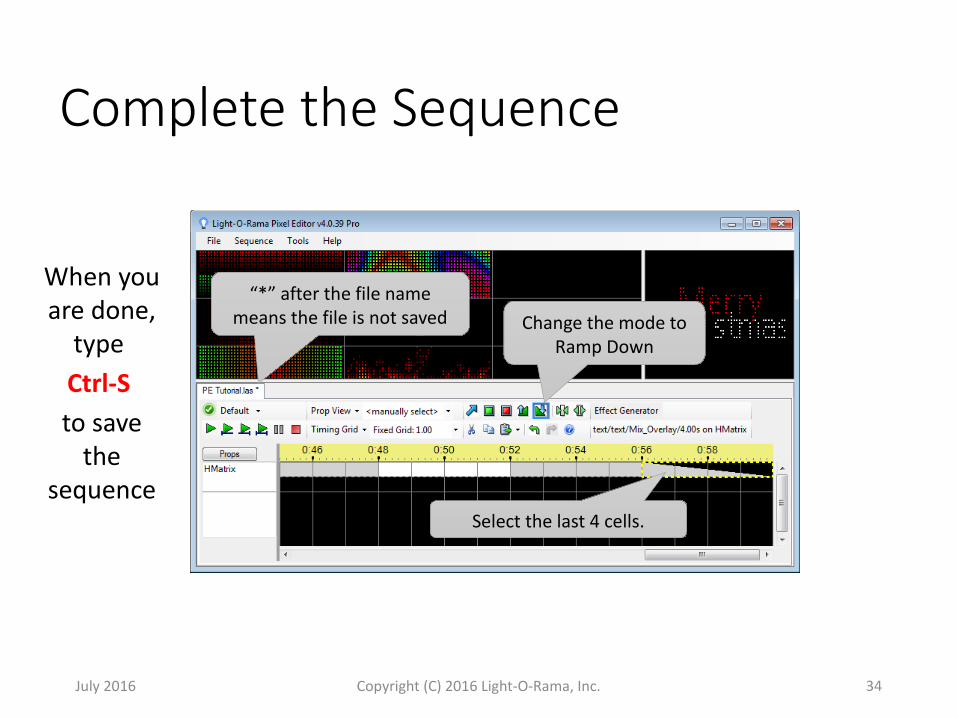
Complete the Sequence
Select the last 4 cells.
Change the mode to Ramp Down
When you are done,
type Ctrl-S to save
the sequence
“*” after the file name means the file is not saved

July 2016 Copyright (C) 2016 Light-O-Rama, Inc. 35
Play Back the Sequence
Play the full sequence
Play from the current location to the end of the sequence
Play from the beginning of the sequence to the current location
Play the visible portion of the sequence
You can also play back a specific prop - preview will play in the left window and the effects for the selected prop will play in the right window. To do this, right-click on a prop name and select one of the choices from the pop-up menu. As a shortcut, you can double-click on a prop name to play the visible portion of the sequence.

July 2016 Copyright (C) 2016 Light-O-Rama, Inc. 36
2 Sequence Rows Per Prop
The top row contains Effect Generator results that are a mix of 1 or 2 effects
The bottom row can also contain Effect Generator results that are a mix of 1 or 2 effects
The 2 rows are mixed together to produce the final effect for the prop

July 2016 Copyright (C) 2016 Light-O-Rama, Inc. 37
Smooth Transitions
• In the sequence we have created so far, effects transition abruptly one to the next.• Now we are going to modify the sequence so each
transition is smooth (crossfade).

July 2016 Copyright (C) 2016 Light-O-Rama, Inc. 38
Move Effects to the Bottom Row
• Move every other effect from the top row to the bottom row
• Click the Arrow icon to go into selection mode.
• Select all the cells of an effect using the mouse. Then click the scissors icon to cut, or use the Ctrl-X shortcut key.
• Select the destination grid cells using the mouse. Then click the clipboard paste icon, or use the Ctrl-V shortcut key.
• Repeat until you reach the end of the sequence.
• The result is shown on the right.

July 2016 Copyright (C) 2016 Light-O-Rama, Inc. 39
Add Fade Out Transitions
• Add a fade out to every effect, both top and bottom rows.
• Click the last cell in an effect. This causes that effect to be the Current Effect.
• Now click the empty cell to the right. Then type the “D” shortcut key (fade down).
• Repeat for every effect.• The result is shown on the
right.

July 2016 Copyright (C) 2016 Light-O-Rama, Inc. 40
Add Fade In Transitions
• Change the first cell in every effect to a fade in/up, both top and bottom rows.
• Click the first cell in an effect. This causes that effect to be the Current Effect. Then type the “U” shortcut key (fade up).
• Repeat for every effect.• The result is shown on the
right.• Type Ctrl-S to save!

July 2016 Copyright (C) 2016 Light-O-Rama, Inc. 41
Save Intensity Data
● The intensity data file is required so that the Sequence Editor and Show Player can play back the Pixel Editor sequence.
● This command requires a PRO level license.

July 2016 Copyright (C) 2016 Light-O-Rama, Inc. 42
Sequence Editor with Intensity File
After the last track, props in the intensity file are listed. Clicking on a prop shows the channels used.
July 2016 Copyright (C) 2016 Light-O-Rama, Inc. 43
Success!
• The sequence looks much better now with smooth transitions.• You have successfully created a Pixel Editor
sequence and used every effect (except movie).• Congratulations and enjoy using the Pixel Editor!
Participate in the Pixel Editor forum on the Light O Rama web site to ask questions and find the ‑ ‑latest information.

July 2016 44
For More Information
http://youtu.be/gg5LW2azjRY
Pixel Editor Introduction:
Pixel Editor Sequencing:http://youtu.be/5unIkAJjauU