Embed Size (px)
Citation preview
1
Creating and Administering a Test in PowerSchool Assessment – February 2, 2017
1. If you used Triand, our old benchmark testing system, you will find PowerSchool Assessment easy to use. Here is the link that you will use to log-in to Power School Assessment: https://aa.powerschool.com/Account/Login?redirectUrl=https://aa.powerschool.com/&code=VA_PULASKI Click on Sign In not Log in with Clever. You will use the same log-in and password that you used for testing.
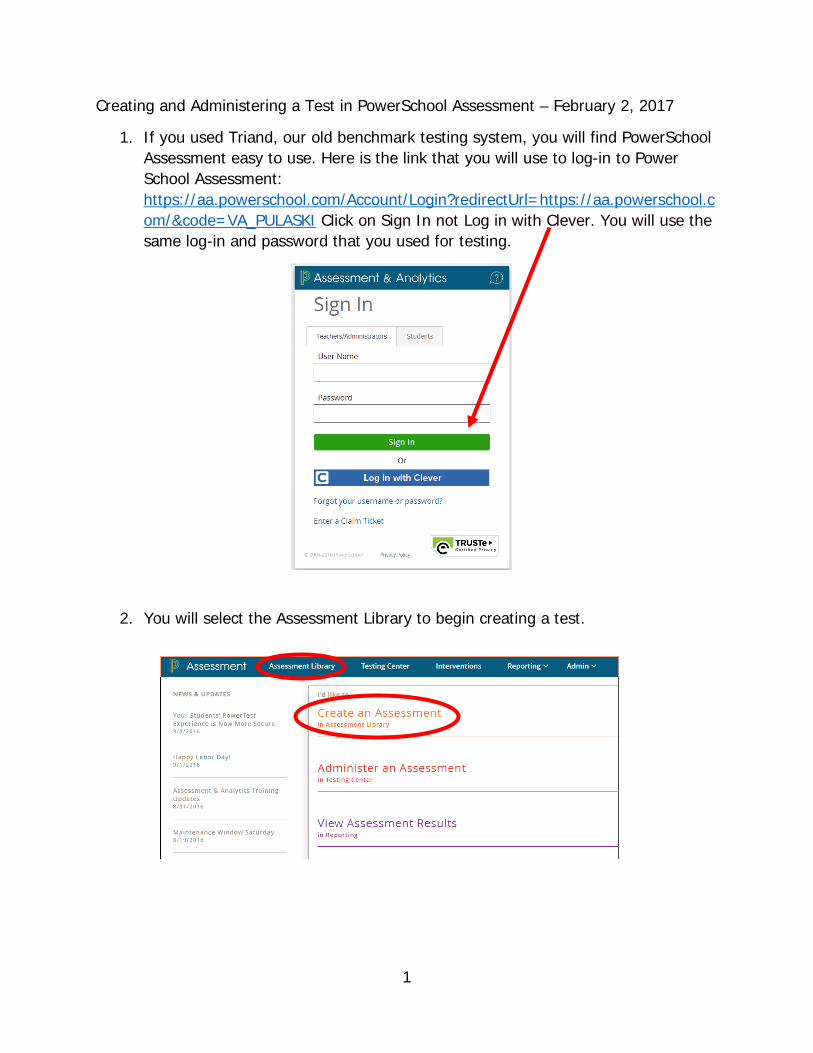
2. You will select the Assessment Library to begin creating a test.
2
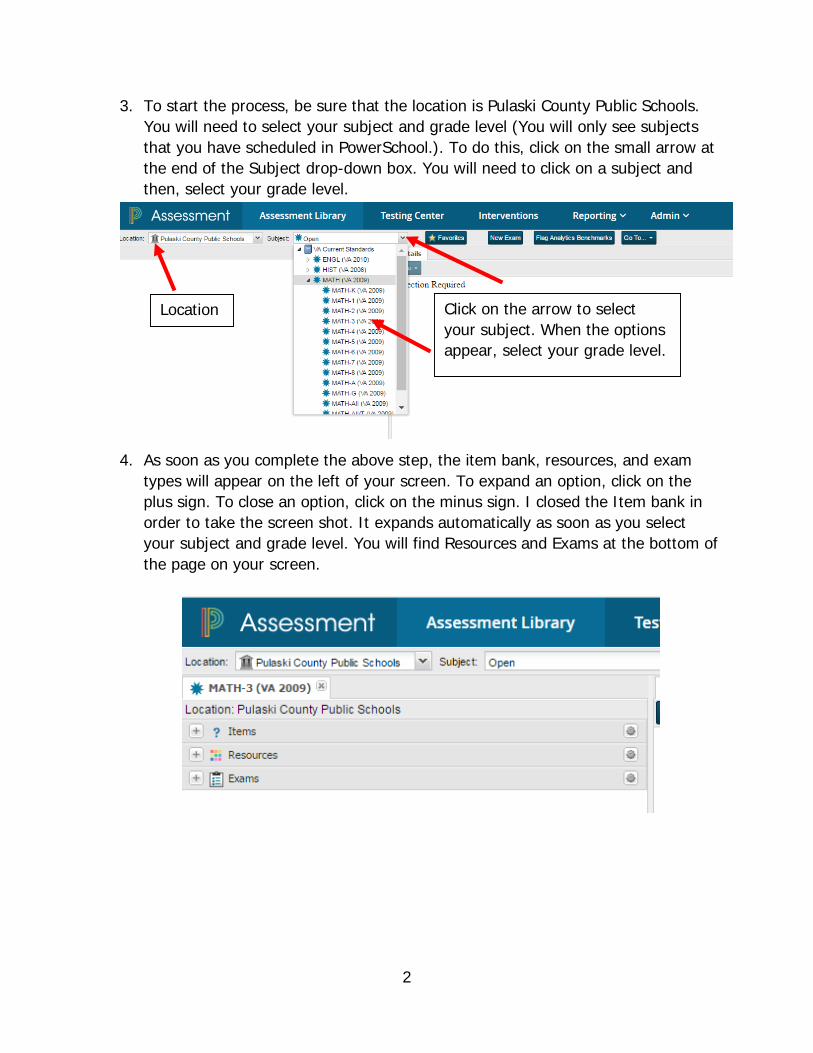
3. To start the process, be sure that the location is Pulaski County Public Schools. You will need to select your subject and grade level (You will only see subjects that you have scheduled in PowerSchool.). To do this, click on the small arrow at the end of the Subject drop-down box. You will need to click on a subject and then, select your grade level.
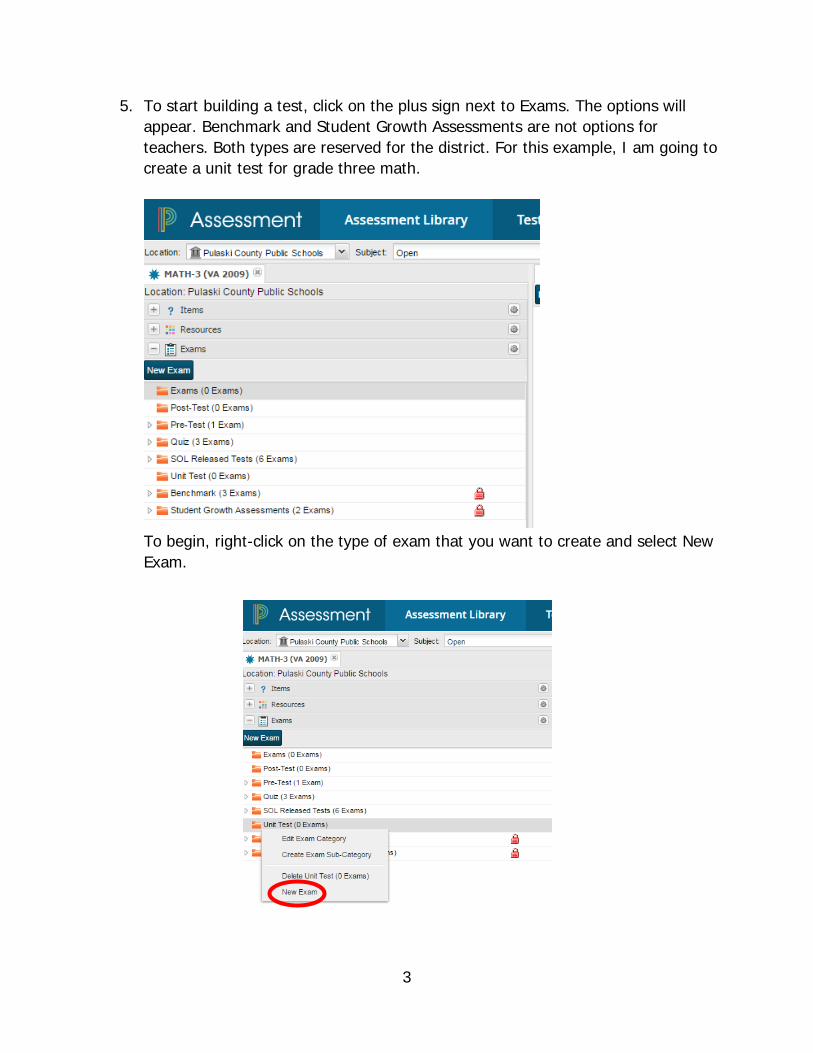
4. As soon as you complete the above step, the item bank, resources, and exam types will appear on the left of your screen. To expand an option, click on the plus sign. To close an option, click on the minus sign. I closed the Item bank in order to take the screen shot. It expands automatically as soon as you select your subject and grade level. You will find Resources and Exams at the bottom of the page on your screen.
Location Click on the arrow to select your subject. When the options appear, select your grade level.
3
5. To start building a test, click on the plus sign next to Exams. The options will appear. Benchmark and Student Growth Assessments are not options for teachers. Both types are reserved for the district. For this example, I am going to create a unit test for grade three math.
To begin, right-click on the type of exam that you want to create and select New Exam.
4
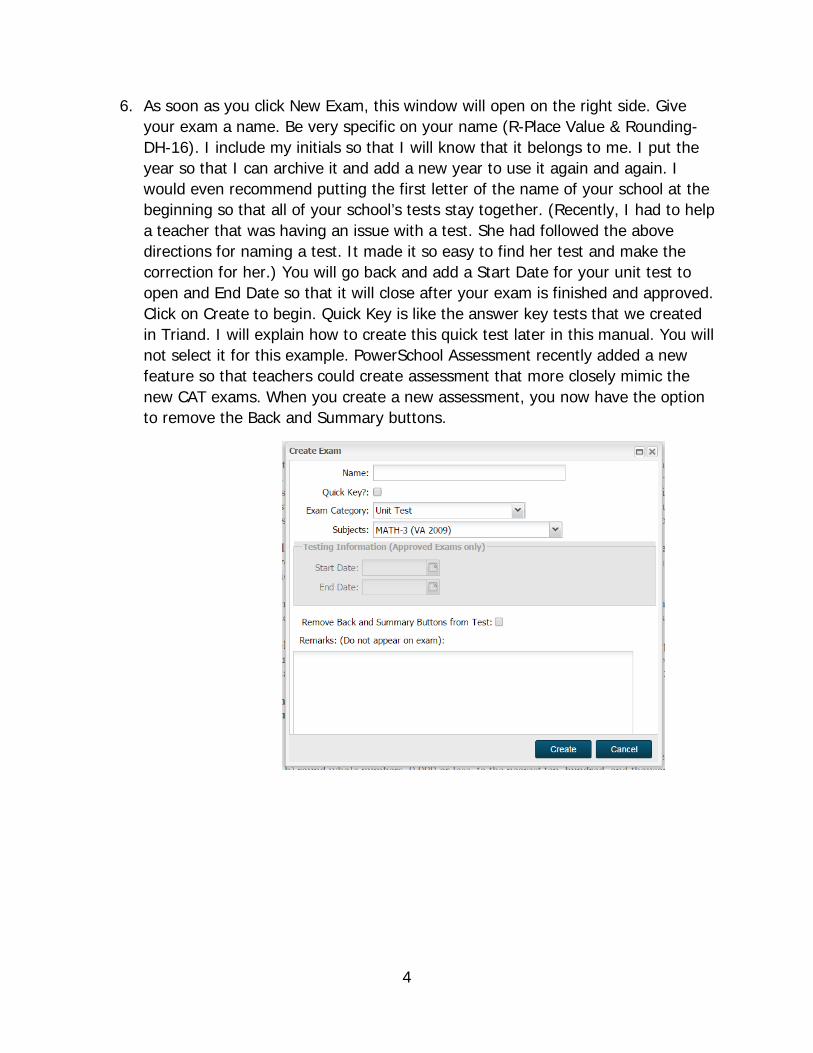
6. As soon as you click New Exam, this window will open on the right side. Give your exam a name. Be very specific on your name (R-Place Value & Rounding-DH-16). I include my initials so that I will know that it belongs to me. I put the year so that I can archive it and add a new year to use it again and again. I would even recommend putting the first letter of the name of your school at the beginning so that all of your school’s tests stay together. (Recently, I had to help a teacher that was having an issue with a test. She had followed the above directions for naming a test. It made it so easy to find her test and make the correction for her.) You will go back and add a Start Date for your unit test to open and End Date so that it will close after your exam is finished and approved. Click on Create to begin. Quick Key is like the answer key tests that we created in Triand. I will explain how to create this quick test later in this manual. You will not select it for this example. PowerSchool Assessment recently added a new feature so that teachers could create assessment that more closely mimic the new CAT exams. When you create a new assessment, you now have the option to remove the Back and Summary buttons.
5
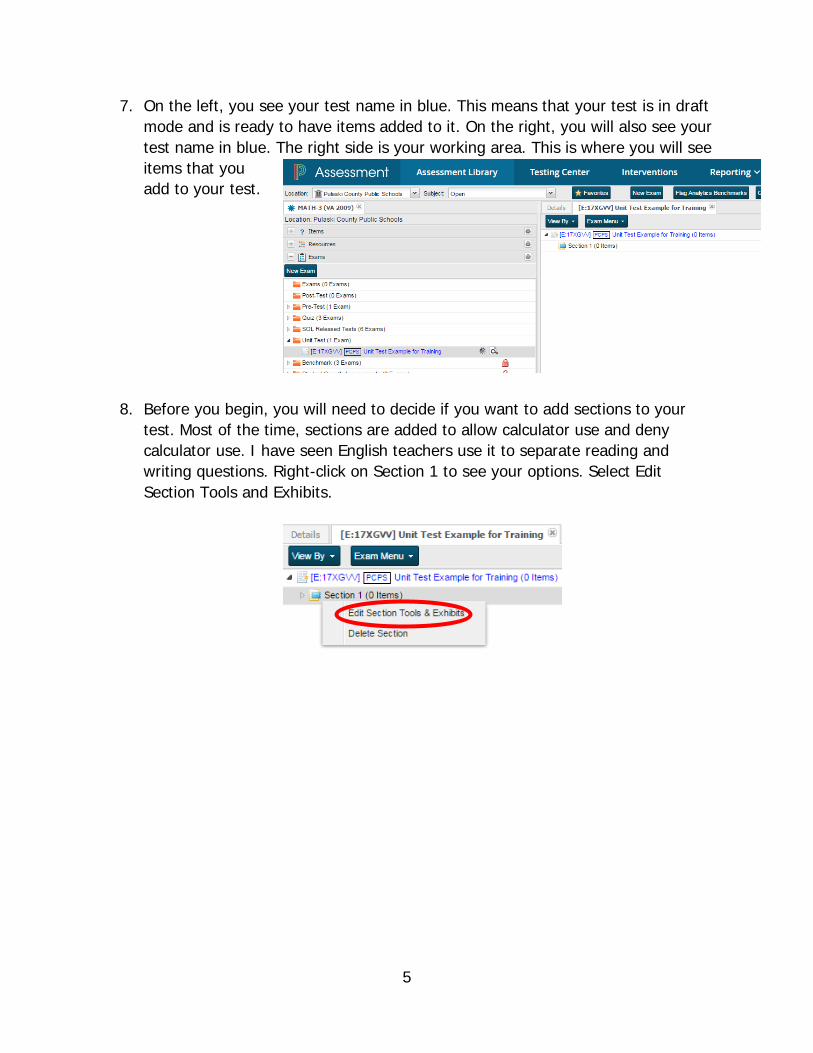
7. On the left, you see your test name in blue. This means that your test is in draft mode and is ready to have items added to it. On the right, you will also see your test name in blue. The right side is your working area. This is where you will see items that you add to your test.
8. Before you begin, you will need to decide if you want to add sections to your test. Most of the time, sections are added to allow calculator use and deny calculator use. I have seen English teachers use it to separate reading and writing questions. Right-click on Section 1 to see your options. Select Edit Section Tools and Exhibits.
6
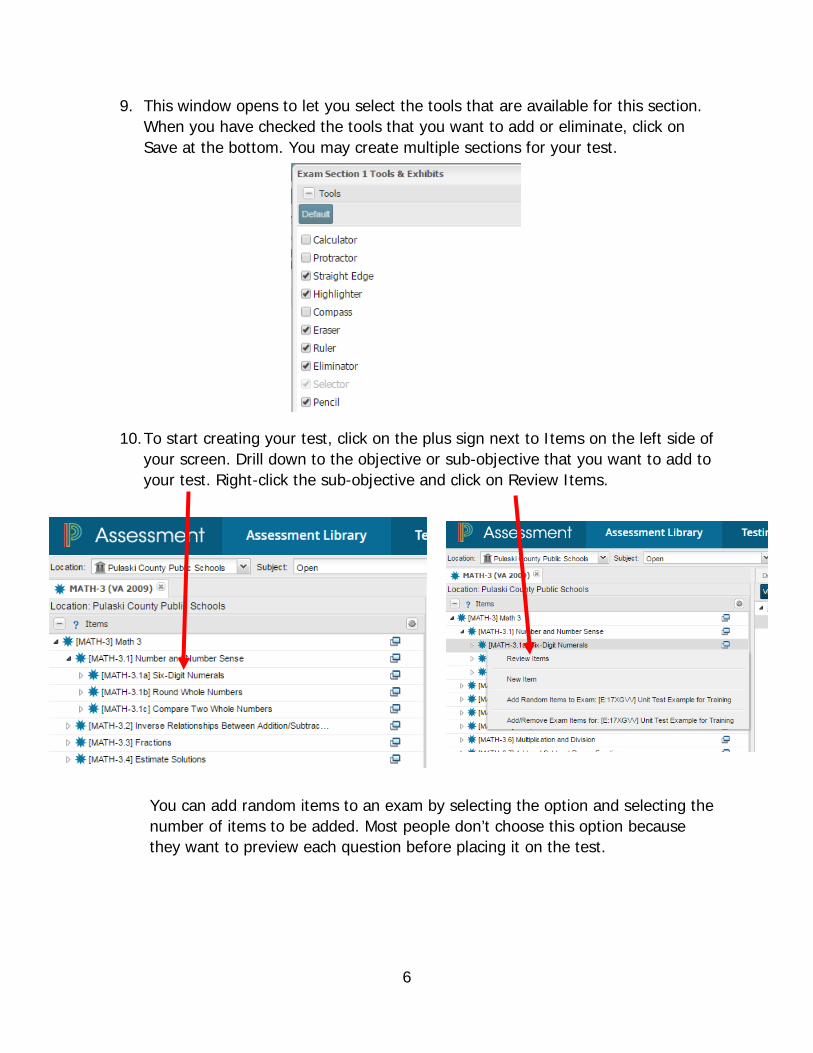
9. This window opens to let you select the tools that are available for this section. When you have checked the tools that you want to add or eliminate, click on Save at the bottom. You may create multiple sections for your test.
10. To start creating your test, click on the plus sign next to Items on the left side of your screen. Drill down to the objective or sub-objective that you want to add to your test. Right-click the sub-objective and click on Review Items.
You can add random items to an exam by selecting the option and selecting the number of items to be added. Most people don’t choose this option because they want to preview each question before placing it on the test.
7
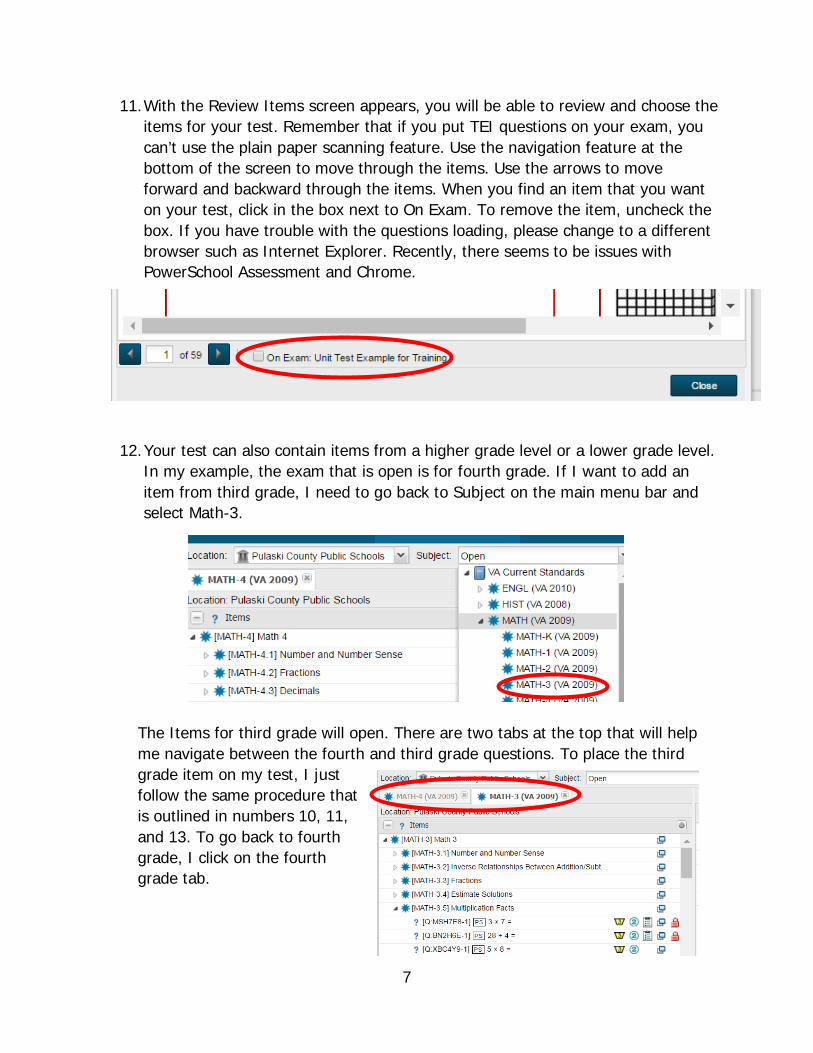
11. With the Review Items screen appears, you will be able to review and choose the items for your test. Remember that if you put TEI questions on your exam, you can’t use the plain paper scanning feature. Use the navigation feature at the bottom of the screen to move through the items. Use the arrows to move forward and backward through the items. When you find an item that you want on your test, click in the box next to On Exam. To remove the item, uncheck the box. If you have trouble with the questions loading, please change to a different browser such as Internet Explorer. Recently, there seems to be issues with PowerSchool Assessment and Chrome.
12. Your test can also contain items from a higher grade level or a lower grade level. In my example, the exam that is open is for fourth grade. If I want to add an item from third grade, I need to go back to Subject on the main menu bar and select Math-3.
The Items for third grade will open. There are two tabs at the top that will help me navigate between the fourth and third grade questions. To place the third grade item on my test, I just follow the same procedure that is outlined in numbers 10, 11, and 13. To go back to fourth grade, I click on the fourth grade tab.

8
13. Items may also be added by expanding the objective or sub-objective and clicking on each item individually to view. If you have an item that you like, drag it to your test. On the left of each item, you will see a question mark. Blue question marks indicate regular multiple choice items. Orange question marks indicate TEI items. CR items are constructed response items. These items may only be used on an online test. You will have to grade the item manually and add the score in testing center for that item. Next to the question mark is the item number followed by the type of item (PS-PowerSchool, etc.). I would recommend sticking to PS items.
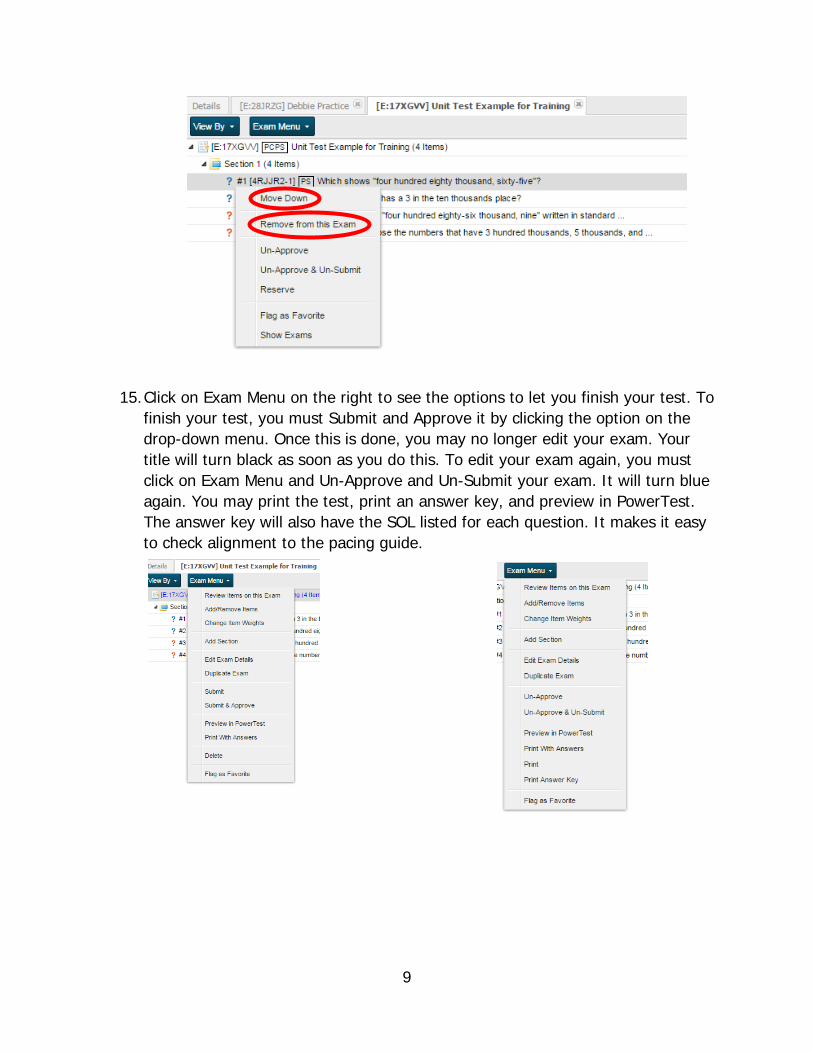
14. It is very easy to move a question to a different location. Just remember that your exam must be in draft status. You can just drag and drop it to the new location, or you can right-click the question and select the Move Down or Move Up commands. If you want to remove a question from your exam, again the exam must be in draft status. You just need to right-click the question and select Remove from this Exam.
Bloom’s Level
Used in a test already
Preview
Locked
9
15. Click on Exam Menu on the right to see the options to let you finish your test. To finish your test, you must Submit and Approve it by clicking the option on the drop-down menu. Once this is done, you may no longer edit your exam. Your title will turn black as soon as you do this. To edit your exam again, you must click on Exam Menu and Un-Approve and Un-Submit your exam. It will turn blue again. You may print the test, print an answer key, and preview in PowerTest. The answer key will also have the SOL listed for each question. It makes it easy to check alignment to the pacing guide.
10
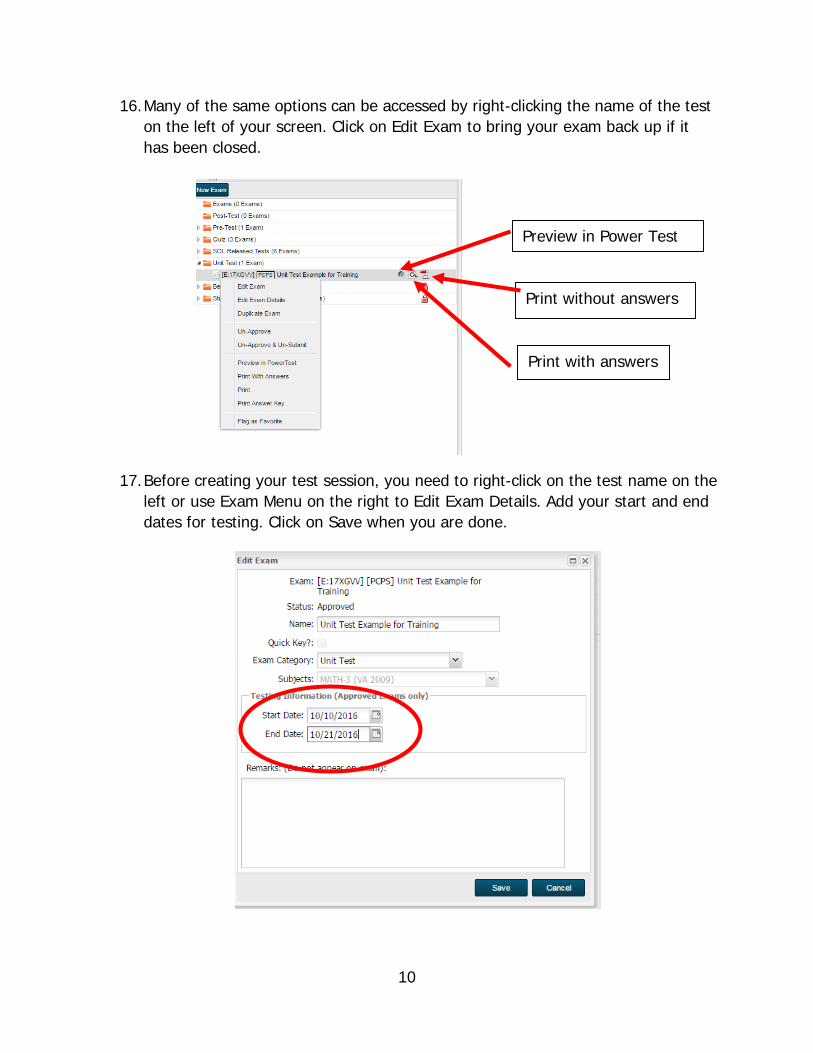
16. Many of the same options can be accessed by right-clicking the name of the test on the left of your screen. Click on Edit Exam to bring your exam back up if it has been closed.
17. Before creating your test session, you need to right-click on the test name on the left or use Exam Menu on the right to Edit Exam Details. Add your start and end dates for testing. Click on Save when you are done.
Preview in Power Test
Print with answers
Print without answers
11
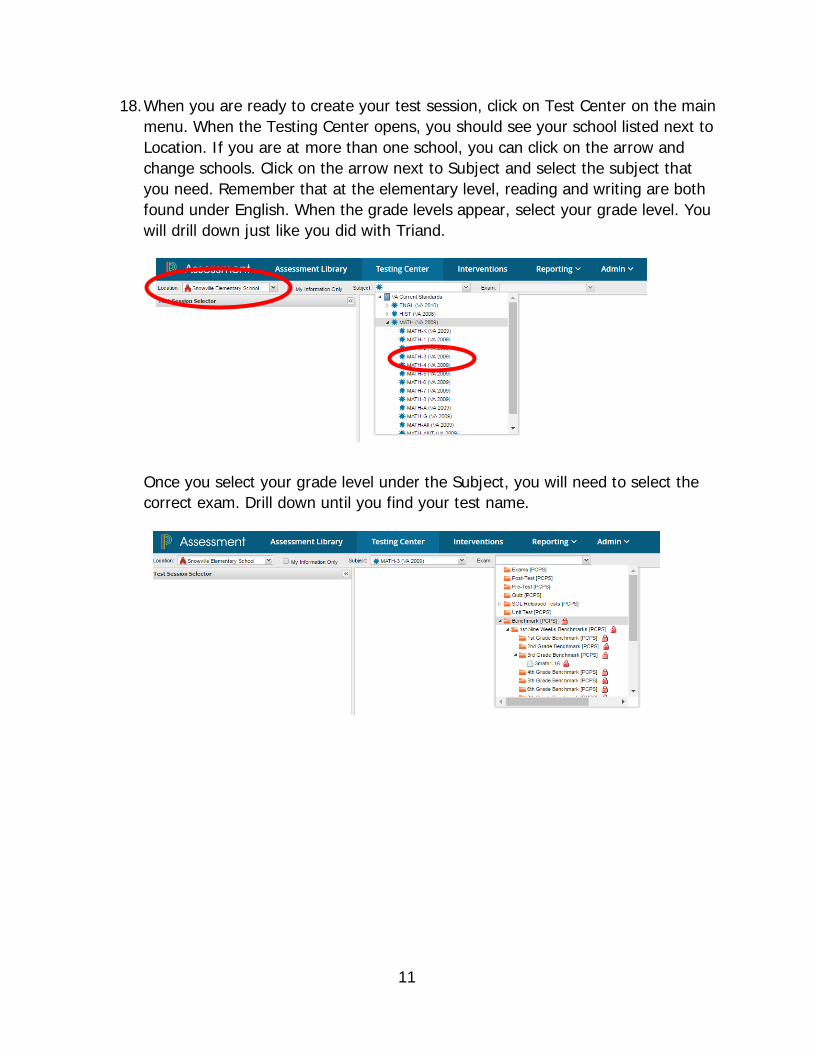
18. When you are ready to create your test session, click on Test Center on the main menu. When the Testing Center opens, you should see your school listed next to Location. If you are at more than one school, you can click on the arrow and change schools. Click on the arrow next to Subject and select the subject that you need. Remember that at the elementary level, reading and writing are both found under English. When the grade levels appear, select your grade level. You will drill down just like you did with Triand.
Once you select your grade level under the Subject, you will need to select the correct exam. Drill down until you find your test name.
12
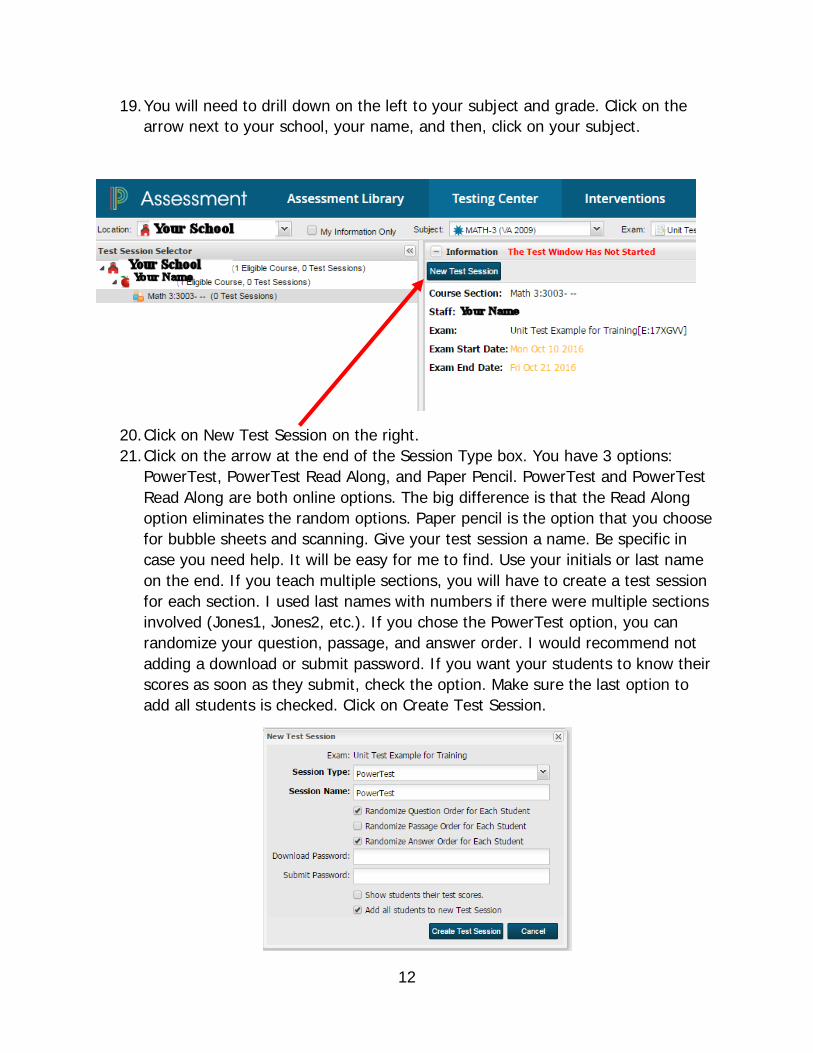
19. You will need to drill down on the left to your subject and grade. Click on the arrow next to your school, your name, and then, click on your subject.
20. Click on New Test Session on the right. 21. Click on the arrow at the end of the Session Type box. You have 3 options:
PowerTest, PowerTest Read Along, and Paper Pencil. PowerTest and PowerTest Read Along are both online options. The big difference is that the Read Along option eliminates the random options. Paper pencil is the option that you choose for bubble sheets and scanning. Give your test session a name. Be specific in case you need help. It will be easy for me to find. Use your initials or last name on the end. If you teach multiple sections, you will have to create a test session for each section. I used last names with numbers if there were multiple sections involved (Jones1, Jones2, etc.). If you chose the PowerTest option, you can randomize your question, passage, and answer order. I would recommend not adding a download or submit password. If you want your students to know their scores as soon as they submit, check the option. Make sure the last option to add all students is checked. Click on Create Test Session.
13
22. As soon as you do this, your students will appear on the right side with the Menu option and the stoplight at the top. Remember that you have to turn the stoplight to green to start an online test. To restart a student test, click on the double arrow at the end of the student’s row. See the Power Test Assessment Manual for specific directions on doing all of this. Once you add an exam to a test session, you can no longer edit the exam. If you need to edit the exam, you will need to delete the test session.
23. Once your students have completed the test, you can view your results by going to Reporting-Assessment Results on the main menu bar. See the Power Test Assessment Manual for specific directions on viewing your results and downloading or printing reports.
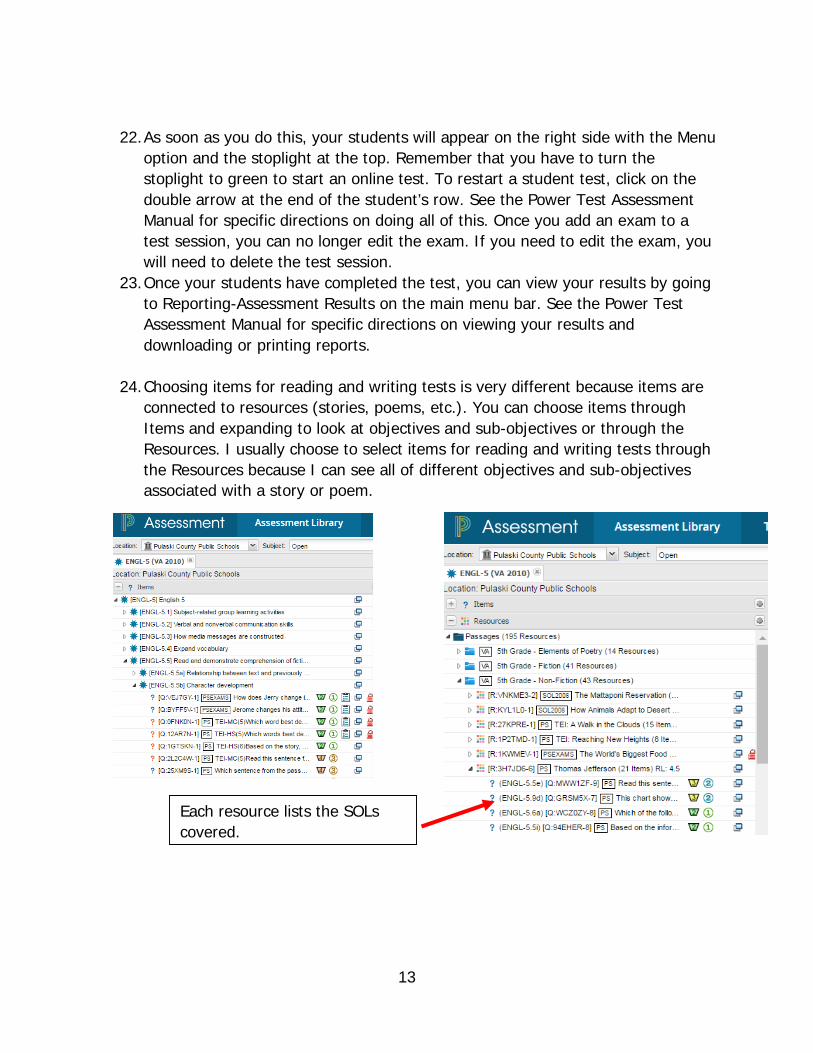
24. Choosing items for reading and writing tests is very different because items are connected to resources (stories, poems, etc.). You can choose items through Items and expanding to look at objectives and sub-objectives or through the Resources. I usually choose to select items for reading and writing tests through the Resources because I can see all of different objectives and sub-objectives associated with a story or poem.
Each resource lists the SOLs covered.
14
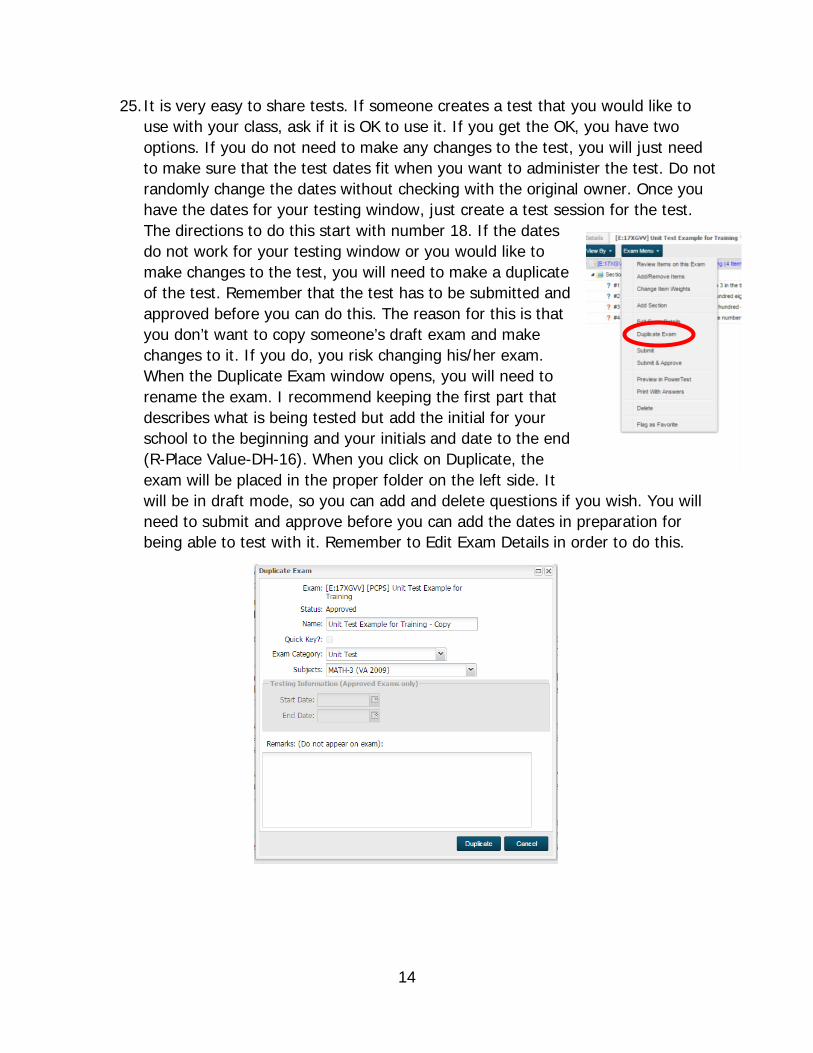
25. It is very easy to share tests. If someone creates a test that you would like to use with your class, ask if it is OK to use it. If you get the OK, you have two options. If you do not need to make any changes to the test, you will just need to make sure that the test dates fit when you want to administer the test. Do not randomly change the dates without checking with the original owner. Once you have the dates for your testing window, just create a test session for the test. The directions to do this start with number 18. If the dates do not work for your testing window or you would like to make changes to the test, you will need to make a duplicate of the test. Remember that the test has to be submitted and approved before you can do this. The reason for this is that you don’t want to copy someone’s draft exam and make changes to it. If you do, you risk changing his/her exam. When the Duplicate Exam window opens, you will need to rename the exam. I recommend keeping the first part that describes what is being tested but add the initial for your school to the beginning and your initials and date to the end (R-Place Value-DH-16). When you click on Duplicate, the exam will be placed in the proper folder on the left side. It will be in draft mode, so you can add and delete questions if you wish. You will need to submit and approve before you can add the dates in preparation for being able to test with it. Remember to Edit Exam Details in order to do this.
15
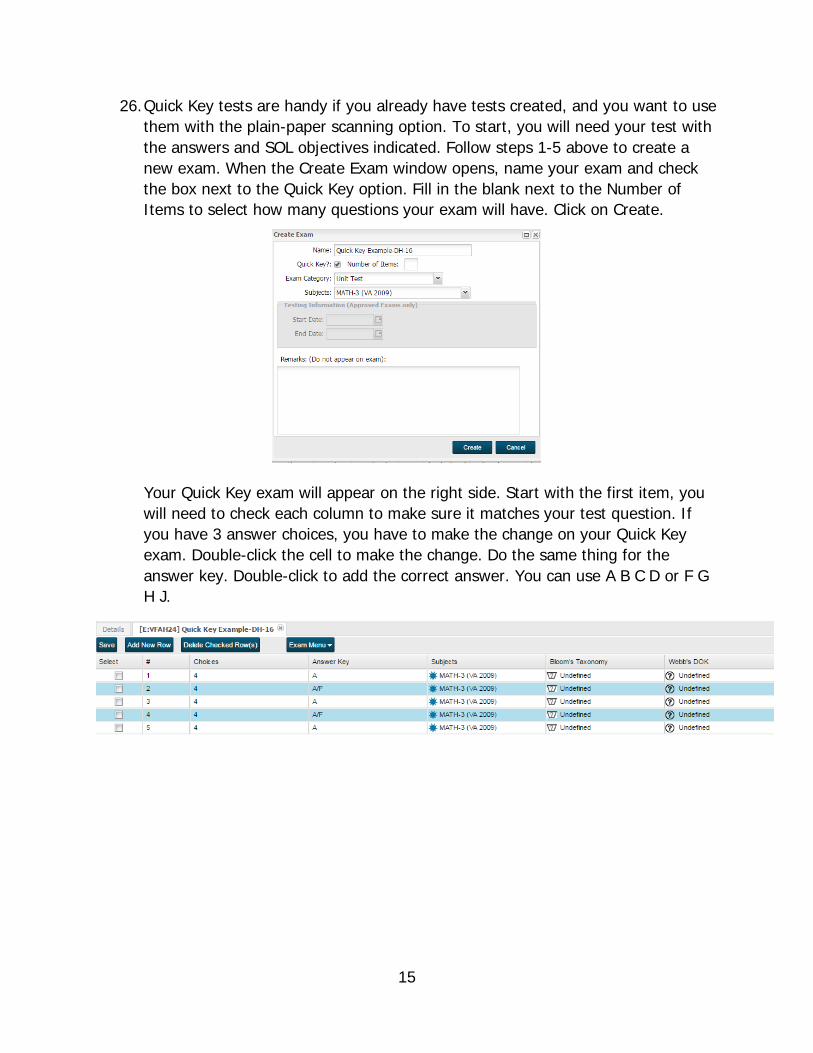
26. Quick Key tests are handy if you already have tests created, and you want to use them with the plain-paper scanning option. To start, you will need your test with the answers and SOL objectives indicated. Follow steps 1-5 above to create a new exam. When the Create Exam window opens, name your exam and check the box next to the Quick Key option. Fill in the blank next to the Number of Items to select how many questions your exam will have. Click on Create.
Your Quick Key exam will appear on the right side. Start with the first item, you will need to check each column to make sure it matches your test question. If you have 3 answer choices, you have to make the change on your Quick Key exam. Double-click the cell to make the change. Do the same thing for the answer key. Double-click to add the correct answer. You can use A B C D or F G H J.
16
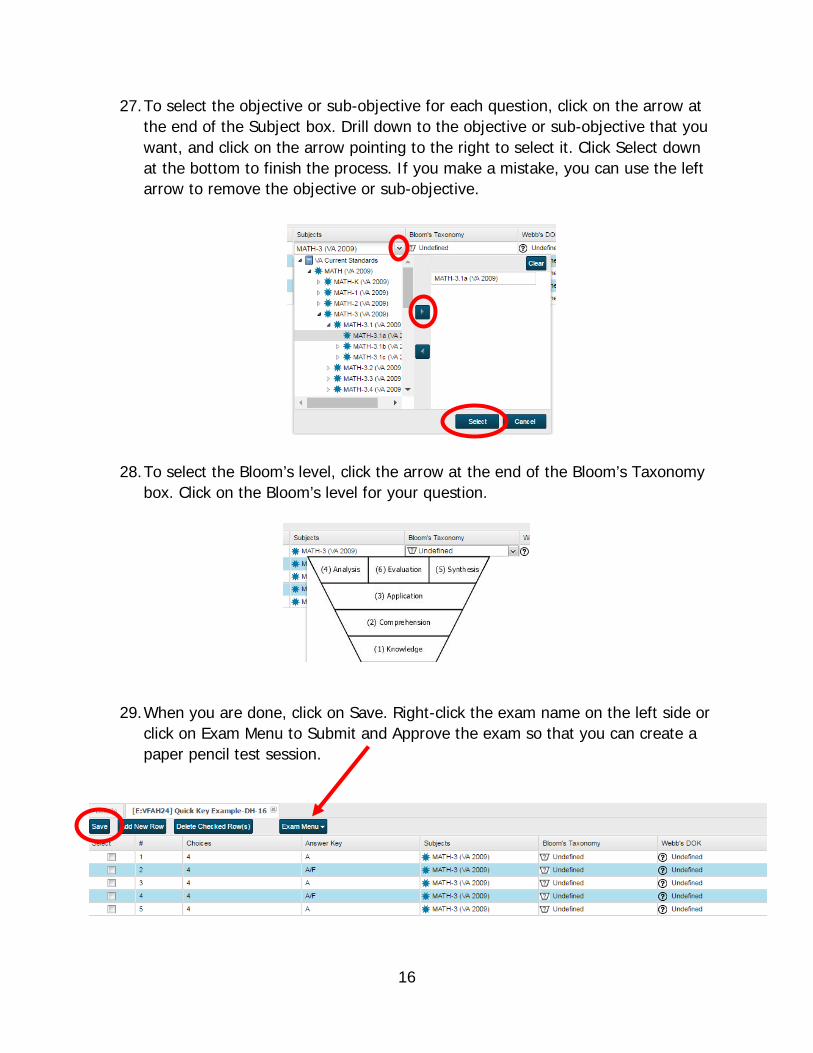
27. To select the objective or sub-objective for each question, click on the arrow at the end of the Subject box. Drill down to the objective or sub-objective that you want, and click on the arrow pointing to the right to select it. Click Select down at the bottom to finish the process. If you make a mistake, you can use the left arrow to remove the objective or sub-objective.
28. To select the Bloom’s level, click the arrow at the end of the Bloom’s Taxonomy box. Click on the Bloom’s level for your question.
29. When you are done, click on Save. Right-click the exam name on the left side or click on Exam Menu to Submit and Approve the exam so that you can create a paper pencil test session.
17
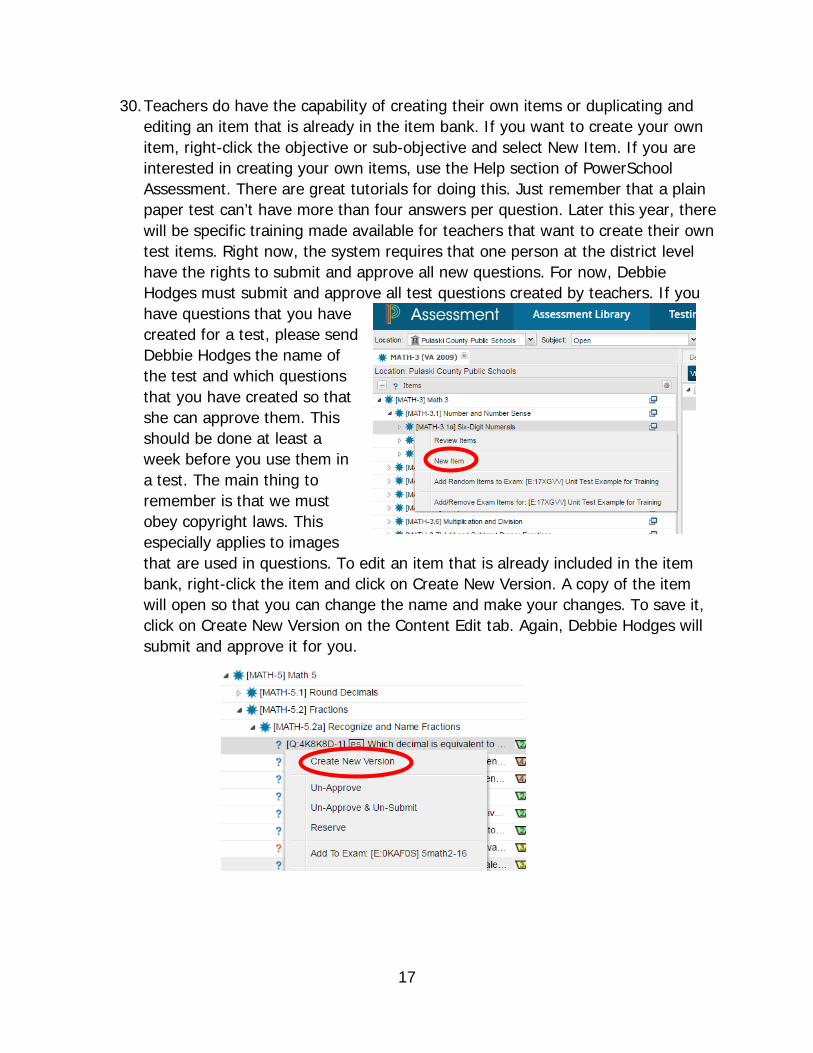
30. Teachers do have the capability of creating their own items or duplicating and editing an item that is already in the item bank. If you want to create your own item, right-click the objective or sub-objective and select New Item. If you are interested in creating your own items, use the Help section of PowerSchool Assessment. There are great tutorials for doing this. Just remember that a plain paper test can’t have more than four answers per question. Later this year, there will be specific training made available for teachers that want to create their own test items. Right now, the system requires that one person at the district level have the rights to submit and approve all new questions. For now, Debbie Hodges must submit and approve all test questions created by teachers. If you have questions that you have created for a test, please send Debbie Hodges the name of the test and which questions that you have created so that she can approve them. This should be done at least a week before you use them in a test. The main thing to remember is that we must obey copyright laws. This especially applies to images that are used in questions. To edit an item that is already included in the item bank, right-click the item and click on Create New Version. A copy of the item will open so that you can change the name and make your changes. To save it, click on Create New Version on the Content Edit tab. Again, Debbie Hodges will submit and approve it for you.

18
31. If you give a pre-test, it is easy to use that same test as a post-test. You must duplicate your pre-test and rename it with a different name (Pre-test Place Value to Post-Test Place Value). Once you do this, just follow the directions for submitting your test and create a new test session for the post-test.