Embed Size (px)
Citation preview

Creating Posters in Excel (2007 & 2010)
Although it would be nice to have a poster printer in each of our homes and work areas, having such a tool is unfortunately not something that will become a reality for most of us. Due to their initial price at purchase and subsequent maintenance and cartridge replacement costs, the majority of us will probably never have immediate access to one. However, with the help of a laser or inkjet printer and Microsoft Excel, the ability to create full-sized, content-rich posters is not out of reach. This booklet will cover the procedures and skills necessary for creating posters in Microsoft Excel 2007 & 2010.
LBT140
Once Excel has been launched on your computer, the following three steps will set the stage for poster creation: 1. Open the View menu ribbon and click on the Page Break View icon. If you
receive a Welcome to Page Break View pop-up window, click OK.
2. Remaining within the View menu ribbon, now select the Normal icon.
3. Finally, and still within the View menu ribbon, select the Zoom icon. From within the Zoom pop-up window, select 25% and click OK. Each of the dotted rectangles you now see represents a single 8.5”x11” sheet of paper.
Getting Started:
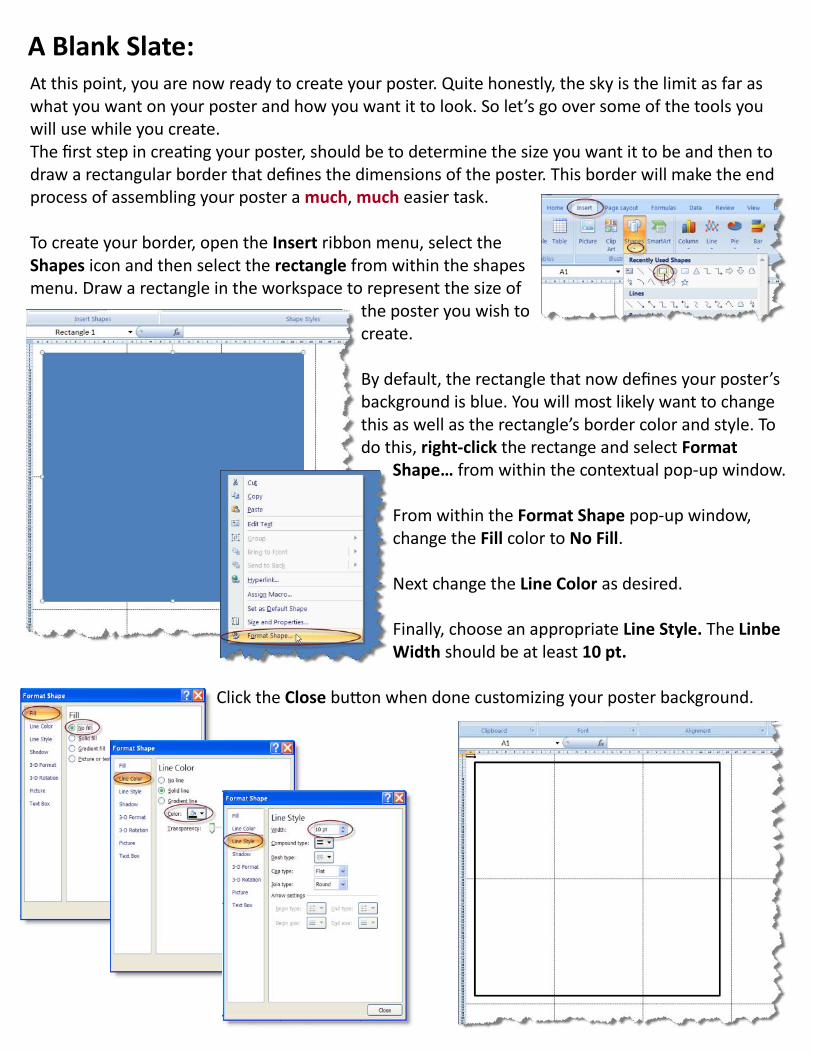
A Blank Slate: At this point, you are now ready to create your poster. Quite honestly, the sky is the limit as far as what you want on your poster and how you want it to look. So let’s go over some of the tools you will use while you create. The first step in creating your poster, should be to determine the size you want it to be and then to draw a rectangular border that defines the dimensions of the poster. This border will make the end process of assembling your poster a much, much easier task. To create your border, open the Insert ribbon menu, select the Shapes icon and then select the rectangle from within the shapes menu. Draw a rectangle in the workspace to represent the size of
the poster you wish to create. By default, the rectangle that now defines your poster’s background is blue. You will most likely want to change this as well as the rectangle’s border color and style. To do this, right-click the rectange and select Format
Shape… from within the contextual pop-up window. From within the Format Shape pop-up window, change the Fill color to No Fill. Next change the Line Color as desired. Finally, choose an appropriate Line Style. The Linbe Width should be at least 10 pt.
Click the Close button when done customizing your poster background.
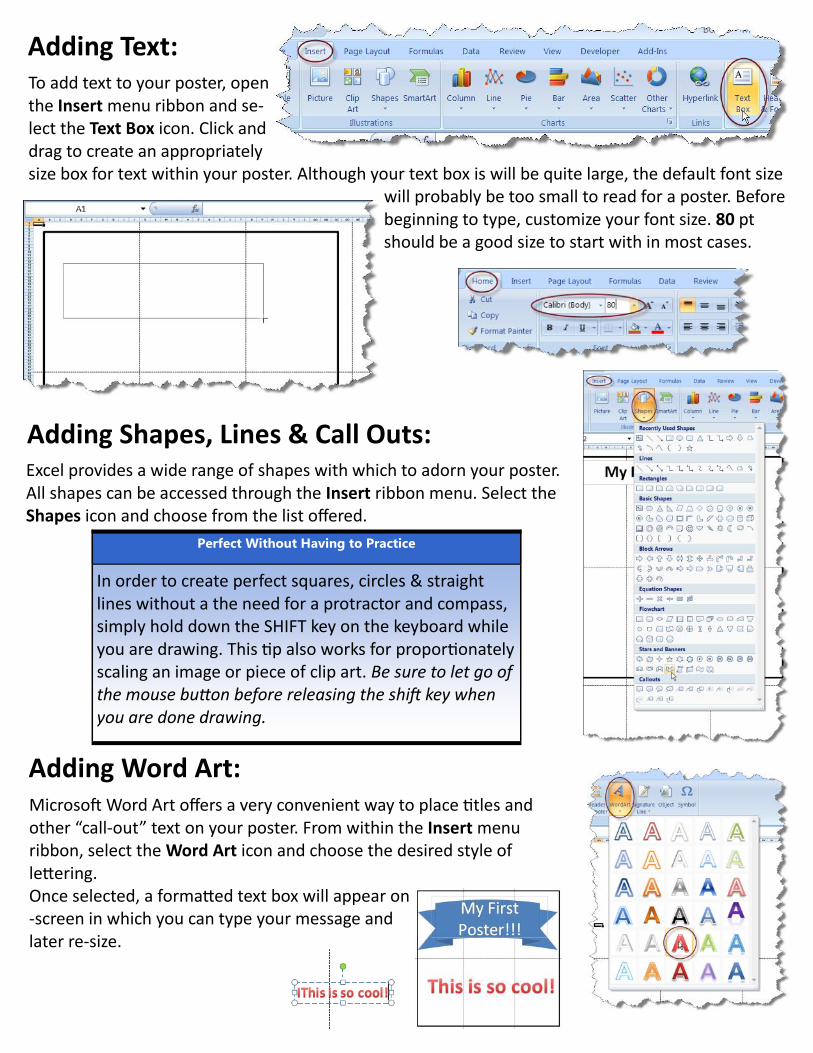
Adding Text: To add text to your poster, open the Insert menu ribbon and se-lect the Text Box icon. Click and drag to create an appropriately size box for text within your poster. Although your text box is will be quite large, the default font size
will probably be too small to read for a poster. Before beginning to type, customize your font size. 80 pt should be a good size to start with in most cases.
Adding Shapes, Lines & Call Outs: Excel provides a wide range of shapes with which to adorn your poster. All shapes can be accessed through the Insert ribbon menu. Select the Shapes icon and choose from the list offered.
Perfect Without Having to Practice
In order to create perfect squares, circles & straight lines without a the need for a protractor and compass, simply hold down the SHIFT key on the keyboard while you are drawing. This tip also works for proportionately scaling an image or piece of clip art. Be sure to let go of the mouse button before releasing the shift key when you are done drawing.
Adding Word Art: Microsoft Word Art offers a very convenient way to place titles and other “call-out” text on your poster. From within the Insert menu ribbon, select the Word Art icon and choose the desired style of lettering. Once selected, a formatted text box will appear on-screen in which you can type your message and later re-size.
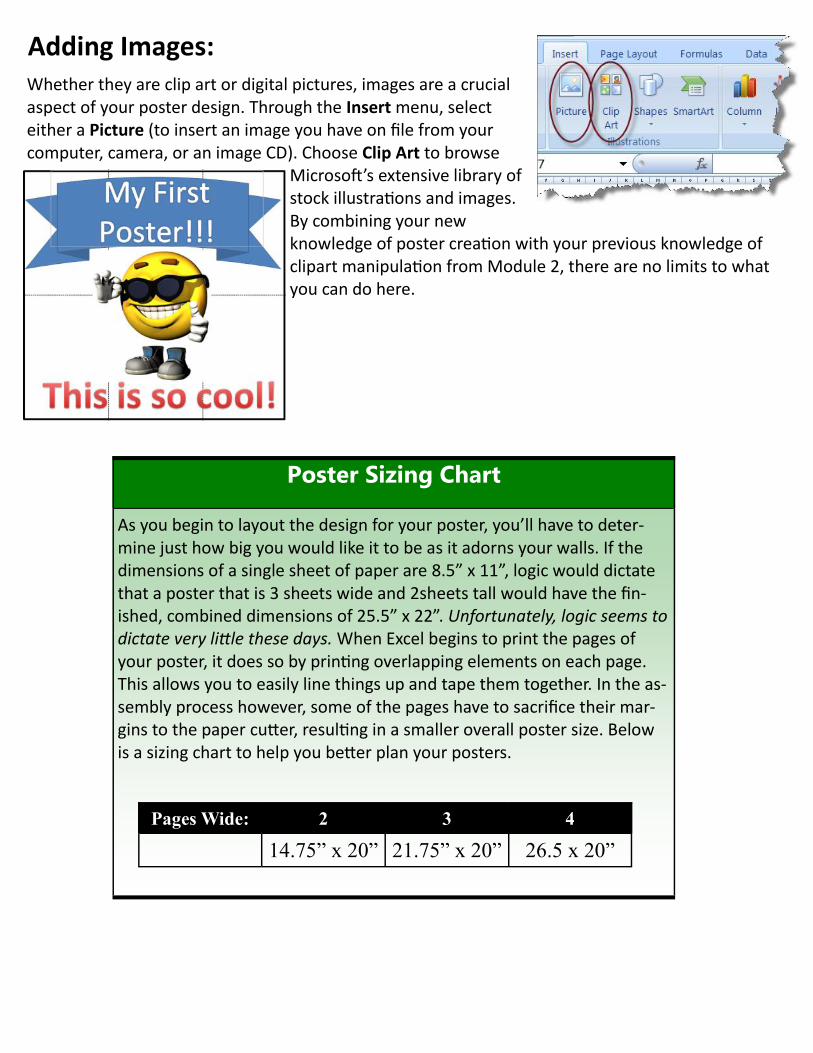
Adding Images: Whether they are clip art or digital pictures, images are a crucial aspect of your poster design. Through the Insert menu, select either a Picture (to insert an image you have on file from your computer, camera, or an image CD). Choose Clip Art to browse
Microsoft’s extensive library of stock illustrations and images. By combining your new knowledge of poster creation with your previous knowledge of clipart manipulation from Module 2, there are no limits to what you can do here.
Poster Sizing Chart
As you begin to layout the design for your poster, you’ll have to deter-mine just how big you would like it to be as it adorns your walls. If the dimensions of a single sheet of paper are 8.5” x 11”, logic would dictate that a poster that is 3 sheets wide and 2sheets tall would have the fin-ished, combined dimensions of 25.5” x 22”. Unfortunately, logic seems to dictate very little these days. When Excel begins to print the pages of your poster, it does so by printing overlapping elements on each page. This allows you to easily line things up and tape them together. In the as-sembly process however, some of the pages have to sacrifice their mar-gins to the paper cutter, resulting in a smaller overall poster size. Below is a sizing chart to help you better plan your posters.
Pages Wide: 2 3 4
14.75” x 20” 21.75” x 20” 26.5 x 20”
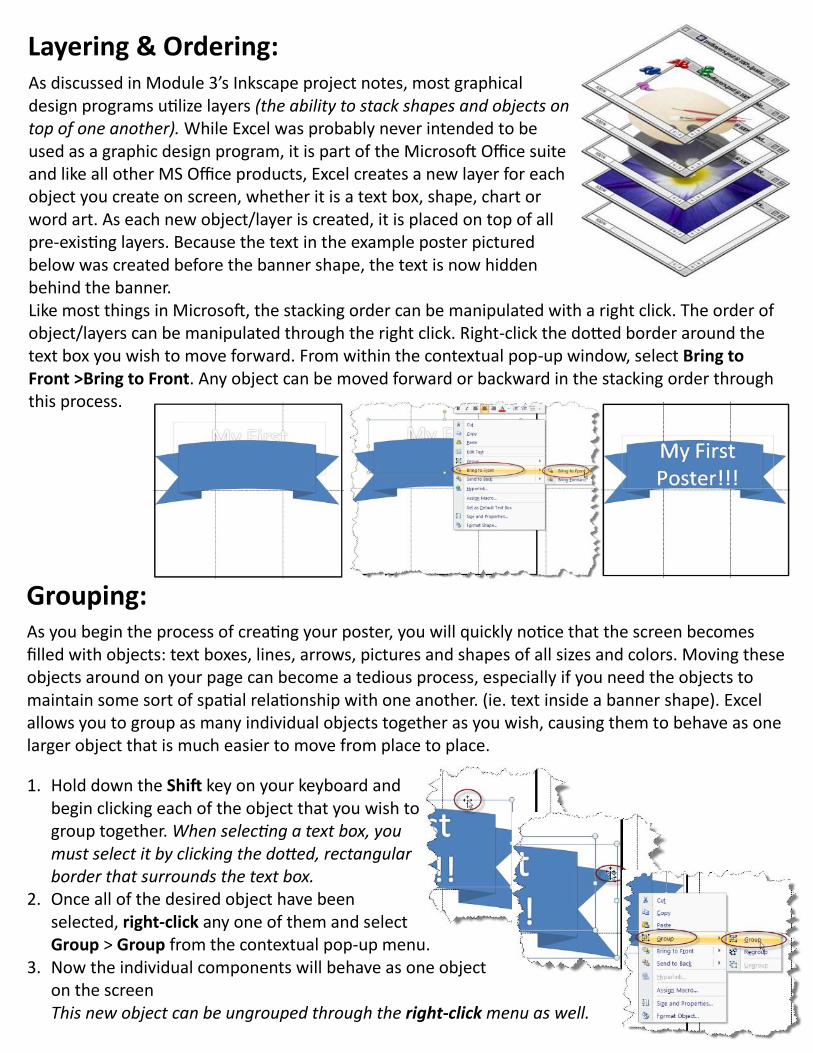
Layering & Ordering: As discussed in Module 3’s Inkscape project notes, most graphical design programs utilize layers (the ability to stack shapes and objects on top of one another). While Excel was probably never intended to be used as a graphic design program, it is part of the Microsoft Office suite and like all other MS Office products, Excel creates a new layer for each object you create on screen, whether it is a text box, shape, chart or word art. As each new object/layer is created, it is placed on top of all pre-existing layers. Because the text in the example poster pictured below was created before the banner shape, the text is now hidden behind the banner. Like most things in Microsoft, the stacking order can be manipulated with a right click. The order of object/layers can be manipulated through the right click. Right-click the dotted border around the text box you wish to move forward. From within the contextual pop-up window, select Bring to Front >Bring to Front. Any object can be moved forward or backward in the stacking order through this process.
Grouping: As you begin the process of creating your poster, you will quickly notice that the screen becomes filled with objects: text boxes, lines, arrows, pictures and shapes of all sizes and colors. Moving these objects around on your page can become a tedious process, especially if you need the objects to maintain some sort of spatial relationship with one another. (ie. text inside a banner shape). Excel allows you to group as many individual objects together as you wish, causing them to behave as one larger object that is much easier to move from place to place.
1. Hold down the Shift key on your keyboard and begin clicking each of the object that you wish to group together. When selecting a text box, you must select it by clicking the dotted, rectangular border that surrounds the text box.
2. Once all of the desired object have been selected, right-click any one of them and select Group > Group from the contextual pop-up menu.
3. Now the individual components will behave as one object on the screen This new object can be ungrouped through the right-click menu as well.
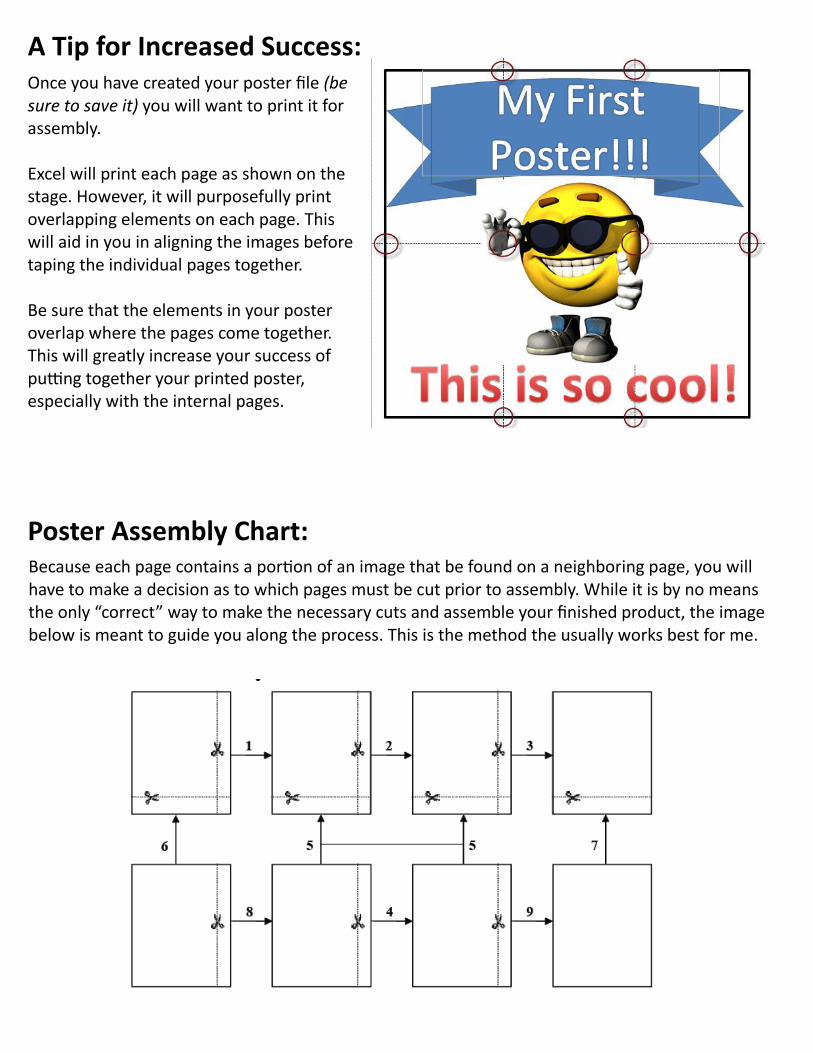
A Tip for Increased Success: Once you have created your poster file (be sure to save it) you will want to print it for assembly. Excel will print each page as shown on the stage. However, it will purposefully print overlapping elements on each page. This will aid in you in aligning the images before taping the individual pages together. Be sure that the elements in your poster overlap where the pages come together. This will greatly increase your success of putting together your printed poster, especially with the internal pages.
Poster Assembly Chart: Because each page contains a portion of an image that be found on a neighboring page, you will have to make a decision as to which pages must be cut prior to assembly. While it is by no means the only “correct” way to make the necessary cuts and assemble your finished product, the image below is meant to guide you along the process. This is the method the usually works best for me.