Embed Size (px)
Citation preview

CCB creative Capacity Building
Design workbook
Name Date Project
1
2
Table of Contents
Introduction Design Process 4
Phase 1 Information 7 Information Gathering Problem Framing Design requirements
Phase 2 Ideas 25 Idea Generation Analysis amp Experimentation Concept Evaluation Pugh Chart
Phase 3 Implementation 75 Analysis amp Experimentation Detail Design Fabrication Testing amp evaluation User Feedback
Extra Work Pages 94
3
4
CCB Design Workbook
Introduction The design process is both an art and a science and exists in many different disciplines Afundamental way to look at engineering design is that you are trying to create a solution to a problem The following steps will help get you on the road to finding a good solution they can be used as a way to track and document the design process help you work with teammates on a design project and give you ideas for how to proceed ldquoBrute forcerdquo engineering options where your resources are basically unlimited often meet the criteria of solving the problem but somewhere there is usually a profound solution which is simple cheap and beautiful It may take a long time to get there but keep working to find it for it as long as possible it is worth the effort
The design process is generally considered to be a combination of the following stages bull information gathering bull problem framing bull setting design requirements bull generating ideas bull analysis amp experimentation bull concept evaluation bull detail design bull fabrication bull testing amp evaluation
The process is not a linear one however and can better be thought of as a circle or spiral as it is often necessary to go through the design cycle many times to get a good solution Experience has shown that the more time spent on the initial stages of the design the easier the later stages become It is also important to go around the cycle often so that you can get feedback on your solution and improve it Each time you go around the cycle you learn something new which leads to a better product in the end Sometimes it takes a long time to go around cycle but sometimes you can go through the steps quickly so that you can get feedback and make progress faster As you become a more experienced designer you will learn when to go fast to get feedback quickly and when to go slower with more attention to detail
5 FIGURE 1 THE DESIGN CYCLE
In this course you will learn the design process and apply it to a real technological challenge This booklet describes the design approach that is used in D-Lab at the Massachusetts Institute of Technology in the United States and guides you through the steps of the cycle You should use this booklet as a design notebook writing directly on the pages provided as you gather information conduct interviews think of ideas perform experiments analyze your results work out the details and get feedback from users There are exercises meant to help you along but design is a creative process so there are plenty of blank pages too to let your imagination run freely As you move on to other projects you can use other notebooks but keep the things that you learned about here in mind as you go through the process Design is a powerful tool that allows you to create solutions to the problems that affect your life The techniques in this booklet will help you learn the design process and will lead to better solutions and to better products
This booklet has been adapted from the D-Lab Design course material and was written by Amy Smith and illustrated by Nathan Cooke with input and assistance from Ben Linder and Kofi Taha The original course notes were written by Amy Smith in collaboration with several D-Lab instructors including Amy Banzaert Andrew Heafitz and Kurt Kornbluth For more information about D-Lab you can visit httpd-labmitedu
6
Phase 1 Information
7
8
Phase 1 Information It is important to get as much information as you can about your project before you start designing You should try to find out as much as you can about
bull the current state of the art what else exists that does the same thing that you want to do bull the user needs and the requirements for performance of the device what size should it be how much should it cost what should the throughput be how much power does it need bull the context in which the device will be used will it be used indoors or outdoors mostly by women or men year-round or only in the rainy season will it be owned by a group or by individuals will it be portable or stationary hellip bull related technologies what technologies perform similar tasks what machines work in a similar way
There are many ways that you can get this information interviewing experts and observing users standard research using libraries or the internet and trying things out for yourself If you have access to computers the internet is a good source of information Databases and reference texts such as the World Bank Development Indicators the Economist Intelligence Unit Country Profiles can provide valuable background information these resources may also be available in libraries As much as possible try to consult with the people who will be the users of the product and become as familiar as you can with the context of the device Here are three ways that you can gather this information
OBSERVE with all of your senses and record your impressions Try shadowing a person as they face the problem that your product is intended to solve Watch
carefully and be sure to notice as much as you can about how they interact with existing technologies that aim to solve the same problem
ASK users what they think about the existing process Listen carefully to their response to find out what they think the problem is Have them describe the process to you Have them describe the environment in which they use the device Ask them what they think the device should do
TRY the process out for yourself Use the existing methods or technologies and note what is good and bad about the process Try doing time studies where you measure how long the whole process takes and how long each step of the process takes so that you can see where you can target improvements in
efficiency Look for technologies that do similar tasks as well as devices that were designed specifically to address your problem For example if you are trying to grind moringa leaves into a powder is there a mill that grinds grain into flour that you can look at to understand how it works
Be sure that you record this information and organize it effectively as it will be useful to refer to it 9 throughout the design process
observe (take notes here)
10
11
12
ask (record questions and answers here)
13
14
15
try (try things out and describe your experiences here)
16
17
18
Problem Framing
Now that you have a good understanding about the challenge itrsquos important to frame the problem What aspect of the problem will you be addressing Who are your users Who are your customers (The user and the customer are not always the same) What do your users andor customers actually need It may be different than what they say they wantmdashthey may have framed the problem in a way that suggests a solution however it is important to go back to the basic requirements of the problem and to build upon that Think carefully about the stakeholders who are involved in this project and those that you are including in your solution Think of several different problem framings and collect more information about each so that you can be sure that you are solving the right problem
For example if we were designing equipment for a beekeepers cooperative and they asked for a honey press we could start by designing a press but we could also take a step back and look at why they want a press It is probably because they want to sell honey
But what if we talked to the people who want to buy the honey and we found out that they preferred honey that is still i n the comb Perhaps they like to chew on
the wax and use it later for candles or other things Then we would not want to design a honey press but we would want to develop a method for cutting the honey cleanly and packaging it for sale
Or perhaps after talking to the beekeepers you find out that they would like to be able to re-use the comb so that the bees do not have to re-build it Then you would design a honey extractor that does not damage the comb
Usually you can come up with four or five ways to frame a problem Think of several different problems framings and write them up here
19
20
Design Requirements
Now that you have an idea of the scope of your project it is necessary to determine the userrsquos needs and convert them into specific design requirements Start by generating a list of customeruser needs When possible try to get information directly from the people who will be using your product If this is not possible then identify several people who are knowledgeable about the topic and get their input Group together similar concepts and make a list of the customer needs
Once you have a list of customer needs you will need to be sure that you have met these needs First decide what to measure next decide how you will measure it finally decide on a range of acceptable values It is important to have a range because it is always necessary to make tradeoffs in design and you may be able to make big improvements in one area by compromising a little in another An example of a list of design requirements for the honey press is shown in Figure 2
Customer Need What are you going to measure
How to measure it (units)
Good Value Better Value
Convenient Time to set up minutes lt 15 min lt 5 min Time to clean minutes lt 30 min lt 15 min
Affordable Cost of device kwacha lt K250000 lt K100000 operating expenses kwachakg of honey lt K15000kg lt K5000kg
Produces goodquality honey
Debris in honey number of particlesgt05 mm 100 ml
lt 5 lt 1
Water content water lt 20 lt 10 Low rate of sugarbreakdown
time exposed to tempgt 35deg C
lt 30 min 0
Human powered power required watts lt 100W lt 50W
Safe exposed sharp edges number 0 0 speed of exposed movshying parts
msec lt 2 msec lt 1 msec
FIGURE 2 DESIGN REQUIREMENTS FOR A HONEY PRESS
21
22
Des
ign
Req
uire
men
ts
Use
r Nee
d W
hat a
re y
ougo
ing
to m
easu
re
How
to m
easu
re it
(uni
ts)
Goo
d Va
lue
Bet
ter V
alue
23
Design R
equirements
User N
eed W
hat are yougoing to m
easure H
ow to m
easure it(units)
Good Value
Better Value
24
Phase 2 Ideas
25
26
Phase 2 Ideas Now that your design problem has been clearly defined and the requirements have been set out it is time to concentrate on thinking of ideas for solutions When there is an existing solution to your problem or a similar one there are three basic types of design ideas that you may generate scaled designs evolutionary designs or revolutionary designs A scaled design comes from an existing design that does the job well and just needs to be scaled for your application An evolutionary design can be created when an existing design is pretty good but fundamental improvements are made A revolutionary design is a totally new approach used to achieve the same function as an existing design but with better performance All three approaches can have successful results In fact your final design will probably be a combination of all of them
Begin by generating ideas on your own (you may have already done a little of this while you were doing research into the problem definition) Try to think of as many different ways as possible to solve the problem Be sure that you do not focus on a single approach Use sketches and notes in your design notebook to record your ideas Be sure to use large well-labeled sketches so that others will be able to understand them Some ideas will be at the system level and others at a more detailed level Keep track of them all and make sure that you capture all your ideas in your this booklet Figure 3 shows some examples of ideas for the honey press Start sketching ideas for your project on page 30-- see if you can come up with ten different approaches to the problem
27
FIGURE 3 EXAMPLES OF IDEAS FOR A HONEY PRESS 28
29
Put your initial ideas here come up with as many ideas as you can
30
31
32
33
34
35
each team member the opportunity to share an idea from their individual list Build off each idea as
Group Brainstorming
Next meet as a team to have a group brainstorming session chose one or two people to record information so that you donrsquot lose any of your good ideas Before you start be sure that you agree on the problem and state it clearly Each person should have paper and a pen or pencil and as you come up with new ideas write them down and add them to the work surface (wall table floor or whatever is comfortable for you) This allows you to capture your ideas as they come in without interrupting others If they are available Post-It notes work very well for this as you can easily move them around and rearrange the ideas that people have added to the work surface Start by giving
it is presented and see where it goes New ideas will emerge donrsquot pass judgment at this point and encourage all ideas You will evaluate and critique ideas at a later stage In order to ensure a productive brainstorming session keep it under one hour and follow the Rules of Brainstorming
bull Defer judgment donrsquot dismiss or criticize any ideas bull Build on the ideas of others no ldquobutsrdquo only ldquoandsrdquo bull Encourage wild ideas think naively keeping all engineering knowledge of what is feasible to the side embrace the most out-of-the-box notions because they can be key to innovative solutions bull Go for quantity aim for as many ideas as possible in a good session up to 100 ideas are generated in 60 minutes bull Be visual use sketches or models to convey your ideas bull Stay focused on the topic bull One conversation at a time no interrupting no dismissing no disrespect no rudeness bull Be optimistic
At the end of your session group your ideas together into similar approaches and write up a brief summary of each approach Some of your ideas will be for a full system while some will be just parts of a system Make sure that you develop them all into complete systems before comparing them You may also want to have another idea generating session to see if you have more ideas after some time has passed As a team choose five to ten approaches that you think are worth following up on
36
Take notes during your brainstorming session here describe the different approaches that your team selected
37
38
39
40
Other Idea Generation Techniques
Once you feel like have exhausted your ideas try to generate more One way to do this is through a process called bisociation In this approach you choose a topic that may seem unrelated to your topic and then think of ideas that bring these two ideas together For example if you are generating ideas for the honey press you could choose the bisociation topic of shoes Then you might think of how you could use shoes as a material to make the press how a shoe could operate the press how the shape of the shoe could be incorporated into the press design how shoe manufacturing methods could be adapted for the press You may choose to do bisociation with additional topics if you donrsquot get fruitful results from the first Try some bisociations on pages 42 - 45
There are many strategies for creative idea generation brainstorming and bisociation are just a couple You might also want to try changing your constraints for example what if you wanted to make the honey pressing process really fast you would think of ideas for how to extract the honey in less than a second or you might want to make the press very inexpensive and you would think of how you could make it for less that K10000 Another method for generating more ideas includes changing your perspective look at things backwards or upside down or from the perspective of the honey rather than the user Pages 46 - 59 give you some suggestions for different ways to look at the problem Choose a few of the exercises and try to come up with at least two or three ideas for each one
41
Choose a bisociation topic and generate more ideas topic ____________________
42
43
Choose another bisociation topic and generate more ideas topic ____________________
44
45
Design it to be very fast
46
Design it to cost less that $2
47
Design it to be as lightweight as possible
48
Make it modular
Design it to be portable
49
Make it tiny
Make it huge
50
Use as few parts as possible or Use recycled parts
Use only 4 different materials
51
Make it using only materials and tools that are available within in 20km
Put it together without glue screws bolts rivets or nails
52
Make it a pair of products
Give it a second use
53
Design it so it can be assembled in under 10 minutes
Design it to be operated with just one hand
54
Design it with a partner half your age
Design it with a partner twice your age
55
Make it out of bicycle parts
Make it out of car parts
56
Design it for children
Design it for the elderly
57
Make it powered by the sun
Make it a particular shape (square round triangle star etc)
58
Make it disposable
Make it last 100 years
59
Analysis amp Experimentation
Now that you have sorted through your ideas you need to start the process of choosing the best approach It is often necessary to learn more about each option in order to make that decision Go through each approach and think of the key things that you need to know in order to effectively evaluate that approach Think of simple experiments or calculations that you could do to find out this information if it is not possible through additional research Devise an experimental procedure and perform the tests to get the information you need At this stage you need to go fast build mock-ups quickly and cheaply that will provide you with the results you need Donrsquot waste time on complicated concepts and donrsquot sweat the details just get the information that you need to see if one idea is better than another
For example if you wanted to test different mechanisms for how to extract honey you could conduct a series of simple tests to try out different methods Figure 4-A shows a test that could be done to see how much honey comes out of the comb when it is placed inside a cloth and twisted The experiment is easy to put together with a few materials and quickly gives resutls to see if more in depth testing is necessary Figure 4-B shows several other test for other components of the honey press
FIGURE 4-A SIMPLE TESTS FOR HONEY EXTRACTION
60
The attachment test tries out various cloth configurations to secure the ends of the fabric
The material test is simply gathers as many materials as possible to see how honey passes through them
This honey bucket test studies how easy it is to pour honey out of different containers and to clean them as well
FIGURE 4-B SIMPLE TESTS OF THE COMPONENTS OF THE HONEY EXTRACTOR
61
Keep records of your experimental results here
62
63
64
65
66
67
Analysis and Experimentation Its often useful to show your data in a graph
Notes
68
Notes
69
Notes
70
Notes
71
Concept Evaluation
Your next task is to choose which of your many ideas you will concentrate on for your design solution It is often difficult to do this as ideas tend to take on a life of their own and you will find that each team member has their own favorite ideas It is important to judge as objectively as possible To do this you will need to consolidate your various ideas into designs that you can compare You might consider grouping together ideas that are similar and combine them into a single solution Try to narrow it down to three to five different concepts each of which may be a combination of several of your original ideas
Pugh Chart Analysis
A Pugh chart is a tool that helps evaluate ideas by setting up a list of characteristics and judging each idea in terms of the individual criteria This helps to create a more objective and structured selection process One idea is chosen as the datum or the idea to which all others will be compared It is good to choose a fairly simple idea as the datum as it will be easier to do the comparisons than if you choose one of your more complicated ideas Sometimes the datum is an existing solution Revisit your list of design requirements to determine the criteria and characteristics that you will use to judge your potential solutions It is important that many of criteria are specific to your project Everything should be safe reliable and cheap think about the characteristics that apply to your project in particular In the case of the honey press such criteria might include keeping the wax out of the honey or the need for processing the honey after using the device Divide the criteria into two categories general criteria which are important for any good design and specific criteria that apply particularly to your project In then end you should have about ten criteria that you will use to evaluate the options If you have many more than this then none of criteria carries enough weight to make a difference if you have too few then your decision may not incorporate enough information
For each of the criteria decide if the option you are evaluating is the same (0) better (+) or worse (-) than your datum Tally the results for each option and determine which idea is the best You may want to weight some of the criteria more heavily (for example safety might be deemed more important than portability when evaluating your idea and therefore you may choose to double the weight of that criterion) When making your final decision you should pay more attention to the specific criteria You may also find that when you make your final selection you will choose characteristics from different options and combine them to form the final design however if you do this you should be careful not to make your project too complex
Criteria Lever Press Rollers Impact Spinning
specific
throughput 0 + + -quality of honey 0 0 - 0 yield ( x 2 ) 0 ( x 2 ) + ( x 2 ) - ( x 2 ) + ( x 2 ) after-processing 0 0 - + power needed 0 + - + ease of cleaning 0 + 0 0
gene
ral ease of use 0 0 + 0
safety 0 0 - + simplicity 0 - 0 -cost (x 2) 0 - + -
Total 0 +3 -3 +2 FIGURE 5 SAMPLE PUGH CHART
72
Your Pugh chart
Criteria Datum Option 1 Option 2 Option 3
specific
gene
ral
Total
73
Criteria Datum Option 1 Option 2 Option 3
specific
gene
ral
Total
74
Phase 3 Implementation
75
Phase 3 Implementation More Analysis amp Experimentation
Now that you have chosen the final concept it is necessary to be sure that critical subsystems will perform as required In many cases their performance can be predicted by calculations in other cases experimentation will be required The experimental setup may closely resemble the prototype that you envisioned or it may be a more traditional laboratory experiment The choice would depend on the information needed and the resources available These experiments will be more rigorous than the ones that you performed during your concept evaluation process as they will impact the final design of your product Think about what you need to know for each system and devise and perform the necessary experiments models or analyses
76
Detail Design
Once the experiments have shown how the subsystems can work it is necessary to work out all the details that will make a functioning prototype This will vary greatly from project to project but includes aspects such as dimensions and tolerances material selection kinematics of assemblies and sub-assemblies and calculations of energy and power requirements Every component of your project should be designed to best fulfill its purpose Your first layout will not be your final one continual refinement is possible until you run out of time but the difference in quality from the first layout to the last can be enormous
Keeping all these considerations in mind start the process of producing technical drawings of your proposed design Good drawings will ensure that team-mates are in agreement about the details of the design and that technicians and artisans can accurately make the parts that you need Whenever possible you should use materials that can be obtained locally and affordably and that do not need to be custom-made
Another important thing to consider when working out the details is to think about how your device will fail It will fail all devices do you want to be sure that your device fails in a safe way and in a way that is easy to repair Look carefully over your design to identify the potential points of failure and then think about which modes of failure need to be prevented and which are acceptable modes of failure Try to design the device so that it fails in the safest most easily fixed manner
Fabrication
Now it is time to turn your ideas into realitymdashgenerally one begins by building a proof-of-concept prototype just to be sure that it could work Your first prototypes can be very rough you just want to see if your ideas will work when assembled together As you repeat the design cycle you will refine your ideas and refine your prototypes
Whenever possible use off-the-shelf parts if they meet your requirements and are not too expensive You can also save a lot of time by using parts or systems from existing devices especially in early versions In most prototypes the parts are typically fabricated on an individual basis and may not be made in the same way or of the same material as the final product but as you get closer to your final design you will use materials and methods that are closer to the final manufacturing processes
Careful planning of the fabrication phase will save you valuable time prevent unnecessary waiting times for your raw materials or components and reduce stressful last-minute hard work Develop a work plan so that you and your teammates can work together effectively and efficiently
Testing amp Evaluation
Once you have built a prototype it is necessary to test it and see if it does what it is supposed to do Now is the time to go back to the design requirements outlined in the early stages of the design process and verify that the device satisfies the requirements Devise techniques for measuring the performance of your device for each of your design requirements As part of this exercise think of how your device could be improved Are there ways you can make it cheaper faster better Try to lower the part count or remove material Is it as simple as possible
77
78
79
80
81
Notes
82
Notes
83
Notes
84
Notes
85
User Feedback
Not only should the technical performance of the device be tested but you also need to test how it works when real people use it Have people try your device and get their feedback Whenever possible have the actual users try the device if this is not feasible try to find people with as close to the same background as possible Have users try your device without as little instruction or guidance as possible and analyze their interactions You can observe how intuitive easy andor safe the device is to use Use the same type of tools that you used when you were gathering information to frame your project observie ask try
86
87
User Feedback
88
User Feedback
89
User Feedback
90
User Feedback
91
92
Congratulations Yoursquove made it around the design cycle Use the information that you gathered from testing and user feedback sessions to prepare for the next journey around the design cycle What nees to be improved Define the new problem that needs to be solved Consider revising the design requirements and the original ideal and desired values Identify the subcomponents that need to be redesigned and outline the goals for how to move the project forward It is usually necessary to go around the cycle several times in order to refine your design and achieve the simple cheap and beautiful solution
93
Design R
equirements chart
Custom
er Need
What are you
going to measure
How
to measure it
(units) G
ood Value B
etter Value
94
Des
ign
Req
uire
men
ts c
hart
Cus
tom
er N
eed
Wha
t are
you
goin
g to
mea
sure
H
ow to
mea
sure
it(u
nits
) G
ood
Valu
e B
ette
r Val
ue
95
Extra Pugh charts
Criteria Datum Option 1 Option 2 Option 3
specific
gene
ral
Total
96
Criteria Datum Option 1 Option 2 Option 3
specific
gene
ral
Total
97
Analysis and Experimentation Its often useful to show your data in a graph
Notes
98
Analysis and Experimentation Its often useful to show your data in a graph
Notes
99
100
101
102
103
104
105
106
107
108
109
MIT OpenCourseWare httpocwmitedu
EC720J 2722J D-Lab II Design Spring 2010
For information about citing these materials or our Terms of Use visit httpocwmiteduterms

Des
ign
Req
uire
men
ts
Use
r Nee
d W
hat a
re y
ougo
ing
to m
easu
re
How
to m
easu
re it
(uni
ts)
Goo
d Va
lue
Bet
ter V
alue
23
Design R
equirements
User N
eed W
hat are yougoing to m
easure H
ow to m
easure it(units)
Good Value
Better Value
24
Phase 2 Ideas
25
26
Phase 2 Ideas Now that your design problem has been clearly defined and the requirements have been set out it is time to concentrate on thinking of ideas for solutions When there is an existing solution to your problem or a similar one there are three basic types of design ideas that you may generate scaled designs evolutionary designs or revolutionary designs A scaled design comes from an existing design that does the job well and just needs to be scaled for your application An evolutionary design can be created when an existing design is pretty good but fundamental improvements are made A revolutionary design is a totally new approach used to achieve the same function as an existing design but with better performance All three approaches can have successful results In fact your final design will probably be a combination of all of them
Begin by generating ideas on your own (you may have already done a little of this while you were doing research into the problem definition) Try to think of as many different ways as possible to solve the problem Be sure that you do not focus on a single approach Use sketches and notes in your design notebook to record your ideas Be sure to use large well-labeled sketches so that others will be able to understand them Some ideas will be at the system level and others at a more detailed level Keep track of them all and make sure that you capture all your ideas in your this booklet Figure 3 shows some examples of ideas for the honey press Start sketching ideas for your project on page 30-- see if you can come up with ten different approaches to the problem
27
FIGURE 3 EXAMPLES OF IDEAS FOR A HONEY PRESS 28
29
Put your initial ideas here come up with as many ideas as you can
30
31
32
33
34
35
each team member the opportunity to share an idea from their individual list Build off each idea as
Group Brainstorming
Next meet as a team to have a group brainstorming session chose one or two people to record information so that you donrsquot lose any of your good ideas Before you start be sure that you agree on the problem and state it clearly Each person should have paper and a pen or pencil and as you come up with new ideas write them down and add them to the work surface (wall table floor or whatever is comfortable for you) This allows you to capture your ideas as they come in without interrupting others If they are available Post-It notes work very well for this as you can easily move them around and rearrange the ideas that people have added to the work surface Start by giving
it is presented and see where it goes New ideas will emerge donrsquot pass judgment at this point and encourage all ideas You will evaluate and critique ideas at a later stage In order to ensure a productive brainstorming session keep it under one hour and follow the Rules of Brainstorming
bull Defer judgment donrsquot dismiss or criticize any ideas bull Build on the ideas of others no ldquobutsrdquo only ldquoandsrdquo bull Encourage wild ideas think naively keeping all engineering knowledge of what is feasible to the side embrace the most out-of-the-box notions because they can be key to innovative solutions bull Go for quantity aim for as many ideas as possible in a good session up to 100 ideas are generated in 60 minutes bull Be visual use sketches or models to convey your ideas bull Stay focused on the topic bull One conversation at a time no interrupting no dismissing no disrespect no rudeness bull Be optimistic
At the end of your session group your ideas together into similar approaches and write up a brief summary of each approach Some of your ideas will be for a full system while some will be just parts of a system Make sure that you develop them all into complete systems before comparing them You may also want to have another idea generating session to see if you have more ideas after some time has passed As a team choose five to ten approaches that you think are worth following up on
36
Take notes during your brainstorming session here describe the different approaches that your team selected
37
38
39
40
Other Idea Generation Techniques
Once you feel like have exhausted your ideas try to generate more One way to do this is through a process called bisociation In this approach you choose a topic that may seem unrelated to your topic and then think of ideas that bring these two ideas together For example if you are generating ideas for the honey press you could choose the bisociation topic of shoes Then you might think of how you could use shoes as a material to make the press how a shoe could operate the press how the shape of the shoe could be incorporated into the press design how shoe manufacturing methods could be adapted for the press You may choose to do bisociation with additional topics if you donrsquot get fruitful results from the first Try some bisociations on pages 42 - 45
There are many strategies for creative idea generation brainstorming and bisociation are just a couple You might also want to try changing your constraints for example what if you wanted to make the honey pressing process really fast you would think of ideas for how to extract the honey in less than a second or you might want to make the press very inexpensive and you would think of how you could make it for less that K10000 Another method for generating more ideas includes changing your perspective look at things backwards or upside down or from the perspective of the honey rather than the user Pages 46 - 59 give you some suggestions for different ways to look at the problem Choose a few of the exercises and try to come up with at least two or three ideas for each one
41
Choose a bisociation topic and generate more ideas topic ____________________
42
43
Choose another bisociation topic and generate more ideas topic ____________________
44
45
Design it to be very fast
46
Design it to cost less that $2
47
Design it to be as lightweight as possible
48
Make it modular
Design it to be portable
49
Make it tiny
Make it huge
50
Use as few parts as possible or Use recycled parts
Use only 4 different materials
51
Make it using only materials and tools that are available within in 20km
Put it together without glue screws bolts rivets or nails
52
Make it a pair of products
Give it a second use
53
Design it so it can be assembled in under 10 minutes
Design it to be operated with just one hand
54
Design it with a partner half your age
Design it with a partner twice your age
55
Make it out of bicycle parts
Make it out of car parts
56
Design it for children
Design it for the elderly
57
Make it powered by the sun
Make it a particular shape (square round triangle star etc)
58
Make it disposable
Make it last 100 years
59
Analysis amp Experimentation
Now that you have sorted through your ideas you need to start the process of choosing the best approach It is often necessary to learn more about each option in order to make that decision Go through each approach and think of the key things that you need to know in order to effectively evaluate that approach Think of simple experiments or calculations that you could do to find out this information if it is not possible through additional research Devise an experimental procedure and perform the tests to get the information you need At this stage you need to go fast build mock-ups quickly and cheaply that will provide you with the results you need Donrsquot waste time on complicated concepts and donrsquot sweat the details just get the information that you need to see if one idea is better than another
For example if you wanted to test different mechanisms for how to extract honey you could conduct a series of simple tests to try out different methods Figure 4-A shows a test that could be done to see how much honey comes out of the comb when it is placed inside a cloth and twisted The experiment is easy to put together with a few materials and quickly gives resutls to see if more in depth testing is necessary Figure 4-B shows several other test for other components of the honey press
FIGURE 4-A SIMPLE TESTS FOR HONEY EXTRACTION
60
The attachment test tries out various cloth configurations to secure the ends of the fabric
The material test is simply gathers as many materials as possible to see how honey passes through them
This honey bucket test studies how easy it is to pour honey out of different containers and to clean them as well
FIGURE 4-B SIMPLE TESTS OF THE COMPONENTS OF THE HONEY EXTRACTOR
61
Keep records of your experimental results here
62
63
64
65
66
67
Analysis and Experimentation Its often useful to show your data in a graph
Notes
68
Notes
69
Notes
70
Notes
71
Concept Evaluation
Your next task is to choose which of your many ideas you will concentrate on for your design solution It is often difficult to do this as ideas tend to take on a life of their own and you will find that each team member has their own favorite ideas It is important to judge as objectively as possible To do this you will need to consolidate your various ideas into designs that you can compare You might consider grouping together ideas that are similar and combine them into a single solution Try to narrow it down to three to five different concepts each of which may be a combination of several of your original ideas
Pugh Chart Analysis
A Pugh chart is a tool that helps evaluate ideas by setting up a list of characteristics and judging each idea in terms of the individual criteria This helps to create a more objective and structured selection process One idea is chosen as the datum or the idea to which all others will be compared It is good to choose a fairly simple idea as the datum as it will be easier to do the comparisons than if you choose one of your more complicated ideas Sometimes the datum is an existing solution Revisit your list of design requirements to determine the criteria and characteristics that you will use to judge your potential solutions It is important that many of criteria are specific to your project Everything should be safe reliable and cheap think about the characteristics that apply to your project in particular In the case of the honey press such criteria might include keeping the wax out of the honey or the need for processing the honey after using the device Divide the criteria into two categories general criteria which are important for any good design and specific criteria that apply particularly to your project In then end you should have about ten criteria that you will use to evaluate the options If you have many more than this then none of criteria carries enough weight to make a difference if you have too few then your decision may not incorporate enough information
For each of the criteria decide if the option you are evaluating is the same (0) better (+) or worse (-) than your datum Tally the results for each option and determine which idea is the best You may want to weight some of the criteria more heavily (for example safety might be deemed more important than portability when evaluating your idea and therefore you may choose to double the weight of that criterion) When making your final decision you should pay more attention to the specific criteria You may also find that when you make your final selection you will choose characteristics from different options and combine them to form the final design however if you do this you should be careful not to make your project too complex
Criteria Lever Press Rollers Impact Spinning
specific
throughput 0 + + -quality of honey 0 0 - 0 yield ( x 2 ) 0 ( x 2 ) + ( x 2 ) - ( x 2 ) + ( x 2 ) after-processing 0 0 - + power needed 0 + - + ease of cleaning 0 + 0 0
gene
ral ease of use 0 0 + 0
safety 0 0 - + simplicity 0 - 0 -cost (x 2) 0 - + -
Total 0 +3 -3 +2 FIGURE 5 SAMPLE PUGH CHART
72
Your Pugh chart
Criteria Datum Option 1 Option 2 Option 3
specific
gene
ral
Total
73
Criteria Datum Option 1 Option 2 Option 3
specific
gene
ral
Total
74
Phase 3 Implementation
75
Phase 3 Implementation More Analysis amp Experimentation
Now that you have chosen the final concept it is necessary to be sure that critical subsystems will perform as required In many cases their performance can be predicted by calculations in other cases experimentation will be required The experimental setup may closely resemble the prototype that you envisioned or it may be a more traditional laboratory experiment The choice would depend on the information needed and the resources available These experiments will be more rigorous than the ones that you performed during your concept evaluation process as they will impact the final design of your product Think about what you need to know for each system and devise and perform the necessary experiments models or analyses
76
Detail Design
Once the experiments have shown how the subsystems can work it is necessary to work out all the details that will make a functioning prototype This will vary greatly from project to project but includes aspects such as dimensions and tolerances material selection kinematics of assemblies and sub-assemblies and calculations of energy and power requirements Every component of your project should be designed to best fulfill its purpose Your first layout will not be your final one continual refinement is possible until you run out of time but the difference in quality from the first layout to the last can be enormous
Keeping all these considerations in mind start the process of producing technical drawings of your proposed design Good drawings will ensure that team-mates are in agreement about the details of the design and that technicians and artisans can accurately make the parts that you need Whenever possible you should use materials that can be obtained locally and affordably and that do not need to be custom-made
Another important thing to consider when working out the details is to think about how your device will fail It will fail all devices do you want to be sure that your device fails in a safe way and in a way that is easy to repair Look carefully over your design to identify the potential points of failure and then think about which modes of failure need to be prevented and which are acceptable modes of failure Try to design the device so that it fails in the safest most easily fixed manner
Fabrication
Now it is time to turn your ideas into realitymdashgenerally one begins by building a proof-of-concept prototype just to be sure that it could work Your first prototypes can be very rough you just want to see if your ideas will work when assembled together As you repeat the design cycle you will refine your ideas and refine your prototypes
Whenever possible use off-the-shelf parts if they meet your requirements and are not too expensive You can also save a lot of time by using parts or systems from existing devices especially in early versions In most prototypes the parts are typically fabricated on an individual basis and may not be made in the same way or of the same material as the final product but as you get closer to your final design you will use materials and methods that are closer to the final manufacturing processes
Careful planning of the fabrication phase will save you valuable time prevent unnecessary waiting times for your raw materials or components and reduce stressful last-minute hard work Develop a work plan so that you and your teammates can work together effectively and efficiently
Testing amp Evaluation
Once you have built a prototype it is necessary to test it and see if it does what it is supposed to do Now is the time to go back to the design requirements outlined in the early stages of the design process and verify that the device satisfies the requirements Devise techniques for measuring the performance of your device for each of your design requirements As part of this exercise think of how your device could be improved Are there ways you can make it cheaper faster better Try to lower the part count or remove material Is it as simple as possible
77
78
79
80
81
Notes
82
Notes
83
Notes
84
Notes
85
User Feedback
Not only should the technical performance of the device be tested but you also need to test how it works when real people use it Have people try your device and get their feedback Whenever possible have the actual users try the device if this is not feasible try to find people with as close to the same background as possible Have users try your device without as little instruction or guidance as possible and analyze their interactions You can observe how intuitive easy andor safe the device is to use Use the same type of tools that you used when you were gathering information to frame your project observie ask try
86
87
User Feedback
88
User Feedback
89
User Feedback
90
User Feedback
91
92
Congratulations Yoursquove made it around the design cycle Use the information that you gathered from testing and user feedback sessions to prepare for the next journey around the design cycle What nees to be improved Define the new problem that needs to be solved Consider revising the design requirements and the original ideal and desired values Identify the subcomponents that need to be redesigned and outline the goals for how to move the project forward It is usually necessary to go around the cycle several times in order to refine your design and achieve the simple cheap and beautiful solution
93
Design R
equirements chart
Custom
er Need
What are you
going to measure
How
to measure it
(units) G
ood Value B
etter Value
94
Des
ign
Req
uire
men
ts c
hart
Cus
tom
er N
eed
Wha
t are
you
goin
g to
mea
sure
H
ow to
mea
sure
it(u
nits
) G
ood
Valu
e B
ette
r Val
ue
95
Extra Pugh charts
Criteria Datum Option 1 Option 2 Option 3
specific
gene
ral
Total
96
Criteria Datum Option 1 Option 2 Option 3
specific
gene
ral
Total
97
Analysis and Experimentation Its often useful to show your data in a graph
Notes
98
Analysis and Experimentation Its often useful to show your data in a graph
Notes
99
100
101
102
103
104
105
106
107
108
109
MIT OpenCourseWare httpocwmitedu
EC720J 2722J D-Lab II Design Spring 2010
For information about citing these materials or our Terms of Use visit httpocwmiteduterms

Design R
equirements
User N
eed W
hat are yougoing to m
easure H
ow to m
easure it(units)
Good Value
Better Value
24
Phase 2 Ideas
25
26
Phase 2 Ideas Now that your design problem has been clearly defined and the requirements have been set out it is time to concentrate on thinking of ideas for solutions When there is an existing solution to your problem or a similar one there are three basic types of design ideas that you may generate scaled designs evolutionary designs or revolutionary designs A scaled design comes from an existing design that does the job well and just needs to be scaled for your application An evolutionary design can be created when an existing design is pretty good but fundamental improvements are made A revolutionary design is a totally new approach used to achieve the same function as an existing design but with better performance All three approaches can have successful results In fact your final design will probably be a combination of all of them
Begin by generating ideas on your own (you may have already done a little of this while you were doing research into the problem definition) Try to think of as many different ways as possible to solve the problem Be sure that you do not focus on a single approach Use sketches and notes in your design notebook to record your ideas Be sure to use large well-labeled sketches so that others will be able to understand them Some ideas will be at the system level and others at a more detailed level Keep track of them all and make sure that you capture all your ideas in your this booklet Figure 3 shows some examples of ideas for the honey press Start sketching ideas for your project on page 30-- see if you can come up with ten different approaches to the problem
27
FIGURE 3 EXAMPLES OF IDEAS FOR A HONEY PRESS 28
29
Put your initial ideas here come up with as many ideas as you can
30
31
32
33
34
35
each team member the opportunity to share an idea from their individual list Build off each idea as
Group Brainstorming
Next meet as a team to have a group brainstorming session chose one or two people to record information so that you donrsquot lose any of your good ideas Before you start be sure that you agree on the problem and state it clearly Each person should have paper and a pen or pencil and as you come up with new ideas write them down and add them to the work surface (wall table floor or whatever is comfortable for you) This allows you to capture your ideas as they come in without interrupting others If they are available Post-It notes work very well for this as you can easily move them around and rearrange the ideas that people have added to the work surface Start by giving
it is presented and see where it goes New ideas will emerge donrsquot pass judgment at this point and encourage all ideas You will evaluate and critique ideas at a later stage In order to ensure a productive brainstorming session keep it under one hour and follow the Rules of Brainstorming
bull Defer judgment donrsquot dismiss or criticize any ideas bull Build on the ideas of others no ldquobutsrdquo only ldquoandsrdquo bull Encourage wild ideas think naively keeping all engineering knowledge of what is feasible to the side embrace the most out-of-the-box notions because they can be key to innovative solutions bull Go for quantity aim for as many ideas as possible in a good session up to 100 ideas are generated in 60 minutes bull Be visual use sketches or models to convey your ideas bull Stay focused on the topic bull One conversation at a time no interrupting no dismissing no disrespect no rudeness bull Be optimistic
At the end of your session group your ideas together into similar approaches and write up a brief summary of each approach Some of your ideas will be for a full system while some will be just parts of a system Make sure that you develop them all into complete systems before comparing them You may also want to have another idea generating session to see if you have more ideas after some time has passed As a team choose five to ten approaches that you think are worth following up on
36
Take notes during your brainstorming session here describe the different approaches that your team selected
37
38
39
40
Other Idea Generation Techniques
Once you feel like have exhausted your ideas try to generate more One way to do this is through a process called bisociation In this approach you choose a topic that may seem unrelated to your topic and then think of ideas that bring these two ideas together For example if you are generating ideas for the honey press you could choose the bisociation topic of shoes Then you might think of how you could use shoes as a material to make the press how a shoe could operate the press how the shape of the shoe could be incorporated into the press design how shoe manufacturing methods could be adapted for the press You may choose to do bisociation with additional topics if you donrsquot get fruitful results from the first Try some bisociations on pages 42 - 45
There are many strategies for creative idea generation brainstorming and bisociation are just a couple You might also want to try changing your constraints for example what if you wanted to make the honey pressing process really fast you would think of ideas for how to extract the honey in less than a second or you might want to make the press very inexpensive and you would think of how you could make it for less that K10000 Another method for generating more ideas includes changing your perspective look at things backwards or upside down or from the perspective of the honey rather than the user Pages 46 - 59 give you some suggestions for different ways to look at the problem Choose a few of the exercises and try to come up with at least two or three ideas for each one
41
Choose a bisociation topic and generate more ideas topic ____________________
42
43
Choose another bisociation topic and generate more ideas topic ____________________
44
45
Design it to be very fast
46
Design it to cost less that $2
47
Design it to be as lightweight as possible
48
Make it modular
Design it to be portable
49
Make it tiny
Make it huge
50
Use as few parts as possible or Use recycled parts
Use only 4 different materials
51
Make it using only materials and tools that are available within in 20km
Put it together without glue screws bolts rivets or nails
52
Make it a pair of products
Give it a second use
53
Design it so it can be assembled in under 10 minutes
Design it to be operated with just one hand
54
Design it with a partner half your age
Design it with a partner twice your age
55
Make it out of bicycle parts
Make it out of car parts
56
Design it for children
Design it for the elderly
57
Make it powered by the sun
Make it a particular shape (square round triangle star etc)
58
Make it disposable
Make it last 100 years
59
Analysis amp Experimentation
Now that you have sorted through your ideas you need to start the process of choosing the best approach It is often necessary to learn more about each option in order to make that decision Go through each approach and think of the key things that you need to know in order to effectively evaluate that approach Think of simple experiments or calculations that you could do to find out this information if it is not possible through additional research Devise an experimental procedure and perform the tests to get the information you need At this stage you need to go fast build mock-ups quickly and cheaply that will provide you with the results you need Donrsquot waste time on complicated concepts and donrsquot sweat the details just get the information that you need to see if one idea is better than another
For example if you wanted to test different mechanisms for how to extract honey you could conduct a series of simple tests to try out different methods Figure 4-A shows a test that could be done to see how much honey comes out of the comb when it is placed inside a cloth and twisted The experiment is easy to put together with a few materials and quickly gives resutls to see if more in depth testing is necessary Figure 4-B shows several other test for other components of the honey press
FIGURE 4-A SIMPLE TESTS FOR HONEY EXTRACTION
60
The attachment test tries out various cloth configurations to secure the ends of the fabric
The material test is simply gathers as many materials as possible to see how honey passes through them
This honey bucket test studies how easy it is to pour honey out of different containers and to clean them as well
FIGURE 4-B SIMPLE TESTS OF THE COMPONENTS OF THE HONEY EXTRACTOR
61
Keep records of your experimental results here
62
63
64
65
66
67
Analysis and Experimentation Its often useful to show your data in a graph
Notes
68
Notes
69
Notes
70
Notes
71
Concept Evaluation
Your next task is to choose which of your many ideas you will concentrate on for your design solution It is often difficult to do this as ideas tend to take on a life of their own and you will find that each team member has their own favorite ideas It is important to judge as objectively as possible To do this you will need to consolidate your various ideas into designs that you can compare You might consider grouping together ideas that are similar and combine them into a single solution Try to narrow it down to three to five different concepts each of which may be a combination of several of your original ideas
Pugh Chart Analysis
A Pugh chart is a tool that helps evaluate ideas by setting up a list of characteristics and judging each idea in terms of the individual criteria This helps to create a more objective and structured selection process One idea is chosen as the datum or the idea to which all others will be compared It is good to choose a fairly simple idea as the datum as it will be easier to do the comparisons than if you choose one of your more complicated ideas Sometimes the datum is an existing solution Revisit your list of design requirements to determine the criteria and characteristics that you will use to judge your potential solutions It is important that many of criteria are specific to your project Everything should be safe reliable and cheap think about the characteristics that apply to your project in particular In the case of the honey press such criteria might include keeping the wax out of the honey or the need for processing the honey after using the device Divide the criteria into two categories general criteria which are important for any good design and specific criteria that apply particularly to your project In then end you should have about ten criteria that you will use to evaluate the options If you have many more than this then none of criteria carries enough weight to make a difference if you have too few then your decision may not incorporate enough information
For each of the criteria decide if the option you are evaluating is the same (0) better (+) or worse (-) than your datum Tally the results for each option and determine which idea is the best You may want to weight some of the criteria more heavily (for example safety might be deemed more important than portability when evaluating your idea and therefore you may choose to double the weight of that criterion) When making your final decision you should pay more attention to the specific criteria You may also find that when you make your final selection you will choose characteristics from different options and combine them to form the final design however if you do this you should be careful not to make your project too complex
Criteria Lever Press Rollers Impact Spinning
specific
throughput 0 + + -quality of honey 0 0 - 0 yield ( x 2 ) 0 ( x 2 ) + ( x 2 ) - ( x 2 ) + ( x 2 ) after-processing 0 0 - + power needed 0 + - + ease of cleaning 0 + 0 0
gene
ral ease of use 0 0 + 0
safety 0 0 - + simplicity 0 - 0 -cost (x 2) 0 - + -
Total 0 +3 -3 +2 FIGURE 5 SAMPLE PUGH CHART
72
Your Pugh chart
Criteria Datum Option 1 Option 2 Option 3
specific
gene
ral
Total
73
Criteria Datum Option 1 Option 2 Option 3
specific
gene
ral
Total
74
Phase 3 Implementation
75
Phase 3 Implementation More Analysis amp Experimentation
Now that you have chosen the final concept it is necessary to be sure that critical subsystems will perform as required In many cases their performance can be predicted by calculations in other cases experimentation will be required The experimental setup may closely resemble the prototype that you envisioned or it may be a more traditional laboratory experiment The choice would depend on the information needed and the resources available These experiments will be more rigorous than the ones that you performed during your concept evaluation process as they will impact the final design of your product Think about what you need to know for each system and devise and perform the necessary experiments models or analyses
76
Detail Design
Once the experiments have shown how the subsystems can work it is necessary to work out all the details that will make a functioning prototype This will vary greatly from project to project but includes aspects such as dimensions and tolerances material selection kinematics of assemblies and sub-assemblies and calculations of energy and power requirements Every component of your project should be designed to best fulfill its purpose Your first layout will not be your final one continual refinement is possible until you run out of time but the difference in quality from the first layout to the last can be enormous
Keeping all these considerations in mind start the process of producing technical drawings of your proposed design Good drawings will ensure that team-mates are in agreement about the details of the design and that technicians and artisans can accurately make the parts that you need Whenever possible you should use materials that can be obtained locally and affordably and that do not need to be custom-made
Another important thing to consider when working out the details is to think about how your device will fail It will fail all devices do you want to be sure that your device fails in a safe way and in a way that is easy to repair Look carefully over your design to identify the potential points of failure and then think about which modes of failure need to be prevented and which are acceptable modes of failure Try to design the device so that it fails in the safest most easily fixed manner
Fabrication
Now it is time to turn your ideas into realitymdashgenerally one begins by building a proof-of-concept prototype just to be sure that it could work Your first prototypes can be very rough you just want to see if your ideas will work when assembled together As you repeat the design cycle you will refine your ideas and refine your prototypes
Whenever possible use off-the-shelf parts if they meet your requirements and are not too expensive You can also save a lot of time by using parts or systems from existing devices especially in early versions In most prototypes the parts are typically fabricated on an individual basis and may not be made in the same way or of the same material as the final product but as you get closer to your final design you will use materials and methods that are closer to the final manufacturing processes
Careful planning of the fabrication phase will save you valuable time prevent unnecessary waiting times for your raw materials or components and reduce stressful last-minute hard work Develop a work plan so that you and your teammates can work together effectively and efficiently
Testing amp Evaluation
Once you have built a prototype it is necessary to test it and see if it does what it is supposed to do Now is the time to go back to the design requirements outlined in the early stages of the design process and verify that the device satisfies the requirements Devise techniques for measuring the performance of your device for each of your design requirements As part of this exercise think of how your device could be improved Are there ways you can make it cheaper faster better Try to lower the part count or remove material Is it as simple as possible
77
78
79
80
81
Notes
82
Notes
83
Notes
84
Notes
85
User Feedback
Not only should the technical performance of the device be tested but you also need to test how it works when real people use it Have people try your device and get their feedback Whenever possible have the actual users try the device if this is not feasible try to find people with as close to the same background as possible Have users try your device without as little instruction or guidance as possible and analyze their interactions You can observe how intuitive easy andor safe the device is to use Use the same type of tools that you used when you were gathering information to frame your project observie ask try
86
87
User Feedback
88
User Feedback
89
User Feedback
90
User Feedback
91
92
Congratulations Yoursquove made it around the design cycle Use the information that you gathered from testing and user feedback sessions to prepare for the next journey around the design cycle What nees to be improved Define the new problem that needs to be solved Consider revising the design requirements and the original ideal and desired values Identify the subcomponents that need to be redesigned and outline the goals for how to move the project forward It is usually necessary to go around the cycle several times in order to refine your design and achieve the simple cheap and beautiful solution
93
Design R
equirements chart
Custom
er Need
What are you
going to measure
How
to measure it
(units) G
ood Value B
etter Value
94
Des
ign
Req
uire
men
ts c
hart
Cus
tom
er N
eed
Wha
t are
you
goin
g to
mea
sure
H
ow to
mea
sure
it(u
nits
) G
ood
Valu
e B
ette
r Val
ue
95
Extra Pugh charts
Criteria Datum Option 1 Option 2 Option 3
specific
gene
ral
Total
96
Criteria Datum Option 1 Option 2 Option 3
specific
gene
ral
Total
97
Analysis and Experimentation Its often useful to show your data in a graph
Notes
98
Analysis and Experimentation Its often useful to show your data in a graph
Notes
99
100
101
102
103
104
105
106
107
108
109
MIT OpenCourseWare httpocwmitedu
EC720J 2722J D-Lab II Design Spring 2010
For information about citing these materials or our Terms of Use visit httpocwmiteduterms
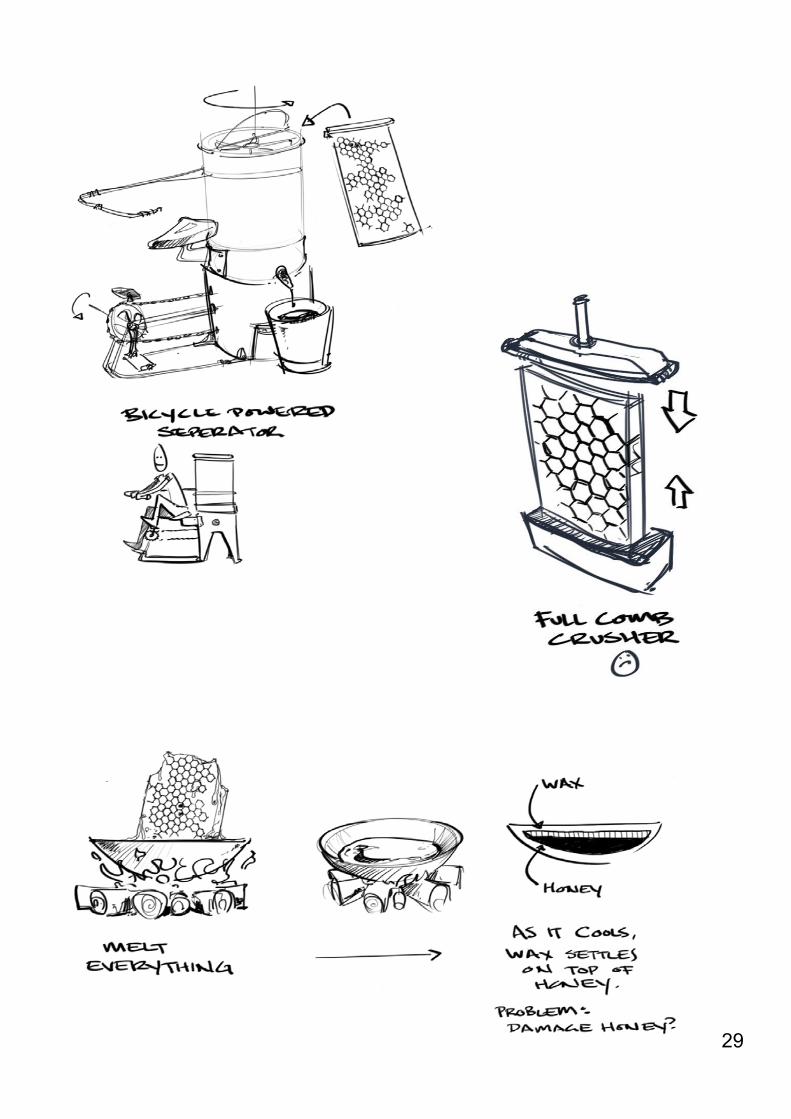
Analysis and Experimentation Its often useful to show your data in a graph
Notes
68
Notes
69
Notes
70
Notes
71
Concept Evaluation
Your next task is to choose which of your many ideas you will concentrate on for your design solution It is often difficult to do this as ideas tend to take on a life of their own and you will find that each team member has their own favorite ideas It is important to judge as objectively as possible To do this you will need to consolidate your various ideas into designs that you can compare You might consider grouping together ideas that are similar and combine them into a single solution Try to narrow it down to three to five different concepts each of which may be a combination of several of your original ideas
Pugh Chart Analysis
A Pugh chart is a tool that helps evaluate ideas by setting up a list of characteristics and judging each idea in terms of the individual criteria This helps to create a more objective and structured selection process One idea is chosen as the datum or the idea to which all others will be compared It is good to choose a fairly simple idea as the datum as it will be easier to do the comparisons than if you choose one of your more complicated ideas Sometimes the datum is an existing solution Revisit your list of design requirements to determine the criteria and characteristics that you will use to judge your potential solutions It is important that many of criteria are specific to your project Everything should be safe reliable and cheap think about the characteristics that apply to your project in particular In the case of the honey press such criteria might include keeping the wax out of the honey or the need for processing the honey after using the device Divide the criteria into two categories general criteria which are important for any good design and specific criteria that apply particularly to your project In then end you should have about ten criteria that you will use to evaluate the options If you have many more than this then none of criteria carries enough weight to make a difference if you have too few then your decision may not incorporate enough information
For each of the criteria decide if the option you are evaluating is the same (0) better (+) or worse (-) than your datum Tally the results for each option and determine which idea is the best You may want to weight some of the criteria more heavily (for example safety might be deemed more important than portability when evaluating your idea and therefore you may choose to double the weight of that criterion) When making your final decision you should pay more attention to the specific criteria You may also find that when you make your final selection you will choose characteristics from different options and combine them to form the final design however if you do this you should be careful not to make your project too complex
Criteria Lever Press Rollers Impact Spinning
specific
throughput 0 + + -quality of honey 0 0 - 0 yield ( x 2 ) 0 ( x 2 ) + ( x 2 ) - ( x 2 ) + ( x 2 ) after-processing 0 0 - + power needed 0 + - + ease of cleaning 0 + 0 0
gene
ral ease of use 0 0 + 0
safety 0 0 - + simplicity 0 - 0 -cost (x 2) 0 - + -
Total 0 +3 -3 +2 FIGURE 5 SAMPLE PUGH CHART
72
Your Pugh chart
Criteria Datum Option 1 Option 2 Option 3
specific
gene
ral
Total
73
Criteria Datum Option 1 Option 2 Option 3
specific
gene
ral
Total
74
Phase 3 Implementation
75
Phase 3 Implementation More Analysis amp Experimentation
Now that you have chosen the final concept it is necessary to be sure that critical subsystems will perform as required In many cases their performance can be predicted by calculations in other cases experimentation will be required The experimental setup may closely resemble the prototype that you envisioned or it may be a more traditional laboratory experiment The choice would depend on the information needed and the resources available These experiments will be more rigorous than the ones that you performed during your concept evaluation process as they will impact the final design of your product Think about what you need to know for each system and devise and perform the necessary experiments models or analyses
76
Detail Design
Once the experiments have shown how the subsystems can work it is necessary to work out all the details that will make a functioning prototype This will vary greatly from project to project but includes aspects such as dimensions and tolerances material selection kinematics of assemblies and sub-assemblies and calculations of energy and power requirements Every component of your project should be designed to best fulfill its purpose Your first layout will not be your final one continual refinement is possible until you run out of time but the difference in quality from the first layout to the last can be enormous
Keeping all these considerations in mind start the process of producing technical drawings of your proposed design Good drawings will ensure that team-mates are in agreement about the details of the design and that technicians and artisans can accurately make the parts that you need Whenever possible you should use materials that can be obtained locally and affordably and that do not need to be custom-made
Another important thing to consider when working out the details is to think about how your device will fail It will fail all devices do you want to be sure that your device fails in a safe way and in a way that is easy to repair Look carefully over your design to identify the potential points of failure and then think about which modes of failure need to be prevented and which are acceptable modes of failure Try to design the device so that it fails in the safest most easily fixed manner
Fabrication
Now it is time to turn your ideas into realitymdashgenerally one begins by building a proof-of-concept prototype just to be sure that it could work Your first prototypes can be very rough you just want to see if your ideas will work when assembled together As you repeat the design cycle you will refine your ideas and refine your prototypes
Whenever possible use off-the-shelf parts if they meet your requirements and are not too expensive You can also save a lot of time by using parts or systems from existing devices especially in early versions In most prototypes the parts are typically fabricated on an individual basis and may not be made in the same way or of the same material as the final product but as you get closer to your final design you will use materials and methods that are closer to the final manufacturing processes
Careful planning of the fabrication phase will save you valuable time prevent unnecessary waiting times for your raw materials or components and reduce stressful last-minute hard work Develop a work plan so that you and your teammates can work together effectively and efficiently
Testing amp Evaluation
Once you have built a prototype it is necessary to test it and see if it does what it is supposed to do Now is the time to go back to the design requirements outlined in the early stages of the design process and verify that the device satisfies the requirements Devise techniques for measuring the performance of your device for each of your design requirements As part of this exercise think of how your device could be improved Are there ways you can make it cheaper faster better Try to lower the part count or remove material Is it as simple as possible
77
78
79
80
81
Notes
82
Notes
83
Notes
84
Notes
85
User Feedback
Not only should the technical performance of the device be tested but you also need to test how it works when real people use it Have people try your device and get their feedback Whenever possible have the actual users try the device if this is not feasible try to find people with as close to the same background as possible Have users try your device without as little instruction or guidance as possible and analyze their interactions You can observe how intuitive easy andor safe the device is to use Use the same type of tools that you used when you were gathering information to frame your project observie ask try
86
87
User Feedback
88
User Feedback
89
User Feedback
90
User Feedback
91
92
Congratulations Yoursquove made it around the design cycle Use the information that you gathered from testing and user feedback sessions to prepare for the next journey around the design cycle What nees to be improved Define the new problem that needs to be solved Consider revising the design requirements and the original ideal and desired values Identify the subcomponents that need to be redesigned and outline the goals for how to move the project forward It is usually necessary to go around the cycle several times in order to refine your design and achieve the simple cheap and beautiful solution
93
Design R
equirements chart
Custom
er Need
What are you
going to measure
How
to measure it
(units) G
ood Value B
etter Value
94
Des
ign
Req
uire
men
ts c
hart
Cus
tom
er N
eed
Wha
t are
you
goin
g to
mea
sure
H
ow to
mea
sure
it(u
nits
) G
ood
Valu
e B
ette
r Val
ue
95
Extra Pugh charts
Criteria Datum Option 1 Option 2 Option 3
specific
gene
ral
Total
96
Criteria Datum Option 1 Option 2 Option 3
specific
gene
ral
Total
97
Analysis and Experimentation Its often useful to show your data in a graph
Notes
98
Analysis and Experimentation Its often useful to show your data in a graph
Notes
99
100
101
102
103
104
105
106
107
108
109
MIT OpenCourseWare httpocwmitedu
EC720J 2722J D-Lab II Design Spring 2010
For information about citing these materials or our Terms of Use visit httpocwmiteduterms

Notes
71
Concept Evaluation
Your next task is to choose which of your many ideas you will concentrate on for your design solution It is often difficult to do this as ideas tend to take on a life of their own and you will find that each team member has their own favorite ideas It is important to judge as objectively as possible To do this you will need to consolidate your various ideas into designs that you can compare You might consider grouping together ideas that are similar and combine them into a single solution Try to narrow it down to three to five different concepts each of which may be a combination of several of your original ideas
Pugh Chart Analysis
A Pugh chart is a tool that helps evaluate ideas by setting up a list of characteristics and judging each idea in terms of the individual criteria This helps to create a more objective and structured selection process One idea is chosen as the datum or the idea to which all others will be compared It is good to choose a fairly simple idea as the datum as it will be easier to do the comparisons than if you choose one of your more complicated ideas Sometimes the datum is an existing solution Revisit your list of design requirements to determine the criteria and characteristics that you will use to judge your potential solutions It is important that many of criteria are specific to your project Everything should be safe reliable and cheap think about the characteristics that apply to your project in particular In the case of the honey press such criteria might include keeping the wax out of the honey or the need for processing the honey after using the device Divide the criteria into two categories general criteria which are important for any good design and specific criteria that apply particularly to your project In then end you should have about ten criteria that you will use to evaluate the options If you have many more than this then none of criteria carries enough weight to make a difference if you have too few then your decision may not incorporate enough information
For each of the criteria decide if the option you are evaluating is the same (0) better (+) or worse (-) than your datum Tally the results for each option and determine which idea is the best You may want to weight some of the criteria more heavily (for example safety might be deemed more important than portability when evaluating your idea and therefore you may choose to double the weight of that criterion) When making your final decision you should pay more attention to the specific criteria You may also find that when you make your final selection you will choose characteristics from different options and combine them to form the final design however if you do this you should be careful not to make your project too complex
Criteria Lever Press Rollers Impact Spinning
specific
throughput 0 + + -quality of honey 0 0 - 0 yield ( x 2 ) 0 ( x 2 ) + ( x 2 ) - ( x 2 ) + ( x 2 ) after-processing 0 0 - + power needed 0 + - + ease of cleaning 0 + 0 0
gene
ral ease of use 0 0 + 0
safety 0 0 - + simplicity 0 - 0 -cost (x 2) 0 - + -
Total 0 +3 -3 +2 FIGURE 5 SAMPLE PUGH CHART
72
Your Pugh chart
Criteria Datum Option 1 Option 2 Option 3
specific
gene
ral
Total
73
Criteria Datum Option 1 Option 2 Option 3
specific
gene
ral
Total
74
Phase 3 Implementation
75
Phase 3 Implementation More Analysis amp Experimentation
Now that you have chosen the final concept it is necessary to be sure that critical subsystems will perform as required In many cases their performance can be predicted by calculations in other cases experimentation will be required The experimental setup may closely resemble the prototype that you envisioned or it may be a more traditional laboratory experiment The choice would depend on the information needed and the resources available These experiments will be more rigorous than the ones that you performed during your concept evaluation process as they will impact the final design of your product Think about what you need to know for each system and devise and perform the necessary experiments models or analyses
76
Detail Design
Once the experiments have shown how the subsystems can work it is necessary to work out all the details that will make a functioning prototype This will vary greatly from project to project but includes aspects such as dimensions and tolerances material selection kinematics of assemblies and sub-assemblies and calculations of energy and power requirements Every component of your project should be designed to best fulfill its purpose Your first layout will not be your final one continual refinement is possible until you run out of time but the difference in quality from the first layout to the last can be enormous
Keeping all these considerations in mind start the process of producing technical drawings of your proposed design Good drawings will ensure that team-mates are in agreement about the details of the design and that technicians and artisans can accurately make the parts that you need Whenever possible you should use materials that can be obtained locally and affordably and that do not need to be custom-made
Another important thing to consider when working out the details is to think about how your device will fail It will fail all devices do you want to be sure that your device fails in a safe way and in a way that is easy to repair Look carefully over your design to identify the potential points of failure and then think about which modes of failure need to be prevented and which are acceptable modes of failure Try to design the device so that it fails in the safest most easily fixed manner
Fabrication
Now it is time to turn your ideas into realitymdashgenerally one begins by building a proof-of-concept prototype just to be sure that it could work Your first prototypes can be very rough you just want to see if your ideas will work when assembled together As you repeat the design cycle you will refine your ideas and refine your prototypes
Whenever possible use off-the-shelf parts if they meet your requirements and are not too expensive You can also save a lot of time by using parts or systems from existing devices especially in early versions In most prototypes the parts are typically fabricated on an individual basis and may not be made in the same way or of the same material as the final product but as you get closer to your final design you will use materials and methods that are closer to the final manufacturing processes
Careful planning of the fabrication phase will save you valuable time prevent unnecessary waiting times for your raw materials or components and reduce stressful last-minute hard work Develop a work plan so that you and your teammates can work together effectively and efficiently
Testing amp Evaluation
Once you have built a prototype it is necessary to test it and see if it does what it is supposed to do Now is the time to go back to the design requirements outlined in the early stages of the design process and verify that the device satisfies the requirements Devise techniques for measuring the performance of your device for each of your design requirements As part of this exercise think of how your device could be improved Are there ways you can make it cheaper faster better Try to lower the part count or remove material Is it as simple as possible
77
78
79
80
81
Notes
82
Notes
83
Notes
84
Notes
85
User Feedback
Not only should the technical performance of the device be tested but you also need to test how it works when real people use it Have people try your device and get their feedback Whenever possible have the actual users try the device if this is not feasible try to find people with as close to the same background as possible Have users try your device without as little instruction or guidance as possible and analyze their interactions You can observe how intuitive easy andor safe the device is to use Use the same type of tools that you used when you were gathering information to frame your project observie ask try
86
87
User Feedback
88
User Feedback
89
User Feedback
90
User Feedback
91
92
Congratulations Yoursquove made it around the design cycle Use the information that you gathered from testing and user feedback sessions to prepare for the next journey around the design cycle What nees to be improved Define the new problem that needs to be solved Consider revising the design requirements and the original ideal and desired values Identify the subcomponents that need to be redesigned and outline the goals for how to move the project forward It is usually necessary to go around the cycle several times in order to refine your design and achieve the simple cheap and beautiful solution
93
Design R
equirements chart
Custom
er Need
What are you
going to measure
How
to measure it
(units) G
ood Value B
etter Value
94
Des
ign
Req
uire
men
ts c
hart
Cus
tom
er N
eed
Wha
t are
you
goin
g to
mea
sure
H
ow to
mea
sure
it(u
nits
) G
ood
Valu
e B
ette
r Val
ue
95
Extra Pugh charts
Criteria Datum Option 1 Option 2 Option 3
specific
gene
ral
Total
96
Criteria Datum Option 1 Option 2 Option 3
specific
gene
ral
Total
97
Analysis and Experimentation Its often useful to show your data in a graph
Notes
98
Analysis and Experimentation Its often useful to show your data in a graph
Notes
99
100
101
102
103
104
105
106
107
108
109
MIT OpenCourseWare httpocwmitedu
EC720J 2722J D-Lab II Design Spring 2010
For information about citing these materials or our Terms of Use visit httpocwmiteduterms

Criteria Datum Option 1 Option 2 Option 3
specific
gene
ral
Total
74
Phase 3 Implementation
75
Phase 3 Implementation More Analysis amp Experimentation
Now that you have chosen the final concept it is necessary to be sure that critical subsystems will perform as required In many cases their performance can be predicted by calculations in other cases experimentation will be required The experimental setup may closely resemble the prototype that you envisioned or it may be a more traditional laboratory experiment The choice would depend on the information needed and the resources available These experiments will be more rigorous than the ones that you performed during your concept evaluation process as they will impact the final design of your product Think about what you need to know for each system and devise and perform the necessary experiments models or analyses
76
Detail Design
Once the experiments have shown how the subsystems can work it is necessary to work out all the details that will make a functioning prototype This will vary greatly from project to project but includes aspects such as dimensions and tolerances material selection kinematics of assemblies and sub-assemblies and calculations of energy and power requirements Every component of your project should be designed to best fulfill its purpose Your first layout will not be your final one continual refinement is possible until you run out of time but the difference in quality from the first layout to the last can be enormous
Keeping all these considerations in mind start the process of producing technical drawings of your proposed design Good drawings will ensure that team-mates are in agreement about the details of the design and that technicians and artisans can accurately make the parts that you need Whenever possible you should use materials that can be obtained locally and affordably and that do not need to be custom-made
Another important thing to consider when working out the details is to think about how your device will fail It will fail all devices do you want to be sure that your device fails in a safe way and in a way that is easy to repair Look carefully over your design to identify the potential points of failure and then think about which modes of failure need to be prevented and which are acceptable modes of failure Try to design the device so that it fails in the safest most easily fixed manner
Fabrication
Now it is time to turn your ideas into realitymdashgenerally one begins by building a proof-of-concept prototype just to be sure that it could work Your first prototypes can be very rough you just want to see if your ideas will work when assembled together As you repeat the design cycle you will refine your ideas and refine your prototypes
Whenever possible use off-the-shelf parts if they meet your requirements and are not too expensive You can also save a lot of time by using parts or systems from existing devices especially in early versions In most prototypes the parts are typically fabricated on an individual basis and may not be made in the same way or of the same material as the final product but as you get closer to your final design you will use materials and methods that are closer to the final manufacturing processes
Careful planning of the fabrication phase will save you valuable time prevent unnecessary waiting times for your raw materials or components and reduce stressful last-minute hard work Develop a work plan so that you and your teammates can work together effectively and efficiently
Testing amp Evaluation
Once you have built a prototype it is necessary to test it and see if it does what it is supposed to do Now is the time to go back to the design requirements outlined in the early stages of the design process and verify that the device satisfies the requirements Devise techniques for measuring the performance of your device for each of your design requirements As part of this exercise think of how your device could be improved Are there ways you can make it cheaper faster better Try to lower the part count or remove material Is it as simple as possible
77
78
79
80
81
Notes
82
Notes
83
Notes
84
Notes
85
User Feedback
Not only should the technical performance of the device be tested but you also need to test how it works when real people use it Have people try your device and get their feedback Whenever possible have the actual users try the device if this is not feasible try to find people with as close to the same background as possible Have users try your device without as little instruction or guidance as possible and analyze their interactions You can observe how intuitive easy andor safe the device is to use Use the same type of tools that you used when you were gathering information to frame your project observie ask try
86
87
User Feedback
88
User Feedback
89
User Feedback
90
User Feedback
91
92
Congratulations Yoursquove made it around the design cycle Use the information that you gathered from testing and user feedback sessions to prepare for the next journey around the design cycle What nees to be improved Define the new problem that needs to be solved Consider revising the design requirements and the original ideal and desired values Identify the subcomponents that need to be redesigned and outline the goals for how to move the project forward It is usually necessary to go around the cycle several times in order to refine your design and achieve the simple cheap and beautiful solution
93
Design R
equirements chart
Custom
er Need
What are you
going to measure
How
to measure it
(units) G
ood Value B
etter Value
94
Des
ign
Req
uire
men
ts c
hart
Cus
tom
er N
eed
Wha
t are
you
goin
g to
mea
sure
H
ow to
mea
sure
it(u
nits
) G
ood
Valu
e B
ette
r Val
ue
95
Extra Pugh charts
Criteria Datum Option 1 Option 2 Option 3
specific
gene
ral
Total
96
Criteria Datum Option 1 Option 2 Option 3
specific
gene
ral
Total
97
Analysis and Experimentation Its often useful to show your data in a graph
Notes
98
Analysis and Experimentation Its often useful to show your data in a graph
Notes
99
100
101
102
103
104
105
106
107
108
109
MIT OpenCourseWare httpocwmitedu
EC720J 2722J D-Lab II Design Spring 2010
For information about citing these materials or our Terms of Use visit httpocwmiteduterms
Notes
82
Notes
83
Notes
84
Notes
85
User Feedback
Not only should the technical performance of the device be tested but you also need to test how it works when real people use it Have people try your device and get their feedback Whenever possible have the actual users try the device if this is not feasible try to find people with as close to the same background as possible Have users try your device without as little instruction or guidance as possible and analyze their interactions You can observe how intuitive easy andor safe the device is to use Use the same type of tools that you used when you were gathering information to frame your project observie ask try
86
87
User Feedback
88
User Feedback
89
User Feedback
90
User Feedback
91
92
Congratulations Yoursquove made it around the design cycle Use the information that you gathered from testing and user feedback sessions to prepare for the next journey around the design cycle What nees to be improved Define the new problem that needs to be solved Consider revising the design requirements and the original ideal and desired values Identify the subcomponents that need to be redesigned and outline the goals for how to move the project forward It is usually necessary to go around the cycle several times in order to refine your design and achieve the simple cheap and beautiful solution
93
Design R
equirements chart
Custom
er Need
What are you
going to measure
How
to measure it
(units) G
ood Value B
etter Value
94
Des
ign
Req
uire
men
ts c
hart
Cus
tom
er N
eed
Wha
t are
you
goin
g to
mea
sure
H
ow to
mea
sure
it(u
nits
) G
ood
Valu
e B
ette
r Val
ue
95
Extra Pugh charts
Criteria Datum Option 1 Option 2 Option 3
specific
gene
ral
Total
96
Criteria Datum Option 1 Option 2 Option 3
specific
gene
ral
Total
97
Analysis and Experimentation Its often useful to show your data in a graph
Notes
98
Analysis and Experimentation Its often useful to show your data in a graph
Notes
99
100
101
102
103
104
105
106
107
108
109
MIT OpenCourseWare httpocwmitedu
EC720J 2722J D-Lab II Design Spring 2010
For information about citing these materials or our Terms of Use visit httpocwmiteduterms

Notes
85
User Feedback
Not only should the technical performance of the device be tested but you also need to test how it works when real people use it Have people try your device and get their feedback Whenever possible have the actual users try the device if this is not feasible try to find people with as close to the same background as possible Have users try your device without as little instruction or guidance as possible and analyze their interactions You can observe how intuitive easy andor safe the device is to use Use the same type of tools that you used when you were gathering information to frame your project observie ask try
86
87
User Feedback
88
User Feedback
89
User Feedback
90
User Feedback
91
92
Congratulations Yoursquove made it around the design cycle Use the information that you gathered from testing and user feedback sessions to prepare for the next journey around the design cycle What nees to be improved Define the new problem that needs to be solved Consider revising the design requirements and the original ideal and desired values Identify the subcomponents that need to be redesigned and outline the goals for how to move the project forward It is usually necessary to go around the cycle several times in order to refine your design and achieve the simple cheap and beautiful solution
93
Design R
equirements chart
Custom
er Need
What are you
going to measure
How
to measure it
(units) G
ood Value B
etter Value
94
Des
ign
Req
uire
men
ts c
hart
Cus
tom
er N
eed
Wha
t are
you
goin
g to
mea
sure
H
ow to
mea
sure
it(u
nits
) G
ood
Valu
e B
ette
r Val
ue
95
Extra Pugh charts
Criteria Datum Option 1 Option 2 Option 3
specific
gene
ral
Total
96
Criteria Datum Option 1 Option 2 Option 3
specific
gene
ral
Total
97
Analysis and Experimentation Its often useful to show your data in a graph
Notes
98
Analysis and Experimentation Its often useful to show your data in a graph
Notes
99
100
101
102
103
104
105
106
107
108
109
MIT OpenCourseWare httpocwmitedu
EC720J 2722J D-Lab II Design Spring 2010
For information about citing these materials or our Terms of Use visit httpocwmiteduterms

User Feedback
Not only should the technical performance of the device be tested but you also need to test how it works when real people use it Have people try your device and get their feedback Whenever possible have the actual users try the device if this is not feasible try to find people with as close to the same background as possible Have users try your device without as little instruction or guidance as possible and analyze their interactions You can observe how intuitive easy andor safe the device is to use Use the same type of tools that you used when you were gathering information to frame your project observie ask try
86
87
User Feedback
88
User Feedback
89
User Feedback
90
User Feedback
91
92
Congratulations Yoursquove made it around the design cycle Use the information that you gathered from testing and user feedback sessions to prepare for the next journey around the design cycle What nees to be improved Define the new problem that needs to be solved Consider revising the design requirements and the original ideal and desired values Identify the subcomponents that need to be redesigned and outline the goals for how to move the project forward It is usually necessary to go around the cycle several times in order to refine your design and achieve the simple cheap and beautiful solution
93
Design R
equirements chart
Custom
er Need
What are you
going to measure
How
to measure it
(units) G
ood Value B
etter Value
94
Des
ign
Req
uire
men
ts c
hart
Cus
tom
er N
eed
Wha
t are
you
goin
g to
mea
sure
H
ow to
mea
sure
it(u
nits
) G
ood
Valu
e B
ette
r Val
ue
95
Extra Pugh charts
Criteria Datum Option 1 Option 2 Option 3
specific
gene
ral
Total
96
Criteria Datum Option 1 Option 2 Option 3
specific
gene
ral
Total
97
Analysis and Experimentation Its often useful to show your data in a graph
Notes
98
Analysis and Experimentation Its often useful to show your data in a graph
Notes
99
100
101
102
103
104
105
106
107
108
109
MIT OpenCourseWare httpocwmitedu
EC720J 2722J D-Lab II Design Spring 2010
For information about citing these materials or our Terms of Use visit httpocwmiteduterms

User Feedback
91
92
Congratulations Yoursquove made it around the design cycle Use the information that you gathered from testing and user feedback sessions to prepare for the next journey around the design cycle What nees to be improved Define the new problem that needs to be solved Consider revising the design requirements and the original ideal and desired values Identify the subcomponents that need to be redesigned and outline the goals for how to move the project forward It is usually necessary to go around the cycle several times in order to refine your design and achieve the simple cheap and beautiful solution
93
Design R
equirements chart
Custom
er Need
What are you
going to measure
How
to measure it
(units) G
ood Value B
etter Value
94
Des
ign
Req
uire
men
ts c
hart
Cus
tom
er N
eed
Wha
t are
you
goin
g to
mea
sure
H
ow to
mea
sure
it(u
nits
) G
ood
Valu
e B
ette
r Val
ue
95
Extra Pugh charts
Criteria Datum Option 1 Option 2 Option 3
specific
gene
ral
Total
96
Criteria Datum Option 1 Option 2 Option 3
specific
gene
ral
Total
97
Analysis and Experimentation Its often useful to show your data in a graph
Notes
98
Analysis and Experimentation Its often useful to show your data in a graph
Notes
99
100
101
102
103
104
105
106
107
108
109
MIT OpenCourseWare httpocwmitedu
EC720J 2722J D-Lab II Design Spring 2010
For information about citing these materials or our Terms of Use visit httpocwmiteduterms
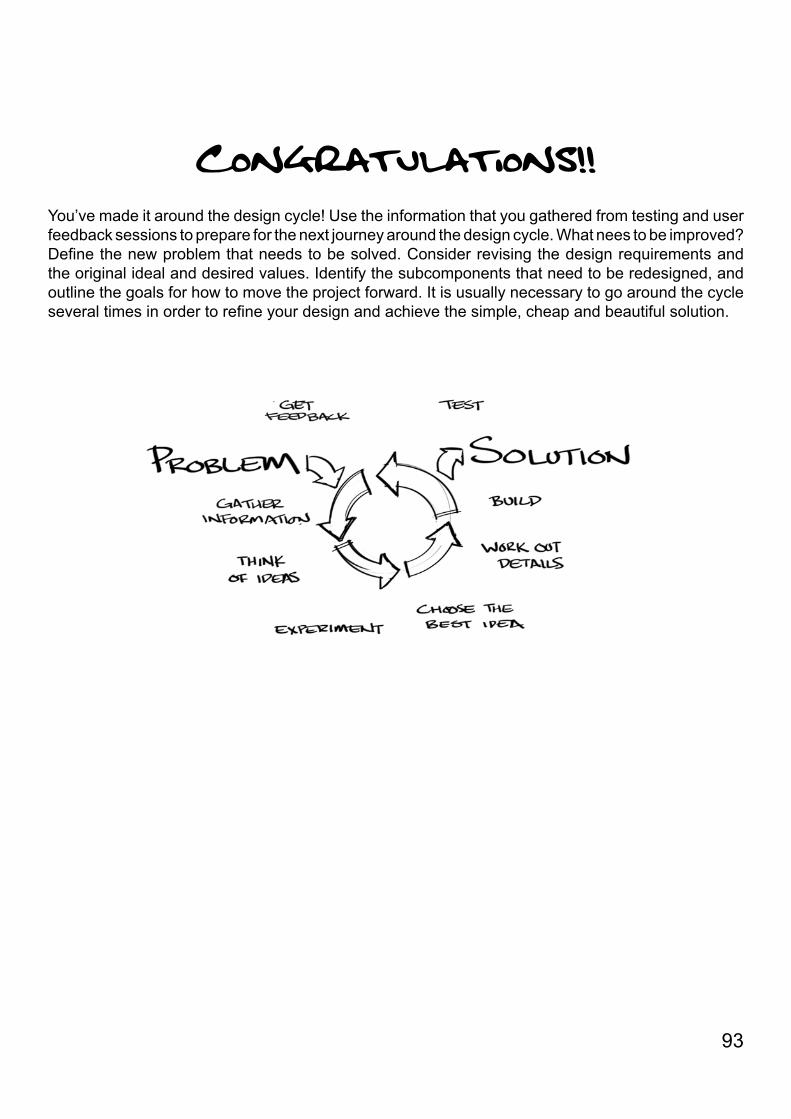
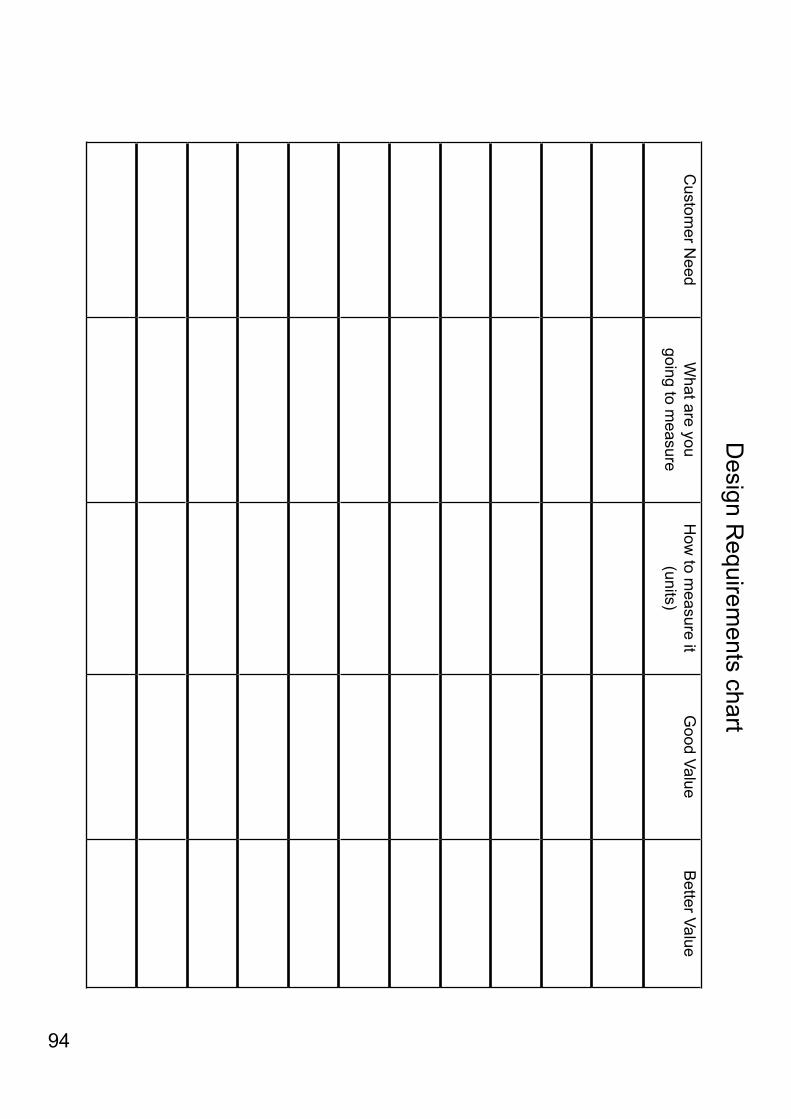

Analysis and Experimentation Its often useful to show your data in a graph
Notes
99
100
101
102
103
104
105
106
107
108
109
MIT OpenCourseWare httpocwmitedu
EC720J 2722J D-Lab II Design Spring 2010
For information about citing these materials or our Terms of Use visit httpocwmiteduterms

100
101
102
103
104
105
106
107
108
109
MIT OpenCourseWare httpocwmitedu
EC720J 2722J D-Lab II Design Spring 2010
For information about citing these materials or our Terms of Use visit httpocwmiteduterms

101
102
103
104
105
106
107
108
109
MIT OpenCourseWare httpocwmitedu
EC720J 2722J D-Lab II Design Spring 2010
For information about citing these materials or our Terms of Use visit httpocwmiteduterms

102
103
104
105
106
107
108
109
MIT OpenCourseWare httpocwmitedu
EC720J 2722J D-Lab II Design Spring 2010
For information about citing these materials or our Terms of Use visit httpocwmiteduterms

103
104
105
106
107
108
109
MIT OpenCourseWare httpocwmitedu
EC720J 2722J D-Lab II Design Spring 2010
For information about citing these materials or our Terms of Use visit httpocwmiteduterms

104
105
106
107
108
109
MIT OpenCourseWare httpocwmitedu
EC720J 2722J D-Lab II Design Spring 2010
For information about citing these materials or our Terms of Use visit httpocwmiteduterms

105
106
107
108
109
MIT OpenCourseWare httpocwmitedu
EC720J 2722J D-Lab II Design Spring 2010
For information about citing these materials or our Terms of Use visit httpocwmiteduterms

106
107
108
109
MIT OpenCourseWare httpocwmitedu
EC720J 2722J D-Lab II Design Spring 2010
For information about citing these materials or our Terms of Use visit httpocwmiteduterms

107
108
109
MIT OpenCourseWare httpocwmitedu
EC720J 2722J D-Lab II Design Spring 2010
For information about citing these materials or our Terms of Use visit httpocwmiteduterms

108
109
MIT OpenCourseWare httpocwmitedu
EC720J 2722J D-Lab II Design Spring 2010
For information about citing these materials or our Terms of Use visit httpocwmiteduterms

109
MIT OpenCourseWare httpocwmitedu
EC720J 2722J D-Lab II Design Spring 2010
For information about citing these materials or our Terms of Use visit httpocwmiteduterms

MIT OpenCourseWare httpocwmitedu
EC720J 2722J D-Lab II Design Spring 2010
For information about citing these materials or our Terms of Use visit httpocwmiteduterms