Embed Size (px)
Citation preview
Crutches
SAVE THESE INSTRUCTIONSNOTE: Check ALL parts for shipping damage. If shipping damage is noted, DO NOT use. Contact carrier/dealer for further instruction.
WARNING• DO NOT install or use this equipment without �rst reading and understanding these instructions. If you are
unable to understand the Warnings, Cautions or Instru ctions, contact a healthcare professional, dealer or technical personnel before attempting to install this equipment - otherw ise, injury or damage may occur.
• Each individual should always consult with their physicia n or therapist to determine proper adjustment and usage.• Invacare products are speci�cally designed and ma nufactured for use in conjunction with Invacare
accessories. Accessories designed by other manufactur ers have not been tested by Invacare and are not recommended for use with Invacare products.
• Proper height adjustments must be made to both th e leg extension and the crut ch handle. A dealer or therapist should aid in th e proper placement for maximum balance and support.
• Be sure that snap buttons are fully protruding throug h the same respecti ve adjustment hole of each leg extension. This ensures that the adju stable legs are securely locked into position and an even height adjustment is obtained.
• Wing nuts MUST be tight at all times.• Ensure that rubber crutch tips are not ripped, wo rn or missing. Replace be fore using the crutches.• ALWAYS observe the weight limit on the labeling of th is product. Check that all labels are present and leg-
ible. Replace if necessary.
Patient Height Speci�cationNOTE: For models not listed, please check labeling on product.
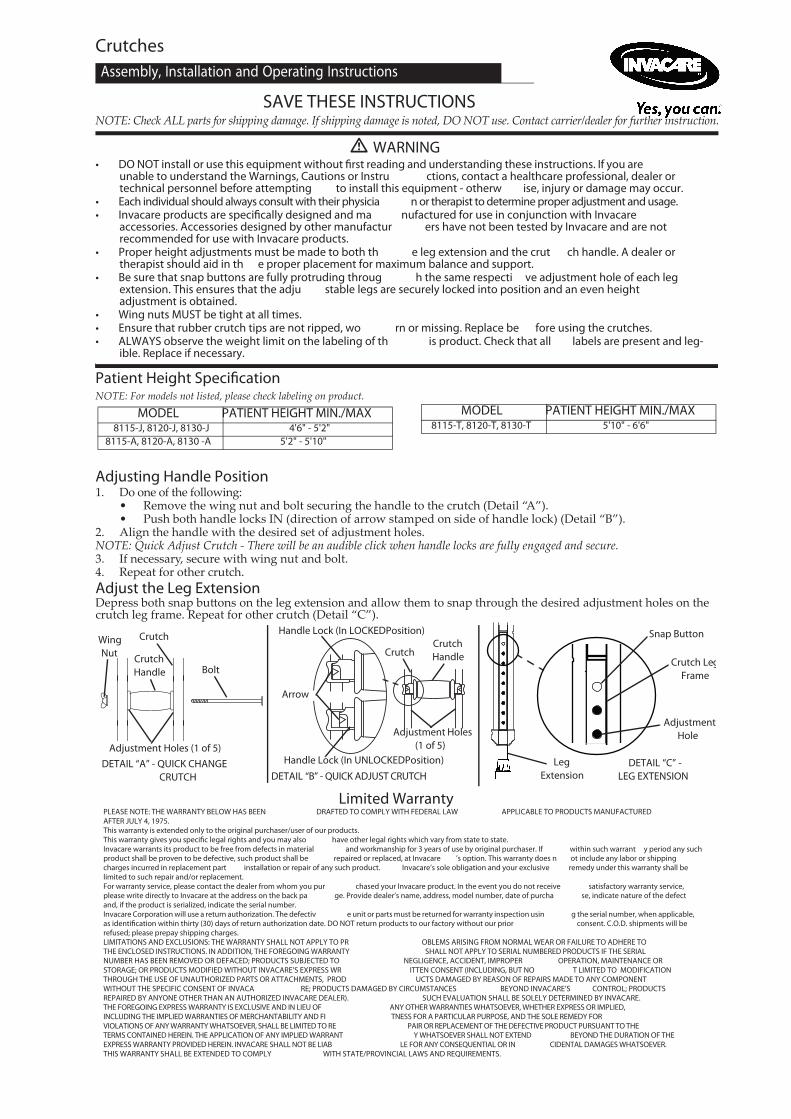
Adjusting Handle Position1. Do one of the following:
• Remove the wing nut and bolt securing the handle to the crutch (Detail “A”).• Push both handle locks IN (direction of arrow stamped on side of handle lock) (Detail “B”).
2. Align the handle with the desired set of adjustment holes.NOTE: Quick Adjust Crutch - There will be an audible click when handle locks are fully engaged and secure.3. If necessary, secure with wing nut and bolt. 4. Repeat for other crutch.Adjust the Leg ExtensionDepress both snap buttons on the leg extension and allow them to snap through the desired adjustment holes on the crutch leg frame. Repeat for other crutch (Detail “C”).
Limited WarrantyPLEASE NOTE: THE WARRANTY BELOW HAS BEEN DRAFTED TO COMPLY WITH FEDERAL LAW APPLICABLE TO PRODUCTS MANUFACTURED AFTER JULY 4, 1975.This warranty is extended only to the original purchaser/user of our products.This warranty gives you speci�c legal rights and you may also have other legal rights which vary from state to state.Invacare warrants its product to be free from defects in material and workmanship for 3 years of use by original purchaser. If within such warrant y period any such product shall be proven to be defective, such product shall be repaired or replaced, at Invacare ’s option. This warranty does n ot include any labor or shipping charges incurred in replacement part installation or repair of any such product. Invacare’s sole obligation and your exclusive remedy under this warranty shall be limited to such repair and/or replacement.For warranty service, please contact the dealer from whom you pur chased your Invacare product. In the event you do not receive satisfactory warranty service, please write directly to Invacare at the address on the back pa ge. Provide dealer’s name, address, model number, date of purcha se, indicate nature of the defect and, if the product is serialized, indicate the serial number.Invacare Corporation will use a return authorization. The defectiv e unit or parts must be returned for warranty inspection usin g the serial number, when applicable, as identi�cation within thirty (30) days of return authorization date. DO NOT return products to our factory without our prior consent. C.O.D. shipments will be refused; please prepay shipping charges.LIMITATIONS AND EXCLUSIONS: THE WARRANTY SHALL NOT APPLY TO PR OBLEMS ARISING FROM NORMAL WEAR OR FAILURE TO ADHERE TO THE ENCLOSED INSTRUCTIONS. IN ADDITION, THE FOREGOING WARRANTY SHALL NOT APPLY TO SERIAL NUMBERED PRODUCTS IF THE SERIAL NUMBER HAS BEEN REMOVED OR DEFACED; PRODUCTS SUBJECTED TO NEGLIGENCE, ACCIDENT, IMPROPER OPERATION, MAINTENANCE OR STORAGE; OR PRODUCTS MODIFIED WITHOUT INVACARE’S EXPRESS WR ITTEN CONSENT (INCLUDING, BUT NO T LIMITED TO MODIFICATION THROUGH THE USE OF UNAUTHORIZED PARTS OR ATTACHMENTS, PROD UCTS DAMAGED BY REASON OF REPAIRS MADE TO ANY COMPONENT WITHOUT THE SPECIFIC CONSENT OF INVACA RE; PRODUCTS DAMAGED BY CIRCUMSTANCES BEYOND INVACARE’S CONTROL; PRODUCTS REPAIRED BY ANYONE OTHER THAN AN AUTHORIZED INVACARE DEALER). SUCH EVALUATION SHALL BE SOLELY DETERMINED BY INVACARE.THE FOREGOING EXPRESS WARRANTY IS EXCLUSIVE AND IN LIEU OF ANY OTHER WARRANTIES WHATSOEVER, WHETHER EXPRESS OR IMPLIED, INCLUDING THE IMPLIED WARRANTIES OF MERCHANTABILITY AND FI TNESS FOR A PARTICULAR PURPOSE, AND THE SOLE REMEDY FOR VIOLATIONS OF ANY WARRANTY WHATSOEVER, SHALL BE LIMITED TO RE PAIR OR REPLACEMENT OF THE DEFECTIVE PRODUCT PURSUANT TO THE TERMS CONTAINED HEREIN. THE APPLICATION OF ANY IMPLIED WARRANT Y WHATSOEVER SHALL NOT EXTEND BEYOND THE DURATION OF THE EXPRESS WARRANTY PROVIDED HEREIN. INVACARE SHALL NOT BE LIAB LE FOR ANY CONSEQUENTIAL OR IN CIDENTAL DAMAGES WHATSOEVER.THIS WARRANTY SHALL BE EXTENDED TO COMPLY WITH STATE/PROVINCIAL LAWS AND REQUIREMENTS.
Assembly, Installation and Operating Instructions
MODEL PATIENT HEIGHT MIN./MAX8115-J, 8120-J, 8130-J 4'6" - 5'2"
8115-A, 8120-A, 8130 -A 5'2" - 5'10"
8115-T, 8120-T, 8130-T 5'10" - 6'6"MODEL PATIENT HEIGHT MIN./MAX
Wing Nut Crutch
Handle
Crutch
Bolt
Leg Extension
Adjustment Hole
Crutch LegFrame
Snap Button
Adjustment Holes (1 of 5)
Crutch
Adjustment Holes (1 of 5)
Crutch Handle
Handle Lock (In LOCKEDPosition)
Handle Lock (In UNLOCKEDPosition)
Arrow
DETAIL “C” - LEG EXTENSIONDETAIL “B” - QUICK ADJUST CRUTCH
DETAIL “A” - QUICK CHANGE CRUTCH
Béquilles
CONSERVER CES INSTRUCTIONSREMARQUE: Vérifiez que TOUTES les pièces sont intactes à leur arrivée. Si elles sont endommagées, N'utilisez PAS ce matériel. Prenez contact avec le distributeur ou avec le transporteur pour obtenir les instructions appropriées.
AVERTISSEMENT• NE PAS utiliser cet équipement sans d’abord avoir lu et compris ce feuillet. Si vous ne comprenez pas les avertissements, les
notes attention et les instructions, veuille z contacter un professionnel des soins de santé, un fournisseur ou un technicien, a vant d’installer cet équipement, sans quoi des blessures ou des dommages peuvent survenir.
• Chaque personne devrait toujours consulter son médecin ou son thérapeute pour déterm iner le réglage et l'utilisation adéquats.• Les produits Invacare sont sp éci�quement conçus et fabriqués pour être utilis és avec les accessoires Invacare. Les accessoire s
conçus par d’autres manufacturiers n’ont pas été testés pa r Invacare et ne doivent pas être utilisés avec les produits Invacare .• Les réglages adéquats pour la hauteur DOIVENT être faits au niveau de la rallong e de la patte et la poignée. Un fournisseur ou un
thérapeute devrait vous aider pour vous assurer un maximum d’équilibre et d’appui.• S’assurer que les boutons à ressorts ressort ent complètement des mêmes ori�ces de ré glage de chaque rallo nge de patte. Ceci
permet d’assurer un bloquage sécuritaire des pattes régl ables et une hauteur égale.• Les écrous à oreilles doiven t être serrés en tout temps.• S’assurer que les embouts de caoutchouc de la béquille ne sont pas usés, déchirés ou manquants. Le cas échéant, les remplacer
avant d’utiliser les béquilles.• Véri�ez TOUJOURS la charge limite sur la plaque signalét ique du produit. Véri�ez que toutes les étiquettes soient
présentes et lisibles. Au besoin, remplacez-les.
Spéci�cations de Taille du PatientREMARQUE: Pour les modèles non listés, merci de vérifier les étiquettes qui sont apposées sur le produit.
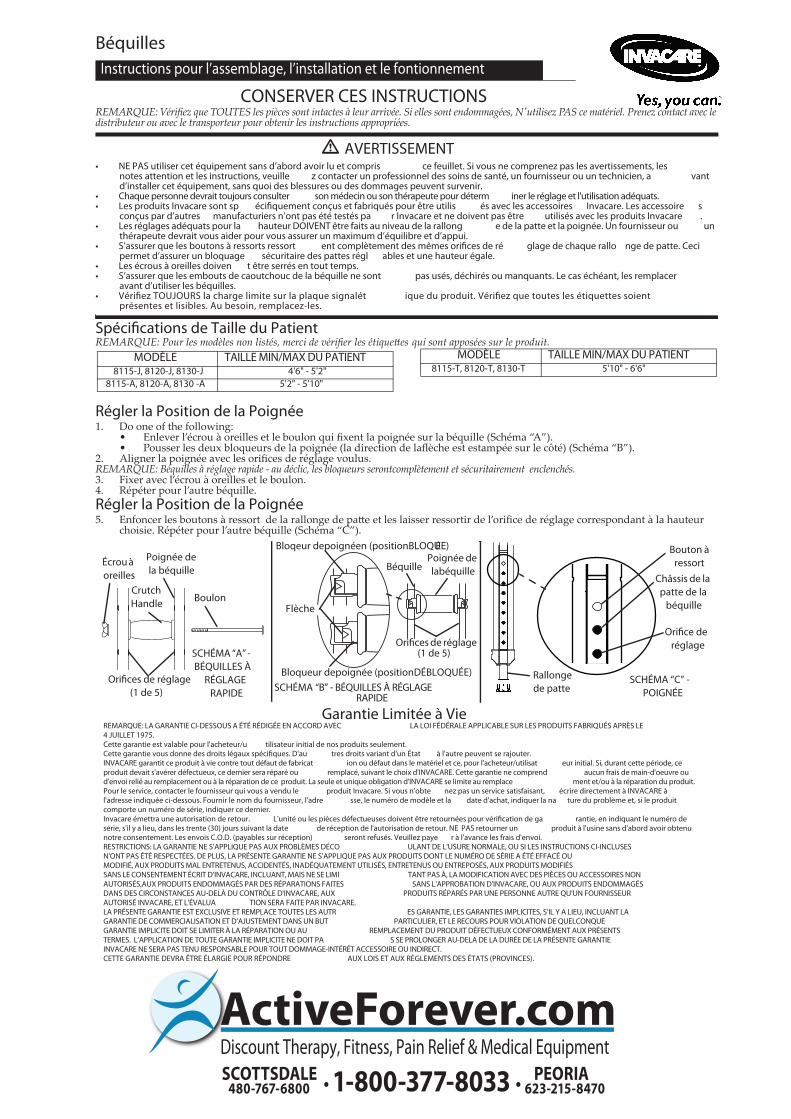
Régler la Position de la Poignée1. Do one of the following:
• Enlever l’écrou à oreilles et le boulon qui fixent la poignée sur la béquille (Schéma “A”).• Pousser les deux bloqueurs de la poignée (la direction de laflèche est estampée sur le côté) (Schéma “B”).
2. Aligner la poignée avec les orifices de réglage voulus. REMARQUE: Béquilles à réglage rapide - au déclic, les bloqueurs serontcomplètement et sécuritairement enclenchés. 3. Fixer avec l’écrou à oreilles et le boulon. 4. Répéter pour l’autre béquille. Régler la Position de la Poignée5. Enfoncer les boutons à ressort de la rallonge de patte et les laisser ressortir de l’orifice de réglage correspondant à la hauteur
choisie. Répéter pour l’autre béquille (Schéma “C”).
Garantie Limitée à VieREMARQUE: LA GARANTIE CI-DESSOUS A ÉTÉ RÉDIGÉE EN ACCORD AVEC LA LOI FÉDÉRALE APPLICABLE SUR LES PRODUITS FABRIQUÉS APRÈS LE 4 JUILLET 1975.Cette garantie est valable pour l'acheteur/u tilisateur initial de nos produits seulement.Cette garantie vous donne des droits légaux spéci�ques. D'au tres droits variant d'un État à l'autre peuvent se rajouter.INVACARE garantit ce produit à vie contre tout défaut de fabricat ion ou défaut dans le matériel et ce, pour l'acheteur/utilisat eur initial. Si, durant cette période, ce produit devait s'avérer défectueux, ce dernier sera réparé ou remplacé, suivant le choix d'INVACARE. Cette garantie ne comprend aucun frais de main-d'oeuvre ou d'envoi relié au remplacement ou à la réparation de ce produit. La seule et unique obligation d'INVACARE se limite au remplace ment et/ou à la réparation du produit.Pour le service, contacter le fournisseur qui vous a vendu le produit Invacare. Si vous n'obte nez pas un service satisfaisant, écrire directement à INVACARE à l'adresse indiquée ci-dessous. Fournir le nom du fournisseur, l'adre sse, le numéro de modèle et la date d'achat, indiquer la na ture du problème et, si le produit comporte un numéro de série, indiquer ce dernier.Invacare émettra une autorisation de retour. L'unité ou les pièces défectueuses doivent être retournées pour véri�cation de ga rantie, en indiquant le numéro de série, s'il y a lieu, dans les trente (30) jours suivant la date de réception de l'autorisation de retour. NE PAS retourner un produit à l'usine sans d'abord avoir obtenu notre consentement. Les envois C.O.D. (payables sur réception) seront refusés. Veuillez paye r à l'avance les frais d'envoi.RESTRICTIONS: LA GARANTIE NE S'APPLIQUE PAS AUX PROBLÈMES DÉCO ULANT DE L'USURE NORMALE, OU SI LES INSTRUCTIONS CI-INCLUSES N'ONT PAS ÉTÉ RESPECTÉES. DE PLUS, LA PRÉSENTE GARANTIE NE S'APPLIQUE PAS AUX PRODUITS DONT LE NUMÉRO DE SÉRIE A ÉTÉ EFFACÉ OU MODIFIÉ, AUX PRODUITS MAL ENTRETENUS, ACCIDENTÉS, INADÉQUATEMENT UTILISÉS, ENTRETENUS OU ENTREPOSÉS, AUX PRODUITS MODIFIÉS SANS LE CONSENTEMENT ÉCRIT D’INVACARE, INCLUANT, MAIS NE SE LIMI TANT PAS À, LA MODIFICATION AVEC DES PIÈCES OU ACCESSOIRES NON AUTORISÉS,AUX PRODUITS ENDOMMAGÉS PAR DES RÉPARATIONS FAITES SANS L'APPROBATION D'INVACARE, OU AUX PRODUITS ENDOMMAGÉS DANS DES CIRCONSTANCES AU-DELÀ DU CONTRÔLE D'INVACARE, AUX PRODUITS RÉPARÉS PAR UNE PERSONNE AUTRE QU’UN FOURNISSEUR AUTORISÉ INVACARE, ET L'ÉVALUA TION SERA FAITE PAR INVACARE.LA PRÉSENTE GARANTIE EST EXCLUSIVE ET REMPLACE TOUTES LES AUTR ES GARANTIE, LES GARANTIES IMPLICITES, S’IL Y A LIEU, INCLUANT LA GARANTIE DE COMMERCIALISATION ET D’AJUSTEMENT DANS UN BUT PARTICULIER, ET LE RECOURS POUR VIOLATION DE QUELCONQUE GARANTIE IMPLICITE DOIT SE LIMITER À LA RÉPARATION OU AU REMPLACEMENT DU PRODUIT DÉFECTUEUX CONFORMÉMENT AUX PRÉSENTS TERMES. L’APPLICATION DE TOUTE GARANTIE IMPLICITE NE DOIT PA S SE PROLONGER AU-DELA DE LA DURÉE DE LA PRÉSENTE GARANTIE INVACARE NE SERA PAS TENU RESPONSABLE POUR TOUT DOMMAGE-INTÉRÊT ACCESSOIRE OU INDIRECT.CETTE GARANTIE DEVRA ÊTRE ÉLARGIE POUR RÉPONDRE AUX LOIS ET AUX RÈGLEMENTS DES ÉTATS (PROVINCES).
Instructions pour l’assemblage, l’installation et le fontionnement
MODÈLE TAILLE MIN/MAX DU PATIENT8115-J, 8120-J, 8130-J 4'6" - 5'2"
8115-A, 8120-A, 8130 -A 5'2" - 5'10"
8115-T, 8120-T, 8130-T 5'10" - 6'6"MODÈLE TAILLE MIN/MAX DU PATIENT
Écrou à oreilles
Crutch Handle
Ori�ces de réglage (1 de 5)
Poignée de la béquille
Boulon
Rallonge de patte
Ori�ce de réglage
Châssis de la patte de la
béquille
Bouton à ressort
SCHÉMA “A” - BÉQUILLES À
RÉGLAGE RAPIDE
SCHÉMA “C” - POIGNÉE
Béquille
Ori�ces de réglage (1 de 5)
Poignée de labéquille
Bloqeur depoignéen (positionBLOQUÉE)
Bloqueur depoignée (positionDÉBLOQUÉE)
Flèche
SCHÉMA “B” - BÉQUILLES À RÉGLAGE RAPIDE