Embed Size (px)
Citation preview

CS 101 - Problem Solving and Structured ProgrammingLab 1 - Introduction to Programming in AliceDue: September 16/17
Getting Started with AliceAlice is installed on the computers in Visilab (the lab on the ground floor of Kendade). To use Alice, you need to login to your account so that you will be able to save the Alice world that you create. To do this:
• Right click on the VisiLabPC icon. It is in the upper left corner of the screen. • Select “Map a network drive”. • For the folder, enter “\\mhc\username” substituting your login id for username. • Click “Connect using a different username”. • Login with your name and password. • Click Finish. This should open a window displaying your existing files. • Double-click on the folder called classwork. • Create a new folder called cs101. Using the File menu, select New and then Folder. This
is where you should store the files you create in this course.
To start Alice, click on the Start menu in the bottom lefthand corner of the screen. Alice should appear in the list of programs in the left column.
You can also install Alice (for free) on your own personal computer. It works on Windows com-puters as well as Macs. You can download Alice 2.0 from http://www.alice.org. You also need to have Java on your computer for Alice to work. Java may already be installed. It comes with Macs. If you try to start Alice and it doesn’t work, it probably means that you do not have Java. You can also download Java (for free) from http://java.sun.com/javase/downloads/index.jsp. You should get JDK 6 Update 7.
When Alice starts, there will first be a splash screen:
.
This will disappear in a few seconds and be replaced by a dialog box looking like this:
1
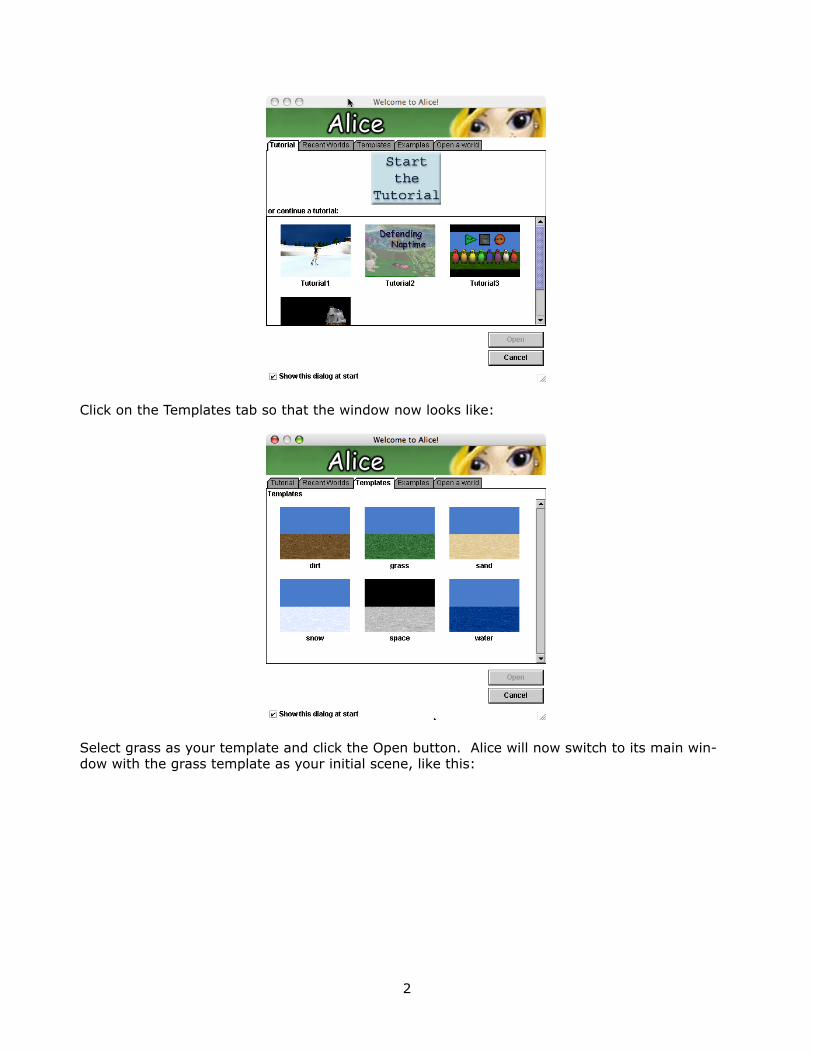
Click on the Templates tab so that the window now looks like:
Select grass as your template and click the Open button. Alice will now switch to its main win-dow with the grass template as your initial scene, like this:
2
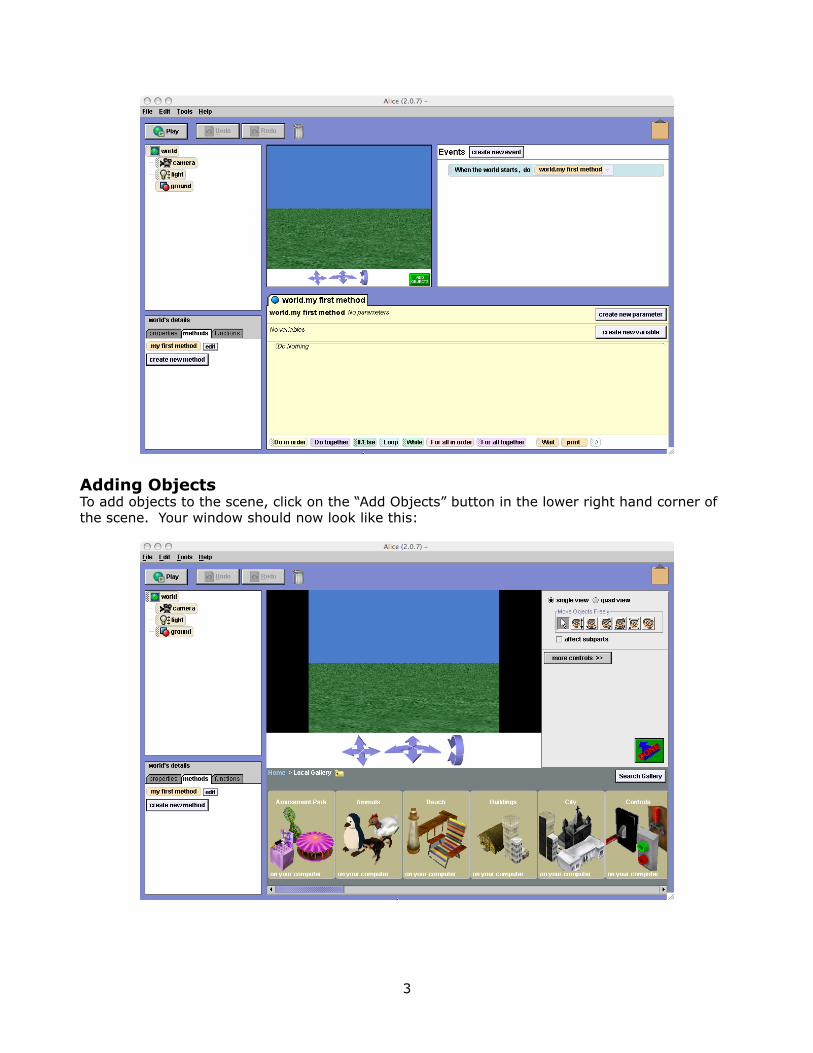
Adding ObjectsTo add objects to the scene, click on the “Add Objects” button in the lower right hand corner of the scene. Your window should now look like this:
3
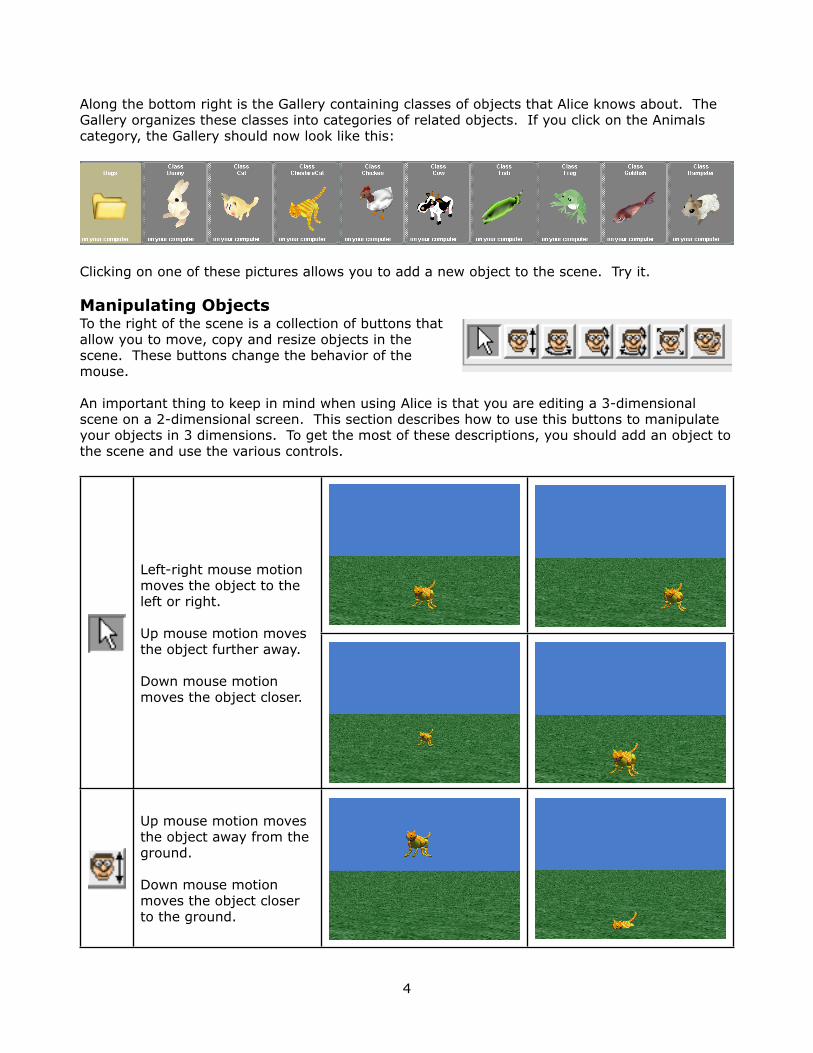
Along the bottom right is the Gallery containing classes of objects that Alice knows about. The Gallery organizes these classes into categories of related objects. If you click on the Animals category, the Gallery should now look like this:
Clicking on one of these pictures allows you to add a new object to the scene. Try it.
Manipulating ObjectsTo the right of the scene is a collection of buttons that allow you to move, copy and resize objects in the scene. These buttons change the behavior of the mouse.
An important thing to keep in mind when using Alice is that you are editing a 3-dimensional scene on a 2-dimensional screen. This section describes how to use this buttons to manipulate your objects in 3 dimensions. To get the most of these descriptions, you should add an object to the scene and use the various controls.
Left-right mouse motion moves the object to the left or right.
Up mouse motion moves the object further away.
Down mouse motion moves the object closer.
Up mouse motion moves the object away from the ground.
Down mouse motion moves the object closer to the ground.
4
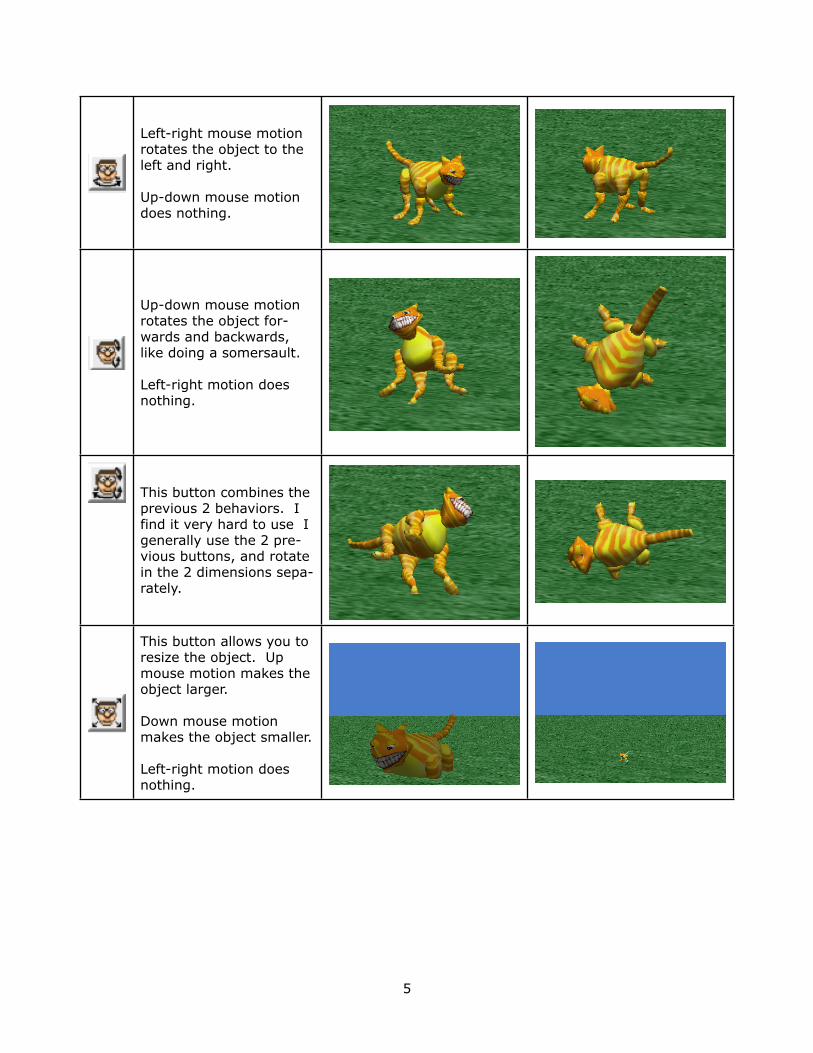
Left-right mouse motion rotates the object to the left and right.
Up-down mouse motion does nothing.
Up-down mouse motion rotates the object for-wards and backwards, like doing a somersault.
Left-right motion does nothing.
This button combines the previous 2 behaviors. I find it very hard to use I generally use the 2 pre-vious buttons, and rotate in the 2 dimensions sepa-rately.
This button allows you to resize the object. Up mouse motion makes the object larger.
Down mouse motion makes the object smaller.
Left-right motion does nothing.
5
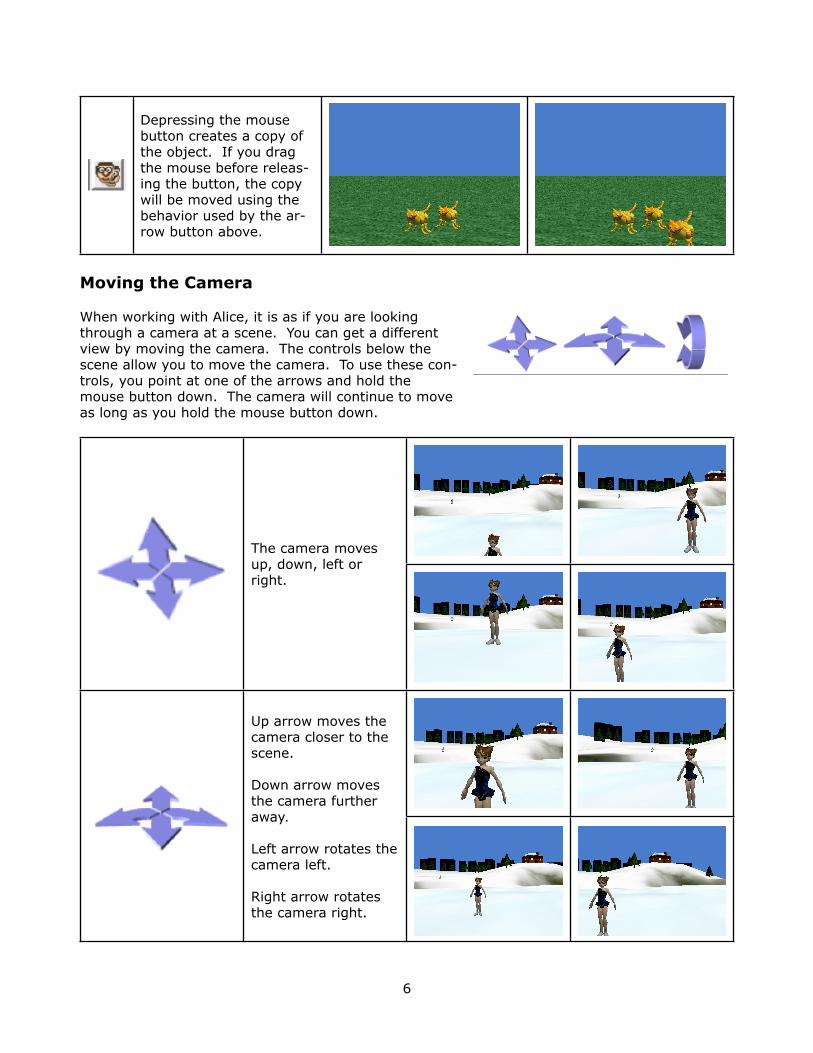
Depressing the mouse button creates a copy of the object. If you drag the mouse before releas-ing the button, the copy will be moved using the behavior used by the ar-row button above.
Moving the Camera
When working with Alice, it is as if you are looking through a camera at a scene. You can get a different view by moving the camera. The controls below the scene allow you to move the camera. To use these con-trols, you point at one of the arrows and hold the mouse button down. The camera will continue to move as long as you hold the mouse button down.
The camera moves up, down, left or right.
Up arrow moves the camera closer to the scene.
Down arrow moves the camera further away.
Left arrow rotates the camera left.
Right arrow rotates the camera right.
6
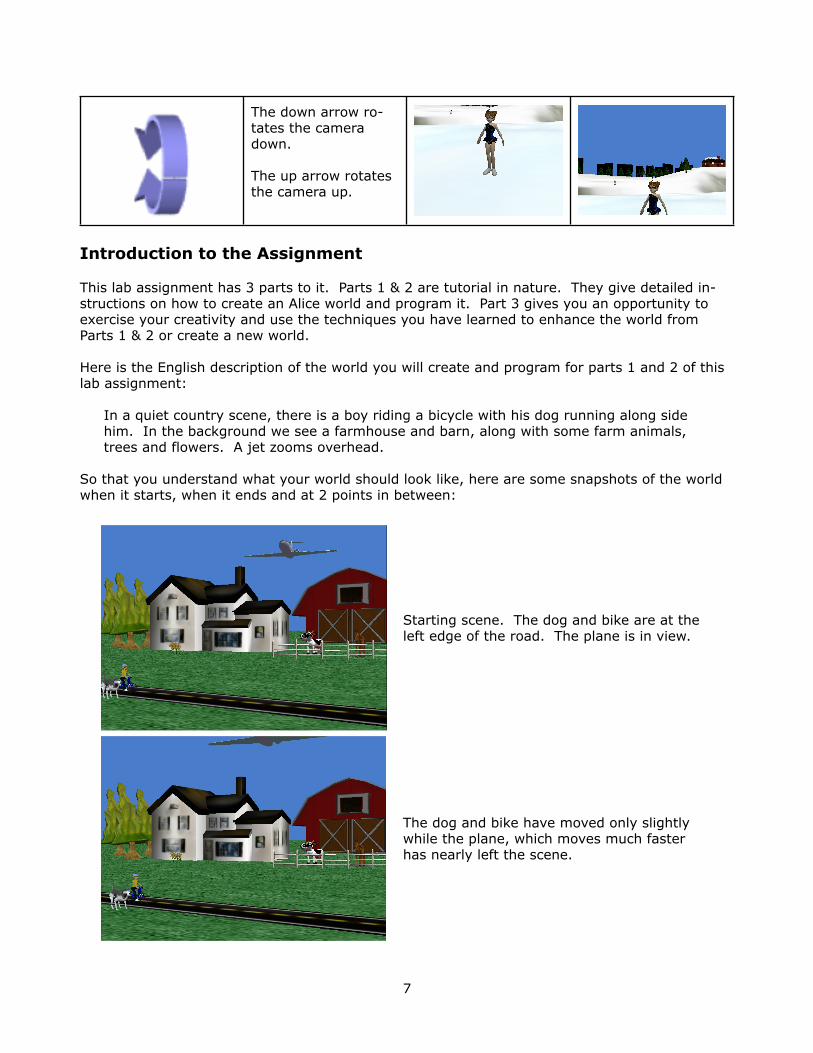
The down arrow ro-tates the camera down.
The up arrow rotates the camera up.
Introduction to the Assignment
This lab assignment has 3 parts to it. Parts 1 & 2 are tutorial in nature. They give detailed in-structions on how to create an Alice world and program it. Part 3 gives you an opportunity to exercise your creativity and use the techniques you have learned to enhance the world from Parts 1 & 2 or create a new world.
Here is the English description of the world you will create and program for parts 1 and 2 of this lab assignment:
In a quiet country scene, there is a boy riding a bicycle with his dog running along side him. In the background we see a farmhouse and barn, along with some farm animals, trees and flowers. A jet zooms overhead.
So that you understand what your world should look like, here are some snapshots of the world when it starts, when it ends and at 2 points in between:
Starting scene. The dog and bike are at the left edge of the road. The plane is in view.
The dog and bike have moved only slightly while the plane, which moves much faster has nearly left the scene.
7

The dog and bike are near the right edge of the scene.
The dog and bike have completely left the scene.
Part 1: Creating a worldThe first thing we want to do is build the scene containing the following objects:
• A road• A boy on a bicycle• A dog (or other animal)• A farmhouse• A barn• A jet• A few farm animals• A fence• A few trees• A few flowers
To get rid of the things that you created in exploring Alice, click the DONE button in the lower right of the world. Then open the File menu and select New World. Select the Grass template.
To add objects to the scene, click on the “Add Objects” button in the lower right hand corner of the scene. Scroll the Gallery until you find the City and click on that. Your Gallery should now look like this:
8
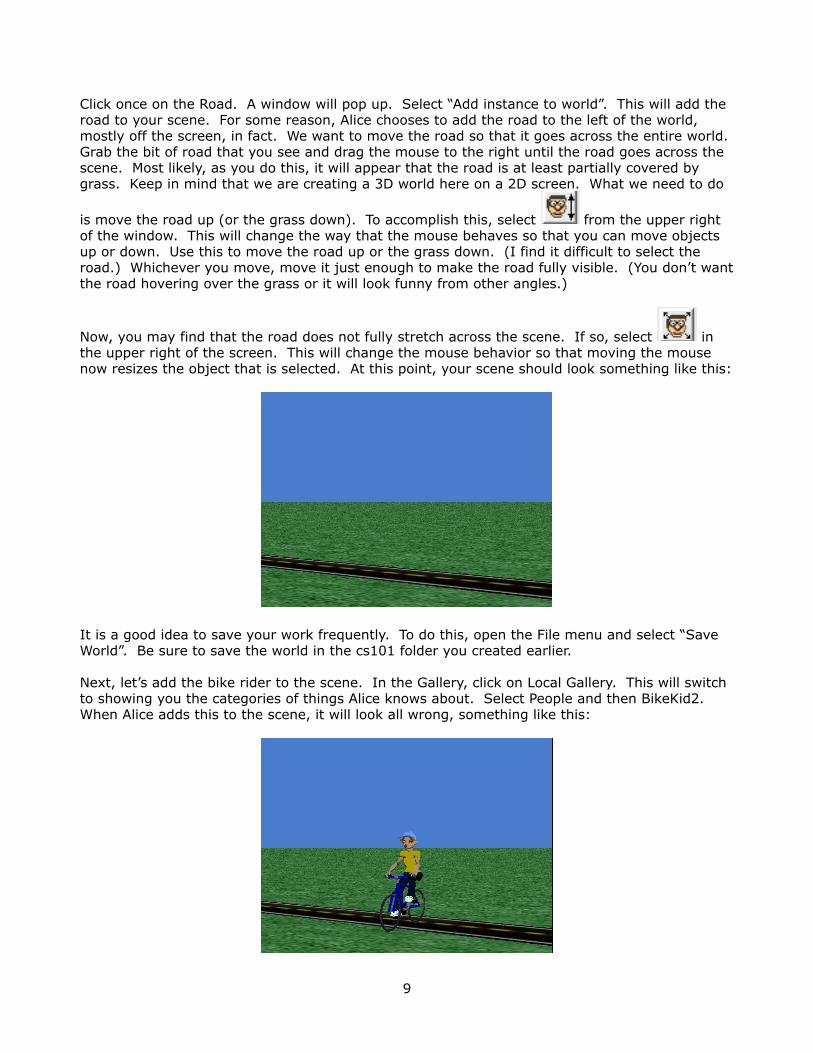
Click once on the Road. A window will pop up. Select “Add instance to world”. This will add the road to your scene. For some reason, Alice chooses to add the road to the left of the world, mostly off the screen, in fact. We want to move the road so that it goes across the entire world. Grab the bit of road that you see and drag the mouse to the right until the road goes across the scene. Most likely, as you do this, it will appear that the road is at least partially covered by grass. Keep in mind that we are creating a 3D world here on a 2D screen. What we need to do
is move the road up (or the grass down). To accomplish this, select from the upper right of the window. This will change the way that the mouse behaves so that you can move objects up or down. Use this to move the road up or the grass down. (I find it difficult to select the road.) Whichever you move, move it just enough to make the road fully visible. (You don’t want the road hovering over the grass or it will look funny from other angles.)
Now, you may find that the road does not fully stretch across the scene. If so, select in the upper right of the screen. This will change the mouse behavior so that moving the mouse now resizes the object that is selected. At this point, your scene should look something like this:
It is a good idea to save your work frequently. To do this, open the File menu and select “Save World”. Be sure to save the world in the cs101 folder you created earlier.
Next, let’s add the bike rider to the scene. In the Gallery, click on Local Gallery. This will switch to showing you the categories of things Alice knows about. Select People and then BikeKid2. When Alice adds this to the scene, it will look all wrong, something like this:
9
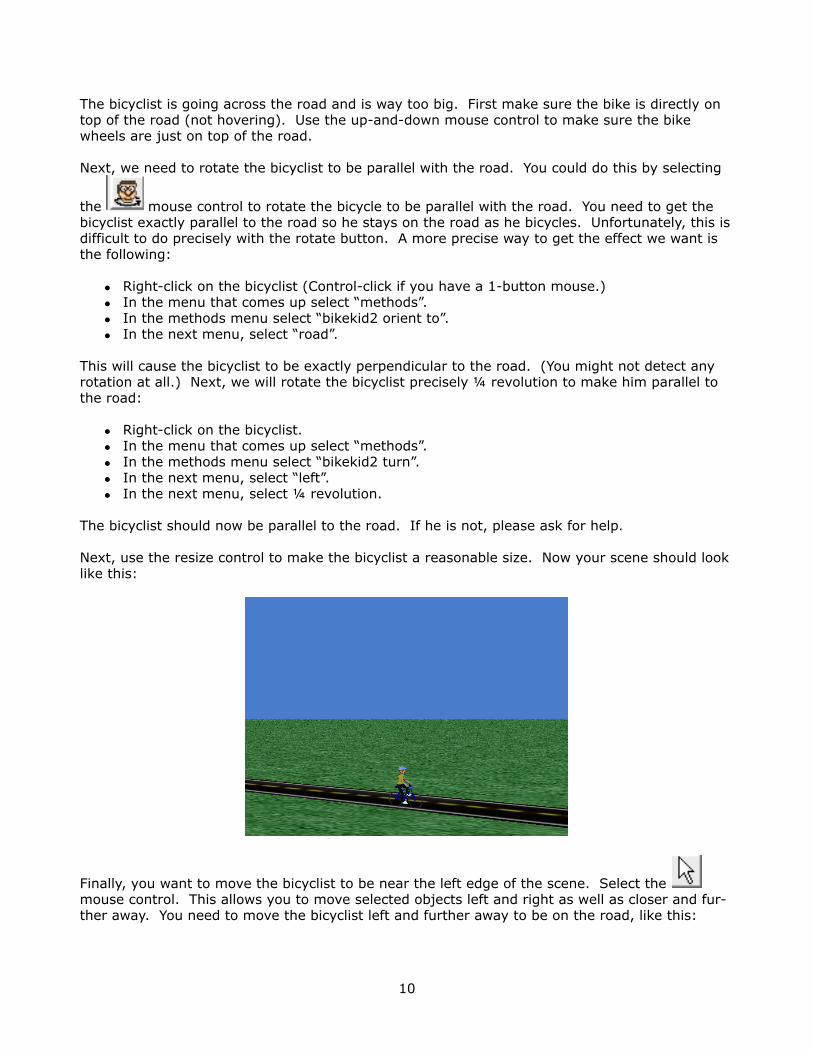
The bicyclist is going across the road and is way too big. First make sure the bike is directly on top of the road (not hovering). Use the up-and-down mouse control to make sure the bike wheels are just on top of the road.
Next, we need to rotate the bicyclist to be parallel with the road. You could do this by selecting
the mouse control to rotate the bicycle to be parallel with the road. You need to get the bicyclist exactly parallel to the road so he stays on the road as he bicycles. Unfortunately, this is difficult to do precisely with the rotate button. A more precise way to get the effect we want is the following:
• Right-click on the bicyclist (Control-click if you have a 1-button mouse.)• In the menu that comes up select “methods”.• In the methods menu select “bikekid2 orient to”.• In the next menu, select “road”.
This will cause the bicyclist to be exactly perpendicular to the road. (You might not detect any rotation at all.) Next, we will rotate the bicyclist precisely ¼ revolution to make him parallel to the road:
• Right-click on the bicyclist.• In the menu that comes up select “methods”.• In the methods menu select “bikekid2 turn”.• In the next menu, select “left”.• In the next menu, select ¼ revolution.
The bicyclist should now be parallel to the road. If he is not, please ask for help.
Next, use the resize control to make the bicyclist a reasonable size. Now your scene should look like this:
Finally, you want to move the bicyclist to be near the left edge of the scene. Select the mouse control. This allows you to move selected objects left and right as well as closer and fur-ther away. You need to move the bicyclist left and further away to be on the road, like this:
10
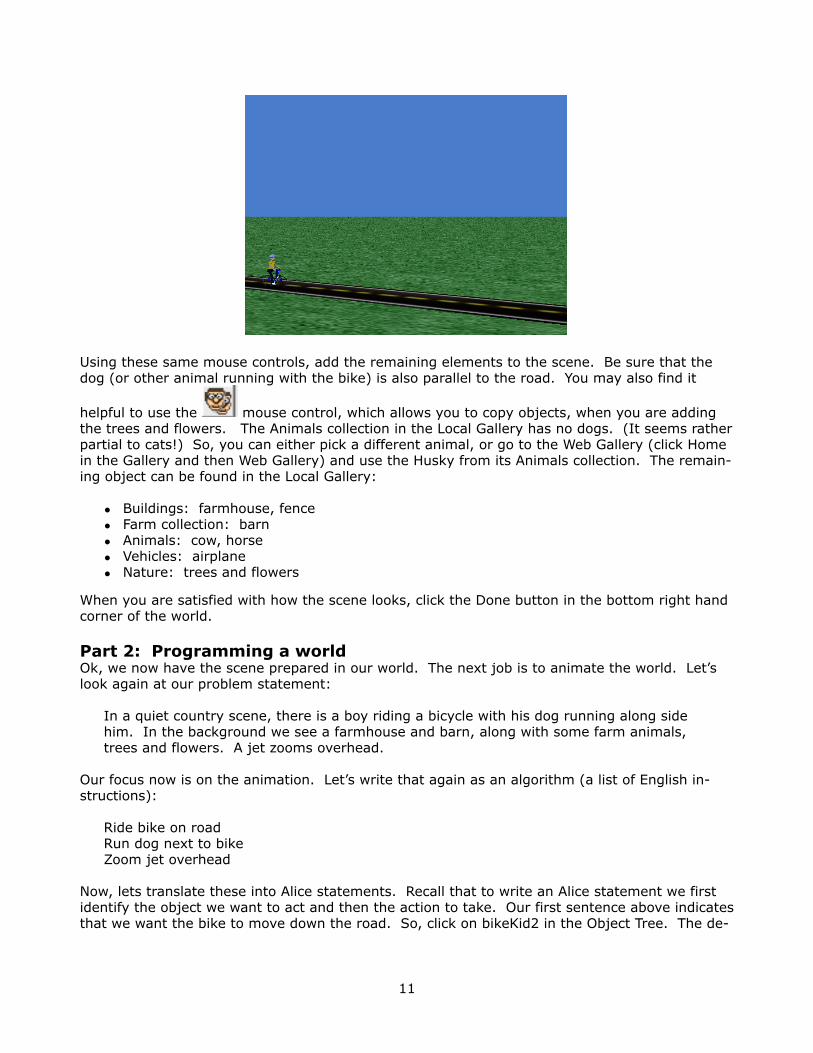
Using these same mouse controls, add the remaining elements to the scene. Be sure that the dog (or other animal running with the bike) is also parallel to the road. You may also find it
helpful to use the mouse control, which allows you to copy objects, when you are adding the trees and flowers. The Animals collection in the Local Gallery has no dogs. (It seems rather partial to cats!) So, you can either pick a different animal, or go to the Web Gallery (click Home in the Gallery and then Web Gallery) and use the Husky from its Animals collection. The remain-ing object can be found in the Local Gallery:
• Buildings: farmhouse, fence• Farm collection: barn• Animals: cow, horse• Vehicles: airplane• Nature: trees and flowers
When you are satisfied with how the scene looks, click the Done button in the bottom right hand corner of the world.
Part 2: Programming a worldOk, we now have the scene prepared in our world. The next job is to animate the world. Let’s look again at our problem statement:
In a quiet country scene, there is a boy riding a bicycle with his dog running along side him. In the background we see a farmhouse and barn, along with some farm animals, trees and flowers. A jet zooms overhead.
Our focus now is on the animation. Let’s write that again as an algorithm (a list of English in-structions):
Ride bike on roadRun dog next to bikeZoom jet overhead
Now, lets translate these into Alice statements. Recall that to write an Alice statement we first identify the object we want to act and then the action to take. Our first sentence above indicates that we want the bike to move down the road. So, click on bikeKid2 in the Object Tree. The de-
11
tail pane should now show “bikeKid2’s details”, like the window shown on the right:
Drag the “bikeKid2 move” tile to the method editor. A menu will appear asking you which direction to move it. Select forward. You will next see a menu asking how far to move it. We want it to con-tinue to move until it leaves the window, so select 10 meters. Now Play the world by clicking the Play button at the top of the window. You should see the bicycle move on the road until it leaves the screen. If it doesn’t leave the screen, increase the distance by clicking on “10 meters” in the instruction in the Method Editor, se-lect Other, and type in a larger value. If the bicycle doesn’t stay on the road, you need to rotate the bicycle so that it is parallel to the road. To do this, click the “Add Objects” button and use the rotate
left-right button ( ) to adjust the positioning of the bicycle.
You will probably find that the bicycle moves very quickly. To slow it down, click on the “more...” menu at the end of the instruction. Se-lect duration and then some time like 10 seconds. This will cause the bicycle to move at the speed of 10 meters / 10 seconds, which will likely seem like a more realistic pace. Play the world again, ad-justing the distance and duration until you are happy with the re-sult.
Once the bicyclist is moving the way you like, repeat the process with the animal that accompanies the bicyclist. Most likely you will want the animal to move at the same speed and distance, so try those. Adjust the animal’s positioning if necessary so that it stays parallel to the road. Now what happens when you play the world?
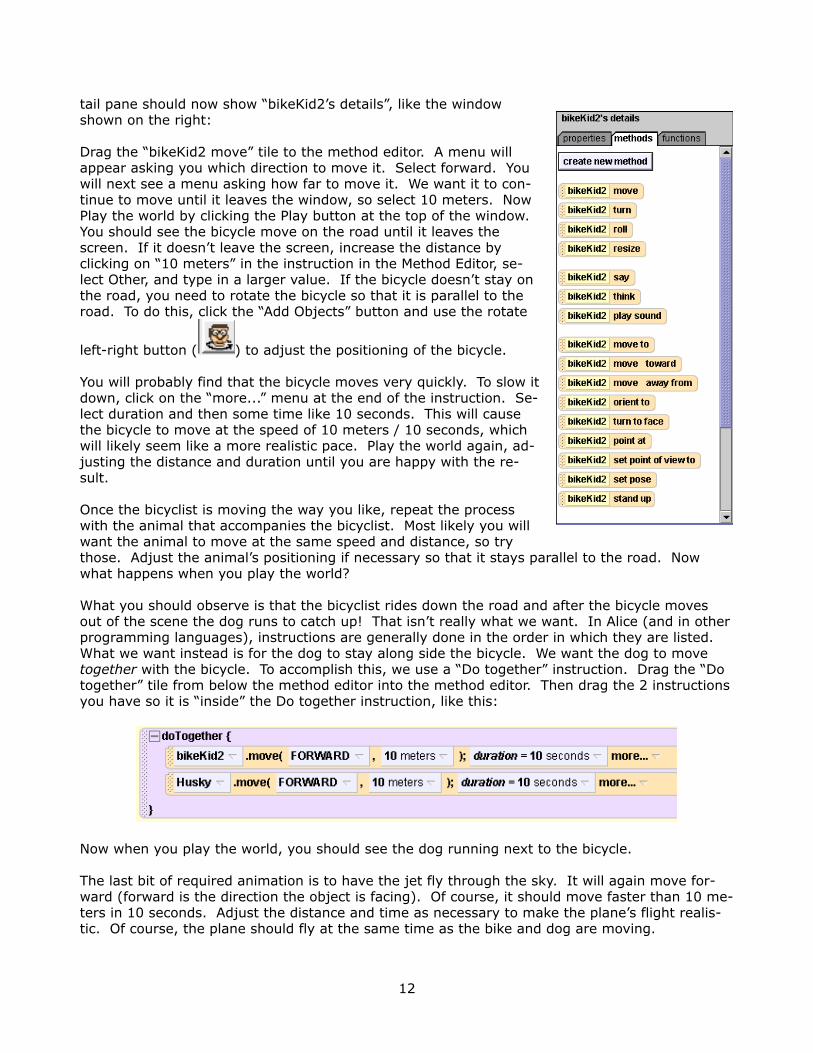
What you should observe is that the bicyclist rides down the road and after the bicycle moves out of the scene the dog runs to catch up! That isn’t really what we want. In Alice (and in other programming languages), instructions are generally done in the order in which they are listed. What we want instead is for the dog to stay along side the bicycle. We want the dog to move together with the bicycle. To accomplish this, we use a “Do together” instruction. Drag the “Do together” tile from below the method editor into the method editor. Then drag the 2 instructions you have so it is “inside” the Do together instruction, like this:
Now when you play the world, you should see the dog running next to the bicycle.
The last bit of required animation is to have the jet fly through the sky. It will again move for-ward (forward is the direction the object is facing). Of course, it should move faster than 10 me-ters in 10 seconds. Adjust the distance and time as necessary to make the plane’s flight realis-tic. Of course, the plane should fly at the same time as the bike and dog are moving.
12

I would also like you to get practice writing comments, English descriptions of the instructions. For example, a useful comment for the lab so far might be:
// A bicyclist and dog travel down the road together while a jet zooms overhead.
To create a comment, drag the tile from below the method editor into the method. Initially, it will say “No comment”. Click on No comment, select Other and you will get a dialog box where you can type in the comment you want. Add this comment to the instructions we have created so far, but be sure to also add 1 or more comments for the additional animation that you do in Part 3.
Part 3: Get creative
Ok, now it is your turn to get creative. Please add at least 2 more objects to the world. You should do some editing to position them. Then add at least 3 more animation instructions, using something other than “move forward”. For example, you might have the cow and horse have a conversation about the bicyclist, or maybe the cow will jump over the moon! Use your imagina-tion! (It doesn’t need to be complicated, but it should tell some kind of story or be humorous, not just random actions.)
Grading
20 Creating the world described in Part 1
5 Animation described in Part 2
10 Additional objects for Part 3
5 Additional animation for Part 3
5 Creativity
5 Comments
Turning in Your WorkGo to ella. Click on COMSC 101 in the toolbar menu across the top. Then click on Assignments in the left column. Click the submit link for this assignment. Click the Add Attachment button. Use the Browse… button to upload a local file. Select the file containing your Alice world. Click Continue. Then click the Submit button.
13


![FXCPU Structured Programming Manual [Application Functions] · FXCPU Structured Programming Manual [Application Functions] FXCPU Structured Programming Manual [Application Functions]](https://img.pdfslide.net/doc/110x75/5f7c3a0ec7c4c4492f38781e/fxcpu-structured-programming-manual-application-functions-fxcpu-structured-programming.jpg)


![FXCPU Structured Programming Manual [Device & Common] · 1 FXCPU Structured Programming Manual [Device & Common] FXCPU Structured Programming Manual [Device & Common] Foreword This](https://img.pdfslide.net/doc/110x75/5eb7b5fc022e29278f78be8d/fxcpu-structured-programming-manual-device-common-1-fxcpu-structured-programming.jpg)